
HP6582,MV - Epilator PHILIPS - Free user manual and instructions
Find the device manual for free HP6582,MV PHILIPS in PDF.
| Product type | Wireless electric epilator |
| Brand | Philips |
| Model | HP6582/MV |
| Usage | On dry or wet skin, waterproof (use in the shower or bath) |
| Power supply | Built-in rechargeable battery, 100-240 V mains adapter |
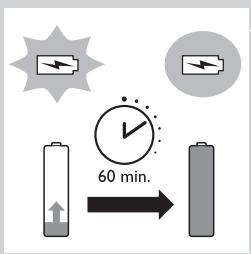
| Charging time | Approximately 1 hour |
| Battery life | Up to 40 minutes cordless |
| Speeds | 2 speeds (I and II) |
| Included accessories | Epilation head, shaving head, trimming comb (3 mm), active massaging hair lifter, sensitive area reducer, Skin Stretcher, precision mini epilator, illuminated tweezers, cleaning brush, storage pouch |
| Main functions | Epilation, shaving, hair trimming, precision epilation, active massage, skin stretching |
| Cleaning | Rinse under running water, dry thoroughly; do not use abrasive products |
| Maintenance | Oil the shaving head twice a year with a drop of sewing machine oil |
| Safety | Overheat protection, travel lock, unplug before cleaning |
| Operating temperature | 10 °C to 30 °C |
| Noise level | Lc = 77 dB(A) |
| Spare parts | Epilation head, shaving head, comb, accessories (available at shop.philips.com) |
| Warranty | International warranty (except the trimming unit subject to wear) |
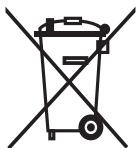
| Recycling | Compliant with WEEE 2012/19/EU and battery according to 2006/66/EC |
Frequently Asked Questions - HP6582,MV PHILIPS
User questions about HP6582,MV PHILIPS
0 question about this device. Answer the ones you know or ask your own.
Ask a new question about this device
Download the instructions for your Epilator in PDF format for free! Find your manual HP6582,MV - PHILIPS and take your electronic device back in hand. On this page are published all the documents necessary for the use of your device. HP6582,MV by PHILIPS.
USER MANUAL HP6582,MV PHILIPS
Always here to help you
Register your product and get support at
www.philips.com/welcome

HP6583
HP6581

natural_image
White Philips Satin Perfect electric shaver with floral decoration and water droplets (no text or symbols visible on body)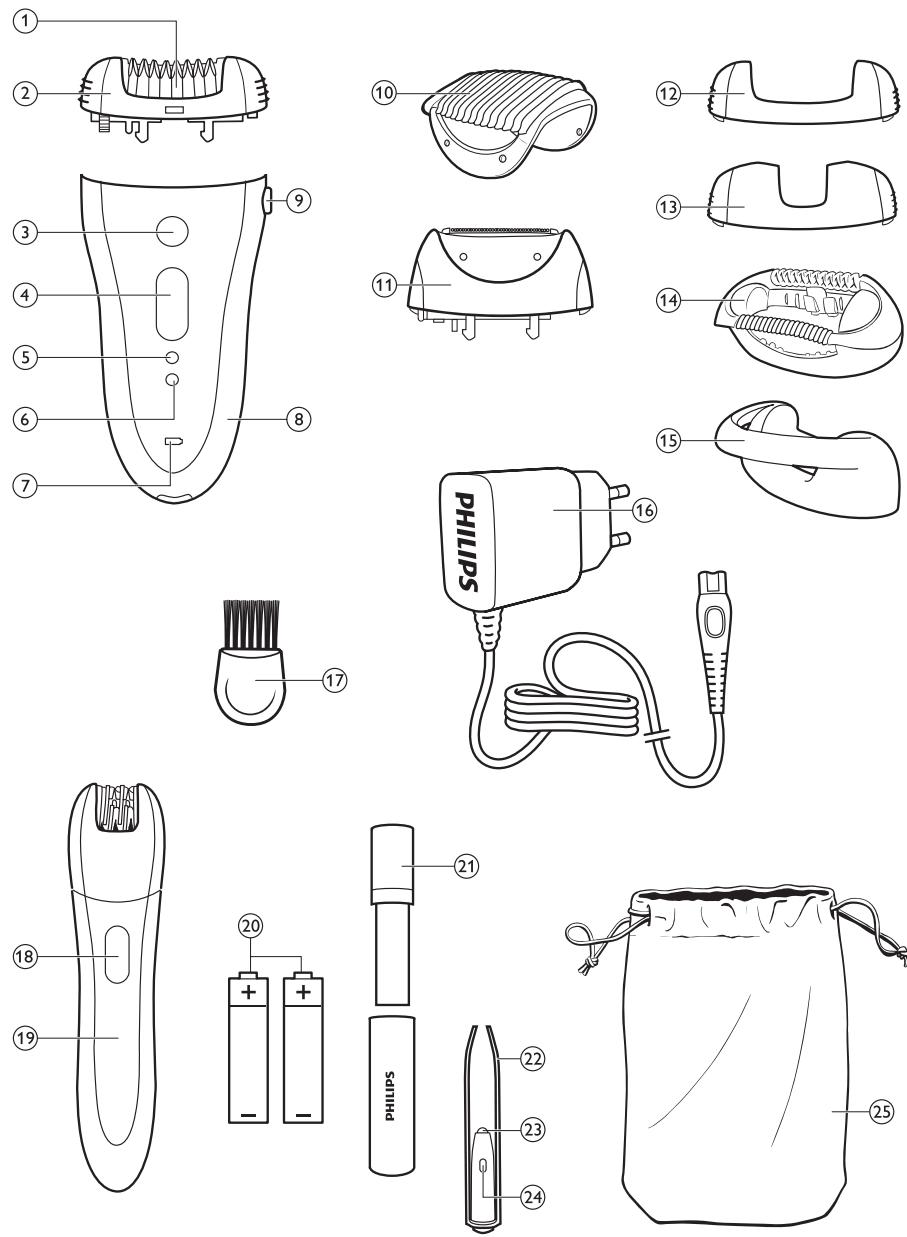
ENGLISH 4
DANSK 21
DEUTSCH 38
ΕΛΛΗΝΙΚΑ 56
ESPAÑOL 75
SUOMI 93
FRANÇAIS 110
ITALIANO 128
NEDERLANDS 146
NORSK 164
PORTUGUÊS 182
PORTUGUÊS DO BRASIL 200
SVENSKA 218
TÜRKÇE 235
267 فارسی
العربية 283
Introduction
Congratulations on your purchase and welcome to Philips! To fully benefit from the support that Philips offers, register your product at www.philips.com/welcome.
Important
Read this important information carefully before you use the appliance and its accessories and save it for future reference. The accessories supplied may vary for different products.
Danger
- Keep the adapter dry.
- If you charge the epilator in the bathroom, do not use an extension cord.
natural_image
Prohibition sign showing a faucet without spraying water, enclosed in a circle (no text or symbols)Warning
- The adapter contains a transformer: Do not cut off the adapter to replace it with another plug, as this causes a hazardous situation.
- This appliance can be used by children aged from 8 years and above and persons with reduced physical, sensory or mental capabilities or lack of experience and knowledge if they have been given supervision or instruction concerning use of the appliance in a safe way and understand the hazards involved. Children shall not play with the appliance. Cleaning and user maintenance shall not be made by children without supervision.
- Always unplug the appliance before you clean it under the tap.
- Do not insert metal-containing material into the socket on the epilator to avoid short circuiting.
- Always check the appliance before you use it. Do not use the appliance if it is damaged, as this may cause injury. Always replace a damaged part with one of the original type.
Caution
- Never use water hotter than 40^ C to rinse the appliance. It is strongly recommended to rinse the appliance with cold water to prevent bacterial growth.
-
Only use this appliance for its intended purpose as shown in the user manual.
-
Never use compressed air, scouring pads, abrasive cleaning agents or aggressive liquids such as petrol or acetone to clean the appliance.
- Make sure the socket is live when you charge the appliance. The electricity supply to sockets in bathrooms may be cut off when the light is turned off.
- For hygienic reasons, the appliance should only be used by one person.
- To prevent damage and injuries, keep operating appliances (with or without attachment) away from scalp hair, face, eyebrows, eyelashes, clothes, threads, cords, brushes, etc.
- Do not use the appliance on irritated skin or skin with varicose veins, rashes, spots, moles (with hairs) or wounds without consulting your doctor first. People with a reduced immune response or people who suffer from diabetes mellitus, haemophilia or immunodeficiency should also consult their doctor first.
- Your skin may become a little red and irritated the first few times you use an epilator. This phenomenon is absolutely normal and quickly disappears. As you epilate more often, your skin gets used to epilation, skin irritation decreases and regrowth becomes thinner and softer. If the irritation has not disappeared within three days, we advise you to consult a doctor.
- Do not use any exfoliation brush immediately after epilation, as this may intensify possible skin irritation caused by the epilator.
- Do not use bath or shower oils when you epilate under wet conditions, as this may cause serious skin irritation.
- Charge, use and store the epilator at a temperature between 10^ C and 30^ C.
- If your epilator is equipped with a light for optimal epilation, do not look directly into the light to avoid being dazzled by it.
- Do not use the epilating head of the epilator without one of the epilation caps.
- Fully charge the epilator every 3 to 4 months, even if you do not use the epilator for a longer time.
- If your epilator comes with tweezers, always replace the batteries of the tweezers with batteries of the original type.
Electromagnetic fields (EMF)
This Philips appliance complies with all applicable standards and regulations regarding exposure electromagnetic fields.
General
- This epilator is waterproof. It is suitable for use in the bath or shower and for cleaning under the tap. For safety reasons, the epilator can therefore only be used without cord.
- The appliance is suitable for mains voltages ranging from 100 to 240 volts.
- The adapter transforms 100-240 volts to a safe low voltage of less than 24 volts.
- Maximum noise level: Lc = 77dB(A).
General description (Fig. 3)
1 Epilating discs
2 Epilating head
3 Opti-Light
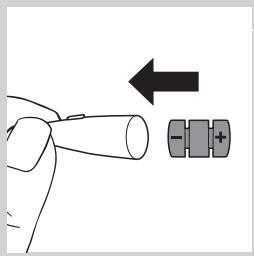
4 On/off button
- Press once for speed II
- Press twice for speed I
5 Light for speed I
6 Light for speed II
7 Charging light
8 Epilator
9 Release button
10 Trimming comb
11 Shaving head
12 Basic epilation cap
13 Sensitive area cap
14 Active hair-lift and massage cap
15 Skin stretcher
16 Adapter
17 Cleaning brush
18 On/off slide
19 Precision epilator
20 Disposable non-rechargeable batteries
21 Storage case of Smart Tweezers
22 Smart Tweezers
23 Light of Smart Tweezers
24 On/off slide for light
25 Pouch
Preparing for use
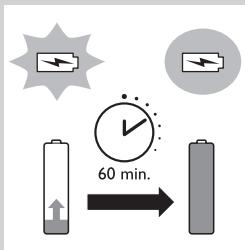
Charging
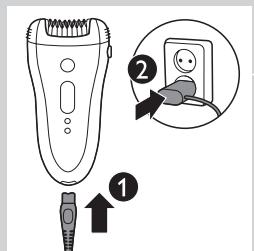
- Charging the epilator takes approx. 1 hour. When the epilator is fully charged, it has a cordless operating time of up to 40 minutes.
1 Connect the small plug to the appliance (1) and the mains plug to the wall socket (2).
The charging light pulsates white to indicate that the appliance is charging. When the batteries are fully charged, the charging light lights up white continuously for 20 minutes and then goes out.
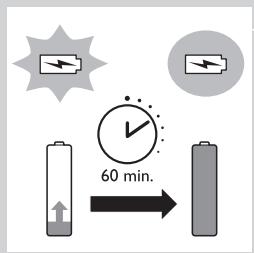
Batteries low or empty
natural_image
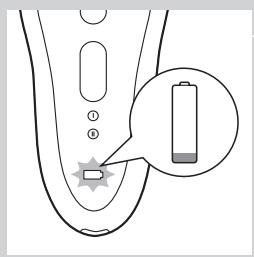
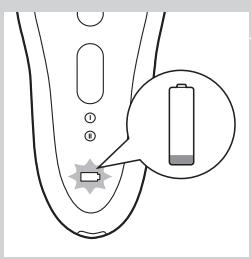
Diagram of a handheld device with a battery icon and a small rectangular component, no text or symbols present- When the batteries are almost empty, the charging light starts to flash red. When this happens, the batteries still contain enough energy for a few minutes of operation.
natural_image
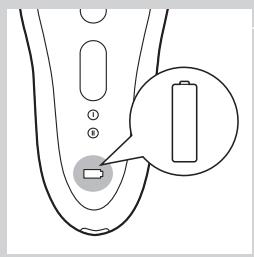
Diagram of a handheld device with a battery icon and a small square button, no text or symbols present- When the batteries are completely empty, the appliance stops operating and the charging light lights up red continuously. To charge the epilator, see 'Charging' above.
Using the epilator
Clean the epilating head and charge the appliance fully before you use the appliance for the first time.
Note: You cannot use the appliance while it is connected to the mains.
Epilating tips
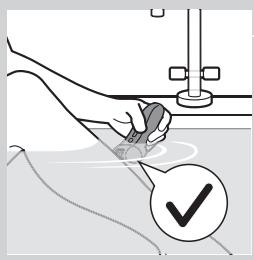
natural_image
Illustration of a hand cleaning a surface with a checkmark icon (no text or symbols present)
- Wet: If you are new to epilation, we advise you to start epilating on wet skin, as water relaxes the skin and makes epilation less painful and gentler. The appliance is waterproof and can be safely used in the shower or bathtub.
- Wet: If you want, you can use your common shower gel or foam.
- Dry: If you epilate dry, epilation is easier just after taking a bath or shower.
- Dry: Make sure your skin is clean and free from grease. Do not apply any cream to your skin before you start to epilate.
- General: We advise you to epilate in the evening, as skin irritation usually disappears overnight.
- General: Epilation is easier and more comfortable when the hairs have a length of 3-4 mm. If the hairs are longer, we recommend that you shave first and epilate the shorter regrowing hairs after 1 or 2 weeks. Alternatively, you can trim the hairs to 3-4 mm.
- General: Use the skin stretcher to keep the skin tight on your arms or upper legs. The skin stretcher helps to reduce the pain while epilating.
Epilating the legs with the epilator

natural_image
Illustration of a car's exhaust pipe with arrows indicating airflow or pollution (no text or symbols)- If you already have some experience with epilation, you can simply use the epilating head with the basic epilation cap.
- If your hairs lie flat on your skin, we advise you to use the active hair-lift and massage cap. This cap not only lifts up the hairs but its active massaging roller also minimises the pulling sensation of epilation.

Note: Remove the basic epilation cap by pressing its both sides (1) before you attach another cap (2) or the skin stretcher.
1 Put any cap on the epilating head.
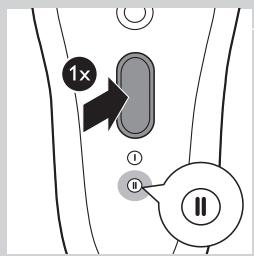
2 Press the on/off button once to switch on the appliance.
The appliance starts to operate at speed II, which is the most efficient speed for epilating.
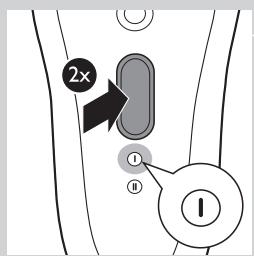
Note: If you want to use speed I, press the on/off button a second time.
Note: Speed I is suitable for areas with little hair growth and for hard-to-reach areas, such as knees and ankles.
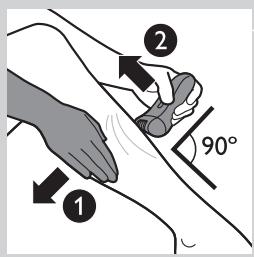
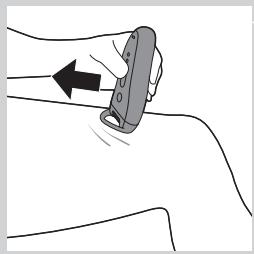
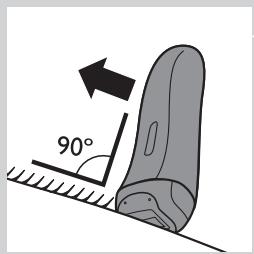
3 If you are not using the skin stretcher, stretch the skin with your free hand to make the hairs stand upright (1). Place the epilating head at an angle of 90^ onto the skin with the on/off button pointing in the direction in which you are going to move the appliance (2).
natural_image
Illustration of a hand holding a device with an arrow indicating motion (no text or symbols)Note: If you are using the skin stretcher you do not need to stretch your skin anymore. The skin stretcher also ensures that you keep the appliance on your skin at the right angle. Make sure that the skin stretcher is in contact with your skin as shown in the figure.
4 Slowly move the appliance over the skin against the direction of the hair growth while pressing it lightly.
Tip: To relax the skin, we advise you to apply a moisturising cream immediately or a few hours after epilation. For the underarms, use a mild deodorant without alcohol.
Shaving the underarms and bikini line
natural_image
Illustration of hands performing a medical procedure on a patient's abdomen (no text or symbols present)Use the shaving head to shave sensitive areas, such as the underarms and the bikini line.
Note: To get the best shaving results, use the shaving head on a dry skin. If you want to use the shaving head in the bath or shower, we advise you to use your common shower gel for a more gentle shave.
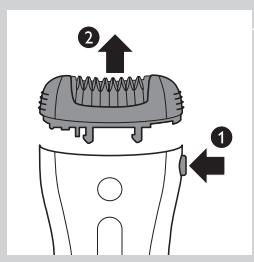
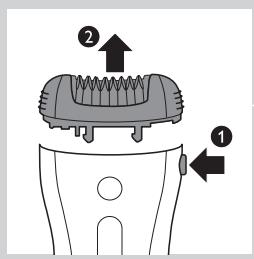
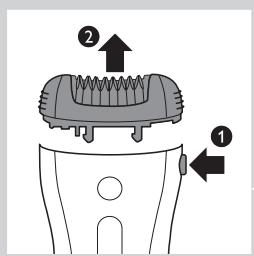
1 Press the release button (1) and remove the epilating head from the epilator (2).
Note: You can remove the shaving head in the same way.
natural_image
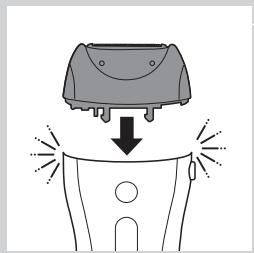
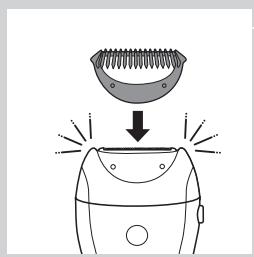
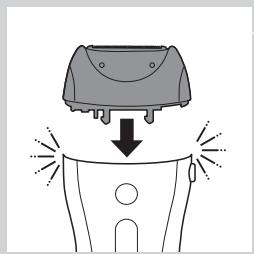
Diagram showing a device with a downward arrow and radiating lines, no text or symbols present2 Put the shaving head on the appliance and press it until it snaps home.
3 Switch on the appliance.
4 Place the shaving head at an angle of 90^ onto your skin with the on/off button pointing in the direction in which you are going to move the appliance.
5 Slowly move the appliance against the direction of hair growth.
Note: Make sure that the shaving head is always fully in contact with the skin.
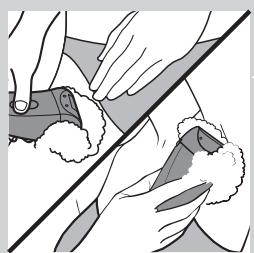
natural_image
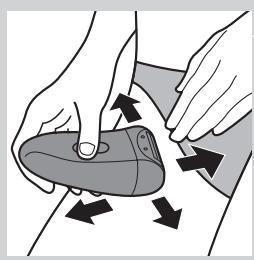
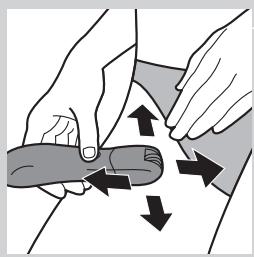
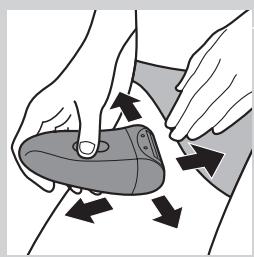
Illustration of hands holding a remote device with directional arrows indicating movement (no text or symbols)6 Shave your bikini line as shown in the figure. Stretch the skin with your free hand and move the appliance in different directions.
natural_image
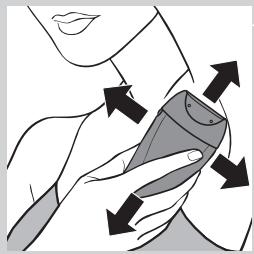
Illustration of a hand holding a medical device with arrows indicating motion or force (no text or symbols)7 Shave your underarms as shown in the figure. Move the appliance in different directions and raise your arm to stretch the skin.
natural_image
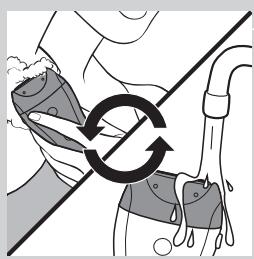
Illustration of a hand holding a medical device with a circular arrow indicating cycle (no text or symbols)Note: When you use shaving foam or gel, clean the shaving head during and after each use with water to ensure optimum performance.
8 When you have finished shaving, switch off the appliance and clean the shaving head according to the instructions in chapter ‘Cleaning and maintenance’.
9 Put the trimming comb on the shaving head when you store the appliance.
Trimming with the comb
Use the shaving head with the comb attached to trim your hairs in the bikini line to a length of 3 mm. You can also use the comb to pretrim long hairs (longer than 10 mm) on the underarms or legs.
1 Press the release button (1) and remove the epilating head from the epilator (2).

natural_image
Diagram showing a device with a handle and a downward arrow indicating motion or force (no text or symbols)2 Put the shaving head on the appliance and press it until it snaps home.
natural_image
Illustration of a hairdryer with a magnified view showing the blade and base (no text or symbols)3 Put the comb on the shaving head.
4 Follow steps 3 to 8 in section ‘Shaving the underarms and bikini line’.
Overheat protection
This function helps to prevent overheating of the appliance.
Note: To avoid overheating of the appliance, do not press it too hard onto your skin. The appliance works best when you move it over your skin without excessive pressure.
If the overheat protection is activated, the appliance switches off automatically and the charging light and the speed lights flash red for 30 seconds.
You can deactivate the overheat protection by letting the appliance cool down and then switch it on again.
Note: If the charging light flashes red again, the appliance has not yet cooled down completely.
Overload protection
If you press the epilating head onto your skin too hard or when the epilating discs of the epilating head get blocked (e.g. by clothes), the appliance switches off automatically and the speed lights flash red for 5 seconds.
1 Turn the epilating discs with your thumb until you can remove whatever blocks the epilating discs.
Using the precision epilator
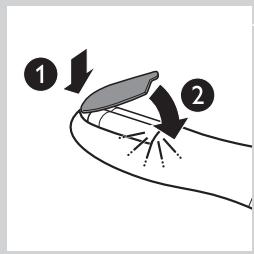
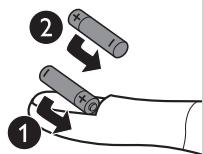
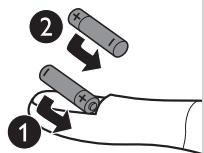
Inserting/changing the batteries
natural_image
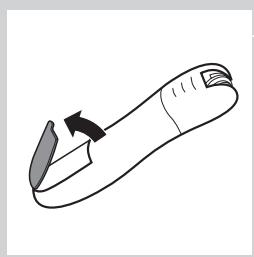
Line drawing of a hand holding a knife with an arrow indicating motion (no text or symbols)1 Remove the lid of the battery compartment by pressing the snap hooks.
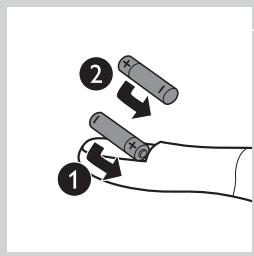
2 Insert 2 AA 1.5V alkaline batteries into the battery compartment.
Note: Make sure the + and - poles of the batteries point in the direction indicated at the bottom of the battery compartment.
Note: New batteries have an operating time of up to 40 minutes.
3 To close the battery compartment, first insert the bottom part of the lid into the rim of the compartment (1) and then press the top part of the lid home until it locks with a snap (2).
Removing the batteries
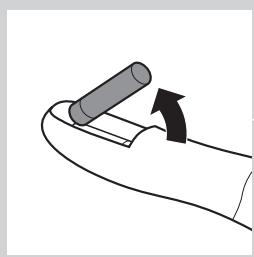
natural_image
Simple line drawing of a hand holding a cylindrical object with an arrow indicating motion (no text or symbols)1 If you want to remove the batteries, open the lid of the battery compartment, see step 1 in section 'Inserting/changing the batteries' above.
2 Take out the first battery.
3 Turn the appliance around, so that the open part of the battery compartment is facing the floor. Hold your hand under the opening and shake the appliance until the second battery falls out.
Note: When you put down the appliance, place it in such a way that the on/off slide is facing the floor to prevent the appliance from rolling away.
Epilating with the precision epilator
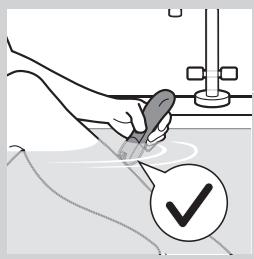
natural_image
Illustration of a hand holding a tool near a water surface with a checkmark icon (no text or symbols present)Do not use this appliance to epilate eyebrows or eyelashes.
Do not use this appliance to remove hairs that grow out of moles.
- Use the precision epilator to epilate the underarms, the bikini line and hard-to-reach areas, wet or dry.
1 Thoroughly clean the area to be epilated. Remove any residues of deodorant, cream etc.
2 Switch on the appliance.
3 Place the epilating head at an angle of 90^ onto the skin with the on/off slide pointing in the direction in which you are going to move the appliance.
4 Slowly move the appliance over the skin, against the direction of the hair growth.
5 Epilate your bikini line as shown in the figure. Stretch the skin with your free hand and move the appliance in different directions to catch all hairs.
6 Epilate your underarms as shown in the figure. Raise your arms to stretch the skin and move the appliance in different directions to catch all hairs.

natural_image
Illustration of hands using a tool to cut a piece of material, with no visible text or symbolsTip: If you want to use the precision epilator in the bath or shower, we advise you to use a small amount of your common shower gel for better gliding.
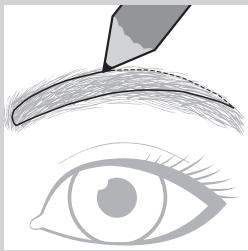
Using the Smart Tweezers
Your epilator comes with Smart Tweezers with integrated light for easy removal of facial hair, such as eyebrow hairs. The Smart Tweezers are protected by a case with integrated mirror which allows you to depilate wherever and whenever you want. The Smart Tweezers are supplied ready for use with 3 button batteries in the battery compartment.
Using the Smart Tweezers
Do not use the Smart Tweezers to remove hairs that grow out of moles.
Do not point the light of the Smart Tweezers directly at your or somebody else's eyes.
natural_image
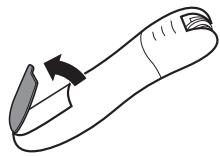
Illustration of an eyebrow being groomed with a pencil, above an eye (no text or symbols)1 Use an eye pencil to mark the desired shape of your eyebrows.
natural_image
Simple line drawing of a pen or stylus with an arrow pointing to the tip (no text or symbols)2 Switch on the light by sliding the on/off button.
natural_image
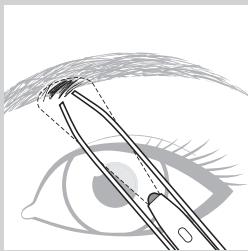
Illustration of an eye with eyeliner application in progress, showing eyelid and eyebrow (no text or symbols)3 Remove any hairs outside the marked shape. Always pull out the hair in the direction of hair growth.
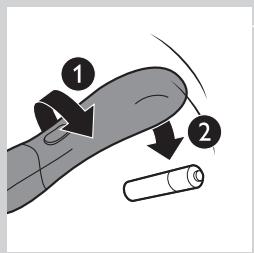
Replacing the batteries
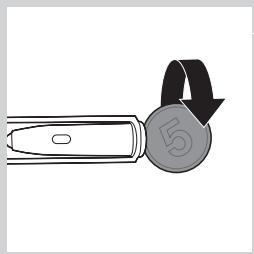
natural_image
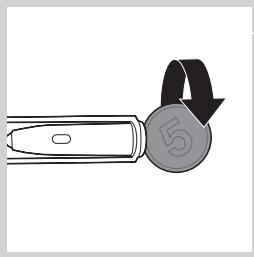
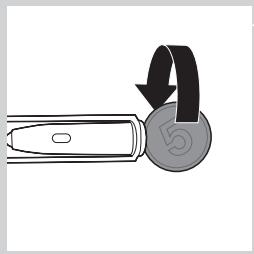
Illustration of a tool with a circular button labeled '5' and a curved arrow, no text or symbols present.1 Open the battery and light compartment by turning the bottom anticlockwise with a coin.
2 Remove the old button batteries.
Keep the button batteries out of the reach of children and pets. Button batteries present a potential choking hazard.
natural_image
Diagram showing a hand holding a cylindrical object with an arrow pointing to a separate connector (no text or symbols present)3 Insert the new button batteries with the negative side pointing forward into the battery and light compartment.
Note: The Smart Tweezers work on three alkaline button batteries, type L736H or AG3 (dia. 7.8 x 3.4 mm).
natural_image
Illustration of a hand holding a coin with a curved arrow indicating rotation (no text or symbols)4 Screw the bottom back onto the battery and light compartment by turning it clockwise with a coin.
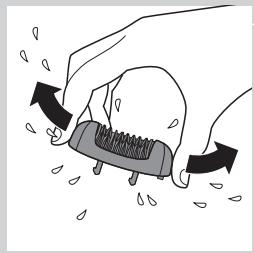
Cleaning and maintenance
Never use scouring pads, abrasive cleaning agents or aggressive liquids such as petrol or acetone to clean the appliance.
Always keep the adapter dry. Never rinse it under the tap or immerse it in water. If necessary, clean the adapter with the cleaning brush or a dry cloth.
Cleaning the epilator and attachments
Clean the epilating head after each wet use to ensure optimum performance.
Always switch off the appliance before you clean it.
1 Switch off the appliance.
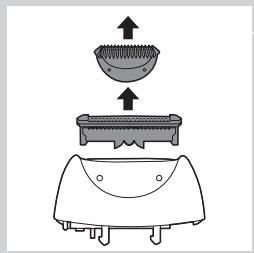
2 Remove the cap from the epilating head.
3 Press the release button (1) and remove the epilating head from the appliance (2).
Note: Never try to detach the epilating discs from the epilating head.
natural_image
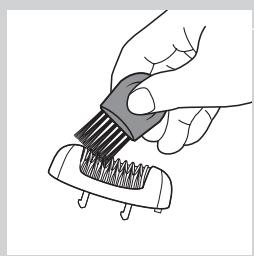
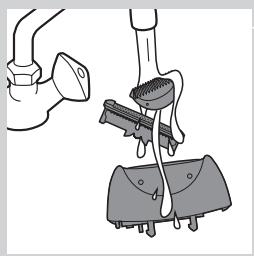
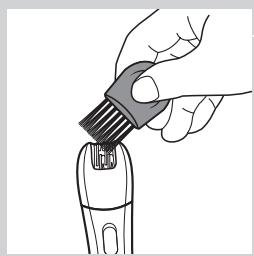
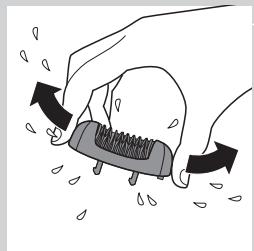
Illustration of a hand using a comb to brush or brush on a small object (no text or symbols)4 Remove loose hairs with the cleaning brush.
5 Rinse all parts (epilator, epilating head, caps and skin stretcher) under a lukewarm tap while turning them.
natural_image
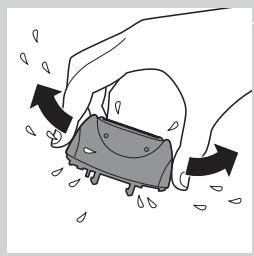
Illustration of a hand pressing down on a textured object with raindrops, no text or symbols present6 Shake excess water off the parts and let them dry.
Note: For hygienic reasons, make sure all parts are dry before you reassemble the appliance.
7 To reattach the epilating head, place it on the appliance and press it onto the appliance until it snaps home.
Cleaning the shaving head and the comb
natural_image
Diagram of a kitchen appliance with a bowl, tray, and base (no text or symbols)1 Remove the comb, if attached, by pulling it off the shaving head.

2 Press the release button (1) and remove the shaving head from the appliance (2).
3 Remove the shaving unit from the shaving head.
natural_image
Illustration of a hand using a tool to lift a small object, with no visible text or symbols.4 Rinse the shaving unit, the shaving head and the comb under a lukewarm tap while turning them.
natural_image
Illustration of a hand holding a small electronic device with arrows indicating motion (no text or symbols)5 Shake the shaving unit, the shaving head and the comb firmly and let them dry.
Note: Do not exert any pressure on the shaving unit to avoid damage.
6 Reattach the shaving unit to the shaving head.
Note: Make sure all parts are dry before you place them back on the appliance.

Tip: Rub a drop of sewing machine oil onto the shaving unit twice a year to extend the lifetime of the cutting element.
Cleaning the precision epilator
natural_image
Illustration of a hand using a hairbrush to apply material to a small object (no text or symbols visible)1 Clean the precision epilator regularly by removing loose hairs with the cleaning brush.
Do not switch on the appliance while brushing.
2 Rinse the precision epilator under the tap.

natural_image
Illustration of a hand using a hairdryer to lift water droplets (no text or symbols)3 Shake excess water off the precision epilator and let it dry.
Note: To make cleaning easier, the epilating head can also be detached by pulling it off the appliance.
Storage
- Store the appliances and the accessories in the pouch.
- Put the comb on the shaving head to prevent damage.
Note: Make sure that all parts are dry when you store them.
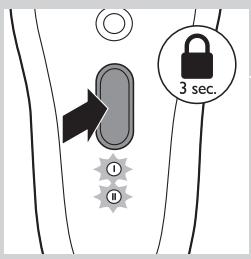
Travel lock
The epilator has an integrated travel lock which prevents the appliance from accidentally being switched on during travel.
1 To activate the travel lock, press and hold the on/off button for 3 seconds until the speed lights flash white 2 times.
The epilator starts running and stops immediately when the travel lock activates.
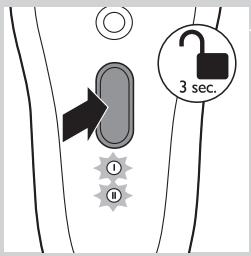
2 To deactivate the travel lock, press and hold the on/off button for 3 seconds until the speed lights flash white 2 times.
Note: You can also insert the appliance plug into the inlet socket and the adapter into a wall socket to deactivate the travel lock.
Ordering accessories
To buy accessories or spare parts, visit www.shop.philips.com/service or go to your Philips dealer. You can also contact the Philips Consumer Care Centre in your country (see the worldwide guarantee leaflet for contact details).
Epilating head
If you use the epilating head two or more times a week, we advise you to replace the epilating head after two years or when it is damaged.
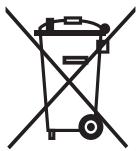
Recycling
natural_image
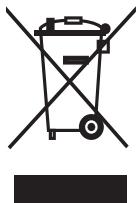
Symbol of a trash bin crossed with a diagonal line, no text or numbers present- This symbol on a product means that the product is covered by European Directive 2012/19/EU.
natural_image
Symbol of a trash bin crossed out by two diagonal lines (no text or numbers present)- This symbol means that the product contains a built-in rechargeable battery covered by European Directive 2006/66/EC which cannot be disposed of with normal household waste. We strongly advise you to take your product to an official collection point or a Philips service centre to have a professional remove the rechargeable battery.
- Inform yourself about the local separate collection system for electrical and electronic products and rechargeable batteries. Follow local rules and never dispose of the product and rechargeable batteries with normal household waste. Correct disposal of old products and rechargeable batteries helps prevent negative consequences for the environment and human health.
Removing the rechargeable battery
Note: We strongly advise you to have a professional remove the rechargeable battery.
Only remove the rechargeable battery when you discard the appliance. Make sure the battery is completely empty when you remove it.
1 Check if there are any screws in the back or front of the appliance. If so, remove them.
2 Remove the back and/or front panel of the appliance with a screwdriver. If necessary, also remove additional screws and/or parts until you see the printed circuit board with the rechargeable battery.
3 If necessary, cut the wires to separate the printed circuit board and the rechargeable battery from the appliance.
Removing the disposable battery
To remove the disposable batteries, see the appropriate section in the user manual.
Guarantee and support
If you need information or support, please visit www.philips.com/support or read the separate worldwide guarantee leaflet.
Guarantee restrictions
Cutting units are not covered by the terms of the international guarantee because they are subject to wear.
Troubleshooting
This chapter summarises the most common problems you could encounter with the appliances. If you are unable to solve the problem with the information below, contact the Consumer Care Centre in your country.
| Problem | Possible cause | Solution |
| The epilator does not work. | The socket used to charge the epilator does not work. | Make sure the socket you use to charge the epilator is live. The charging light goes on to indicate that the epilator is charging. If you connect the epilator to a socket in a bathroom cabinet, you may need to switch on the light in the bathroom to make sure the socket is live. |
| The rechargeable batteries are empty. | When the charging light lights up red continuously, the batteries are empty and you need to charge the epilator for approx. 1 hour. Note: You have to charge the epilator fully before first use. | |
| The travel lock is active. | To deactivate the travel lock, press and hold the on/off button for 3 seconds until the speed lights flash white 2 times. You can also connect the epilator to the mains with the adapter to deactivate the travel lock. | |
| During use, the epilator becomes hot and suddenly stops operating. Then the speed lights and the charging light flash red for 30 seconds. | The overheat protection has been activated. | The epilator is equipped with integrated overhead protection, which prevents the epilator from becoming too hot. If the overheat protection is activated, the appliance switches off automatically. Then the speed lights and the charging light flash red for 30 seconds. To reset the overheat protection, let the epilator cool down and then switch it on again. To avoid overheating of the epilator, do not press the epilator too hard onto your skin. |
| During use, the epilator suddenly stops operating. Then the speed lights flash red for 5 seconds. | The overload protection has been activated. | If you press the epilating head too hard onto your skin or when the rotating discs of the epilating head get blocked (for instance because a piece of clothing has got stuck between the epilating discs), the epilator switches off automatically. Then the speed lights flash red for 5 seconds. Turn the epilating discs with your thumb until you can remove whatever is blocking the epilating discs. Then switch on the epilator again. |
| My skin is irritated after shaving or trimming. | You move the shaver (with or without trimming comb) in the wrong direction or you press too hard. | Slight skin irritation like red skin may occur. This is normal. To avoid irritated skin, make sure the shaving head (with or without trimming comb) is always in full contact with the skin and that you gently move the appliance against the direction of hair growth. |
| Do not apply too much pressure during shaving and trimming, as this may cause skin irritation. | ||
| Check if the shaving head or the trimming comb is broken. Always replace damaged or broken parts with original Philips parts. | ||
| The precision epilator does not work. | The disposable batteries are empty or have been inserted incorrectly. | Replace the batteries or insert them correctly (see chapter ‘Using the precision epilator’). |
| The precision epilator is operating, but its performance is poor. | After 40 minutes, the disposable batteries are almost empty and no longer have enough power to guarantee good performance. | Insert new batteries (see chapter ‘Using the precision epilator’). Only use disposable non-rechargeable AA 1.5V alkaline batteries. |
Introduktion
natural_image
Prohibition sign of a faucet without any text or symbolsAdvarsel
natural_image
Diagram of a handheld device with a battery icon and a small rectangular component, no text or symbols presentnatural_image
Diagram of a handheld device with a highlighted battery component (no text or symbols)natural_image
Illustration of a hand cleaning a surface with a checkmark icon (no text or symbols present)
natural_image
Illustration of a car's exhaust pipe with arrows indicating airflow or pollution (no text or symbols)natural_image
Illustration of a hand holding a device with an arrow indicating motion (no text or symbols)
natural_image
Illustration of hands performing a medical procedure on a patient's abdomen (no text or symbols present)natural_image
Diagram showing a device with a downward arrow and radiating lines, no text or symbols presentnatural_image
Illustration of hands holding a remote device with directional arrows indicating movement (no text or symbols)natural_image
Illustration of a hand holding a medical device with arrows indicating motion or force (no text or symbols)
natural_image
Illustration of a hand holding a glove with a circular arrow indicating cycle (no text or symbols)natural_image
Diagram showing a device with a handle and a downward arrow, emitting light rays from the base (no text or symbols)natural_image
Illustration of a hairdryer with a magnified view showing the blade and base (no text or symbols)natural_image
Line drawing of a stylized object resembling a hand or tool with an arrow indicating rotation (no text or symbols)2 Indsæt 2 AA 1,5 V alkalinebatterier i batterirummet.
natural_image
Simple line drawing of a hand holding a cylindrical object with an arrow indicating motion (no text or symbols)natural_image
Illustration of a hand holding a tool near a water surface with a checkmark icon (no text or symbols present)natural_image
Illustration of hands performing a finger massage technique with directional arrows indicating movement (no text or symbols)natural_image
Illustration of a hand holding a small object with directional arrows indicating movement or force (no text or symbols)natural_image
Illustration of hands using a tool to cut a piece of material, with no visible text or symbolsnatural_image
Illustration of an eyebrow being groomed with a pencil, showing the eyelid and eyebrow (no text or symbols)natural_image
Simple line drawing of a pen or stylus with an arrow pointing to its tip (no text or symbols)natural_image
Anatomical illustration of an eye with surgical instruments (no text or labels)natural_image
Illustration of a tool with a circular button labeled '5' and a curved arrow, no text or symbols present.natural_image
Diagram showing a hand holding a cylindrical object with an arrow pointing to a separate connector (no text or symbols present)natural_image
Illustration of a hand holding a coin with a curved arrow indicating rotation (no text or symbols)natural_image
Illustration of a hand using a comb to brush or brush on a small object (no text or symbols)4 Fjern løse hår med rensebørsten.
5 Rengør alle dele (epilator, epilatorhoved, kapper og hudstrammeren) under rindende lunkent vand, mens du drejer dem.
natural_image
Illustration of a hand pressing down on a textured object with arrows indicating motion (no text or symbols)natural_image
Diagram of a kitchen appliance with a bowl, tray, and handle (no text or symbols)natural_image
Illustration of a hand using a tool to clean or brush the brush (no text or symbols present)natural_image
Illustration of a hand pulling a small object with raindrops, no text or symbols presentnatural_image
Illustration of a hand using a hairbrush to apply material (no text or symbols visible)natural_image
Illustration of a hand holding a cleaning tool with arrows indicating motion (no text or symbols)natural_image
Symbol of a recycling bin with crossed lines indicating no waste or restriction (no text or labels)natural_image
Symbol of a trash bin crossed out by two crossed lines (no text or numbers present)natural_image
Prohibition sign of a faucet crossed out, no text or symbols presentGefahr
natural_image
Diagram of a handheld device with a battery icon and a star-shaped button, no text or symbols presentnatural_image
Diagram of a handheld device with a battery icon and a button, no text or symbols presentnatural_image
Illustration of a hand cleaning a surface with a checkmark icon (no text or symbols present)
natural_image
Illustration of a car's exhaust pipe with arrows indicating airflow direction (no text or symbols)natural_image
Illustration of a hand holding a device with an arrow indicating motion (no text or symbols)natural_image
Illustration of a medical procedure showing hand placement on a patient's abdomen with a surgical tool (no text or symbols present)
natural_image
Diagram showing a device with a handle and a downward arrow, emitting light rays (no text or symbols)

natural_image
Illustration of hands using a handheld device to interact with a surface, showing directional arrows (no text or symbols)
natural_image
Illustration of a person holding a device with arrows indicating motion or force direction (no text or symbols)natural_image
Illustration of a hand holding a glove with a circular arrow indicating cycle (no text or symbols)natural_image
Diagram showing a device with a handle and a downward arrow, emitting light rays from the base (no text or symbols)natural_image
Illustration of a hairdryer with a spring head and a downward arrow indicating compression or drying (no text or symbols)natural_image
Simple line drawing of a hand holding a knife with an arrow indicating motion (no text or symbols)natural_image
Illustration of a hand holding a cylindrical object with an arrow indicating motion (no text or symbols)natural_image
Illustration of a hand holding a tool near a water surface, with a checkmark icon nearby (no text or symbols)natural_image
Illustration of hands performing a finger massage or grip manipulation technique (no text or symbols)natural_image
Illustration of a hand holding a small object with directional arrows indicating movement or force (no text or symbols present)natural_image
Illustration of hands using a tool to cut a piece of material, with no visible text or symbolsnatural_image
Illustration of an eyebrow being groomed with a pencil, alongside an eye (no text or symbols)natural_image
Simple line drawing of a pen or stylus with a black arrow pointing to the tip (no text or symbols)natural_image
Illustration of an eye with eyeliner application in progress, showing eyebrow and eyelid (no text or symbols)natural_image
Simple line drawing of a tool with a circular object and arrow, no text or symbols presentnatural_image
Diagram showing a hand holding a cylindrical object with an arrow pointing to a separate cylindrical component (no text or symbols present)natural_image
Illustration of a mechanical tool interacting with a circular object, showing motion arrows (no text or symbols)natural_image
Illustration of a hand using a comb to brush the product into a small container (no text or symbols)natural_image
Illustration of a hand pressing down on a textured object with raindrops, no text or symbols presentnatural_image
Diagram of a kitchen appliance with a bowl, fan, and base (no text or symbols)natural_image
Illustration of a hand holding a pipe with a tool, next to a cleaning machine (no text or symbols)natural_image
Illustration of a hand holding a small object with raindrops falling, no text or symbols presentnatural_image
Illustration of a hand using a tool to apply a brush to a small object (no text or symbols visible)natural_image
Illustration of a hand using a handheld device to interact with falling droplets (no text or symbols)natural_image
Symbol of a trash bin crossed out by two crossed lines (no text or numbers present)

natural_image
Symbol of a trash bin crossed out by two diagonal lines (no text or numbers present)natural_image
Prohibition sign of a faucet with diagonal line indicating no pollution or leakage (no text present)Κίνδυνος
natural_image
Diagram of a handheld device with a battery icon and a star-shaped button, no text or symbols presentnatural_image
Diagram of a handheld device with a battery icon and a button, no text or symbols presentnatural_image
Illustration of a hand cleaning a surface with a checkmark icon (no text or symbols present)natural_image
Illustration of a hair follicle with water droplets and an arrow indicating direction (no text or symbols)natural_image
Illustration of a hand holding a device with an arrow indicating motion (no text or symbols)natural_image
Illustration of hands performing a medical procedure on a patient's abdomen (no text or symbols present)natural_image
Diagram showing a device with a handle and a downward arrow, emitting light rays (no text or symbols)natural_image
Illustration of hands performing a medical or diagnostic procedure on a device, with arrows indicating motion direction (no text or symbols present)natural_image
Illustration of a person holding a smartphone with arrows indicating motion (no text or symbols)natural_image
Diagram showing a hand holding a device with a circular arrow indicating rotation or cycle (no text or symbols present)natural_image
Diagram showing a device with a handle and a circular button, emitting rays from its side (no text or symbols)natural_image
Illustration of a hairdryer with a magnified view showing the blade and base (no text or symbols)natural_image
Line drawing of a hand holding a knife with an arrow indicating motion (no text or symbols)natural_image
Simple line drawing of a hand holding a cylindrical object with an arrow indicating motion (no text or symbols)natural_image
Illustration of a hand holding a tool near a water surface with a checkmark icon (no text or symbols present)natural_image
Illustration of hands performing a finger massage or grip manipulation technique (no text or symbols)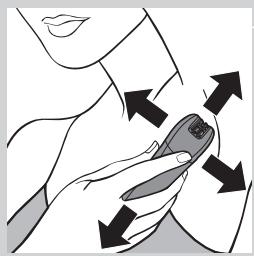
natural_image
Illustration of a hand holding a small object with directional arrows indicating movement or force (no text or symbols)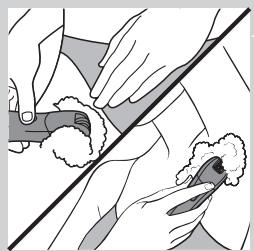
natural_image
Illustration of a medical procedure showing hand positioning and surgical tools (no text or symbols)natural_image
Illustration of an eyebrow being groomed with a pencil, alongside an eye (no text or symbols)natural_image
Simple line drawing of a pen or stylus with a black arrow pointing to the tip (no text or symbols)natural_image
Illustration of an eye with eyeliner and surgical instrument (no text or symbols)natural_image
Simple line drawing of a tool with a circular object and arrow, no text or symbols presentnatural_image
Diagram showing a hand holding a cylindrical object with an arrow pointing to a separate mechanical component (no text or symbols present)natural_image
Illustration of a hand holding a circular object with an arrow indicating rotation (no text or symbols)natural_image
Illustration of a hand using a comb to brush or brush on a small object (no text or symbols visible)natural_image
Illustration of a hand pressing down on a textured object with arrows indicating motion (no text or symbols)natural_image
Diagram of a kitchen appliance with a bowl, fan, and base (no text or symbols)natural_image
Illustration of a hand using a tool to clean or store floor tiles, with no visible text or symbols.natural_image
Illustration of a hand pressing down on a mechanical component with raindrops falling (no text or symbols)natural_image
Illustration of a hand using a tool to apply a brush to a small object (no text or symbols visible)natural_image
Illustration of a hand holding a hairdryer with motion arrows indicating movement (no text or symbols)natural_image
Symbol of a waste bin with crossed lines indicating no waste, and a solid black rectangle below (no text or labels)natural_image
Symbol of a trash bin crossed out by a diagonal line, representing no waste or elimination (no text or numbers present)natural_image
Prohibition sign of a faucet without any text or symbolsnatural_image
Diagram of a handheld device with a battery icon and a small rectangular component, no text or symbols present.natural_image
Diagram of a handheld device with a battery icon and a small square button, no text or symbols presentnatural_image
Illustration of a hand holding a tool near a water tank, with a checkmark icon nearby (no text or symbols)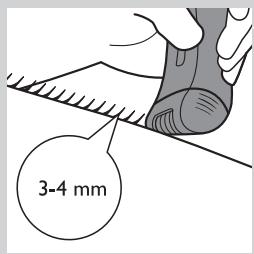
natural_image
Illustration of a fish head with water droplets and an arrow indicating direction (no text or symbols)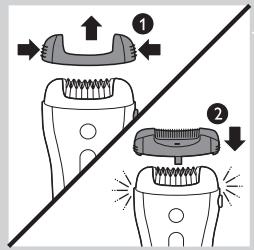
natural_image
Illustration of a hand holding a device with an arrow indicating motion (no text or symbols)natural_image
Illustration of a medical procedure showing hands performing a laparoscopic procedure (no text or symbols present)natural_image
Diagram showing a device with a handle and a curved top, emitting arrows to its sides (no text or symbols)natural_image
Illustration of hands performing a medical procedure on a device with directional arrows indicating movement (no text or symbols)natural_image
Illustration of a person holding a device with arrows indicating motion (no text or symbols)natural_image
Illustration of a hand holding a medical device with a circular arrow indicating cycle (no text or symbols)natural_image
Diagram showing a device with a handle and a downward arrow, emitting light rays from the base (no text or symbols)natural_image
Illustration of a hairdryer with a spring head and a downward arrow indicating compression or drying (no text or symbols)natural_image
Simple line drawing of a hand holding a knife with an arrow indicating motion (no text or symbols)natural_image
Illustration of a hand holding a cylindrical object with an arrow indicating motion (no text or symbols)natural_image
Illustration of a hand using a tool to clean or repair a surface, with a checkmark icon nearby (no text or symbols)natural_image
Illustration of hands performing a medical or therapeutic procedure on a finger, with arrows indicating direction (no text or symbols present)natural_image
Illustration of a hand holding a small object with directional arrows indicating movement or force (no text or symbols present)natural_image
Illustration of two hands performing a manual tool on a piece of paper, with no visible text or symbolsnatural_image
Illustration of an eyebrow being groomed with a pencil, alongside an eye (no text or symbols)natural_image
Simple line drawing of a pen or clip with an arrow indicating motion (no text or symbols)natural_image
Illustration of an eye with eyeliner application in progress, showing eyebrow and eyelid (no text or symbols)natural_image
Illustration of a tool with a circular object and a numbered badge (no text or symbols)natural_image
Illustration of a hand holding a cylindrical object with an arrow pointing to a separate mechanical component (no text or symbols)natural_image
Illustration of a mechanical device with a rotating knob and curved arrow (no text or symbols)natural_image
Illustration of a hand using a tool to brush or brush onto a small object (no text or symbols visible)
natural_image
Illustration of a hand pressing down on a textured object with raindrops, no text or symbols presentnatural_image
Diagram of a kitchen appliance with a bowl, tray, and base (no text or symbols)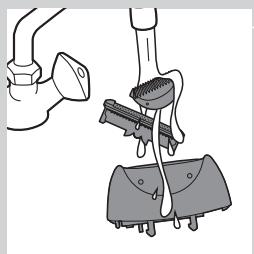
natural_image
Illustration of a hand using a tool to clean or wash a surface, with no text or symbols present.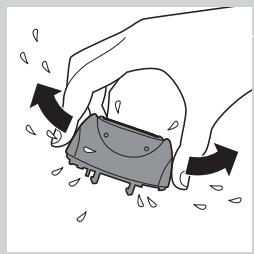
natural_image
Illustration of a cartoon-style object with raindrops falling, surrounded by hands (no text or symbols)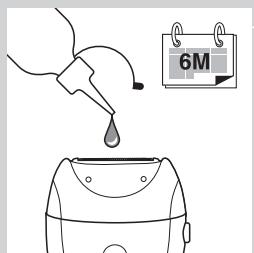
natural_image
Illustration of a hand using a tool to apply a brush to a small object (no text or symbols visible)natural_image
Illustration of a hand using a handheld device to lift water droplets (no text or symbols)natural_image
Symbol of a trash bin crossed out by two diagonal lines (no text or numbers present)
natural_image
Symbol of a trash bin crossed out by two crossed lines (no text or numbers present)natural_image
Prohibition sign of a faucet without any text or symbolsnatural_image
Diagram of a handheld device with a battery icon and a star-shaped button, no text or symbols presentnatural_image
Diagram of a handheld device with a battery icon and a button, no text or symbols presentnatural_image
Illustration of a hand cleaning a surface with a checkmark icon (no text or symbols present)
natural_image
Illustration of a fish head with water droplets and an arrow indicating direction (no text or symbols)natural_image
Illustration of a hand holding a device with an arrow indicating motion (no text or symbols)natural_image
Illustration of hands performing a medical procedure on a patient's abdomen (no text or symbols present)natural_image
Diagram showing a device with a handle and a downward arrow, emitting light rays from its base (no text or symbols)natural_image
Illustration of hands performing a medical or diagnostic procedure on a device with directional arrows indicating movement (no text or symbols present)natural_image
Illustration of a person holding a smartphone with arrows indicating motion (no text or symbols)natural_image
Illustration of a hand holding a glove with a circular arrow indicating cycle (no text or symbols)natural_image
Diagram of a device with a handle and a curved top, showing a downward arrow and radiating lines (no text or symbols)natural_image
Illustration of a hairdryer with a magnified view showing the tip and base (no text or symbols)natural_image
Simple line drawing of a hand holding a knife with an arrow indicating motion (no text or symbols)1 Irrota paristolokeron kansi painamalla sen lukitsimia.
2 Aseta lokeroon kaksi 1,5 voltin AA-alkaliparistoa.
natural_image
Simple line drawing of a hand holding a cylindrical object with an arrow indicating motion (no text or symbols)
Akkujen poistaminen
natural_image
Illustration of a hand holding a tool near a water surface, with a checkmark icon nearby (no text or symbols)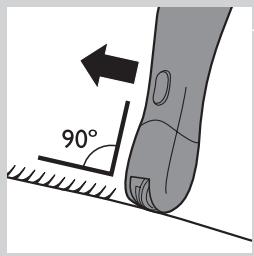
natural_image
Illustration of hands performing a finger massage or grip manipulation technique (no text or symbols)natural_image
Illustration of a hand holding a small object with directional arrows indicating movement or force (no text or symbols)natural_image
Illustration of two hands performing a manual tool on a white object, with no visible text or symbolsnatural_image
Illustration of an eyebrow being groomed with a pencil, showing the eyelid and eyebrow (no text or symbols)natural_image
Simple line drawing of a knife with an arrow indicating motion (no text or symbols)natural_image
Illustration of an eye with eyebrow and eyelid, showing surgical instrument placement (no text or symbols)natural_image
Illustration of a tool handle holding a circular object with a number 5, no text or symbols presentnatural_image
Illustration of a hand holding a cylindrical object with an arrow pointing to a separate mechanical component (no text or symbols)natural_image
Illustration of a mechanical tool interacting with a circular component, showing rotational motion (no text or symbols)natural_image
Illustration of a hand using a comb to brush or brush on a small object (no text or symbols)natural_image
Illustration of a hand pressing down on a textured surface with raindrops, no text or symbols presentnatural_image
Diagram of a kitchen appliance with a bowl, tray, and base (no text or symbols)natural_image
Illustration of a hand using a tool to lift a small object, with no visible text or symbols.natural_image
Illustration of a hand holding a small object with raindrops, no text or symbols presentnatural_image
Line drawing of a hand using a tool to apply a brush to a small object (no text or symbols present)natural_image
Illustration of a hand using a handheld device to lift water droplets (no text or symbols)natural_image
Symbol of a waste bin with no text or labels, featuring a central container and diagonal lines crossing over a rectangle (no text or symbols present)natural_image
Symbol of a trash bin crossed out by two diagonal lines (no text or numbers present)natural_image
Prohibition sign of a faucet with diagonal line indicating no spray or anti-smoking (no text present)Attention
natural_image
Diagram of a handheld device with a battery icon and a star-shaped button, no text or symbols present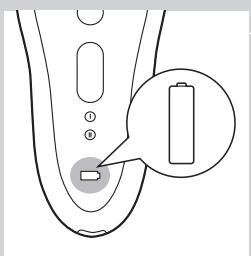
natural_image
Diagram of a handheld device with a battery icon and a button, no text or symbols presentnatural_image
Illustration of a hand cleaning a surface with a checkmark icon (no text or symbols present)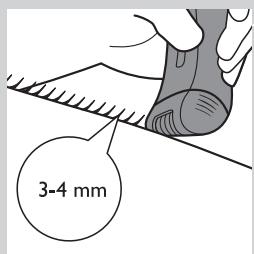
natural_image
Illustration of a car's exhaust pipe with arrows indicating airflow or pollution (no text or symbols)natural_image
Illustration of a hand holding a device with a black arrow indicating motion (no text or symbols)natural_image
Illustration of hands performing a medical procedure on a patient's abdomen (no text or symbols present)natural_image
Diagram of a device with a handle and a curved top, showing airflow or vibration (no text or symbols)natural_image
Illustration of hands holding a remote device with directional arrows indicating movement (no text or symbols)natural_image
Illustration of a person holding a device with arrows indicating motion (no text or symbols)natural_image
Illustration of a hand holding a glove with a circular arrow indicating cycle (no text or symbols)natural_image
Diagram showing a device with a handle and a downward arrow indicating compression or disassembly (no text or symbols present)natural_image
Illustration of a hairdryer with a spring head and a downward arrow indicating compression or drying (no text or symbols)Protection anti-surcharge
natural_image
Simple line drawing of a hand holding a knife with an arrow indicating motion (no text or symbols)natural_image
Illustration of a hand holding a cylindrical object with an arrow indicating motion (no text or symbols)natural_image
Illustration of a hand using a tool to clean or repair a surface, with a checkmark icon nearby (no text or symbols)natural_image
Illustration of hands performing a finger massage or grip manipulation technique (no text or symbols)natural_image
Illustration of a hand holding a small object with directional arrows indicating movement or force (no text or symbols)natural_image
Illustration of hands using a tool to cut a piece of material, with no visible text or symbolsnatural_image
Illustration of an eyebrow being groomed with a pencil, alongside an eye (no text or symbols)natural_image
Simple line drawing of a pen or stylus with a black arrow pointing to the tip (no text or symbols)natural_image
Illustration of an eye with eyeliner application in progress, showing eyebrow and eyelid (no text or symbols)natural_image
Simple line drawing of a tool with a circular button labeled '5' and a curved arrow, no text or symbols present.natural_image
Diagram showing a hand holding a cylindrical object with an arrow pointing to a separate cylindrical component (no text or symbols present)natural_image
Illustration of a mechanical tool interacting with a circular object, showing motion arrows (no text or symbols)natural_image
Illustration of a hand using a comb to brush or brush on a surface (no text or symbols)natural_image
Illustration of a hand pressing down on a textured object with directional arrows indicating motion (no text or symbols)natural_image
Diagram of a kitchen appliance with a bowl, fan, and base (no text or symbols)natural_image
Illustration of a hand holding a pipe with a tool above a cleaning board (no text or symbols)natural_image
Illustration of a hand pulling a small object with arrows indicating motion (no text or symbols)natural_image
Illustration of a hand using a tool to apply a brush to a small object (no text or symbols visible)natural_image
Illustration of a hand using a handheld device to lift water droplets (no text or symbols)natural_image
Symbol of a trash bin crossed out by two crossed lines (no text or numbers present)

natural_image
Symbol of a trash bin crossed out by two diagonal lines (no text or numbers present)natural_image
Prohibition sign of a faucet with diagonal line indicating no spray or anti-smoking (no text present)Avviso
natural_image
Diagram of a handheld device with a battery icon and a star-shaped button, no text or symbols presentnatural_image
Diagram of a handheld device with a battery icon and a small rectangular component, no text or symbols present.natural_image
Illustration of a hand cleaning a surface with a checkmark icon (no text or symbols present)
natural_image
Illustration of a car's exhaust pipe with arrows indicating airflow direction (no text or symbols)natural_image
Illustration of a hand holding a device with an arrow indicating motion (no text or symbols)natural_image
Illustration of a medical procedure showing hands performing a procedure on a patient's abdomen (no text or symbols present)natural_image
Diagram of a device with a handle and a curved top, showing airflow or vibration (no text or symbols)natural_image
Illustration of hands holding a remote device with directional arrows indicating movement (no text or symbols)natural_image
Illustration of a person holding a device with arrows indicating motion (no text or symbols)natural_image
Illustration of a hand holding a medical device with a circular arrow indicating cycle (no text or symbols)natural_image
Diagram showing a device with a handle and a downward arrow, emitting light rays from the base (no text or symbols)natural_image
Illustration of a hairdryer with a spring head and a downward arrow indicating compression or drying (no text or symbols)natural_image
Line drawing of a hand holding a knife with an arrow indicating motion (no text or symbols)natural_image
Illustration of a hand holding a cylindrical object with an arrow indicating motion (no text or symbols)natural_image
Illustration of a hand holding a tool near a water surface with a checkmark icon (no text or symbols present)natural_image
Illustration of hands performing a finger massage or grip manipulation technique (no text or symbols)natural_image
Illustration of a hand holding a small object with directional arrows indicating movement or force (no text or symbols)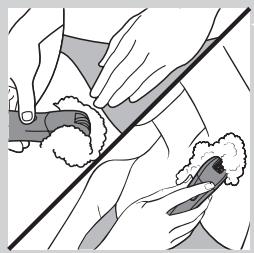
natural_image
Illustration of two hands performing a manual tool on a surface, with no visible text or symbolsnatural_image
Illustration of an eyebrow being groomed with a pencil, alongside an eye (no text or symbols)natural_image
Simple line drawing of a pen or stylus with a black arrow pointing to the tip (no text or symbols)natural_image
Illustration of an eye with eyeliner application in progress, showing eyebrow and eyelid (no text or symbols)natural_image
Simple line drawing of a tool with a circular object and arrow, no text or symbols presentnatural_image
Diagram showing a hand holding a cylindrical object with an arrow pointing to a separate cylindrical component (no text or symbols present)natural_image
Illustration of a hand holding a circular object with an arrow indicating rotation (no text or symbols)natural_image
Illustration of a hand using a brush to brush the brush on a small object (no text or symbols present)natural_image
Diagram of a kitchen appliance with a bowl, tray, and base (no text or symbols)natural_image
Illustration of a hand holding a pipe with a tool above a cleaning board (no text or symbols)natural_image
Illustration of a hand holding a small object with raindrops, no text or symbols presentnatural_image
Illustration of a hand using a tool to apply a brush to a small object (no text or symbols visible)natural_image
Illustration of a hand holding a handheld device with arrows indicating motion or movement (no text or symbols)natural_image
Symbol of a trash bin crossed with a diagonal line, no text or labels present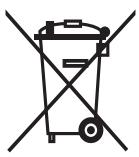
natural_image
Symbol of a trash bin crossed out by a diagonal line, representing no waste or elimination (no text present)natural_image
Prohibition sign of a faucet with diagonal line and raindrops, no text presentWaarschuwing
natural_image
Diagram of a remote control device with a battery icon and a star-shaped indicator on the left (no text or symbols)natural_image
Diagram of a remote control device with a battery icon and a button, no text or symbols presentnatural_image
Illustration of a hand cleaning a surface with a checkmark icon (no text or symbols present)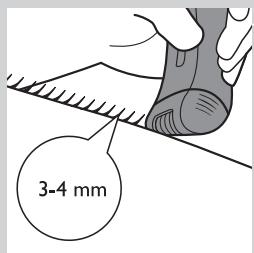
natural_image
Illustration of a fish head with water droplets and an arrow indicating direction (no text or symbols)natural_image
Illustration of a hand holding a device with an arrow indicating motion (no text or symbols)natural_image
Illustration of a medical procedure showing hand placement and occlusion on a patient's abdomen (no text or symbols)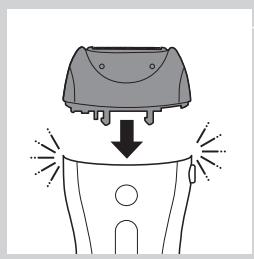
natural_image
Diagram showing a device with a handle and a downward arrow, emitting light rays (no text or symbols)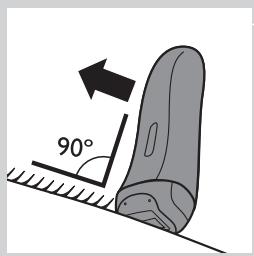

natural_image
Illustration of hands performing a medical procedure on a device with directional arrows indicating movement (no text or symbols present)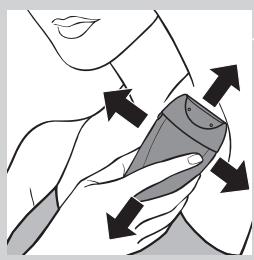
natural_image
Illustration of a person holding a device with arrows indicating motion or force direction (no text or symbols)natural_image
Illustration of a hand holding a medical device with a circular arrow indicating cycle (no text or symbols)natural_image
Diagram showing a device with a handle and a downward arrow indicating motion or force (no text or symbols)natural_image
Illustration of a hairdryer with a spring head and a downward arrow indicating compression or drying (no text or symbols)natural_image
Simple line drawing of a curved object with an arrow indicating direction (no text or symbols)natural_image
Simple line drawing of a hand holding a cylindrical object with an arrow indicating motion (no text or symbols)natural_image
Illustration of a hand holding a tool near a water surface, with a checkmark icon nearby (no text or symbols)natural_image
Illustration of hands performing a finger massage technique with directional arrows indicating movement (no text or symbols)natural_image
Illustration of a hand holding a small object with directional arrows indicating movement or force (no text or symbols)natural_image
Illustration of a hand holding a tool over a small object, with no visible text or symbolsnatural_image
Illustration of an eyebrow being groomed with a pencil, alongside an eye (no text or symbols)natural_image
Simple line drawing of a pair of scissors with a black arrow indicating the handle (no text or symbols)natural_image
Anatomical illustration of an eye with surgical instruments (no text or labels)natural_image
Simple line drawing of a tool with a circular badge labeled '5' and a curved arrow, no text or symbols present.natural_image
Illustration of a hand holding a cylindrical object with an arrow pointing to a separate mechanical component (no text or symbols)natural_image
Illustration of a mechanical device with a rotating knob and curved arrow (no text or symbols)natural_image
Illustration of a hand using a tool to brush or brush onto a small object (no text or symbols visible)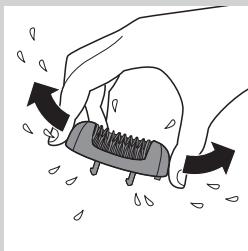
natural_image
Illustration of a hand pressing down on a textured object with arrows indicating motion (no text or symbols)natural_image
Diagram of a mechanical component with a bowl and base, showing upward force arrows (no text or symbols)natural_image
Illustration of a hand using a tool to lift a small object into a surface, with no visible text or symbols.natural_image
Illustration of a cartoon character with raindrops and motion arrows, no text or symbols presentnatural_image
Line drawing of a hand using a hairbrush to clean or brush the product (no text or symbols)natural_image
Illustration of a hand holding a handheld device with arrows indicating motion or movement (no text or symbols)3 Schud overtollig water af en laat de precisie-epilator drogen.
natural_image
Symbol of a trash bin crossed out by two crossed lines (no text or numbers present)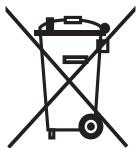
natural_image
Symbol of a trash bin crossed out by a diagonal line, representing no waste or elimination (no text or numbers present)natural_image
Prohibition sign of a faucet without any text or symbolsAdvarsel
natural_image
Diagram of a remote control device with a battery icon and a star-shaped button (no text or symbols)natural_image
Diagram of a handheld device with a battery icon and a button, no text or symbols presentBruke epilatoren
natural_image
Illustration of a hand cleaning a surface with a checkmark icon (no text or symbols present)
natural_image
Illustration of a car's exhaust pipe with arrows indicating airflow or pollution (no text or symbols)natural_image
Illustration of a hand holding a device with an arrow indicating motion (no text or symbols)Merk: Hvis du bruker hudstrammeren, trenger du ikke å strekke ut huden. Hudstrammeren sørger også for at du holder apparatet på huden i riktig vinkel. Pass på at hudstrammeren er i kontakt med huden som vist i figuren.
natural_image
Illustration of hands performing a medical procedure on a patient's abdomen (no text or symbols present)natural_image
Diagram showing a device with a handle and a downward arrow, emitting light rays from its side (no text or symbols)natural_image
Illustration of hands holding a device with directional arrows indicating movement (no text or symbols)natural_image
Illustration of a hand holding a device with directional arrows indicating movement (no text or symbols)natural_image
Illustration of a hand holding a medical device with a circular arrow indicating cycle (no text or symbols)natural_image
Diagram showing a device with a handle and a downward arrow, emitting light rays from the base (no text or symbols)natural_image
Illustration of a hairdryer with a magnified view showing the blade and base (no text or symbols)3 Sett kammen på skjærehodet.
4 Følg trinn 3 til 8 i avsnittet Barbere armhulene og bikinilinjen.
natural_image
Line drawing of a hand holding a small object with an arrow indicating rotation (no text or symbols)natural_image
Simple line drawing of a hand holding a cylindrical object with an arrow indicating motion (no text or symbols)natural_image
Illustration of a hand holding a tool near a water surface with a checkmark icon (no text or symbols present)natural_image
Illustration of hands performing a medical or therapeutic procedure on a finger, with arrows indicating direction (no text or symbols present)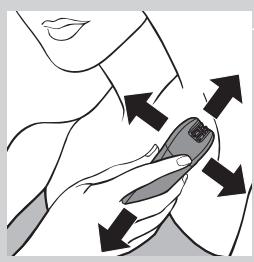
natural_image
Illustration of a hand holding a small object with directional arrows indicating movement or force (no text or symbols)natural_image
Illustration of two hands performing a manual tool on a cotton material, with no visible text or symbolsnatural_image
Illustration of an eyebrow being groomed with a pencil, alongside an eye (no text or symbols)natural_image
Simple line drawing of a pen or stylus with a black arrow pointing to the tip (no text or symbols)natural_image
Illustration of an eye with eyeliner and surgical instrument (no text or symbols)3 Fjern alle hårstråene utenfor markeringen. Trekk alltid ut håret i vekstretningen. Bytte batteriene
natural_image
Simple line drawing of a tool with a circular badge labeled '5' (no text or symbols beyond the number)natural_image
Diagram showing a hand holding a cylindrical object with an arrow pointing to a separate mechanical component (no text or symbols present)natural_image
Illustration of a hand holding a circular object with a curved arrow indicating rotation (no text or symbols)natural_image
Diagram of a kitchen appliance with a bowl, tray, and base (no text or symbols)natural_image
Illustration of a hand using a tool to lift a small object, with no visible text or symbols.natural_image
Illustration of a hand holding a small electronic device with raindrops, no text or symbols presentnatural_image
Line drawing of a hand using a hairbrush to clean or brush the product (no text or symbols)natural_image
Illustration of a hand holding a handheld device with arrows indicating motion or movement (no text or symbols)natural_image
Symbol of a trash bin crossed out by two crossed lines (no text or numbers present)natural_image
Symbol of a trash bin crossed out by a diagonal line, representing no waste or elimination (no text or labels present)natural_image
Prohibition sign of a faucet with no text or symbolsPerigo
natural_image
Diagram of a handheld device with a battery icon and a star-shaped button, no text or symbols presentnatural_image
Diagram of a handheld device with a battery icon and a button, no text or symbols presentnatural_image
Illustration of a hand cleaning a surface with a checkmark icon (no text or symbols present)
natural_image
Diagram of a car's exhaust pipe with airflow and exhaust particles (no text or labels)natural_image
Illustration of a hand holding a device with an arrow indicating motion (no text or symbols)natural_image
Illustration of a medical procedure showing hands performing a laparoscopic procedure (no text or symbols present)natural_image
Diagram of a device with a handle and a curved top, showing airflow or vibration (no text or symbols)natural_image
Illustration of hands holding a remote device with directional arrows indicating movement (no text or symbols)natural_image
Illustration of a hand holding a medical device with arrows indicating motion or force (no text or symbols)natural_image
Illustration of a hand holding a glove with a circular arrow indicating cycle (no text or symbols)natural_image
Diagram showing a device with a handle and a downward arrow, emitting light rays from the base (no text or symbols)
natural_image
Illustration of a hairdryer with a magnified view showing the blade and base (no text or symbols)Colocar/substituir as pilhas
natural_image
Simple line drawing of a curved object with an arrow indicating direction (no text or symbols)2 Insira 2 pilhas alcalinas AA de 1,5V no compartimento das pilhas.
natural_image
Simple line drawing of a hand holding a cylindrical object with an arrow indicating motion (no text or symbols)natural_image
Illustration of a hand holding a tool near a water surface with a checkmark icon (no text or symbols present)natural_image
Illustration of hands performing a finger massage technique with directional arrows indicating movement (no text or symbols)
natural_image
Illustration of a hand holding a small object with directional arrows indicating movement or force (no text or symbols)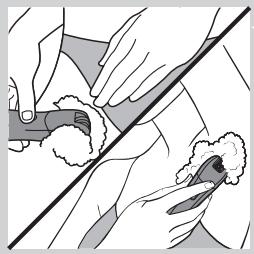
natural_image
Illustration of two hands performing a medical procedure with a tool and a flower (no text or symbols)natural_image
Illustration of an eyebrow being groomed with a pencil, alongside an eye (no text or symbols)natural_image
Simple line drawing of a knife with a black arrow pointing to the blade (no text or symbols)natural_image
Illustration of an eye with eyeliner application in progress, showing eyebrow and eyelid (no text or symbols)natural_image
Illustration of a tool with a circular badge labeled '5' and a curved arrow, no text or symbols present.natural_image
Diagram showing a hand holding a cylindrical object with an arrow pointing to a separate mechanical component (no text or symbols present)natural_image
Illustration of a hand holding a tool with a circular object and an arrow indicating rotation (no text or symbols)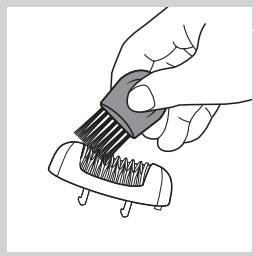
natural_image
Illustration of a hand using a tool to brush or brush onto a small object (no text or symbols visible)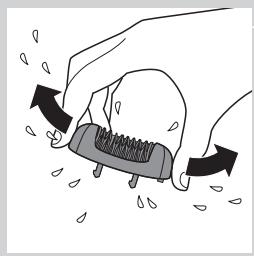
natural_image
Illustration of a hand pressing down on a textured object with raindrops, no text or symbols present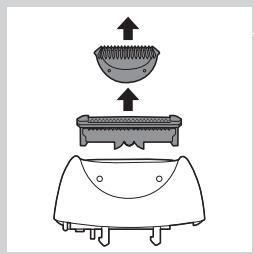
natural_image
Diagram of a kitchen appliance with a bowl, grater, and fan (no text or symbols)
natural_image
Illustration of a medical procedure involving a surgical tool and a foot (no text or symbols present)natural_image
Illustration of a hand pressing down on a mechanical component with raindrops falling (no text or symbols)natural_image
Illustration of a hand using a hairbrush to apply material (no text or symbols visible)natural_image
Illustration of a hand using a handheld device to lift water droplets (no text or symbols)Encomendar acessórios
natural_image
Symbol of a trash bin with crossed lines indicating no waste or discharge (no text or labels)natural_image
Symbol of a trash bin crossed out by two diagonal lines (no text or numbers present)natural_image
Prohibition sign of a faucet without any text or symbolsAviso
natural_image
Diagram of a handheld device with a battery icon and a small rectangular component, no text or symbols presentnatural_image
Diagram of a handheld device with a battery icon and a small square button, no text or symbols presentnatural_image
Illustration of a hand cleaning a surface with a checkmark icon (no text or symbols present)
natural_image
Illustration of a fish head with water droplets and an arrow indicating direction (no text or symbols)natural_image
Illustration of a hand holding a device with an arrow indicating motion (no text or symbols)natural_image
Illustration of a medical procedure showing hands performing a procedure on a patient's abdomen (no text or symbols present)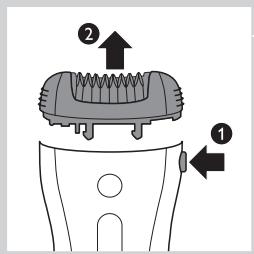
natural_image
Diagram of a device with a handle and a curved top, showing a downward arrow and radiating lines (no text or symbols)
natural_image
Illustration of hands holding a handheld device with directional arrows indicating motion (no text or symbols)natural_image
Illustration of a person holding a mobile phone with arrows indicating motion (no text or symbols)natural_image
Illustration of a hand holding a medical device with a circular arrow indicating cycle (no text or symbols)natural_image
Diagram showing a device emitting light beams from a body, with no text or symbols present.natural_image
Diagram showing a hairless device with a spring-like head and a downward arrow indicating motion (no text or symbols)natural_image
Simple line drawing of a hand holding a knife with an arrow indicating motion (no text or symbols)1 Remova a tampa do compartimento de baterias pressionando os encaixes.
2 Insira duas baterias alcalinas AA de 1,5V no compartimento de baterias.
natural_image
Simple line drawing of a hand holding a cylindrical object with an arrow indicating motion (no text or symbols)natural_image
Illustration of a hand holding a tool near a water surface with a checkmark icon (no text or symbols present)natural_image
Illustration of hands performing a massage or grip technique with directional arrows indicating movement (no text or symbols)natural_image
Illustration of a hand holding a small object with directional arrows indicating movement or force (no text or symbols)natural_image
Illustration of two hands performing a manual tool on a flower, with no visible text or symbolsnatural_image
Illustration of an eyebrow being groomed with a pencil, alongside an eye (no text or symbols)natural_image
Simple line drawing of a pen or clip with a black arrow pointing to the tip (no text or symbols)natural_image
Anatomical illustration of an eye with surgical instruments (no text or labels)natural_image
Illustration of a tool handle with a circular button labeled '5' and a curved arrow, no text or symbols present.natural_image
Illustration of a hand holding a cylindrical object with an arrow pointing to a separate component (no text or symbols)natural_image
Illustration of a mechanical tool interacting with a circular object, showing rotational motion (no text or symbols)natural_image
Illustration of a hand using a tool to brush or brush onto a small object (no text or symbols visible)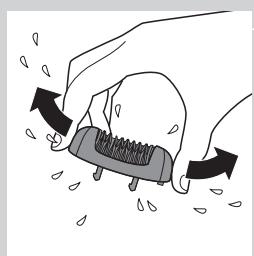
natural_image
Illustration of a hand pressing down on a spring-loaded object with arrows indicating motion (no text or symbols)natural_image
Diagram of a kitchen appliance with a bowl, tray, and base (no text or symbols)natural_image
Illustration of a hand using a tool to lift a small object, with no visible text or symbols.natural_image
Illustration of a cartoon character with raindrops and motion arrows, no text or symbols presentnatural_image
Line drawing of a hand using a tool to apply a brush to a small object (no text or symbols present)natural_image
Illustration of a hand holding a handheld device with arrows indicating motion or movement (no text or symbols)natural_image
Symbol of a waste bin with crossed lines indicating no waste, and a solid black rectangle below (no text or labels)natural_image
Symbol of a trash bin crossed out by a diagonal line, representing no waste or elimination (no text present)natural_image
Prohibition sign of a faucet without any text or symbolsVarning
natural_image
Diagram of a handheld device with a battery icon and a star-shaped button, no text or symbols presentnatural_image
Diagram of a handheld device with a battery icon and a button, no text or symbols presentnatural_image
Illustration of a hand cleaning a surface with a checkmark icon (no text or symbols present)
natural_image
Illustration of a car's exhaust pipe with arrows indicating airflow or pollution (no text or symbols)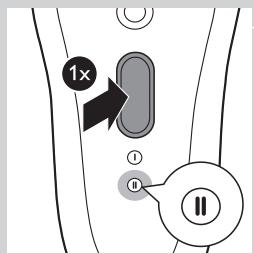
natural_image
Illustration of a hand holding a device with an arrow indicating motion (no text or symbols)natural_image
Illustration of hands performing a medical procedure on a patient's abdomen (no text or symbols present)natural_image
Diagram showing a device with a handle and a downward arrow, emitting light rays from its base (no text or symbols)natural_image
Illustration of hands performing a medical or diagnostic procedure on a device (no text or symbols visible)natural_image
Illustration of a person holding a smartphone with arrows indicating motion (no text or symbols)natural_image
Illustration of a hand holding a small object with a circular arrow indicating rotation or cycle (no text or symbols)natural_image
Diagram of a device with a handle and base, showing a downward arrow and radiating lines (no text or symbols)natural_image
Diagram of a hairdryer with a mesh head and light rays indicating hair distribution (no text or symbols)natural_image
Line drawing of a hand holding a small object with an arrow indicating rotation (no text or symbols)natural_image
Simple line drawing of a hand holding a cylindrical object with an arrow indicating motion (no text or symbols)natural_image
Illustration of a hand holding a tool near a water surface with a checkmark icon (no text or symbols present)natural_image
Illustration of hands performing a medical or therapeutic procedure on a finger, with arrows indicating direction (no text or symbols present)natural_image
Illustration of a hand holding a small object with directional arrows indicating movement or force (no text or symbols present)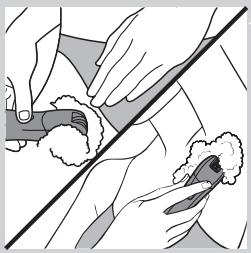
natural_image
Illustration of hands using a tool to cut a piece of material, with no visible text or symbolsnatural_image
Illustration of an eyebrow being groomed with a pencil, alongside an eye (no text or symbols)natural_image
Simple line drawing of a knife with an arrow indicating motion (no text or symbols)natural_image
Illustration of an eye with eyeliner application in progress, showing eyebrow and eyelid structures (no text or symbols)natural_image
Illustration of a tool with a circular button labeled '5' and a curved arrow, no text or symbols present.natural_image
Diagram showing a hand holding a cylindrical object with an arrow pointing to a separate connector (no text or symbols present)natural_image
Illustration of a mechanical device with a rotating knob and curved arrow indicating rotation (no text or symbols)natural_image
Illustration of a hand using a comb to brush or brush on a mechanical component (no text or symbols)natural_image
Illustration of a hand pressing down on a textured object with raindrops, no text or symbols presentnatural_image
Diagram of a kitchen appliance with a bowl, tray, and base (no text or symbols)natural_image
Illustration of a hand holding a pipe with a tool inserted into a cleaning machine (no text or symbols)natural_image
Illustration of a hand holding a small object with raindrops, no text or symbols presentnatural_image
Illustration of a hand using a hairbrush to apply material (no text or symbols visible)natural_image
Illustration of a hand using a handheld device to lift water droplets (no text or symbols)natural_image
Symbol of a waste bin with no text or labels, featuring crossed and unshaded elements (no readable text or symbols)natural_image
Symbol of a trash bin crossed out by two crossed lines (no text or labels)natural_image
Prohibition sign of a faucet without any text or symbolsUyarı
natural_image
Diagram of a remote control device with a battery icon and a star-shaped button (no text or symbols)natural_image
Diagram of a remote control panel with a battery icon and a close-up view of the button (no text or symbols)natural_image
Illustration of a hand cleaning a surface with a checkmark icon (no text or symbols present)
natural_image
Illustration of a fish head with water droplets and an arrow indicating direction (no text or symbols)natural_image
Illustration of a hand holding a device with an arrow indicating motion (no text or symbols)natural_image
Illustration of hands performing a medical procedure on a patient's abdomen (no text or symbols present)natural_image
Diagram showing a device with a handle and a downward arrow, emitting light rays from its base (no text or symbols)natural_image
Illustration of hands performing a medical or diagnostic procedure on a device (no text or symbols visible)natural_image
Illustration of a person holding a smartphone with arrows indicating motion (no text or symbols)natural_image
Illustration of a hand holding a glove with a circular arrow indicating rotation (no text or symbols)natural_image
Diagram of a device with a handle and a curved top, showing a downward arrow and radiating lines (no text or symbols)natural_image
Illustration of a hairdryer with a magnified view showing the tip and base (no text or symbols)natural_image
Line drawing of a hand holding a knife with an arrow indicating rotation (no text or symbols)natural_image
Illustration of a hand holding a cylindrical object with an arrow indicating motion (no text or symbols)
2 İlk pili çıkarın.
natural_image
Illustration of a hand using a tool to clean or repair a surface, with a checkmark icon nearby (no text or symbols)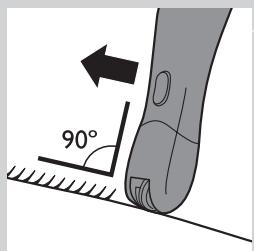
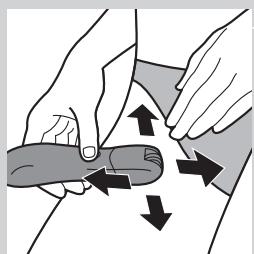
natural_image
Illustration of hands performing a finger massage technique with directional arrows indicating movement (no text or symbols)natural_image
Illustration of a hand holding a small object with directional arrows indicating movement or force (no text or symbols present)natural_image
Illustration of two hands performing a manual tool on a piece of paper, with no visible text or symbolsnatural_image
Illustration of an eyebrow being groomed with a pencil, alongside an eye (no text or symbols)natural_image
Simple line drawing of a knife with an arrow indicating motion (no text or symbols)natural_image
Illustration of an eye with eyeliner application in progress, showing eyebrow and eyelid (no text or symbols)natural_image
Illustration of a tool handle with a circular badge labeled '5' (no text or symbols beyond the number)natural_image
Illustration of a hand holding a cylindrical object with an arrow pointing to a separate mechanical component (no text or symbols)natural_image
Illustration of a mechanical tool interacting with a circular component, showing rotational motion (no text or symbols)natural_image
Illustration of a hand using a comb to brush or brush on a small object (no text or symbols)natural_image
Illustration of a hand pressing down on a textured object with raindrops, no text or symbols presentnatural_image
Diagram of a kitchen appliance with a bowl, grater, and fan (no text or symbols)natural_image
Illustration of a hand using a tool to lift a small object, with no visible text or symbols.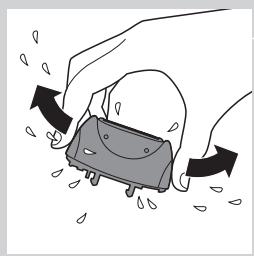
natural_image
Illustration of a hand holding a small object with raindrops, no text or symbols present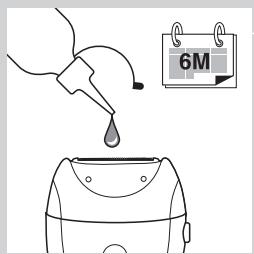
natural_image
Line drawing of a hand using a tool to apply a brush (no text or symbols present)
natural_image
Illustration of a hand using a handheld device to lift water droplets (no text or symbols)natural_image
Symbol of a waste bin with no text or labels, featuring a central container and two crossed arms (no readable text or symbols)natural_image
Symbol of a trash bin crossed out by two crossed lines (no text or numbers present)natural_image
Symbol of a trash bin with no text or numbers presentnatural_image
Symbol of a trash bin crossed out by two diagonal lines (no text or numbers present)natural_image
Illustration of a hand using a hairbrush to clean or brush the product (no text or symbols visible)
natural_image
Illustration of a hand using a handheld device to lift water droplets (no text or symbols)نگهداری
natural_image
Illustration of a hand pressing down on a mechanical component with arrows indicating motion (no text or symbols)
natural_image
Diagram showing a bowl placed above a table with arrows indicating upward motion (no text or symbols)
natural_image
Illustration of a hand using a tool to lift a small object, with no visible text or symbols.
natural_image
Illustration of a hand pressing down on a small mechanical component with raindrops, no text or symbols presentnatural_image
Hand holding a cylindrical object with an arrow pointing to a battery symbol (no text or labels)
natural_image
Diagram showing a mechanical component with an arrow indicating rotation, no text or symbols presentتميز کردن و نگهداری
natural_image
Illustration of a hand using a comb to brush or brush on a small object (no text or symbols)natural_image
Illustration of an eyebrow being groomed with a pencil, and the human eye below (no text or symbols)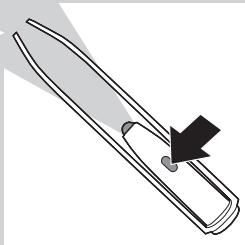
natural_image
Simple line drawing of a knife with an arrow pointing to the blade (no text or symbols)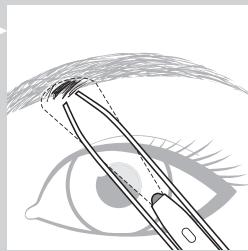
natural_image
Illustration of an eye with eyebrow and eyelid, showing surgical instrument placement (no text or symbols)natural_image
Simple line drawing of a tool with a circular button labeled '5' and a curved arrow, no text or symbols present.natural_image
Illustration of a hand using a tool to clean or repair a surface, with a checkmark icon nearby (no text or symbols)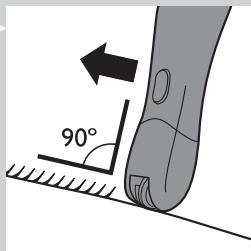
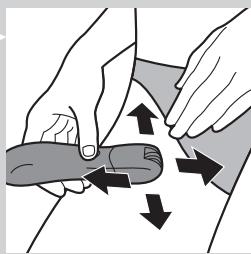
natural_image
Illustration of hands performing a medical or therapeutic procedure on a finger, with arrows indicating direction (no text or symbols present)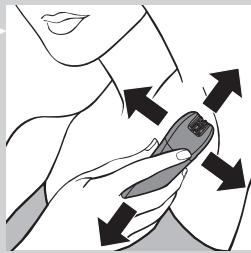
natural_image
Illustration of a hand holding a small object with directional arrows indicating movement or force (no text or symbols present)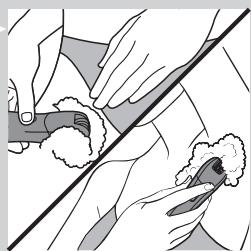
natural_image
Illustration of hands using a tool to cut a piece of material, with no visible text or symbolsnatural_image
Simple line drawing of a curved object with an arrow indicating direction (no text or symbols)جدا کردن باتريها
1 آ Kirbwaheid batriya ra bieron biaorid, dermvcphs batrī ra bazkniid, به مرhl 1 drbcksh
natural_image
Simple line drawing of a hand holding a cylindrical object with an arrow indicating motion (no text or symbols)
natural_image
Diagram showing a device emitting exhaust heat from a body, with no text or symbols present.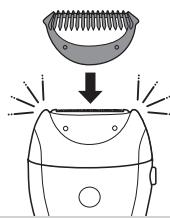
natural_image
Diagram showing a hairdryer with a mesh head and light rays indicating texture (no text or symbols)natural_image
Diagram of a device with a handle and a curved top, showing a downward arrow and radiating lines (no text or symbols)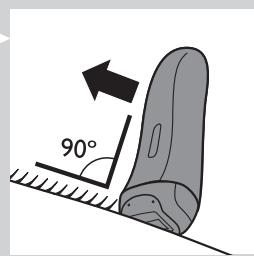
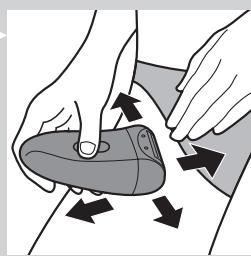
natural_image
Illustration of hands performing a medical or therapeutic procedure on a device with directional arrows indicating movement (no text or symbols present)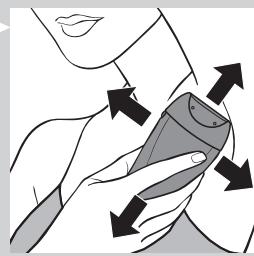
natural_image
Illustration of a person holding a medical device with arrows indicating motion (no text or symbols)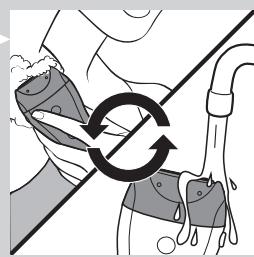
natural_image
Diagram showing a hand holding a bag with a circular arrow indicating cycle (no text or symbols)natural_image
Illustration of a hand holding a handheld device with an arrow indicating motion (no text or symbols)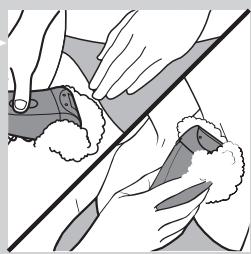
natural_image
Illustration of hands performing a medical procedure on a patient's abdomen (no text or symbols present)
natural_image
Illustration of a hand cleaning a surface with a checkmark icon (no text or symbols present)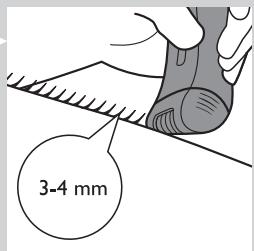
natural_image
Diagram of a fish head with visible tail feathers and an arrow indicating direction (no text or symbols)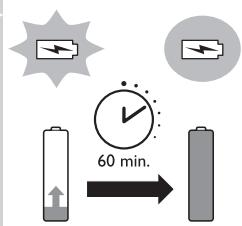
باتری ضعیف یا خالی
natural_image
Diagram of a remote control panel with a battery icon and star marker (no text or symbols)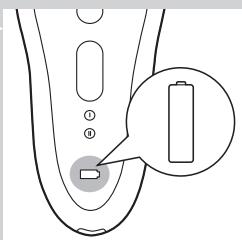
natural_image
Diagram of a remote control device with a battery icon and a button, no text or symbols presentشارزکردن اپیداتور
natural_image
Prohibition sign showing a faucet with a diagonal line and raindrops (no text)natural_image
Symbol of a trash bin crossed out by a diagonal line, representing no waste or elimination (no text or numbers present)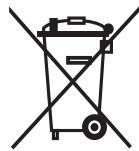
natural_image
Symbol of a trash bin crossed out by two diagonal lines (no text or numbers present)natural_image
Line drawing of a hand using a hairpin to clean or brush the product (no text or symbols)natural_image
Illustration of a hand holding a handheld device with arrows indicating motion or movement (no text or symbols)التخزين
natural_image
Illustration of a hand pressing down on a textured object with arrows indicating motion (no text or symbols)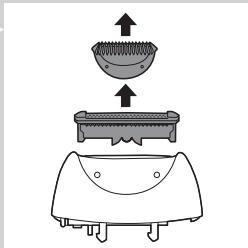
natural_image
Diagram of a kitchen appliance with a bowl, tray, and base (no text or symbols)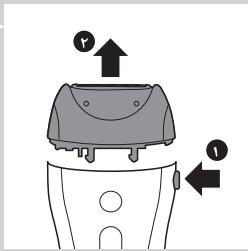
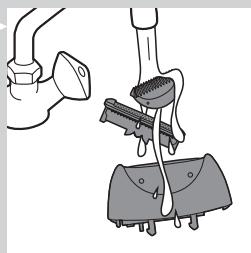
natural_image
Illustration of a hand using a tool to clean or brush the brush (no text or symbols present)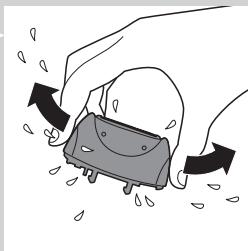
natural_image
Illustration of hands pulling a small mechanical component with arrows indicating motion (no text or symbols)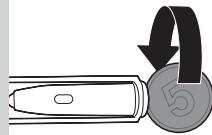
natural_image
Diagram showing a mechanical component with a rotating arrow and a numbered circle (no text or symbols)التنظيف والصيانة
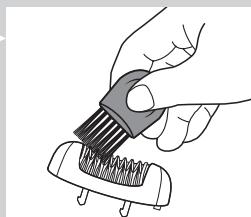
natural_image
Illustration of a hand using a tool to brush or brush onto a mechanical component (no text or symbols visible)natural_image
Illustration of a pencil drawing a curved line with a dashed outline (no text or symbols)
natural_image
Stylized grayscale illustration of a human eye with visible iris, pupil, and eyelashes (no text or symbols)
natural_image
Simple line drawing of a pen or stylus with an arrow pointing to its tip (no text or symbols)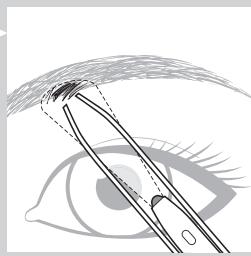
natural_image
Illustration of an eye with surgical instruments and eyelid, no text or symbols present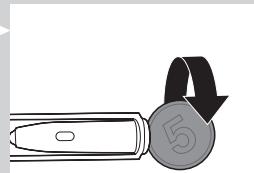
natural_image
Simple line drawing of a tool handle with a circular badge labeled '5' and a curved arrow, no text or symbols present.natural_image
Illustration of a hand holding a tool near a water surface with a checkmark icon (no text or symbols present)
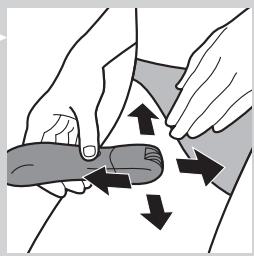
natural_image
Illustration of hands performing a finger massage or grip manipulation technique (no text or symbols)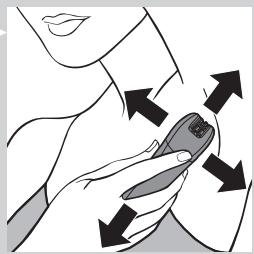
natural_image
Illustration of a hand holding a small object with directional arrows indicating movement or force (no text or symbols)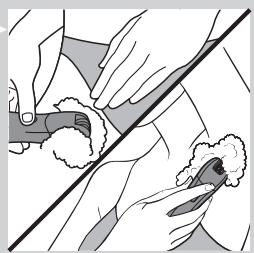
natural_image
Illustration of a hand holding a tool over a small object, with no visible text or symbolsnatural_image
Line drawing of a hand holding a small object with an arrow indicating rotation (no text or symbols)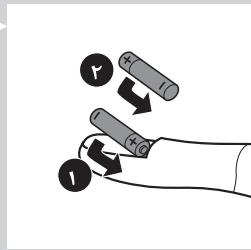
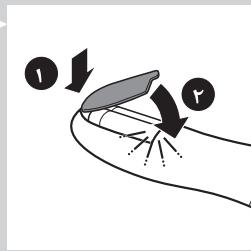
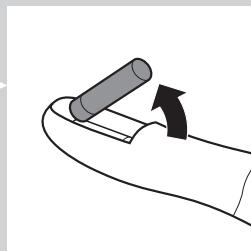
natural_image
Simple line drawing of a curved object with a cylindrical rod and an arrow indicating motion (no text or symbols)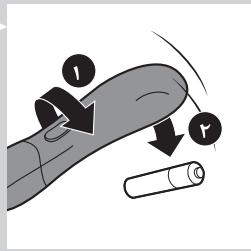
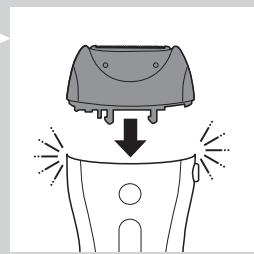
natural_image
Illustration of a device with a handle and a curved top, showing a downward arrow and radiating lines (no text or symbols)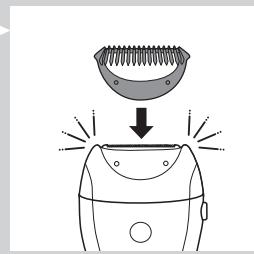
natural_image
Diagram showing a hairdryer with a mesh head and light rays indicating hair damage (no text or symbols)natural_image
Diagram showing a device emitting heat or vibration from its top surface, with no text or symbols present.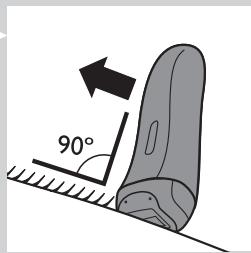
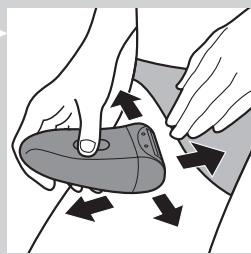
natural_image
Illustration of hands performing a medical or diagnostic procedure on a device, with arrows indicating movement (no text or symbols present)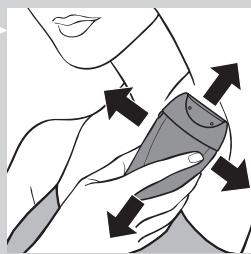
natural_image
Illustration of a person holding a medical device with arrows indicating motion (no text or symbols)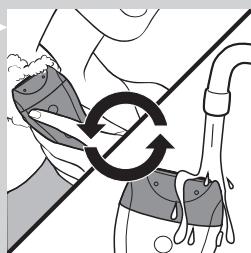
natural_image
Illustration of a hand holding a device with a circular arrow indicating rotation or cycle (no text or symbols)natural_image
Illustration of a hand holding a device with an arrow indicating motion (no text or symbols)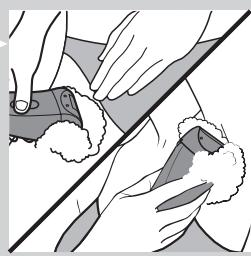
natural_image
Illustration of hands performing a medical procedure on a patient's abdomen (no text or symbols present)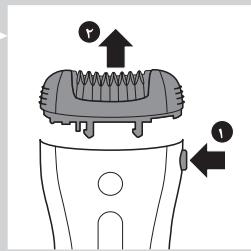
natural_image
Illustration of a hand cleaning a surface with a checkmark icon (no text or symbols present)-

-
[Non-Text]
-
natural_image
Illustration of a fish head with visible fins and tail feathers, no text or symbols present-
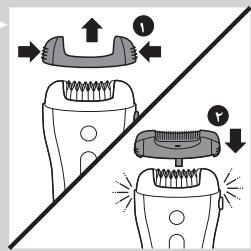
1
1
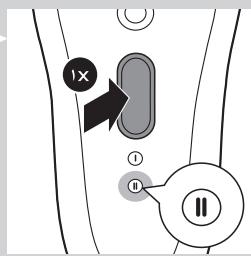
-
