VLF311 - Wall TV mount SANUS SYSTEMS - Free user manual and instructions
Find the device manual for free VLF311 SANUS SYSTEMS in PDF.

| Brand | SANUS SYSTEMS |
| Model | VLF311 |
| Product type | Wall TV mount |
| Maximum load capacity | 54.5 kg (120 lb) |
| Swivel | ±33° |
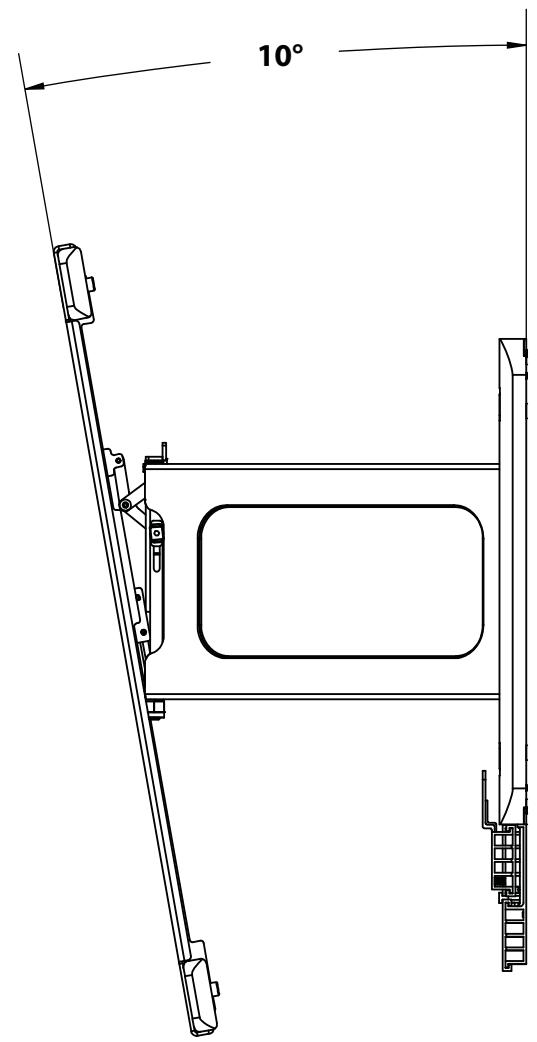
| Tilt | -10° (forward) |
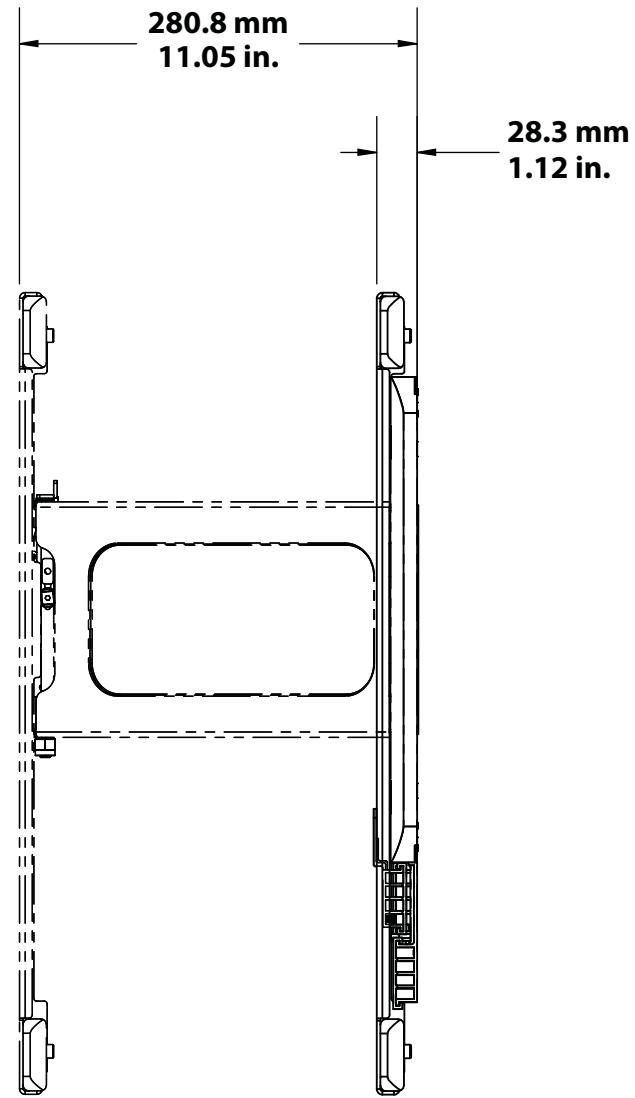
| VESA compatibility | Up to 800 x 400 mm (estimate) |
| Materials | Steel |
| Wall mounting | Wood studs or concrete/concrete blocks |
| Cable management | Integrated with removable covers |
| Installation difficulty level | Intermediate (requires two people) |
| Included tools | Hex keys (1/8 in and 3/16 in) |
| Mount weight | Approximately 8 kg (estimate) |
| Warranty | 5 years (according to manufacturer) |
| Care and cleaning | Wipe with a soft, dry cloth |
| Repairability | Spare parts available upon request |
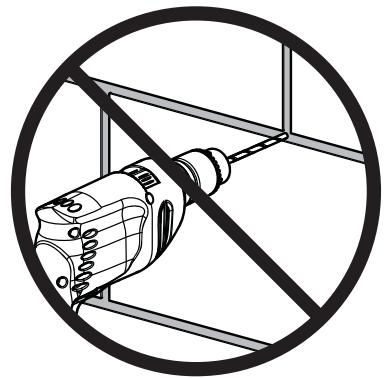
| Safety | Do not use on metal studs; check wall capacity |
Frequently Asked Questions - VLF311 SANUS SYSTEMS
User questions about VLF311 SANUS SYSTEMS
0 question about this device. Answer the ones you know or ask your own.
Ask a new question about this device
Download the instructions for your Wall TV mount in PDF format for free! Find your manual VLF311 - SANUS SYSTEMS and take your electronic device back in hand. On this page are published all the documents necessary for the use of your device. VLF311 by SANUS SYSTEMS.
USER MANUAL VLF311 SANUS SYSTEMS
Europe, Middle East, and Africa: + 31 40 2324700 • europe.sanus@milestone.com
Asia Pacific: 86 755 8996 9226 · sanus.ap@milestone.com
sanus.com
| English Wood stud walls | Concrete/Concrete Block Walls | Choose an Option | Do Not | Alternate View |
| Français Structure de murs en bois | Murs en béton coula ou en blocs de béton | Sélectionnez une option | Interdit | Autre vue |
| Deutsch Holzbalkenwände | Beton-/Betonsteinwände | Wählen Sie eine Option | Tun Sie Folgendes nicht | Alternative Ansicht |
| Espanol Paredes con montantes de madera | Paredes de Hormigón o de bloques de hormigón | Elija una opcción | Prohibido | Vista ampliada |
| Portugues Paredes de pinto de madeira | Paredes de concreto/Paredes de bloco de concreto | Escolha uma opção | Não | Exibação alternada |
| Nederlands Muren met houten balkenconstructie | Muren van beton/betonblokken | Kies een optie | Niet | Alternatieve weergave |
| Italiano Pareti con montanti in legno | Pareti in calcestruzzo/blocchi di calcestruzzo | Scegliere un'opzione | Divieto | Visualizzazione alternativa |
| Étalienuá Toíxoi με ξύlvouς óρθοστάτες | Toíxoi anó ακυρόδεμa/ταίεντόλθους | Επιλέβειτε μα επιλούγή | Mny | Evaλλακτική προβολή |
| Norsk Vegger med trestendere | Betongvegger/vegger av betongblokker | Velg et alternatively | Forbudt | Alternativ visning |
| Dansk Vægge med trædyveler | Beton / betonblokvgægge | Vælg en mulighed | Advarel | Shift visning |
| Svenska Väggar med träreglar | Betong/Betongvägg | Välj ett alternatively | Gör inte | Annan vinkel |
| Руss** Стena c undepebrnékhim kapkaacom | Стени зз bètanha/betонньх бл_OKов | Выберпге вариante | Зарешаетя | Альператиний вд |
| polski Drewniane sciany szkieletowe | Ściany z betonu lub pustaków betonowych | Wybrać opcję | Nie naleź: | Widok z innej strony |
| Česky Zdi s dřevěnými výztuhami | Zdi z betonu/panelu | Vyberte Jednu možnost | Nedélat | Alternativní zobrazení |
| Türkce Ahsap Profill Duvarlar | Beton/Beton Blok Duvarlar | Seçeneklerden Birini Belirleyin | Yapilmaması Gerekler | Diğer Görünüm |
| 日本語 木製sstad壁 | CONKLERA-1/CONKLERA-1 トロロス壁 | 才予予の選挙 | 禁止事項 | 別の角度からの图 |
| 中文 木壻柱墻壁 | 混凝土/混凝土砌块墙 | 选择一个选项 | 请勿 | 不同角度的视图 |
| English Tools required | WARNING: This product contains small items that could be a choking hazard. | CAUTION / WARNING | Repeat Step | Heavy! Assistance Required. |
| Francais Outils nécessaires | Ce produit contient de petites pièces qui peuvent représentier un risque d'étoffement. | ATTENTION/ AVERTISSEMENT! | Répétez l'étape | TRÉS LOURD! Cette étape requiert deux personnes. |
| Deutsch Benöttigte Werkzeuge | Dieses Produkt enthalt kleine Teile, die zum Erstickungstod führen können. | VORSICHT / WARNING | Wiederholen Sie den Schritt | VORSICHT, SCHWER! Bei diesen Schritt werden Sie Hilfe benötigen. |
| Espanol Herramrientas necessities | Este/producto contiene piezas pequeñas que, si fuesen tragadas, podrián producir asficia. | PRECAUCION / IADVERTENCIA! | Repita este paso | iPESADO! Necessitará ayuda para realizar esta operación. |
| Portugues Ferramentas necessities | Este produit contém itenspecquenos que podem offecrer risco de sufocamento. | ATENÇÃO / AVISO! | Repita a etapa | PESADO! Necessitará de ajuda esta etapa. |
| Nederlands Benodigd gereedschap | Dit product bevatkleine onderdelien die stikkingsgevaar kunnen opleveren. | VOORZlichtIG/ WAARSCHUUNG | Herhaal stap | ZWAAR! Voor het uitemoeren van deze stap is assistentie vereist. |
| Italiano Strumenti richiesti | Questo prodotto comprende elementi di piccole dimensioni che potrebbero causare il soffocamento. | PRECAUZIONE/ AVVERTENZA | Ripetere l'operazione | PESANTE! Per esta operazione, si avrà bisogno di aiuto. |
| Εληνυκά Απατούμενα εργαλεία | To προύν αυτό περιλαβάνει μικρά αντικέμενα που μιορείνα αποτέλεσουν κινδύνον πινιμό. | ΠΡΟΣOXH/ ΠΡΟΕΙΔΟΝΙΗΣH | Επανλάβετο βήμα | BAPY! Θα χρειαστείεβοήθεια σ' αυτό το βήμα. |
| Norsk Nødvendig verktøy | Dette produktin ineholder små elementer som kan utgjørke kvelefare. | FORSIKTIG/ADVARSEL | Gjenta trinn | TUNGT! Du vil trenge hjelp til dette operatijen. |
| Dansk Redskaber, der skal bruges | Dette produkt ineholder små delie, som kan forårsage kvælning, hvis de bliver slugt. | FORSIGTIG/ADVARSEL | Gentag trin | TUNGT! Du skal bruge hjælp,ningen du udfrør dette trin. |
| Svenska Verktyg som behövs | Den här Produktten inehäller små delar som kan utgóra kväningsrisik. | FORSIKTIGHT/VARNING | Upprepa steg | TUNGT! DuCOMMBER ATT behöva hjälp under det här stegt. |
| Russkien Heobxodimbyle Инструменты | Виздени捶ь меленье detaioni, которbie могут ссть пчунов удишения初次юпадань в дыхатelledы пту. | ПЕДУПЕХДECHUE/ ПЕДУПЕХДECHUE | Повtorpit déйст因为他们 | БOLЛБЮОВ BECIПри велиносяни данный оерацима поандовсяnomоць. |
| polski Wymagane naręźdia | Produkt zawiera male elementy, kto're moga grozić zakrzuszeniem. | UWAGA / OSTRZEŽENIE | Powtórzych krok | CIEŽKIE! W tej czynnosci potrzebna bjedzie pomoc drugiej osoby. |
| Cesky Požadované nástroje | Tento vyrobek obsahuje malé součástký, které hrozi rizikem zadušeni. | POZOR / VAROVÁNI | Opakovat krok | ТěŽKÉ! Ktomuto krokubudete potřebovat pomocnika. |
| Türkce Gereken Aletler | Bu ürün, boğulma tehlikesine neden olabilecekkıçık parçalar icermektedir. | DİKKAT / UYARI | Adimi Tekrarlayin | AÜR MALZEMEI Bu aşamada yardima İntiayiniz vardir. |
| 日本語 必要なすル | 本製品のはは小さい部品が付属ており、窒息の危険性のはんだ。 | 注意/警告 | 手順の繰り返し | 重量のは! 这的操作は2人で行てくださいます。 |
| 中文 需要的工具 | 此产品包含可能带来窒息危险的小组件。 | 小心/警告 | 重复步骤 | 重物! 移动时需要协助。 |
| English | This End Up |
| Troubleshooting and Maintenance | |
| Français | Ce côte vers le haut |
| Dépannage et maintenance | |
| Deutsch | Dieses Ende nach oben |
| Fehlerbehebung und Wartung | |
| Espanol | Este extremo hacía arriba |
| Resolución de problemas y mantenimiento | |
| Portugués | Esta extremidad para cima |
| Solução de problemas e manutenção | |
| Nederlands | Deze zijde boven |
| Probleemoplossing en onderhoud | |
| Italiano | Alto |
| Risoluzione dei problemi e manutenzione | |
| Еλλυκία | Με autó to ἀκρο προς τα επάνω |
| Аντιμετώπηροβλημάτων και Συντήρηση | |
| Norsk | Denne siden opp |
| Feilsøking og vedlighold | |
| Dansk | Denneende skal være opad |
| Fejlfinding og Vedligeholdelse | |
| Svenska | Denna sida upp |
| Felsökning och unterhalb | |
| Руss�kin | Этим концем в两年前 |
| Устанения несяправностей и обочи вanimate | |
| polski | Tym końcem do góry |
| Roswiązywanie problemów i konserwacja | |
| Česky | Tímto koncem vzhūru |
| Štejské | Bu Uç Yukari |
| Sorun Giderme ve Bakim | |
| 日本語 | 这个词を上にいたします |
| トラ布鲁ドローデイングとメntonス | |
| 中文 | 此端向上 |
| 故障排除与维护 |
English
IMPORTANT SAFETY INSTRUCTIONS - SAVE THESE INSTRUCTIONS - PLEASE READ ENTIRE MANUAL BEFORE USING THIS PRODUCT
For best results, reference both the text and illustrations when using this manual. Cut along the dashed lines to match your language with the illustrations.
English Text Pages 6
Français
INFORMATIONS IMPORTANTES CONCERNANT LA SECURITE - CONSERVEZ CES INSTRUCTIONS - VEUILLEZ LIRE ATTENTIVEMENT LE MANUEL AVANT D'UTILISER CE PRODUIT
IMPORTANT SAFETY INSTRUCTIONS – SAVE THESE INSTRUCTIONS – PLEASE READ ENTIRE MANUAL BEFORE USING THIS PRODUCT
Specifications
Weight capacity: 54.4kg (120 lbs) includes TV, mount, and any accessories
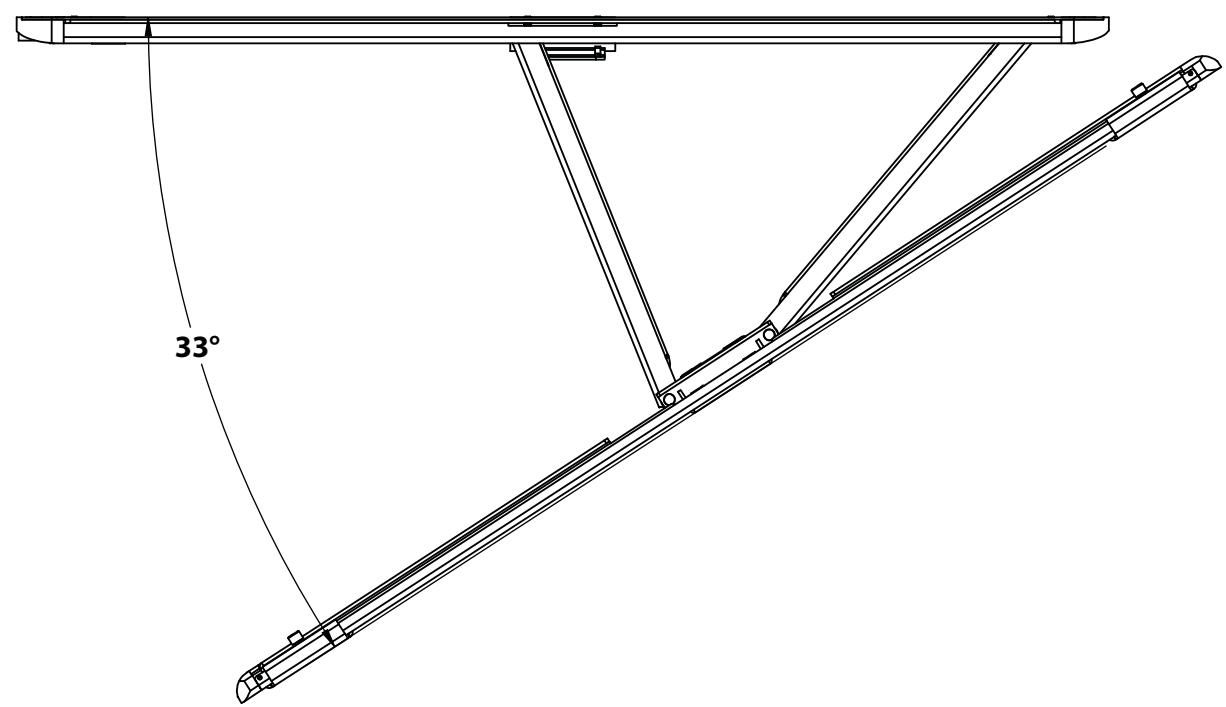
Swivel: ± 33^
Tilt: -10^
CAUTION: Avoid potential personal injuries and property damage!
Do not use this product for any purpose not explicitly specified by manufacturer.
The wall must be capable of supporting five times the weight of the monitor and mount combined.
This product is not designed for use in metal stud walls!
If you do not understand these instructions, or have doubts about the safety of the installation, assembly or use of this product, contact manufacturer Customer Service or call a qualified contractor.
Manufacturer is not responsible for damage or injury caused by incorrect assembly or use.
Supplied Parts and Hardware.
Before starting assembly, verify all parts are included and undamaged. If any parts are missing or damaged, do not return the damaged item to your dealer; contact Customer Service. Never use damaged parts!
NOTE: Not all hardware included will be used.


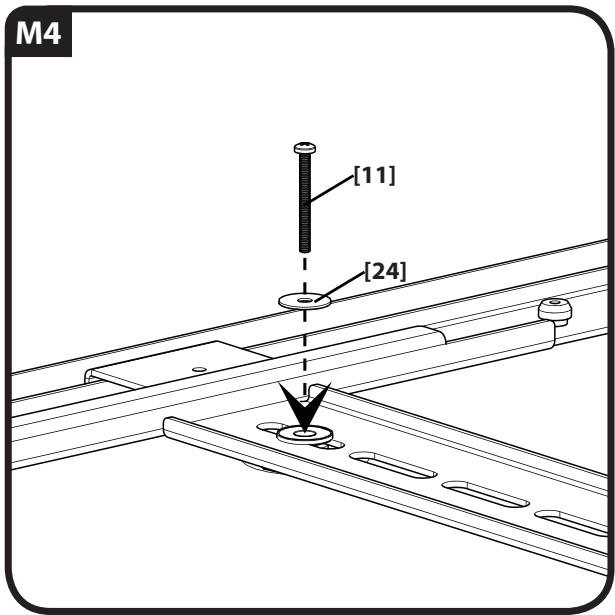
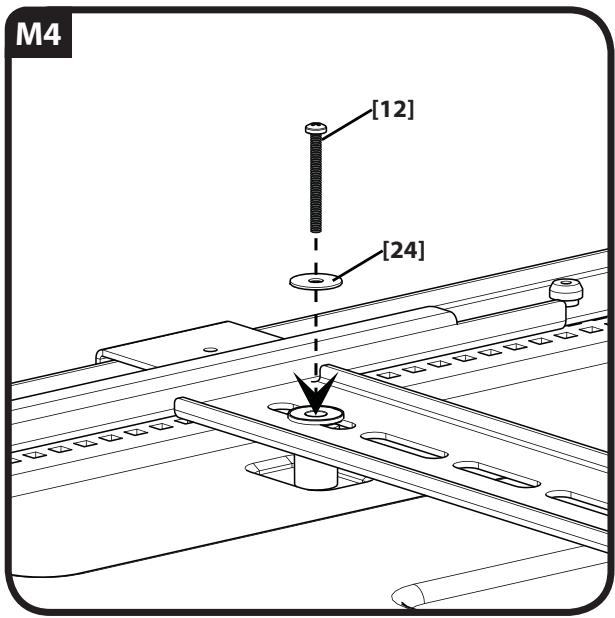
M4×12mm
[10] x 4
M4×30mm
[11] x 4

M4×40mm
[12] x 4
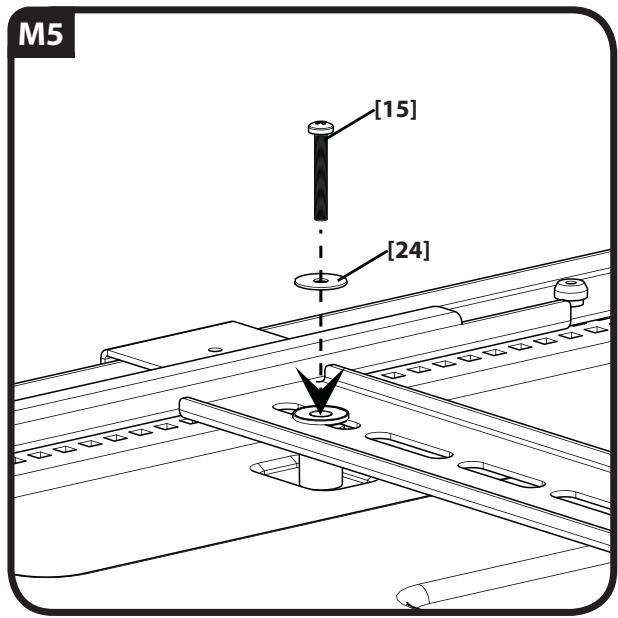
M5×12mm
[13] x 4
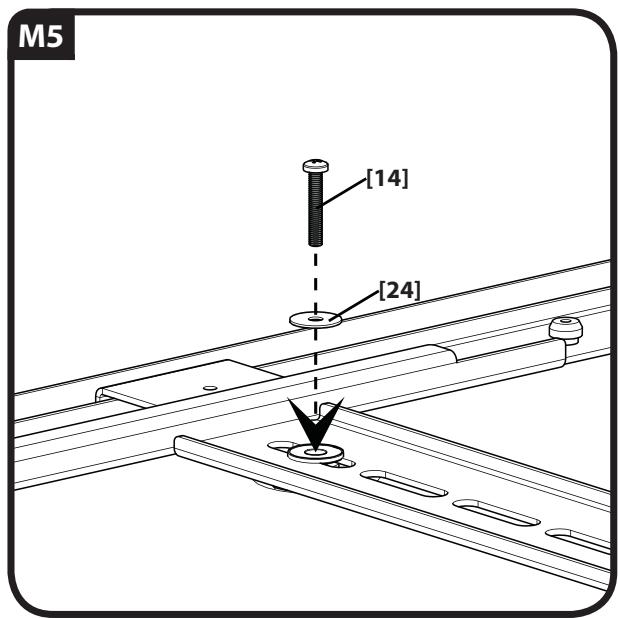
M5×30mm
[14] x 4
M5 x 40mm
[15] x 4
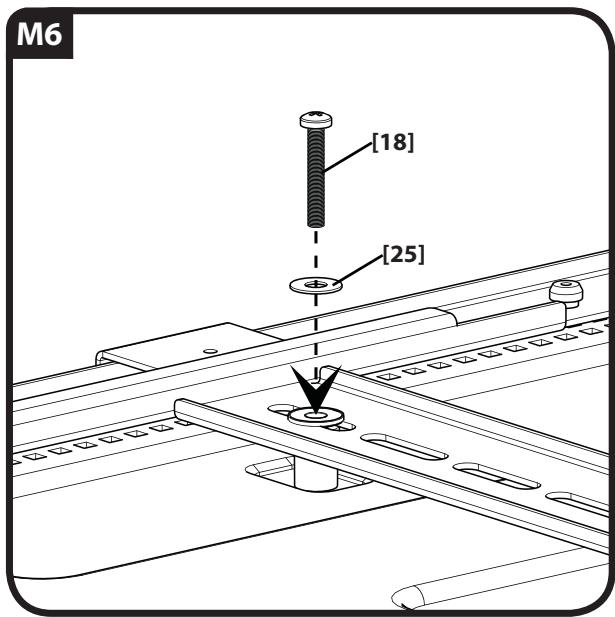
M6 x 14mm
[16] x 4
M6 x 25mm
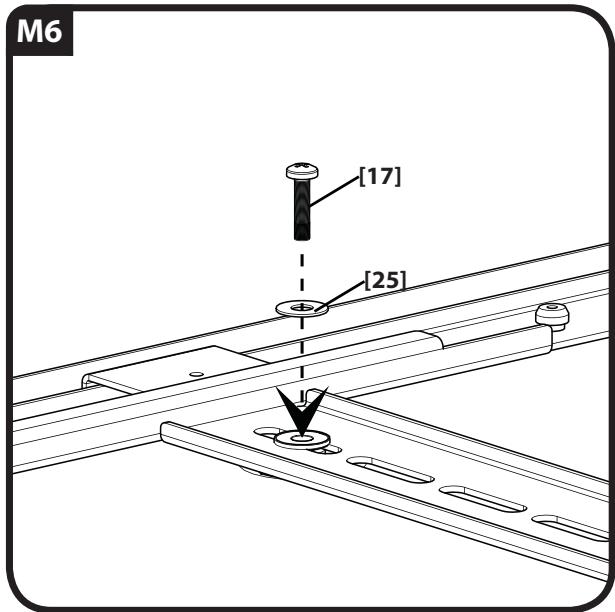
[17] x 4
M6 x 40mm
[18] x 4
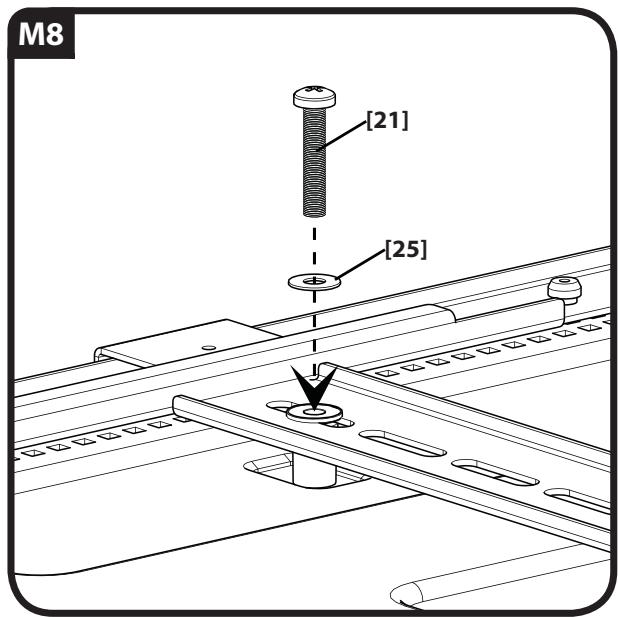
M8 x 16mm
[19] x 4
M8 x 25mm
[20] x 4
M8 x 45mm
[21] x 4
14mm
[22] x 4
24mm
[23] x 4
M4/M5
[24] x 4
M6/M8
[25] x 4

[26] x 4

[30] x 2
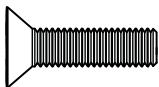
[31] x 8
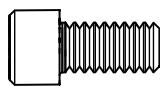
[32] x 6
[33] x 1
[34] x 4
[35] x 4
[36] x 4
CAUTION:
Install brackets to TVs with irregular or obstructed backs
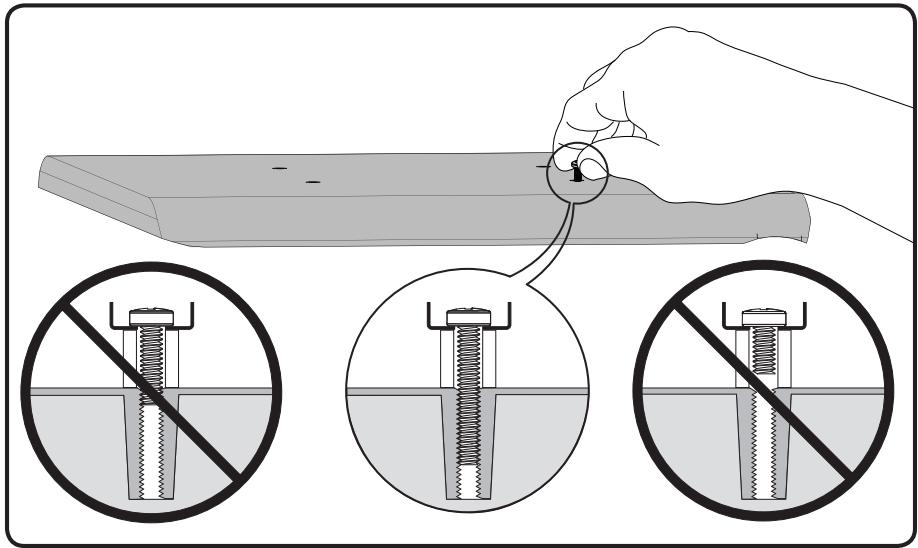
Before you begin, hand thread screws into the threaded inserts on the back of your TV to determine the correct screw diameter (M4, M5, M6, or M8). Verify that there are adequate threads to secure the brackets to the monitor. If you encounter resistance, stop immediately and contact customer service.
CAUTION: Avoid potential personal injuries and property damage! Use the shortest screw and spacer combination to accommodate your needs. Using hardware that is too long may damage your monitor's internal components.
Assembling TV Brackets for TV's with irregular or obstructed backs
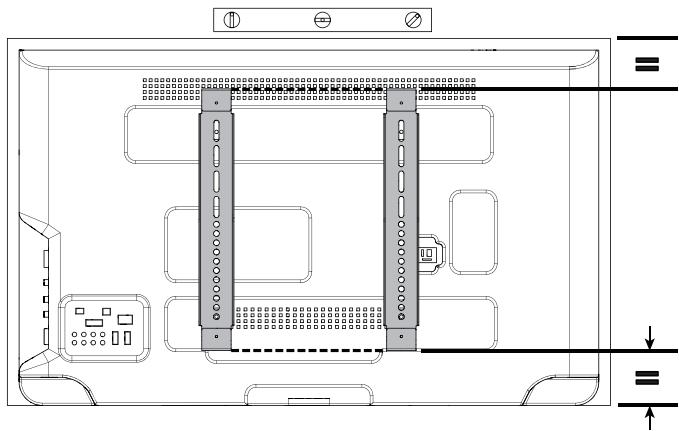
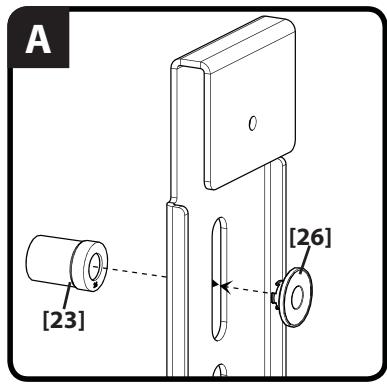
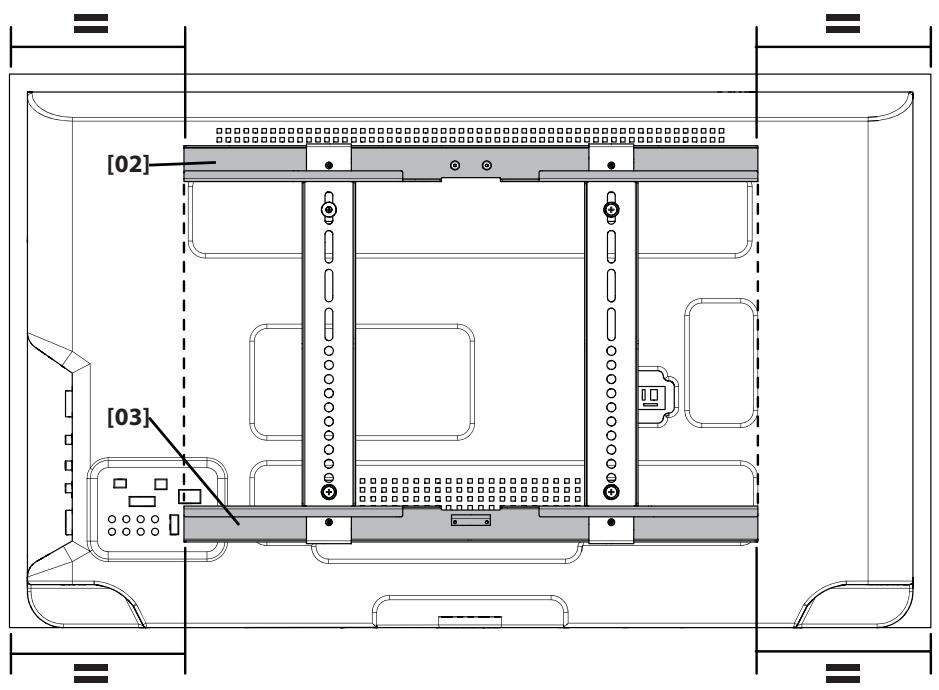
A. Place vertical brackets [06] over the TV to determine which holes and slots will be used. Make sure vertical brackets [06] will be equally spaced top to bottom on the TV and that they will be level.
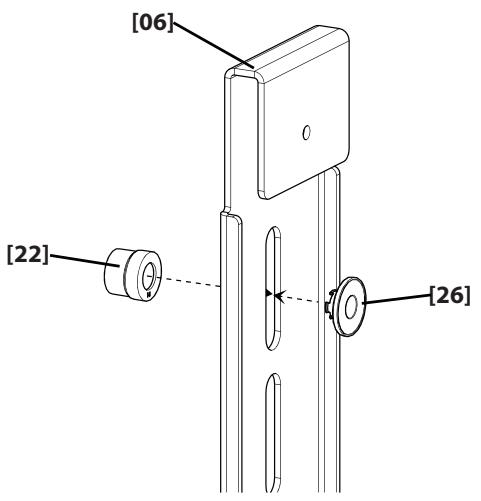
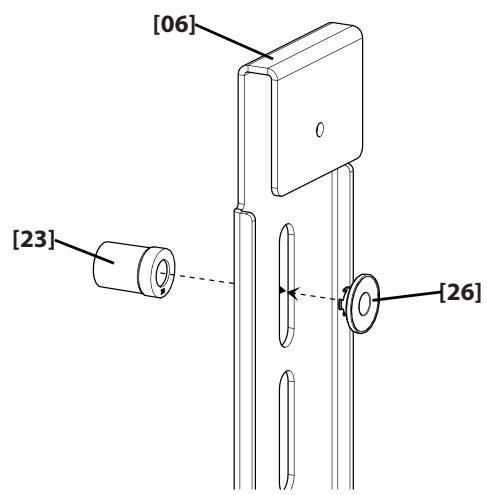
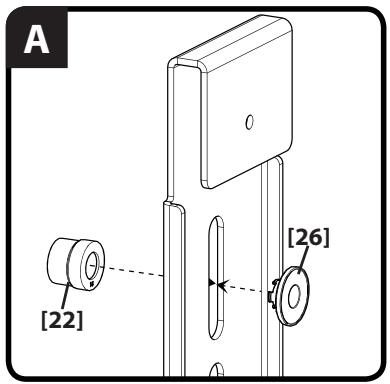
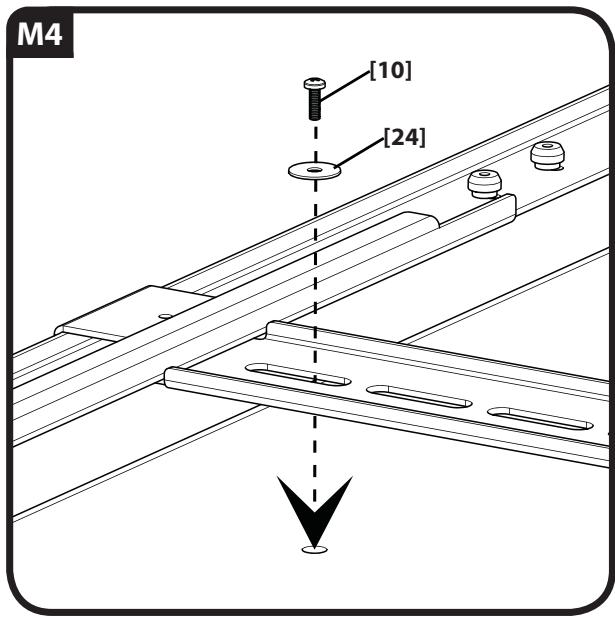
B. If you require spacers, determine if you will need the short [22] or the long spacers [23]. Fit the shoulder washer [26] into the slots and holes of the front side of the vertical brackets [06] and snap the appropriate length spacer onto the shoulder washer [26] from the back (TV) side.
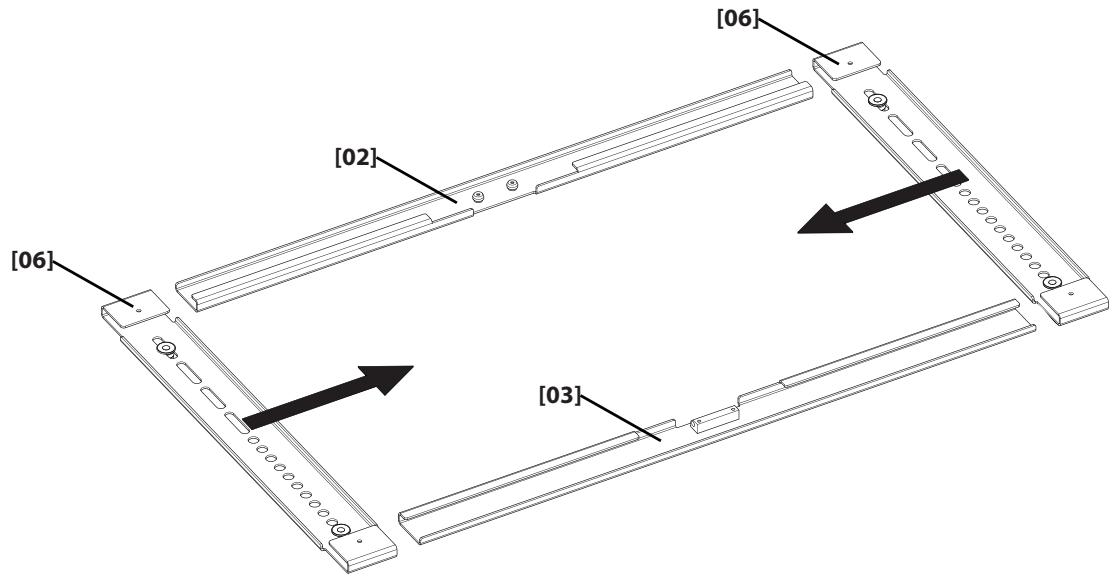
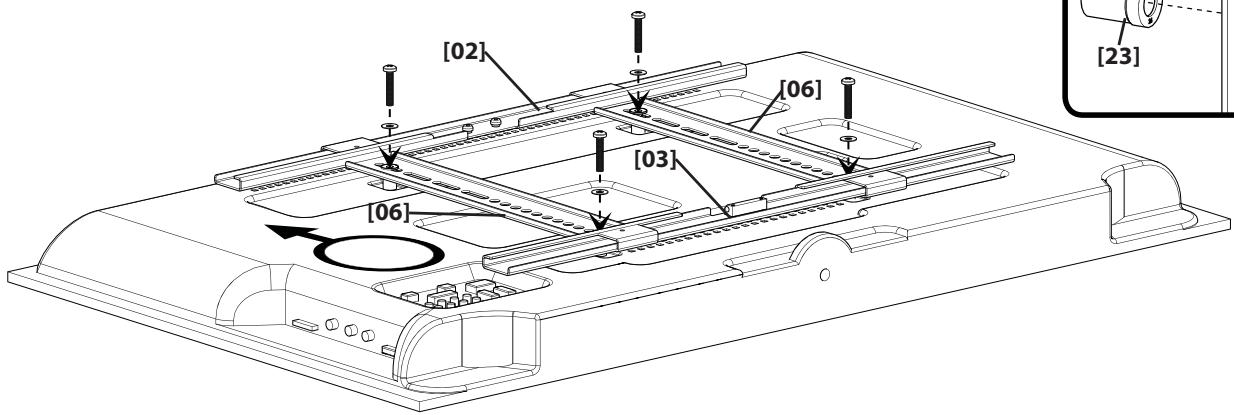
C. Slide the vertical brackets [06] onto the horizontal brackets [02] and [03].
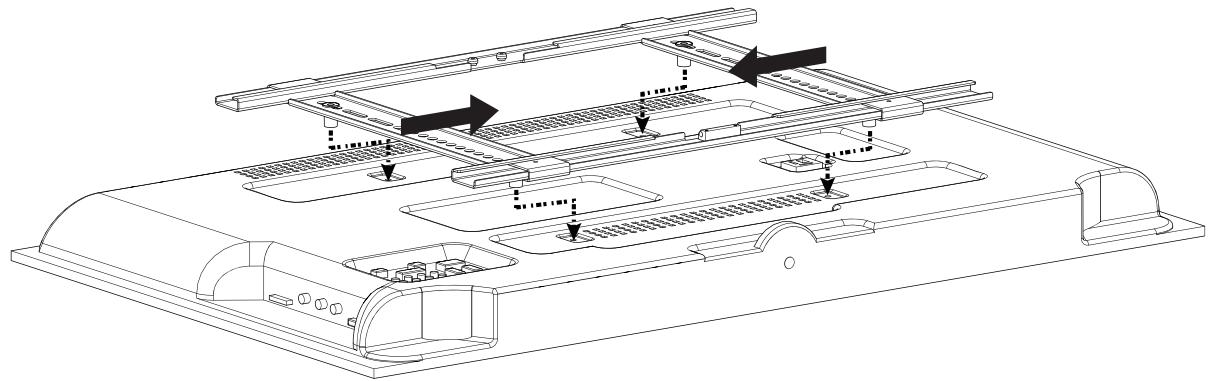
D. Position the assembly over the TV and slide the vertical brackets [06] left or right until they are over the mounting holes in the back of the TV.
For TVs with an irregular/obstructed back. Ensure that the bracket is level on the back of the TV. Standard configurations are shown. For special applications, or if you are uncertain about your hardware selection, contact Customer Service.

1-1

For TVs with an irregular/obstructed back. Ensure that the bracket is level on the back of the TV. Standard configurations are shown. For special applications, or if you are uncertain about your hardware selection, contact Customer Service.

1-2
CAUTION:
Install TV Bracket for TV's with flat backs
Before you begin, hand thread screws into the threaded inserts on the back of your TV to determine the correct screw diameter (M4, M5, M6, or M8). Verify that there are adequate threads to secure the brackets to the monitor. If you encounter resistance, stop immediately and contact customer service.
CAUTION: Avoid potential personal injuries and property damage! Use the shortest screw and spacer combination to accommodate your needs. Using hardware that is too long may damage your monitor's internal components.

Assembling TV Brackets for TV's with flat backs
A. Slide the vertical brackets [06] onto the horizontal brackets [02] and [03].
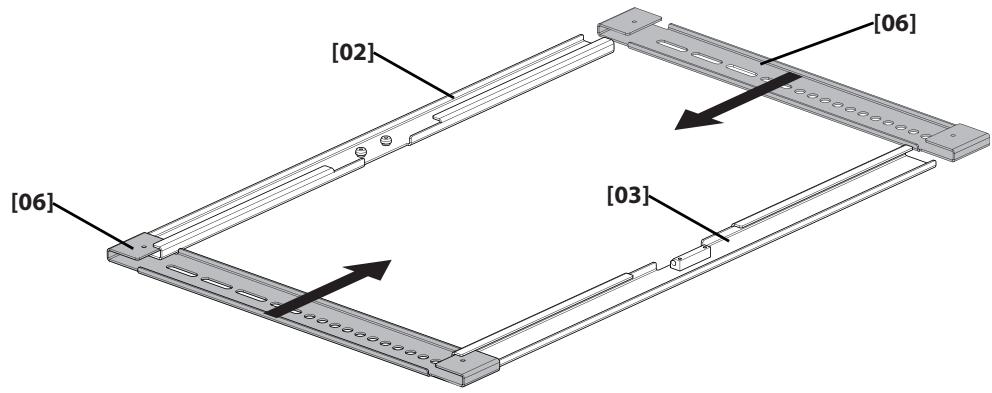
B. Position the assembly over the TV and slide the vertical brackets left or right until they are over the mounting holes in the back of the TV. Make sure vertical brackets [06] will be equally spaced top to bottom on the TV and that the assembly will be level.

2-1
For TVs with a flat back. Ensure that the bracket is level on the back of the TV. Standard configurations are shown. If you need extra space to accommodate cables, recesses, or protrusions, see an installation option (1-1 or 1-2) that uses spacers. For special applications, or if you are uncertain about your hardware selection, contact Customer Service.

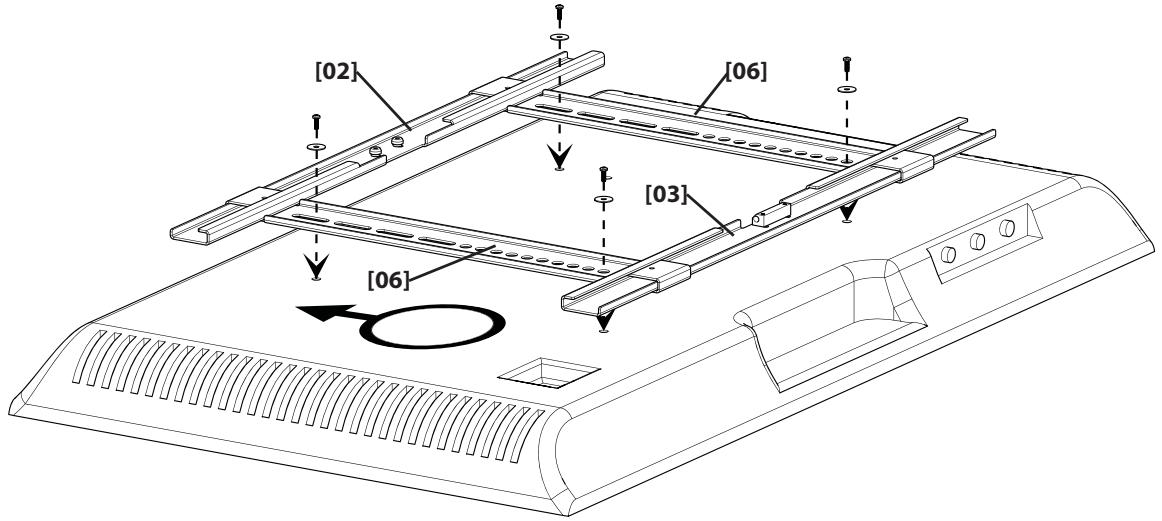
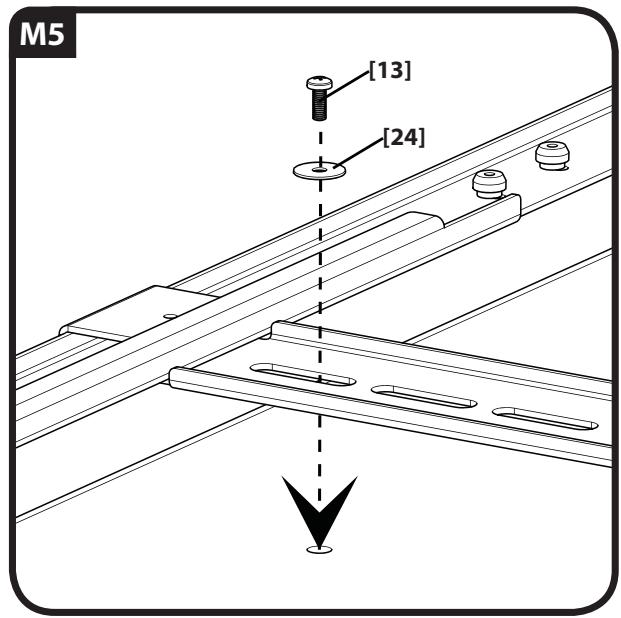
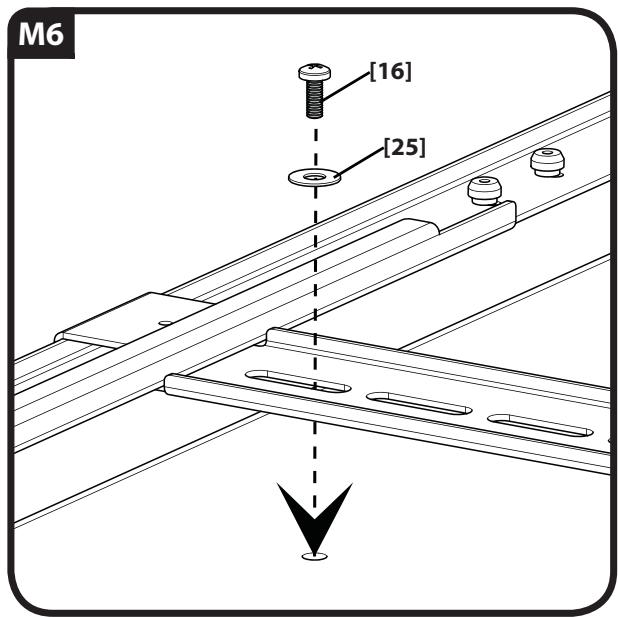

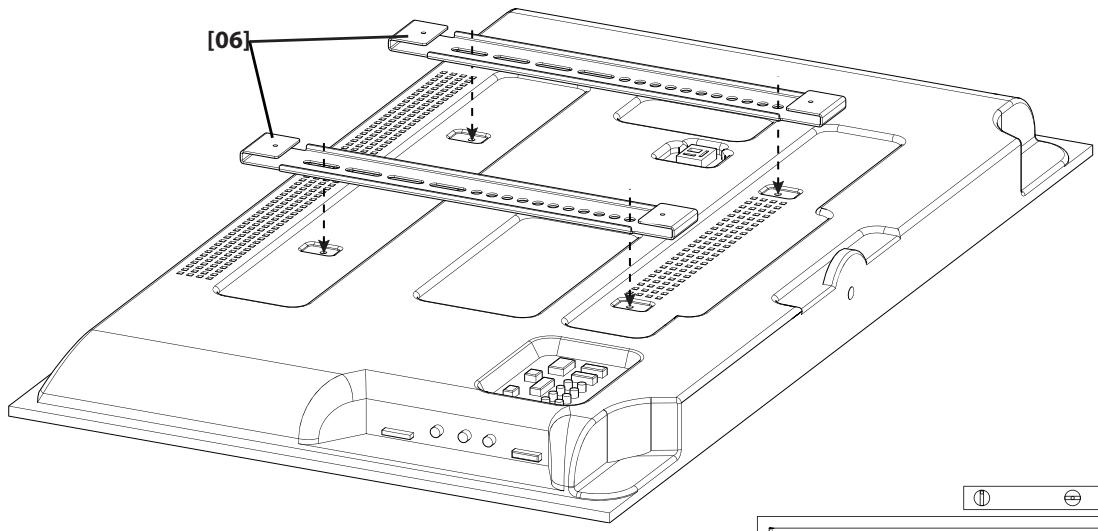
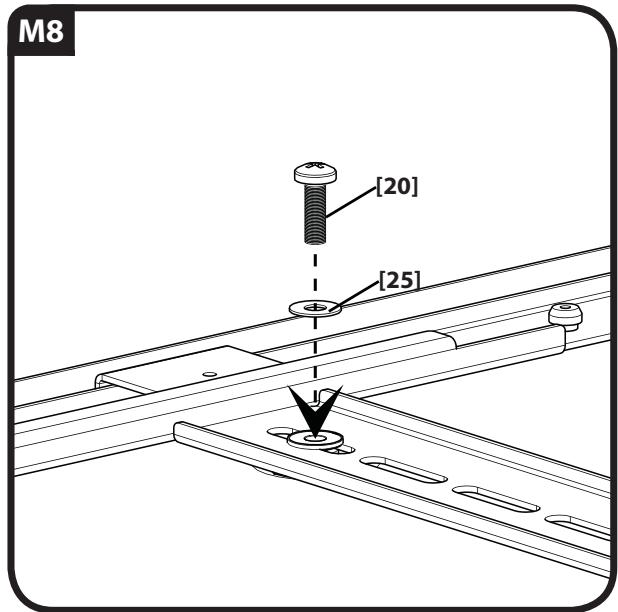
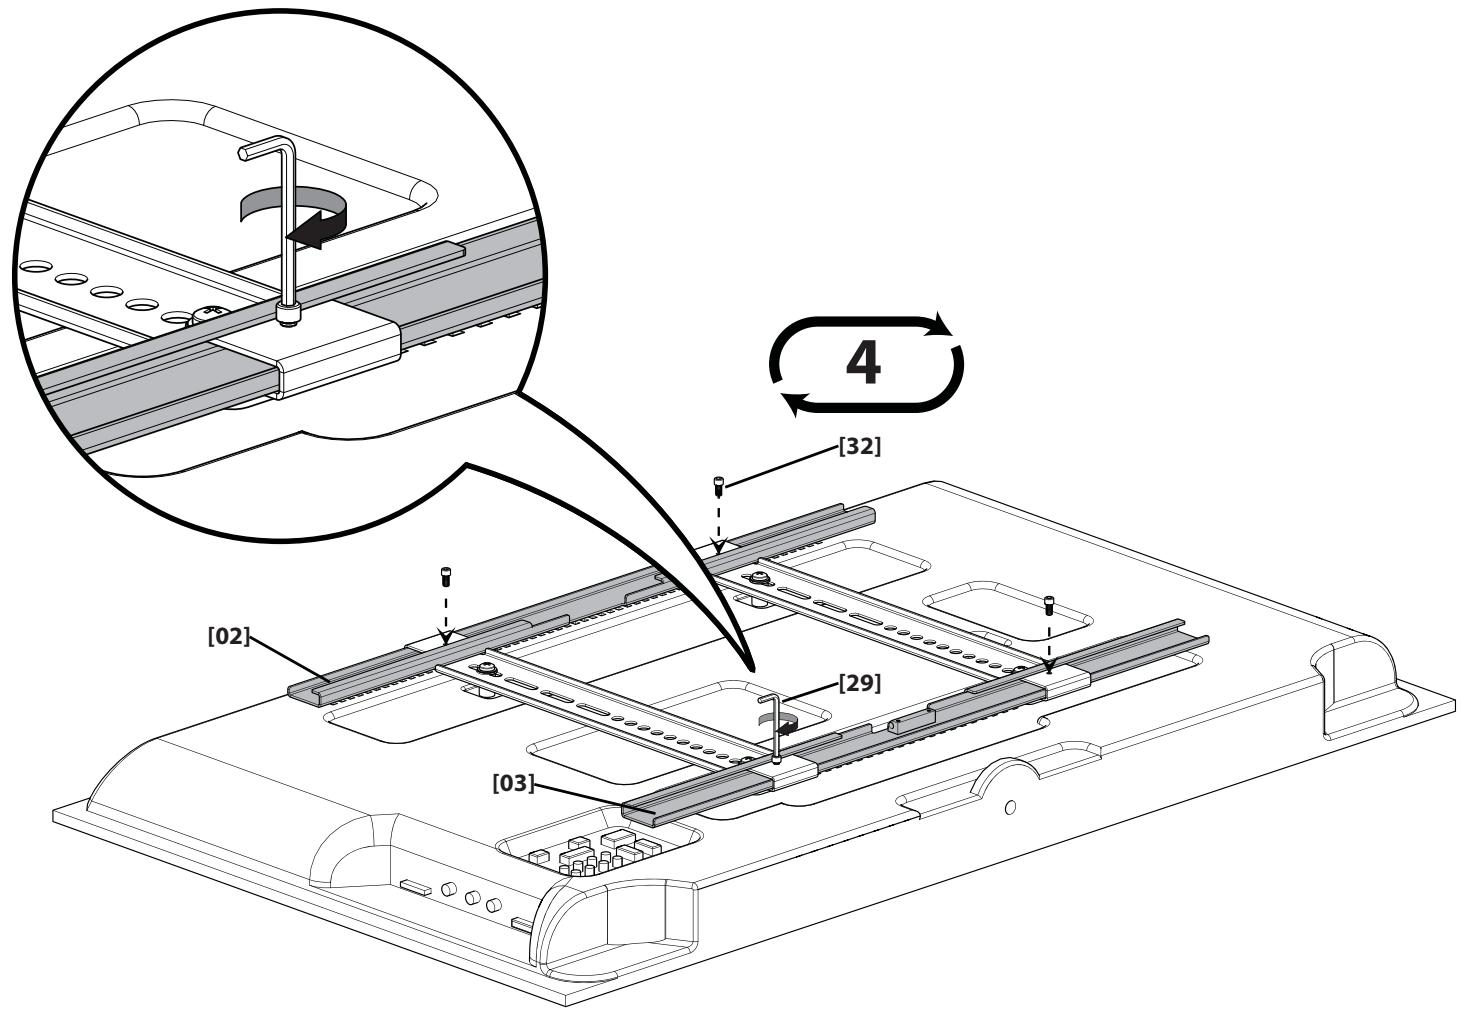
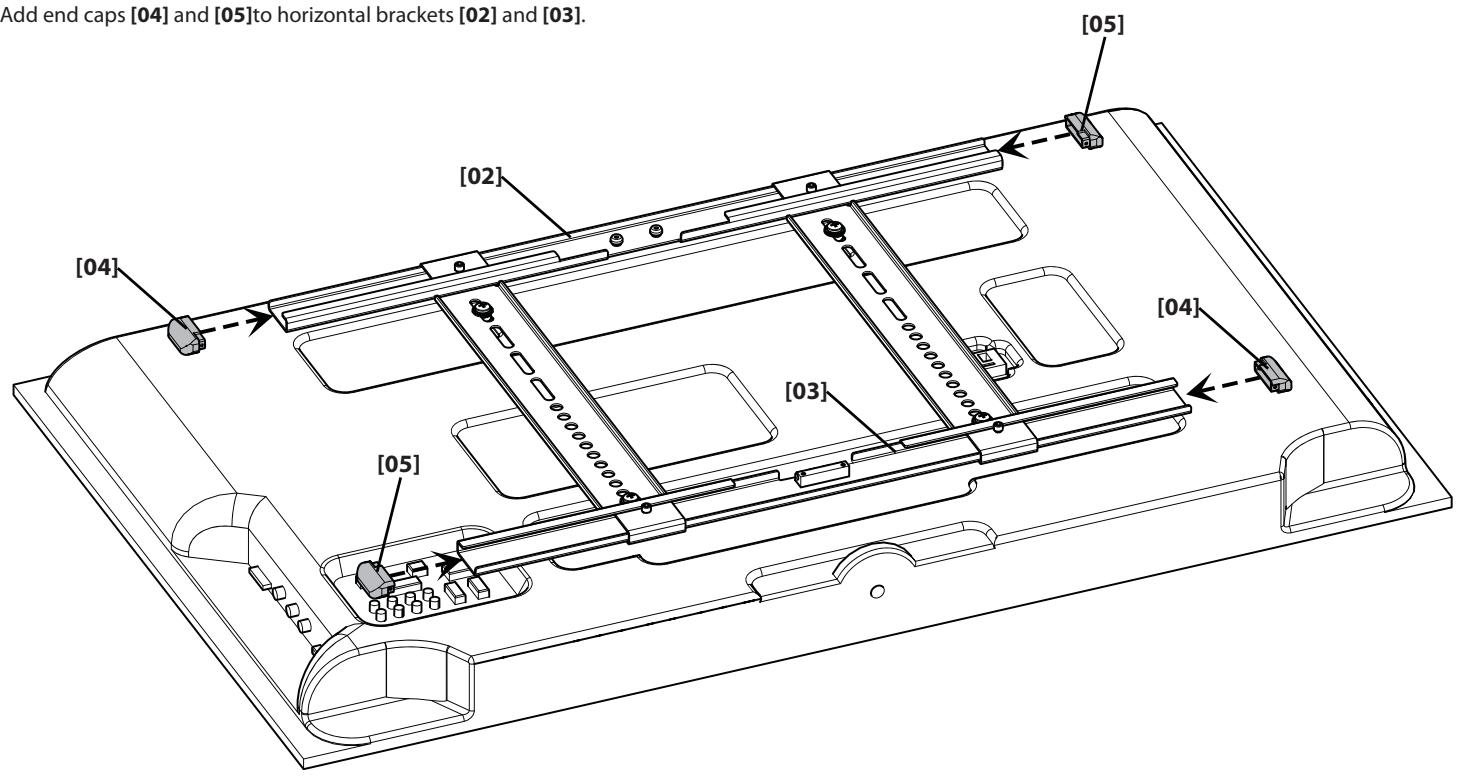
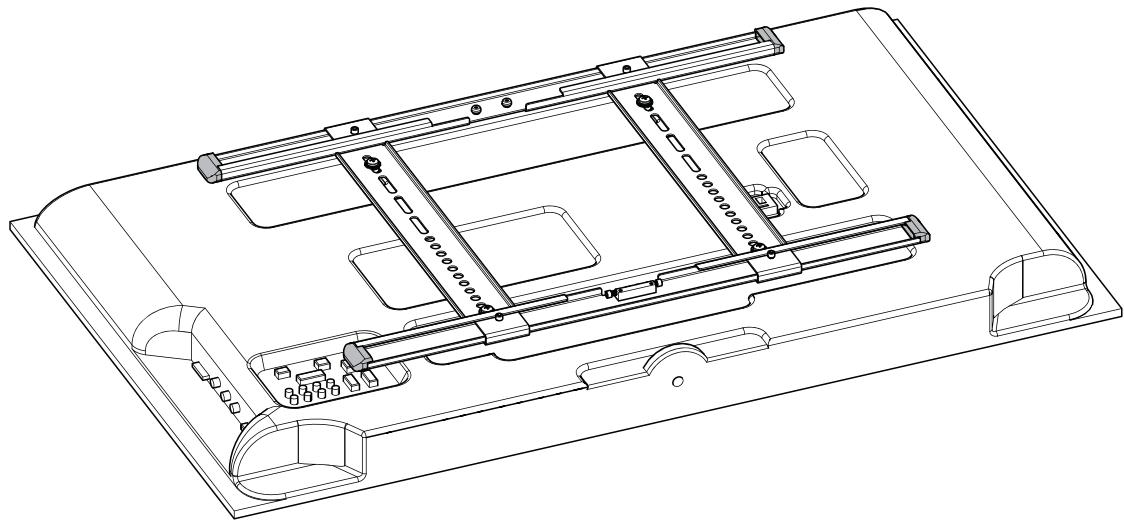
Center the horizontal brackets [02] and [03].
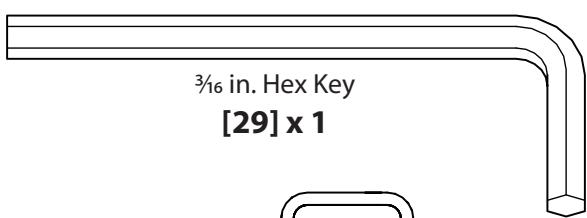
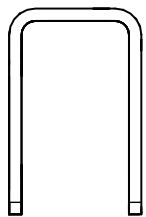
Lock the horizontal brackets [02] and [03] in place with 4 screws [32] using the 316 " hex key [29].
Add end caps [04] and [05] to horizontal brackets [02] and [03].

CAUTION:
Wall Mounting
For assistance in determining wall plate location, see Height Finder at sanus.com.
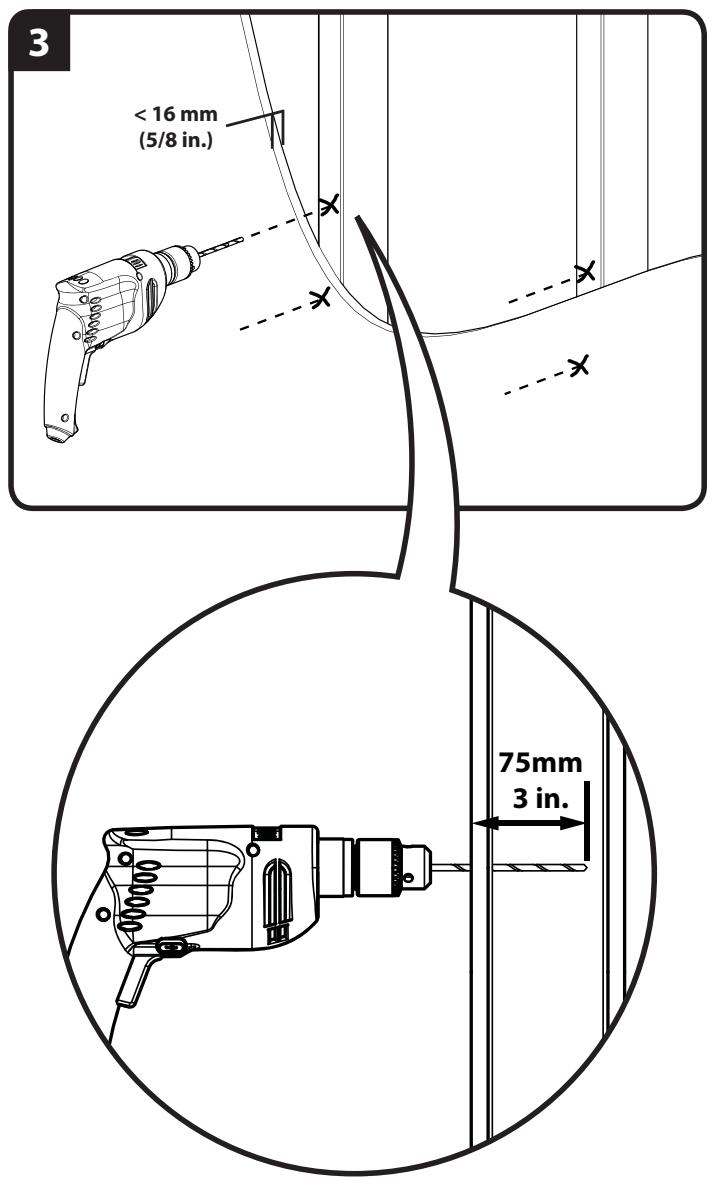
5-1: Wood Stud Mounting
CAUTION: Improper use could reduce the holding power of the lag bolt. To avoid potential injuries or property damage:
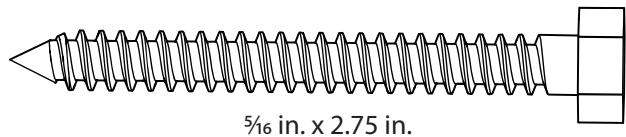
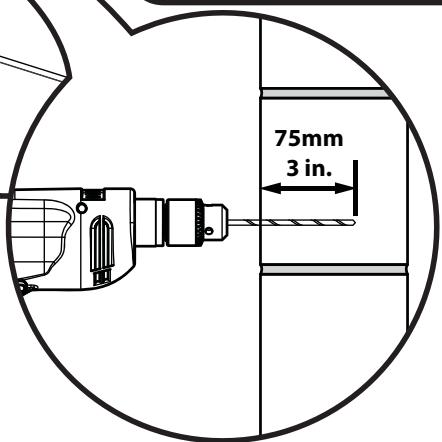
Pilot holes MUST be drilled to a depth of 75mm (3 in.), using a 5.5mm (7/32 in.) diameter drill bit.
Do not over-tighten the lag bolts [36].
Any material covering the wall must not exceed 16mm (5/8 in.).
5-2: Solid Concrete and Concrete Block Mounting
CAUTION: Improper use could reduce the holding power of the lag bolt. To avoid potential injuries or property damage:
Pilot holes MUST be drilled to a depth of 75mm (3 in.), using a 10mm (3/8 in.) diameter drill bit.
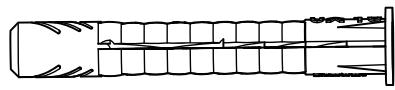
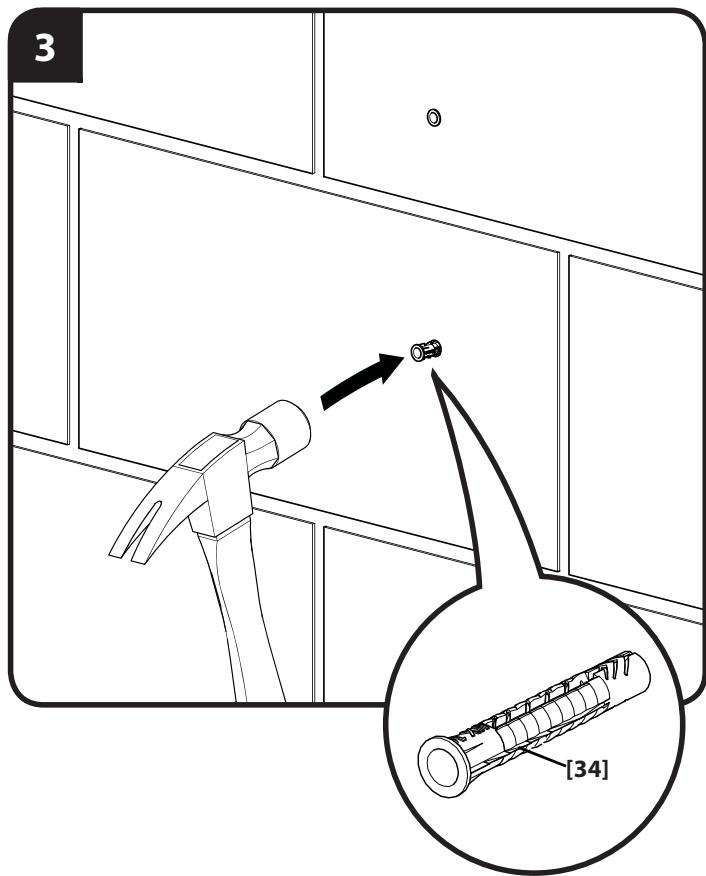
- Be sure the anchors [34] seat flush with the concrete surface.
Mount wall plate directly onto the concrete surface.
Never drill into the mortar between blocks.
Do not over-tighten the lag bolts [36].
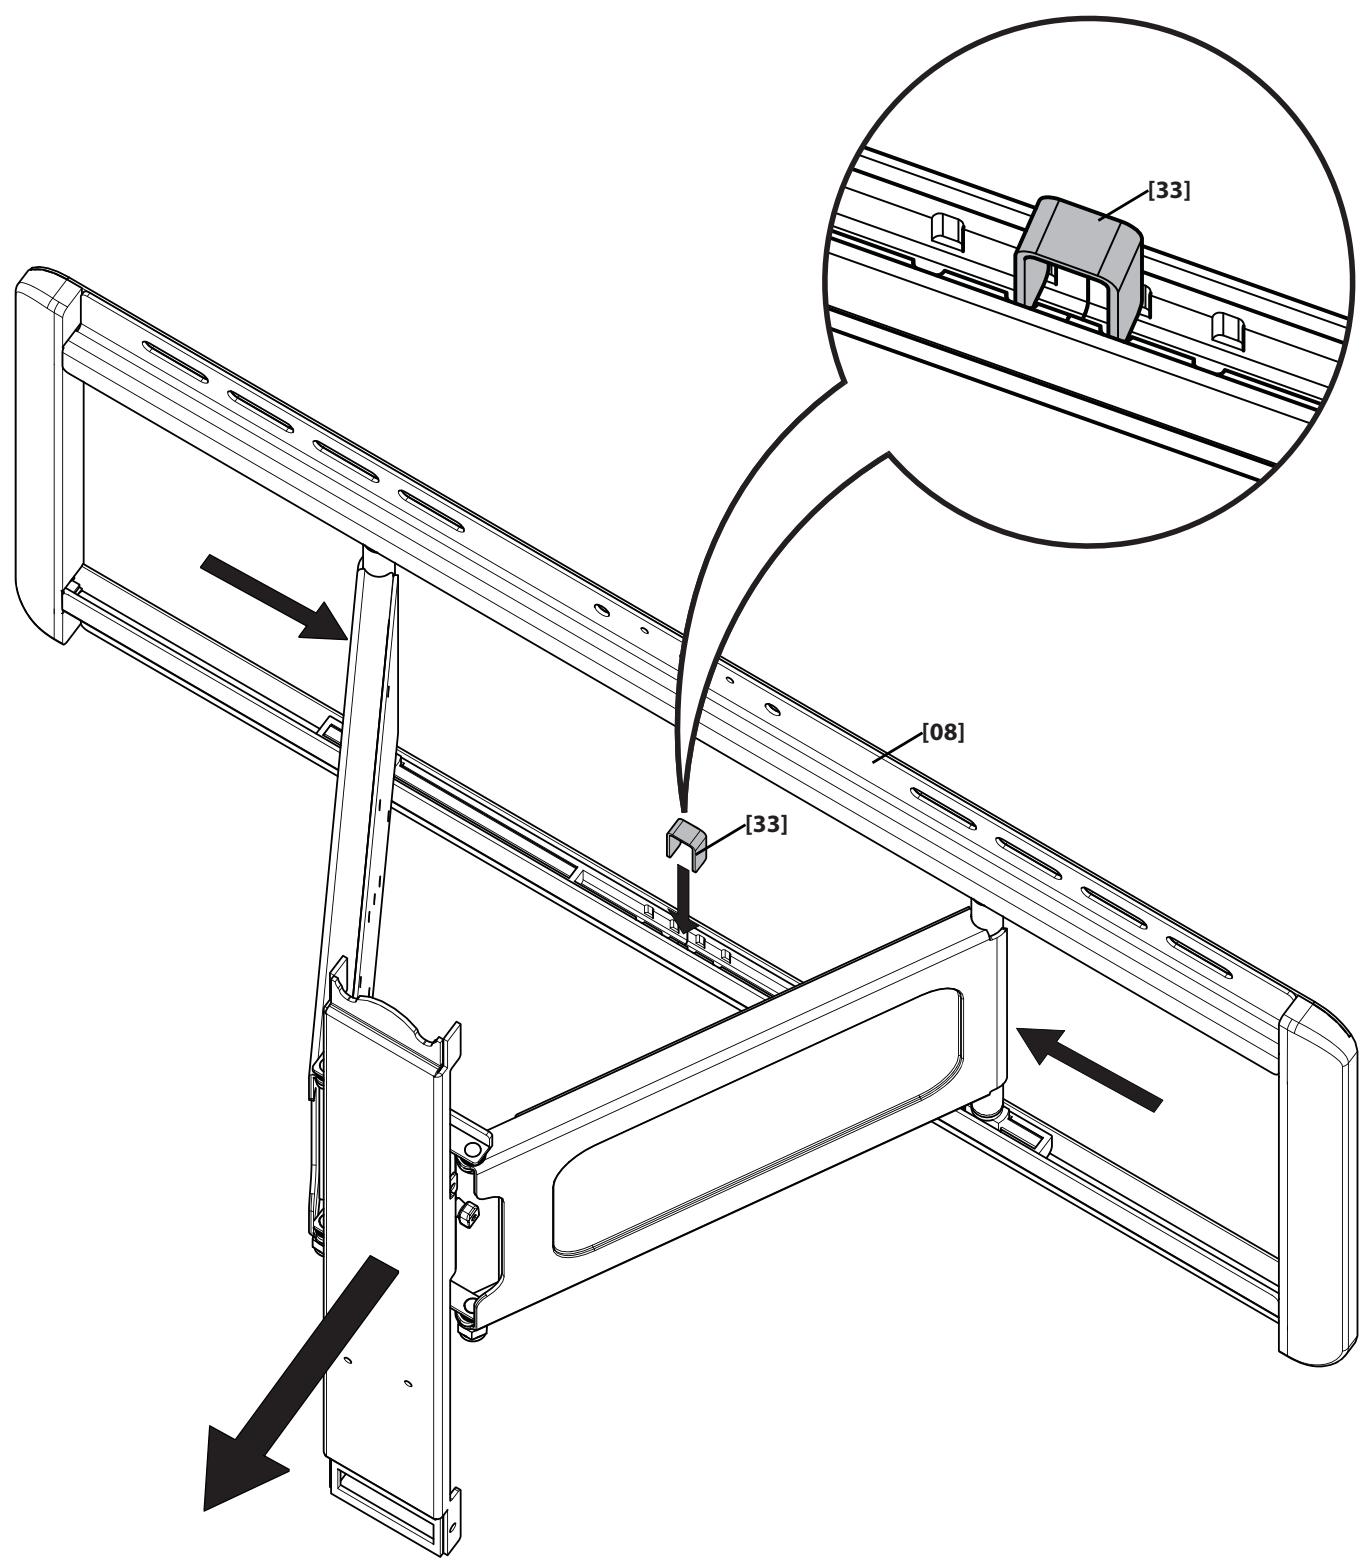
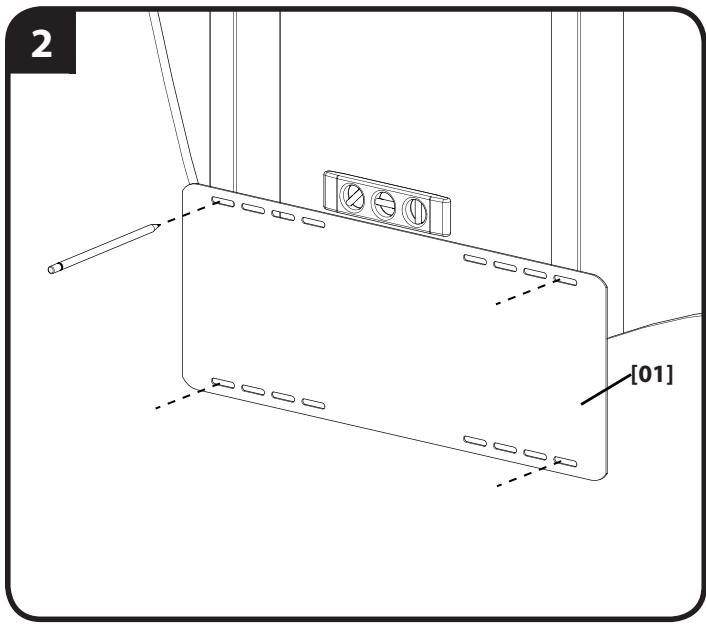
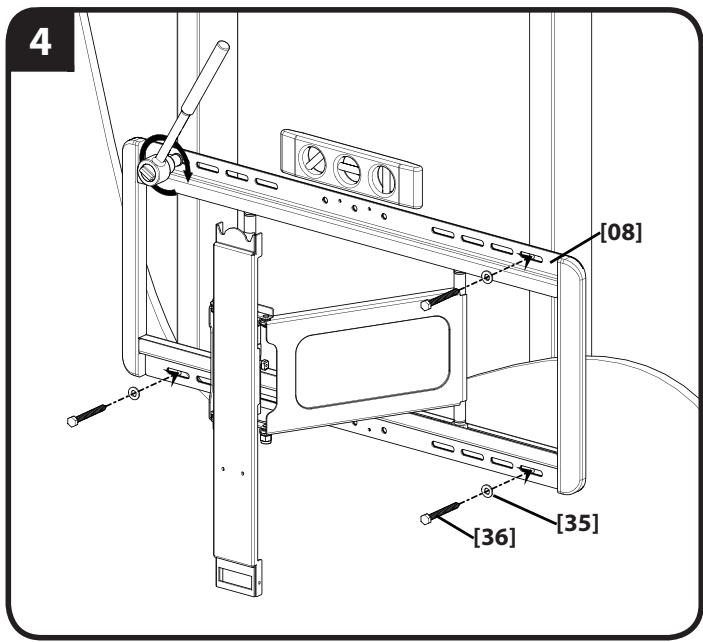
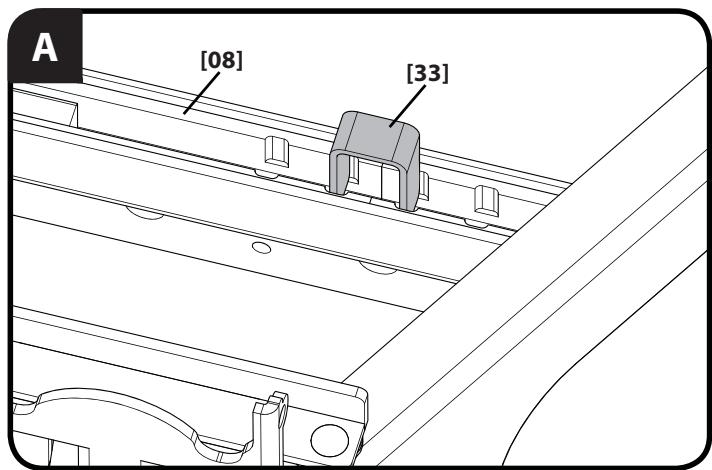
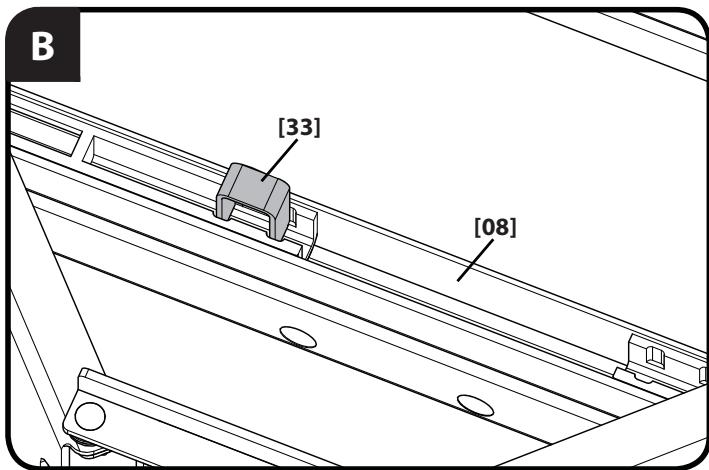
To prepare the wall plate for mounting:
Slide the arms of the wall plate [08] together and insert the slide lock [33] into place. This will lock the arms into full extension making the wall plate mounting and TV attachment easier.
5-1

Wood Stud Wall Mounting - See Cautions in Step 5.
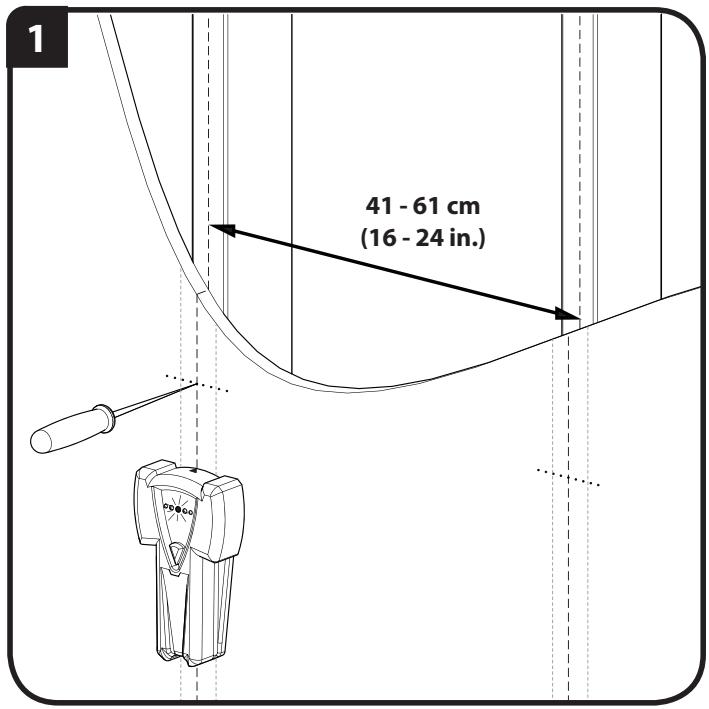
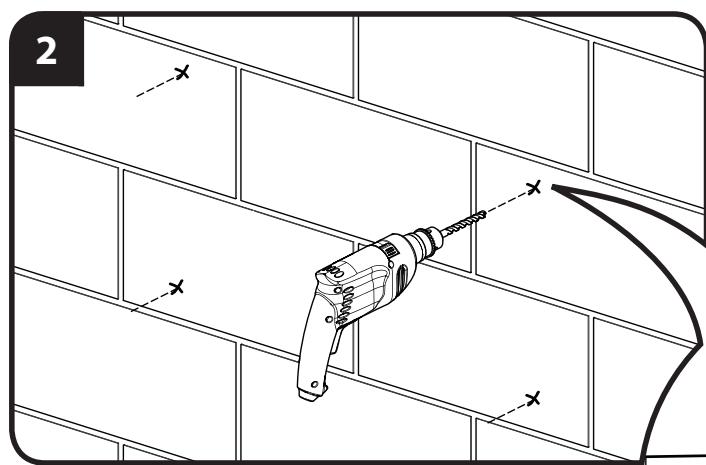
- Locate studs. Verify the center of the stud with an awl or thin nail or use an edge to edge stud finder.
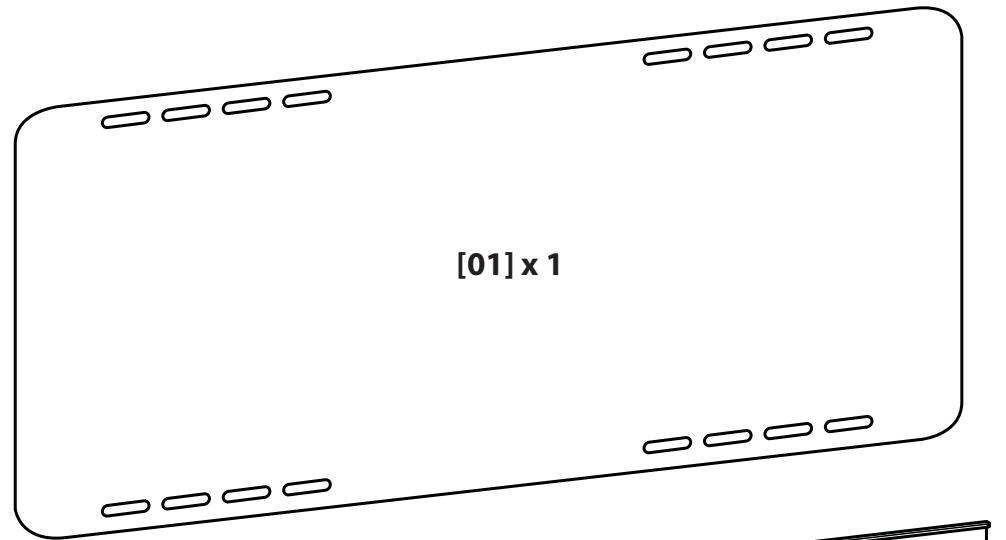
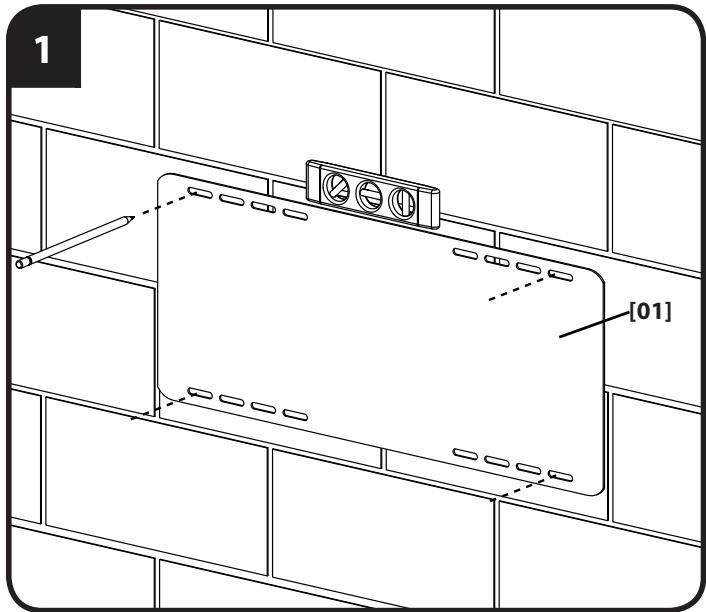
- Using the wall plate template [01], Level the template [01] and mark the hole locations.
- Drill pilot holes as illustrated.
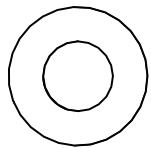
- Place the wall plate against the wall. Tighten the lag bolts [36] only until the washers [35] are pulled firmly against the wall plate [08].
Solid Concrete and Concrete Block Mounting - See Cautions in Step 5.
- Using the wall plate template[01], Level the template [01] and mark the hole locations.
- Drill pilot holes as illustrated.
- Insert lag bolt anchors [34].
- Place the wall plate against the wall. Tighten the lag bolts [36] only until the washers [35] are pulled firmly against the wall plate [08].

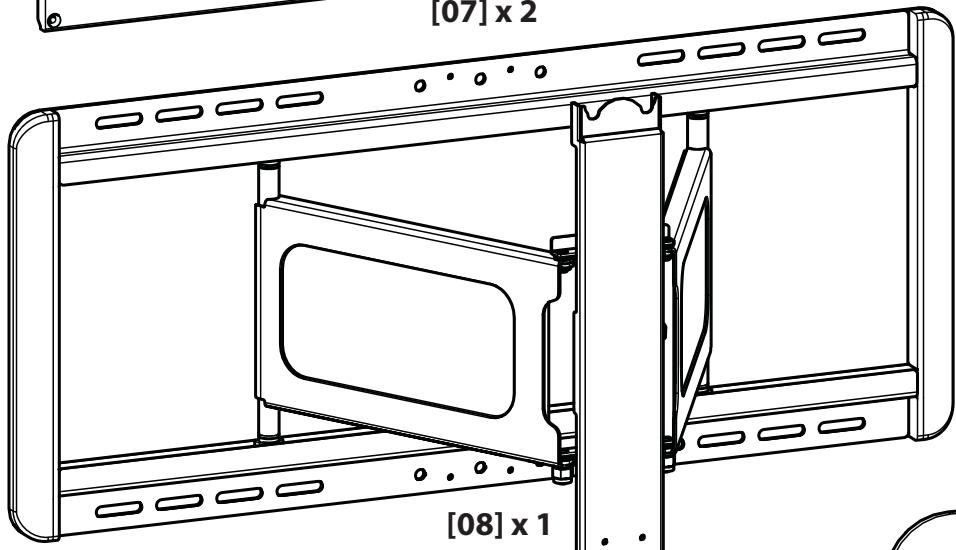
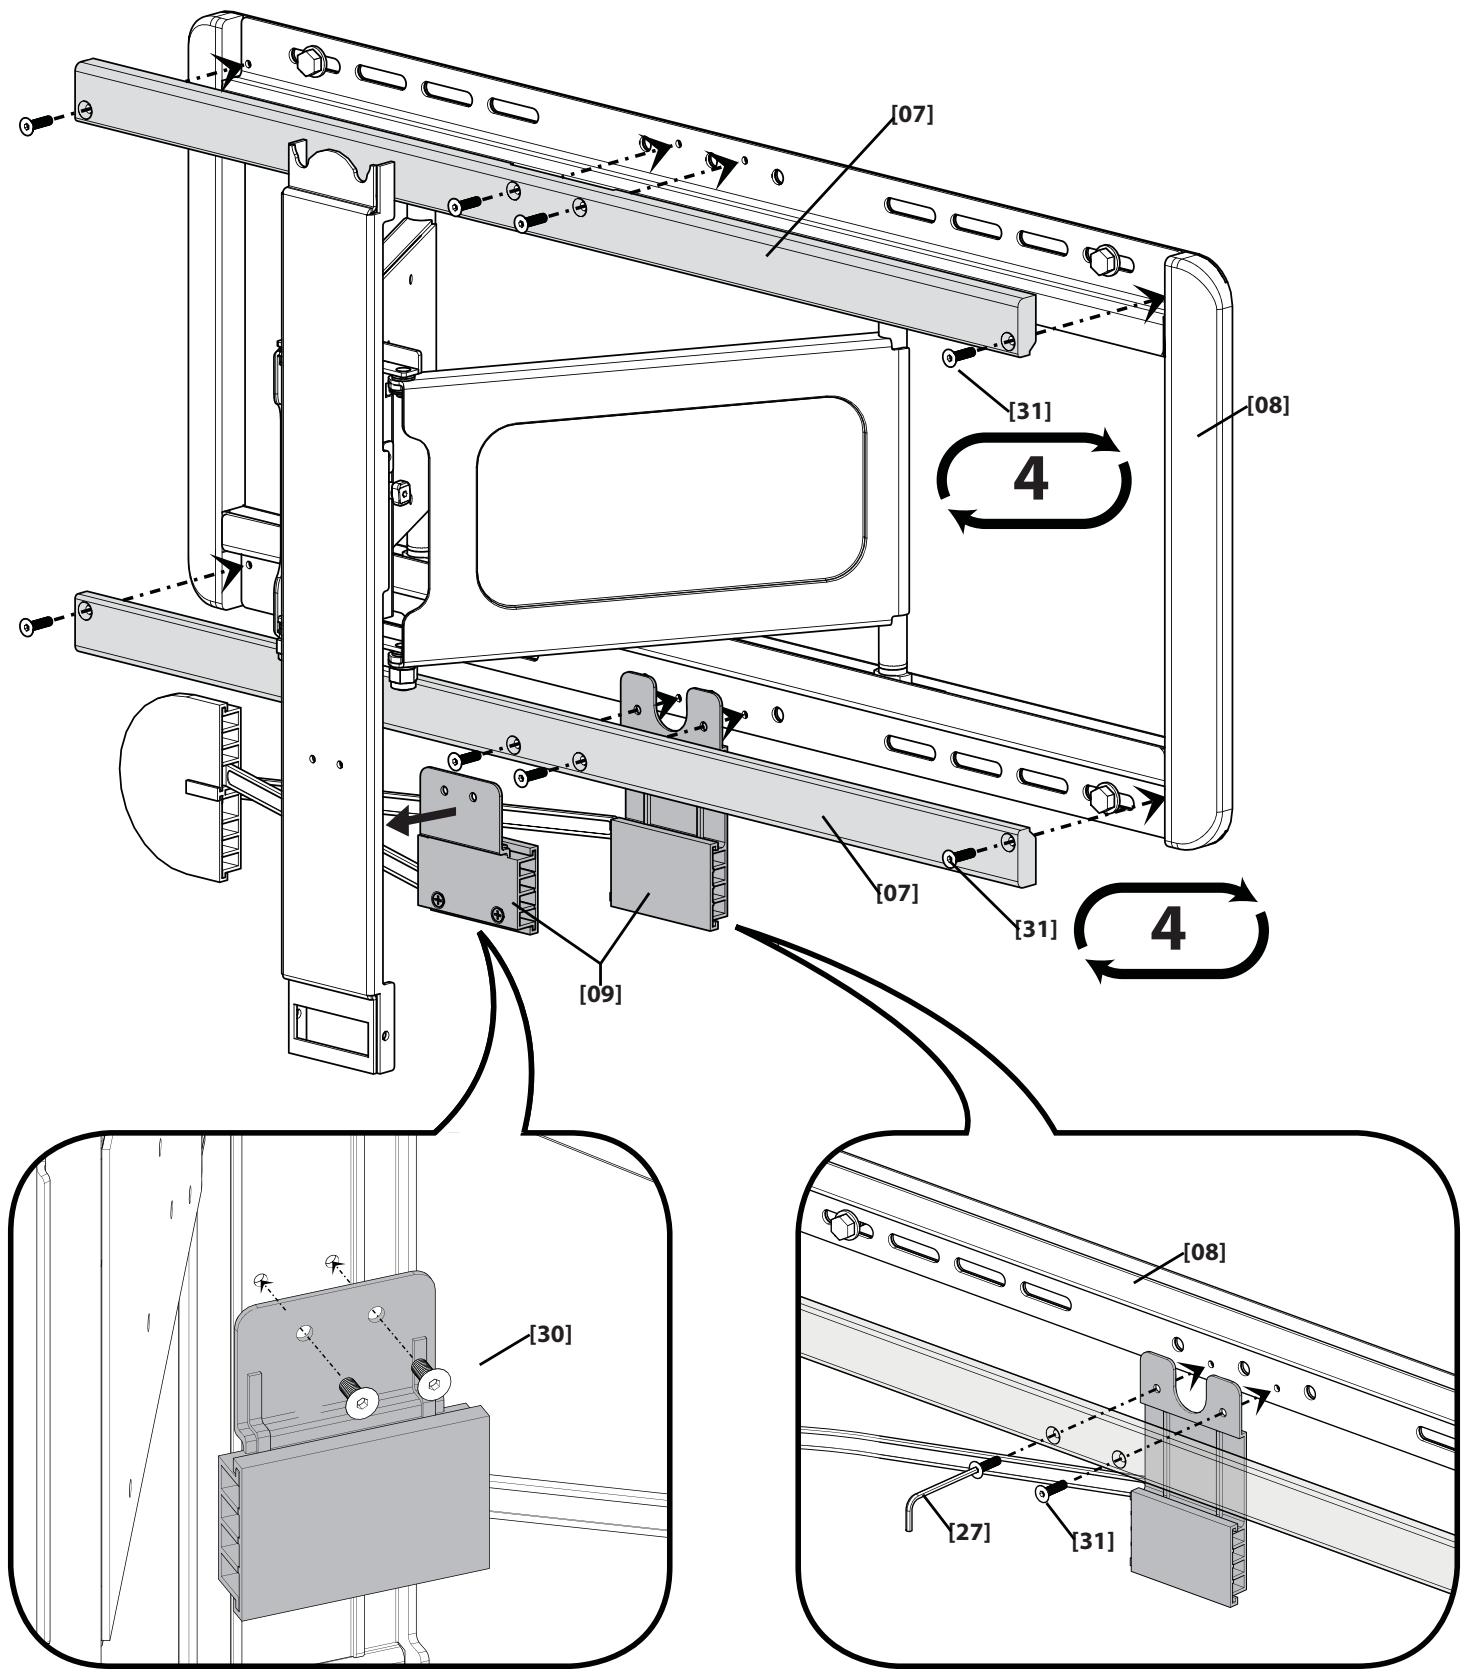
Install the wire management assembly and wall plate covers onto the wall plate.
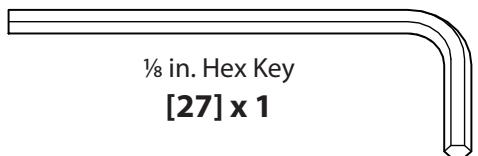
Mount the upper cover [07] using the 18 in. hex key [27] to install four screws [31].
Mount the lower cover [07] using the 18 in. hex key [27] to install four screws [31] while fitting the rear mount of the wire management assembly [09] between the cover [07] and the lower horizontal of the wall plate [08].
Install the front mount of the wire management system to the back side of the face plate of the wall plate [08] using two screws [31].
1
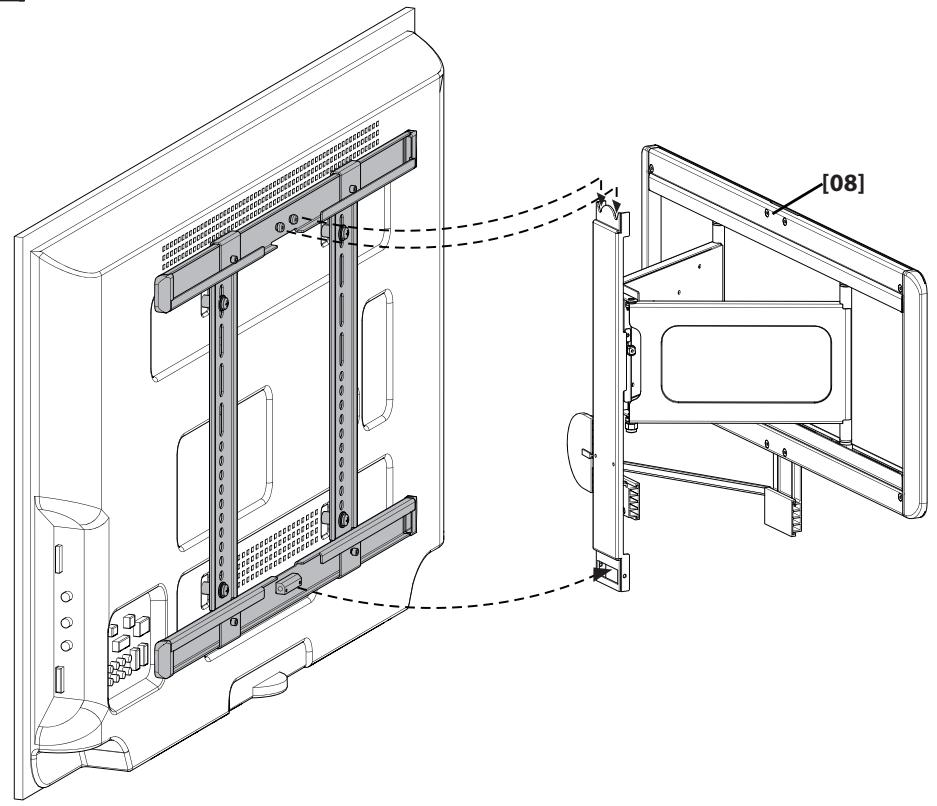
Attach TV to Wall Plate
HEAVY! You will need assistance with this step.
- Hang the TV with mounting bracket assembly onto the face plate of the wall plate [08]. The upper knobs of the mounting bracket assembly will drop into the top slots of the face plate of the wall plate [08].
- Secure the TV to the face plate of the wall plate [08] by installing the locking screws [32] with the 3% in. hex key [29].

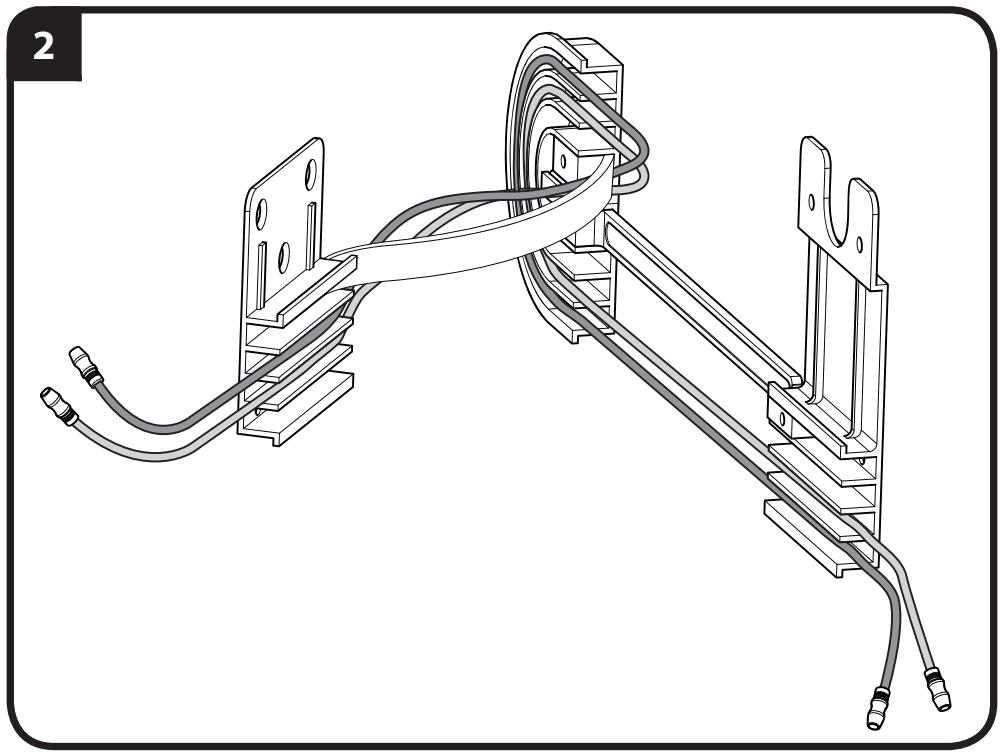
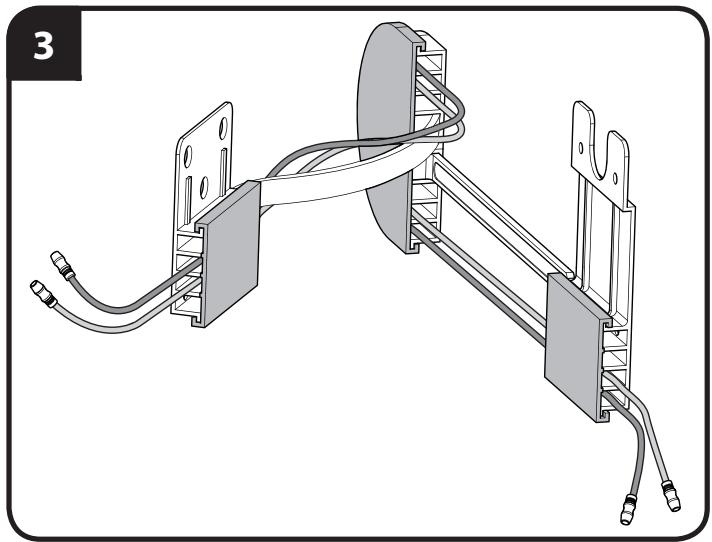
Wire Management
Plug the required wires and/or cables into the TV.
- Slide the three covers of the wire management assembly [09] off the front (face plate mount), rear (wall plate mount), and center (floating).
- Route the wires and/or cables through the three sections.
- Replace the covers.
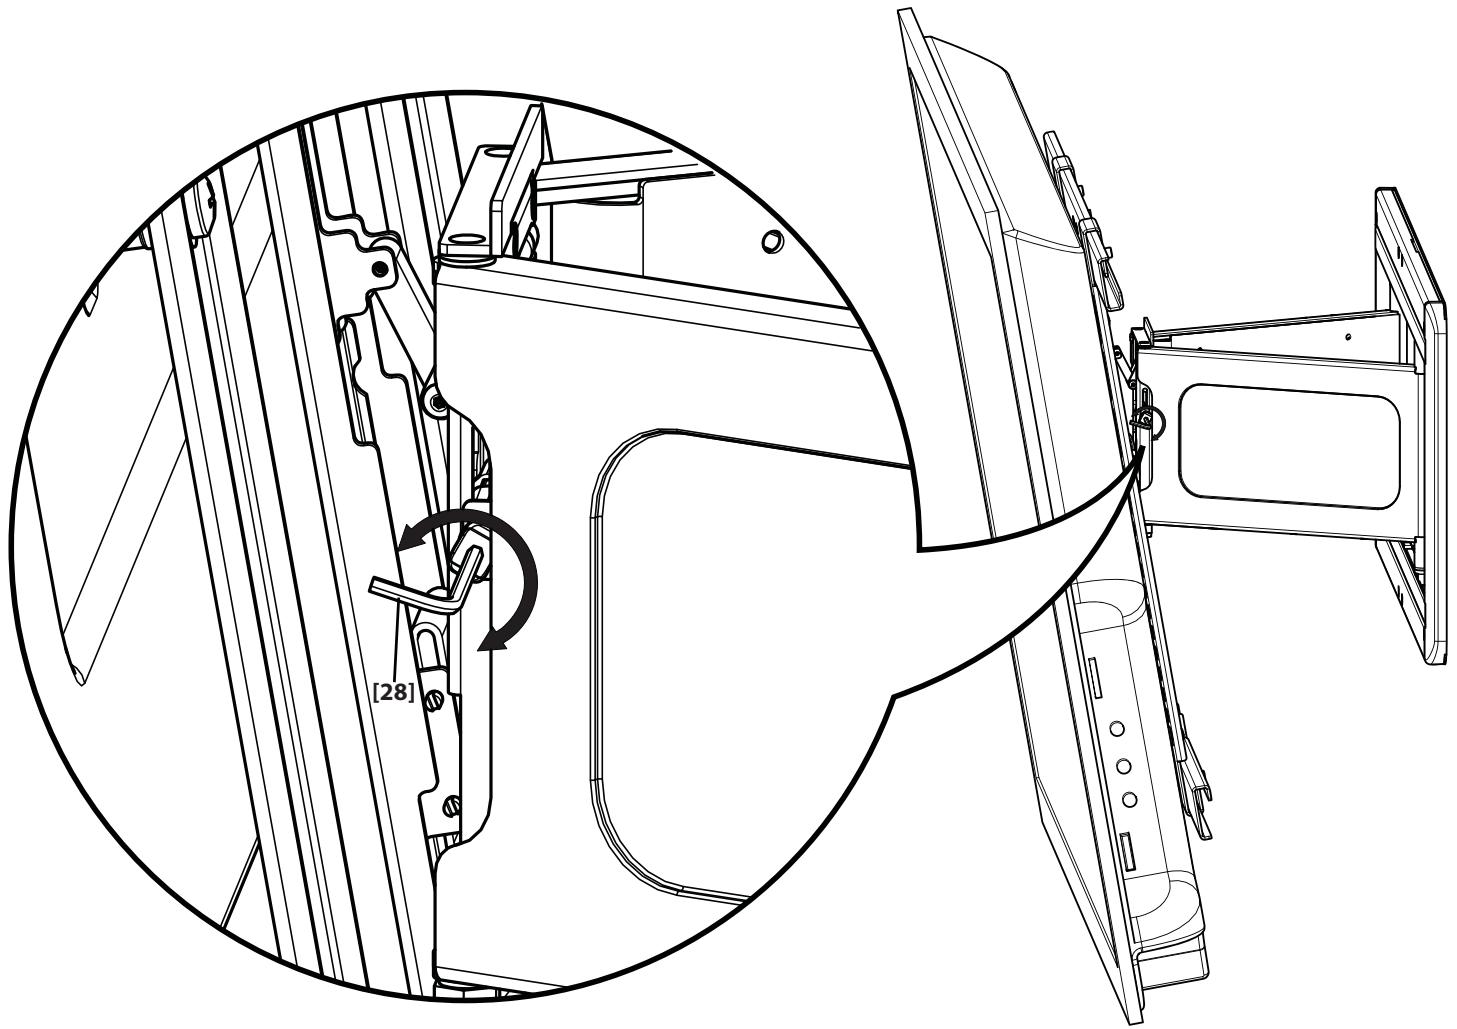
Adjustments
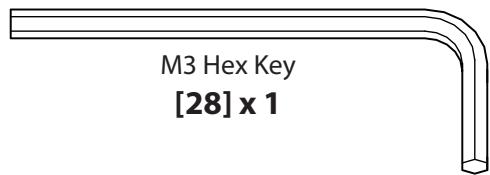
Adjust up/down tilt tension by hand or using the M3 hex key [28].
Storage
After setup is complete, remove slide lock from the locking position A and fit it into the grooves of one of the slides for storage B.
6901-002067<03>
ATTENTION:
INFORMATIONS IMPORTANTES CONCERNANT LA SECURITE - CONSERVEZ CES INSTRUCTIONS - VEUILLEZ LIRE ATTENTIVEMENT LE MANUEL AVANT D'UTILISER CE PRODUIT
Specifications
YctahOBKa KpoHtTeHOB dIe TeJIeBn3OpOB, 3aHra NOBepXHOCTb KOToPbIX HEOBHAA IIN IMeET BbICTynbl
Peped naHApOM yCTaHOBk BCTaBtBe BVHTbB O TBpEcTnHa 3aJHeN NaHEJI TneBn3Opa dIg ONpeJeNEHn COOTBcTByIOUeO IaAMetpa BVHTa (M4, M5, M6 nII M8). POpBepBte, DoCTaTOHNo IIN DInHb Pe3b6b, UTO6bI pRnKPePNb KPOHsTeHb KMOHToP. EcIn BVHTb 3aTgBaHOTc pIIOxo, HemeJeHNO npKpATNeY cTbAOHKy uOBpATNECb
BOTDeI TexHnuecko NODepKKn.
A PPEOCTEPEXHE. Co6IouaIte npabunla 6eOnacHocTn, UTO6bl ppeoTbpaTb Bo3MOxHbIe TpaBMBI nOBpeXHeHne IMUyecTa! NcNoJIb3yIe COeTuAHBe HnHTu HnKpKnAdKn HnMHeMbSe IIOxOJaIe DInHbI. McNob3OBAHMe CNIuKOM DInHHoro KpeHexa MoKeT pINBecTI K OPNBEXDEHNO BHYtpeHNX KOMPOHEHTOB MOHITOPA.
A. Пинокине Вертукалыные Кронштейнbl [06]К Телевизу,чTOбblОпpeДeNTь,Кakne мontхнгьд OTВерспя 6уДИ NGToNBJOBAtbcry.У6eINTecb,чTO Вертукалыные Кронштейнbl [06]БырOBнehbl И ХадяТСЯ НОДИНAKOBOM PACCTORHIMДpyT OT Dpyra BBePxy U BH3Y TeLEBn3Opa.
B. Ecnnoa0bTcB TykN, HxKHO onpeJeHtB, HxKbI IIN KopoTKe [22] nII nnHnBHe [23] BTyKn. BCTabTe ynpHyo 6y [26] B npopezni OTBepCTnHa nepeHne CTOpOHe BepTKKaJIbHbIX KPOHHTeHOB [06] a 3aTeM yctaHOBe T Baa6b [26] BTyKN COOTBETCTByUeJ nnHbC 3aHne CTOpOHe (TB).
C. HadeHbTe BepTnKaIbHbIe KPOHtEiHbI [06] Ha rOpN3OHTaJIbHbIe KPOHtTeiHbI [02] n [03].
D. PacnoIoxnTe nolyeHHbI y3eHnad TeLEBn3OpOM n DInraTte BepTuKaJIbHbIe KPOHTeHbI [06] BLeBO IIN BnpaBO, POKA OHn He OKaJyTcHnAD MOHTaXHbIMN OTBepCTnMn Ha 3aDHeN IOBepxHOCTn TEleBn3Opa.
1-1-cm. yepTeJx Ha ctp. 12
IJIaTeBn3OpOB C HEPBOH/ C BbIcTyPnAMn 3aDHeN PAHeHbU. Y6eIITecb B TOM, Yo KPOHUHTeHbI Ha 3aDHeN PAHeHm MOHATOPa UCTaHOBLeHb I NO yPoBHIO.Ha
pCHyKne POka3AbHb cTaNtAPThbE KOHpyRaoun. IJIa NOnyHeN NnHOFopMaun O HeCTaHapTHbIX KOHpyraumx N yTOUHeN N bIbOpa nPiocnoc6hEni
obpaITIECB TOdEN TeXnueckoi NoJdepjkN.
1-2-cm. yepTeJx Ha ctp. 13
IJIe TeneBn3OpOB C HepOBHoi/C BbIcTynamm 3aJHeN PAnHeIbIy. Y6eIITecB B TOM, UTO KPOHOteHbI Ha 3aJHeN PAnHeI MOnHToP aYCTaHOBJeHbI NO ypOBHIO.Ha IpcSyHKe poka3aHbI cTaHdaprTbIe KOHfNguraqnn. IJIra NpUyeHn INFopMaucuN O HeCTaHdaprTbIX KOHfNguraqnx N yTOUHeHn Bbl6opa npiCnOco6neHn O6paTInTeCb B OTdE TLexHnuecko NpOdePjKn.
2
UctahOBka KPOHsTeHOB dIeTeBUN3OpOB c POBHO 3aHHe IOBepxHOCTbIO - CM. YepTeK Ha Ctp. 14
Peped naHApOM yCTaHOBkN BCTaBtBe BVHTbB O TBpEcTnHa 3aJHeN NaHEJI TneBn3Opa dIg ONpeJeNEHn COOTBcTByIOUeO IaAMetpa BVHTa (M4, M5, M6 nII M8). POpBepBte, DoCTaTOHNo IIN DInHb Pe3b6bl, tTO6bl pNkPePNb KPOHsTeHb KMOHToP. EcIn BVHTb 3aTgRNaHcT pIIOxo, HemeJeHNO npKpATNeY cTbAOHbY o6pATNTecb
BOTDeI TexHnuecko NpOdepKKn.
A PDEOCTEPEXHE. Co6nlaTe npabina 6e0anacHcTn, UTo6bl ppeoTbpaNTb BO3MOxHbIe TpaBmI INOBpeXHe NMyuecTa! NcNoJIb3yIte coetahne BHTa HnAeNIOHbIe NpOKnadKnIOaMHeBSe IpoXoJaIe DInHbI. NcPONb3OaHMe CINKOM DInHHoro KpeHexa MoKeT PrINBeCTN KIOBpeXDeHnIO BVHTpeHHIX KCMNOEHTOB MOHITOpA.
A. HadeHbTe BepTnKaIbHbIe KPOHtEiHbI [06] Ha TropN3OHTaJIbHbIe KPOHtTeiHbI [02] n [03].
B. PacnoIooJIte nOJyUeHHb y3eHnad TeneBUN3OpOM nDnBaTne BepTnKaJIbHbIe KPOHHTeHbI BnEBO NIN BnPaBO, NOKA OHn HE OKaKyTCaHd MOHTaXHBIM NTBePCTNMAH Ha 3aDHe NOBepxHOCTn TeneBUN3Opa. Y6eINTecb, YTO BepTnKaJIbHbIe KPOHHTeHbI [06] BblpOBHeHbI n HaxOJaTcH a OINHaKOBom pacCToAHm Dpyr OT dpyra BBepyu INBn3y TeneBUN3Opa.
2-1
IJIe TeneBn3OpOB C nIOCKoJ/6e3 BbICTyOnOB 3aHNei NaHEnbIo. Y6eIITecb B TOM, UTO KPOHHTeHbI Ha 3aHNei NaHEn MoHITopa yCTaHOBJIe HIO npOBOHIO IOTepYNIPOBaHbI NO BepTtKaJIe. EcIn Tpe6yeTcI dONONHtENbHOe pOcTaPcHCTBO, UTO6bl yLOXmTB Ka6eJIb, IIOOrHaTb yTOpJIeHHbIe NII IN BblNYKJIbe IOBepxHOCTN, CM. OIN H3 BapNaHTOB yCTaHOBKn (1-1 IINI 1-2) C ICSNoJIb3OBAHNem BTVJOK.
3 - cM.Черпж наст. 16
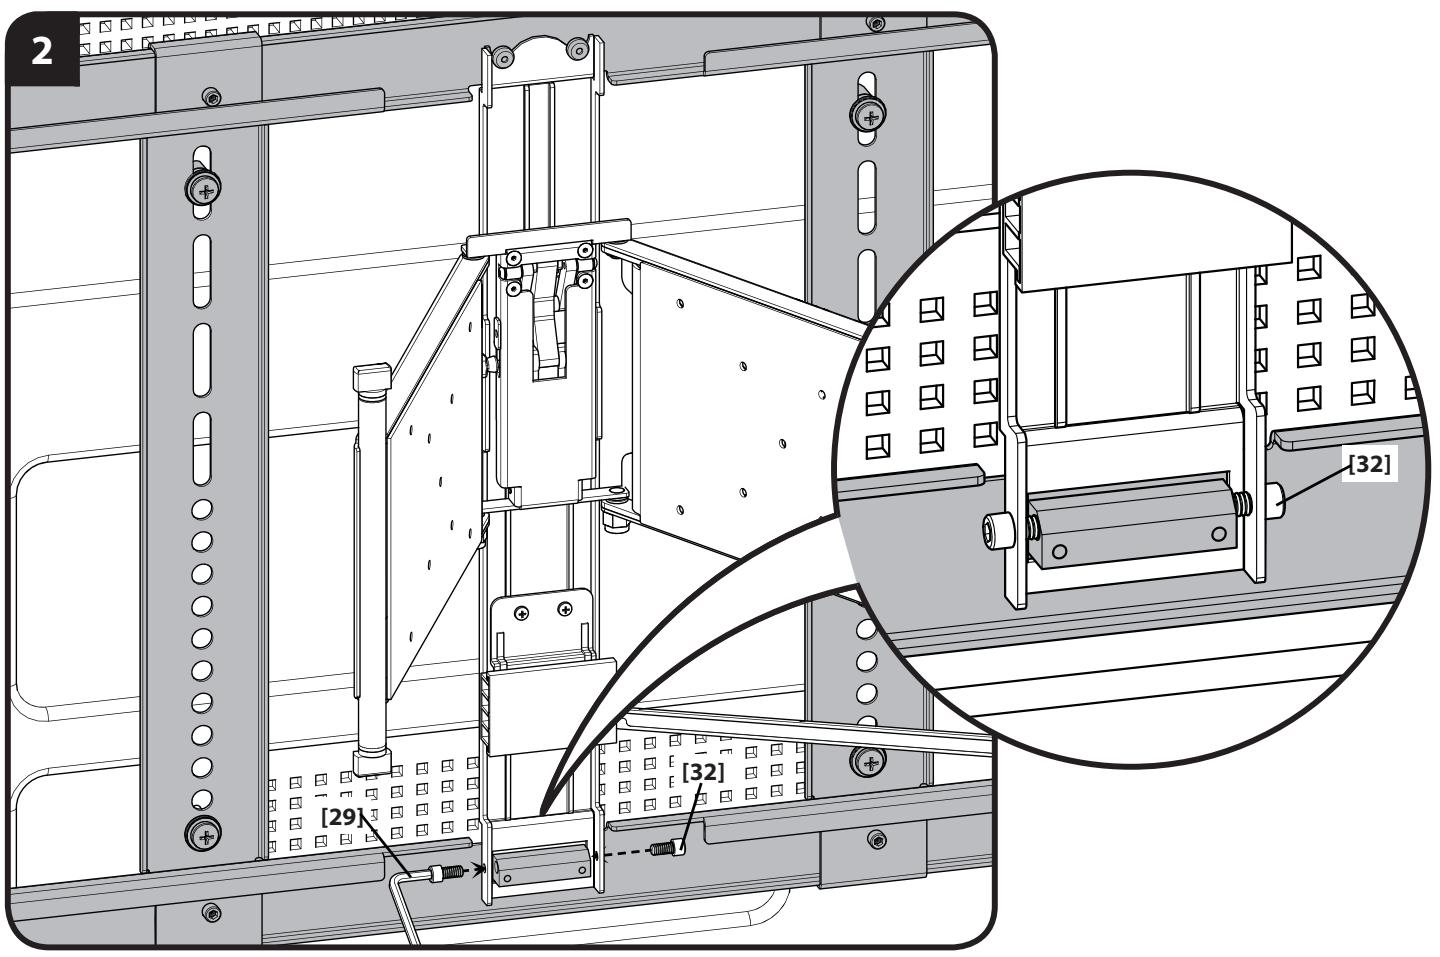
OTcHrTpnpuYTe rOpn3oHTaIbHbIe KpOHtEiHbI [02] n [03].
3aKpeHnTe rOpuOHTaIbHbIe KpOnUHeNbI [02] n [03] Ha MeCTe C nOMoUbIO uecTIRpaHHOrO KInOua Ha 3/16 dIOMa [29] n 4 BnHTOB [32].
5
HacteHHoe KpenIeHne
Для onpe dendene pacnoLOXeHЯ CTeHOB OI nactInb BOcNoJb3yTeCb npINOxKeHem Height Finder ha sanus.com.
5-1: KpenenneK depeBHHoCTOKe
PNEIOCTEPEXHEHNE. HenpaBnIbHOe IcNoJIb3OBAHHe MOKeT UMeHbUInT b npOuHcT coeINHeHn 6oNTa. Bo n36ExAHne BO3MOKhbIX TpABM nII
NoBpeJxHnO6OpyDobHaN:
He npuiarai Te ue3MeHbIe ycIIa Iy 3aTgBaHn6 BoNTOB [36].
ToIuHa MaTePnAJa, NOKpbIbAIOUe RoCTeHy, He IOnJxHa IpeBbIaTb 16 MM (5/8 IIOIma).
C nomoBIO cBePnA dAmEtpom 5,5 MM (7/32 IIOHMa) DONKHbI 6bITb npocBepneHb HappaJIIOUe OTBepCTN rIy6HHOJ 75 MM (3 IIOHMa).
5-2: YctaHOBka Ha CTehy n3 6eToHa/6eToHHbIX 6JIOKOB
A INPEIOCTEPEXHEHNE. HenpaBnIbHOe nCIOJIb3OBAHHe MOKeT UMeHbUInT bPouHocT bCoEINHeHn 6oNTa. Bo n36ExaHne BO3MOKhbIX TpAbM nII
IOBpeJdeHnI o6OpyDoBaHnI:
Y6eHntecb, YTO HIO6eN [34] yCTaHOBHeHb 3aNoDInuO c 6eToHHo NOBepxHOCTbIO.
YCTAHOBNTe CTeHOByIO pIaNactHny HEnOcpeDCTBeHHo Ha 6eTOHHyIO NOBepXHOCTb.
HnB Koem Cnyuae He CBePInTe OTBepCTnB Wbax MeJxu6Jokamn.
He npunaraiTe ue3MepHbIe ycUNaIy IJIa 3aTARnBaHn6oNTOB [36].
C nmooub cbepea dnaMeTpom 10 MM (3/8 duim) OJIJKHb6bTb npocBepne HappaIooie OTBepCTra 75 MM (3 duim).
Iopraok nojrotobkn cteHOBn INaCTHbK yctahOBke:
CBeINTe 5tAHnCTeHOBNIaCTHbI [08] BmecTe, BCTaBbTe ΦIKCaTOp [33]. 3TO 3aKpeINIT 5tAHn B NOLHOCTbIO pa3dBHyTOM IIOJKeHN, I O6JIerHTM OHTaX CteHOBOI PIACTHbI N 3aKpePENHe Na Hei TeLEBnOpa.
5-1-cm. yepTeJx Ha ctp.20
Kpenenne K depebHHoC tOKe - CM. Oco6ble B ware 5.
- Hainite shiapaMn. Y6eHntecb B ceHTpe Stud shiIom nIIOhKIM rBO3dE mIIN IcNoJIb3OBAHne KpaJdo KpaJ Stud Finder.
- Испльзоване Шаблona стений [01]. Вьюнейшаблон [01] и OTметъраснолжень OTверсти.
3.ДрелбаOTbEPTN,ΚaK NOKa3aHO. - 3aTgUBaIe 60ntbIC KBAIpaTHbIMr TOnOBkAMn [36] TOJIbKO Do TEX nOp, NOKA IaIb6bl [35] He 6yDyt NODTJHyTbK HAcTeHHOMy KpeJIeHIO [08].
5-2-CM. Yeptex Ha ctp. 21
YctahOBka Ha CTHe N3 6eToHa/6eToHHbIX 6IOKOB -CM. IpeIOCTepExHnA 5.
1.ИспользованешаблonaСтенOBОПЛЯСТINь[01].БырOBнITEшабLOн[01]иOTмTe pacnoIOnOKeHneOTBepCTM.
2. Порсеверпге Нарравл所以我, Кам поka3aHo на рисунke.
3. YctaHOBInTe IIO6eIN [34].
4. 3aTnBaTe 6oTbI [36] ToIbKO Do Tex nop, noka IaIbI [35] He 6yUT KpeNko NpOITaHytI K CTeHOBO IIaCTHe [08]
6
UctahOBtHe h CTeHOByIO nlaCTHy ee KpbIshKu I y3e I pa3BODKn Ka6eNei - cm. YepTeJx Ha cTp. 22
C nOMOuIeCTnIpaHNO KIOUHa Ha 1/8 IIOMa [27] uYeTbIpeX BInTOB [31] yctaHOBITE BepxHIO KpbIiKy.
Pn nmoiueTngpahHOro KIOUa Ha 1/8 dIyMa [27] uYeTBpeX BnHTOB [31] yCTaHOBtne HIXHIOKpbIbky, pni 3OM IOMeCTNTe TblbHyIO CTOky y3la pa3BOKn Ka6eJe[09] MeJx dy KpbIshKoi [07] INHXHe TOpN3OHTaJIbIO CTeHOBoI PnACTINbI [08].
UcTaHOBnTe nepeHIOIO CTOky CInCTeMbI nPoKnaIKn Ka6eNa Ha 3aDIOIO CTOpOHy IINCeBOI NaHeJI NCTeHOBI nTActHbI [08], INCNoJIb3yI DBA BVHTa [31].
7
PpNkpennne Hne TeneBn3opa K cTeHOBo NnactHe - cm. Yeptex Ha Ctp. 23
BOLbIOW BEC! PnB BvIOnJIHeHn DaHHoN OTepaun Bam NOpaIo6nTc nOmoCb.
- KpenJIeHne TeJIeBn3Opa C MOHTaXHbIM KPOHtTeHnAMN K IINcEOBII pAACTInHe CTeHOBOI pAACTINbI [08]. PeryIaTOpbl B BepxHeJ qACTm MOHTaXHbIX KPOHtTeHOB NONaDyT B BepXHHe MOHTaXHbIe OTBepCTnA IIcEOB II pAACTINbI CTeHOBOI pAACTINbI [08].
- 3aKpeHnTe TB-naHeIb Ha IInCeBOI pIacTHHe CteHOBoI pIacTHbI, 3aTgINBaI 6IoKpUOuIe BnHTbI [32] c NOMoIbIO IeCTnIRpaHHOrO KJIouHa Ha 3/16 JIOIma [29].
8
PpoklaJaKa Ka6eIe - cm. YepTeJx Ha cTp. 24
IopKJIIOUHTe K TeJeBn3Opy Heo6xOaIMbIe npOBoa n Ka6eIi.
- Chmnte Tprk pblknc cnctembl pa3bodkn ka6enei [09] - cpeepn (ctoka nucboon nlaactnhbl), c3aun (ctoka cteHOBOI nlaCTNHbl) n no ceHTpy (noDbNkna CToKa)
- IpnoloxnTe npoOda n/nn Ka6eenn No 3Tm TpeM cekzmaM.
- HaneHbTe KpbIuKn.
9 - cM. YepTeJx Ha cTp. 25
Perynipobkn
ÖtperynnpyTe ycnIne 3aTJkKn pni HaKaIOHe BBepx/BnI3 BByuHyIO nIc NOMOJIbU oSectrpaHNO rKnIOa M3 [28].
Xpanenme
Iocne 3aBepseHn yctahOBKn, n3BVeKnTe fNkCaTOp [33] n3 fNkCnpUoSei pOnzUnn A u BCTaBbTe B na3 oNoH n3 3aDnBeK dJa xpaHeHn B.
▲ PRZESTROGA:
WAZNE INSTRUKCJE DOTYCZACE BEZPIECZENSTWA — NIE WYRZUCAÇ – PRZED UZYTKIEM NALEZY ZAPOZNAĆ SIE Z TRESCIÁ CAŁEJ INSTRUKCJI
Opistecniczny
Milestone AV Technologies and its affiliated corporations and subsidiaries (collectively, "Milestone"), intend to make this manual accurate and complete. However, Milestone makes no claim that the information contained herein covers all details, conditions, or variations. Nor does it provide for every possible contingency in connection with the installation or use of this product. The information contained in this document is subject to change without notice or obligation of any kind. Milestone makes no representation of warranty, expressed or implied, regarding the information contained herein. Milestone assumes no responsibility for accuracy, completeness or sufficiency of the information contained in this document.