ELM701 - TV Stand SANUS SYSTEMS - Free user manual and instructions
Find the device manual for free ELM701 SANUS SYSTEMS in PDF.

User questions about ELM701 SANUS SYSTEMS
0 question about this device. Answer the ones you know or ask your own.
Ask a new question about this device
Download the instructions for your TV Stand in PDF format for free! Find your manual ELM701 - SANUS SYSTEMS and take your electronic device back in hand. On this page are published all the documents necessary for the use of your device. ELM701 by SANUS SYSTEMS.
USER MANUAL ELM701 SANUS SYSTEMS
Europe, Middle East, and Africa: + 31 40 2324700 • europe.sanus@milestone.com
Asia Pacific: 86 755 8996 9226 · sanus.ap@milestone.com
sanus.com
IMPORTANT SAFETY INSTRUCTIONS - SAVE THESE INSTRUCTIONS - PLEASE READ ENTIRE MANUAL BEFORE USING THIS PRODUCT
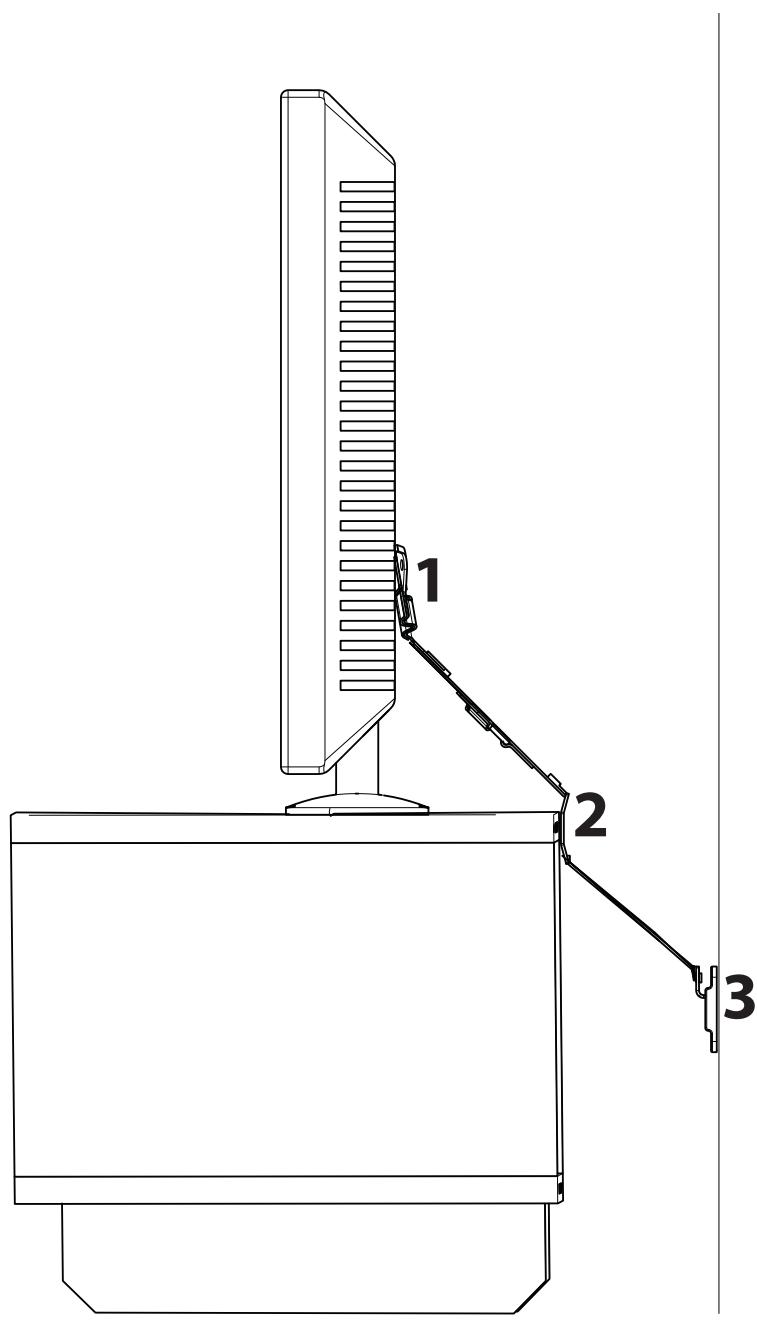
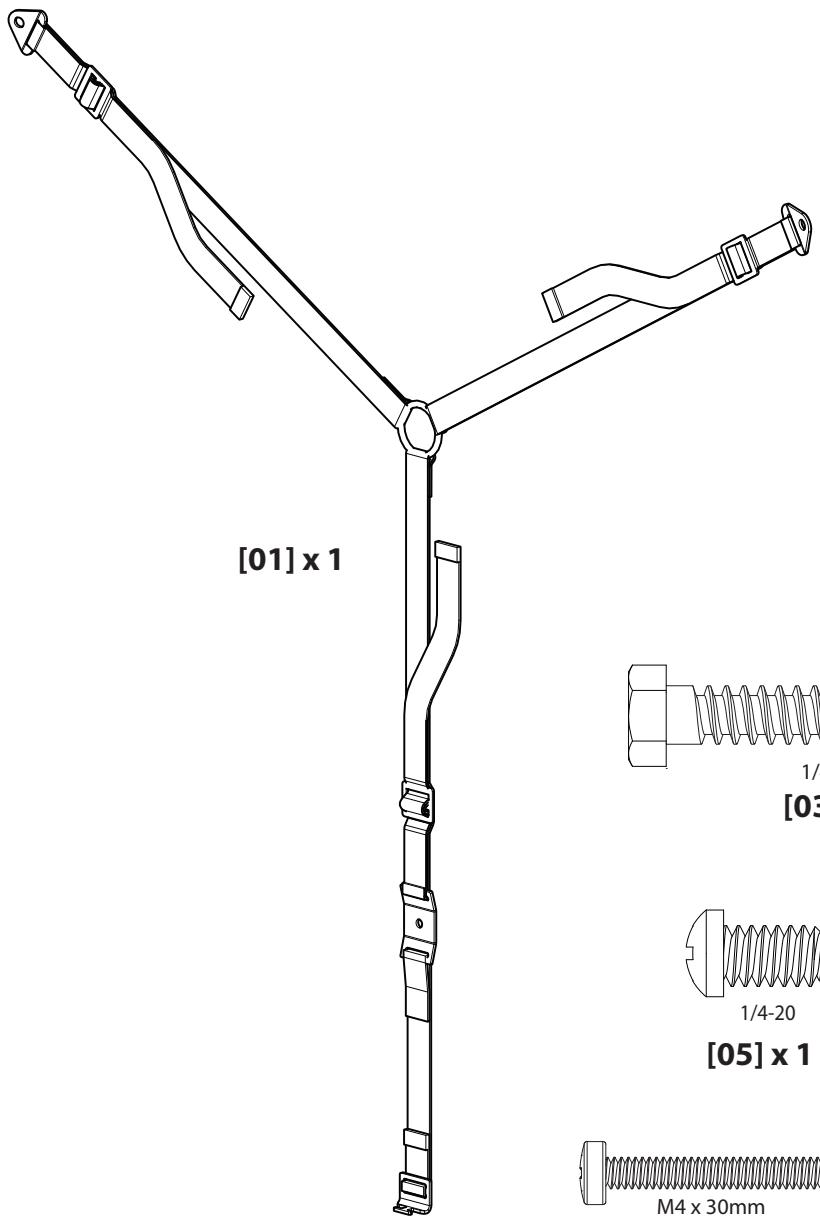
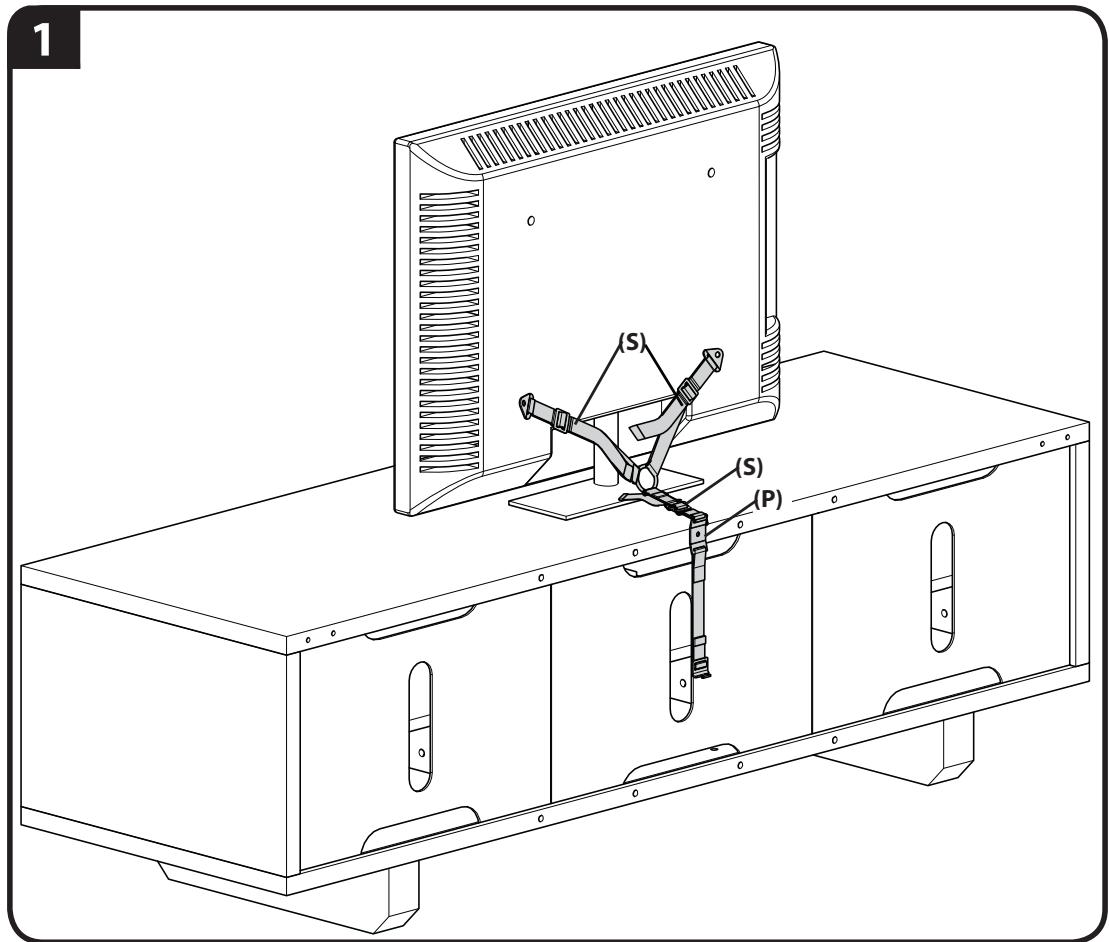
Thank you for purchasing the ELM701 anti-tip strap. Installing this product is as easy as 1 - 2 - 3!
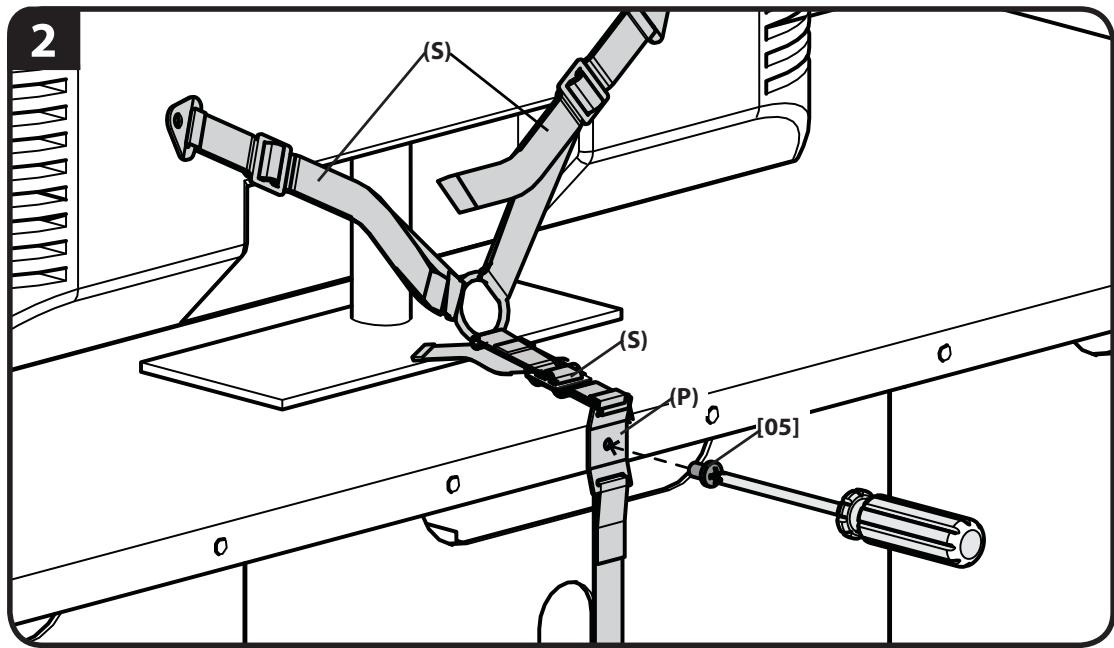
- Attach to the TV.
- Attach to the furniture.
- Optional - Attach to the wall.
See manual for more detailed instructions.
English
For best results, reference both the text and illustrations when using this manual. Cut along the dashed lines to match your language with the illustrations.
English Text Pages 2-15
Français
CAUTION: Avoid potential personal injuries and property damage!
Do not use this product for any purpose not explicitly specified by manufacturer.
This product is designed for use in wood frame walls only!
If you do not understand these instructions, or have doubts about the safety of the installation, assembly or use of this product, contact manufacturer Customer Service or call a qualified contractor.
Manufacturer is not responsible for damage or injury caused by incorrect assembly or use.
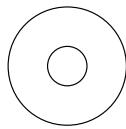
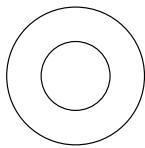
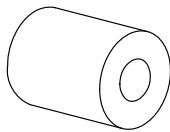
Supplied Parts and Hardware
Before starting assembly, verify all parts are included and undamaged. If any parts are missing or damaged, do not return the damaged item to your dealer; contact Customer Service. Never use damaged parts!
NOTE: Not all hardware included will be used.
[02] x 1
[03] x 2

1/4 in.
[04] x 2
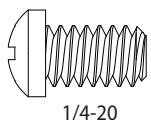
[05] x 1
[06] x 1
[07] x 1
[08] x 2
[09] x 2
[10] x 2

[11] x 2
M4/M5
[12] x 2
M6/M8
[13] x 2
M4/M5
[14] x 2
M6/M8
[15] x 2
CAUTION:
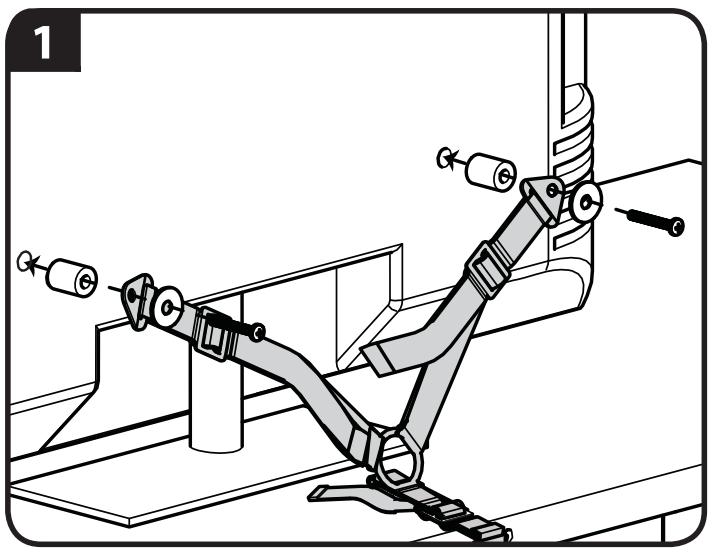
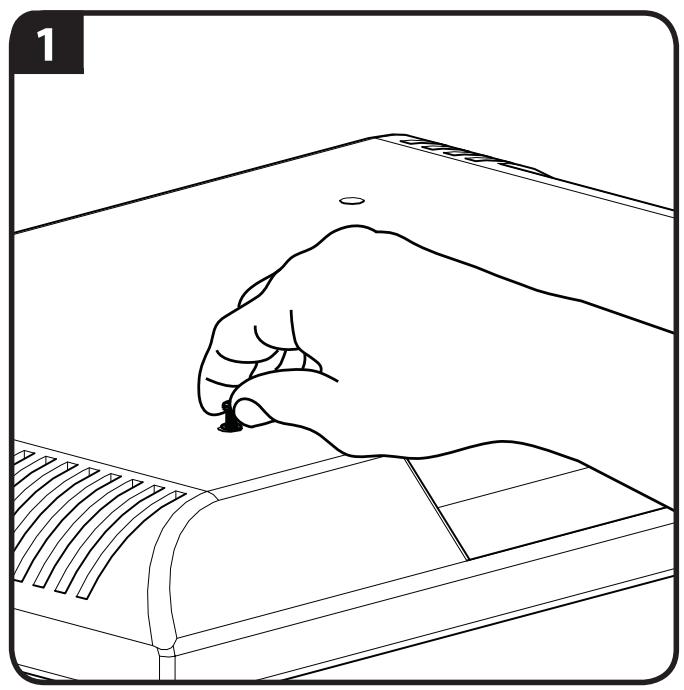
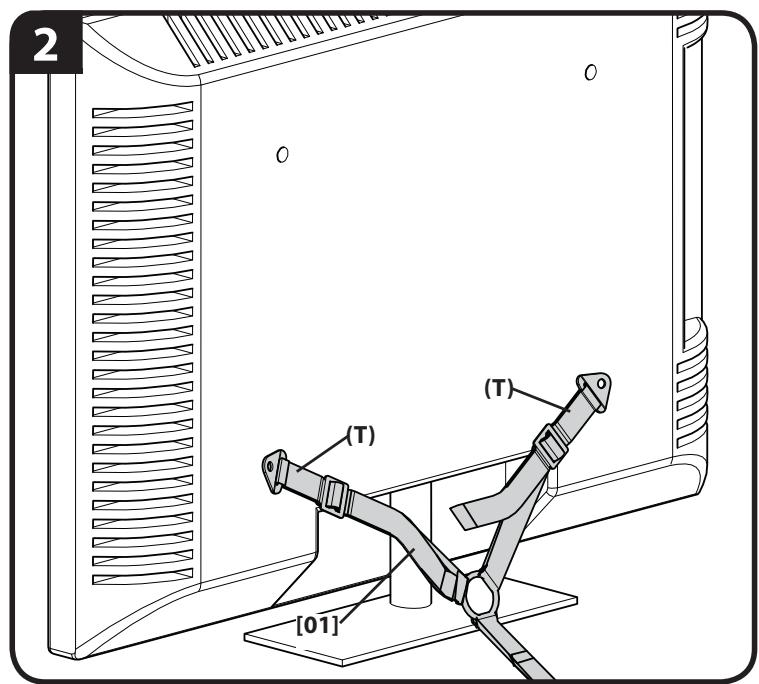
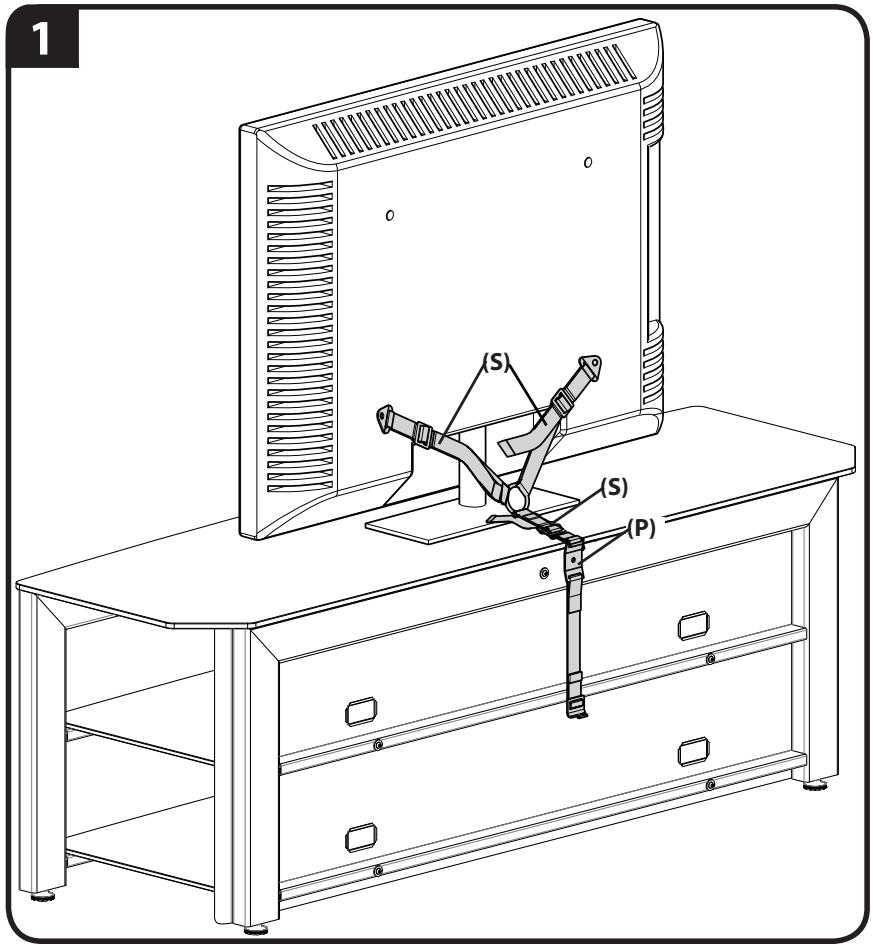
Attach TV Supports (T) to TV
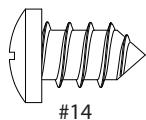
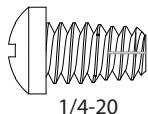
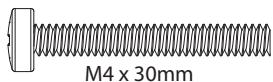
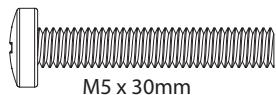
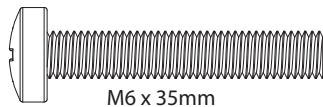
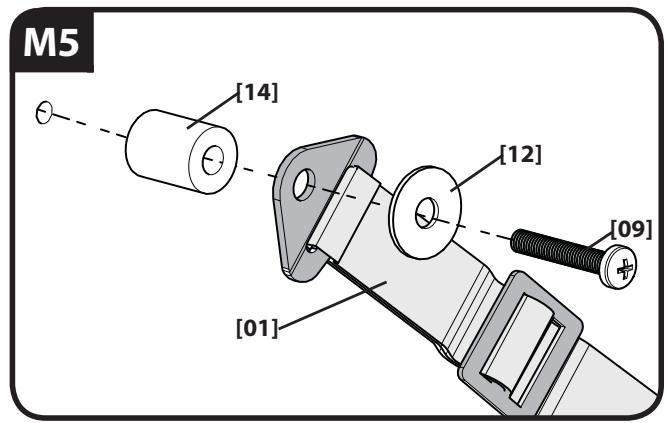
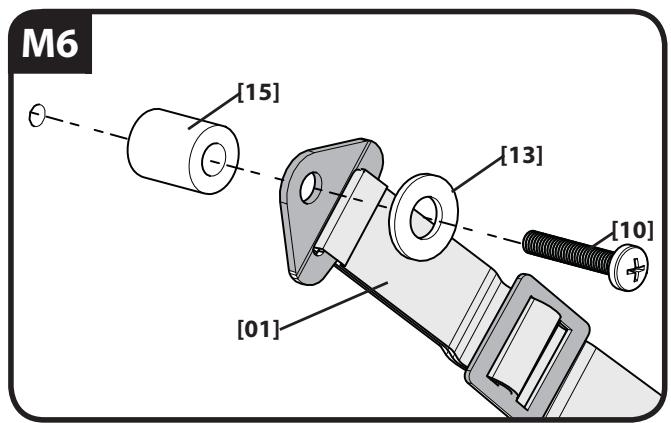
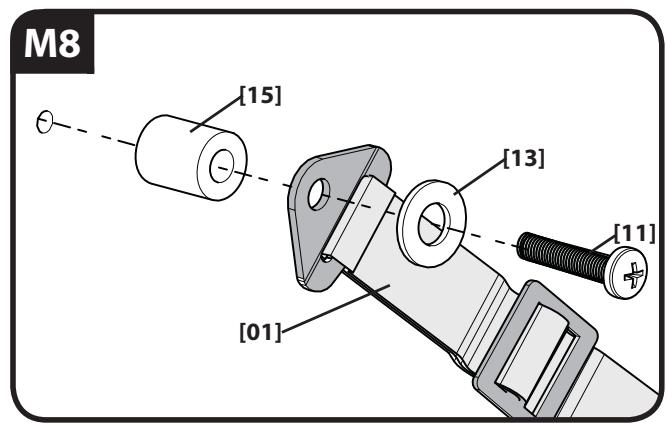
- Hand thread screws into the threaded inserts on the back of your TV to determine the correct screw diameter (M4, M5, M6, or M8).
- Attach TV supports (T) using one of the M4, M5, M6, or M8 screw, washer, spacer combinations shown.
CAUTION: Avoid potential personal injuries and property damage!
TV supports (T) must be attached to the to bottom most mounting holes on the back of your TV.
Do not use screws without spacers.
Standard configurations are shown. For special applications, or if you are uncertain about your hardware selection, contact Customer Service.
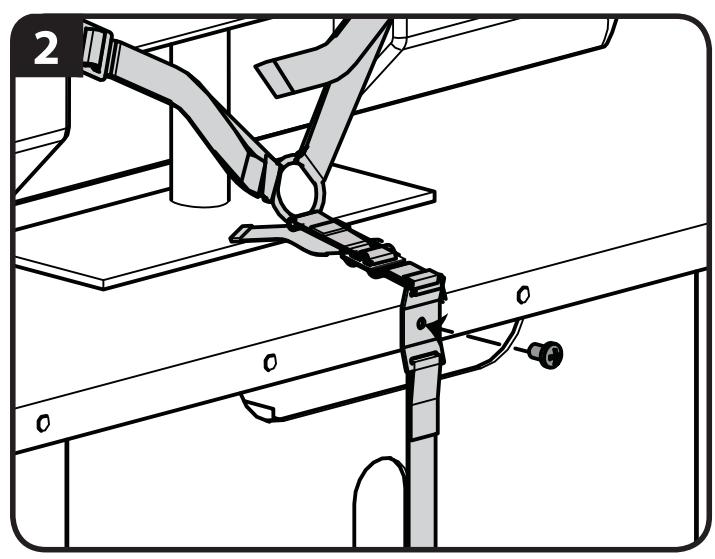
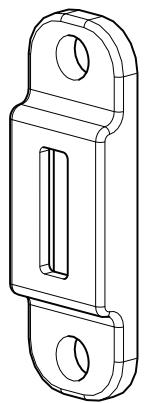
Attach the Mounting Plate (P) to Furniture
If you are attaching the anti-tip strap to compatible furniture, see step 2-1.
If you are attaching the anti-tip strap to wood furniture that is at least 13mm (1/2 in.) thick, see step 2-2.
If you are attaching the anti-tip strap to metal furniture that is at least 3mm (1/8 in.) thick, see step 2-3.
CAUTION:
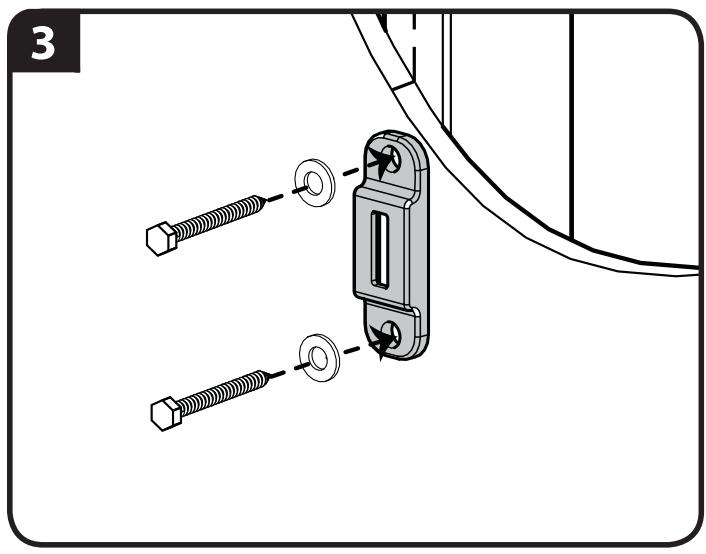
If you are attaching the anti-tip strap to compatible furniture:
- Place the mounting plate (P) over the threaded insert on the back of the furniture.
- Insert and tighten screw [05].
CAUTION: To avoid potential injuries or property damage!
Ensure mounting plate (P) is securely fastened to the furniture.
Ensure all straps (S) are tight.
CAUTION:
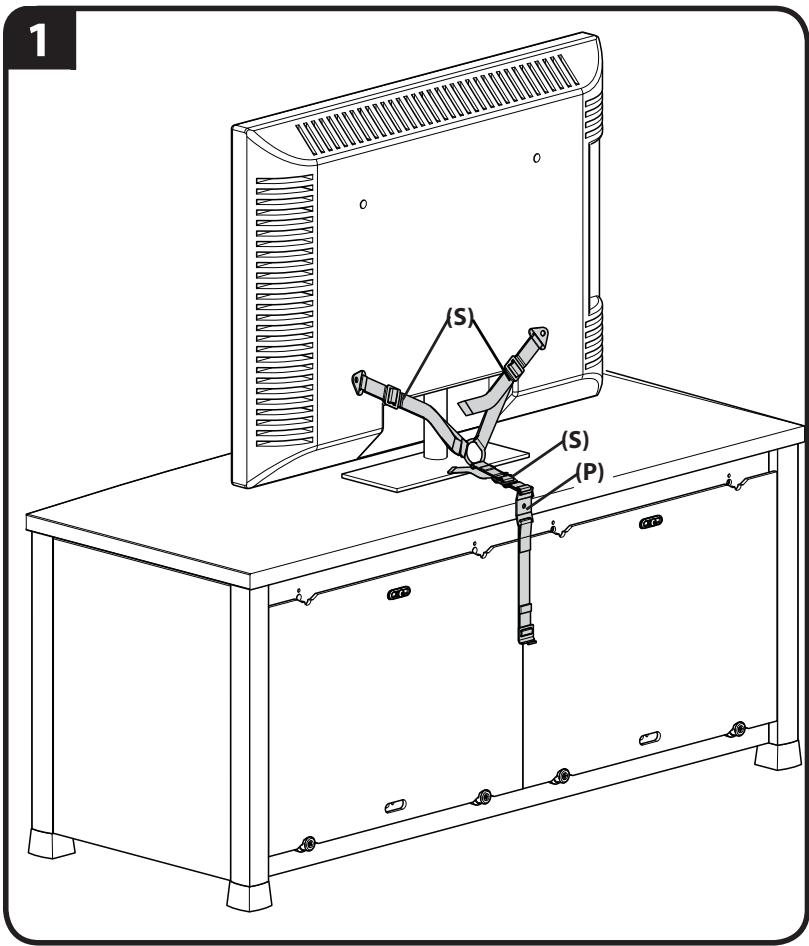
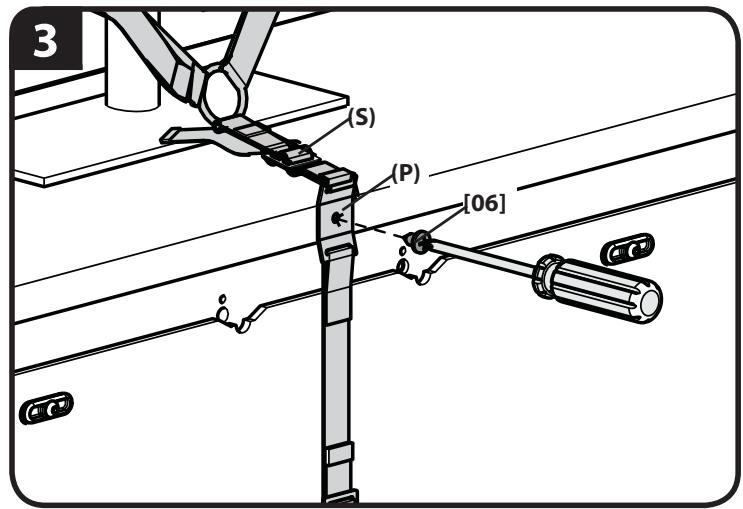
If you are attaching the anti-tip strap to wood furniture:
- Locate a secure area near the top of the furniture that is at least 13mm (1/2 in.) thick.
- Drill pilot hole to a depth of 13mm (1/2 in.) using a 2.5mm (7/64 in.) diameter drill bit.
- Place the mounting plate (P) over the drilled hole on the back of the furniture. Insert and tighten screw [06].
CAUTION: To avoid potential injuries or property damage!
Ensure mounting plate (P) is securely fastened to the furniture.
Ensure all straps (S) are tight.
CAUTION:
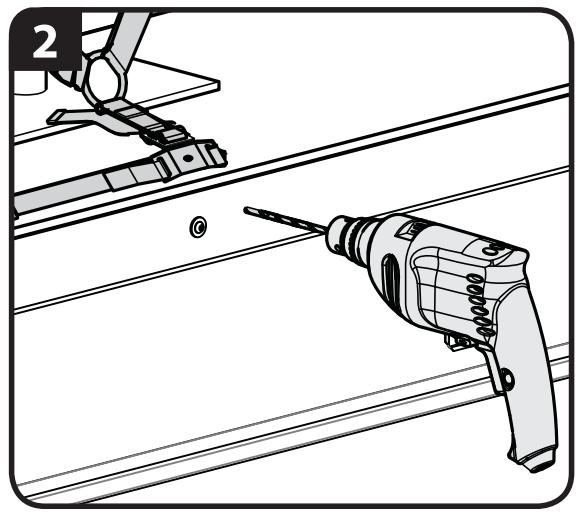
If you are attaching the anti-tip strap to metal furniture:
- Locate a secure area near the top of the furniture that is at least 3mm (1/8 in.) thick.
- Drill pilot hole to a depth of 13mm (1/2 in.) using a 6 mm (15/64 in.) diameter drill bit.
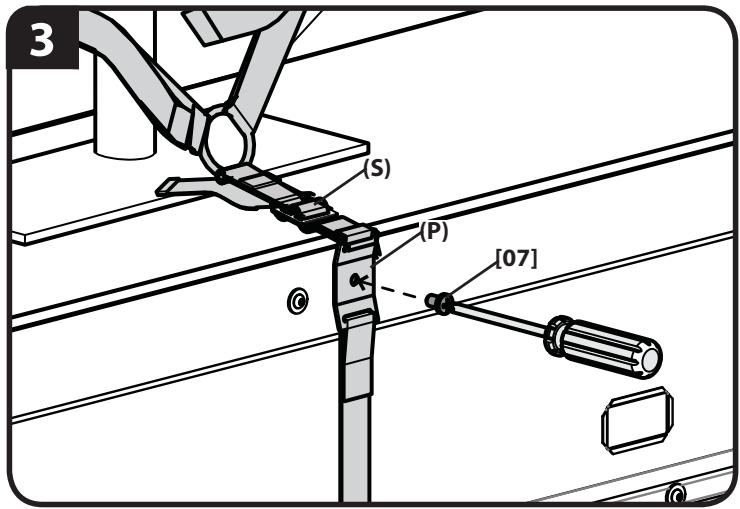
- Place the mounting plate (P) over the drilled hole on the back of the furniture. Insert and tighten screw [07].
CAUTION: To avoid potential injuries or property damage!
Ensure mounting plate (P) is securely fastened to the furniture.
Ensure all straps (S) are tight.

CAUTION:
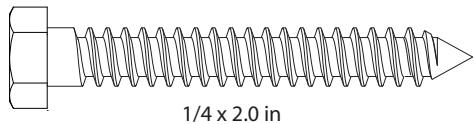
Attach Wall Plate [02] and Anti-tip Strap [01] to Wood Stud Wall
- Locate stud. Verify the center of the stud with an awl or thin nail or use an edge to edge stud finder.
- Level the wall plate [02] and mark the hole locations.
- Drill pilot holes as illustrated.
- Tighten the lag bolts [03] only until the washers [04] are pulled firmly against the wall plate [02].
- Insert the strap hook (H) into the wall plate [02].
- Rotate the strap hook (H) so that it is perpendicular to the wall plate [02].
- Tighten straps (S).
NOTE: If you need to move your funiture, loosen the straps and then unclip the strap hook (H) from the wall plate [02].
CAUTION: Improper use could reduce the holding power of the lag bolt. To avoid potential injuries or property damage:
Pilot holes must be drilled to a depth of 63.5mm (2.5 in.), using a 3mm (1/8 in.) diameter drill bit.
Do not over-tighten the lag bolts [03].
Any material covering the wall must not exceed 16mm (5/8 in.).
![SANUS SYSTEMS ELM701 - Attach Wall Plate [02] and Anti-tip Strap [01] to Wood Stud Wall - 1](/content/2024/12/185897/images/d3700fdc932eff0d289440b54063c49b561d223816d108c6a1f412903e6e7119.jpg)
![SANUS SYSTEMS ELM701 - Attach Wall Plate [02] and Anti-tip Strap [01] to Wood Stud Wall - 2](/content/2024/12/185897/images/811089d684d1c3e2ad802486b3ff175f080c6115275c0ab03480ae89e03fe27c.jpg)
3
![SANUS SYSTEMS ELM701 - Attach Wall Plate [02] and Anti-tip Strap [01] to Wood Stud Wall - 3](/content/2024/12/185897/images/5d2f5fb2c80ecd0f3e2a4a5cc444ae5b8287f79500d89bc51b23cbf4b0ae563c.jpg)
![SANUS SYSTEMS ELM701 - Attach Wall Plate [02] and Anti-tip Strap [01] to Wood Stud Wall - 4](/content/2024/12/185897/images/f69d0dfb275d41d8ee0ce69c699bcb4dccaf4258ef48d02df93334f5e7c8c904.jpg)
![SANUS SYSTEMS ELM701 - Attach Wall Plate [02] and Anti-tip Strap [01] to Wood Stud Wall - 5](/content/2024/12/185897/images/6fddea8480a24c2a0b926f955a1c12732d0ab934135b214ea71c2a42c672aae4.jpg)
![SANUS SYSTEMS ELM701 - Attach Wall Plate [02] and Anti-tip Strap [01] to Wood Stud Wall - 6](/content/2024/12/185897/images/446846a97a78e6eb5a9a628eab89e07e9f532cda31f7f85bb1b5e29f5239abe1.jpg)
![SANUS SYSTEMS ELM701 - Attach Wall Plate [02] and Anti-tip Strap [01] to Wood Stud Wall - 7](/content/2024/12/185897/images/d8aa71c4d20d56c3df3e6c93fd55e3e5146a62e601fbec9f95b0d286375183fe.jpg)
![SANUS SYSTEMS ELM701 - Attach Wall Plate [02] and Anti-tip Strap [01] to Wood Stud Wall - 8](/content/2024/12/185897/images/2d63d5590f36a6c00045cc432d3ae9397cd537fb28e4371b364c199febd2aa17.jpg)
![SANUS SYSTEMS ELM701 - Attach Wall Plate [02] and Anti-tip Strap [01] to Wood Stud Wall - 9](/content/2024/12/185897/images/654caf0f15eb2dbe7f47f9ea3bc7cfb71aa5225b26fb3e3e46786e890fd77d75.jpg)
ATTENTION:
INFORMATIONS IMPORTANTES CONCERNANT LA SECURITE - CONSERVEZ CES INSTRUCTIONS - VEUILLEZ LIRE ATTENTIVEMENT LE MANUEL AVANT D'UTILISER CE PRODUIT
Ensure mounting plate (P) is securely fastened to the furniture.
Ensure all straps (S) are tight.
2- 2
IpoIpo6HbIe INCTpyKcII npINBeHbI B pykoBoIDCTBE.
OCTOPOXHO! Co6IIOaIte npaBnla 6e3oNaChOCTN, uTO6bI pIeIoTbPaTtB Bo3MOxHbIe TpaBmI IOBpeXJdHeNc IMyuIecTBA!
He nCnoJIb3yIte I3dIeNe IaKaoI-Ni6o cIeN, YBaHO He oROBOpEHHO KOMnAhnE IpnO3BOJTeNb.
I3dennpeiHa3NaueHo dny yctaHOBKn TOnbKO Ha depeBraHHyO fXABepKOByIO cTeHy!
EcnBbI He NoHMaete npBBeDeHHbIe HNCTpyKcunn IIn He yBepenbl B 6e3oNaChOCTyCTaHOBKn, c6OpKn IIn EKcPiNyatauIN daHNO pnoDyKta, o6paTntecb B ceHTp nocIePpoDaJxHOrO oCnlykUbaHn KOMnaHn Ppon3BOOnTeJI bnnIO3BOHnTE KBaIInFnsnpOBaHHom yOdpAynK.
KoMaHnIg PpOu3BODHTeJI He HecET OTBeTCTBeHHocT 3a NOBpeJxHeN O6OpUdoBaHn IIN NIOyueHn TpaBMbl NO npuHn He npaBnBHOc6OpKn IIN EKCpIyataunn 3dEJIy.
IeTannu o6opudobHnue, BXoJauee B KOMnJIeK T NOCTaBKn - Cm. NIIIOCTpaunio Ha cTp.7
Ipeedem, kak npctyntb K6bOpke, y6eJeTecb, YTO Becb KOMnJIeK T dTaJIe B HAIuHIN N B HENOBpeJdEHOM COCTOHN. Ecnn KaKHe-1o6 DeTANI OTCyTCTBvIOT nnn NOBpeXdEnbl, He Bo3BaPauaTe I3dEIne DInepy; o6paTntEcB BuHTp 0cCnykBaHnA. HNKOrJa He UcNpOlb3yIte DeΦeKTHbIe Detani!
ПРМЕЧАНБудун ИСПОЛьЗВаТьСЯ He BCEMetaJION3ДелЯ.
1
Milestone AV Technologies and its affiliated corporations and subsidiaries (collectively, "Milestone"), intend to make this manual accurate and complete. However, Milestone makes no claim that the information contained herein covers all details, conditions, or variations. Nor does it provide for every possible contingency in connection with the installation or use of this product. The information contained in this document is subject to change without notice or obligation of any kind. Milestone makes no representation of warranty, expressed or implied, regarding the information contained herein. Milestone assumes no responsibility for accuracy, completeness or sufficiency of the information contained in this document.