FCPK606XL - Cooker CANDY - Free user manual and instructions
Find the device manual for free FCPK606XL CANDY in PDF.

User questions about FCPK606XL CANDY
0 question about this device. Answer the ones you know or ask your own.
Ask a new question about this device
Download the instructions for your Cooker in PDF format for free! Find your manual FCPK606XL - CANDY and take your electronic device back in hand. On this page are published all the documents necessary for the use of your device. FCPK606XL by CANDY.
USER MANUAL FCPK606XL CANDY
Safety Instructions 16
- GeneralWarnings 17
1.1. Symbols Used In This User Manual 17
1.2.Declaration Of Compliance 17
1.3. Safety Hints 17
1.4.Useful Tips 17
1.5. Technical Data 17
2.Installation 18
2.1. Positioning 18
2.2.Feet Adjustment 18
2.3. Dimensions Of The Appliance 18
2.4. General Appearance And Definition Of The Appliance 18
2.5. Cookers Without Energy Cable 19
2.6. Electrical Connection 19
- Vitroceramic Cooktop 20
3.1.Description Of Cooking Zones 20
3.2.CooktopCookwareAdvice 20
3.3. The Choice Of Cookware 20
3.4. Control Knobs Of The Vitroceramic Cooktop 20
4.Use Of The Oven 21
4.1.Grilling 21
4.2. Suggestions For Cooking 21
4.3.Cooking Cake 21
4.4.Cooking Pizza 21
4.5.Cooking Fish 21
4.6.CookingMeats 21
4.7.Cooking Turn Spit 21
4.8. Using The End Of Cooking Timer 22
4.9. Using The Minute Timer 22
4.10.Use Of The Electronic Programmer 22
4.11. Electric Oven 22
4.12.Cooking Tables 23 - Cleaning And Maintenance 24
5.1. Catalytic Self - Cleaning Oven 24 - Service Centre & Troubleshooting 25
- Protection Of The Environment 25
CONTENIDO
ES
WARNING: The appliance and its accessible parts become hot during use. Care should be taken to avoid touching heating elements.
- Children under 8 Year of age must be kept away from the appliance unless they are continuously supervised.
- This appliance can be used by children aged from 8 years and above and persons with reduced physical, sensory or mental capabilities or lack of experience and knowledge if they have been given supervision or instruction concerning use of the appliance in a safe way and understand the hazards involved.
Children must not play with the appliance. - Cleaning and user maintenance shall not be made by children without supervision.
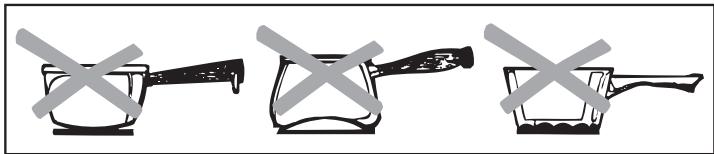
- WARNING: Unattended cooking on a hob with fat or oil can be dangerous and may result in fire.
- NEVER try to extinguish a fire with water, but switch off the appliance and then cover flame e.g. with a lid or a fire blanket.
- WARNING: Danger of fire: do not store items on the cooking surfaces.
- WARNING: If the surface is cracked, switch off the appliance to avoid the possibility of electric shock.
- During use the appliance becomes hot. Care should be taken to avoid touching heating elements inside the oven.
- WARNING: Accessible parts may become hot during use. Young children must be kept away.
- Do not use harsh abrasive cleaners or sharp metal scrapers to clean the oven door glass since they can scratch the surface, which may result in shattering of the glass.
- The internal bottom surface of the drawer can get hot.
- The oven must be switched off before removing the guard, after cleaning, the guard must be replaced in accordance with the instructions.
- Only use the temperature probe recommended for this oven.
- Do not use a steam cleaner for cleaning operations
- Any spillage should be removed from the lid before opening.
- The hob surface must be allowed to cool down before closing the lid.
- If present, do not to stare into halogen lamp hob elements.
- WARNING: Avoid possibility of electric shock - ensure the appliance is switched off before replacing the lamp
- If the range is placed on a base, measures must to be taken to prevent the appliance slipping off the base.
- A mean for disconnection from the supply mains having a contact separation in all poles that provide full disconnection under overvoltage category III conditions, must be incorporated in the fixing wiring in accordance with the wiring rules.
- The instructions state the type of cord to be used, taking into account the temperature of the rear surface of the appliance.
- If the supply cord is damaged, it must be replaced by a special cord or assembly available from the manufacturer or its service agent.
- CAUTION: In order to avoid a hazard due to inadvertent resetting of the thermal cutout, this appliance must not be supplied through an external switching device, such as a timer, or connected to a circuit that is regularly switched on and off by the utility.
- "CAUTION: Accessible parts may be hot when the grill is in use. Young children must be kept away".
- WARNING: In order to prevent tipping of the appliance, stabilizing means must be installed. Please refer to the instructions on page 98 of this manual
1. GENERAL WARNINGS
Thank you for choosing one of our products. To get the most out of your cooker we recommend that you:
- Read the notes in this manual carefully: they contain important instructions on how to install, use and service this cooker in safety. Keep this booklet in a safe place for easy, future reference.
- In the case of the sale or transfer of the appliance, this manual should be given together with the appliance in order to guarantee the proper transfer of the information on installation/usage of the appliance and the relative warnings.
- All accessible parts are hot when the appliance is in operation, take care to not touch these elements. When the cooker is first switched on it may give off acid smelling fumes—this smoke is harmless we suggest to operate the cookers for 2 hours while empty.
1.1. SYMBOLS USED IN THIS USER MANUAL
For easier comprehension, the symbols below are used in this user manual.

Safety Information.

Information for Environment Protection.

This appliance complies with the EU E.E.C directives.

Caution, possibility of tilting.

Anti-tip restraints.
1.2. DECLARATION OF COMPLIANCE
All parts of this appliance that may come into contact with foodstuffs comply with the provisions of EEC Directive 89/109. The appliance complies with European Directives 2006/95/EC and 2004/108/EC, and subsequent amendments. The appliance also complies with 93/68 General Directives and subsequent amendments.
1.3. SAFETY HINTS
- The cooker must be used only for the purpose for which it was designed: it must only be used for cooking food. Any other use, e.g. as a form of heating, is improper use of the cooker and is therefore dangerous.
- The manufacturers cannot be held responsible for any damage caused by improper, incorrect or unreasonable use.
- When using any electrical appliance you must follow a few basic rules. If the appliance breaks down or develops a fault switch it off, disconnect it from mains, do not touch it, call the authorised Service.
- This appliance is not intended for use by persons (including children) with reduced physical, sensory or mental capabilities, or lack of experience and knowledge, unless they have been given supervision or instruction concerning use of the appliance by a person responsible for their safety.
Children should be supervised to ensure that they do not play with the appliance. - An oven by its very nature becomes very hot. Especially the glass of the oven door. Do not allow children to go near the oven when it is hot, especially when the grill is on.
Always use gloves to remove food from the oven. - Always keep your appliance clean, for safety and health reasons. Fat and food residues may cause fire.
- Do not insert your hand between oven hinges. Keep children away.
- Make sure that all the knobs are in the OFF position when the appliance is not in use.
The oven drawer is to store empty trays or to keep food warm. - Do not put flammable, explosive or cleaning materials like nylon bags, paper, cloths, etc, into the drawer.
- Use only heat resistant pots and pans. Do not use flammable materials.
- It is dangerous to modify or to attempt to modify the properties of the appliance.
- Particular attention is necessary when you are frying: do not leave the appliance unattended.
The appliance is heavy. Take care when moving. - The emission of hot air is normal while the appliance is working. Do not close the vents on the oven.
- Some spillage on the appliance may occur, when placing food on or into the appliance or when removing food with excess fat or
water. Clean such residues immediately after cooking, in order to prevent unpleasant smells and possible fires.
- When using any electrical appliance you must follow a few basic rules:
*It is not generally a good idea to use adapters, multiple sockets for several plugs and cable extension.
*Do not pull the power cable to remove the plug from the socket.
Do not touch the oven with wet or damp hands or feet.
If the main cable is damaged it must be replaced promptly:
*When replacing the cable, follow the instructions given below:
*Cable replacement must be carried out by qualified technicians. Use only an approved service centre for repairs end ensure that only original parts are used.
*When necessary, remove the power cable and replace it with one of the H05RR-F, H05VVF, and H05V2V2-F type. The cable have the capacity for the electrical current required by the product.
- Do not leave the appliance unattended before it has cooled down.

If the above instructions are not adhered to, the manufacturer cannot guarantee the safety of the cooker.
1.4. USEFUL TIPS
- Do not use deformed or unbalanced pans.
- Clean the grill and the fat collecting tray carefully before initial usage.
- When using cleaning sprays, do not spray on heaters or on the thermostat.
- Make sure that oven shelves are correctly placed.
- Do not cover oven parts with aluminium foil.
1.5. TECHNICAL DATA
| FEATURES | TOTAL ELECTRIC POWER |
| 60 x 60 4 Hilight Heater and Electrical Oven | 8.4 kW |
| 50 x 60 4 Hilight Heater and Electrical Oven | 6.6- 6.8 kW |
Rating plate (located at the rear of the cooker)
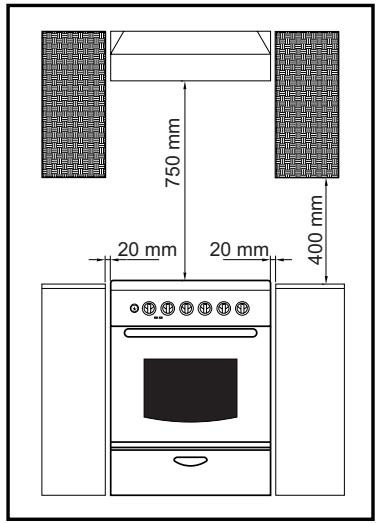
2. INSTALLATION
Installation have to be made by qualified personnel. The manufacturer have no obligation to carry this out. If the assistance of the manufacturer is required to rectify faults arising from incorrect installation, this assistance is not covered by the guarantee.
The installation instructions for professionally qualified personnel must be followed. Incorrect installation may cause harm or injury to people, animals or belongings. The manufacturer cannot be held responsible for such harm or injury.
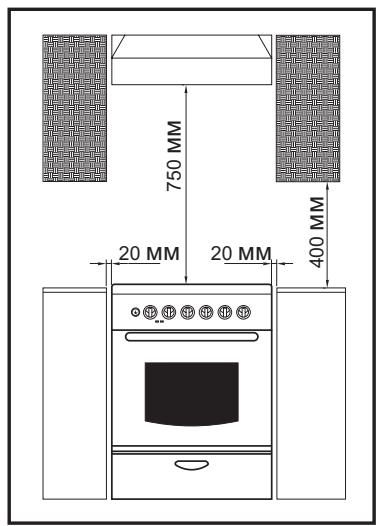
WARNING! Care must be taken regarding where the appliance is placed! It can only be installed in a continuously ventilated room.
Electrical connections must always be disconnected before any repair, installation or modification.
- Before positioning your appliance, check the properties of the energy supply and make sure that your appliance is regulated accordingly.
- The appliance must not be installed near flammable materials (e.g. furniture, curtains, etc.)
- If the range is placed on a base, measures must to be taken to prevent the appliance slipping off the base.
2.1. POSITIONING
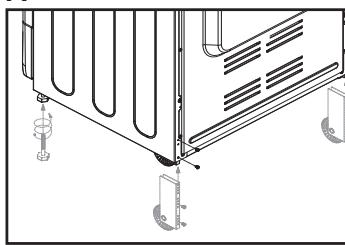
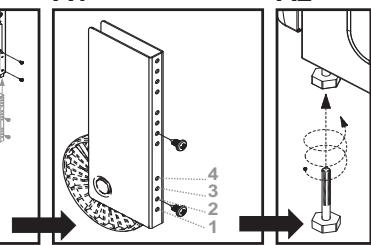
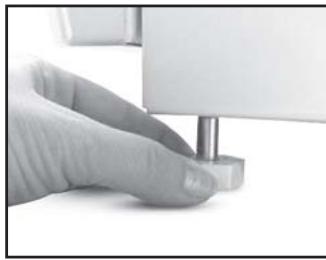
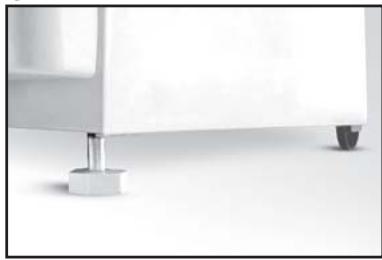
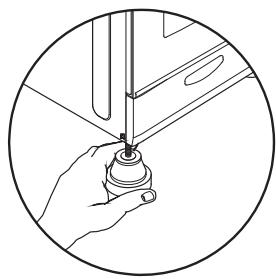
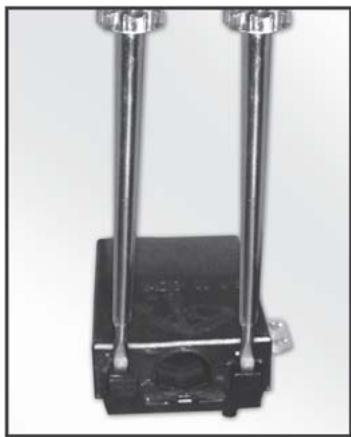
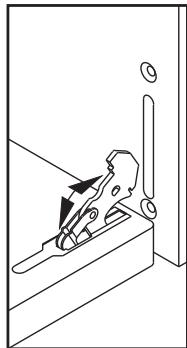
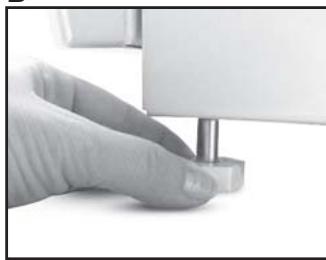
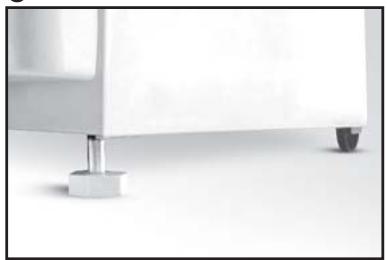
2.2. FEET ADJUSTMENT
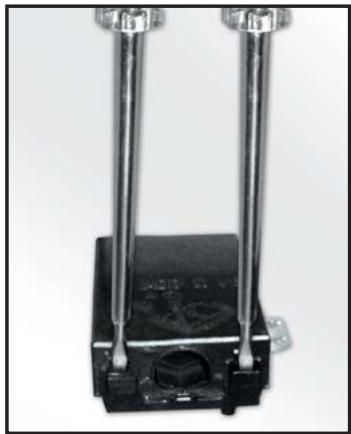
Your appliance has adjustable feet at the lower corners of its chassis.
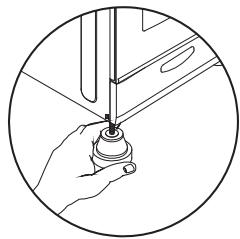
- The feet can be adjusted individually with the aid of a wrench to guarantee that the oven is perfectly balanced and levelled, so that any liquids in the pans is horizontal.
Adjustable feet and wheels.
A
B
C
- The maximum height of cooker will be 868mm by fixing the adjustable front feet and rear wheels to the 4th hole.
- Rear wheels should be fixed to the 2nd hole (picture A1), standard height. Thus, standard height will be 850 ~mm .
Adjustable feet.
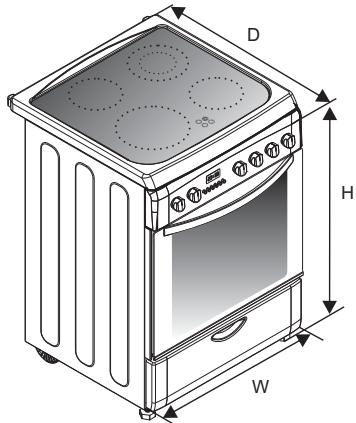
2.3. DIMENSIONS OF THE APPLIANCE
| 60 x 60 | 50 x 60 | |
| Height (mm) | 850 | 850 |
| Width (mm) | 598 | 510 |
| Depth (mm) | 600 | 600 |
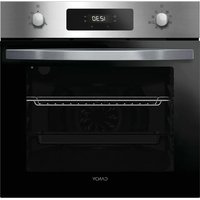
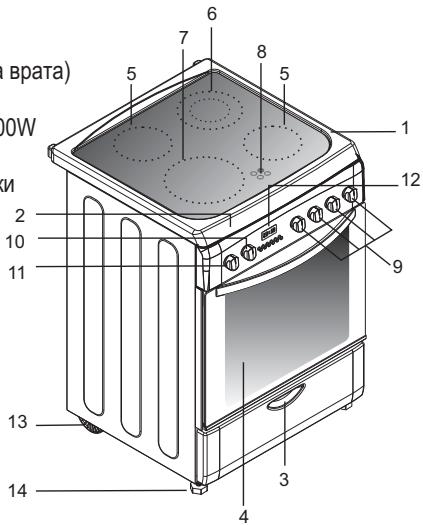
2.4. GENERAL APPEARANCE AND DEFINITION OF THE APPLIANCE
This User Manual has been drawn up as a guide for several models. Some of the properties mentioned in this manual may not exist in your appliance.
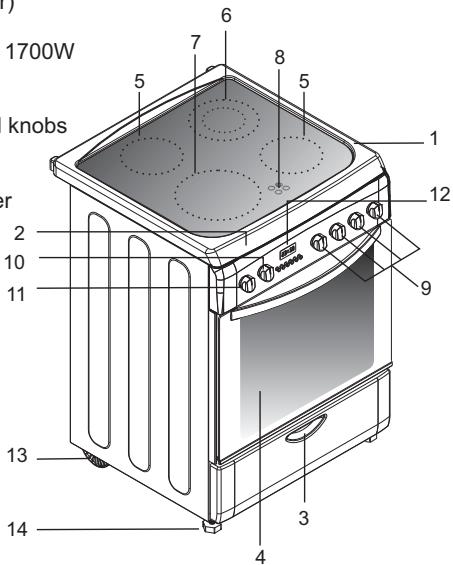
60 × 60 COOKER
1-Cook top
2- Control panel
3-Drawer
4-Oven door (Front door)
5-Hilight Heater 1200W
6- Double Hilight Heater 1700W
7-Hilight Heater 2300W
8- Warning Lamps
9-Hilight heaters control knobs
10-Oven knob
11- Thermostat knob
12- Electronic programmer
13-Moving Foot
14-Bolt Foot
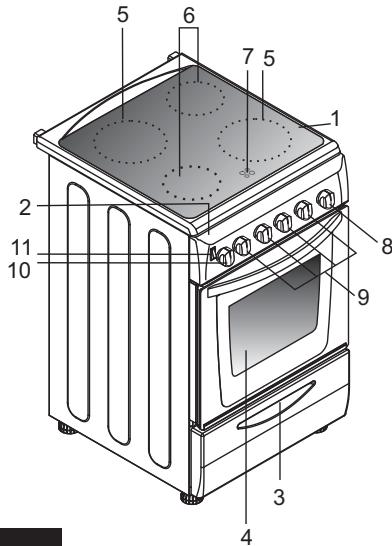
50 × 60 COOKER
1-Cook top
2- Control panel
3-Drawer
4-Oven door (Front door)
5-Hilight Heater 1800W
6-Hilght Heater 1200W
7- Warning Lamp
8-Timer knob
9-Hilight heaters
control knobs
10-Oven knob
11-Fan knob
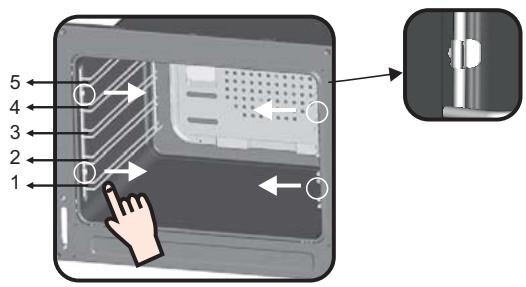
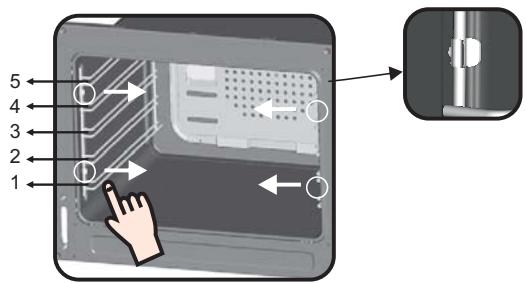
REMOVING AND CLEANING WIRE RACKS
1- Remove the wire racks by pulling them in the direction of the arrows (see below)
2- To clean the wire racks either put them in the dishwasher or use a wet sponge, ensuring that they are dried afterwards.
3-After the cleaning process install the wire racks in reverse order.
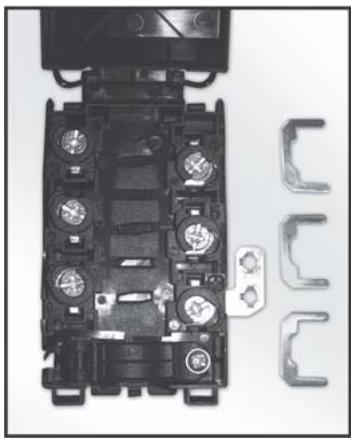
2.5. COOKERS WITHOUT ENERGY CABLE
Cable box connection types
1- Monophase connection
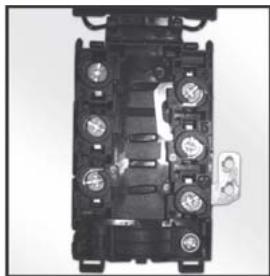
2- Three-phase connection
Attention: A poor clamping can draw away risks dangerous heating at the level of the cable feeding
| Monophase 220-240 V~ | Three-phase 380-415V3N~ | ||||
| Cable - Section Cable - Type | 3 G 4 mm² H05VV-F ou H05RR-F | 5 G 1.5 mm² H05VV-F ou H05RR-F | |||
| 3 | N | 4 | 3 | N | |
| 2 | PE | 5 | 2 | L2 | |
| 1 | PE | 1/2 | 1 | PE | |
| L1: Phase shunt 1-2 and shunt 2-3 | 1 Phase 2 Phase 3 Phase 5 Neatural shunt 4-5 T Earth | ||||
2.6. ELECTRICAL CONNECTION
Cookers can be presented with or without energy cable. Cable connection should be done by Autorited service according to following instructions.
The electrical connection must be made according to the standards and regulations in force. Before making the electrical connection, check the following:
- Is the capacity of the electrical connections and safety fuses in the building sufficient to cope with the load of the appliance? (Check with the adhesive info label)
- Does the electricity supply line have an earth connection conforming with the standards in force? A proper earth connection must exist in your home. If there is not a proper earth connection at your home, please apply to an authorized technician to deal with this problem.
- Is the socket or the multi-pole switch at a easily reachable point after the installation of the appliance?
- A plug conforming to standards should be connected to the mains cable and the cable should be inserted into a safe socket.
- A multi-pole switch must be used between the appliance and the electricity line if a direct electrical connection to the appliance is required. (It must comply with standards and be appropriate for the load)
The green-yellow ground cable must not be interrupted by a switch. The brown phase cable (from the "L" coded connector of the oven) must always be connected to the phase line of the mains.
- The power line must be positioned so that it is not exposed to temperatures higher than 50^ C .
- When the power cable must be changed, a cable with a cross section appropriate to the indicated power must be used. The green-yellow ground cable should be approximately 2cm longer than phase and neutral cables.
- Check the heaters by switching them on for 3 minutes, after having completed the connection.
- The manufacturer will not accept responsibility for damages arising due to non-compliance with the safety standards.
If an appliance is not fitted with a supply cord and a plug, or with other means for disconnection from the supply mains having a contact separation in all poles that provide full disconnection under overvoltage category III conditions, the instructions shall state that means for disconnection must be incorporated in the fixed wiring in accordance with the wiring rules.
3.1.DESCRIPTION OF COOKING ZONES
Highlight zone
A metallic conductor strip is spread uniformly over the whole surface unit. It is effective within 3 seconds and is suitable for steady, even and also lengthy cooking.
The glass-ceramic cook top benefits from greater heat output which is generated by the highlight cooking zones thereby accelerating the cooking process. Modifications to the design of the hob have not affected the capacity of the glass to withstand high temperatures, but they have improved controllability.
With the "Sprinter" facility, reduced cooking times of up to 15% can be achieved, depending on the method of cooking and the type of saucepans used.
- Multi-circuit heating elements offer the advantage that several cooking zone sizes can be used with one heating element.
3.2. COOKTOP COOKWARE ADVICE
Efficient cooking
The extra large highlight zone, will depending on the dimensions of the cook ware and/or the quantity of food being cooked, provide even higher performance levels.
Using good quality cookware is critical for obtaining the best performance from your hob.

Use pans with a large enough diameter to completely
cover the surface unit the size of the pan should be no smaller than the heated area. If it is slightly wider the energy will be used at maximum efficiency.
3.3. THE CHOICE OF COOKWARE
The following information will help you to choose cookware which will give good performance.
Stainless Steel
Highly recommended. Especially good with a sandwich clad base. The sandwich base combines the benefits of stainless steel (appearance, durability and stability) with the advantages of aluminium or copper (heat conduction, even heat distribution).
Aluminium
Heavy weight recommended. Good conductivity.
Aluminium residues sometimes appear as scratches on the cook top but can be removed if cleaned immediately. Because of its low melting point, thin aluminium should not be used.
Cast Iron
Usable, but not recommended. Poor performance. May scratch the surface.
Copper Bottom / stoneware
Heavy weight recommended. Good performance, but copper may leave residues which can appear as scratches. The residues can be removed, as long as the hob is cleaned immediately. However, do not let these pots boil dry. Overheated metal can bond to glass hobs. An over heated copper pot will leave a residue that will permanently stain
the cook top.
Ensure that the base of the pot or pan is dry
when filling pans with liquid or using one that has been stored in the refrigerator, ensure that the base of the pan is completely dry before placing it on the hob. This will help to avoid staining the cook top.
Always use good quality cookware with perfectly flat and thick bases
Using this type of cookware will prevent hot spots that cause food to stick. Thick metal pots and pans will provide even distribution of heat.
Porcelain/enamel
Good performance only if the base is thin, smooth and flat.
Glass-ceramic
Not recommended. Poor performance. May scratch the surface.
Suitability of Cooking Pans
Keep in mind that larger pans have larger heating surfaces.
This will help them to cook the food faster than pans with smaller heating surfaces.
Always use pan sizes proportionate to the amount of the food to be cooked. In order to prevent splashing, do not use very small pans, especially for foods with excess liquid. If you use excessively large pans for quick cooked foods, sausages and liquids will stick and residues will remain attached to the pan after being emptied.
Closed pans and baking trays or moulds are suggested for cooking sweets. Splashed sugar and juices from an open pan may stick to the cooker surface and will be difficult to remove. This is especially important for pans used for roasting or pressurized cooking at high temperature.
Do not leave burners unattended without a pan or with an empty pan on top.
Check the suitability of cooking pans with respect to the following criteria;
They should be heavy.
They should completely cover the burner surface; they may be a little bigger but no smaller.
Base surfaces should be completely flat and fit well on the cooking surface.
- Some parts of the food may be heated while others remain cold due to the uneven distribution of heat under the pan. Therefore, continuous stirring of the food being cooked is necessary in the case of thin-bottomed pans. Heat is more effectively and evenly distributed with thick-based pans.
- Use of very small pans is not recommended. Wider, low-sided pans are more suitable for more effective and quicker cooking than small, deep pans.
- You cannot shorten cooking time by using a small pan over a large burner. You will only waste gas in this way. However, a pan with a lid will save energy.
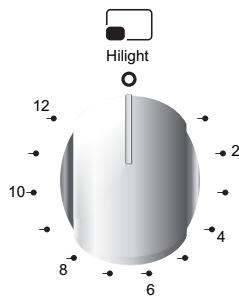
3.4. CONTROL KNOBS OF THE VITROCERAMIC COOKTOP
HOW TO OPERATE THE COOKTOP
Locate the sign corresponding to the cooking zone that you need.
Turn the control knob to the required cooking setting.
Initially we recommend that the heat zone be set at the highest position until the contents of the saucepan have reached the required temperature; the heat can then be reduced to the required cooking setting.
The residual heat indicator light will come on when the cook top surface temperature reaches 60 degrees or above.
It will remain on even if the cook top is switched off and will only go out when the cook top surface has cooled down.
| Position | Some Tips | ||
| 1 | 1-2 | Very Low | To keep a dish hot, melt butter and chocolate... |
| 2 | 3-4 | Low | Slow cooking, sauces, stews, rice pudding poached eggs... |
| 3 | 5-6 | Moderate | Beans, frozen foods, fruit, boiling water... |
| 4 | 7-8 | Medium | Steamed apples, fresh vegetables, pasta, crepes, fish... |
| 5 | 9-10 | High | More intense cooking, omelettes, steaks... |
| 6 | 11-12 | Very High | Steaks,chops, frying... |
To switch off the cook top, turn the knob to "O".
- The oval heating zone consists of two heating areas: a circular area and an oval shaped section. Turn the control knob from 1 to 12 to regulate the circular area. To operate the oval section, simply turn the control knob to position12 and then select a position from 1 to 12.
- The heating area consists of two concentric zones. The inner circle is activated when the knob is turned to any of the positions from 1 to 12. The outer ring will only be activated when the control is turned beyond 12 up to a maximum power.
4. USE OF THE OVEN
4.1. GRILLING
- Grilling gives food a rich brown colour quickly. Depending on the quantity of the food, you can switch the grill on to different positions. Almost all food can be cooked under the grill except for very lean game and meat rolls.
- Meat and fish that is going to be grilled should first be lightly doused with oil.
- Place a fat collecting tray beneath during grilling. Put some water into the tray to prevent unpleasant smells and to prevent the fat catching fire.
- Grilling is usually preferred for cooking pieces of meat, for example steaks, which are not too thick, different sized meat parts, cleaved hunted birds, fish, some vegetables (e.g. courgettes, aubergines, tomatoes, etc.) together with meat and fish products on spits.
Oil the fish lightly before putting it directly under the grill.
Add salt on meat after cooking, salt fish into the cleavage before cooking.
- The distance from the grill will depend on the thickness of the meat or fish. If the distance is correctly judged, the outer parts will not be burnt and the inside will not remain raw.
- Prevent unpleasant odours and smoke caused by dripping fats and sauces by pouring 1-2 glass of water into the fat-collecting tray.
- You can also use the grill for toasting, toasted bread or sandwiches, for example, and also to cook certain fruits (bananas, grapefruit or pineapple slices, apples etc.). However, fruit must not come into contact with the heating elements.

Never cover oven inner walls or the bottom with aluminium foil. Accumulated heat can damage the oven enamel and your meal.
4.2. SUGGESTIONS FOR COOKING
Traditional Cooking
Heat is generated from the upper and lower heaters. Generally, the middle shelf position is preferable for cooking. However, if the top or bottom surface of the food must be cooked more, place it on the upper or lower shelf.
Convection Cooking (with Fan)
- The food is cooked by evenly distributed preheated air blown into the oven by the help of the fan located on the inside back wall of the oven.
It is possible to cook several dishes simultaneously on different shelves thanks to the evenly distributed heat inside the oven.
- This type of oven is also very useful for defrosting frozen food. It can also be used for sterilizing canned food, preparing fruit syrups, and dehydrating fruits and mushrooms.
4.3. COOKING CAKES
- Unless otherwise suggested, preheat the oven for at least 10 minutes before use. Do not open the oven door when cooking cakes otherwise they will not rise (cakes or dishes with yeast and soufflés). The blast of cold air which will enter the oven will prevent rising. You can check whether cakes are properly cooked by inserting a rod into the dough. If the rod comes out dry when you pull it out, it means that the cake is properly cooked. Do not check in this way until at least three quarters of the cooking time has elapsed.
Please keep in mind the following tips
- If the surface of the food is cooked well but it is still raw or partly raw inside, it must be cooked longer at a lower temperature.
- On the other hand, if the surface of the food is too dry, it should be cooked at a higher temperature for a shorter time.
4.4. COOKING PIZZA
Thermostat setting at maximum
- Preheating time 15 min (20 min if possible)
- Position of the tray in either one of the two lowest position
Cooking time 20 min.
4.5. COOKING FISH
Small fish can be cooked at the maximum temperature from start to finish. Medium sized fish must be cooked at the maximum temperature at the beginning and then the temperature must be slowly reduced. Larger fish must be cooked at lower temperatures from start to finish. Check the cut at the bottom of fish to understand whether it is cooked properly. In order to understand whether the fish properly grilled or not, check the cleavage at the bottom of the fish. The colour (for grilled fish) should be an even matt white. This is not the case for salmon and trout.
4.6. COOKING MEATS
- The minimum quantity of meat to be cooked in the oven is 1kg . Otherwise, the meat will be too dry.
If you require well done meat, use less fat. If meat has a little fat, there is no need to use oil. If one side of the meat is fatty, place this side up. The melted fat will sufficiently grease the part below. Red meats should be taken out of the fridge at least 1 hour before the cooking. - Otherwise the meat may become tough due to the temperature difference. Do not use salt before cooking, especially when grilling meat. Salt will draw the blood and juices out of the meat which will consequently prevent the roasting of the upper surface of the meat.
- Add salt to roast meat only after half of the cooking time has elapsed.
- Place the meat to be roasted in a wide, shallow pan.
- Deep sided containers / pans act as a shield against the heat. Meat can be placed in the oven in a heat resistant pan or directly onto the grill. Insert a fat / gravy collecting tray beneath the grill. Sauces must be added at the beginning if the food is cooked for a short time, while it would be better to add sauces in the last half hour if the food is cooked for a longer time.
4.7. COOKING TURN SPIT
- The cooker is equipped with a metal turnspit, two forks and a hook used to support the spit.
-Instruction for use: - Remove all accessories from the oven;
- Put the deep pan on the bottom of the oven or on the lowest bench;
- Stick the turnspit through the meat, centered between the two forks;
- Fix the turnspit into the drive hole located in the bottom wall, then hang the support hook in the drive located at the top front of the oven cavity and around the edge of the turnspit.
- Preheating is not necessary with the turnspit.
- Cooking Time Recommended In Turnspit Position;
| Cooking time (min) | Electric Oven |
| Beef (1kg) | 20/30 |
| Lamb, sheep (1kg) | 30/40 |
| Veal, Poultry (1kg) | 60/70 |
| Pork (1 kg) | 65/75 |
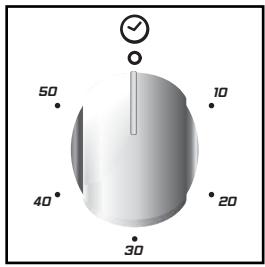
4.8. USING THE END OF COOKING TIMER
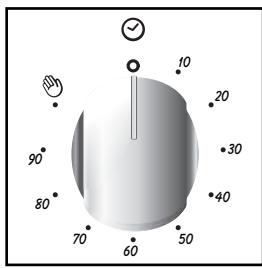
This control enables to set the desired cooking time (max. 90 min.) the oven will automatically switch off at the end of the set time.
The timer will count down from the set time return to the 0 position and switch off automatically.
For normal use of oven set the timer to the position.
To set the oven ensure the timer is not on the O position.
4.9. USING THE MINUTE TIMER
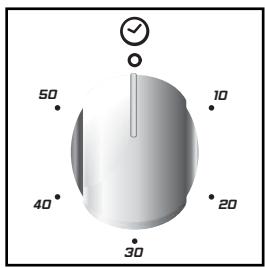
To set the cooking time, turn dial one complete revulution and then position the index to the required time. When the times has lapsed, the signal will ring for a few seconds.
4.11. ELECTRIC OVEN
| Position | Oven Function |
| F | Function |
| °C | Temperature |
| ℃ | Cooking time |
| ○ | Not in function |
| ←→ | Turn spit and grill heater |
| ◇ | Lamp |
| ◇ | Grill heater |
| × | Grill heater and fan |
| × | Fan |
| × | Upper heating element and fan |
| × | Lower heating element and fan |
| × | Upper heating element, lower heating element and fan |
| ◇ | Lower and upper heating element |
| ◇ | Upper heating element |
| ◇ | Lower heating element |
| ◇ | Manual |
| PIZZA | Pizza |
4.10. USE OF THE ELECTRONIC PROGRAMMER
| FUNCTION | HOW TO ACTIVA | HOW TO SWITCH IT OFF | WHAT IT DOES | WHAT IT IS FOR |
| MINUTE MINDER | •Press and hold the button▲ •Press the buttons▼or▲to set the required time •Release all the buttons | •When the set time as elapsed an audible alarm is activated (this alarm will stop on its own, however it can be stopped immediately by pressing the button) □ | •Sounds an alarm at the end of the set time. •To check how long is left to run press the button▲ | •Allows to use the oven as alarm clock (could be activated either with operating the oven or with out operating the oven) |
| MANUAL FUNCTION | •Press the button □ •Set the cooking function with the oven function selector | •Turn the oven function selector to position“○” | •Enables you to operate the oven. | •For cooking the desired recipes |
| COOKING TIME | •Press and hold the TIMER button •Press the buttons▼or▲to set the lenght of cooking required •Release all buttons •Set the cooking function with the oven function selector | •When the time is elapsed the oven will switch off automatically. Should you wish to stop cooking earlier either turn the function selector to 0, or set time to 0:00(TIMER and▼▲buttons) | •It allows to preset the cooking time required for the recipe chosen. •To check how long is left to run press the TIMER button. •To alter/change the preset time press TIMER and▼▲buttons | •At the end of the cooking set time, the oven will switch off automatically and an audible alarm will ring. |
| END OF COOKING | •Press and hold the END button •Press the buttons▼▲to set the time at which you wish the oven to switch off •Release the buttons •Set the cooking function with the oven function selector | •At the time set, the oven will switch off. To switch off manually, turn the oven function selector to position“○”. | •Enables you to set the end of cooking time •To check the preset time press the END button •To modify the preset time press buttons END+▼▲ | •This function is typically used with “cooking time” function. For example if the dish has to be cooked for 45 minutes and needs to be ready by 12:30, simply select the required function, set the cooking time to 45 minutes and the end of cooking time to 12:30. •Cooking will start automatically at 11:45 (12:30 minus 45 mins) and will continue until the preset end of cooking time, when the oven will switch itself off automatically WARNING! If the END of cooking is Selected without setting the length of cooking time, the oven will start cooking Immediately and it will Stop at the END of cooking time set. |
Setting the correct time:
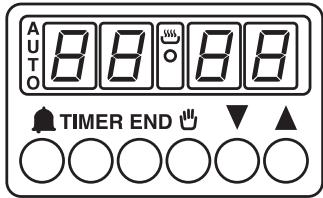
WARNING : the first operation to carry out after the oven has been installed or following the interruption of power supply (this is recognizable the display pulsating and showing )[L/L] is setting the correct time. This is achieved as follows:
- Press and hold the TIMER and END buttons (▶ and ↓)
- Set time with buttons
- Release all buttons
ATTENTION the oven only operates if set on manual function or preset time.
N.B.: on some models the symbols are replaced by ± and .
In the programming of a timer with 5 buttons, for manual function, press "TIMER" and "END" buttons simultaneously
TIMER END

Traditional and Hot Air Circulation Cooking Methods; Weights (Gr)
TYPE OF THE FOOD Traditional Cooking Method
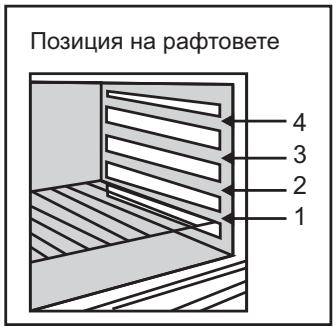
| Weight (Gr) | TYPE OF THE FOOD | Traditional Cooking Method | Hot Air Circulation Method | Cooking times (Minutes) | NOTES | ||
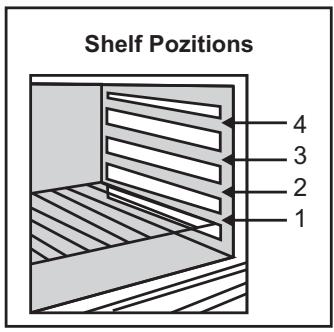
| CAKES AND DESSERTS | Shelf Position | Tempera-ture(℃) | Shelf Position | Tempera-ture(℃) | |||
| Dough with stirred egg | 2 | 180 | 2 (1 and 3) | 160 | 45 - 60 | ||
| Dough | 1 | 180 | 2 (1 and 3) | 160 | 20 - 35 | ||
| Small Cakes | 2 | 180 | 2 (1 and 3) | 160 | 20 - 30 | ||
| Cheese Cake | 1 | 175 | 2 | 150 | 60 - 80 | ||
| Apple Pie | 1 | 180 | 2 (1 and 3) | 160 | 40 - 60 | ||
| Strudel | 2 | 175 | 2 (1 and 3) | 150 | 60 - 80 | ||
| Jam tart | 2 | 180 | 2 (1 and 3) | 160 | 45 - 60 | ||
| Small cakes | 2 | 180 | 2 (1 and 3) | 160 | 15 - 25 | ||
| Biscuits | 2 | 180 | 2 (1 and 3) | 160 | 10 - 20 | ||
| Cream cakes | 2 | 100 | 2 (1 and 3) | 100 | 90 - 120 | ||
| 1000 | BREAD | ||||||
| White Bread | 1 | 200 | 2 | 175 | 45 - 60 | ||
| 500 | Rye Bread | 1 | 200 | 2 | 175 | 30 - 45 | |
| 500 | Sandwich | 2 | 200 | 2 (1 and 3) | 175 | 20 - 35 | Inside the closed oven on dishes 8 pieces on a tray Under the grill |
| PASTRY | |||||||
| Macaroni | 2 | 200 | 2 (1 and 3) | 175 | 40 - 50 | ||
| With vegetable | 2 | 200 | 2 (1 and 3) | 175 | 45 - 60 | ||
| Small pastries | 2 | 200 | 2 (1 and 3) | 175 | 35 - 45 | ||
| Lasagne | 2 | 200 | 2 | 175 | 45 - 60 | ||
| MEATS | |||||||
| Roast beef | 2 | 200 | 2 | 175 | 50 - 70 | Cook on grill | |
| 1000 | Roast pork | 2 | 200 | 2 | 175 | 100 - 130 | Cook on grill |
| 1200 | Roast veal | 2 | 200 | 2 | 175 | 90 - 120 | Cook on grill |
| 1000 | British style roast beef | 2 | 220 | 2 | 200 | 50 - 70 | Cook on grill |
| 1500 | Lamb | 2 | 200 | 2 | 175 | 110 - 130 | Leg |
| 1200 | Chicken | 2 | 200 | 2 | 175 | 60 - 80 | Full size |
| 1000 | Turkey | 2 | 200 | 2 | 175 | 210 - 240 | Full size |
| 4000 | Duck | 2 | 175 | 2 | 160 | 120 - 150 | Full size |
| 1500 | Goose | 2 | 175 | 2 | 160 | 150 - 200 | Full size |
| 3000 | Rabbit | 2 | 200 | 2 | 175 | 60 - 80 | In parts |
| 1200 | FISH | ||||||
| Whole fish | 2 | 200 | 2 (1 and 3) | 175 | 40 - 60 | 2 Fishes | |
| 800 | Fillet | 2 | 200 | 2 (1 and 3) | 175 | 30 - 40 | 4 Fillets |
NOTE :
1) Cooking times do not include pre heating. Preheating the oven for about 10 minutes is advisable especially for cakes, pizzas and breads.
2) Indicates tray positions for cooking several dishes simultaneously.
3) All cooking operations must be carried out with oven door closed.
| FOOD TYPES | QUANTITY | COOKING ON GRILL | COOKING TIMES (Minutes) | |||
| N. OF PARTS | WEIGHT | SHELF POSITION | TEMPERATURE (℃) | UPPER SECTION | LOWER SECTION | |
| Beefsteak | 4 | 800 | 4 | max | 10 | 8 |
| Grilled cutlet | 4 | 600 | 4 | max | 12 | 8 |
| Sausage | 8 | 500 | 4 | max | 10 | 6 |
| Chicken parts | 6 | 800 | 3 | max | 30 | 20 |
| Mixed grill | 4 | 700 | 4 | max | 12 | 10 |
| Milky desserts | 4 | 400 | 4 | max | 13 | 10 |
| Tomato slices | 8 | 500 | 4 | max | 12 | -- |
| Fish fillets | 4 | 400 | 4 | max | 8 | 6 |
| Scallops | 6 | --- | 4 | max | 12 | -- |
| Toast | 4 | --- | 4 | max | 8 | -- |
| Bread slices | 4 | — | 4 | max | 2-3 | 1 |
5. CLEANING AND MAINTENANCE
Before all cleaning and maintenance :
- Disconnect mains voltage.
- If the oven is hot, wait till it has cooled down.
- Never use a steam or high pressure spray to clean the appliance.
- Never use abrasive cleaners, wire wool or sharp objects to clean the glass oven door.
- Clean enamelled surfaces with warm, soapy water or with suitable brand products. On no account use abrasive powders that may damage surfaces and ruin the appearance of the cooker.
It is very important to clean the oven each time it is used.
- Use detergents and abrasive metal pads for the stainless steel grills.
- The glass surfaces such as the top, the oven door and the warming compartment door must be cleaned when they are cold.
- Damage caused by failure to respect this rule is not covered by the guarantee.
- Do not use abrasive products, metal cleaning pads, sharp objects, rough cloths, or chemical products and detergents that can permanently damage the catalytic lining.
- It is a good idea to use deep roasting trays for fatty foods such as joints of meat etc. and to put a tray underneath the grill to catch surplus fat.
- Cleaning and user maintenance shall not be made by children without supervision.
-Do not use a steam cleaner for cleaning operations
Cleaning of Oven Door
For thorough cleaning of the oven door, it is advisable to remove the same, as shown in below.
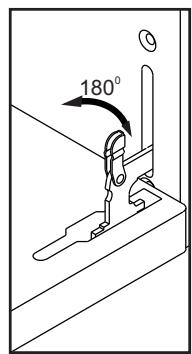
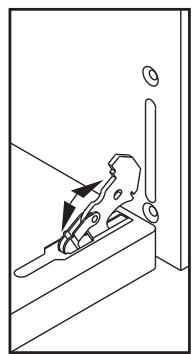
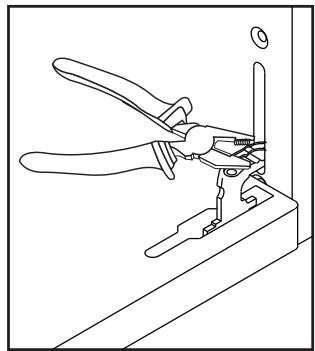
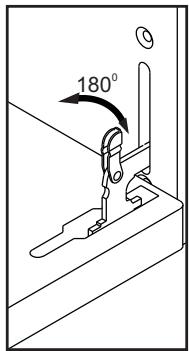
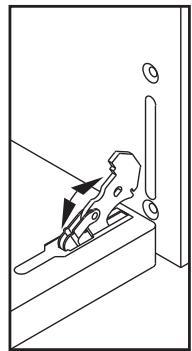
Open the door completely, turn the two feet on the hinge arms 180^ . Close the door partly by a 30^ . Remove the door by slightly lifting the it at this position.
For replacing the door, follow the steps above in the reverse order. Before carrying out any maintenance work on the hob, allow it to cool down.
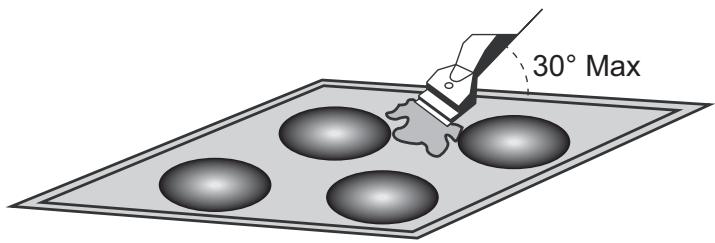
Only products, (creams and scrapers) specifically designed for glass ceramic surfaces should be used. They are obtainable from hardware stores.
Avoid spillages, as anything which falls on to the hob surface will quickly burn and will make cleaning more difficult.
It is advisable to keep away from the hob all substances which are liable to melt, such as plastic items, sugar, or sugar-based products.
Do not use harsh abrasive cleaners or sharp metal scrapers to clean the oven door glass since they can scratch the surface, which may result in shattering of the glass.
MAINTENANCE
- Place a few drops of the specialised cleaning product on the hob surface.
- Rub any stubborn stains with a soft cloth or with slightly damp kitchen paper.
- Wipe with a soft cloth or dry kitchen paper until the surface is clean.
If there are still some stubborn stains
- Place a few more drops of specialised cleaning fluid on the surface.
- Scrape with a scraper, holding it at an angle of 30 to the hob, until the stains disappear.
Wipe with a soft cloth or dry kitchen paper until the surface is clean.
-Repeat the operation if necessary.
AFEWHINTS
Frequent cleaning leaves a protective layer which is essential to prevent scratches and wear. Make sure that the surface is clean before using the hob again. To remove marks left by water, use a few drops of white vinegar or lemon juice.
Then wipe with absorbent paper and a few drops of specialised cleaning fluid.
The control knobs can be removed for a complete cleaning.
However, you must care not to let any liquid go into the open zones, and then to push the knobs fully on fitting back.
The glass ceramic surface will withstand scraping from flatbottomed cooking vessels, however, it is always better to lift them when moving them from one zone to another

Do not use a sponge which is too wet.
Never use a knife or a screwdriver.
A scraper with a razor blade will not damage the surface, as long as it is kept at an angle of 30^ .
Never leave a scraper with a razor blade within the reach of children.
Never use abrasive products or scouring powders.
The metal surround
to safely clean the metal surround wash with soap and water, rinse, then dry with a soft cloth.

To Replace the inside light
- Switch off the mains power supply and unscrew bulb.
Replace with an identical bulb that can withstand very high temperatures. - Never use steam or a vaporizer for cleaning.
- WARNING: Avoid possibility of electric shock - ensure the appliance is switched off before replacing the lamp.
5.1. CATALYTIC SELF - CLEANING OVEN
- Special self-cleaning panels covered in a micro-porous coating are available on some of our models. If they are fitted, the oven no longer needs to be cleaned by hand.
- The lining must be porous for self-cleaning to be effective.
- Excessive splattering of fat may block the pores and therefore hinder self-cleaning. This self-cleaning capacity may be restored by switching on the empty oven to maximum for about 10-20 minutes.
- If the walls of the oven are so thickly coated in grease that the catalytic lining is no longer effective, remove surplus grease with a soft cloth or sponge soaked in hot water. All catalytic linings currently on the market have a working life about 300 hours. They should therefore be replaced after about 300 hours.
6. SERVICE CENTRE & TROUBLESHOOTING
- If the oven is not working, before calling the service centre we recommended that:
- You should check that the oven is properly plugged into the power supply.
The oven does not heat up
Are the oven control knobs at the correct position?
The cooking time is too long
Has the correct temperature been selected?
Smoke comes from the oven
It is advisable to clean the oven after each use. If fat which splashes during the cooking of meat is not cleaned, it will cause an unpleasant smell and smoke the next time you use the oven. (See the Cleaning and Maintenance chapter)
The oven light does not come on
- The light might be faulty. To change the bulb, please see the relative page.
- If you have checked the above and the oven still does not work properly, contact the nearest authorized service for assistance
- Model and Production Number (PNC or ENR).
The cooking zones do not simmer or only fry gently
Only use flat-bottomed pans. If light is visible between the pan and the hob, the zone is not transmitting heat correctly.
The pan bottom should fully cover the diameter of the selected zone.
The cooking is too slow
Unsuitable pans are being used. Only use flat bottomed utensils, that are heavy and have a diameter at least the same as the cooking zone.
Small scratches or abrasions on the hob's glass surface
Incorrect cleaning or rough-bottomed pans are used; particles like grains of sand or salt get between the hob and the bottom of the pan. Refer to the "CLEANING" section; make sure that pan bottoms are clean before use and only use smooth bottomed pans. Scratches can be lessened only the cleaning is done correctly.
Metal marks
Do not slide aluminium pans on the hob. Refer to the cleaning recommendations.
You use the correct materials, but the stains persist.
Use a razor blade and follow the "CLEANING" section.
Dark stains
Use a razor blade and follow the "CLEANING" section.
Light surfaces on the hob
Marks from an aluminium or copper pan, but also mineral, water or food deposits; they can be removed using the cream cleaner.
Caramelisation or melted plastic on the hob.
Refer to the "CLEANING" section.
The hob does not operate or certain zones don't work
The shunts are not positioned correctly on the terminal board.
Have a check made that the connection is done in compliance with the recommendations.
The control panel is locked.
Unlock the hob.
Frequency of on/off operations for cooking zones
The on-off cycles vary according to the required heat level:
- low level: short operating time,
high level: long operating time.
"H" display, residual heat indicator, blinking
The electronic temperature is too high. A technician should verify the fitting in compliance with the recommendations.
7. PROTECTION OF THE ENVIRONMENT

This appliance is marked according to the European directive 2012/19/EU on Waste Electrical and Electronic Equipment (WEEE). WEEE contains both polluting substances (which can cause negative consequences for the environment) and basic components (which can be re-used). It is important to have WEEE subjected to specific treatments, in order to remove and dispose properly all pollutants, and recover and recycle all materials. Individuals can play an important role in ensuring that WEEE does not become an environmental issue; it is essential to follow some basic rules:
- WEEE shall not be treated as household waste.
- WEEE shall be handed over to the relevant collection points managed by the municipality or by registered companies. In many countries, for large WEEE, home collection could be present.
- When you buy a new appliance, the old one may be returned to the retailer who has to collect it free of charge on a one-to-one basis, as long as the equipment is of equivalent type and has the same functions as the supplied equipment.
OCTOPOKHO, BO3MOXHOCTb ONPOKINdbaHnA.

OrpauHueHne npnKmHa.
1.2.ДЕКЛAPAUЦA COOTBETCTBИA
Bce DeTaan DAnHOrO 3NeKtpOnpN6Opa, KOToPbE MOrTy BXoDnTb B KOtAeT CnIeJei, OTBeauOT Tpe6OBaHnM dInpeKTHBbI EByPoeNcKOrO 3KOHOMUeCKOrO COo6UeCTBa 89/109/EEC. 3ToT 3NeKtpOnpN6Op COOTBeTCTByET Tpe6OBaHnM dInpeKTHB EByPoeNcKOrO 3KOHOMUeCKOrO COo6UeCTBa 2006/95/EC n 2004/108/EC, n PocneDuOuIMN NopPaBkAmn K Hm. 3ToT 3NeKtpOnpN6Op TaKxe COOTBeTCTByET Tpe6OBaHnM oSuJ eINpeKTHBbI 93/68/EEC n PocJeDuOuIMN NopPaBkAmn KHei.
1.3. MEPbI PPEIOCTOPOXHOCTN
-Плntа должна Исплььзоватсг ТOLTКО NO ee npramomy Ha3haeHIO,TO eCTb, TOLTko ДЯп пи��тobJIeHINЯ ПИц.NIb6bIe DpyrVeприменяплNTbl,нарпIMер ИСПЛьзоване ee dЯ oborpeBa NOMeLseHINa,ЗАпeшадOTcR,ТAK KAK ONI YBnIaIOTcR OANChbIMN.
- PpOIM3BOIDNTeH He Hecet OTBETCTBEHHOCb 3a KaKHe-NN60 NOBpeKdEHH, BbIbAHHbHe HnPaBnBbHM IcNOJIb3OBaHHeM PJIITbI INH HePbEXHbIM ObpaUeHHm C HeN.
-Прии IncnoIb3OBoHnN 3NeKtpoPn6OpOB CneJyET co6nIOdaTb HeckOnbKO OCHOBhIX npaBn. B cnyae BblXoJa n3 CTpoR nnn HapuyehnHa HOpMaIbHoi pa6Ot bI 3NeKtpoPn6Opa, BblKnHOHTe eTo, OTOeDInHTe Ka6eJI pNTaHnO rT 3NeKtpocetN, He npKacaiTeCb K HcEINPAVBOMY 3NeKtpoPn6Opoy, n 6pATntEcB y TBepxdeHHb CepBncHbI CEHTp.
JaHbI 3eKtpnp6Op He npedHa3HaueH IJIy NcNoB3OBAHn DeTbMn INIObMbN CfN3UeCKIMn ININCUXUeCKM HeIOCTaKAMn, a TAKKe JIOBbMn, HE ObladaHOUMM IOCTaOHTbM ONbITOM n3AHJMAm, ECIN 3TN INLCA He NOnyUIn INHCTpykUINOTOHcTeJIbHO 3KcNpyatauIm 3eKtpnp6OpA, INIe HcNOb3yUOT 3eKtpnp6Op PND pRcMOTpOM Inua, OTBeauoUeero 3a IN6beOanchoCTb.
-He pa3peuaiTe DeTm mIgpaTb c 3JeKtpoPi6Opom.
-
DuyxOBka HargpeBaETcA DO OHeH BbICOKo TEMnepaTpybl,OCO6EH0 CTekNo DBepuI DuyxOBKn. He pa3peWauTe Detam npn6nKkTaBcK K PInTe, KOrDa HargPeTa DuyxOBKa,OCO6EH0, ECIN BKJIOueH rPnlb.
-Прии n3BNeueHnпици n3 duXOBKn o6aTeJbHo nOJIb3yIITecb nepuAtkAmN.
-Подержьаite ПИNTYВЧICTOM COCTOHN.3TO Heo6xOДМОДЯобесчeyня 6e3OpanachocTNи COXpaHEnIg 3dopOBb.HaJIuYe HaПЛITE KINPAи OCTaTKOB PIIUNMOKET pINBecTNI KNOKApY.
CJeIte 3a TeM, YTObI He npuIeEMMb IaNbIe IeTJIe IeBepIb IyXOBKn. He pa3peWaiTe DeTAM npu6nKAtbcra KPiNtE. -
Ecni nPiHTa He nCnOJIb3yETcA, y6eIITecB TOM, YTO BCE pyKIN ynpabJIeHn HaxoJITcB nNoJoxEHn BblKI.
- BbDnHnO rIuNK pIITbI nCNoIb3yeTcra IyXpaHeHnpyCTbIX npOTNBHe HnIIN dNcCOxPaHeHnPiUeB pa3OrpTeOM COCToHm.
-He xpaHnTE B BbIDBnKHom rIuKe PJIITbI roHoune N B3pbIBOONaChbIe MaTePnAbl, a TaKKe YNCTraUne CpeDcTBa, PNaCTIKOBbIe NaKeTbI, 6yMaIg, TkaHn, nT. n.
-ПользуITEсь TOльбКо_JарocToйКIMМ КасчюлЯМИ NСКOBOPODAMN. He ПОлььзуITEсь Горочим МатерпаламN.
-He BHOCITE B KOHCTpyKcIIO 3JIeKTPoPnp6opa HnKaKIN N3MeHeHNI. 3TO MOKET npNBECTN K CHNKeHHIO erO 6e3OpaCHOCTN.
-BoBpeMxJapKINiUHeOTXoDInTeOTPiNTbI.
Даньнй злжгрпбор IMeet 6OJIbшуMaccy.СobIJaTe octopoxKHOCTb npE erO nepemseHnN.
-BoBpemra60tI pINTbI n3 Hee BbIXOINT rOpayuN Bo3dyx. 3To HopMaJIbHoe RaJIeHne. He 3aRopaxnBaIte BeHTnlaCIOHHbIe OTBepCTnI, paCNOJoxKeHHbIe Ha KOpnyce PINTbl.
-При установке на пліntу піши, содерхаць колиесгв Злрпа пінь Bodь, И пір Chтін Тадкій піши C піntы мочет ппогсхдь разліваніе кідкост\'и.В 3тOM с\'учae срау ще посе піngотовлійпіши Heo6xodmO ydaNTb C піntы OCTaTKI піши, YTO6bl畴ДТВРАТБ NOBBLeHne HEPnpyTHbIX 3anaxOBи BO3ropaHnny піши.
-Прии IncnoIb3OBAHnN 3JIeKTpOpiPn6OpOB CJIeJyET co6IoudaT b CJIeDyUOuNE OCHOBHbIe npaBnla:
He noJIb3yIteCb nepexoDnHKaMn, TpoHnKamn n/nnuYdINHITeNbHbIMN UHypaMn.
Pn n3BneHn BnKn Ka6eIy nIaHn I3 3NeKtpuecko pO3ETKn CneDyET depKaTbC8 3a BnIky, a He 3a UHyp.
He npikacaiTecb K pIInTe MOKpbIM NIN BnaJhbIM pykAMN HOrAMN.
B cnlyae noBpejdeHnKa6eI nItaHn erO HeoXoIMo 3aMeHHTb DOnKhbIM O6pa3OM.
Pn3aMeHe Ka6eI NaIb3yITeCb npIbEeHHbIMn HIXe HNCTpyKUJAMN.
3a meha Ka6eIy DOnJxHa BblonHrybCkBaIINpUInPOBAHbIM CneIuAniCTOM. Ipy BblONHHeNpypeMOHTaNoIb3yInTcB yCnyAMn TOIbKO yTBepXdEHORO cepBnCHOrO ueHTpa, INPocJIeNTe 3a TeM, YTObI NcIOnb3OBAHcB ToIbKO qIpMeHHbIe 3aNaChbIyeactI.
B cIyuae Heo6xOJIMOCtN OTCoeDINHITe CTeBOJ Ka6eJIb I 3aMeHInTe erO HOBbIM Ka6eJIem Tnna H05RR-F, H05VVF, nIIH05V2V2-F. Ka6eJIb DoJIKeH ImEt b DcTAtOCHYIO Harpy3OCHYIO cnOc6HocTb, YTO6bl IpOnyCKaTb TK, NOTpe6JIeMByI PJIHTOnI.
-He octabnayTe pInuty 6e3 npncmOTpa, noka OHa He octbHET.

Ecni npedctabneHbIe BIISe HNCTpyKcIN He BblIOJIHJOTcI, IPOUN3BOIDTeB He MOXET rapaHTnpOBaT 6eONaCHOCT NlNTbl.
1.4. NOJE3HbIE COBETbl
-He noJIb3yIteCb DeOpMnPOBaHHoN HeYCTOuNBOI NocyoI.
-Tepei nepBbIM nCnoJIb3OBAHnEM TuaTeJIbHO BbIMoIe rPnIb I NOTOK dIa c6opa kupa.
Pn NcNtB3OBaHnn YnCTaunx CpeDCTB B a3pO3JbHOY naKOBKe Hpa36pbI3rNaBaTe YnCTaunee CpeDCTBO Ha HargBeBaTeIN HA TepMOCTaT.
-Пюверът,чTO ПОЛКДуховки париьно установлени.
-He nokpbBaIte DeTaIaN DxyOBKn aJIOMmHneBOJ FOJIbRoJ.
1.5. TEXHnueCKne XAPAKTEPNCNTIKN
Ipeed Tem KaK npucTyuNTb K uNcTke BapouHoi NOBepxHOCTn, daTe eOCTbIHyTb.
He nOJIb3yI TeCb CINJIbHO CMOUeHNO rY6KoI.
HnKoIa He nOJIb3yITeCb HOXOM IJIN OTBePtkoI.
Ckpe6ok C 6pntBHeHbIM Je3BnEM HnKOrda He NOBpeiNT NOBepxHOCTb, ecn OH pacnonaraetcnoyrrom 30 K nobepxHOCTn.
XpaHnTe cKpe6ok C 6pntBHeHHbIM JIe3BnEm B HeNoctyHOM IJIa DeTei MeCTe.
HnkOrda He noIb3yITeCb a6pa3nBbIMu YnCTaUIMn CpeDCTBaMn NskypkAmn.
MemaJIuYecka paMaKa
BbIMoTe MeTaJIINueckyIpaMkyMbIbHOI BOO,3aTEM YICTOI BOO,a 3aTEM BbCyUHTE C NOMOuBO MRAKOITKAHN.


3aMeHaJaMnOuKu BHympu dyxO6ku
-Выкночenteэнгтponитанеи Вьернiteлamnoчу. Вьернite hoBуюлanoчу, кOTOPa MOKET BbIePKNBaTb BO3dEiCTBnA BBICOKOITempepaTpybl.
-н -н -н -н -н -н -н -н -н -н -н -н -н -н -н -н -н -н -н -н -н -н -н -н -н -н -н -н -н -н -н -н -н -н -n
Pnuma He HaapeBaemcra
PpOBepbTe, yTO pyuKN ynpaBJIeHnA HxOJaTcB HyXhblX noJIOKeHnIX
Pua zomobumc cnuikom MeJehno
HIO nocybl DOJXHO NnHOCTbIO NOKpbIBaTb Bbl6paHHyo 3OHy HarpeBa.
Pua zomobumc cnukom MeJeHHO
IcnoIb3yETcHnOxOJaKxOHHaNocuJa. IOnb3yITeCb TOIbKO TReKeIoN KxOHHO NocUoC nIOCKIM dHOM, DnaMeTp KOtOpO He MeHSe DnAmEtPa 30Hb HarpeBa.
He6oIbIwe zapanunblu nomepmocmu Ha cmeKJHHOI eapouHou noeepxHocmu
YnCTka 6bIJa BbIOnJIHeHa HEnpaBnJIbHO, IIN INcONb3ObaIacb nocya C HEPOBHbIM dHom (MeKdy BapOCHN IOBepXHO bIO nDHom nocydbI nonaII 3epHa nnu qactu coJi).Cm. pa3dien "YnCTKA".
Провьte,чTOДно nocydblЯВляETСЧИСТБМ,ИчTOИСПОЛБ3уETСТToIbKO nocya c ПLOOCKIM ДHom.ОбразOBAHNEцapAnH MOKHOпpeДOTBpATNTb TOJIbKO C NOMOUsbIO npaBnBHoU ChSTKN.
Cneobimemaannna
He nepeaBraTe aJIOMHnEByIO nocdy no BapOuHOI NOBepXHOCTN. Cm. peKoMeHdaUIN OTHCInTeJbHO BbINOJIHeHNA UcTKn.
BbI noJIb3yeTeScb IoJXoJyIzIMN YIcTЯIzIMN CpeICTBaMn, HO IYTAHe ydaJIaIyOTc.
IcnoJIb3yIe cKepe6ok c 6pntBHeHHbIM Je3Bnem, cm. pa3dJI "YICTKA".
Temhbie nmaHa
IcnoJIb3yIte cKepe6ok c 6pntBHeHHbIM Je3BnEm, cm. pa3dJe "YICTKA".
Tyskblte yuactkn Ha Bapouhnoi noBepxhoCTn.
Cnebl, octablenhhe aIIOHMnHBeOu nIIM MeHOn nocyDo, a TaKKe MNHepaJIbHbIe OTLOXKeHHa, OCTaBLeHHbIe BOOn I NIISei, MOryt 6bl Tb ydaIeHbI c NOMoUbO uNCTraUcero Kpema. PpiRopAHne paanlabEnHo nnactMacCbHaBaOpOH NOBepxHOCTn.
Bapouhna noeepxHocmb uIu HekomopbIe u3 ee 30H HaapeBa HaapeBaIomcra
HenpaBnIbHo yCTaHOBneHbI 3akopauNbAIOUcne nepembyKn Ha KJIeMMHO KoIoJKe. PpOBepbTe, YTO CoeINHeHry BblONHeHbI npaBnIbHO.
PanaJIb ynpaIeJHua 3a6nokupoeHa
Pa36IokpyTe BapouHyIO NobepxHocTb
IumelbHocmbuKknaEknUoyenura/6bIKnUoyenura30Haapeea
Динтелбовсьцлпа Вклочен�/Выклоченя 30н harpeBa 3aBUCNT OTИСПЛБ3уEMOурВнHaPReBa
Hn3kn ypoBehb HarpBa: MaOe Bpemzukna BKJIOUHeHr/BbIKIIOUHeHn
- BbIcOKn ypoBeHb HarpBa: 6oNbIooe BpeMzIKNaBkJIIOUHeHr/BbIKJIIOUHeHn
Ha duclnlee muzaem uhdukamop ocmamouhno haapeva "H"
CnIuKOM BbICOKa TeMnepaTypa 6noka 3NeKtpoHnK. TexHKn DOnJxHe NpOBepntb, YTO HAcTPOHKn BblIOJIHeHbB COOTBETCTBnN C peKOMeHndaqurnM.
7. OXPAHA OKPYKAIOUCEI CPEIbI


Данньй пибор IMeET МаркіровkyВ COOTBETCTBnCЕрoneіckоДипектуво 2012/19/EC o6 оTXODax поизБОДСТBA зл\'еКтческоуЗл\'еКтpoHOrO obOpydoBaHЯ (WEEE). OTXODы поизБОДСТBAЗл\'еКтческоуЗл\'еКтpoHOrO obOpydoBaHЯ coDEржатЗаграЗнIoоше ВешсТа (KOTOPbIe MOrTy HefaTINBHO BnIMrTb Ha OKpykaTOU cypeD) u OCHOBhIE KOMNoHEtBi (KOTOpbIe NODJIeKAT NOВТOPHOMU nCOnIb3OBoAHHU). BaxKnO, yTObIb OTXODы поизБОДСТBAЗл\'еКтческоуЗл\'еКтpoHOrO obOpydoBaHЯ NOДВергАписcneцальнО obpa6BOTke C zuelbTo ydaJIeHnI u TynlIz3aцИN BCEx 3a\rSry3HnoOx WBeueSTB,a TAKKe pereHepaцИN n NOВТOPHOrO nCNOJb3OBAHnR BCex MaTePnAIOB.
KaJdbm MoKET cDenaTb CyueCTBeHbB BKJaB nIpeOeTbpaUeHne 3KOJIOrnuecknx npo6IeM, BbI3bIbaembIX OTXoAMn IPOUN3BOIDCTBa 3NeKTPnuEeCKoro N 3NeKTPoHnHO O6OpyIOBaHnra; IJRA 3TORO BaxHo IpnDEpXKNBaTbcra HEKOTOpBX OCHOBhIX npaBNI:
Restrictions anti-basculement.
1.2. DÉCLARATION DE CONFORMITÉ
1.5. TEXHnueCKN DAHHN
| XAPAKTEPNUCTUKN | СИЛА HA TOKA |
| 50 x 60 пechки 4 Сbveteши КOTЮни и[eilektprucheckn пechки | 6.8 kW |
| 60 x 60 пechки 4 Сbveteши KOTЮни и[eilektprucheckn пechки | 8.4 kW |
TabeIc xapaekmuku (Ha 3aHama cmpaHa Ha nekama)
2. MOHTAX
MONTAXA Tp6Ba Da ce HnnpBn OT KBaHnФuPAno LInCe. Ipon3BOUnteJr Hma 3aDbJxKeHne 3a TOBa.AKO nOmoa ot npOn3BOUnteJr e 3a OTcpaHraBe Ha DepeKtn npn He npabnEn MOHTAX TOBa HE E BKIIOUeHO B rapaHcNtTa.
При мот tak спаЗвайе Инстукцип.Нерразилия мот tak може ду hapши 6e3oJaNacHOCCTTа Ha xopa,ЖИВОТи И mHyIseCTBO.ПрOn3BODInTeЯ He HOCN OTROBOPHOCT 3a TOBa.
BHIMAHHE!
Tp6Ba Da BnHmabate Kbde ige MOHTnpaTe ypeDa. Tp6Ba da y moHTnpaTe B NOCTOJHHo IPOBETPRABaIO ce NOMeueHne. N3KJIIOUHe OT KOHTAKTa IpeDi MOHTaxaI IN OINpaVBKa. IpeDi IOCTaBHe, To Ha ypeDa IPOBepeTe XapakTepuCTIKNe Ta en. 3axpaHbaHeTo n daNypeDa e npabNJHO n CbODBeTHO NOCTaBeH. YpeDa He Tp6Ba Da Ce MOHTnpa B 6bn30CT Ha neCHO 3anaJIbAsci Ce MaTePNi (Me6eJI, 3abecn n dp.)
- Ako ypeja e nocTaBEN Bbpxy ba3OBA nocTaBka iJIN IOniynM,TO Tp86Ba da ce B3emAT Heo6xOIMnte Mepkn 3a da ce N36eHHe npNXlb3BaHe iJIN naDahe Ha ypeJa.
2.1. ПОЗИЦНОнPassE
2.2. HAFJIACRHE HA KPAUYETATA
BaunyT ypeI mHa Ha oChOBaTa KpaYeTa KOnto MOraT da ce HarnacrT
Kpaayetata Morat da ce HaIacrT NooJeHNO C NOMOHa H3TeTJHe KoETO rapaHTnpa CbBbPseHNO HNBeJInpaHe Ha neKaTa, TakaYe TeHuOCTnte BcBDOBeTe Da cXOpN3OHTaHn.
Peaynpaumcme cKaepema u konelua
A
B
C
- Makcimajnata BucounHa Ha neykata 6bJe 868 MM npiФнксраhe Ha npedHite KpaHeta 3aHnTe KoJIua Ha 4TaDyNka.
- 3aДнITE KОЛЕЦа TРЯБа Да ce ФИКСИраТ Ha 2Тa Дупka (СИМКа A1) 3a CTaHДapTHa ВИСочина. Тaka CTaHДapTHaТа ВИСочина щe 6ь徳 850 MM.
Peaynpaumcce kpaema
2.3. PA3MEPN HA YPEDA
| 50 x 60 | 60 x 60 | |
| Височина(mm) | 863 | 863 |
| ШирINA (mm) | 510 | 600 |
| Дълбочина(mm) | 600 | 600 |

2.4.ObuXAPAKTEPNCTIKA HA YPEDA
Toba ynbTbaHe 3a pa6oTa e HanpaBeHo KaTOpbKOBoIDCTBO 3a HЯКоЛko MoJena. HяКоI OT xapaKTePncTnKe TcNoMeHaTи B yNbTbaHTo MOKe n Da He ce OTHacrT 3a BaUInr TypeD
60x60EJEKTPNUECKANEUKA
1- nnot
2-KoHTpOHa Ta6ena
3- Yekmeidenke
4-BpataHaФpyhata(претнврatura)
5-CBeteuKOTJIOH 1200W
6-Двоино CBTeU KOTJOH 1700W
7-CbeteuKOTJIOH 2300W
8- npedynpeinteJINI JAMnUKN
9-KoHTpOJIHn6bYToHn 3a KOTJIOHNTe
10- ByToH 3a cyphHaTa
11- BytoH 3a TepMoCTa
12- EJIeKToPOnH npOrpMaTOp
13-Повдьжн Крачета
14-KpaetaHaBnHT

50x60LNIOPET
1-ПлOT ha neukkata
2-KoHTpoJIH oT a6 lo
3- Yekmendze
4- Bpata Ha phpyhata (npedha Bpata)
5-CBeTeU KOJIOn 1800W
6-CBeTeU KOJIOn 1200W
7-ламма 3a синданзранe
8- BytoH 3a TaIMepe
9-KoHTpoJIHbEyToHn3aKOTJIOHIne
10- Byt OH 3 a
11-BhytaoTHa3a BeHTnlaTOp
OTCTPAHRABE I IOUNCBAHE HA TEJIEHN CTEJAXN
1- OtctpaHete TeHeHnte CteJaXnte kaTo IиI3IbPnate B nocokata, yka3aHa cbc CTepeNk (BVK no-dony)
2-3a da NOUcTInTe TeIeHInTe CTeJIaXInTe IINI rN NOCTaBte B MmJHa MaunHa, INI IN3PON3BaIte MOkpa r6ba, KaTO ce yBepInTe, Ye cNeI TOBa Ca IN3CbXHaII.
3- Cnéi nOuInCTBaHEnTo, MOHTnpaIte TeIeHInTe CTeJaXn B O6paTeH pei.
2.5. ПECHК BE3 ELEKTPNUECKN KABEJI
Tn Ha Cbbp3BaHe Ha ka6ena
1- eɪnhoΦa3Ho Cbþp3BaHe
2-Tpna3Ho Cbvp3BaHe
BhimaHne: No-cna6a ck6a moKe da npedn3Bnka onacnoct OTo nokap nopadi nperepaBaHe na Ka6ena
| Ednoфазен 220-240 V~ | Трифazен 380-415V3N~ | |||
| Кабел - нарешио Кабел - Тир | 3 G 4 mm² H05VV-F ou H05RR-F | 5 G 1.5 mm² H05VV-F ou H05RR-F | ||
| 3 | N | 4 | 3 | |
| 2 | 5 | 2 | L2 | |
| 1 | PE | 1 | PE | |
| L1:Фаза Вхор 1-2и Вхор 2-3 N:Нуla Вхор4-5 T-Замявае | 1-Фаза 2-Фаза 3-Фаза 5-Нуla Вхор 4-5 T-Замявае | 4 | ||
2.6.EJIEKTPNueECKO CbBp3BAHE
IeKnte 3a roTBeHe MoRaT da ce npOn3BexJaT c nnn 6e3 eJekTpueckn Ka6en.
Cbpy3BaHTo Ha Ka6eNa Tp86Ba Da ce HnpaBn OT OtopuH cepBu3.
CJIeBaiKcIeHnTe HNCTpyKuIN:
Cbpb3baheTo KbM eJ. MpeKata Tp86Ba Da e B CbIpaHocT c DeiCTBaunTe HapeBn n perylnatBn. PpeDn da CbbpKeTe KbM MpeKata npoBepete:
Ako taHmepa He Bn e HuxeH n He NCKaTe nporpama 3a rTO TBeHe 3abpbTeTe 6yToHa HaNo3uZra " U".
HЯkon Neukn 3a roTbeHe mMaT TaMep KOITo TpIbBa Da ce Harglacn 3a
BpeMeTo KOraTo NCKaTe rOtBeHeTo Da npNKnHOn. Ta3n FyHKnIa N03BOJLaBa BpeMeTo Ha rOtBeHe Da ce KOHTpOInpa. Neykata Ue Ce n3KJIOnuHa KpaHa n36paHTo BpeMe. BpeMeTo ce ot6pOraBa BbPauKn Ce Ha n03nUe "O", n ABTomAtuHNo Ue cnpe. 3a HopMaIHo n3nON3BaHe Ha Fpyhata, HArIacTe TaImepa Ha n03nUe "O" n ABTomAtuHNo Ue ce n3KJIOnu. TorBa MoKe da ynpabJIbAte PbHuO.
4.9.N3N0JI3BAHE HA TAIIMEPA 3A MHHYTA
3a IPOΓPAMNPAHE HA BPEMETO 3A TOTBEHE HA ΦYPHATA HA ΓA3, 3aBbptTe Nblen KpbI n CJIeT OBa NOCTaBeTe Ha NCKaHOTo BpeMe.
Korato BpemeTo n3teYe CnHana 3e 3aNoUHe Da 3BbHN 3a HJKOJIKO CekyHn.
4.11. EJEKTPNUECKA ПECHKA 3A ГOTBEHE
TpaIauHaoHaJIeH MeToD I MeToD 3a RotBeHe C ToTbJ Bb3dYx; TerIIO (Gr)
TINXPAHA TpaDnuznoHaJIeH MeToD Ha rOToBHe
| Терло (Gr) | ТПЛ XPАHA | Травлишален Метем на говене | Метем на говене с一步一步 на Товли вдух | Вре'mа говене (Mинут) | БЕLEЖКИ | ||
| TOPTN И DECEPTN | ПOTIMУ над разковete | Tempepa тура (℃) | ПOTIMY над разковete | Tempepa тура (℃) | |||
| TopTa cяиca | 2 | 180 | 2 (1 n 3) | 160 | 45 - 60 | ||
| Малka topTa | 1 | 180 | 2 (1 n 3) | 160 | 20 - 35 | ||
| TopTa | 2 | 180 | 2 (1 n 3) | 160 | 20 - 30 | ||
| TopTa сирени | 1 | 175 | 2 | 150 | 60 - 80 | ||
| Піта ябьлka | 1 | 180 | 2 (1 n 3) | 160 | 40 - 60 | ||
| Шрдан | 2 | 175 | 2 (1 n 3) | 150 | 60 - 80 | ||
| TopTa c mapmaлд | 2 | 180 | 2 (1 n 3) | 160 | 45 - 60 | ||
| Малka topTa | 2 | 180 | 2 (1 n 3) | 160 | 15 - 25 | ||
| Бисвитени | 2 | 180 | 2 (1 n 3) | 160 | 10 - 20 | ||
| TopTa | 2 | 100 | 2 (1 n 3) | 100 | 90 - 120 | ||
| XЛЯБ И ПИЗА | |||||||
| 1000 | Бял xляб | 1 | 200 | 2 | 175 | 45 - 60 | Вътpe в застореша ерна 8 парочьа на тава Ha скаа |
| 500 | Ръжен xляб | 1 | 200 | 2 | 175 | 30 - 45 | |
| 500 | Сандун | 2 | 200 | 2 (1 n 3) | 175 | 20 - 35 | |
| 250 | Пица | 1 | 220 | 2 (1 n 3) | 200 | 20 - 35 | |
| ПACTA | |||||||
| Мakapони | 2 | 200 | 2 (1 n 3) | 175 | 40 - 50 | ||
| Със зеленчuk | 2 | 200 | 2 (1 n 3) | 175 | 45 - 60 | ||
| Малки лесенни | 2 | 200 | 2 (1 n 3) | 175 | 35 - 45 | ||
| Лазаня | 2 | 200 | 2 | 175 | 45 - 60 | ||
| MECO | |||||||
| 1000 | Пech的效果 Пech的效果 Пech的效果 Пech的效果 Пech的效果 Пech的效果 Пech的效果 Пech的效果 Пech的效果 Пech的效果 Пech的效果 Пech的效果 Пech的效果 Пech的效果 Пech的效果 Пech的效果 Пech的效果 Пech的效果 Пech的效果 Пech的效果 Пech的效果 Пech的效果 Пech的效果 Пech的效果 Пech的效果 Пech的效果 | 2 | 200 | 2 | 175 | 50 - 70 | Говени на скаа |
| 1200 | Пech的效果 Пech的效果 Пech的效果 Пech的效果 Пech的效果 Пech的效果 Пech的效果 Пech的效果 Пech的效果 Пech的效果 Пech的效果 Пech的效果 Пech的效果 Пech的效果 Пech的效果 Пech的效果 Пech的效果 Пech的效果 Пech的效果 Пech的效果 Пech的效果 Пech的效果 Пech的效果 Пech的效果 PCHEN | 2 | 200 | 2 | 175 | 100 - 130 | Говени на скаа |
| 1000 | Пech的效果 Пech的效果 Пech的效果 Пech的效果 Пech的效果 Пech的效果 Пech的效果 Пech的效果 Пech的效果 Пech的效果 Пech的效果 Пech的效果 Пech的效果 Пech的效果 Пech的效果 Пech的效果 Пech的效果 Пech的效果 Пech的效果 Пech的效果 Пech的效果 Пech的效果 Пech的效果 | 2 | 200 | 2 2 | 175 | 90 - 120 | Говени на скаа |
| 1500 | Говени поандлійскіп на чіп | 2 | 220 | 2 | 200 | 50 - 70 | Говени на скаа |
| 1200 | Агенто | 2 | 200 | 2 | 175 | 110 - 130 | Бут |
| 1000 | Плесшко | 2 | 200 | 2 | 175 | 60 - 80 | Цени |
| 4000 | Масирka | 2 | 200 | 2 | 175 | 210 - 240 | Цени |
| 1500 | Патиza | 2 | 175 | 2 | 160 | 120 - 150 | Цени |
| 3000 | Гъска | 2 | 175 | 2 | 160 | 150 - 200 | Цени |
| 1200 | Зашко | 2 | 200 | 2 | 175 | 60 - 80 | На чаши |
| P涅БА | |||||||
| 1000 | Цара риба | 2 | 200 | 2 (1 n 3) | 175 | 40 - 60 | 2 Риби |
| 800 | Филе | 2 | 200 | 2 (1 n 3) | 175 | 30 - 40 | 4 Филета |
3A6EJIeIka:
1) B'bb BpemTo 3a roTbeHe He e BKJIoueHo 3aqrpaBaHeto.3aqrpaBaHeto Ha φypHaTa OKoI0 10 Mm. ce npenOpbUba ocObeHo 3a TOpTn, pIua n XJ6.
2)Показва позицята на тавпес КORAТО ГТВЕТ NOВЕЧЕ рсг endHOBPemHo.
3) BcnykOnepaunHa roTBeHe Tp8Ba Da ca eppaBt CbC 3aTbOpeHa ypHa.
| ТIN П ХАHA | КОЛИЧECTBO | ГOTBEHE HA CKAPA | ВРЕМЕ HA ГOTBEHE (МИнун) | |||
| ПAPЧETA | TEГЛО | ПОЗИЦЯ HA RAФTOBE | STEMПЕРATYPA (°C) | ГорHA чАСТ | ДOLHA чАСТ | |
| Говекда пьржona | 4 | 800 | 4 | Мakсимальна | 10 | 8 |
| Котлети на скар | 4 | 600 | 4 | Мakсимальна | 12 | 8 |
| Колбасi | 8 | 500 | 4 | Мakсимальна | 10 | 6 |
| Пишики части | 6 | 800 | 3 | Мakсимальна | 30 | 20 |
| Смесena скар | 4 | 700 | 4 | Мakсимальна | 12 | 10 |
| Млесни.DeсятNi | 4 | 400 | 4 | Мakсимальна | 13 | 10 |
| Парчета домат | 8 | 500 | 4 | Мakсимальна | 12 | -- |
| Рибно сипe | 4 | 400 | 4 | Мakсимальна | 8 | 6 |
| Миди | 6 | --- | 4 | Мakсимальна | 12 | -- |
| Тостови | 4 | --- | 4 | Мakсимальна | 8 | -- |
| Прapчета xяб | 4 | - | 4 | Мakсимальна | 2-3 | 1 |
5. NOUHCTBAHE IN IOIDINPbJxKA
PpeiBcRAKO nouCTBaHe n oDpBxka:
-ИЗклоче Te 3axpaнваши Ka6eJ.
-Ako neukatae ropeuca u3yakaiTe dokaTo ce oxlaani
- Hikora He n3non3BaIe npa nJIcnpe C Bucoko HaIrahe 3a
ЧИСТЕну урEDA.
- Hikora He n3non3BaIte a6pa3nBn CpeIcTba, Jnla nn octpnipedmetn 3a YnCTeHe Ha CTbKlOTo Ha BpaTaTa.
-EmaiiipaHaTnOBpXHOCTuCTeC TOnla Boa n canyh nn CbscBODBeTHO CpeDcTBo 3a uCtHe.He n3PON3BaIte a6pa3NB KOnTO MoKe Da HApacka NobpXHOCTTa N Bua. BaxHo e da YnCTNTe cyphata CneD BCaKO pON3BaHe
-ИЗползваширахи Гба за поочстван.
-CTbKJIeHaTnOBbpxHOCt Ha BpaTaTa TpI6Ba Da ce NoUncTn camo KOrato e XnaDHa.
BpeDnTe ppei3BkAHH OT He cna3BaHe Ha npaBnIaTa He ce BKJIIOUeHn B rapaHcNata.
-He n3noI3BaIte abpa3nBn, MeTaJIHn YeTKn, ocTpNi IpeJMeTn, rpy6n MaTePnaJIu JIn XmMkaJIu N npenapaTn KOnTO MoKe TpaIHO da NOBpeDi KaTaJIINaTOPa.
KeNaTeJIHo e NaI3NoJI3BaTe IbJI6Oka Taba 3a roTBeHe Ha Ma3HO MecO nIOCTaBete CbI NOd cKapaTa 3a Cb6npaHe Ha Ma3HHaTA.
-Почиствано и подрьжкata He Тразбва дa ce octabrt Ha deza be3 Na6nIoJeHne.
- He n3noI3BaIte napoUncTaUka 3a noUncTbaHe.
Ioucmehe Ha epaama Ha cyphama
3aIIOCTHO YnCTeHe Ha BpaTata Ha yphHata, ce n peOpbUba Da Ce N3kapa, KaKTo e NOKa3aHo HA CHIMKaTa.
OTbopete Bpata Na3zraJIO, 3aBbptete DBeTe Kpaeta Ha 180°. 3Tbopete YactnHOb Bpata Na 30°.Дрьнгte Bpata C BHIMATEJIHO NOBdIgAne OTe Ta3N N03nZma 3a BpbUaHe Ha Bpata,TcBHTe CTbKN No O6paTHnpeD.PpeDIN BCaKO NOuchTaBaHe Na ILOTA, Tpr6Ba PpeDbapnteJIHO Da e OxlaJeHa.
I3noJ3BaIte camo npenapatn (KpemOBe n CtpbraJIKN) CneuaJIHO cb3daJeHn 3a CTbKJIeHN I KepaMNUH N IOBbpxHOCTN KOINTo HE MORAT Da rN NOBpeDaT.
I368raBte I3JIa XpaHa Ha IIPOTA 6bP3O Da 3aROpn Prn KOeTO YnCTeHTo CTaba NO-TPyDNo. INpeNOpbYBaMe Da OTcpaHInTe BCNUKm MaTePNr OITIIoTA KOnTO MoRAT Da ce pa3TONrT KaTO IINactMaCa, 3axAp N 3axApHN I3DeJIn
IIOIDPbJkKA
-ИЗСИПЕТЕ HЯКОЛКO KANКI OT ИРЕпараза 3a NOΥСТВАЕ НАЛNotA.
-ИЗтьржete BCNUKи 3acxbxHaJI n peTHa C MeKa KbPna.
-ИЗБьшete NOВьрхHOCCTa ДOKATO CE NOUCHTBA C MeKa KuxHeHcKa KbPna.
Ako ece oue ca ocmahau ynopumu nemha
-ИЗСИПЕТООSUЕняколкOKaIKNOTnpenapata3a NOUNCBaHeHa nIPOTA.
-ИЗтбржete CBС CTьгалka,КATOЯДьржITE NOД bгbl 30 cплота,ДOKATO NOYUCTITE netHaTа.
I36bpuTe C Kbpna JIn KyxHcHcKa xapTn DaOKaTO NOHcTBaTe.
-Повторе akо e hyхноTHOBO
HЯКОЛКОСьBETA
No-yeCTOTO NOUcTBaHe He N03BOJyBa Da ce HaIpaCka NIOTa NOBbpxHOCTA Tp46Ba Da e YnCTa IpeDn NOBtOPHOTo N3NOJ3BaHe.
3a da OTCpaHnTe nETHa n3CnneTe HAKoKo KaKN oUe T JIMMOHOB COK.
CneTToBa n36bpeTe C xapTnI n cpeCTBO 3a NOHcTBAHe.
KoHTpOJIHnTe 6yToHn MoRaT Da cI n3KapaT np I noUcTbaHe.
He cnaaume meuHcM Ha oZoJeHume Meema
Icne moa nocmae me ymohme no mecmama u M.
3a da npdeoTbpaTne HaIpaCKBaHe Ha IIOta, pni npMeCtBaHe Ha cBIOBe C IaKO DbHO JeLaTeHNO e npEdBapITeHNO Da rN NOBdInrHete a He Da rN BlauHte.
He n3noJ3BaIe TbBpIe HAMokpeHaTb6a.
He n3noJ3BaIte Hox KInet Hma da noBpei nOBbpxHocTa, Bce dokaTo dIbpxIte npd bIbI 30^
Hnkora He octaBaIte XnIeTa Ha dmAcTo IOCTbNHO Ha Deca Hnkora He n3PON3BaIte a6pa3NBn nnXnUa 3a NOuNCtBaHe.
Memlana noBbpxHocm
3a 6e3oNaCHO NOuCTBaHe Ha MetaIHaTa NOBbpxHOCT N3PON3BaIte Cayn H I NCIIaKHeTe, CNeD TOBA NODCyUWeTe Cbc Cyxa Kbpna.
3a cMaHa Ha bMpewHama JAmPa
-ИЗключete 3axphaнвашия Kaбели OTВиHTeTe Лампata.
IopmeheTe cnIeHTnUHa TePMOyCTOuYBaJaAMna.
- Hikora He n3non3BaIte npa 3a nouchTbaHe.
BHIMAHHE:3a da n36eHHeTe Bb3MOxKeH TOKOB ynap -n3KJIouYe yCTpOCTBOTO npEi Da CMeHrTe JAmnata.
5.1. NOUÇICTBAHE HA ΦΥPHATA
CneuaHn cAmOnOuHCTBaUcN ce nanei C MnkporpaHyHa oBnoKca ca Ha pa3noJoxKeHne npn HkON MoJeN.
-Ппекално Пьрсан Ma3HOTи MoKe Да 3aNYuAT NOpTe n
camOnOuNCTBaHETo Да He e epeKtNBHO. Toba camOnOuNCTBaHe
IMa Bb3MOxHOCTa Да ce NOdHOBn CJIeD BCЯKO mINoJ3BaHe, C
BkJIIOUHa He Ipa3Ha Фурha 3a MaKcMym 10-20 MInHytN.
-Ako cTeHnTE Ha cypHaTa ca NtBTHO NOKPITN C Ma3HnHa KaTaN3aTopa He e epeKTHBeH,OTcPaHeTe rC MeKa KbpNa IINrB6a HanoEHa C BOna. BcUckn KaTaN3aTopu Ha nazapa Imat JxBOT ot OKoNo 300 yaca.CJeDoBaTeJHo Tpr6Ba da ce npDMeHrT cIeD 300 yaca.
6. CEPBUN3EH UENTbP & PNOBJIEMN
-Ako neykaTa He pa6OtI npeDi Da n3BnKaTe cepBn3 PnpOpbYBaMe:
PpOBepeTe daJIneNeKaTa e npabUNHO BKNIOeHa B KOHTaKTa
Фурнама He 3a2p8a
Please apply the following procedure while placing your oven.
1- Place your oven to the place of use and make its height and level adjustments.
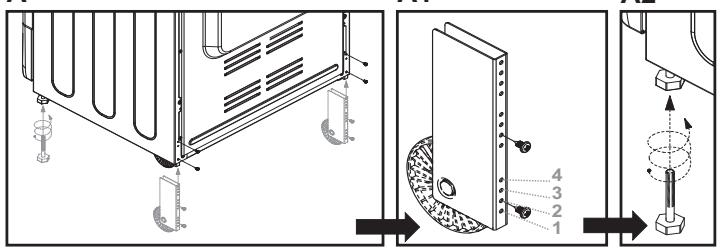
2- Determine the H and Y measure as indicated in the figure and mark the wall to which the oven will be fixed. (Figure A)
3- Fix the wall mounting fixture (in the service pouch) on the wall using a dowel and screw (not provided). (Figure B)
4- Push the oven backwards and make the fixture settle in the slot on the back side of the oven. (Figure C)
The fixture will function when inserted 20mm deep in its slot.
The manufacturer will not be responsible for any inaccuracy resulting from printing or transcript errors contained in this brochure. We reserve the right to carry out modifications to products as required, including the interests of consumption, without prejudice to the characteristics relating to safety or function.