
WORKFORCE DS-870 - To scan EPSON - Free user manual and instructions
Find the device manual for free WORKFORCE DS-870 EPSON in PDF.
| Product Type | Document Scanner |
| Brand | EPSON |
| Model | WORKFORCE DS-870 |
| Scan Speed (Black and White) | 35 ppm / 70 ipm (300 dpi, A4, duplex) |
| Optical Resolution | 600 dpi |
| Automatic Document Feeder (ADF) | Yes, 50-sheet capacity (80 g/m²) |
| Duplex Scanning | Yes, automatic |
| Scan Formats | PDF, JPEG, TIFF, BMP, PNG, and others via software |
| Interface | USB 3.0 |
| Included Software | Epson Scan 2, Document Capture Pro, TWAIN, WIA |
| Dimensions (W x D x H) | 300 x 166 x 158 mm |
| Weight | Approx. 3.6 kg |
| Power Supply | AC adapter 24 V DC, 0.75 A |
| Power Consumption | 11 W (operating), 1.1 W (standby), 0.3 W (off) |
| Maintenance and Cleaning | Clean the scanner glass with a soft cloth; use cleaning sheets for the ADF |
| Safety | Automatic shutdown in case of jam; scanner lock |
| Spare Parts and Repairability | ADF roller kit, LED lamps (long life), maintenance possible by authorized center |
| General Information | Fast scanning for offices; compatible with Windows and macOS |
Frequently Asked Questions - WORKFORCE DS-870 EPSON
User questions about WORKFORCE DS-870 EPSON
0 question about this device. Answer the ones you know or ask your own.
Ask a new question about this device
Download the instructions for your To scan in PDF format for free! Find your manual WORKFORCE DS-870 - EPSON and take your electronic device back in hand. On this page are published all the documents necessary for the use of your device. WORKFORCE DS-870 by EPSON.
USER MANUAL WORKFORCE DS-870 EPSON
| One-pocket model | Two-pocket model | ||
| Operating environment | CPU | Minimum Specification: At least a Pentium4 2.0 GHz or the equivalent Recommended Specification: At least IntelCore2 Duo 1.8GHz or the equivalent | |
| Memory | Minimum Specification: At least 512 MB or above the minimum operating system requirement Recommended Specification: At least 1 GB or above the minimum operating system requirement | ||
| HDD | Free space of more than 30 MB (Before installing the driver) | ||
| Interface | USB2.0 Hi-speed | ||
| Processing speed | max. 110 dpm / max. 200 dpm | ||
| Cut sheet paper unit | Printing method | Line ink jet with ink jet head (360 nozzles in 2 lines) | |
| Paper dimensions | Size: 60 to 120 mm (H) × 120 to 235 mm (L) {2.36" to 4.72" (H) × 4.72" to 9.25" (L)} Thickness: 0.075 to 0.2 mm {0.003" to 0.008"} (only single-ply can be used) | ||
| Scanner unit | Scanning method | Contact image sensor (CIS) | |
| Paper dimensions | Same as above cut sheet paper | ||
| ID card specifications | Reading media: ISO/IEC7810 compliant (without embossed effect) Size: 53.92 to 54.18 mm (H) × 85.47 to 85.90 mm (L) {2.12" to 2.13" (H) × 3.36" to 3.38" (L)} Thickness: 0.5 + 0.84 mm {0.02" + 0.03"} | ||
| MICR recognition method | Magnetic bias | ||
| MSR unit (factory option) | Recognition method | Two-frequency coherent phase (F2F) | |
| Card specifications | Reading media: ISO/IEC7810 compliant Size: 53.92 to 54.18 mm (H) × 85.47 to 85.90 mm (L) {2.12" to 2.13" (H) × 3.36" to 3.38" (L)} Thickness: 0.76 + 0.08 mm {0.02" + 0.003"} | ||
| Supported magnetic format | ISO 7811-6, AAMVA, previous California driver's license | ||
| Auto sheet feeding capacity | 100 sheets or fewer when paper thickness is 0.13 mm {0.005"} or less)*1 | ||
| Pocket storage | 100 sheets or fewer when paper thickness is 0.13 mm {0.005"} or less) | Main pocket: 100 sheets or fewer when paper thickness is 0.13 mm {0.005"} or less)*1 Sub pocket: 50 sheets or fewer (when paper thickness is 0.13 mm {0.005"} or less)*2 | |
| Ink cartridge | Exclusive ink cartridge: SJIC18(K), Color of ink: Black | ||
| Interface | USB (Type A/Type B*3) [compliance: USB 2.0, communication speed: Hi-Speed (480 Mbps)/Full-Speed (12 Mbps)*4] | ||
| Power supply | AC adapter: PS-180 (Model: M159B), Supply voltage: DC + 24 V ± 7% | ||
| Temperature | Operating | 10 to 35°C {50 to 95°F} | |
| Storage | When packed for shipping (ink not charged): -20 to 60°C {-4 to 140°F} When ink is charged: -20 to 40°C {-4 to 104°F} | ||
| Humidity | Operating | 20 to 80% RH | |
| Storage | When packed for shipping (ink not charged): 5 to 85% RH When ink is charged: 25 to 85% RH | ||
| Overall dimensions (H × W × D) | 177 × 142 × 263.8 (374.8) mm {6.97" × 5.59" × 10.39" (14.76")} *5 | 177 × 167 × 298.8 (409.8) mm {6.97" × 6.58" × 11.76" (16.13")} *5 | |
| Weight (mass) | Approx. 4.5 kg {9.9 lb} | Approx. 4.5 kg {9.9 lb} | |
dpm: documents per minute, Mbps: megabits per second
1: The total thickness of the stacked sheets must be 13 mm {0.51"} or less (including uneven sheets due to folds, etc.)
2: The total thickness of the stacked sheets must be 6.5 mm 0.26" or less (including uneven sheets due to folds, etc.)
3: USB (Type A) connector is a factory option.
4: When using a Full-Speed USB interface, the product performance declines.
*5: The values in the brackets are when the pocket guide is fully pulled out.
Standards and Approvals
The following standards are applied only to the printers that are so labeled. (EMC is tested using the Epson power supplies.)
Europe: CE marking
North America: FCC Class A, ICES-003 Class A
WARNING
This is a Class A product. In a domestic environment this product may cause radio interference in which case the user may be required to take adequate measures.
The connection of a non-shielded printer interface cable to this printer will invalidate the EMC standards of this device.
You are cautioned that changes or modifications not expressly approved by Seiko Epson Corporation could void your authority to operate the equipment.
CE Marking
The printer conforms to the following Directives and Norms:
Directive 2004/108/ECEN 55022 Class A
EN 55024
IEC 61000-4-2IEC 61000-4-6
IEC 61000-4-3IEC 61000-4-8
IEC 61000-4-4IEC 61000-4-11
IEC 61000-4-5
FCC Compliance Statement For American Users
This equipment has been tested and found to comply with the limits for a Class A digital device, pursuant to Part 15 of the FCC Rules. These limits are designed to provide reasonable protection against harmful interference when the equipment is operated in a commercial environment.
This equipment generates, uses, and can radiate radio frequency energy and, if not installed and used in accordance with the instruction manual, may cause harmful interference to radio communications.
Operation of this equipment in a residential area is likely to cause harmful interference, in which case the user will be required to correct the interference at his own expense.
For Canadian Users
This Class A digital apparatus complies with Canadian ICES-003.
Indication of the manufacturer and the importer in accordance with requirements of directive 2011/65/EU (RoHS)
Manufacturer: SEIKO EPSON CORPORATION
Address: 3-5, Owa 3-chome, Suwa-shi, Nagano-ken 392-8502, Japan
Web site: http://www.epson.com/
Importer: EPSON EUROPE B.V.
Address: Atlas Arena, Asia Building, Hoogoorddreef 5,1101 BA Amsterdam Zuidoost The Netherlands
Web site: http://www.epson.com/europe.html
English
Specifications for the TM-S2000MJ
This product differs in function and equipment depending on the combinations of the following specifications.
Document processing speed: 110 dpm/200 dpm [dpm: documents per minute]
Number of document exit pockets: One-pocket/Two-pocket
Whether or not the product is equipped with an MSR (Magnetic Stripe Reader)
- Whether or not the product is equipped with a USB (Type A) connector
Purpose of This Manual
This manual provides information describing basic operations to operators of the TM-S2000MJ to enable safe and correct use of the product. Read this manual carefully before using this product and store it in an accessible location.
Illustrations
Most of the illustrations are at the beginning of this manual. The shape of the products in the illustrations may be different from yours, depending on the models and areas.
Restriction of Use
When this product is used for applications requiring high reliability/safety, such as transportation devices related to aviation, rail, marine, automotive, etc.; disaster prevention devices; various safety devices, etc.; or functional/precision devices, etc.; you should use this product only after giving consideration to including fail-safes and redundancies into your design to maintain safety and total system reliability. Because this product was not intended for use in applications requiring extremely high reliability/safety, such as aerospace equipment, main communication equipment, nuclear power control equipment, or medical equipment related to direct medical care, etc., please make your own judgment on this product's suitability after a full evaluation.
Caution
All rights reserved. No part of this publication may be reproduced, stored in a retrieval system, or transmitted in any form or by any means, electronic, mechanical, photocopying, recording, or otherwise, without the prior written permission of Seiko Epson Corporation. No patent liability is assumed with respect to the use of the information contained herein. While every precaution has been taken in the preparation of this book, Seiko Epson Corporation assumes no responsibility for errors or omissions. Neither is any liability assumed for damages resulting from the use of the information contained herein.
Neither Seiko Epsoc Corporation nor its affiliates shall be liable to the purchaser of this product or third parties for damages, losses, costs, or expenses incurred by purchaser or third parties as a result of: accident, misuse, or abuse of this product or unauthorized modifications, repairs, or alterations to this product, or (excluding the U.S.) failure to strictly comply with Seiko Epsoc Corporation's operating and maintenance instructions.
Seiko Eps Corporation shall not be liable against any damages or problems arising from the use of any options or any consumable products other than those designated as Original Eps Products or Eps Approved Products by Seiko Eps Corporation.
EPSON is a registered trademark of Seiko Epson Corporation in Japan and other countries/regions.
NOTICE: The contents of this manual are subject to change without notice.
© 2012 Seiko Epson Corporation
Important Safety Information
Key to Symbols
The symbols in this manual are identified by their level of importance, as defined below. Read the following carefully before handling the product.
WARNING:
Warnings must be followed carefully to avoid serious bodily injury.
CAUTION:
Cautions must be observed to avoid minor injury to yourself, damage to your equipment, or loss of data.
Note:
Notes have important information and useful tips on the operation of your equipment.
Safety Precautions
WARNING:
Shut down your equipment immediately if it produces smoke, a strange odor, or unusual noise. Continued use may lead to fire. Immediately unplug the equipment and contact your dealer or a Seiko Epson service center for advice.
Never attempt to repair this product yourself. Improper repair work can be dangerous.
Never disassemble or modify this product. Tampering with this product may result in injury or fire. Be sure to use the specified power source. Connection to an improper power source may cause fire.
Do not allow foreign matter to fall into the equipment. Penetration by foreign objects may lead to fire.
If water or other liquid spills into this equipment, unplug the power cord immediately, and then contact your dealer or a Seiko Epson service center for advice. Continued usage may lead to fire.
Do not use aerosol sprayers containing flammable gas inside or around this product. Doing so may cause fire.
CAUTION:
Do not connect cables in ways other than those mentioned in this manual. Different connections may cause equipment damage and burning.
Be sure to set this equipment on a firm, stable, horizontal surface. Product may break or cause injury if it falls.
Do not use in locations subject to high humidity or dust levels. Excessive humidity and dust may cause equipment damage or fire.
Do not place heavy objects on top of this product. Never stand or lean on this product. Equipment may fall or collapse, causing breakage and possible injury.
Before leaving the product unused for an extended period, make sure the ink cartridge is installed, turn the product off using the power button, and unplug the product to ensure safety.
Notes on Usage
Do not open the covers during operation.
Make sure that the product is not subjected to any impact or vibration.
Do not put any food or drink on the product case.
To prevent a paper jam, do not prevent paper from being ejected from the paper exit, and do not pull the paper being ejected.
Notes on Transportation
Transport the product with an ink cartridge installed.
Transport the product with the ASF guide and the pocket guide tucked in.
- Be sure to use the power button to turn off the product before transportation.
- Keep the product upright and horizontal during transportation.
Downloading Drivers, Utilities, and Manuals
Further product information is written in the TM-S2000MJ Technical Reference Guide. Drivers, utilities, and manuals can be downloaded from one of the following URLs.
For customers in North America, go to the following web site: http://www.epsonexpert.com/ and follow the on-screen instructions.
For customers in other countries, go to the following web site: http://download.epson-biz.com/?service=pos
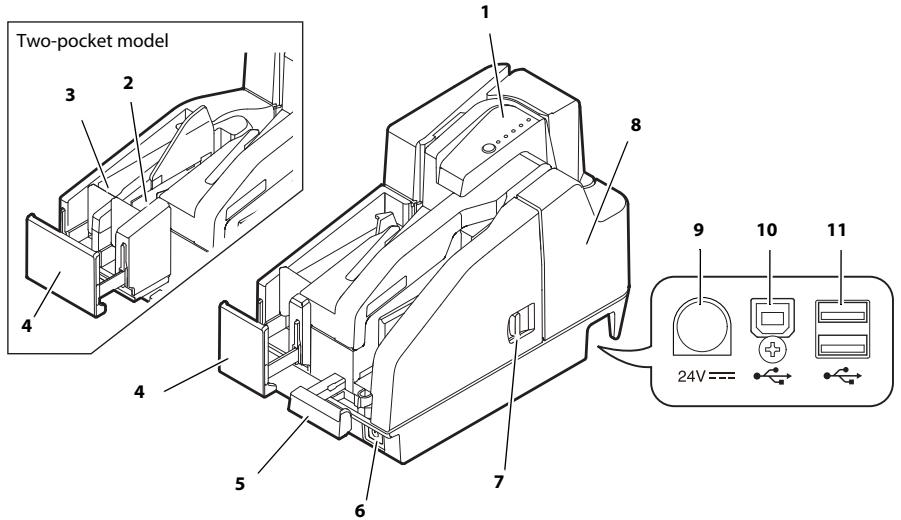
- Control panel
- Sub pocket
- Main pocket
- Pocket guide
- ASF guide
- Power button
- MICR cover open lever
-
MICR cover
-
Power supply connector
- USB connector (Type B)
- USB connector (Type A) (factory option)
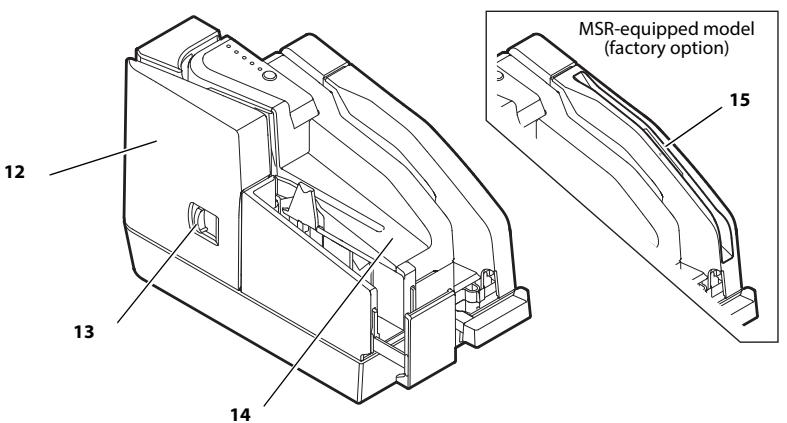
- Scanner cover
- Scanner cover open lever
- Ink cartridge cover
- MSR (factory option)
Control Panel
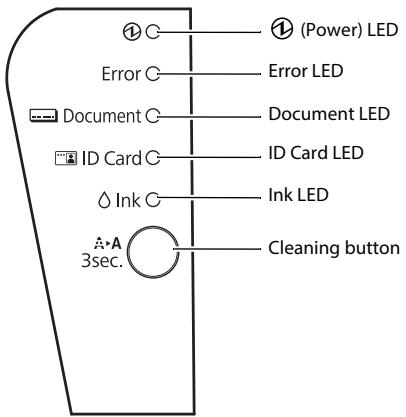
(Power) LED
Comes on when the product is on.
Flashes while some operations such as turning power on/off, ink charging, or cleaning, are executed.

Note:
Be sure not to turn off the product or open the covers while 1 (Power) LED is flashing.
Error LED
Comes on when the product is offline (except during self-test, and cleaning).
Flashes when an error occurs. (See "Troubleshooting" on page 18.)
Document LED
Comes on when the product is ready to process cut sheet paper in the ASF or while the product is processing cut sheet paper.
Flashes when the product is waiting for cut sheet paper insertion.
ID Card LED
Comes on when ID card is set and the product is ready to process it.
Flashes when the product is waiting for ID card insertion or removal.
Ink LED
Comes on when no ink cartridge is installed or it is time to replace the ink cartridge.
Flashes when ink is low.
Cleaning button
Pressing this button for three seconds or more starts the print head cleaning. (See
"Cleaning the Print Head" on page 17.
Setting up the Product
To set up the product, follow the steps below.
- Unpacking (See "Unpacking" on page 12.)
- Installing the product (See "Installing the Product" on page 12.)
- Connecting the USB cable (See "Connecting the USB Cable" on page 12.)
- Connecting the AC adapter (See "Connecting the AC Adapter" on page 13.)
- Turning on the product (See "Tuning on/off the Printer" on page 13.)
- Installing the ink cartridge (See "Installing and Replacing the Ink Cartridge" on page 13.)
- Operation check with test print (See "Test Printing" on page 14.)
Unpacking
Check whether the following items are included. If any item is damaged, contact your dealer.
TM-S2000MJ
Dedicated ink cartridge [SJIC18(K)] x 2
USB cable
AC adapter [PS-180 (Model: M159B)]
AC cable*1
Cut sheet paper for test printing
User's manual (this manual)
Setup guide
*1: May not be included depending on the product model.
Installing the Product
When installing the product, make sure of the following:
Leave enough space around the product to open the covers, the ASF tray, and the pocket guide.
- Do not place the product near any magnetic fields to avoid decreasing the MICR recognition rate. Especially, when you install the product near a display device, check the recognition rate of the MICR reader.
Install the product horizontally.
Make sure cords and foreign objects are not caught in the product.
Remove the shock-absorbing materials in the product and fixing tape before use.
Connecting the USB Cable

Note:
Do not turn on the product before installing the necessary drivers.
- Connect the USB cable to the USB (Type B) connector. (See illustration A.)
- Fix the USB cable with the cable hook to prevent the USB cable from falling off. (See illustration A.)
- Connect the USB cable to the host computer.
Connecting the AC Adapter
See illustration ±bB and follow the steps below to connect the AC adapter.
CAUTION:
Be sure to use the specified AC adapter [PS-180 (Model: M159B)]. Connection to an improper power source may cause fire or shock.
- Connect the AC cable to the AC adapter.
- Connect the DC cable of the AC adapter to the power supply connector on the product.
- Insert the AC cable plug into a socket.
Tuning on/off the Printer
To turn on the product, press the power button on the front side of the product.
To turn off the product, press the power button for 3 seconds or more until (Power) LED goes off.
CAUTION:
When turning off the product, make sure the AC cable is connected to the product and a wall socket, and always use the power button.
Installing and Replacing the Ink Cartridge
Notes on Using the Ink Cartridge
Read the manual included with the ink cartridge before use.
- When the ink cartridge is installed for the first time, the product uses ink to prepare for printing (ink charging).
- Cartridge yields vary based on such usage environment and conditions.
To insure print quality, some ink remains in the cartridge after the Ink LED comes on.
Epson recommends the use of genuine Epson ink cartridges. The use of non-genuine ink may cause damage that is not covered by Epson's warranties, and under certain circumstances, may cause erratic product behavior.
Do not touch the green IC chip on the side of the ink cartridge.
Do not remove the ink cartridge except when replacing it with a new one.
Do not open the ink cartridge until you are ready to install it.
After installing an ink cartridge, use it up within 6 months.
Use the ink cartridge before the expiration date printed on its package and on the ink cartridge itself.
- Do not puncture the convex part of the bottom of the ink cartridge or remove the transparent film on the bottom of the ink cartridge.
A used cartridge may have some ink on the convex part of the bottom of the cartridge. Avoid touching that part to keep your hands clean.
- Dispose of the used ink cartridges according to the laws or regulations in your country and region.
To transport or store this product for a long period after once using this product, make sure the ink cartridge is installed in the product.
This printer may automatically run maintenance operations at night or when the power is turned on to maintain print quality. As a result of these maintenance operations, you may need to replace the ink cartridge. In this case, replace the ink cartridge with a new one.
Installing and Replacing the Ink Cartridge
When ink is low in the ink cartridge, the Ink LED flashes. When the Ink LED as well as the Error LED come on, printing stops and it is time to change the ink cartridge.
Follow the steps below to install the ink cartridge into the product for the first time or replace it with a new one.
- Turn on the product.
- Put your finger under the left side of the ink cartridge cover and pull it up to open it. (See illustration C.)
- If there is a used ink cartridge, remove the ink cartridge by pulling up the tab on the top of the cartridge while holding the product. (See illustration D.)
- Remove a new ink cartridge from its package.
- Install the ink cartridge in the correct direction, and push it until it clicks in place.
- Close the ink cartridge cover.

Note:
When you first use the product, installing an ink cartridge begins charging the ink supply. Ink charging takes approximately four minutes and ① (Power) LED flashes during that time. Do not tilt the product during ink charging to avoid ink leakage. Be sure not to turn off the product or open the covers while ① (Power) LED is flashing. This restarts the ink charging, which wastes ink.
- Make sure ① (Power) LED turns on after flashing.
Test Printing
After the product setup or when the product is not operating correctly, you can check the product operation with test printing. If the product performs pattern printing when you follow the steps below, the product is operating normally.

Note:
For test printing on cut sheet paper, use the included cut sheet paper (normal paper of 70 mm 2.76'' width and 152~mm 5.98'' long or larger).
Do not use thermal roll paper.
Make sure all the covers are closed, and while pressing the cleaning button, turn on the product. After the Document LED flashes, set 3 pieces of cut sheet paper in the ASF. (For how to set the cut sheet paper, see "Inserting Cut Sheet Paper" on page 16.)
Test printing is completed when " completed" is printed after a certain amount of printing.
When printout is faint
When printout of "Nozzle Check Pattern" is faint or uneven as the illustration below, the print head may need to be cleaned.
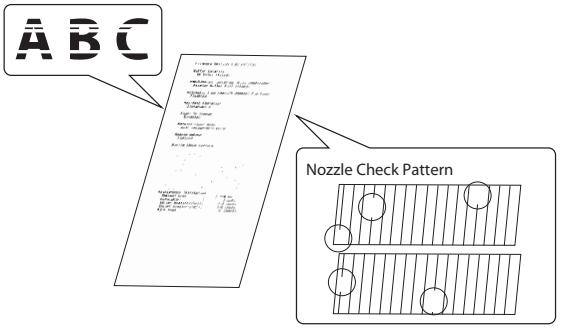
See "Cleaning the Print Head" on page 17 to clean the print head.
Processing Cut Sheet Paper
Flow of Processing Cut Sheet Paper
From cut sheet paper is inserted until ejected, the product processes it in the following order.
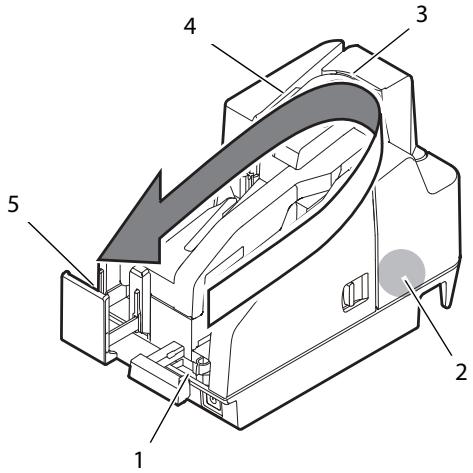
- Auto sheet feeder (ASF) section: feeds the cut sheet paper.
- MICR reader section: reads magnetic ink characters on the cut sheet paper.
- Printer section: prints on the cut sheet paper.
- Scanner section: scans both sides of the cut sheet paper.
- Pocket section: ejects the processed cut sheet paper.
Inserting Cut Sheet Paper
You can put up to 100 sheets of cut sheet paper in the ASF.

Note:
Use cut sheet paper (single-ply) that meets the specifications. (See "Specifications" at the beginning of this manual.)
Do not insert any paper that has clips or staples.
Make sure the cut sheet paper is flat, without curls, folds, or wrinkles.
- Pull out the ASF guide and the pocket guide appropriately for the size of the cut sheet paper to be set. (See illustration ±bE .)

CAUTION:
To avoid a paper jam, always pull out the pocket guide before processing cut sheet paper.
- Make sure the Document LED is flashing.
- Set the cut sheet paper in the ASF with the edges aligned to the paper setting mark ±b on the right side of the ink cartridge cover. (See illustration ±bF .)
Follow the precautions below.
- Set the sheets with the face on which you want to print facing inside.
- To scan checks or read the magnetic ink characters with MICR, set the sheets with the part of the magnetic ink characters facing outside and down.
- To set multiple sheets, align them neatly on the bottom-right (insertion side) corner.

CAUTION:
If the documents are inserted without being aligned, they may not be fed at all, or a paper jam or incorrect feeding of multiple sheets may result.
- After setting the cut sheet paper, release it immediately.

CAUTION:
Do not open the covers while processing is in progress.
Do not insert an ID card into the ID card insertion slot while processing cut sheet paper.
Ejecting Cut Sheet Paper
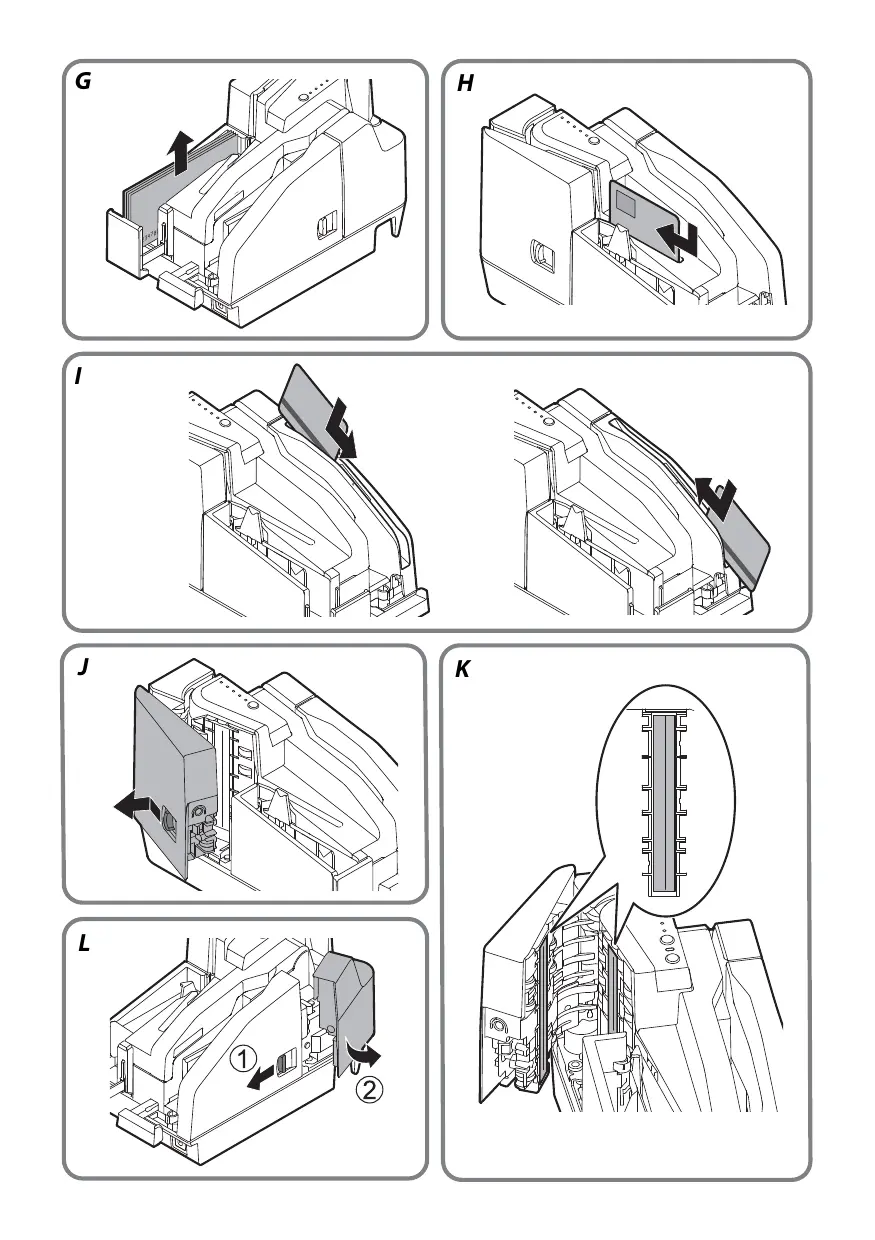
Remove the cut sheet paper when it is ejected. (See illustration G .)
For two-pocket models, paper may be ejected separately into the main pocket and the sub pocket depending on your application.

CAUTION:
To prevent a paper jam, do not leave more than 100 sheets in the pocket (for two-pocket models, 100 sheets in the main pocket and 50 sheets in the sub pocket) while processing cut sheet paper.
Scanning ID Cards
Follow the steps below to scan both side of an ID card.

Note:
Use an ID card which meets the specifications. (See "Specifications" at the beginning of this manual.)
Make sure that the ID card is flat and does not have excessive bending, cracks, folds, or embossing.
Do not touch the external terminal when using an IC card.
-
Make sure the ID Card LED is flashing.
-
Put the ID card in the insertion slot on the right side of the pocket with its photo side facing the pocket, and slide it along the bottom of the slot. (See illustration H .)
- When the card starts feeding, release it immediately.
CAUTION:
When the ID card is feeding, a part of it comes out of the card carrier slit at the back of the product. Be sure not to block this slit.
Do not touch the ID card when it is being ejected. Doing so may cause distortion and other problems with the scanned data.
Do not open the covers while processing is in progress.
- When the ID card is ejected and the ID Card LED flashes, remove the ID card from the slot.
Reading Magnetic Stripe Cards
If your product is equipped with a MSR unit, you can read the magnetic stripe on the card.

Note:
Use a magnetic stripe card which meets the specifications. (See "Specifications" at the beginning of this manual.)
To read the magnetic stripe card, check the insertion direction with the arrow on the card, and swipe it through the slit downward or upward with the magnetic stripe on the card facing inside and down. (See illustration I.)
The buzzer beeps once when reading succeeds and beeps three times when it fails.
Cleaning
Cleaning the Product Case
Be sure to turn off the product, and wipe the dirt off the product case with a dry cloth or a damp cloth.

CAUTION:
Never clean the product with alcohol, benzine, thinner, or other such solvents. Doing so may damage or break the parts made of plastic and rubber.
Cleaning the Print Head
When printing becomes faint or uneven although the Ink LED is not on or flashing, the print head may need to be cleaned.
In this case, press the cleaning button on the control panel for 3 seconds or more to start the print head cleaning. During the cleaning, (Power) LED flashes.
When (Power) LED comes on after flashing, the print head cleaning is completed.

Note:
The cleaning process uses some ink. Do not run cleaning when it is unnecessary.
Cleaning the MICR Head
When the MICR head becomes dirty, the product cannot read the magnetic ink characters normally.
Clean the MICR head every 6 months or every 100,000 passes by setting the following cleaning sheet in the same way as cut sheet paper. (See "Inserting Cut Sheet Paper" on page 16.)
KIC Team, Inc.
Waffle technology® MICR cleaning card (model:CS1B15WS)
- Epson Check Scanner Cleaning Kit (model:KWEPS-KCS2)
Note:
Use a cleaning sheet only one time; then discard it.
It is recommended to clean the MICR head once per week or once every 2,000 sheets for good reading results.
It is recommended to clean the scanner after cleaning the MICR head.
Cleaning the Scanner
If the glass of the scanner gets soiled from ink or paper dust, the quality of scanned data may deteriorate. Clean the glass every 6 months or every 100,000 passes by following the steps below.
Note:
It is recommended to clean the scanner once per week or once every 2,000 sheets for good reading results.
- Pull the scanner cover open lever and open the scanner cover by pulling it outward. (See illustration J .)
- Lightly wipe 2 parts of glass areas (see illustration ±bK ) with a soft, dry cloth.
CAUTION:
Do not use synthetic detergent, benzine, water, or other liquid for cleaning. Doing so may result in a stain.
When the glass of the scanner is smeared with oil, grease or other unremovable substance, wipe it with a cloth lightly dipped in alcohol. However, never apply any liquid directly to the glass of the scanner.
- Close the scanner cover firmly until it clicks in place.
Troubleshooting
Error LED is on or flashing
Make sure that all the covers are properly closed.
When the Ink LED is on, see "Installing and Replacing the Ink Cartridge" on page 14 to replace the ink cartridge with a new one.
When paper or an ID card is jammed, remove the jammed paper referring to "Paper or ID card is jammed."
□ Printing stops if the surroundings of the print head overheats, and resumes automatically when it cools.
Turn off the product, and after 10 seconds, back on. If the Error LED is still flashing, the product may require servicing.
Printout is faint
When printout is faint, the print head may be dirty. See "Cleaning the Print Head" on page 17 to clean the print head.
Scanned data or reading result of the magnetic ink characters is not normal
- When the scanned data is not normal, the glass of scanner may be dirty. See "Cleaning the Scanner" on page 18 to clean the glass of scanner.
- When the magnetic ink characters cannot be read normally, the MICR head may be dirty. See "Cleaning the MICR Head" on page 18 to clean the MICR head.
Paper or ID card is jammed
When cut sheet paper is jammed
Depending on where the paper is jammed, open the MICR cover or scanner cover, and remove the jammed paper.
To open the MICR cover, pull the MICR cover open lever and open the MICR cover by pulling it outward. (See illustration L .)
To open the scanner cover, pull the scanner cover open lever and open the scanner cover by pulling it outward. (See illustration J .)
When an ID card is jammed
- Pull the scanner cover open lever and open the scanner cover by pulling it outward. (See illustration J .)
- Remove the jammed ID card.
- Close the scanner cover firmly until it clicks in place.
François
© 2012 Seiko Epson Corporation
AVERTISSEMENT
Voyant (alimentation)
© 2012 Seiko Epson Corporation
CUIDADO
Este é um produit de Classe A. Num ambiente domestico, este produits poderá Causeir interferencia de rado. Nesse caso, o utilizescer podar ter de tornar medidas adequadas.
© 2012 Seiko Epson Corporation
ADVERTENCIA
© 2012 Seiko Epson Corporation
AVVERTENZA
LED Documento (Document)
LED Inchiostro (Ink)
Waffle technology® MICR cleaning card (modello:CS1B15WS)
- Epson Check Scanner Cleaning Kit (modello:KWEPS-KCS2)

Nota:
aal aal aal aal aal aal aal aal aal aal aal aal aal aal aal aal aal aal aal aal aal aal aal aal aal aal aal aal aal aal aal aal aal aal aal aal aal aal aal aal aal aal aal aal aal aal aal aal aal aal aal
aalld aabd aaydaal aall cai bgl aygll gail sall aanag aayy
a 1 a 1 a 1 a 1 a 1 a 1 a 1 a 1 a 1 a 1 a 1 a 1 a 1 a 1 a 1 a 1 a 1 a 1 a 1 a 1 a 1 a 1 a 1 a 1 a 1 a 1 a 1 a 1 a 1 a 1 a 1 a 1 a 1 a 1 a
Lio 00000000000000000000000000000000000000000000000000000
Lo oJoo aoo 0000000000000000000000000000000000000000000000000000000000000000
gulglulglalldyusuysuysuysuysuysuysuysuysuysuysuysuysuysuysuysuysuysuysuysuysuysuysuysuysuysuysuysuysuysuysuysuysuysuysuysuysuysuysuysuysuysuysuysuys
. 4abz u 3 sii i jzll a 13 . gjg jgga . Cbch djlqglg g
.84 aal 3 "gaaag gaiy g) Ia
(Document) (\text{吉} \text{吉} \text{吉} \text{吉} \text{吉} \text{吉} \text{吉} \text{吉} \text{吉} \text{吉} \text{吉} \text{吉} \text{吉} \text{吉} \text{吉} \text{吉} \text{吉} \text{吉} \text{吉} \text{吉} \text{吉}
glll jalgl gai ygi (ASF) aLgogjil 0gol al 0gol glal 1jale jglg jk
jgljg jgljgl jglglaa
(ID Card) 1 LED
Lgulab joljglalg laloo aol o ool ool ool g
aaii iilj jllj jj l jk
(Ink) LED
aagbgluogyoluaiggla 3 a, nooal agbjo gaiie
aagbyolg yolg sgaun aadly laus
a.
(83 aal al 1) .aal al w j baa aas o jg j g j j j j j
(.7a all 当 "Ugolglj"JbI) Ugolglj
(.7a aal 3" jglj s" jil) jglj
(.77 aall ^ USB 152000" "blil) USB 152000
(.78 aall "AC uglutl jull Ugus Jogos" jbil) AC uglutl jull Ugus Jogos .4
.5
.6
(80 aall 3^ ayyjy jalb" jbil) jalll Jaoaia jayo aIcb .7
Ug#b1
Lg 1 j 10 10 10 10 10 10 10 10
2x[SJIC18(K)]
□
TM-S2000MJ
□
[(M159B:Jg)PS-180]jgluJ
□
USB
a aal alalalg b
1xgulzoljLd
□
1
□
(1)
□
gulj g uuguag uuguguaa aag yaaas aaii iia jy jis
#
Epson 150000000000000000000000000000000000000000000000000
a
AaBbCgIe dssgblrcll IIC aas y
.
LgSjUusuugSsIaueyJnllawbjoepy
1.453 2.453 3.453 4.453 5.453 6.453 7.453 8.453 9.453
Lae gea aegbdoalge gbbai aolallg jn aon aagbdo pao
aaiagbdoiawlalwaiol allljgl wadwl aaiwaiagbdoj gao pao
diabia g dji jgai lag alaoaui jdl tglb joa aill pa
jgllllglk 3g S y gol aagb jn no sS allaozai jno jajn ao algb od jal
Jl 1
.000000000000000000000000000000000000000
(.Error) 日 LED (Ink) 1LLED 日 1sI LdE.
a aagbgy
a 1
.1
(C. yagolj jbl). 1bll tai l aegy g noa agby e b2 no yal qall coo
Jkawablll 10g aagbrjol jgsglld jgdl gglbl jll llll gjj jlll aagb
(D. __________
.4
.5
a1 = 23,a2 = - 43,b1 = 56,b2 = - 35

LEDgagagagagagagagagagagagagagagagagagagagagagagagagagagagagagagagagagagagagagagagagagagagagagagagagagagagagagagagagagagagagagagag
11 1
.
.7
a 15b jglal pl 15j. aaiy jdl sbj yj gll Jn jgall die gao Jkay alaoa pae Jggi j 15j .

Jg b (j5.98) 152 g jc (j5.276) 70 70 wao gdoa ogyi) jia aig egbai gbi iw e gblai g
.(ySg)
(3)证明: 1an < 2x - 1x^2 - 23^n · x^2 < 1an
(Document) litg LED 1 j J 2a h bll l 2j 1 a 1 1 1 1 1 1 1 1 1 1 1 1 1 1 1 1 1 1 1 1 1 1 1 1 1 1 1 1 1 1 1 1 1 1 1 1 1 1 1 1 1 1 1 1
aill jao aas aas (gai)""compcted *** a5 ybi laic ayy qall aal
aaiu agabla aunll jgSi loii
a a a a a a a a a a a a a a a a a a a a a a a a a a a a a a a a a a a a a a a
.

50g g jll 100 123456789010000000000000000000000000000000000000000000000000
()
ID 1
a aal y

(111111111111"ulalolglb)jbj)ddolalololgyl
.0jy jy gag a 1a 1g agg a g 1d y d 1c 1d 1d 1d 1d 1d 1d 1d
aill lalb plalw lue yall y
ID Card) LED 1
jai).aaiai g aaii gao gao aygai gaiy gaiy yaiy aiiaai iaiiaai jaiiaai jaiiaai
(H
JgdsjIclogkai aalblluoluc 3

Jus Jus jus no sSt. gttl no galtll jgld 3 aalalal alo 3 2 2 2 2 2 2 2 2 2 2 2 2 2 2 2
.
Igdo aagaaal lgljy JSLaogai ydluy plall gdy jayloiae al
JUeWyI 1
.1200 (ID Card) 1500 LED 1200
cui blic a bii
a 1
中
(CS1B15WS:J) Waffle technology® MICR cleaning card
(KWEPS-KCS2: )Epson Check Scanner Cleaning Kit
4ab = y_0

ba 100g 00s g8w gill aaiil 48g pao
.0g 2.000 JcMRC
. MICR wjw jzjj 12a ajj all aai jnssb
.0j 0j j 12 12 12 12 12 12 12 12 12 12 12 12 12 12 12
(Jgaggl aal jbl)j. jall l 4aow sll al gaiy aalw 1s bgs
.(Kgogjll jbjil).dolg aaii lalaeabai jylojj jyjgl qe yc wol .2

J 1 J 1 J 1 J 1 J 1 J 1 J 1 J 1 J 1 J 1 J 1 J 1 J 1 J 1 J 1 J 1 J 1 J 1 J 1 J 1 J 1 J 1 J 1 J 1 J 1 J 1 J 1 J 1 J 1 J 1 J 1 J 1 J 1 J 1 J
gaaag cahy yaa
| 84 | a. a. a. a. a. a. a. a. a. a. a. a. a. a. a. a. a. a. a. a. a. a. a. a. a. a. a. a. a. a. a. a. a. a. a. a. a. a. a. a. a. a. a. a. a. a. a. a. a. a. a. | |
| 85 | a. a. a. a. a. a. a. a. a. a. a. a. a. a. a. a. a. a. a. a. a. a. a. a. a. a. a. a. a. a. a. a. a. a. a. a. a. a. a. a. a. a. a. a. a. a. a. a. a. |
golal aclal gjg jai
3.2gll 4.2gll 5.2gll 6.2gll 7.2gll 8.2gll 9.2gll 10.2gll 11.2gll
(Lg ggllll jll) .glll l l aas sllgMICR.15c 15cMICR.15c
(1Jgaggljllj)j. jalll lI aaiu 1aill gaiqall aaiu Iaiz e Jyauw, dugall auiu Iaie
a 1
.1
.2
.3
WEEE (Waste Electrical and Electronic Equipment) Directive
This information only applies to customers in the European Union, according to Directive 2012/ 19/EU OF THE EUROPEAN PARLIAMENT AND OF THE COUNCIL OF 04 July 2012 on waste electrical and electronic equipment (WEEE) and legislation transposing and implementing it into various national legal systems, and to customers in countries in Europe, Middle East and Africa (EMEA) where they have implemented equivalent regulations.
For other countries, please contact your local government to investigate the possibility of recycling your product.


English
The crossed out wheeled bin label that can be found on your product indicates that this product should not be disposed of via the normal household waste stream. To prevent possible harm to the environment or human health please separate this product from other waste streams to ensure that it can be recycled in an environmentally sound manner. For more details on available collection facilities please contact your local government office or the retailer where you purchased this product.