
Expression 836XL - Scanner EPSON - Free user manual and instructions
Find the device manual for free Expression 836XL EPSON in PDF.


| Product Type | Large-format flatbed scanner |
| Brand | Epson |
| Model | Expression 836XL |
| Optical Resolution | 600 x 600 dpi |
| Maximum Scan Width | 36 inches (914 mm) |
| Maximum Scan Area | 36 x 24 inches (914 x 610 mm) |
| Scanning Technology | CCD (Charge-Coupled Device) with cold cathode fluorescent lamp |
| Optical Density | 3.6 Dmax |
| Color Depth | 48-bit input, 24-bit output |
| Scan Speed | Up to 1.5 inches per second in color at 300 dpi |
| Document Feeder | Manual feed with automatic document size detection |
| Light Source | White LED replaceable lamp |
| Dimensions (W x D x H) | 1350 x 510 x 350 mm (53.1 x 20.1 x 13.8 in) |
| Weight | 78 kg (172 lb) |
| Power Supply | 100-240V AC, 50/60 Hz, 0.8A |
| Connectivity | USB 2.0, Ethernet (100Base-TX) |
| Operating System Support | Windows, macOS, and Linux |
| Maintenance | Clean the glass platen with a soft, lint-free cloth; calibrate periodically |
| Safety | Do not open the casing; use the recommended power adapter; unplug during cleaning |
| Spare Parts & Repairability | Replaceable lamp unit and glass; user-replaceable consumables |
| General Information | Designed for professional graphic arts, CAD, and archival digitization |
Frequently Asked Questions - Expression 836XL EPSON
User questions about Expression 836XL EPSON
0 question about this device. Answer the ones you know or ask your own.
Ask a new question about this device
Download the instructions for your Scanner in PDF format for free! Find your manual Expression 836XL - EPSON and take your electronic device back in hand. On this page are published all the documents necessary for the use of your device. Expression 836XL by EPSON.
USER MANUAL Expression 836XL EPSON
FCC Compliance Statement for United States Users
This equipment has been tested and found to comply with the limits for a Class B digital device, pursuant to Part 15 of the FCC Rules. These limits are designed to provide reasonable protection against harmful interference in a residential installation. This equipment generates, uses, and can radiate radio frequency energy and, if not installed and used in accordance with the instructions, may cause harmful interference to radio or television reception. However, there is no guarantee that interference will not occur in a particular installation. If this equipment does cause interference to radio and television reception, which can be determined by turning the equipment off and on, the user is encouraged to try to correct the interference by one or more of the following measures.
▶ Reorient or relocate the receiving antenna
▶ Increase the separation between the equipment and receiver
Connect the equipment into an outlet on a circuit different from that to which the receiver is connected
▶ Consult an experienced radio/TV technician for help.
WARNING
The connection of a non-shielded equipment interface cable to this equipment will invalidate the FCC Certification of this device and may cause interference levels that exceed the limits established by the FCC for this equipment. It is the responsibility of the user to obtain and use a shielded equipment interface cable with this device. If this equipment has more than one interface connector, do not leave cables connected to unused interfaces.
Changes or modifications not expressly approved by the manufacturer could void the user's authority to operate the equipment.
For Canadian Users
This digital apparatus does not exceed the Class B limits for radio noise emissions from digital apparatus as set out in the radio interference regulations of the Canadian Department of Communications.
A Note Concerning Responsible Use of Copyrighted Materials
Like photocopiers, scanners can be misused by improper scanning of copyrighted material. Although Section 107 of the U.S. Copyright Act of 1976 (Title 17, United States Code), the “fair use” doctrine, permits limited copying in certain circumstances, those circumstances may not be as broad as some people assume. Unless you have the advice of a knowledgeable attorney, be responsible and respectful by not scanning published material without the permission of the copyright holder.
Copyright Notice
All rights reserved. No part of this publication may be reproduced, stored in a retrieval system, or transmitted in any form or by any means, electronic, mechanical, photocopying, recording, or otherwise, without the prior written permission of SEIKO EPSON CORPORATION. The information contained herein is designed only for use with this EPSON scanner. EPSON is not responsible for any use of this information as applied to other scanners.
Neither SEIKO EPSON CORPORATION nor its affiliates shall be liable to the purchaser of this product or third parties for damages, losses, costs, or expenses incurred by purchaser or third parties as a result of: accident, misuse, or abuse of this product or unauthorized modifications, repairs, or alterations to this product, or (excluding the U.S.) failure to strictly comply with SEIKO EPSON CORPORATION's operating and maintenance instructions.
SEIKO EPSON CORPORATION and its affiliates shall not be liable for any damages or problems arising from the use of any options or any consumable products other than those designated as Original EPSON Products or EPSON Approved Products by SEIKO EPSON CORPORATION.
EPSON is a registered trademark of SEIKO EPSON CORPORATION. EPSON Expression, EPSON SoundAdvice, and EPSON FaxAdvice are trademarks of Epson America, Inc.
General Notice: Other product names used herein are for identification purposes only and may be trademarks of their respective companies.
Copyright © 1997 by Epson America, Inc., Torrance, California, USA
E836XL1297-00
12/97
Contents
Introduction 11
Optional Equipment 13
How to Use This Manual 14
Warnings, Cautions, and Notes 15
Important Safety Instructions 16
Where to Get Help 18
1 Scanner Basics 21
Scanner Parts 21
Lights and Buttons 23
Scanner Errors 24
Scanning 25
Scanning Oversized Documents 27
2 Using Optional Equipment 28
Using the Transparency Unit 29
Unpacking the Transparency Unit 30
Removing the Shipping Screws 31
Installing the Transparency Unit 33
Installing the Transparency Guide 36
Scanning Transparencies and Oversized Film 39
Using the Film Holders 40
Scanning Normal Documents with the Transparency Unit Installed 50
Adjusting the Transparency Guide Angle 52
Using the Auto Document Feeder 53
Unpacking the Auto Document Feeder 54
Installing the Auto Document Feeder 55
Loading Paper in the Auto Document Feeder 60
Fixing Paper Jams in the Auto Document Feeder 64
Adjusting the Scanning Position of the Auto
Document Feeder 67
3 Maintaining and Transporting Your Scanner 69
Cleaning the Scanner 70
Replacing the Fluorescent Lamp 71
Transporting the Scanner 72
4 Troubleshooting
Diagnosing Problems 73
Indicator Lights 75
Upgrading Your System 76
Problems and Solutions 78
Operation Problems 78
Scan Quality Problems 80
Image Matching Problems 84
Using the Document Guide 86
Installing the Document Guide 87
Scanning the Document Guide 90
Calculating the Adjustment Angle 95
Scanning Your Aligned Document 97
Using the Clear Document Guide 98
5 Specifications 99
Scanner Specifications 100
Scanning 100
Supported Documents 102
Electrical 102
Environmental 103
Safety Approvals 103
Parallel Interface 104
SCSI Interface 106
Initialization Methods 109
Auto Document Feeder Specifications 110
Basic Specifications 110
Documents Supported 111
Electrical 112
Environmental 113
Safety Approvals 113
Transparency Unit Specifications 114
Basic Specifications 114
Electrical 115
Environmental 115
Index 116
Introduction
The EPSON Expression™ 836XL is a true 800-dpi full-color flatbed scanner with a US B (12.2 inch · 17.2 inch) or A3 size scanning area. It has the ability to scan in color or grayscale, making it ideal for virtually all uses, from simple drawings to complex full-color illustrations. It achieves extremely high quality in color by reading and saving 36 bits per pixel.
Your EPSON ® scanner offers the following features:
▶ Full color scanning of up to 68 billion colors or grayscale scanning in up to 4,096 shades of gray.
▶ Scanning resolution of 800 dpi. You can adjust the output resolution to match the resolution of your output device.
▶ Automatic Area Segmentation (AAS) gives you the ability to separate text from photographs on a page so grayscale images are clearer and text recognition is more accurate.
▶ Text Enhancement Technology enhances optical character recognition (OCR) accuracy when scanning text.
- Three resident interfaces: one bidirectional parallel and two SCSI. With these interfaces, you can connect multiple computers to the scanner at the same time.
▶ Software control of all scanner functions.
Optional Equipment
The following optional items are available to expand the versatility of your scanner. For detailed information on using these options, see Using Optional Equipment.
Auto Document Feeder (B81311*)
The auto document feeder allows you to scan up to 30 pages automatically.
Transparency Unit (B81310*)
This option allows you to scan transparent materials, primarily 35 mm slides and negatives. It has a maximum reading area of 11.4 · 16.5 inches (290 · 420 mm), which allows you to scan transparent materials up to A3 or US B size.
SCSI System Cable (25-pin to 50-pin) (B860081)
This cable allows you to connect a SCSI device to an Apple ® Macintosh ® computer or a SCSI adapter card on a Windows ® PC.
SCSI Peripheral Cable (50-pin to 50-pin) (B860091)
This cable allows you to connect two SCSI devices in a daisy chain.
Bidirectional Parallel Interface Board (B80818*)
This board installs in an IBM® compatible computer and provides parallel connection between the scanner and computer. Setup and installation of this board are fully described in the manual that comes with the board. An interface cable must be purchased separately.
How to Use This Manual
Scanner Basics describes the scanner's lights and buttons, and gives instructions for basic scanning and scanning of oversized documents.
Using Optional Equipment gives instructions for installing and using the optional transparency unit and auto document feeder.
Maintaining and Transporting Your Scanner gives tips on caring for your scanner and preparing it for a move.
Troubleshooting provides solutions to problems you may encounter.
Specifications provides technical details on your scanner and its optional equipment.
Warnings, Cautions, and Notes

Warnings must be followed carefully to avoid bodily injury.

Cautions must be observed to avoid loss of data or damage to your equipment.

Notes contain important information about your scanner.
Important Safety Instructions
Read all of these instructions carefully. Follow all warnings and instructions marked on the scanner.
The scanner must be placed on a sturdy, level surface.
- Unplug the scanner before cleaning it. Clean it with a damp cloth only. Do not spill liquid on the scanner.
Do not place the scanner near a radiator or heat source.
Do not block or cover the openings in the scanner's cabinet. Do not insert objects through the slots.
Place your scanner close enough to the computer or workstation for the scanner cable to reach both ends. Make sure you can easily unplug the power cord.
- Use only the type of power source indicated on the scanner's label.
Connect all equipment to properly grounded power outlets. Avoid using outlets on the same circuit as photocopiers or air control systems that regularly switch on and off.
Do not let the power cord become damaged or frayed.
If you use an extension cord with the scanner, make sure the total ampere rating of the devices plugged into the extension cord does not exceed the cord's ampere rating. Also, make sure the total ampere rating of all devices plugged into the wall outlet does not exceed the wall outlet's ampere rating.
▶ Do not attempt to service the scanner yourself.
Unplug the scanner, lock the carriage in place with the transportation lock screw, and bring it to qualified service personnel under the following conditions:
▶ If the power cord or plug is damaged
▶ If liquid has entered the scanner
▶ If the scanner has been dropped or the cabinet damaged
▶ If the scanner does not operate normally or exhibits a distinct change in performance.
Where to Get Help
EPSON provides customer support through the following services:
Electronic support services
| Service Access | |
| World Wide Web From the Internet, you can reach EPSON's Home Page at http://www.epson.com. | |
| EPSON Internet FTP Site | If you have Internet FTP capability, use your Web browser (or other software for FTP downloading) to log onto ftp.epson.com with the user name anonymous and your e-mail address as the password. |
| EPSON Download Service | You can call the EPSON Download Service at (800) 442-2007. Set your communications software to 8 data bits, 1 stop bit, no parity. Modem speed can be up to 28.8 Kbps. |
| EPSON Forum on CompuServe® | Members of CompuServe can type GO EPSON at the menu prompt to reach the Epson America Forum. For a free introductory CompuServe membership, call (800 848-8199 and ask for representative #529. |
Automated telephone services
| Service Access | |
| EPSON SoundAdviceTM | For pre-recorded answers to commonly asked questions about EPSON products 24 hours a day, seven days a week, call (800) 442-2110. |
| EPSON FaxAdviceTM Access | EPSON’s technical information library by calling (800) 442-2110. You must provide a return fax number to use this service. |
| EPSON Referral Service | For the location of your nearest Authorized EPSON Reseller or Customer Care Center, call (800) 442-2110. |

Note: If you need help using software with an EPSON product, see the documentation for that program for technical support information.
EPSON also provides technical support and information on the installation, configuration, and operation of EPSON products. Dial (800) 922-8911 (U.S. and Canada) or (310) 782-2600 (U.S. only), 6 A.M. to 6 P.M., Pacific Time, Monday through Friday.
Before you call, please have the following information ready:
Product name
▶ Product serial number
▶ Computer configuration
▶ Description of the problem
You can purchase optional equipment, manuals, accessories, and parts from EPSON Accessories at (800) 873-7766 (U.S. sales only). In Canada, please call (800) 873-7766 for dealer referral.
1 Scanner Basics
Scanner Parts
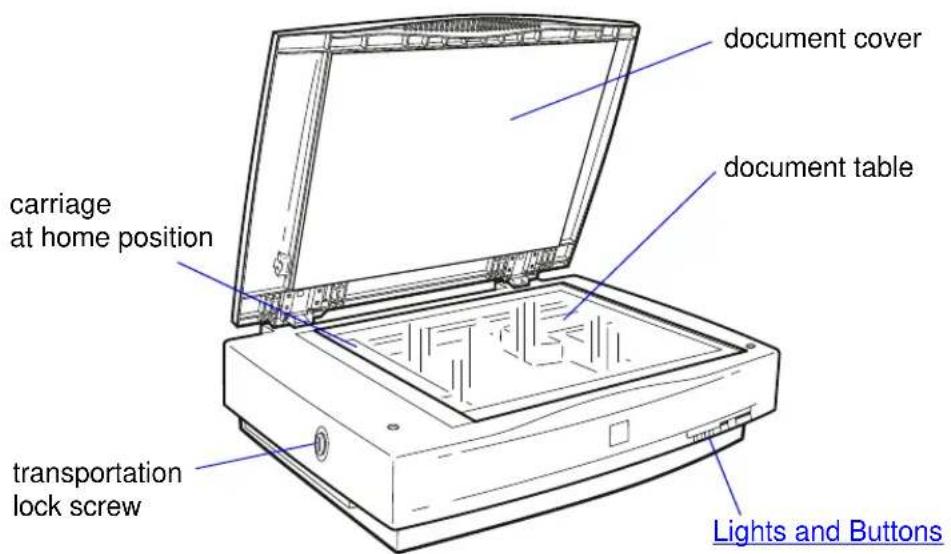
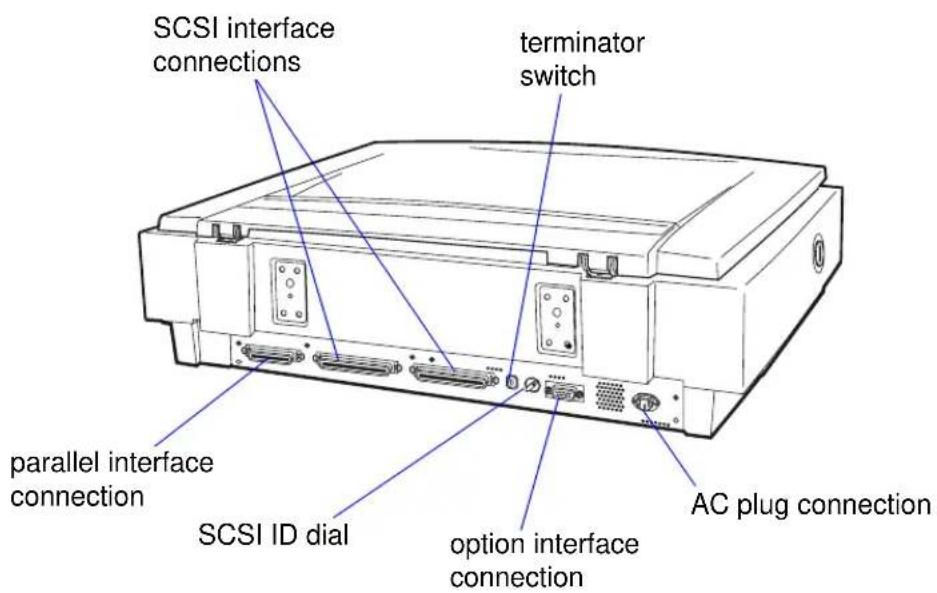
Lights and Buttons
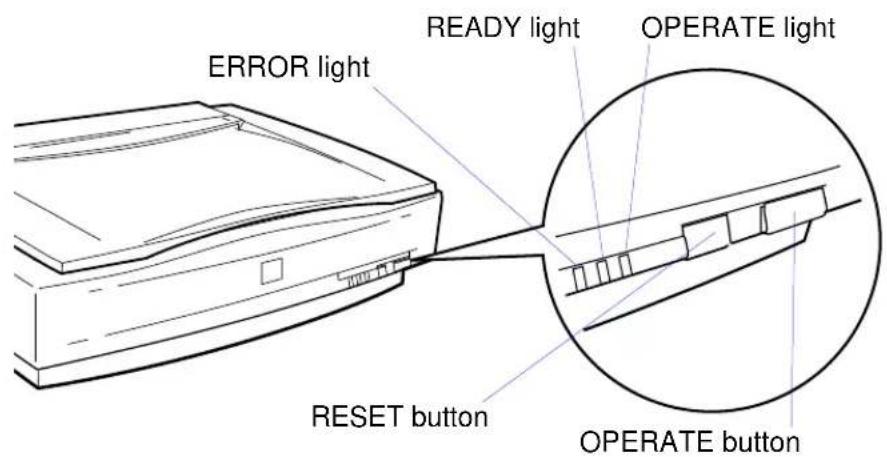
OPERATE light (green)
Comes on when the scanner is turned on.
READY light (green)
Comes on when the scanner is ready to scan and flashes during scanning. When an error occurs, the type of error is indicated by both the READY and ERROR lights, as listed in Scanner Errors.

Caution: Pressing the RESET button during a scan stops the scanner and may cause an error in the scanning software.
The RESET button may not work if two computers are connected to the scanner and a computer using the bidirectional parallel interface is not turned on.
ERROR light (red)
Comes on when an error occurs and, along with the READY light, indicates the type of error.
OPERATE button
Turns the scanner on and off.
RESET button
Resets the scanner.
Scanner Errors
If an error occurs, the scanner stops operating and the READY and ERROR lights indicate the type of error. See Diagnosing Problems for details.
| ERROR light READY | light Error type | |
| On On Command error | ||
| Flashing Off Interface | error | |
| Flashing Flashing Fatal error | ||
| Off Off Option (ADF or TPU) error | ||

Note: Make sure the document is flat against the glass surface so that the image is properly focused.
Always close the lid to prevent interference from external light.
Don't leave photographs on the document table for a long time; they may stick to the glass.
Keep the document table clean. See Cleaning the Scanner for instructions.
Scanning
1 Press the OPERATE button to turn on the scanner. The OPERATE light comes on.
2 Make sure the scanner's READY light is on, then turn on the computer.
3 Open the document cover.
4 Place your original on the document table with the side to be scanned facing down. Position the document in the upper left corner as shown.
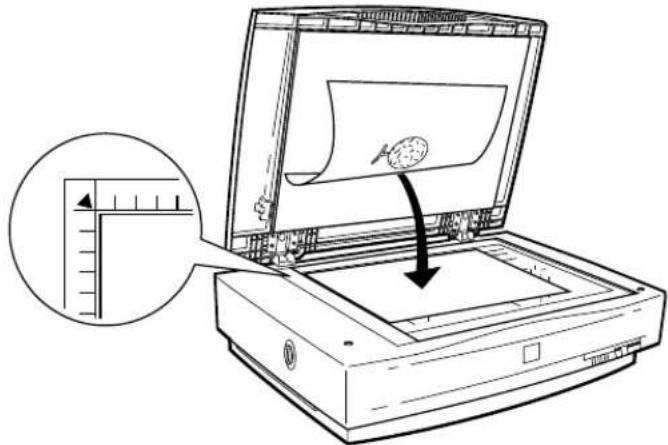

Note: The clear document guide can also be used to hold light originals against the document table; this will prevent the original from being pushed out of alignment by air currents as the document cover is closed. See Using the Clear Document Guide for details.
5 Close the document cover gently so that the document doesn't move.
6 To scan your document, follow the instructions in the EPSON TWAIN Pro User's Guide or the LaserSoft SilverFast ai for EPSON Expression TM 836XL User's Guide.

Caution: Do not force the cover off the scanner or lift the cover by the front. You may damage the cover.
When scanning with the cover removed, cover any exposed areas of the document table to prevent interference from external light.
Scanning Oversized Documents
For thick documents or other materials, you can remove the document cover. Grasp the back of the document cover beside the hinges and lift it straight up.
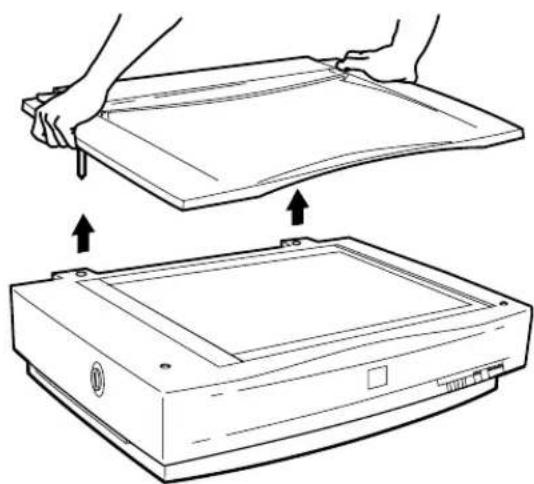
To reattach the document cover, insert the hinge pins into the holes and push straight down on the cover until it clicks into place.
2
Using Optional Equipment
Follow the steps in these sections to install and use the scanner's optional equipment:
▶ Using the Transparency Unit
▶ Using the Auto Document Feeder
Using the Transparency Unit
The optional transparency unit (part number B81310*) lets you scan full color transparencies, strips of negatives or positives, and slides. You can also scan normal opaque documents with the TPU installed.
Follow the steps in these sections to install and use the TPU:
▶ Unpacking the Transparency Unit
Removing the Shipping Screws
Installing the Transparency Unit
Installing the Transparency Guide
▶ Scanning Transparencies and Oversized Film
▶ Using the Film Holders
- Scanning Normal Documents with the Transparency Unit Installed
Adjusting the Transparency Guide Angle
Unpacking the Transparency Unit
Make sure all these items are included in the box with the TPU. Contact your EPSON dealer if anything is missing or damaged.
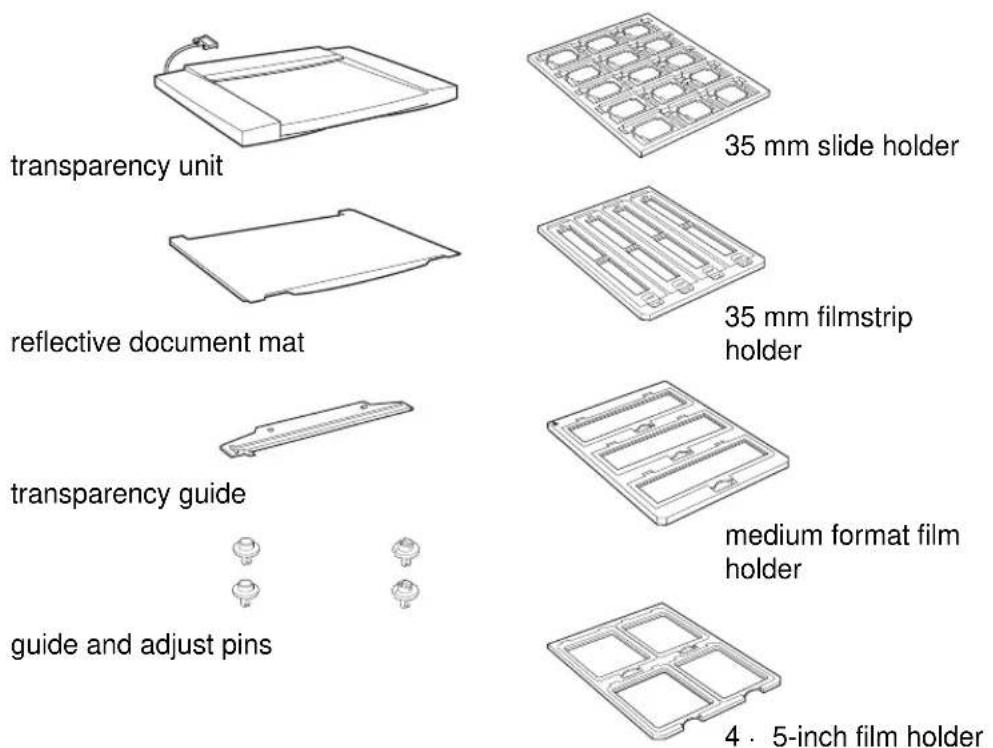

Caution: If a screw is left in an outer hole while using the TPU, the TPU may be damaged.
Removing the Shipping Screws
To prevent damage during shipping, shipping screws are attached to the TPU to secure its lamp assembly. You must remove these screws before using the TPU.
1 Turn the TPU so the glass side faces up.
2 Use a Phillips head (cross head) screwdriver to remove both shipping screws from the holes labeled CLAMP, as shown below.
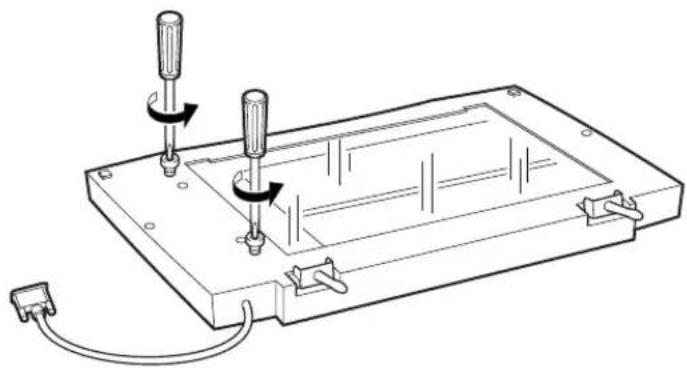

Note: If you can't replace the shipping screws, the TPU's lamp assembly may not be in its home position. If this is the case, reattach the TPU to the scanner, close the TPU, and turn on the scanner. The lamp assembly returns to its home position. Turn off the scanner, remove the TPU, and insert the screws.
3 Install the screws in the storage holes labeled STOCK between the shipping holes, as shown below.
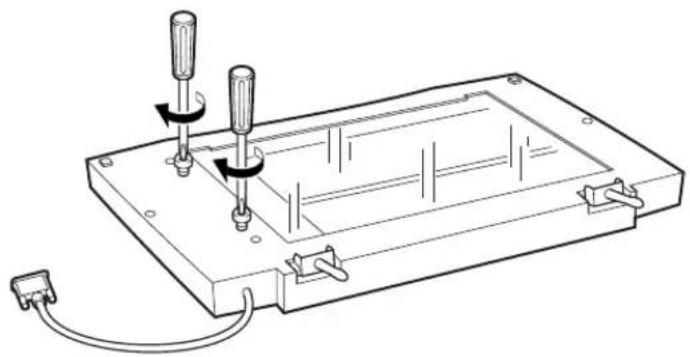
Before transporting the scanner, turn it off, remove the TPU, and replace the shipping screws in the outer shipping holes labeled CLAMP. The transportation lock screw on the scanner must also be locked before transporting the scanner (see the scanner's Setup Guide).
Installing the Transparency Unit
Follow the steps below to install the TPU:
1 Make sure the scanner is turned off. Then unplug the power cable from the scanner.
2 Remove the document cover by grasping it beside the hinges and lifting it straight up.
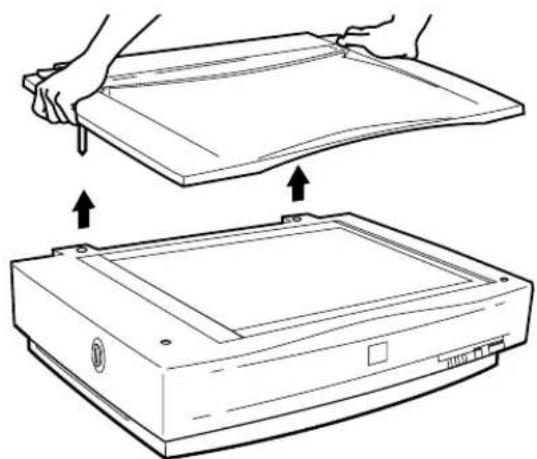
3 Align the TPU hinge pins with the holes in the scanner, then lower the TPU until the pins rest securely in the holes.
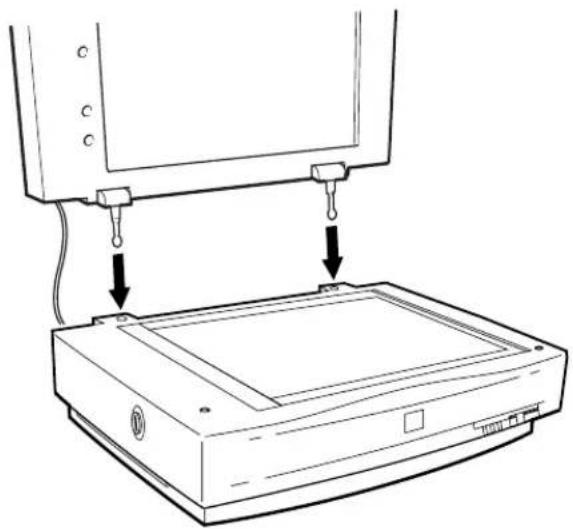
4 Close the TPU.

Caution: Do not put heavy objects on the TPU—doing so may damage the TPU.
5 Attach the TPU connector to the option connector at the back of the scanner. Secure the connector using the attached screws.
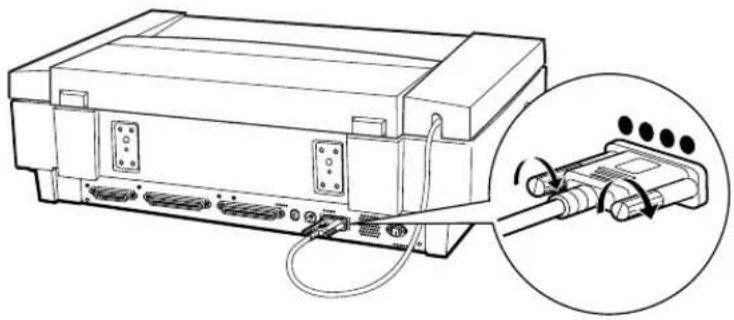
6 Plug the scanner back in and turn it on.
Installing the Transparency Guide
Follow the steps below to install the transparency guide:
1 Lift the TPU.
2 If your scanner doesn't already have a guide pin and adjust pin installed as shown below, insert the guide pin and adjust pin that came with the TPU. Make sure the adjust pin's arrow faces the guide pin.
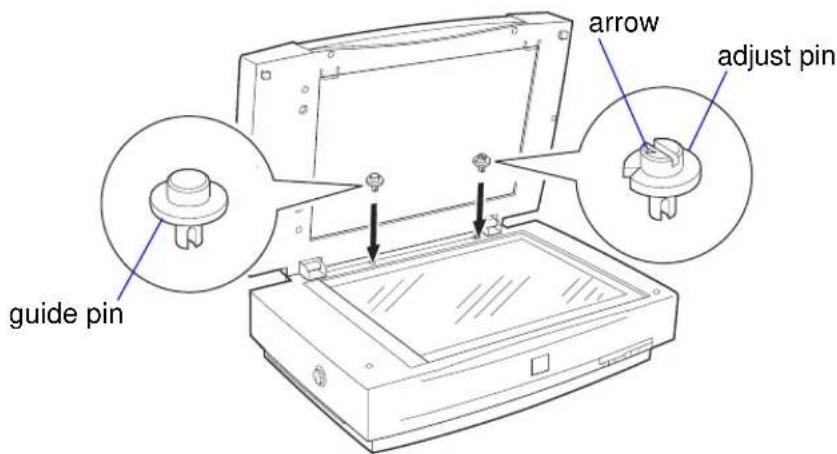
3 Place the transparency guide above the scanner's document table over the pins as shown below. Make sure the oval hole is on the right.
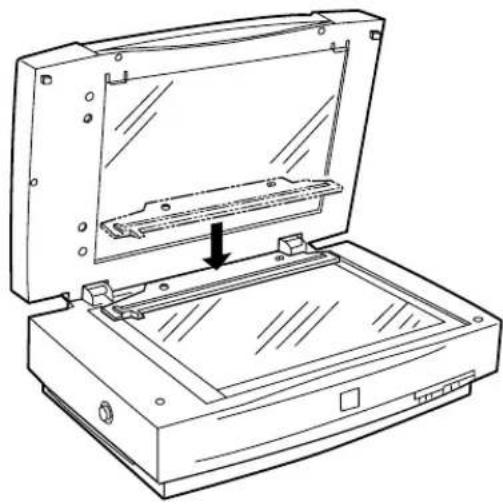
Before scanning transparencies, use a soft, dry, lint-free cloth to wipe the glass of the TPU and the scanner's document table, including the narrow window visible through the transparency guide.
To scan transparencies, see Scanning Transparencies and Oversized Film.
To scan slides or strips of negative or positive film, see Using the Film Holders.
To scan normal documents with the transparency guide installed, Scanning Normal Documents with the Transparency Unit Installed.
Scanning Transparencies and Oversized Film
To scan transparencies or film that is larger than the guides on the document table, place the transparency or film facedown on the document table with the corner against the notch on the transparency guide, as shown below. The maximum film size is 11.4 · 16.5 inches (290 · 420 mm).
Close the TPU and scan according to the instructions in your scanner software's online guide.
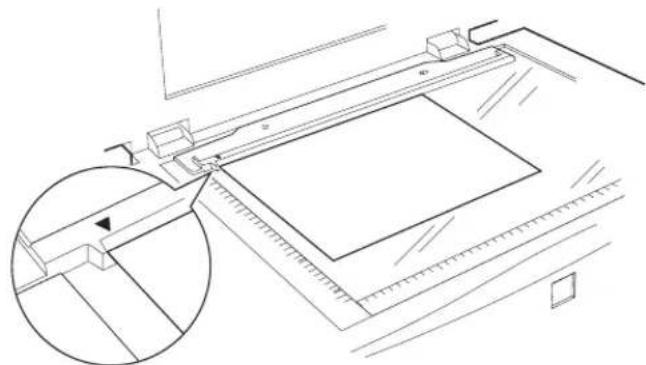
Using the Film Holders
You can use the four film holders that came with the TPU to scan 35 mm slides, strips of 35 mm negative or positive film, strips of medium format (2 1/4-inch) film, and 4 · 5-inch (102 · 127 mm) film. Follow the steps in these sections:
▶ Loading 35 mm slides
▶ Loading strips of negative or positive film
▶ Loading medium format (2 1/4-inch) film
Loading 4 x 5-inch film
Loading 35 mm slides
1 Load slides in the 35 mm slide holder, facedown with the tops of all slides facing the triangle side, as shown below.
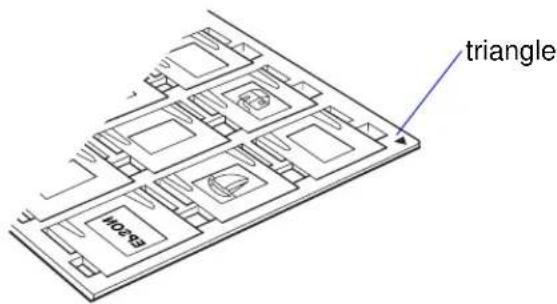
2 Place the slide holder on the document table with the corner against the notch on the transparency guide, as shown below. Align the triangles on the slide holder and the transparency guide.
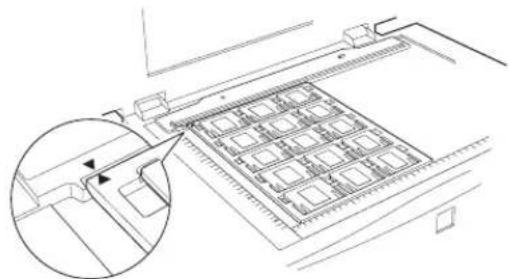
3 Close the TPU and scan the slides according to your scanner software's online guide.
Loading strips of negative or positive film
1 Place the 35 mm filmstrip holder on a flat surface, then lift up one end of the strip cover and remove it.
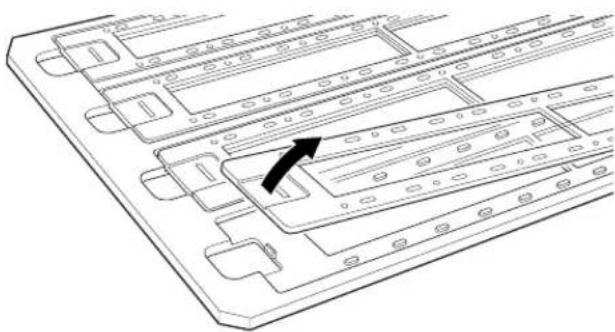
2 Insert a strip of film in the filmstrip holder facedown.
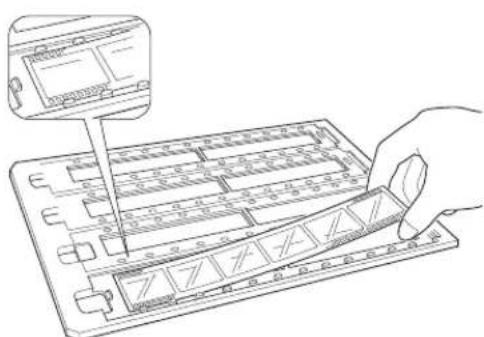
3 To replace the strip cover:
- Insert the two tabs on one end of the cover into the two corresponding slots in the holder.
▶ Swing the cover down, fitting the cover holes over the pins on the holder.
▶ Snap the cover shut.
4 Repeat steps 1 through 3 for all the filmstrips you want to scan.
5 Place the filmstrip holder on the document table with the corner against the notch on the transparency guide. Align the triangles on the filmstrip holder and the transparency guide.
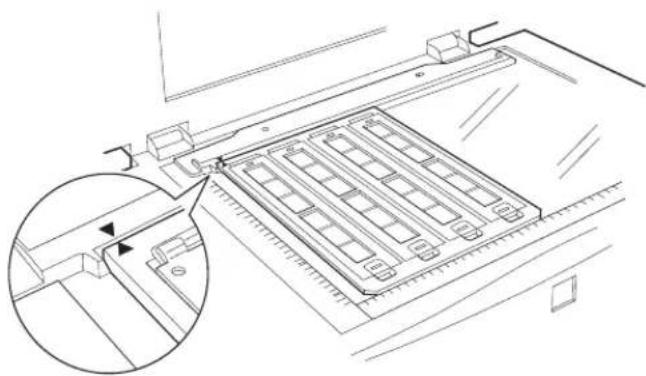
6 Close the TPU and scan the film according to your scanner software's online guide.
Loading medium format (2 1/4-inch) film
1 Place the medium format film holder on a flat surface, then lift up the side of the strip cover to open it.
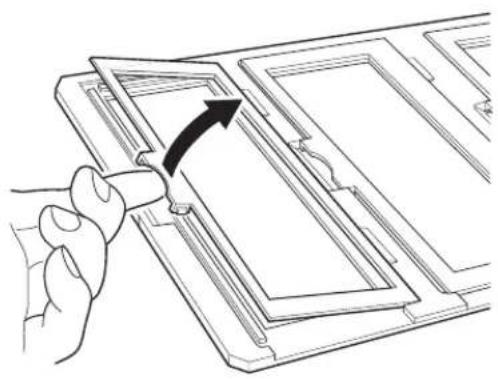
2 Insert the film in the holder facedown.
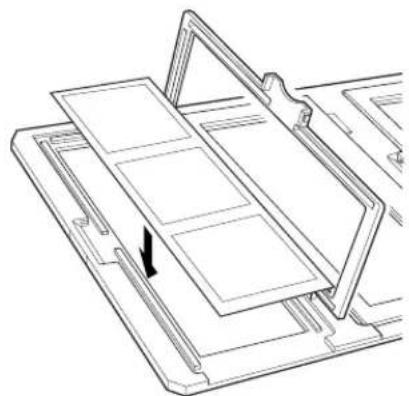
3 Close the cover until it snaps shut.
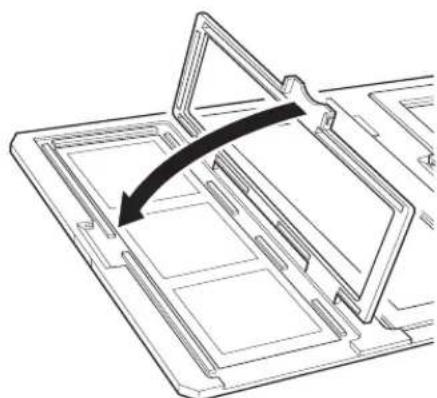
4 Repeat steps 1 through 3 for all the film you scan.
5 Place the holder on the document table with the corner against the notch on the transparency guide. Align the triangles on the holder and the transparency guide.
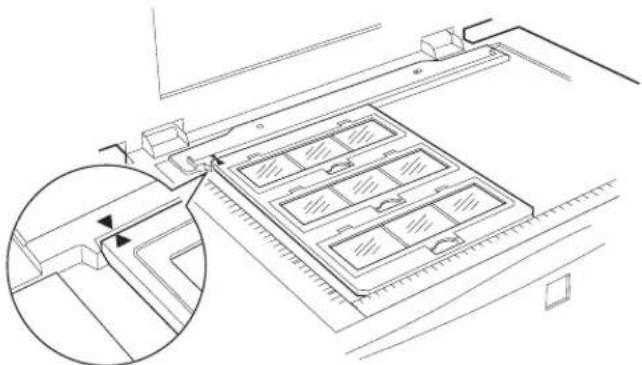
6 Close the TPU and scan the film according to the instructions in your scanner software's online guide.
Loading 4 x 5-inch film
1 Place the 4 · 5-inch film holder on a flat surface, then lift up the side of the film cover to open it.
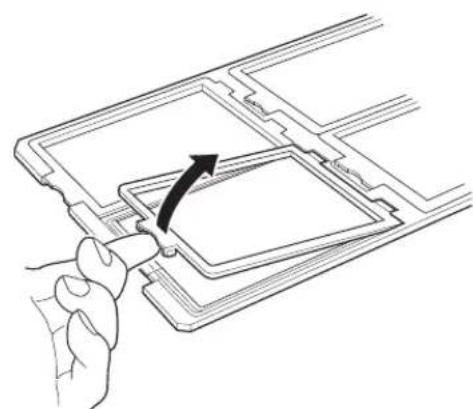
2 Insert the film in the holder facedown.
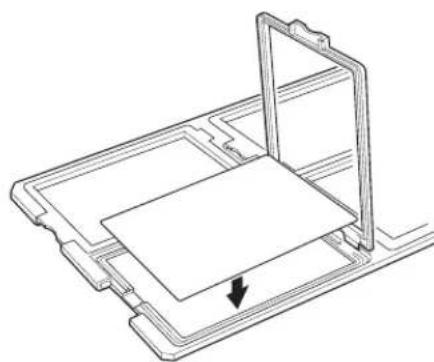
3 Close the cover until it snaps shut.
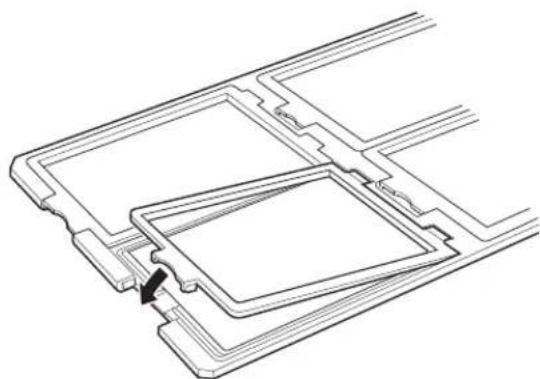
4 Repeat steps 1 through 3 for all the film you want to scan.
5 Place the holder on the document table as shown with the corner against the notch on the transparency guide. Align the triangles on the holder and the transparency guide.
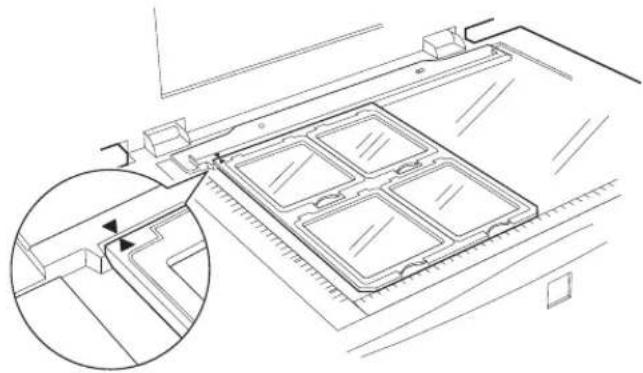
6 Close the TPU and scan according to the instructions in your scanner software's online guide.
Scanning Normal Documents with the Transparency Unit Installed
To scan normal documents with the TPU installed, insert the reflective document mat included with the TPU as described below.
1 Open the TPU and remove the transparency guide from the scanner's document table, if necessary.
2 Slide the reflective document mat into place and insert the tabs into the slots on the TPU as shown below. Then firmly pull up the mat while inserting the top two tabs into the slots in the top of the TPU.
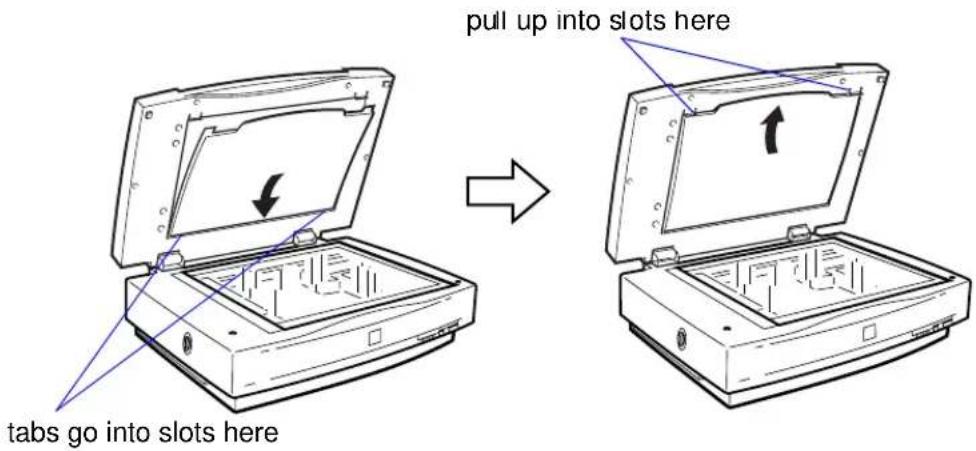
3 Place your document on the document table and close the TPU.
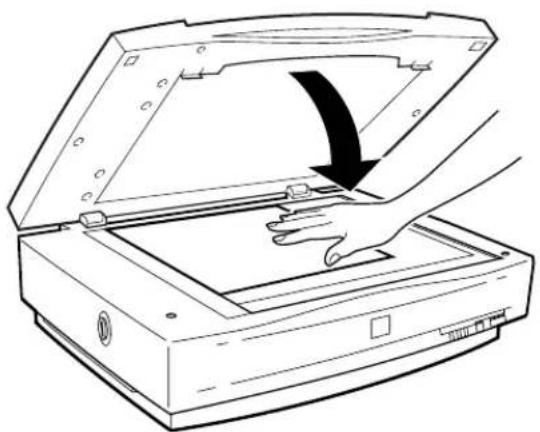
4 Scan according to the instructions in Scanner Basics, setting your Document Source to Flatbed (TWAIN Pro) or your Document Type to Reflective (SilverFast).
To remove the reflective document mat, slide it down and then pull it up and out of the slots on the TPU.
Adjusting the Transparency Guide Angle
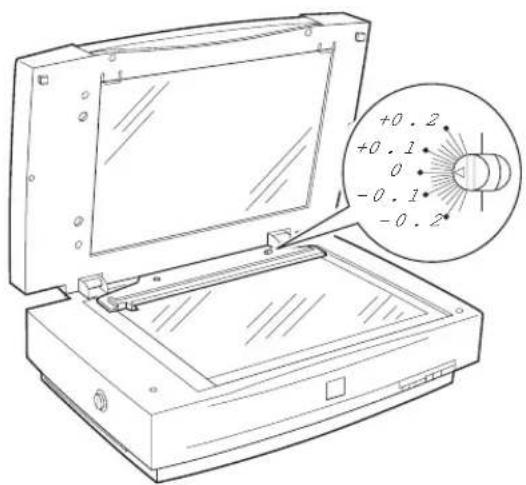
Most scanners scan at a slight angle due to the movement of the carriage. If you find that your scanned images are being scanned at a slight angle, adjust the angle of scanning by turning the adjust pin.
The direction and degree you should turn the adjust pin depends on your scanner and the placement of the document to be scanned. You may want to experiment with it to determine the best angle.
Using the Auto Document Feeder
The auto document feeder (part number B813112) automatically loads multi-page documents into your scanner. It is particularly useful for OCR (optical character recognition) scanning or for creating an image database. To use the ADF with your OCR software, you must install EPSON TWAIN Pro. Follow the steps in these sections to install and use the ADF:
▶ Unpacking the Auto Document Feeder
Installing the Auto Document Feeder
Loading Paper in the Auto Document Feeder
Fixing Paper Jams in the Auto Document Feeder
Adjusting the Scanning Position of the Auto Document Feeder
Unpacking the Auto Document Feeder
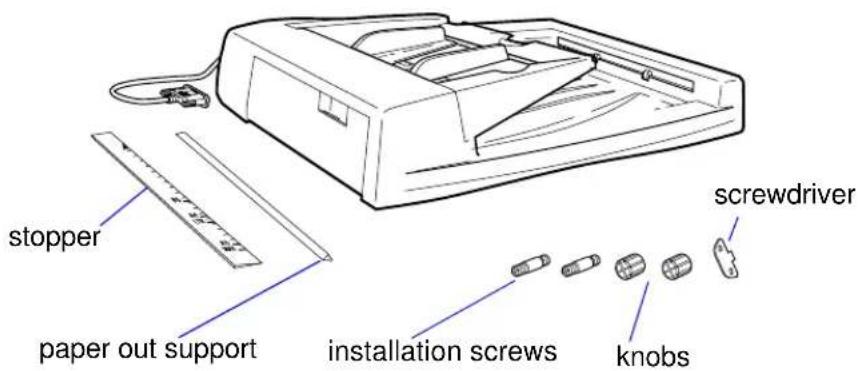
Make sure that the following items are included in the ADF box. Contact your EPSON dealer if anything is missing or damaged.
Installing the Auto Document Feeder
Before installing the ADF, be aware that:
The ADF is heavy, so you may need to have someone help you lift it.
The ADF is large, so clear a wide space around the scanner before unpacking and installing it.
Follow the steps below to install the ADF on your scanner:
1 Make sure your scanner is turned off and unplug the scanner's power and interface cables.
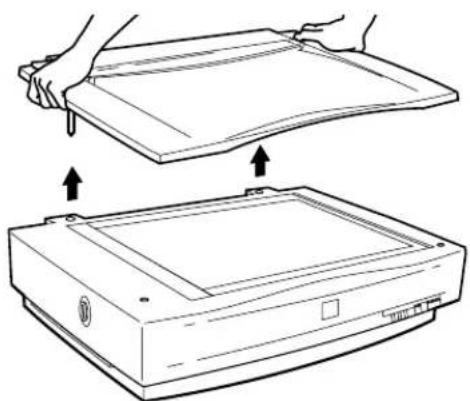
2 Remove your scanner's document cover by grasping it beside the hinges and lifting it straight up.
3 Insert the installation screws that came with the ADF into the holes in the back of the scanner and secure them with the enclosed screwdriver, as shown below.
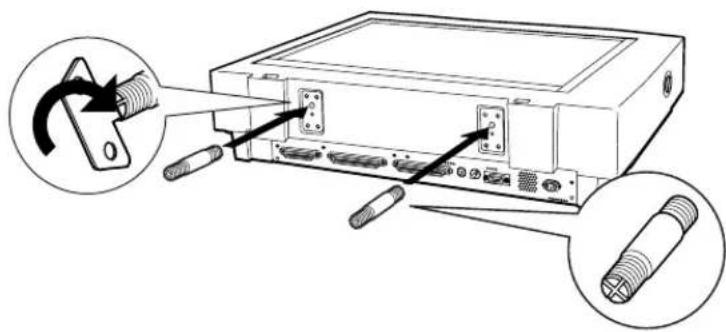
4 Place the two knobs included with the ADF beside the scanner.
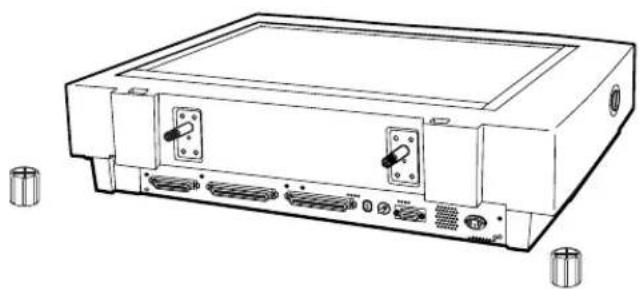

Warning: The ADF is heavy, so you may need to have someone help you lift it.
5 Place the ADF on the scanner, lining up the screws with the holes as shown.
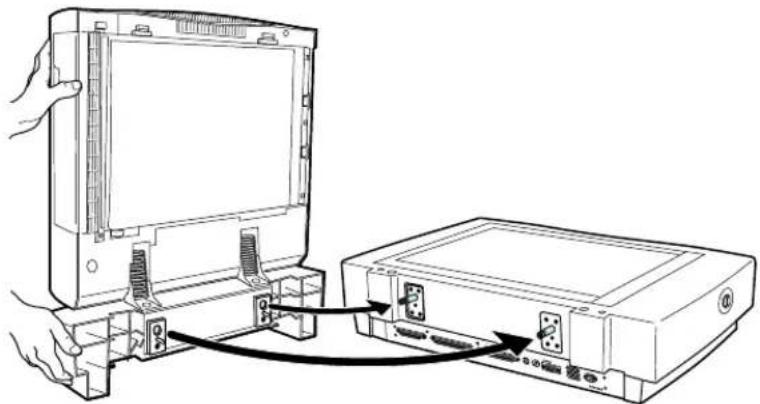
6 Twist the knobs onto the ends of the screws and tighten them using the enclosed screwdriver.
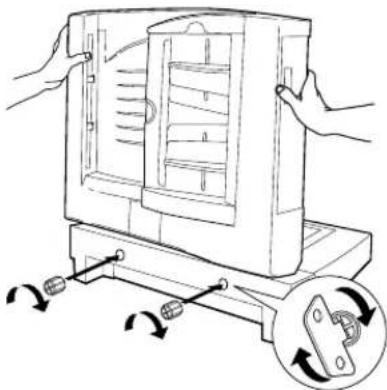
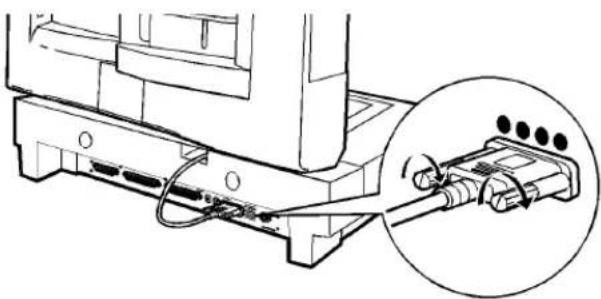
7 Attach the ADF's connector to the scanner's option interface. Secure the connection by tightening the connector screws.

Caution: If the ADF misfeeds, first make sure the stopper and paper out support are in place and correctly installed.
8 Peel off the backing from the stopper and from the paper out support provided with the ADF. Then attach the stopper and paper out support to the scanner as shown. Insert the tabs on the paper out support into the slots at the right end of the document table.
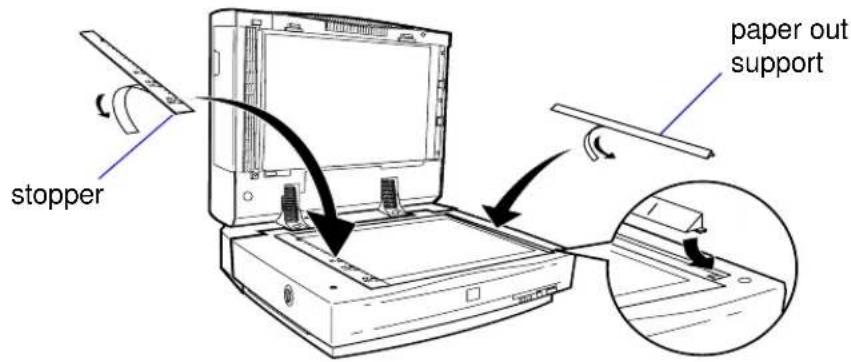
9 Close the ADF.
10 Reattach all the scanner cables and turn on the scanner.

Caution: Do not feed photographic sheets or valuable original artwork into the ADF; misfeeding may result in accidental wrinkling or damage to your original.
Loading Paper in the Auto Document Feeder
The ADF can hold up to 30 sheets of the following paper sizes, based on a paper weight of 17 lb and a thickness of 0.2 inch (6.0 mm) or less:
| Paper size Direction | |
| A3, Ledger, B4, Legal, A4, Letter, B5, A5, 5.5 · 5.8-inch (140 · 148 mm) | Portrait |
| A4, Letter, B5, A5 Landscape |
See Specifications for complete paper requirements.
Before loading the ADF, make sure the document:
▶ Has no wet ink on it.
▶ Has no holes and is not ripped or wrinkled.
- Has no staples or other objects attached that may damage the feeder.
- Has no folds.
Is not a multipart form.
Is not bound.

Note: You can automatically scan both sides of a document using the ADF-double sided setting in EPSON TWAIN Pro. See the software's online user's guide for instructions.
▶ Has no carbon coating.
- Has no cut-out areas.
Follow the steps below to load paper in the ADF:
1 Slide the edge guides all the way out.
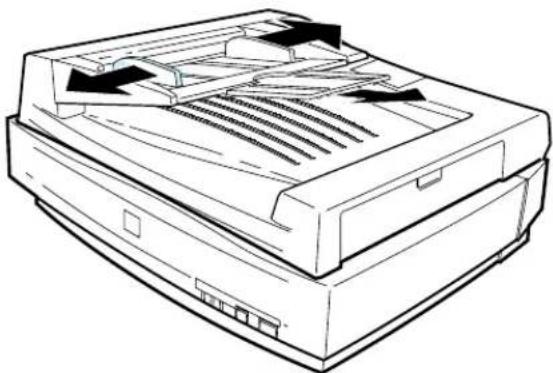
2 Arrange your stack of originals face up, with the page you want to scan first on the bottom. Insert the paper stack into the ADF until it meets resistance.
If your document is in portrait orientation (top and bottom edges are shorter than the side edges), insert the document bottom edge first.

Caution: When scanning high-quality color or halftone documents, it is best to open the ADF and scan documents as described in Loading documents manually.
Don't open the ADF while scanning. You'll get an option error and possibly a paper feeding error.
Always close the ADF before scanning or using the feeder.
If your document is in landscape orientation (top and bottom edges are longer than the side edges), insert the document left edge first.
If your documents are large, pull out the paper support.
3 Slide the edge guides to the edges of your paper.
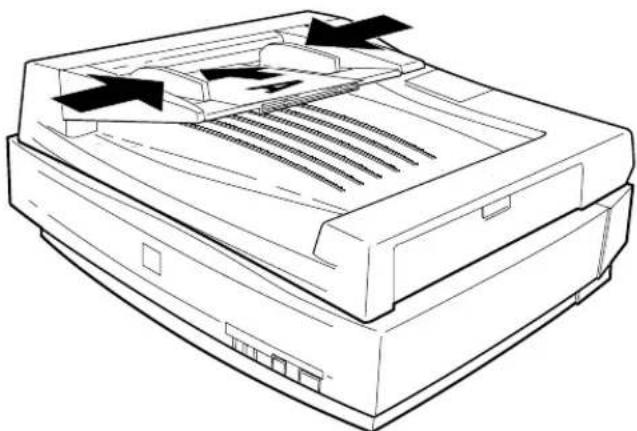
4 Follow the steps in your software's user's guide to scan your document.
Loading documents manually
You can load documents manually while the ADF is installed. Open the ADF and place the document on the document table. Then close the ADF and scan the document as described in Scanner Basics.
Fixing Paper Jams in the Auto Document Feeder
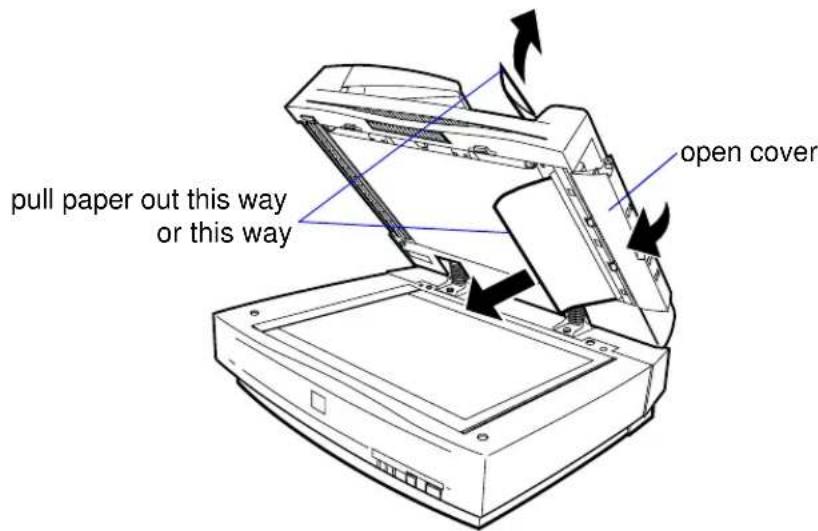
If a paper jam occurs, first open the ADF's cover to determine where the paper jam occurred.
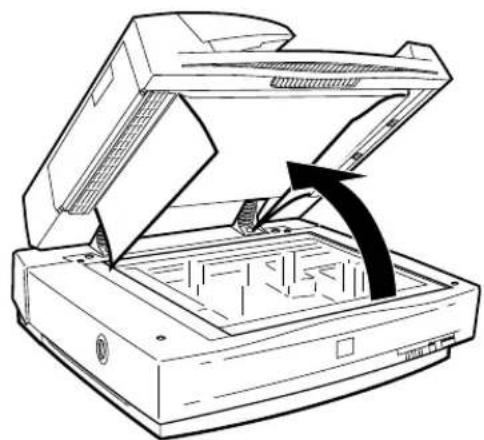
If paper jams in the feeder, open the cover on the left and slowly pull out the jammed paper as shown. (Be careful not to pull too hard or the paper may tear, making it more difficult to remove.)
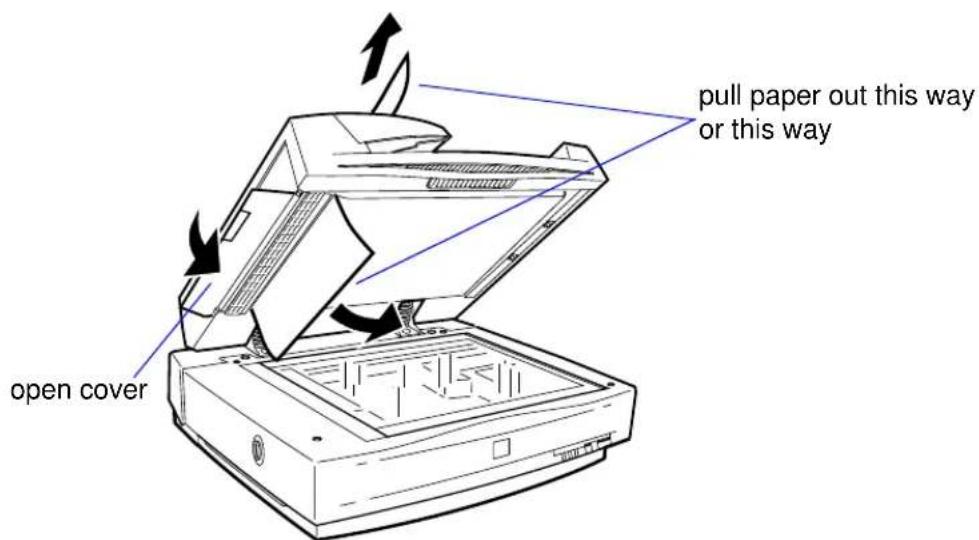
If paper jams in the paper eject position, open the cover on the right and slowly pull out the jammed paper as shown. (Be careful not to pull too hard or the paper may tear, making it more difficult to remove.)
After removing the jammed paper, close the ADF cover and reset the scanner by turning it off and on again or pressing the RESET button.
Adjusting the Scanning Position of the Auto Document Feeder
If your document feeds into the ADF too far or not far enough, adjust the scanning position using the adjustment dials. This problem may occur if the stopper is not installed or not positioned properly on the document table, so first make sure the stopper is installed as described in Installing the Auto Document Feeder.
To access the dials, slide open the dial cover on the rear of the ADF.
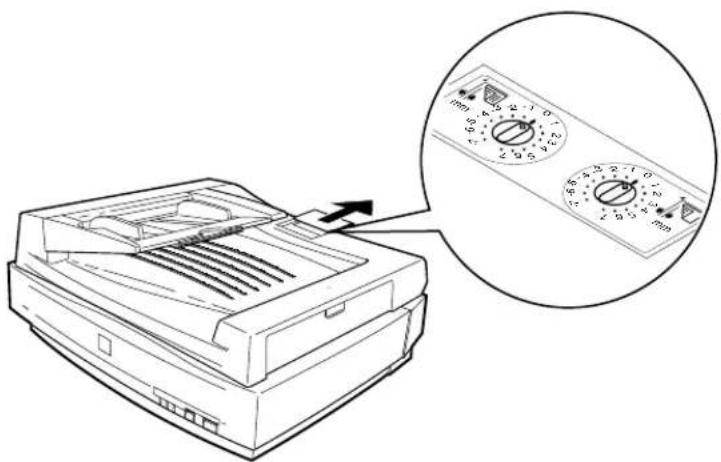
The right dial controls where paper stops when it is first loaded from the feeder. The left dial controls where double-sided originals stop during scanning of the second side.
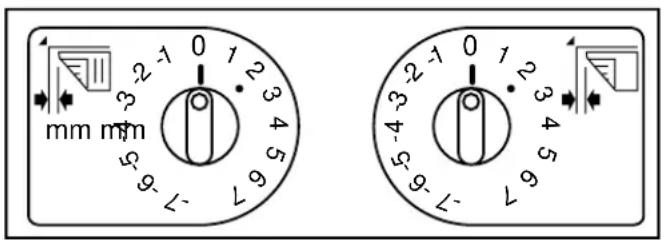
If the upper portion of the scanned image is missing, turn the dial clockwise. The position changes in 1 mm (0.04 inch) increments.
If the lower portion of the scanned image is missing, turn the dial counterclockwise. The position changes in 1 mm (0.04 inch) increments.
3
Maintaining and Transporting Your Scanner
This chapter gives tips on caring for your scanner and preparing it for a move in these sections:
Cleaning the Scanner
▶ Replacing the Fluorescent Lamp
▶ Transporting the Scanner

Caution: Never open the scanner case.
Cleaning the Scanner
To keep your scanner operating at its best, you should clean it periodically. Before cleaning it, unplug the scanner's power cable. Then clean the outside with mild detergent diluted in water.
If the glass of the document table gets dirty, clean it with a soft dry, lint-free cloth. If grease or other hard-to-remove material gets on the glass, remove it with a small amount of glass cleaner on a soft lint-free cloth. Wipe off any remaining moisture with a dry lint-free cloth.
Do not:
▶ Scratch or damage the document table glass
▶ Use a hard or abrasive brush to clean it
▶ Use alcohol, thinner, or corrosive solvents
▶ Spill liquids into the scanner mechanism or electronic components
▶ Spray lubricants inside the scanner

Caution: Never open the case of the scanner. If you think repairs or adjustments are necessary, consult your Epson Customer Care Center.
Replacing the Fluorescent Lamp
The luminosity of the fluorescent lamp declines over time. If the lamp breaks or becomes too dim to operate normally, the scanner stops working and both the READY and ERROR lights flash. If this happens, the lamp assembly may need to be replaced. For details, contact your local Epson Customer Care Center (see Where to Get Help for details).

Note: If the scanner is inoperable, the carriage may not automatically return to the home position. If it doesn't, raise the right side of the scanner and hold it up until the carriage comes to rest at the left side. Then turn the transportation lock screw to the locked position.
Transporting the Scanner
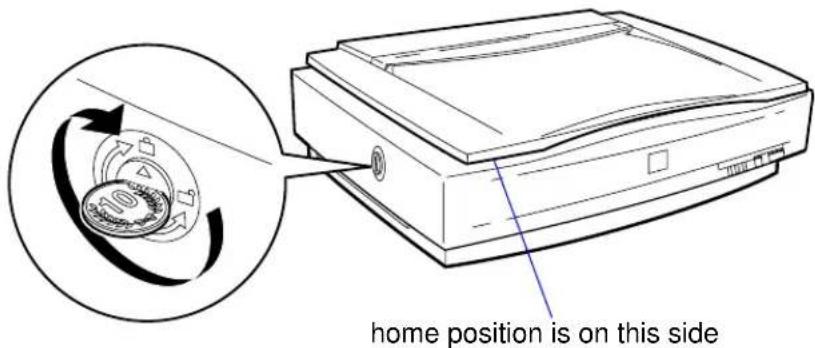
If you need to transport the scanner or store it for an extended period, you must secure the carriage beforehand.
Turn on the scanner and wait until the carriage moves to the home position (the left side). Then turn off the scanner.
Turn the transportation lock screw to the locked position to secure the carriage.
4
Troubleshooting
This chapter helps you solve scanner problems in these sections:
Diagnosing Problems
Upgrading Your System
▶ Problems and Solutions
Using the Document Guide
Diagnosing Problems
Some problems you may have can involve your software or computer, such as:
▶ Incorrect setup of the parallel or SCSI interface
▶ Inappropriate selection of the scanner functions
▶ Incorrect setup of your computer or software
▶ Incorrect operation of your scanner software
If an error occurs, check the scanner's indicator lights. See Indicator Lights to determine what kind of error it is, and try the suggested solutions. If that doesn't solve the problem, see Problems and Solutions.
See the documentation that came with your software, computer, and printer for other possible solutions.
Indicator Lights
If an error occurs, the scanner stops operating. The READY and ERROR lights indicate the type of error.
| ERROR light | READY light | Error type Solution | |
| On On Command | error | The scanner has received incorrect commands from your scanning software. Try rescanning the document. If the error still occurs, try restarting the scanner. | |
| Flashing | Off Interface | error | The interface setup is wrong or the scanner is not properly connected to the computer. Check the interface connection.Then push the RESET button or turn the scanner off and on. |
| Flashing | Flashing F | fatal error The problem could be:► The transportation lock screw has not been released.► The optional TPU or the optional ADF is not set up correctly.► The fluorescent lamp may need to be replaced.► The scanner is inoperative.Check that the transportation lock screw is released, check any installed options, then push the RESET button. If the scanner still does not operate properly, turn the scanner off and on. If the problem persists or it occurs repeatedly, consult your dealer. | |
| Off Off Option | error | There's a problem with an installed option. Check the option and remove any jammed paper, if necessary. | |
Upgrading Your System
To improve your image processing speed and the appearance of the images on your monitor, you can add the following items to your system:
▶ Additional memory. Scanned images use much more memory than text files, so you may need more RAM in your computer and a larger hard disk.
- Accelerator board. You may want to increase your system's processing speed; large files take longer to process than small ones.
Video card. If your scanned images look grainy or have poor gradient fills on your monitor, you may want to upgrade your video card. You'll need 24-bit color (also called true color or millions of colors) or better for the highest quality image reproductions.
▶ High resolution monitor. The resolution of your monitor also affects the quality of the image you see. Consider a high resolution monitor if you do precise color work, but be sure you have a compatible video card.
▶ Compression software. Many different programs are available to make image files smaller for storage or transmission. For example, they can enable you to store a 3MB image file on a 1.44MB floppy disk. Compression software can compress images and restore them with virtually no loss of data or quality.
Problems and Solutions
Check these sections for the problem you're having and for possible solutions:
▶ Operation Problems
▶ Scan Quality Problems
▶ Image Matching Problems
Operation Problems
The OPERATE light does not come on.
| Problem Solution | |
| The scanner is not getting power. | Make sure the power cable is correctly plugged into the scanner and the power outlet. Make sure the outlet is operational and is not connected to a timer or switch. |
The READY light does not come on.
| Problem Solution | |
| The scanner is not communicating with your computer. | Make sure the scanner is securely connected to the correct computer interface and that the computer is turned on. |
The scanner does not start scanning.
| Problem Solution | |
| Your software or interface is not operating properly. | Make sure you've selected the correct interface port and settings when you installed your scanner and interface software. Also make sure the interface board on your computer is installed properly. |
| If you're using the SCSI interface, confirm that the terminator and SCSI ID are set correctly. See the Setup Guide for instructions. | |
| If you have other expansion boards in your computer, make sure that they're not interfering with the interrupt setting of the interface board for your scanner. (See your computer manual for details.) | |
The scanner software does not work properly.
| Problem Solution | |
| Your system doesn’t meet your software requirements or the software is set up incorrectly. | Make sure you have correctly installed your software. |
| Make sure your computer system meets all the requirements specified for your software. | |
| Make sure your software supports this model of scanner. | |
| Make sure the computer has enough memory for your software. If you’re running other software at the same time, using RAM resident programs, or have many device drivers, the computer may not have enough memory left. (See your software and computer manuals for details.) | |
Scan Quality Problems
The entire image is distorted or blurred.
| Problem Solution | |
| The document is not placed correctly. | Make sure the document is placed flat on the document table. |
| You may have accidentally moved the document during scanning.Check the position of the document and don’t move it while the scanner is operating. | |
| Be sure the scanner is not tilted or placed on an unstable surface. | |
Part of the image is distorted or blurred.
| Problem Solution | |
| Part of the document may be wrinkled, warped, or not in contact with the document table. | Be sure the document is uniformly flat and smooth. |
| There may be IRQ (interrupt request) conflicts within your system. | Check your operating system manual and online help files for instructions on how to resolve IRQ conflicts. |
The edges of the document are missing from the scanned output.
| Problem Solution | |
| The document is positioned incorrectly. | The document table has non-readable areas around the edges.Reposition your document so that the image you want to scan is within the readable area. |
Color is patchy or distorted at the edges of the image.
| Problem Solution | |
| The document may be letting in external light. | If the document is very thick or warped at the edges, the edges of the image may be discolored. Cover the edges of the document with opaque paper to block outside light. |
| If part of the document extends beyond the document table, that edge may not be in contact with the document table. Change the position of the document. | |
The image is faint or out of focus.
| Problem Solution | |
| The document is not placed correctly. | Check that the document is placed flush against the document table. |
| Your software settings may be incorrect. | Adjust the brightness option in your software to a darker setting. |
The image is too dark.
| Problem Solution | |
| Your software settings may be incorrect. | Adjust the brightness setting in your software. Also check the brightness and contrast settings of your monitor. |
Straight lines in the image are jagged.
| Problem Solution | |
| The document may be placed at an angle on the document table. | Align it so that the horizontal and vertical lines are carefully aligned with the scales on the top and side of the document table. |
| Your document isn’t aligned to compensate for carriage movement. | The scanner’s normal carriage movement may result in scans which aren’t perfectly aligned with the document table scales. Use the document guide to adjust your document alignment as described in Using the Document Guide. |
A line of dots is always missing in the scanned image.
| Problem Solution | |
| Your printer may be causing the problem. | If this happens in your printed image only, it may be caused by your printer. (See your printer manual for instructions on solving the problem.) |
| Your scanner may be causing the problem. | If this happens on both your screen and printout, the scanner’s sensor may be malfunctioning. Consult your dealer. |
The image cannot be printed, the printout is garbled, or the printout is not an image.
| Problem Solution | |
| Your printer may be causing the problem. | Check that the printer is properly connected with the computer and is correctly set up. (See your printer manual for instructions.) |
| Your printer software may be causing the problem. | Check that your printer software is properly installed and configured. (See your software manual for details.) |
Color stripes appear when scanning film.
| Problem Solution | |
| Your scan is being distorted by an effect known as Newton's Ring. | Try scanning the film upside down. Newton's Ring is an optical phenomenon that occurs when two very thin membranes such as film surfaces or soap bubble surfaces meet. |
Image Matching Problems
The image does not look the same as the original.
| Problem Solution | |
| Your software settings may be incorrect. | Try different image settings in your scanner software. |
| Your software may not have sufficient color matching and color management features, or these components of your software may not be correctly installed. (See your software manuals for details.) | |
| Your application software may not be set up correctly to import your image. | If you are importing a scanned-image file into your application software, make sure the file format is one your software can read. Also check that the image settings in your application are appropriate for the type of image you want to scan. (See your software manual for details.) |
Colors on your monitor are different from those in the original image.
| Problem Solution | |
| You're using EPSON TWAIN Pro and didn't calibrate your screen to the scanner. | Use the EPSON Screen Calibration utility as described in the Setup Guide. |
| Your software settings may be incorrect. | Check the image settings in your scanner software, especially data format (bits/pixel/color), gamma correction, and color correction. Try a different combination of these settings. See your scanner software's online user's guide for instructions. |
| Your system's color matching may be affecting your results. | Check the color matching and color management capabilities of your computer, display adapter, and software. Some computers can change the color palette to adjust colors on your screen. (See your software and computer manuals for details.) |
| Exact matching of monitor colors is very difficult. Try using the ICM (Windows 95) or ColorSyncTM (Macintosh), color matching schemes that came with your scanner software for the most precise color matches. See your scanner software's online user's guide for instructions. Also check your software and monitor manuals for information on color matching and calibration. | |
Printed colors are different from those in the original image.
| Problem Solution | |
| An exact color match may not be possible. | Exact reproduction of colors is very difficult because of the different technologies used to reproduce colors. See your software manual or your printer documentation for guidance on color matching. |
The printed image is larger or smaller than the original size.
| Problem Solution | |
| You may have adjusted the image size settings in your software. | Change the image size settings in your software to resize the scanned image. Don’t use the size of the image on your monitor to judge the printed size. |

Note: Before using these instructions, read the EPSON TWAIN Pro User's Guide to learn how to create and work with frames.
Using the Document Guide
Most scanners scan at a slight angle due to the movement of the carriage. If you find that your scanned images are being scanned at a slight angle, use the document guide to adjust the angle of scanning.
This section includes instructions for:
Installing the Document Guide
▶ Scanning the Document Guide
Calculating the Adjustment Angle
Scanning Your Aligned Document
Before you install the document guide, locate the following parts, included in your scanner box.
grid document guide
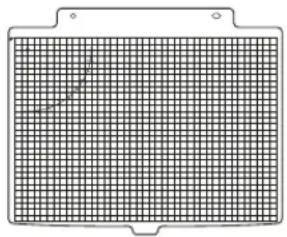

guide pin
clear document guide
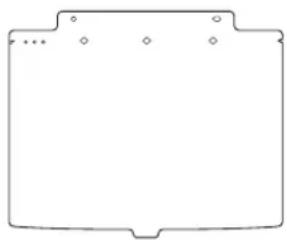

adjust pin
Installing the Document Guide
1 Insert the guide pin in the left hole above the scanner's document table and the adjust pin in the right hole; push them in securely. Turn the adjust pin so its arrow faces the guide pin.
2 Lay the clear document guide on the document table with the oval hole on the right and the round hole on the left. Align the holes on the guide over the pins.
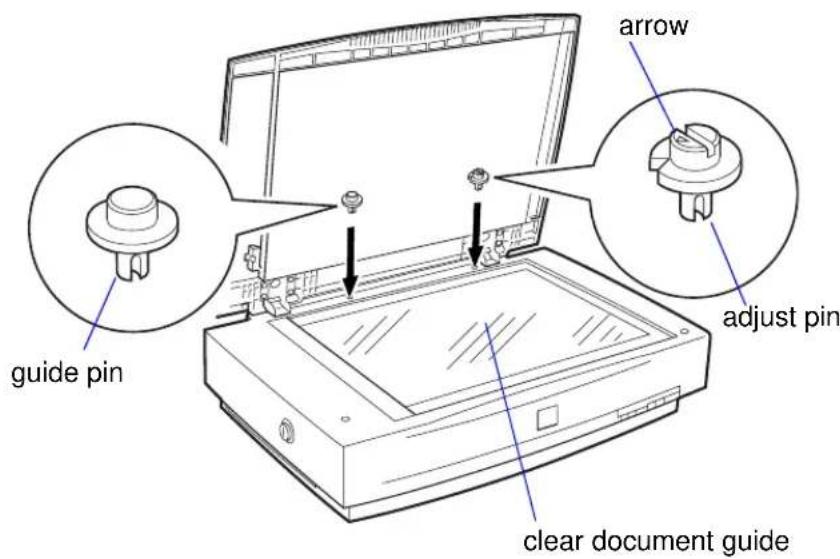
3 Place the grid document guide onto the guide pins with the oval hole on the right and the round hole on the left.
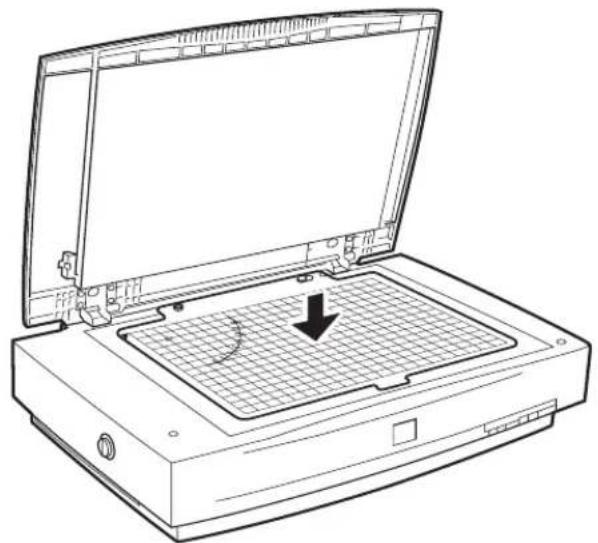
4 Close the document cover.
Scanning the Document Guide
1 Open an application and access EPSON TWAIN Pro. Select the following settings:
| EPSON TWAIN Pro Settings |
| Document Source: Flatbed |
| Image Type: 256 Grayscale |
| Destination: LineWork Scan |
| Resolution: 800 dpi |
Click Preview. You see a preview of the document guide in the preview area. (See the EPSON TWAIN Pro User's Guide for details.)
2 Make a marquee around the alignment dots on the document guide.
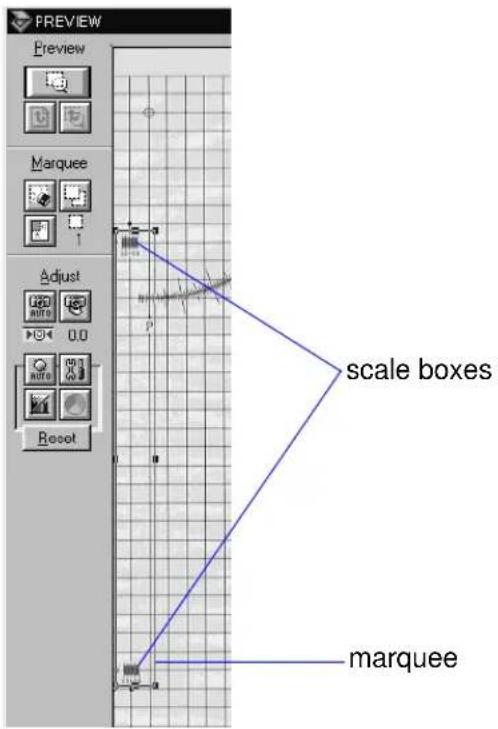
3 Use the Marquee tool to create another frame around the top scale.
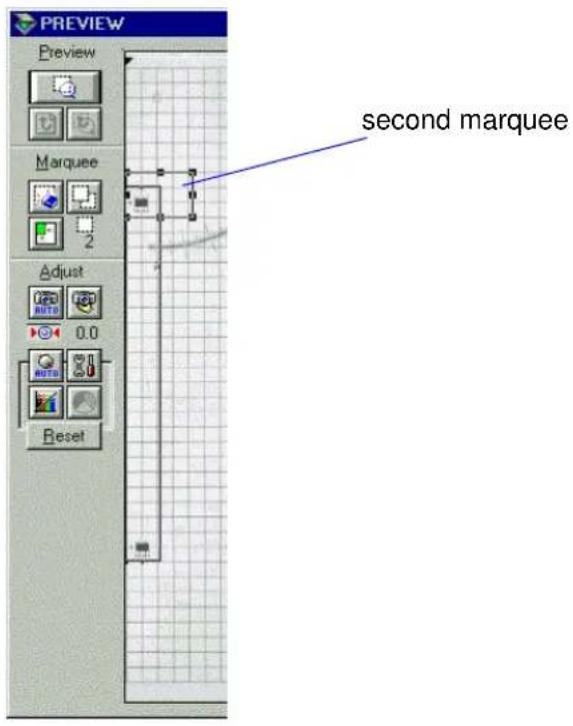
4 Use the Zoom tool to view the enlarged scale. Remove the second frame by clicking on the Delete Marquee tool
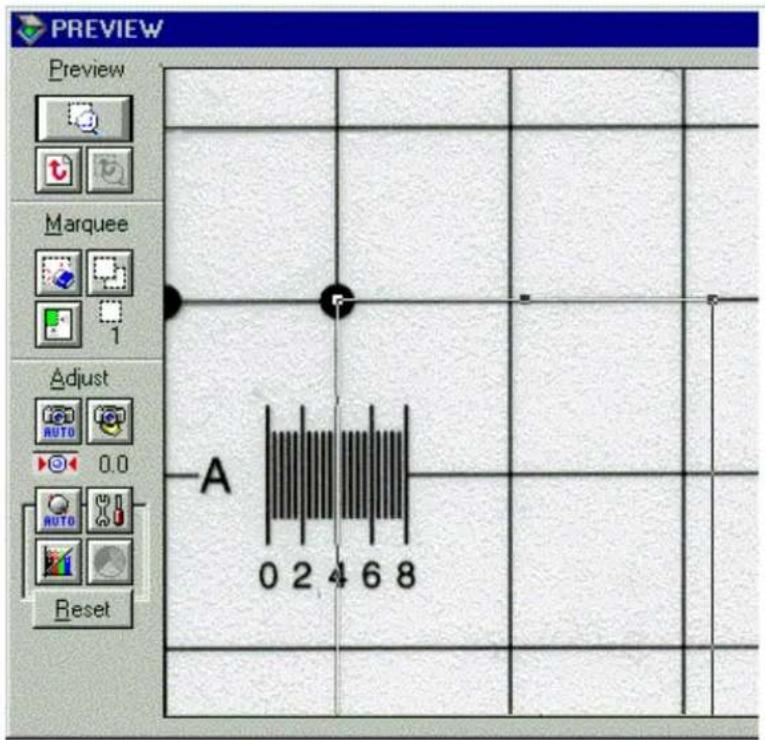
5 Align the left edge of the original frame with position 4 on the scale. Click on the Return to Full Preview button
6 Repeat steps 3 and 4 for the bottom scale. Write down the position of the original frame edge on the bottom scale.
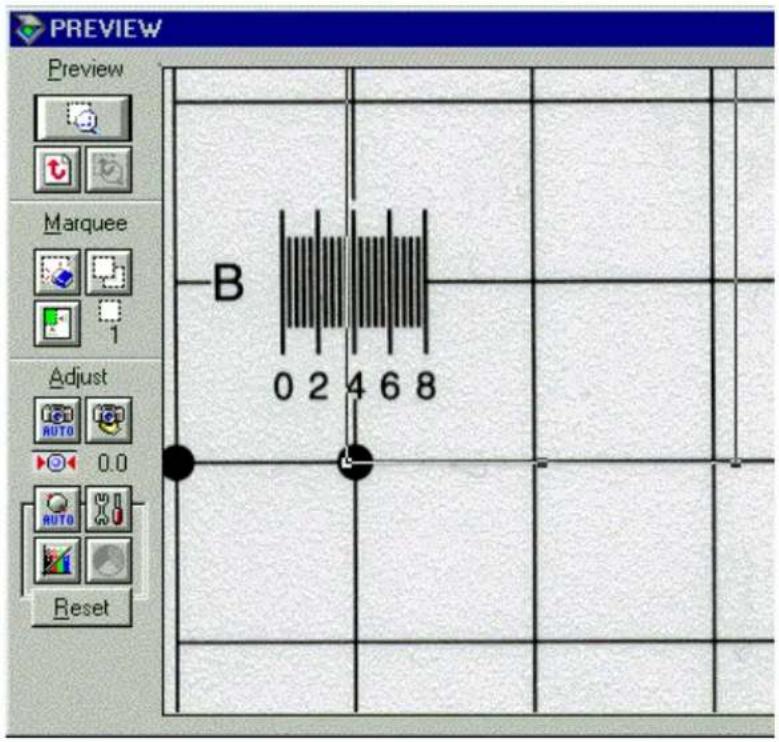
7 Use the procedure in Calculating the Adjustment Angle to calculate the proper adjustment angle.
Example: Top scale reading = 4.0
Bottom scale reading = 3.6
Calculating the Adjustment Angle
If you need to adjust the document guide angle, you first need to determine which way to adjust it and by how much.
To determine the amount you need to adjust the pin to align your document, subtract the bottom scale value from the top scale value and divide the result by 4. In our example, calculate (4.0 - 3.6) 4 = 0.1 . Therefore, you must set the adjust pin angle to 0.1.
Use a screwdriver to turn the adjust pin to the number you calculated (0.1 in the previous example).
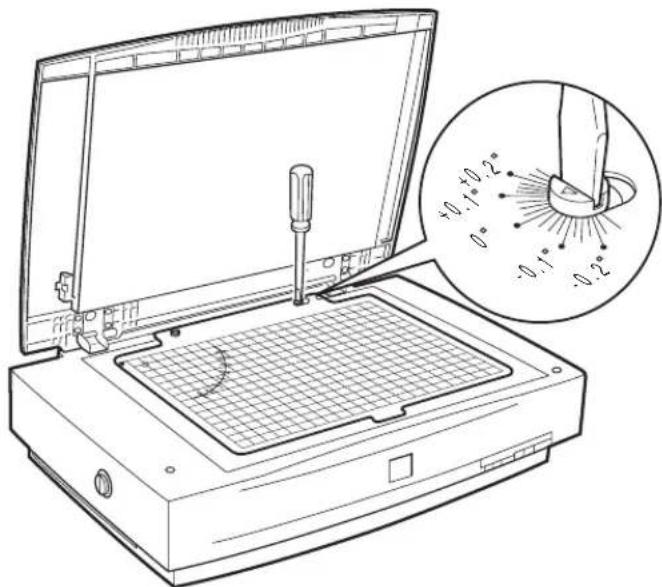
To confirm the angle, repeat the steps under Scanning the Document Guide. Once you've confirmed the angle, it's a good idea to write it down for future reference.
Scanning Your Aligned Document
1 Remove the clear and grid document guides.
2 Lay the grid document guide on a table with the oval hole on the left and the round hole on the right.
3 Place your document face up on the grid document guide and align your document with the grid; then secure the document with tape. Place any other documents you want to scan and tape them the same way.
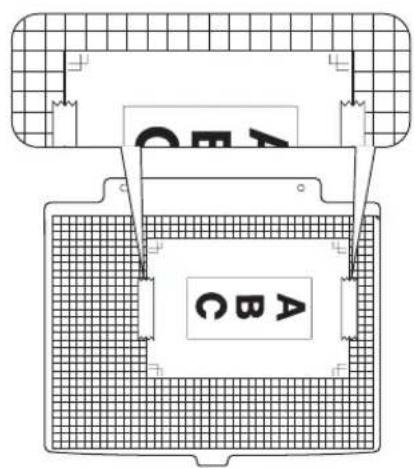
4 Turn the grid document guide over and lay it on the document table with the oval hole on the right.
5 Set the adjust pin to the angle you selected in Calculating the Adjustment Angle, if necessary.
6 Close the document cover and scan as described in Scanner Basics.
Using the Clear Document Guide
The clear document guide can also be used to hold light originals against the document table; this will prevent the original from being pushed out of alignment by air currents as the document cover is closed.

Note: Specifications are subject to change without notice.
5
Specifications
This chapter provides the technical specifications for your scanner and its optional equipment in these sections:
Scanner Specifications
▶ Auto Document Feeder Specifications
▶ Transparency Unit Specifications
Scanner Specifications
Scanning
Scanner type Flatbed, color
Photoelectric device Color CCD line sensor
Effective pixels 9760 dots by 13760 pixels at 800 dpi, 100%
Maximum document size 12.2 · 17.2 inches (310 · 437 mm) A3 or US B size; reading area can be specified from software
Scanning resolution 800 dpi main, 1600 dpi sub
Output resolution 50 dpi to 3200 dpi in 1 dpi increments; values above 800 dpi are interpolated in the software
Command level ESC/I-B8 (B6+ Focus Control)
Scanning speed Line art: Approx. 10.8 ms/line 256 gray levels: Approx. 10.8 ms/line Full color: Approx. 15 ms/line (using A3/portrait at 800 dpi draft mode)
| Adjustable focusing function | One-piece CCD/lens movement systemFocus adjustable up to 5 mm above the surface of the document table |
| Color separation | RGB color filters on CCD |
| Reading sequence | Monochrome mode: One-pass scanningColor line sequence mode: One-pass scanning (R, G, B) |
Zoom 50% to 200% in 1% increments
Image data 12 bits input (optical density of 3.3); 8 or 12 bits output
Brightness 7 levels
Line art settings Fixed threshold with Text Enhancement Technology enabled
Interface Bidirectional parallel and SCSI
Light source Xenon cold cathode fluorescent lamp
Reliability Main unit MCBF: 100,000 cycles of carriage movements
Dimensions Width: 25.8 inches (656 mm)
Depth: 18.0 inches (458 mm)
Height: 6.7 inches (170 mm)
Weight Approximately 44.1 lb (20 kg)
Supported Documents
Reflective type Opaque documents with smooth surfaces
Transparency type
Positive and negative film (optional TPU required)
Electrical
| Specifications | 100–120 V model | 220–240 V model |
| Input voltage range 100 to 240 VAC; universal autoswitching | ||
| Rated frequency 50 to 60 Hz | ||
| Input frequency 49.5 to 60.5 Hz | ||
| Rated current 1.2 A 0.7 A | ||
| Power consumption Approx. 60 W, 75 W maximum with optional equipment installed | ||
| Insulation resistance 10 m Ω at 500 VDC (between AC line and chassis) | ||
Environmental
| Specifications Operation Storage | ||
| Temperature 41 to 95 °F(5 to 35 °C) | -13 to 140 °F(-25 to 60 °C) | |
| Humidity 10% to 80%,without condensation | 10% to 85%,without condensation | |
| Operating conditions Ordinary office or home conditionsExtremely dusty conditions should be avoidedOperation under direct sunlight or near a strong light source should be avoided | ||
Safety Approvals
| Model Safety Standards EMC | |
| 100–120 V UL 1950 with D3, CSA C22.2 950 with D3 | FCC part 15 subpart B class B (USA), CSA C108.8 class B (Canada) |
| 220–240 V EN 60950 (VDE), EN 60950 Nordic Deviation (NEMKO) | EN55022 (CISPR Pub 22) class B, EN 61000-3-2, EN 61000-3-3, EN 50082-1, IEC 801-2, IEC 802-3, IEC 802-4 |
Parallel Interface
Interface type Bidirectional parallel interface
Data format 8-bit parallel
Synchronization External strobe pulse
Handshaking ACKNLG and BUSY signals
Logic level Input/output data and interface control signals are TTL compatible
Connector type 36-pin Centronics ® type connector
Connector pin arrangement
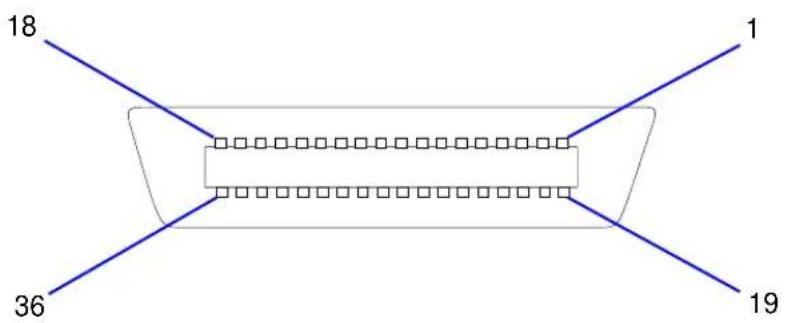
Parallel pin assignments:
| Pin No. | Signal I/O Description | ||
| 1 | STROBE | I Data strobe pulse | |
| 2-9 DATA | 0-7 I/O 8-bit | data bus | |
| 10 | ACKNLG | O Acknowledge symbol | |
| 11 BUSY | O Scanner busy signal | ||
| 12 NC — | Not used | ||
| 13 GND — | Ground | ||
| 14-15 NC | — Not used | ||
| 16 GND — | Ground | ||
| 17 C_GND — | Frame ground | ||
| 18 NC — | Not used | ||
| 19-30 GND — | Ground | ||
| 31 | INIT | I Scanner reset signal. The pulse width at the receiving terminal must be longer than 50 s. | |
| 32 NC — | Not used | ||
| 33 GND — | Ground | ||
| 34, 35 NC | — Not used | ||
| 36 DIR | I Direction | ||
SCSI Interface
Interface type ANSI Standard X3.131-1986
Functions BUS FREE phase
ARBITRATION phase
SELECTION/RESELECTION phase
COMMAND phase
(the Logical Unit number is fixed at 0 and the command
link function is not supported)
DATA phase
Data in phase
Data out phase
STATUS phase
MESSAGE phase
MESSAGE IN phase
MESSAGE OUT phase
ATTENTION condition
RESET condition
Logic level TTL compatible
Electrical
standard
ANSI Standard X3.131-1986
ID Setting Can be set from 0 to 7
Terminator Internal terminator selectable
Connector type Two 50-pin connectors
Connector pin arrangement
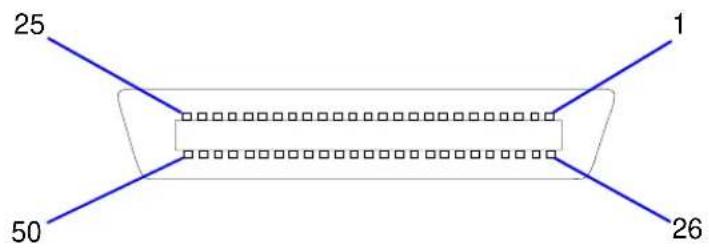
SCSI pin assignments
| Pin No. Signal I/O Description | |||
| 1-12, 14-25, 35-37, 39, 40, 42 | GND — Ground | ||
| 13 NC — Not used | |||
| 26-33 DB0-DB7 I/O Data bus 0-7 | |||
| 34 DBP I/O Data bus parity | |||
| 38 TERMPWR — Terminator power | |||
| 41 ATN I Attention | |||
| 43 BSY I/O Busy | |||
| 44 ACK I Acknowledge | |||
| 45 RST I Reset | |||
| 46 MSG O Message | |||
| 47 SEL I/O Select | |||
| 48 C/D O Command/data | |||
| 49 REQ O Request | |||
| 50 I/O O Input/output | |||
Initialization Methods
The scanner can be initialized (returned to a fixed set of conditions) in the following ways:
| Type Method | |
| Hardware initialization | When the scanner is turned on.When the scanner receives an INIT signal from the parallel interface: pin 31 goes LOW.When the scanner receives a SCSI Reset signal from the SCSI interface. |
| Software initialization | When software sends the ESC @ (initialize the scanner) command.When the scanner receives a SCSI Bus Device Message. |
Auto Document Feeder Specifications
Basic Specifications
Type Page feeding and duplex scanning with automatic reverse
Document feeding
Pages are center aligned, fed faceup from the bottom of the stack, and ejected faceup
Document replacement time
1.2 seconds (A4/Letter landscape)
Multiple sizes Unavailable; all documents in a stack must be the same size
Noise 50 dB or less
Reliability 100,000 sheet paper feeding life
100,000 sheet paper ejecting life
100,000 hinge closings
Dimensions Width: 23.6 inches (601 mm)
Depth: 20.8 inches (529 mm)
Height: 4.8 inches (122 mm)
Weight 35 lb (16 kg)
Documents Supported
Document size Portrait: A3, Ledger, B4, Legal, A4, Letter, B5, A5, 5.5 · 5.8 inch (140 · 148 mm)
Landscape: A4, Letter, B5, A5
Feeding 50 sheets 21 lb (80 g/m 2 ) paper: A4, Letter or smaller Capacity 30 sheets 21 lb (80 g/m 2 ) paper: B4, Legal or larger
Ejecting 100 sheets Capacity
Paper quality High quality bond paper
Compatible paper types High quality paper, average quality paper, inkjet paper (fine and super-fine), bond paper
Incompatible paper types Tracing paper, OHP film, or label sheets Coated, pasted, carbon, catalog, or specialty fiber paper (such as rice paper) Stapled, clipped, torn, curled, bent, or holed paper
Paper thickness 13 to 33 lb (50 to 127 g/m 2 )
Electrical
Power supply Supplied through the scanner
24 ± 10% VDC
5 ± 10% VDC
Consumption current
24 VDC: 2.0 A
5 VDC: 0.3 A
Insulation resistance
10 mΩ or more at 500 VDC (between AC line and chassis)
Dielectric strength
1000 VAC per minute (between AC line and chassis)
Resistance to static electric noise
Case: Operated properly at 10 KV or less Metal: Operated properly at 7 KV or less
Environmental
| Specifications Operating Storage | ||
| Temperature 41 to 95 °F(5 to 35 °C) | -13 to 140 °F(-25 to 60 °C) | |
| Humidity 10% to 80% withoutcondensation | 10% to 85% withoutcondensation | |
| Resistance to vibration | 0.2 G / 5 to 55 Hz in alldirections | 2 G / 5 to 55 Hz in alldirections |
| Drop test height 24.2 inches (62 cm) when packed | ||
| Operating conditions Ordinary office or home conditionsExtremely dusty conditions should be avoidedOperation under direct sunlight or near a stronglight source should be avoided (if paperthickness is over 110 g/m2, operatingconditions are 59 to 77 °F (15 to 25 °C), 40% to70% RH) | ||
Safety Approvals
| Safety regulations | UL1950 CSA 950 FCC |
CE markings Directive 89/336 EEC, 92/31 EEC, 73/23 EEC
Transparency Unit Specifications
Basic Specifications
Type Fixed-document transparency scanning unit
Light source Xenon cold cathode fluorescent lamp
Color separation RGB color filter separation
Supported documents Positive and negative film
Document size 16.5 · 11.4 inches (420 · 290 mm) maximum
A3 or US B size
35 mm film (strip or slide)
Medium (2 1/4-inch) film
4 · 5 inch
8 · 10 inch
Reliability 100,000 carriage returns MCBF
Dimensions Width: 25.8 inches (656 mm)
Depth: 17.8 inches (452.2 mm)
Height: 2.24 inches (57 mm)
Weight Approximately 13.2 lb (6 kg)
Electrical
Power supply Supplied from the scanner
24 VDC
5 VDC
Consumption
24 VDC: 1.3 A
current
5 VDC: 0.3 A
Environmental
| Specifications Operating Storage | ||
| Temperature 41 to 95 °F(5 to 35 °C) | -13 to 140 °F(-25 to 60 °C) | |
| Humidity 10% to 80% withoutcondensation | 10% to 85% withoutcondensation | |
| Operating conditions Ordinary office or home conditionsExtremely dusty conditions should be avoidedOperation under direct sunlight or near a stronglight source should be avoided | ||
Index
A AC connector, 22, 102
Accelerator board, 76
ADF, see Auto document feeder
Adjust pin, 36, 52, 87
Adjustment angle, document guide, 95 to 96
Auto document feeder description, 13
dials, 67 to 68
installing, 55 to 59
loading, 60 to 63
loading manually, 63
paper jams, fixing, 64 to 66
scanning position, adjusting, 67 to 68
specifications, 110 to 113
unpacking, 54
using, 53 to 68
Automatic Area Segmentation, 11
B Buttons, 23 to 24
C Cables, 13
Cleaning
scanner, 70
transparency unit, 38
Color matching problems, 84 to 85
Color stripes, 83
Compression software, 77
Cover, removing, 27
D Dials, ADF, 67 to 68
Document guide
adjustment angle, calculating, 95 to 96
installing, 87 to 89
parts, 87
scanning, 90 to 94
Document guide, continued scanning aligned document, 97 to 98
using, 86 to 98
Document position, 80 to 82
E Electrical specifications auto document feeder, 112 scanner, 102 transparency unit, 115
Environmental specifications
auto document feeder, 113
scanner, 103
transparency unit, 115
EPSON TWAIN Pro, 26, 51, 53, 61, 84, 86, 90 to 94
ERROR light, 23 to 24, 71, 75
Errors, 24, 75
F Features, 11 to 12
Film holders
35 mm filmstrips, loading, 42 to 44
35 mm slides, loading, 41
4 x 5-inch film, loading, 47 to 49
medium format (2 1/4-inch) film, loading, 44 to 46
unpacking, 30
using, 40 to 49
Fluorescent lamp, replacing, 71
G Guide pin, 36, 87
H Home position scanner, 72 transparency unit, 32
I Image matching problems, 84 to 85 Initialization, scanner, 109 Interface parallel, 12, 14, 22, 104 to 105 problems, 79 SCSI, 12, 13, 22, 106 to 108
L Lamp, replacing, 71
Lights, 23 to 24, 75
Lock screw, transportation, 21
M Maintenance, 70 to 71
Manual, how to use, 14 to 15
Matching problems, image, 84 to 85
Medium format film, 44 to 46
Memory, 76
Monitor, 76, 82
N Negatives
scanning, 42 to 44
see also Film holders
Newton's Ring, 83
O OCR, 11, 53
OPERATE button, 24
OPERATE light, 23, 78
Optical character recognition, 11, 53
Option connector, 22, 35, 58
Optional equipment
auto document feeder, 53 to 68
list of, 13
transparency unit, 29 to 52
using, 28 to 68
Oversized documents, 27
Oversized film, 39
P Paper jams, fixing, 64 to 66
Parallel interface, 12, 14, 22, 104 to 105
Printer problems, 82
Problems
diagnosing, 73 to 75
image matching, 84 to 85
operation, 78 to 79
scan quality, 80 to 83
Q Quality problems, 80 to 83
R RAM, 76 READY light, 23 to 24, 71, 75, 78 Reflective document mat, 50 to 51 RESET button, 24
S Safety approvals auto document feeder, 113 scanner, 103 Safety instructions, 16 to 17 Scanner errors, 24, 75 Scanner parts, 21 to 22 Scanner sensor, 82 Scanning, 25 to 26 Screws scanner, 21, 72 transparency unit, 31 to 32 SCSI interface, 12, 13, 22, 106 to 108 Service, 17 Slides, see Film holders Software problems, 79, 82, 84 to 85
Specifications auto document feeder, 110 to 113 scanner, 100 to 109 transparency unit, 114 to 115 Supported documents auto document feeder, 111 scanner, 102 transparency unit, 114 System, upgrading, 76 to 77
T Text Enhancement Technology, 11 Transparency unit cleaning, 38 description, 13 installing, 33 to 35 loading oversized film, 39 loading transparencies, 39 scanning normal documents with, 50 to 51 shipping screws, removing, 31 to 32 specifications, 114 to 115
Transparency unit, continued
transparency guide angle, adjusting, 52
transparency guide, installing, 36 to 38
unpacking, 30 to 32
using, 29 to 52
using film holders, 40 to 49
Transportation lock screw, 21
Transporting scanner, 72
Troubleshooting, 73 to 98
U Upgrading system, 76 to 77
V Video card, 76
- FCC COMPLIANCE STATEMENT FOR UNITED STATES USERS
- WARNING
- FOR CANADIAN USERS
- A NOTE CONCERNING RESPONSIBLE USE OF COPYRIGHTED MATERIALS
- COPYRIGHT NOTICE
- CONTENTS
- INTRODUCTION
- SCANNER BASICS
- USING OPTIONAL EQUIPMENT
- MAINTAINING AND TRANSPORTING YOUR SCANNER
- TROUBLESHOOTING
- SPECIFICATIONS
- OPTIONAL EQUIPMENT
- AUTO DOCUMENT FEEDER (B81311*)
- TRANSPARENCY UNIT (B81310*)
- SCSI SYSTEM CABLE (25-PIN TO 50-PIN) (B860081)
- SCSI PERIPHERAL CABLE (50-PIN TO 50-PIN) (B860091)
- BIDIRECTIONAL PARALLEL INTERFACE BOARD (B80818*)
- HOW TO USE THIS MANUAL
- WARNINGS, CAUTIONS, AND NOTES
- IMPORTANT SAFETY INSTRUCTIONS
- WHERE TO GET HELP
- SCANNER PARTS
- LIGHTS AND BUTTONS
- OPERATE LIGHT (GREEN)
- READY LIGHT (GREEN)
- ERROR LIGHT (RED)
- OPERATE BUTTON
- RESET BUTTON
- SCANNER ERRORS
- SCANNING
- SCANNING OVERSIZED DOCUMENTS
- USING THE TRANSPARENCY UNIT
- UNPACKING THE TRANSPARENCY UNIT
- REMOVING THE SHIPPING SCREWS
- INSTALLING THE TRANSPARENCY UNIT
- INSTALLING THE TRANSPARENCY GUIDE
- SCANNING TRANSPARENCIES AND OVERSIZED FILM
- USING THE FILM HOLDERS
- LOADING 35 MM SLIDES
- LOADING STRIPS OF NEGATIVE OR POSITIVE FILM
- LOADING MEDIUM FORMAT (2 1/4-INCH) FILM
- LOADING 4 X 5-INCH FILM
- SCANNING NORMAL DOCUMENTS WITH THE TRANSPARENCY UNIT INSTALLED
- ADJUSTING THE TRANSPARENCY GUIDE ANGLE
- USING THE AUTO DOCUMENT FEEDER
- UNPACKING THE AUTO DOCUMENT FEEDER
- INSTALLING THE AUTO DOCUMENT FEEDER
- LOADING PAPER IN THE AUTO DOCUMENT FEEDER
- LOADING DOCUMENTS MANUALLY
- FIXING PAPER JAMS IN THE AUTO DOCUMENT FEEDER
- ADJUSTING THE SCANNING POSITION OF THE AUTO DOCUMENT FEEDER
- CLEANING THE SCANNER
- DO NOT
- REPLACING THE FLUORESCENT LAMP
- TRANSPORTING THE SCANNER
- DIAGNOSING PROBLEMS
- INDICATOR LIGHTS
- UPGRADING YOUR SYSTEM
- PROBLEMS AND SOLUTIONS
- OPERATION PROBLEMS
- SCAN QUALITY PROBLEMS
- IMAGE MATCHING PROBLEMS
- USING THE DOCUMENT GUIDE
- INSTALLING THE DOCUMENT GUIDE
- SCANNING THE DOCUMENT GUIDE
- CALCULATING THE ADJUSTMENT ANGLE
- SCANNING YOUR ALIGNED DOCUMENT
- USING THE CLEAR DOCUMENT GUIDE
- SCANNER SPECIFICATIONS
- SUPPORTED DOCUMENTS
- ELECTRICAL
- ENVIRONMENTAL
- SAFETY APPROVALS
- PARALLEL INTERFACE
- SCSI INTERFACE
- INITIALIZATION METHODS
- AUTO DOCUMENT FEEDER SPECIFICATIONS
- BASIC SPECIFICATIONS
- DOCUMENTS SUPPORTED
- TRANSPARENCY UNIT SPECIFICATIONS
- INDEX
Brand : EPSON
Model : Expression 836XL
Category : Scanner