
TM-S1000II-NW - Scanner EPSON - Free user manual and instructions
Find the device manual for free TM-S1000II-NW EPSON in PDF.
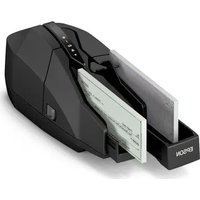


| Product Type | Compact color document scanner |
| Brand | Epson |
| Model | TM-S1000II-NW |
| Scanning Technology | CIS (Contact Image Sensor) |
| Optical Resolution | 300 x 300 dpi |
| Scan Speed | Up to 5 ppm (simplex) |
| Document Size | Checks and documents up to 216 x 356 mm |
| Connectivity | USB 2.0, Ethernet (10BASE-T/100BASE-TX), Wi-Fi (802.11b/g/n) |
| Power Supply | AC adapter 24V DC, 1.5A |
| Power Consumption | Approx. 15W during scanning, 2W standby |
| Dimensions (W x D x H) | 150 x 115 x 70 mm |
| Weight | 0.5 kg |
| Automatic Document Feeder | Single-sheet pass-through ADF |
| Main Functions | Scan checks, receipts, business cards, IDs, and documents |
| Maintenance | Regularly clean the CIS glass and roll with a soft cloth |
| Safety | UL, FCC, CE, RoHS compliant |
| Spare Parts | Replaceable CIS module, pickup roller |
| OS Compatibility | Windows, macOS, Linux |
| Warranty | 1-year limited warranty |
Frequently Asked Questions - TM-S1000II-NW EPSON
User questions about TM-S1000II-NW EPSON
0 question about this device. Answer the ones you know or ask your own.
Ask a new question about this device
Download the instructions for your Scanner in PDF format for free! Find your manual TM-S1000II-NW - EPSON and take your electronic device back in hand. On this page are published all the documents necessary for the use of your device. TM-S1000II-NW by EPSON.
USER MANUAL TM-S1000II-NW EPSON
- No part of this document may be reproduced, stored in a retrieval system, or transmitted in any form or by any means, electronic, mechanical, photocopying, recording, or otherwise, without the prior written permission of Seiko Epson Corporation.
● The contents of this document are subject to change without notice. Please contact us for the latest information. - While every precaution has been taken in the preparation of this document, Seiko Epson Corporation assumes no responsibility for errors or omissions.
● Neither is any liability assumed for damages resulting from the use of the information contained herein. - Neither Seiko Epson Corporation nor its affiliates shall be liable to the purchaser of this product or third parties for damages, losses, costs, or expenses incurred by the purchaser or third parties as a result of:
accident, misuse, or abuse of this product or unauthorized modifications, repairs, or alterations to this product, or (excluding the U.S.) failure to strictly comply with Seiko Epson Corporation's operating and maintenance instructions.
- Seiko Epson Corporation shall not be liable against any damages or problems arising from the use of any options or any consumable products other than those designated as Original Epson Products or Epson Approved Products by Seiko Epson Corporation.
Trademarks
Microsoft ® , Windows * , Internet Explorer and Microsoft Edge are either registered trademarks or trademarks of Microsoft Corporation in the United States and other countries.
Wi-Fi ® , WPA ™ , WPA2 ™ , and WPA3 ™ are either registered trademarks or trademarks of Wi-Fi Alliance ® .
Google Chrome ™ is a trademark of Google LLC.
Mac , macOS and Safari are trademarks of Apple Inc., registered in the U.S. and other countries and regions.
Firefox® is a trademark or registered trademark of the Mozilla Foundation in the US and other countries.
QR Code is a registered trademark of DENSO WAVE INCORPORATED in Japan and other countries.
All other trademarks are the property of their respective owners and used for identification purpose only.
©Seiko Epson Corporation 2024
About this Manual
Key to Symbols
The symbols in this manual are identified by their level of importance, as defined below. Read the following carefully before handling the product.
 | IMPORTANT | Indicates information with which you must comply when using the product. Mishandling due to ignoring this information may cause the product to fail or malfunction. |
 | NOTE | Indicates supplementary explanations and information you should know. |
Using Web Config
Web Config is a printer's built-in web page that allows you to check and change printer settings on your browser. To use Web Config, you need to set your computer's IP address to the same segment as the printer.
How to Start Web Config
[Models other than the TM-S1000II-NW]
- Start your web browser on a computer or smart device on the network and enter the IP address of the printer in the address field.
| Example for HTTPS | Example for HTTP |
| IPv4: https://192.0.2.111/ | IPv4: http://192.0.2.111/ |
| IPv6: https://[2001:db8::1000:1]/ | IPv6: http://[2001:db8::1000:1]/ |
- Select [Advanced Settings].
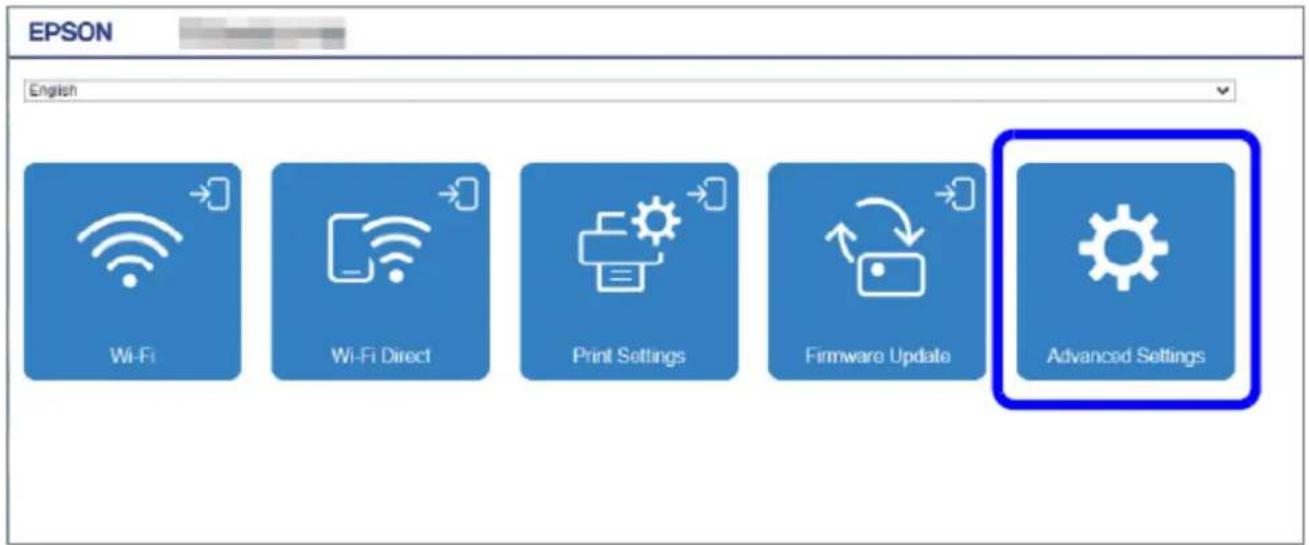
- Select [Administrator Login].
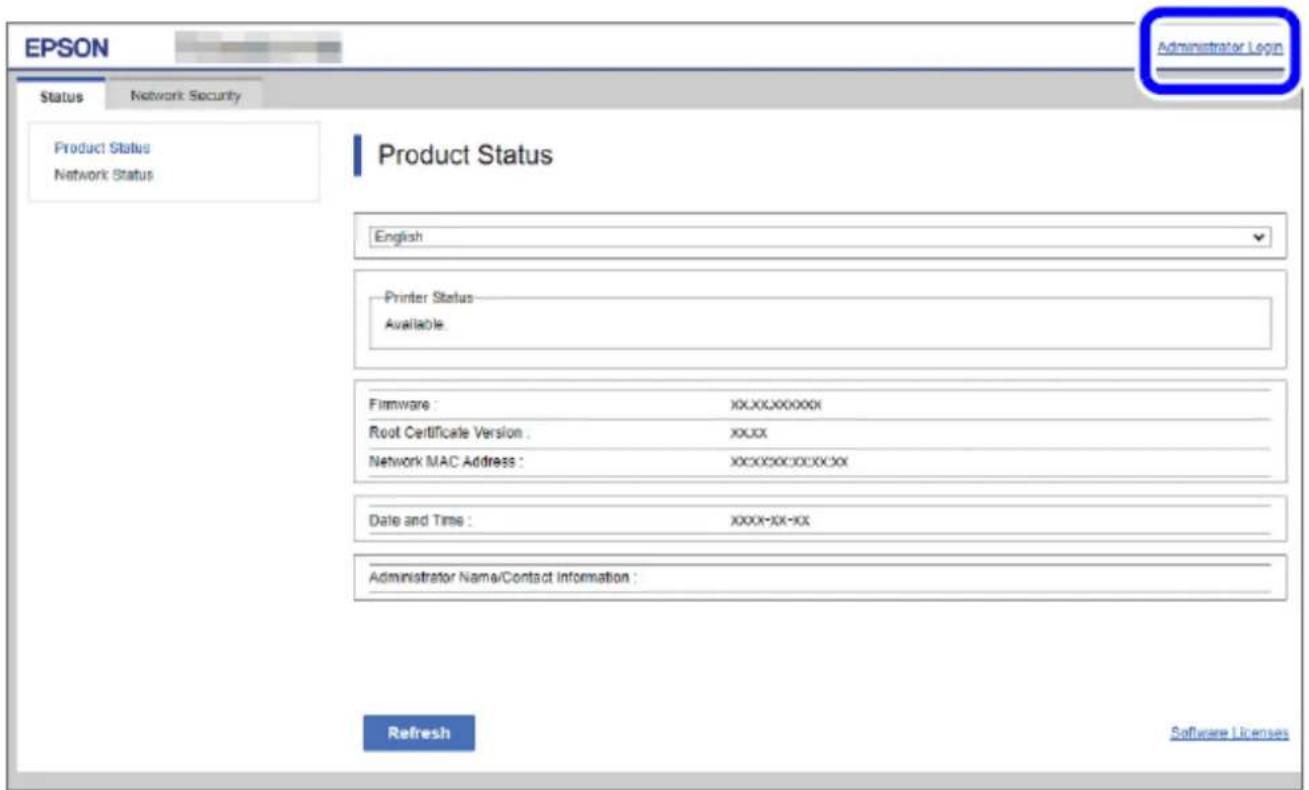
- When the authentication screen appears, enter your password and log in.
The default password is the serial number of the printer. You can find the serial number by running the self-test or on the nameplate attached to the printer.
| NOTE | Enable JavaScript in your browser. Because a self-signed certificate owned by the printer is used when accessing HTTPS, a warning will appear in the browser when Web Config is started. |
[TM-S1000II-NW]
- Start your web browser on a computer or smart device on the network and enter the IP address of the printer in the address field.
| Example for HTTPS | Example for HTTP |
| IPv4: https://192.0.2.111/ | IPv4: http://192.0.2.111/ |
| IPv6: https://[2001:db8::1000:1]/ | IPv6: http://[2001:db8::1000:1]/ |
- After Web Config starts, select the menu you wish to configure.
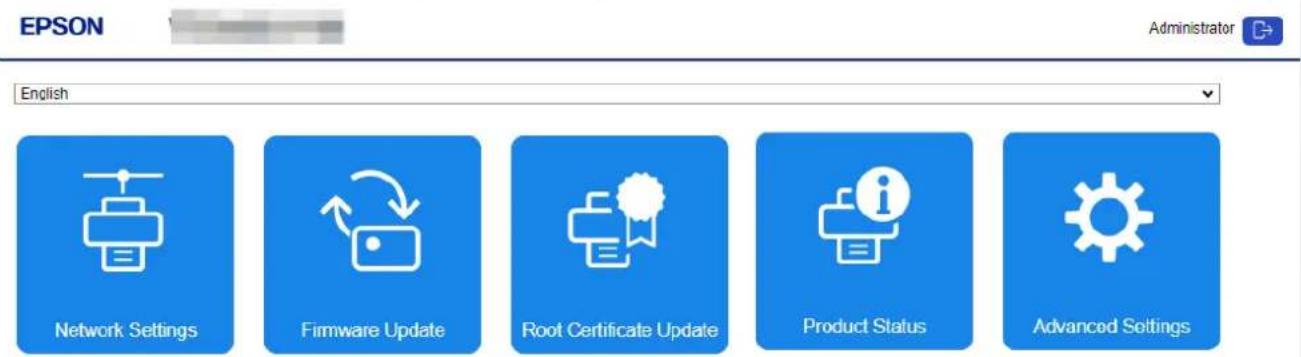
- When the authentication screen appears, enter your password and log in.
If the product is in its factory default state, no user name has been set. Therefore, do not enter anything in the "User Name" field. The user name can be set in the "Change Administrator Password" screen.
The default password is the serial number of the scanner. The serial number can be found on the nameplate affixed to the scanner. Refer to the technical reference guide for each device for the location of the nameplate.
To improve security, it is recommended to change the administrator password from the default pass-word. The password can be changed from [Advanced Settings] - [Product Security] - [Administrator Password] in Web Config. It can also be changed using the utility specialized for each model.
| NOTE | Enable JavaScript in your browser. Because a self-signed certificate owned by the printer is used when accessing HTTPS, a warning will appear in the browser when Web Config is started. |
Printers
This document covers Web Config for the following printers.
- TM-H6000VI
- TM-S1000II-NW
- TM-T20IV-L
- TM-T20X-II
TM-T82IV-L - TM-T82X-II
TM-T83IV
For more information about the functions of each printer, see Chapter 11, "List of Functions by Model".
TABLE OF CONTENTS
Cautions....2
Trademarks 2
About this Manual....2
Key to Symbols 2
Using Web Config....3
How to Start Web Config....3
Printers 5
TABLE OF CONTENTS......6
- Introduction....10
1.1 Definitions....10
1.2 Terminologies....10
-
Supported Web Browsers....11
-
Layout....11
3.1 Basic Settings Page 11
3.1.1 Configuration for Smartphone 11
3.1.2 Configuration for PC....12
3.2 Advanced Settings Page 14
3.2.1 Configuration for smartphones....14
3.2.2 Configuration for PC....15
3.3 Changing the Top Page (Basic Settings/Advanced Settings)....16
-
Language....17
-
Top Page....17
5.1 URL....17
5.2 JavaScript....17
- Password Authentication ....18
6.1 Pages Always Can Be Accessed....18
6.2 Timing of Administrator Authentication....18
6.3 Session Management....18
6.4 Log on Page....19
6.4.1 Image....19
6.4.2 Input Items....19
6.4.3 Button....20
6.5 Log on Failure Page 21
6.5.1 Image 21
6.5.2 Result 21
- Common Specifications....22
7.1 Password Entry Field....22
- Basic Settings Page 23
8.1 Main Page....23
8.1.1 Top Page....23
8.1.1.1 Image 23
8.1.1.2 Display Language Setting....24
8.1.1.3 Link Items....24
8.2 Log on Page 25
8.2.1 Image 25
8.2.2 Description 26
8.2.3 Link 27
8.2.4 Input Items....27
8.2.5 Button....27
8.3 Log on Failure Page 28
8.3.1 Image 28
8.3.2 Result 28
8.4 Wi-Fi....29
8.4.1 Top Page....29
8.4.1.1 Image 29
8.4.1.2 Setting Items 29
8.4.1.3 Button 29
8.4.2 SSID Setting Page 30
8.4.2.1 Image 30
8.4.2.2 Setting Items 30
8.4.2.3 Button 30
8.4.3 Result Page 31
8.4.3.1 Image 31
8.4.3.2 Setting Result 31
8.4.3.3 Button 31
8.5 Wi-Fi Direct....32
8.5.1 Top Page 32
8.5.1.1 Image 32
8.5.1.2 Setting Items 32
8.5.1.3 Buttons 32
8.5.2 Result Page 33
8.5.2.1 Image 33
8.5.2.2 Setting Result 33
8.5.2.3 Button 33
8.6 Network Basic Setup 34
8.6.1 Top Page 34
8.6.1.1 Image 34
8.6.1.2 Setting Items 34
8.6.1.3 Button 35
8.6.1.4 Error Popup....35
8.6.2 Result page 37
8.6.2.1 Result success....37
8.6.2.2 Result Failed 37
8.7 Print Settings Page 38
8.7.1 Top Page 38
8.7.1.1 Image 38
8.7.1.2 Setting Items 38
8.7.1.3 Buttons 39
8.7.2 Result Page 40
8.7.2.1 Image 40
8.7.2.2 Setting Result 40
8.7.2.3 Button 40
8.8 Firmware Update Page 41
8.8.1 Top Page....41
8.8.1.1 Image 41
8.8.1.2 Display Items 41
8.8.1.3 Description 41
8.8.1.4 Buttons 41
8.8.2 Firmware Search Process Page 42
8.8.2.1 Image 42
8.8.2.2 Description Items....42
8.8.2.3 Button 42
8.8.3 Before Update Confirm Page 43
8.8.3.1 Image 43
8.8.3.2 Description 43
8.8.3.3 The Information of the Firmware Update 43
8.8.3.4 Buttons 43
8.8.4 Cancel Process Page 44
8.8.4.1 Image 44
8.8.4.2 Description 44
8.8.4.3 Button 44
8.8.5 Result Page 45
8.8.5.1 Image 45
8.8.5.2 Setting Result 45
8.8.5.3 Button 45
8.9 Root Certificate Update 46
8.9.1 Top page....46
8.9.1.1 Image 46
8.9.1.2 Description 46
8.9.1.3 Display Items 46
8.9.1.4 Buttons 46
8.9.2 Progress page 47
8.9.2.1 Image 47
8.9.3 Result page 48
8.9.3.1 Image 48
8.9.3.2 Result 48
8.10 Product Status....49
8.10.1 Top page....49
8.10.1.1 Image 49
8.10.1.2 Tab 49
8.10.1.3 Display Items 50
9. Advanced Settings....52
9.1 Status 52
9.1.1 Product Status....52
9.1.1.1 Top Page 52
9.1.2 Network Status....57
9.1.2.1 Top Page 57
9.1.3 TM-Intelligent 63
9.1.3.1 Top page 63
9.2 Print 64
9.2.1 Print Settings....64
9.2.1.1 Top Page 64
9.2.1.2 Result Page 66
9.3 Network....67
9.3.1 Network Basic 67
9.3.1.1 Top Page 67
9.3.1.2 Confirm Page....71
9.3.1.3 Result Page 72
9.3.2 Wi-Fi 73
9.3.2.1 Top Page 73
9.3.2.2 SSID Search Page 75
9.3.2.3 Wi-Fi Settings Page....75
9.3.2.4 Confirm Wi-Fi Setup Page 77
9.3.2.5 Result Page 78
9.3.3 Wired LAN 79
9.3.3.1 Top page 79
9.3.3.2 Confirm page....80
9.3.3.3 Result page....81
9.3.4 Wi-Fi Direct 82
9.3.4.1 Top Page 82
9.3.4.2 Confirm Page 85
9.3.4.3 Result Page 86
9.4 Network Security....87
9.4.1 Protocol....87
9.4.1.1 Top Page 87
9.4.1.2 Confirmation Page 91
9.4.1.3 Result Page....92
9.4.2 CA Certificate 93
9.4.2.1 Top Page 93
9.4.2.2 Import Page 95
9.4.2.3 Result Page 96
9.4.3 Root Certificate Update....97
9.4.3.1 Top Page 97
9.4.3.2 Progress Page 98
9.4.3.3 Result Page....98
9.4.4 SSL/TLS....100
9.4.4.1 Basic....100
9.4.4.2 Certificate 103
9.4.4.3 Automatic Certificate Update....112
9.4.5 IPsec/IP Filtering 116
9.4.5.1 Basic....116
9.4.5.2 Client Certificate....131
9.4.6 IEEE802.1X....139
9.4.6.1 Basic....139
9.4.6.2 Client Certificate....145
9.5 Product Security 154
9.5.1 Password Encryption....154
9.5.3 Program Verification on Start Up....159
9.5.3.1 Top page 159
9.5.3.2 Result page....160
9.6 Device Management 161
9.6.1 Basic 161
9.6.1.1 Top page 161
9.6.1.2 Confirm page....162
9.6.1.3 Result page....163
9.6.2 Export and Import Setting Value 164
9.6.2.1 Export/Import Category 164
9.6.2.2 Export....165
9.6.2.3 Import 167
9.6.2.4 Firmware Update 173
9.6.2.5 Top Page 173
9.6.2.6 Firmware Search Process Page 174
9.6.2.7 Before Update Confirm Page 175
9.6.2.8 Cancel Process Page 176
9.6.2.9 Result Page....177
9.6.3 Administrator Name / Contact Information....178
9.6.3.1 Top Page 178
9.6.3.2 Result Page....178
9.6.4 Date and Time 179
9.6.4.1 Display Format....179
9.6.4.2 Date and Time 181
9.6.4.3 Time Difference 183
9.6.4.4 Time Server 185
9.6.5 Restore Default Settings 187
9.6.5.1 Top page 187
9.6.5.2 Result page....188
- TM-i Settings....189
10.1 Authentication....189
10.1.1 Image 189
10.2 Page Layout 189
10.3 Title Window 190
10.3.1 Display Items....190
10.3.2 Restarting....190
10.4 Menu Window....191
10.5 Settings Window 192
10.5.1 Common Items....192
10.5.1.1 Error Display in Text Box....192
10.5.1.2 Dialog....192
10.5.1.3 Input Limits 192
10.5.2 Basic Screen....193
10.5.2.1 Image 193
10.5.3 Display Items....193
10.6 Printer Screen....194
10.6.1 Image 194
10.6.2 Printer List 194
10.6.2.1 Display Items 194
10.6.3 Error Dialog....195
10.7 Slip Screen....196
10.7.1 Image 196
10.7.2 Display Items....196
10.8 ePOS-Print 197
10.8.1 Image 197
10.8.2 Display Items....197
10.9 ePOS-Device 198
10.9.1 Image 198
10.9.2 Display Items....198
10.10 Server Direct Print....199
10.10.1 Image 199
10.10.2 Display Items....199
10.11 Status Notification Screen 201
10.11.1 Image 201
10.11.2 Display Items 201
10.12 Proxy Screen....203
10.12.1 Image 203
10.12.2 Display Items 203
10.13 Reset Screen 204
10.13.1 Image 204
10.13.2 Button 204
10.14 Help Screen 205
10.14.1 Image 205
10.14.2 Display Items....205
- List of Functions by Model....206
This guide is applied to the EPSON Web Config function (hereafter called "Web Config").
1.1 Definitions
In this guide, words and phrases enclosed in double-quotation marks (“”) are strings that are shown in Web Config.
1.2 Terminologies
Table 1-1 Terminologies
| Terms | Definitions |
| Button | HTML element that allows a user to execute an action by pressing it. |
| Text box | HTML element that shows some text or allows a user to edit text. There are two types of text boxes (read-only/read-write) |
| Check box | HTML element that allows a user to choose multiple items from several options. |
| Tab | HTML element that allows a user to choose one document from multiple documents. |
| Radio button | HTML element that allows a user to choose one item from provided options. |
| Drop-down list | HTML element that allows a user to choose one item from a Drop-down option list. |
| Frame | HTML element that is used to divide a page into multiple areas. |
| File button | HTML element that allows a user to open a window to select a file. |
| Red | Color defined as RGB (255, 80, 0) and used as 'CUD-Red' on Web Config. |
| UTF-8 | One of the character codes that can be entered in a Web browser.A character code from 1 to 3 bytes is used to express one character.Although there is an exception in which 4-byte surrogate pairs are treated as one character, these single characters are counted as two characters in internal processing. |
| UTF-16 | One of the character codes that can be entered in a Web browser.Characters that exceed the value of 0x010000 in UTF-16 are called surrogate pairs. They are single characters that are counted as two characters. |
2. Supported Web Browsers
Web Config supports the following platforms and web browsers.
Table 2-1 Supported Web Browsers
| Platforms | Web Browsers |
| Windows 11, Windows 10, Windows 8.1, Windows 8, Windows 7 | IE8, IE9, IE10, IE11, Edge, Firefox, Chrome |
| Mac OS X (10.6.8,10.7.x,10.8.x,10.9.x,10.10.x, 10.11.x,10.12.x,10.13.x,10.14.x) | Safari, Firefox, Chrome |
| iOS5.0 or later | Safari |
| Android (ver.2.3 or later) | Chrome, Default browser |
| Chromebook | Default browser |
3. Layout
This section describes the page layout of Web Config.
3.1 Basic Settings Page
3.1.1 Configuration for Smartphone
If the width of the display device is 700px or less, it will be displayed in the configuration for smartphones.
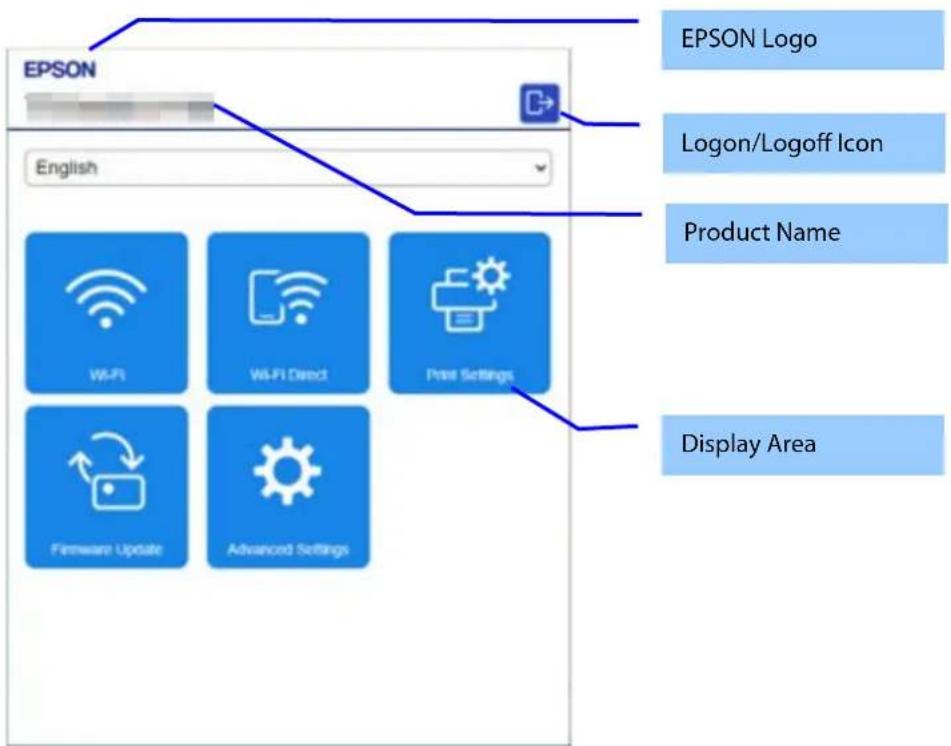
Figure 3-1 Top page example(for smartphone)
![graph TD A["EPSON"] --> B["Firmware Update"] B --> C["Current Version :"] C --> D["Check for the latest updates. Note the following and click "Start".<br>• Do not update the firmware while printing or scanning.<br>• If there is an error on the product, clear it first.<br>• Current job or q…](/content/2026/08/1566445/images/4fe6f631bb72d214276cd11e8e69038afeae6e1f73466f1bf89b029eda140450.jpg)
Figure 3-2 Function page example(for smartphone)
3.1.2 Configuration for PC
If the width of the display device is larger than 700px, it will be displayed in the configuration for PC.
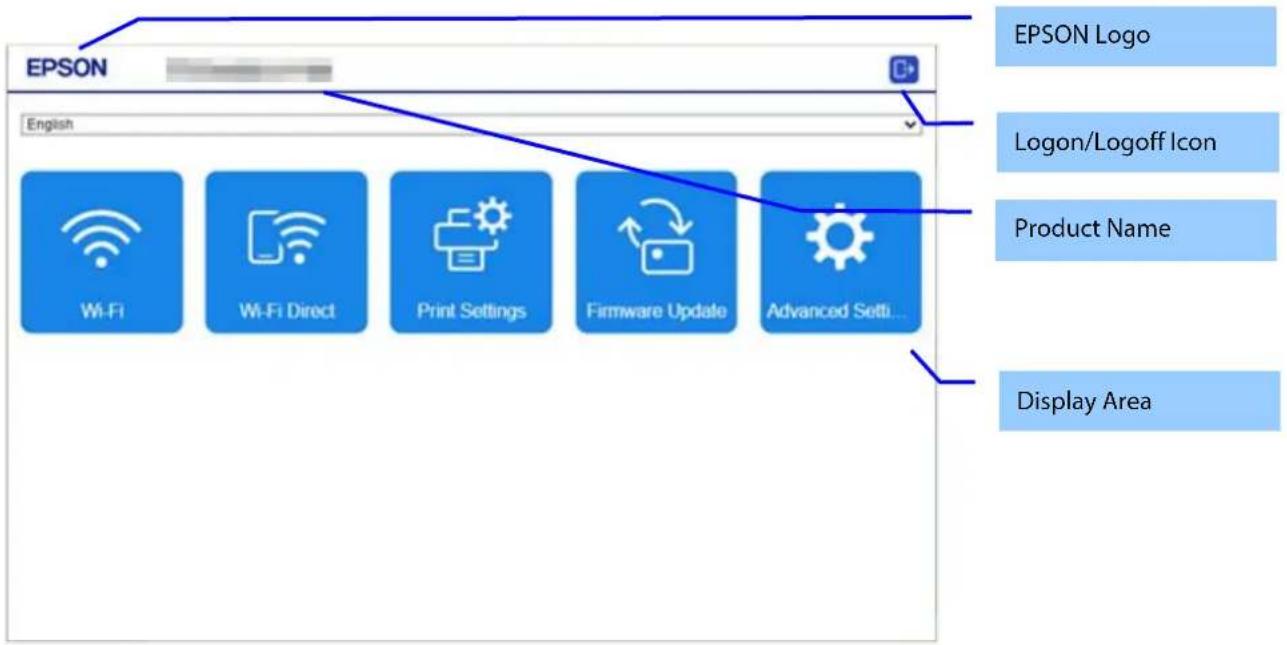
Figure 3-3 Top page example(for PC)
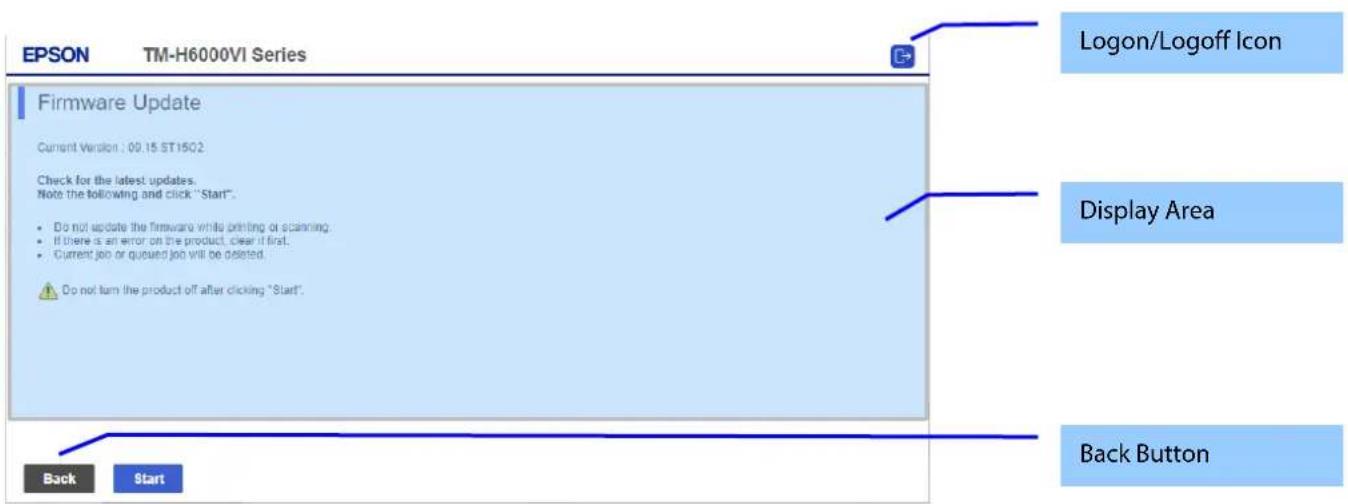
Figure 3-4 Function page example(for PC)
Table 3-1 Layout (Basic Settings)
| Parts | Description |
| EPSON Logo | Displays an image of the EPSON Logo. Click the EPSON Logo to access the top page of Web Config.The top page cannot be accessed from the Firmware Update page (except for top page) even if pressed. |
| Product Name | Displays the product name. |
| Back Button | Appears when function page is displayed. Press the button to return to the top page. |
| Logon/Logoff Icon | [TM-S1000II-NW]This link is for log on/off for user. When user logs on, the page which is input authentication information.A name of "Administrator" and a logoff icon is displayed when the administrator logs on. Click the logoff icon to access the WebConfig top page after the administrator logs off.[Models other than the TM-S1000II-NW]A logoff icon is displayed when the administrator logs on. Click the logoff icon to access the Web Config top page after the administrator logs off. |
| Display Area | Displays device status and setting items. The entire page is scrolled if there is a large amount of information. |
3.2 Advanced Settings Page
3.2.1 Configuration for smartphones
If the width of the display device is 700 px or less, it will be displayed in the configuration for a smartphone. Only the TM-S1000II-NW supports a configuration for smartphones.
![EPSON Administrator Product Status English Scanner Status: Unavailable Check [Hardware Status]. Panel Snapshot Cut Sheet Paper Type : Paper Size : Paper out Firmware : 00.00.CE16B9 Root Certificate Version : XX.XX Serial Number : abcdefg Network MAC Address : 01:23:45:67:89.AB Wi-Fi Direct MAC Addre…](/content/2026/08/1566445/images/081a3be64f44351b2fb72909c8b8793ab1403ed900b93f6812b11264cebc4b9a.jpg)
Figure 3-5 Advanced Top page example(for Smartphone)
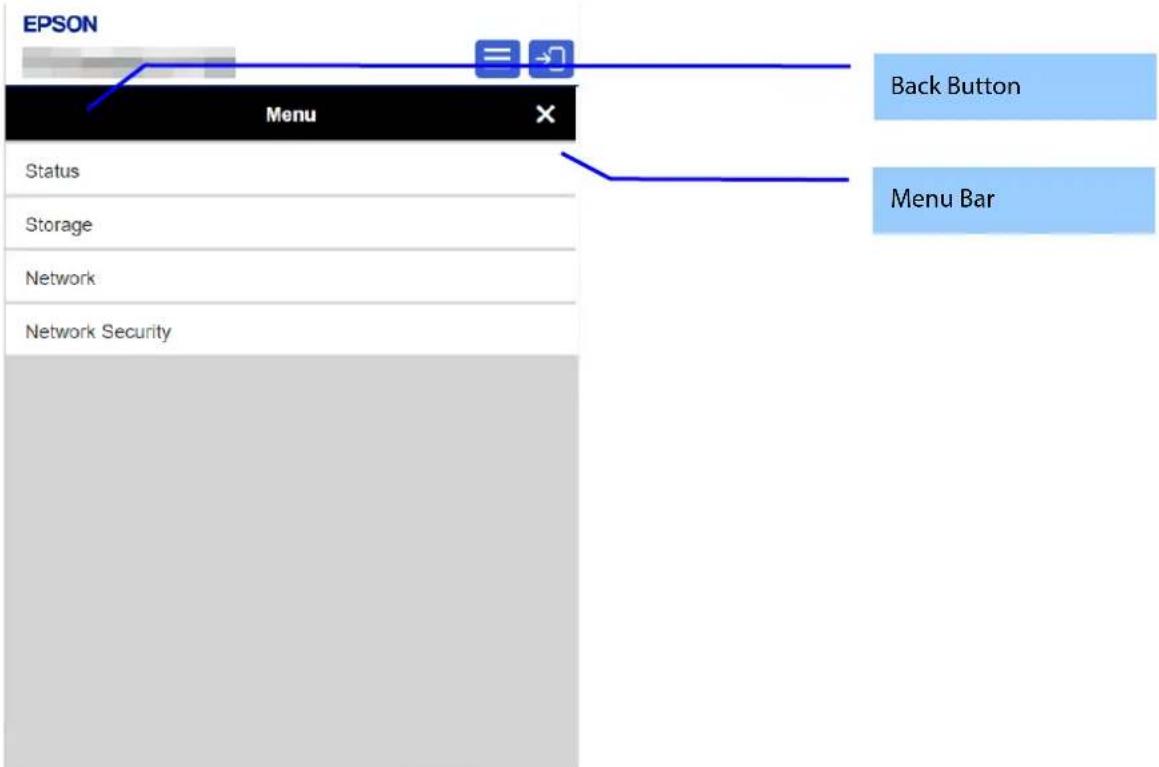
Figure 3-6 Menu Bar page example(for Smartphone)
3.2.2 Configuration for PC
If the width of the display device is larger than 700 px, it will be displayed in the configuration for a PC.
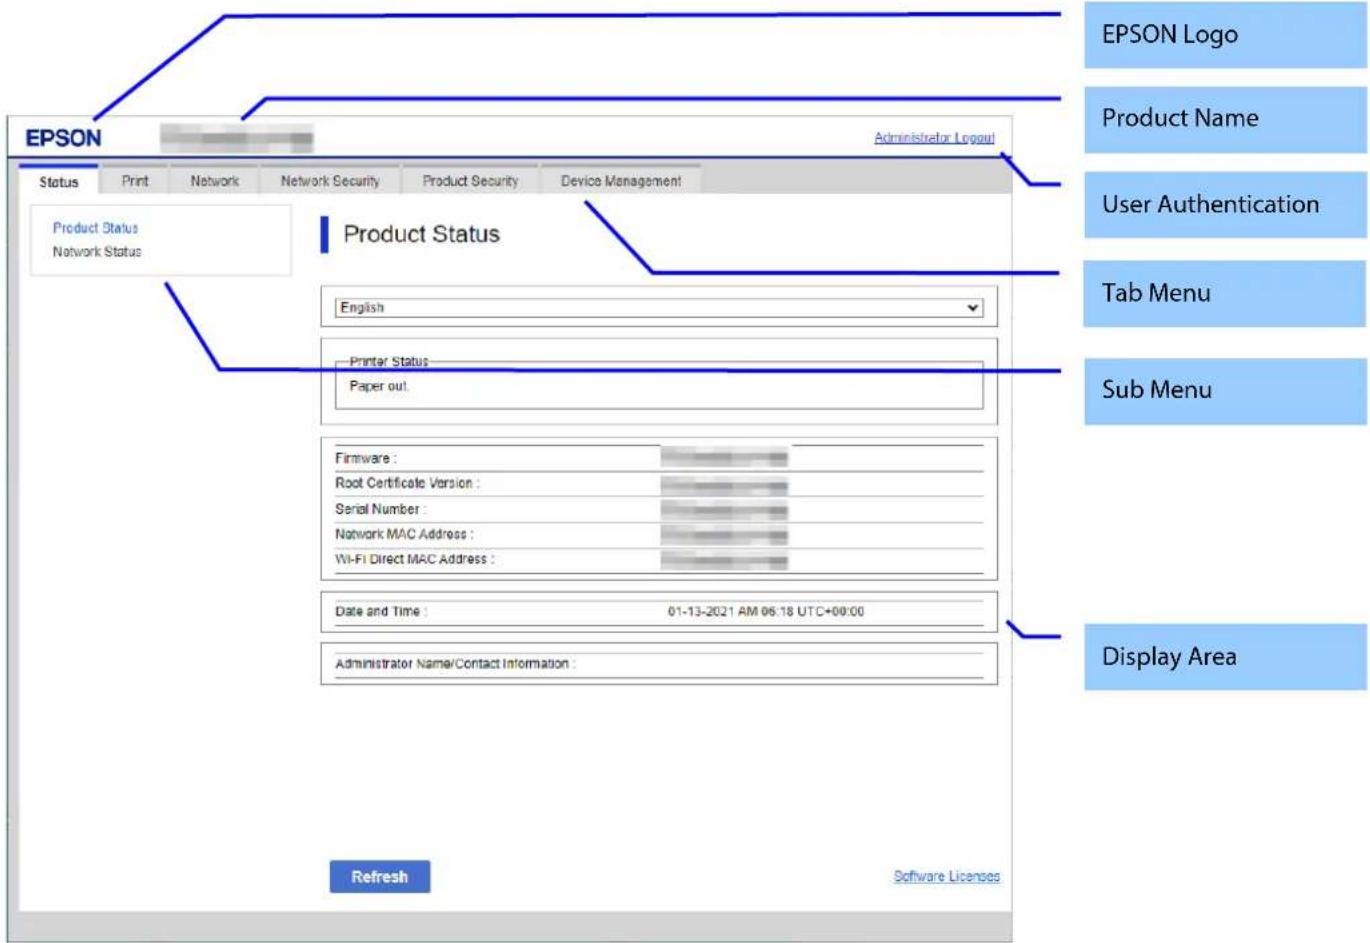
Figure 3-7 Advanced Top page example(for PC)
Table 3-2 Layout (Advanced Settings)
| Parts | Description |
| EPSON Logo | Displays an image of the EPSON Logo. |
| Product Name | Displays the product name. |
| User Authentication | This link allows the user to log on/off. When the user logs on, a page for entering authentication information is displayed. There are two links: "Logon" and "Logoff".When a user is logged on, that user's name is displayed to the left side of the link. ("Administrator" is displayed when an administrator is logged on.) |
| Logon/Logoff Icon | This link is for user logon/logoff. When user logs on, a page for entering authentication information is displayed."Administrator" and logoff icon are displayed when the administrator logs on. Click the logoff icon to access the Web Config top page after the administrator logs off. |
| Tab Menu | Displays the main menu on tabs. The selected tab menu is highlighted. |
| Sub Menu | Displays the sub-menus for the selected tab menu. The selected sub-menu is highlighted. |
| Hamburger Menu | [TM-S1000II-NW]For smartphone configuration, hide tab menu/submenu and show hamburger menu insteadWhen the button is pressed, the menu bar is displayed. |
| Menu Bar | [TM-S1000II-NW]Displayed when the hamburger menu is pressed in the smartphone configuration.First, the main menu is displayed, and when selected and pressed, a submenu corresponding to each menu is displayed. |
| Back Button | [TM-S1000II-NW]This button appears in the title when the menu bar is displayed in the smartphone configuration.When the button is pressed, the display returns to the previous layer. When pressed at the top layer, the content of the previous display area is displayed. |
| Display Area | Displays the device status and setting items. Scroll down if there is too much information to fit in the window. Only the display area will scroll. |
For more information about the Tab Menus and Sub-Menus shown on Web Config, refer to the Function Table.
3.3 Changing the Top Page (Basic Settings/Advanced Settings)
To switch from Basic Settings to Advanced Settings, select "Advanced Setting" on the top page to transition to the page for moving to advanced settings. Select whether to log on as an administrator in the transfer page. If administrator logon is selected, transition to the top page of Advanced Settings via the logon screen. If administrator logon is not selected, it will transition directly to the top page of Advanced Settings.
To switch from Advanced Settings to Basic Settings, press the EPSON logo at the top of the menu to transition to the top page of Basic Settings.
4. Language
Web Config supports Japanese / Basic English / French / German / Italian / Spanish / Portuguese. Spec of selected language when Web Config is opened is shown below.
Table 4-1 Spec of Language
| Language | Condition |
| English | Before language setup on the Web Config |
| Language which is setup on the Web Config | After language setup on the Web Config |
5. Top Page
5.1 URL
Web Config can be opened from the following URLs.
Table 5-1 URL access to Web Config
| URL | Description |
| http(s)://(IP address or Device name*)/PRESENTATION/BASIC/HOME/TOP | Correct URL |
| http(s)://(IP address or Device name*) | Redirect to correct URL |
*The device name must be registered with a DNS.
If the function for redirecting to HTTPS is enabled, HTTP access is redirected to HTTPS access. Since the device uses the self-signed certificate that is stored in the device for HTTPS access by default, a warning message will be shown in the web browser. The user can change the self-signed certificate to any server certificate in the SSL/TLS settings on Web Config.
5.2 JavaScript
If JavaScript is disabled in the web browser settings, the top page can still be viewed. However, since the transition to each setting page is limited, a warning icon and the error message "Please enable JavaScript settings in your browser" will be displayed.
6. Password Authentication
Web Config contains content that can be viewed and set by administrator permission. To access such settings, password authentication is required. The following table defines the login status of the administrator.
Table 6-1 Definition of administrator login/out conditions
| Logged-in condition by Administrator | Password has been authenticated. |
| Logged-out condition by Administrator | Password has not been authenticated. |
The password for the printer panel and EpsonNet Config is shared. If the password is changed, Web Config requires authentication using the new one when accessed after the change. If the password is changed while logged in, the change goes into effect during the next login.
6.1 Pages Always Can Be Accessed
The following pages are accessible all the time regardless of the administrator's logon status.
Table 6-2 Pages Always can be Accessed
| Pages always to be accessed | Description | |
| Basic Settings | Main Page | All pages are viewable. |
| Function Page | The top page of each function is viewable. | |
| Advanced Settings | Status Tab | Product Status (contains Software Licenses)Network Status |
| Network Security Tab | SSL/TLS certificate | |
6.2 Timing of Administrator Authentication
To move to the administrator logon status, the user is required to go to the Administrator logon page from the top menu of the Basic Settings or the Advanced Settings and perform password authentication. After authentication, Web Config is in logon status and inputting passwords is no longer required to access pages requiring a password. In administrator logoff status, Web Config moves to the administrator logon page and requires the user to input a password when accessing pages to which transition is allowed in administrator logon status.
6.3 Session Management
Administrator logon/logoff is managed by session showing the connection status with the accessed browser. The administrator logon status indicates the period in which a connection is maintained. When the user logs out, the session is disconnected.
A session is established between the printer and a browser browsing Web Config after the printer proves that the administrator password input on the administrator logon page is valid. The session is maintained for 30 minutes after the last access from the browser. However, when the browser is quit, the session is closed. When multiple sessions are established, the session authenticated last is always valid. Therefore, if Web Config is accessed and logged on by another browser, the browser gets the administrator privilege. At this time, if you try to page transition using a browser that previously had been logged on, administrator logon page is displayed.
6.4 Log on Page
6.4.1 Image
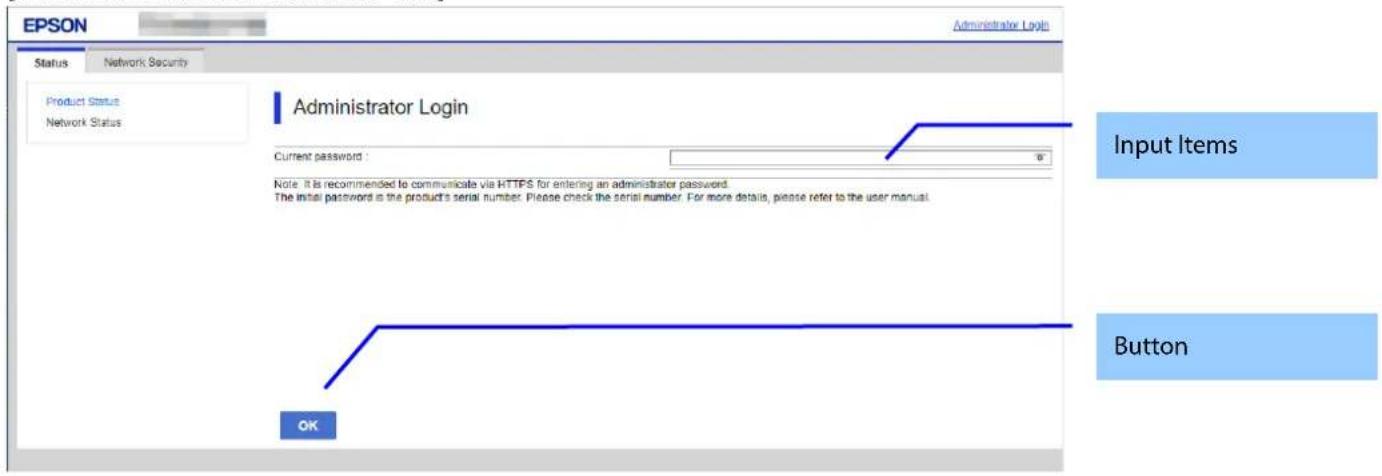
The following figure shows the layout of the logon page.
[Models other than the TM-S1000II-NW]
[TM-S1000II-NW]
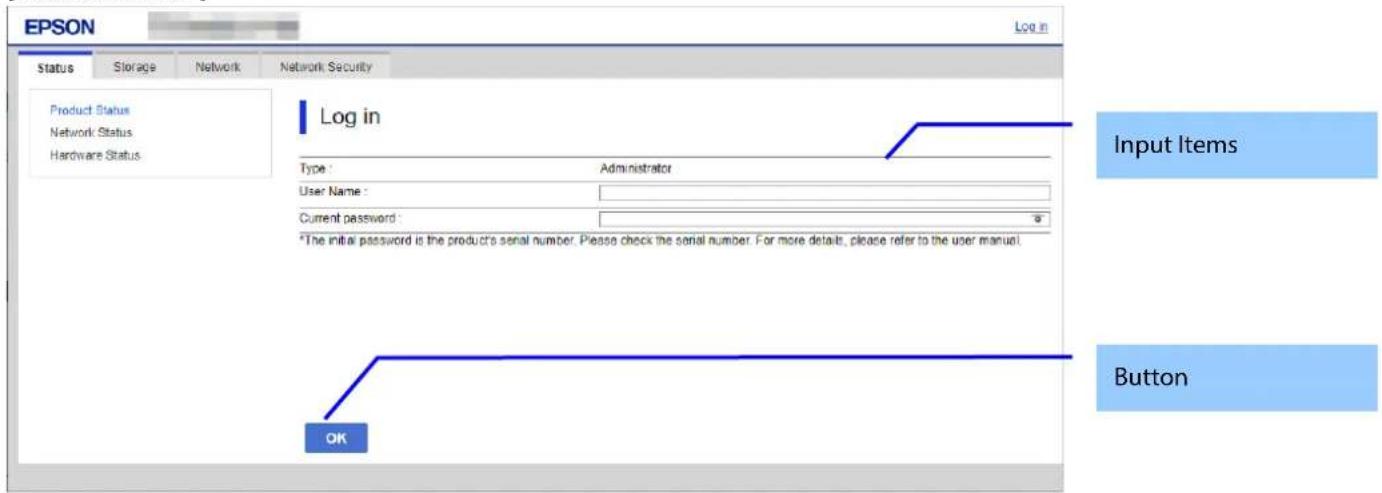
Figure 6-1 Log on Page
6.4.2 Input Items
Table 6-3 Input Items
| Items | Description | Conditions |
| "User name" | Text box for entering the current user name.If the Enter key is pressed while the cursor is in this text box, the same process will be performed as when the OK button is pressed. | - |
| "Current password" | Text box for entering the current password. The entered value is masked with '*'.If the Enter key is pressed while the cursor is in this text box, the same process as when the OK button is pressed is performed. | - |
| "The initial password is provided on the label attached to the product. For more details, please refer to the user manual." | Comment | For models supporting the UK security model. |
| "The initial password is the product's serial number. Please check the serial number. For more details, please refer to the user manual." | Comment | For models not supporting the UK security model. |
6.4.3 Button
Table 6-4 Button
| Items | Description |
| "OK" | Button for logging on. After the user logs on, the Product Status page on the Status tab is displayed. |
The Administrator logon page is displayed in the following cases.
- User authentication link clicked
● Direct access to a page that requires logging on - Web Config accessed 20 min. or longer since the previous time
- Accessing Web Config while currently logged on as an administrator in another web browser
6.5 Log on Failure Page
If logon fails, the logon page is displayed with the authentication results. At this time, the password field is left blank.
6.5.1 Image
[Models other than the TM-S1000II-NW]
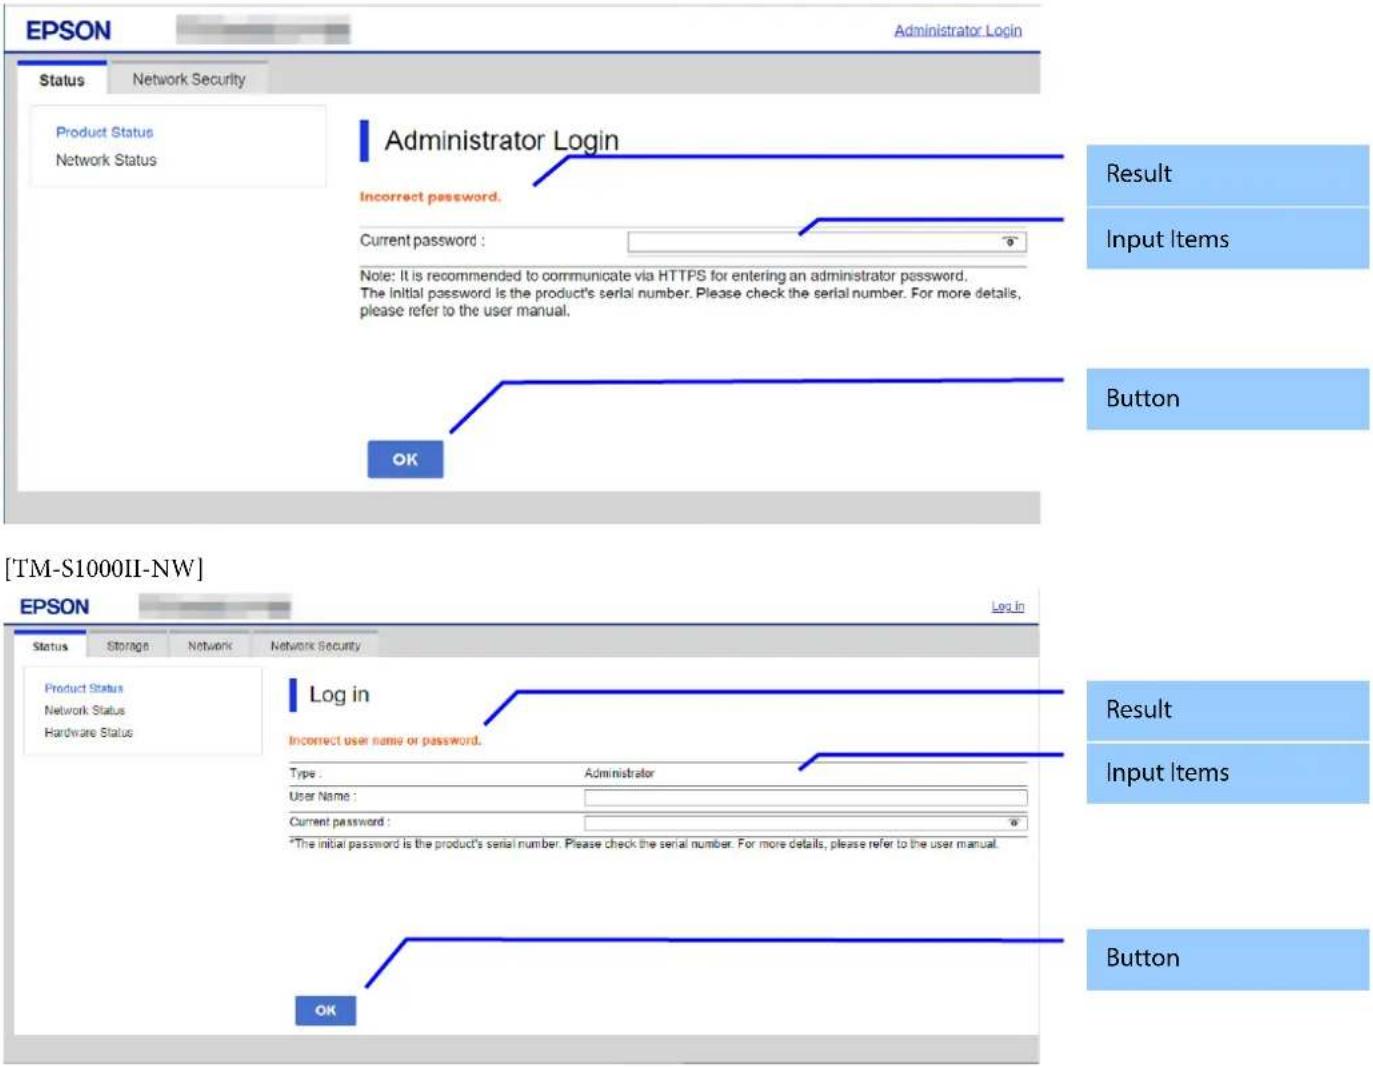
6.5.2 Result
Table 6-5 Setting Result
| Items | Description |
| "Incorrect username or password." | For TM-S1000II-NW.This message is shown when the entered username or password is incorrect.This item is displayed in red letters.This item is displayed on the device which supports username and when failed administrator logon. |
| "Incorrect password." | This message is shown when the entered password is incorrect.This item is displayed in red letters.This item is displayed when administrator logon fails on devices that do not support user names. |
| "Authentication failed.""Try again later." | This message is displayed when registered user logon fails.This item is displayed in red letters. |
7.1 Password Entry Field
The common specifications for password entry fields are shown below.
- Entered characters are masked. To use textbox, specify the "password" attribute for "type".
- When a password is set, 10 asterisks (*) are used for the “value” attribute for the textbox.
- If no password is entered, nothing is entered for the “value” attribute for the textbox. However, in some cases 10 asterisks (*) are displayed even if no password is entered. These conditions are detailed in the description for each item.
- If 10 asterisks are entered for the password, the password is not changed.
- User The user can change display/hideselect to display or hide the input password to by clicking the eye icon which is located on the right of textbox.
8. Basic Settings Page
8.1 Main Page
8.1.1 Top Page
8.1.1.1 Image
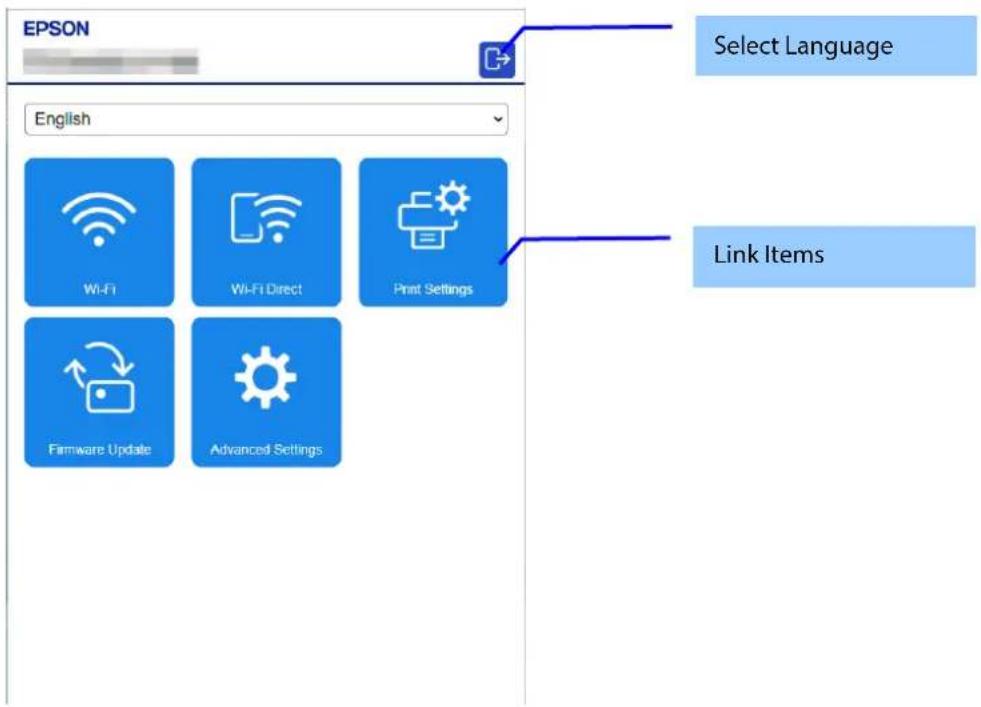
Figure 8-1 Configuration for Smartphone
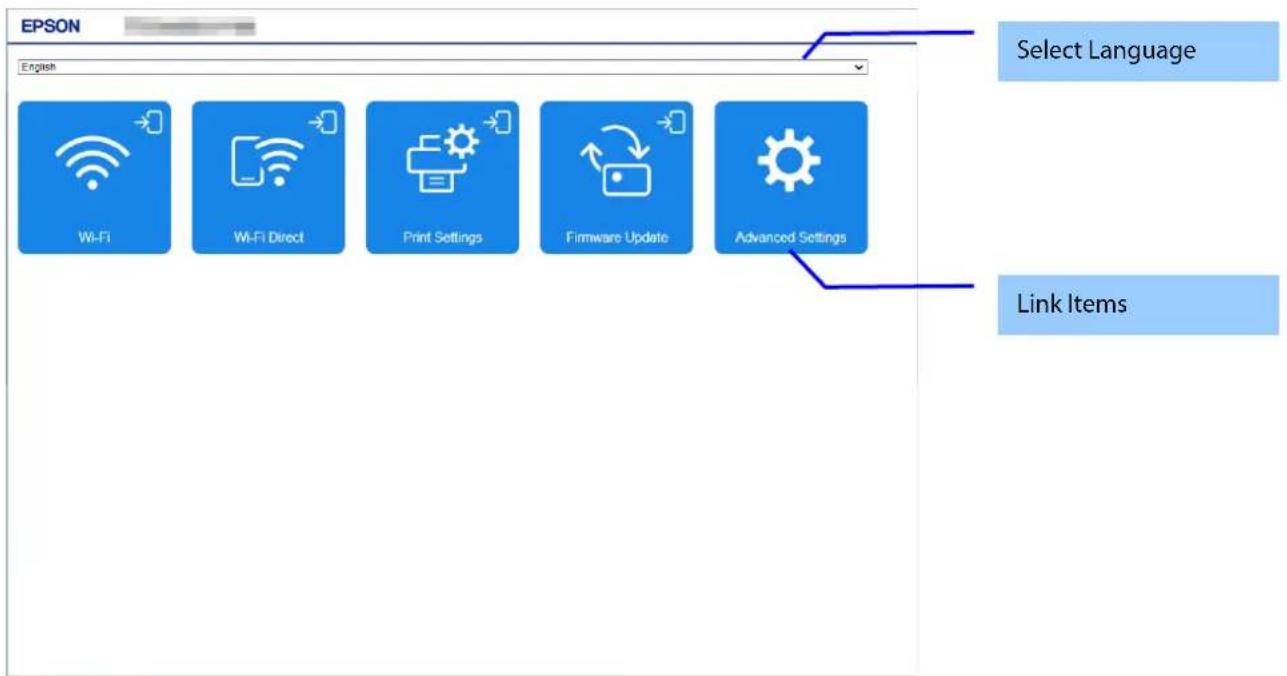
Figure 8-2 Configuration for PC
8.1.1.2 Display Language Setting
Items are displayed when multiple display languages are supported.
The language specification is in accordance with section 4, Language. After choosing a language, it is reflected enabled immediately and the page is changed based on the selected language.
8.1.1.3 Link Items
Link items are displayed in the form of square buttons. The layout for smartphones is 3 x N, the layout for PCs is 5 x N. If the length of the item name exceeds the width of the square button, the ellipsis "..." is displayed.
[Models other than the TM-S1000II-NW]
For link items that require the user to be logged on, a logon icon is displayed to the top right of the button if the user is not already logged on.
| Items | Description | Condition |
| "Wi-Fi" | Access the top page of Wi-Fi Settings | - |
| "Wi-Fi Direct" | Access the top page of Wi-Fi Direct Settings | Only with Wi-Fi Direct support device. |
| "Printer Settings" | Access the top page of Printer Settings | Models that support printing |
| "Network Basic Setup" | Access the top page of Network Basic Setup | Only TM-S1000II-NW. |
| "Firmware Update" | Access the top page of the Firmware Update | Only with Firmware Update support device. |
| "Root Certificate Update" | Access the top page of Root Certificate Update | Only TM-S1000II-NW. |
| "Product Status" | Access the top page of Product Status | Only TM-S1000II-NW. |
| "Advanced Settings" | Access the top page of Advanced Settings |
8.2 Log on Page
8.2.1 Image
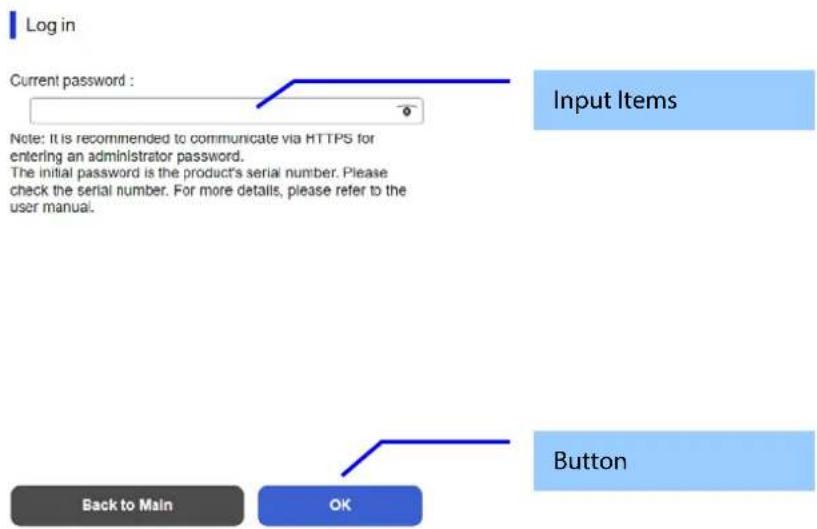
The following figure shows the layout of a log on page.
There are two display patterns for the logon page: "full screen display" and "popup display".
If you press the "Advanced Settings" button from the top page and move there, a description and link will be added.
[Models other than the TM-S1000II-NW]
[TM-S1000II-NW]
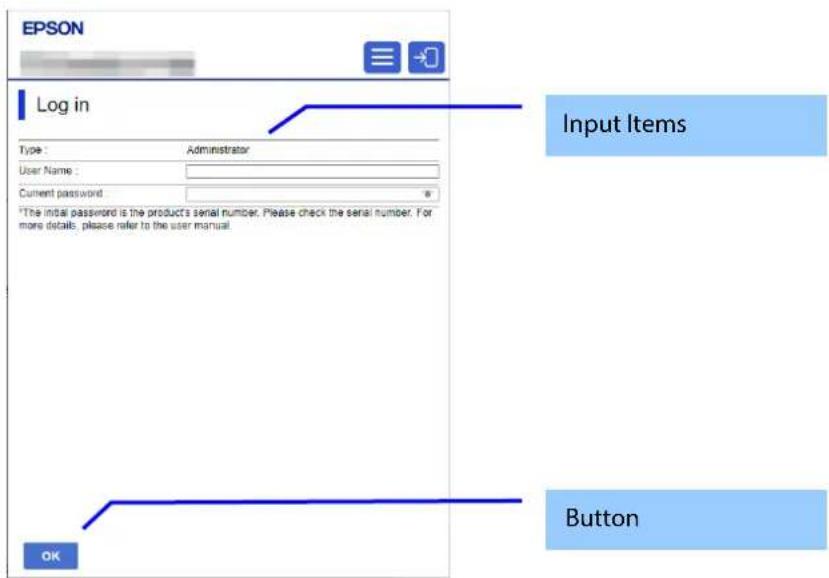
Figure 8-3 Log on Page
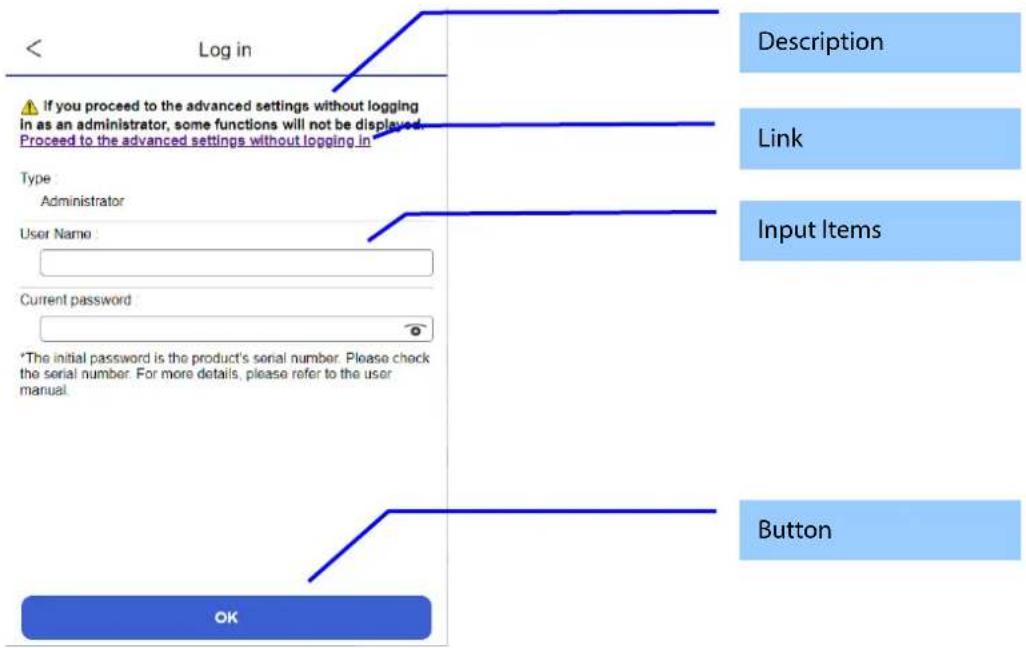
Figure 8-4 Log on page (with description and link)
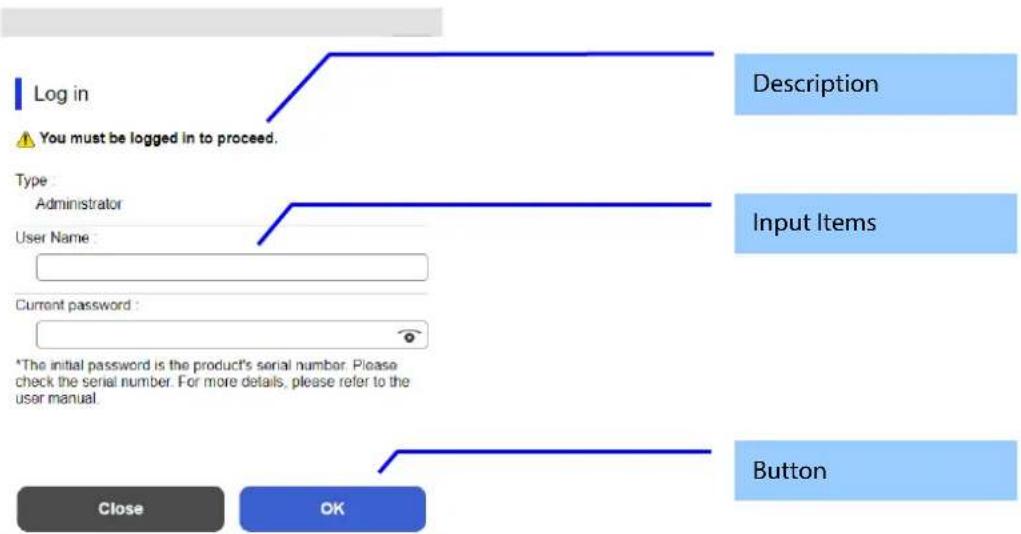
Figure 8-5 Log on page (Popup)
8.2.2 Description
Table 8-1 Description
| Items | Description | Condition |
| "If you proceed to the advanced settings without logging in as an administrator, some functions will not be displayed." | Fixed Strings | [TM-S1000II-NW]When you press the "Advanced Settings" button from the top page[Models other than the TM-S1000II-NW]Not displayed |
| "You must be logged in to proceed." | Fixed Strings | [TM-S1000II-NW]When pop-up is displayed[Models other than the TM-S1000II-NW]Not displayed |
8.2.3 Link
Table 8-2 Link
| Items | Description | Condition |
| "Proceed to the advanced settings without logging in" | Display in hyperlink format. When you press the link without logging on, top page of the Advanced Settings is displayed. | [TM-S1000II-NW]When you press the "Advanced Settings" button from the top page[Models other than the TM-S1000II-NW]Not displayed |
8.2.4 Input Items
Table 8-3 Input Items
| Items | Description | Conditions |
| "Current password" | A text box to the input current password. The input value is masked with '*'.Pressing the Enter key with the cursor in this text box performs the same processing as when pressing the OK button.When '!' is pressed, the input value is displayed.When '!' is pressed, the input value is masked with '*'. | - |
| "* The initial password is provided on the label attached to the product. For more details, please refer to the user manual." | Comment | UK security model |
| "* The initial password is the product's serial number. Please check the serial number. For more details, please refer to the user manual." | Comment | Not UK security model |
8.2.5 Button
Table 8-4 Button
| Items | Description | Conditions |
| "OK" | Button for logging on. After logging on, the top page of each function is displayed. | - |
| "Close" | Close pop-up screen. | When pop-up is displayed |
| "Back to Main" | Displays the main page. | Models other than the TM-S1000II-NW |
Administrator logon page is shown in the following cases.
- When the user authentication link is clicked.
- Direct access to the page which requires logging on.
- Web Config access after 20 min. from last access.
● During administrator logon, Web Config access after administrator logon from other web browser.
8.3 Log on Failure Page
If log on fails, the log on page of the authentication results is displayed.
At this time, the user name is displayed with the previous input value remaining, and the password field is left blank.
8.3.1 Image
[Models other than the TM-S1000II-NW]
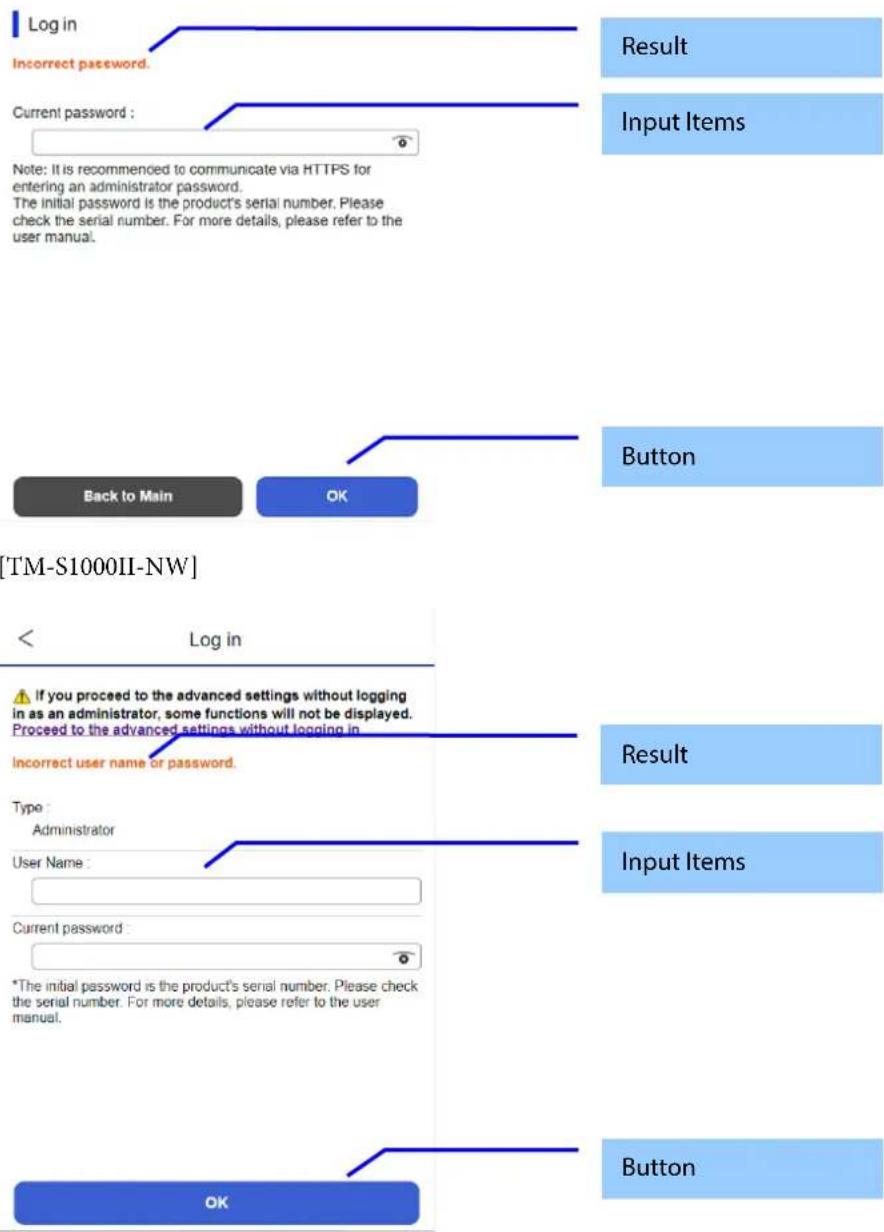
8.3.2 Result
Table 8-5 Setting Result
| Items | Description |
| "Incorrect password." | This message is shown when the entered password is incorrect.This item is displayed in red.This item is displayed on a device which does not support username and when administrator log on fails. |
| "Authentication failed.""Try again later." | This message is shown when registered user log on fails.This item is displayed in red. |
8.4 Wi-Fi
8.4.1 Top Page
8.4.1.1 Image
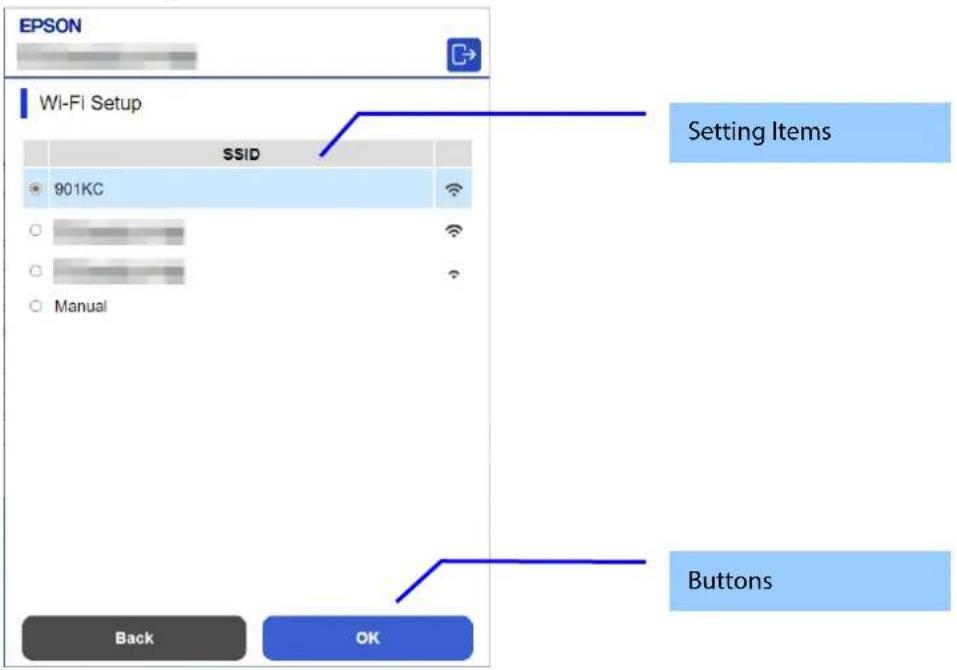
8.4.1.2 Setting Items
Table 8-6 Setting Items
| Items | Description | Condition |
| "SSID" | Selects the SSID found in the SSID search and the manual option using the radio buttons. | - |
8.4.1.3 Button
Table 8-7 Button
| Items | Description | Condition |
| "OK" | Moves to the configuration page for SSID connection. | - |
| "Back" | Button to move to the main page. | - |
8.4.2 SSID Setting Page
8.4.2.1 Image
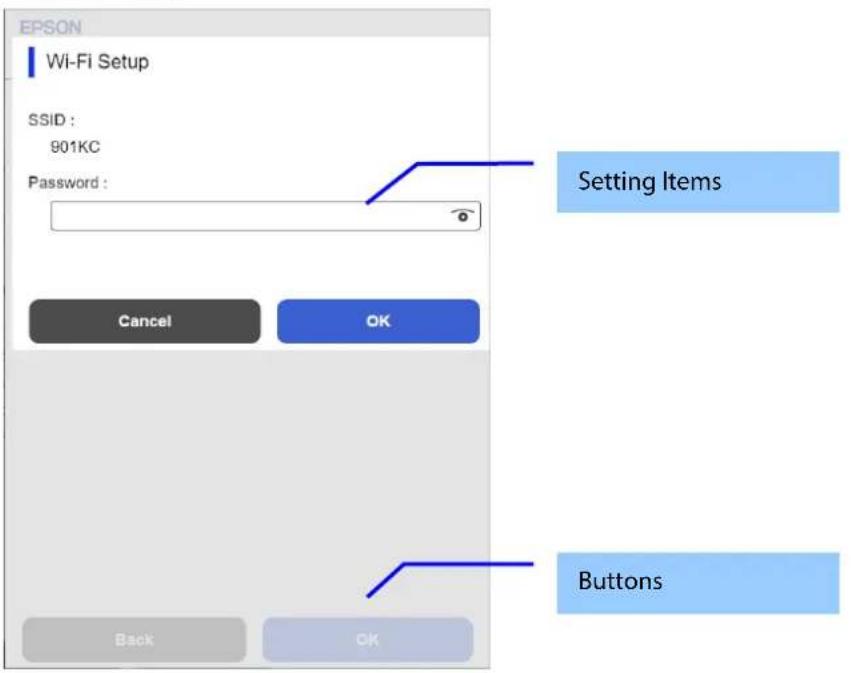
8.4.2.2 Setting Items
Table 8-8 Setting Items
| Items | Description | Condition |
| "SSID" | If selected from a list, the selected SSID is displayed as a fixed string.If manual, use the text box to configure the settings. | - |
| "Password" | A text box is provided. The string must have 0, 5, or 8 to 63 characters. (ASCII codes: 0x20 - 0x7E)The input values are masked by '*'. | If the SSID selected from the search list has no password set, it is hidden. |
8.4.2.3 Button
Table 8-9 Button
| Items | Description | Condition |
| "OK" | Moves to the configuration page for SSID connection. | - |
| "Cancel" | Cancel the pop-up. | - |
8.4.3 Result Page
8.4.3.1 Image
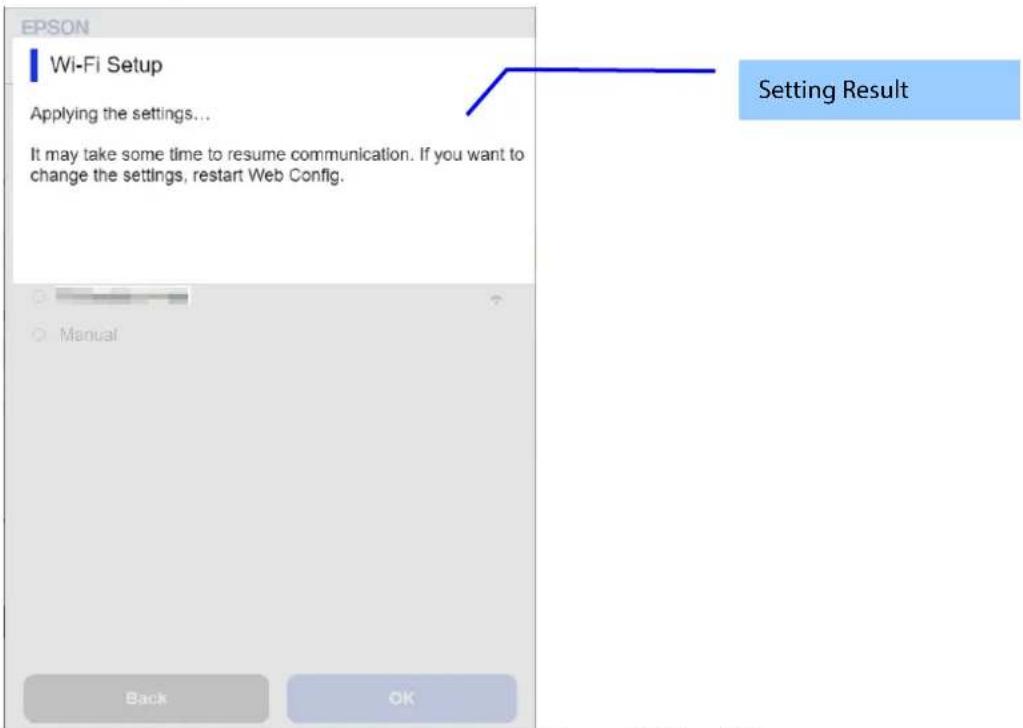
Figure 8-6 Result Page
8.4.3.2 Setting Result
Table 8-10 Setting Result
| Items | Description |
| "Communication is restarting.Restarting communication may take a few minutes. If you want to change the settings, reconnect to the Web Config." | This text is shown if setup is successful. |
| "Setup failed." | This text is shown if setup fails. |
8.4.3.3 Button
Table 8-11 Button
| Items | Description | Condition |
| "Back to Main" | Button to change to the main page. | This button is displayed when setup fails. |
8.5 Wi-Fi Direct
8.5.1 Top Page
8.5.1.1 Image
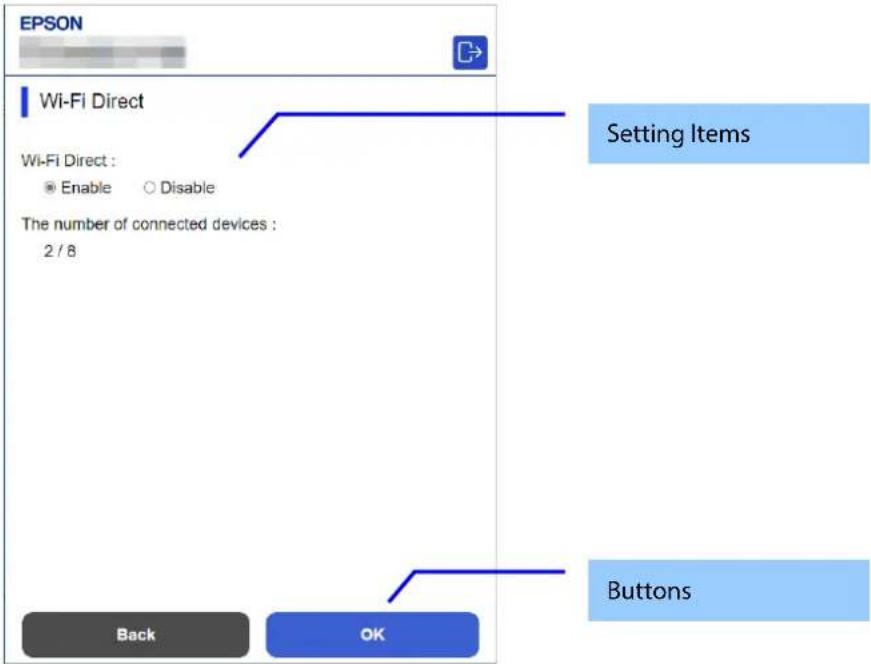
8.5.1.2 Setting Items
Table 8-12 Setting Items
| Items | Description | Condition |
| "Wi-Fi Direct" | Two radio buttons are provided to choose either of the following:"Enable" / "Disable" | - |
| "The number of connected devices" | Displays the number of connected devices with Wi-Fi Direct.The number of connected devices/Max devices | This item is displayed when "Wi-Fi Direct" is "Enable". |
| "SSID" | Same content as SSID in "Advanced Settings > Wi-Fi Direct" is displayed under same conditions. | This item is displayed when "Wi-Fi Direct" is "Enable".(Not displayed in CL25.) |
| "Password" | Same content as Password in "Advanced Settings > Wi-Fi Direct" is displayed under same conditions. | This item is displayed when "Wi-Fi Direct" is "Enable".(Not displayed in CL25.) |
| "You can connect to a wireless LAN access point by scanning the two-dimensional code." | Displays a fixed string and a QR code below it. | This item is displayed when "Wi-Fi Direct" is "Enable".(Not displayed in CL25.) |
8.5.1.3 Buttons
Table 8-13 Buttons
| Items | Description |
| "Back" | Button to move to the main page. |
| "OK" | This button is to change the settings.When this button is pushed, Web Config is transferred to the setting results page. |
8.5.2 Result Page
8.5.2.1 Image
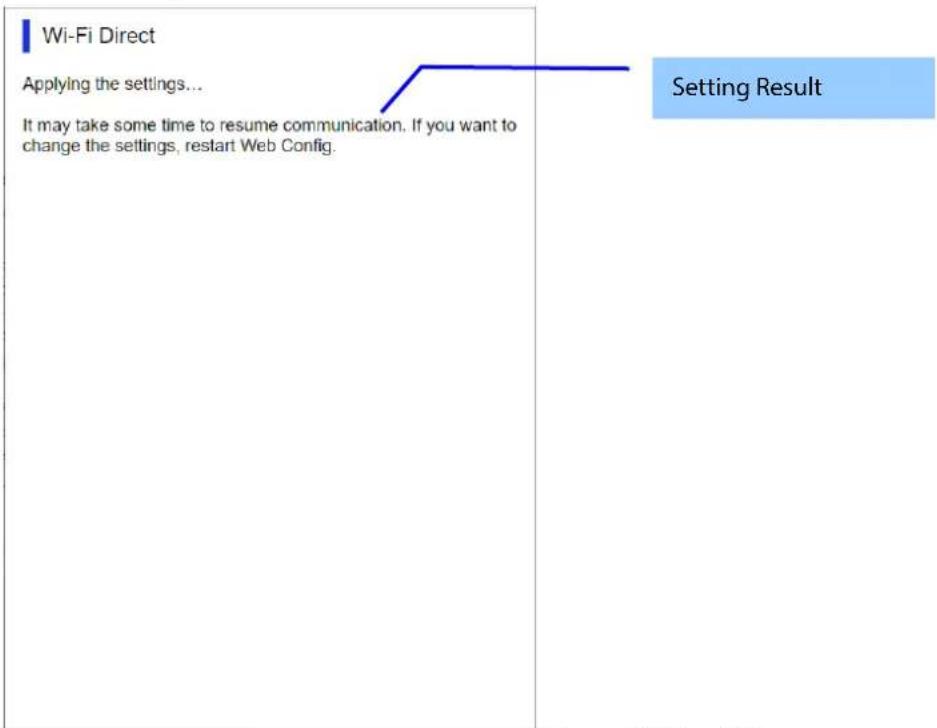
Figure 8-7 Result Page
8.5.2.2 Setting Result
Table 8-14 Setting Result
| Items | Description | Condition |
| "Setup complete.It may take some time to resume communication. If you want to change the settings, restart Web Config." | Displays a fixed string. | This text is shown if setup is successful. |
| "Setup failed." | Displays a fixed string. | This text is shown if setup fails. |
| "SSID" | Same content as "SSID in Advanced Settings > Wi-Fi Direct" is displayed under same conditions. | This item is displayed when "Wi-Fi Direct" is "Enable". (Not displayed in CL25.) |
| "Password" | Same content as Password in "Advanced Settings > Wi-Fi Direct" is displayed under same conditions. | This item is displayed when "Wi-Fi Direct" is "Enable". (Not displayed in CL25.) |
| "You can connect to a wireless LAN access point by scanning the two-dimensional code." | Displays a fixed string and a QR code below it. | This item is displayed when "Wi-Fi Direct" is "Enable". (Not displayed in CL25.) |
8.5.2.3 Button
Table 8-15 Button
| Items | Description | Condition |
| "Back to Main" | Button to change to the main page. | This button is displayed if setup fails. |
8.6 Network Basic Setup
8.6.1 Top Page
8.6.1.1 Image
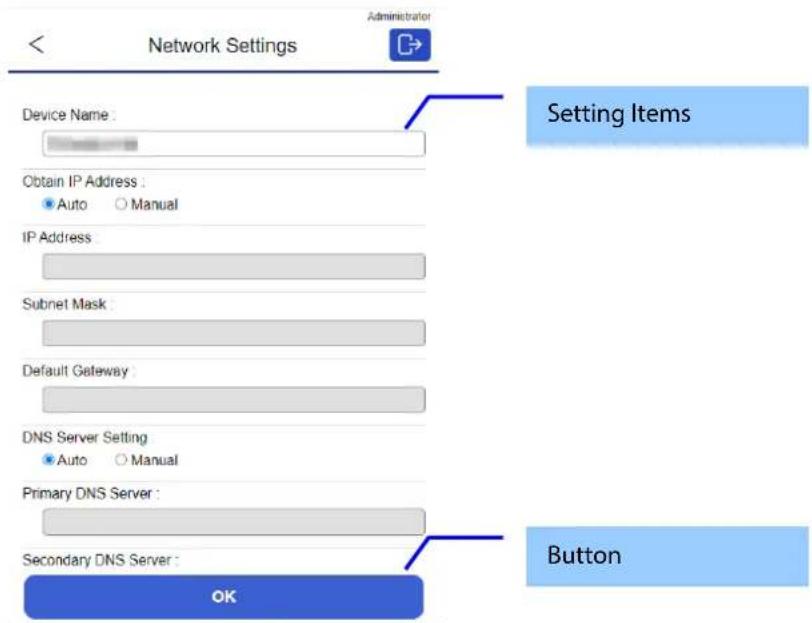
Figure 8-8 Top Page
8.6.1.2 Setting Items
The following table shows network setting items for Wi-Fi/Network Setup.
Table 8-16 Setting Items
| Items | Description | Condition |
| “Device Name” | A text box is provided. The string must have 2 to 53 characters and contain"A"~"Z", "a"~"z", "0"~"9", and "-" ("space" is not allowed).The leading and final character must be "A"~"Z", "a"~"z", or "0"~"9"(-" is not allowed). | - |
| “Obtain IP Address” | Two radio buttons are provided to choose either of the following:"Auto" / "Manual" | - |
| “IP Address” | A text box is provided.Format: "xxx.xxx.xxx.xxx""xxx" part must be "0" to "255".The following addresses cannot be set:"0.0.0.0" to "0.255.255.255.255"Loopback address ("127.0.0.0" to "127.255.255.255")Class D address ("224.0.0.0" to "239.255.255.255")Class E address ("240.0.0.0" to "255.255.255.255")Directed broadcast address ("255.255.255.255") | If "Obtain IP Address" is "Auto", this item is grayed out. |
| “Subnet Mask” | A text box is provided.Format: "xxx.xxx.xxx.xxx""xxx" part must be "0" to "255".The following addresses cannot be set:Discontinuous mask bit ("255.254.128.0" etc.)0.0.0.0255.255.255.254255.255.255.255 | If "Obtain IP Address" is "Auto", this item is grayed out. |
| "Default Gateway" | A text box is provided.Format: "xxx.xxx.xxx.xxx""xxx" must be "0" to "255".The following addresses cannot be set:"0.0.0.0" (Input is allowed if "not set", but will be blank when displayed.)"0.0.0.1" to "0.255.255.255.255"Loopback address ("127.0.0.0" to "127.255.255.255")Class D address ("224.0.0.0" to "239.255.255.255")Class E address ("240.0.0.0" to "255.255.255.255")Directed broadcast address ("255.255.255.255") | If "Obtain IP Address" is "Auto", this item is grayed out. |
| "DNS Server Setting" | Two radio buttons are provided to choose either of the following: "Auto" / "Manual""Manual" is selected when "Obtain IP Address" is "Manual". | - |
| "Primary DNS Server" | A text box is provided.Format: "xxx.xxx.xxx.xxx""xxx" part must be "0" to "255".("0.0.0.0") is prohibited.It is an error if "Primary DNS Server" is blank and "Secondary DNS Server" has been entered.You can enter empty string. | If "DNS Server Setting" is "Auto", this item is greyed out. |
| "Secondary DNS Server" | A text box is provided.Format: "xxx.xxx.xxx.xxx""xxx" part must be "0" to "255".("0.0.0.0") is prohibited.You can enter empty string. | If "DNS Server Setting" is "Auto", this item is grayed out. |
| "Proxy Server Setting" | "Do Not Use" / "Use" | - |
| "Proxy Server" | Sets the proxy server address in the IPv4 address or FQDN format. | If "Proxy Server Setting" is "Do Not Use", this item is grayed out. |
| "Proxy Server Port Number" | A text box is provided. Values must be "0" to "65535". | If "Proxy Server Setting" is "Do Not Use", this item is grayed out. |
8.6.1.3 Button
Table 8-17 Button
| Items | Description |
| "OK" | If pressed while logged off, Web Config makes transition to the Logged on page.If pressed while logged on, Web Config shows the Error pop-up or the Confirm pop-up. |
8.6.1.4 Error Popup
If Web Config recognizes an error in the input value after the OK button is pressed, the error pop-up below is shown. If an input value error has multiple occurrences, a high priority is displayed. If "OK" button on the error pop-up window is pressed, transits to top page.
Table 8-18 Error Pop-up
| Items | Description |
| "Invalid value below." | This message is shown when the input value in the text box is invalid. The item names of the corrected values are shown under the message in the left cell. If there are two or more items whose values were corrected, those items are listed line by line. |
| "The combination of IP Address and Subnet Mask is incorrect.""All the bits in the host address part of the IP address cannot be set to 1." | If the bits of the host address portion of the IP address are all 1, this text is displayed. |
| "The combination of IP Address and Subnet Mask is incorrect.""All the bits in the host address part of the IP address cannot be set to 0." | If the bits of the host address portion of the IP address are all 0, this text is displayed. |
| "The combination of Default Gateway and Subnet Mask is incorrect.""All the bits in the host address part of the Default Gateway cannot be set to 1." | If the bits of the host address portion of the Default Gateway are all 1, this text is displayed. |
| "The combination of Default Gateway and Subnet Mask is incorrect.""All the bits in the host address part of the Default Gateway cannot be set to 0." | If the bits of the host address portion of the Default Gateway are all 0, this text is displayed. |
| "The combination of IP Address, Subnet Mask and Default Gateway is incorrect.""IP Address and Default Gateway must be on the same network segment as defined by the Subnet Mask." | This text will appear in the following case:There is a default gateway setting, and the network part that represents the subnet mask differs in the IP address and default gateway. |
8.6.1.4.1 Confirm Popup
When “OK” button on the top page is pressed, the confirm popup window is shown if input items are without error. If “OK” button on the confirm popup window is pressed, transits to result page.
Table 8-19 Error Pop-up
| Items | Description |
| "Communication will be shut down temporarily to enable the new settings.""You cannot access the network immediately after the settings are changed." | - |
8.6.2 Result page
If "OK" button on the confirm popup window is pressed, transits to result page. The content of the result page varies according to the result (success or failure).
8.6.2.1 Result success
8.6.2.1.1 Image
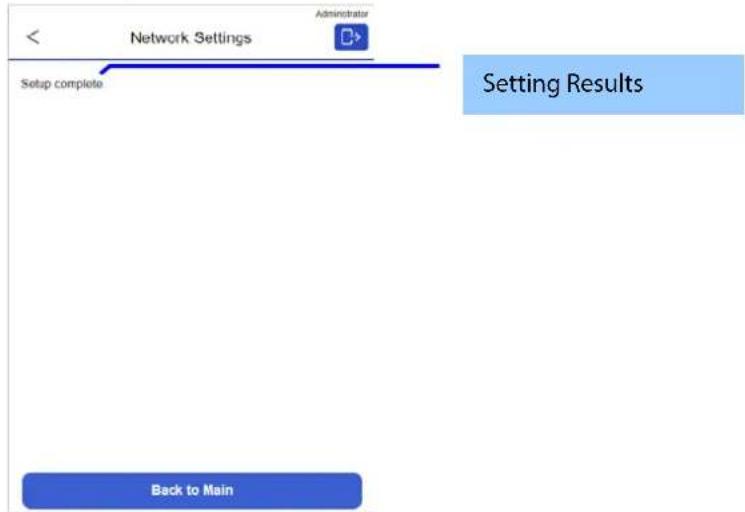
Figure 8-9 Result page(Success)
8.6.2.1.2 Setting Result
Table 8-20 Message
| Items | Description |
| "Setup complete." | This text is shown if Wi-Fi/Network setup is successful. |
8.6.2.2 Result Failed
If the setting fails, a failure message is displayed in red at the beginning of the top page. Refer to the chapter on the top page for details on items other than the content of failure messages.
8.6.2.2.1 Image
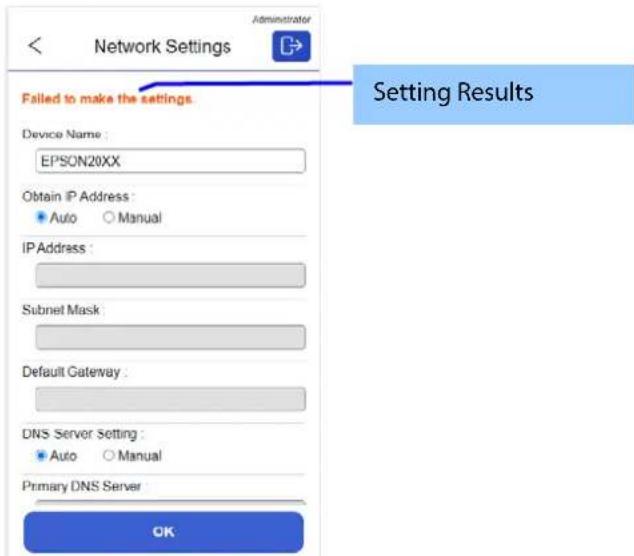
Figure 8-10 Result page(Failed)
8.6.2.2.2 Setting Result
Table 8-21 Message
| Items | Description |
| "Setup failed." | This message is shown if Wi-Fi/Network setup fails due to setup/token mismatch. |
| "Cannot access the product until processing is complete." | This message is shown if Wi-Fi/Network setup fails due to conflicting network settings. |
8.7 Print Settings Page
8.7.1 Top Page
8.7.1.1 Image
The following figure shows the layout of the top page.
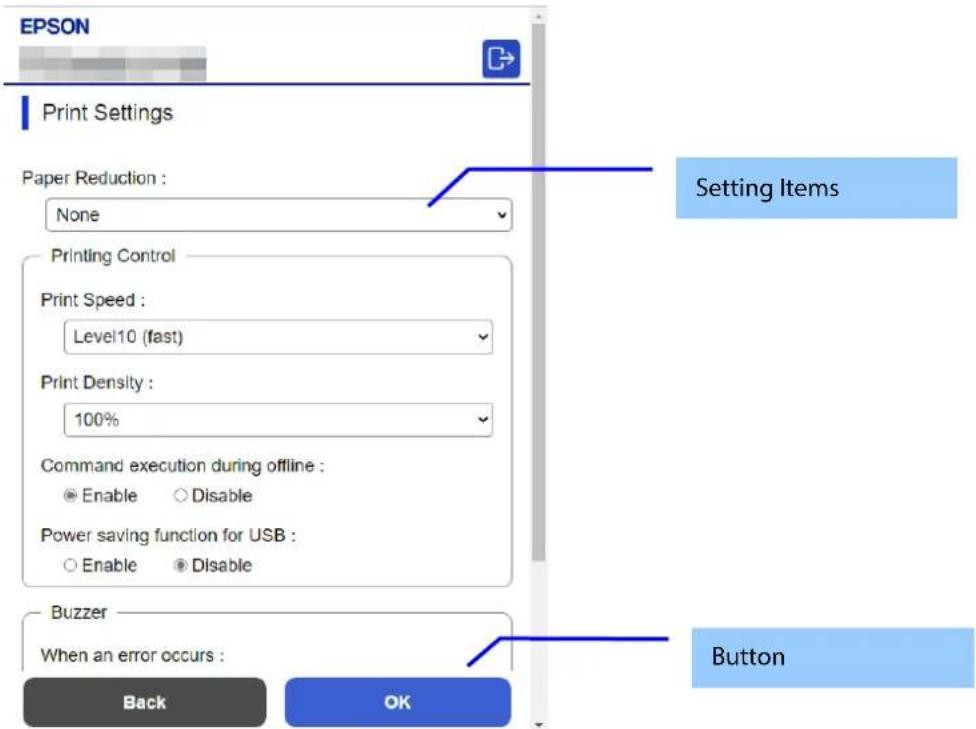
Figure 8-11 Image
8.7.1.2 Setting Items
Table 8-22 Setting Items
| Items | Description | Condition |
| "Paper Reduction" | Use the drop-down list to select from the following options:"Max" / "Recommendation" / "None" | Displayed only on models that support paper reduction |
| "Printing Control" | Title | - |
| "Print Speed" | For models that support the maximum printing speed "Level10"Use the drop-down list to select from the following options:"Level1 (slow)" / "Level2" / "Level3" / "Level4" / "Level5" / "Level6" / "Level7" / "Level8" / "Level9" / "Level10 (fast)"For models that support the maximum printing speed "Level13"Use the drop-down list to select from the following options:"Level1 (slow)" / "Level2" / "Level3" / "Level4" / "Level5" / "Level6" / "Level7" / "Level8" / "Level9" / "Level10" / "Level11" / "Level12" / "Level13 (fast)"For models that support the maximum printing speed "Level17"Use the drop-down list to select from the following options:"Level1 (slow)" / "Level2" / "Level3" / "Level4" / "Level5" / "Level6" / "Level7" / "Level8" / "Level9" / "Level10" / "Level11" / "Level12" / "Level13" / "Level14" / "Level15" / "Level16" / "Level17 (fast)" | Displayed only on models that support print speed |
| "Print Density" | For models that support "%" display:A value can be chosen using the Drop-down list from the following options:"70%" / "75%" / "80%" / "85%" / "90%" / "95%" / "100%" / "105%" / "110%" / "115%" / "120%" / "125%" / "130%"* "125%" and "130%" are displayed only for models that support the maximum print density "130%".* "As per DIP switch settings" is displayed only on models that support Print Density settings for DIP switches.For models that support "Level" display:Using the drop-down list, select from the following:"Level 1" / "Level 2" / "Level 3" / "Level 4" / "Level 5" / "Level 6" / "Level 7" | Displayed only on models that support Print Density |
| "Command execution during offline" | User can select "Enable" / "Disable" by radio button. | Displayed only on models that support command execution during offline |
| "Power saving function for USB" | User can select "Enable" / "Disable" by radio button. | Displayed only on models that support the USB power saving function |
| "Buzzer" | Title | - |
| "Buzzer" | User can select "Optional Buzzer" / "Disable" by radio button. | This item is displayed on devices with a buzzer. |
| "When an erro occurs" | Use the drop-down list to select from the following options:"Off" / "Once" / "Continuous"* "Continuous" is displayed only for compatible models. | This item is displayed on devices with a buzzer. |
| "When auto paper cut is operating" | User can select "Off" / "Once" by radio button. | This item is displayed on devices with a buzzer when performing automatic paper cut. |
| "When paper end occurs" | User can select "Off" / "Once" by radio button. | This item is displayed on devices with a buzzer when paper end occurs. |
| "When battery level changed" | User can select "Off" / "Once" by radio button. | This item is displayed on devices with a buzzer when the battery level changes. |
| "When specified pulse 1 (2 pin) occurs" | User can select "Off" / "Once" by radio button. | This item is displayed on devices with a buzzer when specified pulse 1 (2 pin) occurs. |
| "When specified pulse 2 (5 pin) occurs" | User can select "Off" / "Once" by radio button. | This item is displayed on devices with a buzzer when specified pulse 2 (5 pin) occurs. |
8.7.1.3 Buttons
The following table shows the button on the page.
Table 8-23 Buttons
| Items | Description |
| "Back" | Button to move to the main page. |
| "OK" | Button to start print settings. Press the button to display the reboot confirmation pop-up |
If the Web Config recognizes an error in the input value after the "OK" button is pressed, the following reboot confirmation pop-up is shown.
Table 8-24 Reboot Confirmation Pop-up
| Items | Description |
| "Product will be restarted to apply the settings." | Displayed when the "Set" button is pressed. Click the "OK" button in the pop-up to move the results page. |
8.7.2 Result Page
The result message is shown in the main frame after the "OK" button is pressed.
8.7.2.1 Image
The following figure shows the layout of the results page.
![graph TD A["Back to Main"] --> B["It may take some time to resume communication. If you want to change the settings, restart Web Config."] B --> C["Setting Result"]](/content/2026/08/1566445/images/d4e77ef807f2aa46790b9e7de4d0ef2c546eda333de227920e4f3aae7601db4a.jpg)
Figure 8-12 Image
8.7.2.2 Setting Result
Table 8-25 Setting Result
| Items | Description |
| "Restarting... Restarting communication may take a few minutes. If you want to change the settings, reconnect to the Web Config." | This message is shown when the settings are completed successfully. |
| "Setup failed." | This message is shown if setup fails. |
| "Cannot access the product until processing is complete." | This message is shown when the setting is unavailable because the product is processing. |
8.7.2.3 Button
Table 8-26 Button
| Items | Description |
| "Back to Main" | Changes to the main page. |
8.8 Firmware Update Page
8.8.1 Top Page
8.8.1.1 Image
![graph TD A["Back"] --> B["Start"] C["Firmware Update"] --> D["Current Version :"] D --> E["Check for the latest updates. Note the following and click "Start".<br>• Do not update the firmware while printing or scanning.<br>• If there is an error on the product, clear it first.<br>• Current…](/content/2026/08/1566445/images/b598d5e3ceda9d430660eb8cc9e2d6507768f76e65d5dad3bad10827ebb26056.jpg)
Figure 8-13 Top Page
8.8.1.2 Display Items
Table 8-27 Display Items
| Items | Description |
| "Current Version" | Up to 12 characters in ASCII codesXX.YY.ZZZZZZZ-XX: Linux Kernel version-YY: Linux Appli version-ZZZZZZ: Main version |
8.8.1.3 Description
Table 8-28 Description
| Items | Description | Condition |
| "Check for the latest updates.""Note the following and click "Start"." | Fixed Strings | - |
| "Do not update the firmware while printing or scanning." | Fixed Strings | - |
| "If there is an error on the product, clear it first." | Fixed Strings | - |
| "Remove the roll paper if loaded." | Fixed Strings | This message is shown on destinations with roll paper feed. |
| "Current job or queued job will be deleted." | Fixed Strings | - |
| "Connect an AC adapter if not connected." | Fixed Strings | This message is shown on models equipped with a battery. |
| "Do not turn the product off after clicking "Start"." | Fixed StringsThe ! icon is shown in front of the string. | - |
8.8.1.4 Buttons
Table 8-29 Buttons
| Items | Description |
| "Back" | Button to move to the main page. |
| "Start" | Button to Firmware Search Process Page. |
8.8.2 Firmware Search Process Page
The page is shown after the 'Start' button is pressed.
The following figure shows a layout of the firmware search page.
Firmware search process page does not display Back Button and Logon/Logoff Icon in the header.
8.8.2.1 Image
![graph TD A["Firmware Update"] --> B["Checking the firmware."] B --> C["Checking for the latest updates. Please wait..."] C --> D["Refresh"] E["Description"] --> F["Button"]](/content/2026/08/1566445/images/185415393b84f97e76864f3f076a264a55c875d1cd5de7e002d146c05f30856f.jpg)
Figure 8-14 Firmware Search Process Page
8.8.2.2 Description Items
Table 8-30 Description
| Items | Description |
| "Checking the firmware.""Checking for the latest updates.Please wait..." | Fixed Strings |
8.8.2.3 Button
Table 8-31 Button
| Items | Description |
| "Refresh" | Button on the bottom of the main frame for refreshing the page.Click it to refresh the page. |
8.8.3 Before Update Confirm Page
This page is shown if new firmware is found.
The following figure shows a layout of the confirmation page before updating.
8.8.3.1 Image
![EPSON Firmware Update Found new firmware. The following firmware data is available [WF-XXXX Series YYYYMM.DD] Firmware 00.00 YJ2553 Description The information of the firmware update Read all the update information. Then click "Start" to update the firmware. "The firmware update takes several minute…](/content/2026/08/1566445/images/b35a0f268581887f79fec2fe8e895a58b1f6be757d85f2486ffc8b7b65f979a0.jpg)
Figure 8-15 Before Update Confirm Page
8.8.3.2 Description
Table 8-32 Description
| Items | Description |
| "Found new firmware.""The following firmware data is available." | Fixed Strings |
| "Read all the update information.Then click "Start" to update the firmware.""The firmware update takes several minutes.You cannot interrupt the update after starting it." | Fixed Strings |
| "By using the firmware, you agree to the End User License Agreement. FOR USERS IN THE UNITED STATES, YOU AGREETO IMPORTANT LEGAL TERMS AND CONDITIONS,INCLUDING A CLASS ACTION WAIVER AND ARBITRATION.PLEASE READ CAREFULLY: https://support.epson.net/eula/" | EULA |
| "Accept" | Check box. Check this item to enable the "Start" button. |
8.8.3.3 The Information of the Firmware Update
Table 8-33 The Information of the Firmware Update
| Items | Description |
| Product name and release date. | YYYY.MM.DDUp to 10 characters in ASCII codes |
| Firmware | Up to 12 characters in ASCII codesXX.YY.ZZZZZZ-ZX: Linux Kernel version-YY: Linux Appli version-ZZZZZZ: Main version |
| Description | Up to 1024 bytes in UTF-8 |
8.8.3.4 Buttons
Table 8-34 Buttons
| Items | Description |
| "Cancel" | Click to cancel the firmware update. |
| "Start" | Click to start the firmware update. |
8.8.4 Cancel Process Page
With Cancel Process Page, Back button and Logon/Logoff icon are not displayed in the header.
8.8.4.1 Image
![graph TD A["EPSON"] --> B["Firmware Update"] B --> C["Checking the firmware."] C --> D["Canceling the firmware update."] D --> E["Refresh"] F["Description"] --> G["Button"]](/content/2026/08/1566445/images/11175e2b631a659872482045d1e2f8991ba33f190cfb7c987112c2f67a56f011.jpg)
Figure 8-16 Cancel Process Page
8.8.4.2 Description
Table 8-35 Description
| Items | Description |
| "Canceling the firmware update." | Fixed Strings |
8.8.4.3 Button
Table 8-36 Button
| Items | Description |
| "Refresh" | Button on bottom of the main frame.Click to refresh the page. |
8.8.5 Result Page
8.8.5.1 Image
EPSON

Firmware Update
Checking the firmware.
Updating firmware.
Do not turn the product off.
When the update is complete, the product turns off and on automatically.
If you turn the product off while updating, it may
function abnormally. Restart the Web Config on
browser if you wish to use it.
Setting Result
Figure 8-17 Result Page
8.8.5.2 Setting Result
Table 8-37 Setting Result
| Items | Description |
| "Updating firmware.""Do not turn the product off.""When the update is complete, the product turns off and on automatically.If you turn the product off while updating, it may function abnormally. Restart the Web Config on browser if you wish to use it." | This message is shown when the firmware update is started successfully.The ! icon is shown in front of "Do not turn the product off." |
| "The firmware update was canceled." | This message is shown when the firmware update is canceled successfully. |
| "You have the latest firmware." | This message is shown when the current version of the firmware is the most recent. |
| "Cannot connect to the Epson server." | This message is shown when the printer could not access the server.The X icon is shown in front of the string. |
| "Cannot update the firmware.""Quit printing or scanning.""Remove the roll paper if loaded.""When an error message appears on the screen or status lights indicate an error, solve the problem.""Note: There might be an error regarding the consumables such as ink supply units.""Remove the memory card.""If the problem is not solved, close the Web browser and then launch it." | This message is shown when the printer cannot update the firmware.The X icon is shown in front of "Cannot update the firmware.""Remove the roll paper if loaded." is shown on destinations with roll paper feed. |
| "The operation failed.""Another computer may be communicating with the product." | This message is shown when another computer may be communicating with the product.The X icon is shown in front of "The operation failed." |
| "Cannot update the firmware.""Low battery. Connect to a power source." | This message is shown when processing cannot be executed because the power is not connected and the battery level is low.The X icon is shown in front of "Cannot update the firmware." |
8.8.5.3 Button
Table 8-38 Button
| Items | Description |
| "Back to Main" | Changes to the main page. |
8.9 Root Certificate Update
8.9.1 Top page
The root certificate update function on Web Config downloads root certificate files from the server provided by Epson and updates files that the printer has.
8.9.1.1 Image
![graph TD A["Start"] --> B["Description"] B --> C["Display Items"] C --> D["Button"] D --> E["Current Version: XX XX"] E --> F["Update the root certificate to use cloud services"]](/content/2026/08/1566445/images/8ea707919ffb1328030d27d6215c013ddb832cecc312aeee7f72efc26eed95c2.jpg)
Figure 8-18 Top Page
8.9.1.2 Description
Table 8-39 Description
| Items | Description |
| "Update the root certificate to use cloud services." | Fixed Strings |
8.9.1.3 Display Items
Table 8-40 Display Items
| Items | Description |
| "Current Version" | File version format: "MM.mm" "MM" means major version; "mm" means minor version. |
8.9.1.4 Buttons
Table 8-41 Button
| Items | Description |
| "Start" | If pressed when the administrator is logged on, Web Config makes transition to the Progress page.If pressed when the administrator is logged off, the administrator login pop-up window is displayed. (If administrator logs in with displayed popup, Web Config makes transition to the Progress page.) |
8.9.2 Progress page
8.9.2.1 Image
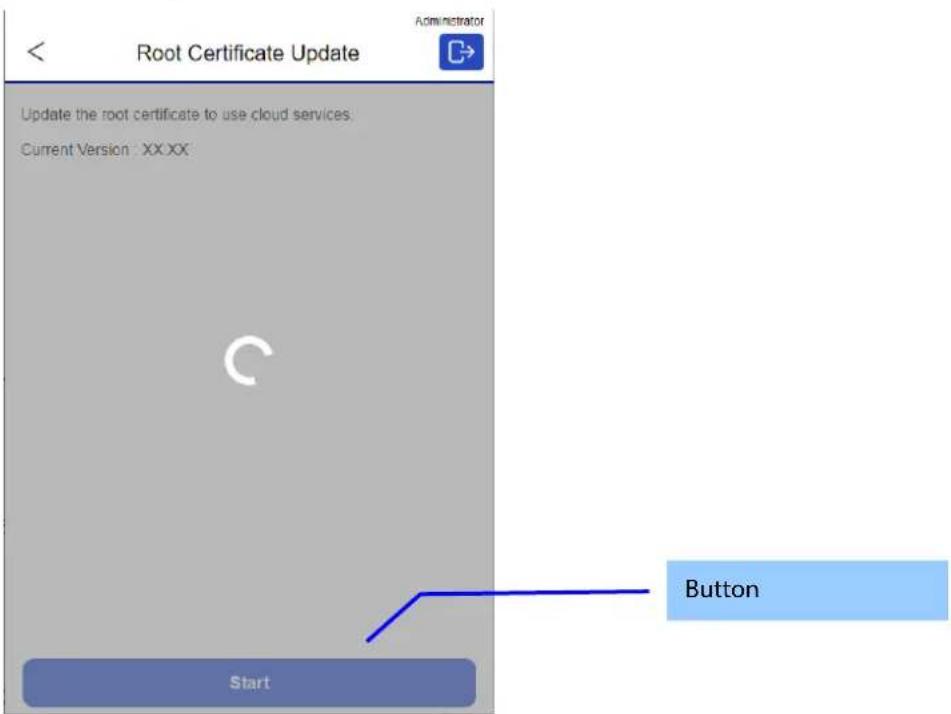
Figure 8-19 Progress Page
8.9.3 Result page
8.9.3.1 Image
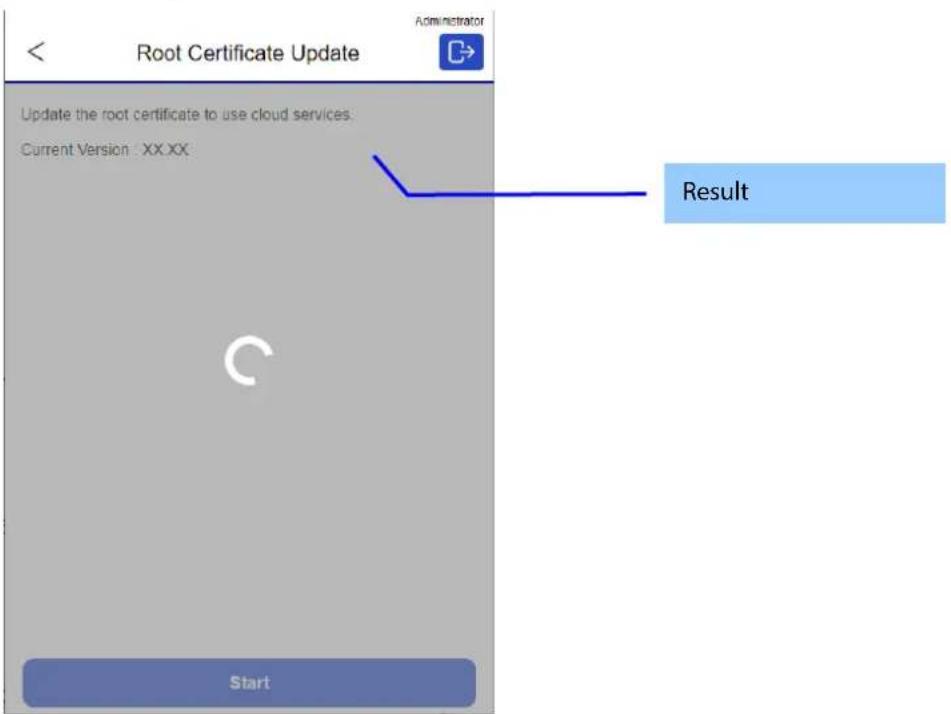
Figure 8-20 Result Page
8.9.3.2 Result
Table 8-42 Result
| Items | Description |
| "Setup complete." | This message is shown when the settings are completed. |
| "You have the latest root certificate." | Displays when the root certificate is the latest available. |
| "Cannot connect to the Epson server." | The printer could not access the server. |
| "The operation failed." | The product is busy. The printer is being configured. |
| "Setup failed." | This message is shown if Wi-Fi/Network setup fails due to setup/token mismatch. |
8.10 Product Status
8.10.1 Top page
8.10.1.1 Image
[For Smartphone]
[For PC]
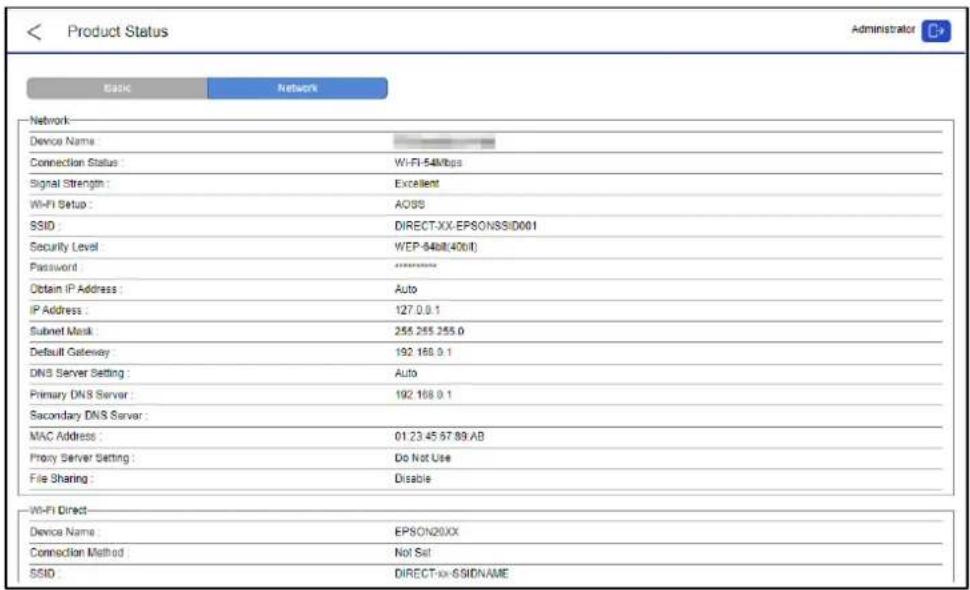
Figure 8-21 Top Page
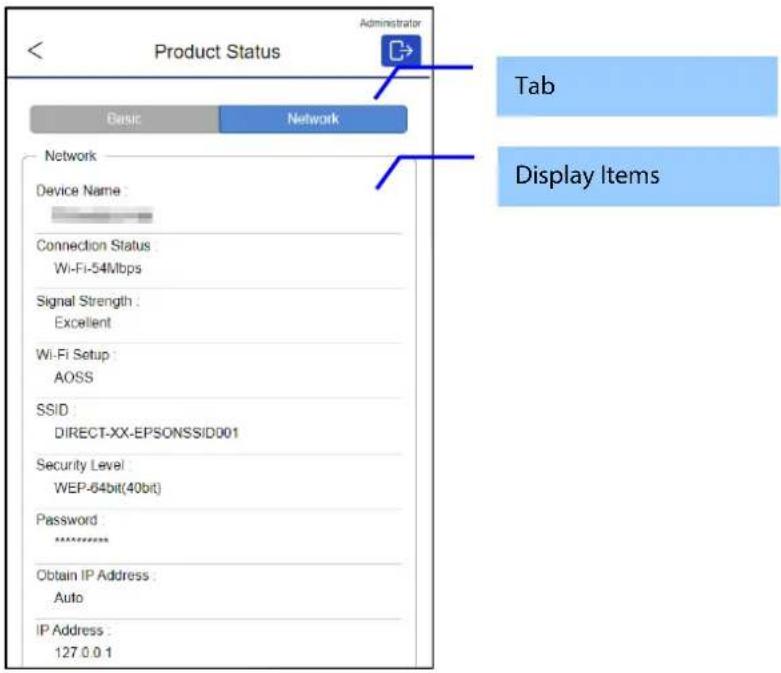
8.10.1.2 Tab
Displays tab for changing display items on the top.
Table 8-43 Tab
| Items | Description | Condition |
| "Basic" | Basic information of display items is displayed when this tab selected. This tab is default. | - |
| "Network" | Network information of display items is displayed when this tab selected. | - |
| "Wi-Fi Direct" | Network information of display items is displayed when this tab selected. | Displays only with Wi-Fi Direct support device. |
8.10.1.3 Display Items
Table 8-44 Basic Information
| Items | Description | Condition |
| "Status" | Displays content of status information at 10.1.1.1.2.2. Link to Panel Snapshot or Harware Status is not displayed.If there is no status information to display, "Working normally" is displayed. | - |
| "Supply" | Displays content of supply information at 10.1.1.1.2.3. | This item is shown when display of ink or maintenance box level is supported. |
| "Battery Status" | Displays content of battery status at 10.1.1.1.2.4. | This item is displayed when the device supports battery. |
| "Software Licenses" | Link is same as for Software Licenses at 10.1.1.1.2.11. | - |
Table 8-45 Network Information
| Items | Description | Condition |
| "Network" | Title | - |
| "Device Name" | Same content as Device Name in Advanced Settings > Network Status is displayed under same conditions. | - |
| "Connection Status" | Same content as Connection Status in Advanced Settings > Network Status is displayed under same conditions. | - |
| "Signal Strength" | Same content as Signal Strength in Advanced Settings > Network Status is displayed under same conditions. | - |
| "Obtain IP Address" | Same content as Obtain IP Address in Advanced Settings > Network Status is displayed under same conditions. | - |
| "IP Address" | Same content as IP Address in Advanced Settings > Network Status is displayed under same conditions. | - |
| "Subnet Mask" | Same content as Subnet Mask in Advanced Settings > Network Status is displayed under same conditions. | - |
| "Default Gateway" | Same content as Default Gateway in Advanced Settings > Network Status is displayed under same conditions. | - |
| "DNS Server Setting" | Same content as DNS Server Setting in Advanced Settings > Network Status is displayed under same conditions. | - |
| "Primary DNS Server" | Same content as Primary DNS Server in Advanced Settings > Network Status is displayed under same conditions. | - |
| "Secondary DNS Server" | Same content as Secondary DNS Server in Advanced Settings > Network Status is displayed under same conditions. | - |
| "Proxy Server Setting" | Same content as Proxy Server Setting in Advanced Settings > Network Status is displayed under same conditions. | - |
| "Proxy Server" | Same content as Proxy Server in Advanced Settings > Network Status is displayed under same conditions. | - |
| "Proxy Server Port Number" | Same content as Proxy Server Port Number in Advanced Settings > Network Status is displayed under same conditions. | - |
| "Wi-Fi Setup" | Same content as Wi-Fi Setup in Advanced Settings > Network Status is displayed under same conditions. | - |
| "SSID" | Same content as SSID in Advanced Settings > Network Status is displayed under same conditions. | - |
| "Security Level" | Same content as Security Level in Advanced Settings > Network Status is displayed under same conditions. | - |
| "Password" | Same content as Password in Advanced Settings > Network Status is displayed under same conditions. | - |
| "MAC Address" | Same content as MAC Address in Advanced Settings > Network Status is displayed under same conditions. | - |
| "File Sharing" | "Enable" / "Disable" | Shown when the device supports file sharing and Connection Status is not Disable. |
| "File Sharing Mode" | "Read Only" / "Read/Write" | Shown when the device supports file sharing, Connection Status is not Disable, and File Sharing is Enable. |
| "Wi-Fi Direct" | Title | Displayed only on Wi-Fi Direct support device. |
| "Device Name" | Shows the name of printer currently used. | Displayed only on Wi-Fi Direct support device. |
| "Connection Method" | "Not Set"/"Simple AP" | Displayed only on Wi-Fi Direct support device. |
| "Obtain IP Address" | "Auto" / "Manual" | Displayed only on Wi-Fi Direct support device and if "Connection Method" is not "Not Set". |
| "IP Address" | IP address has the format "xxx.xxx.xxx.xxx". xxx: 0 - 255 in decimal numbers | Displayed only on Wi-Fi Direct support device and if "Connection Method" is not "Not Set". |
| "Subnet Mask" | "xxx.xxx.xxx.xxx" xxx: 0 - 255 in decimal numbers | Displayed only on Wi-Fi Direct support device and if "Connection Method" is not "Not Set". |
| "Default Gateway" | "xxx.xxx.xxx.xxx" xxx: 0 - 255 in decimal numbers | Displayed only on Wi-Fi Direct support device and if "Connection Method" is not "Not Set". |
| "The number of connected devices" | If it is not equipped with Realtek's Wi-Fi chip: Range of "0" - "4" If it is equipped with Realtek's Wi-Fi chip: Range of "0" - "8" | Displayed only on Wi-Fi Direct support device and if "Connection Method" is not "Not Set". |
| "SSID" | 1 - 32 characters (alphanumeric characters and symbols) | Displayed only on Wi-Fi Direct support device and if "Connection Method" is not "Not Set". |
| "Channel" | If it is not equipped with Realtek's Wi-Fi chip: Range of "1" - "13" If it is equipped with Realtek's Wi-Fi chip: 2.4GH Range of "1" - "13" 5GHz "36"/"40"/"44"/"48"/"52"/"56"/"60"/"64"/ "100"/"104"/"108"/"112"/"116"/"120"/"124"/"128"/"132"/"136"/ "140"/"149"/"153"/"157"/"161"/"165" | Displayed only on Wi-Fi Direct support device and if "Connection Method" is not "Not Set". |
| "Security Level" | "WPA2-PSK(AES)" | Displayed only on Wi-Fi Direct support device and if "Connection Method" is not "Not Set". |
| "Password" | "**********" | Displayed only on Wi-Fi Direct support device and if "Connection Method" is not "Not Set". |
| "MAC Address" | "XX:XX:XX:XX:XX:XX" X: Range of "0" - "F" in hexadecimal numbers | Displayed only on Wi-Fi Direct support device and if "Connection Method" is not "Not Set". |
Same content as Wi-Fi Direct in Advanced Settings > Network Status is displayed for Wi-Fi Direct Information.
9. Advanced Settings
9.1 Status
9.1.1 Product Status
9.1.1.1 Top Page
9.1.1.1.1 Image
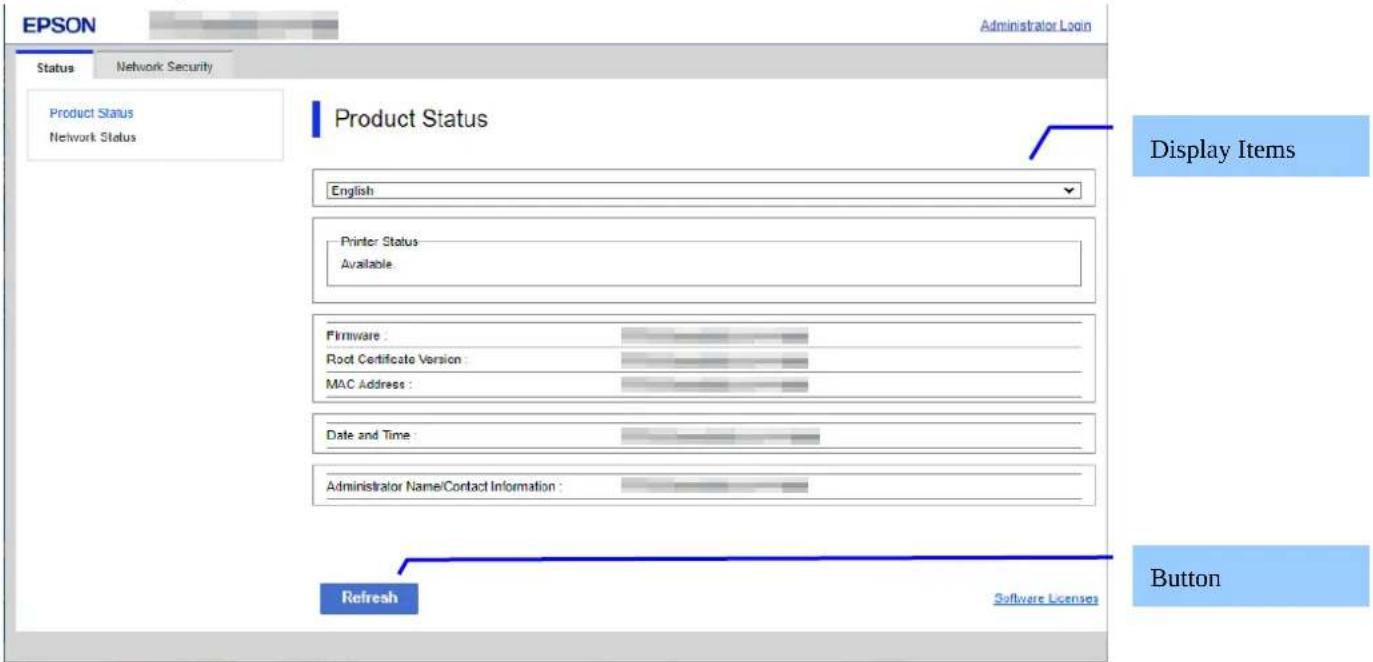
Figure 9-1 Product Status
9.1.1.1.2 Display items
9.1.1.1.2.1 Display Language Setting
The language specification is in accordance with Section 4 Language. When a language is selected, it is applied immediately and the page changes based on the selected language.
9.1.1.1.2.2 Status Information
One of the following messages is displayed in the printer status area, if the device has print function. If anything other than “Available” or “Busy” is displayed, a link to a Panel Snapshot is shown under the message.
Table 9-1 Printer Status
| Items | Description |
| "Available." | This message is shown when the printer is ready to use. |
| "Busy." | This message is shown when the printer is not in any error condition but it is unable to use. |
| "Paper out." | This message is shown when the printer is out of paper. |
| "Paper jam." | This message is shown when the printer has a paper jam. |
| "An error has occurred. Please confirm the indicator or message on the product." | This message is shown when the printer cannot be used because of an error that is not due to mechanical failure. |
| "Printer error. Turn the power off and on again. For details, see your documentation." | This message is shown when some other fatal printer error occurs.If an error code is assigned, the error code is shown right behind the message. |
| "The ReadyPrint service is unavailable." | This message is shown when user cannot use ReadyPrint function.If an error code is assigned, the error code is shown right behind the message. |
| "Communication error. Check the Wi-Fi/network connection. For details, see your documentation." | This message is shown when user cannot use the device because communication error has occurred. |
In the scanner status area, either of the following messages is shown, if the product doesn't have print function. "Available." "Busy." When outside is indicated, a link to a Panel Snapshot is indicated under the message.
Table 9-2 Scanner Status
| Items | Description | Condition |
| "Available." | This message is shown when the scanner is ready to use. | - |
| "Busy." | This message is shown when the scanner is busy. | - |
| "Paper jam. Remove the jammed paper in the Automatic Document Feeder (ADF)" | This message is shown when the scanner is in paper-jam condition. | - |
| "Incorrect size documents have been placed in the Automatic Document Feeder (ADF).Remove the documents." | This message is shown when the scanner is in ADF paper size error condition. | - |
| "Double feed has occurred." | This message is shown when the scanner is in double feed error condition. | - |
| "The number of scans is close to the Life Cycle of the rollers." | This message is shown when consumable roller should be replaced. | -Only consumable roller support printers. |
| "The number of scans exceeds the Life Cycle of the rollers." | This message is shown when consumable roller must be replaced. | -Only consumable roller support printers. |
| "Unavailable. Check [Hardware Status]." | This message is shown when the scanner has some error due to the mechanical failure and is unable to use. | - |
| "An error has occurred. Please confirm the indicator or message on the product." | This message is shown when the status is other than those above.(This error does not occur in the product.) | - |
One of the following messages is shown in the hardware status area.
Table 9-3 Hardware Status
| Items | Description |
| "Scanner is out of order. Contact Epson Support." "Panel Snapshot" | This message is shown when only Scanner is out of order. An error code is shown right behind the message. The string is shown in red.A link to a Panel Snapshot Page is indicated. |
| "Fax is out of order. Contact Epson Support." "Panel Snapshot" | This message is shown when only Fax is out of order. An error code is shown right behind the message. The string is shown in red.A link to a Panel Snapshot Page is indicated. |
| "Fax(G3-1) is out of order. Contact Epson Support." "Panel Snapshot" | This message is shown when only G3-1 is out of order. The string is shown in red.A link to a Panel Snapshot Page is indicated. |
| "Fax(G3-1): It can not be used with the current firmware. Please update the firmware." "Panel Snapshot" | This message is shown when only G3-1 can not be used due to version mismatch.A link to a Panel Snapshot Page is indicated. |
| "Fax(G3-2) is out of order. Contact Epson Support." "Panel Snapshot" | This message is shown when only G3-2 is out of order. The string is shown in red.A link to a Panel Snapshot Page is indicated. |
| "Fax(G3-2): It can not be used with the current firmware. Please update the firmware." "Panel Snapshot" | This message is shown when only G3-2 can not be used due to version mismatch.A link to a Panel Snapshot Page is indicated. |
| "Fax(G3-3) is out of order. Contact Epson Support." "Panel Snapshot" | This message is shown when only G3-3 is out of order. The string is shown in red.A link to a Panel Snapshot Page is indicated. |
| "Fax(G3-3): It can not be used with the current firmware. Please update the firmware." "Panel Snapshot" | This message is shown when only G3-3 can not be used due to version mismatch.A link to a Panel Snapshot Page is indicated. |
| "Fax(G3-4) is out of order. Contact Epson Support." "Panel Snapshot" | This message is shown when only G3-4 is out of order. The string is shown in red.A link to a Panel Snapshot Page is indicated. |
| "Fax(G3-4): It can not be used with the current firmware. Please update the firmware." "Panel Snapshot" | This message is shown when only G3-4 can not be used due to version mismatch.A link to a Panel Snapshot Page is indicated. |
| "Wi-Fi is out of order. Contact Epson Support." "Panel Snapshot" | This message is shown when only Wi-Fi is out of order. An error code is shown right behind the message. The string is shown in red.A link to a Panel Snapshot Page is displayed. |
| "Memory card slot is out of order. Contact Epson Support.""Panel Snapshot" | This message is shown when only memory card slot is out of order. An error code is shown right behind the message. The string is shown in red.A link to a Panel Snapshot Page is indicated. |
| "Built-in SD card is out of order. Contact Epson Support.""Panel Snapshot" | This message is shown when only Built-in SD card is out of order. An error code is shown right behind the message. The string is shown in red.A link to a Panel Snapshot Page is indicated. |
| "TPM is out of order. Contact Epson Support.""If you have not backed up the device data encryption key, back up the key.""To continue using the printer without exchanging the TPM, disable device data encryption.""Panel Snapshot" | This message is shown when only TPM is out of order and encryption function is enabled. An error code is shown right behind the message. The string is shown in red.A link to a Panel Snapshot Page is indicated. |
| "TPM is out of order. Contact Epson Support.""Device data encryption can not be enabled.""Panel Snapshot" | This message is shown when only TPM is out of order and encryption function is disabled. An error code is shown right behind the message. The string is shown in red.A link to a Panel Snapshot Page is indicated. |
| "HDD error. Contact Epson Support.""Panel Snapshot" | This message is shown when only standard equipped HDD or CE option HDD is abnormal. An error code is shown right behind the message. The string is shown in red.A link to a Panel Snapshot Page is indicated. |
| "Option HDD error. Contact Epson Support.""Panel Snapshot" | This message is shown when only user option HDD is abnormal. An error code is shown right behind the message. The string is shown in red.A link to a Panel Snapshot Page is indicated. |
| "Option HDD cannot be used because there is a problem with the printer. Contact Epson Support.""Panel Snapshot" | This message is shown when only the sub board is out of order and user option HDD cannot be used. An error code is shown right behind the message. The string is shown in red.A link to a Panel Snapshot Page is indicated. |
| "PDL board is out of order. Contact Epson Support.""Panel Snapshot" | This message is shown when only PDL board is out of order. An error code is shown right behind the message. The string is shown in red.A link to a Panel Snapshot Page is indicated. |
| "PS board is out of order. Contact Epson Support.""Panel Snapshot" | This message is shown when the device has PS board as standard and PS board is out of order. An error code is shown right behind the message. The string is shown in red.A link to a Panel Snapshot Page is indicated. |
| "There is a problem with PS board. Reset PS board after shut down and pull out the outlet. If the device can not be recovered, contact Epson Support.""Panel Snapshot" | This message is shown when the device has PS board optionally and PS board is out of order. An error code is shown right behind the message. The string is shown in red.A link to a Panel Snapshot Page is indicated. |
| "Cassette1 is out of order. Contact Epson Support.""Panel Snapshot" | For printers other than model LP, this message is shown when only Cassette1 is out of order. The string is shown in red.A link to a Panel Snapshot Page is indicated. |
| "Cassette2 is out of order. Contact Epson Support.""Panel Snapshot" | For printers other than model LP, this message is shown when only Cassette2 is out of order. The string is shown in red.A link to a Panel Snapshot Page is indicated. |
| "Cassette3 is out of order. Please contact Epson Support.""Panel Snapshot" | For printers other than model LP, this message is shown when only Cassette3 is out of order. The string is shown in red.A link to a Panel Snapshot Page is indicated. |
| "Cassette4 is out of order. Contact Epson Support.""Panel Snapshot" | For printers other than model LP, this message is shown when only Cassette4 is out of order. The string is shown in red.A link to a Panel Snapshot Page is indicated. |
| "NFC is out of order. Contact Epson Support.""Panel Snapshot" | This message is shown when only NFC module is out of order. An error code is shown right behind the message. The string is shown in red.A link to a Panel Snapshot Page is indicated. |
| "Additional Network is out of order. Please contact Epson Support.""Panel Snapshot" | This message is shown when only Additional Network module is out of order. An error code is shown right behind the message. The string is shown in red.A link to a Panel Snapshot Page is indicated. |
| "Additional Network: Update the firmware because this feature does not work in the current version.""Panel Snapshot" | This message is shown when only Additional Network can not be used due to version mismatch.A link to a Panel Snapshot Page is indicated. |
| "Expansion Board: Update the firmware because this feature dose not work in the current version.""Panel Snapshot" | This message is shown when only Expansion board cannot be used due to version mismatch.A link to a Panel Snapshot Page is indicated. |
| "Expansion board is out of order. Contact Epson Support." "Panel Snapshot" | This message is shown when only Expansion board is out of order. The string is shown in red.A link to a Panel Snapshot Page is indicated. |
| "There are problems with x parts of the hardware. Contact Epson Support. (Detail)" "Panel Snapshot" | This message is shown when there is an abnormality in more than one type of hardware. 'x' indicates the number of failures. The string is shown in red. This message provides a link to open the Hardware Status page in a separate tab.A link to a Panel Snapshot Page is displayed. |
| "There are problems with x parts of the hardware. (Detail)" "Panel Snapshot" | This message is shown when there is an abnormality in more than one type of hardware. 'x' indicates the number of failures. The string is shown in red. This message provides a link to open the Hardware Status page in a separate tab.A link to a Panel Snapshot Page is displayed. |
JavaScript information and IP address conflict information are shown in the Other Status area.
When JavaScript is disabled in the web browser, both JavaScript information and IP address conflict information are shown if the device detects that the IP address (IPv4) assigned to the device is used by another device.
Table 9-4 Other Status
| Items | Description |
| "Enable the browser's JavaScript setting." | This message is shown when JavaScript is disabled in the web browser. |
| "xxx.xxx.xxx.xxx is already in use on the network." | 'xxx.xxx.xxx.xxx' indicates the IP address of the product. This message is shown if the device detects that the IP address (IPv4) assigned to the device is used by another device. If the same error screen is deleted from the panel display, this message will no longer be displayed. |
| "Invalid date and time." | This message is shown when Date and Time are not set. |
| "The setting which is required restart has been changed. Turn the power off and on." | This message is shown when a restart is required to apply the changes made to settings. |
| "Direct-XX-YYYYYY is already in use on the network." | Shown when the Wi-Fi is used.'Direct-XX-YYYYYY' indicates the IP address of the product. This message is shown if the device detects that the SSID assigned to the device is used by another device. If the same error screen is deleted from the panel display, this message will no longer be displayed. |
9.1.1.1.2.3 Device System Information
Table 9-5 Device System Information
| Items | Description | Condition |
| "Firmware" | Shows the firmware version.Up to 12 characters in ASCII codesXX.YY.ZZZZZZ-XX: Linux Kernel version-YY: Linux Appli version-ZZZZZZ: Main version | - |
| "Root Certificate Version" | Shows the root certification version. | - |
| "Serial Number" | Shows the serial number. | For models that support the initial value for the administrator password, this is displayed only when the administrator is logged in. |
| "Network MAC Address" | Shows the MAC address of the network interface currently used (either wired LAN, wireless LAN (infrastructure), or wireless LAN (ad hoc)). | This item is displayed on model that support wireless functions. |
| "Wi-Fi Direct MAC Address" | Shows the MAC addresses of the Wi-Fi Direct interface if Wi-Fi Direct is enabled (both P2P Device Address and P2P Interface Address). | This item is displayed on model that support wireless functions. |
| "MAC Address" | Shows the MAC address of the network interface currently used (either wired LAN, wireless LAN (infrastructure), or Wi-Fi Direct). | This item is displayed on model that do not support wireless functions. |
9.1.1.1.2.4 Date/Time Information
Table 9-6 Date/Time Information
| Items | Description | Condition |
| "Date and Time" | Shows the date and time when the page is opened.If "Date and Time" is not set, "Invalid date and time." is shown. | Displayed only for printers that support date and time settings. |
9.1.1.1.2.5 Administrator Information
Table 9-7 Administrator Information
| Items | Description |
| "Administrator Name/Contact Information" | Shows contact information (name, phone number, etc.) that the user of the printer can use. |
9.1.1.1.2.6 Software Licenses
Web Config shows this page when the “Software Licenses” link is clicked. License information for OSS that the printer is using is displayed on this page.
9.1.1.1.3 Button
Table 9-8 Button
| Items | Description |
| "Refresh" | If pressed, updated information is shown on the top page. |
9.1.2 Network Status
In the Confirm Network Settings, you can confirm the product's network settings.
9.1.2.1 Top Page
9.1.2.1.1 Image
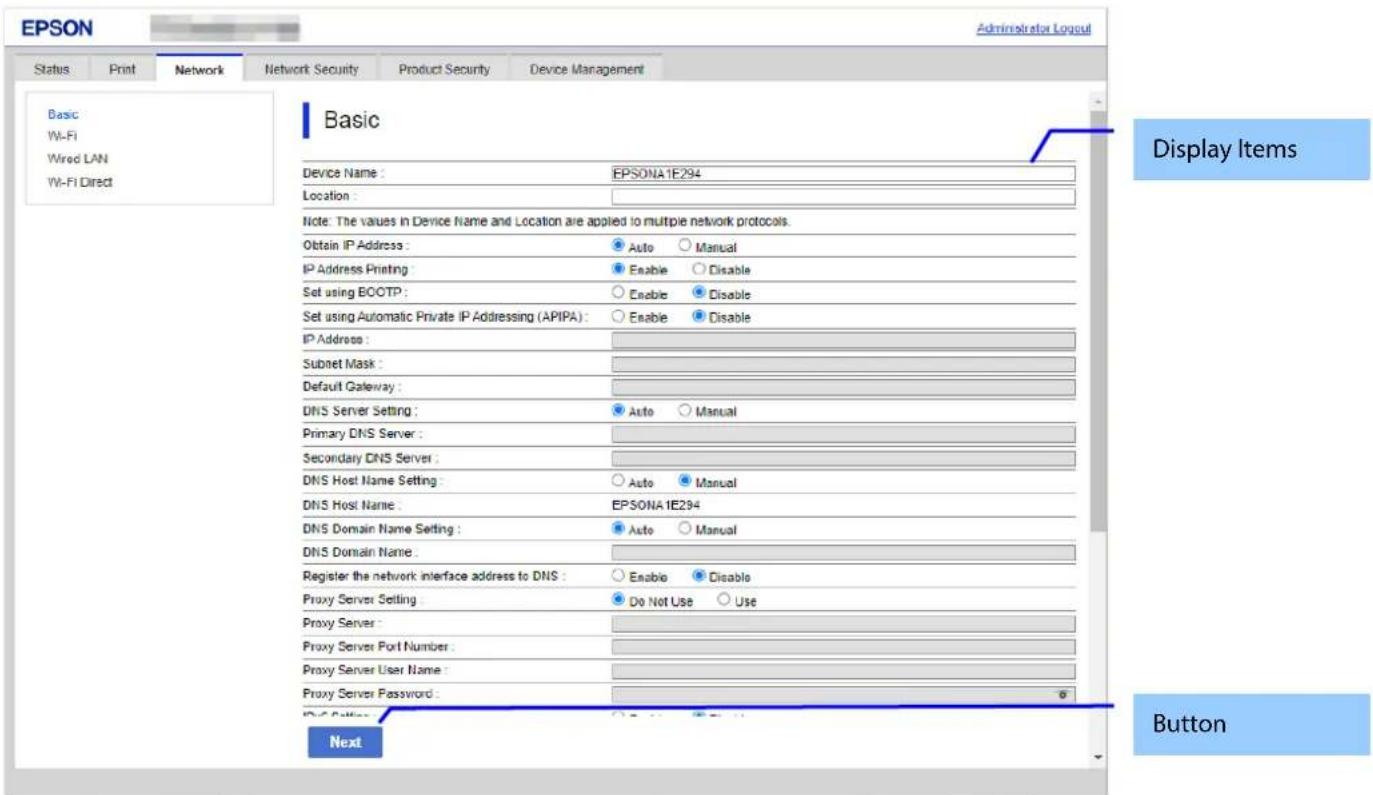
Figure 9-2 Network Status
9.1.2.1.2 Tab
If a device supports multiple-interfaces, "Network" and "Wi-Fi Direct" tabs are displayed, which can change the display information.
9.1.2.1.3 Display items
The following table shows the display items for both model that support wireless functions and model that do not support wireless functions.
Table 9-9 Displaying items (Network)
| Items | Description | Condition |
| "Device Name" | Shows the name of the printer. | - |
| "Connection Status" | "Disconnect" / "10BASE-T Half Duplex" / "10BASE-T Full Duplex" / "100BASE-TX Half Duplex" / "100BASE-TX Full Duplex" / "1000BASE-T Full Duplex"/ "Unknown" | Displayed when the model is equipped with a wired LAN and the wireless LAN setting (infrastructure) is not set. |
| "Wi-Fi Disconnected" / "Searching for Wi-Fi" / "W-Fi-xxxMbps" ("xx": "00" - "495") / "Unknown" | Displayed when the model is equipped with a wireless LAN and the wireless LAN setting (infrastructure) has already been set. | |
| "Disable" | Displayed when the model is equipped with only wireless LAN and the wireless LAN setting (infrastructure) is not set. | |
| "Signal Strength" | "Excellent" / "Good" / "Fair" / "No Good" / "Unknown" | Only shown when wireless LAN is used. Not shown while Wi-Fi Direct is used. |
| "Obtain IP Address" | "Auto" / "Manual" | Not shown when Connection Status is disabled. |
| "Set using BOOTP" | "Enable" / "Disable" | If "Obtain IP Address" is "Manual", this item is not shown. |
| "Set using Automatic Private IP Addressing" | "Enable" / "Disable" | If "Obtain IP Address" is "Manual", this item is not shown. |
| "IP Address" | "xxx.xxx.xxx.xxx" xxx: 0 - 255 in decimal | Not shown when Connection Status is disabled. |
| "Subnet Mask" | "xxx.xxx.xxx.xxx" xxx: 0 - 255 in decimal | Not shown when Connection Status is disable. |
| "Default Gateway" | "xxx.xxx.xxx.xxx" xxx: 0 - 255 in decimal | Not shown when Connection Status is disable. |
| "DNS Server Setting" | "Auto" / "Manual" | Not shown when Connection Status is disable. |
| "Primary DNS Server" | "xxx.xxx.xxx.xxx" xxx: 0 - 255 in decimals | Not shown when Connection Status is disable. |
| "Secondary DNS Server" | "xxx.xxx.xxx.xxx" xxx: 0 - 255 in decimal | Not shown when Connection Status is disable. |
| "DNS Host Name Setting" | "Auto" / "Manual" | Not shown when Connection Status is disable. |
| "DNS Host Name Status" | "Unknown"/ "Successful" / "Failed" | Shown if the way of obtaining a DNS host name is auto.Not shown when Connection Status is disable. |
| "DNS Host Name" | Shows the DNS host name currently used. | Not shown when Connection Status is disable. |
| "DNS Domain Name Setting" | "Auto" / "Manual" | Not shown when Connection Status is disable. |
| "DNS Domain Name Status" | "Unknown"/ "Successful" / "Failed" | Shown if the way of obtaining a DNS host name is auto.Not shown when Connection Status is disable. |
| "DNS Domain Name" | Shows the DNS domain name currently used. | Not shown when Connection Status is disable. |
| "Register the network interface address to DNS" | "Enable" / "Disable" | Not shown when Connection Status is disable. |
| "Proxy Server Setting" | "Do Not Use" / "Use" | Not shown when Connection Status is disable. |
| "Proxy Server" | Shows the proxy server address in the IP address or FQDN format.- IP address format "xxx.xxx.xxx.xxx" xxx: 0 - 255 in decimal-FQDN format ASCII (alphanumeric, dot, hyphen), 1-255 characters | Shown when the value for "Proxy Server Setting" is "Use".Not shown when Connection Status is disable. |
| "Proxy Server Port Number" | Range of 0 - 65535 in decimals. | Shown when value of "Proxy Server Setting" is "Use".Not shown when Connection Status is disable. |
| "Proxy Server User Name" | 0 - 255 byte characters (range of 0x20 - 0x7E in ASCII codes) | Shown when value of "Proxy Server Setting" is "Use".Not shown when Connection Status is disable. |
| "Proxy Server Password" | "Not Set" / "**********" | Shown when value of "Proxy Server Setting" is "Use".Not shown when Connection Status is disable. |
| "IPv6 Setting" | "Enable" / "Disable" | Not shown when Connection Status is disable. |
| "IPv6 Privacy Extension" | "Enable" / "Disable" | Shown if IPv6 is enabled.Not shown when Connection Status is disable. |
| "IPv6 DHCP Server Setting" | "Do Not Use" / "Use" | Shown if IPv6 is enabled.Not shown when Connection Status is disable. |
| "IPv6 Address" | Shows an IPv6 address default gateway. | Shown if IPv6 is enabled.Not shown when Connection Status is disable. |
| "IPv6 Address Default Gateway" | Shows a valid IPv6 link-local address. | Shown if IPv6 is enabled.Not shown when Connection Status is disable. |
| "IPv6 Link-Local Address" | Shows a valid stateful IPv6 address. | Shown if IPv6 is enabled.Not shown when Connection Status is disable. |
| "IPv6 Stateful Address " | Shows a valid stateless IPv6 address. | Shown if IPv6 is enabled.Not shown when Connection Status is disable. |
| "IPv6 Stateless Address 1" | Shows a valid stateless IPv6 address. | Shown if IPv6 is enabled.Not shown when Connection Status is disable. |
| "IPv6 Stateless Address 2" | Shows a valid stateless IPv6 address. | Shown if IPv6 is enabled.Not shown when Connection Status is disable. |
| "IPv6 Stateless Address 3" | Shows an IPv6 address. | Shown if IPv6 is enabled.Not shown when Connection Status is disable. |
| "IPv6 Primary DNS Server" | Shows an IPv6 address. | Shown if IPv6 is enabled.Not shown when Connection Status is disable. |
| "IPv6 Secondary DNS Server" | Shows an IPv6 address default gateway. | Shown if IPv6 is enabled.Not shown when Connection Status is disable. |
| "Wi-Fi Setup" | "AOSS" / "WPS" / "Manual" / "Wi-Fi Auto Connect" / "Epson iPrint" | Shown if wireless LAN is used.Not shown when Connection Status is disable. |
| "Wi-Fi Mode" | "IEEE802.11b" / "IEEE802.11g" / "IEEE802.11b/g" / "IEEE802.11b/g/n" / "IEEE802.11a/n/ac" | Shown if the wireless LAN is used.Not shown when Connection Status is disable. |
| "SSID" | 1 - 32 charactersAlphanumeric and sign characters | Shown if the wireless LAN is used.Not shown when Connection Status is disable. |
| "Channel" | - Not equipped with Wi-Fi chipRange of "1" - "13"- Equipped with Wi-Fi chip2.4GHzRange of "1" - "13"5GHz"36"/"40"/"44"/"48"/"52"/"56"/"60"/"64"/"100"/"104"/"108"/"112"/"116"/"120"/"124"/"128"/"132"/"136"/"140"/"149"/"153"/"157"/"161"/"165" | Shown if the wireless LAN is used.Not shown when Connection Status is disable. |
| "Security Level" | "None" / "WEP-64bit(40bit)" / "WEP-128bit(104bit)" / "WPA-PSK(TKIP)" / "WPA2-PSK(AES)" / "WPA2/WPA3-Enterprise" / "WPA3-SAE(AES)" | Shown if the wireless LAN is used.Not shown when Connection Status is disable. |
| "Password" | "Not Set" / "**********" | Shown if wireless LAN is used and Security Level is not WPA2/WPA3-Enterprise.Not shown when Connection Status is disable. |
| "MAC Address" | "XX:XX:XX:XX:XX:XX:XX:XX:XX:XX:XX:XX:XX:XX:XX:XX:XX:XX:XX:XX:XX:XX:XX:XX:XX:XX:XX:XX:XX:XX:XX:XX:XX:XX:XX:XX:XX:XX:XX:XX:XX:XX:XX:XX:XX:XX:XX:XX:XX:XX:XX:XX:XX:XX:XX:Xx:XX:XX:XX:XX:XX:XX:XX:XX:XX:XX:XX:XX:XX:XX:XX:XX:XX:XX:XX:XX:XX:XX:XX:XX:XX:XX:XX:XX:XX:XX:XX:XX:XX:XX:XX:XX:XX:XX:XX:XX:XX:XX:XX:XX:XX:XX:XX:XX:XX:X X:0 - F in hexadecimal | Not shown when Connection Status is disable. |
| "IEEE802.11k/v" | "Enable" / "Disable" | For wireless LAN option dongle models, display when the dongle is inserted in the main unit, and hide when not inserted. Display on models that support the IEEE802.11k/v/r function. |
| "IEEE802.11r" | "Enable" / "Disable" | For wireless LAN option dongle models, display when the dongle is inserted in the main unit, and hide when not inserted. Display on models that support the IEEE802.11k/v/r function. |
| "Power Saving(Wi-Fi)" | "Enable" / "Disable" | |
| <Wi-Fi Direct compatible models> "Frequency Range (Wi-Fi • Wi-Fi Direct)" <Wi-Fi Direct non-compatible models> "Frequency Range" | "Enable" / "Disable" | |
| "Roaming Setting" | Fixed strings for field name | Displayed on models that support the Roaming function and only when wireless LAN is used. Not shown when Connection Status is "Disabled". |
| "Roaming Setting" | "Enable" / "Disable" | Displayed on models that support the Roaming function and only when wireless LAN is used. Not shown when Connection Status is "Disabled". |
| "AP Density" | "Low" / "Medium" / "High" | Displayed on models that support the Roaming function and only when "Roaming Setting" is "Enabled". |
Table 9-10 Display Items (Wi-Fi Direct)
| Items | Description | Condition |
| "Device Name" | Shows the printer name currently used. | - |
| "Connection Method" | "Not Set"/"Simple AP" | - |
| "IP Address" | "Auto"/"Manual" and IP address are displayed.The IP address is in the following format:"xxx.xxx.xxx.xxx".xxx: 0 - 255 in decimals | Shown if "Connection Method" is not "Not Set" |
| "Subnet Mask" | "xxx.xxx.xxx.xxx"xxx: 0 - 255 in decimal | Shown if "Connection Method" is not "Not Set" |
| "Default Gateway" | "xxx.xxx.xxx.xxx"xxx: 0 - 255 in decimal | Shown if "Connection Method" is not "Not Set" |
| "The number of connected devices" | Range of "0" - "8" | Shown if "Connection Method" is not "Simple AP". |
| "SSID" | 1 - 32 characters (alphanumeric characters and marks) | Shown if "Connection Method" is not "Not Set" |
| "Channel" | - If it is not equipped with Wi-Fi chip.Range of "1" - "13"- If it is equipped with Wi-Fi chip.2.4GHzRange of "1" - "13"5GHz"36"/"40"/"44"/"48"/"52"/"56"/"60"/"64"/"100"/"104"/"108"/"112"/"116"/"120"/"124"/"128"/"132"/"136"/"140"/"149"/"153"/"157"/"161"/"165" | Shown if "Connection Method" is not "Not Set" |
| "Security Level" | "WPA2-PSK(AES)" only | Shown if "Connection Method" is not "Not Set" |
| "Password" | "*******" | Shown if "Connection Method" is not "Not Set" |
| "MAC Address" | "XX:XX:XX:XX:XX:XX"X: Range of "0" - "F" in hexadecimal | Shown if "Connection Method" is not "Not Set" |
Table 9-11 Display items (Not supporting multiple-interface)
| Items | Description | Condition |
| "Device Name" | Shows the printer name currently used. | - |
| "Connection Status" | "Disconnect" / "10BASE-T, Half Duplex" / "10BASE-T, Full Duplex" / "100BASE-TX, Half Duplex" / "100BASE-TX, Full Duplex" / "1000BASE-T, Full duplex" / "Unknown" | Shown when the wired LAN is used. |
| "Wi-Fi Disconnected" / "Searching for Wi-Fi" / "W-Fi-xxxMbps" ("xxx": "00" - "495") / "Unknown" | Shown when the wi-fi is used. | |
| "Signal Strength" | "Excellent" / "Good" / "Fair" / "No Good" / "Unknown" | Only shown when wireless LAN is used. Not shown while Wi-Fi Direct is used. |
| "Obtain IP Address" | "Auto" / "Manual" | - |
| "Set using BOOTP" | "Enable" / "Disable" | - If "Obtain IP Address" is "Manual", this item is not shown. |
| "Set using Automatic Private IP Addressing (APIPA)" | "Enable" / "Disable" | - If "Obtain IP Address" is "Manual", this item is not shown. |
| "IP Address" | "xxx.xxx.xxx.xxx" xxx: 0 - 255 in decimal | - |
| "Subnet Mask" | "xxx.xxx.xxx.xxx" xxx: 0 - 255 in decimal | - |
| "Default Gateway" | "xxx.xxx.xxx.xxx" xxx: 0 - 255 in decimal | - |
| "DNS Server Setting" | "Auto" / "Manual" | - |
| "Primary DNS Server" | "xxx.xxx.xxx.xxx" xxx: 0 - 255 in decimal | - |
| "Secondary DNS Server" | "xxx.xxx.xxx.xxx" xxx: 0 - 255 in decimal | - |
| "Way of obtaining DNS Host Name" | "Auto" / "Manual" | - |
| "DNS Host Name Status" | "Unknown" / "Successful" / "Failed" | Shown if the way of obtaining a DNS host name is auto. |
| "DNS Host Name" | Shows the DNS host name currently used. | - |
| "Way of obtaining DNS Domain Name" | "Auto" / "Manual" | - |
| "DNS Domain Name Status" | "Unknown" / "Successful" / "Failed" | Shown if the way of obtaining a DNS host name is auto. |
| "State of DNS Domain Name obtained automatically" | Shows the DNS domain name currently used. | - |
| "Proxy Server Setting" | "Do Not Use" / "Use" | - |
| "Proxy Server" | Shows the proxy server name in the IP address or FQDN format. - IP address format "xxx.xxx.xxx.xxx" xxx: 0 - 255 in decimal - FQDN format ASCII (alphanumeric, dot, hyphen), 1-255 characters | Shown when the value for "Proxy Server Setting" is "Use". |
| "Proxy Server Port Number" | Range of "0" - "65535" in decimal | Shown when the value for "Proxy Server Setting" is "Use". |
| "Proxy Server User Name" | 0 - 256byte alphanumeric characters ASCII 0x20 - 0x7E | Shown when value of "Proxy Server Setting" is "Use". |
| "Proxy Server Password" | "Not Set" / "**********" | Shown when value of "Proxy Server Setting" is "Use". |
| "IPv6 Setting" | "Enable" / "Disable" | - |
| "IPv6 Anonymous Address" | "Enable" / "Disable" | Shown if the IPv6 Setting is used. |
| "IPv6 DHCP Server Setting" | "Do Not Use" / "Use" | Shown if IPv6 is enabled. Not shown if the DHCPv6 function is not supported. |
| "IPv6 Address" | Shows an IPv6 address. | Shown if the IPv6 Setting is used. |
| "IPv6 Address Default Gateway" | Shows an IPv6 address. | Shown if the IPv6 Setting is used. |
| "IPv6 Link-Local Address" | Shows a valid IPv6 link-local address | Shown if the IPv6 Setting is used. |
| "IPv6 Stateful Address" | Shows a valid stateful IPv6 address. | Shown if IPv6 is enabled.Not shown when Connection Status is disable. |
| "IPv6 Stateless Address 1" | Shows an IPv6 stateless address | Shown if the IPv6 Setting is used. |
| "IPv6 Stateless Address 2" | Shows an IPv6 stateless address | Shown if the IPv6 Setting is used. |
| "IPv6 Stateless Address 3" | Shows an IPv6 stateless address | Shown if the IPv6 Setting is used. |
| "IPv6 Primary DNS Server" | Shows an IPv6 address | Shown if the IPv6 Setting is used. |
| "IPv6 Secondary DNS Server" | Shows an IPv6 address | Shown if the IPv6 Setting is used. |
| "Wi-Fi Setup" | "AOSS" / "WPS" / "Wi-Fi Direct" / "Manual" / "Wi-Fi Auto Connect" / "Epson iPrint" | Shown if the wireless LAN is used. |
| "Wi-Fi Mode" | "IEEE802.11b" / "IEEE802.11g" / "IEEE802.11b/g" / "IEEE802.11b/g/n" | Shown if the wireless LAN is used. |
| "The number of connected devices" | Range of 0 to 4 in decimals | Shown if the Simple AP Mode is enabled. |
| "SSID" | 1~32 charactersAlphanumeric and sign characters | Shown if the wireless LAN is used. |
| "Channel" | Range of "1" - "13" | Shown if the wireless LAN is used. |
| "Security Level" | "None" / "WEP-64bit(40bit)" / "WEP-128bit(104bit)" / "WPA-PSK(TKIP)" / "WPA2-PSK(AES)" / "WPA2/WPA3-Enterprise" / "WPA3-SAE(AES)" | Shown if the wireless LAN is used. |
| "Password" | "Not Set" / "**********" | Shown if wireless LAN is used and Security Level is not WPA2-Enterprise. |
| "MAC Address" | "XX:XX:XX:XX:XX:XX"X: Range of "0" - "F" in hexadecimal | - |
| "IEEE802.11k/v" | "Enable" / "Disable" | Displayed on models that support the IEEE802.11k/v/r function.For wireless LAN option dongle models, displayed when the dongle is inserted in the main unit, and hidden when not inserted. |
| "IEEE802.11r" | "Enable" / "Disable" | Displayed on models that support the IEEE802.11k/v/r function.For wireless LAN option dongle models, displayed when the dongle is inserted in the main unit, and hidden when not inserted. |
9.1.2.1.4 Button
Table 9-12 Button
| Items | Description |
| "Refresh" | If pressed, updated information is shown on the top page. |
9.1.3 TM-Intelligent
It is possible to establish a link to TM-i.
9.1.3.1 Top page
Click a menu item to open the TM-i Settings page in a new tab.
(See "TM-i Settings" for more information.)
9.1.3.1.1 Image
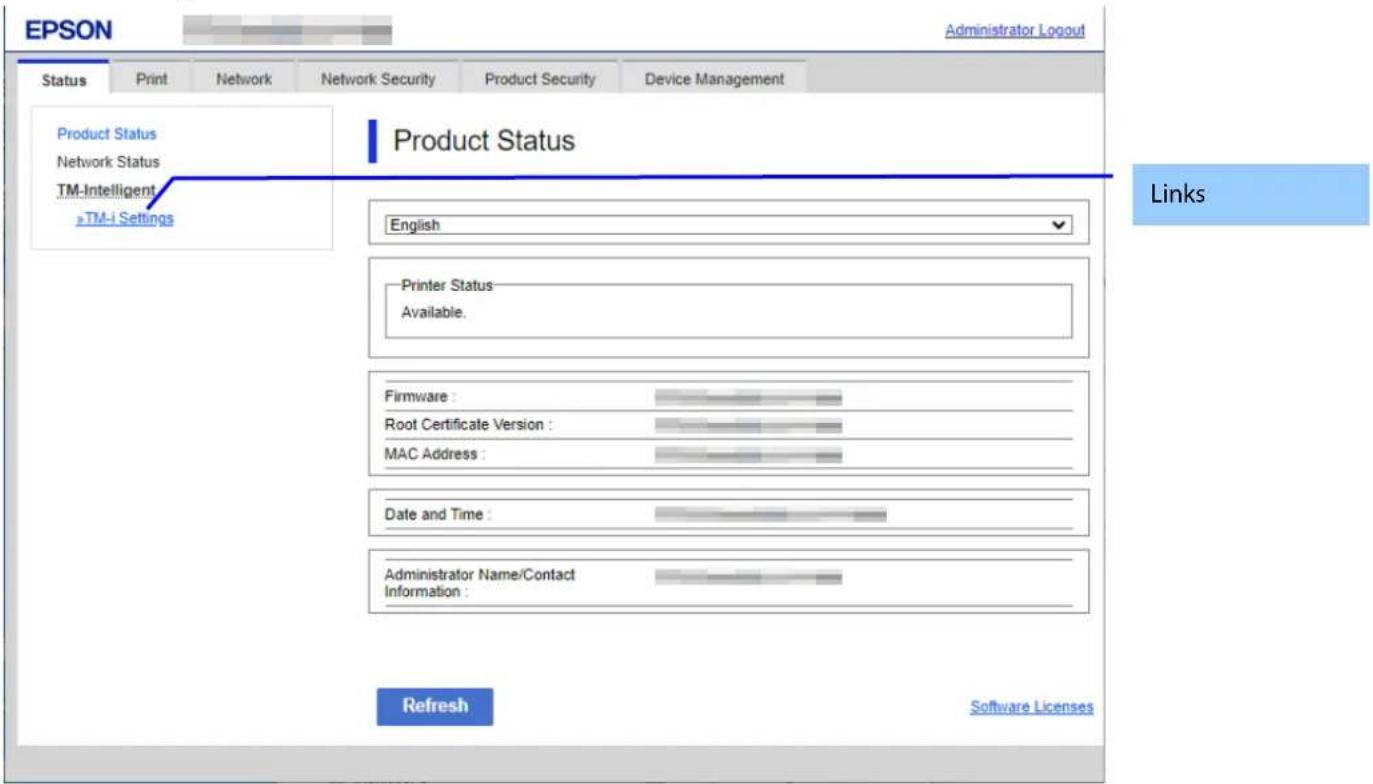
Figure 9-3 Top page
9.2 Print
9.2.1 Print Settings
9.2.1.1 Top Page
9.2.1.1.1 Image
The following figure shows the layout of the top page.
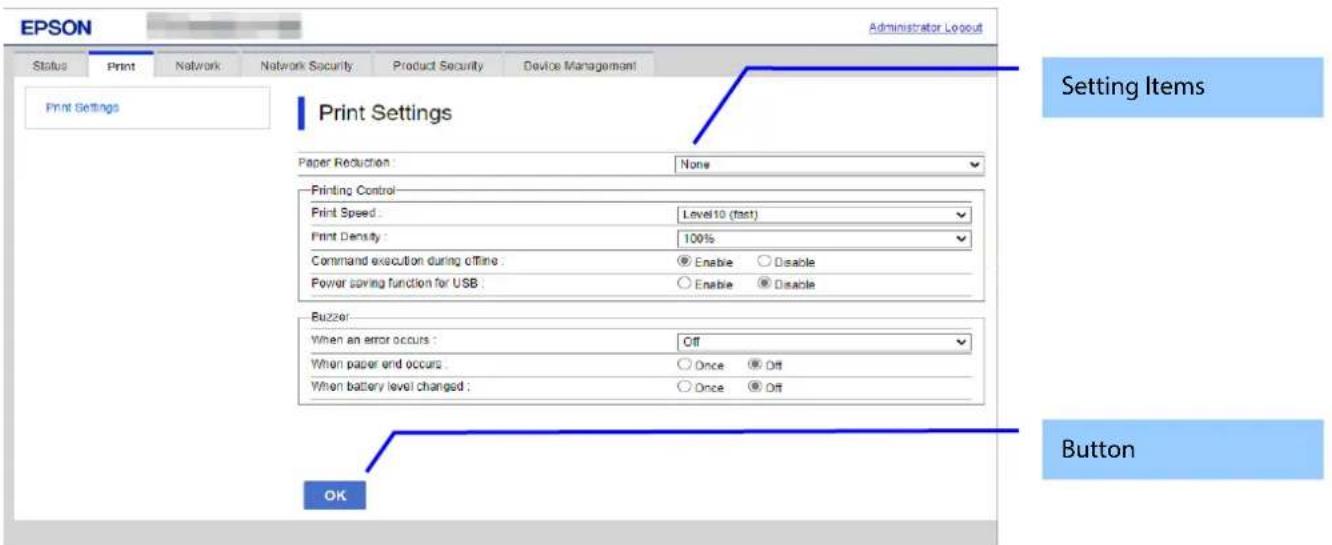
Figure 9-4 Image
9.2.1.1.2 Setting Items
Table 9-13 Setting Items
| Items | Description | Condition |
| "Paper Reduction" | Use the drop-down list to select from the following options:"Max" / "Recommendation" / "None" | Display only on models that support paper reduction |
| "Printing Control" | Title | - |
| "Printing Speed" | For models that support the maximum printing speed "Level10"Use the drop-down list to select from the following options:"Level1 (slow)" / "Level2" / "Level3" / "Level4" / "Level5" / "Level6" / "Level7" / "Level8" / "Level9" / "Level10 (fast)"For models that support the maximum printing speed "Level13"Use the drop-down list to select from the following options:"Level1 (slow)" / "Level2" / "Level3" / "Level4" / "Level5" / "Level6" / "Level7" / "Level8" / "Level9" / "Level10" / "Level11" / "Level12" / "Level13 (fast)"For models that support the maximum printing speed "Level17"Use the drop-down list to select from the following options:"Level1 (slow)" / "Level2" / "Level3" / "Level4" / "Level5" / "Level6" / "Level7" / "Level8" / "Level9" / "Level10" / "Level11" / "Level12" / "Level13" / "Level14" / "Level15" / "Level16" / "Level17 (fast)" | Displayed only on models that support print speed |
| "Print Density" | For models that support "%" display.A value can be chosen using the Drop-down list from the following options:"70%" / "75%" / "80%" / "85%" / "90%" / "95%" / "100%" / "105%" / "110%" / "115%" / "120%" / "125%" / "130%"* "125%" and "130%" are displayed only for models that support the maximum print density "130%".* "As per DIP switch settings" is displayed only on models that support Print Density setting using dip switches.For models that support "Level" display.Using the drop-down list, choose from the following:"Level 1" / "Level 2" / "Level 3" / "Level 4" / "Level 5" / "Level 6" / "Level 7" | Display only on models that support Print Density |
| "Command execution during offline" | User can select "Enable" / "Disable" by radio button. | Display only on models that support Command execution during offline |
| "Power saving function for USB" | User can select "Enable" / "Disable" by radio button. | Display only on models that support Power saving function for USB |
| "Buzzer" | Title | - |
| "Buzzer" | User can select "Optional Buzzer" / "Disable" by radio button. | This item is displayed on devices with a buzzer. |
| "When an erro occurs" | Use the drop-down list to select from the following options:"Off" / "Once" / "Continuous"* "Continuous" is displayed only for compatible models. | This item is displayed on devices with a buzzer. |
| "When auto paper cut is operating" | User can select "Off" / "Once" by radio button. | This item is displayed on devices with a buzzer when automatic paper cut is performed. |
| "When paper end occurs" | User can select "Off" / "Once" by radio button. | This item is displayed on devices with a buzzer when paper end occurs. |
| "When battery level changed" | User can select "Off" / "Once" by radio button. | This item is displayed on devices with a buzzer when the battery level changes. |
| "When specified pulse 1 (2 pin) occurs" | User can select "Off" / "Once" by radio button. | This item is displayed on devices with a buzzer when specified pulse 1 (2 pin) occurs. |
| "When specified pulse 2 (5 pin) occurs" | User can select "Off" / "Once" by radio button. | This item is displayed on devices with a buzzer when specified pulse 2 (5 pin) occurs. |
9.2.1.1.3 Button
The following table shows the buttons on the page.
Table 9-14 Button
| Items | Description |
| "OK" | Button to start print settings. Press the button to display the reboot confirmation pop-up |
| "Back" | Button to move to the main page. |
If the Web Config recognizes an error in the input value after the "OK" button is pressed, the following reboot confirmation pop-up is shown.
Table 9-15 Reboot Confirmation Pop-up
| Items | Description |
| "Product will be restarted to apply the settings." | Displayed when the "Set" button is pressed. Click the "OK" button in the pop-up to move the Result Page. |
9.2.1.2 Result Page
The result message is shown on the main frame after the "OK" button is pressed.
9.2.1.2.1 Image
The following figure shows the layout of the results page.
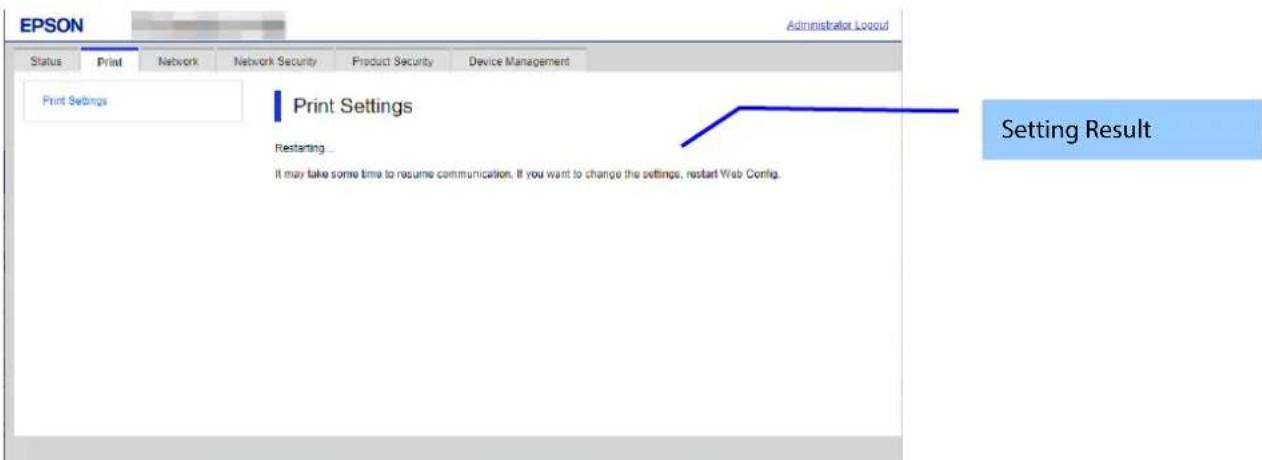
Figure 9-5 Image
9.2.1.2.2 Setting Result
Table 9-16 Setting Result
| Items | Description |
| "Restarting... Restarting communication may take a few minutes. If you want to change the settings, reconnect to the Web Config." | This message is shown when the settings are completed successfully. |
| "Setup failed." | This message is shown if setup fails. |
| "Cannot access the product until processing is complete." | This message is shown when the setting is unavailable because the product is processing. |
9.3 Network
9.3.1 Network Basic
9.3.1.1 Top Page
9.3.1.1.1 Image
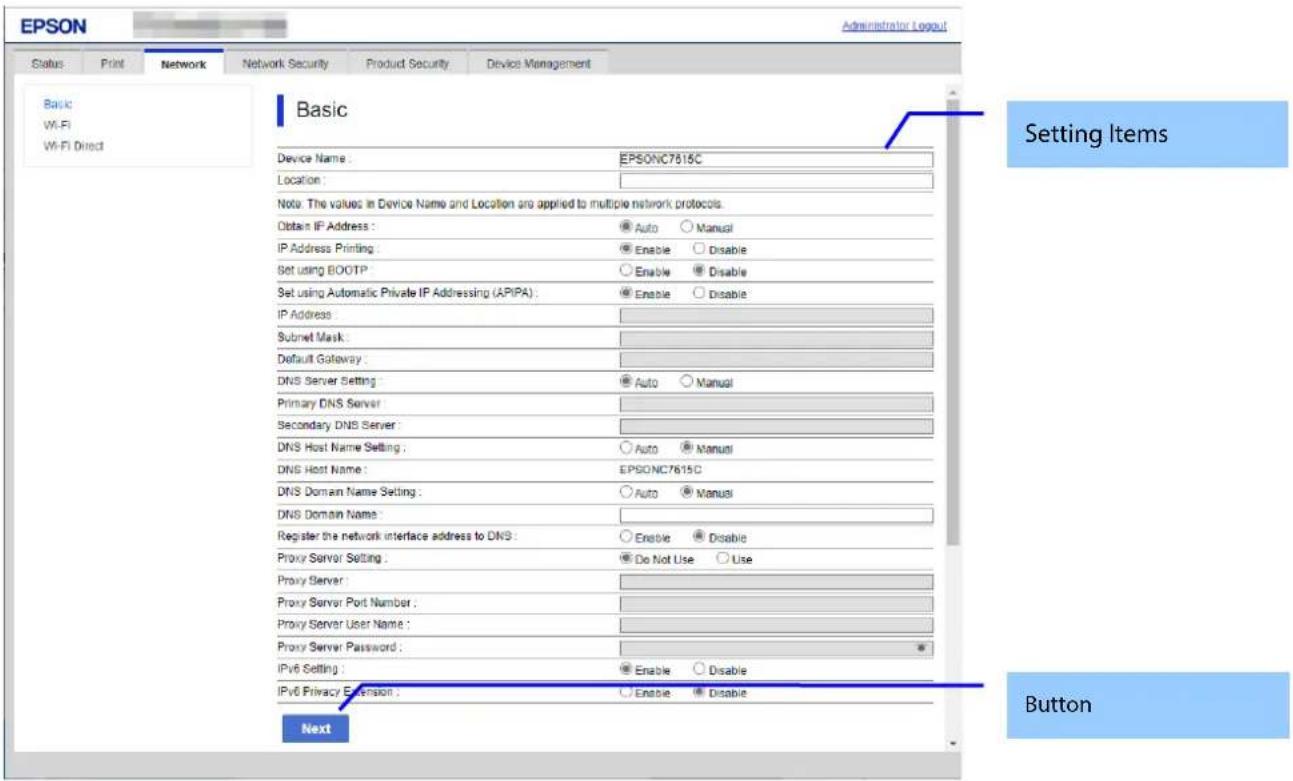
Figure 9-6 Top Page
9.3.1.1.2 Setting Items
The following table shows the network setting items in Wi-Fi/Network Setup.
Table 9-17 Setting Items
| Items | Description | Condition |
| "Device Name" | A text box is provided. The string must have 2 to 15 characters and contain"A"~"Z", "a"~"z", "0"~"9", and "-". (Spaces are not allowed.)The leading character must be "A"~"Z" or "a"~"z". ("0"~"9" and "-" are not allowed.)The final character must be "A"~"Z", "a"~"z" or "0"~"9". ("-" is not allowed.) | - |
| "Location" | A text box is provided. The string must be UTF-8 characters up to 127 bytes. | - |
| "Note: The values in Device Name and Location are applied to multiple network protocols." | Notes for "Printer Name" and "Location" | - |
| "Obtain IP Address" | Two radio buttons are provided to choose one of the following:"Auto" / "Manual" | - |
| "IP Address Printing" | Two radio buttons are provided to choose one of the following:"Enable" / "Disable" | This item is displayed only for models that support IP address printing. |
| "Set using BOOTP" | Two radio buttons are provided to choose one of the following:"Enable" / "Disable" | - If "Obtain IP Address" is "Manual", this item is grayed-out.This item is not displayed on CIJ. |
| "Set using Automatic Private IP Addressing(APIPA)" | Two radio buttons are provided to choose one of the following:"Enable" / "Disable" | - If "Obtain IP Address" is "Manual", this item is grayed-out.This item is not displayed on CIJ. |
| "IP Address" | A text box is provided.Format: "xxx.xxx.xxx.xxx""xxx": "0"~"255" in decimals.The following addresses can not be set."0.0.0.0"~"0.255.255.255.255"Loopback address("127.0.0.0"~"127.255.255.255")Class D address("224.0.0.0"~"239.255.255.255")Class E address("240.0.0.0"~"255.255.255.255")Directed broadcast address("255.255.255.255") | - If "Obtain IP Address" is "Auto", this item is grayed-out. |
| "Subnet Mask" | A text box is provided.Format: "xxx.xxx.xxx.xxx""xxx": "0"~"255" in decimals.The following addresses can not be set.Discontinuous mask bit (Ex: "255.254.128.0")0.0.0.0255.255.255.254255.255.255.255 | - If "Obtain IP Address" is "Auto", this item is grayed-out. |
| "Default Gateway" | A text box is provided.Format: "xxx.xxx.xxx.xxx""xxx": "0"~"255" in decimals.The following addresses can not be set."0.0.0.0" (The display is blank if this value is set.)The following addresses can not be set."0.0.0.1"~"0.255.255.255.255"Loopback address("127.0.0.0"~"127.255.255.255")Class D address("224.0.0.0"~"239.255.255.255")Class E address("240.0.0.0" ~"255.255.255.255")Directed broadcast address("255.255.255.255") | - If "Obtain IP Address" is "Auto", this item is grayed-out. |
| "DNS Server Setting" | Two radio buttons are provided to choose one of the following:"Auto" / "Manual""Manual" is selected when "Obtain IP Address" is "Manual". | - |
| "Primary DNS Server" | A text box is provided.Format: "xxx.xxx.xxx.xxx""xxx": "0"~"255" in decimals."0.0.0.0") is prohibited.If "Primary DNS Server" is blank but a value has been entered for "Secondary DNS Server", an error occurs.You can leave this field blank. | - If "DNS Server Setting" is "Auto", this item is grayed-out. |
| "Secondary DNS Server" | A text box is provided.Format: "xxx.xxx.xxx.xxx""xxx": "0"~"255" in decimal."0.0.0.0") is prohibited.You can enter the empty. | - If "DNS Server Setting" is "Auto", this item is grayed-out. |
| "DNS Host Name Setting" | Two radio buttons are provided to choose one of the following:"Auto" / "Manual" | - |
| "DNS Host Name" | The Device Name is shown. | - |
| "DNS Domain Name Setting" | Two radio buttons are provided to choose one of the following:"Auto" / "Manual" | - |
| "DNS Domain Name" | A text box is provided. The string must have 2 to 249 characters and contain"A"~"Z", "a"~"z", "0"~"9", and "-". (Spaces are not allowed.)However, it is necessary to enter no more than 251 characters in total for both the host name and domain name. If this number is exceeded, the configuration is not applied. The leading character must be "A"~"Z" or "a"~"z". ("0"~"9" and "-" are not allowed.)The final character must be "A"~"Z", "a"~"z", or "0"~"9". (-" is not allowed.)The number of characters on each label separated by a period (".") must be 1 to 63. | - If "DNS Domain Name Setting" is "Auto", this item is grayed-out. |
| "Register the network interface address to DNS" | Two radio buttons are provided to choose one of the following:"Enable" / "Disable" | - |
| "Proxy Server Setting" | "Do Not Use" / "Use" | - |
| "Proxy Server" | Set the proxy server address in the IPv4 address or FQDN format. | - If "Proxy Server Setting" is "Do Not Use", this item is grayed-out. |
| "Proxy Server Port Number" | A text box is provided. The string must be "0" to "65535" in decimals. | - If "Proxy Server Setting" is "Do Not Use", this item is grayed-out. |
| "Proxy Server User Name" | A text box is provided. The string must be from 0 to 255 bytes with characters in ASCII codes (0x20 - 0x7E). | - If "Proxy Server Setting" is "Do Not Use", this item is grayed-out. |
| "Proxy Server Password" | A text box is provided. The string must be from 0 to 255 bytes with characters in ASCII codes (0x20 - 0x7E).10 asterisks (*) are displayed when "Proxy Server Setting" is "Use". | - If "Proxy Server Setting" is "Do Not Use", this item is grayed-out. |
| "IPv6 Setting" | Two radio buttons are provided to choose one of the following:"Enable" / "Disable" | - |
| "IPv6 Privacy Extension" | Two radio buttons are provided to choose one of the following:"Enable" / "Disable" | - If "IPv6 Setting" is "Disable", this item is grayed-out. |
| "IPv6 DHCP Server Setting" | Two radio buttons are provided to choose one of the following:"Do Not Use" / "Use" | - If "IPv6 Setting" is "Disable", this item is grayed-out.- Only DHCPv6 support printers. |
| "IPv6 Address" | You can set empty or in the IPv6 address with prefix.Use the following IPv6 address formats, if you want to set.·xxxx:xxxx:xxxx:xxxx:xxxx:xxxx:xxxx:xxxx/prefix"xxxx" is Hexadecimal for one to four digit."prefix" is 1 - 128 in decimal.You can abbreviate the contiguous "xxxx" consisting of all "0" as ":"on one place in IPv6 address.Shows the error if it consists of following address part."::/128""::/1/128""FF00::/8"This item is need to enter if the item of IPv6 Address Default Gateway is entered. | - If "IPv6 Setting" is "Disable", this item is grayed-out. |
| "IPv6 Address Default Gateway" | You can set empty or in the IPv6 address.Use the following IPv6 address formats, if you want to set.·xxxx:xxxx:xxxx:xxxx:xxxx:xxxx:xxxx:xxxx"xxxx" is Hexadecimal for one to four digit.You can abbreviate the contiguous "xxxx" consisting of all "0" as ":"on one place in IPv6 address.Shows the error if it consists of following address part."::/128""::/1/128""FF00::/8" | - If "IPv6 Setting" is "Disable", this item is grayed-out. |
| "IPv6 Link-Local Address" | A valid IPv6 link-local address is shown. | - |
| "IPv6 Stateful Address " | Shows a valid stateful IPv6 address. | - Only DHCPv6 support printers. |
| "IPv6 Stateless Address 1" | A valid IPv6 stateless address is shown. | - |
| "IPv6 Stateless Address 2" | A valid IPv6 stateless address is shown. | - |
| "IPv6 Stateless Address 3" | A valid IPv6 stateless address is shown. | - |
| "IPv6 Primary DNS Server" | Set this item in the IPv6 address.Use one of the following formats.xxxx:xxxx:xxxx:xxxx:xxxx:xxxx:xxxx:"xxxx" indicates one to four digits in Hexadecimal.For "xxxx", the first "0" can be abbreviated, but at least one character is required.Repeated "xxxx" in one location of an IPv6 address that are all "0" can be abbreviated as "::".Shows an error if it includes any of the following address parts."::/128""::/1/128""FF00::/8"If "IPv6 Primary DNS Server" is blank but a value has been entered for "IPv6 Secondary DNS Server", an error occurs.You can leave this field blank. | - If "IPv6 Setting" is "Disable", this item is grayed-out. |
| "IPv6 Secondary DNS Server" | Set this item in the IPv6 address.Use one of the following formats.xxxx:xxxx:xxxx:xxxx:xxxx:xxxx:xxxx:xxxx"xxxx" indicates one to four digits in Hexadecimal.Repeated "xxxx" in one location of an IPv6 address that are all "0" can be abbreviated as "::".Shows an error if it includes any of the following address parts."::/128""::1/128""FF00::/8"You cannot register other IPv6 DNS server addresses that have already been registered.You can leave this field blank. | - If "IPv6 Setting" is "Disable", this item is greyed-out. |
| "IEEE802.11k/v" | Two radio buttons are provided to choose either of the followings:"Enable" / "Disable" | For wireless LAN option dongle models, display when the dongle is inserted in the main unit, and hide when not inserted.Displayed on models supporting the IEEE802.11k/v/r function. |
| "IEEE802.11r" | Two radio buttons are provided to choose either of the followings:"Enable" / "Disable" | For wireless LAN option dongle models, display when the dongle is inserted in the main unit, and hide when not inserted.Displayed on models supporting the IEEE802.11k/v/r function. |
| "Power Saving(Wi-Fi)" | Two radio buttons are provided to choose either of the following:"Enable" / "Disable" | Always displayed when in "Kagaribi mode".Displayed only when the Wi-Fi dongle is attached and in "Dongle mode". |
| A dropdown list is provided to choose either of the following:"Auto" / "2.4 GHz" / "5 GHz" | Displayed when in "Kagaribi mode" if the model is equipped with a 5GHz Wi-Fi chip. Not displayed if the model is only equipped with a 2.4GHz Wi-Fi Chip.Displayed when in "Dongle mode" if a 5GHz dongle is attached. Not displayed if a 2.4GHz dongle is attached or if the dongle is not attached. |
9.3.1.1.3 Button
Table 9-18 Button
| Items | Description |
| "Next" | If pressed, Web Config goes to the Confirm Wi-Fi/Network Settings page. |
If Web Config recognizes an error in the entered value after the Next button is pressed, the following error pop-up is shown. If the entered value error occurs multiple times, a high priority is displayed.
Table 9-19 Error Pop-up
| Items | Description |
| "Invalid value below." | This message is shown when the value entered in the text box is invalid. The item names of the corrected values are shown under the message in the left cell. If there are two or more items whose values were corrected, those items are listed line by line. |
| "The combination of IP Address and Subnet Mask is incorrect.""All the bits in the host address part of the IP address cannot be set to 1." | This message is displayed if all of the bits in the host address portion of the IP address are 1. |
| "The combination of IP Address and Subnet Mask is incorrect.""All the bits in the host address part of the IP address cannot be set to 0." | This message is displayed if all of the bits in the host address portion of the IP address are 0. |
| "The combination of Default Gateway and Subnet Mask is incorrect.""All the bits in the host address part of the Default Gateway cannot be set to 1." | This message is displayed if all of the bits in the host address portion of the Default Gateway are 1. |
| "The combination of Default Gateway and Subnet Mask is incorrect.""All the bits in the host address part of the Default Gateway cannot be set to 0." | This message is displayed if all of the bits in the host address portion of the Default Gateway are 1. |
| "The combination of IP Address, Subnet Mask and Default Gateway is incorrect.""IP Address and Default Gateway must be on the same network segment as defined by the Subnet Mask." | This message is shown in the following cases.A default gateway has been set, and the network part that indicates the subnet mask is different in the IP address and default gateway. |
9.3.1.2 Confirm Page
9.3.1.2.1 Image
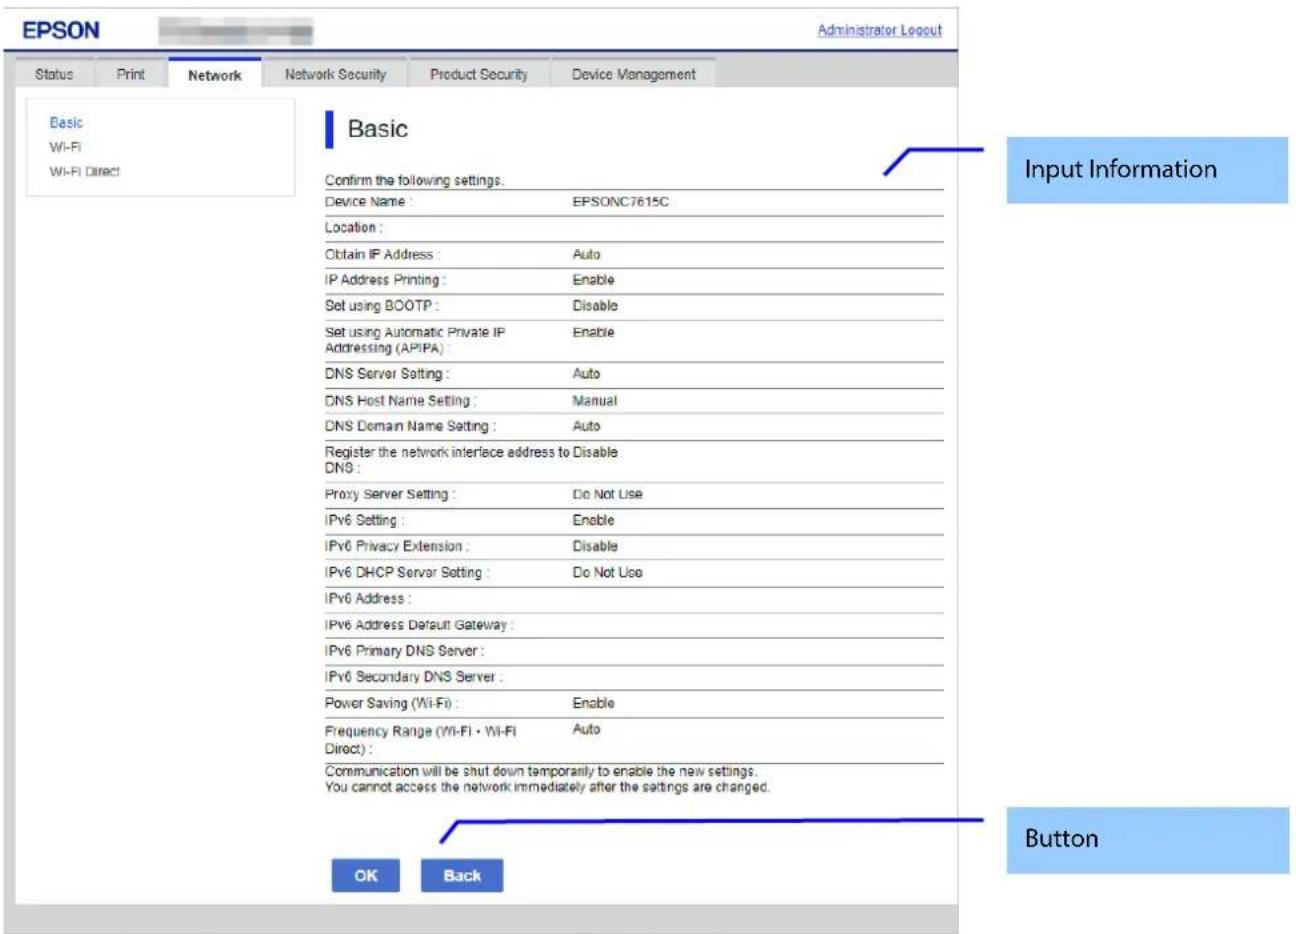
Figure 9-7 Confirm Page
9.3.1.2.2 Input Information
Table 9-20 Input Information
| Items | Description |
| "Confirm the following settings." | This message is shown at the top of the page, followed by the setting items and their values. |
| "Communication will be shut down temporarily to enable the new settings. You cannot access the network immediately after the settings are changed." | This message is shown at the bottom of the page. |
9.3.1.2.3 Button
There is a button to proceed to the remaining settings based on the values entered on this page, and a button to go back to the previous page.
Table 9-21 Button
| Items | Description |
| "OK" | This button is used to apply the entered values to the system shown on the Confirm Wi-Fi/Network Settings page. If pressed, Web Config goes to the Result page. |
| "Back" | This button is used to go back to the Wi-Fi/Network Settings page. |
9.3.1.3 Result Page
The following figure shows the page that is displayed after the network settings are processed. The content of the Result page will vary based on the result (success or failure).
9.3.1.3.1 Image
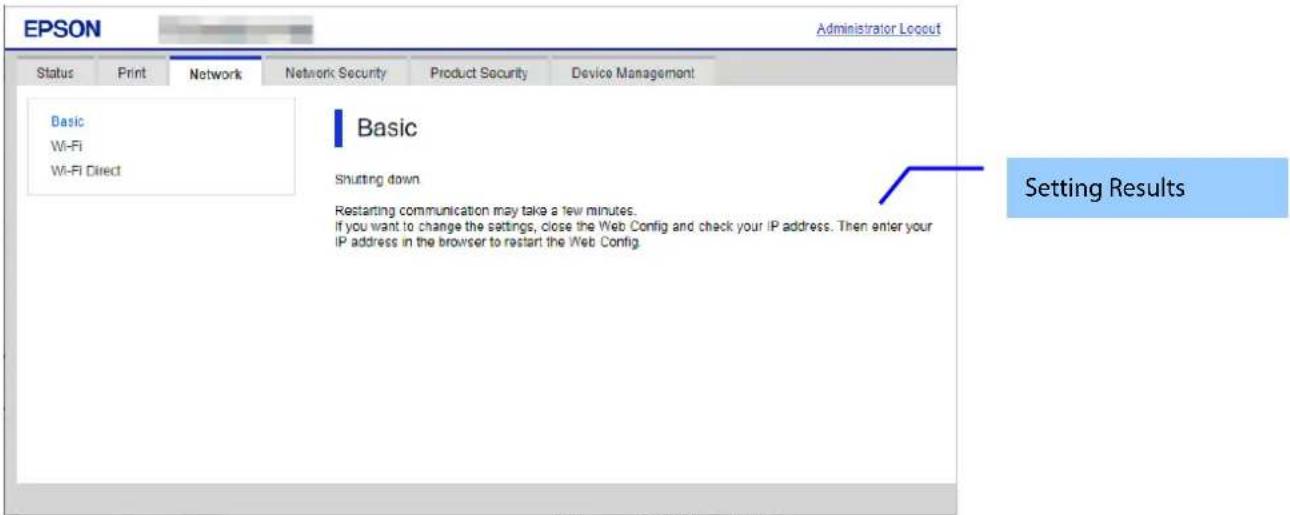
Figure 9-8 Result Page
9.3.1.3.2 Setting Result
Table 9-22 Setting Result
| Items | Description |
| "Shutting down.""Restarting communication may take a few minutes.""If you want to change the settings, close the Web Config and check your IP address. Then enter your IP address in the browser to restart the Web Config." | This message is shown if Wi-Fi/Network setup is successful. |
| "Setup failed." | This message is shown if Wi-Fi/Network setup fails. |
9.3.2 Wi-Fi
Only models that support wireless LAN are displayed.
9.3.2.1 Top Page
9.3.2.1.1 Image
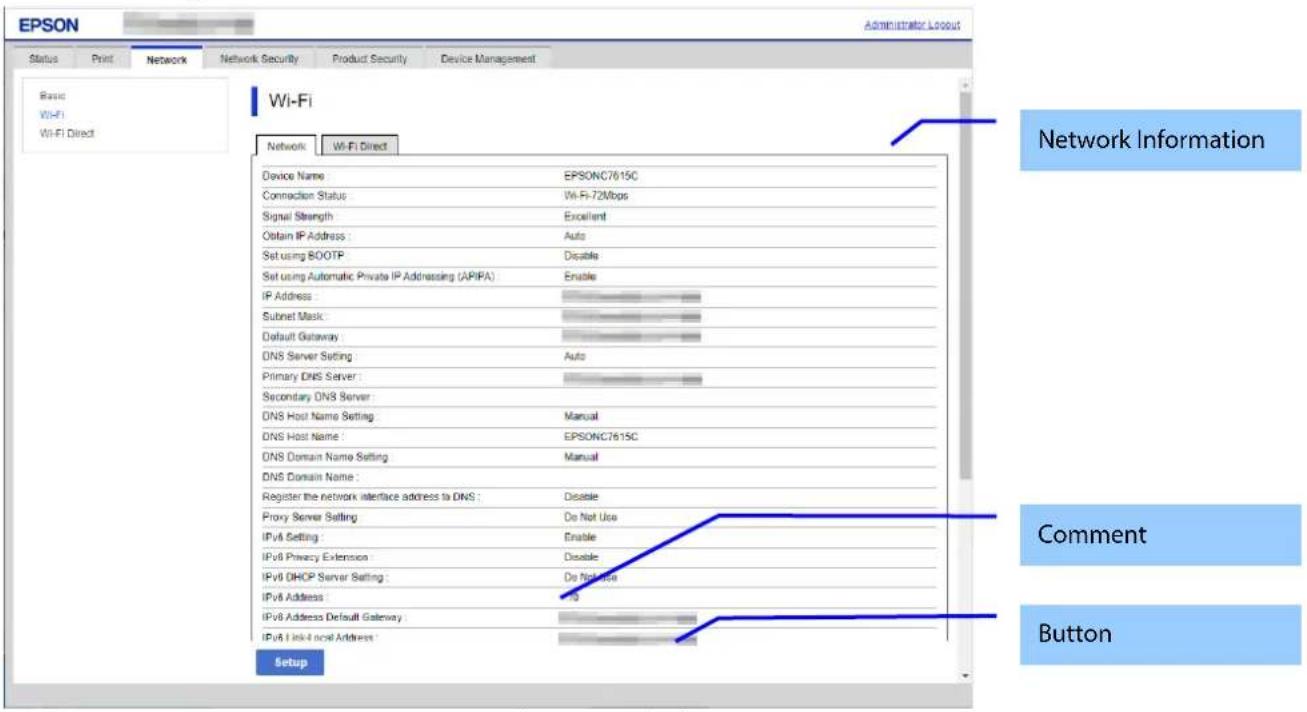
Figure 9-9 Wi-Fi Setup Top Page
9.3.2.1.2 Network Information
Display same contents as Network Status of Status tab.
9.3.2.1.3 Comment
The following table shows some comments.
Table 9-23 Comment
| Comment | Description |
| "Wi-Fi is enabled." | Is displayed above button when Wi-Fi is enabled. |
| "Wi-Fi is disabled" | Is displayed above button when Wi-Fi is disabled. |
9.3.2.1.4 Button
The following buttons are supported.
Table 9-24 Button
| Items | Description | Condition |
| "Change Wi-Fi Settings" | This button is used to begin Wi-Fi setup. If pressed, Web Config makes transition to the SSID Search page. | This item is displayed when Wi-Fi is enabled. |
| "Disable Wi-Fi" | This button is used to disable Wi-Fi. If pressed, Web Config shows a pop-up window with the OK/Cancel buttons. If the OK button is pressed on the pop-up, Web Config makes transition to the Setup Complete page. If the Cancel button is pressed, Web Config closes the pop-up. | This item is displayed when Wi-Fi is enabled. |
| "Enable Wi-Fi" | This button is used to enable Wi-Fi. | This item is displayed when Wi-Fi is disabled. |
9.3.2.1.5 Confirmation Popup
When the Disable Wi-Fi button is pressed, Web Config shows a confirmation pop-up to confirm whether the user really wants to disable Wi-Fi. "Disable Wi-Fi?" is displayed on the pop-up.
9.3.2.2 SSID Search Page
9.3.2.2.1 Image
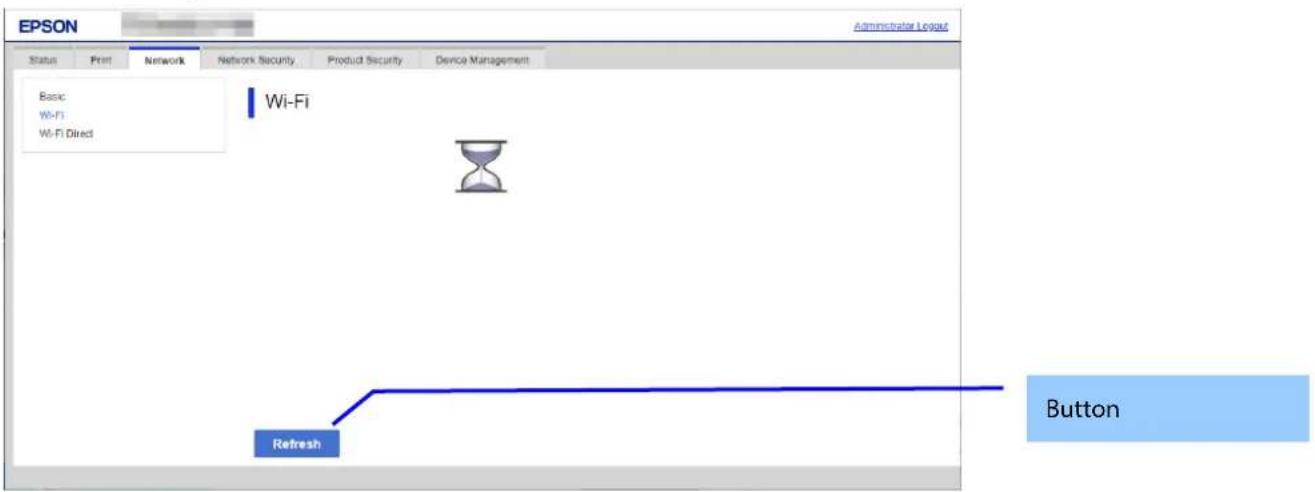
Figure 9-10 SSID Search Page
9.3.2.2.2 Button
Table 9-25 Button
| Items | Description |
| "Refresh" | After the Refresh button is pressed, Web Config goes to the Wi-Fi Settings page if an SSID search has been completed. If an SSID search has not been completed, Web Config remains on the SSID Search page. |
9.3.2.3 Wi-Fi Settings Page
If the Web Config confirms periodically that an SSID search has been done triggered by transition to this page or pressing the Refresh button, it goes to the Wi-Fi Settings page as below. You can choose a SSID on the searched SSID list by choosing a radio button or choose a radio button to specify any SSID manually.
9.3.2.3.1 Image
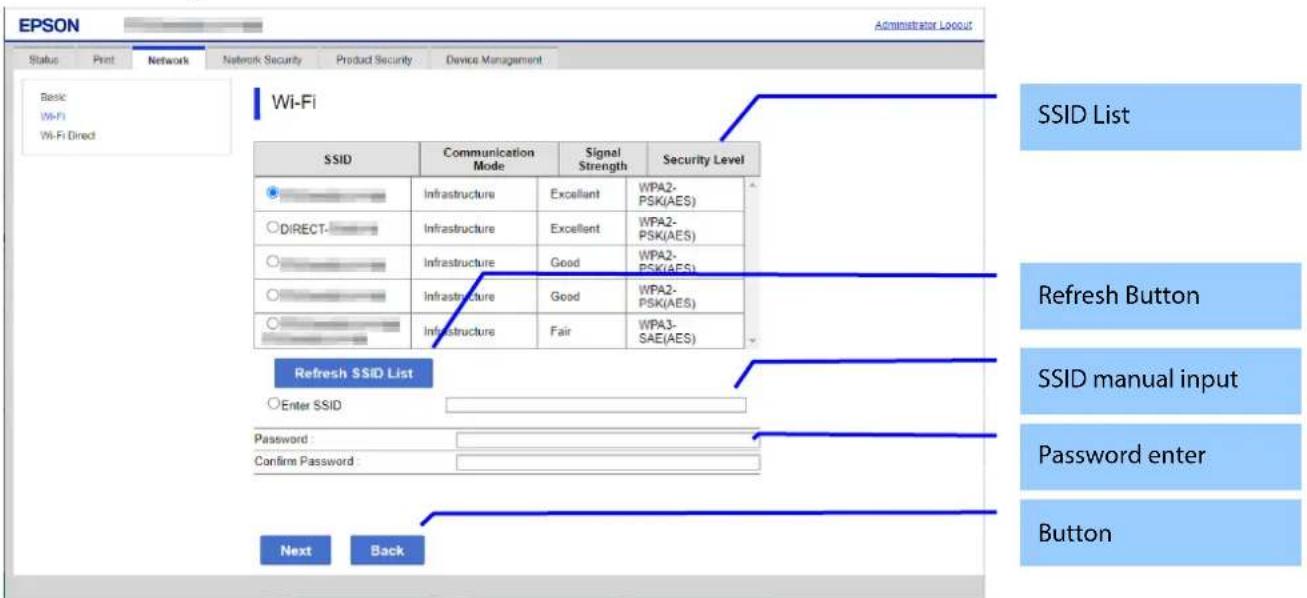
Figure 9-11 Wi-Fi Settings Page
9.3.2.3.2 SSID List
You can choose an SSID from the list of searched SSIDs as shown below. A list of up to 15 searched SSIDs (with up to 10 infrastructure mode SSIDs and up to 5 ad hoc mode SSIDs) regardless of coordination mode (Infrastructure or ad hoc) and sorted by signal strength level (strong -> weak).
Table 9-26 SSID List
| Items | Description | Condition |
| "SSID" | Shows the name of each SSID. | - |
| "Communication Mode" | Shows one of the following communication modes: "Infrastructure" | - |
| "Signal Strength" | Shows one of the following signal strengths: "Excellent" / "Good" / "Fair" | Displays only models equipped with Wi-Fi chip. |
| "Security Level" | Shows one of the following security levels: "None" / "WEP-64bit(40bit)" / "WEP-128bit(104bit)" / "WPA-PSK(TKIP)" / "WPA2-PSK(AES)" "WPA3-SAE(AES)" / "Unknown"If Security Level is WEP-64bit or WEP-128, "Unknown" is shown (because a printer can not recognize 64bit or 128bit). | - |
9.3.2.3.3 SSID Manual Input
You can specify any SSID manually.
Table 9-27 SSID Manual Input
| Items | Description |
| "Enter SSID" | A text box is provided so the user can enter an SSID manually. The string must have 1 to 32 characters (ASCII codes: 0x20 - 0x7E). |
9.3.2.3.4 Refresh Button
The Refresh button provides the user with the updated SSID list.
Table 9-28 SSID Refresh Button
| Items | Description |
| "Refresh SSID List" | If pressed, Web Config shows the SSID Search page. |
9.3.2.3.5 Password Entering
Table 9-29 Password Entering
| Items | Description |
| "Password" | A text box is provided. The string must have 1, 5, or 8 to 63 characters (ASCII codes: 0x20 - 0x7E).The entered values are masked by '*''. |
| "Confirm Password" | Same as Security Key. |
9.3.2.3.6 Button
There is a button to proceed to the remaining settings based on the values entered on this page, and a button to go back to the previous page.
Table 9-30 Button
| Items | Description |
| "Next" | This button is used to go forward with Wi-Fi Setup based on the values entered on the Wi-Fi Setup page. If pressed, Web Config goes to the Confirmation page without applying the changes. |
| "Back" | If pressed, Web Config discards the entered values and goes to the top page of Wi-Fi Setup. |
When the "Apply" button is pressed, Web Config displays a pop-up window that shows the following message if it recognizes an error in the entered value.
Table 9-31 Error Pop-up
| Items | Description |
| "Invalid value below." | This message is shown when the value entered for SSID, Password, or Confirm Password is invalid. The item names of the invalid values are shown under the message in the left cell. If there are two or more items whose values were invalid, those items are listed line by line. |
| "Passwords you entered do not match." | This message is shown if the values entered for Password and Confirm Password do not agree. |
9.3.2.4 Confirm Wi-Fi Setup Page
9.3.2.4.1 Image
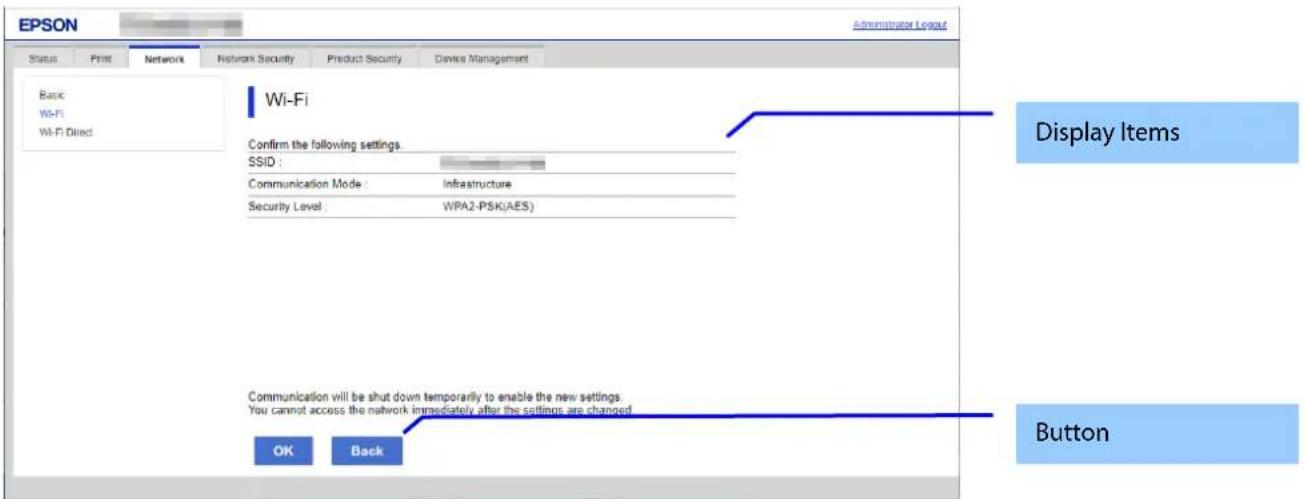
Figure 9-12 Confirm Wi-Fi Setup Page
9.3.2.4.2 Display Items
Table 9-32 Display Items
| Items | Description |
| "Confirm the following settings." | This message is shown at the top of the page. |
| "SSID" | The value entered on the Wi-Fi Setup page is shown. |
| "Communication Mode" | The value entered on the Wi-Fi Setup page is shown. |
| "Security Level" | The value entered on the Wi-Fi Setup page is shown. |
| "Communication will be shut down temporarily to enable the new settings. You cannot access the network immediately after the settings are changed." | This message is shown at the bottom of the page. |
"Security Level" is determined by the values on the Wi-Fi Setting page.
Table 9-33 Value for Security Level
| the values of Wi-Fi Setting page | Security Level of Confirm | ||
| SSID | Security Level of selected SSID | Length of Security Level | Wi-Fi Setup Page |
| - Select "Enter SSID". | - | 0 | "None" |
| 5 | "WEP-64bit(40bit)" | ||
| Others | "Unknown" | ||
| - Select from list. | - "Unknown" | 0 | "None" |
| 10 (hexdecimal) | "WEP-64bit(40bit)" | ||
| 26 (hexdecimal) | "WEP-128bit(104bit)" | ||
| 5 (not hexadecimal) | "WEP-64bit(40bit)" | ||
| 13 (not hexadecimals) | "WEP-128bit(104bit)" | ||
| Others | "Unknown" | ||
| - Others | - | - Select Security Level | |
9.3.2.4.3 Button
There is a button to proceed to Wi-Fi Setup based on the values entered on the Confirm Wi-Fi Setup page, and a button to go back to the previous page.
Table 9-34 Button
| Items | Description |
| "OK" | This button is used to go forward with Wi-Fi Setup based on the values entered on the Confirm Wi-Fi Setup page. If pressed, Web Config goes to the Result page. |
| "Back" | If pressed, Web Config discards the entered values and goes to the Wi-Fi Settings page. |
9.3.2.5 Result Page
9.3.2.5.1 Image
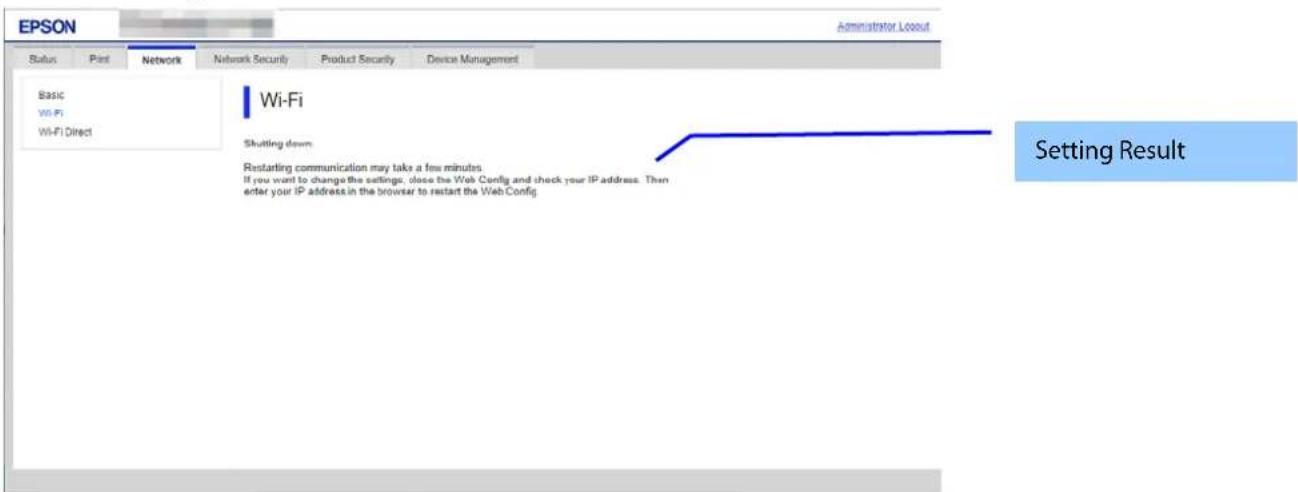
Figure 9-13 Result Page
9.3.2.5.2 Setting Result
Table 9-35 Setting Result
| Items | Description |
| "Shutting down.Restarting communication may take a few minutes.If you want to change the settings, close the Web Config and check your IP address. Then enter your IP address in the browser to restart the Web Config." | This message is shown if setup is successful. |
| "Setup failed." | This message is shown if setup fails. |
9.3.3 Wired LAN
Only models that support wired LAN are displayed.
9.3.3.1 Top page
9.3.3.1.1 Image
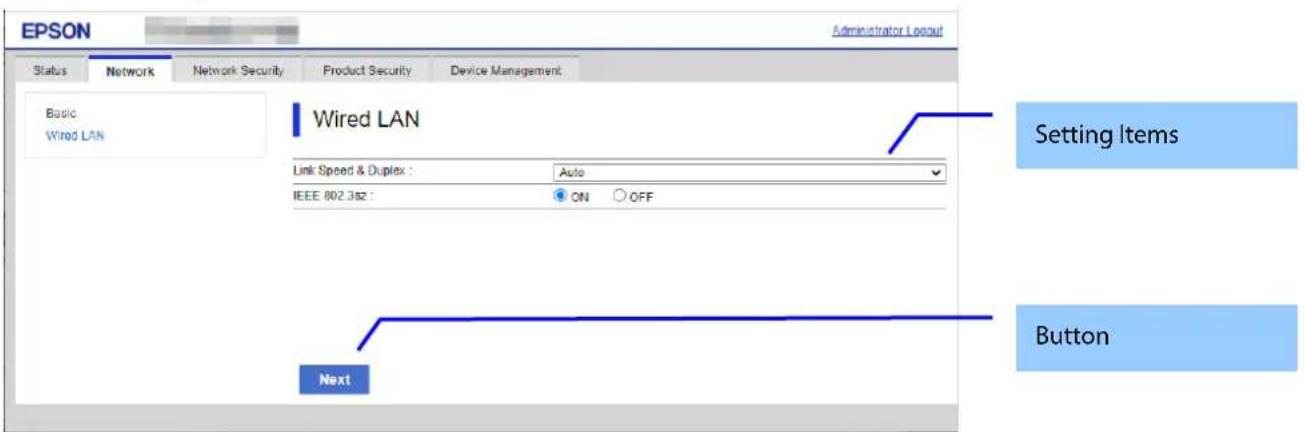
Figure 9-14 Top page
9.3.3.1.2 Setting Items
The following table shows the setting items in Wired LAN Settings.
Table 9-36 Setting Items
| Items | Description | Condition |
| "Link Speed & Duplex" | A drop-down list is provided to choose one of the following:"Auto" / "10BASE-T Half Duplex" / "10BASE-T Full Duplex" / "100BASE-TX Half Duplex" / "100BASE-TX Full Duplex" / "100BASE-TX Auto" | Can be select "100BASE-TX Auto" if model is SoC12H. |
| "IEEE 802.3az" | Either "ON" / "OFF" can be chosen with a radio button. | This item is displayed on devices that support IEEE802.3az. (See NW Function Table.) |
9.3.3.1.3 Button
The following table shows the setting button in Wired LAN Settings.
Table 9-37 Button
| Items | Description |
| "Next" | If pressed, Web Config goes to the Confirm Wired LAN Settings page. |
9.3.3.2 Confirm page
9.3.3.2.1 Image
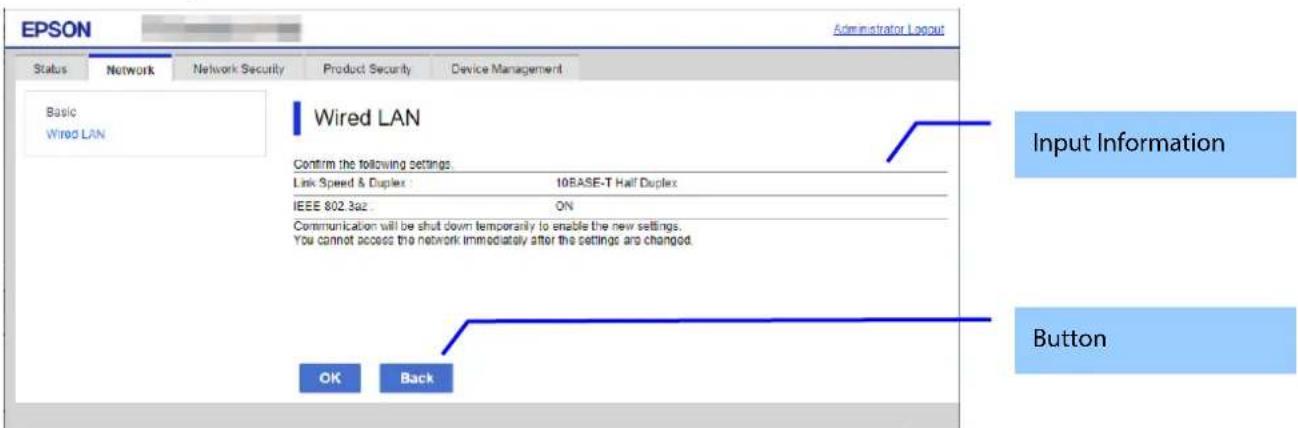
Figure 9-15 Confirm page
9.3.3.2.2 Input Information
Table 9-38 Input Information
| Items | Description |
| "Confirm the following settings." | This message is shown at the top of the page, followed by the setting items and their values. |
| "Communication will be shut down temporarily to enable the new settings. You cannot access the network immediately after the settings are changed." | This message is shown at the bottom of the page. |
9.3.3.2.3 Button
There is a button to proceed to the remaining settings based on the values entered on this page, and a button to go back to the previous page.
Table 9-39 Button
| Items | Description |
| "OK" | This button is used to apply the entered values to the system shown on the Confirm Wired LAN Settings page. If pressed, Web Config goes to the Result page. |
| "Back" | This button is used to go back to the Wired LAN Settings page. |
9.3.3.3 Result page
The following figure shows the page that is displayed after the network settings are processed. The content of the Result page will vary based on the result (success or failure).
9.3.3.3.1 Image
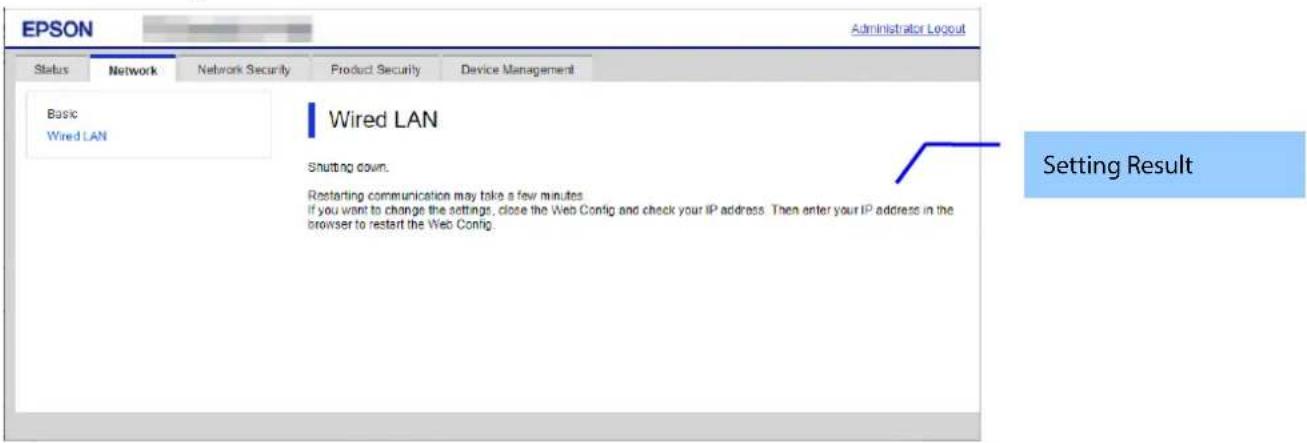
Figure 9-16 Result page
9.3.3.3.2 Setting Result
Table 9-40 Setting Result
| Items | Description |
| "Shutting down.""Restarting communication may take a few minutes.""If you want to change the settings, close the Web Config and check your IP address. Then enter your IP address in the browser to restart the Web Config." | This message is shown if setup is successful. |
| "Setup failed." | This message is shown if Wi-Fi/Network setup fails. |
9.3.4 Wi-Fi Direct
In the Wi-Fi Direct area, you can confirm the information for the Wi-Fi Direct connection and change the settings. Only models that support wireless LAN are displayed.
9.3.4.1 Top Page
9.3.4.1.1 Image
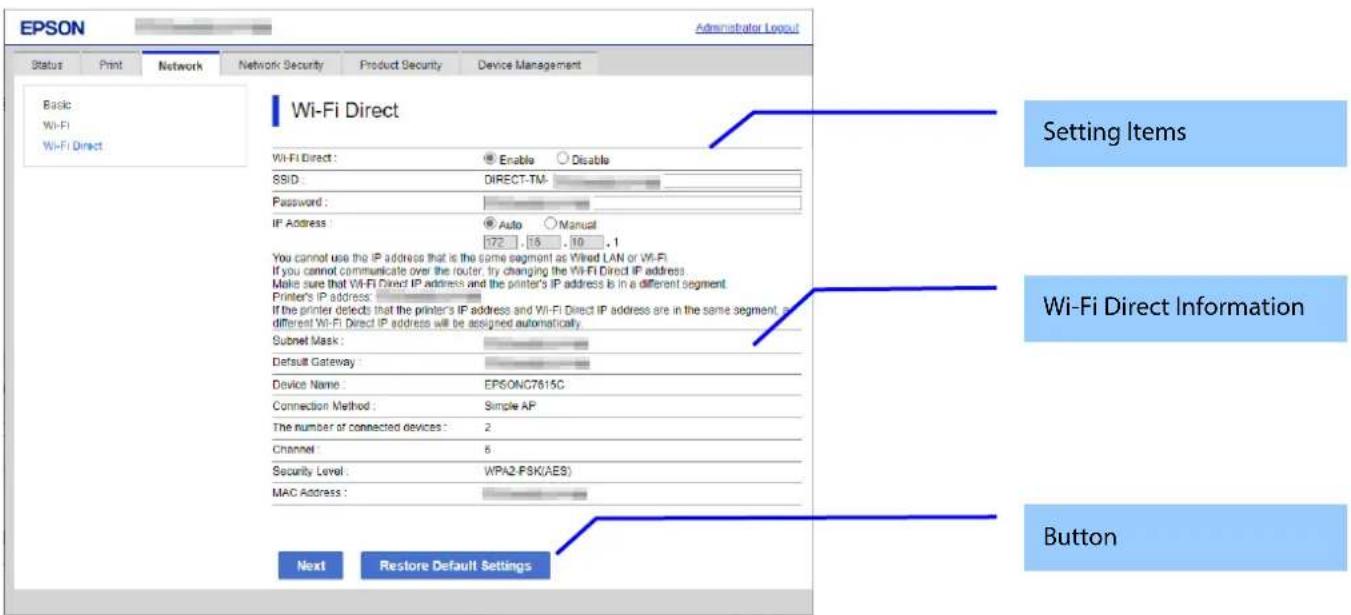
Figure 9-17 Top Page
9.3.4.1.2 Setting Items
The following table shows the items that can be set.
Table 9-41 Setting Items
| Items | Description | Condition |
| "Wi-Fi Direct" | Two radio buttons are provided to choose one of the following:"Enable" / "Disable"If you select "Disable", Wi-Fi Direct (Simple AP) is disabled.If you select "Enable", Wi-Fi Direct (Simple AP) is enabled. | - |
| "SSID" | Enter 0-22 0x20-0x7F ASCII characters in the text box."DIRECT-TM-" is displayed as a fixed character string in front of the text box."DIRECT-TM-" + the character string entered in this text box becomes the SSID name. | Displays only models equipped with Wi-Fi chip. |
| "Password" | The user can set a password for Wi-Fi Direct.8 ~ 22 characters in ASCII. | This item is enabled when "Wi-Fi Direct" is "Enable", if it isn't supported other than Wi-Fi chips (, if it is supported Broadcom Wi-Fi chips). |
| "Frequency Range" | Drop-down list is provided to choose either of the following:"2.4 GHz" / "5 GHz" | This item is displayed for models that use Wi-Fi chip. |
| "IP Address" | Two radio buttons are provided to choose one of the following:"Auto" / "Manual"When "manual" is selected, a text box for entering an IP address is displayed.There are three input fields for entering the 8-bit delimiter of the IP address in decimals. The final byte is fixed as "1"."." is displayed between each input fields.If Wi-Fi Direct is enabled, the default value is displayed for the operation value. When it is disabled, the default value is displayed for the setting value if the IP address is set manually. Otherwise, it is blank.A value from 0 to 255 can be entered for each text box.Perform the following check for values that are entered for the IP address."0.0.0.1"~"0.255.255.1"Loopback address ("127.0.0.1"~"127.255.255.1")Class D address ("224.0.0.1"~"239.255.255.1")Class E address ("240.0.0.1"~"255.255.255.1")A check is also performed for conflicts with IP addresses on wired LAN or wireless LAN (Wi-Fi). If there is an error, it will be displayed in a pop-up window. However, this check is not performed if there is no connection.(The check is performed for up to the 2nd byte of the IP address on wired or wireless LAN.) | If "Wi-Fi Direct" is "Disable", this item is grayed out.The text box is grayed out if the setting is Auto. |
| "You cannot use the IP address that is the same segment as Wired LAN or Wi-Fi.If you cannot communicate over the router, try changing the Wi-Fi Direct IP address. Make sure that Wi-Fi Direct IP address and the printer's IP address is in a different segment. Printer's IP address: %s If the printer detects that the printer's IP address and Wi-Fi Direct IP address are in the same segment, a different Wi-Fi Direct IP address will be assigned automatically." | Fixed character string displayed in the IP address setting items."%s" indicates the IP address for the current wired LAN or Wi-Fi. | - |
9.3.4.1.3 Wi-Fi Direct Information
The content is the same as the description for the confirmation of the network information.
9.3.4.1.4 Button
The following table shows the buttons on the page.
Table 9-42 Button
| Items | Description | Condition |
| "Next" | This button is for going to the confirmation page. | - |
| "Delete" | If the pop-up warning "Delete the device registration(s)?" appears and you press the OK button, the deleted results page will be displayed.If Cancel button is pressed, pop-up warning is deleted.Description of the function will appear above the button."You can delete registered device information on the product." | Not displayed when "Restore Default Settings" button is displayed. |
| "Restore Default Settings" | If pressed, Web Config restores the setting values to the factory defaults. | This item is displayed for models that use the Wi-Fi chip. |
When the "OK" button is pressed, Web Config displays a pop-up window with the following message if it recognizes an error in the entered value.
Table 9-43 Error Pop-up
| Items | Description |
| "Invalid value below." | Shows a warning when a value is entered incorrectly. |
9.3.4.2 Confirm Page
9.3.4.2.1 Image
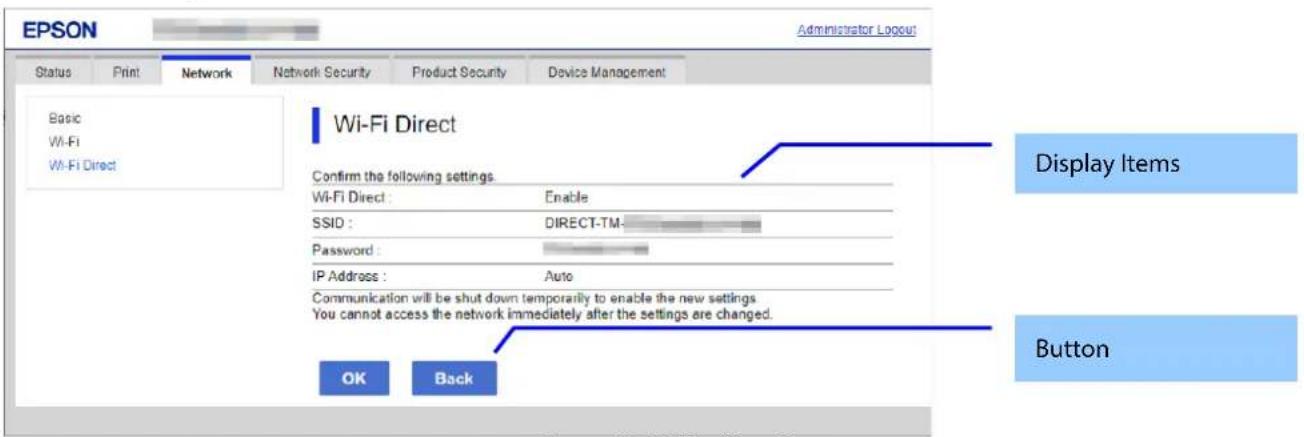
Figure 9-18 Confirm Page
9.3.4.2.2 Display Items
The settings that were entered on the previous page are shown for confirmation after the “Change the following settings” message. The following message is shown below the confirmed settings: “Communication will stop temporarily to enable the new settings. You will not be able to access the network immediately after the settings are changed.”
If "Wi-Fi Direct" and "Wireless LAN Access Point" are both enabled, the following cautionary statement will be displayed:
"The following settings will be disabled:"
- Network > Tethering > Wi-Fi > Wireless LAN Access Point"
9.3.4.2.3 Button
The following table shows the buttons on the page.
Table 9-44 Button
| Items | Description |
| "OK" | - Button at the bottom of the main frame to perform settings. |
| "Back" | - Button at the bottom of the main frame to go back to the previous page. |
9.3.4.3 Result Page
The result page is shown in the main frame after the "OK" button is pressed. An error page is shown when Wi-Fi LAN mode is set to IEEE802.11g in the printer. The page is shown when "Delete" is pressed on the previous page.
9.3.4.3.1 Image
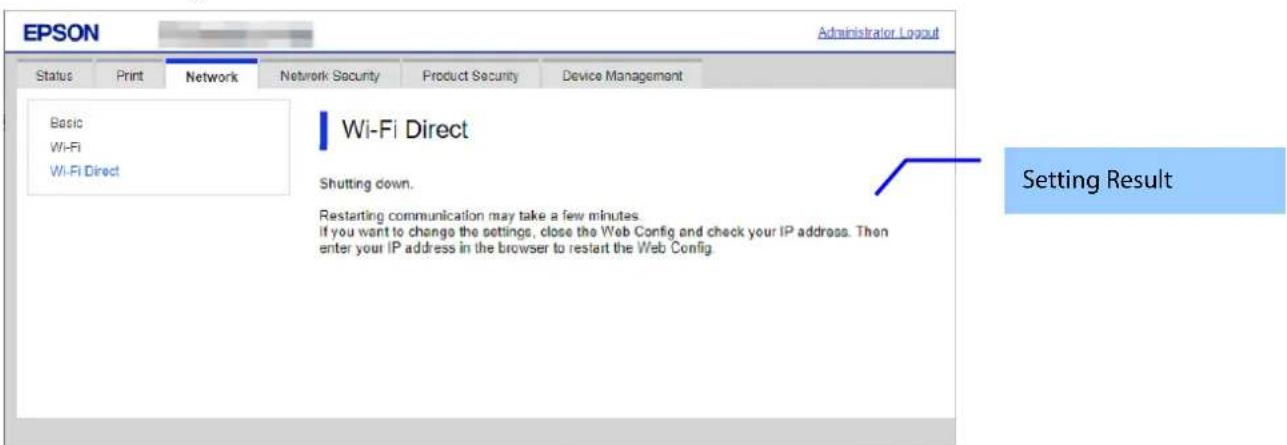
Figure 9-19 Result Page
9.3.4.3.2 Setting Result
Table 9-45 Setting Result
| Items | Description | Condition |
| "Setup complete.""Restarting communication may take a few minutes.""If you want to change the settings, close the Web Config and check your IP address. Then enter your IP address in the browser to restart the Web Config." | Displays a fixed string. | This text is shown if setup is successful. |
| "SSID" | Same content as SSID in Advanced Settings > Wi-Fi Direct is displayed under same conditions. | This item is displayed when "Wi-Fi Direct" is "Enable". (Not displayed in CL25.) |
| "Password" | Same content as Password in Advanced Settings > Wi-Fi Direct is displayed under same conditions. | This item is displayed when "Wi-Fi Direct" is "Enable". (Not displayed in CL25.) |
| "You can connect to a wireless LAN access point by scanning the two-dimensional code." | Displays a fixed string and a QR code below it. | This item is displayed when "Wi-Fi Direct" is "Enable". (Not displayed in CL25.) |
9.4 Network Security
9.4.1 Protocol
9.4.1.1 Top Page
9.4.1.1.1 Image
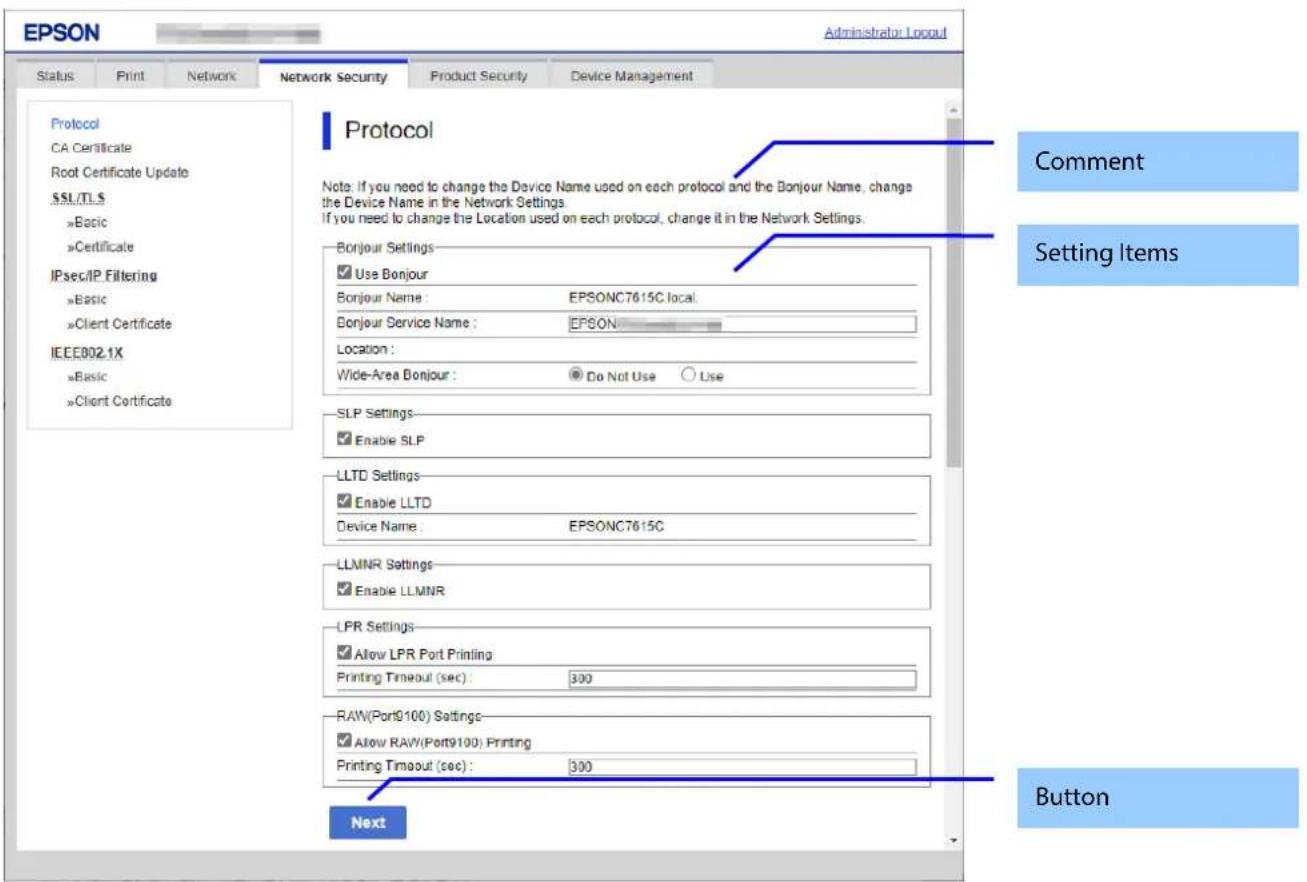
Figure 9-20 Top Page
9.4.1.1.2 Comment
Table 9-46 Comment
| Comment | Description |
| "Note: If you need to change the Device Name and Bonjour Name used for each protocol, change the Device Name in the Network Settings.If you need to change the Location used for each protocol, change it in the Network Settings." | -Fixed Strings |
9.4.1.1.3 Setting Items
Table 9-47 Setting Items
| Items | Description | Condition |
| "Bonjour Settings" | Title | - |
| "Use Bonjour" | Use the check box to choose whether or not to use Bonjour. | - |
| "Bonjour Name" | Shows the bonjour name, consisting of the device name and '.local'. | Read only |
| "Bonjour Service Name" | Use the edit box to set the bonjour service name. The string must have up to 41 alphanumeric characters (0x20 ~ 0x7E). | Can be entered when "Use Bonjour" is checked. |
| "Location" | Shows the locations that use Bonjour protocol. | Read only |
| "Top Priority Protocol" | Use the drop-down list to choose the following options."Port9100" / "IPP" | Only RAW (Port9100) and IPP support products.Can be entered, when "Use Bonjour" is checked. |
| "iBeacon Settings" | Title | Only printers that support iBeacon |
| "Enable iBeacon Transmission" | Use the check box to choose whether or not to enable iBeacon. | Only iBeacon support printers |
| "SLP Settings" | Title | - |
| "Enable SLP" | Use the check box to choose whether or not to enable SLP. | - |
| "WSD Settings" | Title | - |
| "Enable WSD" | Use the check box to choose whether or not to enable WSD. | - |
| "Scanning Timeout (sec)" | Use the edit box to set the timeout for WSD.(3 ~ 3600 seconds) | Can be entered, when "Enable WSD" is checked.Only printers that support WSD Scan |
| "Device Name" | Shows the device name using WSD. The value can be changed from Wi-Fi/Network setup. | Read only |
| "Location" | Shows the locations that use WSD. The value can be change from the Wi-Fi/Network setup. | Read only |
| "LLTD Settings" | Title | - |
| "Enable LLTD" | Use the check box to choose whether or not to enable LLTD. | - |
| "Device Name" | Shows the device names that use LLTD. The value can be changed from Wi-Fi/Network setup. | Read only |
| "LLMNR Settings" | Title | - |
| "Enable LLMNR" | Use the check box to choose whether or not to enable LLMNR. | - |
| "LPR Settings" | Title | Only printers that support LPR |
| "Allow LPR Port Printing" | Use the check box to choose whether or not to allow LPR port printing | Only LPR support printer. |
| "Printing Timeout (sec)" | Use the edit box to set the timeout for LPR port printing(0 ~ 3600 seconds) | Only LPR support printer.Can be entered, when "Allow LPR Port Printing" is checked. |
| "RAW (Port9100) Settings" | Title | Only printers that support RAW (Port9100) |
| "Allow RAW(Port9100) Printing" | Use the check box to choose whether or not to allow RAW port printing | Only RAW(Port9100) support printer. |
| "Printing Timeout (sec)" | Use the edit box to set the timeout for RAW port printing(0 ~ 3600 seconds) | Only printers that support RAW (Port9100)Can be entered, when "Allow RAW (Port9100) Printing" is checked. |
| "RAW(Custom Port) Settings" | Title | Only RAW(Custom Port) support device. |
| "Allow RAW(Custom Port) Printing" | Use the check box to choose whether or not to allow RAW (Custom Port) printing. | Only RAW(Custom Port) support device. |
| "Port Number" | The user can set the port number.2014 ~ 65535 (Except for 9100, 1865, 2968) | Only RAW(Custom Port) support device.Enabled when checked "Allow RAW(Custom Port) Printing". |
| "Printing Timeout(sec)" | Use the edit box to set the timeout for RAW (Custom Port) printing. (0 ~ 3600 sec) | Only RAW(Custom Port) support device.Enabled when checked "Allow RAW(Custom Port) Printing". |
| "IPP Settings" | Title | Only IPP support printer. |
| "Enable IPP" | Use the check box to choose whether or not to enable IPP. | Only IPP support printer. |
| "Allow Non-secure Communication" | Use the radio buttons to select "Allowed" / "Not Allowed". | Only printers that support IPP |
| "Communication Timeout (sec)" | Use the edit box to set the timeout used for IPP.(3 ~ 3600 seconds) | Only IPP support printer.Can be entered, when "Enable IPP" is checked. |
| "Printer Name" | Use the check box to choose whether or not to allow RAW port printing | Only RAW(Port9100) support printer. |
| "Location" | Use the edit box to set the timeout for RAW port printing(0 ~ 3600 seconds) | Only printers that support RAW (Port9100)Can be entered, when "Allow RAW (Port9100) Printing" is checked. |
| "SNMPv1/v2c Settings" | Title | Only SNMPv3 support printer. |
| "Enable SNMPv1/v2c" | You can choose whether or not to enable SNMPv1/v2c using the check box. | This item is displayed when the device supports SNMPv3 function and not support SNMPv1/v2c Individual Setting. |
| "Enable SNMPv1" | You can choose whether to enable SNMPv1 using the check box. | This item is displayed when the device supports SNMPv1/v2c Individual Setting. |
| "Enable SNMPv2c" | You can choose whether to enable SNMPv2c using the checkbox. | This item is displayed when the device supports SNMPv1/v2c Individual Setting. |
| "Access Authority" | Use the drop-down list to choose the following options."Read Only" / "Read/Write" | Only SNMPv3 support printer.Can be entered, when "Enable SNMPv1/v2c" is checked. |
| "Community Name(Read Only)" | Use the text box to set the Community Name (Read Only).0 ~ 32 characters in ASCII | Only SNMPv3 support printer.Can be entered, when "Enable SNMPv1/v2c" is checked. |
| "Community Name(Read/Write)" | Use the text box to set the Community Name (Read/Write).0 ~ 32 characters in ASCII | Only SNMPv3 support printer.Can be entered, when "Enable SNMPv1/v2c" is checked. |
| "Allow access from Epson tools" | "Allowed" / "Not Allowed" can be selected by radio button. | Only SNMPv3 support printer.Can be entered when "Enable SNMPv1/v2c" is checked.If the device can set SNMPv1/v2c individually, this item is enabled when each checkbox is selected. |
| "SNMPv3 Settings" | Title | Only SNMPv3 support printer. |
| "Enable SNMPv3" | Use the check box to choose whether or not to enable SNMPv3. | Only printers that support SNMPv3 |
| "User Name" | Use the text box to set the User Name.1 ~ 32 bytes in UTF-8 | Only printers that support SNMPv3Can be entered, when "Enable SNMPv3" is checked. |
| "Authentication Settings" | Title | Only SNMPv3 support printer. |
| "Algorithm" | Use the drop-down list to choose the following options."MD5" / "SHA-1" | Only SNMPv3 support printer.Can be entered, when "Enable SNMPv3" is checked. |
| "Password" | Use the text box to set the Password.8 ~ 32 bytes, in ASCII and masked.If 10 asterisks (*) are entered when the password field is blank, the setting fails. | Only SNMPv3 support printer.Can be entered, when "Enable SNMPv3" is checked. |
| "Confirm Password" | Same as Password. | Same as Password. |
| "Encryption Settings" | Title | Only SNMPv3 support printer. |
| "Algorithm" | Use the drop-down list to choose the following options."DES" / "AES-128" | Only SNMPv3 support printer.Can be entered, when "Enable SNMPv3" is checked. |
| "Password" | Use the text box to set the Password.8 ~ 32 bytes, in ASCII and masked.If 10 asterisks (*) are entered when the password field is blank, the setting fails. | Only SNMPv3 support printer.Can be entered, when "Enable SNMPv3" is checked. |
| "Confirm Password" | Sameas Password. | Same as Password. |
| "Context Name" | Use the text box to set the Context Name.0 ~ 32 bytes in UTF-8 | Only SNMPv3 support printer.Can be entered, when "Enable SNMPv3" is checked. |
9.4.1.1.4 Button
The following table shows the buttons on the page.
Table 9-48 Button
| Items | Description |
| "Next" | The button for going to the confirmation page is at the bottom of the main frame. |
When the “Next” button is pressed, Web Config displays a pop-up window with the following message if it recognizes an error in the entered value.
Table 9-49 Error Pop-up
| Items | Description |
| "Invalid value below.""-WSD Settings >Timeout" | Shows a warning when a value is entered incorrectly. |
| "Passwords you entered do not match.""-SNMPv3 Settings >" | When the password and the confirmation password do not match, this message is shown. |
When the "Next" button is pressed, assuming there is no error in the input value and the following display conditions are met, a warning dialog is displayed.
Table 9-50 Dialog
| Items | Description | Display Condition |
| "A blank space is included in the Bonjour Service Name. Wide-Area Bonjour may not work." | If OK button is pressed, Web Config makes transition to the confirmation page.If Cancel button is pressed, operation is canceled. | This message is shown if "Use Bonjour" is checked, "Wide-Area Bonjour"- "Use" are selected, and the input value of Bonjour Service Name includes one-byte space. |
9.4.1.2 Confirmation Page
9.4.1.2.1 Image
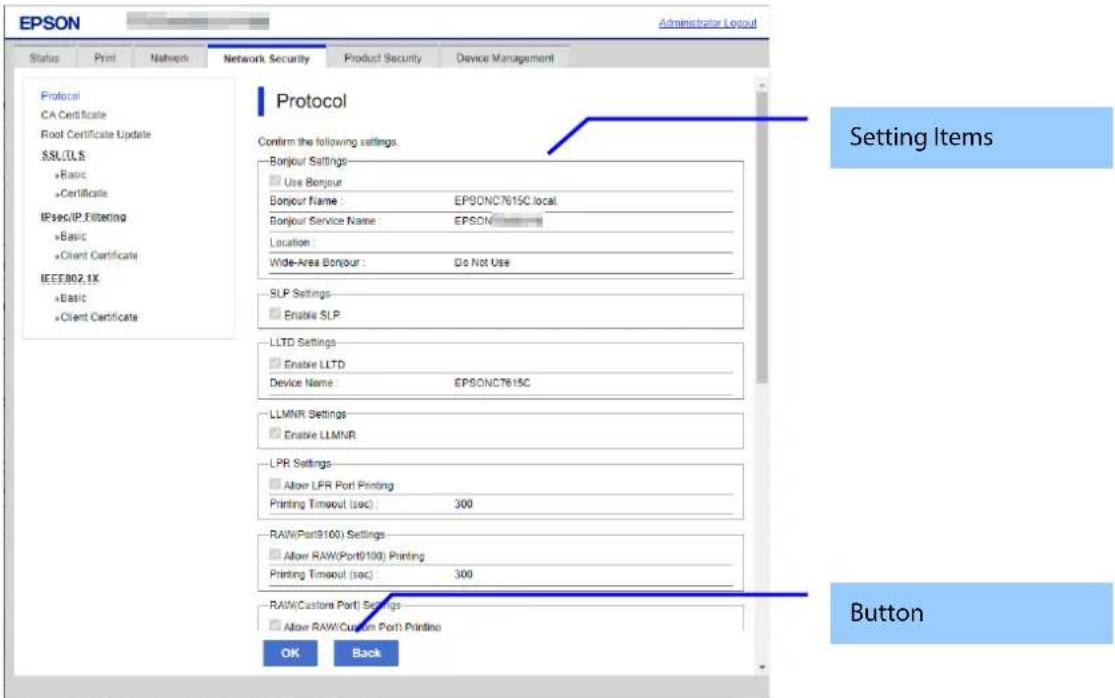
Figure 9-21 Confirmation Page
9.4.1.2.2 Setting Items
The settings entered on the previous page are shown for confirmation, after the message “Change the following settings”. The following message is shown below the confirmed settings.
"Communication will be shut down temporarily to enable the new settings."
"You will not be able to access the network immediately after the settings are changed."
9.4.1.2.3 Button
The following table shows the buttons on the page.
Table 9-51 Button
| Items | Description |
| "OK" | - Button at the bottom of the main frame to perform settings. |
| "Back" | - Button at the bottom of the main frame to go back to the previous page. |
9.4.1.3 Result Page
9.4.1.3.1 Image
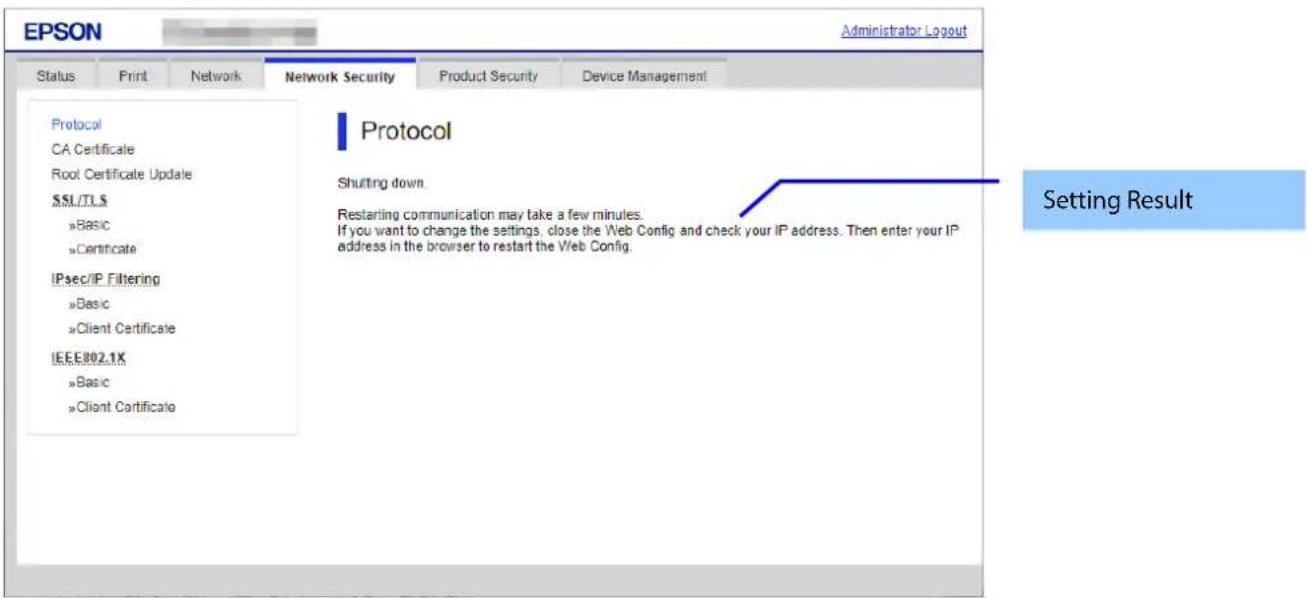
Figure 9-22 Result Page
9.4.1.3.2 Setting Result
Table 9-52 Setting Result
| Items | Description |
| "Shutting down.""Restarting communication may take a few minutes.""If you want to change the settings, close the Web Config and check your IP address. Then enter your IP address in the browser to restart the Web Config." | -This message is shown when the settings are completed.The network shuts down in order to update. |
| "Setup failed." | - This message is shown if the settings fail. |
9.4.2 CA Certificate
9.4.2.1 Top Page
On the CA Certificate top page, you can import, display, and delete CA Certificate. If importing or deleting is successful, this page is shown. The following figure shows the layout of the CA Certificate top page.
9.4.2.1.1 Image
The following figure shows the layout of the top page.
![EPSON Administrator Logout Status Print Network Network Security.Product Security Device Management Protocol CA Certificate Root Certificate Update SL/TL »Basic »Certificate IPsec/IP Filtering »Basic »Client Certificate IEEE802.1X »Basic »Client Certificate CA Certificate Click [Reboot Network] to a…](/content/2026/08/1566445/images/817f8065d8aab8a55a8fa38cc5f03b605d7274f95897adee083541a8ce9547d1.jpg)
Figure 9-23 Top Page
9.4.2.1.2 Description Items
Table 9-53 Description
| Items | Description |
| "Click [Reboot Network] to apply importing or deleting the certificate to the communication immediately." | Fixed Strings |
| "The setting may be applied to the communication after other settings are changed or the device is restarted." | Fixed Strings |
9.4.2.1.3 Display Items
Table 9-54 Display Items
| Items | Description |
| "1" | - Shows the content of the server certificate imported into the printer. |
| "2" | Same as above |
| "3" | Same as above |
| "4" | Same as above |
| "5" | Same as above |
| "6" | Same as above |
| "7" | Same as above |
| "8" | Same as above |
| "9" | Same as above |
| "10" | Same as above |
9.4.2.1.4 Button
Table 9-55 Button
| Items | Description | Condition |
| "Import" | Button used to import CA certificate | This button is shown when CA Certificate is not imported. |
| "Delete" | Button used to delete the imported CA certificate | This button is shown when CA Certificate is imported. |
| "Reboot Network" | Button used to reboot network functions | - |
9.4.2.1.5 Delete
A pop-up window is shown when the “Delete” button in the CA certificate settings is pressed. The following figure shows the layout of the page for deleting the CA certificate.
Table 9-56 Pop-up window
| Items | Description |
| "The certificate of No. %d will be deleted." | Static strings |
A pop-up window is shown when the 'Reboot Network' button on the CA certificate page is pressed. The following figure shows the layout of the reboot network page.
Table 9-57 Pop-up window
| Items | Description |
| "The network will be rebooted.""Communication will be shut down temporarily." | Static strings. |
9.4.2.2 Import Page
The page is shown after the 'Import' button is pressed.
The following figure shows the layout of the page for importing the CA certificate into the printer.
9.4.2.2.1 Image
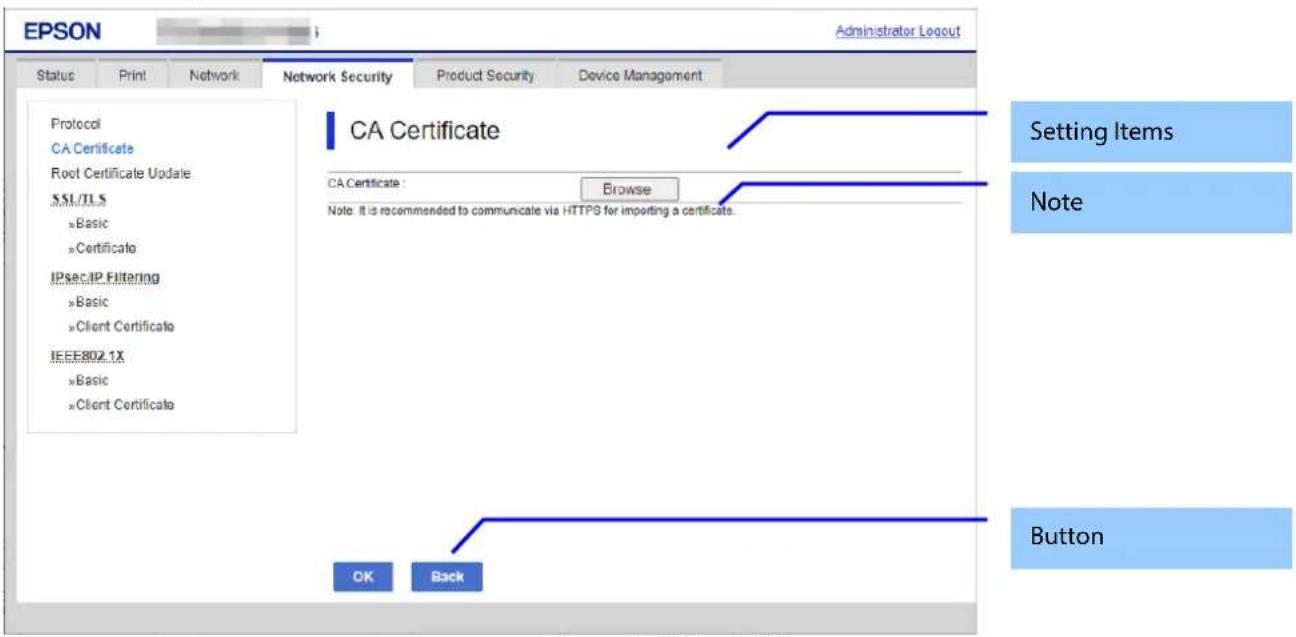
Figure 9-24 Import Page
9.4.2.2.2 Setting Items
Table 9-58 Setting Items
| Items | Description |
| "CA Certificate" | -Enter the file of the CA certificate to import it into the printer. You can also use the file button to select the file. |
9.4.2.2.3 Note
The following table shows the note on the CA Certificate Import page.
Table 9-59 Note
| Items | Description |
| "CA Certificate" | You can input the file of the CA certificate for import into the printer. You can also select the file using file button. |
9.4.2.2.4 Button
Table 9-60 Button
| Items | Description |
| "OK" | -Button at the bottom of the main frame to perform importing.After the "Import" button is pressed, Web Config displays one of the following pages depending on the result.- If importing is successful, the top page is shown in the main frame.- If importing fails, the result page is shown in the main frame.- If the entered value is invalid, a pop-up window is shown. |
| "Back" | Button at the bottom of the main frame for going back to the top page of the CA Certificate settings. |
9.4.2.2.5 Error Pop-up Window
Table 9-61 Error Pop-up Window
| Items | Description |
| "Invalid file." | This message is shown in the following cases.- The file uses an incorrect format or wrong interrelation.- The file size is greater than the stipulated range of 5k to 24k. (See the note.) |
| "Invalid date and time." | This message is shown when an expired certificate is imported, and the date and time are not set. |
| "The certificate has expired. Check if the certificate is valid, or check the date and time on the product." | This message is shown when an expired certificate is imported, and the date and time are already set. |
| "Shutting down.""Restarting communication may take a few minutes.""If you want to change the settings, close the Web Config and check your IP address. Then enter your IP address in the browser to restart the Web Config." | This message is shown when network rebooting is successful. |
| "Setup failed." | This message is shown when importing or network rebooting fails. |
| "Select a CA Certificate." | This message is shown when the file of the CA Certificate is not selected. |
9.4.2.3 Result Page
After the "Import" button is pressed, the top page is shown in the main frame if importing is successful. After the "Import" button is pressed, the result is shown in the main frame if importing fails.
9.4.2.3.1 Image
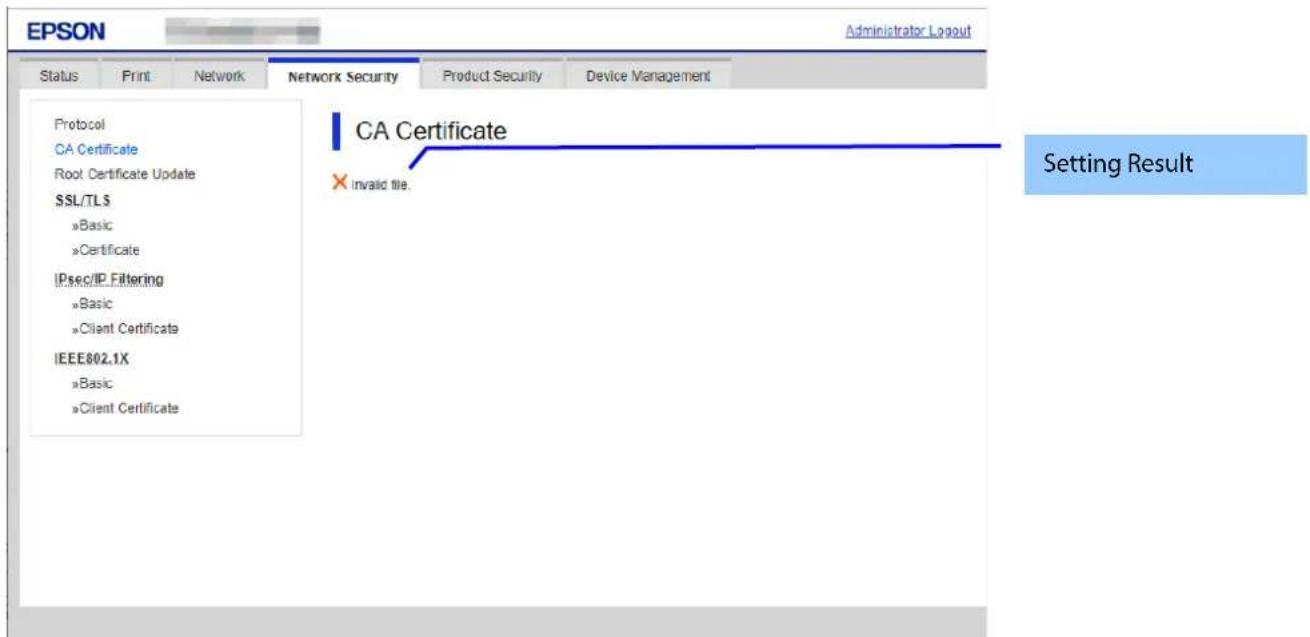
Figure 9-25 Result Page
9.4.2.3.2 Setting Result
Table 9-62 Result
Note: If the size of a certificate to be imported is larger than 24KBytes, the device is unable to read it and a Web browser error is shown.
9.4.3 Root Certificate Update
9.4.3.1 Top Page
The root certificate update function on the Web Config downloads a root certificate file from the server provided by Epson and updates the printer files.
9.4.3.1.1 Image
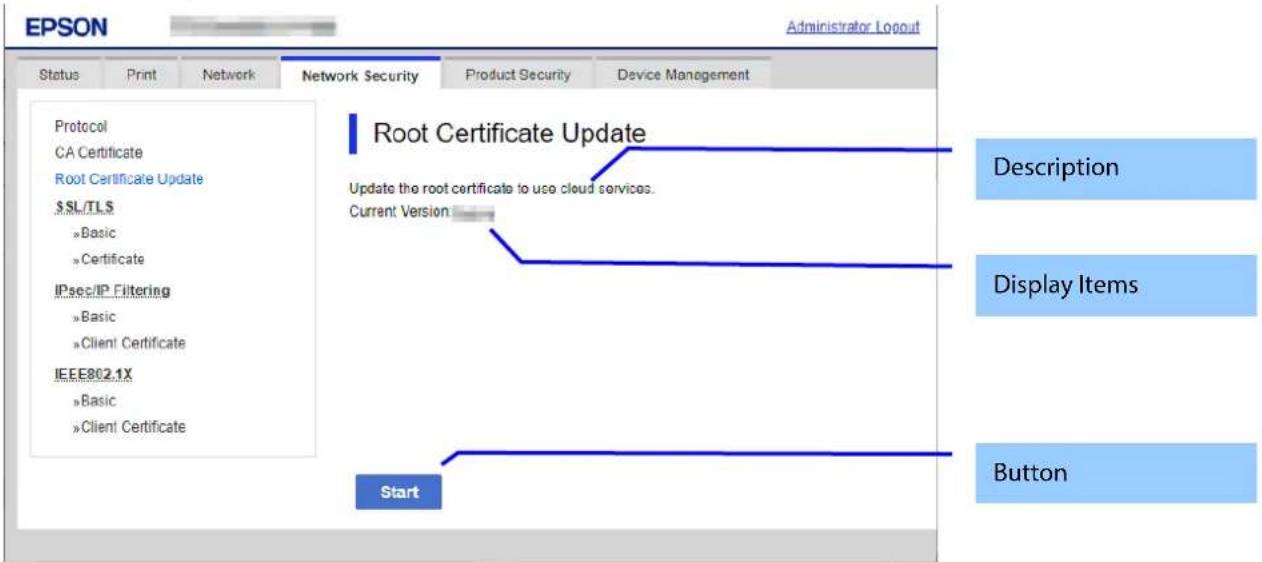
Figure 9-26 Top Page
9.4.3.1.2 Description
Table 9-63 Description
| Items | Description |
| "Update the root certificate to use cloud services." | Fixed Strings |
9.4.3.1.3 Display Items
Table 9-64 Display Items
| Items | Description |
| "Current Version" | File version format: "MM.mm". "MM" means major version; "mm" means minor version. |
9.4.3.1.4 Button
Table 9-65 Button
| Items | Description |
| "Start" | Press to change to the progress page. |
9.4.3.2 Progress Page
9.4.3.2.1 Image
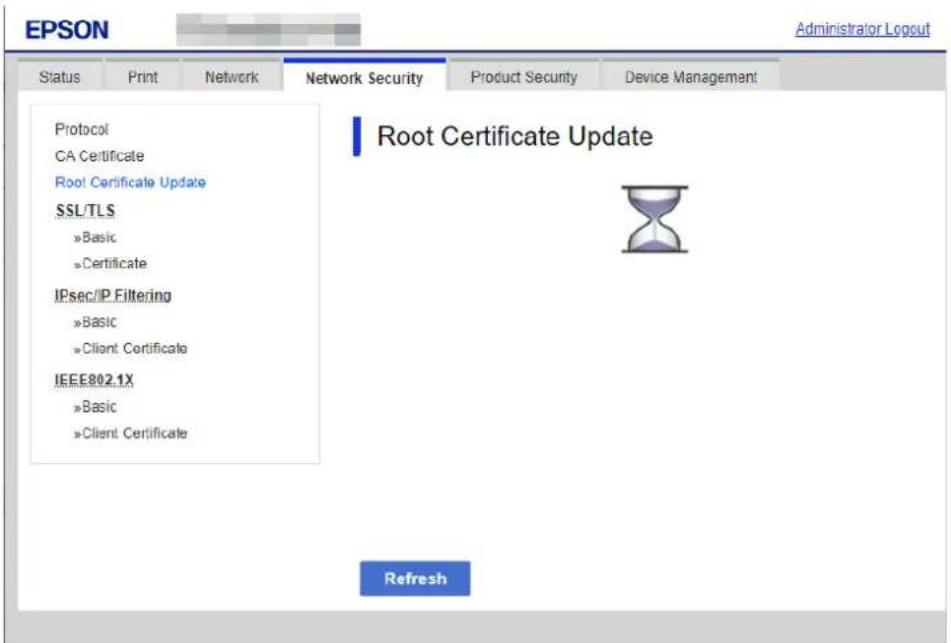
Figure 9-27 Progress Page
9.4.3.3 Result Page
9.4.3.3.1 Image
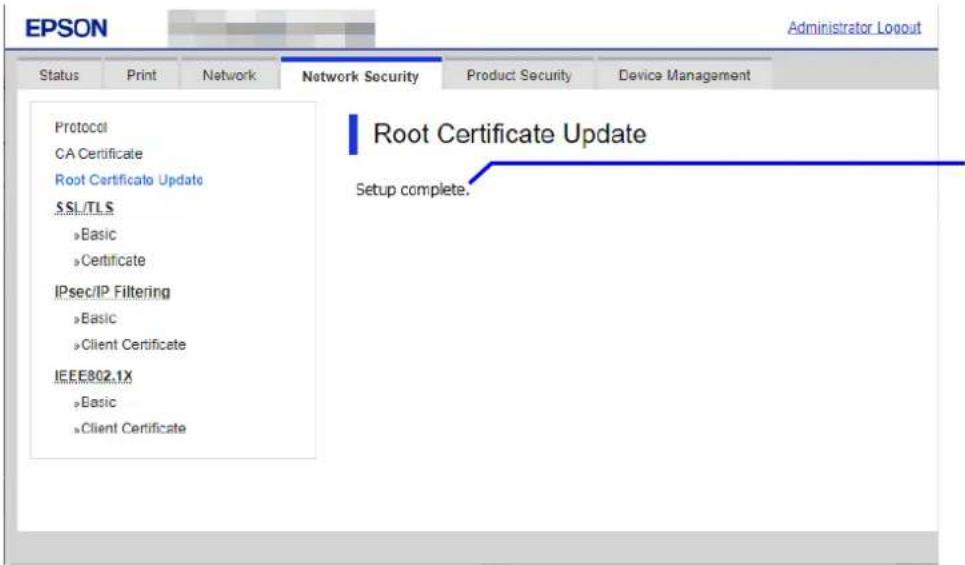
Result Page
Figure 9-28 Result Page
9.4.3.3.2 Result
Table 9-66 Result
| Items | Description |
| "Setup complete." | This message is shown when the settings are completed. |
| "You have the latest root certificate." | The root certificate is the latest available. |
| "Cannot connect to the Epson server." | The printer could not access the server. |
| "The operation failed." | The product is processing. The printer is being configured. |
| "Setup failed." | This message is shown if Wi-Fi/Network setup fails due to setup/token mismatch. |
9.4.4 SSL/TLS
In the SSL/TLS settings area, you can configure the settings related to the HTTP server the printer supports.
Table 9-67 Sub menu
| Sub menu |
| "Basic" |
| "Certificate" |
9.4.4.1 Basic
9.4.4.1.1 Top Page
9.4.4.1.1.1 Image
The following figure shows the layout of the top page.
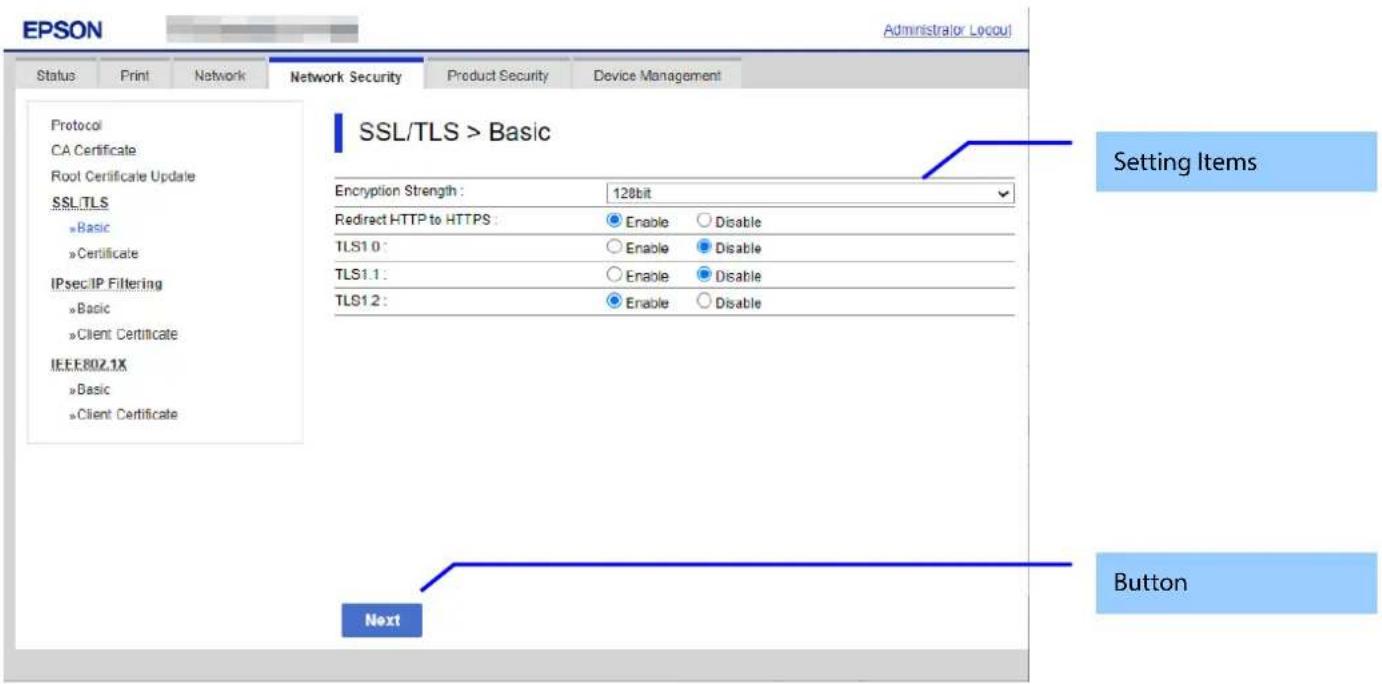
Figure 9-29 Top Page
9.4.4.1.1.2 Setting Items
Table 9-68 Setting Items
| Items | Description | Condition |
| "Encryption Strength" | -Use the drop-down list to choose the strength of the encryption."80bit" / "112bit" / "128bit" / "192bit" / "256bit" | |
| "Redirect HTTP to HTTPS" | - You can change whether or not the printer allows redirecting HTTP to HTTPS."Enable" / "Disable" | |
| "TLS1.0" | Two radio buttons are provided to choose either of the following:"Enable" / "Disable" | |
| "TLS1.1" | Two radio buttons are provided to choose either of the following:"Enable" / "Disable" | |
| "TLS1.2" | Two radio buttons are provided to choose either of the following:"Enable" / "Disable" | Displayed on models that support TLS1.3. |
9.4.4.1.1.3 Button
Table 9-69 Button
| Items | Description |
| "Next" | There is the button at the bottom of the confirmation page. |
9.4.4.1.2 Confirming Page
The confirmation page appears when the "Next" button is pressed on the previous settings page.
9.4.4.1.2.1 Image
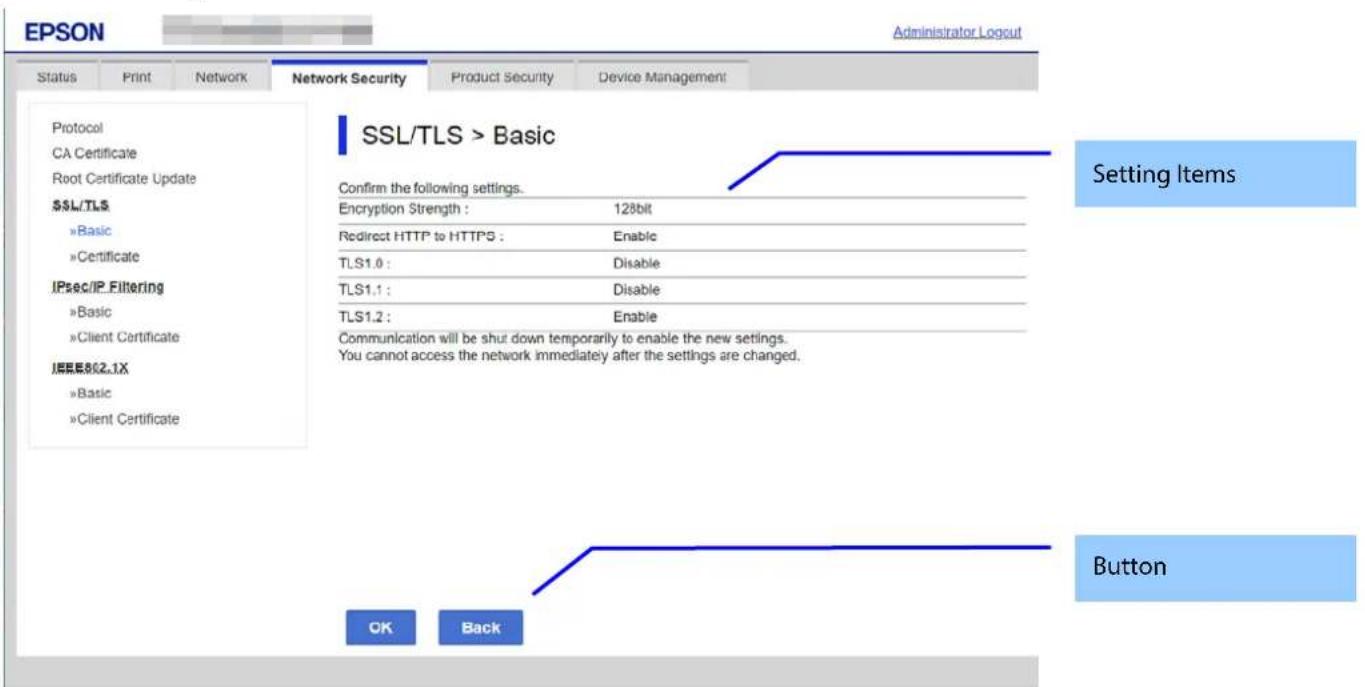
Figure 9-30 Confirming Page
9.4.4.1.2.2 Setting Items
The settings entered on the previous page are shown for confirmation, after the message “Change the following settings”.
The following message is shown below the confirmed settings.
"Communication will be shut down temporarily to enable the new settings."
"You will not be able to access the network immediately after the settings are changed."
9.4.4.1.2.3 Button
The following table shows the buttons on the page.
Table 9-70 Button
| Items | Description |
| "OK" | - Button at the bottom of the main frame to perform settings. |
| "Back" | - Button at the bottom of the main frame to go back to the previous page. |
9.4.4.1.3 Result Page
The following result is shown in the main frame after the "OK" button is pressed.
9.4.4.1.3.1 Image
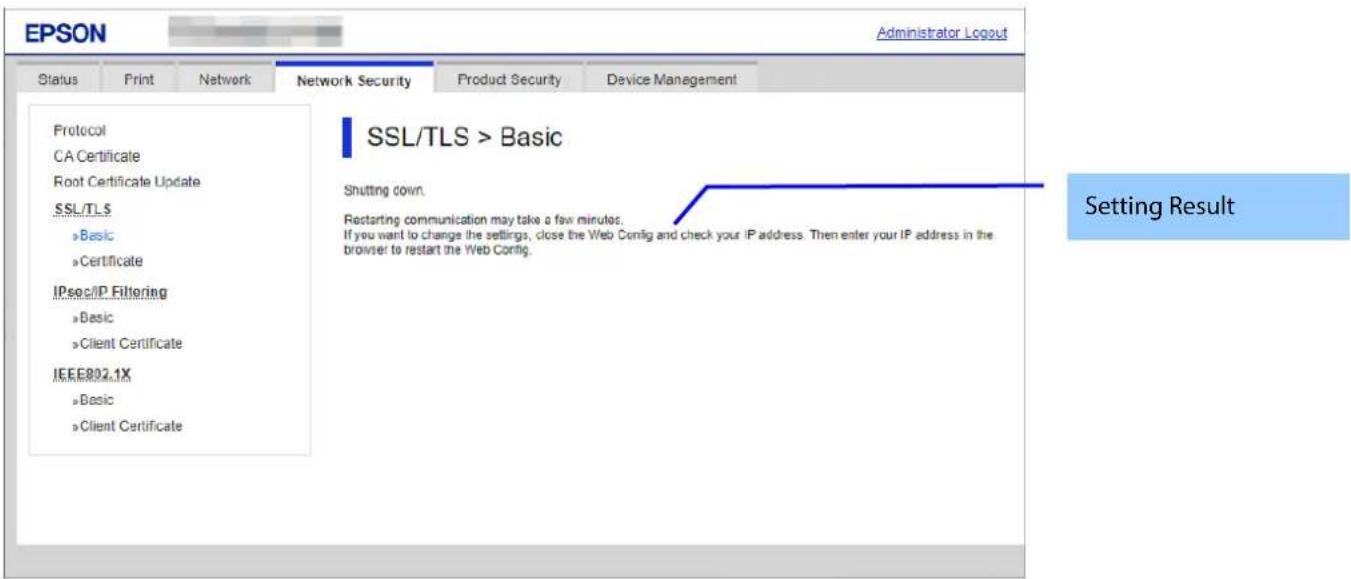
Figure 9-31 Result Page
9.4.4.1.3.2 Setting Result
Table 9-71 Setting Result
| Items | Description |
| "Shutting down.""Restarting communication may take a few minutes.""If you want to change the settings, close the Web Config and check your IP address. Then enter your IP address in the browser to restart the Web Config." | -This message is shown when the settings are completed.The network shuts down in order to update. |
| "Setup failed." | - This message is shown if the settings fail. |
9.4.4.2 Certificate
9.4.4.2.1 Top Page
9.4.4.2.1.1 Image
The following figure shows the layout of the top page.
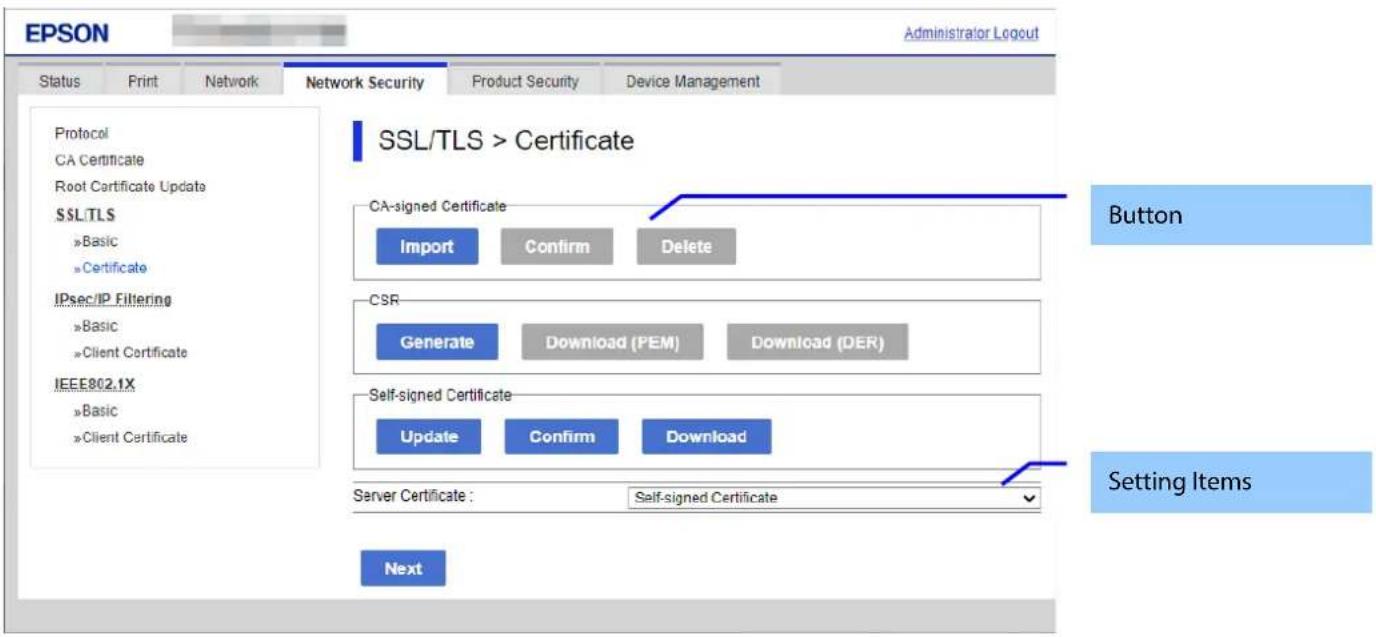
Figure 9-32 Top Page
9.4.4.2.1.2 Setting Items
You can choose the certificate used for the SSL/TLS connection.
Table 9-72 Setting Items
| Items | Description |
| "Server Certificate" | Use the drop-down list to make a choice."CA-signed Certificate" / "Self-signed Certificate"If a CA-signed certificate is not imported, a self-signed certificate is chosen automatically by the printer. |
9.4.4.2.1.3 Button
The following table shows the button on the page.
Table 9-73 Button
| Items (Group Name) | Items (Button Name) | Description | Condition |
| "Server Certificate" | "Next" | -Button for changing the server certificate for SST/TLS | - |
| "CA-signed Certificate" | "Import" | - Button for importing a CA-signed certificate | - |
| "Confirm" | - Button for confirming the imported CA-signed certificate | CA-signed certificate imported | |
| "Delete" | - Button for deleting the imported CA-signed certificate | Enabled if a CA-signed certificate is imported but not in use | |
| "CSR" | "Generate" | - Button for moving to the settings page to generate CSR | - |
| "Download (PEM)" | - Button for downloading the CSR date in PEM format | -CSR created. | |
| "Download (DER)" | - Button for downloading the CSR date in PEM format | -CSR created. | |
| "Self-signed Certificate" | "Update" | - Button for moving to the settings page to update the self-signed certificateIf the date and time are not adjusted in the printer, the following message is shown in the main frame."Invalid Date and Time." | - |
| "Confirm" | - Button for moving to the confirmation page for the self-signed certificate | - | |
| "Download" | - Button to download the self-signed certificate date in PEM format (extension:.cer).The default name of the downloaded file is in the form of "SelfSigned_".is the date and time set for the product. | This button is always shown. (Only this button is shown on the page when the administrator is logged off or a registered user is logged on.) |
9.4.4.2.2 Importing for CA-signed Certificate
9.4.4.2.2.1 Import Top Page
This page is shown after the 'Import' button in the CA-signed certificate settings is pressed.
The following figure shows the layout of the page for importing the CA-signed certificate into the printer.
9.4.4.2.2.1.1 Image
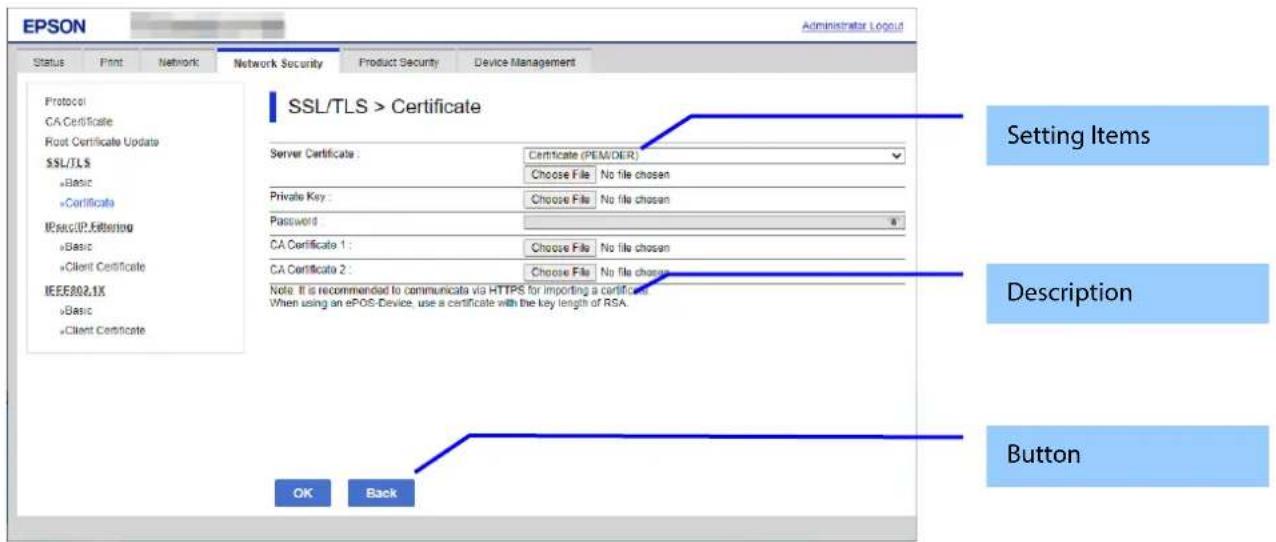
Figure 9-33 Import Top Page
9.4.4.2.2.1.2 Setting Items
On the Import Top Page, the following items can be controlled by the administrator.
Table 9-74 Setting Items
| Items | Description | Condition |
| "Server Certificate" | -Enter the file of the server certificate to import it into the printer. You can also use the file button to select the file. | - |
| File Format | Choose the file format of the server certificate to import it into the printer."Certificate (PEM/DER)"/"Certificate with Private Key (PKCS#12)" | - |
| "Private Key" | -Enter the private key file of the server certificate to import it into the printer. You can also use the file button to select the file. | -Enabled if certificate (PEM/DER) selected |
| "Password" | -Enter the passphrase for encryption to create a private key. Usable string: ASCII code (0x20-0x7E) Max of 48 characters. | - Enabled if certificate with private key (PKCS#12) selected |
| "CA Certificate 1" | -Enter the file of the certificate signed by CA issuing the server certificate to import it into the printer. You can also use the file button to select the file. | - Enabled if certificate (PEM/DER) selected |
| "CA Certificate 2" | -Enter the file of the certificate signed by CA issuing the first CA certificate to import it into the printer. It also is able to select the file using file button. | - Enabled if certificate (PEM/DER) selected |
9.4.4.2.2.1.3 Description Items
Table 9-75 Description Items
| Items | Description |
| "Note: It is recommended to communicate via HTTPS for importing a certificate." | Fixed Strings |
| "To use ePOS-Device, use a certificate with an RSA key length." | Fixed Strings |
The following table shows the buttons on the page.
Table 9-76 Button
| Items | Description |
| "OK" | Button at the bottom of the main frame to perform importing.After the "OK" button is pressed, Web Config performs the following operations depending on conditions.- If the entered value is invalid, Web Config displays a pop-up window with an error message.- If the entered value is NOT invalid and a CA-signed Certificate was imported already, Web Config displays a pop-up window with a warning message.- If the entered value is NOT invalid and a CA-signed Certificate was NOT imported already, Web Config displays a Result page. |
| "Back" | - Button at the bottom of the main frame for going back to the top page of the certificate settings. |
9.4.4.2.3 Confirm for CA-signed Certificate
This page is shown after 'Confirm' for the import is pressed in the CA-signed certificate settings. The following figure shows the layout of the page for confirming imported certificates.
9.4.4.2.3.1 Confirm Page
9.4.4.2.3.1.1 Image
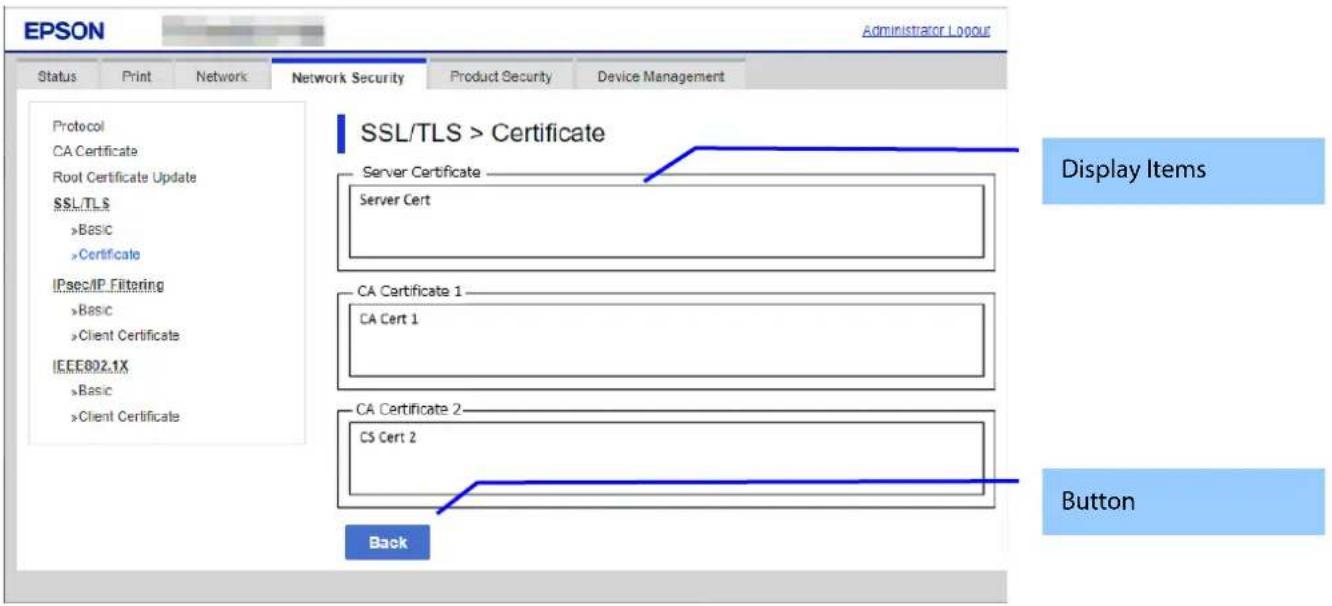
Figure 9-34 Confirm for CA-signed Certificate
9.4.4.2.3.1.2 Display Items
Table 9-77 Display Items
| Items | Description |
| "Server Certificate" | Shows the content of the server certificate imported into the printer |
| "CA Certificate 1" | Shows the content of the first CA-signed certificate imported into the printer |
| "CA Certificate 2" | Shows the content of the second CA-signed certificate imported into the printer |
| Items | Description |
| "Back" | - Button at the bottom of the main frame for going back to the top page of the certificate settings. |
9.4.4.2.4 Generate CSR(Certificate Signing Request)
9.4.4.2.4.1 Generate Top Page
This page is shown after 'Generate' for importing in the CSR settings is pressed.
The following figure shows the layout of the page for generating CSR.
9.4.4.2.4.1.1 Image
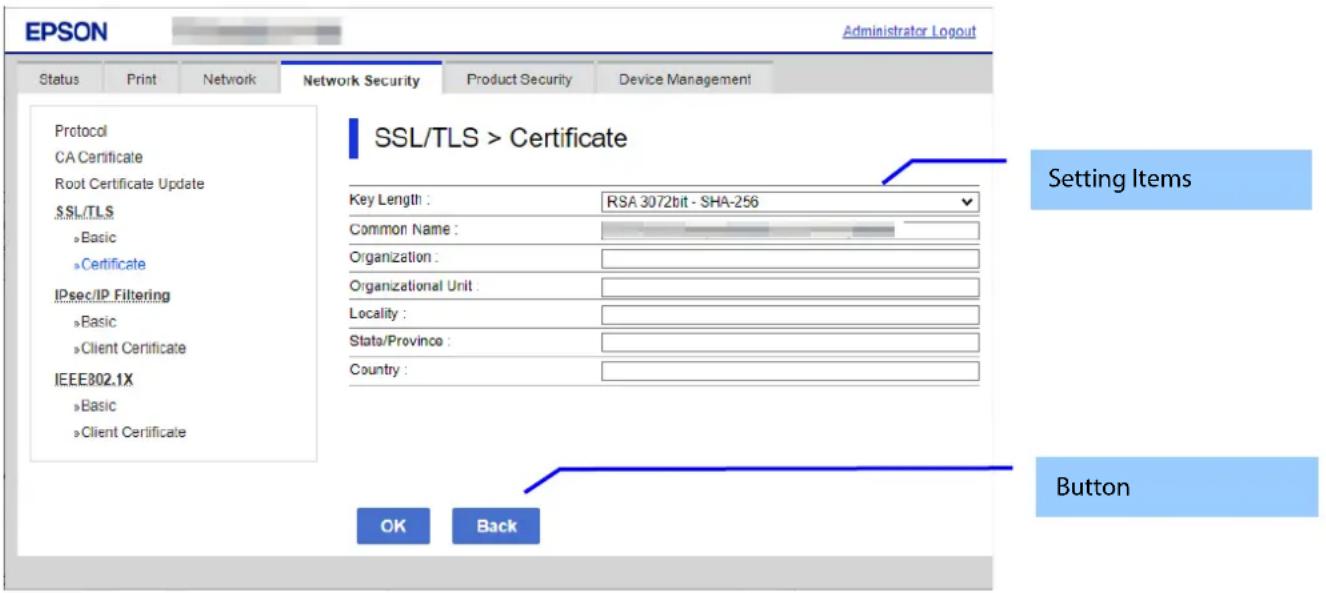
Figure 9-35 Generate CSR(Certificate Signing Request)
9.4.4.2.4.1.2 Setting Items
The user must enter the following information to generate CSR.
The following table shows the items on the page.
Table 9-79 Setting Items
| Items | Description |
| "Key Length" | Use the drop-down list to choose the public key size for generating CSR."RSA 1024bit - SHA-1" / "RSA 2048bit - SHA-256" / "RSA 3072bit - SHA-256" / "EC 256bit - SHA-256" / "RSA 4096bit - SHA-384" / "EC 384bit - SHA-384" / "EC 521bit - SHA-512" |
| "Common Name" | Use the text box to input a common name for generating CSR.Entering information is mandatory for generating CSR.Set a string with from 1 to 128 characters in the IPv4 address, IPv6 address, host name, or FQDN format.Commas (",")(0x2c) have a special meaning as control characters. See the NOTE below. |
| "Organization" | Use the text box to input the organization for generating CSR.Usable string: US-ASCII (0x20-0x7e), Max. 64 charactersIf there is no string, the value is treated as a white space. |
| "Organizational Unit" | Use the text box to input the organization unit for generating CSR.Usable string: US-ASCII (0x20-0x7e), Max. 64 charactersIf there is no string, the value is treated as a white space. |
| "Locality" | Use the text box to input a locality for generating CSR.Usable string: US-ASCII (0x20-0x7e), Max. 64 charactersIf there is no string, the value is treated as a white space. |
| "State/Province" | Use the text box to input a state or province for generating CSR.Usable string: US-ASCII (0x20-0x7e), Max. 64 charactersIf there is no string, the value is treated as a white space. |
| "Country" | Use the text box to input a country for generating CSR.Usable string: US-ASCII (0x20-0x7e), Max. 2 charactersIf there is no string, the value is treated as a white space. |
| "Sender's Email Address" | Specify the source address for sending e-mail.Enter an ASCII character string in the range of 0 to 255 characters in the text box.(Excluding: () <> [];¥ ",') |
NOTE: You can enter multiple names for these items.
Table 9-80 Button
| Items | Description |
| "OK" | - Button for generating CSR at the bottom of the main frame |
| "Back" | -Button at the bottom of the main frame for going back to the top page of the certificate settings. |
When the “Generate” button is pressed, Web Config displays a pop-up window with the following message if it recognizes an error in the entered value.
Table 9-81 Error Pop-up Window
| Items | Description |
| "Invalid value below. ¥n -%s¥n -%s¥n..." | Shows a warning when a value is entered incorrectly. |
9.4.4.2.4.2 Result Page
After the OK button is pressed, Web Config shows the hourglass and then goes to the Result page. (Refer to Deleting a CA-signed certificate.)
9.4.4.2.4.2.1 Result Page
Table 9-82 Setting Result
| Items | Description |
| "Setup Complete." | This message is shown when the settings are completed. |
| "Setup failed." | This message is shown if the settings fail. |
9.4.4.2.5 Download CSR(Certificate Signing Request)
This page is shown after 'Download' for importing in the CSR settings is pressed.
The default name of the downloaded file is in the form of "EXPORT_CSR_
The method of downloading the CSR varies by Web browser.
9.4.4.2.6 Updating self-signed Certificates
9.4.4.2.6.1 Update Top Page
This page is shown after 'Update' for the import is pressed in the self-signed certificate settings.
The following figure shows the layout of the page for updating the self-signed certificate that is already embedded in the printer.
9.4.4.2.6.1.1 Image
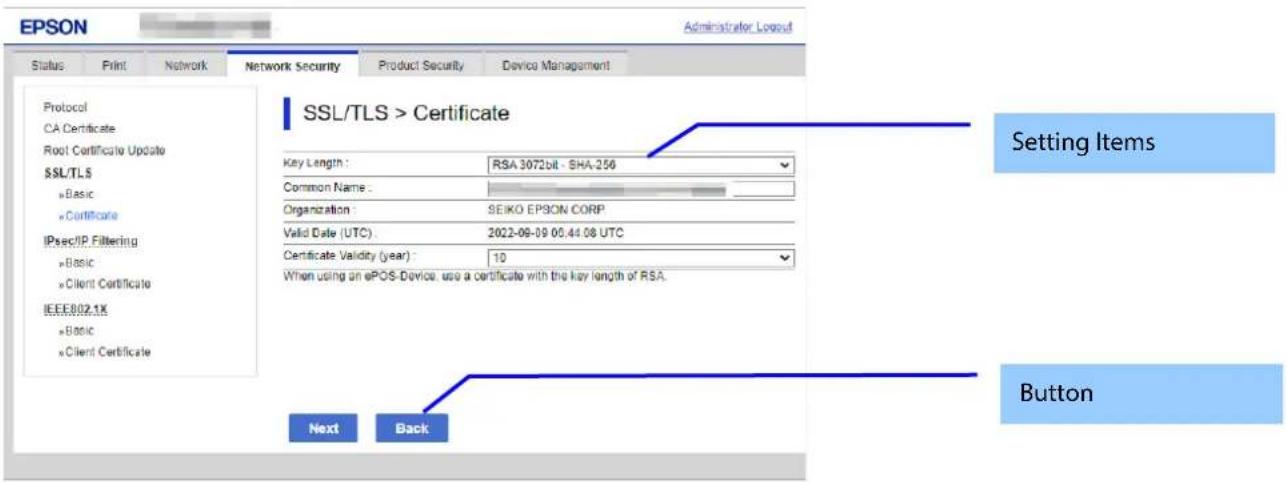
Figure 9-36 Updating self-signed Certificates
9.4.4.2.6.1.2 Setting Items
Table 9-83 Setting Items
| Items | Description |
| "Key Length" | Use the drop-down list to choose the public key size for updating the self-signed certificate."RSA 1024bit - SHA-1" / "RSA 2048bit - SHA-256" / "RSA 3072bit - SHA-256" / "EC 256bit - SHA-256" / "RSA 4096bit - SHA-384" / "EC 384bit - SHA-384" / "EC 521bit - SHA-512" |
| "Common Name" | Use the text box to input a common name for generating CSR. Entering information is mandatory for generating CSR.Set a string with from 1 to 128 characters in the IPv4 address, IPv6 address, host name, or FQDN format.Commas (",")(0x2c) have a special meaning as control characters. See the NOTE below. |
| "Organization" | "SEIKO EPSON CORP." -Fixed |
| "Valid Date (UTC)" | Shows the date and time for the client |
| "Certificate Validity (year)" | Use the drop-down list to select a year for the valid term of the self-signed certificate."1" / "2" / "3" / "4" / "5" / "6" / "7" / "8" / "9" / "10"The units are years. |
| "To use ePOS-Device, use a Certificate which Key Length is RSA." | Fixed Strings |
NOTE: You can enter multiple names.
| Items | Description |
| "Next" | Button at the bottom of the main frame for updating the self-signed certificate. |
| "Back" | Button at the bottom of the main frame for going back to the top page of the certificate settings. |
When the "Next" button is pressed, Web Config displays a pop-up window with the following message if it recognizes an error in the entered value.
Table 9-85 Error Pop-up
| Items | Description |
| "Invalid value below. ¥n -%s¥n -%s¥n..." | Shows the warning with the items of the mis inputted value. |
9.4.4.2.6.2 Confirm Settings Page
The confirmation page appears when the self-signed certificate is changed.
9.4.4.2.6.2.1 Image
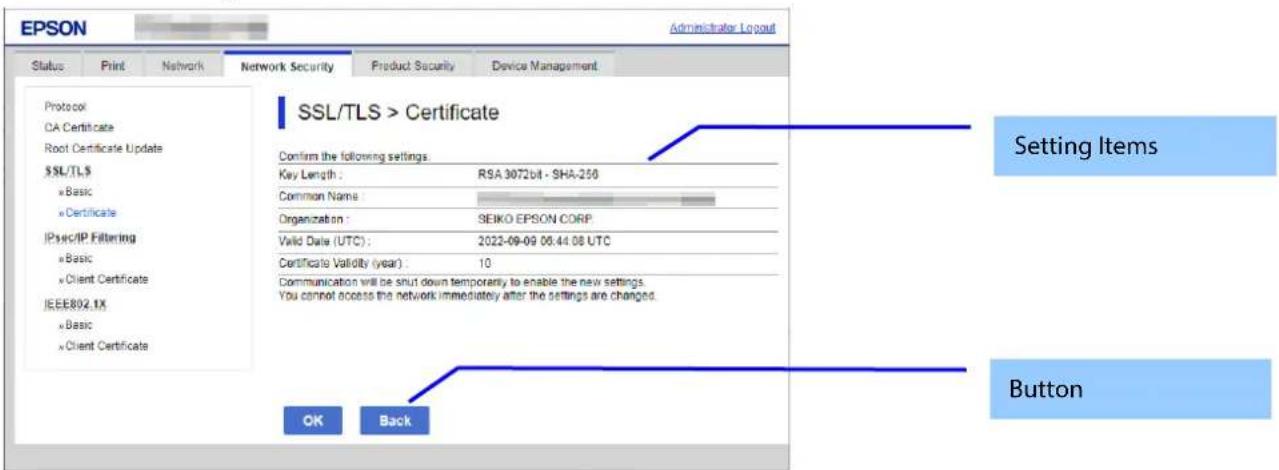
Figure 9-37 Confirm Settings Page
9.4.4.2.6.2.2 Setting Items
The settings entered on the previous page are shown for confirmation, after the message “Change the following settings”. The following message is shown below the confirmed settings.
"Communication will be shut down temporarily to enable the new settings."
"You will not be able to access the network immediately after the settings are changed."
9.4.4.2.6.2.3 Button
Table 9-86 Button
| Items | Description |
| "OK" | Button at the bottom of the main frame to perform settings. |
| "Back" | Button at the bottom of the main frame to go back to the previous page. |
9.4.4.2.6.3 Result Page
The following result is shown in the main frame after the "OK" button is pressed. (Refer to Deleting a CA-signed certificate)
9.4.4.2.6.3.1 Result Page
Table 9-87 Setting Result
| Items | Description |
| "Shutting down.""Restarting communication may take a few minutes.""If you want to change the settings, close the Web Config and check your IP address. Then enter your IP address in the browser to restart the Web Config." | This message is shown when the settings are completed.The network shuts down in order to update. |
| "Date and Time are not set" | This message is shown when the printer's date and time are not set. |
| "Setup failed." | This message is shown if the settings fail. |
9.4.4.2.7 Confirm for the Self-signed Certificate
This page is shown after 'Confirm' for the import is pressed in the self-signed certificate settings. The following figure shows the layout of the page for confirming certificates.
9.4.4.2.7.1 Confirm Top Page
9.4.4.2.7.1.1 Image
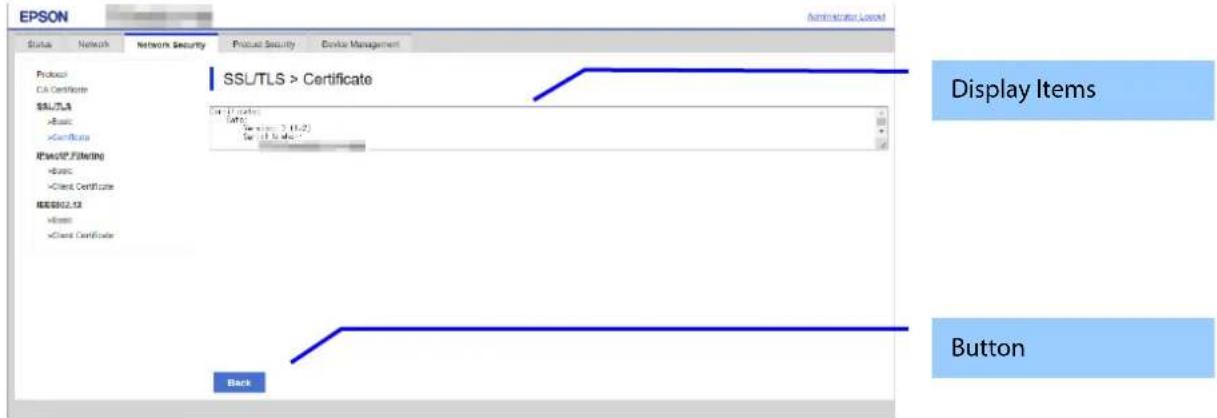
Figure 9-38 Confirming Self-signed Certificates
9.4.4.2.7.1.2 Display items
Table 9-88 Display Items
| Items | Description |
| "Self-signed certificate" | Shows the content of the self-signed certificate.ASCII, Max. 8192 bytes |
| Items | Description |
| "Back" | Button at the bottom of the main frame for going back to the top page of the certificate settings. |
9.4.4.2.8 Downloading the Self-signed Certificate
The self-signed certificate is downloaded by pressing the "Download" button on the certificate settings page of SSL/TLS settings. The download file is in PEM format. (extension:.cer)
The default name of the downloaded file is in the form of "SelfSigned_<Date and Time Print)".
The following dialog box is displayed when downloading.
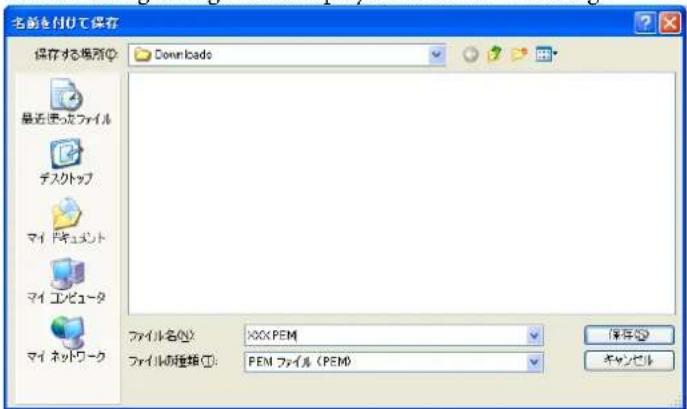
Figure 9-39 Windows Dialogue Box for the Self-signed Certificate Downloading
This dialogue box is displayed as a standard function of each Web browser and varies depending on the Web browser.
9.4.4.3 Automatic Certificate Update
9.4.4.3.1 Top page
9.4.4.3.1.1 Image
The following figure shows the layout of the top page.
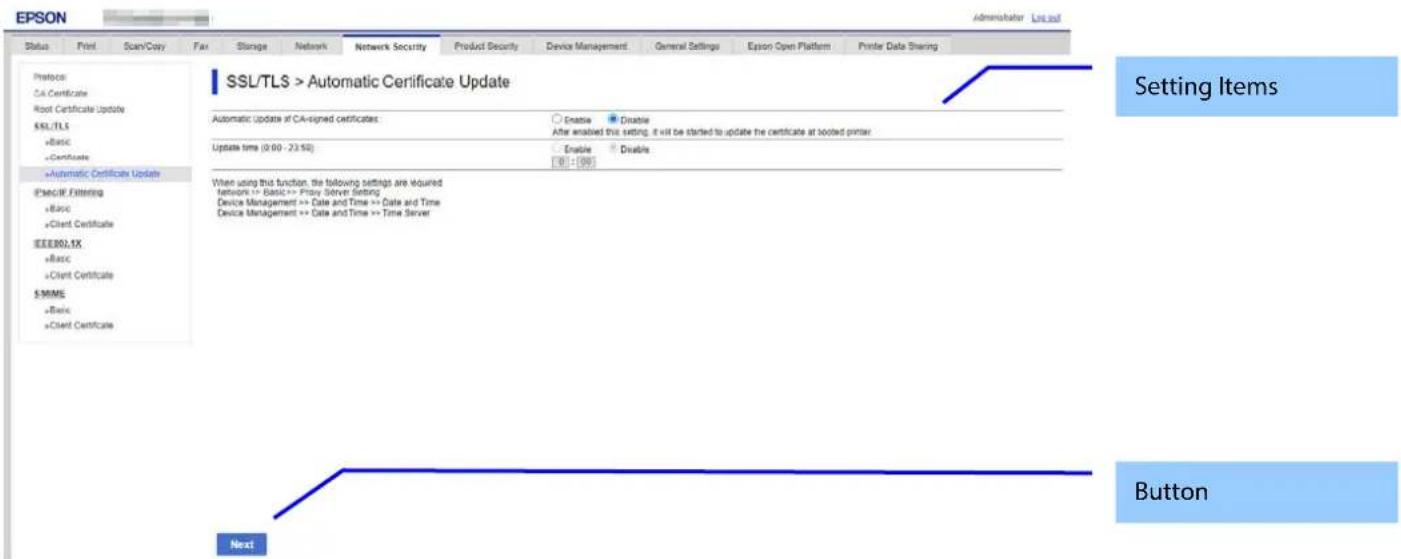
Figure 9-40 Top page
9.4.4.3.1.2 Setting Items
Table 9-90 Setting Items
| Items | Description | Condition |
| "Automatic Update of CA-signed certificates" | Two radio buttons are provided to choose one of the following:"Enable" / "Disable" | - |
| "After enabled this setting, it will be started to update the certificate at booted printer." | Fixed character string | - |
| "Update time (0:00 – 23:59)" | Two radio buttons are provided to choose one of the following:"Enable" / "Disable" | This item is not grayed-out when "Automatic Update of CA-signed certificates" is enabled. |
| This is enabled when the above Update time (radio button) is set to "Enable". The hour text box, ":", and the minutes text box are dispalyed, in that order.The following characters can be entered in each text box: "0" to "9".Only the 24-hour clock format can be used. | This item is not grayed-out when both "Update time (0:00 – 23:59)" and "Automatic Update of CA-signed certificates" are enabled. |
9.4.4.3.1.3 Comment
Comments in the following table are displayed.
Table 9-91 Comment
| Comment | Description |
| "When using this function, the following settings are required.""Network >> Basic >> Proxy Server Setting""Device Management >> Date and Time >> Date and Time""Device Management >> Date and Time >> Time Server" | These comments are displayed at the bottom of the page. |
9.4.4.3.1.4 Button
Table 9-92 Button
| Items | Description |
| "Next" | This button is provided at the bottom of the page. Click it to go to the confirmation page. |
When the "Next" button is clicked, a pop-up window will be displayed if there is an error in the entered value.
Table 9-93 Error Popup
| Items | Description |
| "Invalid value below." | This message is displayed if a value entered in a text box is incorrect. The item names for the incorrect values are shown under the message in the cell on the left. If there are two or more items with incorrect values, each item is displayed on a separate line. |
9.4.4.3.2 Confirming page
When the "Next" button is clicked on the previous settings page, the confirmation page is displayed.
9.4.4.3.2.1 Image
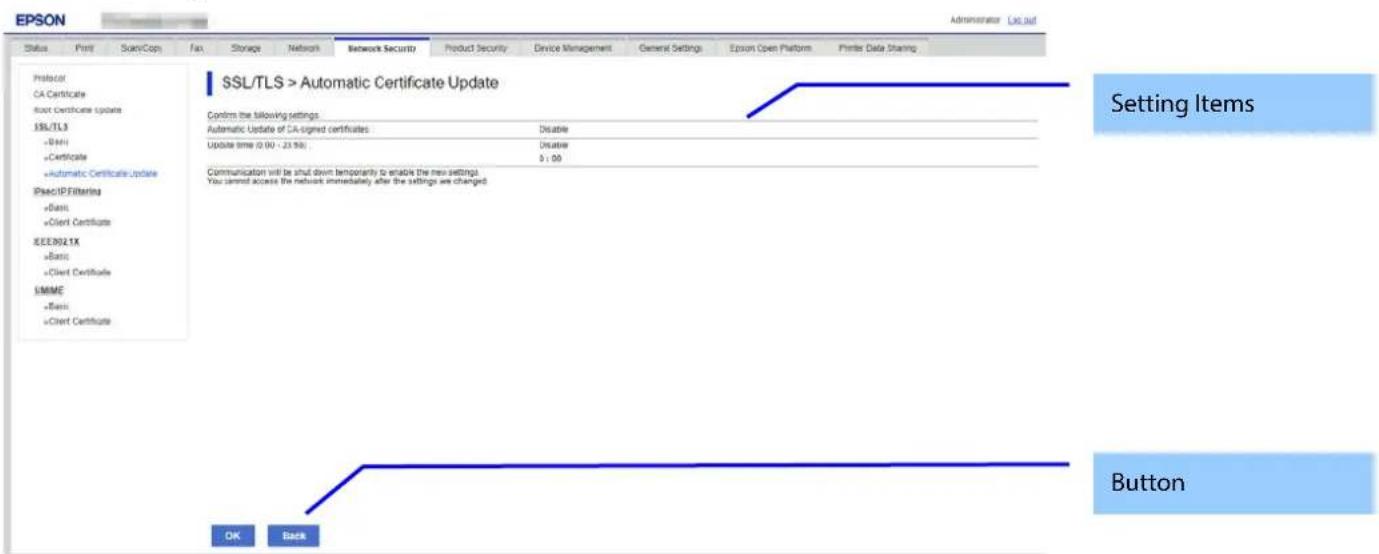
Figure 9-41 Confirming page
9.4.4.3.2.2 Setting Items
The message "Change the following settings?" is displayed, followed by the setting items and the values entered on the previous page.
The following message is displayed below the setting items.
* "The network connection will be lost temporarily to enable the new settings."
"You will be unable to access the network immediately after the settings are changed."
9.4.4.3.2.3 Button
The buttons for setting values on the confirmation page are shown in the following table.
Table 9-94 Button
| Items | Description |
| "OK" | This button is used to set the values displayed on the confirmation page. Click it to go to the results page. |
| "Back" | Click this button to return to the settings page. |
9.4.4.3.3 Result page
When the "OK" button is clicked, the results page is displayed.
9.4.4.3.3.1 Image
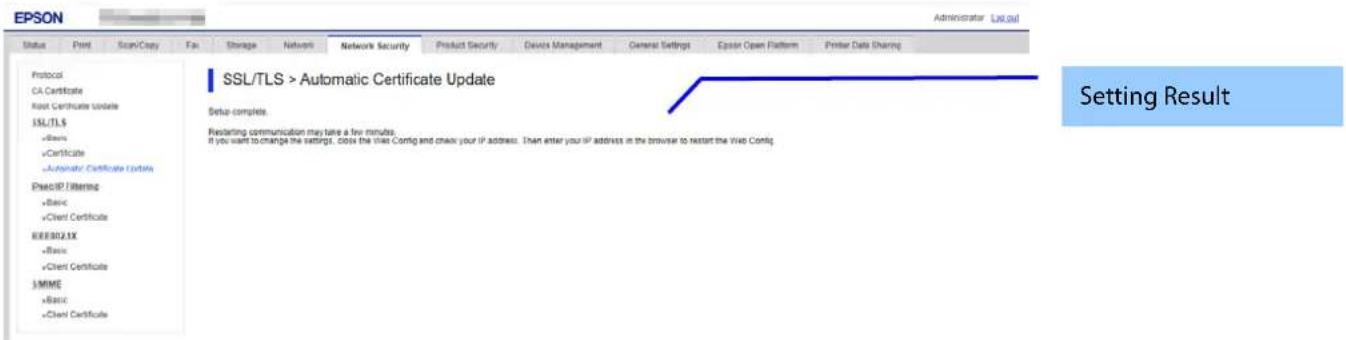
Figure 9-42 Result page
9.4.4.3.3.2 Setting Result
Table 9-95 Setting Result
| Items | Description |
| "Setup complete. " "Restarting communication may take a few minutes. " "If you want to change the settings, close the Web Config and check your IP address. Then enter your IP address in the browser to restart the Web Config." | This message is displayed if the settings are updated successfully.(A network reboot will occur.) |
| "Setup failed. " | This message is displayed if the settings are not updated successfully. |
9.4.5 IPsec/IP Filtering
In the IPsec/IP Filtering settings, there are 2 submenus: "Basic" and "Client Certificate".
9.4.5.1 Basic
A default policy and group policies 1 - 10 of IPsec/IP Filtering are available for setup in Basic setting.
9.4.5.1.1 Top Page
9.4.5.1.1.1 Default Policy
9.4.5.1.1.1 Image
The following figure shows the layout for the Setting Items of Default Policy page.
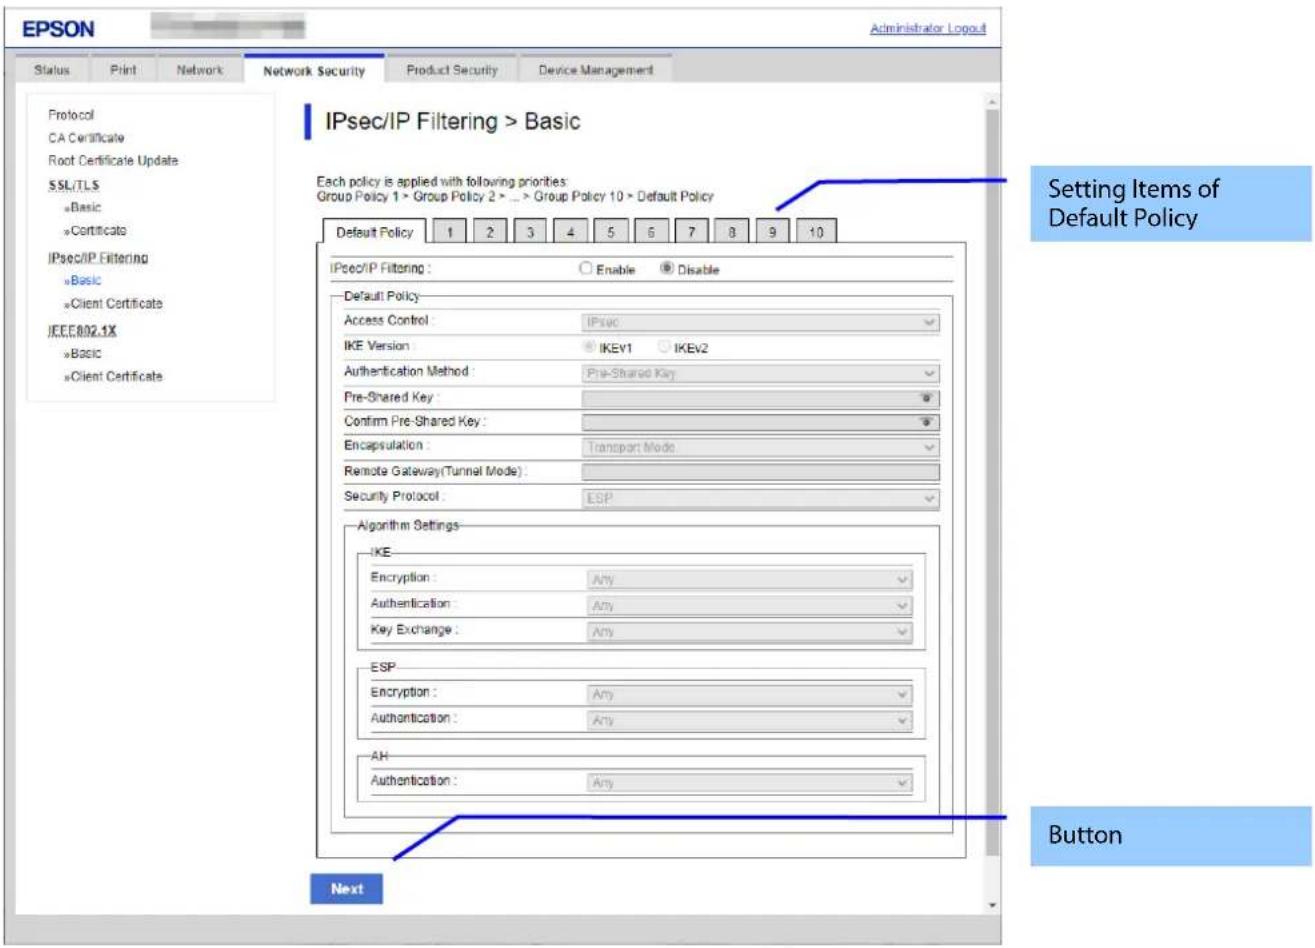
Figure 9-43 IPsec Default Policy
The following figure shows the layout of this settings area.
Table 9-96 Setting Items
| Items | Description | Condition |
| "Each policy is applied with following priorities:" "Group Policy 1 > Group Policy 2 > ... > Group Policy 10 > Default Policy" | Description of the policy | - |
| "IPsec/IP Filtering" | Two radio buttons are provided to choose one of the following:"Enable" / "Disable" | - |
| "Default Policy" | Title | - |
| "Access Control" | Use the drop-down list to make a choice."Permit Access" / "Refuse Access" / "IPsec" | If "IPsec/IP Filtering" is "Enabled", this item can be configured. |
| "IKE Version" | Use the radio buttons to choose "IKEv1" / "IKEv2". | If "IPsec/IP Filtering" is "Enabled" and "Access Control" is "IPsec", this item can be configured. |
| "Authentication Method" | Use the drop-down list to make a choice."Pre-Shared Key" / "Certificate" | This item is displayed when "IKE Version" is "IKEv1".This item is enabled when "IPsec/IP Filtering" is "Enabled" and "Access Control" is "IPsec". |
| "Pre-Shared Key" | Enter the passphrase.Usable string: ASCII code (0x20-0x7E)Max of 127 characters. | This item is displayed when "IKE Version" is "IKEv1".This item is enabled when "IPsec/IP Filtering" is "Enabled" and "Access Control" is "IPsec". |
| "Confirm Pre-Shared Key" | Same as "Pre-Shared Key" | Same as "Pre-Shared Key". |
| "Local" | Title | This item is displayed when "IKE Version" is "IKEv2". |
| "Authentication Method" | Use the drop-down list to make a choice."Pre-Shared Key" / "Certificate" | This item is displayed when "IKE Version" is "IKEv2".This item is enabled when "IPsec/IP Filtering" is "Enabled" and "Access Control" is "IPsec". |
| "ID Type" | Use the drop-down list to make a choice."Distinguished Name" / "IP Address" / "FQDN" / "Email Address" / "Key ID" | This item is displayed when "IKE Version" is "IKEv2".This item is enabled when "IPsec/IP Filtering" is "Enabled", "Access Control" is "IPsec", and "Authentication Method" for "Local" is "Pre-Shared Key".] |
| "ID" | The values that can be entered depends on the selection for "ID Type". [@][#][=] cannot be used as the first character, regardless of the type selected. "Distinguished Name": ASCII, 1-255 characters. Must use [=]. "IP Address": IPv4, IPv6 "FQDN": ASCII (alphanumeric, dot, hyphen), 1-255 characters "Email Address": ASCII, 1-255 characters. Must use [@]. [=] cannot be used. "Key ID": ASCII, 1-255 characters | This item is displayed when "IKE Version" is "IKEv2" and "ID Type" for "Local" is anything other than "IP Address". This item is enabled when "IPsec/IP Filtering" is "Enabled", "Access Control" is "IPsec", and "Authentication Method" for "Local" is "Pre-Shared Key". |
| "Pre-Shared Key" | Enter the passphrase. Usable string: ASCII code (0x20-0x7E) Max. 127 characters. | This item is displayed when "IKE Version" is "IKEv2". This item is enabled when "IPsec/IP Filtering" is "Enabled", "Access Control" is "IPsec", and "Authentication Method" for "Local" is "Pre-Shared Key". |
| "Confirm Pre-Shared Key" | Same as "Pre-Shared Key". | -Same as "Pre-Shared Key". |
| "Remote" | Title | This item is displayed when "IKE Version" is "IKEv2". |
| "Authentication Method" | Use the drop-down list to make a choice. "Pre-Shared Key" / "Certificate" | This item is displayed when "IKE Version" is "IKEv2". This item is enabled when "IPsec/IP Filtering" is "Enabled" and "Access Control" is "IPsec". |
| "ID Type" | Use the drop-down list to make a choice. "Distinguished Name" / "IP Address" / "FQDN" / "Email Address" / "Key ID" | This item is displayed when "IKE Version" is "IKEv2". This item is enabled when "IPsec/IP Filtering" is "Enabled", "Access Control" is "IPsec", and "Authentication Method" for "Remote" is "Pre-Shared Key". |
| "ID" | The values that can be entered depends on the selection for "ID Type". [@][#][=] cannot be used as the first character, regardless of the type selected. "Distinguished Name":ASCII, 1-255 characters. Must use [=]. "IP Address":IPv4, IPv6 "FQDN": ASCII(alphanumeric, dot, hyphen), 1-255 characters "Email Address": ASCII, 1-255 characters. Must use [@] and [=] is not usable. "Key ID": ASCII, 1-255 characters | This item is displayed when "IKE Version" is "IKEv2". This item is enabled when "IPsec/IP Filtering" is "Enable", "Access Control" is "IPsec" and "Authentication Method" of "Remote" is "Pre-Shared Key". |
| "Pre-Shared Key" | Enter the passphrase. Usable string: ASCII code (0x20-0x7E) Max of 127 characters. | This item is displayed when "IKE Version" is "IKEv2". This item is enabled when "IPsec/IP Filtering" is "Enable", "Access Control" is "IPsec" and "Authentication Method" of "Remote" is "Pre-Shared Key". |
| "Confirm Pre-Shared Key" | Same as "Pre-Shared Key". | -Same as "Pre-Shared Key". |
| "Encapsulation" | Use the drop-down list to make a choice. "Transport Mode" / "Tunnel Mode" | If "IPsec/IP Filtering" is "Enable" and "Access Control" is "IPsec", it is possible to set this item. |
| "Remote Gateway(Tunnel Mode)" | Enter an IPv4 address or IPv6 address.Max of 39 characters. | If "IPsec/IP Filtering" is "Enable", "Access Control" is "IPsec" and "Encapsulation" is "Tunnel Mode",it is possible to set this item. |
| "Security Protocol" | Use the drop-down list to make a choice."ESP" / "AH" | If "IPsec/IP Filtering" is "Enable" and "Access Control" is "IPsec",it is possible to set this item. |
| "Algorithm Settings" | Title strings. "IKE", "ESP", and "AH" are included. | - |
| "IKE" | Title strings. "Encryption", "Authentication" and "Key Exchange" are contained. | - |
| "Encryption" | Use the drop-down list to choose from the following."AES-CBC-128" / "AES-CBC-192" / "AES-CBC-256" / "3DES" / "Any" | This item is displayed when "IKE Version" is "IKEv1".This item is enabled when "IPsec/IP Filtering" is "Enable", "Access Control" is "IPsec". |
| "Encryption" | Use the drop-down list to choose from the following."AES-CBC-128" / "AES-CBC-192" / "AES-CBC-256" / "AES-GCM-128" / "AES-GCM-192" / "AES-GCM-256" / "3DES" / "Any" | This item is displayed when "IKE Version" is "IKEv2".This item is enabled when "IPsec/IP Filtering" is "Enable", "Access Control" is "IPsec". |
| "Authentication" | Use the drop-down list to choose from the following."SHA-1" / "SHA-256" / "SHA-384" / "SHA-512" / "MD5" / "Any" | This item is enabled when "IPsec/IP Filtering" is "Enable", "Access Control" is "IPsec". |
| "Key Exchange" | Use the drop-down list to choose from the following."DH Group 1" / "DH Group 2" / "DH Group5" / "DH Group14" / "DH Group15" / "DH Group16" / "DH Group17" / "DH Group18" / "DH Group19" / "DH Group20" / "DH Group21" / "DH Group22" / "DH Group23" / "DH Group24" / "DH Group25" / "DH Group26" / "Any" | This item is displayed when "IKE Version" is "IKEv1".This item is enabled when "IPsec/IP Filtering" is "Enable", "Access Control" is "IPsec". |
| "Key Exchange" | Use the drop-down list to choose from the following."DH Group 1" / "DH Group 2" / "DH Group5" / "DH Group14" / "DH Group15" / "DH Group16" / "DH Group17" / "DH Group18" / "DHGroup19" / "DH Group20" / "DH Group21" / "DH Group22" / "DH Group23" / "DH Group24" / "DH Group25" / "DH Group26" / "DH Group27" / "DH Group28" / "DH Group29" / "DH Group30" / "Any" | This item is displayed when "IKE Version" is "IKEv2".This item is enabled when "IPsec/IP Filtering" is "Enable", "Access Control" is "IPsec". |
| "ESP" | Title strings. "Encryption" and "Authentication" are contained. | - |
| "Encryption" | Use the drop-down list to choose from the following."AES-CBC-128" / "AES-CBC-192" / "AES-CBC-256" / "AES-GCM-128" / "AES-GCM-192" / "AES-GCM-256" / "3DES" / "Any" | This item is enabled when "IPsec/IP Filtering" is "Enable", "Access Control" is "IPsec" and "Security Protocol" is "ESP". |
| "Authentication" | Use the drop-down list to choose from the following."SHA-1" / "SHA-256" / "SHA-384" / "SHA-512" / "MD5" / "Any" | This item is enabled when "IPsec/IP Filtering" is "Enable", "Access Control" is "IPsec" and "Security Protocol" is "ESP". This item is disabled when "Encryption" of "ESP" is "AES-GCM-128" or "AES-GCM-192" or "AES-GCM-256". |
| "AH" | Title strings. "Authentication" is contained. | - |
| "Authentication" | Use the drop-down list to choose from the following..Support algorithms refer to the Network Functional Specifications."SHA-1" / "SHA-256" / "SHA-384" / "SHA-512" / "MD5" / "Any" | This item is enabled when "IPsec/IP Filtering" is "Enable", "Access Control" is "IPsec" and "Security Protocol" is "AH". |
| Items | Description |
| "Next" | If pressed, Web Config goes to the Confirm IPsec Settings page. |
If Web Config recognizes an error in the entered value after the Next button is pressed, the following error pop-up is shown.
Table 9-98 Error Pop-up
| Items | Description |
| "Invalid value below." | This message is shown when the value entered in the text box is invalid. The item names of the corrected values are shown under the message in the left cell. If there are two or more items whose values were corrected, those items are listed line by line. |
| This message is displayed if the combination of the Local Address (Printer/Scanner) and Remote Address (Host) is incorrect. See the following table. | |
| "Select 1 to 10 service names." | Displayed if there are 0 or 11 or more checks for "Service Name". |
| "Pre-shared keys you entered do not match." | Displayed if the values you entered for the Pre-shared keys do not match |
-Permit Access or Refuse Access
| Permit Access or Refuse Access | Local Address (Printer/Scanner) | ||||
| IPv4 | fe80::~ | Except fe80::~ | Any * | ||
| Remote Address (Host) | (Specify IP Adress)IPv4 | √ | - | - | √ |
| (Specify IP Adress) fe80::~ | - | √ | - | - | |
| (Specify IP Adress)fe80::~ | - | - | √ | √ | |
| (Specify IP Adress Range) IPv4 | √ | - | - | √ | |
| (Specify IP Adress Range) fe80::~ | - | √ | - | - | |
| (Specify IP Adress Range) Except fe80::~ | - | - | √ | √ | |
| (Blank) Any | √ | - | √ | √ | |
IPsec
| IPsec | Local Address (Printer/Scanner) | ||||
| IPv4 | fe80::~ | Except fe80::~ | Any * | ||
| Remote Address (Host) | (Specify IP Adress)IPv4 | √ | - | - | √ |
| (Specify IP Adress) fe80::~ | - | - | - | - | |
| (Specify IP Adress)fe80::~ | - | - | √ | √ | |
| (Specify IP Adress Range) IPv4 | - | - | - | - | |
| (Specify IP Adress Range) fe80::~ | - | - | - | - | |
| (Specify IP Adress Range) Except fe80::~ | - | - | - | - | |
| (Blank) Any | √ | - | √ | √ | |
√: Cannot be set.
- : Cannot be set. The message “The combination of Local Address (Printer/Scanner) and Remote Address (Host) is incorrect.” is displayed.
*: Does not include IPv6 link-local address
9.4.5.1.1.2 Group Policy
9.4.5.1.1.2.1 Image
The following figure shows the layout of the Setting Items on the Group Policy page.
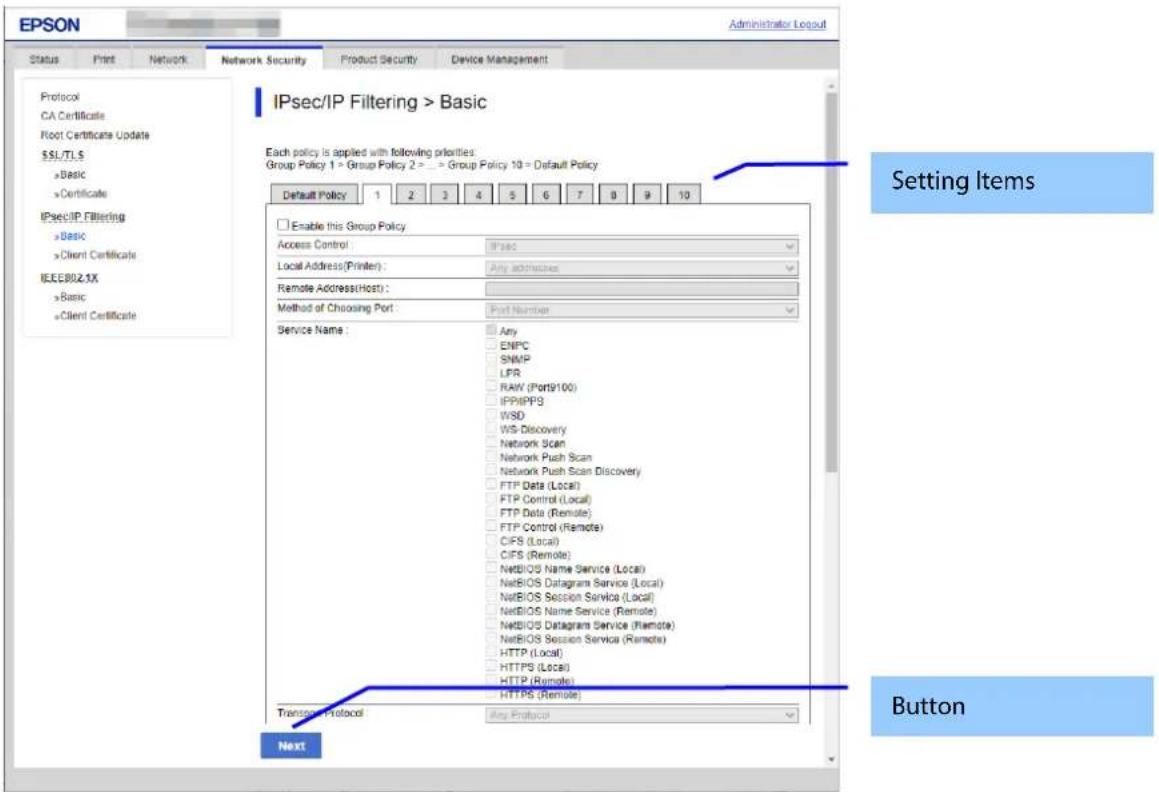
Figure 9-44 Group Policy of IPsec Basic Top Page
9.4.5.1.1.2.2 Setting Items of Group Policy
The following figure shows a layout of this settings area.
Table 9-99 Setting Items
| Items | Description | Description |
| "Each policy is applied with following priorities:" "Group Policy 1 > Group Policy 2 > ... > Group Policy 10 > Default Policy" | Description of the policy. | - |
| "Enable this Group Policy" | Enabled if the check box is selected | - |
| "Access Control" | - Use the drop-down list to make a choice."Permit Access" / "Refuse Access" / "IPsec" | - If "Enable this Group Policy" is enabled, this item can be configured. |
| -Use the drop-down list to make a choice."Unavailable" / "Any addresses"//IPv4 Address / IPv6 Address / IPv6 Link-Local Address / IPv6 Stateful Address/IPv6 Stateless Address 1 / IPv6 Stateless Address 2 / IPv6 Stateless Address 3 | - If "Enable this Group Policy" is enable, it is possible to set this item. | |
| IPv6Address, IPv6LinklocalAddress, IPv6StatelessAddress1, IPv6StatelessAddress2, and IPv6StatelessAddress3 are displayed when the address is set."Unavailable" is displayed when the Local Address and IP Address for the printer are incorrect. "Unavailable" is not set.If the method for IP Address is auto, you can select "Use automatically acquired IPv4 address (xxx.xxx.xxx.xxx)". | ||
| "Remote Address(Host)" | -Enter up to 43 characters.You can enter in the IPv4 and IPv6 formatsYou can enter the empty.It is possible to use the prefix.You can not enter 255.255.255.255 and 0.0.0.0. | - If "Enable this Group Policy" is enabled, this item can be configured. |
| "Method of Choosing Port" | -Use the drop-down list to make a choice."Service Name" / "Port Number" | - If "Enable this Group Policy" is enable, it is possible to set this item. |
| "Service Name" | From 1 to 10 of the following can be selected for "Service Name".However, if "Any" is selected, no other item can be selected."Any "/ "ENPC" / "SNMP"/ "LPR"/ "RAW (Port9100)" / "IPP/IPPS"/ "WSD"/ "WS-Discovery"/ "Network Scan"/ "Network Push Scan"/ "Network Push Scan Discovery"/ "CIFS (Local)"/ "CIFS (Remote)"/ "NetBIOS Name Service (Local)"/ "NetBIOS Datagram Service (Local)"/ "NetBIOS Session Service (Local)"/ "NetBIOS Name Service (Remote)"/ "NetBIOS Datagram Service (Remote)"/ "NetBIOS Session Service (Remote)"/ "HTTP (Local)"/ "HTTPS (Local)"/ "HTTP (Remote)"/ "HTTPS (Remote)" | - If "Enable this Group Policy" is enabled and "Method of Choosing PORT" is "Service Name", it is possible to configure this item.If the printer has these features, they can be selected.-LPR function "LPR"- RAW (Port9100)function "RAW (Port9100)"- IPP function "IPP/IPPS"WSD Scan "WSD"/ "WS-Discovery"-Scan function "Network Scan"- Push Scan Function "Network Push Scan"/ "Network Push Scan Discovery"-ScanToFolder "FTP Data (Remote)"/ "FTP Control (Remote)"/ "CIFS (Remote)"/ "NetBIOS Name Service (Remote)"/ "NetBIOS Datagram Service (Remote)"/ "NetBIOS Session Service (Remote)"/-File Sharing "CIFS (Local)"/ "NetBIOS Name Service (Local)"/ "NetBIOS Datagram Service (Local)"/ "NetBIOS Session Service (Local)"/ |
| "Transport Protocol" | -Use the drop-down list to make a choice."Any Protocol" / "TCP" / "UDP" / "ICMPv4" | - If "Enable this Group Policy" is enable and "Method of Choosing Port" is "Port Number", it is possible to set this item. |
| "Local Port" | Enter up to 60 characters.Numbers, commas, spaces, and empty strings can be input.Enter up to 10 numbers, separated by commas. The range is 1-65535. | - If "Enable this Group Policy" is enabled, "Method of Choosing Port" is "Port Number", and "Transport Protocol" is "TCP" or "UDP", it is possible to configure this item. |
| "Remote Port" | Enter up to 60 characters.Numbers, commas, spaces, and empty strings can be input.Enter up to 10 numbers, separated by commas. The range is 1-65535. | - If "Enable this Group Policy" is enable,"Method of Choosing Port" is "Port Number" and "Transport Protocol" is "TCP" or "UDP", it is possible to set this item. |
| "IKE Version" | Use the radio buttons to choose "IKEv1" / "IKEv2". | - If "Enable this Group Policy" is enabled and "Access Control" is "IPsec", it is possible to configure this item. |
| "Authentication Method" | -Use the drop-down list to make a choice."Pre-Shared Key" / "Certificate" | This item is displayed when "IKE Version" is "IKEv1". This item is enabled when "Enable this Group Policy" is enable and "Access Control" is "IPsec". |
| "Pre-Shared Key" | - Enter the passphrase.Usable string: ASCII code (0x20-0x7E)Max of 127 characters. | This item is displayed when "IKE Version" is "IKEv2". This item is enabled when "Enable this Group Policy" is enable, "Access Control" is "IPsec" and "Authentication Method" of "Local" is "Pre-Shared Key". |
| "Confirm Pre-Shared Key" | - Same as "Pre-Shared Key". | - Same as "Pre-Shared Key". |
| "Local" | Title | This item is displayed when "IKE Version" is "IKEv2". |
| "Authentication Method" | -Use the drop-down list to make a choice."Pre-Shared Key" / "Certificate" | This item is displayed when "IKE Version" is "IKEv2". This item is enabled when "Enable this Group Policy" is enable and "Access Control" is "IPsec". |
| "ID Type" | Use the drop-down list to make a choice."Distinguished Name" / "IP Address" / "FQDN" / "Email Address" / "Key ID" | This item is displayed when "IKE Version" is "IKEv2". This item is enabled when "Enable this Group Policy" is enable, "Access Control" is "IPsec" and "Authentication Method" of "Local" is "Pre-Shared Key". |
| "ID" | The values that can be entered depends on the selection for "ID Type". [@][#][=] cannot be used as the first character, regardless of the type selected."Distinguished Name":ASCII, 1-255 characters. Must use [=]. "IP Address":IPv4, IPv6"FQDN":ASCII(alphanumeric, dot, hyphen), 1-255 characters"Email Address":ASCII, 1-255 characters. Must use [@] and [=] is not usable."Key ID":ASCII, 1-255 characters | This item is displayed when "IKE Version" is "IKEv2". This item is enabled when "Enable this Group Policy" is enable, "Access Control" is "IPsec" and "Authentication Method" of "Remote" is "Pre-Shared Key". |
| "Pre-Shared Key" | -Enter the passphrase.Usable string: ASCII code (0x20-0x7E)Max of 127 characters. | This item is displayed when "IKE Version" is "IKEv2". This item is enabled when "Enable this Group Policy" is enable, "Access Control" is "IPsec" and "Authentication Method" of "Remote" is "Pre-Shared Key". |
| "Confirm Pre-Shared Key" | - Same as "Pre-Shared Key". | - Same as "Pre-Shared Key". |
| "Remote" | Title | This item is displayed when "IKE Version" is "IKEv2". |
| "Authentication Method" | -Use the drop-down list to make a choice."Pre-Shared Key" / "Certificate" | This item is displayed when "IKE Version" is "IKEv2". This item is enabled when "Enable this Group Policy" is enable and "Access Control" is "IPsec". |
| "ID Type" | Use the drop-down list to make a choice."Distinguished Name" / "IP Address" / "FQDN" / "Email Address" / "Key ID" | This item is displayed when"IKE Version" is "IKEv2". This item is enabled when"Enable this Group Policy" is enabled, "Access Control" is "IPsec", and "Authentication Method" for "Remote" is "Pre-Shared Key". |
| "ID" | The values that can be entered depends on the selection for "ID Type". [@][#][=] cannot be used as the first character, regardless of the type selected."Distinguished Name":ASCII, 1-255 characters. Must use [=]. "IP Address":IPv4, IPv6"FQDN": ASCII(alphanumeric, dot, hyphen), 1-255 characters"Email Address": ASCII, 1-255 characters. Must use [@] and [=] is not usable."Key ID": ASCII, 1-255 characters | This item is displayed when"IKE Version" is "IKEv2". This item is enabled when"Enable this Group Policy" is enable, "Access Control" is "IPsec" and "Authentication Method" of "Remote" is "Pre-Shared Key". |
| "Pre-Shared Key" | -Enter the passphrase.Usable string: ASCII code (0x20-0x7E)Max of 127 characters. | This item is displayed when"IKE Version" is "IKEv2". This item is enabled when"Enable this Group Policy" is enable, "Access Control" is "IPsec" and "Authentication Method" of "Remote" is "Pre-Shared Key". |
| "Confirm Pre-Shared Key" | -Same as "Pre-Shared Key". | -Same as "Pre-Shared Key". |
| "Encapsulation" | -Use the drop-down list to make a choice."Transport Mode" / "Tunnel Mode" | -If "Enable this Group Policy" is enabled and "Access Control" is "IPsec", it is possible to configure this item. |
| "Remote Gateway(Tunnel Mode)" | -It is possible to enter up to 39 characters.You can enter in the IPv4 and IPv6 formatsYou can enter the empty.You can not enter 255.255.255.255 and 0.0.0.0. | -If "Enable this Group Policy" is enable, "Access Control" is "IPsec" and "Encapsulation" is "Tunnel Mode", it is possible to set this item. |
| "Security Protocol" | -Use the drop-down list to make a choice."ESP" / "AH" | -If "Enable this Group Policy" is enabled and "Access Control" is "IPsec", it is possible to configure this item. |
| "Algorithm Settings" | Title strings. "IKE", "ESP" and "AH" are contained. | - |
| "IKE" | Title strings. "Encryption", "Authentication" and "Key Exchange" are contained. | - |
| "Encryption" | Use the drop-down list to choose from the following."AES-CBC-128" / "AES-CBC-192" / "AES-CBC-256" / "3DES" / "Any" | This item is displayed when"IKE Version" is "IKEv1". This item is enabled when"Enable this Group Policy" is enabled and "Access Control" is "IPsec". |
| "Encryption" | Use the drop-down list to choose from the following."AES-CBC-128" / "AES-CBC-192" / "AES-CBC-256" / "AES-GCM-128" / "AES-GCM-192" / "AES-GCM-256" / "3DES" / "Any" | This item is displayed when"IKE Version" is "IKEv2". This item is enabled when"Enable this Group Policy" is enable, "Access Control" is "IPsec". |
| "Authentication" | Use the drop-down list to choose from the following."SHA-1" / "SHA-256" / "SHA-384" / "SHA-512" / "MD5" / "Any" | This item is enabled when"Enable this Group Policy" is enabled and "Access Control" is "IPsec". |
| "Key Exchange" | Use the drop-down list to choose from the following. "DH Group 1" / "DH Group 2" / "DH Group5" / "DH Group14" / "DH Group15" / "DH Group16" / "DH Group17" / "DH Group18" / "DH Group19" / "DH Group20" / "DH Group21" / "DH Group22" / "DH Group23" / "DH Group24" / "DH Group25" / "DH Group26" / "Any" | This item is displayed when "IKE Version" is "IKEv1". This item is enabled when "Enable this Group Policy" is enable, "Access Control" is "IPsec". |
| "Key Exchange" | Use the drop-down list to choose from the following. "DH Group 1" / "DH Group 2" / "DH Group5" / "DH Group14" / "DH Group15" / "DH Group16" / "DH Group17" / "DH Group18" / "DH Group19" / "DH Group20" / "DH Group21" / "DH Group22" //DH Group23/ "DH Group24" / "DH Group25" / "DH Group26" / "DH Group27" / "DH Group28" / "DH Group29" / "DH Group30" / "Any" | This item is displayed when "IKE Version" is "IKEv2". This item is enabled when "Enable this Group Policy" is enable, "Access Control" is "IPsec". |
| "ESP" | Title strings. "Encryption" and "Authentication" are contained. | - |
| "Encryption" | Use the drop-down list to choose from the following. "AES-CBC-128" / "AES-CBC-192" / "AES-CBC-256" / "AES-GCM-128" / "AES-GCM-192" / "AES-GCM-256" / "3DES" / "Any" | This item is enabled when "Enable this Group Policy" is enabled, "Access Control" is "IPsec", and "Security Protocol" is "ESP". |
| "Authentication" | Use the drop-down list to choose from the following. "SHA-1" / "SHA-256" / "SHA-384" / "SHA-512" / "MD5" / "Any" | This item is enabled when "Enable this Group Policy" is enabled, "Access Control" is "IPsec", and "Security Protocol" is "ESP". This item is disabled when "Encryption" for "ESP" is "AES-GCM-128", "AES-GCM-192", or "AES-GCM-256". |
| "AH" | Title strings. "Authentication" is contained. | - |
| "Authentication" | Use the drop-down list to choose from the following.. Support algorithms refer to the Network Functional Specifications. "SHA-1" / "SHA-256" / "SHA-384" / "SHA-512" / "MD5" / "Any" | This item is enabled when "Enable this Group Policy" is enabled, "Access Control" is "IPsec", and "Security Protocol" is "ESP". |
Table 9-100 Button
| Items | Description |
| "Next" | If pressed, Web Config goes to the Confirm IPsec Settings page. |
If Web Config recognizes an error in the entered value after the Next button is pressed, the following error pop-up is shown.
Table 9-101 Error Pop-up
| Items | Description |
| "Invalid value below." | This message is shown when the value entered in the text box is invalid. The item names of the corrected values are shown under the message in the left cell. If there are two or more items whose values were corrected, those items are listed line by line. |
| - This message is displayed if the combination of the Local Address (Printer/Scanner) and Remote Address (Host) is incorrect. See the following table. | |
| "Pre-shared keys you entered do not match." | - Displayed if there are 0 or 11 or more checks for "Service Name". |
| - Displayed if the values you entered for the Pre-shared keys do not match |
-Permit Access or Refuse Access
| Permit Access or Refuse Access | Local Address (Printer/Scanner) | ||||
| IPv4 | fe80::~ | Except fe80::~ | Any * | ||
| Remote Address (Host) | (Specify IP Adress)IPv4 | √ | - | - | √ |
| (Specify IP Adress) fe80::~ | - | √ | - | - | |
| (Specify IP Adress)fe80::~ | - | - | √ | √ | |
| (Specify IP Adress Range) IPv4 | √ | - | - | √ | |
| (Specify IP Adress Range) fe80::~ | - | √ | - | - | |
| (Specify IP Adress Range) Except fe80::~ | - | - | √ | √ | |
| (Blank) Any | √ | - | √ | √ | |
IPsec
| IPsec | Local Address (Printer/Scanner) | ||||
| IPv4 | fe80::~ | Except fe80::~ | Any * | ||
| Remote Address (Host) | (Specify IP Adress)IPv4 | √ | - | - | √ |
| (Specify IP Adress) fe80::~ | - | - | - | - | |
| (Specify IP Adress)fe80::~ | - | - | √ | √ | |
| (Specify IP Adress Range) IPv4 | - | - | - | - | |
| (Specify IP Adress Range) fe80::~ | - | - | - | - | |
| (Specify IP Adress Range) Except fe80::~ | - | - | - | - | |
| (Blank) Any | √ | - | √ | √ | |
√: This setting can be configured.
- : Cannot be configured. The message "The combination of Local Address (Printer/Scanner) and Remote Address (Host) is incorrect." is displayed.
*: Does not include IPv6 link-local address
9.4.5.1.2 Confirm IPsec Settings Page
If the Next button is pressed on the IPsec Group Settings page, Web Config goes to the Confirm IPsec Group Policy Settings page.
9.4.5.1.2.1 Image
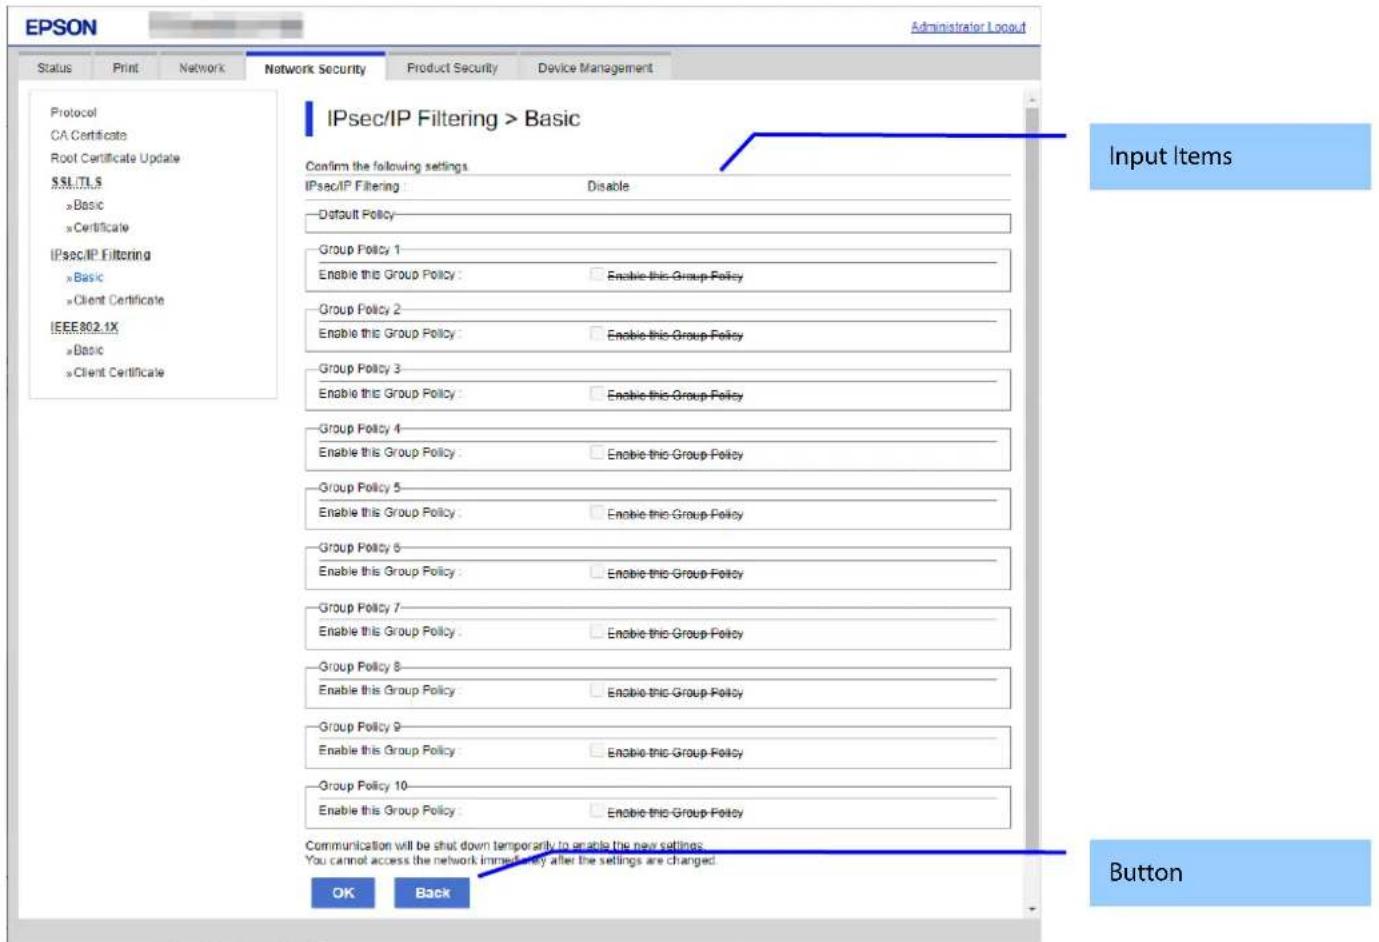
Figure 9-45 Confirm IPsecDefault Policy Settings Page
9.4.5.1.2.2 Input Information
Table 9-102 Input Information
| Items | Description |
| "Confirm the following settings." | If the Next button is pressed on the IPsec Group Settings page, Web Config goes to the Confirm IPsec Group Policy Settings page. |
| "Default Policy" | If the Next button is pressed on the IPsec Group Settings page, Web Config goes to the Confirm IPsec Group Policy Settings page. |
| "Group Policy 1"/ "Group Policy 2"/ "Group Policy 3"/ "Group Policy 4"/ "Group Policy 5"/ "Group Policy 6"/ "Group Policy 7"/ "Group Policy 8"/ "Group Policy 9"/ "Group Policy 10" | If the Next button is pressed on the IPsec Group Settings page, Web Config goes to the Confirm IPsec Group Policy Settings page. |
| "Communication will be shut down temporarily to enable the new settings." "You cannot access the network immediately after the settings are changed." "Depending on the changes, you may not be able to connect to Web Config." | If the Next button is pressed on the IPsec Group Settings page, Web Config goes to the Confirm IPsec Group Policy Settings page. |
| This message is shown on the bottom of the page. | |
| "If connection is lost unintentionally, initialize the network settings on the product's control panel. And then configure it again." | |
| < The case of scanner with LCD panel > | |
| "If connection is lost unintentionally, disable IPsec/IP Filtering on the product's control panel. And then configure it again." |
9.4.5.1.2.3 Button
There is a button to proceed to the remaining settings based on the values entered on this page, and a button to go back to the previous page.
Table 9-103 Button
| Items | Description |
| "OK" | This button is used to apply the entered values to the system shown on the Confirm IEEE802.1X Settings page. If pressed, Web Config goes to the Result page. |
| "Back" | This button is used to go back to the IPsec Default Policy Settings page. |
9.4.5.1.2.4 Result Page
The following figures show pages displayed after processing network setup.
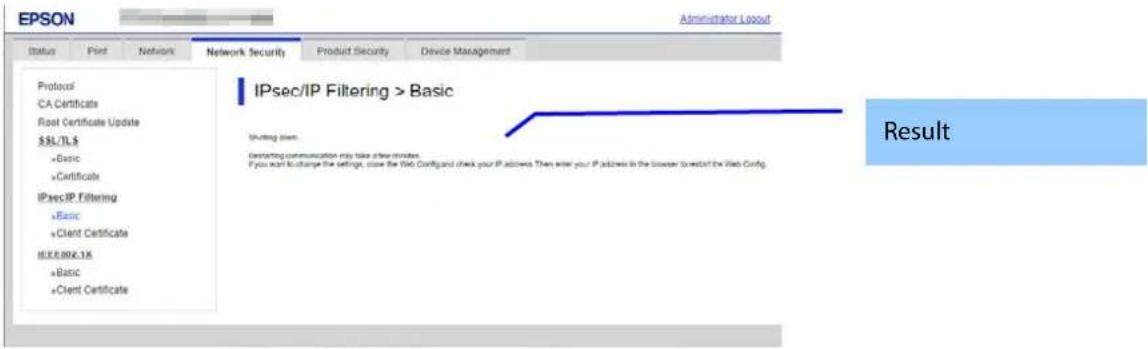
Figure 9-46 Success Page
9.4.5.1.2.5 Setting Result
Table 9-104 Setting Result
| Items | Description |
| "Shutting down.""Restarting communication may take a few minutes.""If you want to change the settings, close the Web Config and check your IP address. Then enter your IP address in the browser to restart the Web Config." | -This message is shown when the settings are completed.The network shuts down in order to update. |
| "Setup failed." | - This message is shown if the settings fail.. |
9.4.5.2 Client Certificate
9.4.5.2.1 Top Page
9.4.5.2.1.1 Image
The following figure shows the layout of the top page.
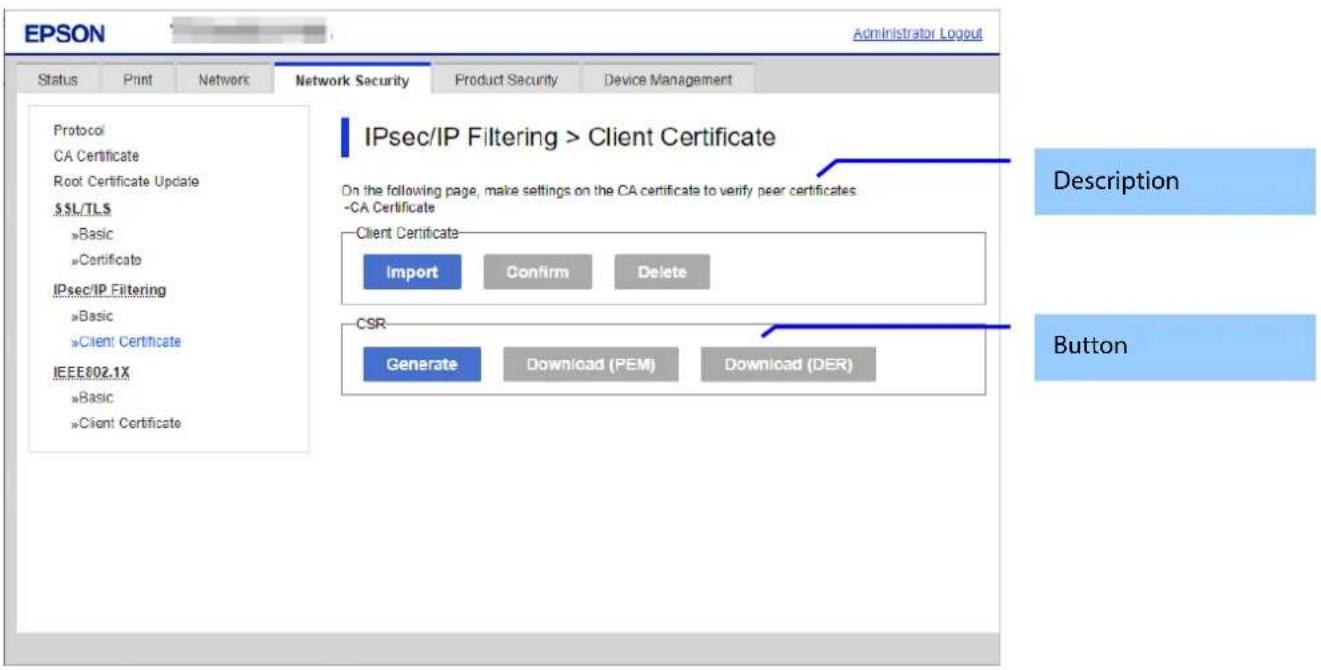
Figure 9-47 Top Page
9.4.5.2.1.2 Description
Table 9-105 Description
| Items | Description |
| "On the following page, configure the settings on the CA certificate to verify peer certificates.""-CA Certificate" | Fixed Strings |
9.4.5.2.1.3 Copy list
You can choose other functions to copy the certificate to this function.
Table 9-106 Copy list
| Items | Description | Condition |
| "Copy From" | Use the drop-down list to make a choice."Certificate for SSL/TLS" / "Certificate for IEEE802.1X""Certificate for SSL/TLS" is displayed when the Client Certificate is imported on the SSL/TLS page."Certificate for IEEE802.1X" is displayed when the Client Certificate is imported on the IEEE802.1X page."Certificate for S/MIME" is displayed when the Client Certificate is imported on the S/MIME page. "Certificate for S/MIME" is displayed when the Client Certificate is imported on the S/MIME page. | "Copy From" is displayed when the Client Certificate is imported on the following page:SSL/TLS pageIEEE802.1X pageS/MIME page |
9.4.5.2.1.4 Button
The following table shows the buttons on the page.
Table 9-107 Button
| Items (Group Name) | Items (Button Name) | Description | Condition |
| "Client Certificate" | "Import" | - Button for importing Client certificate | - |
| "Confirm" | - Button for confirming the imported Client certificate | -Client certificate imported | |
| "Delete" | - Button for deleting the imported Client certificate | -Client certificate imported | |
| "Copy" | - Button for copying client certificates from other functionsWeb Config displays a pop-up window if a Client Certificate was already imported in this function.Web Config displays a result page if a Client Certificate was NOT imported in this function. | The "Copy" button is displayed when the Client Certificate is imported on the following page:SSL/TLS pageIEEE802.1X page | |
| "CSR" | "Generate" | - Button for moving to the settings page to generate CSR | - |
| "Download (PEM)" | - Button for downloading the CSR date in PEM format | -CSR created. | |
| "Download (DER)" | - Button for downloading the CSR date in PEM format | -CSR created. |
9.4.5.2.2 Result Page
9.4.5.2.2.1 Image
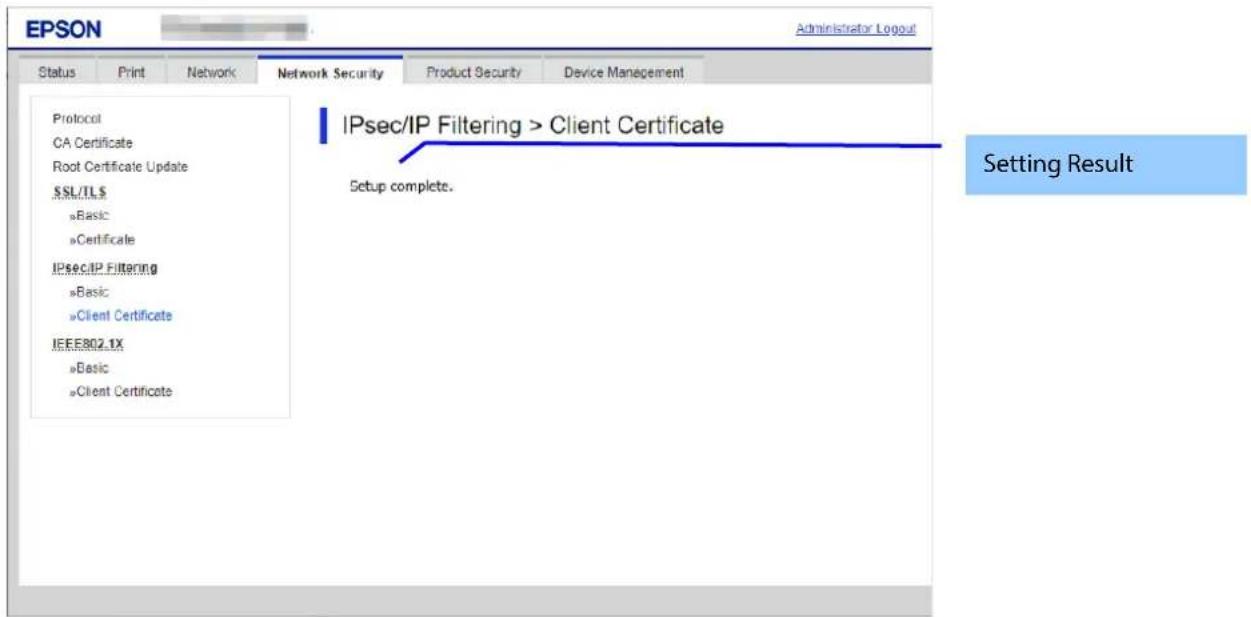
Figure 9-48 Result Page
9.4.5.2.2.2 Setting Results
The following result is shown in the main frame after the "Copy" button is pressed.
Table 9-108 Result Page
| Items | Description |
| "Setup complete." | - This message is shown when importing without overwriting is completed. |
| "Setup failed." | - This message is shown if the settings fail. |
9.4.5.2.3 Importing for Client Certificate
9.4.5.2.3.1 Import Top Page
This page is shown after the 'Import' button in the Client certificate settings is pressed.
The following figure shows the layout of the page for importing the Client certificate into the printer.
9.4.5.2.3.1.1 Image
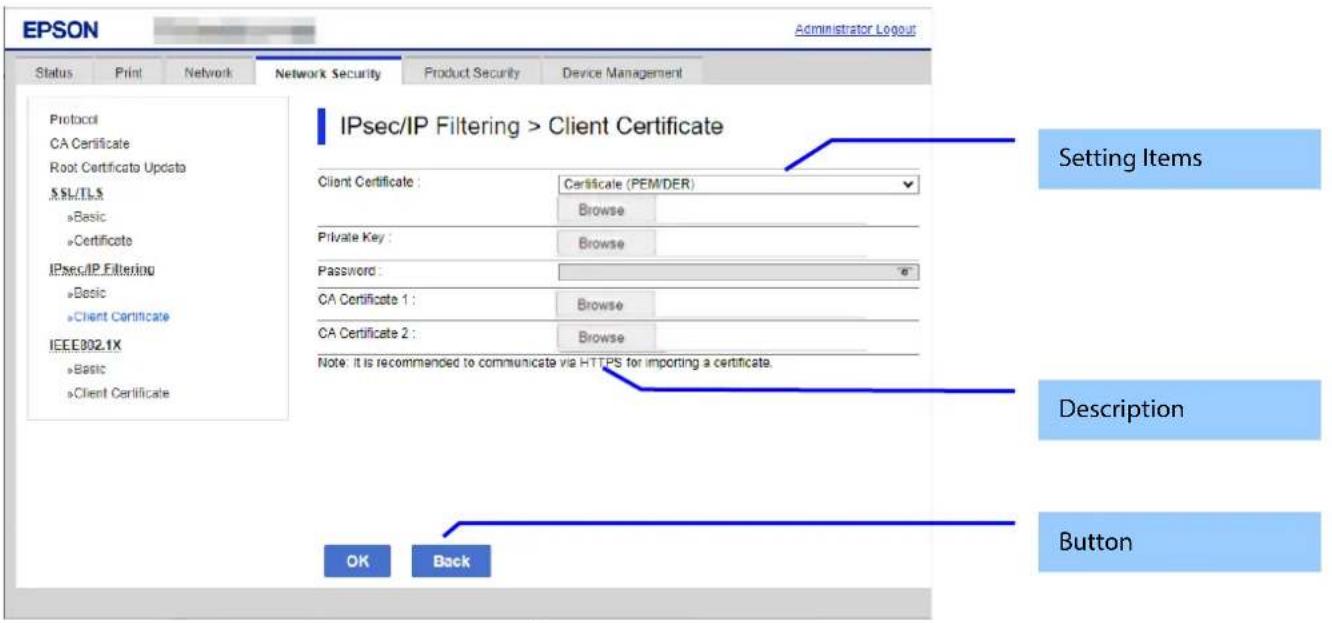
Figure 9-49 Import Top Page
9.4.5.2.3.1.2 Setting Items
On the Import Top Page, the following items can be controlled by the administrator.
Table 9-109 Setting Items
| Items | Description | Condition |
| "Client Certificate" | Enter the file of the Client certificate to import it into the printer. You can also use the file button to select the file. | - |
| File Format | Choose the file format of the server certificate to import it into the printer."Certificate (PEM/DER)"/"Certificate with Private Key (PKCS#12)" | - |
| "Private Key" | Enter the private key file of the server certificate to import it into the printer. You can also use the file button to select the file. | Only when certificate (PEM/DER) is selected |
| "Password" | Enter the passphrase for encryption to create a private key. Usable string: ASCII code (0x20-0x7E) Max of 48 characters. | In certificate with private key (PKCS#12) selected only. |
| "CA Certificate 1" | Enter the file of the certificate signed by CA issuing the server certificate to import it into the printer. You can also use the file button to select the file. Max of 255 characters. | In certificate (PEM/DER) selected only. |
| "CA Certificate 2" | Enter the file of the certificate signed by CA issuing the first CA certificate to import it into the printer. It also is able to select the file using file button. | In certificate (PEM/DER) selected only. |
Table 9-110 Description
| Items | Description |
| "Note: It is recommended to communicate via HTTPS when importing a certificate." | Fixed Strings |
The following table shows the buttons on the page.
Table 9-111 Button
| Items | Description |
| "OK" | Button at the bottom of the main frame to perform importing. After the "OK" button is pressed, Web Config performs the following operations depending on conditions.- If the entered value is invalid, Web Config displays a pop-up window with an error message.- If the entered value is NOT invalid and a Client Certificate was imported already, Web Config displays a pop-up window with a warning message.- If the entered value is NOT invalid and a Client Certificate was NOT imported already, Web Config displays a Result page. |
| "Back" | Button at the bottom of the main frame for going back to the top page of the certificate settings. |
9.4.5.2.3.2 Result Page
The following result is shown in the main frame after the "OK" button is pressed.
9.4.5.2.3.2.1 Image
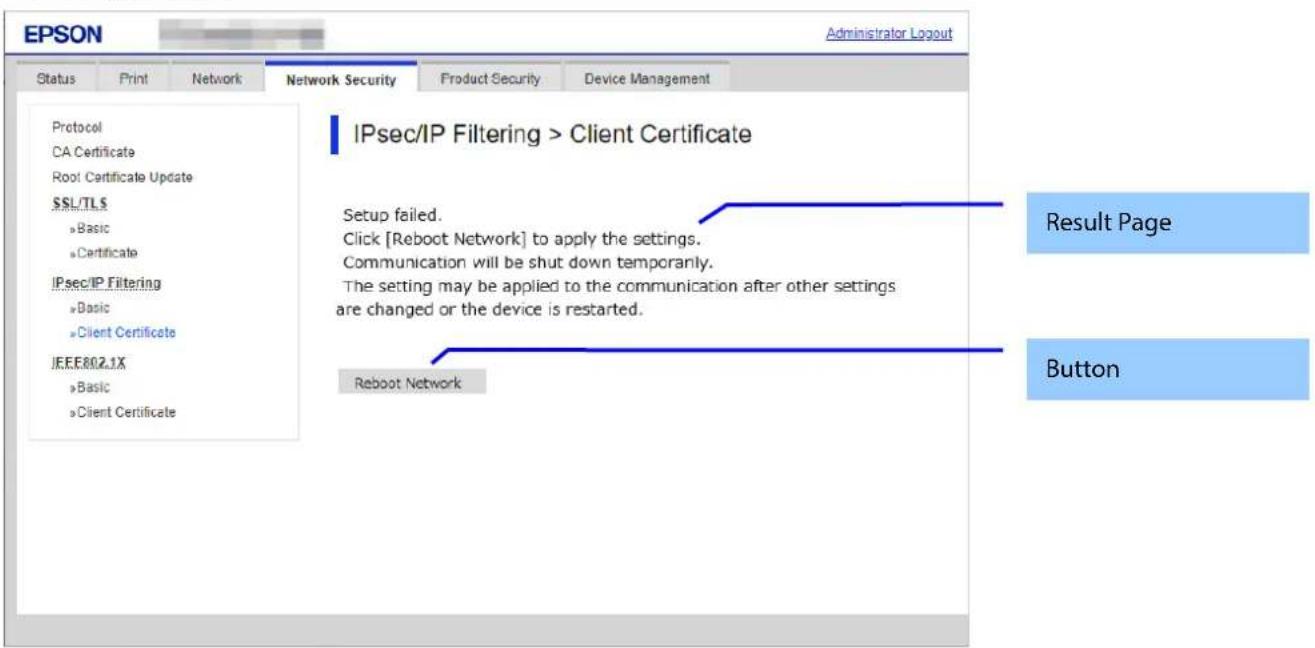
Figure 9-50 Result Page
9.4.5.2.3.2.2 Result
Table 9-112 Result
| Items | Description | Redirect from Import Top Page | Redirect from Warning Pop-up | Redirect after Pressing Reboot Network Button |
| "Setup complete." | This message is shown when importing is completed. | Yes | No | No |
| "Shutting down.""Restarting communication may take a few minutes.""If you want to change the settings, close the Web Config and check your IP address. Then enter your IP address in the browser to restart the Web Config." | This message is shown when importing and overwriting are completed.The network shuts down in order to update. | No | Yes | Yes |
| "Invalid password." | This message is shown when the entered password is invalid. | Yes | Yes | No |
| "Invalid file." | This message is shown in the following cases.- The file uses an incorrect format or wrong interrelation.- The file size is greater than the stipulated range of 5k to 24k. (See the note.)- The private key and certificate do not match.- Incorrect chain. | Yes | Yes | No |
| "Invalid date and time." | This message is shown when an expired certificate is imported, and the date and time are not set. | Yes | Yes | No |
| "The certificate has expired. Check if the certificate is valid, or check the date and time on the product." | This message is shown when an expired certificate is imported, and the date and time are already set. | Yes | Yes | No |
| "Cannot use the Client Certificates that include more than three CA certificates." | - This message is shown when a server certificate that includes more than 3 CA-signed certs is imported in PSCS#12. | Yes | Yes | No |
| "Private key is required." | This message is shown when a private key is required. | Yes | Yes | No |
| "Setup failed." | This message is shown when importing fails. | Yes | Yes | No |
| "Setup failed.""Click [Reboot Network] to apply the settings.""Communication will be shut down temporarily.""The setting may be applied to the communication after other settings are changed or the device is restarted." | This message is shown when a network reboot fails. | No | Yes | Yes |
Note: If the size of a certificate to be imported is larger than 24KBytes, the device is unable to read it and a Web browser error is shown.
9.4.5.2.3.2.3 Button
Table 9-113 Button
| Items | Description | Condition |
| "Reboot Network" | Reboots the networkIf the network reboot is successful, Web Config displays the successful result page.If the network reboot fails, Web Config displays the same page. | If the network reboot fails |
9.4.5.2.4 Confirm for Client certificate
9.4.5.2.4.1 Top Page
This page is shown after ‘Confirm’ for the import is pressed in the Client certificate settings. The format of the indicated page is the same as “Confirm for CA-signed certificate”.
9.4.5.2.4.1.1 Display Items
Table 9-114 Display Items
| Items | Description |
| "Client Certificate" | Shows the content of the server certificate imported into the printer |
| "CA Certificate 1" | Shows the content of the first CA-signed certificate imported into the printer |
| "CA Certificate 2" | Shows the content of the second CA-signed certificate imported into the printer |
9.4.5.2.4.1.2 Button
Table 9-115 Button
| Items | Description |
| "Back" | Button at the bottom of the main frame for going back to the top page of the certificate settings. |
9.4.5.2.5 Generate CSR(Certificate Signing Request)
9.4.5.2.5.1 Generate Top Page
This page is shown after 'Generate' for importing in the CSR settings is pressed. The format of the indicated page is the same as "SSL/TLS > Certificate> Generate CSR".
9.4.5.2.5.1.1 Image
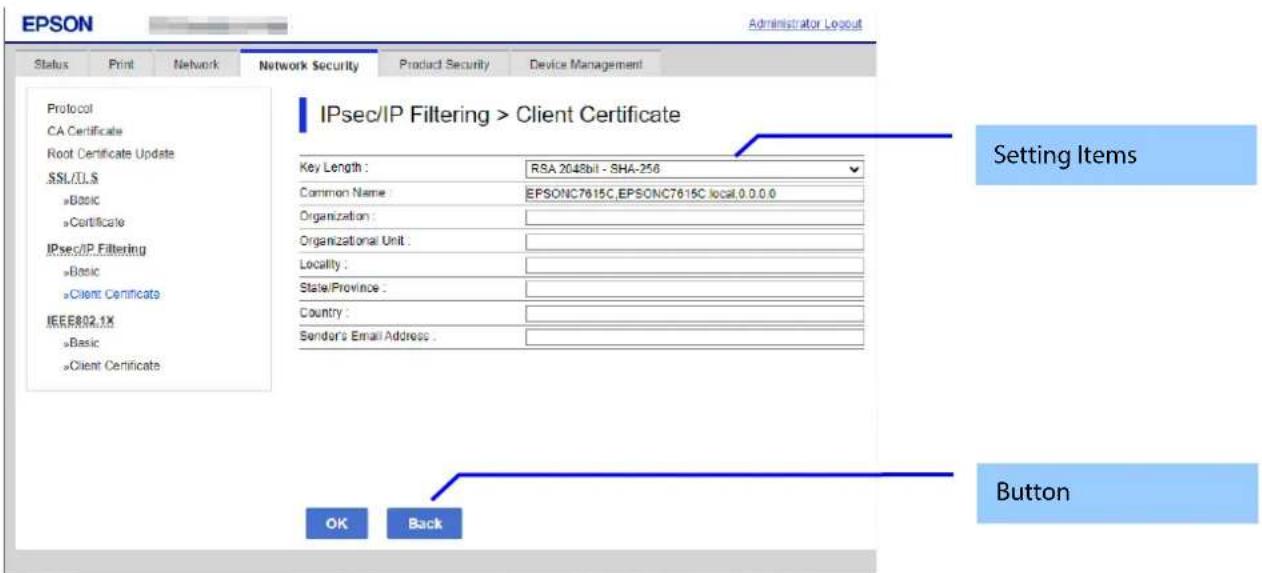
Figure 9-51 Generate CSR(Certificate Signing Request)
9.4.5.2.5.1.2 Setting Items
The user must enter the following information to generate CSR. The following table shows the items on the page.
Table 9-116 Setting Items
| Items | Description |
| "Key Length" | Use the drop-down list to choose the public key size for generating CSR."RSA 1024bit- SHA-1" / "RSA 2048bit- SHA-256" / "RSA 3072bit - SHA-256" / "EC 256bit- SHA-256" / "RSA 4096bit - SHA-384" / "EC 384bit - SHA-384" / "EC 521bit- SHA-512" |
| "Common Name" | Use the text box to input a common name for generating CSR.Entering information is mandatory for generating CSR.Set a string with from 1 to 128 characters in the IPv4 address, IPv6 address, host name, or FQDN format.Commas (",")(0x2c) have a special meaning as control characters. See the NOTE below. |
| "Organization" | Use the text box to input the organization for generating CSR.Usable string: US-ASCII (0x20-0x7e), Max. 64 charactersIf there is no string, the value is treated as a white space. |
| "Organizational Unit" | Use the text box to input the organization unit for generating CSR.Usable string: US-ASCII (0x20-0x7e), Max. 64 charactersIf there is no string, the value is treated as a white space. |
| "Locality" | Use the text box to input a locality for generating CSR.Usable string: US-ASCII (0x20-0x7e), Max. 64 charactersIf there is no string, the value is treated as a white space. |
| "State/Province" | Use the text box to input a state or province for generating CSR.Usable string: US-ASCII (0x20-0x7e), Max. 64 charactersIf there is no string, the value is treated as a white space. |
| "Country" | Use the text box to input the country for generating CSR.Usable string: US-ASCII (0x20-0x7e), Max. 2 charactersIf there is no string, the value is treated as a white space. |
| "Sender's Email Address" | Specify the source address for sending e-mail.Enter an ASCII character string in the range of 0 to 255 characters in the text box.(Excluding: () <> [];¥ ",') |
NOTE: You can enter multiple names for these items.
When the "Generate" button is pressed, Web Config displays a pop-up window with the following message if it recognizes an error in the entered value.
Table 9-117 Button
| Items | Description |
| "OK" | Button for generating CSR at the bottom of the main frame. |
| "Back" | Button at the bottom of the main frame for going back to the top page of the certificate settings. |
Table 9-118 Error Pop-up
| Items | Description |
| "Invalid value below. ¥n -%s¥n -%s¥n..." | Shows a warning when a value is entered incorrectly. |
9.4.5.2.5.2 Result Page
After the Generate CSR button is pressed, Web Config goes to the Result page.
9.4.5.2.5.2.1 Image
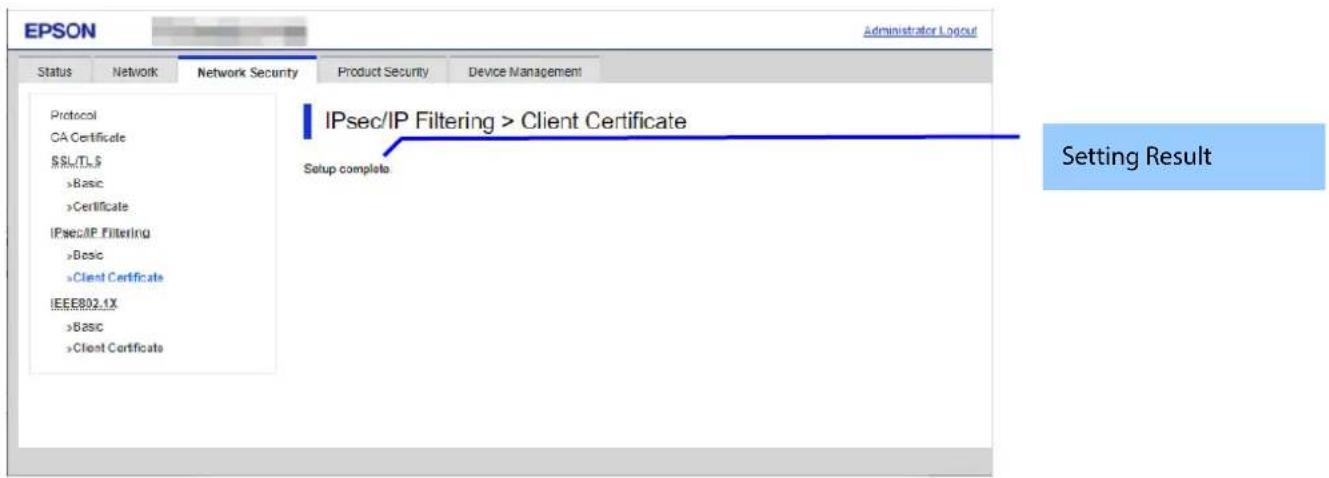
Figure 9-52 Result Page
9.4.5.2.5.2.2 Setting Result
Table 9-119 Setting Result
| Items | Description |
| "Setup complete." | This message is shown when the settings are completed. |
| "Setup failed." | This message is shown if the settings fail. |
9.4.5.2.6 Download CSR(Certificate Signing Request)
This page is shown after 'Download' for importing in the CSR settings is pressed.
The default name of the downloaded file is in the form of "EXPORT_CSR_
The method of downloading the CSR varies by Web browser.
9.4.6 IEEE802.1X
In the IEEE802.1X settings area, you can configure the settings related to the HTTP server the printer supports.
Table 9-120 Sub menu
| Sub menu |
| "Basic" |
| "Client Certificate" |
9.4.6.1 Basic
9.4.6.1.1 Top Page in Basic Settings
9.4.6.1.1.1 Image
The following figure shows the layout of the settings for IEEE802.1X basic.
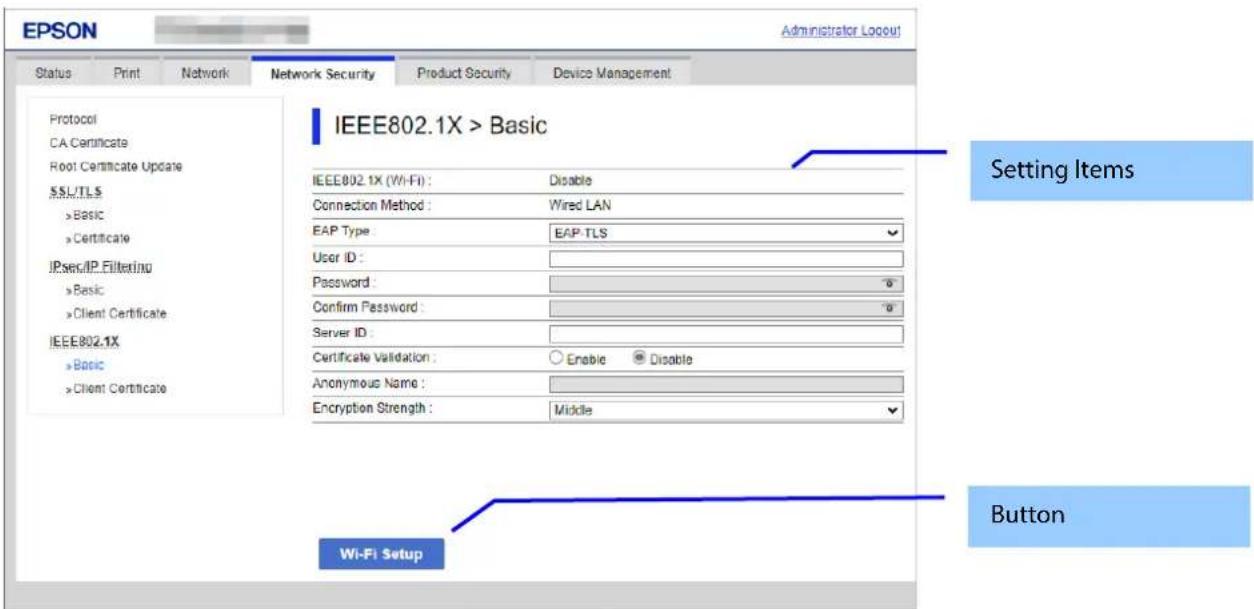
Figure 9-53 IEEE802.1X Top Page in Basic Settings
9.4.6.1.1.2 Setting Items
The following figure shows the layout of this settings area.
Table 9-121 Setting Items
| Items | Description | Condition |
| "IEEE802.1X (Wired LAN)" | Use the radio buttons to select "Enabled" or "Disabled". | Only products that support Wired LAN |
| "IEEE802.1X (Wi-Fi)" | Display "Enable" or "Disable" | Read Only- Only printers that support WPA2/WPA3- Enterprise |
| "Connection Method" | Display "Wired LAN" / "Wi-Fi" / "Disable". | Read Only- Only WPA2/WPA3-Enterprise support printers. |
| "EAP Type" | - If it is not equipped with Wi-Fi chip.Select "EAP-TLS" / "PEAP-TLS" / "PEAP/MSCHAPv2" by drop-down list.- If it is equipped with Wi-Fi chip.Select "EAP-TLS" / "EAP-TTLS" / "PEAP-TLS" / "PEAP/MSCHAPv2" by drop-down list. | - |
| "User ID" | A text box is provided. The string must be from 0 to 128 bytes with characters in ASCII codes. (0x20 - 0x7E) | - |
| "Password" | A text box is provided. The string must be from 1 to 128 bytes with characters in ASCII codes. (0x20 - 0x7E)If "EAP Type" is "PEAP/MSCHAPv2" or "EAP-TTLS", character must be entered. | - Not equipped with Wi-Fi chip Can be entered by the user when "EAP Type" is "PEAP/MSCHAPv2"- Equipped with Wi-Fi chip Can be entered by the user when "EAP Type" is "PEAP/MSCHAPv2" or "EAP-TTLS" |
| "Confirm Password" | Same as Password. | Same as Password |
| "Server ID" | A text box is provided. The string must be from 0 to 128 bytes with characters in ASCII codes. (0x20 - 0x7E) | - |
| "Certificate Validation" | Two radio buttons are provided to choose one of the following:"Enable" / "Disable" | Display only models other than TM-m50II-H. |
| "Certificate Validation (Wired LAN)" | A radio button is provided to choose either of the following:"Enable" / "Disable" | Displayed only for the TM-m50II-H. |
| "Anonymous Name" | A text box is provided. The string must be from 0 to 128 bytes with characters in ASCII codes. (0x20 - 0x7E) | - When "EAP Type" is "PEAP-TLS", "PEAP/MSCHAPv2" or "EAP-TTLS", user can enter. |
| "Encryption Strength" | Select "Middle" / "High" by drop-down list. | - |
9.4.6.1.1.3 Button
Table 9-122 Button
| Items | Description | Condition |
| "Next" | If pressed, Web Config goes to the Confirm IEEE802.1X Settings page. | Only Wired LAN support products. |
| "Wi-Fi Setup" | If pressed, Web Config goes to the SSID Search page. | Only products that support WPA2/WPA3-Enterprise |
If Web Config recognizes an error in the entered value after the button is pressed, the following error pop-up is shown.
Table 9-123 Error Pop-up
| Items | Description |
| "Invalid value below." | This message is shown when the value entered in the text box is invalid. The item names of the corrected values are shown under the message in the left cell. If there are two or more items whose values were corrected, those items are listed line by line. |
| "Passwords you entered do not match." | When the password and the confirmation password do not match, this message is shown. |
9.4.6.1.2 SSID Search Page
When the "Wi-Fi Setup" button is pressed, Web Config goes to the SSID Search page as shown below. If Web Config confirms periodically that an SSID search has been triggered by access to this page or by pressing the Refresh button, it goes to the Wi-Fi Settings page. If the SSID search has not been completed, Web Config remains on this page. If an SSID search is not possible, Web Config shows the failure result page.
9.4.6.1.2.1 Image
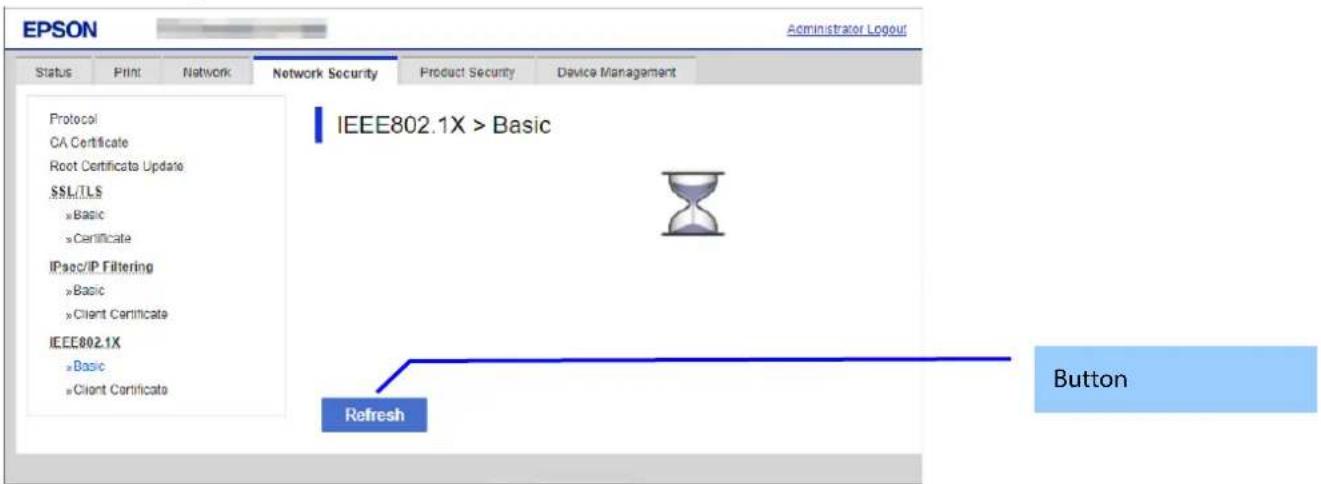
Figure 9-54 SSID Search Page
9.4.6.1.2.2 Button
Table 9-124 Button
| Items | Description |
| "Refresh" | After the Refresh button is pressed, Web Config goes to the Wi-Fi Settings page if an SSID search has been completed. If an SSID search has not been completed, Web Config remains on the SSID Search page. |
9.4.6.1.3 Wi-Fi Settings Page
If the Web Config confirms periodically that an SSID search has been done triggered by transition to this page or pressing the Refresh button, it goes to the Wi-Fi Settings page as below. You can choose a SSID on the searched SSID list by choosing a radio button or choose a radio button to specify any SSID manually.
9.4.6.1.3.1 Image
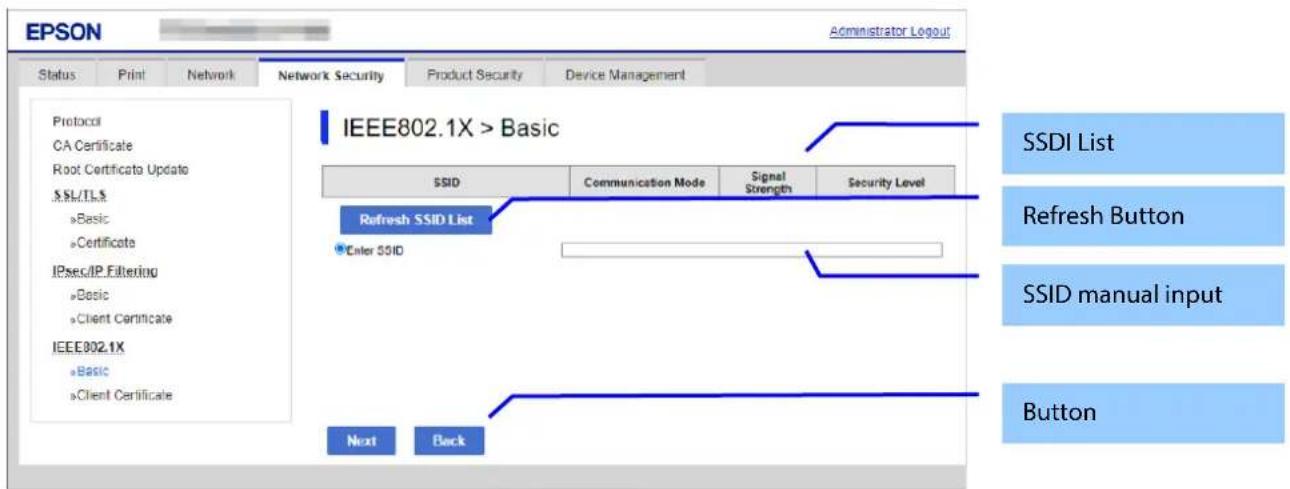
Figure 9-55 Wi-Fi Settings Page
9.4.6.1.3.2 SSID List
Choose an SSID from the list of searched SSIDs as shown below. A list of up to 10 searched SSIDs (only WPA2/WPA3-Enterprise SSIDs) is sorted by signal strength level (strong -> weak).
Table 9-125 SSID List
| Items | Description | Condition |
| "SSID" | Shows the name of each SSID. | - |
| "Communication Mode" | Shows either of the following communication modes:"Infrastructure" | - |
| "Signal Strength" | Shows one of the following signal strengths: "Excellent" / "Good" / "Fair" / "No Good" / "Unknown" | This item is displayed for models that use the Wi-Fi chip. |
| "Security Level" | Shows one of the following security levels: "WPA2/WPA3-Enterprise" | - |
9.4.6.1.3.3 SSID Manual Input
You can specify any SSID manually.
Table 9-126 SSID Manual Input
| Items | Description |
| "Enter SSID" | A text box is provided so the user can enter an SSID manually. The string must have 1 to 32 characters. (ASCII codes: 0x20 - 0x7E) |
9.4.6.1.3.4 Refresh Button
The Refresh button provides the user with the updated SSID list.
Table 9-127 Refresh Button
| Items | Description |
| "Refresh SSID List" | If pressed, Web Config shows the SSID Search page. |
9.4.6.1.3.5 Button
There is a button to proceed to the remaining settings based on the values entered on this page, and a button to go back to the previous page.
Table 9-128 Button
| Items | Description |
| "Next" | This button is used to go forward with Wi-Fi Setup based on the values entered on the Wi-Fi Setup page. If pressed, Web Config goes to the Confirmation page without applying the changes. |
| "Back" | If pressed, Web Config discards the entered values and goes to the top page of Wi-Fi Setup. |
When the “Apply” button is pressed, Web Config displays a pop-up window that shows the following message if it recognizes an error in the entered value.
Table 9-129 Error Pop-up
| Items | Description |
| "Invalid value below." | This message is shown when the value entered for SSID is invalid. The item name of the invalid value is shown under the message in the left cell. |
9.4.6.1.4 Confirm IEEE802.1X Settings Page
If the Next button is pressed on the IEEE802.1X Top page or Wi-Fi Settings page, Web Config goes to the Confirm IEEE802.1X Settings page.
9.4.6.1.4.1 Image
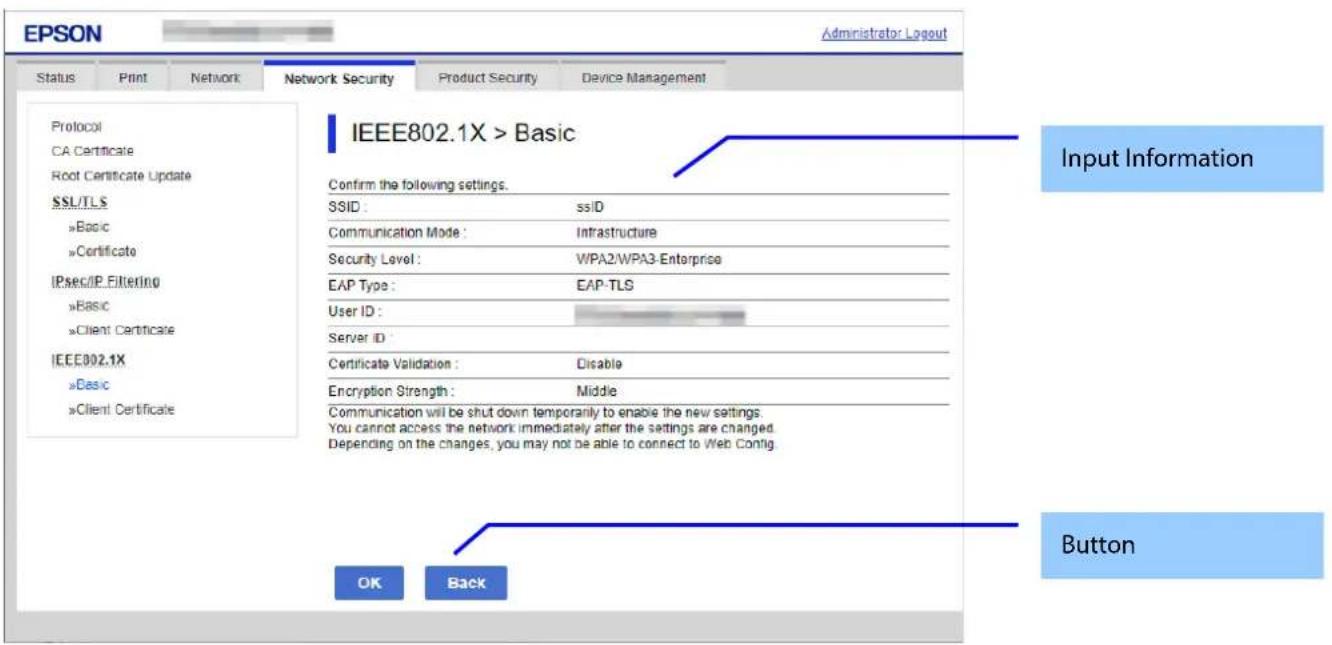
Figure 9-56 Confirm IEEE802.1X Settings Page
9.4.6.1.4.2 Input Information
The display items for entered information are changed from the top page or the Wi-Fi settings page.
Display items of input information is changed from top page or Wi-Fi settings page.
Table 9-130 Comparison of Display Items
| Items | From Top Page | From Wi-Fi Settings Page |
| "SSID" | - | √ |
| "Communication Mode" | - | √ |
| "Security Level" | - | √ |
| "IEEE802.1X(Wired LAN)" | √ | √ |
| "EAP Type" | √ | √ |
| "User ID" | √ | √ |
| "Password" | √ | √ |
| "Server ID" | √ | √ |
| "Anonymous Name" | √ | √ |
| "Encryption Strength" | √ | √ |
Disabled items on the top page are hidden.
Table 9-131 Description
| Items | Description | Condition |
| "Confirm the following settings." | This message is shown at the top of the page, followed by the setting items and their values. | - |
| "Communication will be shut down temporarily to enable the new settings.""You cannot access the network immediately after the settings are changed.""Depending on the changes, you may not be able to connect to Web Config." | This message is shown at the bottom of the page.This message is shown at the bottom of the page. | -- Only from top page |
| "If connection is lost unintentionally, initialize the network settings on the product's control panel. And then configure it again." | ||
9.4.6.1.4.3 Button
There is a button to proceed to the remaining settings based on the values entered on this page, and a button to go back to the previous page.
Table 9-132 Button
| Items | Description |
| "Apply" | This button is used to apply the entered values to the system shown on the Confirm IEEE802.1X Settings page. If pressed, Web Config goes to the Result page. |
| "Back" | This button is used to go back to the IEEE802.1X Top page in Basic Settings or on the Wi-Fi Settings page. |
9.4.6.1.5 Result Page
The following figure shows the page that is displayed after the network settings are processed.
9.4.6.1.5.1 Image
The content of the Result page will vary based on the result (success or failure).
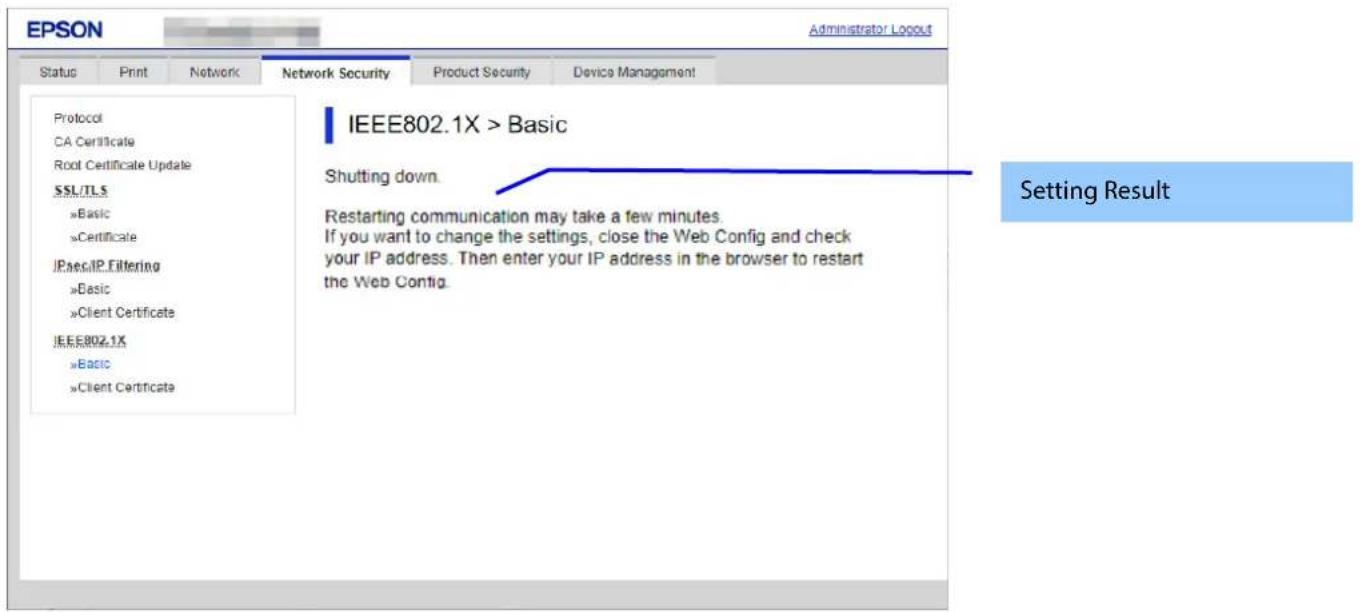
Figure 9-57 Result Page
9.4.6.1.5.2 Setting Result
Table 9-133 Setting Result
| Items | Description |
| "Shutting down.""Restarting communication may take a few minutes.""If you want to change the settings, close the Web Config and check your IP address. Then enter your IP address in the browser to restart the Web Config." | This message is shown when the settings are completed.The network shuts down in order to update. |
| "Setup failed." | - This message is shown if the settings fail. |
9.4.6.2 Client Certificate
9.4.6.2.1 Top Page
The following figure shows the layout of the top page for certificate settings.
The format of the indicated page is the same as "IPsec/IP Filtering > Importing for Client certificate".
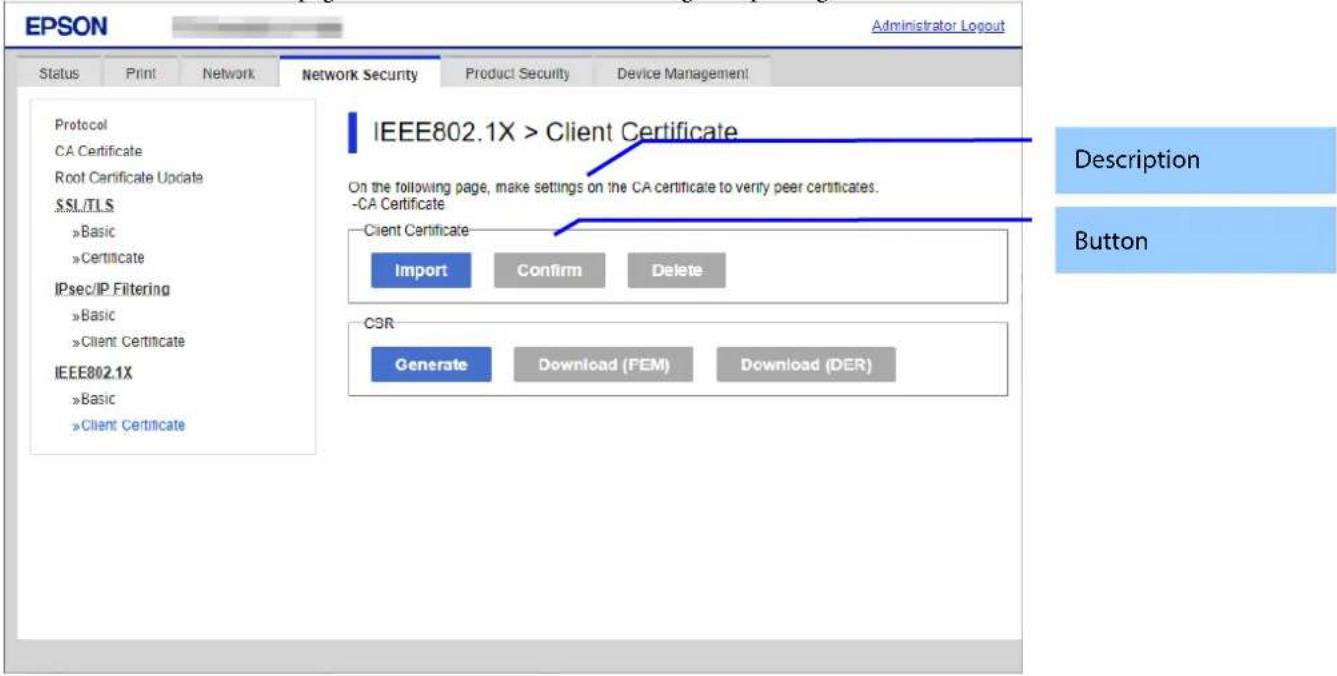
Figure 9-58 Top Page
9.4.6.2.1.1 Description Items
Table 9-134 Description Items
| Items | Description |
| "On the following page, make settings on the CA certificate to verify peer certificates.""-CA Certificate" | Fixed Strings |
9.4.6.2.1.2 Copy List
You can choose other functions to copy the certificate to this function.
9-135 Copy List
| Items | Description | Condition |
| "Copy From" | Use the drop-down list to make a choice."Certificate for SSL/TLS" / "Certificate for IPsec""Certificate for SSL/TLS" is displayed when Client Certificate is imported in SSL/TLS page."Certificate for IPsec" is displayed when Client Certificate is imported in IPsec page."Certificate for S/MIME" is displayed when Client Certificate is imported in S/MIME page. | "Copy From" is displayed when the Client Certificate is imported on the following page:- SSL/TLS page- IPsec page- S/MIME page |
9.4.6.2.1.3 Button
The following table shows the buttons on the page.
Table 9-136 Button
| Items (Group Name) | Items (Button Name) | Description | Condition |
| "Client Certificate" | "Import" | Button for importing Client certificate | - |
| "Confirm" | Button for confirming the imported Client certificate | Client certificate imported. | |
| "Delete" | Button for deleting the imported Client certificate | Client certificate imported | |
| "Copy" | Button for copying client certificates from other functionsWeb Config displays a pop-up window if a Client Certificate was already imported in this function.Web Config displays a result page if a Client Certificate was NOT imported in this function. | The "Copy" button is displayed when the Client Certificate is imported on the following page- SSL/TLS page- IPsec page | |
| "CSR" | "Generate" | - Button for moving to the settings page to generate CSR | - |
| "Download (PEM)" | - Button for downloading the CSR date in PEM format | -CSR created. | |
| "Download (DER)" | - Button for downloading the CSR date in PEM format | -CSR created. |
9.4.6.2.2 Result Page
The following result is shown in the main frame after the "Copy" button is pressed.
9.4.6.2.2.1 Image
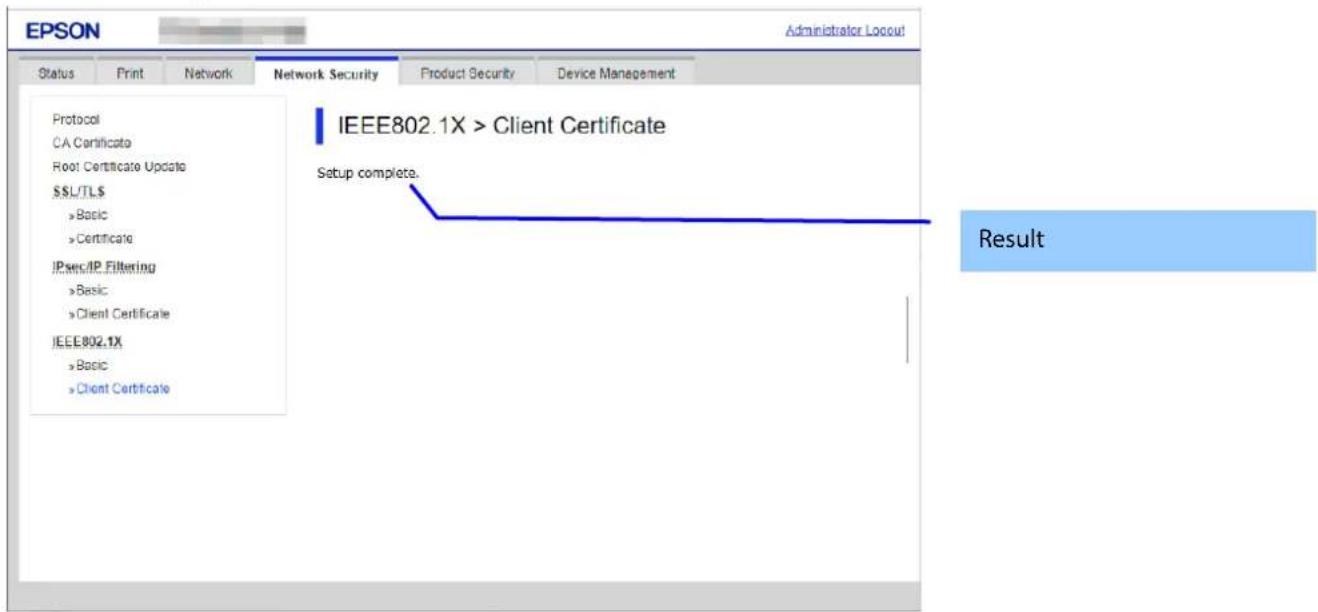
Figure 9-59 Result Page
9.4.6.2.2.2 Result
Table 9-137 Result Page
| Items | Description |
| "Setup complete." | This message is shown when importing without overwriting is completed. |
| "Setup failed." | This message is shown if the settings fail. |
9.4.6.2.3 Importing for Client Certificate
9.4.6.2.3.1 Import Top Page
This page is shown after the 'Import' button in the Client certificate settings is pressed.
The format of the indicated page is the same as "IPsec/IP Filtering > Importing for Client certificate".
9.4.6.2.3.1.1 Setting Items
On the Import Top Page, the following items can be controlled by the administrator.
Table 9-138 Setting Items
| Items | Description | Condition |
| "Client Certificate" | Enter the file of the Client certificate to import it into the printer. You can also use the file button to select the file. | - |
| File Format | Choose the file format of the server certificate to import it into the printer."Certificate (PEM/DER)" / "Certificate with Private Key (PKCS#12)" | - |
| "Private Key" | Enter the private key file of the server certificate to import it into the printer. You can also use the file button to select the file. | Only when certificate (PEM/DER) is selected |
| "Password" | Enter the passphrase for encryption to create a private key. Usable string: ASCII code (0x20-0x7E) Max of 48 characters. | Only if certificate with private key (PKCS#12) is selected |
| "CA Certificate 1" | Enter the file of the certificate signed by CA issuing the server certificate to import it into the printer. You can also use the file button to select the file. Max of 255 characters. | In certificate (PEM/DER) selected only. |
| "CA Certificate 2" | Enter the file of the certificate signed by CA issuing the first CA certificate to import it into the printer. It also is able to select the file using file button. | In certificate (PEM/DER) selected only. |
9.4.6.2.3.1.2 Description Items
Table 9-139 Description Items
| Items | Description |
| "Note: It is recommended to communicate via HTTPS for importing a certificate." | Fixed Strings |
The following table shows the button on the page.
Table 9-140 Button
| Items | Description |
| "OK" | Button at the bottom of the main frame to perform importing. After the "OK" button is pressed, Web Config performs the following operations depending on conditions.- If the entered value is invalid, Web Config displays a pop-up window with an error message.- If the entered value is NOT invalid and a Client Certificate was imported already, Web Config displays a pop-up window with a warning message.- If the entered value is NOT invalid and a Client Certificate was NOT imported already, Web Config displays a Result page. |
| "Back" | Button at the bottom of the main frame for going back to the top page of the certificate settings. |
9.4.6.2.3.2 Error Pop-up Window
If the "OK" button is pressed, the error pop-up window is shown if the entered value is invalid.
The format of the indicated page is the same as "IPsec/IP Filtering > Importing for Client certificate".
9.4.6.2.3.2.1 Confirmation Message
Table 9-141 Error Pop-up Window
| Items | Description |
| "Select a Client Certificate." | This message is shown when the file of the client certificate is not selected. |
| "CA Certificate 1 is not entered." | If the file of the CA certificate1 is not selected but the CA certificate is selected, this message is shown. |
| "Invalid value below." | Shown if an entered value error occurs |
9.4.6.2.3.2.2 Button
The wording of the OK button is displayed according to the display specifications for each Web browser.
Table 9-142 Button
| Items | Description |
| "OK" | Button for going back to the Import Top Page. |
9.4.6.2.3.3 Warning Pop-up Window
If the "OK" button is pressed, the error pop-up window is shown if the Server Certificate was imported already.
The format of the indicated page is the same as "IPsec/IP Filtering > Importing for Client certificate".
9.4.6.2.3.3.1 Confirmation Message
Table 9-143 Warning Pop-up Window
| Items | Description |
| "The certificate will be overwritten.""Communication will be shut down temporarily." | If the entered value is NOT invalid and a Client Certificate was imported already, a pop-up window with a warning message is displayed. |
9.4.6.2.3.3.2 Button
The wording of the OK button and the Cancel button is displayed according to the display specifications for each Web browser.
Table 9-144 Button
| Items | Description |
| "OK" | Overwrites all of the imported certificatesButton for going to the result page. |
| "Cancel" | Button for going back to the Import Top Page. |
9.4.6.2.3.4 Result Page
The following result is shown in the main frame after the "OK" button is pressed.
The format of the indicated page is the same as "IPsec/IP Filtering > Importing for Client certificate".
9.4.6.2.3.4.1 Result
Table 9-145 Result
| Items | Description | Redirect from Import Top Page | Redirect from Warning Pop-up | Redirect after Pressing Reboot Network Button |
| "Setup complete." | This message is shown when importing is completed. | Yes | No | No |
| "Shutting down.""Restarting communication may take a few minutes.""If you want to change the settings, close the Web Config and check your IP address. Then enter your IP address in the browser to restart the Web Config." | This message is shown when importing and overwriting are completed.The network shuts down in order to update. | No | Yes | Yes |
| "Invalid password." | This message is shown when the entered password is invalid. | Yes | Yes | No |
| "Invalid file." | This message is shown in the following cases.- The file uses an incorrect format or wrong interrelation.- The file size is greater than the stipulated range of 5k to 24k. (See the note.)- The private key and certificate do not match.- Incorrect chain. | Yes | Yes | No |
| "Invalid date and time." | This message is shown when an expired certificate is imported, and the date and time are not set. | Yes | Yes | No |
| "The certificate has expired. Check if the certificate is valid, or check the date and time on the product." | This message is shown when an expired certificate is imported, and the date and time are already set. | Yes | Yes | No |
| "Cannot use the Client Certificates that include more than three CA certificates." | This message is shown when a server certificate that includes more than 3 CA-signed certs is imported in PSCS#12. | Yes | Yes | No |
| "Private key is required." | This message is shown when a private key is required. | Yes | Yes | No |
| "Setup failed." | This message is shown when importing fails. | Yes | Yes | No |
| "Setup failed.""Click [Reboot Network] to apply the settings.""Communication will be shut down temporarily.""The setting may be applied to the communication after other settings are changed or the device is restarted." | This message is shown when a network reboot fails. | No | Yes | Yes |
Note: If the size of a certificate to be imported is larger than 24KBytes, the device is unable to read it and a Web browser error is shown.
| Items | Description | Condition |
| "Reboot Network" | Reboots the networkIf the network reboot is successful, Web Config displays the successful result page.If the network reboot fails, Web Config displays the same page. | If the network reboot fails |
9.4.6.2.4 Confirm for Client Certificate
This page is shown after 'Confirm' for the import is pressed in the Client certificate settings.
The format of the indicated page is the same as "IPsec/IP Filtering > Confirm for Client certificate".
9.4.6.2.4.1 Display Items
Table 9-147 Display Items
| Items | Description |
| "Client Certificate" | Shows the content of the server certificate imported into the printer |
| "CA Certificate 1" | Shows the content of the first CA-signed certificate imported into the printer |
| "CA Certificate 2" | Shows the content of the second CA-signed certificate imported into the printer |
9.4.6.2.4.2 Button
Table 9-148 Button
| Items | Description |
| "Back" | Button at the bottom of the main frame for going back to the top page of the certificate settings. |
9.4.6.2.5 Delete for the Client Certificate
9.4.6.2.5.1 Warning Pop-up Window
To delete all imported client certificates, click the "Delete" button for client certificates on the top page for certificate settings in the IEEE802.1X settings.
9.4.6.2.5.2 Result Page
The following result is shown in the main frame after the "OK" button is pressed.
9.4.6.2.5.2.1 Image
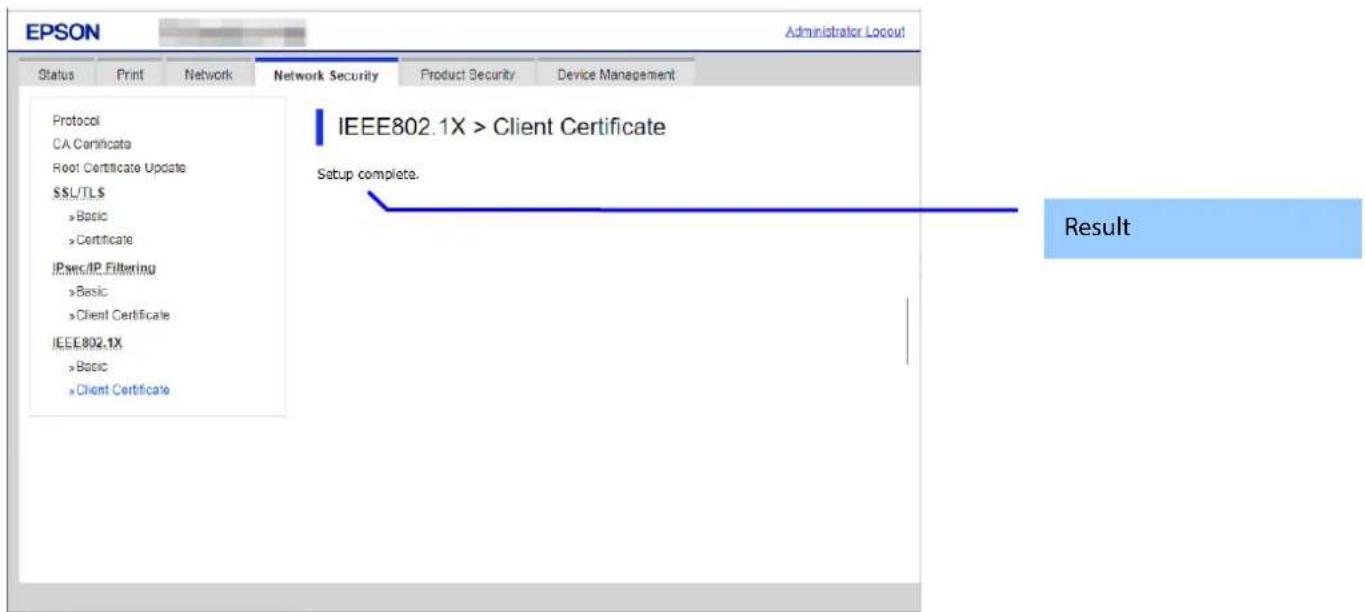
Figure 9-60 Result Page
9.4.6.2.5.2.2 Result
Table 9-149 Result Page
| Items | Description |
| "Setup complete." | This message is shown when deleting the certificate is successful. |
| "Setup failed." | This message is shown when deleting the certificate fails. |
9.4.6.2.6 Copying and Overwriting a Client Certificate
9.4.6.2.6.1 Warning Pop-up Window
A pop-up window is shown when the 'Copy' is pressed if the Client Certificate was imported with this function. The format of the indicated page is the same as "Importing for CA-signed certificate".
9.4.6.2.6.1.1 Confirmation Message
Table 9-150 Warning Pop-up Window
| Items | Description |
| "The certificate will be overwritten.""Communication will be shut down temporarily." | If the Client Certificate was imported already, a pop-up window with a warning message is displayed. |
9.4.6.2.6.1.2 Button
The wording of the OK button and the Cancel button is displayed according to the display specifications for each Web browser.
Table 9-151 Button
| Items | Description |
| "OK" | Overwrites all of the imported certificatesButton for going to the result page. |
| "Cancel" | Button for going back to the Import Top Page. |
9.4.6.2.6.2 Result Page
The following result is shown in the main frame after the "OK" button is pressed.
The format of the indicated page is the same as "IPsec/IP Filtering > Copying and overwriting Client certificate".
9.4.6.2.6.2.1 Result
Table 9-152 Result
| Items | Description | Transit from Warning Pop-up | Result Page |
| "Shutting down.""Restarting communication may take a few minutes.""If you want to change the settings, close the Web Config and check your IP address. Then enter your IP address in the browser to restart the Web Config." | This message is shown when copying and overwriting are completed.The network shuts down in order to update. | Yes | Yes |
| "Setup failed." | This message is shown when copying and overwriting fail. | Yes | Yes |
9.4.6.2.7 Generate CSR(Certificate Signing Request)
9.4.6.2.7.1 Generate Top Page
This page is shown after 'Generate' for importing in the CSR settings is pressed.
The format of the indicated page is the same as "SSL/TLS > Certificate> Generate CSR".
9.4.6.2.7.1.1 Setting Items
The user must enter the following information to generate CSR.
The following table shows the items on the page.
Table 9-153 Setting Items
| Items | Description |
| "Key Length" | Use the drop-down list to choose the public key size for generating CSR."RSA 1024bit - SHA-1" / "RSA 2048bit - SHA-256" / "RSA 3072bit - SHA-256" / "EC 256bit - SHA-256" / "RSA 4096bit - SHA-384" / "EC 384bit - SHA-384" / "EC 521bit - SHA-512" |
| "Common Name" | Use the text box to input a common name for generating CSR.Entering information is mandatory for generating CSR.Set a string with from 1 to 128 characters in the IPv4 address, IPv6 address, host name, or FQDN format.Commas (",")(0x2c) have a special meaning as control characters. See the NOTE below. |
| "Organization" | Use the text box to input the organization for generating CSR.Usable string: US-ASCII (0x20-0x7e), Max. 64 charactersIf there is no string, the value is treated as a white space. |
| "Organizational Unit" | Use the text box to input the organization unit for generating CSR.Usable string: US-ASCII (0x20-0x7e), Max. 64 charactersIf there is no string, the value is treated as a white space. |
| "Locality" | Use the text box to input a locality for generating CSR.Usable string: US-ASCII (0x20-0x7e), Max. 64 charactersIf there is no string, the value is treated as a white space. |
| "State/Province" | Use the text box to input a state or province for generating CSR.Usable string: US-ASCII (0x20-0x7e), Max. 64 charactersIf there is no string, the value is treated as a white space. |
| "Country" | Use the text box to input the country for generating CSR.Usable string: US-ASCII (0x20-0x7e), Max. 2 charactersIf there is no string, the value is treated as a white space. |
| "Sender's Email Address" | Specify the source address for sending e-mail.Enter an ASCII character string in the range of 0 to 255 characters in the text box. (Excluding: () <> [];¥",') |
NOTE: You can enter multiple names for these items.
9.4.6.2.7.1.2 Button
Table 9-154 Button
| Items | Description |
| "OK" | Button for generating CSR at the bottom of the main frame |
| "Back" | Button at the bottom of the main frame for going back to the top page of the certificate settings. |
When the "Generate" button is pressed, Web Config displays a pop-up window with the following message if it recognizes an error in the entered value.
Table 9-155 Error Pop-up
| Items | Description |
| "Invalid value below. ¥n -%s¥n -%s¥n..." | Shows a warning when a value is entered incorrectly. |
9.4.6.2.7.1.3 Result Page
After the Generate CSR button is pressed, Web Config goes to the Result page.
Table 9-156 Setting Result
| Items | Description |
| "Setup complete." | This message is shown when the settings are completed. |
| "Setup failed." | This message is shown if the settings fail. |
9.4.6.2.8 Download CSR(Certificate Signing Request)
This page is shown after 'Download' for importing in the CSR settings is pressed.
The default name of the downloaded file is in the form of "EXPORT_CSR_
The method of downloading the CSR varies by Web browser.
9.5 Product Security
9.5.1 Password Encryption
9.5.1.1 Top Page
9.5.1.1.1 Image
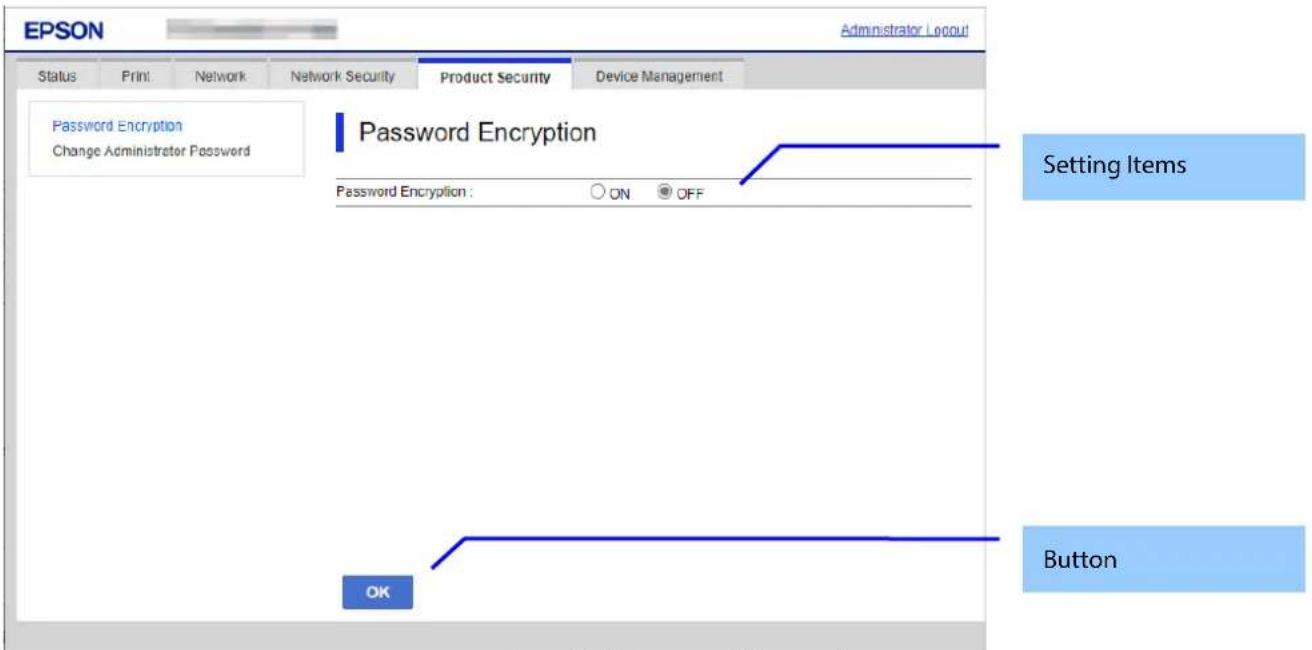
Figure 9-61 Password Encryption
9.5.1.1.2 Setting Items
The following table shows the item on the page.
Table 9-157 Setting Items
| Items | Description | Condition |
| "Password Encryption" | Two radio buttons are provided to choose either of the followings:"ON" / "OFF" | Display only on software encryption models. |
| "Password Encryption" | Display the following set values as a string."ON" / "OFF" | Display only on TPM encryption models. |
9.5.1.1.3 Button
The following table shows the button on the page.
Table 9-158 Button
| Items | Description | Condition |
| "OK" | The button on bottom of the main frame to perform setting. | Display only on software encryption models. |
9.5.1.1.4 Confirmation Dialog
Table 9-159 Confirmation Dialog
| Items | Description |
| "Restart the printer to apply the password encryption setting.If you turn the power off while restart is in progress, data may be damaged and the printer settings are restored to defaults." | Displayed when "Setting" button is pressed. |
9.5.1.2 Result Page
The result message is shown on the main frame after "OK" button is pressed.
9.5.1.2.1 Image
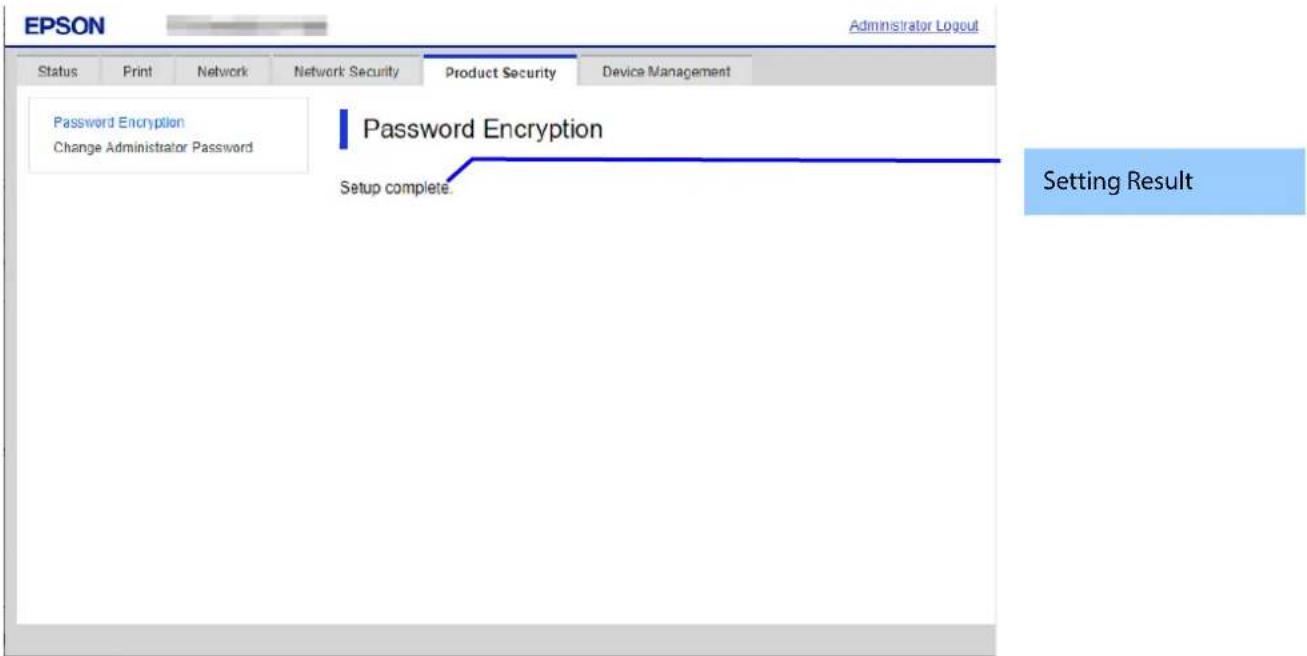
Figure 9-62 Result Page
9.5.1.2.2 Setting Result
Table 9-160 Result Page
| Items | Description |
| "Setup complete." | This message is shown when the settings are completed successfully. |
| "Setup failed." | This message is shown if setup is failed. |
9.5.2 Change Administrator Password
In this area, the user can change the authentication information for an administrator. The settings that are configured by the user in this area are used when an administrator logs on.
9.5.2.1 Top Page
9.5.2.1.1 Image
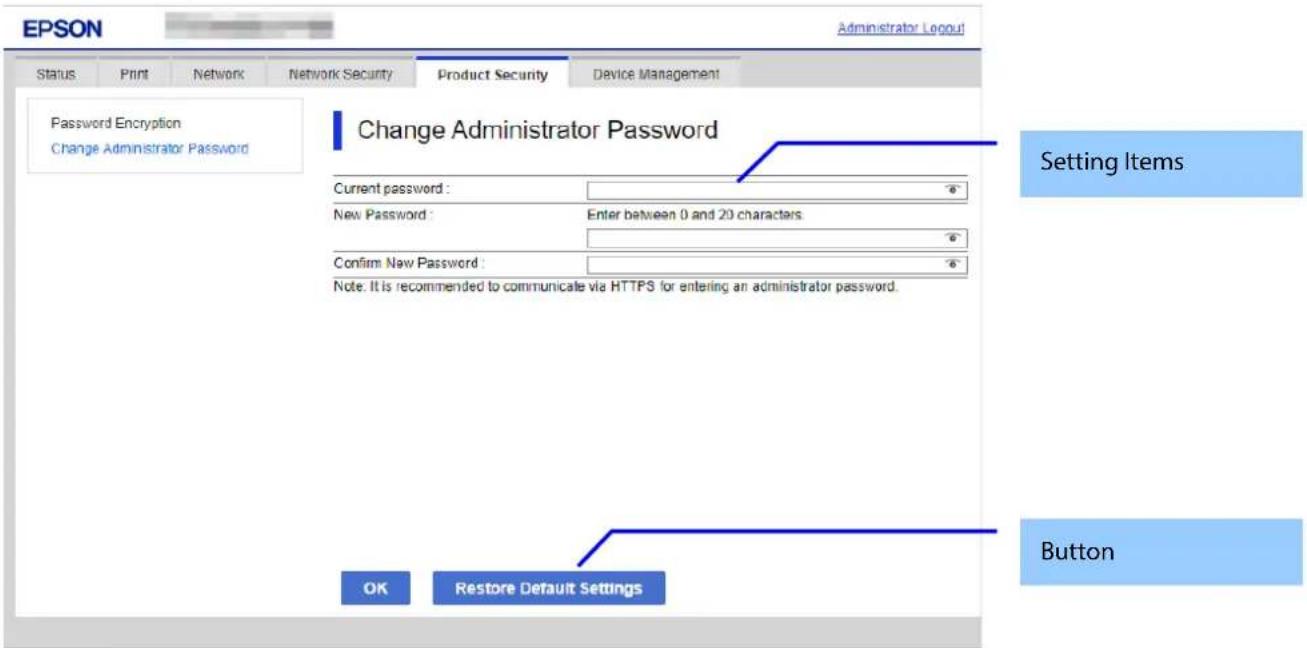
Figure 9-63 Change Administrator Password
9.5.2.1.2 Setting Items
The following table shows the items on the page.
Table 9-161 Setting Items
| Items | Description | Condition | ||
| "Current password" | Text box for entering the current password | - | ||
| "User Name" | A text box to input current user name. Usable string: ASCII code (0x20-0x7E) between 0 and 20 characters. | - | ||
| "Enter between 0 and 20 characters." | A message for inputting characters. | - | ||
| "New Password" | Text box for entering the current user's name. Usable string: ASCII code (0x20-0x7E) from 0 to 20 characters. | - | ||
| "Enter between %d and 20 characters." | A message for inputting characters.*Max: Refer to Network Function Table. | - | ||
| Model | "Password Policy" | *Min | ||
| RED/UK PSTI + ISO15408 | "Enable" | 1 | ||
| "Disable" | 8 | |||
| RED/UK PSTI | - | 8 | ||
| ISO15408 | - | 1 | ||
| Other | - | 1 | ||
| "Confirm New Password" | A text box to confirm the inputted password. Usable string: ASCII code (0x20-0x7E) Maximum of (*Max) characters.*Max: Refer to Network Function Table. | - | ||
9.5.2.1.3 Button
The following table shows the buttons on the page.
Table 9-162 Button
| Items | Description | Condition |
| "OK" | Button at the bottom of the page | - |
| "Restore Default Settings" | If pressed, Web Config restores the setting values to the factory defaults. | Displayed only on models that support the initial value for the administrator password. |
When the "OK" button is pressed, Web Config displays a pop-up window with the following message if it recognizes an error in the entered value.
Table 9-163 Error Pop-up
| Items | Description |
| "Invalid value below." | When the format of the entered user name or password is not correct, this message is shown. |
| "Password and confirm password do not match." | When new password and the confirmation password do not match, this message is shown. |
9.5.2.2 Result Page
The result message is shown in the main frame after the "OK" button is pressed.
9.5.2.2.1 Image
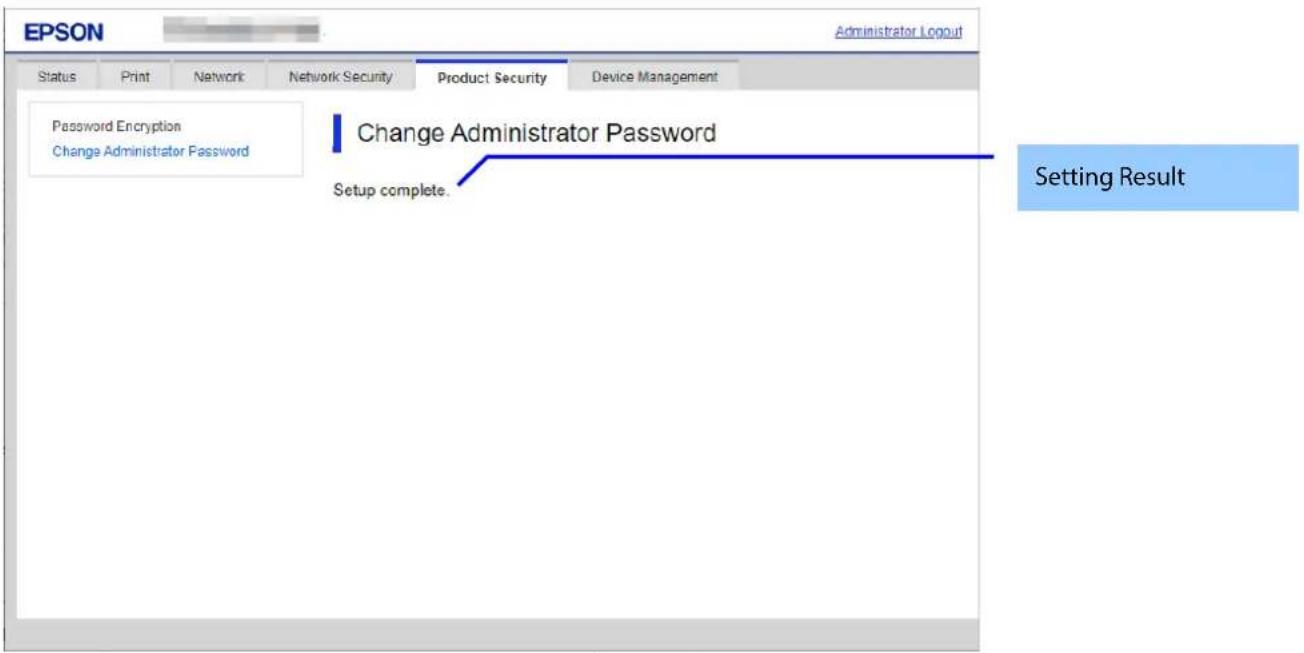
Figure 9-64 Image
9.5.2.2.2 Setting Result
Table 9-164 Result
| Items | Description |
| "Setup complete." | This message is shown when the settings are completed. After that, Web Config reloads the page and displays the product status page.If an administrator was logged on previously, Web Config maintains administrator logon mode. If a user other than an administrator was logged on, Web Config exits administrator logon mode. |
| "Failed to make the settings.""The password you entered is incorrect." | This message is shown if the current password entered by the user is incorrect.None of the setting items on this page are applied to the printer. |
| "The password does not meet the password policy requirements. Check the requirements." | This message is shown if setup fails due to a violation of the Password Policy. |
| "Setup failed." | This message is shown if setup fails for a reason other than those described above. |
9.5.3 Program Verification on Start Up
9.5.3.1 Top page
9.5.3.1.1 Image
The following figure shows the layout of the top page.
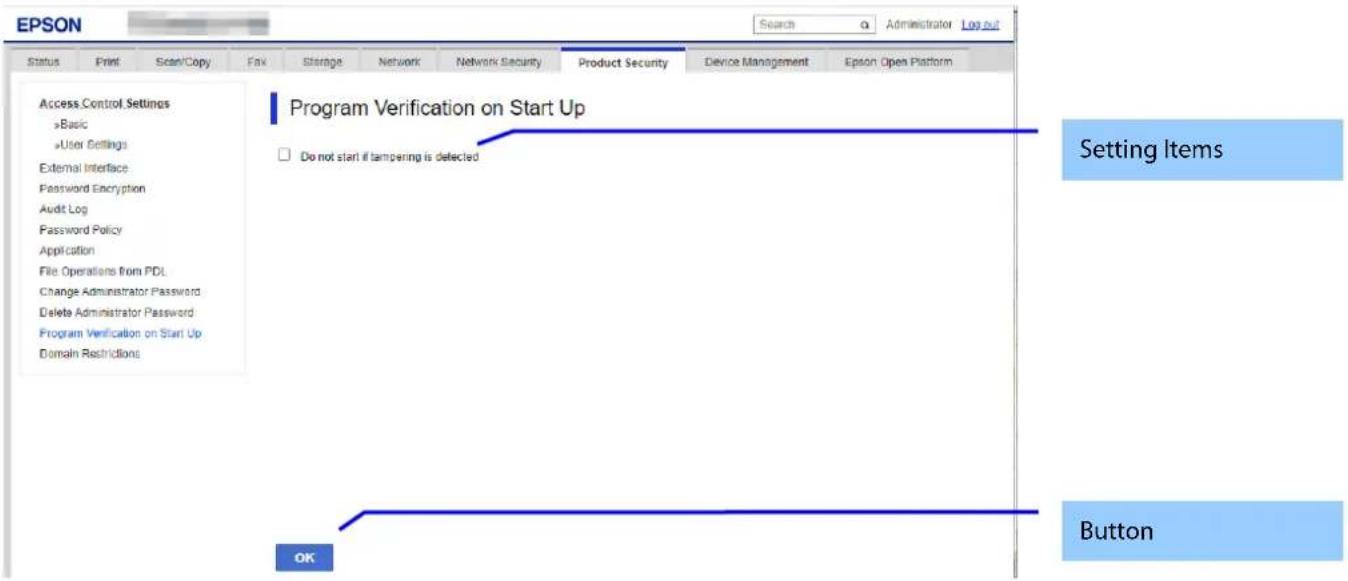
Figure 9-65 Image
9.5.3.1.2 Setting Items
Table 9-165 Setting Items
| Items | Description | Condition |
| "Program Verification on Start Up" | User can select "ON" / "OFF" by radio button. | This item is displayed only on models that support program verification at startup. |
| "Do not start if tampering is detected" | Selected: Start printerNot selected: Do not start printerThis setting is selected (Start printer) by default. | This item is displayed only on models that support Secure Boot and ISO15408. |
9.5.3.1.3 Button
The button for setting the information included in the settings items is shown in the following table.
Table 9-166 Button
| Items | Description |
| "OK" | This button is provided at the bottom of the page. |
9.5.3.2 Result page
When the "OK" button is clicked, the results page is displayed.
9.5.3.2.1 Image
The results page is shown in the following figure.
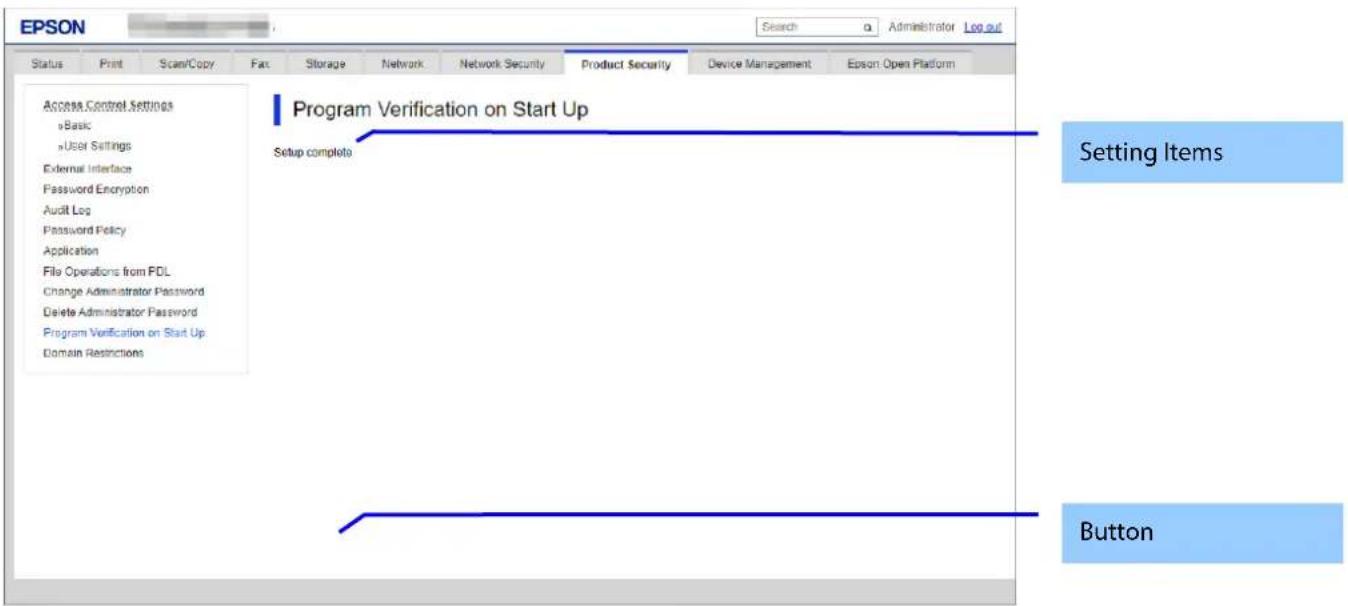
Figure 9-66 Image
9.5.3.2.2 Setting Result
Table 9-167 Setting Result
| Items | Description |
| "Setup complete." | This message is displayed if the settings are updated successfully. |
| "Setup failed." | This message is displayed if the settings are not updated successfully. |
9.6 Device Management
9.6.1 Basic
Using Basic, you can configure the device management function's behavior.
9.6.1.1 Top page
9.6.1.1.1 Image
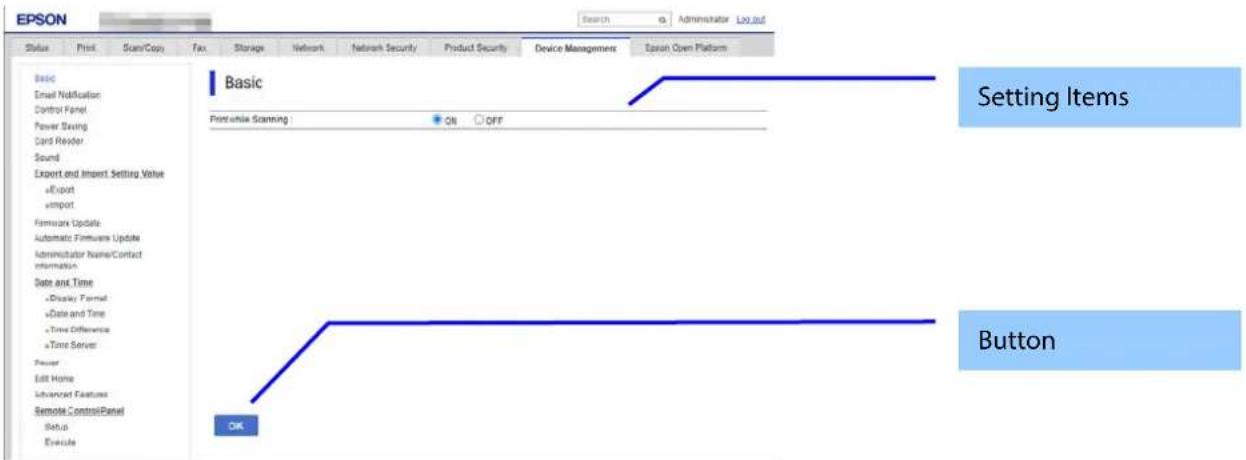
Figure 9-67 Basic
9.6.1.1.2 Button
Table 9-168 Button
| Items | Description | Condition |
| "Next" | This button is used to go to the confirmation page. | - |
9.6.1.2 Confirm page
9.6.1.2.1 Image
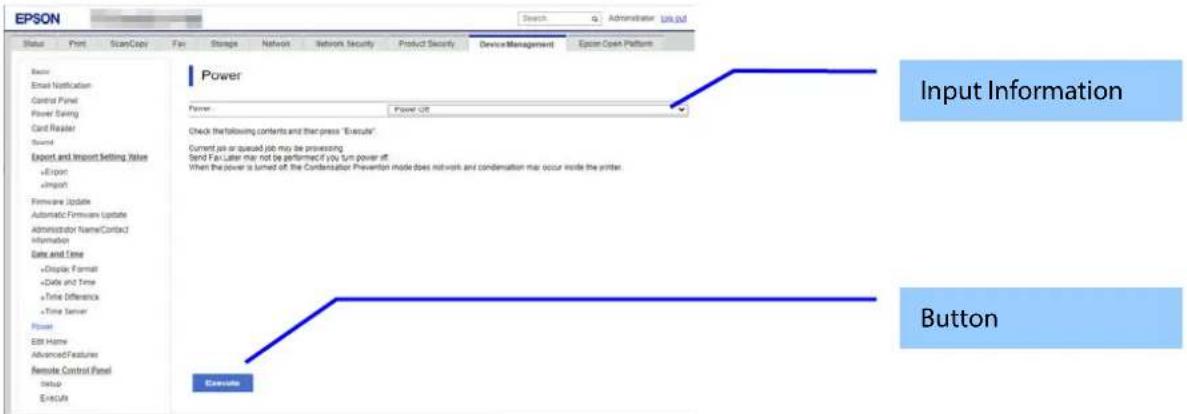
Figure 9-68 Confirm page
9.6.1.2.2 Input Information
Table 9-169 Input Information
| Items | Description |
| " Confirm the following settings." | This message is shown on top of the page, followed by setting items and their values. |
| " Communication will be shut down temporarily to enable the new settings. You cannot access the network immediately after the settings are changed." | This message is shown on the bottom of the page. |
9.6.1.3 Result page
The following figures show pages displayed after network setup. The content of the Result page varies according to the result (success or failure).
9.6.1.3.1 Image
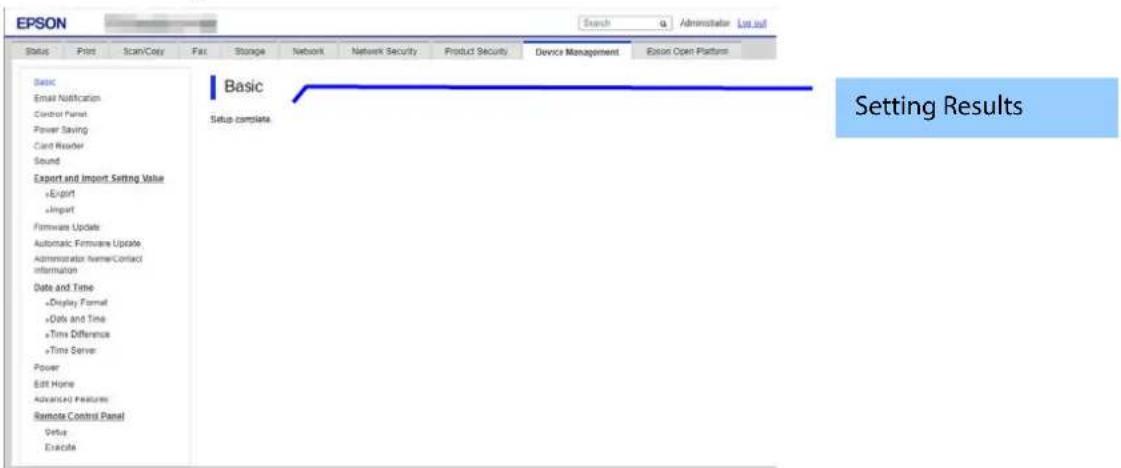
Figure 9-69 Result page
9.6.1.3.2 Setting Result
Table 9-170 Setting Result
| Items | Description |
| "Setup complete.""Restarting communication may take a few minutes.""If you want to change the settings, close the Web Config and check your IP address. Then enter your IP address in the browser to restart the Web Config." | This text is shown if Basic setup is successful. |
| "Setup failed." | This message is shown if Basic setup fails. |
9.6.2 Export and Import Setting Value
On the Setting Export and Import page, the user can export Web Config advanced settings to a file, and import those settings from a configuration file.
Table 9-171 Sub menu of Export/Import
| Sub menu | |
| "Export" | |
| "Import" | |
9.6.2.1 Export/Import Category
The user can select an export/import category that includes multiple setting items. The categories and setting items are shown below. Some categories contain sub-categories. If the parent category is selected, all sub-categories are selected.
Table 9-172 Export/Import Category.
| Category | Description | |
| "All" | All categories are selected. | |
| "Print" | All subcategories are selected. | |
| "Print Settings" | For print settings on the menu. | |
| "Network" | All sub-categories are selected. | |
| "Basic" | All sub-categories are selected. | |
| "Settings except below" | Network Settings > Basic in the menu is selected, except for the following settings. | |
| "Device Name" | Printer Name in Network Basic is selected. | |
| "Location" | Location in Network Basic is selected. | |
| "Obtain IP Address, IP Address, Subnet Mask, and Default Gateway" | Obtain IP Address, IP Address, Subnet Mask, and Default Gateway in Network Basic are selected. | |
| "IPv6 Address and IPv6 Address Default Gateway" | IPv6 Address and IPv6 Address Default Gateway in Network Basic are selected. | |
| "Wi-Fi" | Wi-Fi in the menu is selected. | |
| "Wired LAN" | Wired LAN in the menu is selected. | |
| "Wi-Fi Direct" | Not equipped with Wi-Fi chipWi-Fi Direct in the menu is selected. | |
| Equipped with Wi-Fi chipAll sub-categories are selected. | ||
| "Settings except below" | Equipped with Wi-Fi chipNetwork > Wi-Fi Direct in the menu is selected, except for the following settings. | |
| "SSID and Password" | If it is equipped with Wi-Fi chip.It intends SSID and Password of Wi-Fi Direct. | |
| "Network Security" | All sub-categories are selected. | |
| "Protocol" | All sub-categories are selected. | |
| "Settings except below" | Services > Protocol in the menu is selected except for the following settings. | |
| "Bonjour Service Name" | Bonjour Service Name of Protocol is selected. | |
| "SSL/TLS" | All sub-categories are selected. | |
| "Basic" | Basic of SSL/TLS in the menu is selected. | |
| "Certificate" | Server Certificate of SSL/TLS in the menu is selected. | |
| "Automatic Certificate Update" | Intended for Automatic Certificate Update of SSL/TLS (on menu). | |
| "IPsec/IP Filtering" | All sub-categories are selected. | |
| "Basic" | Basic of IPsec/IP Filtering in the menu is selected. | |
| "Client Certificate" | Client Certificate Settings in IPsec/IP Filtering Certificate is selected. | |
| "IEEE802.1X" | All sub-categories are selected. | |
| "Basic" | Basic of IEEE802.1X in the menu is selected. | |
| "Client Certificate" | Client Certificate Settings in IEEE802.1X Certificate is selected. | |
| "CA Certificate" | CA Certificate in the menu is selected. | |
| "Product Security" | All sub-categories are selected. | |
| "Password Encryption" | Password Encryption in the menu is selected. | |
| "Administrator Password" | Administrator Password in the menu is selected. | |
| "Program Verification on Start Up" | Intended for Program Verification at Start Up (on menu). | |
| "Device Management" | All sub-categories are selected. | |
| "Administrator Name/Contact Information" | Administrator Name/Contact Information in the menu is selected. | |
| "Date and Time" | Date and Time (Display Format, Time Difference, and Time Server) in the menu are selected. | |
9.6.2.2 Export
The Export page consists of a Top page and a Result page.
9.6.2.2.1 Top Page
9.6.2.2.1.1 Image
When "Export" is chosen in the menu frame, the top page for export is displayed as shown below.
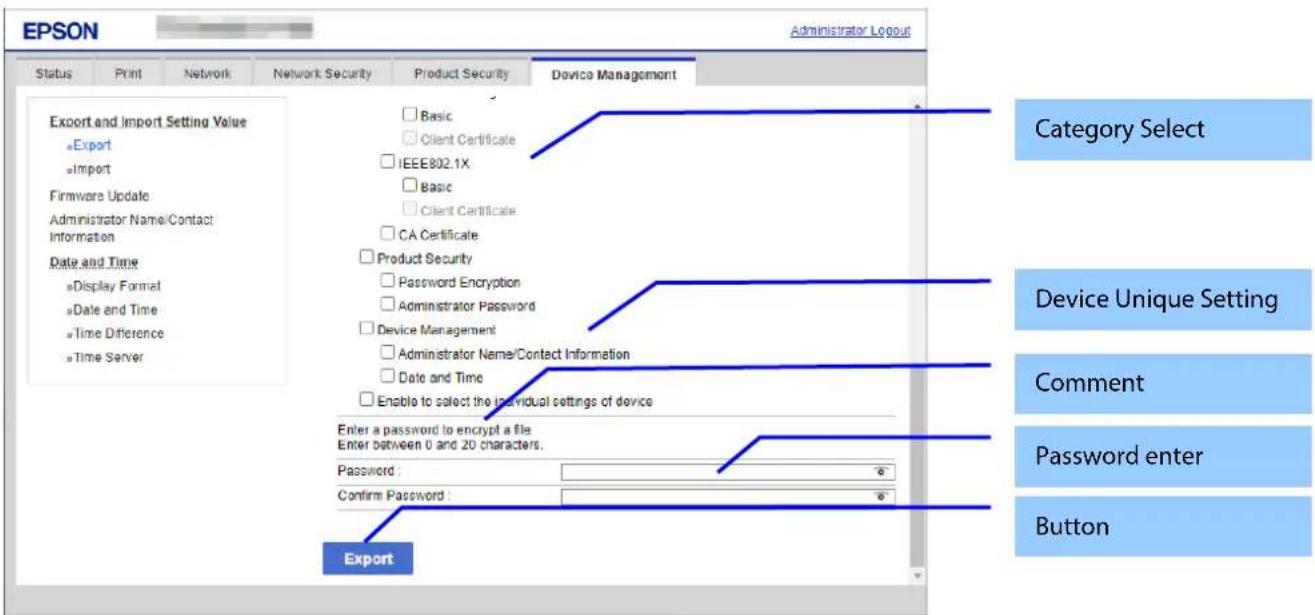
Figure 9-70 Top Page
9.6.2.2.1.2 Comment
The following table shows the layout for comments.
Table 9-173 Comment
| Items | Description |
| "Enter a password to encrypt a file.""Enter between 0 and 20 characters." | Displayed above password entry. |
| "Select check box(es) of category to export. " | This is displayed above the category selection. |
9.6.2.2.1.3 Password Enter
Enter a password for file encryption.
Table 9-174 Password Enter
| Items | Description |
| "Password" | Use the text box to set a password for file encryption.0 – 20 bytes in characters (ASCII 0x20 – 0x7E).The values are masked. |
| "Confirm Password" | Same as the Encryption password. |
9.6.2.2.1.4 Device Unique Settings Select
The following table shows the description of items for which unique device settings can be selected.
Table 9-175 Device Unique Settings Select
| Items | Description |
| "Enable to select the individual settings of device" | This setting allows the Unique Device Settings to be selected. |
9.6.2.2.1.5 Category Select
This item is for checking the export categories. Selectable categories are shown in “Export/Import Category”. No categories are selected at first. The following table shows the features of each export category.
Table 9-176 Features of Export Categories
| Categories | Feature |
| Device Name | Check box is grayed-out, when "Enable to select the individual settings of device" is not checked. |
| Network > Network Basic > Location | |
| Obtain IP Address, IP Address, Subnet Mask, Default Gateway | Check box is grayed-out, when "Enable to select the individual settings of device" is not checked.This item is displayed when "Obtain IP Address" is "Manual". |
| IPv6 Address, IPv6 Address Default Gateway | Check box is grayed-out, when "Enable to select the individual settings of device" is not checked. |
| Network Security Settings > SSL/TLS > Certificate | |
| Network Security Settings > IPsec/IP Filtering > Client Certificate Settings | |
| Network Security Settings > IEEE802.1X > Client Certificate Settings | |
| Network Security > Protocol > Bonjour Service Name | |
| SSID and Password | |
| Product Security > Password Encryption | Displayed only on models with software encryption enabled. |
9.6.2.2.1.6 Button
The following table shows the buttons on the page.
Table 9-177 Button
| Items | Description |
| "Export" | If pressed, the printer starts to create an export file. If file creation fails, Web Config goes to the Result page. After it is pressed, all items on the top page are grayed-out. |
When the "Export" button is pressed, the Web Config displays a pop-up window showing the following message if it recognizes an error in the entered value.
Table 9-178 Export Error Pop-up
| Items | Description |
| "Select at least one category." | This message is shown when the category is not checked. |
| "Invalid value below." | Shows a warning when a value is entered incorrectly. |
| "Passwords you entered do not match." | When the password and the confirmation password do not match, this message is shown. |
The default name of the downloaded file is in the format of "Config_
9.6.2.2.2 Result Page
The Result page is shown if the file download fails.
Table 9-179 Export Result
| Items | Description |
| "Creating a file failed.""Export the file again." | This message is shown if file creation fails. |
9.6.2.3 Import
Import page consists of Top page, Category Select page, Confirmation page, and Result page. Items not contained in imported data can be set as current values or default values.
9.6.2.3.1 Top Page
9.6.2.3.1.1 Image
When "Import" is chosen in the menu frame, the top page is displayed as shown below.
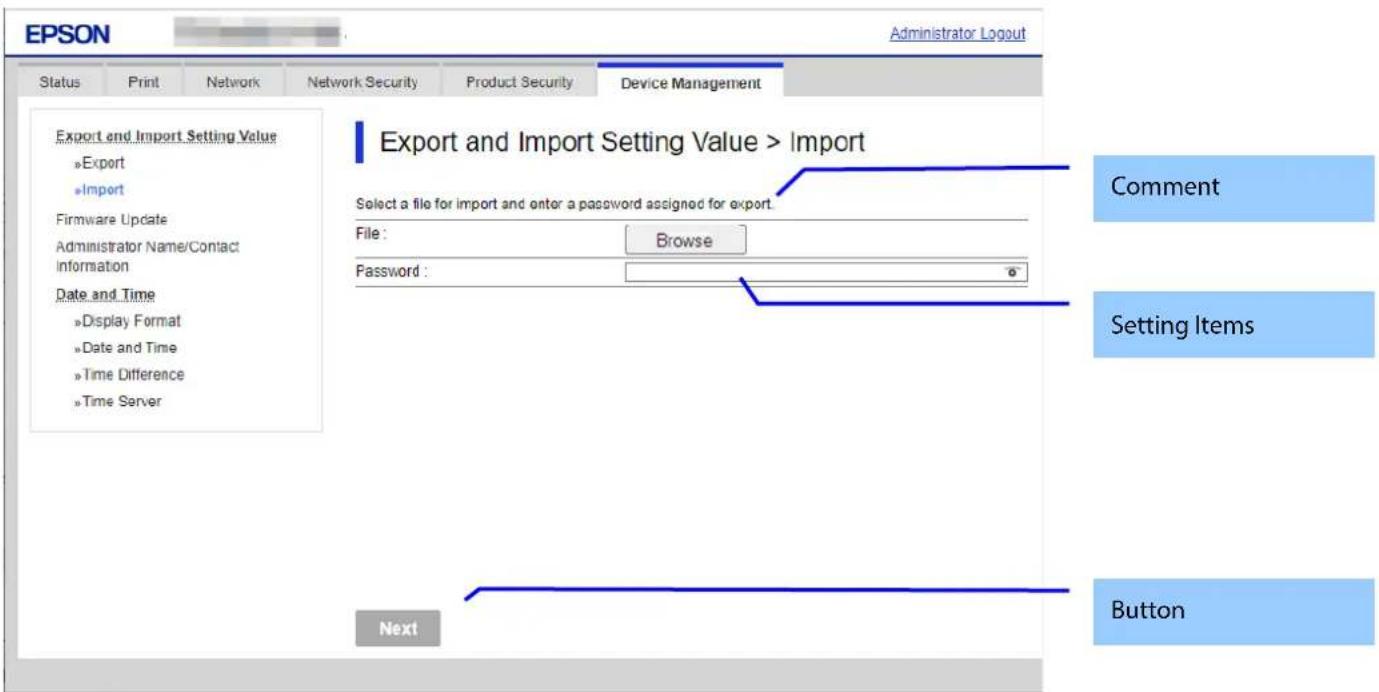
Figure 9-71 Top Page
9.6.2.3.1.2 Comment
The following table shows the comments.
Table 9-180 Comment
| Items | Description | Condition |
| "Select a file for import and enter a password assigned for export." | Displayed at the top of the page. | - |
| "Sending file. Please wait..." | Displayed above the next button. | Displayed after the next button is pressed. |
9.6.2.3.1.3 Setting Items
The following table shows the layout of this settings area.
Table 9-181 Setting Items
| Items | Description |
| "File" | The user can enter the import file. Use the file button to select a file. |
| "Password" | Use the text box to set a password for file decryption.0 – 20 bytes in characters. (ASCII 0x20 – 0x7E)The values are masked. |
9.6.2.3.1.4 Button
The following table shows the buttons on the page.
Table 9-182 Button
| Items | Description | Condition |
| "Next" | If pressed, the Web Config makes transition to the Category Select page.If file analysis is failed, the Web Config makes transition to the Result page. After pressed, all items in top page are grayed-out. | This button is enabled only when an import file is selected. |
When the "Next" button is pressed, Web Config displays a pop-up window with the following message if it recognizes an error in the entered value. All items are grayed out and comments are not displayed.
Table 9-183 Error Pop-up
| Items | Description |
| "Invalid value below." | Shows a warning when a value is entered incorrectly. |
9.6.2.3.2 Category Select Page
9.6.2.3.2.1 Image
When the file analysis has been done, the Web Config shows Category Select page. This page is as below.
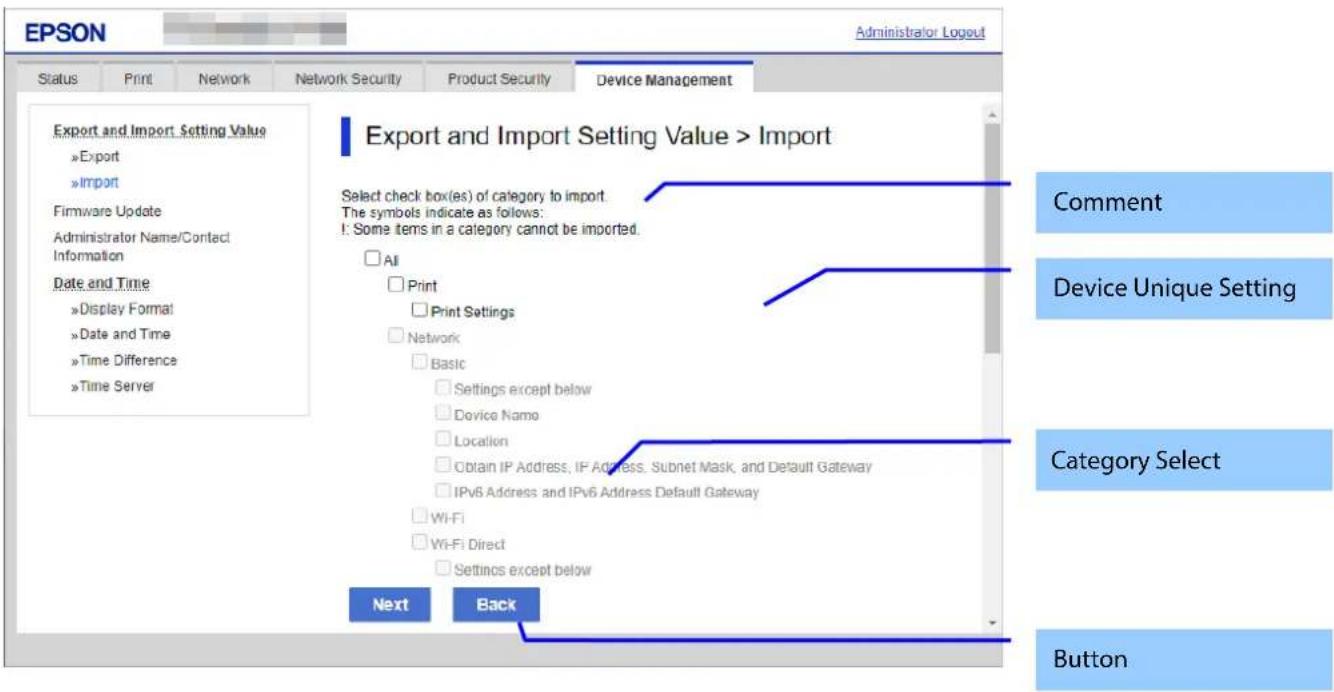
Figure 9-72 Category Select page
9.6.2.3.2.2 Comment
The following table shows the layout for comments.
Table 9-184 Comment
| Comment | Description | Condition |
| "Select check box(es) of category to import." | This is displayed above the category selection. | - |
| "The symbols indicate as follows:"": Some items in a category cannot be imported." | This is displayed above the category selection. | - |
9.6.2.3.2.3 Device Unique Settings Select
The following table shows the description of items for which unique device settings can be selected.
Table 9-185 Device Unique Settings Select
| Items | Description | Condition |
| "Enable to select the individual settings of device" | This setting allows the Unique Device Settings to be selected. | Grayed-out if import file does not contain unique device settings |
9.6.2.3.2.4 Category Select
All categories are not selected at first. The following table shows features of import categories.
Table 9-186 Features of Import Categories.
| Category | Feature |
| All Categories | The check box is enabled only when the import file includes settings. "!" is displayed in front of a category if some of the settings in that category are not imported. |
| Device Name | Check box is grayed-out, when "Enable to select the individual settings of device" is not checked.This item is grayed-out if setting data is not contained in the import file. |
| Network > Network Basic > Location | |
| Obtain IP Address, IP Address, Subnet Mask, Default Gateway | Check box is grayed-out, when "Enable to select the individual settings of device" is not checked.This item is not displayed when "Obtain IP Address" is "Auto".This item is grayed-out if setting data is not contained in the import file. |
| IPv6 Address, IPv6 Address Default Gateway | Check box is grayed-out, when "Enable to select the individual settings of device" is not checked.This item is grayed-out if setting data is not contained in the import file. |
| Network Security Settings > SSL/TLS > Certificate | |
| Network Security Settings > IPsec/IP Filtering > Client Certificate Settings | |
| Network Security Settings > IEEE802.1X > Client Certificate Settings | |
| Network Security > Protocol > Bonjour Service Name | |
| SSID and Password | |
| Network Security Settings > IPsec/IP Filtering > Basic | When importing from a model with few setting items, missing items are set to their default values.Items that are grayed out and items with different IKE versions are not overwritten. |
| Network Security Settings > IEEE802.1X > Basic | When importing from a model with few setting items, missing items are set to their default values. |
| Product Security > Password Encryption | Displayed only on models with software encryption enabled. |
9.6.2.3.2.5 Button
The following table shows the buttons on the page.
Table 9-187 Button
| Items | Description |
| "Next" | If pressed, Web Config transitions to the Confirmation page. |
| "Back" | If pressed, Web Config goes to the Top page. |
When the “Next” button is pressed, Web Config displays a pop-up window with the following message if it recognizes an error in the entered value.
Table 9-188 Error Pop-up
| Items | Description |
| "Select at least one category." | This message is shown when the category is not checked. |
9.6.2.3.3 Confirmation Page
9.6.2.3.3.1 Image
The page is shown when "Next" on the previous page is pressed.
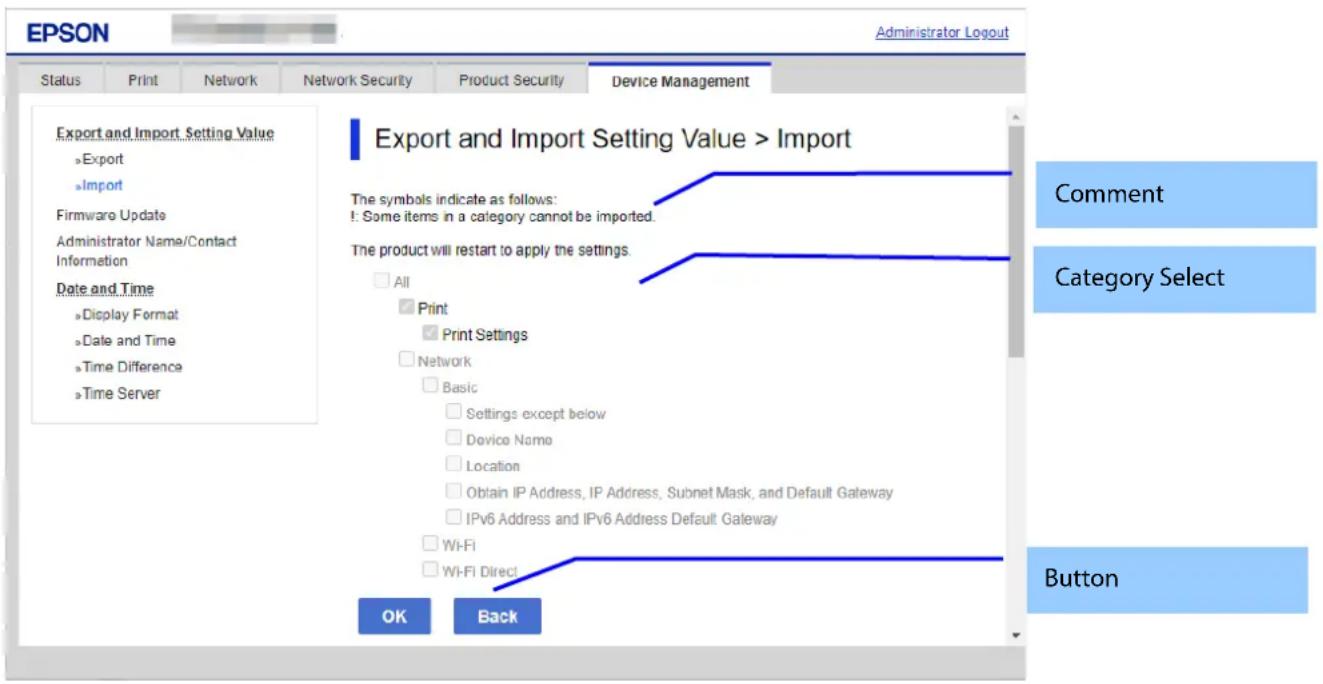
Figure 9-73 Confirmation Page
9.6.2.3.3.2 Comment
The following table shows the layout for comments.
Table 9-189 Comment
| Comment | Description | Condition |
| "The symbols indicate as follows: "": Some items in a category cannot be imported. " | This is displayed above the category selection. | - |
| "Some categories cannot be selected. Check the following." | Displayed above category selection. | Displayed when Contacts or Fax Settings are displayed. |
| " Communication will be shut down temporarily to enable the new settings. You cannot access the network immediately after the settings are changed." | This message is shown on the bottom of the page. | - |
9.6.2.3.3.3 Category Confirm
The category information that was entered on the previous page is shown. Categories that weren't selected are grayed out.
9.6.2.3.3.4 Button
The following table shows the button on the page.
Table 9-190 Button
| Items | Description |
| "OK" | If pressed, Web Config goes to the Result page. |
| "Back" | If pressed, Web Config goes to the Category Select page. |
9.6.2.3.4 Result Page
9.6.2.3.4.1 Result
The content of the Result page will vary based on the result.
Table 9-191 Result
| Items | Description |
| "Setup complete.""Restarting communication may take a few minutes.""If you want to change the settings, close the Web Config and check your IP address. Then enter your IP address in the browser to restart the Web Config." | This message is shown when the settings are completed.The network shuts down for updating. |
| "Setup complete." | This message is shown when the settings are completed.The network does not shut down. |
| "Setup failed." | This message is shown when the settings have failed or import file was changed.When the device is in interrupt mode, the settings fail. |
| "Loading file failed.""Check if the file and password are correct and then import the file again." | This message is shown when file is not correct or password is not correct. |
9.6.2.4 Firmware Update
9.6.2.5 Top Page
9.6.2.5.1 Image
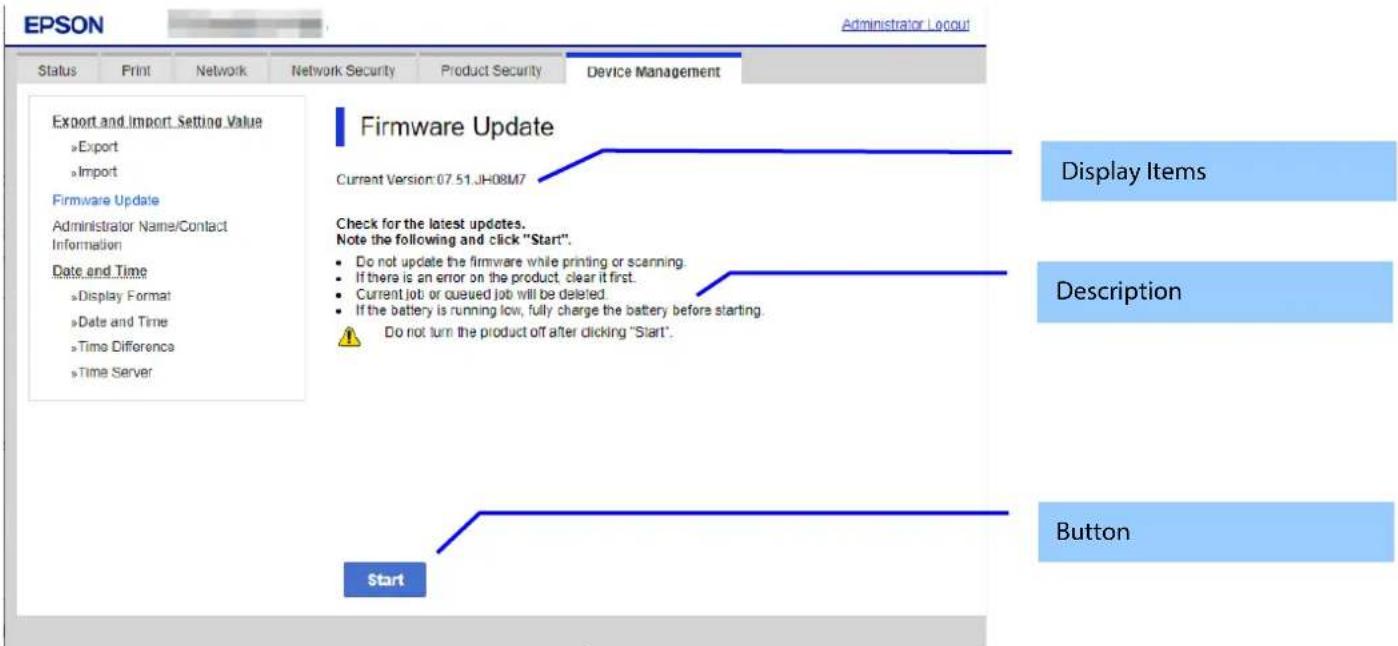
Figure 9-74 Top Page
9.6.2.5.2 Display Items
Table 9-192 Display Items
| Items | Description |
| "Current Version" | Up to 12 characters in ASCII codesXX.YY.ZZZZZZ-XX: Linux Kernel version-YY: Linux Appli version-ZZZZZZZ: Main version |
9.6.2.5.3 Description
Table 9-193 Description
| Items | Description | Condition |
| "Check for the latest updates.""Note the following and click "Start"." | Fixed Strings | - |
| "Do not update the firmware while printing or scanning." | Fixed Strings | - |
| "If there is an error on the product, clear it first." | Fixed Strings | - |
| "Remove the roll paper if loaded." | Fixed Strings | This message is shown on destinations with Roll Paper Feed. |
| "Current job or queued job will be deleted." | Fixed Strings | - |
| "Do not turn the product off after clicking "Start"." | Fixed Strings! icon is shown in front of the string. | - |
| "Connect an AC adapter if not connected." | Fixed Strings | This message is shown on models with installed battery. |
9.6.2.5.4 Button
Table 9-194 Button
| Items | Description |
| "Start" | The button to Firmware search page. |
9.6.2.6 Firmware Search Process Page
The page is shown after the 'Start' button is pressed.
The following figure shows a layout of the Firmware search process page.
9.6.2.6.1 Image
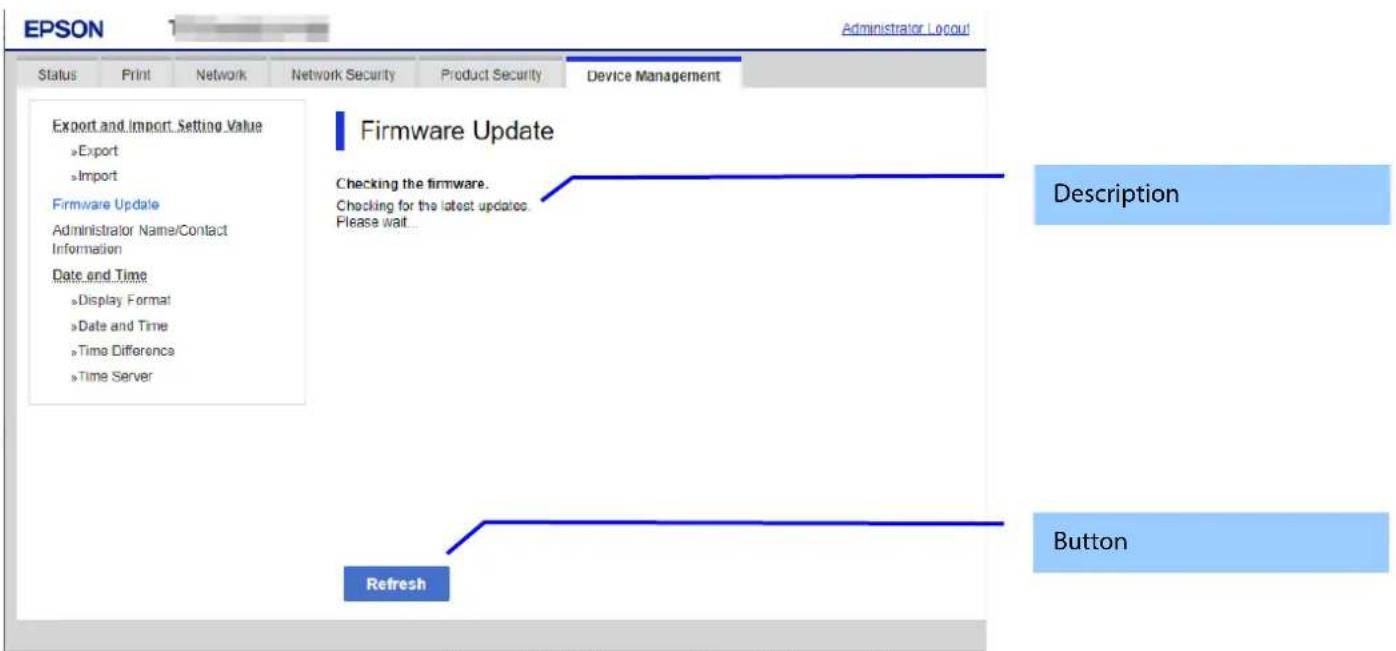
Figure 9-75 Firmware Search Process Page
9.6.2.6.2 Description Items
Table 9-195 Description
| Items | Description |
| "Checking the firmware.""Checking for the latest updates.Please wait..." | Fixed Strings |
9.6.2.6.3 Button
Table 9-196 Button
| Items | Description |
| "Refresh" | The button on bottom of the main frame to refresh the page.If you click, the page is refreshed. |
9.6.2.7 Before Update Confirm Page
The page is shown if new firmware is found.
The following figure shows a layout of the Before update confirm page.
If no operation continues for 20 minutes after displaying this page, the update process will be canceled.
9.6.2.7.1 Image
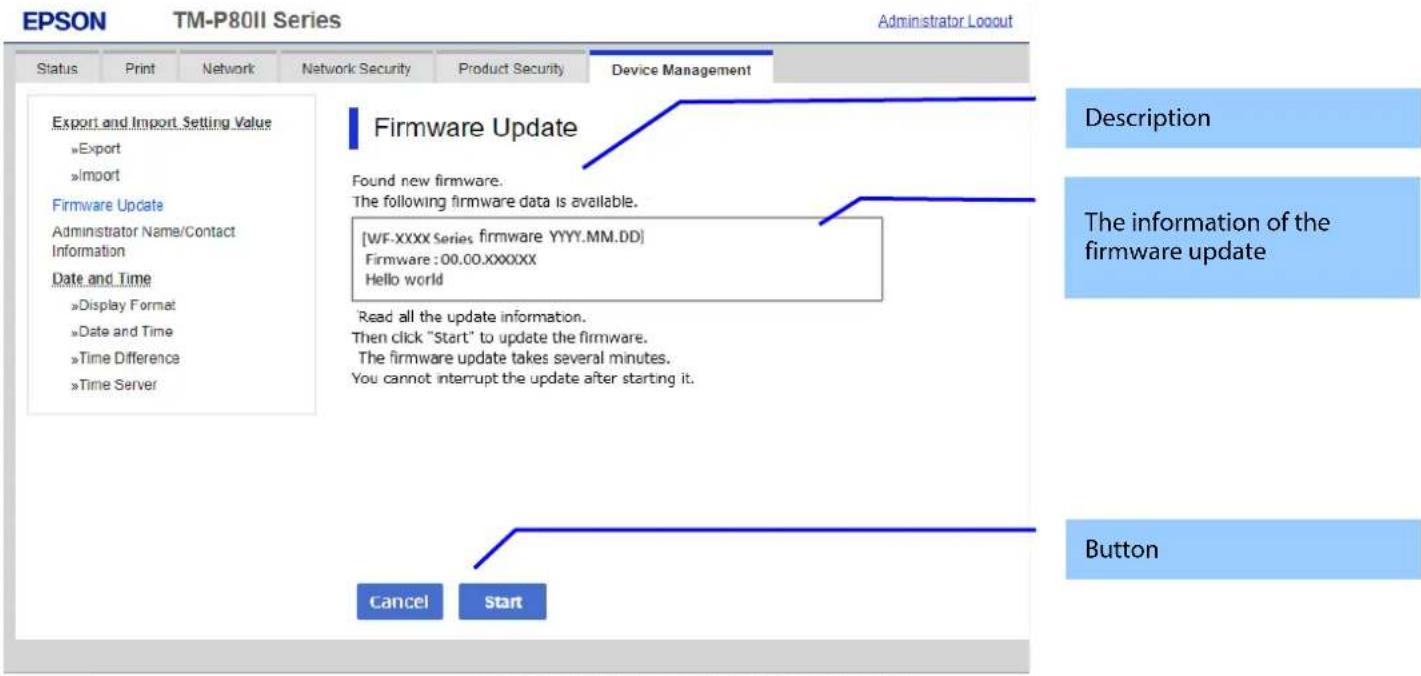
Figure 9-76 Before Update Confirm Page
9.6.2.7.2 Description
Table 9-197 Description
| Items | Description |
| "Found new firmware.""The following firmware data is available." | Fixed Strings |
| "Read all the update information.Then click "Start" to update the firmware.""The firmware update takes several minutes.You cannot interrupt the update after starting it." | Fixed Strings |
| "By using the firmware, you agree to the End User License Agreement. FOR USERS IN THE UNITED STATES, YOU AGREETO IMPORTANT LEGAL TERMS AND CONDITIONS,INCLUDING A CLASS ACTION WAIVER AND ARBITRATION.PLEASE READ CAREFULLY: https://support.epson.net/eula/" | EULA |
| "Accept" | Check box. When this item is checked then "Start" button is enable. |
9.6.2.7.3 The Information of the Firmware Update
Table 9-198 The Information of the Firmware Update
| Items | Description |
| Product name and release date. | Up to 10 characters in ASCII codesYYYY.MM.DD |
| Firmware | Up to 12 characters in ASCII codesXX.YY.ZZZZZZ-XX: Linux Kernel version-YY: Linux Appli version-ZZZZZZ: Main version |
| Description | Up to 1024 bytes in UTF-8 |
9.6.2.7.4 Button
Table 9-199 Button
| Items | Description |
| "Cancel" | If you click, Firmware update is canceled. |
| "Start" | If you click, Firmware update is started. |
9.6.2.8 Cancel Process Page
9.6.2.8.1 Image
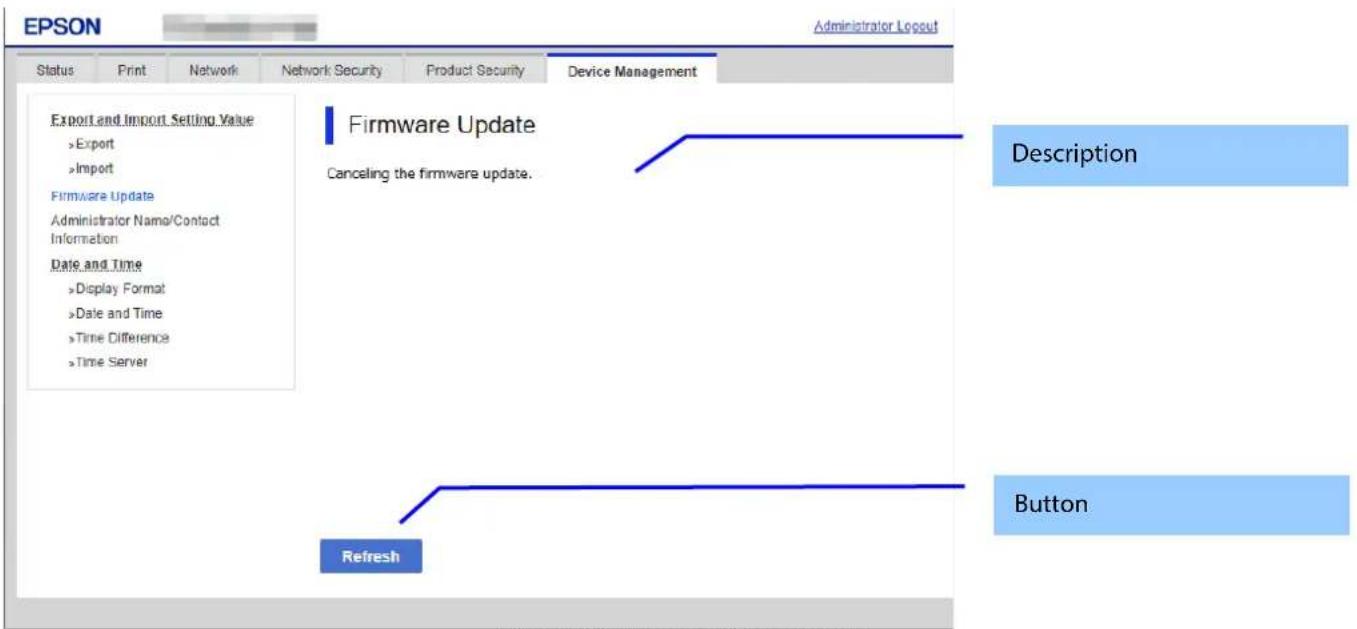
Figure 9-77 Cancel Process Page
9.6.2.8.2 Description
Table 9-200 Description
| Items | Description |
| "Canceling the firmware update." | Fixed Strings |
9.6.2.8.3 Button
Table 9-201 Button
| Items | Description |
| "Refresh" | The button on bottom of the main frame to refresh the page.If you click, the page is refreshed. |
9.6.2.9 Result Page
9.6.2.9.1 Image
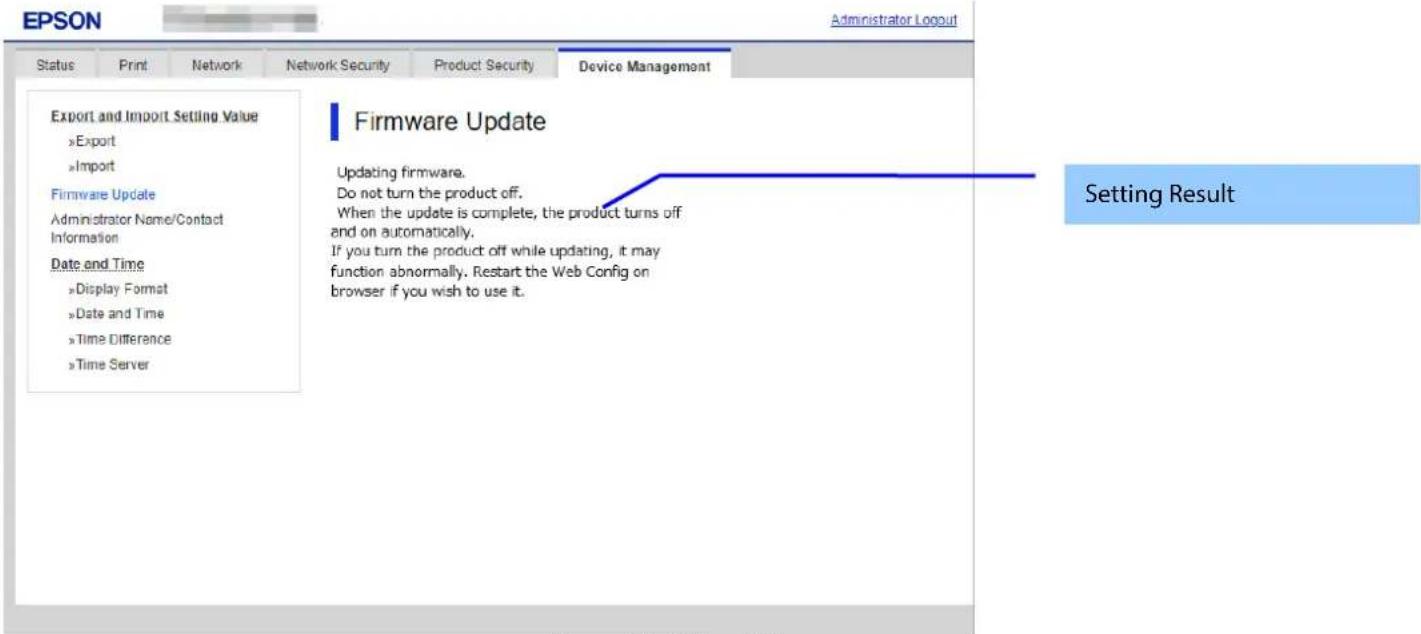
Figure 9-78 Result Page
9.6.2.9.2 Setting Result
Table 9-202 Result
| Items | Description |
| "Updating firmware.""Do not turn the product off.""Do not disconnect an AC adapter.""When the update is complete, the product turns off and on automatically.If you turn the product off while updating, it may function abnormally. Restart the Web Config on browser if you wish to use it." | This message is shown when Firmware update is started successfully.! icon is shown in front of "Do not turn the product off.".The message "Do not disconnect an AC adapter" is shown on models with an installed battery. |
| "The firmware update was canceled." | This message is shown when Firmware update is canceled successfully. |
| "You have the latest firmware." | This message is shown when the current version of the firmware is latest. |
| "Cannot connect to the Epson server." | This message is shown when the printer could not access to the server.The X icon is shown in front of the string. |
| "Cannot update the firmware.""Quit printing or scanning.""Remove the roll paper if loaded.""When an error message appears on the screen or status lights indicate an error, solve the problem.""Note: There might be an error regarding the consumables such as ink supply units.""Connect an AC adapter if not connected.""Remove the memory card.""If the problem is not solved, close the Web browser and then launch it." | This message is shown when the printer cannot update the firmware.The X icon is shown in front of "Cannot update the firmware.". "Remove the roll paper if loaded." is shown on destinations with Roll Paper Feed. |
| "The operation failed.""Another computer may be communicating with the product." | This message is shown when another computer may be communicating with the product.The X icon is shown in front of "The operation failed.". |
9.6.3 Administrator Name / Contact Information
In this area, the user can set the contact information for the administrator.
9.6.3.1 Top Page
9.6.3.1.1 Image
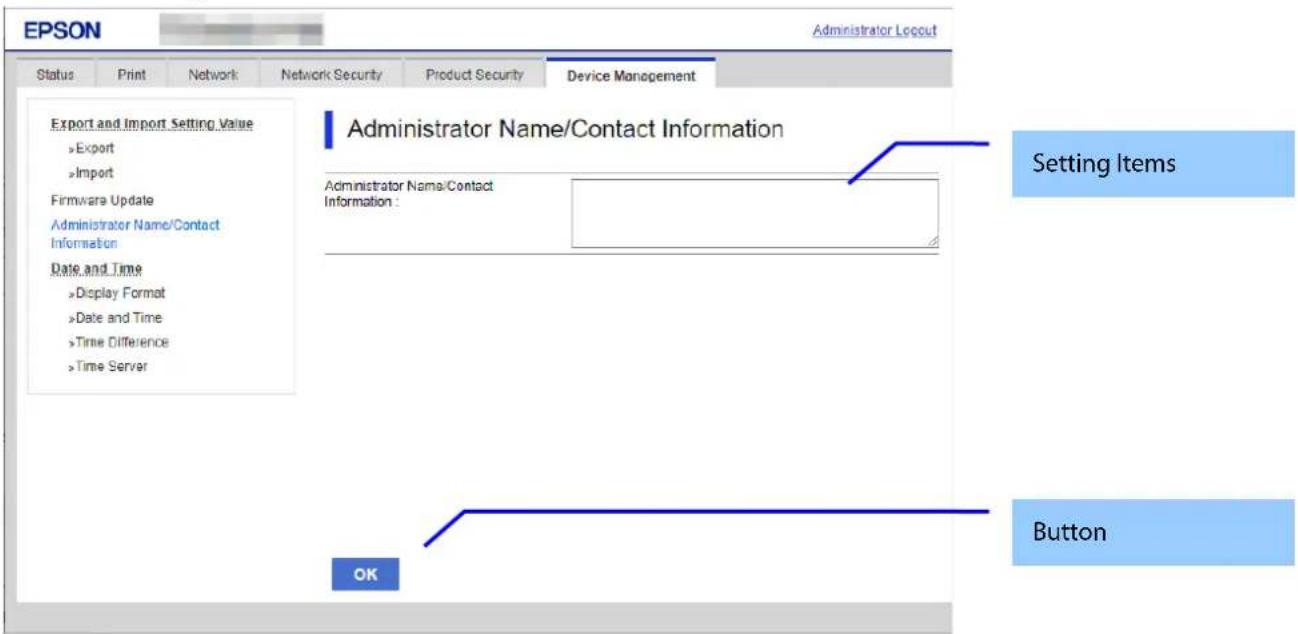
Figure 9-79 Contact Information Settings
9.6.3.1.2 Setting Items
The following table shows the items on the page..
Table 9-203 Setting Items
| Items | Description |
| "Administrator Name/Contact Information" | UTF-8: 0 ~ 255ByteText box for entering contact informationUsable string: UTF-8 code, Max. of 255 bytes. |
9.6.3.1.3 Button
The following table shows the buttons on the page.
Table 9-204 Button
| Items | Description |
| "OK" | Button at the bottom of the main frame |
9.6.3.2 Result Page
The result message is shown in the main frame or in an error pop-up after the "OK" button is pressed.
9.6.3.2.1 Result
Table 9-205 Result
| Items | Description |
| "Setup complete." | This message is shown when the settings are completed. |
| "Setup failed." | This message is shown if setup fails. |
| "Invalid value below."" – Administrator Name/Contact Information" | Shows an error pop-up when a value is entered incorrectly. |
9.6.4 Date and Time
In the settings area, you can set the date and time supported by the printer. You can also change the settings related to the NTP server.
Table 9-206 Sub menu of Date and Time
| Sub menu | Condition |
| "Display Format" | - |
| "Date and Time" | - |
| "Time Difference" | - |
| "Time Server" | Only printers that support NTP |
9.6.4.1 Display Format
The following figure shows the layout of this settings area.
9.6.4.1.1 Top Page
9.6.4.1.1.1 Image
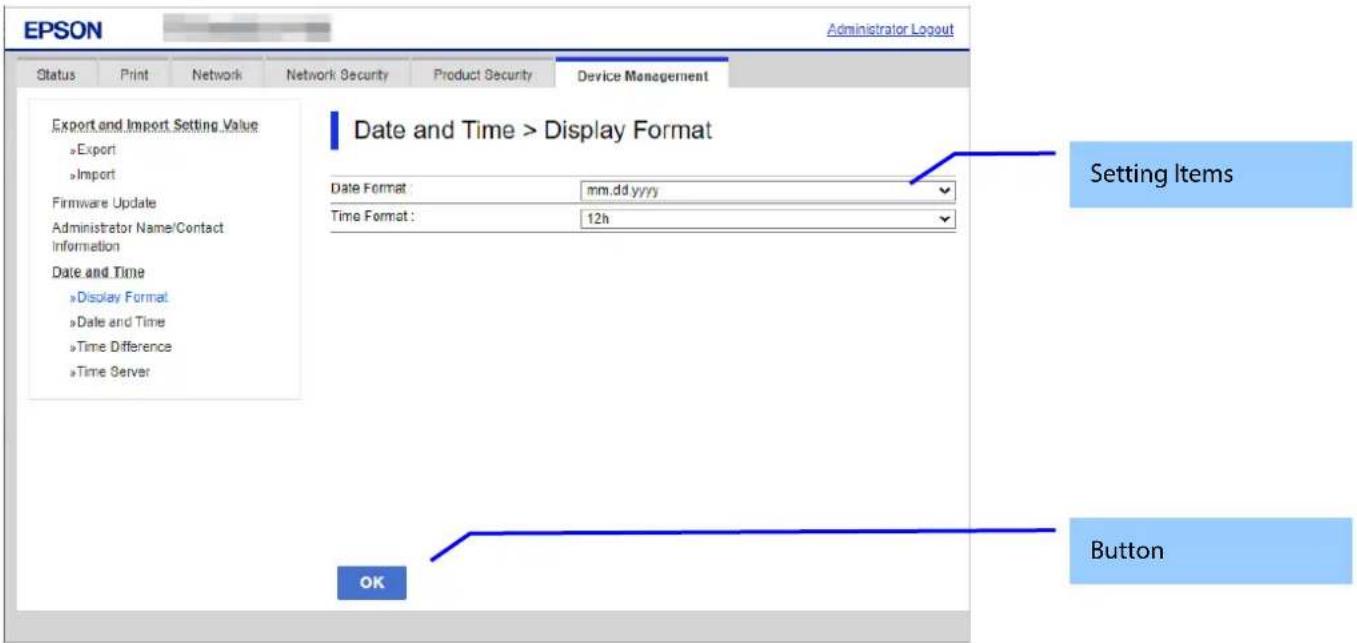
Figure 9-80 Display Format Settings
9.6.4.1.1.2 Setting Items
Table 9-207 Items in the Display Format Settings
| Items | Description |
| "Date Format" | Use the drop-down list to change the display format for date."yyyy.mm.dd""mm.dd.yyyy""dd.mm.yyyy" |
| "Time Format" | Use the drop-down list to select one of the following."12h" / "24h" |
9.6.4.1.1.3 Button
The following table shows the button on the page.
Table 9-208 Button
| Items | Description |
| "OK" | -Button at the bottom of the main frame to perform settings. |
9.6.4.1.2 Result Page
The result message is shown in the main frame after the "OK" button is pressed.
9.6.4.1.2.1 Image
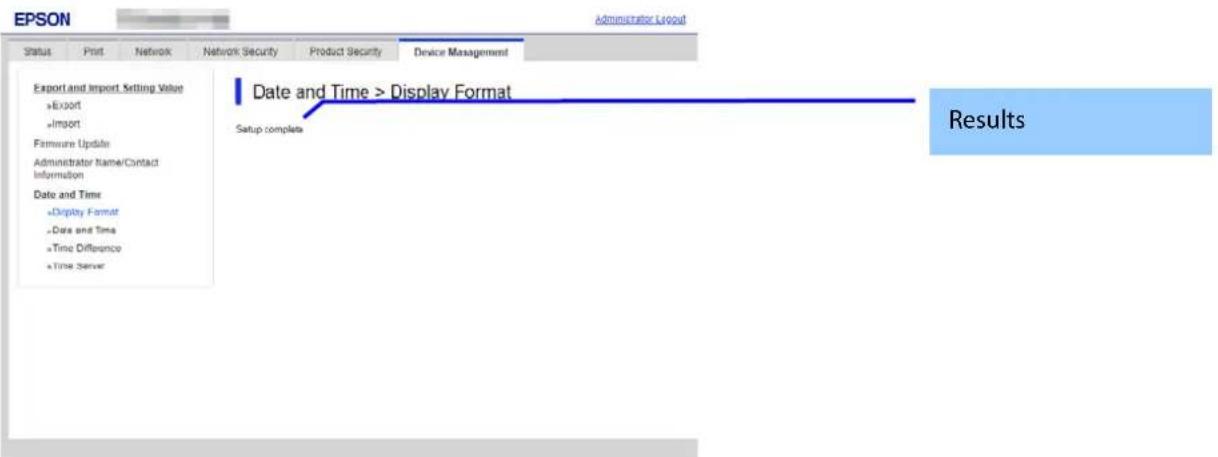
Figure 9-81 Result Page
9.6.4.1.2.2 Result
Table 9-209 Results
| Items | Description |
| "Setup complete" | This message is shown when the settings are completed. |
| "Setup failed" | This message is shown if the settings fail. |
9.6.4.2 Date and Time
9.6.4.2.1 Top Page
9.6.4.2.1.1 Image
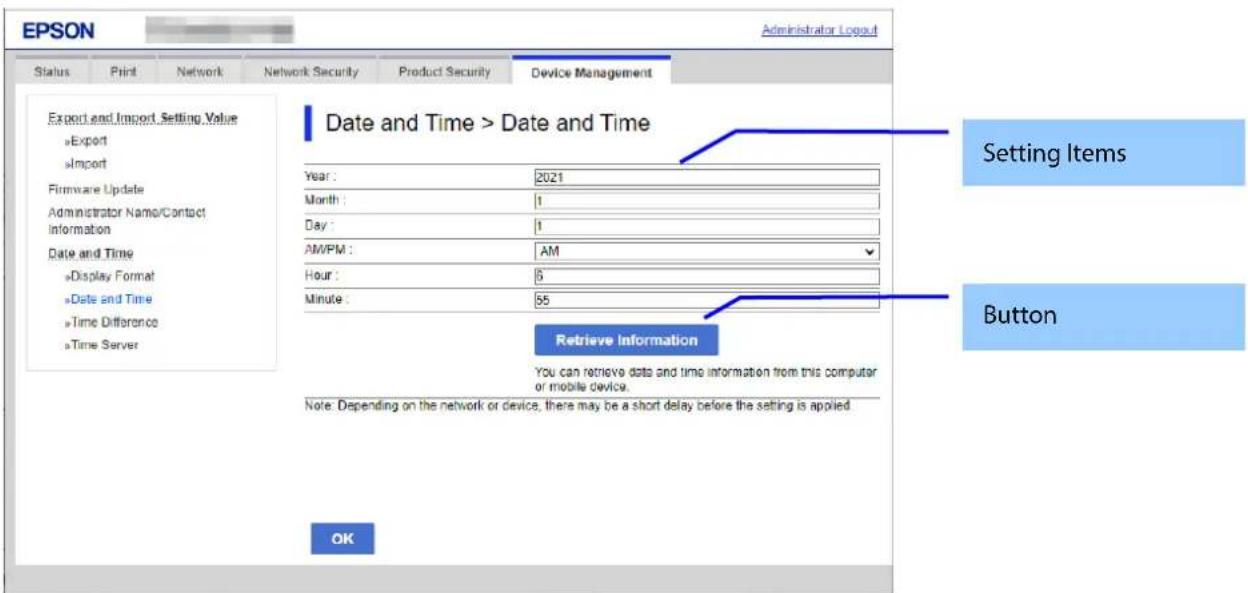
Figure 9-82 Date and Time settings
9.6.4.2.1.2 Setting Items
The following table shows the items on the page.
Table 9-210 Setting Items
| Items | Description | Condition |
| "Year" | Text box for entering a year. Four digits. (20XX-2099). XX: Indicates the product's launch year. | - |
| "Month" | Text box for entering the month(1-12) | - |
| "Day" | Text box for entering the date (1-31) | - |
| "AM/PM" | Use the drop-down list to select one of the following. "AM" / "PM" | Can be use this settings if the "Time Format" setting is "24h". |
| "Hour" | Text box for entering time in hoursIf the time fomat is 24h: (0-23)If the time fomat is 12h: (0-11) | - |
| "Minute" | Text box for entering minutes.(0-59) | - |
| "You can retrieve date and time information from this computer or mobile device." | Description of "Retrieve Information" button. | |
| "Note: Depending on the network or device, there may be a short delay before the setting is applied." | Fixed message | - |
9.6.4.2.1.3 Button
The following table shows the buttons on the page.
Table 9-211 Button
| Items | Description |
| "Retrieve Information" | You can retrieve date and time information from this computer or mobile device. |
| "OK" | -Button at the bottom of the main frame to perform settings. |
When the "OK" button is pressed, Web Config displays a pop-up window with the following message if it recognizes an error in the entered value.
Table 9-212 Error Pop-up
| Items | Description |
| "Invalid value below.""-Year""-Month""-Day""-Hour""-Minute" | Shows a warning when a value is entered incorrectly. If "-Year" or "-Month" is not entered, "-Day" is not verified. |
9.6.4.2.2 Result Page
The following result is shown in the main frame after the "OK" button is pressed.
9.6.4.2.2.1 Image
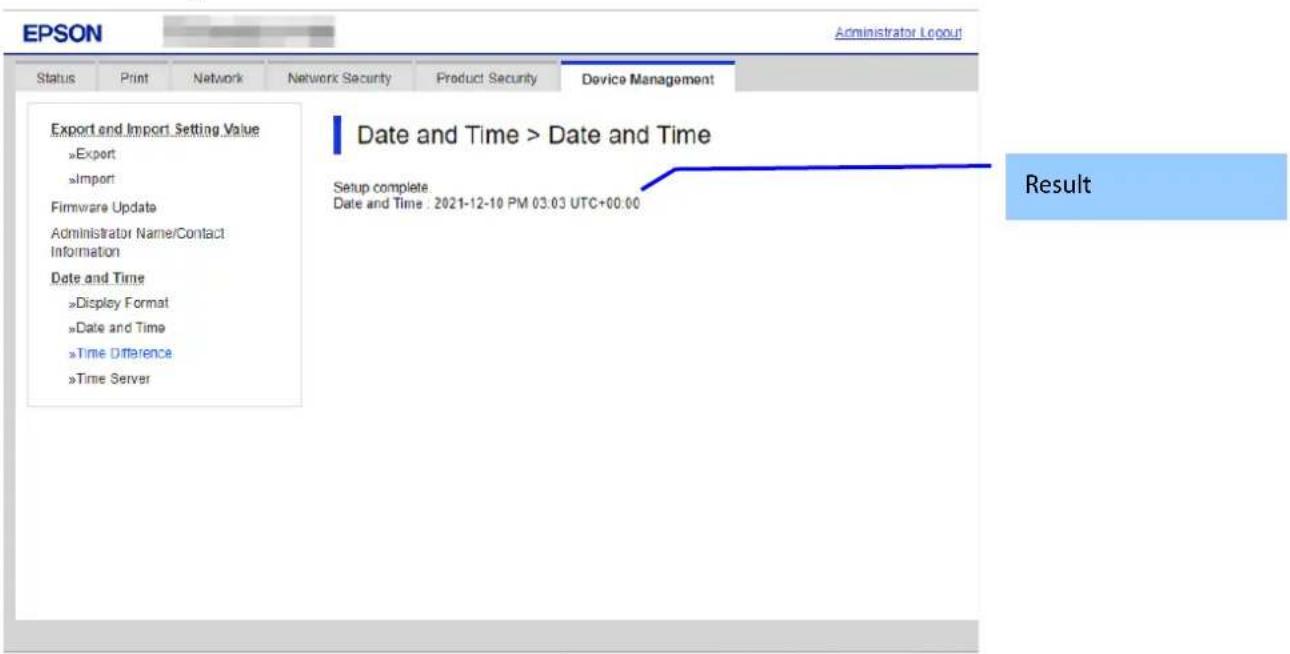
Figure 9-83 Result Page
9.6.4.2.2.2 Result
Result is below.
Table 9-213 Result
| Items | Description | Condition |
| "Setup complete" | This message is shown when the settings are completed. | - |
| "Setup failed" | This message is shown if the settings fail. | - |
| "Date and Time" | The current date and time are displayed in the specified format. | When successful |
9.6.4.3 Time Difference
9.6.4.3.1 Top Page
9.6.4.3.1.1 Image
The following figure shows the layout of this settings area.
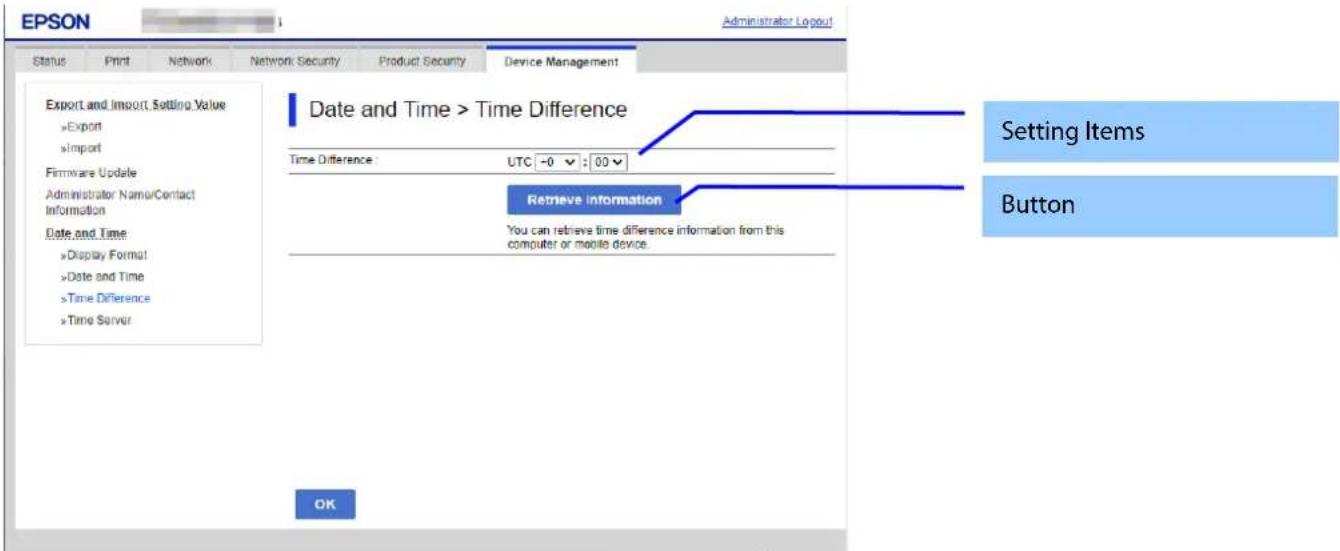
Figure 9-84 Time Difference
9.6.4.3.1.2 Setting Items
The following table shows the items on the page.
Table 9-214 Setting Items
| Items | Description |
| "Daylight Saving Time" | Use the radio buttons to change summer time setting."OFF" / "ON" |
| "Time Difference" | Use the drop-down list to set the time difference.HH indicates the hour, and can be configured from -12 to +13.You can also select "+0" and "-0".MM indicates minutes, which can be set to 00, 15, 30 or 45."0:00" is displayed as "+0:00". |
| "You can retrieve time difference information from this computer or mobile device." | Fiexed strings |
9.6.4.3.1.3 Button
The following table shows the buttons on the page.
Table 9-215 Button
| Items | Description |
| "Retrieve Information" | Button used to get data from computer. This item is displayed next to "Time Difference". |
| "OK" | Button at the bottom of the main frame to perform settings. |
9.6.4.3.2 Result Page
The result message is shown in the main frame after the "OK" button is pressed.
9.6.4.3.2.1 Image
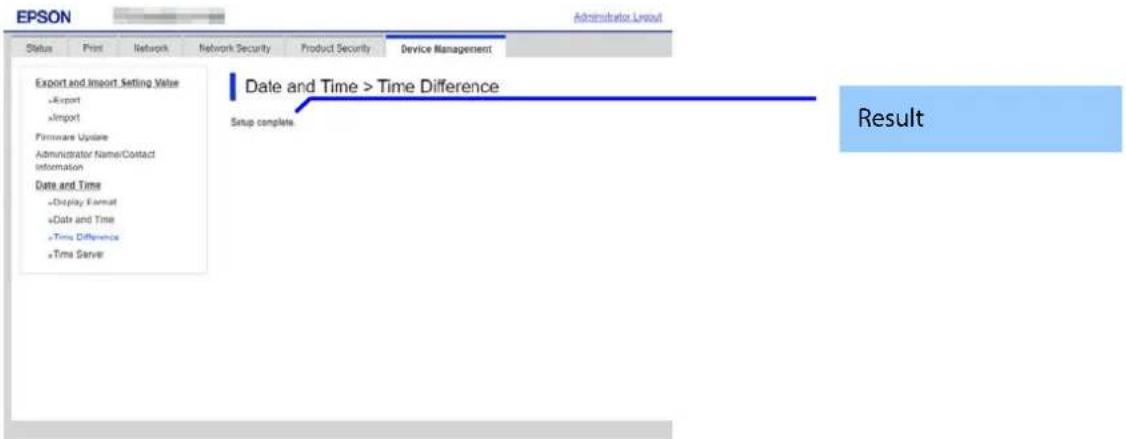
Figure 9-85 Result Page
9.6.4.3.2.2 Result
Table 9-216 Results
| Items | Description |
| "Setup complete" | This message is shown when the settings are completed. |
| "Setup failed" | -This message is shown if the settings fail. |
9.6.4.4 Time Server
9.6.4.4.1 Top Page
9.6.4.4.1.1 Image
The following figure shows the layout of this settings area.
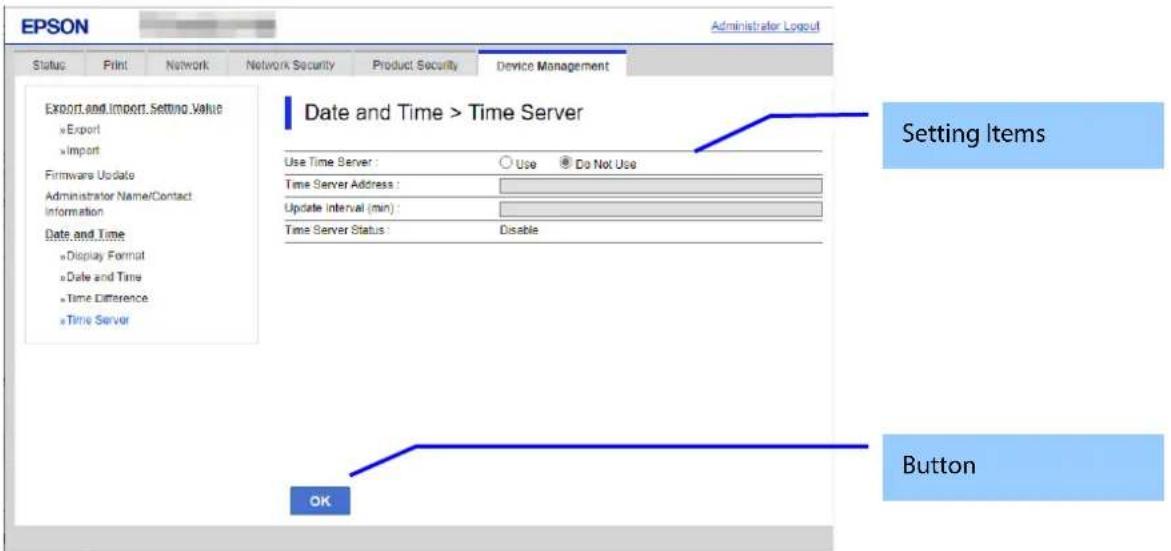
Figure 9-86 Time Server Settings
9.6.4.4.1.2 Setting Items
The following table shows the items on the page.
Table 9-217 Time Sever Settings
| Items | Description | Condition |
| "Use Time Server" | You can choose whether to use a time server. "Use" / "Do Not Use" | - |
| "Time Server Address" | Enter an NTP server address by IP address or FQDN. | Enabled if "Use" is chosen in "Use Time Server" |
| "Update Interval (min)" | Set the interval for updating the time on the printer. | Enabled if "Use" is chosen in "Use Time Server" |
| "Time Server Status" | Shows the latest connection status between the printer and the server. "Completed synchronizing" / "Synchronizing" / "Failed to synchronize" / "Disable" | Enabled if "Use" is chosen in "Use Time Server" |
9.6.4.4.1.3 Button
The following table shows the buttons on the page.
Table 9-218 Button
| Items | Description |
| "OK" | - Button at the bottom of the main frame for configuring settings. |
When the "OK" button is pressed, Web Config displays a pop-up window with the following message if it recognizes an error in the entered value.
Table 9-219 Error Pop-up
| Items | Description |
| "Invalid value below.""-Time Server Address""-Update Interval(min)" | Shows a warning when a value is entered incorrectly. |
9.6.4.4.2 Result Page
As soon as the result is determined, the following result message is shown in the main frame.
9.6.4.4.2.1 Image
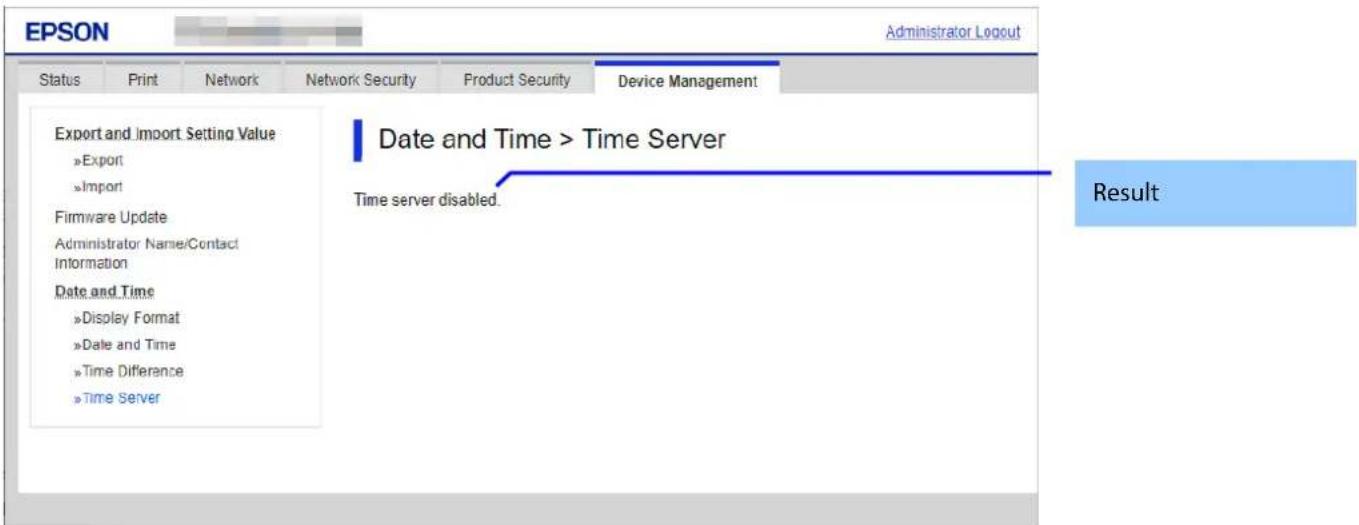
Figure 9-87 Result Page
9.6.4.4.2.2 Setting Result
The result is shown below.
Table 9-220 Result
| Items | Description | Condition |
| "Setup complete" | This message is shown when the settings are completed. | - |
| "Setup failed" | This message is shown when the settings have failed. | - |
| "Cannot access the product until processing is complete." | This message is shown if the settings cannot be configured because the device is busy. | - |
9.6.5 Restore Default Settings
9.6.5.1 Top page
9.6.5.1.1 Image
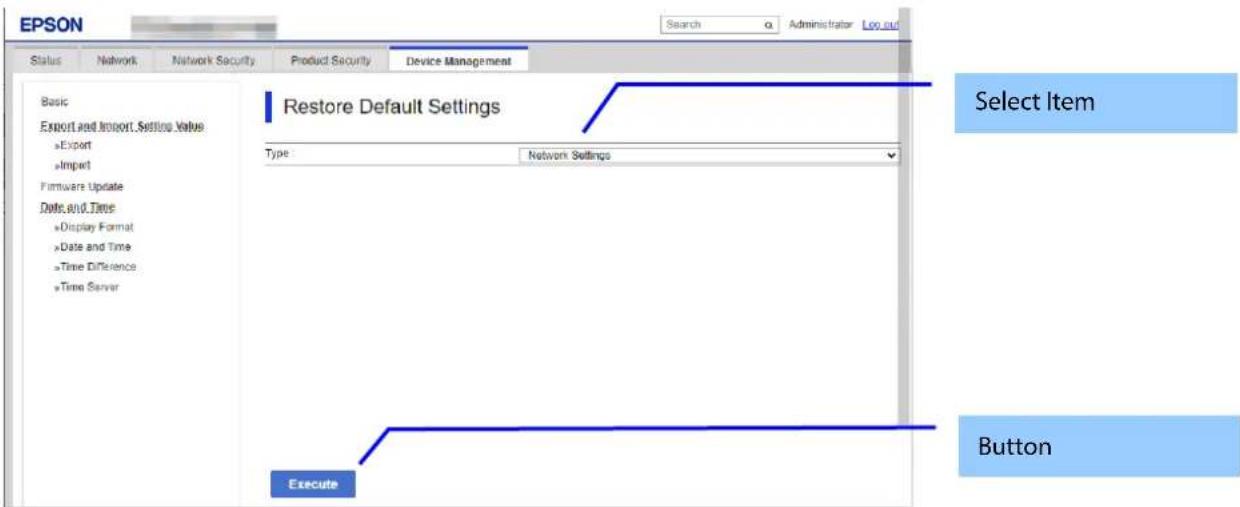
Figure 9-88 Top Page
9.6.5.1.2 Select Item
Table 9-221 Select Item
| Items | Description | Condition |
| "Type" | Select "Network Settings" / "Erase All Memory" / "Clear All Data and Settings" in the drop-down list. | - |
| Select "High Speed" / "Overwrite" / "Triple Overwrite" in the drop-down list. | This item is enabled when "Type" is set to "Erase All Memory" or "Clear All Data and Settings". |
9.6.5.1.3 Button
Table 9-222 Button
| Items | Description |
| "Execute" | Confirmation popup is displayed. |
9.6.5.1.4 Confirmation popup
In Confirmation popup, below description and OK/Cancel button are disapplayed. When user select OK, reset would be executed and result page is displayed.
Table 9-223 Confirmation popup
| Items | Description |
| "Restore the settings to defaults?" | This message is displayed when the user selects "Network Settings" and clicks the "Execute" button. |
| "Clear data in HDD?" | This message is displayed when the user selects "Erase All Memory" and clicks the "Execute" button. |
| "Clear all data and restore default settings?" "It may take several minutes." "Continue?" | This message is displayed when the user selects "Clear All Data and Settings" and clicks the "Execute" button. |
9.6.5.2 Result page
9.6.5.2.1 Image
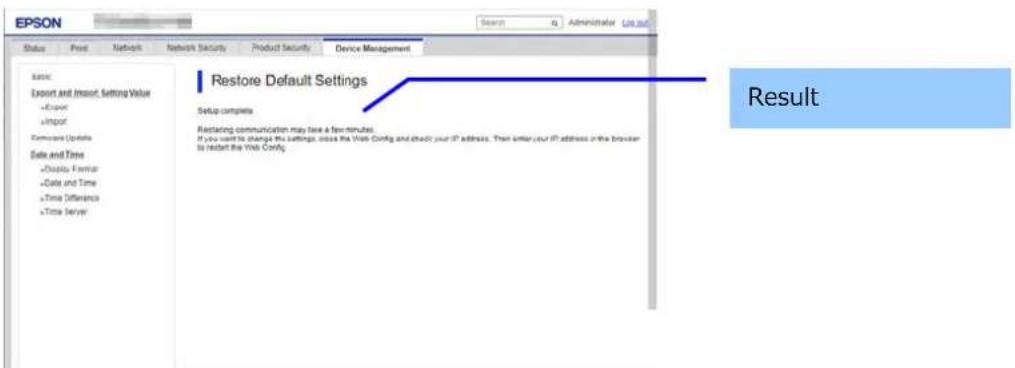
Figure 9-89 Result Page
9.6.5.2.2 Result
Table 9-224 Result
| Items | Description |
| "Printer receives the request." | This message is displayed when initialization without NW initialization starts successfully. |
| "Setup complete.""Restarting communication may take a few minutes.""If you want to change the settings, close the Web Config and check your IP address. Then enter your IP address in the browser to restart the Web Config." | This message is displayed when initialization with NW initialization starts successfully. |
| "Printer cannot perform the request." | This message is displayed if the printer cannot be initialized. |
10. TM-i Settings
WebConfig-i provides support for changing settings related to TM-i from the UI displayed in the browser.
10.1 Authentication
The WebConfig-i screen is displayed only if the administrator is already logged on to WebConfig.
If the administrator is not logged in to WebConfig, the authentication error page shown in Figure 10-1 Authentication Error Page is displayed.
10.1.1 Image
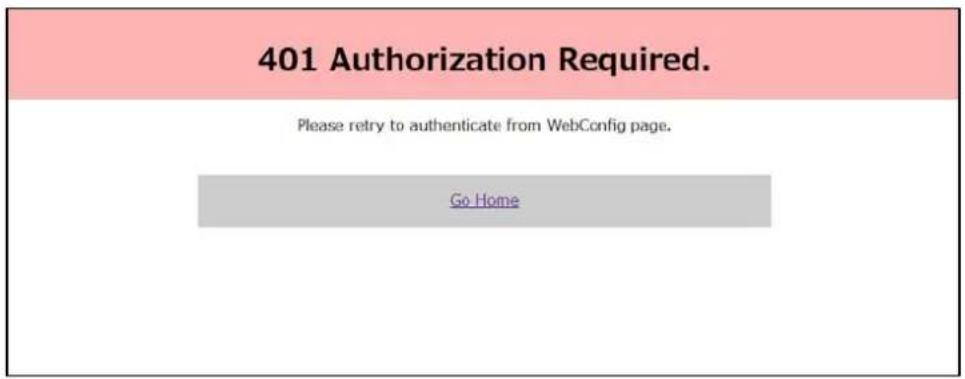
Figure 10-1 Authentication Error Page
10.2 Page Layout
The page is divided into three sections as shown below. A screen image is shown in Figure 10-2 Page Layout.
Title window: Upper pane showing title and button to apply settings
Menu window: Left pane showing menu of settings
Settings window: Right pane showing actual setting values
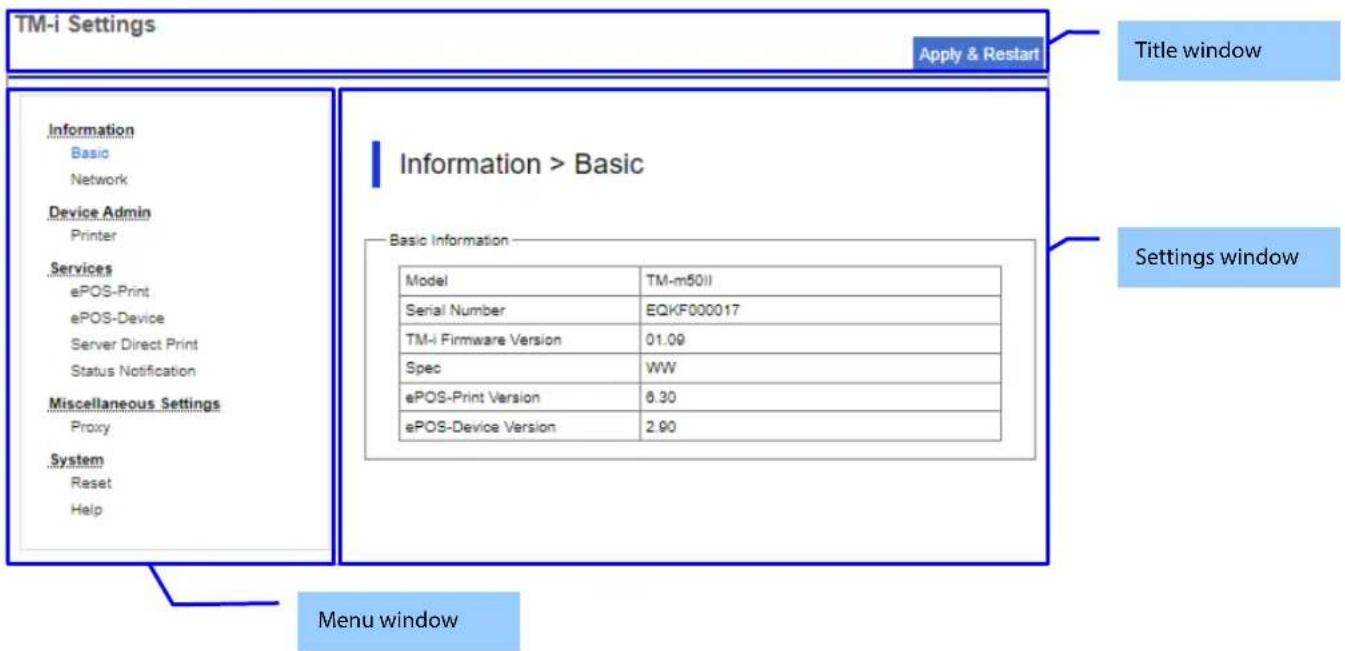
Figure 10-2 Page Layout
10.3 Title Window
10.3.1 Display Items
Table 10-1 Display Items
| Items | Description | |
| "TM-i Settings" | The title is displayed in the upper left corner of the title window. | |
| "Apply & Restart" button | A button for applying the settings and restarting the system is found in the lower right corner of the title window.If the button is pressed, the dialog shown below will be displayed. However, if there is an error in the settings, the button will not respond.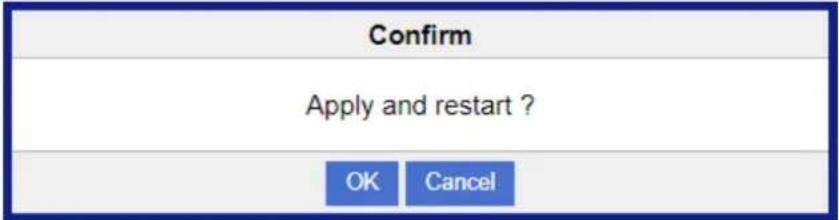 | |
| Items | Description | |
| "Confirm" | Title | |
| "Apply and restart ?" | Text | |
| "OK" button | Applies the settings and restarts.For details on restarting, see 10.3.2 Restarting. | |
| "Cancel" button | Closes the dialog. | |
| Items | Description |
| "Confirm" | Title |
| "Apply and restart ?" | Text |
| "OK" button | Applies the settings and restarts.For details on restarting, see 10.3.2 Restarting. |
| "Cancel" button | Closes the dialog. |
10.3.2 Restarting
When restarting, wait for the following screen to appear and the restarting process to be completed. Restart completion is determined by whether index_options.json has been successfully read. The timeout period is 3 minutes. If the timeout period expires, close the screen and reload the page.
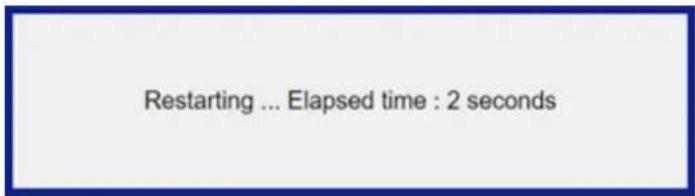
Figure 10-3
Table 10-2 Display Items
| Items | Description |
| "Restarting ... Elapsed time : x seconds" | Character string indicating the restart status |
10.4 Menu Window
Depending on the model, the menu shown in Table 10-3 may be displayed. The sub-items are links, which, when clicked, change the screen of the settings window.
Only the Network menu links to the WebConfig screen.
Table 10-3 Menu Layout
| Main items | Sub-items |
| "Information" | "Basic" |
| "Network" | |
| "Device Admin" | "Printer" |
| "Slip" | |
| "Services" | "ePOS-Print" |
| "ePOS-Device" | |
| "Server Direct Print" | |
| "Status Notification" | |
| "Miscellaneous Settings" | "Proxy" |
| "System" | "Reset" |
| "Help" |
Menu main items and sub-items are also displayed in the title of the settings window. An example is shown in Figure 10-4.
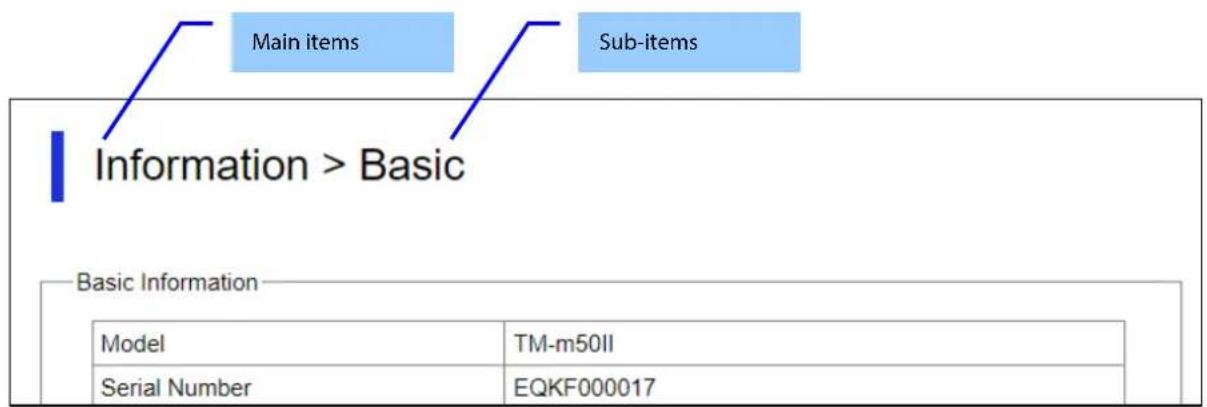
Figure 10-4 Relationship Between Menu Name and Title of Settings Window
10.5 Settings Window
10.5.1 Common Items
10.5.1.1 Error Display in Text Box
If the input value is invalid, the background color of the text box will be yellow and the error content will be displayed in red text on the right side.
An example of the display is shown in Figure 10-5.
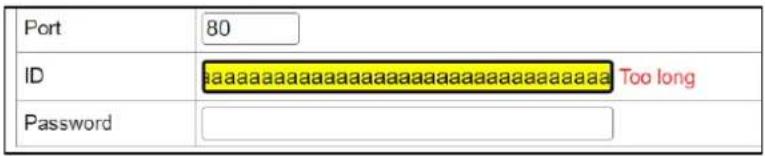
Figure 10-5 Error Display in Text Box
10.5.1.2 Dialog
An example of a dialog displaying an error and message is shown in Figure 10-6.
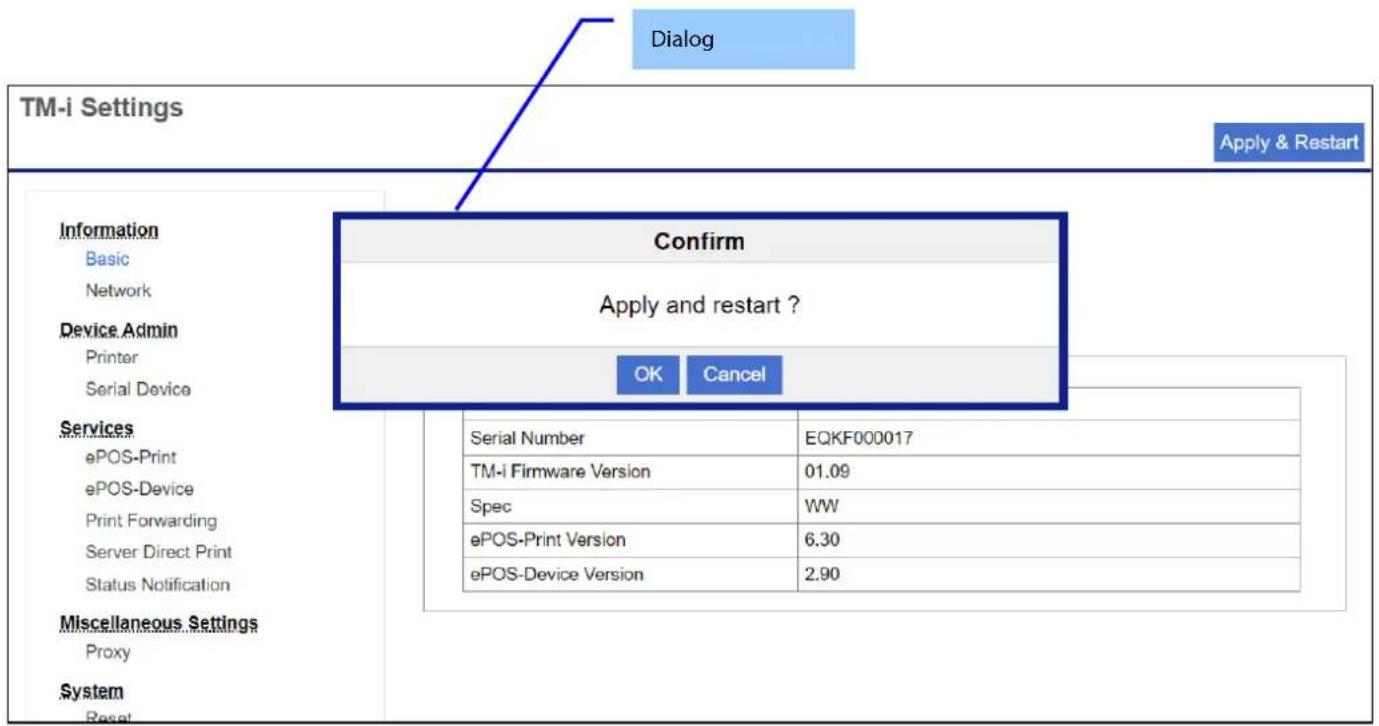
Figure 10-6 Example of Dialog Display
10.5.1.3 Input Limits
The fields shown in Table 10-4 on each page have limits on input values. If a value is outside the limit, the string/value will be treated as invalid.
Table 10-4 Field Input Limits
| Items | Limit |
| URL | Must start with [http(s)://] and not exceed 2043 characters. |
| ID | Only [A-Z, a-z, 0-9, underscores, periods, and hyphens] are allowed, up to 30 characters. |
| Password | Only [A-Z, a-z, 0-9, underscores, periods, and hyphens] are allowed, up to 30 characters. |
| Name | Only [A-Z, a-z, 0-9, underscores, periods, and hyphens] are allowed, up to 30 characters. |
| DeviceID | Only [A-Z, a-z, 0-9, underscores, periods, and hyphens] are allowed, up to 30 characters. |
10.5.2 Basic Screen
Displays basic information about TM-i.
10.5.2.1 Image
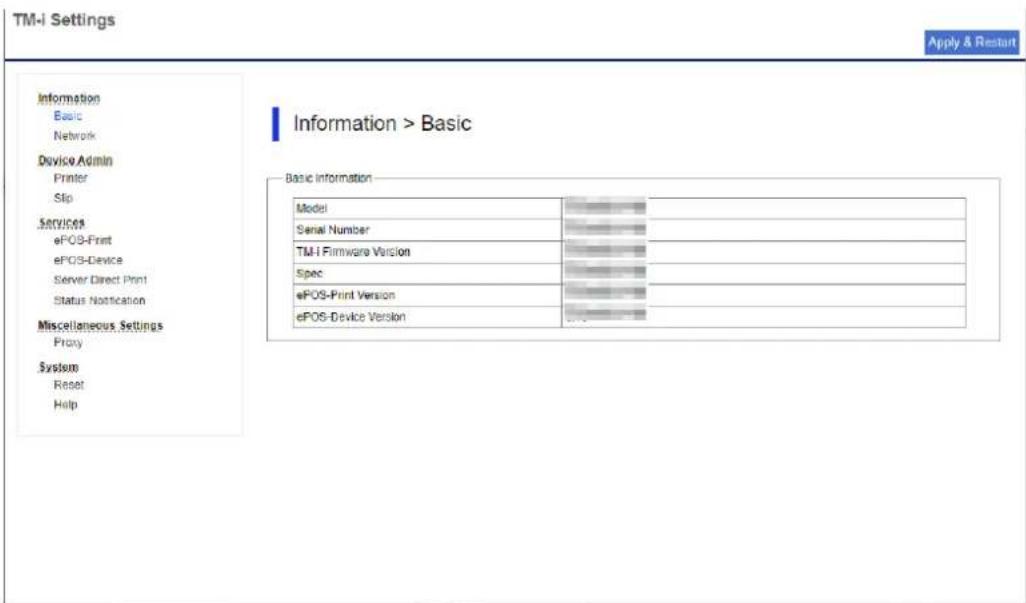
Figure 10-7 Basic
10.5.3 Display Items
Table 10-5 Display Items
| Items | Description |
| "Basic Information" | Group title |
| "Model" | Displays the model name. |
| "Serial Number" | Displays the serial number.If the serial number is not stored, "(none)" is displayed. |
| "TM-i Firmware Version" | Displays version information for TM-i. |
| "Spec" | Displays the destination. |
| "ePOS-Print Version" | Display the version of ePOS-Print. |
| "ePOS-Device Version" | Displays the version of ePOS-Device. |
10.6 Printer Screen
Displays a screen for registering network printers.
10.6.1 Image
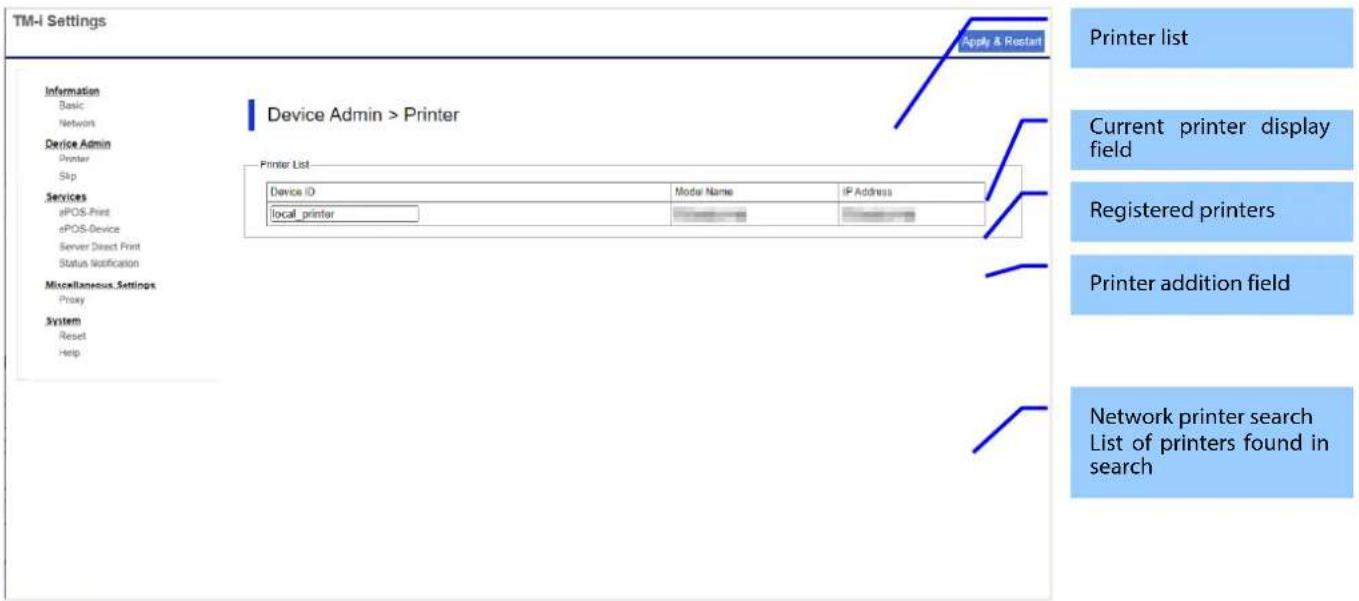
Figure 10-8 Printer
10.6.2 Printer List
10.6.2.1 Display Items
Displays a table listing of registered printers. Also has the ability to add, delete, and edit printers.
● The top row displays information about the current printer. Values cannot be changed.
Table 10-6 Display Items
| Items | Description |
| "Printer List" | Group that displays a list of information on registered printers |
| "Delete/New" | Displays buttons for adding and deleting printers.The top row shows the current printer, so buttons are not displayed.Displays a Delete button for registered printers.Displays a New button on the bottom row. |
| "Device ID" | A text box displays the device ID assigned to the printer.In a printer addition field on the bottom row, "network_printer_#####" is displayed in a text box. Assigns sequential numbers to #####, starting from 0001. Assigns the lowest unused number up to 9999 for which an ID already exists. If the number exceeds 9999, "network_printer_Too_many_printer" is displayed in a text box. |
| "Model Name" | Displays the model name or model series in a drop-down list.For the current printer in the top row, the model name is displayed in text and cannot be changed.The list of model names to be displayed in the drop-down list is as follows: "TM-T88 series" (default) / "TM-T82 series" / "TM-T70 series" / "TM-T20 series" / "TM-m50 series" / "TM-m30 series" / "TM-m10 series" / "TM-P80 series" / "TM-P60 series" / "TM-P20 series" / "TM-U220 series" / "TM-H6000 series" / "TM-T90 series" / "TM-L90" / "TM-L100" |
| "IP Address" | Displays IPv4 address in a text box.The initial (default) value is an empty string.For the current printer in the top row, a fixed value (127.0.0.1) is displayed in text and cannot be changed. |
10.6.3 Error Dialog
The content of an error dialog showing that an input value is incorrect is shown below.
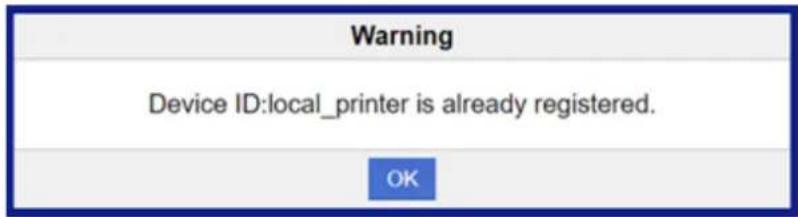
Figure 10-9 Error Dialog
Table 10-7 Error Dialog
| Items | Description | ||
| "Warning" | Title | ||
| Text (see table at right) | "Device ID:{devid} is already registered." | Will be displayed if the device ID has already been registered.{devid} will contain the entered device ID. | |
| "Invalid string" | Will be displayed if the device ID is invalid. | ||
| "Too long" | Will be displayed if the length of the device ID exceeds the limit. | ||
| "Device ID is missing." | Will be displayed if the device ID is missing (empty). | ||
10.7 Slip Screen
Displays the slip print setting screen.
10.7.1 Image
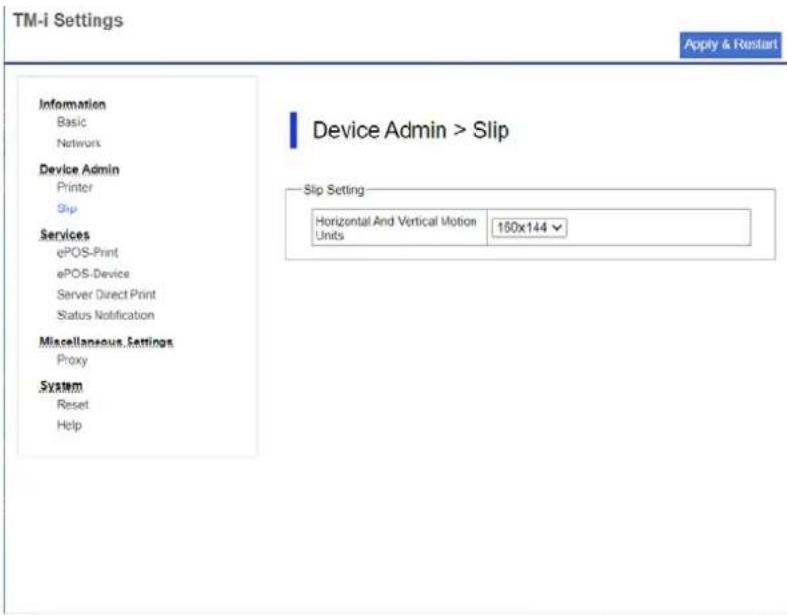
Figure 10-10 Slip
10.7.2 Display Items
Table 10-8 Display Items
| Items | Description |
| "Slip Setting" | Group title |
| "Horizontal And Vertical Motion Units" | Provides a drop-down list to select from among the following resolutions for slip printing:"160x144" / "80x72" |
10.8 ePOS-Print
Displays the ePOS-Print setting screen.
10.8.1 Image
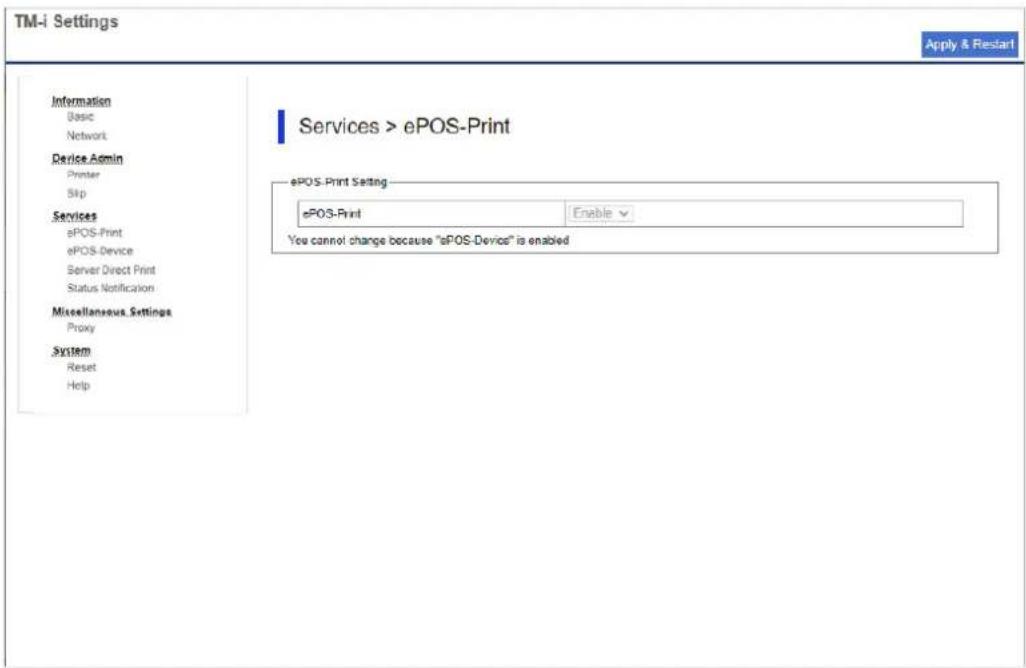
Figure 10-11 ePOS-Print
10.8.2 Display Items
Table 10-9 Display Items
| Items | Description | Condition |
| "ePOS-Print Setting" | Group title | - |
| "ePOS-Print" | Provides a drop-down list with the following options to enable or disable ePOS-Print:"Enable" / "Disable" | Grayed out if either of these conditions is met:"ePOS-Device" is "Enable""Server Direct Print" is "Enable" |
| "You cannot change because "Server Direct Print" and "ePOS-Device" are enabled" | Fixed string indicating the cause when ePOS-Print setting cannot be changed | Will be displayed when both ePOS-Device and Server Direct Print are enabled. |
| "You cannot change because "ePOS-Device" is enabled" | Fixed string indicating the cause when ePOS-Print setting cannot be changed | Will be displayed when ePOS-Device is enabled. |
| "You cannot change because "Server Direct Print" is enabled" | Fixed string indicating the cause when ePOS-Print setting cannot be changed | Will be displayed when Server Direct Print is enabled. |
10.9 ePOS-Device
Displays the ePOS-Device setting screen.
10.9.1 Image
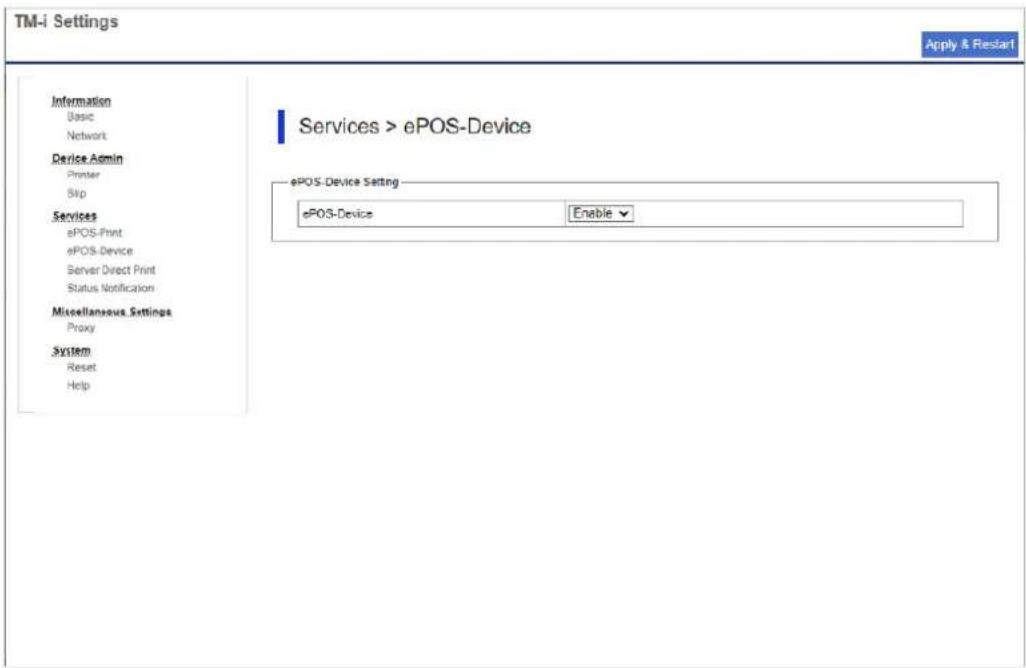
Figure 10-12 ePOS-Device
10.9.2 Display Items
Table 10-10 Display Items
| Items | Description |
| "ePOS-Device Setting" | Group title |
| "ePOS-Device" | Provides a drop-down list with the following options to enable or disable ePOS-Device: "Enable" / "Disable" |
10.10 Server Direct Print
10.10.1 Image
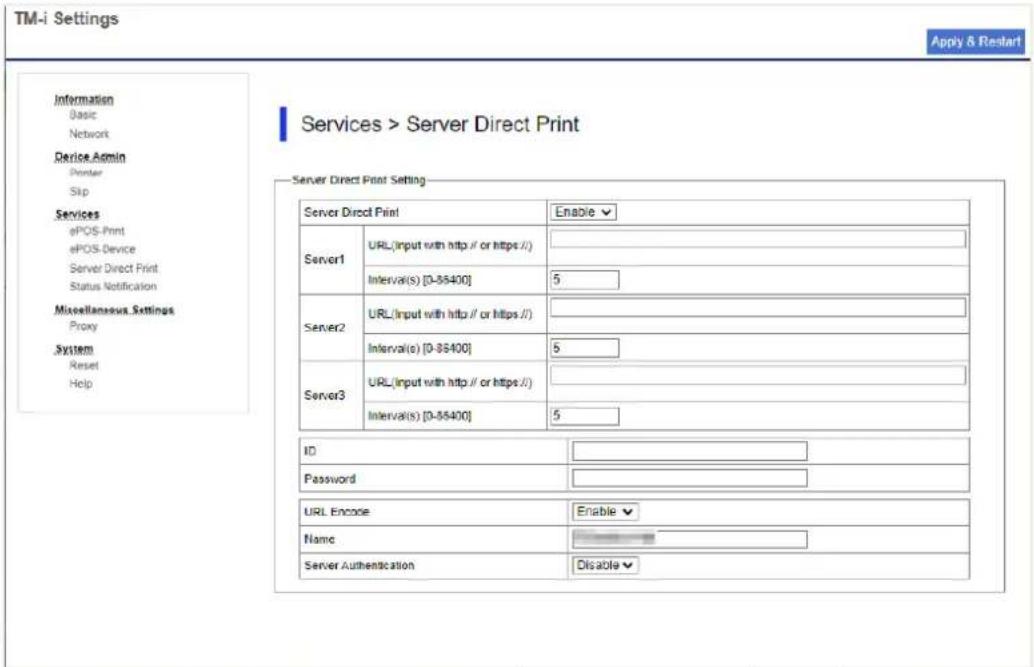
Figure 10-13 Server Direct Print
10.10.2 Display Items
Table 10-11 Display Items
| Items | Description | Condition | |
| "Server Direct Print Setting" | Group title | - | |
| "Server Direct Print" | Provides a drop-down list with the following options to enable or disable Server Direct Print: "Enable" / "Disable" | - | |
| "Server1" | "URL (Input with http:// or https://)" | Provides a text box to enter the URL of the first server. Error messages are displayed in the following cases:● When URL is invalid: "Invalid URL" | Will be grayed out when "Server Direct Print" is "Disable." |
| "Interval(s) [0-86400]" | Provides a text box to enter the access interval to the first server. Error messages are displayed in the following cases:● When character other than [0-9] is included: "Only numerics"● When outside the [0-86400] range: "Invalid range" | Will be grayed out when "Server Direct Print" is "Disable." | |
| Server2 | Same as above | Displays second server's settings. Content is same as Server 1. | Will be grayed out when "Server Direct Print" is "Disable." |
| Server3 | Same as above | Displays third server's settings. Content is same as Server 1. | Will be grayed out when "Server Direct Print" is "Disable." |
| "ID" | Provides a text box to enter the ID used for server authentication. Error messages are displayed in the following cases:● When more than 30 characters: "Too long"● When input value is invalid: "Invalid string" | Will be grayed out when "Server Direct Print" is "Disable." | |
| "Password" | Provides a text box to enter the password used for server authentication. The input value is masked and displayed. Error messages are displayed in the following cases:● When more than 30 characters: "Too long"● When input value is invalid: "Invalid string" | Will be grayed out when "Server Direct Print" is "Disable." | |
| "URL Encode" | Provides a drop-down list with the following options to enable or disable URL encoding: "Enable" / "Disable" | Will be grayed out when "Server Direct Print" is "Disable." | |
| "Name" | Provides a text box to enter the name for identifying the printer.Error messages are displayed in the following cases:● When more than 30 characters: "Too long"● When input value is invalid: "Invalid string" | Will be grayed out when "Server Direct Print" is "Disable." | |
| "Server Authentication" | Provides a drop-down list with the following options to enable or disable server authentication: "Enable" / "Disable" | Will be grayed out when "Server Direct Print" is "Disable." | |
10.11 Status Notification Screen
10.11.1 Image
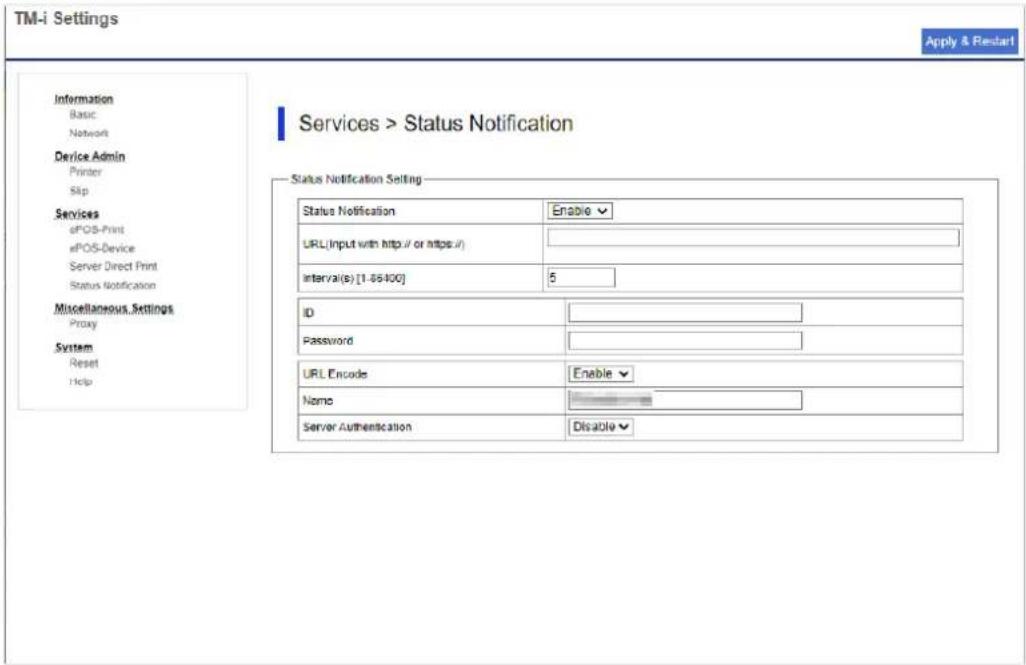
Figure 10-14 Status Notification
10.11.2 Display Items
Table 10-12 Display Items
| Items | Description | Condition |
| "Status Notification Setting" | Group title | - |
| "Status Notification" | Provides a drop-down list with the following options to enable or disable status notifications:"Enable" / "Disable" | - |
| "URL (Input with http:// or https://)" | Provides a text box to enter the server URL.Error messages are displayed in the following cases:When URL is invalid:"Invalid URL" | Will be grayed out when"Status Notification" is"Disable." |
| "Interval(s)" | Provides a text box to enter the access interval to the server.When character other than [0-9] is included:"Only numerics"When outside the [0-86400] range:"Invalid range" | Will be grayed out when"Status Notification" is"Disable." |
| "ID" | Provides a text box to enter the ID used for server authentication.When more than 30 characters:"Too long"When input value is invalid:"Invalid string" | Will be grayed out when"Status Notification" is"Disable." |
| "Password" | Provides a text box to enter the password used for server authentication.When more than 30 characters:"Too long"When input value is invalid:"Invalid string" | Will be grayed out when"Status Notification" is"Disable." |
| "URL Encode" | Provides a drop-down list with the following options to enable or disable URL encoding:"Enable" / "Disable" | Will be grayed out when"Status Notification" is"Disable." |
| "Name" | Provides a text box to enter the name for identifying the printer.When more than 30 characters:"Too long"When input value is invalid:"Invalid string" | Will be grayed out when"Status Notification" is"Disable." |
| "Server Authentication" | Provides a drop-down list with the following options to enable or disable server authentication: "Enable" / "Disable" | Will be grayed out when "Status Notification" is "Disable." |
10.12 Proxy Screen
10.12.1 Image
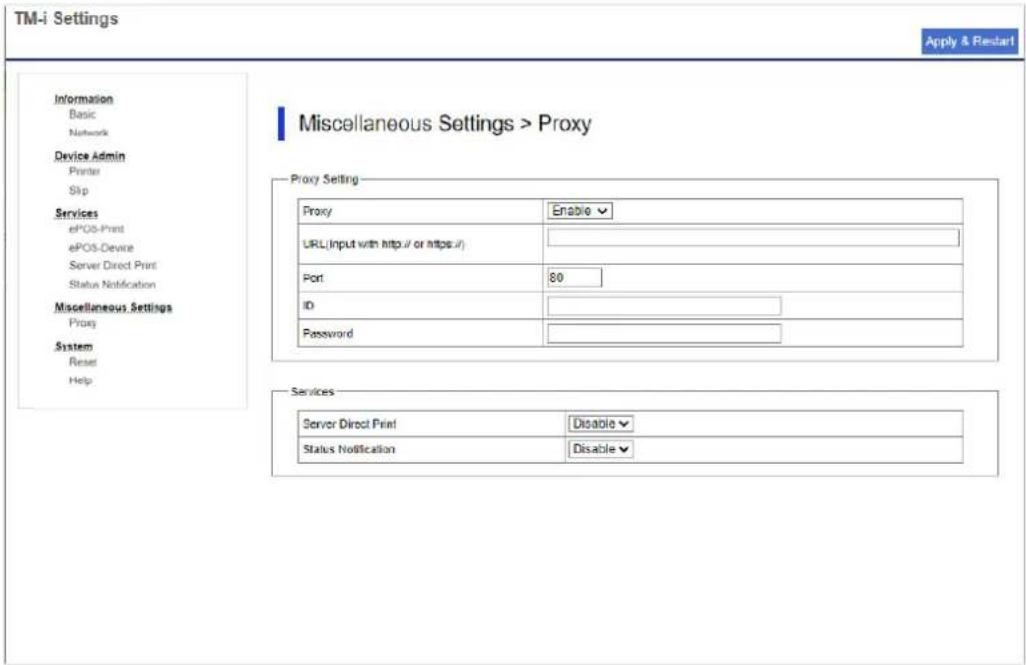
Figure 10-15 Proxy
10.12.2 Display Items
Table 10-13 Display Items
| Items | Description | Condition |
| "Proxy Setting" | Group title | - |
| "Proxy" | Provides a drop-down list with the following options to enable or disable proxy use:"Enable" / "Disable" | - |
| "URL (Input with http:// or https://)" | Provides a text box to enter the proxy server URL.Error messages are displayed in the following cases:● When URL is invalid:"Invalid URL" | Will be grayed out when "Proxy" is "Disable." |
| "Port" | Provides a text box to enter the port of the proxy server.● When character other than [0-9] is included:"Only numerics"● When outside the [0-65535] range:"Invalid range" | Will be grayed out when "Proxy" is "Disable." |
| "ID" | Provides a text box to enter the ID used for proxy authentication.● When more than 30 characters:"Too long"● When input value is invalid:"Invalid string" | Will be grayed out when "Proxy" is "Disable." |
| "Password" | Provides a text box to enter the password used for proxy authentication.● When more than 30 characters:"Too long"● When input value is invalid:"Invalid string" | Will be grayed out when "Proxy" is "Disable." |
| "Services" | Group title | - |
| "Server Direct Print" | Provides a drop-down list with the following options to enable or disable the use of proxies for Server Direct Print:"Enable" / "Disable" | Will be grayed out when "Proxy" is "Disable." |
| "Status Notification" | Provides a drop-down list with the following options to enable or disable proxy use in status notifications:"Enable" / "Disable" | Will be grayed out when "Proxy" is "Disable." |
10.13 Reset Screen
10.13.1 Image
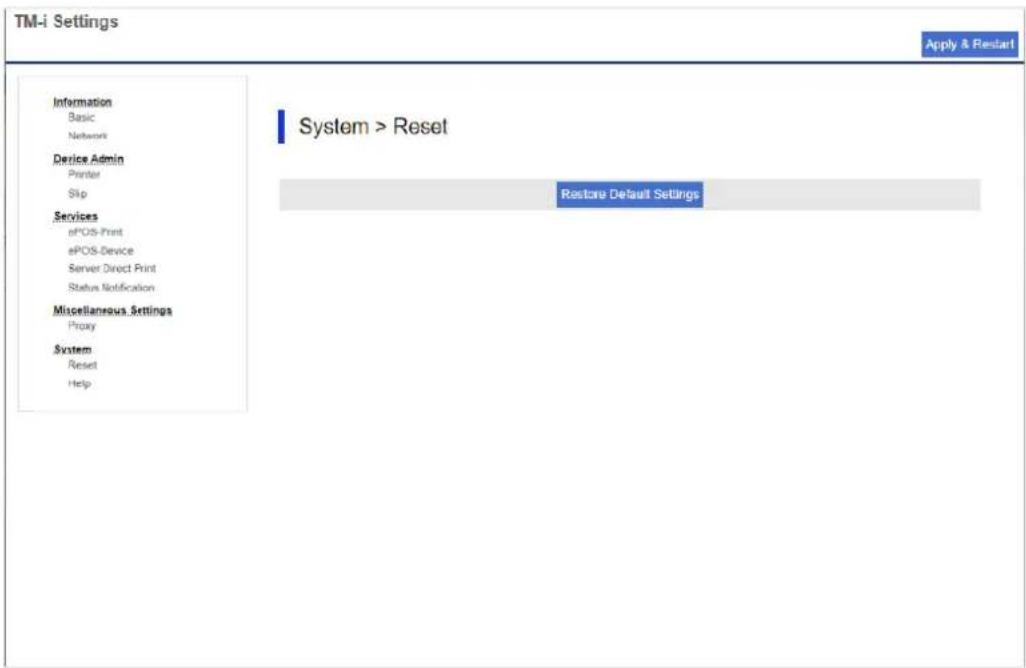
Figure 10-16 Reset
10.13.2 Button
Table 10-14 Button
| Items | Description | |
| "Restore Default Settings" button | The following dialog will be displayed.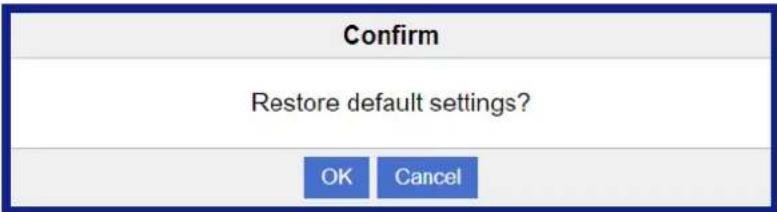 | |
| Items | Description | |
| "Confirm" | Dialog title | |
| "Restore default settings?" | Text | |
| "OK" button | Restores the settings to those at the time of purchase and then restarts.For details on restarting, see 10.3.2 Restarting. | |
| "Cancel" button | Closes the dialog. | |
| Items | Description |
| "Confirm" | Dialog title |
| "Restore default settings?" | Text |
| "OK" button | Restores the settings to those at the time of purchase and then restarts.For details on restarting, see 10.3.2 Restarting. |
| "Cancel" button | Closes the dialog. |
10.14 Help Screen
10.14.1 Image
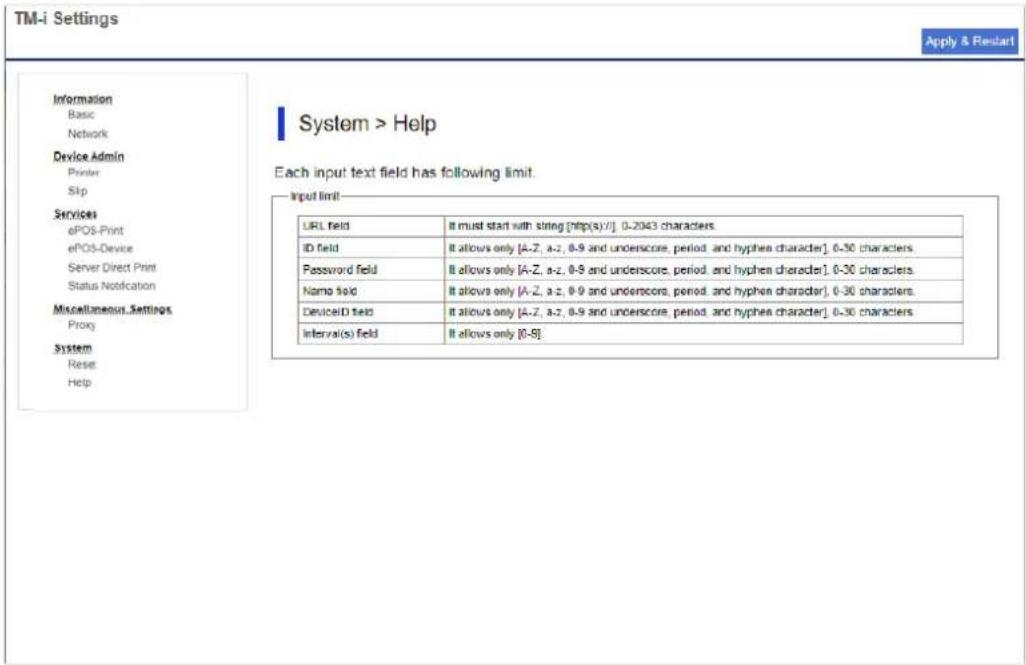
Figure 10-17 Basic
10.14.2 Display Items
Table 10-15 Display Items
| Items | Description |
| "Each input text field has following limit." | Displays a description of the input limitations. |
| "Input limit" | Group title |
| "URL field" | Displays a description of the input limitations for URL."It must start with string:[http(s)://], 0-2043 characters." |
| "ID field" | Displays a description of the input limitations for ID."It allows only [A-Z, a-z, 0-9 and underscore, period, and hyphen character], 0-30 characters." |
| "Password field" | Displays a description of the input limitations for Password."It allows only [A-Z, a-z, 0-9 and underscore, period, and hyphen character], 0-30 characters." |
| "Name field" | Displays a description of the input limitations for Name."It allows only [A-Z, a-z, 0-9 and underscore, period, and hyphen character], 0-30 characters." |
| "DeviceID field" | Displays a description of the input limitations for Device ID."It allows only [A-Z, a-z, 0-9 and underscore, period, and hyphen character], 0-30 characters." |
| "Interval(s) field" | Displays a description of the input limitations for Interval."It allows only [0-9]." |
- List of Functions by Model
| Functions | TM-H6000VI | TM-S1000II-NW | TM-T20IV-L TM-T20X-II TM-T82IV-L TM-T82X-II TM-T83IV | |
| Password authentication | ✓ | ✓ | ✓ | |
| Basic Settings | ✓ | ✓ | ✓ | |
| Wi-Fi | ✓ | ✓ | - | |
| Network Settings | - | ✓ | - | |
| Wi-Fi Direct | ✓ | - | ✓ | |
| Print Settings | ✓ | - | ✓ | |
| Firmware Update | ✓ | ✓ | ✓ | |
| Root Certificate Update | - | ✓ | - | |
| Product Status | - | ✓ | - | |
| Advanced Settings | ✓ | ✓ | ✓ | |
| Advanced Settings | ✓ | ✓ | ✓ | |
| Status | ✓ | ✓ | ✓ | |
| Product Status | ✓ | ✓ | ✓ | |
| Network Status | ✓ | ✓ | ✓ | |
| TM-Intelligent | ✓ | - | - | |
| TM-i Setting | ✓ | - | - | |
| ✓ | - | ✓ | ||
| Print Settings | ✓ | - | ✓ | |
| Network | ✓ | ✓ | ✓ | |
| Basic | ✓ | ✓ | ✓ | |
| Wi-Fi | ✓ | ✓ | ||
| Wired LAN | ✓ | ✓ | ✓ | |
| Wi-Fi Direct | ✓ | - | - | |
| Network Security | ✓ | ✓ | ✓ | |
| Protocol | ✓ | ✓ | ✓ | |
| CA Certificate | ✓ | ✓ | - | |
| Root Certificate Update | ✓ | ✓ | ✓ | |
| SSL/TLS | ✓ | ✓ | ✓ | |
| Basic | ✓ | ✓ | ✓ | |
| Certificate | ✓ | ✓ | ✓ | |
| Automatic Certificate Update | - | - | - | |
| IPsec/IP Filtering | ✓ | ✓ | - | |
| Basic | ✓ | ✓ | - | |
| Client Certificate | ✓ | ✓ | - | |
| IEEE802.1X | ✓ | ✓ | - | |
| Basic | ✓ | ✓ | - | |
| Client Certificate | ✓ | ✓ | - | |
| Product Security | ✓ | ✓ | ✓ | |
| Password Encryption | ✓ | ✓ | ✓ | |
| Change Administrator Password | ✓ | ✓ | ✓ | |
| Program Verification on Start Up | - | ✓ | - | |
| Device Management | ✓ | ✓ | ✓ | |
| Basic | ✓ | ✓ | ✓ | |
| Export and Import Setting Value | ✓ | ✓ | ✓ | |
| Export | ✓ | ✓ | ✓ | |
| Import | ✓ | ✓ | ✓ | |
| Firmware Update | ✓ | ✓ | ✓ | |
| Administrator Name/Contact Information | ✓ | ✓ | ✓ | |
| Date and Time | ✓ | ✓ | - | |
| Display Format | ✓ | ✓ | - | |
| Date and Time | ✓ | ✓ | - | |
| Time Difference | ✓ | ✓ | - | |
| Time Server | ✓ | ✓ | - | |
| Restore Default Settings | - | ✓ | - | |
| TM-i Settings | ✓ | ✓ | ✓ | |

- TRADEMARKS
- ABOUT THIS MANUAL
- KEY TO SYMBOLS
- USING WEB CONFIG
- HOW TO START WEB CONFIG
- [TM-S1000II-NW]
- PRINTERS
- TABLE OF CONTENTS
- WI-FI DIRECT
- NETWORK BASIC SETUP
- PRINT SETTINGS PAGE
- FIRMWARE UPDATE PAGE
- ROOT CERTIFICATE UPDATE
- PRODUCT STATUS
- ADVANCED SETTINGS
- STATUS
- DEFINITIONS
- TERMINOLOGIES
- SUPPORTED WEB BROWSERS
- LAYOUT
- BASIC SETTINGS PAGE
- CONFIGURATION FOR SMARTPHONE
- CONFIGURATION FOR PC
- ADVANCED SETTINGS PAGE
- CONFIGURATION FOR SMARTPHONES
- CHANGING THE TOP PAGE (BASIC SETTINGS/ADVANCED SETTINGS)
- LANGUAGE
- TOP PAGE
- URL
- JAVASCRIPT
- PASSWORD AUTHENTICATION
- PAGES ALWAYS CAN BE ACCESSED
- TIMING OF ADMINISTRATOR AUTHENTICATION
- SESSION MANAGEMENT
- LOG ON PAGE
- IMAGE
- INPUT ITEMS
- BUTTON
- LOG ON FAILURE PAGE
- RESULT
- PASSWORD ENTRY FIELD
- MAIN PAGE
- DISPLAY LANGUAGE SETTING
- LINK ITEMS
- DESCRIPTION
- LINK
- WI-FI
- SETTING ITEMS
- SSID SETTING PAGE
- RESULT PAGE
- SETTING RESULT
- BUTTONS
- ERROR POPUP
- CONFIRM POPUP
- RESULT SUCCESS
- RESULT FAILED
- DISPLAY ITEMS
- FIRMWARE SEARCH PROCESS PAGE
- DESCRIPTION ITEMS
- BEFORE UPDATE CONFIRM PAGE
- THE INFORMATION OF THE FIRMWARE UPDATE
- CANCEL PROCESS PAGE
- PROGRESS PAGE
- TAB
- STATUS INFORMATION
- DEVICE SYSTEM INFORMATION
- DATE/TIME INFORMATION
- ADMINISTRATOR INFORMATION
- SOFTWARE LICENSES
- NETWORK STATUS
- TM-INTELLIGENT
- PRINT SETTINGS
- NETWORK
- NETWORK BASIC
- CONFIRM PAGE
- INPUT INFORMATION
- NETWORK INFORMATION
- COMMENT
- CONFIRMATION POPUP
- SSID SEARCH PAGE
- WI-FI SETTINGS PAGE
- SSID LIST
- SSID MANUAL INPUT
- REFRESH BUTTON
- PASSWORD ENTERING
- CONFIRM WI-FI SETUP PAGE
- WIRED LAN
- WI-FI DIRECT INFORMATION
- NETWORK SECURITY
- PROTOCOL
- CONFIRMATION PAGE
- CA CERTIFICATE
- DELETE
- IMPORT PAGE
- NOTE
- ERROR POP-UP WINDOW
- TABLE 9-62 RESULT
- SSL/TLS
- BASIC
- CONFIRMING PAGE
- CERTIFICATE
- IMPORTING FOR CA-SIGNED CERTIFICATE
- IMPORT TOP PAGE
- CONFIRM FOR CA-SIGNED CERTIFICATE
- GENERATE CSR(CERTIFICATE SIGNING REQUEST)
- GENERATE TOP PAGE
- DOWNLOAD CSR(CERTIFICATE SIGNING REQUEST)
- UPDATING SELF-SIGNED CERTIFICATES
- UPDATE TOP PAGE
- CONFIRM SETTINGS PAGE
- CONFIRM FOR THE SELF-SIGNED CERTIFICATE
- CONFIRM TOP PAGE
- DOWNLOADING THE SELF-SIGNED CERTIFICATE
- THE FOLLOWING DIALOG BOX IS DISPLAYED WHEN DOWNLOADING
- AUTOMATIC CERTIFICATE UPDATE
- IPSEC/IP FILTERING
- GROUP POLICY
- SETTING ITEMS OF GROUP POLICY
- CONFIRM IPSEC SETTINGS PAGE
- CLIENT CERTIFICATE
- COPY LIST
- SETTING RESULTS
- IMPORTING FOR CLIENT CERTIFICATE
- CONFIRM FOR CLIENT CERTIFICATE
- IEEE802.1X
- TOP PAGE IN BASIC SETTINGS
- CONFIRM IEEE802.1X SETTINGS PAGE
- CONFIRMATION MESSAGE
- WARNING POP-UP WINDOW
- DELETE FOR THE CLIENT CERTIFICATE
- COPYING AND OVERWRITING A CLIENT CERTIFICATE
- PRODUCT SECURITY
- PASSWORD ENCRYPTION
- CONFIRMATION DIALOG
- CHANGE ADMINISTRATOR PASSWORD
- PROGRAM VERIFICATION ON START UP
- DEVICE MANAGEMENT
- EXPORT AND IMPORT SETTING VALUE
- EXPORT/IMPORT CATEGORY
- EXPORT
- PASSWORD ENTER
- DEVICE UNIQUE SETTINGS SELECT
- CATEGORY SELECT
- IMPORT
- CATEGORY SELECT PAGE
- CATEGORY CONFIRM
- FIRMWARE UPDATE
- ADMINISTRATOR NAME / CONTACT INFORMATION
- DATE AND TIME
- DISPLAY FORMAT
- TIME DIFFERENCE
- TIME SERVER
- RESTORE DEFAULT SETTINGS
- SELECT ITEM
- TM-I SETTINGS
- AUTHENTICATION
- PAGE LAYOUT
- TITLE WINDOW
- RESTARTING
- MENU WINDOW
- SETTINGS WINDOW
- COMMON ITEMS
- ERROR DISPLAY IN TEXT BOX
- DIALOG
- INPUT LIMITS
- BASIC SCREEN
- PRINTER SCREEN
- PRINTER LIST
- ERROR DIALOG
- SLIP SCREEN
- EPOS-PRINT
- EPOS-DEVICE
- SERVER DIRECT PRINT
- STATUS NOTIFICATION SCREEN
- PROXY SCREEN
- RESET SCREEN
- HELP SCREEN
Brand : EPSON
Model : TM-S1000II-NW
Category : Scanner