
6H757CX - Multicooker FAGOR - Free user manual and instructions
Find the device manual for free 6H757CX FAGOR in PDF.
| Product type | Built-in multifunction oven |
| Brand | Fagor |
| Model | 6H757CX |
| Power supply | 230 V / 50 Hz |
| Cooking functions | Conventional heat, bottom heat, full grill, central grill, fan grill, turbo heat, fan-assisted conventional heat, defrost |
| Timer types | Electronic programmer, digital timer, analog timer (depending on model) |
| Rotisserie | Yes (depending on model) |
| Cooking sensor | Yes (depending on model), range 30-99 °C |
| Extra safety door | Yes (depending on model, identified by a letter on the rating plate) |
| Self-cleaning side walls | Yes, self-cleaning enamel on removable side walls |
| Cleaning | Soapy water for the exterior; self-cleaning walls maintained by heating to 250 °C |
| Child safety | Timer or programmer in position 0 prevents operation |
| Included accessories | Grid, tray, rotisserie (depending on model), fixing screws |
| Installation | Built-in, requires respecting ventilation openings, connection via cable "A" |
Frequently Asked Questions - 6H757CX FAGOR
User questions about 6H757CX FAGOR
0 question about this device. Answer the ones you know or ask your own.
Ask a new question about this device
Download the instructions for your Multicooker in PDF format for free! Find your manual 6H757CX - FAGOR and take your electronic device back in hand. On this page are published all the documents necessary for the use of your device. 6H757CX by FAGOR.
USER MANUAL 6H757CX FAGOR
MANUEL D'INSTRUCTIONS FOURS
OVEN INSTRUCTION MANUAL
MANUAL D'INSTRUÇÉS PARA UTILIZAZão DOS FORNOS
BET WITH US ON ECOLOGY. RECYCLE THE PACKAGING.
We contribute in the defence of the Environment. Thus our packagins:
- Are 100% recyclable.
- Contain the smaller quantity of parts and possible material to facilitate thus the recycling.
APOSTE CONNOSCO PELA ECOLOGIA. RECICLE A EMBALAGEM.
Operating instructions Page 103
PORTUGUES
Manual de instruções . . . . . . . . . . . . . . . . . . . . . . . . . . . . . . . . . . . . . . . . . . . . . . . . . . . . . . . . . . . . .
NEDERLANDS
Gebruiksaanwijzing . . . . . . . . . . . . . . . . . . . . . . . . . . . . . . . . . . . . . . . . . . . . . . . . . . . . . . . . . . . . .
| POSSICIONES Y FUNCTIONS | 1a - 3a | 4a - 8a | 7a-8a | 9a | 10a-11a | 12a-13a | 14a-15a | 16a | |||||||||
| 1 | 2 | 3 | 4 | 5 | 6 | 7 | 8 | 9 | 10 | 11 | 12 | 13 | 14 | 15 | 16 | ||
| θ | |||||||||||||||||
| 1 | x | X | X | X | X | X | X | X | |||||||||
| 2 | x | X | X | X | X | X | X | X | X | ||||||||
| 3 | x | X | X | X | X | X | |||||||||||
| 4 | x | X | X | X | X | X | X | ||||||||||
| 5 | x | X | X | X | X | X | X | X | |||||||||
| 6 | x | X | X | X | X | X | X | X | |||||||||
| 7 | x | X | X | X | X | X | X | X | X | X | |||||||
| θ | x | X | X | X | X | X | X | X | X | X | |||||||
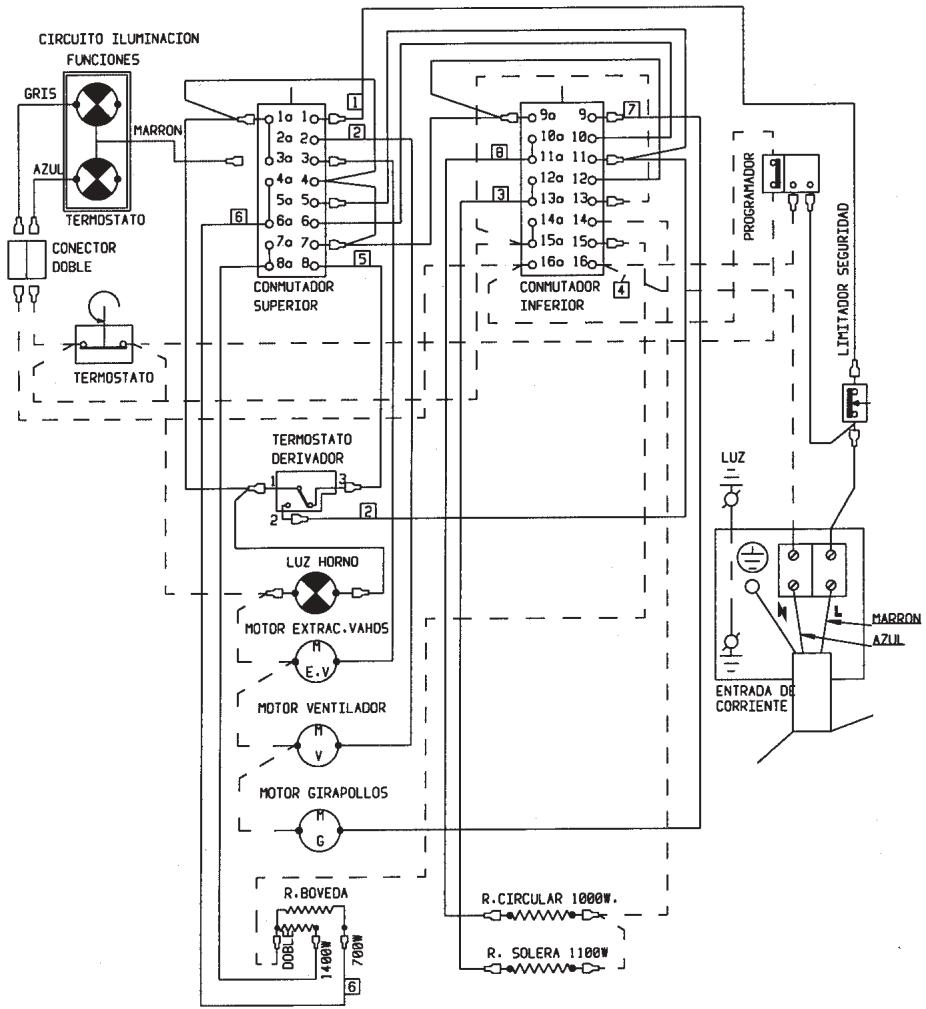
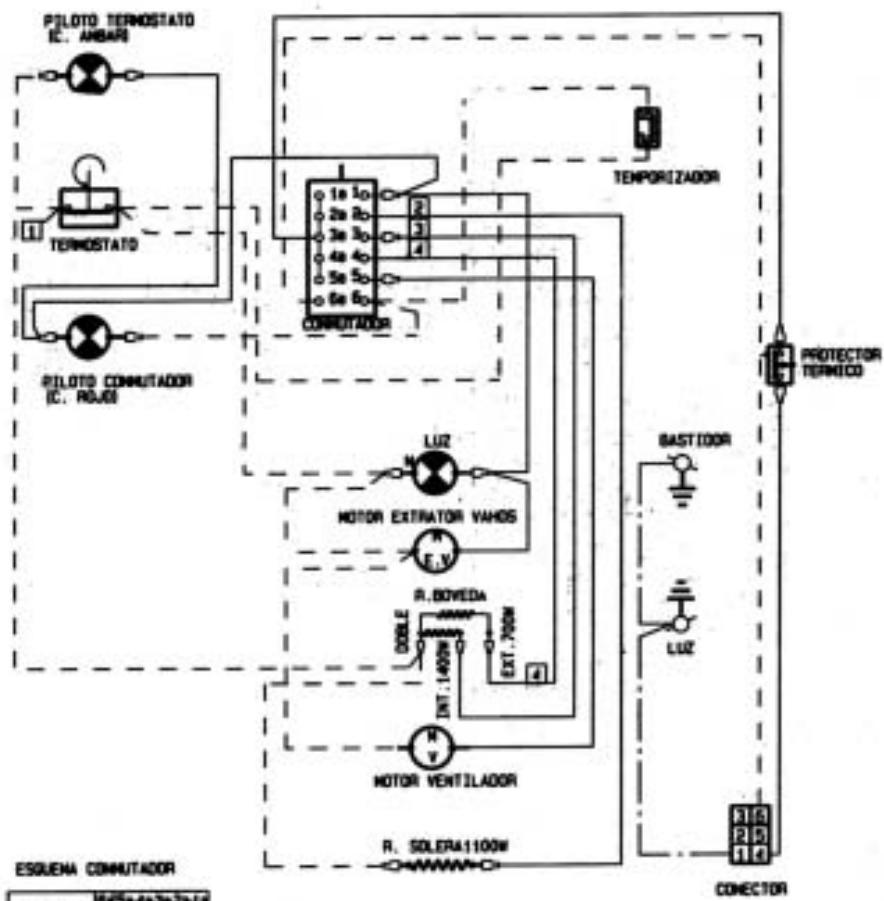
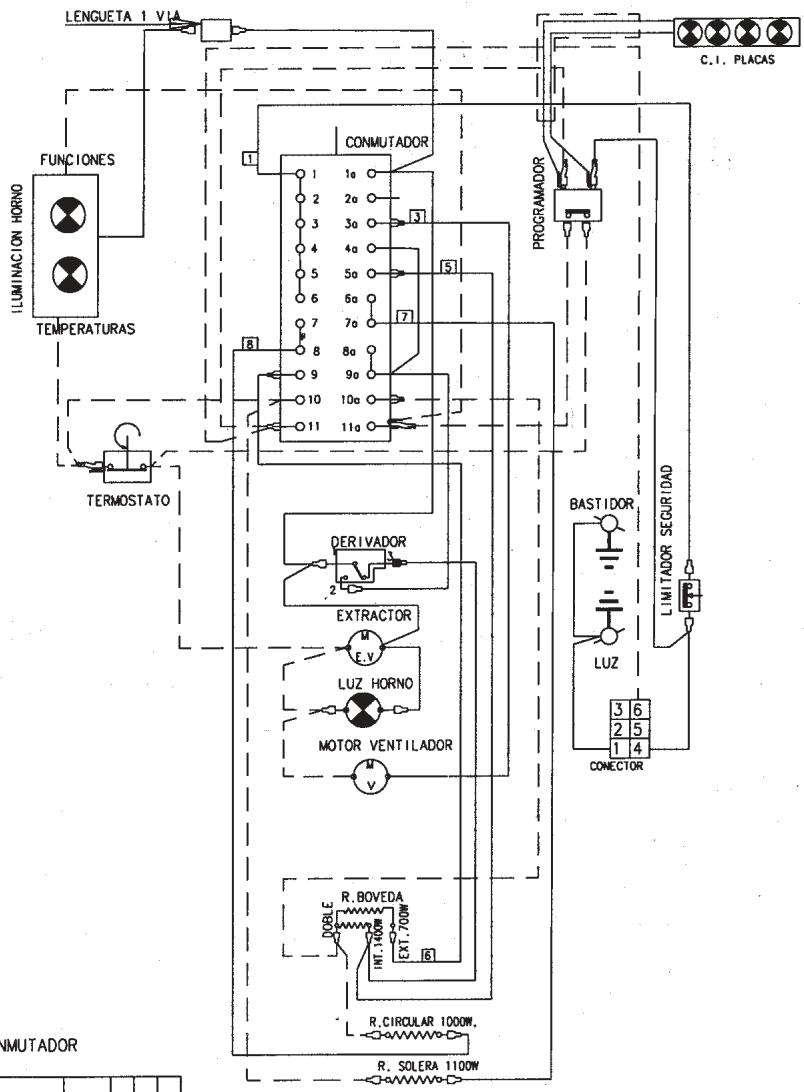
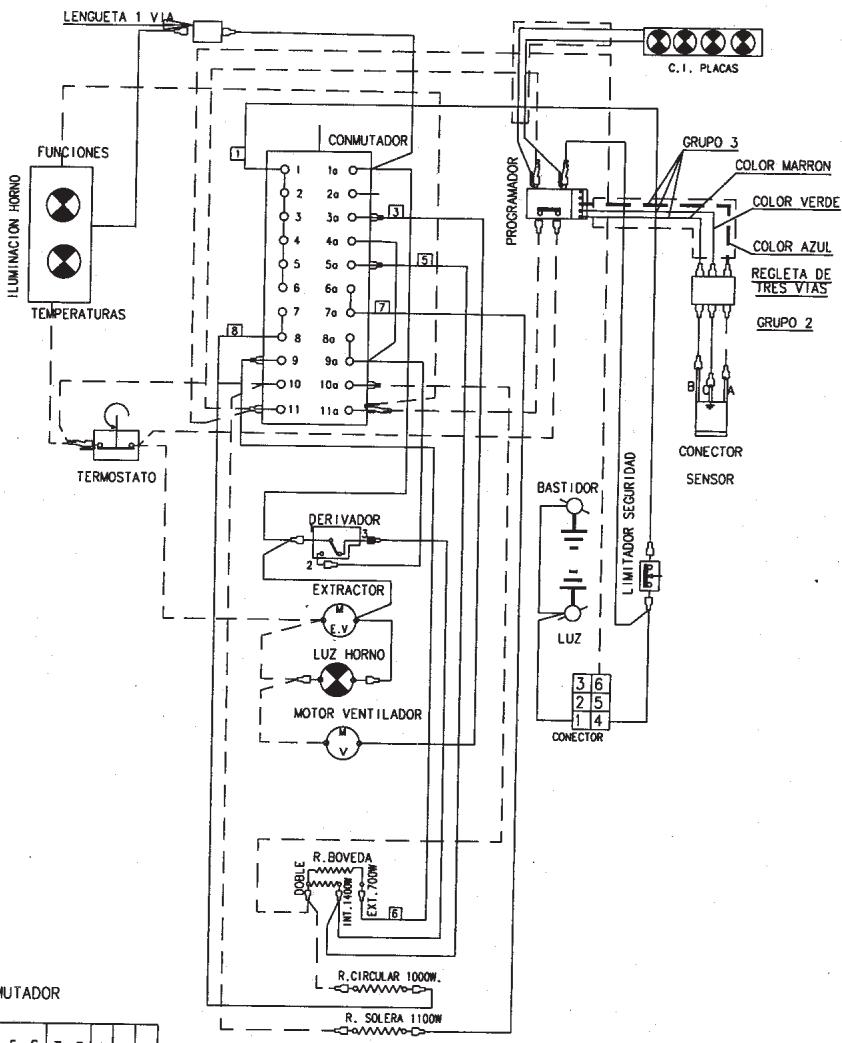
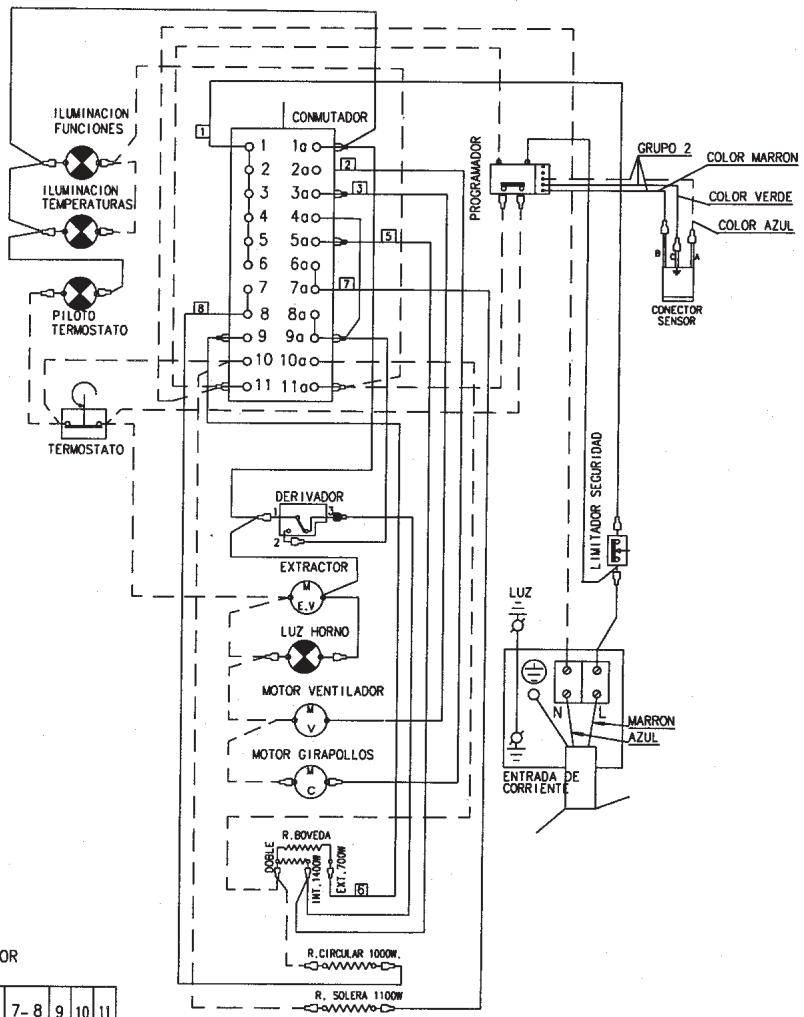
ESQUEMA ELECTRICO
ESQUEMA CONMUTADOR
| COLOR VERDE-AMARILLO = COLOR TEJA = COLOR AZUL TERMINAL FASTON HEMBRA CON FUNDA |
| POSSICIONES y FUNCTIONES | 1a - 3a | 4a - 6a | 7a-8a | 9a | 10a-11a | 12a-13a | 14a-15a | 16a | |||||||||
| 1 | 2 | 3 | 4 | 5 | 6 | 7 | 8 | 9 | 10 | 11 | 12 | 13 | 14 | 15 | 16 | ||
| θ | |||||||||||||||||
| 1 | x | X | X | X | X | X | X | X | |||||||||
| 2 | x | X | X | X | X | X | X | X | X | ||||||||
| 3 | x | X | X | X | X | X | |||||||||||
| 4 | x | X | X | X | X | X | X | ||||||||||
| 5 | x | X | X | X | X | X | X | X | |||||||||
| 6 | x | X | X | X | X | X | X | X | |||||||||
| 7 | x | X | X | X | X | X | X | X | X | ||||||||
| 8 | x | X | X | X | X | X | X | X | X | ||||||||
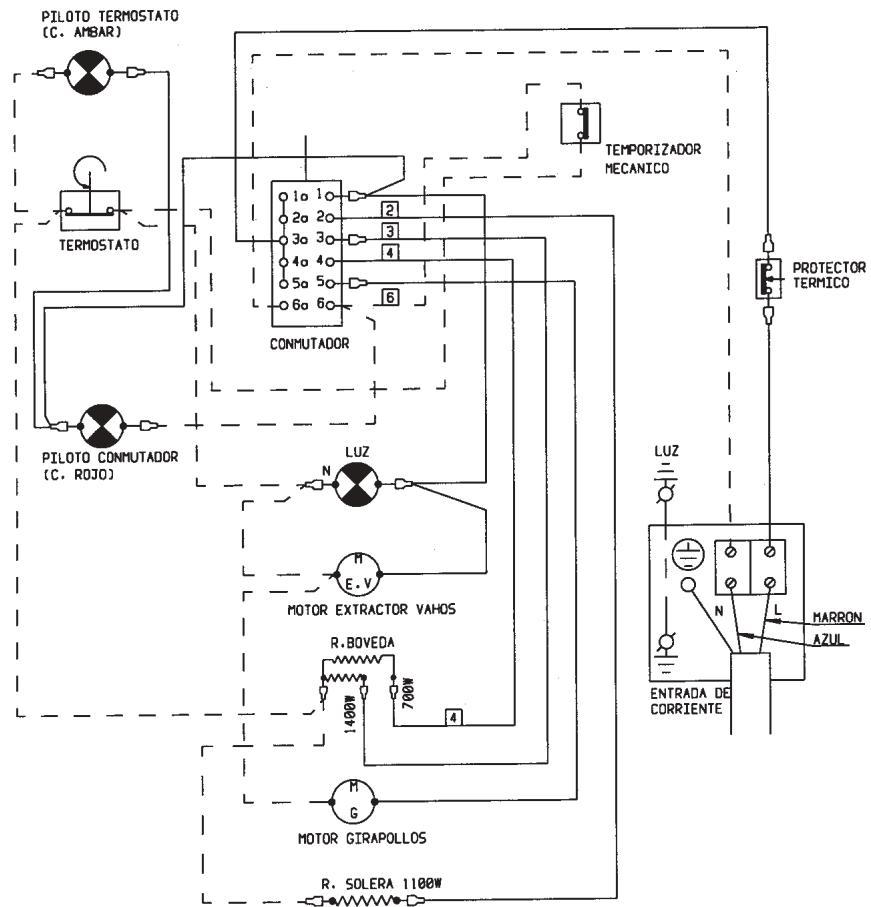
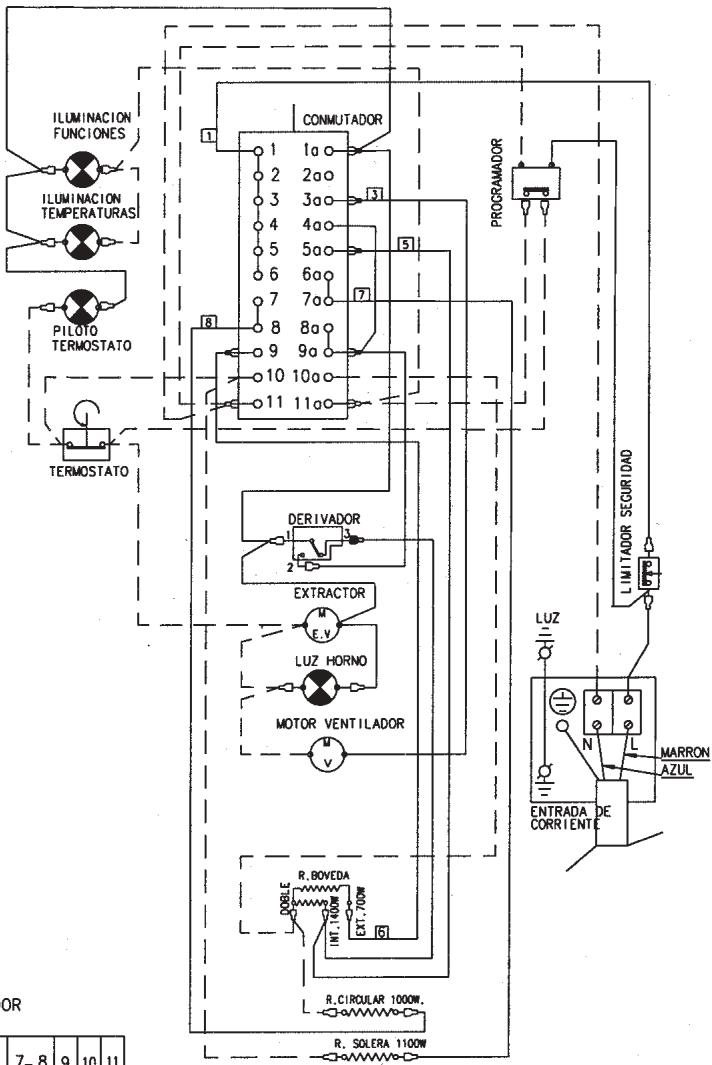
ESQUEMA ELECTRICO
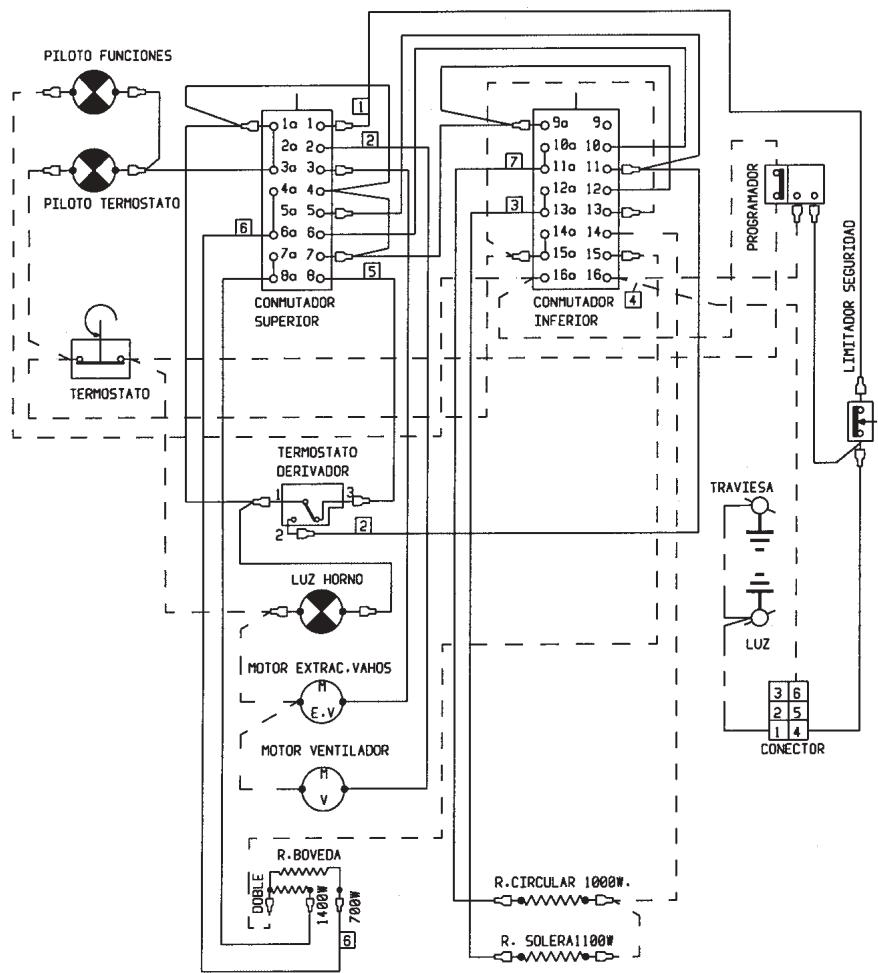
ESQUEMA CONMUTADOR
| COLOR VERDE-AMARILLO = COLOR TEJA = COLOR AZUL TERMINAL FASTON HEMBRA CON FUNDA |
| POSICIONES Y FUNCTIONES | 1a - 3a | 4a - 6a | 7a-8a | 9a | 18a-11a | 12a-13a | 14a-15a | 16a | |||||||||
| 1 | 2 | 3 | 4 | 5 | 6 | 7 | 8 | 9 | 10 | 11 | 12 | 13 | 14 | 15 | 16 | ||
| 0 | |||||||||||||||||
| 1 | x | X | X | X | X | X | X | X | |||||||||
| 2 | x | X | X | X | X | X | X | X | X | ||||||||
| 3 | x | X | X | X | X | X | |||||||||||
| 4 | x | X | X | X | X | X | X | ||||||||||
| 5 | x | X | X | X | X | X | X | X | |||||||||
| 6 | x | X | X | X | X | X | X | X | |||||||||
| 7 | x | X | X | X | X | X | X | X | X | X | |||||||
| 8 | x | X | X | X | X | X | X | X | X | X | |||||||
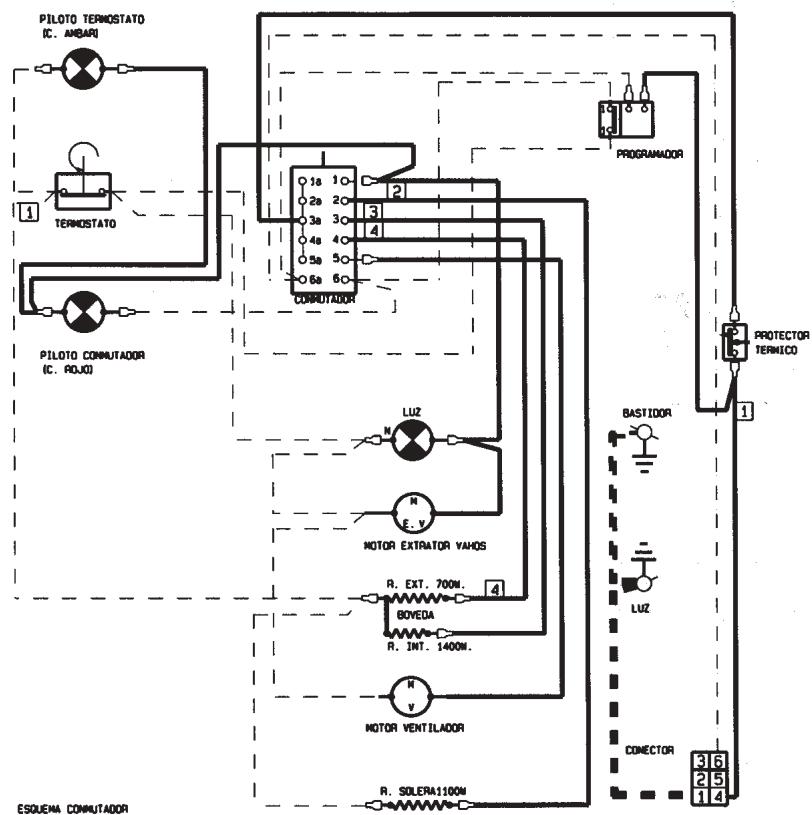
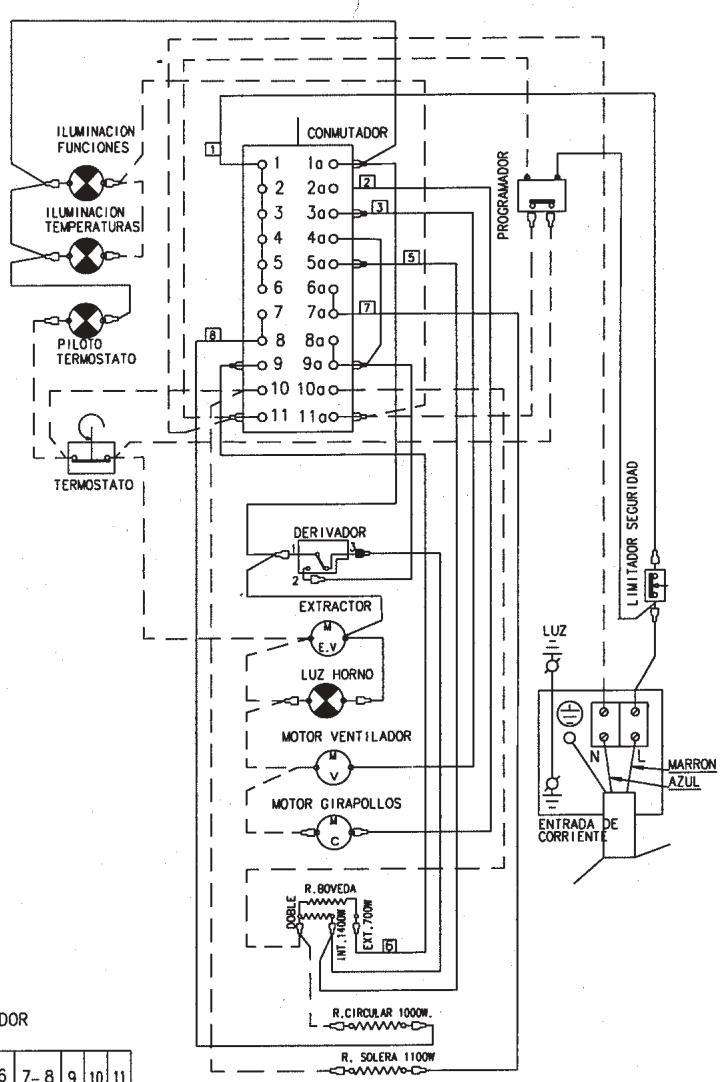
ESQUEMA ELECTRICO
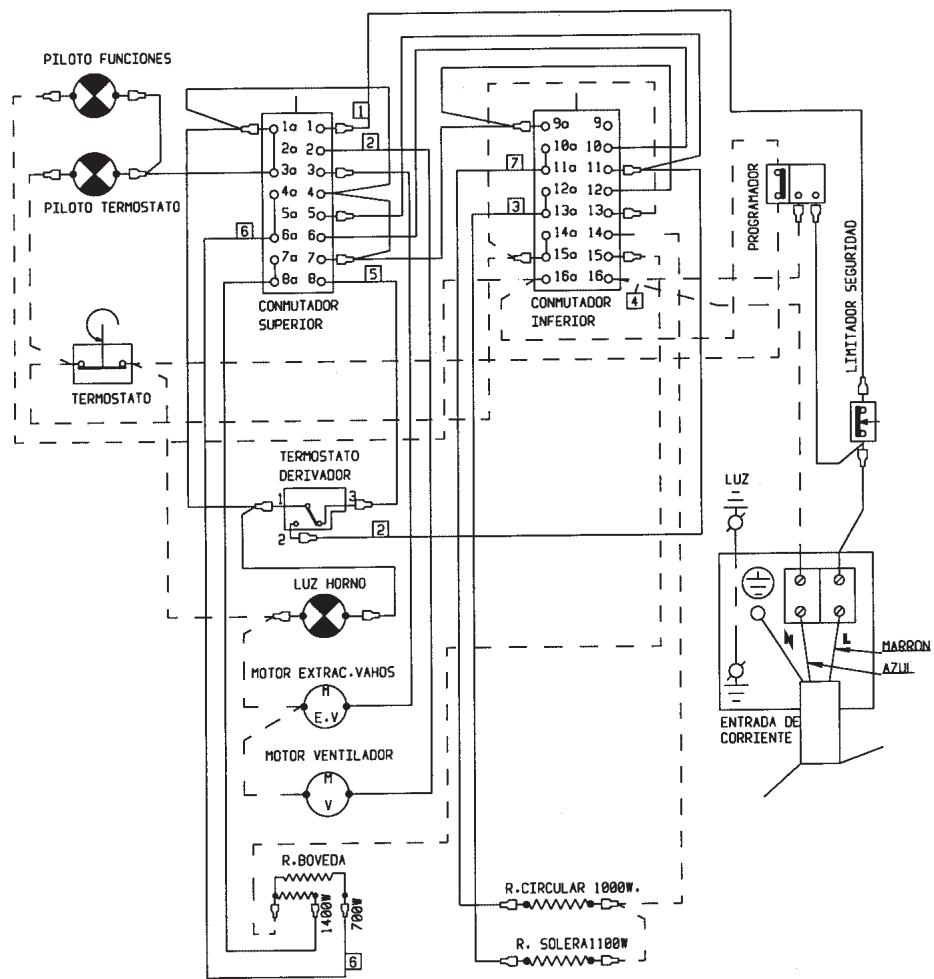
ESQUEMA CONMUTADOR
| COLOR VERDE-AMARILLO = COLOR TEJA = COLOR AZUL |
| POSSICIONESYFUNCTIONES | 1a - 3a | 4a - 6a | 7a-8a | 9a | 10a-11a | 12a-13a | 14a-15a | 16a | |||||||||
| 1 | 2 | 3 | 4 | 5 | 6 | 7 | 8 | 9 | 10 | 11 | 12 | 13 | 14 | 15 | 16 | ||
| θ | |||||||||||||||||
| 1 | X | X | X | X | X | X | X | ||||||||||
| 2 | X | X | X | X | X | X | X | X | |||||||||
| 3 | X | X | X | X | X | ||||||||||||
| 4 | X | X | X | X | X | X | |||||||||||
| 5 | X | X | X | X | X | X | X | ||||||||||
| 6 | X | X | X | X | X | X | X | ||||||||||
| 7 | X | X | X | X | X | X | X | X | X | ||||||||
| 8 | X | X | X | X | X | X | X | X | X | ||||||||
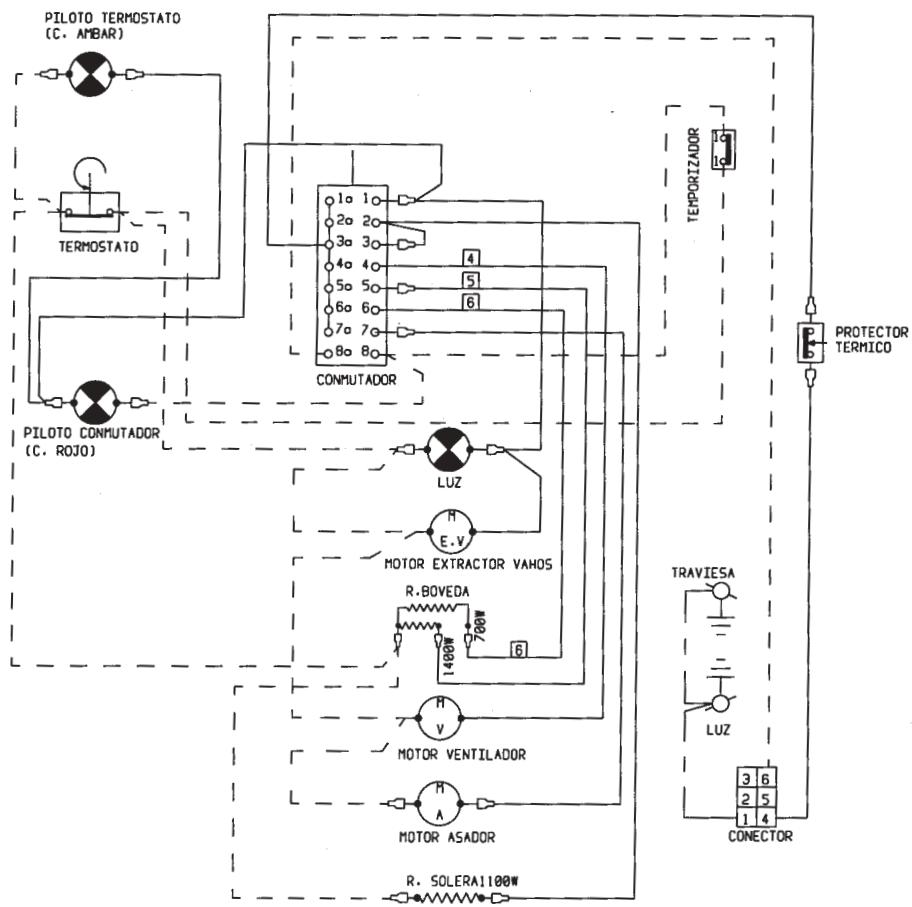
ESQUEMA ELECTRICO
ESUEENCUMNUTADOR
| POSICION | 10 | 15 | 4 | 3 | 2 | 1 |
| 0 | ||||||
| 1 | X | X | X | X | ||
| 2 | X | X | ||||
| 3 | X | X | X | |||
| 4 | X | X | X | X | X | |
| 5 | X | X | X | X | X |

ESQUEM DE FUNCIONES


| POSICION | 0 | 1 | 2 | 3 | 4 | 5 |
| 0 | ||||||
| 1 | X | X | X | |||
| 2 | X | X | ||||
| 3 | X | X | X | X | ||
| 4 | X | X | X | X | X | |
| 5 | X | X | X | X | X |


| POSICION | 6a | 5a-4a-3a-2a-1a | ||||
| 6 | 5 | 4 | 3 | 2 | 1 | |
| 0 | ||||||
| 1 | X | X | X | X | ||
| 2 | X | X | X | |||
| 3 | X | X | X | X | ||
| 4 | X | X | X | X | X | |


1
2
3
4
COLOR VERDE-AMARILLO
COLOR TEJA
COLOR AZUL
TERMINAL FASTON HEMBRA CON FUNDA
RELATIOZION EXISTENTE ENLETO LOS ESIQUESAMOS DE CONTEXTONES DE LOS DIFFERentes CONVITORES
| CONMUTADOR GOTAK | a-b-c-d-e | f | ||||
| 1 | 2 | 3 | 4 | 5 | 6 | |
| CONMUTADOR DREFF | 1a | 2a | 3a | 4a | 5a | 6a |
| 1 | 2 | 3 | 4 | 5 | 6 | |
ESQUEMA ELECTRICO
| POSICION | 6a | 5a-4a-3a-2a-1a | ||||
| 6 | 5 | 4 | 3 | 2 | 1 | |
| 0 | ||||||
| 1 | X | X | X | X | ||
| 2 | X | X | X | |||
| 3 | X | X | X | X | ||
| 4 | X | X | X | X | X | |


1
2
3
4
= COLOR VERDE-AMARILLLO
= COLOR TEJA
= COLOR AZUL
TERMINAL FASTON HEMBRA CON FUNDA
RELATIOZON EXISTENTE ENRTE LOS ESGUAMOS DE CONTEXIONES DEL SOSTER DIFERentes CONQUIYadores
| CONMUTADOR GOTAK | a-b-c-d-e | f | ||||
| 1 | 2 | 3 | 4 | 5 | 6 | |
| CONMUTADOR DREFF | 1a | 2a | 3a | 4a | 5a | 6a |
| 1 | 2 | 3 | 4 | 5 | 6 | |
ESQUEMA ELECTRICO
| POSICION | 1x-2x-3x-4x-5x-6x-7x | 8x |
| 0 | ||
| 1 | X X | |
| 2 | X | |
| 3 | X | |
| 4 | X | |
| 5 | X X X X |
| POSICION | 1 | 2 | 3 | 4 | 5 | 6 | 7 | 8 |
| 0 | ||||||||
| 1 | X | X | X | X | ||||
| 2 | X | X | X | X | ||||
| 3 | X | X | X | X | X | |||
| 4 | X | X | X | X | X | |||
| 5 | X | X | X | X | X |
ESOLENA DE FUNCIODNES
| 1 | 2 | 3 | 4 | 5 |
RELATIOION EXISTENTE ENTIRE LOS EQUIVENLAS DE COMEXIONDES DE LOS DIFFERENTES COMMUNICARES
| CONMUTACOR DOTAK | a-b-c-d-e-f | ∅ | |||||
| 1 | 2 | 3 | 4 | 5 | 6 | t | |
| CONMUTACOR DREFF | 1a-2a-3a-4a-5a-6a-7a | 8a | |||||
| 1 | 2 | 3 | 4 | 5 | 6 | 7 | |
| • COLOR VERDE-AMARILLO |
| • COLOR TEJA |
| • COLOR AZUL |
| TERMINAL FASTON HEMBRA CON FUND |
| TERMINAL FASTON MOTO |
ESQUEMA ELECTRICO
ESQUEMA CONMUTADOR
| POSICION | 1a-2a-3a-4a-5a-6a-7a | 8a | ||||||
| 1 | 2 | 3 | 4 | 5 | 6 | 7 | 8 | |
| 0 | ||||||||
| 1 | X | X | X | X | ||||
| 2 | X | X | X | X | ||||
| 3 | X | X | X | X | X | |||
| 4 | X | X | X | X | X | |||
| 5 | X | X | X | X | X | |||
ESQUEMA DE FUNCIONES
| 0 | 1 | 2 | 3 | 4 | 5 |
| POSICION | 1a-2a-3a-4a-5a-6a-7a | 8a | ||||||
| 1 | 2 | 3 | 4 | 5 | 6 | 7 | 8 | |
| 0 | ||||||||
| 1 | X | X | X | X | ||||
| 2 | X | X | X | X | ||||
| 3 | X | X | X | X | X | |||
| 4 | X | X | X | X | X | |||
| 5 | X | X | X | X | X | |||

0

1

2

3

4

5
| 1-2-3-4-5-6 | 7-8 | 9 | 10 | 11 | |||||
| 1a | 2a | 3a | 4a | 5a | 6a-7a | 8a-9a | 10a | 11a | |
| 0 | |||||||||
| 1 | X | X | X | X | |||||
| 2 | X | X | X | X | X | ||||
| 3 | X | X | X | ||||||
| 4 | X | X | X | X | X | ||||
| 5 | X | X | X | X | X | X | X | ||
| 6 | X | X | X | X | X | X | X | ||
| 7 | X | X | X | X | X | X | |||
| 8 | X | X | X | X | X | X | |||
COLOR VERDE-AMARILLO
- COLOR TEJA
COLOR AZUL
TERMINAL FASTON HEMBRA CON FUNDA NEGRA
TERMINAL FASTON HEMBRA CON FUNDA ROJA
ESQUEMA ELECTRICO
ESQUEMA CONMUTADOR
| 1-2-3-4-5-6 | 7-8 | 9 | 10 | 11 | ||||||
| 1a | 2a | 3a | 4a | 5a | 6a-7a | 8a-9a | 10a | 11a | ||
| 0 | ||||||||||
| 1 | X | X | X | X | ||||||
| 2 | X | X | X | X | ||||||
| 3 | X | X | X | |||||||
| 4 | X | X | X | X | ||||||
| 5 | X | X | X | X | X | X | ||||
| 6 | X | X | X | X | X | X | ||||
| 7 | X | X | X | X | X | |||||
| 8 | X | X | X | X | X | |||||
COLOR VERDE-AMARILLO
- COLOR TEJA
COLOR AZUL
TERMINAL FASTON HEMBRA CON FUNDA NEGRA
TERMINAL FASTON HEMBRA CON FUNDA ROJA
ESQUEMA ELECTRICO
ESQUEEMA CONMUTADOR
| 1-2-3-4-5-6 | 7-8 | 9 | 10 | 11 | ||||||
| 1a | 2a | 3a | 4a | 5a | 6a-7a | 8a-9a | 10a | 11a | ||
| 0 | ||||||||||
| 1 | X | X | X | X | ||||||
| 2 | X | X | X | X | ||||||
| 3 | X | X | X | |||||||
| 4 | X | X | X | X | ||||||
| 5 | X | X | X | X | X | X | ||||
| 6 | X | X | X | X | X | X | ||||
| 7 | X | X | X | X | X | |||||
| 8 | X | X | X | X | X | |||||
COLOR VERDE-AMARILLO COLOR TEJA COLOR AZUL
TERMINAL FASTON HEMBRA CON FUNDA NEGRA TERMINAL FASTON HEMBRA CON FUNDA ROJA
ESQUEMA ELECTRICO
ESQUEMA CONMUTADOR
| 1-2-3-4-5-6 | 7-8 | 9 | 10 | 11 | |||||||
| 1a | 2a | 3a | 4a | 5a | 6a...7a | 80-90 | 10a | 11a | |||
| 0 | |||||||||||
| 1 | X | X | X | X | X | ||||||
| 2 | X | X | X | X | |||||||
| 3 | X | X | X | ||||||||
| 4 | X | X | X | X | X | X | |||||
| 5 | X | X | X | X | X | X | X | ||||
| 6 | X | X | X | X | X | X | X | ||||
| 7 | X | X | X | X | X | X | |||||
| 8 | X | X | X | X | X | X | |||||
COLOR VERDE-AMARILLO
COLOR TEJA
COLOR AZUL
TERMINAL FASTON HEMBRA CON FUNDA NECRA
TERMINAL FASTON HEMBRA CON FUNDA ROJA
ESQUEMA ELECTRICO
ESQUEMA CONMUTADOR
| 1-2-3-4-5-6 | 7-8 | 9 | 10 | 11 | |||||||
| 1a | 2a | 3a | 4a | 5a | 6a-7a | 8a-9a | 10a | 11a | |||
| 0 | |||||||||||
| 1 | 1 | X | X | X | X | ||||||
| 2 | 2 | X | X | X | X | ||||||
| 3 | 3 | X | X | X | |||||||
| 4 | 4 | X | X | X | X | ||||||
| 5 | 5 | X | X | X | X | X | X | ||||
| 6 | 6 | X | X | X | X | X | X | ||||
| 7 | 7 | X | X | X | X | X | |||||
| 8 | 8 | X | X | X | X | X | |||||
COLOR VERDE-AMARILLO
COLOR TEJA
COLOR AZUL
TERMINAL FASTON HEMBRA CON FUNDA NEGRA
TERMINAL FASTON HEMBRA CON FUNDA ROJA
ESQUEMA ELECTRICO
ESQUEMA CONMUTADOR
| 1-2-3-4-5-6 | 7-8 | 9 | 10 | 11 | |||||||
| 1a | 2a | 3a | 4a | 5a | 6a-7a | 8a-9a | 10a | 11a | |||
| 0 | |||||||||||
| 1 | 1 | X | X | X | X | ||||||
| 2 | 2 | X | X | X | X | ||||||
| 3 | 3 | X | X | X | |||||||
| 4 | 4 | X | X | X | X | ||||||
| 5 | 5 | X | X | X | X | X | X | ||||
| 6 | 6 | X | X | X | X | X | X | ||||
| 7 | 7 | X | X | X | X | X | |||||
| 8 | 8 | X | X | X | X | X | |||||
COLOR VERDE-AMARILLO
COLOR TEJA
COLOR AZUL
TERMINAL FASTON HEMBRA CON FUNDA NECRA
TERMINAL FASTON HEMBRA CON FUNDA ROJA
SECURITE DE NOS APPAREILS
FONCTIONNEMENT MANUEL
FONCTIONNEMENT MANUEL
FONCTIONNEMENT MANUEL
FONCTIONNEMENT MANUEL
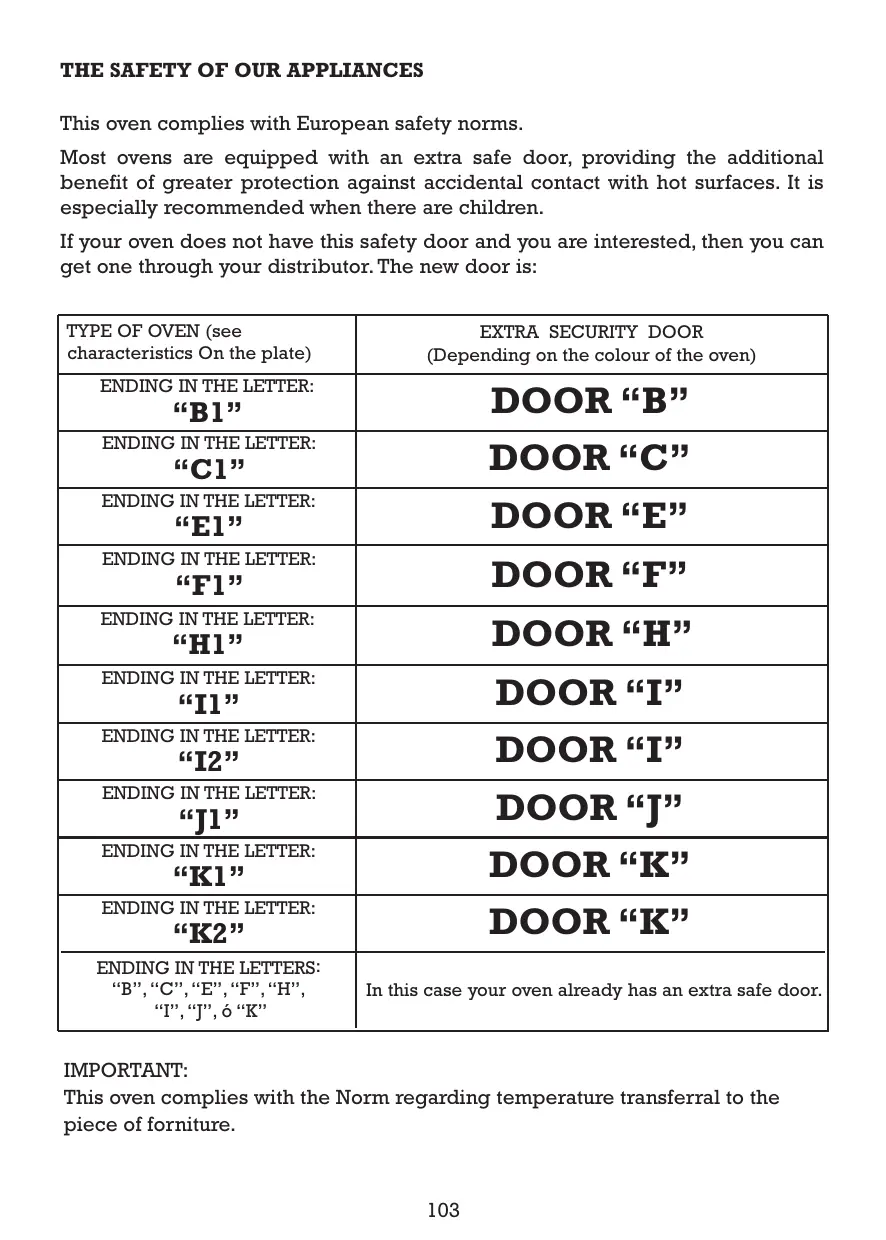
THE SAFETY OF OUR APPLIANCES
This oven complies with European safety norms.
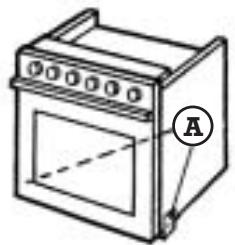
Most ovens are equipped with an extra safe door, providing the additional benefit of greater protection against accidental contact with hot surfaces. It is especially recommended when there are children.
If your oven does not have this safety door and you are interested, then you can get one through your distributor. The new door is:
| TYPE OF OVEN (see characteristics On the plate) | EXTRA SECURITY DOOR (Depending on the colour of the oven) |
| ENDING IN THE LETTER: “B1” | DOOR “B” |
| ENDING IN THE LETTER: “C1” | DOOR “C” |
| ENDING IN THE LETTER: “E1” | DOOR “E” |
| ENDING IN THE LETTER: “F1” | DOOR “F” |
| ENDING IN THE LETTER: “H1” | DOOR “H” |
| ENDING IN THE LETTER: “I1” | DOOR “I” |
| ENDING IN THE LETTER: “J2” | DOOR “J” |
| ENDING IN THE LETTER: “K1” | DOOR “K” |
| ENDING IN THE LETTER: “K2” | DOOR “K” |
| ENDING IN THE LETTERS: “B”, “C”, “E”, “F”, “H”, “I”, “J”, ò “K” | In this case your oven already has an extra safe door. |
IMPORTANT:
This oven complies with the Norm regarding temperature transferral to the piece of furniture.
CONTENTS
General description 105
Oven operation 109
Timer operation 110
Programmer operation 113
Operating the programmer with roasting sensor.119
Spit roaster 124
Removing roasting trays. 126
Practical advice. 127
Tables 129
Cleaning 136
What to do if. 138
Installation. 139
WARNING
Before using the oven for the first time, it should be switched on using the program 250^ for half hour. This will eliminate any remains of grease from the manufacturing process. Then, clean it with soap and water.
High temperatures are reached inside the oven during cooking. Do not let children near it.
Technical data and oven identification information are given on the data plate. This is located on the front of the oven. This plate should be consulted before making any electrical connections.
IMPORTANT: Electrical connections and repairs must be made by a specialist familiar with the legal requirements and standards in each country.
The HV2... oven combined with tops of the "EP-4E and VP-XY" type. Matching should be done according to the service provided.
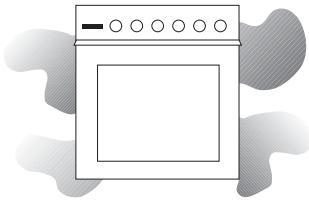
GENERAL DESCRIPTION
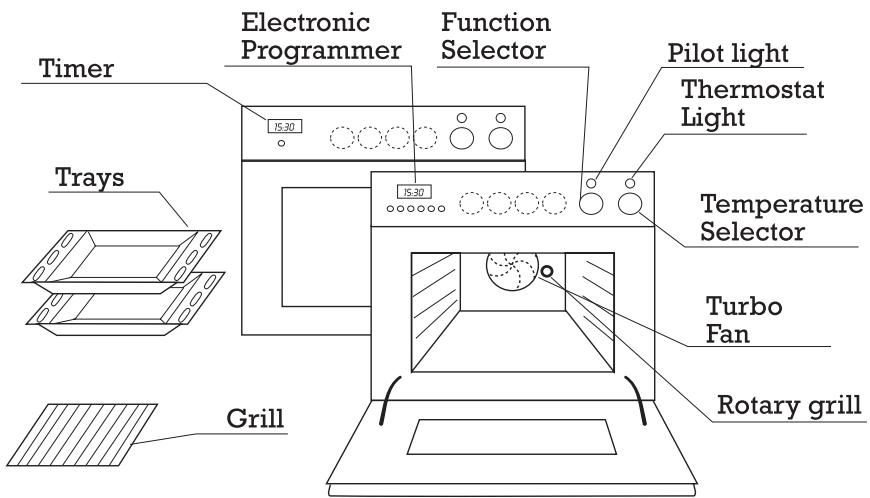
The four central controls, drawn in dotted lines, are for the four hot plates (see hot plates instruction manual).
Your oven will not have these controls if it was installed without hot plates.
ELECTRONIC PROGRAMMER (According to model)
Provides clock function plus the programming of automatic cooking stop, automatic cooking start and stop, manual cooking and warning functions.
TIMERS (According to model)
With clock function and automatic cooking stop and manual operation functions.
PROGRAMMER (According to model)
Provides clock function plus the programming of automatic cooking stop, automatic cooking start and stop and manual cooking and warning functions.
ANALOGUE TIMER (According to model)
With clock for programming automatic end of cooking, manual operation and warning tone.
MANUAL TIMER (According to model)
Functions: end cooking time, manual operation and buzzer.
SPIT ROASTER (According to model)
Roasting and browning.

HIDEABLE CONTROLS (According to model)
The controls can be hidden and revealed simply by pressing them.
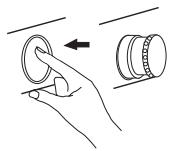
FIXED CONTROLS (According to model)
The controls cannot be hidden and are designed for ease of use.
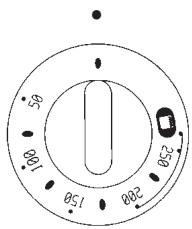
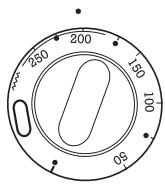
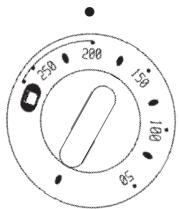
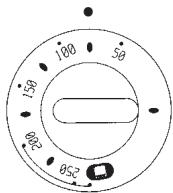
TEMPERATURE SELECTOR
This is used to select the cooking temperature, whether regular or grill (see tables).
The thermostat light switches off when the temperature is reached and switches on and off during cooking to maintain the chosen temperature.

GENERAL DESCRIPTION
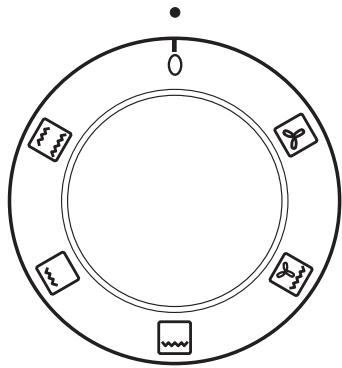
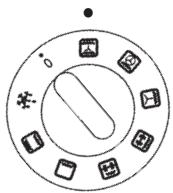
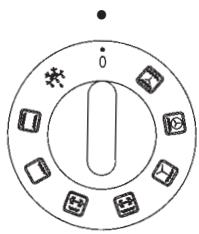
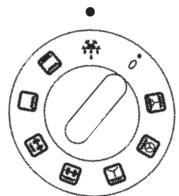
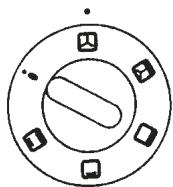
PROGRAMME SELECTOR
This control allows the selection of the way in which the oven is heated (see tables). The pilot light comes on whenever a programme is selected.

Traditional heat. Heating from above and below, as normal.

Central grill. For grilling the centre area of the tray only for small items.

Full grill. For grilling the entire area of the tray from above.

Grill with fan. For grilling and roasting, with the heat spread out by the fan.

Turbo heater. Heat is evenly distributed by a fan.
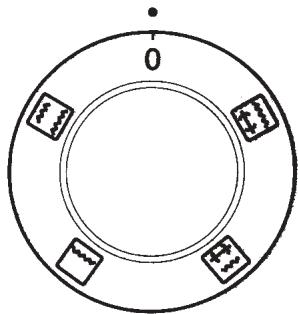
PROGRAMME SELECTOR
This allows you to select mode o oven heating (See tables). The pilot light comes on whenever a programme is selected.

Conventional heating. Heats from top and bottom in the normal way.

Conventional heating. Heats from the bottom.

Central grill (with optional spit roaster).

Full grill (with optional spit roaster).
GENERAL DESCRIPTION
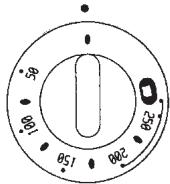
PROGRAMME SELECTOR
This allows you to select mode o oven heating (See tables).
The pilot light comes on whenever a programme is selected.

Defrosting: All elements heat to a very low temperature, allowing the perfect defrosting of food.

Traditional heat: Heats from above and below, in the traditional way.

Floor heating: Heats from below and is the most suitable way of keeping containers warm.


Low grill: For grilling only the centre of the tray, for small items (plus rotary grill, according to model).


Strong grill: For grilling from above over the entire area of the tray (plus rotary grill, according to model).
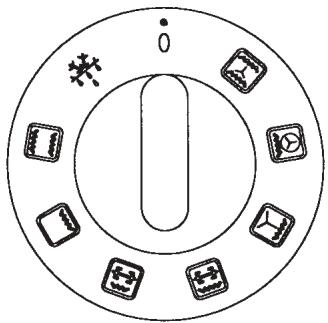

Ventilated grill: For grilling and roasting, spreading the heat with a fan.

Traditional heat plus turbo: Heats from below and in the centre, spreading the heat with a fan.

Ventilated traditional heat: Heats from above and below, spreading the heat with a fan.
OVEN OPERATION
1 Place the food into the oven on the tray at the recommended height. (See tables)
2 Use the programmer or timer as required. See programmer/timer operating instructions.
3 Select the heating method using the program selector. For example: (See tables).
4 Select the cooking temperature or the grill temperature using the temperature selector. For example: 150^ (see tables).

5 When cooking ends, set the program and temperatures selectors to zero. ( )
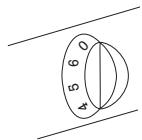
The timer is also a clock. To set the time, press the button and turn it to the left.
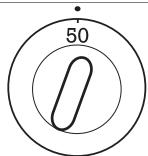
To use the timer, turn the knob to the left without pressing it until it shows the required time (for example, 15 minutes).
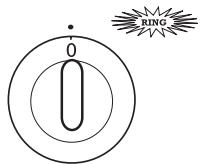
At the end of the set time, a bell sounds and cooking stops. To stop the bell, turn the knob to the position.
With the timer in this position, the oven cannot be turned on (child safety).
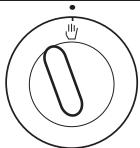
To use the oven without the timer, set the knob to the position. The oven may be used without any time limit.
HOW THIS TIMER WORKS
This timer may be used to programme your oven so that it switches off automatically after cooking for a given length of time.
This timer may be used as an alarm (although it will not switch on the oven) and also as a clock.
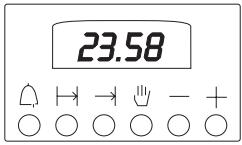
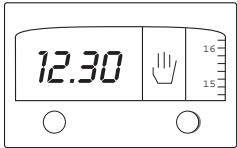
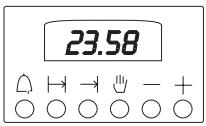
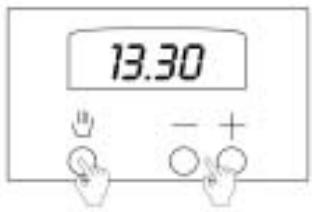
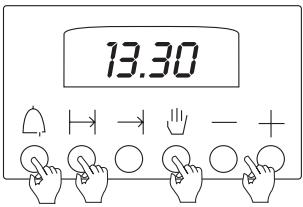
AJUSTING THE CLOCK
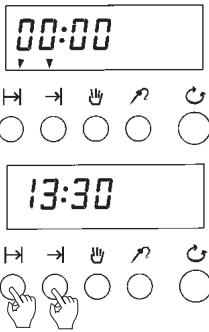
When the oven is installed, or after a power cut, the screen will be flashing at 0.00
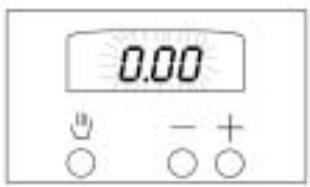
Press the button and set the time with the - + buttons. For example: 13.30. This function will remain activated for 7 seconds after the last adjustment. (The saucepan will light up).
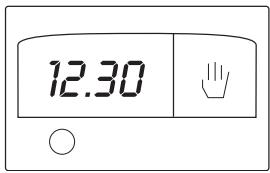
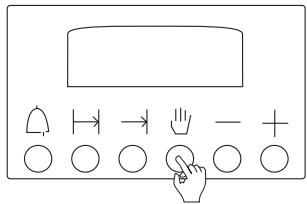
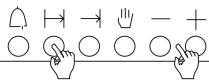
MANUAL OPERATION
Press the button and the saucepan symbol will light up. Now follow the instructions given in the section on "How the oven works".
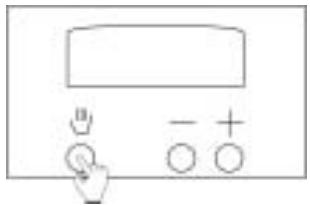
2 Remember that the oven will be working without a timer and you will have to switch it off yourself.
HOW THIS TIMER WORKS
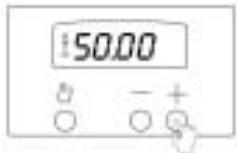
SETTING THE TIMER
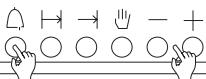
You wish start cooking now, but you want the oven to switch off after a given time.
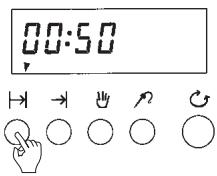
1 Press the "+" button and the screen will read "O". Press the "+" button again to select the time you want the oven to work for. For example, 50 min.
ll you wish to set the oven for more than 99 minutes and 50 seconds, the clock digits change and the screen reads 1 hour and 40 seconds. Now the digits on the left-hand side are the hours and the ones on the right are the minutes.
For example: I want to set the oven for 1 hour and 50 minutes. There is a minutes countdown until the screen reads 1 hour and 40 minutes. Then the display changes to 99 minutes and 50 seconds and there is a seconds countdown until the oven switches off automatically.
2 oven works". When the time is up, the alarm will go off and the oven will switch off automatically. To switch off the alarm, press the button.
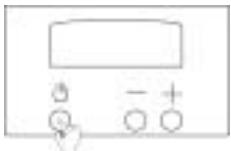
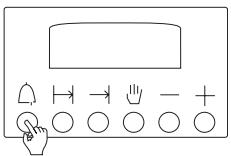
OPERATING THE ALARM
Your wish to use the alarm, either for the oven or for any other purpose.
Follow the instructions in part "1" of the previous description. Forget about part "2". In order to switch off the alarm, press the button.
The programmer can be used to carry out cooking at a certain time, after which the oven automatically switches off. Even when you're not at home, the oven will automatically switch on and then off again when coking is finished.
In any case, if you do not wish to program the oven, it can be used normally without the programmer.
The programmer can also be used as an alarm clock (without switching on the oven) and as a clock.
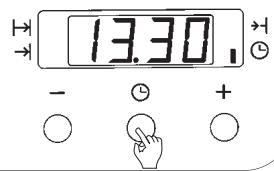
SETTING THE CLOCK
When the oven is installed, or after a power cut, the display will show 0.00, flashing.
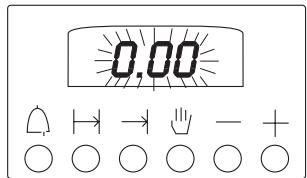
Press and hold in the button and use the - + buttons to set the time. For example: 13.30 or simultaneously push the and buttons and use the - + buttons to set the time. (This varies according to the model).
MANUAL OPERATION
To use the oven without programming, press the button.
The oven may now be used as described in the "Oven operation" section. Remember that oven is operating without programming and that you will need to switch it off when cooking is over.
You can use the oven without the programmer switching it off, but sometimes it's handy to be warned after a certain period of time has passed, or even as an alarm clock without cooking.
Press and hold in the button and use the - and + buttons to set the alarm time.
For example: 30min.
2
If you also want to use the oven, either manually or with programming, follow the corresponding instructions.
The alarm will start to sound when the time period has elapsed; to silence it, press the button.
NOTE: The alarm has three different tones. To change the tone, proceed as follows: When the alarm sounds, press the button; the tone will change while the button is pressed. This operation may be carried out in any program when ever the alarm sounds.
0.30
Remember that the alarm does not switch off the oven.
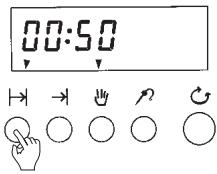
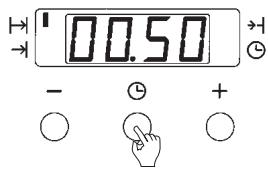
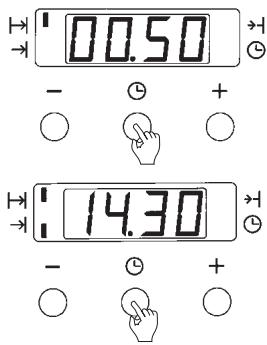
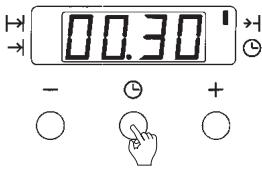
PROGRAMMING FOR AUTOMATIC SWITCHING OFF
This is used when you want cooking to start now but to stop automatically after a certain period of time.
Press and hold in the and use - + buttons to select the time. For example:50min. AUTO appears on the display.
0.50
2 describe in the "Over operations". The alarm will start to sound when cooking ends and the oven will be switched off. To silence the alarm, press the button . Do not forget to set the oven controls to zero. Press the button to remove the flashing AUTO display
P1 P1
PROGRAMMING FOR DELAYED COOKING
You don't want to start cooking now - it's too early and you have to go out, but you want the oven to have done its work when you return and to have switched off automatically.
Press and hold in the button and use the - + buttons to set the hour at which you want cooking to end.
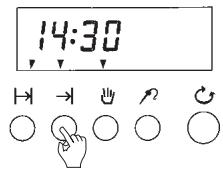
For example: 14.30
14.30
H→-+
Og Og Og
2 use the - + select the cooking time.
For example: 50 min.
AUTO appears on the display.
0.50
H→-+
O O O O
3 now programmed. In this example, 50 minutes before 14.30, the oven will switch on and will switch off at 14.30 automatically, at which point the alarm will sound. Press the button to silence it.
Do not forget to set the oven controls to zero.
Press the button to remove the flashing AUTO display.
NOTA: You can change the end time and the duration even when the oven is already working, using the and buttons.
It is advisable, before definitively programming the oven, to make a test programming.
To erase a program, press the button. If the oven controls are not set to zero, it will continue to function.
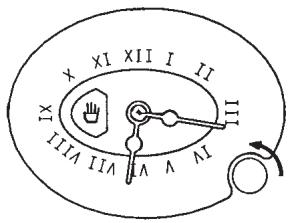
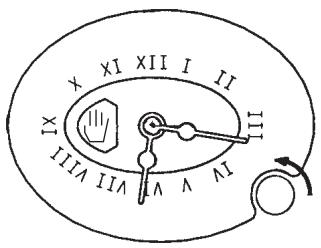
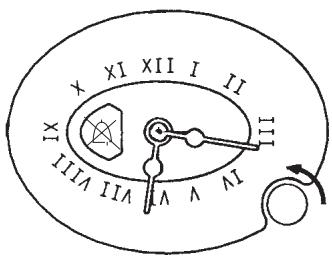
TIMER OPERATION
This timer may be used to set a time at the end of wich the oven automatically switches off. It can also be set to start and stop automatically while there is no one in the house.
In any case, if you do not want a timed operation, the oven can be operated manually.
The timer also functions as a clock.
SETTING THE CLOCK
When installing the oven or after a power cut, you must set the clock.
Use the small inner control on the left.
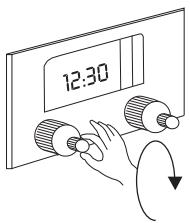
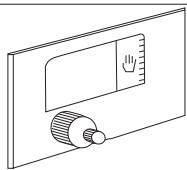
MANUAL OPERATION
If you wish to use the oven without the timer, turn the large outer control knob clockwise until the hand symbol appears.
NOTE: Make sure that the colck shows the same time as the column of numbers on the right hand side of the clock window. A crossed-out bell or a zero "0" will prevent the oven working in a manual situation as these are deemed to be "end of automatic cooking" symbols.
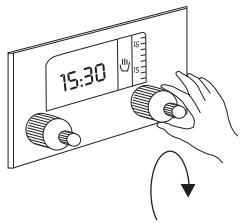
Now proceed to start oven as shown in "Oven operation".
Oven operation will not be timed. Remember that you have to switch the oven off at the end of cooking.
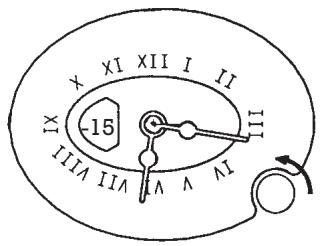
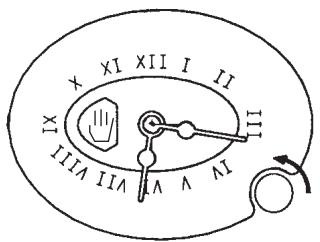
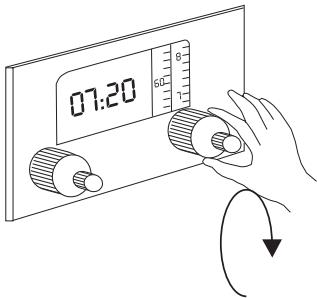
PROGRAMMING FOR AUTOMATIC SWITCHING OFF
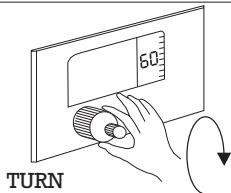
If you wish to start cooking NOW and have the 1 oven switch off automatically after a given time, turn the large outer control clockwise to desired setting. Eg: 60 mins.
NOTE: Make sure that the clock shows the correct time and coincides with the right hand column.
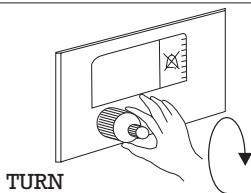
PROGRAMMING FOR DELAYED COOKING
If you also wish to DELAY the start of cooking, 2 press in the small inner control knob and turn clockwise to select starting time. Eg: 13:30. The oven will switch on at 13:30. If it is set for 60 minutes, it will switch off at 14:30.
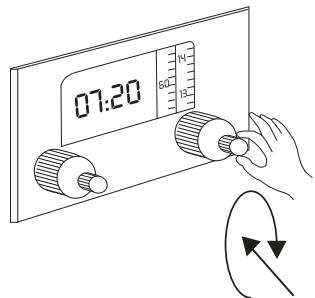
PRESS IN... AND TURN
Complete starting procedure as shown in "Oven operation". When cooking finishes, a buzzer will sound. To stop the buzzer, turn the timer control to × . With the control at this setting the oven cannot be switched on. (Child safety). Do not forget to zero oven controls when finished.
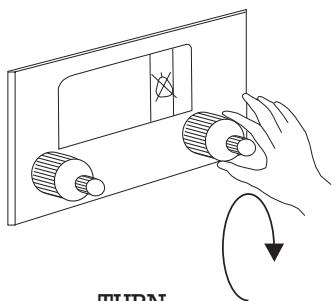
TURN
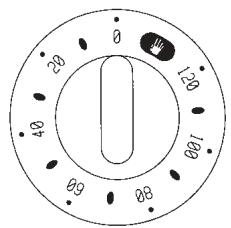
TIMER OPERATION
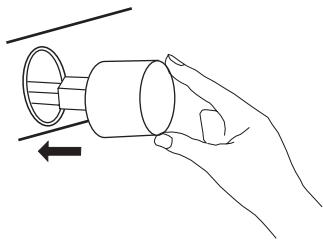
TIMER MANUAL
Turn the control clockwise as far as it will go, then turn anticlock wise to the desired time (eg. 50 mins) terming to the left. Proceed to turn on the oven. (See "Oven operation").
When control reaches 0, a buzzer will sound and the oven will switch off. With the control set at 0 the oven cannot be switched on. (Child safety).
If you wish to use the oven without the timer, set control to the hand symbol .
The oven can now be operated for an unlimited time
TIMER DIGITAL
Your timer is also a clock. To set time, press in the small central knob and turn it clockwise to select the correct time.

PRESS...AND TURN
For cooking duration, turn the large outer control knob clockwise to the time required (Eg: 60 mins). Proceed to turn on the oven.
(See "Oven operation").
When finished, a buzzer will sound and the oven will switch off. To turn off buzzer, move control to setting.
With the control at this setting, the oven cannot be switched on. (Child safety).
If you wish to use the oven without the timer, set to symbol.
The oven can now be operated for an unlimitid time.
OPERATING THE PROGRAMMER WITH
ROASTING SENSOR
This programme may be used so that a dish is cooked for a specific amount of time, after which the oven will automatically switch off, and can even be used whilst you are out of the house, so that the oven will switch on and off automatically.
SETTING THE CLOCK
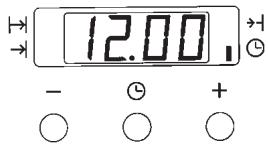
1 When the oven is first installed or following a cut in the power supply, the screen will show 0:00 and will flash alternately with the indicators for duration and end of cooking .
2 Push the || and buttons at the same time to set the digits to 12:00. Next, turn the button until the desired time is reached.
PROGRAMMING THE OVEN TO START IMMEDIATELY
You want the oven to begin cooking now but you want it to stop automatically after a certain amount of time.
Push the duration button then turn the button until the desired time is selected.
For example: 50 minutes.
The || and indicators will light up and the screen will display the real time. You may view the remaining cooking time by pushing the || button.
2 Carry out the rest of the steps for switching on te oven, "Operating the oven".
Once the cooking time is over, the oven will switch off and will begin to beep. In order to stop the beeping, push the button and push the same button again in order to cancel the manual mode.
Do not forget to turn the oven switch to "0".
You do not want to switch the oven on yet because it is too early but you have to go out and when you return you would like the oven to have done its work and switched off automatically.
1 Push the duration button then turn the button until the desired duration appears on the display.
For example: 50 minutes.
The indicator will light up.
2 Push the end of cooking button, then turn the button until the display shows the time at which you wish the cooking to end.
For example: 14:30.
The | , | and indicators will light up.
Once the oven switches on, the end of cooking light will go off.
3 Carry out the rest of the steps for switching on the oven, "Operating the oven".
By following these instructions, the oven will be programmed.
In the example, the oven will switch on 50 minutes before 14:30 and at 14:30 it will switch off automatically and will begin to beep. In order to stop the beeping, push the button and push the same button again in order to cancel the manual mode.
Do not forget to turn the oven switch to "0".
Should there be no-one at home, the beeping will cease after 2 minutes and the oven will remain switched off.
NOTE: You may modify the end of cooking and duration times even when the oven is already on. In order to do this, use the and buttons and turn the button. We recommend that before definitively programming the oven, you carry out a trial programming.
The programme may be cancelled by setting either the or button to 0:00.
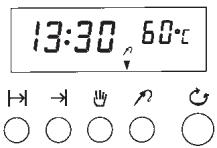
The temperature indicator is activated by inserting the sensor in the socket (located inside the oven, in the upper left front part).
The temperatures that may be selected range from 30^ to 99^ .
Once the probe is inserted, the screen will display the temperature 60^ . The probes symbol and the temperature indicator will flash.
1 Push the temperature button and turn the button until the desired temperature appears. For example: 80^ . When the button is released, the temperature programme will begin. Carry out the rest of the steps for switching on the oven, "Operating the oven".
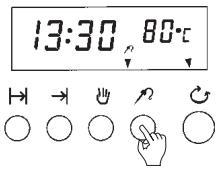
2 The screen will display the real temperature detected by the sensor (for example 50^ ). The pre-established temperature may be viewed by pushing the temperature button.
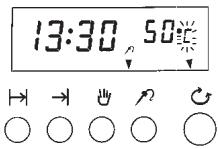
3 Once the temperature is reached the oven will stop and emit a beeping sound. The measured temperature will flash. At this point, remove the probe (the temperature indicator will disappear from the screen).
NOTAS: The roasting sensor may be used with all the programmes. For the sensor's temperatures (see tables). Please do not use any probe other than the one that corresponds to this machine.
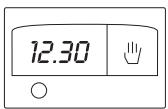
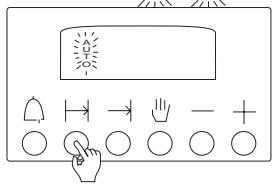
1 When the oven is first installed or following a cut in the power supply, the screen will show 12:00 and the light signal will flash. Use the “-” and “+” buttons to set the desired time. For example: 13:30. After a few seconds the light signal will go off.
2 You may alter the time whenever you wish. In order to do this, push the button until the light signal is reached. Then set the time.
MANUAL OPERATION
Once the clock has been set, carry out the rest of the steps for switching on the oven, "Operating the oven".
Remember that the oven is functioning without the programmer and that you must switch off the oven at the end of the cooking time.
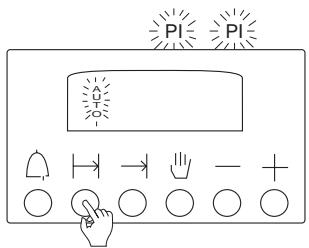
PROGRAMMING THE OVEN TO START IMMEDIATELY
You want the oven to begin cooking now but you want it to stop automatically after a certain amount of time.
1 Push the central button and the upper left light signal will flash. Use the “-” and “+” buttons to set the desired time. For example: 50 minutes.
2 Once the cooking time is over, the oven will switch off and will begin to beep. In order to stop the beeping, put the function button to the "0" position and push any of the three buttons.
3 Should there be no-one at home, the beeping will cease after 2 minutes and the oven will remain switched off. The light signal will continue to flash.
Do not forget to carry out the rest of the steps for switching on the oven (operating the oven).
You do not want to switch the oven on yet because it is too early but you have to go out and when you return you would like the oven to have donet its work and switched off automatically.
1 Push the central button and the upper left light signal will flash. Unse the “-” and “+” buttons to set the desired duration time. For example: 50 minutes.
2 Push the central button twice and the lower left light signal will flash. Use the - and + buttons to set the time at which you wish the oven to switch off. For example: 14:30. The two pilot lights will remain lit up.
3 Carry out the rest of the steps for switching on the oven, "Operating the oven". After doing this, the oven will be programmed. In the example, the oven will switch on 50 minutes before 14:30 and at 14:30 it will switch off automatically and will begin to beep. In order to stop the beeping, put the function button to the "0" position and push any of the three buttons. Should there be no-one at home, the beeping will cease after 2 minutes and the oven will remain switched off.
NOTE: You may modify the end of cooking and duration times even when the oven is already on. In order to do this, use the central button in the and position.
We recommend that before definitively programming the oven, you carry out a trial programming
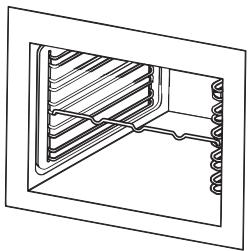
USING THE TIMER FUNCTION
You may wish to use the timer function both for the oven or for any other purpose. To use this function, follow the instructions given below.
Push the central button until the upper right pilot light flashes. Use the “-” and “+” buttons to set the desired time.
For example: 30 minutes.
Once this time has passed, the timer will beep. In order to stop the beeping, push any button.
SPIT ROASTER
For ovens with a four-position function selector, proceed as follow.
Insert spit bracket at setting as shown in the pictures.
2 Skewer food on spit and secure with sliding blades.

3 oven and rest outer end on bracket. Insert oven tray at bottom setting. Unscrew spit handle to close oven door.
4 me, setting the temperature selector at 200^ .
IMPORTANT: Always close oven door.

5 handle back on and remove spit. Release sliding blades and withdraw spit from food.
SPIT ROASTER
For ovens with an eight-position function selector and rotary grill, proceed as follows:
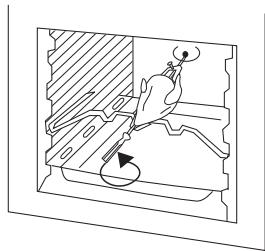
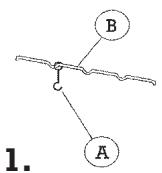
1 Fit the spit "A" into the spit support "B", as shown in Figure 1, and then fit it into the oven as shown in Figure 2.
1.
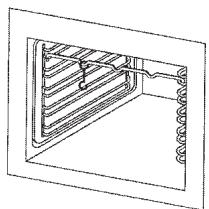
2.
2 Skewer food on spit and secure with sliding blades.
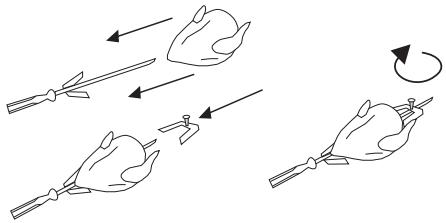
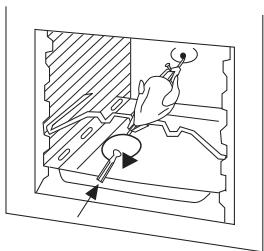
3 Insert spit point in orifice at back of oven and rest outer end on bracket. Insert oven tray at bottom setting. Unscrew spit handle to close oven door.
4 Start rotary spit grilling programme, setting the temperature selector at 200^ .
IMPORTANT: Always close oven door.

5 When finished roasting, screw spit handle back on and remove spit. Release sliding blades and withdraw spit from food.

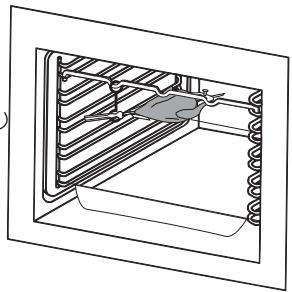
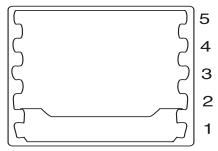
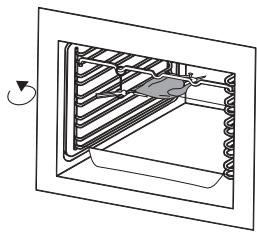
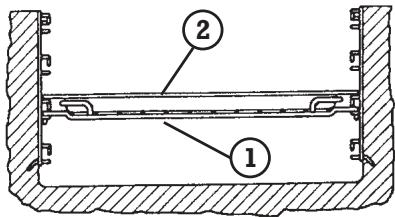
REMOVING ROASTING TRAYS
If the oven has a tray extractor, proceed as follows:
1 First insert the tray carrier grille in the position shown in the figure.
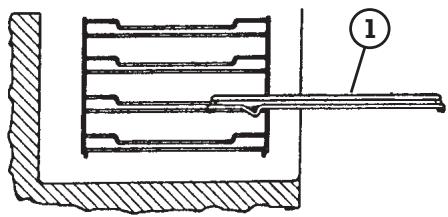
2 Then insert tray 2 in the upper part of the grille 1 in the position shown in the figure.
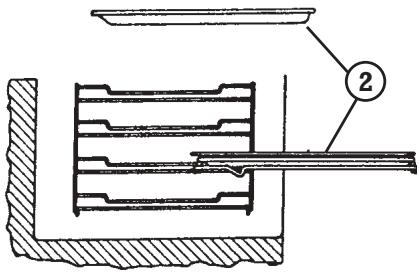
3 Fit the assembly into the oven.Fit the assembly into the oven.
To remove the trays once cooking has ended, pull the tray carrier grille fully outwards and then either:
1^ Remove the tray from the grille.
or
2^ Remove the entire assembly by slightly lifting the grille over the stops that prevent it from falling.
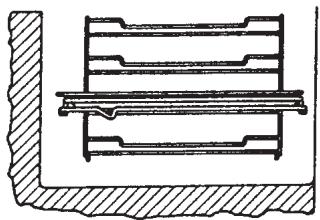
4 The grille and tray assembly can be placed in any of the four levels, taking into account its position as shown in the figure:
1^ Grille
2^ Tray
PRACTICAL ADVICE
Always use the tables in this book as a reference for using your oven. Even if you are cooking to your own recipe, the entry for a similar type of food will help you to choose the function, temperature and tray position.
CONSULT THE TABLES
The cooking times are guidelines and will be longer if the food is placed into the oven directly from the fridge. The times will also depend on your taste, depending on whether you prefer it rare or well done.
GUIDELINE TIMES
Single-piece and very large items require rather longer times. The tables are designed for quantities for 4 persons.
TABLES FOR 4 PERSONS
Use the temperatures in the tables. A temperature higher than that given cause splashing and cayse excessive steam and smoke.
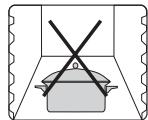
Do not place food or containers directly on the floor of the oven.
Always use the tray or grille.

If your oven has a grill, put the tray under it for roasts and bakes. This way, all the juices will fall on the tray and the oven will keep cleaner. The oven should preferably be preheated for 10 minutes, especially for deserts and fish.
PRACTICAL ADVICE
With deserts, test cakes by pricking with a skewer in the center. If no mix adheres to the skewer when it is withdrawn, the cake is ready.
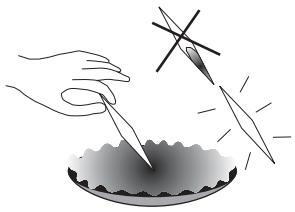
If the mix sinks, use a temperature which is 10^ lower next time.
-10°C
If the underside of the cake is overdone, next time place the cake on a higher level in the oven By contrast, if the top side of the cake is overdone, next time place it on the level below. In both cases, you should select a lower temperature.
-10°C
Allow meat and poultry to rest for 5 to 10 minutes inside the oven, once cooking has finished.
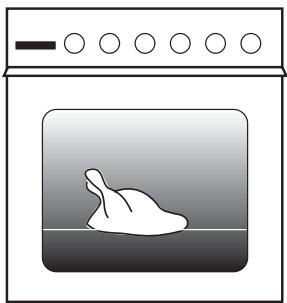
Always use the grill with the oven closed. If the food does not occupy the entire tray, place it in the center. Poultry will be better browned if basted with cooking oil.
TABLES
| FOOD | PROGRAM | TEMPERATURE | TIME | POSITION | PRE-HEAT | ACCESORIES |
| ENTREES AND VEGETABLES | ||||||
| Baked egg dishes | 225° | 5 min | 3 | NO | ||
| Canalopes | 200° | 20 min | 2 | NO | ||
| Baked cauliflower | 225° | 10-12 min | 1 | YES | ||
| Baked potatoes | 225° | 45-50 min | 2 | NO | ||
| Baked peppers | 200° | 30-35 min | 2 | NO | ||
| FISH AND SEAFOOD | ||||||
| Roast | 210° | 15-18 min | 1 | YES | ||
| TBaked bonito | 225° | 10-15 min. | 2 | YES | ||
| Roast angler fish | 250° | 30-35 min | 1 | NO | ||
| Trout | 210° | 12-14 min | 2 | YES | ||
| Baked bream | 210° | 25-30 min | 2 | YES | ||
| Sole | 225° | 6-10 min | 2 | YES | ||
| VARIOUS | ||||||
| Pizza | 200° | 30-35 min | 2 | NO | ||
| Bonito turnover | 200° | 25-30 min | 2 | YES | ||
| Bread | 225° | 25-30 min | 3 | YES | ||
| Cakes | 200° | 12-14 min | 1 | YES | ||
TABLES
| FOOD | PROGRAM | TEMPERATURE | TIME | POSITION | PRE-HEAT | SENSOR | ACCE-SORIES |
| MEAT AND POULTRY | |||||||
| Whole sirloin | 175° | 60-70 min | 2 | NO | 60°-70° | ||
| Beef ribs | 150° | 90-110 min | 2 | NO | |||
| Roast lamb | 175° | 60-70 min | 2 | NO | |||
| Rabbit in sauce | 175° | 45-55 min | 1 | NO | |||
| Roast beef | 150° | 70-80 min | 2 | NO | |||
| Ox tail | 200° | 120-140 min | 1 | NO | |||
| Roast pork, 1kg | 150° | 50-60 min | 2 | NO | 80° | ||
| Roast chicken | 200° | 45-50 min | 2 | NO | 85°-90° | ||
| Roast turkey | 190° | 140-160 min | 1 | NO | 85°-90° | ||
| Duck à l'orange | 210° | 90-100 min | 2 | NO | 85°-90° | ||
| Roast quail | 225° | 7-10 min | 4 | YES | |||
| DESERTS | |||||||
| Apple pie | 190° | 40-45 min | 3 | NO | |||
| Pears in wine | 225° | 45-50 min | 1 | NO | |||
| Cream caramel | 175° | 30-35 min | 1 | NO | |||
| Souffle | 200° | 10-12 min | 1 | YES | |||
| Biscuit | 180° | 30 min | 1 | YES | |||
| Baked apple | 175° | 30-35 min | 2 | NO | |||
| Pastry | 175° | 30-35 min | 2 | YES | |||
TABLES
| FOOD | PROGRAM | TEMPERATURE | TIME | POSITION | PRE-HEAT | ACCESORIES |
| ENTREES AND VEGETABLES | ||||||
| Baked egg dishes | 225° | 5 min | 3 | NO | ||
| Canalopes | 200° | 20 min | 2 | NO | ||
| Paella | 225° | 35-40 min | 1 | NO | ||
| Baked cauliflower | 225° | 10-12 min | 1 | YES | ||
| Baked potatoes | 225° | 55-60 min | 2 | NO | ||
| Baked peppers | 200° | 30-35 min | 2 | NO | ||
| FISH AND SEAFOOD | ||||||
| Roast | 210° | 15-18 min | 1 | YES | ||
| Baked prawn | 250° | 5-7 min | 5 | YES | ||
| Baked bonito | 225° | 15-18 min. | 2 | YES | ||
| Roast angler fish | 250° | 30-35 min | 1 | NO | ||
| Trout | 210° | 12-14 min | 2 | YES | ||
| Baked bream | 210° | 25-30 min | 2 | YES | ||
| Sole | 225° | 8-10 min | 2 | YES | ||
| VARIOUS | ||||||
| Pizza | 200° | 30-35 min | 2 | NO | ||
| Bonito turnover | 200° | 30-35 min | 2 | YES | ||
| Bread | 225° | 25-30 min | 3 | YES | ||
| Cakes | 200° | 12-14 min | 1 | YES | ||
TABLES
| FOOD | PROGRAM | TEMPERATURE | TIME | POSITION | PRE-HEAT | SENSOR | ACCE-SORIES |
| MEAT AND POULTRY | |||||||
| Whole sirloin | 175° | 60-70 min | 2 | NO | 60°-70° | ||
| Beef ribs | 150° | 90-110 min | 2 | NO | |||
| Roast lamb | 175° | 60-70 min | 2 | NO | |||
| Rabbit in sauce | 175° | 60-70 min | 1 | NO | |||
| Roast beef | 150° | 70-80 min | 2 | NO | |||
| Ox tail | 200° | 120-140 min | 1 | NO | |||
| Roast pork, 1kg | 150° | 60-70 min | 2 | NO | 80° | ||
| Hamburgers | 250° | 7-10 min | 4 | YES | |||
| Sausages | 250° | 5-7 min | 4 | YES | |||
| Roast chicken | 175° | 45-50 min | 2 | NO | 85°-90° | ||
| Roast turkey | 190° | 140-160 min | 1 | NO | 85°-90° | ||
| Duck à l'orange | 210° | 90-100 min | 2 | NO | 85°-90° | ||
| Roast quail | 225° | 9-12 min | 4 | YES | |||
| DESERTS | |||||||
| Apple pie | 190° | 40-45 min | 3 | NO | |||
| Pears in wine | 225° | 50 min | 1 | NO | |||
| Cream caramel | 175° | 35-40 min | 1 | NO | |||
| Souffle | 200° | 10-12 min | 1 | YES | |||
| Biscuit | 180° | 30 min | 1 | YES | |||
| Baked apple | 175° | 30-35 min | 2 | NO | |||
| Pastry | 175° | 30-35 min | 2 | YES | |||
TABLES
| FOOD | PROGRAM | TEMPERATURE | TIME | POSITION | PRE-HEAT |
| ENTREES AND VEGETABLES | |||||
| Baked egg dishes | 250° | 7-10 min | 3 | NO | |
| Canalopes | 200° | 30-35 min | 2 | NO | |
| Paella | 250° | 35-40 min | 1 | NO | |
| Baked cauliflower | 250° | 10-12 min | 1 | YES | |
| Baked potatoes | 250° | 60-65 min | 2 | NO | |
| Baked peppers | 250° | 35-40 min | 2 | NO | |
| FISH AND SEAFOOD | |||||
| Roast hake | 250° | 15-20 min | 1 | YES | |
| Baked prawn | 250° | 8-10 min | 5 | YES | |
| Baked bonito | 250° | 15-18 min. | 2 | YES | |
| Roast angler fish | 250° | 30-35 min | 1 | NO | |
| Trout | 250° | 14-16 min | 2 | YES | |
| Baked bream | 250° | 25-30 min | 2 | YES | |
| Sole | 250° | 8-10 min | 2 | YES | |
| VARIOUS | |||||
| Pizza | 225° | 30-35 min | 2 | NO | |
| Bonito turnover | 225° | 30-35 min | 2 | YES | |
| Bread | 250° | 25-30 min | 3 | YES | |
| Cakes | 225° | 12-14 min | 1 | YES | |
TABLES
| FOOD | PROGRAM | TEMPERATURE | TIME | POSITION | PRE-HEAT |
| MEAT AND POULTRY | |||||
| Whole sirloin | 200° | 60-70 min | 2 | NO | |
| Beef ribe | 190° | 90-110 min | 2 | NO | |
| Roast lamb | 210° | 60-70 min | 2 | NO | |
| Rabbit in sauce | 225° | 60-70 min | 1 | NO | |
| Roast beef | 210° | 80-90 min | 2 | NO | |
| Or tail | 215° | 120-140 min | 1 | NO | |
| Roast pork 1Kg | 175° | 60-70 min | 2 | NO | |
| Hamburgers | 250° | 7-10 min | 4 | YES | |
| Sausages | 250° | 5-7 min | 4 | YES | |
| Roast chicken | 200° | 45-50 min | 2 | NO | |
| Roast turkey | 190° | 140-160 min | 1 | NO | |
| Duck à l'orange | 225° | 90-100 min | 2 | NO | |
| Roast quail | 250° | 9-12 min | 4 | YES | |
| DESERTS | |||||
| Appel pie | 190° | 40 min | 3 | NO | |
| Pears in wine | 250° | 60-70 min | 1 | NO | |
| Cream caramel | 200° | 35-40 min | 1 | NO | |
| Soufle | 225° | 10-12 min | 1 | YES | |
| Biscuits | 180° | 30 min | 1 | YES | |
| Baked apple | 200° | 30-35 min | 2 | NO | |
| Pastry | 200° | 30-35 min | 2 | YES | |
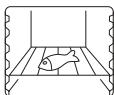
DEFROSTING
Always place food to be defrosted on a wire grill at level 2.
If your function selector has got eight positions, use programme to de-freeze, and put the temperature selector at 75^ .
If your function selector has got five positions use function 2 without selecting a temperature, i.e. leaving the temperature selector at it's lowest setting ( ).
DEFROSTING TABLE
| FOOD | WEIGHT | TIME | POIDS |
| MEAT | |||
| Round | 1.000 grs. | 90 min | 1 |
| Filletts | 400 grs. | 20 min | 4 |
| Minced meat | 1.000 grs. | 60 min | 1 |
| Chopped meat | 1.000 grs. | 70 min | 20 |
| Whole chicken | 1.200 grs. | 70 min | 1 |
| Chicken pieces | 1.200 grs. | 40 min | 20 |
| Sausages | 500 gs. | 25 min | 12 |
| Loin, pieces | 1.000 grs. | 90 min | 1 |
| Loin in fillets | 450 grs. | 40 min | 8 |
| FISH | |||
| Haken | 800 grs. | 60 min | 1 |
| Filletts de merluza | 480 grs. | 20 min | 4 |
| Small fish (mullet) | 700 grs | 30 min | |
| Tuna in slices | 1.200 grs. | 25 min | 2 |
| Prawns | 1.000 grs. | 30 min | 40 |
| VARIOUS | |||
| All types of vegetables | 400 grs. | 20 min | |
| Bread, cakes, etc | 250 grs. | 10 min | |
| Pre-cooked food | 500 grs. | 30 min. | |
CLEANING
Never use gritty or abrasive detergents. Clean the oven exterior with a soft cloth and soapy water regularly.
WATER + SOAP

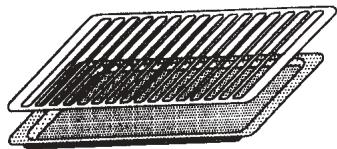
All the panels inside the oven, except for the floor and ceiling, are covered with selfcleaning enamel.
These panels eliminate small splashes of grease during cooking without the need to clean them.
Some large splashes may not disappear immediately; after remoing the cooked food, leave the oven at 250^ for half hour. (Do not let children near it).

However, if there is heavy splashing, panels must be washed.
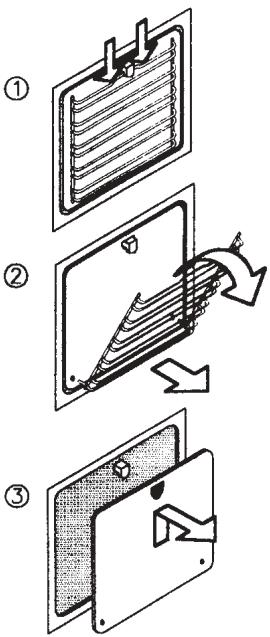
To make cleaning easy, in these models side panel are also removable. Cleaning can be in a dishwasher or by hand, with warm water and a non-metallic sponge.
Instructions to remove the side panels:
1) Push down the upper bar of guides until it is released.
2) Turn the guides as shown in the picture and pull out. The guides will be free.
3) Take the panel down.
NOTE: Do not use ven cleaning solvents on self-cleaning ovens.
CLEANING
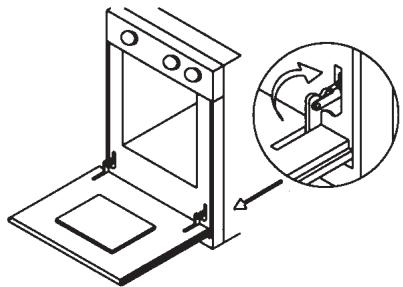
DO NOT LEAN UNNECESSARILY ON THE DOOR WHEN CLEANING THE OVEN INTERIOR AS THE DOOR HINGES AND SUPPORTS MAY BECOME DAMAGED.
The door may be removed to facilitate easier cleaning of interior. Carefully follow these stops.
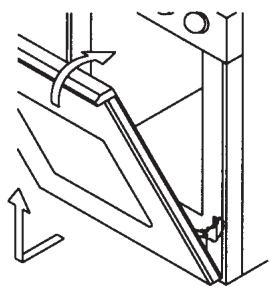
1 Open the door fully and lift the locking latches on the hinges completely.
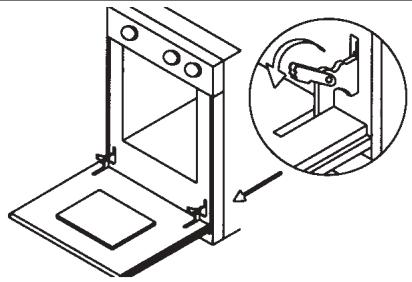
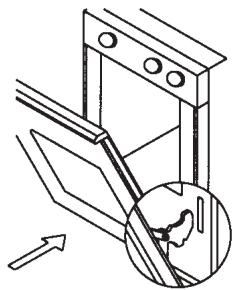
2 Close the door gently until it stops. Then, holding the door with both hands, lift upward and outwards until the hinges release from their slots. The door will then be free.
3 To replace the door, fit the hinges fully home into their slots, as shown in the drawings.
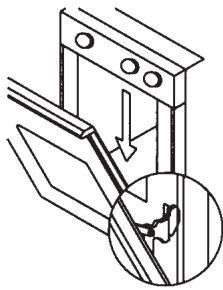
4 Open the door downward and return the latches back to their original position.
The door will now be installed.
WHAT TO DO IF...
| THE OVEN DOES NOT SWITCH ON - Fuse blown. Replace them it. - If the fuses blow again, too many devices may be running. - If the oven still does not work, call Technical Service. |
| The oven does not switch on and the programmer is flashing 0.00. - Probably there has been a power cut. Adjust the time on the programmer and repeat the switching on of the oven. |
| LIGHT DOES NOT WORK EVEN THOUGH THE OVEN IS ON - Probably the light bulb has blown. When the oven is cold, unscrew the lamp cover, remove the bulb and replace it with another ensuring the replace- ment bulb is capable of operating at 300°c (Switch off at the mains first, for safety reasons). |
| THE OVEN FILLS WITH SMOKE COMING FROM THE OVEN ITSELF. - All ovens produce smoke to a greater or lesser extent, especially when roas- ting. You can decrease the volume of smoke by reducing the amount of fat in the tray and by using the oven at a slightly lower temperature. Do not use temperatures which are higher than those given in the guide tables. - The grill element may be dirty, with grease from a previous roast. When the grill is switched on, this grease will be burnt and a great deal of smoke will be created for a few minutes (keep the oven door closed). Try to keep the grill clean. |
| If the above does not help to solve the problem, contact the authorized techni- cal service. You will be asked for a series of questions about data particular to your oven, which appears on the data plate or guarantee card supplied with the oven. Note these references here in case you need them. |
| SERIAL NUMBER: REFERENCE: |
| The Technical Service Department can use this information to process your query so that the problem can be resolved on the first visit, thus saving time and costs by eliminating the need for several visits. |
INSTALLATION
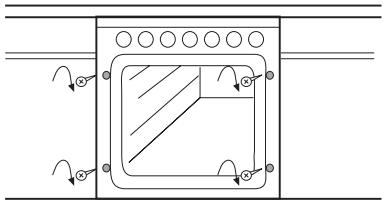
UNPACKING
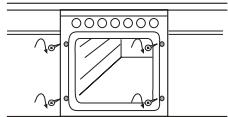
Carefully remove all the elements protecting the apparatus. The two brackets "A" in two parts of the oven must also be removed, as shown in the figure.
OVEN WITH HO PLATE CONTROLS
The unit's measurements are as shown in the drawing. The hot plat unit should be installed first and left disconnected until the oven is installed. (See hot plate instruction manual).

It is very important to maintain the ventilation holes for the correct operation of the oven.
INSTALLATION
Lift the hot plate straps and cable when installing the oven into the unit, leaving sufficient room to house the straps onto the knob shafts screw them into place and fit cable to the connector.
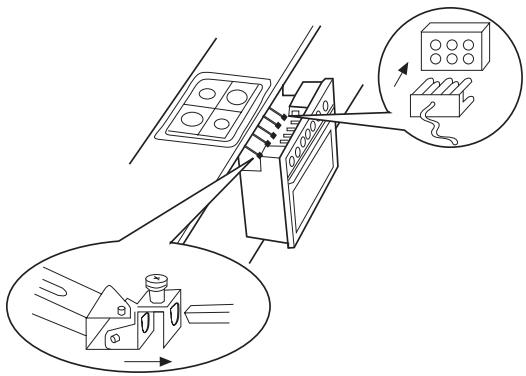
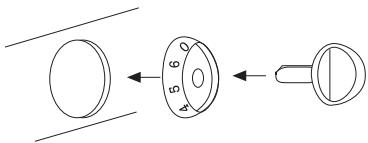
Push the oven fully home and support the unit with 4 screws. (In oven accessories bag)
Then fit the knobs (in oven accessories bag).
INSTALLATION
OVEN WITH FIXED HOT PLATE CONTROLS
The unit's measurements are as shown in the drawing.
The hot plate unit should be installed first and left disconnected until the oven is installed. (See hot plate instruction manual).
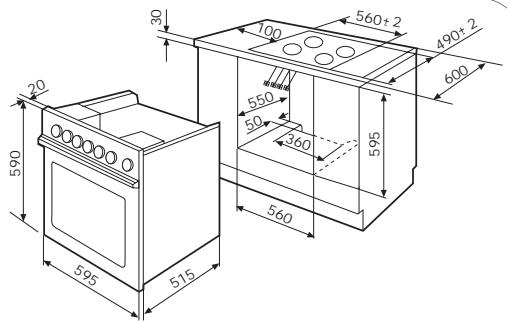
It is very important to maintain the ventilation holes for the correct operation of the oven.
Lift the hot plate straps and cable when installing the oven into the unit, leaving sufficient room to house the straps onto the knob shafts screw them into place and fit cable to the connector.
Push the oven fully home and support the unit with 4 screws. (In oven accessories bag)
Press-fit the controls accessories, according to the type of heat source (in stove-top/oven accessories bag or in both). Then fit the knobs (in oven accessories bag).

GAS


VITROCER. OVAL/DOUBLE INDUTCION INDUTCION ELECTRIC PLUS
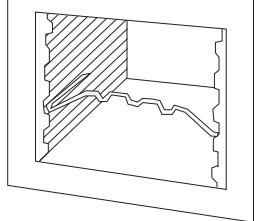
INSTALLATION
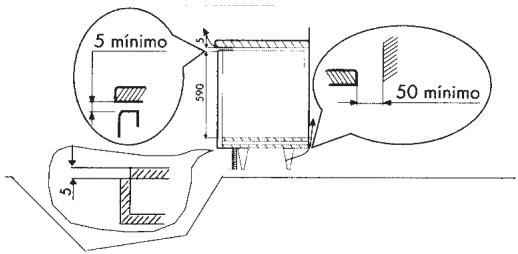
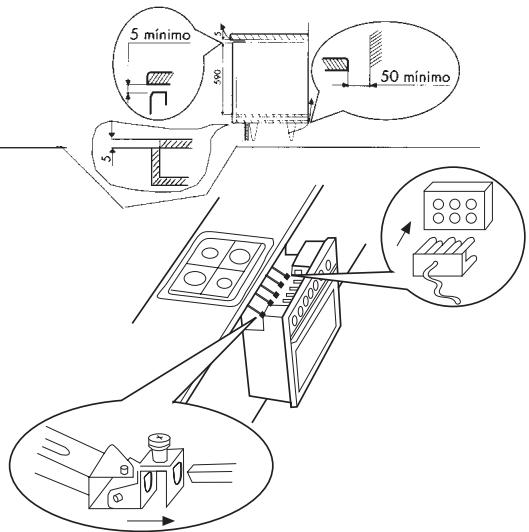
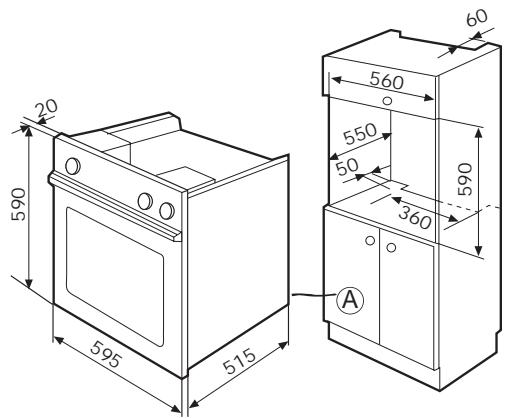
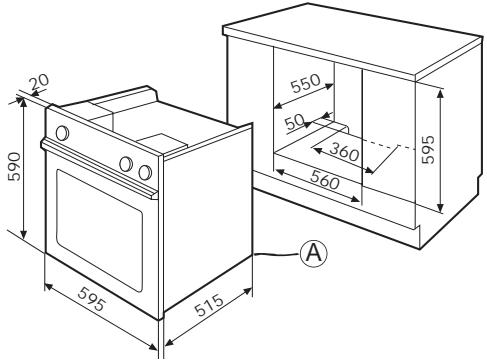
OVEN WITHOUT HOT PLATE CONTROLS
The dimensions of the ventilation cut-outs in the kitchen units must be as shown in the figures, for high or low mounted units.
It is very important to maintain adequate ventilation cut-outs at the back in order that the oven operates correctly.
The electrical connection must be made using the hose "A".
The appliance and electrical supply socket must be correctly earthed.
If using a cooker panel; a switch must be fitted, to disconnect all three phases, with minimum a 3 mm separation between contacts.
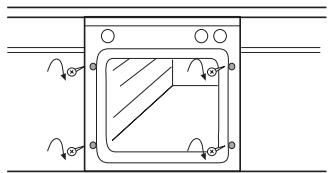
Once plugged in, fit the oven into the unit, taking care not to leave excess cable lying on top of the oven.
Do not stand the oven on the supply cable.
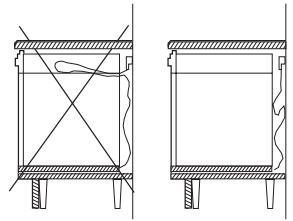
Fix the oven to the oven housing using 4 screws (in the oven accessories bag).
NOTE: If the oven is to be installed without a surrounding unit, a mounting kit is available as a chargeable accessory, and which includes installation instructions.
SEGURANÇA DOS NOSSOS APARELHOS
OVEN MET KOOKPLAAT MET VASTE KNOPPEN
Printed on recycled paper.