
MWH2322B - Microwave Oven HOTPOINT - Free user manual and instructions
Find the device manual for free MWH2322B HOTPOINT in PDF.
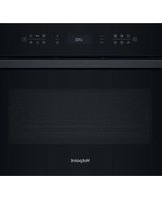
| Brand | HOTPOINT |
| Model | MWH2322B |
| Product Type | Built-in Microwave Oven |
| Capacity | 20 L |
| Microwave Power (Output) | 800 W |
| Input Power | 1250 W |
| Rated Voltage | 230 V ~ 50 Hz |
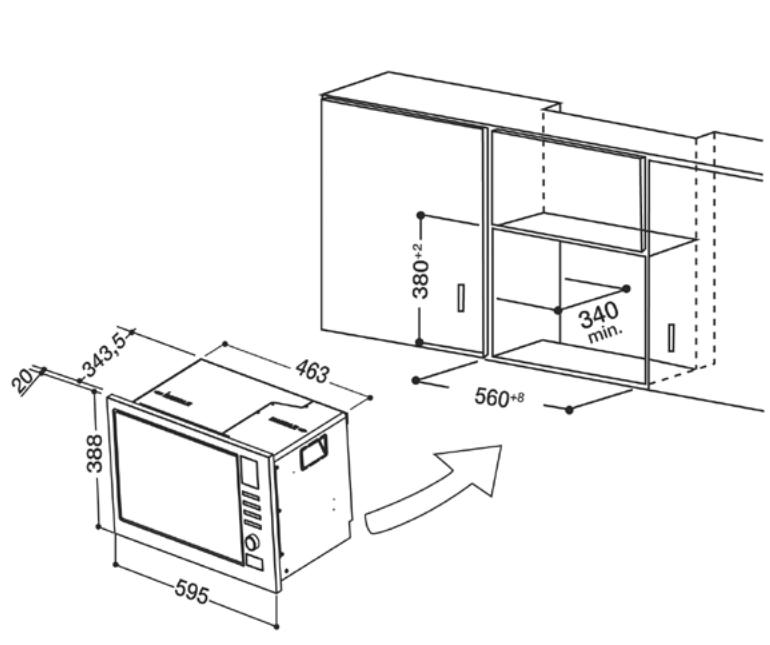
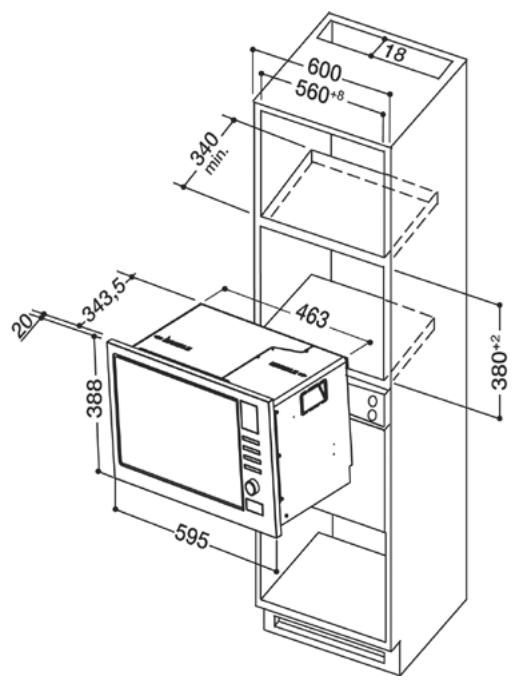
| Dimensions (W x H x D) | 594 x 343.5 x 388 mm |
| Net Weight | Approx. 14.85 kg |
| Turntable Diameter | 245 mm |
| Installation Type | Built-in (60 cm wide cabinet) |
| Number of Power Levels | 5 (P100, P80, P50, P30, P10) |
| Main Functions | Microwave cooking, defrost by weight or time, auto menu (10 programs), multi-stage cooking, clock, timer, quick start |
| Child Safety | Key lock (long press STOP) |
| Cavity Material | Enameled steel |
| Included Accessories | Glass plate, turntable support, instruction manual |
| Cleaning and Maintenance | Interior with damp cloth; do not use steam cleaner |
| Reparability | Intervention by qualified professional (cover removal danger) |
| Control Type | Rotary knob and touch buttons |
| Display | Digital LED (clock, timer, menu) |
| Use | Domestic |
| Important Safety Instructions | Do not operate empty, do not use metal utensils, grounding required |
Frequently Asked Questions - MWH2322B HOTPOINT
User questions about MWH2322B HOTPOINT
0 question about this device. Answer the ones you know or ask your own.
Ask a new question about this device
Download the instructions for your Microwave Oven in PDF format for free! Find your manual MWH2322B - HOTPOINT and take your electronic device back in hand. On this page are published all the documents necessary for the use of your device. MWH2322B by HOTPOINT.
USER MANUAL MWH2322B HOTPOINT
Haxmte KhoNky " (START) eue pa3 dIy hauana npiroTOBJIeHn.
Пример:ЕспьВамТребуETСИСПОЛБЗOBATь 80% CBUMOшOCTNДЯ ПИROTOВLEнЯВ TeчЕнe 20 MInHyT,ВылOLнITE сLEдУЮШе ИСТPyКцИN:
1) Haxmnte KhoNky “ ” OOnH pa3. Ha nCnIee noka3bIbAeTcR "P100".
2) Haxmnte KhoNky " ” euple pa3
илноbernnte pergyIaTOp “h” Дя Вьбopa 80% CBU-
MOUHOCTN.
3) HaxmTe KhONky " (START) "ДЯ NOДТВержденя.
Ha dinCJIeE nOKa3bIbAetcra "P 80".
4) Повернite ретуларог "сдя ВьICTаВленяпразолжпельноctи пи��тobленья до пявленья надиспee "20:00".
Дисilee 20.00.5) HaxMITE KONky “ START ” ДЯ НаJa nprirotobneHnIa.
3.Быстpbьзануck
1) B coCToHnOxNdaHnHaXmnte KhONkY
"START”ДЯн haçaJa npuROTOBneHnA
PnMoHocTn 100%. Pnp KaKdOM NocJeDyUoIeM HaxaTN NpOdoJXKeTbHOCTb PnroTOBneHryBeNnBaETcHa 30 CeKyHbNIOb Do 95 MNHyT.
2)В ржиме CBU пи паимороживане нахмп Te KHOПКУ “(START)”,ДЯ уBEЛЧЕНИ ПЮДОЛЖИТЕЛьНOCHTI Ha 30 ceKун.
3) B coctoHn mOxuDAnHnIOBepHnTe peyIaTOp
"!” BnEBO DnB BbICTaBJIeHnI npOIOJXITeJIbHOCTN nprirotOBJIeHnI npn MoUHcOCTn 100%, 3aTeM haxmnte KHOPIKy “ l IJI NaHaJaI nprirotOBJIeHnI.
“ ≈ ” Pad instructions
CteBoI npoBOI He DoJxHc 6bITb cXaT nJIN corHyT.
A. BcTpoEHHa yCtahOBka
B. ПОДГ罗TOВka Hnши
1.Почntай Te Инстукции Ha HIXKHEM LIA6LOHE HINJI, noJIOxNte 7a6NoH NaДно HnIiN.
- CdelaIe OTMeTkn Ha dHe HnSiB COOTBETCTBnC O TBepCTnMaM “a” B 7a6JIoHe.
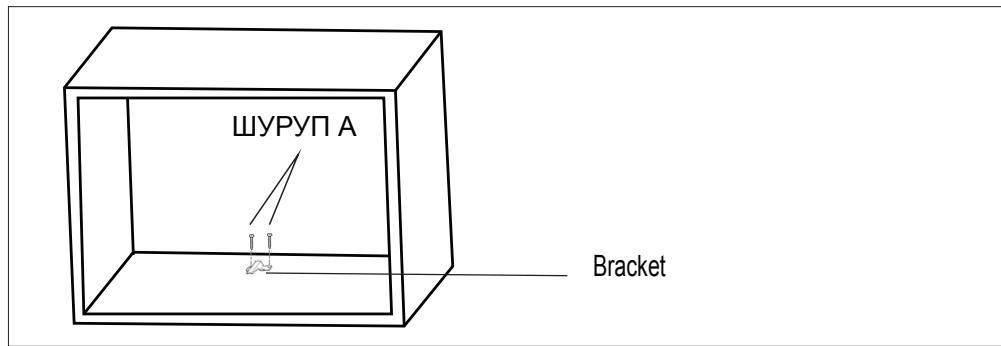
- Y6epnte HIXHNI IJABIOH HIIIN npinkpenTe HIXHNE CKObblIUPYIOM A.
C. YctaHOBka neu.
- BCTaBbTe ney b HnIy.
m = 311
Precautions and suggestions, 106
Oven installation, 110
Operating instructions, 111
Troubleshooting, 115
Installation, 116

Ka3aKawa

Hotpoint
ARISTON
Read these instructions carefully before using your microwave oven, and keep it carefully.
If you follow the instructions, your oven will provide you with many years of good service.
SAVE THESE INSTRUCTIONS CAREFULLY
PRECAUTIONS TO AVOID POSSIBLE EXPOSURE TO EXCESSIVE MICROWAVE ENERGY
GB
(a) Do not attempt to operate this oven with the door open since this can result in harmful exposure to microwave energy. It is important not to break or tamper with the safety interlocks.
(b) Do not place any object between the oven front face and the door or allow soil or cleaner residue to accumulate on sealing surfaces.
(c) WARNING: If the door or door seals are damaged, the oven must not be operated until it has been repaired by a competent person.
ADDENDUM
If the apparatus is not maintained in a good state of cleanliness, its surface could be degraded and affect the lifespan of the apparatus and lead to a dangerous situation.
Specifications
| Model: | MWA 121.1 X/HA |
| Rated Voltage: | 230V~50Hz |
| Rated Input Power (Microwave): | 1250W |
| Rated Output Power (Microwave): | 800W |
| Oven Capacity: | 20 L |
| Turntable Diameter: | Ø 245mm |
| External Dimensions: | 594x343.5x388mm |
| Net Weight: | Approx. 14.85Kg |
IMPORTANT SAFETY INSTRUCTIONS
WARNING
To reduce the risk of fire, electric shock, injury to persons or exposure to excessive microwave oven energy when using your appliance, follow basic precautions, including the following:
- Avverenza: Non riscaldare liquidi ed altri alimenti in 1. Warning: Liquids and other foods must not be heated in sealed containers since they are liable to explode.
- Warning: It is hazardous for anyone other than a competent person to carry out any service or repair operation that involves the removal of a cover which gives protection against exposure to microwave energy.
- Warning: Only allow children to use the oven without supervision when adequate instructions have been given so that the child is able to use the oven in a safe way and understand the hazards of improper use.
- Warning: When the appliance is operated in the combination mode, children should only use the oven under adult supervision due to the
temperatures generated. (only for grill series)
- Only use utensils suitable for use in microwave ovens.
- The oven should be cleaned regularly and any food deposits should be removed.
- Read and follow the specific:"PRECAUTIONS TO AVOID POSSIBLE EXPOSURE TO EXCESSIVE MICROWAVE ENERGY".
- When heating food in plastic or paper containers, keep an eye on the oven due to the possibility of ignition.
- If smoke is observed, switch off or unplug the appliance and keep the door closed in order to stifle any flames.
- Do not overcook food.
- Do not use the oven cavity for storage purposes. Do not store items, such as bread, cookies, etc. inside the oven.
- Remove wire twist-ties and metal handles from paper or plastic containers/bags before placing them in the oven.
- Install or locate this oven only in accordance with the installation instructions provided.
- Eggs in the shell and whole hard-boiled eggs should not be heated in microwave ovens since they may explode, even after microwave heating has ended.
- Use this appliance only for its intended uses as described in manual. Do not use corrosive chemicals or vapors in this appliance. This oven is especially designed to heat. It is not designed for industrial or laboratory use.
- If the supply cord is damaged, it must be replaced by the manufacturer, its service agent or similarly qualified persons in order to avoid a hazard.
- Do not store or use this appliance outdoors.
- Do not use this oven near water, in a wet basement or near a swimming pool.
- The temperature of accessible surfaces may be high when the appliance is operating. The surfaces are liable to get hot during use. Keep cord away from heated surface, and do not cover any events on the oven.
- Do not let cord hang over edge of table or counter.
- Failure to maintain the oven in a clean condition could lead to deterioration of the surface that could adversely affect the life of the appliance and possibly result in a hazardous situation.
- The contents of feeding bottles and baby food jars shall be stirred or shaken and the temperature checked before consumption, in order to avoid burns.
- Microwave heating of beverages can result in delayed eruptive boiling, therefore care must be taken when handling the container.
- The appliance is not intended for use by persons (including children) with reduced physical, sensory or mental capabilities, or lack of experience and knowledge, unless they have been given supervision or instruction concerning use of the appliance by a person responsible for their safety.
- Children should be supervised to ensure that they do not play with the appliance.
- The microwave oven shall not be placed in a
cabinet unless it has been tested in a cabinet.
- The appliances are not intended to be operated by means of an external timer or separate remote-control system.
- WARNING: Ensure that the appliance is switched off before replacing the lamp to avoid the possibility of electric shock.
- Accessible parts may become hot during use. Young children should be kept away.
- Steam cleaner is not to be used.
- Surface of a storage drawer can get hot.
- Do not use harsh abrasive cleaners or sharp metal scrapers to clean the oven door glass since they can scratch the surface, which may result in shattering of the glass.
- During use the appliance becomes hot. Care should be taken to avoid touching heating elements inside the oven.
- Only use the temperature probe recommended for this oven.(for ovens provided with a facility to use a temperature-sensing probe.)
- During the first use there is a particular smell due to production oils to protect some components.
-
This appliance can be used by children aged from 8 years and above and persons with reduced physical, sensory or mental capabilities or lack of experience and knowledge if they have been given supervision or instruction concerning use of the appliance in a safe way and understand the hazards involved. Children shall not play with the appliance. Cleaning and user maintenance shall not be made by children unless they are older than 8 and supervised.
-
Keep the appliance and its cord out of reach of children less than 8 years.
- This appliance is intended to be used in household and similar applications such as:
- staff kitchen areas in shops, offices and other working environments;
- by clients in hotels, motels and other residential type environments;
- farm houses;
- bed and breakfast type environments.
- WARNING: The appliance and its accessible parts become hot during use. Care should be taken to avoid touching heating elements. Children less than 8 years of age shall be kept away unless continuously supervised.
READ CAREFULLY AND KEEP FOR FUTURE REFERENCE
DANGER
Electric Shock Hazard
Touching some of the internal components can cause serious personal injury or death. Do not disassemble this appliance.
WARNING
Electric Shock Hazard
Improper use of the grounding can result in electric shock. Do not plug into an outlet until appliance is properly installed and grounded.
CLEANING
Be sure to unplug the appliance from the power supply.
- Clean the inside of the oven after using with a slightly damp cloth.
- Clean the accessories in the usual way in soapy water.
- The door frame and seal and neighboring parts must be cleaned carefully with a damp cloth when they are dirty.
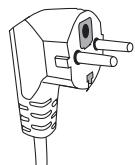
Two-round-pin plug
UTENSILS
See the instructions on "Materials you can use in microwave oven or to be avoided in microwave oven." There may be certain non-metallic utensils that are not safe to use for microwaving. If in doubt, you can test the utensil in question following the procedure below.
Utensil Test:
- Fill a microwave-safe container with 1 cup of cold water (250ml) along with the utensil in question.
- Cook on maximum power for 1 minute.
- Carefully feel the utensil. If the empty utensil is warm, do not use it for microwave cooking.
- Do not exceed 1 minute cooking time.
CAUTION
Personal Injury Hazard
It is hazardous for anyone other than a competent person to carry out any service or repair operation that involves the removal of a cover which gives protection against exposure to microwave energy.
| Materials you can use in microwave oven Utensils | Remarks |
| Aluminum foil | Shielding only. Small smooth pieces can be used to cover thin parts of meat or poultry to prevent overcooking. Arcing can occur if foil is too close to oven walls. The foil should be at least 1 inch (2.5cm) away from oven walls. |
| Browning dish | Follow manufacturer's instructions. The bottom of browning dish must be at least 3/16 inch (5mm) above the turntable. Incorrect usage may cause the turntable to break. |
| Dinnerware | Microwave-safe only. Follow manufacturer's instructions. Do not use cracked or chipped dishes. |
| Glass jars | Always remove lid. Use only to heat food until just warm. Most glass jars are not heat resistant and may break. |
| Glassware | Heat-resistant oven glassware only. Make sure there is no metallic trim. Do not use cracked or chipped dishes. |
| Oven coking bags | Follow manufacturer's instructions. Do not close with metal tie. Make slits to allow steam to escape. |
| Paper plates and cups | Use for short-term cooking/warming only. Do not leave oven unattended while cooking. |
| Paper towels | Use to cover food for reheating and absorbing fat. Use with supervision for a short-term cooking only. |
| Parchment paper | Use as a cover to prevent splattering or a wrap for steaming. |
| Plastic | Microwave-safe only. Follow the manufacturer's instructions. Should be labeled “Microwave Safe”. Some plastic containers soften, as the food inside gets hot. “Boiling bags” and tightly closed plastic bags should be slit, pierced or vented as directed by package. |
| Plastic wrap | Microwave-safe only. Use to cover food during cooking to retain moisture. Do not allow plastic wrap to touch food. |
| Thermometers | Microwave-safe only (meat and candy thermometers). |
| Wax paper | Use as a cover to prevent splattering and retain moisture. |
Materials to be avoided in microwave oven
| Utensils | Remarks |
| Aluminum tray | May cause arcing. Transfer food into microwave-safe dish. |
| Food carton with metal handle | May cause arcing. Transfer food into microwave-safe dish. |
| Metal or metaltrimmed utensils | Metal shields the food from microwave energy. Metal trim may cause arcing. |
| Metal twist ties | May cause arcing and could cause a fire in the oven. |
| Paper bags | May cause a fire in the oven. |
| Plastic foam | Plastic foam may melt or contaminate the liquid inside when exposed to high temperature. |
| Wood | Wood will dry out when used in the microwave oven and may split or crack. |
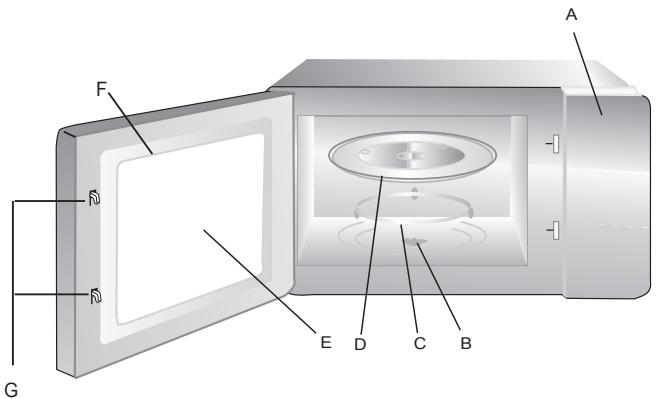
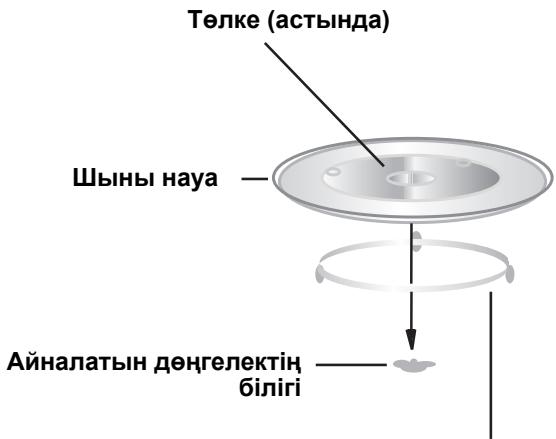
Names of Oven Parts and Accessories
Remove the oven and all materials from the carton and oven cavity.
Your oven comes with the following accessories:
Glass tray 1
Turntable ring assembly 1
Instruction Manual 1
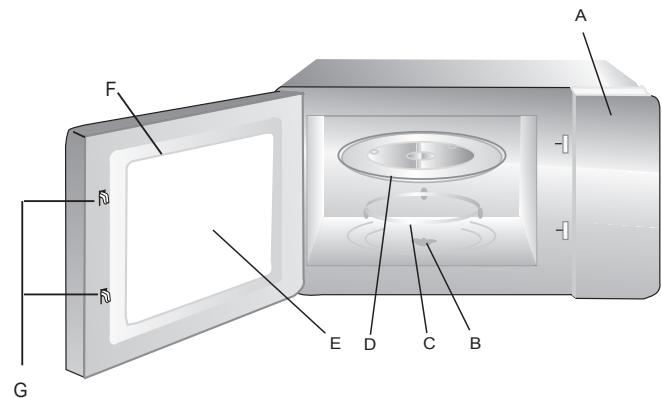
A) Control panel
B) Turntable shaft
C) Turntable ring assembly
D) Glass tray
E) Observation window
F) Door assembly
G) Safety interlock system
Turntable Installation
a. Never place the glass tray upside down. The glass tray should never be restricted.
b. Both glass tray and turntable ring assembly must always be used during cooking.
c. All food and containers of food are always placed on the glass tray for cooking.
d. If glass tray or turntable ring assembly cracks or breaks, contact your nearest authorized service center.

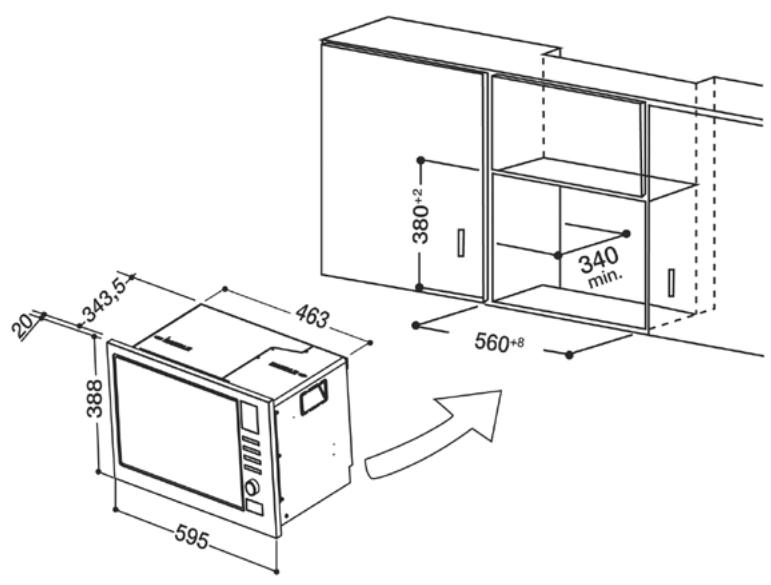
Installation and connection
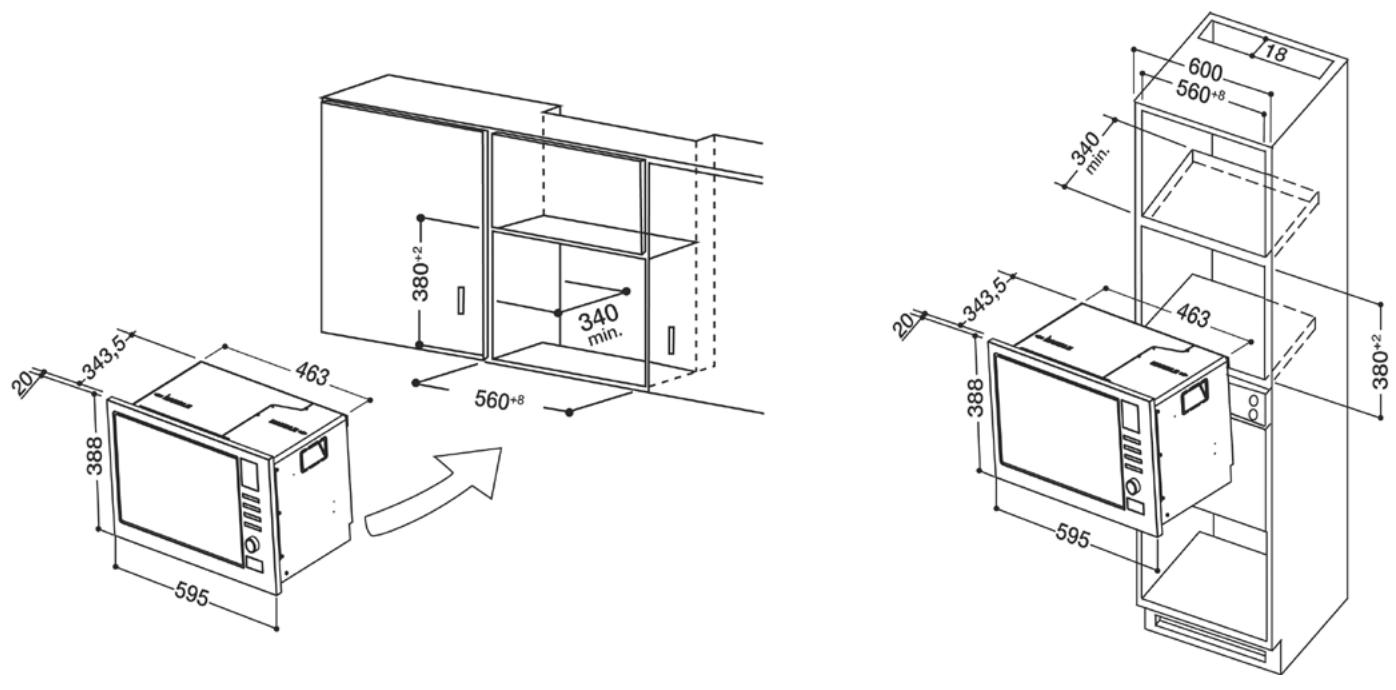
- This appliance is only intended for domestic use.
- This oven is intended for built-in use only. It is not intended for counter-top use or for use inside a cupboard.
- Please observe the special installation instructions.
- The appliance can be installed in a 60cm wide wall-mounted cupboard (at lease 55cm deep and 85cm off the floor).
- The appliance is fitted with a plug and must only be connected to a properly installed earthed socket.
- The mains voltage must correspond to the voltage specified on the rating plate.
- The socket must be installed and connecting cable must only be replaced by a qualified electrician. If the plug is no longer to accessible following installation, an all-pole disconnecting device must be present on the installation side with a contact gap of at lease 3mm.
- Adapters, multi-way strips and extension leads must not be used. Overloading can result in a risk of fire.
The accessible surface may be hot during operation.
1.Clock Setting
When the microwave oven is electrified, the oven will display "0:00", buzzer will ring once.
1) Press “ / ” once. “00:00” displays.
2) Turn "h" to adjust the hour figures, the input time should be within 0--23(24-hour).
3) Press “ / ”, the minute figures will flash.
4) Turn "..." to adjust the minute figures, the input time should be within 0--59.
5) Press “ 圆 /“ to finish clock setting. “:” will flash.
Note: 1) If the clock is not set, it would not function when powered.
2) During the process of clock setting, if you press "PAUSE", the oven will go back to the previous status automatically.
2. Microwave Cooking
Press “ ≈ ” the LED will display
"P100". Press " " for times or
turn “ 🏽 ” to choose the power you want, and “P100”, “P80” “P50”, “P30” or “P10” will display for each added
press. Then press “START” to confirm, and turn “” to set cooking time from 0:05 to 95:00.
Press " START" again to start cooking.
Example: If you want to use 80% microwave power to cook for 20 minutes, you can operate the oven as the following steps.
1) Press “ ≈ ” once, the screen display “P100”.
2) Press “ ≈ ” once again or turn
" to choose 80% microwave power.
3) Press "START" to confirm, and the screen displays "P 80".
4) Turn "..." to adjust the cooking time until the oven displays "20:00".
5) Press " " to start cooking.
3. Quick Start
1) In waiting state, Press “ ( ) ” to start cooking with 100% power, each added press will increase 30 seconds cooking time up to 95 minutes.
2) In microwave cooking or time defrost state, each press of “ _ART ” can increase 30 seconds of cooking time.
3) In waiting state, turn “ ” left to set cooking time with 100% microwave power, then press “ ” to start cooking.
4. Defrost By Weight
1) Press “ / ” once, and the oven will display “dEF1”.
2) Turn "..." to select the weight of food from 100 to 2000 g.
3) Press " START" to start defrosting.
“ ” Pad instructions
| Order | Display | Microwave Power |
| 1 | P100 | 100% |
| 2 | P80 | 80% |
| 3 | P50 | 50% |
| 4 | P30 | 30% |
| 5 | P10 | 10% |
5. Defrost By Time
1) Press “ / ” twice, and the oven will display “dEF2”.
2) Turn "..." to select the defrost time. The MAX time is 95 minutes.
3) Press " START" to start defrosting.
The defrost power is P30, and it will not be changed.
6. Kitchen Timer
(1) Press “ / ” twice, LED will display 00:00, timer indicator will light.
(2) Turn "h" to enter the correct time. (The maximum cooking time is 95 minutes.)
(3) Press "START" to confirm setting, timer indicator will be lighted.
(4) When the kitchen time is reached, timer indicator will go out. The buzzer will ring 5 times. If the clock be set (24-hour system), LED will display the current time.
Note: The kitchen Time is differ from 24-hour system. Kitchen Timer is a timer.
7. Inquiring Function
(1) In states of microwave, grill and combination cooking, press “ ≈ ”, the current power will be displayed for 3 seconds. After 3 seconds, the oven will turn back to the former state:
(2) In cooking state, press “ / ” to inquire the time and the time will display for 3 seconds.
8.Auto Menu
1) Turn "h" right to choose the menu, and "A-1" to "A-10" will display.
2) Press “ ” to confirm.
3) Turn " " to choose the default weight as the menu chart.
4) Press "START" to start cooking. Example: If you want to use "Auto Menu" to cook fish for 350g.
1) Turn "clockwise till "A-4" display.
2) Press “ ” to confirm.
3) Turn " to select the weight of fish till "350" display.
4) Press " START" to start cooking.
9. Multi-section cooking
At most 2 sections can be set for cooking. In multi-section cooking, if one section is defrosting, then defrosting shall be placed in the first section.
Example: If you want to defrost food for 5 minutes and then cook with 80% microwave power for 7 minutes, operate it as the following:
1) Press " / 3.5 ” twice, and the oven will display
2) Turn "h" to select the defrost time till "5:00" display.
3) Press " ≈ ” once, the screen display "P100".
4) Press “ ≈ ” once again or turn “ ≈ ” to choose
80% microwave power.
5) Pres "P 80".

” to confirm, and the screen displays
6) Turn "O" to adjust the cooking time till the oven displays "7:00".
7) Press " " to start cooking, and buzzer will sound once for the first section, defrosting time counts down; buzzer will sound once again entering the second cooking. when cooking finish, buzzer sounds five times.
10. Lock-out Function for Children
Lock: In waiting state, press "PAUSE" for 3 seconds, there will be a long beep denoting entering the children-lock state and current time will display if the time has been set, otherwise, the LED will display "C-2". Lock quitting: In locked state, press "PAUSE" for 3 seconds, there will be a long "beep" denoting that the lock is released.
The menu chart:
| Menu | Weight (g) | Display |
| A-1 PIZZA | 200 g | 200 |
| 400 g | 400 | |
| A-2 Potato | 200 g | 200 |
| 400 g | 400 | |
| 600 g | 600 | |
| A-3 Meat | 250 g | 250 |
| 350 g | 350 | |
| 450 g | 450 | |
| A-4 Fish | 250 g | 250 |
| 350 g | 350 | |
| 450 g | 450 | |
| A-5 Vegetable | 200 g | 200 |
| 300 g | 300 | |
| 400 g | 400 | |
| A-6 Beverage | 1 cup (120 ml) | 1 |
| 2 cups (240 ml) | 2 | |
| 3 cups (360ml) | 3 | |
| A-7 Pasta | 50g(with 450 ml cold water) | 50 |
| 100g(with 800 ml cold water) | 100 | |
| A-8 Popcorn | 50 g | 50 |
| 100 g | 100 | |
| A-9 Chicken | 200 | 200 |
| 400 | 400 | |
| 600 | 600 | |
| 800 | 800 | |
| A-10 Reheat | 200 | 200 |
| 400 | 400 | |
| 600 | 600 | |
| Normal | ||
| Microwave oven interfering TV reception | Radio and TV reception may be interfered when microwave oven operating. It is similar to the interference of small electrical appliances, like mixer, vacuum cleaner, and electric fan. It is normal. | |
| Dim oven light | In low power microwave cooking, oven light may become dim. It is normal. | |
| Steam accumulating on door, hot air out of vents | In cooking, steam may can out of food. Most will get out from vents. But some may accumulate on cool place like oven door. It is normal. | |
| Oven started accidentally with no food in. | It is forbidden to run the unit without any food inside. It is very dangerous. | |
| Trouble | Possible Cause | Remedy |
| Oven cannot be started | (1) Power cord not plugged in tightly | Unplug. Then plug again after 10 seconds. |
| (2) Fuse blowing or circuits breaker works. | Replace fuse or reset circuits breaker (repaired by professional personnel of your company) | |
| (3) Trouble with outlet | Test outlet with other electrical appliances. | |
| Oven does not head | (4) Door not closed well | Close door well |
| Glass turntable makes noise when microwave oven operates | (5) Dirty roller rest and oven bottom | Refer to “Maintenance of Microwave” to clean dirty parts. |
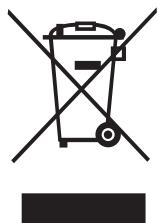
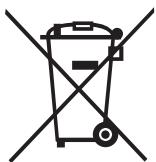
According to Waste of Electrical and Electronic Equipment (WEEE) directive, WEEE should be separately collected and treated. If at any time in future you need to dispose of this product please do NOT dispose of this product with household waste. Please send this product to WEEE collecting points where available.
Please Read the Manual Carefully Before Installation
Please Note
Electrical connection
The oven is fitted with a plug and must be only connected to a properly installed earthed socket. In accordance with the appropriate regulations, the socket must only be installed and the connecting cable must only be replaced by a qualified electrician.
If the plug is no longer accessible following installation and all-pole isolating switch must be present on the installation side with a contact gap at least 3mm.
The fitted cabinet must not have a back wall behind the appliance.
Minimum installation ventilation slots and suction holes.
Note:
Do not trap or bend the power cable.
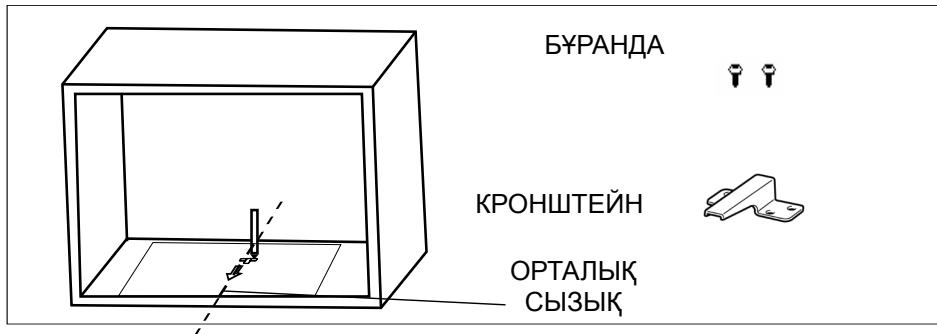
A. Built-in furniture
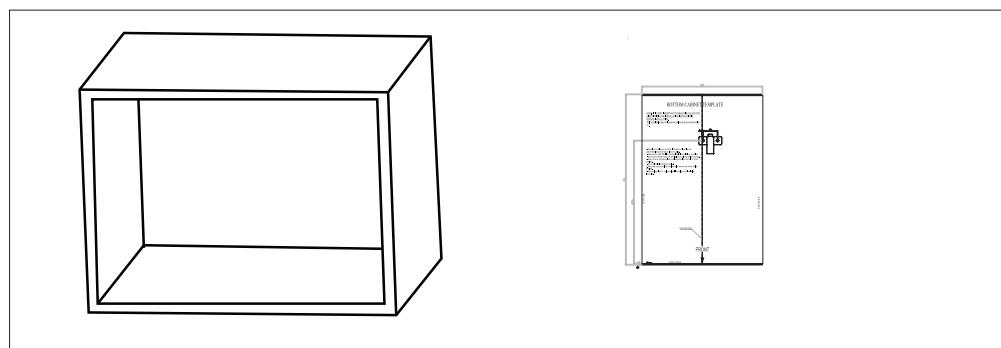
B.Prepare the cabinet
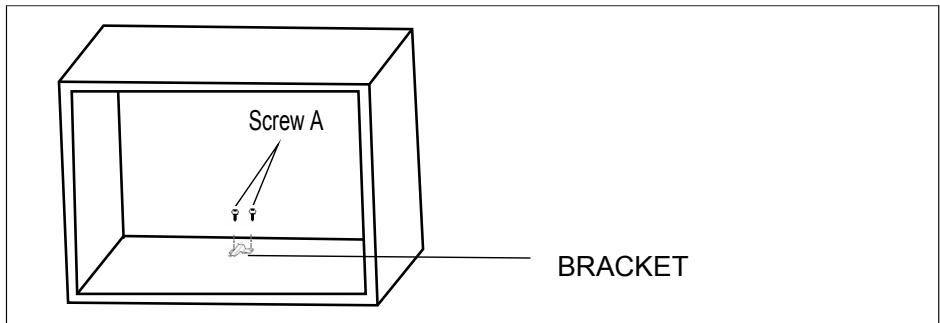
- Read the instruction on the BOTTOM CANINET TEMPLATE, put the template on the bottom plane of cabinet.
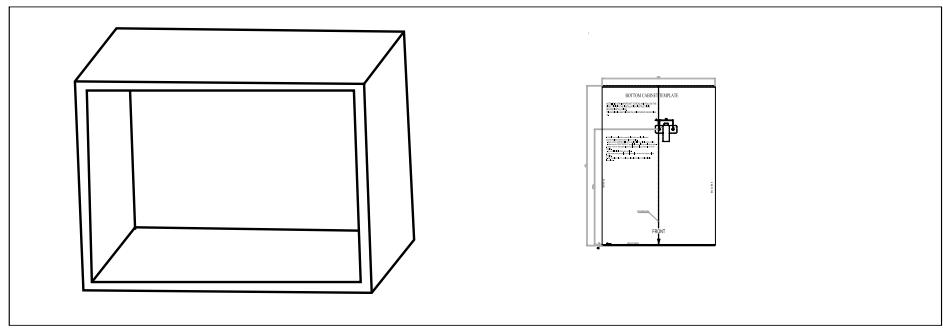
- Make the marks on the bottom plane of cabinet according to marks"a" of of the template
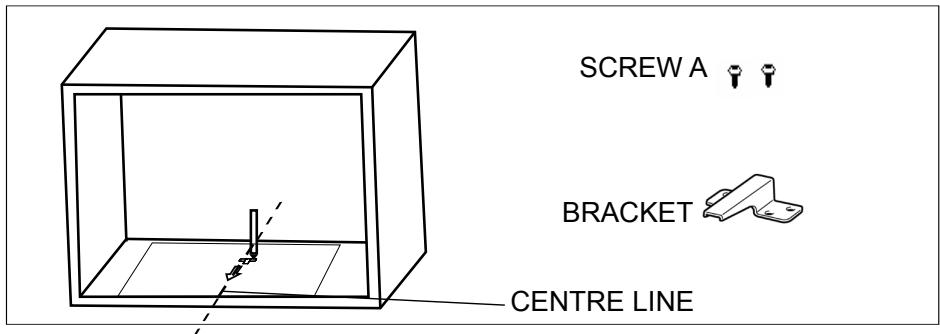
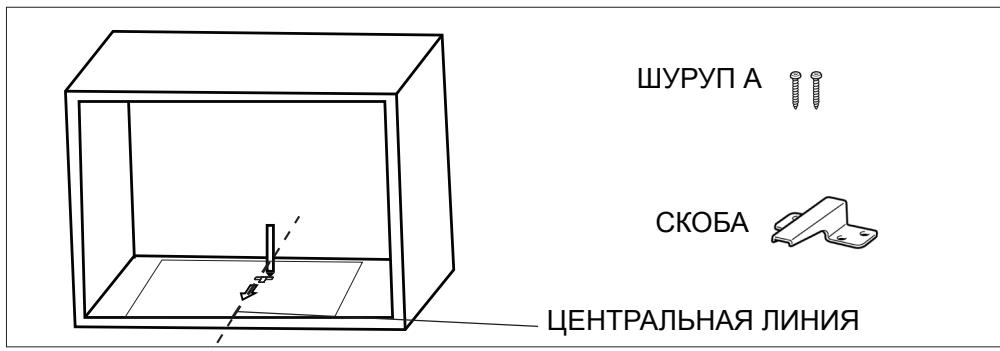
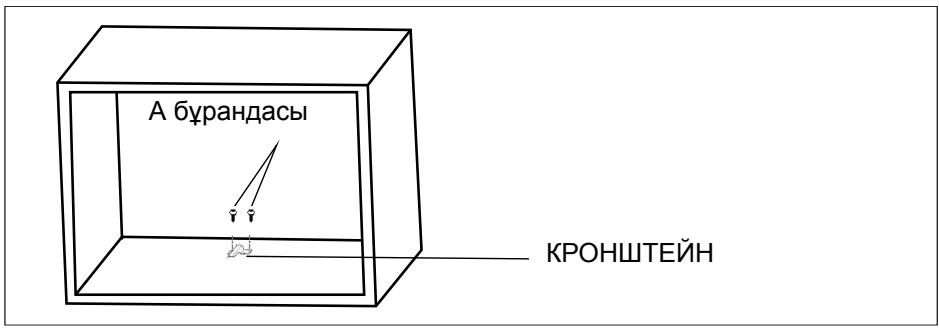
- Remove the bottom cabinet template and fix the bracket with screw A.
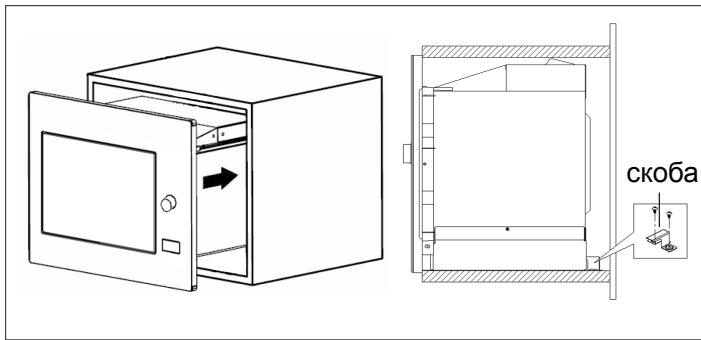
C.Install the oven
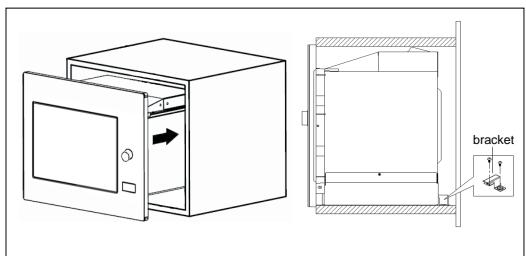
-
Install the oven to the cabinet
-
Make sure the back of the oven is locked by bracket.
-
Do not trap or kink the power cord.
-
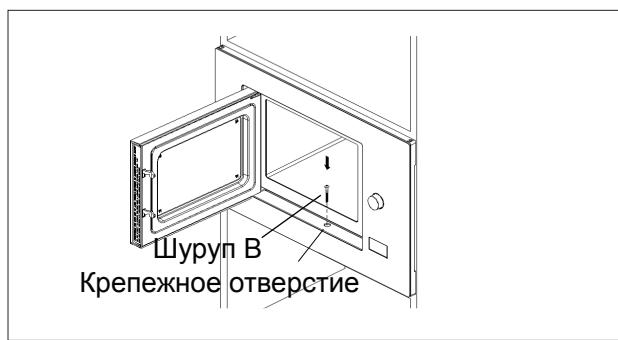
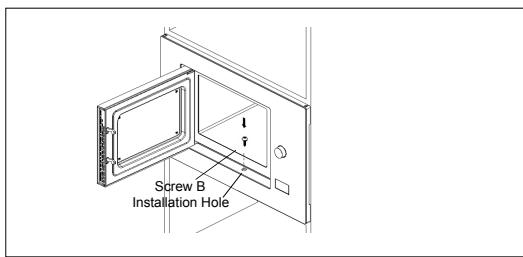
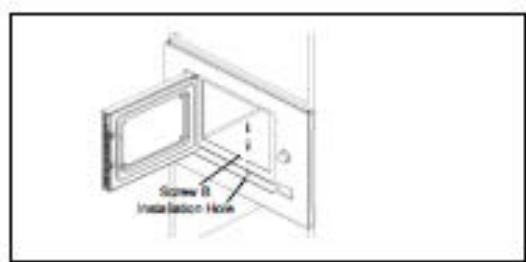
Open the door, fix the oven to the cabinet with Screw B, at the installation hole.
IT
Italiano
FR
Français
ES
Espanol
PT
Portugues
NL
Nederlandst
DE
Deutsch
RU
Pycckn
KZ
Ka3aKawa
Ma3MyHbI
CaKtbIkeckepTyIepXaHeYcblbIcTap,119
Peta opHaTy, 124
PaindanaHy TpaIbI HycKaynap, 125
AkaayIbIKTapdbIXOIO,129
Ophaty, 130

Hotpoint
ARISTON
Kbicka TOnkblnDbl neWti naIdaIaNy aIdbHda OcbI HycKaynapbl MyKNrT OKbln WbIFbIHbI3 XeHE MyKnrt CaKTahbl3.
Erep HucaynapdbI opbHdaacahb3, nei ci3re Ken Kbln JkaKcbI Kb13MeT KepeTeDi.
OCbI HYCKAYJAPDbI MYKINrT CAKTAHbI3
bIKTINMAJ APTbIK KbICKA TOJKBiH KyATbIHbIH OCEPIH BOJIbIPMAYdbIH CAKTbIK WAPAJAPbl
a)Булnewtieciiraшык Кидэнадануfa Āpeket JxacamaHbI3, Эntkehi 6yI KbICKa TOJIKBiHdbI KyaATtbIH 3nAHNbI ācepîne ᵋKeŋyi MymkIn. Kayinci3dk KynbITapbIH 6y36ay Hemece OJapDbI Θ3repTney MaHbI3dbI.
(b) NeuTiH aIbIHfbl 6eTI MeH eCKi apacbIHda eIbip 3aT KOIMaHbI3, Ra BoJMaCa, TbIFbI3aFbIbI 6eTTepDe KpDiH Hemece Ta3aJIaFbIbI KaIDbIFbIHbIH XINHaIybiHa MymKiHdik 6epMeHi3.
(c) ECKEPTY: erep ecik hemece ecik TbIfbl3dafbIUtapbl 3aKbIMdAnca, 6iJIkTi aam XeHdereHwe neSti naJaIaNbay Kepek.
KOCbIMUa
Erep Kypblfbl JkaKcbI Ta3a Kynde caKTaJca, OHbIH 6eTI JkaFdaI 6Olybl MymKiH.
TexHnkaJIbIK cneuΦnkaUaJIap
AinHanaTbIH DeHreIeK caKInHaCsbIH KInHay 1
PaiandaHny HucKayIbIbI 1
A) Backapy TaKTacbl
B) Aиналаын DeHreIeKTei h 6jiri
C) Aиналаын DeHreJek caKnHaCbI JxNHaFbI
D) haya
E) BaKBblay Tepe3eci
F) EciKti JxHay
G) Kayinci3diK KyIbI Kyyieci
AinHajatbIn DeHreJekTi opHaTy
a. Ewkaaah WbIHb HayaHb ayapbIn KOImaHbI3. IbHbI Haya eWkaaH KbcblIMaybl KepeK.
b. Μυήνι ὅγα ἀ, aΗΝΑΤβΙΝ ΕθέΓηκεΚ cαχινας βχιναίνα Αδεπρηγ Κεύπει έρκαλωαν Παῦσανανβινγί Κερεκ.
c. Bykin TamaK JHe TamaK bIDbICTapbl 3ipney yuHn ePKaHaH bHb Hayara OPhaNaCTbIPbIaNbl.
d. Erep 乌HbI HayaHa HeMece aHaJaTbIH DHeHreIeK CaKNHaCbI KINHaFbIHDa CbIHbIKTap NaIda BoJICA, eH KaKbIH EkJNetti cepBnCTIK opTaJIbIKKa xa6apNaCbIHbI3.
AinHaIaTbIH DeHreJIek CaKINHaCbI XINHaFbI
Ophaty XaHe Kocy
- ByI Kypblfbl TeK yIe naJaIaHyra apHaJFaH.
- BykpybIyfbl TeK kipictipinreH Typde naJaIaNHyra apHaIraH. OJ yCTeN 6eTInHe naJaIaNHyra Hemece uKaΦ iUInHe naJaIaNHyra apHaJIMaFaH.
- OcbI opHaTy TpyaJIbI apHaNbI HycKaynapDbI opbIHdaHbI3.
- KypbIrfbHbKeHdi 60 cm Ka6bIpfara 6ekiTineTIn 1kaΦTa opHaTyfa 6oJaDbI (KemHne 55 cm TepeH XeHe eDeHHHe 85 cm KaUbIKtbIKTa).
- KypbIrfbl aWamEn Xa6DbIkTaNfAH XaHE OHbI Tek Tnicti TypDe opHaTbIlnFaH, Jepre KocblnfaH po3eTKara XaNfay KepeK.
- Keniik Kepehy KepceTkiuTep TaKtacbHda Kepcetijiren Kepehyre caB oJybl Kepek.
- Po3eTkaHbOpHaTydbJxHe JkAflFaBliKabEnbdi aybICTbipydbI TeK 6iNikTI 3neKtpNK OpbIHdaybl KepeK.ErepOpHaTuAn KeiH aHaFa KOn JKeTki3y MymKiH 6oImaca,OpHaTyOpbIHda BaJIaHbIC caHbIaybl KeMInDe 3 MM 6apNbIK NOnHocTi axbIpaTaTbIH Kypblfbl 6Olybl KepeK.
- AanTepnepdi, KEN JkaTbI JKOJaKTapDbI JKeHe Y3apTKblcIMdApDbI naJdaJaan6ay KepeK. ApTbIK JyKTeMe optke eKeJnyi MymKiH.
KoJ XeTki3yre 60JaTBiH 6et naJaIaHy Ke3IHde bICTbIK 6Olybl MymkIn.
1. CafatbI opHaTy
Kbicka tokblnbI neiTe aNektp 6ap 6oNa, neu «0:00» KepceTei, zmmeh 6ip pet shllnbipnaiNbI.
1) “ / ” Tуймecин бір рет 6асыньз. «00:00» kерсітіnéді.
2) “” Tуймecин басьл са fatцфрьн peTTeHiz, eHriizinreH yaKbIT 0--23 (24 carat) apacbHda 6OnybI kepek.
3) “ / ” TVIMecIH 6acbHbI3, MInHyT cNΦpnapbl KblblblkTaIdbI.
4) “” Tуймecин басьи МИнУТ сифрпарьи peTTeHi3, eHriizirreh yakbiT 0--59 apacbIHda boNYBI KepeK.
5)Carat opHaTydbl aaykTay ywiH / Tymecin 6acblb3.:XblblbIKtaIdbI.
Eckertne:
1) Erep opHaTbIImaHaH 6oIca, caFat KyaT 6epiInreHneKymblc icTeMeiNi.
2) CaftbOpHaTy 6apbcHda “ STOP TymecinBaccah3, nea aJdbHfbl Kyre abTomattbl TypdeopanaDbI.
2. KbICKa TOnKbIHnApMeH ə3ipJey
“TуимecinбасиЗ,K山Д«P100»КерсTeDi.
“TMyMeCih yaKbITTap yuH 6acbHb3 Hemece
" TyTkacbIH 6kpbl Kajket Kyaattbl TaHdaHb3 KHe ep KocbIMsa 6ackaHda «P100», «P80», «50», «P30» Hemece «P10» kεpcetijédi. Codan KeiH pactay yuH " START " TyImeciN 6acbHb3 KHe 0:05 KHe 95:00 apacbIHda əzipney yaKbTbH opHaTy YuH " TyTkacbIH 6ypaHb3.
3ipnydi 6actay yuH “START” TYIMecIH KaTadaH 6acblb13.
MbicaI: 80% Kbicka ToKbIHdap KyaTbH 20 MNHyT 6oBbl e3ipney ywiN naJaHaHfbHb3 KeNce, neSti keNeci KaamdapdaIdaI naJaHaHa aIacbI3.
1) “ *** ” Tуймecин бір рет басыньіз, зкранда «P100» Керсетіпеді.
2) 80% Kbicka TOnkbiHdap KyaTbIH TaHday yuin " ≈ ≈ "TyImeciH KaItaDah 6acbl3 Hemece " TyTKacbiH 6ypbl3.
3) Pactay yushi“ START” TyuMeciH 6acbHbI3, COHda ekpaHda «P 80» KepeTinei.
4) ΘεπρηγακβιΤβιH πεῦ «20:00» γακβιΤβιH κερετκενήσε peTTey yιδιην “”,TyΤΚαςθιν δύρβιΗβι3.
5) Θεπηγίδι δαςτάγ γιχήν “(START)” τυχήμεική δαςύβει.
3. XbIДam icke Kocy
1) KyTu KnyiHne 100% KyaTpeH e3ipNeuyi bactay yuHIn " START" TyuMeCiH bAcbIbI3, ep KocbIMua bacy e3ipNey yaKbIbH 30 cekyHnKa apTtbpaIbI, 95 MmHyTk aeiH.
2) KbIcKa TOnKbIHapMeH ə3ipJeyde Hemece yaKbITneH epity KyiHnde "START" TYmecin ap bacy ə3ipJey yaKbITbIH 30 cekyHka apTTbIpaIbl.
3) KyTy KIyHHe 100% KbICKa TOnKbIHdAp KyaTbI 6ap e3ipNey yaKbITbIH OPhaTy yWIn " TytKabIH bypaHbI3, cOan H KeiH e3ipNeydi 6actay yWIn " START "TyMecin 6acbIHbI3.
4. CanMaK 6oBbHwa epity
1) “ / ” TγινΜεςιν διρ πετ δαςχήβις, coύνης πευτέτους ἀδεντός.
2) 100 xhe 2000 r apacbHaH TaMaK caImaFbIH TaHday yuiH" h" TyTkacbH bpaHbI3.
3) EpiTydi 6actay yushiIN "START" nepheciH 6acbHbI3.
Erepohatyadn KeiHa aHa fKaonKeTki3y Mymkih 6oImaca, opHaTy opHbInDa 6aJIaHbIC caHbInaybI KEMIHde 3 MM 6apblk noJIIOCTi OKwauNaTbIH KCKbl 6OlybI KepeK.
OpHaTbIJFaH ⅢKaΦTa Kypblfbl apTbIHda apTkbl KaobIpfa 6oJmaybi Kepek.
Eh a3 opHaTy keIaTeTy yIaIbIKTapbl KHe copy TecikTepi.
Eckertne:
KyaT Ka6eJIH KbIcBn KaJIMaHbI3 HemeCe MaNbICTbIPMaHbI3.
A. Kipictipinren Xnha3

B.Шkaфты дайындану
- TÖMEHΓI LJKAΦ YÜNÇIHIDΕΝΙ HUCKAYdBι OKBiHBi3, YÜNÇHI LJKAΦTbH TÖMEHRI JKA3bIKTbIFbHa KOYbHb3.

- YnriHIn «a» 6enrinepeihe cau shkaΦtbIHTemErKaa3bIKTBfBbIHa 6enrinep KacahbI3.
- TemeHri ukaФ ylricih aIbIbI3 xHe KPOHHTeHdi A 6ypaHdaCbImeH 6ekTiH3.
C. Пechт op hematу
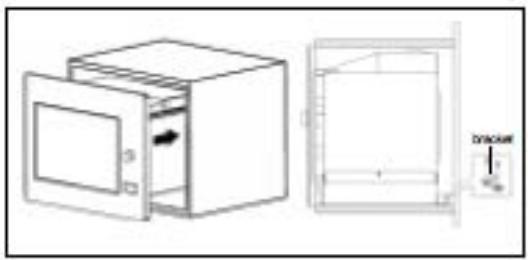
- Newti wkaqKa opHaTbIbI3
-Пeштih apTbI kpoHHTeHMeH KyIbInTaNfAhnBtH TEkcepij3.
-KyaT Ka6eHIN KbIcBn KaImaHbI3 Hemece 6ypamaHbI3.
- EciKti aIbIbI, neTI IkaFka B 6ypaHdaacbImeH opHaTy teciriHde 6ekTiH3.


- 3.Быстpbьзануck
- BcTpoEHHa yCtahOBka
- ПОДГ罗TOВka Hnши
- YctaHOBka neu.
- PRECAUTIONS TO AVOID POSSIBLE EXPOSURE TO EXCESSIVE MICROWAVE ENERGY
- ADDENDUM
- IMPORTANT SAFETY INSTRUCTIONS
- WARNING
- READ CAREFULLY AND KEEP FOR FUTURE REFERENCE
- DANGER
- CLEANING
- Two-round-pin plug
- UTENSILS
- Utensil Test:
- CAUTION
- Personal Injury Hazard
- Names of Oven Parts and Accessories
- Turntable Installation
- Installation and connection
- 1.Clock Setting
- Microwave Cooking
- Quick Start
- Defrost By Weight
- “ ” Pad instructions
- Defrost By Time
- Kitchen Timer
- Inquiring Function
- 8.Auto Menu
- Multi-section cooking
- Lock-out Function for Children
- Please Read the Manual Carefully Before Installation
- Please Note
- Electrical connection
- Note:
- Built-in furniture
- B.Prepare the cabinet
- C.Install the oven
- bIKTINMAJ APTbIK KbICKA TOJKBiH KyATbIHbIH OCEPIH BOJIbIPMAYdbIH CAKTbIK WAPAJAPbl
- KOCbIMUa
- AinHajatbIn DeHreJekTi opHaTy
- Ophaty XaHe Kocy
- CafatbI opHaTy
- Eckertne:
- KbICKa TOnKbIHnApMeH ə3ipJey
- XbIДam icke Kocy
- CanMaK 6oBbHwa epity
- Kipictipinren Xnha3
- B.Шkaфты дайындану
- Пechт op hematу
Brand : HOTPOINT
Model : MWH2322B
Category : Microwave Oven