
PHOENIXFIX PRO 3 - Car seat KIDDY - Free user manual and instructions
Find the device manual for free PHOENIXFIX PRO 3 KIDDY in PDF.
User questions about PHOENIXFIX PRO 3 KIDDY
0 question about this device. Answer the ones you know or ask your own.
Ask a new question about this device
Download the instructions for your Car seat in PDF format for free! Find your manual PHOENIXFIX PRO 3 - KIDDY and take your electronic device back in hand. On this page are published all the documents necessary for the use of your device. PHOENIXFIX PRO 3 by KIDDY.
USER MANUAL PHOENIXFIX PRO 3 KIDDY
Please read these instructions carefully before using this infant carrier for the first time.
Keep this manual for future reference.
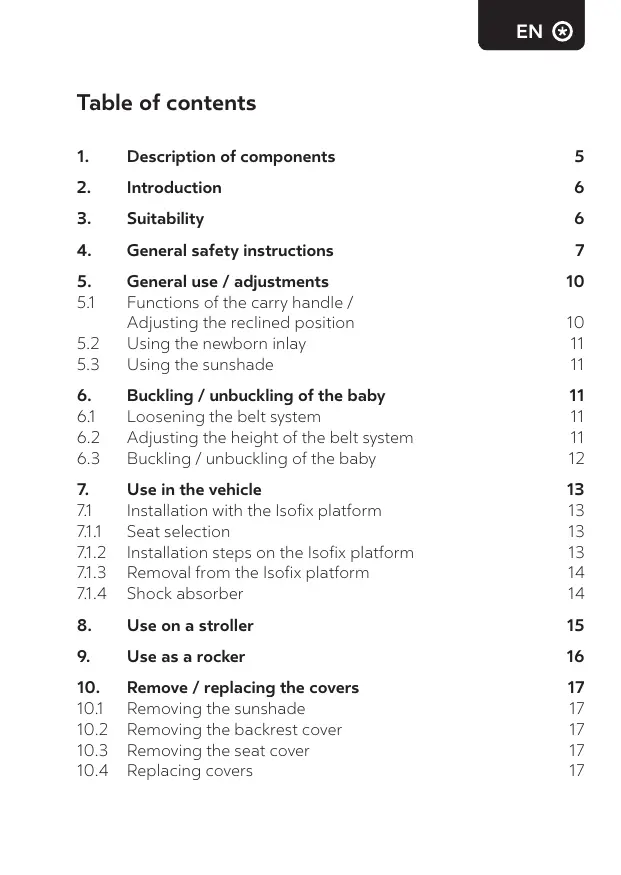
Table of contents
- Description of components 5
- Introduction 6
- Suitability 6
- General safety instructions 7
- General use / adjustments 10
5.1 Functions of the carry handle / Adjusting the reclined position 10
5.2 Using the newborn inlay 11
5.3 Using the sunshade 11 - Buckling / unbuckling of the baby 11
6.1 Loosening the belt system 11
6.2 Adjusting the height of the belt system 11
6.3 Buckling / unbuckling of the baby 12
7.Use in the vehicle 13
7.1 Installation with the Isofix platform 13
7.1.1 Seat selection 13
7.1.2 Installation steps on the Isofix platform 13
7.1.3 Removal from the Isofix platform 14
7.1.4 Shock absorber 14
8.Use on a stroller 15
9.Use as a rocker 16 -
Remove / replacing the covers 17
10.1 Removing the sunshade 17
10.2 Removing the backrest cover 17
10.3 Removing the seat cover 17
10.4 Replacing covers 17 -
Care and maintenance 18
11.1 Cleaning the seat covers 18
11.2 Cleaning plastic parts 18
11.3 Cleaning the belt system 18 - Steps to take after an accident 18
- Warranty 18
Operation manual Evoluna i-Size 2
IMPORTANT - Read the instructions carefully before use and keep for future reference in the storage compartment at the foot end of the carrier. So you always have it at hand whenever you need it.
1. Description of components
A - The child restraint system Evoluna i-Size 2
B-Carry handle
C - Release button stroller
D - Shoulder belt
E - Seat cover
F - Central adjuster
G-Buckle
H - Shock absorber
I - Infant carrier release handle
J - Locking bar
K - Sunshade
L - Newborn inlay
M - Safety belt lock tongues
N - Carry handle button
O - Front cover
P - Sunshade release button
Q - Sunshade joint
R - Height adjustment handle
2. Introduction
We are pleased that you have chosen the Evoluna i-Size 2 to be your child restraint system.
The Evoluna i-Size 2 forms part of the i-Size product line of our company, which provides extensive safety for the protection of your baby and growing child by making use of special energy-absorbing materials. The forces generated during a collision are absorbed particularly well before they reach the delicate body parts of your baby.
To gain the most comprehensive protection for your child, the Evolutana i-Size 2 must be used exactly as described in this manual!
The Evoluna i-Size 2 also stands out due to its unique sleeping position, which offers your child an almost flat reclined position when using the infant carrier in the vehicle, on your stroller or as a rocker.
3. Suitability

The Evoluna i-Size 2 infant carrier has been tested and approved in accordance with the Safety Standard ECE-R129.
This means ECE-R129 (i-Size): In connection with the Isofix
platform, the Evoluna i-Size 2 may be used on all i-Size vehicle seats. Kiddy also allows the installation on Isofix vehicle seats that are listed in the vehicle type list.
Check the latest version of the type list at:
Never fix the Evoluna i-Size 2 with the vehicle seat belt!

It is important to take note that you may never use the Evolutana i-Size 2 seat with an active front airbag! A front airbag that hits the infant carrier with force can cause serious injury or even death to the child!

For use in your vehicle, please also follow the manufacturer's recommendations in your owner's manual.
4. General safety instructions

WARNING
- Please read the instructions for use carefully before using the car seat for the first time. Incorrect use can endanger the life of your child.
- Many injuries are caused by mere thoughtlessness and can easily be avoided.
- It is not permitted to make any modifications to the child restraint system. Doing so nullifies or impairs its effectiveness in protection. If difficulties arise, please consult your retailer or the manufacturer.
- Regularly inspect the different elements of the infant carrier. The belt system and buckle in particular must be checked regularly for wear and tear or possible damage.
-
Do not attempt to make adjustments while travelling.
-
Always install the Evoluna i-Size 2 facing the direction opposite to the one in which you are travelling (the child's back facing the direction you are travelling in).
- Please adhere to the instructions in the owner's manual of the vehicle into which the Evoluna i-Size 2 is installed.
- Make sure that all movable parts of the Evoluta i-Size 2 are always properly locked in place and that no parts are lodged between movable seats or doors.
- The infant carrier should only be used for children with a body height from 45 to 83~cm and a maximum weight of 13~kg .
- In vans and mini-vans it is particularly important to ensure that the Evoluna i-Size 2 is installed in an easily accessible seat in the event that third-party rescue is required.
-
Never use the Evoluna i-Size 2 as a shopping bag or as a means for transporting something.
-
Never leave your baby unsupervised, especially not when the Evoluna i-Size 2 is placed on a high surface (nappy changing station, table, etc.).
- Always secure the baby with the belt system (even when you are not using the Evoluna i-Size 2 inside the vehicle).
- Do not place any heavy items on the rear window shelf, these can become dangerous projectiles in the event of an accident.
- Always fasten the Evoluna i-Size 2 seat with the Isofix platform when transporting it in your car un-occupied.
- Never use the Evoluna i-Size 2 seat without its original cover, it forms part of the safety concept.
- Shield the Evoluna i-Size 2 seat from direct sunlight to prevent uncomfortable heating of the surface.
-
Schedule breaks during longer trips and take your baby out of the Evoluna i-Size 2 to relieve the pressure on its spinal column.
-
Do not use the Evoluna i-Size 2 any more if parts have been damaged or after an accident (at an impact speed greater than 10km/h ! (See point 12.)
5. General use / adjustments
5.1 Functions of the carry handle / Adjusting the reclined position
To adjust the carry handle, press both carry handle buttons (fig. 1, no. 1) and then swivel the carry handle (fig. 1, no. 2) into the required position.
WARNING
Make sure that both carry handle buttons are locked in place again (they protrude)!
The carry handle of the Evoluna i-Size 2 can be used in two positions (fig. 2):
- fig. 2, no. 1: seating position / carry position / installation position in the vehicle
- fig. 2, no. 2:
reclined position / installation position in the vehicle / on stroller/ as rocker
In some vehicles due to the lack of space it might not be possible to use the reclined position.
5.2 Using the newborn inlay
The Evoluna i-Size 2 is equipped with a comfort insert for newborns. This inlay ensures a more level position of your baby in the infant carrier. This comfort inlay may only be used for babies up to the age of 6 months (fig. 3). To remove the inlay, open the buckle and remove the insert from the shoulder belts.
5.3 Using the sunshade
To extend the sunshade pull the hood towards the foot end of the car seat. To retract the sunshade push towards the head end of the car seat.
The sunshade is detachable. To do this, first pull the soft top from the shell (fig. 4). Then press the sunshade release button inwards (fig. 5, no. 1) and pull the sunshade joint off (fig. 5, no. 2). Carry out this step on both sides.
To attach the sunshade, insert the two joints into the respective guide rail until they are locked (fig. 6) and attach the soft top to the shell.
6. Buckling / unbuckling of the baby
6.1 Loosening the belt system
Turn the carry handle in to the carry position. Before you can adjust the height of the shoulder belts, the belt system must be loosened. For this purpose, keep the central adjuster pressed in the front under the seating area (fig. 7, no. 1), and pull the shoulder belts (fig. 7, no. 2) out.
6.2 Adjusting the height of the belt system
Open the front cover at the head end of the infant carrier by slightly pressing the hooks upward. (fig. 8, no. 1), now the cover opens (fig. 8, no. 2). Now turn the height adjuster handle 90^ clockwise (fig. 9, no. 1)
and pull the handle outward (fig. 9, no. 2), then move it into the desired position upward or downward (fig. 9, no. 3). The optimum height position of the shoulder belts is reached when the belts are at the babies shoulder height (fig. 10).
Lock the height adjuster handle back into place after you have finished. Please make sure that the belt system is not twisted or does not become lodged! Close the front cover.
6.3 Buckling / unbuckling of the baby
Always buckle up your child when it is in the infant carrier!
Loosen the shoulder belts as described in point 6.1 and place them over the side of the rim of the carrier. Place your baby in the infant carrier and then position the shoulder belts over its shoulders (fig. 11, no. 1).
Place the safety belt lock tongues attached to the shoulder belts over each other (fig. 11, no. 2). Now push the safety belt lock tongues into the buckle. It is locked in place when a click sound is heard (fig. 12).
Make certain that it is securely locked in place! Now pull the central belt until the belt system fits the body of the child snugly (fig. 13).
Make sure that the space between the belts and your child is no more than the width of a finger (ca. 1 cm) and that the belt system is not twisted.
To unbuckle your baby loosen the shoulder belts as described in point 6.1 and press the red button on the buckle to unbuckle your baby. Now you can take the child out of the seat.
7. Use in the vehicle
7.1 Installation with the Isofix platform
7.1.1 Seat selection

Read up all the necessary information about the use of child restraint systems in your vehicle owner's manual.
Never fix the Evoluna i-Size 2 with the vehicle seat belt (fig. 14)!

In connection with the Isofix platform, the Evoluna i-Size 2 may be used on all i-Size vehicle seats. Kiddy also allows the installation on Isofix vehicle seats that are listed in the vehicle type list (fig. 14).
The latest version of the vehicle type list is always available for download at www.kiddy.de/typealist_isofixbase.

Rear-facing child restraint systems may never be used with an activated front airbag (fig. 14)!
In some vehicles due to the lack of space it might not be possible to use the reclined position.
Traces of use or discolouration can appear on some vehicle seat covers made from sensitive materials (e.g. velour, leather etc.) if car seats or platforms are used. To avoid this we recommend to place a seat cover shield or protection mat underneath the product.
7.1.2 Installation steps on the Isofix platform
First the Isofix platform has to be properly mounted in the vehicle. For this purpose, please refer to the instruction manual for the Isofix platform.
Place the carriage in the foremost position. Slide the side releasing slide at the knee of the platform to the back (fig. 15, no. 1) and pull the carriage forward at the same time (fig. 15, no. 2).
Now place the Evoluna i-Size 2 from above onto the Isofix platform, so that the locking bars are in the grooves of the platform (fig. 16). If necessary, press the infant carrier down.
The green display's at the front and side of the carriage indicates whether the seat is locked securely (fig. 17). If the green display's are not visible this means that the Evoluna i-Size 2 has not been properly fastened to the platform!
Now you can decide whether you want to use the Evoluna i-Size 2 in the seated position (fig. 18, no. 1) or in reclined position (fig. 18, no. 2). Simply adjust the position with the carry handle (see point 5.1).
The final step involves pushing the releasing slide (at the side of the knee) back (fig. 19, no. 1) and securely sliding the carriage at the padding of the vehicle seat's backrest (fig. 19, no. 2). Now let the releasing slide go. The next locking position can be found by moving the carriage. The carriage must be securely locked and if this is the case, the green display will become visible (fig. 19, no. 3).
7.1.3 Removal from the Isofix platform
To remove the Evoluna i-Size 2 from the Isofix platform, keep the release handle for the infant carrier, which can be found above the front cover, pulled (fig. 20, A) and lift the infant carrier from the Isofix platform (fig. 20, B).
Your Isofix platform is also equipped with a mechanism to release the infant carrier. If you pull the releasing handle at the front of the carriage (fig. 21, A), you can remove the seat in an upward movement (fig. 21, B).
7.1.4 Shock absorber
The Evoluna i-Size 2 is equipped with shock absorbers on the carrying handle, which in case of a side impact increase the safety of the child
restraint system. If the shock absorbers prevent the installation of the child restraint system in the vehicle, due to the width of the vehicle, these can be removed.
To do this, rotate the shock absorber (fig. 22) until it is released from the lock and then pull it off the carrying handle sideways (fig. 23). For assembly, carry out the steps in reverse order. Please note that the direction of rotation of both shock absorbers is different.
Should the shock absorbers impair the fitting of the child restraint system on a stroller, these can also be removed.
WARNING
The shock absorbers are an essential part of the safety concept of the child restraint system and should only be removed if it is not possible to install the child restraint system properly for reasons of space. Do not forget to refit the shock absorbers during a possible vehicle change.
8. Use on a stroller
Ensure that the respective adapters are properly and in correct direction mounted to the stroller.
Now place the infant carrier on the adapters with the head-end in the direction of travel (fig. 24, no. 1). Check that everything is locked into place.
Now you can decide whether you want to adjust the child restraint system in a seated or reclined position (see point 5.1).
To release the Evoluna i-Size 2 from the stroller, press both release buttons down (fig. 25, A) and, at the same time, lift the infant carrier from the stroller (fig. 25, B).
9. Use as a rocker
The Evoluta i-Size 2 can be used as a rocker in the seated or the reclined position. To do so, adjust the carry handle in the appropriate position (see point 5.1).
Safety instructions

WARNING
- Never leave your child unattended.
- Do not use this infant carrier once your child can sit unaided.
- This infant carrier is not intended for longer periods of sleeping.
- It is dangerous to use this reclined infant carrier on an elevated surface, e.g. a table.
- Always use the restraint system.
- Do not use the infant carrier if any components are broken or missing.
-
Do not use accessories or replacement parts other than those approved by the manufacturer.
-
This child seat does not replace a cot or a bed. Should your child need to sleep, then it should be placed in a suitable cot or bed.
10. Remove / replacing the covers
10.1 Removing the sunshade
First remove the sunshade from the shell. Proceed as described in section 5.3. To remove the fabric from the canopy frame detach the loops from each joint (fig. 26). Hold the sunshade frame, turn one of the joints and pull it off the canopy frame. The final step is to pull the fabric off the frame.
10.2 Removing the backrest cover
Undo the buckle and detach the two velcro's which are located at the sides of the shoulder pad's. Detach the cover from the belt height adjustment on the backrest. Pull the backrest cover off the shoulder belts.
10.3 Removing the seat cover
Place the Evoluna i-Size 2 in the lay-back position and pull the cover off the velcro's front seat and the buckle through the seat cover.
10.4 Replacing covers
To replace the covers proceed in the reverse order as described for removing the covers (point 10.1-10.3). When you remount the cover, ensure that the belts are not twisted or have become lodged!
11. Care and maintenance
11.1 Cleaning the seat covers
For cleaning of the covers, please follow the stitched care instructions for the particular fabric part and follow advice symbols.
11.2 Cleaning plastic parts
Plastic parts can be cleaned with a mild detergent or with a damp cloth. Never use aggressive cleaning agents (e.g. solvents).
11.3 Cleaning the belt system
The belt system can be cleaned with a damp cloth. Do not use detergent!
12. Steps to take after an accident
After an accident with an impact speed greater than 10km / h , the child restraint system must be sent back to the manufacturer without fail, to be checked for possible damage and replaced if necessary.
13. Warranty
For this child restraint system we extend a warranty against defects in materials and workmanship for up to two years. The warranty period starts on the day of purchase. A receipt is required for all claims. The warranty covers child restraint systems that have been handled properly and are returned in a clean and orderly condition.
The warranty does not cover:
Normal wear and tear and damage due to unreasonable use.
- Damages due to improper or inordinate usage.
All of our cover fabrics meet the highest standards regarding color-fastness against UV radiation. Nevertheless all fabrics fade if exposed to UV radiation. This is not due to defective material but due to normal wear and tear, which is not covered by the warranty.
For more information about care, maintenance and warranty, please visit our website (www.kiddy.de/downloads).
Please contact your specialist dealer immediately in the event of warranty claim.
The Kiddy team wishes you and your child a good and safe trip at all times.