USER MANUAL MUSICCAST VINYL 500 YAMAHA
The precautions listed below are to prevent risk of harm to the user and others, as well as to prevent property damage, and to help the user use this unit properly and safely. Be sure to follow these instructions.
After reading this manual, be sure to keep it in a safe place where it can be referenced at any time.
- Be sure to request inspections or repairs from the dealer where you purchased the unit or from qualified Yamaha service personnel.
- Yamaha cannot be held responsible for injury to you or damage of the products caused by improper use or modifications to the unit.
- This product is for ordinary homes. Do not use for applications requiring high reliability, such as managing lives, health care or high-value assets.

WARNING
This content indicates "risk of serious injury or death."
Power supply/AC adaptor
- Do not do anything that could damage the power cord.
- Do not place it near a heater.
- Do not bend it excessively or alter it.
- Do not scratch it.
- Do not place it under a heavy object. Using the power cord with the core of the cord exposed could cause electric shocks or a fire.
- Do not touch the power plug or cord if there is a chance of lightning. Failure to observe this may cause electric shocks.
- Use this unit with the power supply voltage printed on it. Failure to connect to an appropriate AC outlet may cause a fire, electric shocks, or malfunctions.
- Be sure to use the supplied AC adaptor. Failure to observe the above may cause a fire, burns, or malfunctions.
-
Check the electric plug periodically and remove any dirt or dust which may have accumulated on it. Failure to observe this may cause a fire or electric shocks.
-
When setting up the unit, make sure that the AC outlet you are using is easily accessible. If some trouble or malfunction occurs, immediately turn off the power switch and disconnect the plug from the AC outlet. Even when the power switch is turned off, as long as the power cord is not unplugged from the wall AC outlet, the unit will not be disconnected from the power source.
- If you hear thunder or suspect approaching lightning, quickly turn off the power switch and pull the power plug from the AC outlet. Failure to observe this may cause a fire or malfunctions.
- If not using the unit for long periods of time, be sure to pull the power plug from the AC outlet. Failure to observe this may cause a fire or malfunctions.
Do not disassemble
- Do not disassemble or modify this unit. Failure to observe this may cause a fire, electric shocks, injury, or malfunctions. If you notice any irregularities, be sure to request an inspection or repair from the dealer where you purchased the unit or from qualified Yamaha service personnel.
Water warning
- Do not expose the unit to rain, use it near water or in damp or wet conditions, or place on it any containers (such as vases, bottles or glasses) containing liquids which might spill into any openings or places where water may drop. A liquid such as water getting into the unit may cause a fire, electric shocks, or malfunctions. If any liquid such as water seeps into the device, turn off the power immediately and unplug the power cord from the AC outlet. Then, request an inspection from the dealer where you purchased the unit or from qualified Yamaha service personnel.
- Never insert or remove an electric plug with wet hands. Do not handle this unit with wet hands. Failure to observe this may cause electric shocks or malfunctions.
Fire warning
- Do not place any burning items or open flames near the unit, since they may cause a fire.
Wireless unit
- Do not use this unit near medical devices or inside medical facilities. Radio waves from this unit may affect electro-medical devices.
- Do not use this unit within 15cm (6 in) of persons with a heart pacemaker implant or a defibrillator implant. Radio waves from this unit may affect electro-medical devices, such as a heart pacemaker implant or defibrillator implant.
If you notice any abnormality
-
If any of the following abnormalities occur, immediately turn off the power and disconnect the power plug.
-
The power cord/plug is damaged.
- An unusual smell or smoke is emitted from the unit.
- Foreign material gets into the interior of the unit.
- There is a crack or damage in the unit.
Continued use could cause electric shocks, a fire, or malfunctions. Immediately request an inspection or repair from the dealer where you purchased the unit or from qualified Yamaha service personnel.
- Be careful not to drop or apply strong impact to this unit or the AC adaptor. If you suspect the unit may have been damaged due to dropping or impact, immediately turn off the power and pull the power plug from the AC outlet. Failure to observe this may cause electric shocks, a fire, or malfunctions. Immediately request an inspection from the dealer where you purchased the unit or from qualified Yamaha service personnel.
This content indicates "risk of injury."
Power supply/AC adaptor
- Do not cover or wrap the AC adaptor with a cloth or blanket. Failure to observe this may trap heat, causing deformation in the case or a fire.
- Do not use an AC outlet where the power plug fits loosely when inserted. Failure to observe this may cause a fire, electric shocks, or burns.
- When removing the electric plug from the unit or an AC outlet, always hold the plug itself and not the cord. Pulling by the cord can damage it and cause electric shocks or a fire.
- Insert the power plug firmly all the way into the AC outlet. Using the unit when it is not plugged in sufficiently can cause dust to accumulate on the plug, causing a fire or burns.
Installation
- Do not place the unit in an unstable position where it might accidentally drop or fall over and cause injuries.
-
When installing this unit:
-
Do not cover it with any cloth.
- Do not install it on a carpet or rug.
- Make sure the top surface faces up; do not install on its sides or upside down.
-
Ensure that the top is facing upwards. Failure to observe this may cause malfunctions or for the unit to fall and cause injury.
-
Do not install the unit in places where it may come into contact with corrosive gases or salt air or places that have excessive smoke or steam. Doing so may result in malfunction.
- Avoid being near the unit during a disaster, such as an earthquake. Since the unit may turn over or fall and cause injury, quickly move away from the unit and go to a safe place.
- Before moving this unit, be sure to turn off the power switch and disconnect all connection cables. Failure to observe this may damage the cables or cause you or someone else to trip and fall.
Hearing loss
- Before connecting the unit to other devices, turn off the power for all devices. Failing to do so may result in hearing loss, electric shock, or device damage.
- When turning on the AC power in your audio system, always turn on the amplifier or receiver LAST, to avoid hearing loss and speaker damage. When turning the power off, the amplifier or receiver should be turned off FIRST for the same reason. Failure to observe the above may cause hearing impairment or speaker damage.
Maintenance
- Remove the power plug from the AC outlet before cleaning the unit. Failure to observe this may cause electric shocks.
Handling caution
- Keep small parts out of the reach of infants. Your children may accidentally swallow them.
-
Do not do the following:
-
stand on or sit on the equipment.
- put heavy items on top of the equipment.
- place the equipment in a stack.
- apply unreasonable force to buttons, switches, input/output terminals, etc.
-
lean against the equipment.
-
Avoid pulling the connected cables to prevent injuries or damage to the unit by causing it to fall.
Notice
Indicates points that you must observe in order to prevent product failure, damage or malfunction and data loss.
Power supply/AC adaptor
- If not using the unit for a long period of time, be sure to pull the power plug from the outlet. A minute current is still flowing even if the power has been turned off (the power is in standby).
Installation
- Do not use this unit in the vicinity of other electronic equipment, such as a TV, radio, or mobile phone. Failure to observe this may cause this unit or the TV or radio to produce noise.
- Do not use this unit in a location that is exposed to direct sunlight that becomes extremely hot, such as near a heater, or extremely cold, or that is subject to excessive dust or vibration. Failure to observe this may cause the unit's panel to become deformed, the internal components to malfunction, or for operation to become unstable.
- If using a wireless function, avoid installing this unit near metal walls or desks, microwave ovens, or other wireless network devices. Obstructions could shorten the transmission distance.
Connections
- If connecting external units, be sure to thoroughly read the manual for each unit and connect them in accordance with the instructions. Failure to properly handle a unit in accordance with the instructions could cause malfunctions.
Handling
- Do not place plastic or rubber products on this unit. Failure to observe this may cause discoloration or deformation in the panel of this unit.
- If the ambient temperature changes drastically (such as during unit transportation or under rapid heating or cooling) and there is a chance condensation may have formed in the unit, leave the unit for several hours without turning on the power until it is completely dry before use. Using the unit while there is condensation can cause malfunctions.
Maintenance
- If the temperature or humidity changes drastically, water droplets (condensation) may form on the unit surface. If water droplets form, immediately wipe them off with a soft cloth. If water droplets are left on the unit, they may be absorbed into the wooden parts, causing deformation.
- When cleaning the unit, use a dry, soft cloth. Using chemicals such as benzine or thinner, cleaning agents, or chemical scrubbing cloths can cause discoloration or deformation.
About content in this manual
- The illustrations and screens in this manual are for instructional purposes only.
- The company names and product names in this manual are the trademarks or registered trademarks of their respective companies.
- Software may be revised and updated without prior notice.
About the name plate of the unit
The model number, serial number, power requirements, etc., may be found on or near the name plate, which is at the bottom of the unit. You should note this serial number in the space provided below and retain this manual as a permanent record of your purchase to aid identification in the event of theft.
Model No.
Serial No.
(bottom_en_01)
[Europe model]
Wireless communication functions
Bluetooth
Radio Frequency (Operational Frequency): 2402 MHz to 2480 MHz
Maximum Output Power (EIRP): 7.27 dBm
Wi-Fi (2.4 GHz)
Radio Frequency: 2402 MHz to 2482 MHz
Maximum Output Power (EIRP): 19.98 dBm
Wi-Fi (5 GHz)
Radio Frequency, Maximum Output Power (EIRP):
5170 to 5250MHz, 22.03 dBm
5250 to 5330MHz, 22.27 dBm
5490 to 5710MHz, 24.56 dBm
5735 to 5835MHz, 13.96 dBm
- Wireless devices transmitting over a 5 GHz frequency band can only be used indoors. Use of such devices outdoors is prohibited by law.
These symbols on the products, packaging, and/or accompanying documents mean that used electrical and electronic products and batteries should not be mixed with general household waste.
For proper treatment, recovery and recycling of old products and used batteries, please take them to applicable collection points, in accordance with your national legislation.
By disposing of these products and batteries correctly, you will help to save valuable resources and prevent any potential negative effects on human health and the environment which could otherwise arise from inappropriate waste handling.
For more information about collection and recycling of old products and batteries, please contact your local municipality, your waste disposal service or the point of sale where you purchased the items.
For business users in the European Union:
If you wish to discard electrical and electronic equipment, please contact your dealer or supplier for further information.
Cd
These symbols are only valid in the European Union. If you wish to discard these items, please contact your local authorities or dealer and ask for the correct method of disposal.
Note for the battery symbol (bottom two symbol examples):
This symbol might be used in combination with a chemical symbol. In this case it complies with the requirement set by the EU Battery Directive for the chemical involved.
Contents
Before you start 10
What you can do with the unit 10
About this manual 11
Handling records 11
Check the supplied accessories. 11
Parts and their functions 12
Top panel. 12
Back panel. 14
Getting ready 15
Location 15
Assembly 15
Assembling the unit. 15
Attaching the dust cover. 17
Making connections. 18
Connecting to an amplifier 18
Connecting a network cable 19
Making adjustments. 20
Adjusting the stylus pressure 20
Adjusting the anti-skating 22
Turning the power on. 22
About this unit's standby modes. 22
Connecting the unit to the network 23
Playback 25
Listening to a record 25
Listening to Internet radio 28
Listening to streaming services 28
Playing music files stored on a media server (PC/NAS) 29
Media sharing setup. 29
Playing music files 29
Listening to music via Bluetooth. 30
Listening to music via AirPlay 31
Using MusicCast CONTROLLER to register favorites 31
Detailed settings 32
Making settings via MusicCast CONTROLLER . . . 32
Setting the sleep timer 32
Enabling/disabling automatic playback 32
Enabling/disabling automatic standby 32
Making settings via a web browser 33
Accessing the settings screen 33
When necessary 34
Updating the firmware 34
Initializing the settings 35
Connecting to a network using the WAC function.. 35
Care. 36
Replacement 36
Replacing the belt. 36
Replacing the record stylus. 37
Moving this unit 37
Troubleshooting 38
General. 38
Bluetooth 40
Network 41
Supported devices and file formats 43
Supported devices 43
File formats 43
Trademarks. 44
Specifications. 45
Before you start
What you can do with the unit
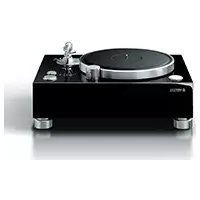
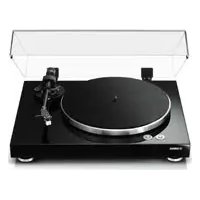
This unit is a network turntable that supports playback from network sources such as media servers or mobile devices, in addition to playing records.
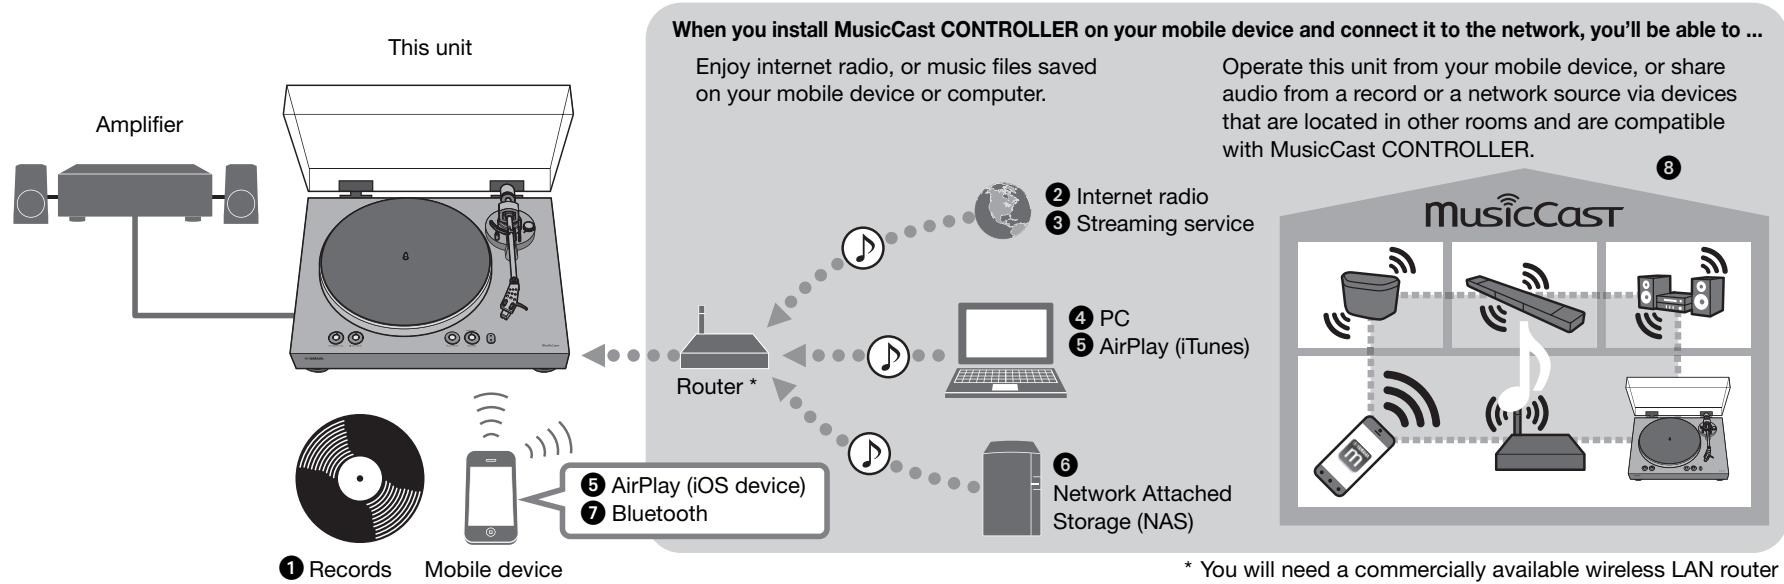
* You will need a commercially available wireless LAN router (access point) if you plan to use a mobile device.
1 Record playback ( page 25)
Listening to Internet radio ( page 28)
3 Listening to streaming services ( page 28)
4 Playing music files stored on your PC ( page 29)
5 Playing music files with AirPlay ( page 31)
Playing music files stored on a Network Attached Storage (NAS) device ( page 29)
7 Playing audio content from a Bluetooth device ( page 30)
8 Playing music using MusicCast CONTROLLER ( page 23)
About this manual
When reading this manual, please note the following.
- Specifications and appearance are subject to change without notice in order to improve the product.
-
In this manual, iPhone, iPad and iPod touch are collectively referred to as "iOS device".
This manual uses MusicCast CONTROLLER screens displayed in English on an iPhone as examples.
Explanation of graphic symbols used in this manual:
-
"WARNING" indicates points that you must observe to avoid risk of death or serious injury.
- "CAUTION" indicates points that you must observe to avoid risk of injury.
NOTICE indicates points that you must observe to avoid damaging the product or causing it to malfunction.
NOTE indicates supplementary information that you will find useful.
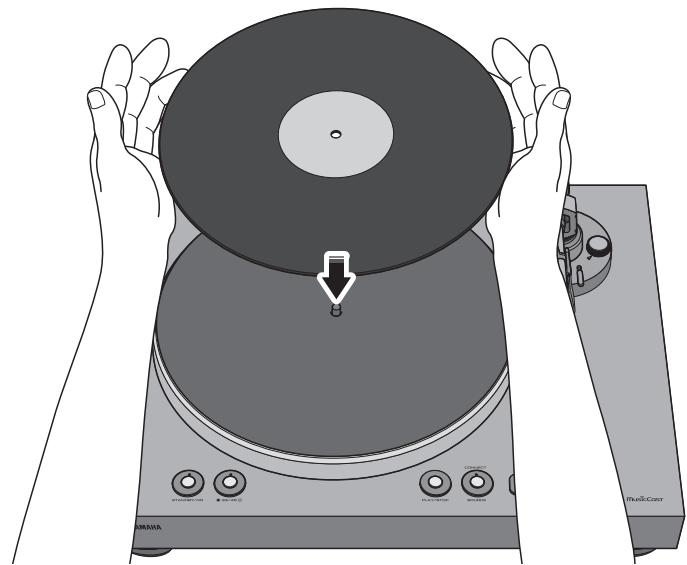
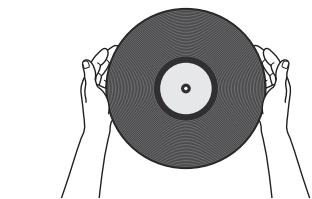
Handling records
When you hold a record, you should either support the record's label area and its outer edge, or hold the record's outer edges between your two hands.
Check the supplied accessories
Make sure that all items are present.

Platter × 1
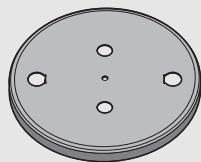

Platter sheet × 1

- The belt is installed on the platter.

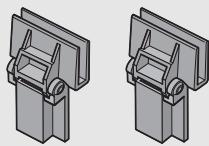
Counter weight × 1

Head shell x1 (with cartridge)

45 rpm adaptor × 1


Dust cover × 1

Dust cover hinge × 2

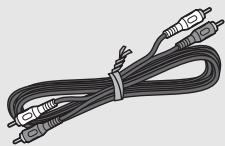
RCA stereo cable × 1

AC adaptor × 1
- For details, refer to the included "Supplement" (leaflet).

Owner's Manual (this manual)

Supplement (leaflet)
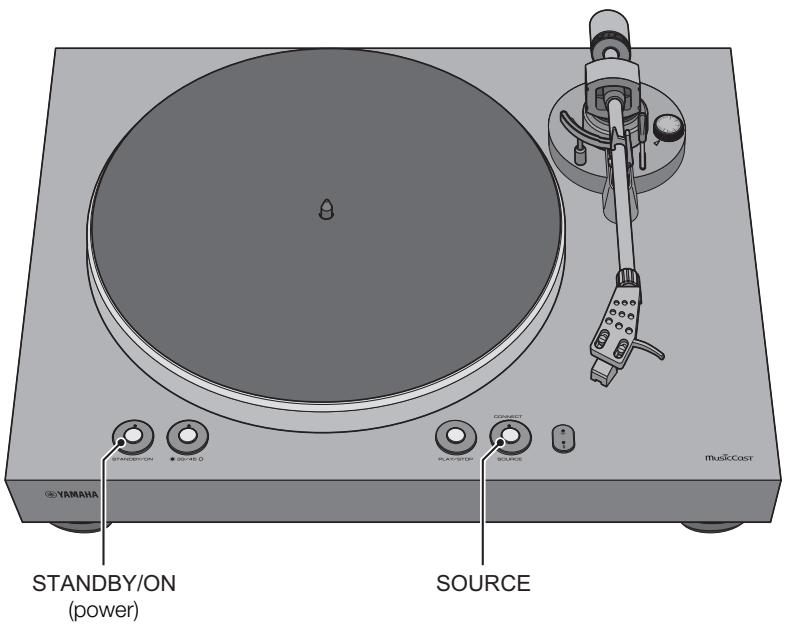
Parts and their functions
Top panel
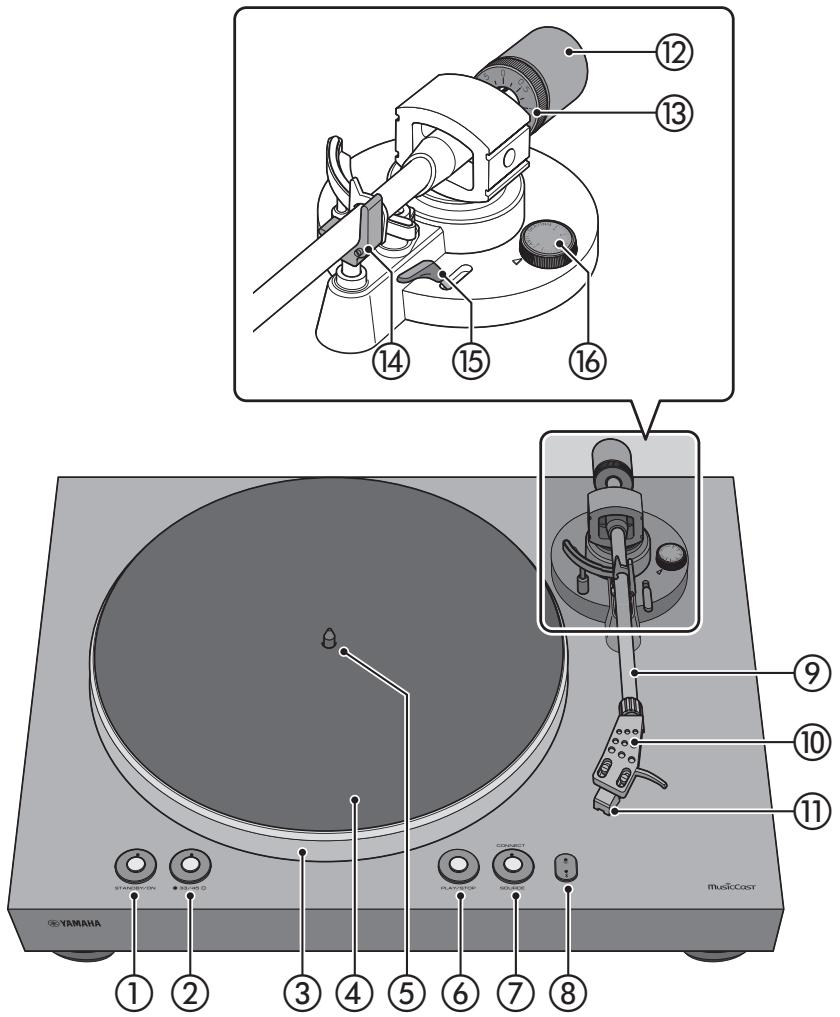
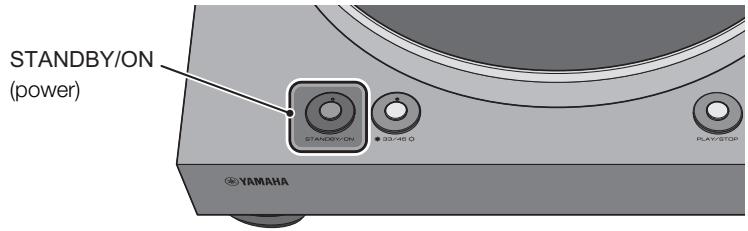
① STANDBY/ON (power)
This switches the unit's power between on and standby (off). ( page 22)
STANDBY/ON (power) indicator
This indicates the status of the unit's power.
Lit: Power is on
Dimly lit: Power is in the network standby state (⇒ page 22)
Unlit: Power is in the eco standby state (⇒ page 22)
② 33/45 (speed) ( page 26)
Speed indicator ( page 26)
③ Platter (⇒ page 15)
(4) Platter sheet (⇒ page 16)
(5) Center spindle (⇒ page 15)
⑥ PLAY/STOP (play/stop) ( page 26)
Makes the platter rotate or stop.
NOTE
If the source (audio source) is network or Bluetooth, this plays/stops the network source.
(7) SOURCE
Selects the source (audio source) for this unit. Each time you press this, the source alternates between PHONO, network, and Bluetooth.
NOTE
The source can be switched if this unit's back panel audio output select switch is set to LINE OUT.
SOURCE indicator
The color of the indicator changes depending on the source.
Source
PHONO
network (AirPlay)
network (other than AirPlay)
Bluetooth
Indicator color
White
Pink
Green
Blue
NOTE
When new firmware is provided, the indicator flashes orange. ( page 34)
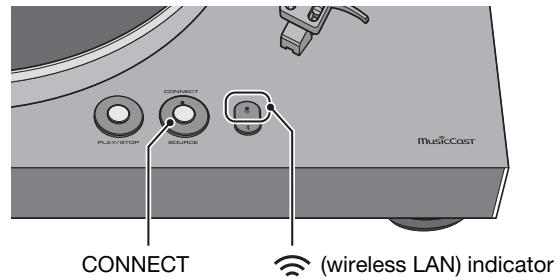
CONNECT
Use this when using MusicCast CONTROLLER to make network connection settings. (⇒ page 23)
(8) (wireless LAN) indicator
Lights when this unit connects wirelessly. ( page 23)
Bluetooth indicator
Lights when this unit connects to a Bluetooth device. (⇒ page 30)
9 Tone arm ( page 16)
10 Head shell ( page 16)
11 Cartridge
Counterweight ( page 21)
Counter ring ( page 21)
14 Arm rest ( page 20)
(15) Lift lever (⇒ page 26)
16 Anti-skating ( page 22)
Back panel

① SERVICE jack
This jack is only for service. It is not normally used.
② NETWORK jack
Use a LAN cable (commercially available) to connect this to your network.
③ WIRELESS switch
Enables/disables this unit's wireless functionality (including Bluetooth).
AUTO (default): Wireless functionality is enabled.
OFF: Wireless functionality is disabled.
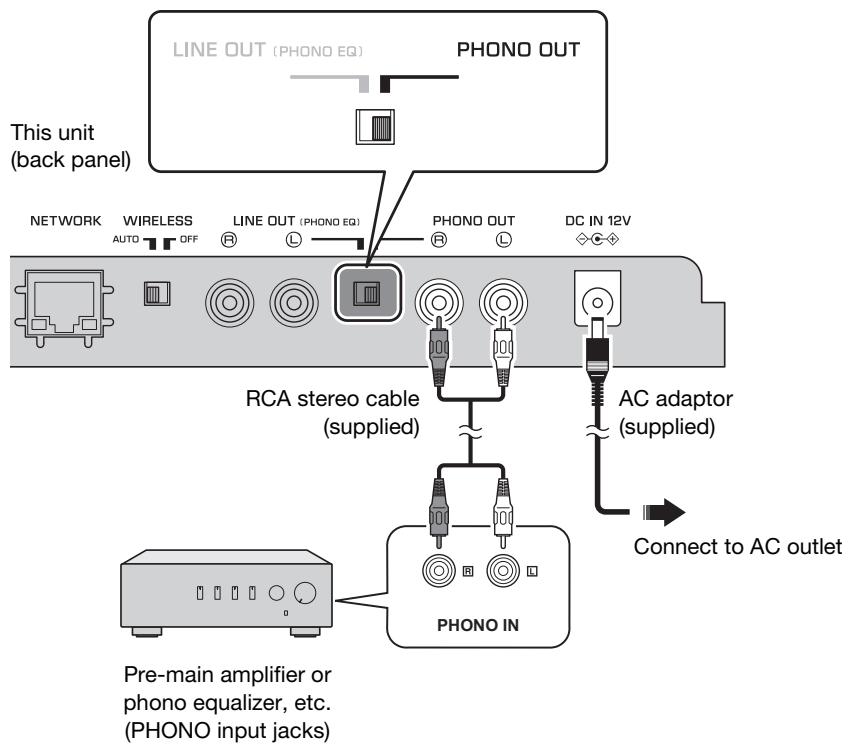
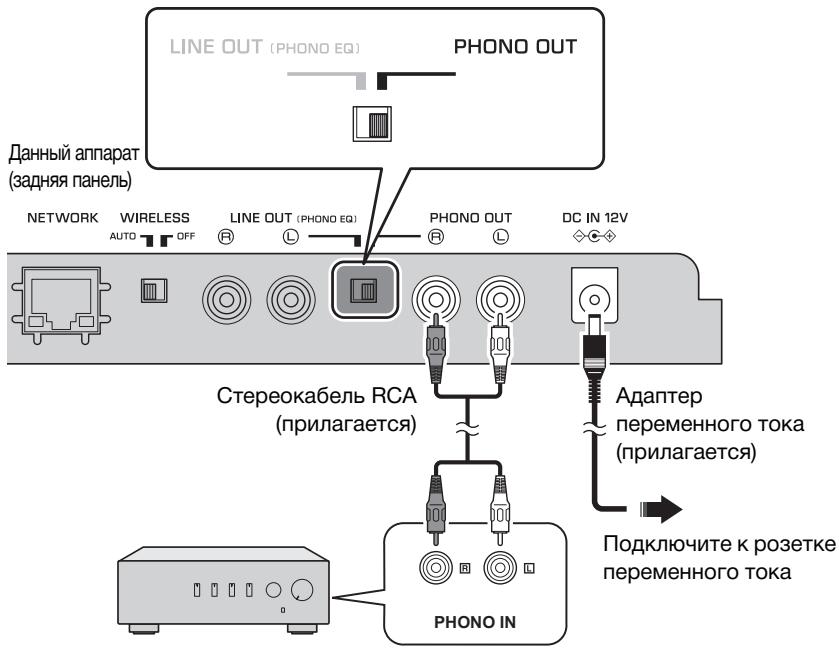
LINE OUT jacks
Output the playback audio from the record or the network source. ( page 18)
⑤ Audio output select switch
Switches the audio output. ( page 18)
LINE OUT (default): The signal from the cartridge is amplified by the phono equalizer that is built into this unit, and is output from the LINE OUT jacks.
PHONO OUT: The signal from the cartridge is output directly from the PHONO OUT jacks.
(6) PHONO OUT jacks
These jacks output the playback audio of the record. (⇒ page 19)
⑦ DC IN jack
Connect the AC adaptor (included) to this jack. ( page 18)
Getting ready
Location
Because record playback is easily affected by vibration, you should place the unit in a level location that is not subject to external vibration.
Place it sufficiently far from your speaker system so that it will not be affected by sound pressure or vibration.
Assembly
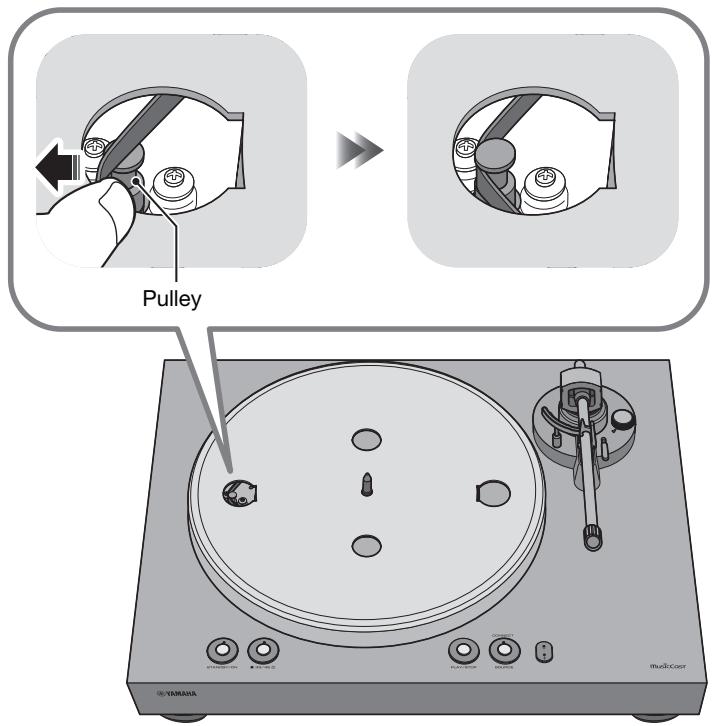
Assembling the unit
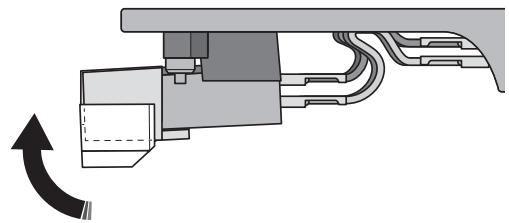
1 Lift up the platter.
2 Reaching through the round hole in the platter, pull the belt outward, hooking it over your finger.
3 Insert the platter onto the center spindle.

CAUTION
Take care not to drop the platter. Dropping it might cause injury, or might damage the unit.

4 Align the round hole of the platter with the pulley.
Use your finger to hook the belt onto the pulley.
Take care that the belt is not twisted. After hooking the belt onto the pulley, rotate the platter several times to ensure that the belt is smoothly in place.
6 Place the platter sheet on the platter.
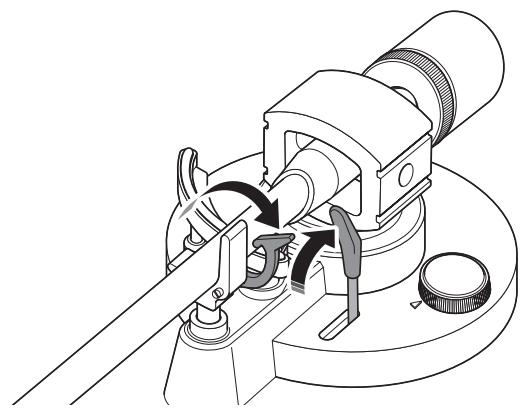
7 Attach the counter weight to the tone arm.
With the markings on the counter weight facing you, slide it onto the back end of the tone arm.
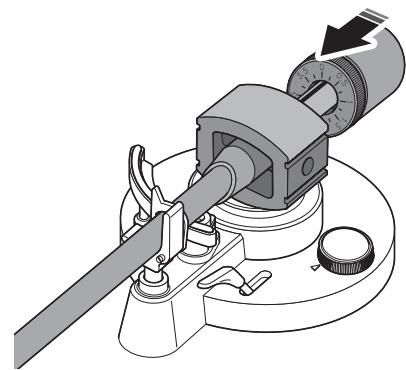
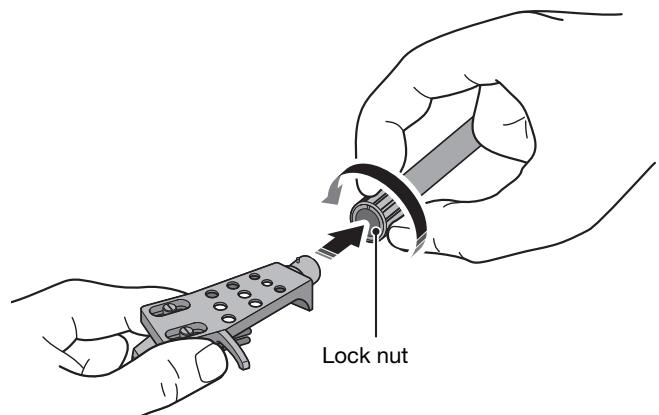
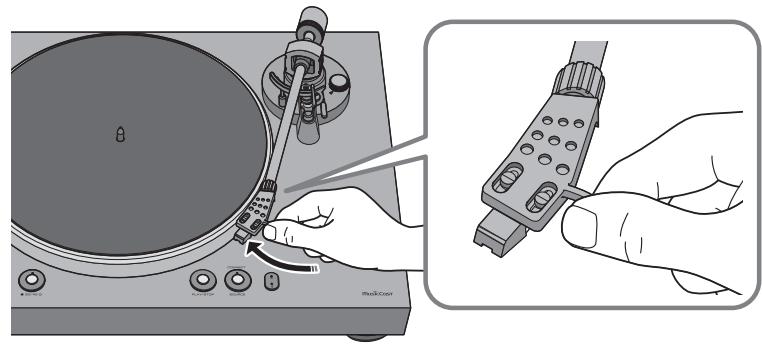
8 Attach the head shell to the tone arm.
Insert the head shell into the front end of the tone arm, and turn the lock nut to secure it.
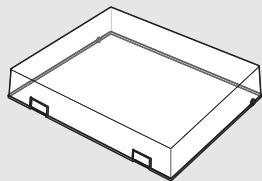
Attaching the dust cover
The dust cover protects this unit from dust etc.
1 Insert the hinges into the appropriate locations at two sides of the dust cover.

2 Attach the dust cover by inserting the hinges into the hinge bases located on the back panel of the unit.
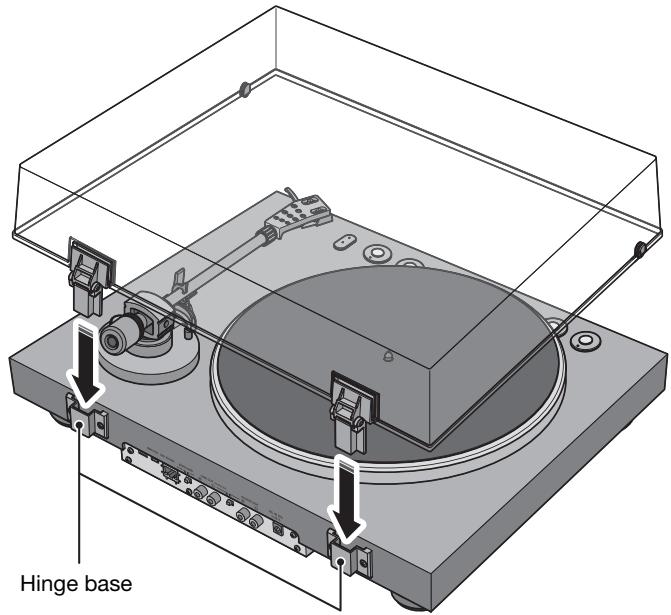
NOTE
To remove the dust cover, grasp the two sides of the dust cover and slowly lift upward to remove the cover together with its hinges.

CAUTION
Take care not to pinch your hands or fingers when opening or closing the dust cover.
Making connections
Connecting to an amplifier
Make connections as shown in the following illustration.

CAUTION
Do not plug the power cords of this unit and other connected devices into AC outlets until all connections and audio output select switch settings are complete.
If using this unit's LINE OUT jacks
Sources that can be played back: Records, all network sources including internet radio, Bluetooth
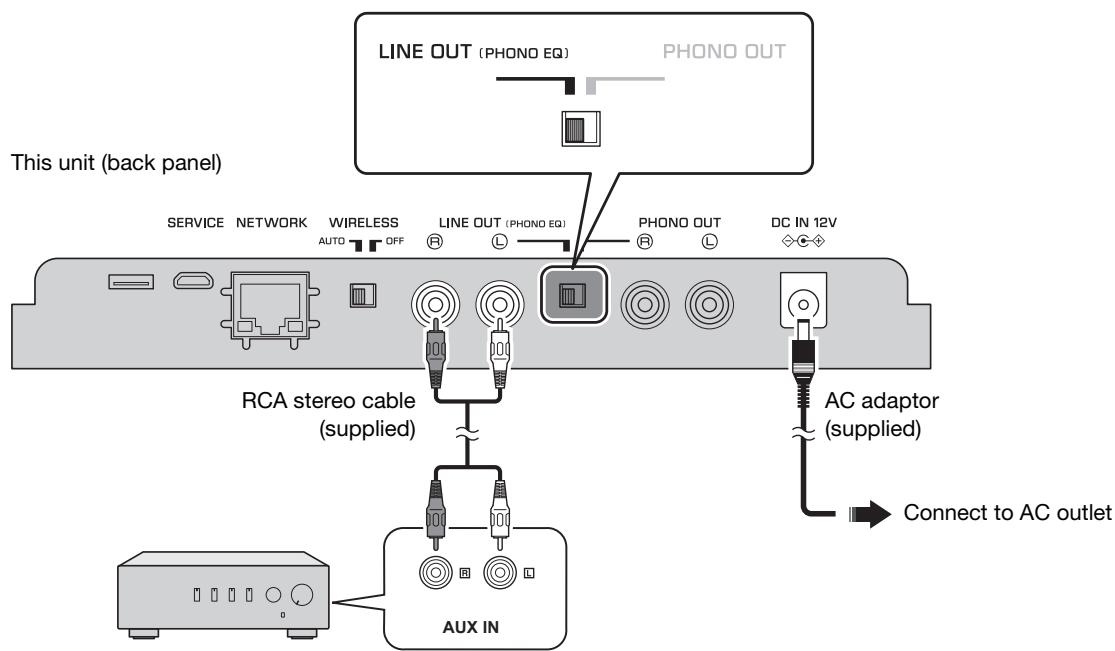
Pre-main amplifier or speakers with built-in amplifier, etc. (external input jacks)
If using this unit's PHONO OUT jacks
Sources that can be played back: Records
This unit's network functionality cannot be used.
Connecting a network cable
To use a wired connection to the network, connect this unit to your router using a commercially-available STP network cable (CAT-5 or higher straight cable). To connect wirelessly to the network, proceed to "Connecting the unit to the network" ( page 23).
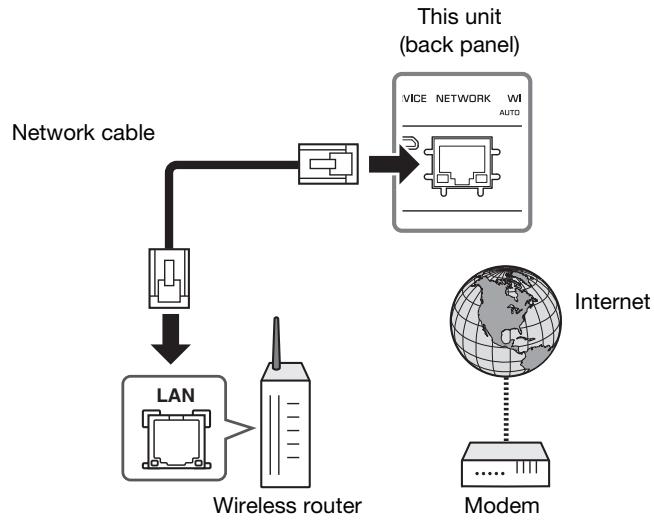
NOTE
Connect the network cable before you turn on the power of this unit.
You can connect to the network via a wired connection regardless of whether the WIRELESS switch located on the back panel of this unit is set to AUTO or OFF. () page 14)
If the unit is already wirelessly connected to the network, put this unit's power in standby mode, connect the network cable, turn the back panel WIRELESS switch OFF, and then turn on the power. (⇒ page 14)
Making adjustments
Adjusting the stylus pressure
Adjust the tone arm so that the appropriate stylus pressure is applied to the record.
1 Detach the stylus cover.
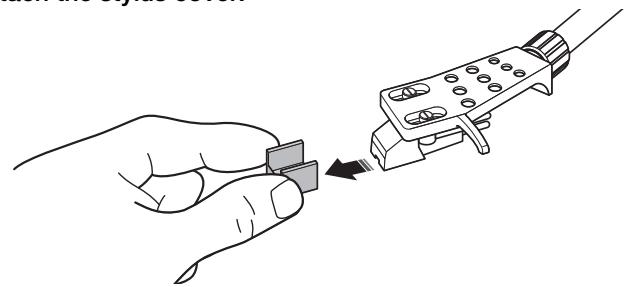
NOTICE
Take care that the stylus cover or your finger do not contact the stylus.
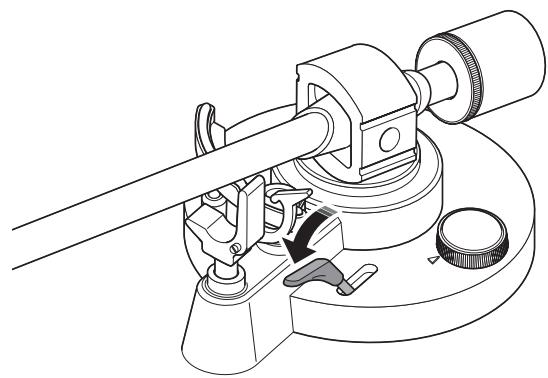
2 Set the anti-skating adjustment to the "0" position.

3 Release the tone arm lock.
4 Move the tone arm off of the arm rest and slightly to the left.
NOTICE
Take care that the needle does not contact any part of the unit.
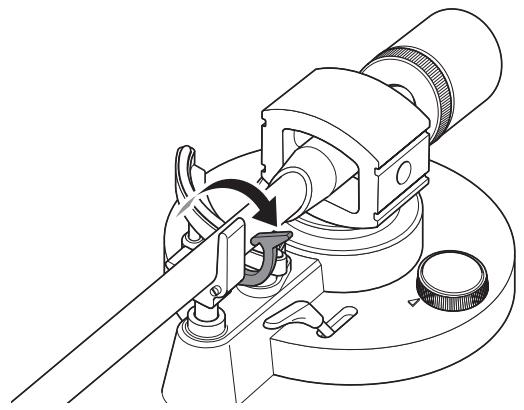
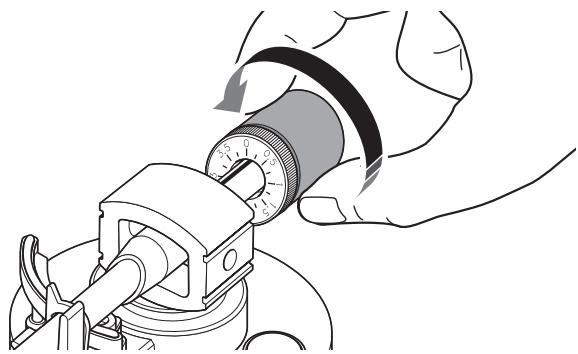
5 Turn the counter weight so that the tone arm is horizontal. Toward ①: Counter weight moves forward on the tone arm. Toward ②: Counter weight moves backward on the tone arm.
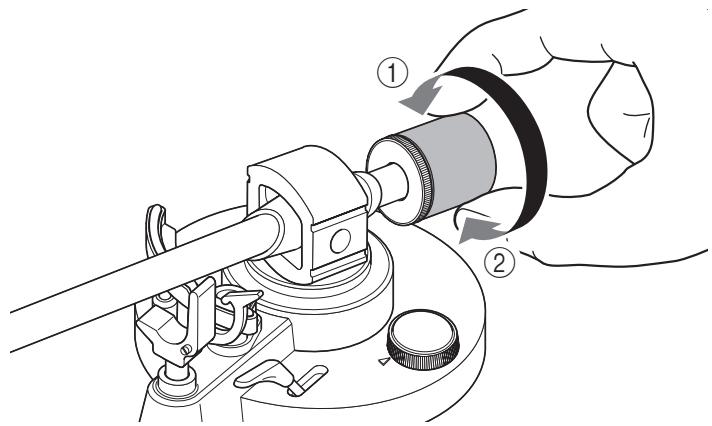
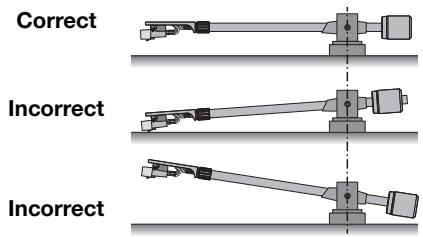
Tone arm is horizontal (balanced)
Counter weight is too far forward
Counter weight is too far backward
6 Return the tone arm to the arm rest, and lock it in place.
7 Turn the counter ring so that the "0" marking is aligned with the center line on the back end of the tone arm.
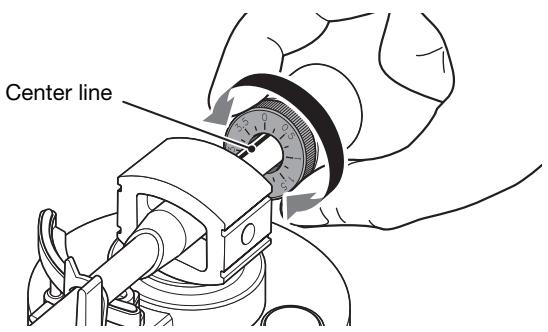
NOTE
When turning the counter ring, use your fingers to press the counter weight so that it does not rotate.
8 By turning the counter weight, set the counter weight markings to the stylus pressure specified for the cartridge.
The specified stylus pressure for the supplied cartridge is 3.5g
NOTE
Turning the counter weight also turns the counter ring.
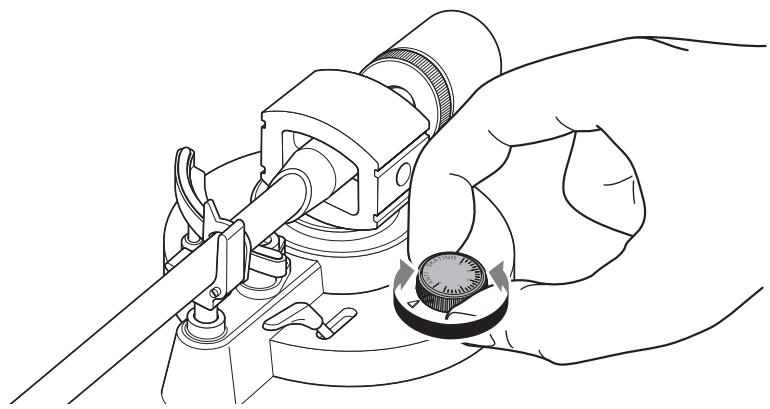
Adjusting the anti-skating
As the platter rotates, the tip of the stylus generates a force that pulls it toward the center of rotation. If the anti-skating value is set to the same value as the stylus pressure, a force is generated that pulls the tip of the stylus outward away from the center of rotation, and the two forces cancel each other.
1 Turn the anti-skating adjustment to the same value as the stylus pressure of the cartridge.
Turning the power on
On the top panel of the unit, press STANDBY/ON (power) to turn on the power of the unit. Press STANDBY/ON (power) once again to put the unit in standby mode.
NOTE
When you first turn on the power after purchasing the unit or initializing it, the (wireless LAN) indicator might flash. If it flashes, you can connect to the wireless network by sharing the network settings of your iOS device. ( page 35) In order to enjoy music from a variety of network sources, use MusicCast CONTROLLER to connect to your network. ( page 23)
About this unit's standby modes
This unit has two types of standby mode.
Network standby: This device's power can be turned on from a network device. (only when the audio output select switch is set to LINE OUT)
Eco standby: This mode reduces the standby power consumption.
NOTE
If you want to switch to the eco standby setting, you can use your web browser to change the Standby setting. () page 33
If you want to temporarily switch to eco standby, hold down STANDBY/ON (power) for five seconds while the unit is powered-on. (only when the audio output select switch is set to LINE OUT)
Connecting the unit to the network
This section explains how to register the unit with MusicCast and set up the unit for the network connection.
Even if this device is connected to the network via a cable, MusicCast registration is necessary in order to play back network sources.
NOTE
If you want to play high-resolution audio sources via the network, a wired connection is recommended for more stable playback. ( page 19)
Your mobile device must already be connected to the wireless LAN router (access point).
Install MusicCast CONTROLLER on your mobile device.
In the App Store or in Google Play, search for MusicCast CONTROLLER (free), and install it on your mobile device.
For more about MusicCast CONTROLLER, refer to the following website.
https://www.yamaha.com/musiccast/

MusicCast CONTROLLER is an app for controlling devices that support MusicCast. It allows you to share music between multiple MusicCast compatible devices that are placed in different rooms. You can use your smartphone or other mobile device as a remote controller, and easily select songs and make settings on the MusicCast compatible device.
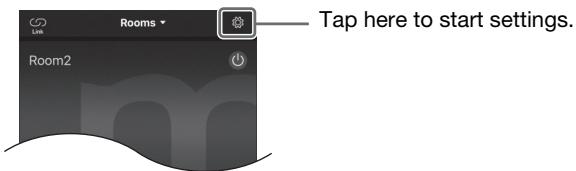
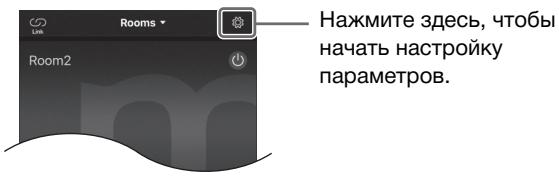
2 Start the MusicCast CONTROLLER on your mobile device, and then tap "Setup".
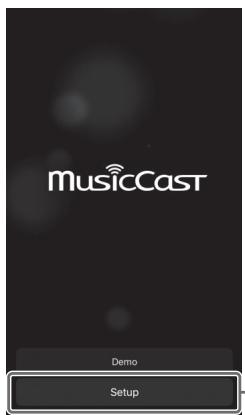
Tap here.
3 Operate MusicCast CONTROLLER as directed by the instructions that appear on the screen of your mobile device, and on the top panel of this unit, hold down the CONNECT button for five seconds.
The (wireless LAN) indicator flashes.
4 Follow the instructions on the display of the mobile device to operate MusicCast CONTROLLER to make the network settings.
When this unit connects to the network, the (wireless LAN) indicator is lit.
Now the unit is registered with MusicCast and the network settings are complete.
Use MusicCast CONTROLLER to play the music.
NOTE
To set up additional MusicCast-compatible devices, tap the (Settings) in the upper-right corner of the MusicCast CONTROLLER screen, and then select "Add New Device".
Playback
Listening to a record
Here's how to play back a record.
Starting playback

CAUTION
If you play back a record without sufficiently lowering the volume of your amplifier, a loud sound might occur when the tip of the stylus contacts the record. This can cause hearing loss and might damage your amplifier and speaker, so be sure to lower the volume of your amplifier.
If you are playing a record and the sound is being output from the LINE OUT jacks, the platter will stop when you switch the source from PHONO to network or Bluetooth.
NOTE
MusicCast CONTROLLER cannot start/stop record playback or switch the speed.
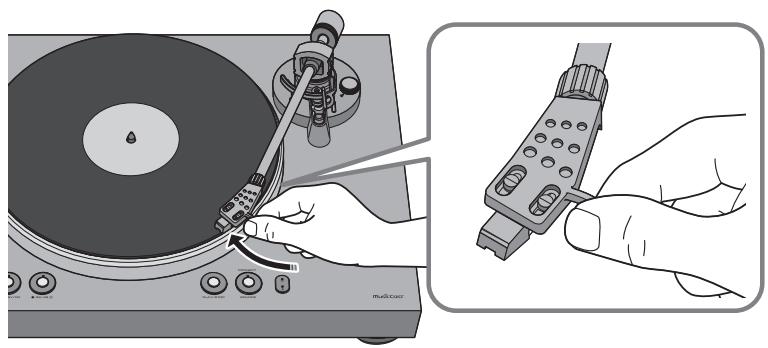
1 Open the dust cover, and place the record on the platter.
If you're playing a 45 rpm record, use the included 45 rpm adaptor.
Press 33/45 (speed) to select the appropriate speed for the record.
The speed switches each time you press 33/45 (speed).
Speed indicator lit: 33 1/3 rpm
Speed indicator unlit: 45 rpm
3 Press SOURCE to switch the source to PHONO.
The SOURCE indicator is lit white.
NOTE
If the audio output select switch is set to PHONO OUT, there's no need to switch the source.
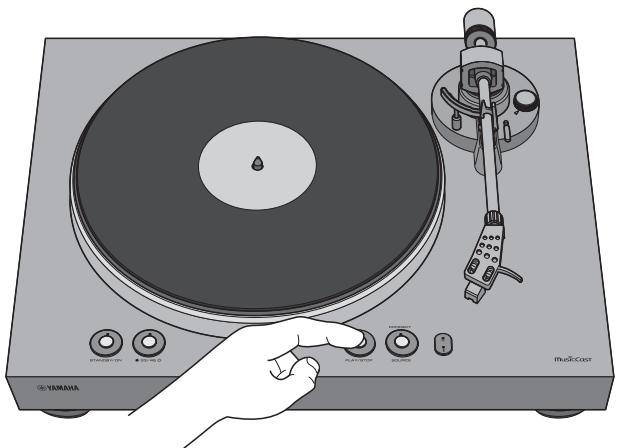
4 Press PLAY/STOP (play/stop).
The platter rotates.
5 Release the tone arm lock, and raise the lift lever.
6 Move the tone arm to the playback position of the record.
7 Lower the lift lever.
The tone arm is lowered, and playback starts.
Pausing playback
If you raise the lift lever, the tone arm rises and playback pauses.
When you lower the lift lever, playback resumes.
Stopping playback
1 Raise the lift lever.
2 Return the tone arm to the arm rest.
3 Lower the lift lever.
4 Press PLAY/STOP (play/stop). The platter stops rotating.
5 Lock the tone arm.
NOTE
The tone arm does not automatically rise when the record finishes playing.
If you will not be using the unit for a time, attach the cover to the stylus to protect it.
Listening to Internet radio
Here's how to select an internet radio station using the MusicCast CONTROLLER that's installed on your mobile device.
NOTE
Before you select a station, register this unit with MusicCast. () page 23
Certain Internet radio stations might not be available at all times or during certain hours.
This function uses the "airable.Radio" service. This service is provided by Tune In GmbH.
This service may change or end without notice.
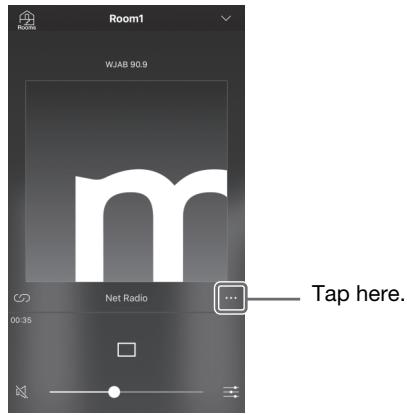
1 Use MusicCast CONTROLLER to select the room in which this unit is located (e.g., Room 1).
2 Tap "Net Radio".
3 Select the internet radio station to which you want to listen.
Listening to streaming services
You can listen to a streaming service using the MusicCast CONTROLLER that's installed on your mobile device. For details on streaming services, refer to the supplementary explanation(s) regarding the streaming service(s) that are available in your area. Access the Yamaha Downloads site to download the supplementary explanation(s).
https://download.yamaha.com/
NOTE
Service is limited to certain areas.
Services supported by the unit might not be available depending on the region in which the unit was purchased.
The service may change or end without notice.
You can play music files stored on your PC or DLNA-compatible Network Attached Storage (NAS) device on the unit.
NOTE
Audio may be interrupted while using a wireless network connection. In this case, use a wired network connection. ( page 19)
For information on the file format that can be played by the unit, please refer to "Supported devices and file formats" ( page 43). Also, please refer to the specifications for the NAS device.
To play music stored on the PC (or NAS device) on the unit, you need to enable media sharing between this unit and the other devices.
The setting procedure may vary depending on the PC or the version of Windows Media Player. The following instructions use Windows Media Player12 as an example.
NOTE
The method will depend on the computer and the settings that you're using. For details, refer to the manufacturer of your computer or to the Windows Media Player help.
Start Windows Media Player 12 on your PC.
2 Select "Stream", then "Turn on media streaming".
3 Click "Turn on media streaming".
4 Select "Allowed" from the drop-down list next to the unit's model name.
5 Click "OK" to exit.
Refer to the instruction manual for the device or software and configure the media sharing settings.
Playing music files
Here's how to play back using the MusicCast CONTROLLER that's installed on your mobile device.
NOTE
Register the unit as a MusicCast-enabled device before playing music files. ( page 23)
1 Use MusicCast CONTROLLER to select the room in which this unit is located (e.g., Room 1).
2 Tap "Server".
3 Follow the on-screen instructions to select a song.
Listening to music via Bluetooth
You can play music files stored on a Bluetooth device (such as a smartphone) on the unit.
NOTE
In order to use Bluetooth functionality, set the WIRELESS switch located on the back panel of this unit to AUTO. () page 14)
For information on supported Bluetooth devices, refer to "Supported devices and file formats" (→ page 43).
1 On the top panel of this unit, press SOURCE to switch the source to Bluetooth.
The SOURCE indicator is lit blue.
2 On the Bluetooth device, turn the Bluetooth function on.
3 On the Bluetooth device, select this unit from the list of available devices.
When this unit connects to a Bluetooth device, the × (Bluetooth) indicator is lit.
NOTE
If you are prompted to enter a passkey, enter the number "0000".
If the unit is registered as a MusicCast device, the room name will appear on the available device list.
4 On the Bluetooth device, select a song and start playback.
NOTE
If the unit detects a Bluetooth device that was previously connected, the unit will automatically connect to the Bluetooth device after you perform Step 1. To establish another Bluetooth connection, first terminate the current Bluetooth connection.
To terminate a Bluetooth connection, perform one of the following operations:
- Disconnect from the Bluetooth device.
- Select any option other than "Bluetooth" as the source for this unit.
If you enable Bluetooth standby, this unit automatically turns on when a connect operation is performed on the Bluetooth device.
( page 33)
Listening to music via AirPlay
You can use the AirPlay function to play iTunes or iOS device music files music files via a network.
NOTE
If the iOS device does not recognize the unit, check your network environment (such as the router)
For information on supported iOS devices, please refer to "Supported devices and file formats" (→ page 43).
1 Start iTunes, or display the Music playback screen on the iOS device.
Once the iTunes or iOS device recognizes the unit, the AirPlay icon appears.
E.g., (iOS 10)

E.g., (iTunes)

2 In iTunes or on the iOS device, click (tap) the AirPlay icon, and then select this unit as the output destination for the audio.
3 Select a song in iTunes or on the iOS device to start playback.
This unit's source automatically switches to network (Airplay), and playback starts.
The SOURCE indicator is lit pink.
Using MusicCast CONTROLLER to register favorites
You can register up to 40 favorite content items (songs stored on your PC and Internet Radio stations).
Play a song or an Internet Radio station that you want to register.
2 In the playback screen, tap and then tap "Add to favorites".
Recalling registered content
1 Use MusicCast CONTROLLER to select the room in which this unit is located (e.g., Room 1).
2 Tap "Favorites", and select the content that you want to play.
Detailed settings
Making settings via MusicCast CONTROLLER
You can use MusicCast CONTROLLER to make settings for a variety of functions.
Setting the sleep timer
This function automatically sets this unit's power to standby mode after the specified time has elapsed.
Settings: Off (default), 30 Min., 60 Min., 90 Min., 120 Min.
NOTE
The sleep timer setting is canceled if you perform any of the following actions.
- Set this units power to standby mode.
- Unplug this unit from the AC outlet.
- Switch the source to PHONO.
The sleep timer cannot be used if the source is set to PHONO.
Enabling/disabling automatic playback
This function specifies whether songs from the computer (server) will play automatically when the source is switched to Server.
Settings
On (default): Automatic playback is enabled. If the unit keeps a history of playback, the last item that was played will be played again. If such an item no longer exists, the unit will not play it.
Off: Automatic playback is disabled.
Enabling/disabling automatic standby
This function automatically sets the power to standby mode after the specified time has elapsed without any playback or operation being performed.
Settings
Off: Automatic standby is disabled.
On: Automatic standby is enabled. If this unit has not been playing for the last 20 minutes, or has not been operated for the last eight hours, the power automatically switches to standby mode.
Default
U.K., Europe and Korea models: On
Other models: Off
NOTE
Immediately before entering standby mode, the STANDBY/ON (power) indicator flashes.
Making settings via a web browser
You can use a web browser on your computer or other device to make settings for this unit and for the network connection. Here we explain the Standby setting.
Connect this unit to the network before you proceed with the following operations. (⇒ pages 19 and 23)
Accessing the settings screen
Here's how to access the settings screen on your computer.
1 Use MusicCast CONTROLLER to find out the IP address of this unit.
2 Start a web browser on your computer.
3 In the address bar of your web browser, enter the IP address that you found, and then press Enter.
The settings screen appears.
NOTE
We do not guarantee that this will work with all devices or browsers.
Standby setting
Network Standby
Specifies whether this unit's power can be turned on from a network device.
Auto (default): Network standby is enabled. If this unit is not connected to a network, network standby is automatically disabled. (This unit enters eco standby mode.)
On: Network standby is enabled. This setting will consume more power than the "Off" setting.
Off: Network standby is disabled. (This unit enters eco standby mode.)
Bluetooth Standby
Specifies whether this unit's power can be controlled from the Bluetooth device. If this setting is "On", this unit automatically turns on when a connect operation is performed on the Bluetooth device.
On (default): Bluetooth standby is enabled. (Only if the network standby setting is "Auto" or "On".)
Off: Bluetooth standby is disabled.

With an advanced energy saving design, this product achieves a low power consumption of not more than 2 watts when in Network Standby mode.
When necessary
Updating the firmware
New firmware that provides additional features or product improvements is released as needed.
You can update the firmware using the MusicCast CONTROLLER that's installed on your mobile device.
When new firmware is available, the screen of MusicCast CONTROLLER shows the message "Update new firmware now?".
1 Tap "Yes".
Firmware update begins.
During the update, a progress bar is shown in the screen of MusicCast CONTROLLER, and the SOURCE indicator of this unit flashes light blue.
When the update is successful, the screen of MusicCast CONTROLLER indicates "Firmware update completed." and the SOURCE indicator of this unit is lit light blue.
NOTICE
While the firmware is being updated, do not operate this unit or disconnect the AC adaptor or the network cable.
NOTE
If you chose "Later", tap (Settings) in MusicCast CONTROLLER and choose "New firmware is available". Update the firmware as directed by the screen.
When new firmware is available, the SOURCE indicator also flashes orange when the power of this unit is turned on.
If you're not using MusicCast CONTROLLER, the firmware update starts when you hold down PLAY/STOP (play/stop) and press STANDBY/ON (power) while this unit's power is in standby mode.
For more about the firmware, refer to the Yamaha website.
Initializing the settings
Here's how to initialize the settings of this unit.
Press STANDBY/ON (power) to put this unit's power in standby mode.
2 While holding down SOURCE, press STANDBY/ON (power) to turn on the power of this unit.
The settings will be initialized.
Connecting to a network using the WAC function
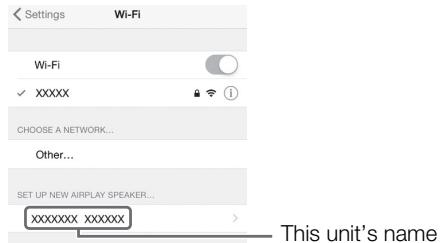
When you first turn on the power after purchasing the unit or initializing it, the (wireless LAN) indicator will flash. (Except when the unit is already connected to the network via a cable, or when the audio output select switch is set to PHONO OUT) While it is flashing, you can connect to the wireless network by sharing the network settings of your iOS device (WAC function).
To use this function, proceed as follows.
In the Wi-Fi screen of your iOS device, select this unit as the AirPlay speaker.
E.g., (iOS 10)
2 Make sure that the "Network" field is set to your preferred network, and then tap "Next".
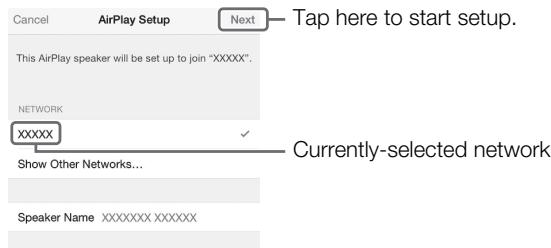
When the setup is complete, the unit will automatically connect to the selected network (access point).
Care
Caring for this unit
Wipe it with a soft dry cloth. Do not use chemicals such as benzine or thinner, since they might damage the surface.
Caring for the record stylus
The tip of the record stylus is extremely delicate. Handle it with care so that it is not damaged. If dust should adhere to the tip of the stylus, use a soft pointed brush to wipe it off starting at the base of the stylus and moving toward the tip, or use a commercially available cleaner made for that purpose.
Caring for records
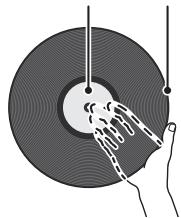
Dirt adhering to a record can cause skips or noise. Use a commercially available record cleaner to remove dirt.
Replacement
Replacing the belt
Depending on the conditions of use, the belt can wear out or break. If this occurs, replace the belt. For a replacement belt, contact your nearest authorized Yamaha dealer or service center.
1 Turn off the power of this unit and of the connected devices, and disconnect this unit's AC adaptor from the AC outlet.
2 Remove the platter sheet from the platter.
3 Detach the belt from the pulley.
4 Insert your fingers into the round holes of the platter, and lift up the platter.

CAUTION
Take care not to drop the platter. Dropping it might cause injury, or might damage the unit.
5 Turn the platter over, and remove the belt.
6 Install the replacement belt on the platter.
Take care that the belt is not twisted.
7 Install the platter on this unit.
For details on installation, refer to "Assembly" on page 15.
Replacing the record stylus
When the tip of the record stylus becomes worn down or damaged, replace it immediately.
As the replacement stylus, please purchase an ATN3600L replacement stylus made by Audio-Technica.

CAUTION
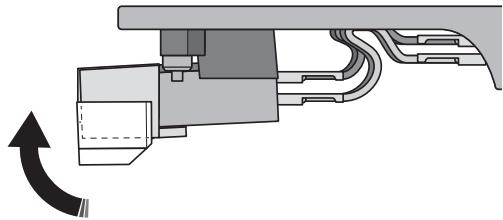
Attach the stylus cover before replacing the stylus. The tip of the stylus might injure you, or it might become damaged.
Take care that children do not swallow the stylus when it is removed.
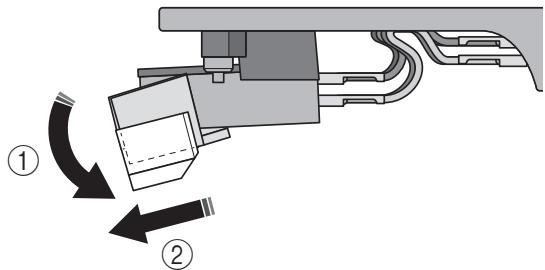
1 Turn off the power of this unit and of the connected devices, and disconnect this unit's AC adaptor from the AC outlet.
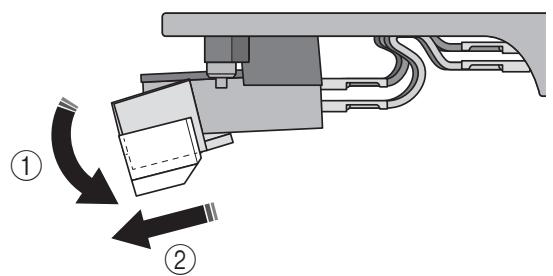
2 While using your fingers to hold the body of the cartridge, press the stylus down in the direction of ①, and pull it in the direction of ② to remove it.
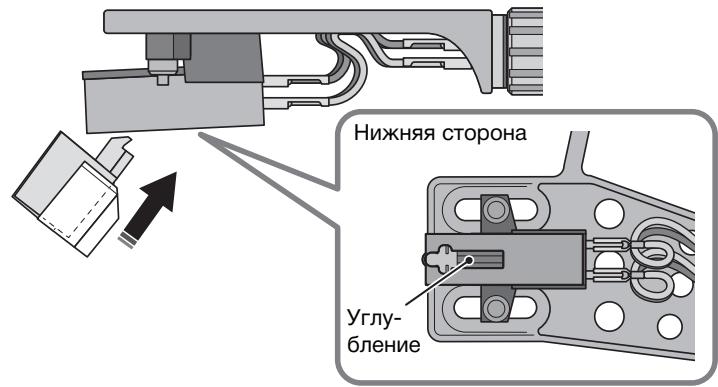
3 While using your fingers to hold the body of the cartridge, insert the tab of the replacement stylus into the groove on the underside of the cartridge.
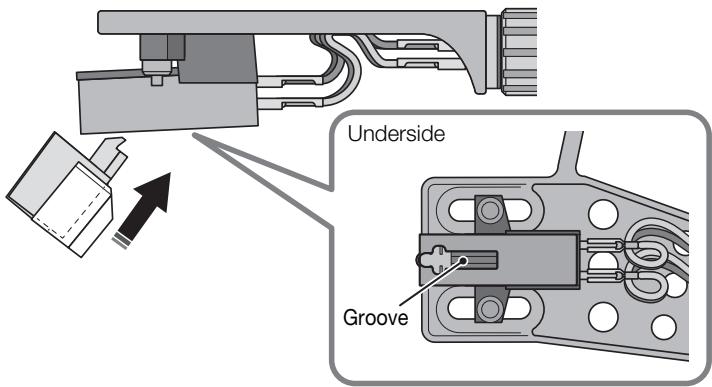
4 Press the stylus upward until you hear a click.
Moving this unit
When moving this unit, lock the tone arm so that it does not move.
Troubleshooting
If the unit stops operating correctly, check the following points.
If taking the appropriate action does not solve the problem, or if there is a problem not listed below, press the STANDBY/ON (power) button located on the unit's back panel to turn off the power, disconnect the power cord, and contact your nearest authorized Yamaha dealer or service center.
General
| Problem | Cause | Action | Reference page |
| Pressing STANDBY/ON (power) does not turn on the power. | The AC adaptor has come unplugged from this unit's DC IN jack or from the AC outlet, or is not firmly plugged in. | Firmly plug the AC adaptor into this unit's DC IN jack and into an AC outlet. | 18 |
| When you press STANDBY/ON (power), the STANDBY/ON (power) indicator flashes and the power does not turn on. | The protection circuit operated three times in succession. | In order to protect the unit, the power will no longer turn on. Contact a Yamaha service center to have the unit repaired. | - |
| Pressing SOURCE does not switch the source. | The audio output select switch is set to PHONO OUT. | Set the audio output select switch to LINE OUT. | 14 |
| The platter does not rotate. | The belt is not correctly positioned on the platter and pulley, or the belt has come off. | Attach the belt correctly to the platter and the pulley. | 15 |
| STANDBY/ON (power) is not on. | Turn STANDBY/ON (power) on. | 22 |
| No sound. | The head shell is not correctly attached to the tone arm. | Attach the head shell correctly to the tone arm. | 16 |
| The RCA stereo cable is not connected correctly. | Connect the RCA stereo cable correctly. | 18 |
| The mute setting of the amplifier is on. | Turn off the mute setting of the amplifier. | - |
| The audio output select switch of this unit is set incorrectly. | Set the audio output select switch correctly for the device that is connected. | 18 |
| Volume is too weak or too loud. | The cartridge setting of the amplifier or phono equalizer is incorrect. | Set the cartridge setting of the amplifier or phono equalizer correctly for the type of cartridge that you're using (MM or MC). | - |
| The audio output select switch is set incorrectly. | Set the audio output select switch correctly for the device that is connected. | 18 |
| Something is wrong with the left/right balance of the sound. | The unit is tilted. | Place the unit on a level location. | - |
| Playback speed is wrong. | The speed setting is incorrect. | Set the 33/45 (speed) setting correctly. This unit does not support playback of SP records (78 rpm). | 12 |
| Hum is audible. | The RCA stereo cable is not connected correctly. | Connect the RCA stereo cable correctly. | 18 |
| The head shell is not firmly secured to the tone arm. | Use the lock nut to firmly secure the head shell to the tone arm. | 16 |
| Skipping Noise occurs. The sound is distorted. | The stylus pressure is not adjusted correctly. | Set the counter weight markings to the stylus pressure specified for the cartridge. | 20 |
| The record is scratched or warped. | Do not used scratched or warped records. | - |
| The record is dirty. | Use a commercially available record cleaner to clean the record. | - |
| The record is statically charged. | Use an anti-static brush to remove the static charge. | - |
| The stylus is dirty. | Remove the dirt from the stylus. | 36 |
| The stylus is worn down. | Replace the stylus. | 37 |
| The unit is placed in a location that is subject to vibration. | Place the unit in a level location that is not subject to vibration. | - |
| Feedback occurs. | The unit is too close to the speakers. | Locate the unit farther away from the speakers. | - |
| The playback volume is too high. | Adjust the volume of the amplifier. | - |
Bluetooth
| Problem | Cause | Action | Reference page |
| Unable to pair the unit with the Bluetooth device. | The WIRELESS switch located on the back panel of this unit is turned OFF. | Set the WIRELESS switch located on the back panel of this unit to AUTO. | 14 |
| The audio output select switch of this unit is set to PHONO OUT. | Set the audio output select switch of this unit to LINE OUT. | 14 |
| Another Bluetooth device is already connected to this unit. | Disconnect the Bluetooth device that is currently paired, and then pair with the desired Bluetooth device. | 30 |
| The unit and the Bluetooth devices are too far apart. | Move the Bluetooth device closer to the unit. | - |
| Wireless communication is being obstructed by interference from a device that uses the 2.4 GHz frequency band (e.g., microwave oven or wireless LAN). | Move this unit or your Bluetooth device farther away from such devices. If your wireless LAN router supports the 5 GHz frequency band, switch to a connection that uses the 5 GHz frequency band. | - |
| Your Bluetooth device does not support the A2DP protocol. | Use a Bluetooth device that supports the A2DP protocol. | - |
| The connection profile registered in the Bluetooth device may not be functioning correctly for some reason. | Delete the Bluetooth profile in the Bluetooth device, and then connect the Bluetooth device to this unit. | - |
| The passkey of the devices, such as a Bluetooth adaptor, that you want to pair with the unit is other than “0000”. | Use a connecting device with a passkey “0000”. | - |
| No sound can be heard, or the sound cuts off intermittently. | The volume level of the Bluetooth device is too low. | Increase the volume level of the Bluetooth device. | - |
| The Bluetooth device is not set to send audio signals to this unit. | On the Bluetooth device, select this unit as the audio output destination. | 30 |
| The Bluetooth connection has been cut. | Perform Bluetooth connection operations again. | 30 |
| The unit and the Bluetooth devices are too far apart. | Move the Bluetooth device closer to the unit. | - |
| Wireless communication is being obstructed by interference from a device that uses the 2.4 GHz frequency band (e.g., microwave oven or wireless LAN). | Move this unit or your Bluetooth device farther away from such devices. If your wireless LAN router supports the 5 GHz frequency band, switch to a connection thatuses the 5 GHz frequency band. | - |
Network
| Problem | Cause | Action | Reference page |
| Unable to use the network function. | The network parameters (IP address) have not been obtained properly. | Enable the DHCP server function of your router. | - |
| The audio output select switch of this unit is set to PHONO OUT. | Set the audio output select switch of this unit to LINE OUT. | 14 |
| The WIRELESS switch located on the back panel of this unit is turned OFF. | Set the WIRELESS switch located on the back panel of this unit to AUTO. | 14 |
| You are attempting to connect to an IPv6 type router. | This unit is not compatible with IPv6 networks. Connect it to an IPv4 network. | - |
| The unit is unable to connect to the Internet via a wireless LAN router (access point). | The wireless LAN router (access point) is turned off. | Turn on the power to the wireless LAN router (access point). | - |
| The unit and the wireless LAN router (access point) are too far apart. | Place the unit and the wireless LAN router (access point) closer to each other. | - |
| There is an obstacle between the unit and the wireless LAN router (access point). | Remove the obstruction that is between this unit and your wireless LAN router (access point). | - |
| The wireless network cannot be used. | A device emitting electromagnetic waves (such as a microwave oven, a wireless device and so on) may be located nearby. | When connecting the unit wirelessly, do not use it near devices that emit electromagnetic waves. | - |
| Access to the network is restricted by the firewall settings of the wireless LAN router (access point). | Check the firewall settings of the wireless LAN router (access point). | - |
| The computer (server) cannot be detected. | The media sharing settings on the PC (or server) may be incorrect. | Modify the media sharing settings so that the unit will be able to access the folders on the PC (or server). | - |
| Access is restricted due to the security settings on the PC (or server) or router. | Check the security settings on the PC (or server) or router. | - |
| The unit and the PC are not connected to the same network. | Check the network connection and the router settings to make sure that they are connected to the same network. | - |
| Files on the PC (or server) are not displayed (or played back). | The file format is not supported by the unit or the PC (or server). | Be sure to use a file format that is supported by the unit and the PC. | 43 |
| Unable to play the Internet radio. | The selected Internet radio station is currently out of service. | There may be a network problem at the radio station, or the broadcasting service may have been stopped. Try to play the station later or select another station. | - |
| The currently-selected radio station is broadcasting silence. | Some Internet radio stations broadcast silence at certain times of the day. In this case, there is no problem with the reception, but no audio will be produced. Try to play the station later or select another station. | - |
| Access to the network is restricted by the firewall settings of the network devices (such as the router). | Check the firewall settings on your devices. The Internet radio can be played only through the port designated by each radio station. The port number varies depending on the radio station. | - |
| The iOS device does not detect the unit when using AirPlay. | You may be using a router that supports multiple SSIDs. | The router's network separator function may be blocking access to the unit. If you are connecting an iOS device to the unit, use an SSID that allows access to the unit. (Try to connect to the Primary SSID.) | - |
| The unit is not detected when using a dedicated application on a mobile device. | The unit and the mobile device are not on the same network. | Check the network connection and the router settings to make sure that they are connected to the same network. | - |
| You may be using a router that supports multiple SSIDs. | The router's network separator function may be blocking access to the unit. If you are connecting an iOS device to the unit, use an SSID that allows access to the unit. (Try to connect to the Primary SSID.) | - |
| The firmware on this unit failed to update. | The network connection may not be good. | Try updating again after a while. | 34 |
| The unit is unable to connect to the wireless LAN router (access point). | MAC address filtering may have been enabled on the wireless LAN router (access point). | The unit is unable to connect to the router if MAC address filtering is enabled. Change the setting on the wireless LAN router (access point), and try to connect the unit again. | - |
The following devices and file formats can be used by the unit.
Supported devices
Bluetooth devices
- You can use Bluetooth devices that support the A2DP protocol.
Yamaha does not guarantee the connections of all Bluetooth devices.
AirPlay
AirPlay works with iPhone, iPad, and iPod touch with iOS 4.3.3 or later, Mac with OS X Mountain Lion or later, and PC with iTunes 10.2.2 or later.
Compatible models (as of July, 2018)
Made for.
iPhone X, iPhone 8 Plus, iPhone 8, iPhone 7 Plus, iPhone 7, iPhone SE, iPhone 6s Plus, iPhone 6s, iPhone 6 Plus, iPhone 6, iPhone 5s, iPhone 5c, iPhone 5, iPhone 4s
iPad Pro (10.5"), iPad Pro (12.9") 2nd Generation,
iPad Pro (12.9") 1st Generation, iPad Pro (9.7"),
iPad mini 4, iPad Air 2, iPad mini 3, iPad Air, iPad mini 2, iPad mini,
iPad (5th generation), iPad (4th generation), iPad (3rd generation), iPad 2
iPod touch (6th generation), iPod touch (5th generation)
PC/NAS
| File | Sampling frequency (kHz) | Bit depth (bit) | Bitrate (kbps) | Number of channels | Support for gapless playback |
| WAV * | 32/44.1/48/88.2/96/176.4/192 | 16/24 | - | 2 | ✓ |
| MP3 | 32/44.1/48 | - | 8–320 | 2 | - |
| WMA | 32/44.1/48 | - | 8–320 | 2 | - |
| MPEG-4 AAC | 32/44.1/48 | - | 8–320 | 2 | - |
| FLAC | 32/44.1/48/88.2/96/176.4/192 | 16/24 | - | 2 | ✓ |
| ALAC | 32/44.1/48/88.2/96 | 16/24 | - | 2 | ✓ |
| AIFF | 32/44.1/48/88.2/96/176.4/192 | 16/24 | - | 2 | ✓ |
| DSD | 2.8 MHz/5.6 MHz11.2 MHz | 1 | - | 2 | - |
-
Linear PCM format only
-
To play back FLAC files stored on your PC/NAS, you must install server software that supports the sharing of FLAC files via DLNA on your PC, or use a NAS device that supports FLAC files.
For more information, refer to the instruction manual for the server software.
Digital Rights Management (DRM) encoded content cannot be played back.
Trademarks
Works with Apple AirPlay
Use of the Works with Apple badge means that an accessory has been designed to work specifically with the technology identified in the badge and has been certified by the developer to meet Apple performance standards.
Apple, iPad, iPad Air, iPad Pro, iPhone and iTunes are trademarks of Apple Inc., registered in the U.S. and other countries.
App Store is a service mark of Apple Inc.
WindowsTM
Windows is a registered trademark of Microsoft Corporation in the United States and other countries.
Internet Explorer, Windows Media Audio and Windows Media Player are either registered trademarks or trademarks of Microsoft Corporation in the United States and/or other countries.
Android™ Google Play™
Android and Google Play are trademarks of Google Inc.

CERTIFIED

The Wi-Fi CERTIFIED™ Logo is a certification mark of Wi-Fi Alliance®.
Wi-Fi, Wi-Fi CERTIFIED and Wi-Fi Protected Setup are registered trademarks or trademarks of Wi-Fi Alliance®.

Bluetooth
The Bluetooth® word mark and logos are registered trademarks owned by Bluetooth SIG, Inc., and any use of such marks by Yamaha Corporation is under license. Other trademarks and trade names are those of their respective owners.

Yamaha Eco-Label is a mark that certifies products of high environmental performance.
MusicCast
MusicCast is a trademark or registered trademark of Yamaha Corporation.
Explanations regarding GPL/LGPL
This product utilizes GPL/LGPL open-source software in some sections.
You have the right to obtain, duplicate, modify, and redistribute only this open-source code.
For information on GPL/LGPL open source software, how to obtain it, and the GPL/LGPL license, refer to the Yamaha Corporation website:
https://download.yamaha.com/sourcecodes/musiccast/
Licenses
For information on the licenses of the third-party software in this product, refer to the following.
http://IP address of this product*/licenses.html
- IP address of this product is checked with MusicCast CONTROLLER.
Specifications
The specifications of this unit are as follows.
Platter section
Drive method. Belt drive
Motor. DC motor
Rotation Speed 33 1/3 rpm, 45 rpm
Rotation Speed Variation. ±2%
Wow and flutter .0.2%
Platter.Aluminium die-casting
Diameter 30 cm
Tone arm section
Type Static balance straight tone arm
Effective arm length .223.5 mm
Stylus pressure adjustment range 0-4 g
Acceptable cartridge weight 15.5-19 g (including head shell)
Overhang. 19 mm
Cartridge section
Type MM type
Output voltage. 2.5 mV (1 kHz, 3.54 cm/sec)
Stylus pressure .3.5 ± 0.5 g
Cartridge weight .5.0 ±0.3 g
Cartridge Height 17.0 ±0.7 mm
Head shell weight 10 g (including screws, nuts, and wires)
Analog audio (RCA Unbalanced)
PHONO OUTx1
LINE OUT×1
NETWORK (Wired) × 1 (100Base-TX/10Base-T)
Bluetooth
Sink Function
Source Device to this unit (ex. Smartphone/Tablet)
Supported codec. .SBC,AAC
Supported profile . A2DP, AVRCP
Bluetooth version . Ver. 4.2
Wireless output. Bluetooth Class 2
Maximum communication distance. 10 m without interference
Network
AirPlay supported
Internet Radio
Wireless Network
Wireless Network Standards . IEEE 802.11 a/b/g/n/ac* 20 MHz channel bandwidth only
Radio Frequency Band 2.4 GHz, 5 GHz
WPS (Wi-Fi Protected Setup) PIN method
Available Security Method
WEP
WPA2-PSK (AES)
Mixed Mode
Audio section (Network, Bluetooth)
Output level (1 kHz, 0 dB, Fs 44.1 kHz) 2.0 ±0.3 V
Signal to Noise Ratio (IHF-A Network) (Infinity zero, Fs 44.1 kHz) 110 dB or higher
Dynamic range (1 kHz, -60 dB, Fs 44.1 kHz). . . . . . . . . . . . . . . . . . . . . . . . . . . . . . . . . . . . . . . . . . . . . . . . . . . . . . . . . . . . . . . . . . . . . . . . . . . . .
- 100 dB or higher
Harmonic Distortion (1 kHz, 0 dB, Fs 44.1 kHz) . . . . . . . . . . . . . or lower
Frequency Response Fs 44.1 kHz . 2 Hz-20 kHz (+0/-3 dB)
Fs 48 kHz 2 Hz-24 kHz (+0/-3 dB)
Fs 96 kHz 2 Hz-48 kHz (+0/-3 dB)
Fs 192 kHz 2 Hz-96 kHz (+0/-6 dB)
Audio section (PHONO)
Output level
PHONO OUT (1 kHz, 3.54 cm/sec) .2.5 mV ±3 dBV
LINE OUT. .450 mV (-7 dBV)
Signal to Noise Ratio (A-weighted, 20 kHz LPF). .67 dB or higher
General
AC adaptor power supply Input. AC 100-240 V 50/60 Hz
Output 12V1A
Power consumption 6 W
Eco standby. 0.3 W
Network Standby On/Bluetooth Standby Off
Wired 1.4 W
Wireless (Wi-Fi) 1.8 W
Network Standby On/Bluetooth Standby On
Wired 1.6 W
Wireless (Wi-Fi) 1.8 W
Weight 5.7 kg
Dimensions (width × height × depth). 450 × 136 × 368 mm (including legs and protrusions)
- The contents of this manual apply to the latest specifications as of the publishing date. To obtain the latest manual, access the Yamaha website then download the manual file.
PRECAUTIONS D'USAGE
LISEZ ATTENTIVEMENT AVANT DE PROCÉDER À TOUTE UTILISATION. VEILLEZ À SUIVRE CES INSTRUCTIONS.
Contrepoids × 1
(6) Prises PHONO OUT
Ces prises restituent le signal audio du disque vinyle. (→ page 17)
(7) Prise DC IN
https://www.yamaha.com/musiccast/

https://download.yamaha.com/
NOTE
Works with Apple AirPlay
https://www.yamaha.com/musiccast/

Works with Apple AirPlay
WPS (Wi-Fi Protected Setup)
Mit PIN
Stalla in timern for somn. 30
Works with Apple AirPlay
Rotationshastighet. 33 1/3 rpm, 45 rpm
Variation i rotationshastighet ± 2%
Lagfrekvent svaj 0,2%
Tallrik. Pressgutning i aluminium
Matt 30 cm
Tonarmens upppdefining
Typ Statisk balans rakt tonarm
WPS (Wi-Fi Protected Setup) PIN-metod
Tillganglig sakerhetsmetod WEP
WPA2-PSK (AES)
Blandat lage
Ljudets uppeldining (Nätverk, Bluetooth)
Utgangsniva (1 kHz, 0 dB, Fs 44,1 kHz). 2,0 ±0,3 V
Signal till brusfaktor (IHF-A Nätverk) (Oändigt noll, Fs 44,1 kHz) 110 dB aller högre
③ Interru tture WIRELESS
https://www.yamaha.com/musiccast/

Works with Apple AirPlay
http://(IP address of this product*)/licenses.html
WPS (Wi-Fi Protected Setup)
Metodo PIN
③ Interruptor WIRELESS
https://www.yamaha.com/musiccast/

Works with Apple AirPlay
WPS (Wi-Fi Protected Setup)
Método PIN
VOORZORGSGMAATREGELEN
LEES DIT ZORGVULDIG DOOR VOOR GEBRUK. VOLG DEZE INSTRUCTIES.
De anti-skating instellen 20
(3) WIRELESS-schakelaar
De anti-skating instellen
https://www.yamaha.com/musiccast/

https://download.yamaha.com/
OPMERKING
Works with Apple AirPlay
https://download.yamaha.com/sourcecodes/musiccast/
Licenties
WPS (Wi-Fi Protected Setup)
PIN-methode
Beschikbare beveiligingsmethode
WEP
WPA2-PSK (AES)
Mixed Mode
Audiogedeelte (Network, Bluetooth)
Uitgangsnavau (1 kHz, 0 dB, Fs 44,1 kHz) 2,0 ±0,3 V
Signaal/ruis-verhouding (IHF-A network) (Infinity zero, Fs 44,1 kHz)
110 dB of hoger
Dynamisch bereik (1 kHz, -60 dB, Fs 44,1 kHz). . . . . . . . . . . . . . . . . . . . . . . . . . . . . . . . . . . . . . . . . . . . . . . . . . . . . . . . . . . . . . . . . . . . . . . . . .
Harmonische verrorming (1 kHz, 0 dB, Fs 44,1 kHz) . . . . 0,003% of lager
Frequentierresponds
Fs 44,1 kHz . .2 Hz-20 kHz (+0/-3 dB)
Fs 48 kHz 2 Hz-24 kHz (+0/-3 dB)
Fs 96 kHz 2 Hz-48 kHz (+0/-3 dB)
Fs 192 kHz 2 Hz-96 kHz (+0/-6 dB)
Audiogedeelte (PHONO)
Uitgangsnaveau
PHONO OUT (1 kHz, 3,54 cm/sec) .2,5 mV ±3 dBV
LINE OUT. 450 mV (-7 dBV)
Signaal/ruis-verhouding (A-gewogen, 20 kHz LPF). . . . . . . . . . . . . . . . . . . . . . . . . . . . . . . . . . . . . . . . . . . . . . . . . . . . . . . . . . . . . . . . . . . . . . . . .
Algemeen
https://www.yamaha.com/musiccast/

Works with Apple AirPlay
WPS (Wi-Fi Protected Setup)
Método PIN
HactroiKa COBmecTHOrO IcNoJIb3OBaHnI HocHTeJIeI 27
Bocnpo3BeDHe My3bIkaJIbHbIX paIIOB. 27
Послuyшване музби сnomоьblu Bluetooth .. 28
Kak depekaTb pIaCTnHky?
KordaBbIePjXnTe PJIaCTHKNy,HeO6xOJIMo POJIePjXnBaTb ee 3a oJIaCTb 3TNKeTKN IN BHeUHNI Kpa JIN60 DePjXaTb PJIaCTHKNy 3a BHeUHNE Kpa JdByMpyKaMn.
Oblaactb 3TuKeTkn BHeuHm KpaI
Проверкаkomплектуни
LBeT INHdNkAToPA MeHReTCB 3aBNCIMOCTN OT NCTOCHNka.
NCTOUYHK
PHONO
Cetb (AirPlay)
Cetb (OTJNUHbI OATAirPlay)
Bluetooth
Lbet HndkaTopa
Белын
P03OBbI
3eJIeHbI
CnHn
ПОНМЕЧАНЕ
ПинhalичимНOBOROBCTpoeHHOrO nporpaMMHOrO oecneueHnHdNKaTOP Mmraet OpaHKeBbIM cBeTOM. () cTp.32
CONNECT
ClenyeT nCnoIb3ObaTb B coUeTaHn C MusicCast CONTROLLER nJa NaCTPOIKI napameTpOB CeTeBOrIO nOdkJIuOeHn. ( cTp.21)
8 INHdkaTop (6ecnpoBODna loKaIbHa ceTb)
3aropaetc npi npdknuehen annapaTa no 6ecnpoBHOH CBra3N. ( cTp.21)
NnkaTop (Bluetooth)
3aropaetc npi npdkluehen annapaTa K yctpoiCTby Bluetooth. ( ctp.28)
1 BCTaBbTe peTnB COOTBeTCTByIOuIne MeCTa C DByx CTOpOH 3aunTHoH KpbIuKIn.
2 Ппкрпnte 3auntHyu Kpbiuky, BCTaBnB peTnB COOTBeTCTByIoUne OCHOBaHnHa 3aDHe nAHeJn annapaTa.
ПОНМЕЧАНЕ
YTO6bI CHaTb 3aUHTHyO KpbIiKy, BO3bMITcB 3a Hee C DByX CTOpOH MeDJIeHHO NOdHMITE BBepx, YTO6bI CHaTb ee BmecTe C nETJMI.
BHUMAHNE
BybTe octopoXhbl, He npuIeMnTe pyKn IIn nIaIbCuI, OTKpbIBaR nn 3aKpbIBaR 3aIHTHyO KpbIiKy.
YCTaHOBka NOdKJIIOUeHnI
PoiKJIoueHne K yCnJInteIIO
YcTaHOBnTe NpdkNIOUeHnI, KaK pOKa3aHo Ha pucyHKe HIXe.

BHIMAHHE
He nodklnoaHTe cniloBOKabeN daHoro annapaTa n BCE ocTalbHbe NoDKLIOUeHHbIe yCTPOiCTBa K PO3ETkAm NpeMeHHORo TOka, NOKa He 3aBepseHbI BCE noDKIIOUeHHn HAcTPOiNpeEklOuAteJIy BbIBOda ayDnOcIRHaJa.
Ecnncnoj3yIOrTa rHe3da LINE OUT ha annapate
NtOuHKn, KOtOpbIe MoXnHO BocnpOn3BODntb: pJlactnHKn, BCE cTeTBeBle NcToHKn, BKlIOyA INThepHeT-paINo, Bluetooth
PpeochoBHO yCnIeJIb nn KOLOHKn
CO BCTpoEHHbIM YCJINITEJIEM T.Д.
(BHeIHHe BxoHbIe THe3Ja)
Ecnncnojb3yotc rhe3da PHONO OUT ha annapate
NCTOCHNK, KOTOpBIE MOXHO BOCPON3BOUNTB: PJIaCTNHKN
Ceteyo yHKnIO annapaTa nCnoJb30BaTb HeB03MOxH0.
PpeochoBHO yCnIeIb nn
ΦOHO3Kbαλaɪ3εριT.D.
(BXOДньie rHe3da PHONO)
IopdkloucheHne ceTeBoro Ka6eJia
INdkaTOp (6ecnpoBODHa JIOkaJIbHa cTeb) HaHT HeMraTb.

(6ecnpoBODHa loKaJIbHa cTeB)
4 Cnedynte HNCTpyKzmaH Na 3kpaHe Mo6bHOrO yctpoiCtBa Dnay ynpabIeHna npiloxKeHem MusicCast CONTROLLER, TTo6bl HAcTPOiTb CeTeBbI napaMeTpbl.
Korda annapat nodkJIouHTcK cETN, 3aropntc uHnDKaTOp (6ecnpoBODna JOKaJIbHa cETb).
Tenepb annapaat 3apeRncTpupoBaH B cetu MusicCast, a ceteBbI npapaMeTpbl HaCTpoEhbl.
Icnoj3yTe npuioxehne MusicCast CONTROLLER nJI BOCIpOIN3BeDeHnMy3bIKn.
ПРIMECHAHNE
Длг Насторидополинтельх MusicCast-coBmecTmblx yctpoiCTb Haxmite Ha 3naOK (HacpoiKn)В npabOM bepxhemугlyHa 3kpaHe MusicCast CONTROLLERи BBi6epnte 3haueHne "Добавпь HOBOe yctpoiCTBO".
Bocnpon3BedeHne
PpnoocTaHOBKa BocnpOn3BedeHnA
Korda Bbl IOnHIMaTe pbyar IOnbema, TOHaPM IOnHIMaETcra IN BOCPON3BVeDEHne npIOCTaHaBJIbBaETcR.
Korda Bbl onyckaetepbur noIbema,BOCpOun3BeJeHne BO306HOBJIaTeTc.
OctaHOBKa Bocpon3BedeHna
I PoiHnMIte pbIur ng oIbema.
2 BepHnTe ToHaPm Ha onOpy.
3 Onyctnte pbyar nojbeMa.
4 Haxmte KhoNky PLAY/STOP (BocnpOn3BeDeHne/OctaHObKa). OopHyI dIck pepeCTaHET BpaUaTbCra.
5 3aФИКсИрУTeToHApM.
ПРИМЕЧАНЕ
ToHapm aBTomatnueckn He IOpHMmaetcra, KOrda 3aKaHUnBaeTcB OBCPpon3BeDeHne PJIaCTnHKn.
EcIn Bbl He nIaHpyeTe IcNoJIb3OBAb annapaT B TeueHne onpeJeHHO BpeMeHn, npKpeNITe KpbIshky K mIgIe, YTo6bl ee 3aIHTb.
Прослuyшваиме Иntернетрадино
3decb onncbIbaeTc npoceDpya BbIbopa INHTepHET-paIIOCTaHcN C pmoIbI npnIoJxKeHna MusicCast CONTROLLER, KOTOpoe yCTaHO H a MObIbHOM yCTpOInCTBe.
ПТИМЕЧАНЕ
Пелег Быбором радиocтанци зaperистричу te annapat B ceTN MusicCast. ( ctr.21)
HeKOTOpbIe IHTepHET-paIIOCTaHcIIN MOryT 6bITb HeIOCTynHbI NOCTOHHo IIN B ONpeJeIeHbIe Yacbl.
Данная Функця Исноьзует слжбу "airable.Radio". эта слжба npedoctablaertcя kompannei Tune In GmbH.
Daanha cnyk6a moKet 6bItb n3MeHeHa nnI ppeKaueHa 6e3 yBeDomJIeHn.
1 C nmoosbno npniloxeHnma MusicCast CONTROLLER BbIbepuTe KOMHaTy, B KOtOpO HaxoDntc daHHbI aannapaT (HanpIMep, Room 1).
2 Haxmnte "Net Radio".
3 BbI6epnte INTepHeT-paHocTaHcHIO, KOtOpyIO Bbl XOTnTe npocnyuataB.
iHdikKaTOp (Bluetooth).
ПРИМЕЧАНЕ
Ecni 3anpaunBaetc npoIb, BVeIte "0000".
Ecnn annapat 3apernctpupoban KaK yctpoiCTBO MusicCast, Na3BaHne KOMHaTbI NOBHTCB CNICKe DoCtynhBix yctpoiCTB.
4 Ha yctpoiCTBe Bluetooth Bb6epnte KOMnO3nIIO N BKJIouHTe BOCnpoN3BVeJeHne.
ПРИМЕЧАНЕ
Ecnn annapaT obHapyKNT yCtpoiCTBO Bluetooth, KOTOpoe 6blno paHee noknOeHo, OH aBOMaTHueCKN nokKnOHTcK yCtpoiCTBy Bluetooth nocLe BbInonHeHnMa 1. Jna yCTaHOBKe eue oJHoro coeHNHeHn Blooth chauJa Heo6xOIMo pa3OpBaTb Tekyuee coeHNHeHne Bluetooth.
Ytobpa3opBaTb coeHHe Hne Bluetooth, BInOnHnTe oNo n3 cnedyuux deiCTBn.
- OtklnouHTecb ot yctpoiCTBa Bluetooth.
- Bыберпге Лобoe 3начениe, олчиhoe ot "Bluetooth", в Качеве Источиka Дд данноу appeal.
Ecnn BkIIOUeH pexmOxuaHnaBBlooth,annapat ABToMaTnueCKBIOuHTc npn BBInOpHeHHn Oepaunn noKIIIOUeHnHa yCTpOJCTBe Bluetooth. ( ctp.31)
Прослшваиме My3ыки спомоцью AirPlay
BkI. (no ymouaHIO): aBTOMaTnueCKoe BOCpOu3BeHe BKJIooYeHO. EcIn annapat coxpanreT kypnaI BOCpOu3BeHeNIA, To nocJeHNI BOCpOu3BODIMbI 3JIeMeNT 6yTeB OBCpOu3BeHcOBA. EcIn taKo 3JIeMeNT 6BJbSe He cyUeCTByET, annapat He 6yTe erO BOCpOu3BODITb.
BbIKn.: aBTOMaTNUeCKOE BOCIpON3BeDeHne BbIKNoueHO.
BkIIOUeHne I BBIKJIIOUeHne aBTOMaTNUeCKOTo nepexoDa B peXIM OxuHaHn
Данная Функця abTOMaTnueckи пepeBoDnT nIaHne B pexm OxknlaHnaPIOcNe ICTeHeHry yka3aHHOrOпePnoDA bPeMeHn, B TeHeHne KOTOpOBOcPOn3BVeDEHne ИлдугпОпeрaцИн He BbIPOJIHЯOTcR.
Hactpoyn
BbIK.: aBTOMaTnueckn IepexoD B pexm OxuJaHn BbIKJUoyeH.
Bkn.: aBTOMaTnueckn nepexoB peKm OxuHaBkIIOUeH. Ecnn BocnpOn3BeHe Ha annapaTe He BbIOJHLIOcB TeUeHne 20 MnHT, nII npyTne onepaun He BblIOJHLIOcB TeUeHne BOcMbu YacOB, nITaHne aBTOMaTnueckn nepekluOHaTcBpeKm OxuHaHn.
IyoymoJauHnIO
Moelen dIe CoeINHeHHoro KopoJIeBCTBa, EbpOnbI N Kopen: Bkn.
ДугnevModen:Выкн
ПИМЕЧАНЕ
HenocpeIcTBeHNO nepeI nepexoOM B peKIM OxuJaHn IHNkKaTOp STANDBY/ON (nITaHne) Muraet.
7 UcTaHOBInTe OOnOpHbI dNcK Ha annapaT.
Iopno6hee o6 yctaHOBKe cm. B pa3dene "C60pKa" Ha ctp. 13.
3aMeHa nIgIblnJaactHKn
EcnI KOHnK nIJIbI n3HocnCra nIIIOBpeJdeH, HeMeIeHHO 3aMeHnte ee.
IJIy 3aMeHbI cIeNyET npio6peCTn CMeHHyO nIpy ATN3600L
IpnI3BOIDCTBa Audio-Technica.

BHIMAHNE
Pnukpenite Kpbilky ngbli nepeed 3amehoirngbl. KoHnK ngbl moxet nopahntb Bac nnn OH MOXeT 6bItb NOBpeKdeH.
Cneinte, yTo6bI Detn He nporJIoTnIn nrgy, KOrda OHa cHraTa.
1 BbIKJIOUHTe NITaHne annapaTa n IOKJIIOUeHHbIX yCTpOiCTB n OTKJIIOUHTe aadTep nepemeHHoro TOKa annapaTa ot po3ETKn.
2 YdepKmba nalbuaMn KOpNyc KapTpndJa, HaxMnte Ha ngly B HnnpabJIeHm ① nnotraHnTe ee B HnnpabJIeHm ②, YTO6bl ee CHrTb.
3 YdepxuBaa nalbuaMn KOpnyc KapTpudka, BCTaBBTe BbICTyn Ha CmeHno irIe By rJy6beHne Ha HnXHe CTopoHe KapTpudka.
4 Haxmte Ha ngly B hnpaBneHn BBepx do ueJka.
Clenyuoune yctpoiCTBa n φopMaTbI φaJIOB MOrTy INcNoJIb3OBaTbcA annapaTOM.
PoeKnBaembIe yctpoNCTBa
UcTpoIcTBA Bluetooth
- MoXHo IcNoJIb3OBAbY yCtpoIcTbA Bluetooth, KOTOpblie nOdepKnBaIoT npToKoJ A2DP.
Kompania Yamaha He rapaHTnpyeT nodkJIIOueHne Bcex ycTpoiCTB Bluetooth.
AirPlay
AirPlay pa6oTaET c iPhone, iPad u iPod touch c iOS 4.3.3 uu 6oJee no3dNeBercn, Mac c OS X Mountain Lion uu 6oJee no3dNeBercn u PI K c iTunes 10.2.2 uu 6oJee no3dNeBercn.
Cobmctmbie mojenn (no coctoHnHa nioJIb 2018 roa)
PpeHa3NaYeHO dIa.
iPhone X, iPhone 8 Plus, iPhone 8, iPhone 7 Plus, iPhone 7, iPhone SE, iPhone 6s Plus, iPhone 6s, iPhone 6 Plus, iPhone 6, iPhone 5s, iPhone 5c, iPhone 5, iPhone 4s
iPad Pro (10,5"), iPad Pro (12,9") 2 nokoJeHne, iPad Pro (12,9") 1nokoJeHne, iPad Pro (9,7"),
iPad mini 4, iPad Air 2, iPad mini 3, iPad Air, iPad mini 2, iPad mini, iPad (5 nokoJeHne), iPad (4 nokoJeHne), iPad (3 nokoJeHne), iPad 2
iPod touch (6 nokolene), iPod touch (5 nokolene)
ΦopMaTbI φaɪnloB
■ K / N A S
| Фай | Частota дис- кретиазец (кг.) | Битовая glубина (бит) | Битре� (кбит/c) | Колочтою Каналов | Посаджka Нениров STОГВО Восториздемпя |
| WAV * | 32/44,1/48/ 88,2/96/ 176,4/192 | 16/24 | - | 2 | 3 |
| MP3 | 32/44,1/48 | - | 8-320 | 2 | - |
| WMA | 32/44,1/48 | - | 8-320 | 2 | - |
| MPEG-4 AAC | 32/44,1/48 | - | 8-320 | 2 | - |
| FLAC | 32/44,1/48/ 88,2/96/ 176,4/192 | 16/24 | - | 2 | 3 |
| ALAC | 32/44,1/48/ 88,2/96 | 16/24 | - | 2 | 3 |
| AIFF | 32/44,1/48/ 88,2/96/ 176,4/192 | 16/24 | - | 2 | 3 |
| DSD | 2,8 Мг/ 5,6 Мг/ 11,2 Мг | 1 | - | 2 | - |
*ToIbko IInHeiHbI φOpMaT PCM
ДявocриЗБeDEHЯфayIOBFLAC,KOToPbIeXpaHЯTcHaПКИЛВ NAS,Heo6xOIMO yCTaHOBnTB Ha PIK cepBepHoe P0, PndepXnBaIOUeCoBmecTHoe INCNoJIb3OBaHne FLAC-ФaIIOB Upe3 DLNA,INI INCNoJIb3OBaTb CeTeBOe XpaHJIuIe DaHHbIX (NAS), PndepXnBAIOUeФaIblFLAC. Pndpo6Hee CMOTpInTe B pykoBoDCTBe IOp cepBepHomy PO.
Coapedxumoe cTaHapTa Digital Rights Management (DRM) HeJIb3a BOCIPON3BOIDITb.
TobapHbIe 3HaKn
Works with
Apple AirPlay
HaJIuIe 3TuKeTKn Works with Apple o3NaHaeT, yTo yCTpOiCtBO npEJaHa3NaUeHO CTeUaJIbHo IJRA pa6oTbIC TexHOrOpIeN, yKa3aHHoH Ha 3TuKcETke, n cepTnΦuIuPoBaHO pa3pa6oTuNKOM Ha COOTBeTCTBVe cTaHdApTAM TexHnueCKNX XapakTepNC TIK KOMnAHm Apple.
Apple, iPad, iPad Air, iPad Pro, iPhone u iTunes yBnIOTcT ToBAPHbIMN 3HaKaMn KOMpaHm Apple Inc., 3apeRNCtpnpoBaHHbIMN B CLUa n dpyrnx cTpaHax.
CkopocTb BpaueHn 331/306/MnH,4506/MnH
Bec Kapkaca roJIOBkn 10r (BKnIoua BnHTbI, raIKN n npOBoa)
Pa3beMbI BBOda/BbIBOda
AhaIorOboBiy ayDIOOBbIXoR (RCA He6BaJHcnpoBaHHbI)
PHONO OUT × 1
LINE OUT × 1
NETWORK (Пювовдhoe) × 1 (100Base-TX/10Base-T)
Bluetooth
Функциа Sink
(Haipmep, CmapToh/IIaHwet)
Ponepxmbaemb Kopek. SBC, AAC
WPS (Wi-Fi Protected Setup)
PIN-KoI
Cnocob oecneuehen 6e3oanacnoctn
WEP
WPA2-PSK (AES)
CmeuHbpeKIM
Ayduno (Cetb, Bluetooth)
YpOBeHbBixoHOro cInHaJa(1KΓu,0D,B,Fs44,1KΓu) .2,0±0,3B
COOTHOUeHHe CnHaJI/ShyM (Cetb IHF-A)
(OT 6eCKoHeuHocTn Do Hny, Fs 44,1 KfU) .110 d5 nIi 6oJIee
YPOBHeH BbIXoHOrO CnHaJa
PHONO OUT (1 kΓι, 3,54 cm/c) .2,5 MB ±3 έδB
LINE OUT 450 mB (-7 dB)
CoOTHoSeHHe nCnHaJI/7yM (B3BeUeHHbI no KpNBoi A, 20 KfΦH)
67 65 nii 60lee
06uhe xapaKTepeNCTnKn
IITaHne aJaanTepa nepemehnHO Toka
BxoI 100-240 B nepemehnoro Toka 50/60 T
BbIXoI 12 B/1 A
IopTe6JIeMaJ MoUHocTb 6 Bt
3KOHOMnHbIpeXmOxuHaHna 0,3B
Cetb pexim oxndaHn Bk./Pexim oxndaHn Bluetooth bbln.
PpOBoDnoe 1,4 B
BecnpoboHoe (Wi-Fi) 1,8 B
Cetb pexim OxindaBnBk./Pexim OxindaBnBn Bluetooth Bkn.
PpOBoIHoe 1,6 B
BecnpoBoHoe (Wi-Fi). 1,8 B
Bec .5,7 Kr
Pa3mepbl (IinpuHa X BbICota X rJy6nHa) 450X136X368 MM
(BKJIIOUOaHOOKNI BbICTyNbl)
B codejkaHn daHHoro pykoOoCTBa npBedeHbI nocJeHne Ha MOMeHT ny6JIuKaUu TeXHnueCKNe XapaKTepNCu.ДЯ nOlyeHnI nocJeHne BercnN pykoOoCTBa NOCeTnte Be6-caIT KOpnpaUu YamaHa u 3arpy3nte paJl c pykoOoCTBOM.
| EN | SIMPLIFIED EU DECLARATION OF CONFORMITY |
| Hereby, Yamaha Music Europe GmbH declares that the radio equipment type [TT-N503] is in compliance with Directive 2014/53/EU. The full text of the EU declaration of conformity is available at the following internet address: https://europe.yamaha.com/en/support/compliance.doc.html |
| FR | DECLARATION UE DE CONFORMITE SIMPLIFIEE |
| Le soussigné, Yamaha Music Europe GmbH, déclare que l'équipement radioélectrique du type [TT-N503] est conforme à la directive 2014/53/EU. Le texte complèt de la déclaration UE de conformité est disponible à l'adresse internet suivante: https://europe.yamaha.com/en/support/compliance.doc.html |
| DE | VEREINFACHE EU-KONFORMITÄTSERKLÄRUNG |
| Hiermit erklart Yamaha Music Europe GmbH, dass der Funkanlagenotyp [TT-N503] der Richtlinie 2014/53/EU entspricht. Der vollständige Text der EU-Konformitätserklärung ist unter der folgenden Internetadresse verfügbar: https://europe.yamaha.com/en/support/compliance.doc.html |
| SV | FÖRENKLAD EU-FÖRSÄKRAN OM ÖVERENSSTÄMMELSE |
| Härmed försakrar Yamaha Music Europe GmbH attenna typ av radioutrustning [TT-N503] överensstämmer med direktiv 2014/53/EU. Den fullständiga texten till EU-försakrar om överensstammelse finns på foljande webbadress: https://europe.yamaha.com/en/support/compliance.doc.html |
| IT | DICHIARAZIONE DI CONFORMITÀ UE SEMPLIFICATA |
| Il fabricante, Yamaha Music Europe GmbH, dichiara che il tipo di apparecchiatura radio [TT-N503] è conforme alla direttiva 2014/53/EU. Il testo completo della dichiarazione di conformità UE è ispionate al segmente indirizzo Internet: https://europe.yamaha.com/en/support/compliance.doc.html |
| ES | DECLARATION ÚNE DE CONFORMIDAD SIMPLIFICADA |
| Por la presente, Yamaha Music Europe GmbH declara que el tipo di equipo radioélectrico [TT-N503] es conforme con la Direcitiva 2014/53/EU. El texto completo de la declaración UE de onformidad está ispionate en la direction Internet significiente: https://europe.yamaha.com/en/support/compliance.doc.html |
| PT | DECLARATION ÚNE DE CONFORMIDADE SIMPLIFICADA |
| O(a) abiax asinnado(a) Yamaha Music Europe GmbH declara que o presente tipo de equipo dequipamento de rídio [TT-N503] está em conformidade com a Direcitiva 2014/53/EU. O texto integral da declaração de conformidade está disponível no segunte endereço de Internet: https://europe.yamaha.com/en/support/compliance.doc.html |
| NL | VEREENVOIDIGDE EU-CONFORMITEITSVERKLARING |
| Hierbij verkaar ik, Yamaha Music Europe GmbH, dat het type radioapparatuur [TT-N503] conform is met Rlichtijn 2014/53/EU. De volledige tekst van de EU-conformiteitsverklaring kan worden geraadpleegd op het volgende internetadres: https://europe.yamaha.com/en/support/compliance.doc.html |
| BG | OPINOCTEHA EC DEKLAPAUÇIN 3A CBJTBTCTBVE |
| С要进一步 доу Yamaha Music Europe GmbH deklapura, Que tosni tini radioobpьжени [TT-N503] é в сожтевпгспссссссссссссссссссссссссссссссссссссссссссссссссссссссссссссссссссссссссссссссссссссссссссссссссссссc | |
| CS | ZJEDNODUŞENÉ EURO PROHLASENI O SHODE |
| Tînto Yamaha Music Europe GmbH prohlasej, ze typ radiosóho zaizeni [TT-N503] je v souladu se směrnici 2014/53/EU. Üplné znéni EURO prohlaseni o shodë je k dispozici n tićo internetové adrese: https://europe.yamaha.com/en/support/compliance.doc.html |
| DA | FORENKLET EU-OVERENSSTEMMELSESERKLARING |
| Hermed erklærer Yamaha Music Europe GmbH, at radioudystyrstypen [TT-N503] er I overensstemmelse med direktiv 2014/53/EU. EU-overensstemmelseserklärgengens fulde tekst kan findes på folgende internetadresse: https://europe.yamaha.com/en/support/compliance.doc.html |
| ET | LIHTSUSTATUD ELI VASTAVUSDEKLARATSIOON |
| Käseselvaga deklareerib Yamaha Music Europe GmbH, et käesolev raidoseadme tüup [TT-N503] vastab direktivi 2014/53/EL nouetele. Eli vastavusdeklarsisooni täülik tekst on kättesaadav jargmisel internetaiaadressil: https://europe.yamaha.com/en/support/compliance.doc.html |
| EL | APLAOYTEYMENH ΔHΑΟΙΗ ΣΥΜΟΡΟΦΟΙΗ EE |
| Me tyn napovoa o/n Yamaha Music Europe GmbH, δηλινεί ατο σράοεδολιαμός [TT-N503] πλπορί την σθηγία 2014/53/EE. To πλπρες κειρεν τής δηλιωσις συμμροφωικός EE διαιβεια τοῦν ακόλουθη iστοελίδα στο σδιδίκτον: https://europe.yamaha.com/en/support/compliance.doc.html |
| HR | POJEDNOSTAVLJENA EU IZJAVA O SUKLADNOSTI |
| Yamaha Music Europe GmbH ovime izjavljue da je radijska oprema tipa [TT-N503] u skladu s Direktivom 2014/53/EU. Cjeloviti tekst EU izjave o sukladnosti dostupan je na sljedećoj internetskoj adresi: https://europe.yamaha.com/en/support/compliance/doc.html | |
| LV | VIENKÁRSOTA ES ATBILSTÍBAS DEKLARACIJA |
| Ar šo Yamaha Music Europe GmbH deklare, ka radioiekarta [TT-N503] atbilst Direktivai 2014/53/ES. Pilns ES atbilstibas deklaracijas tekstir pieejams šàda interneta vietne: https://europe.yamaha.com/en/support/compliance/doc.html | |
| LT | SUPAPRASTINTA ES ATITIKTIES DEKLARACIJA |
| Aš, Yamaha Music Europe GmbH, patvirtinu, kad radiojr jrenginiuTipas [TT-N503] atitinka Direktvyq 2014/53/ES. Visas ES atitikties deklaracijos tekstas prieinamas šiuo interneto adresu: https://europe.yamaha.com/en/support/compliance/doc.html | |
| HU | EGYSZERUSITETT EU-MEGFELELOSEGİ NYILATKOZAT |
| Yamaha Music Europe GmbH igazolja, hogy a [TT-N503] tipusu radioberendezes megfelel a 2014/53/EU irányelvnek. Az EU-megfelósegi nyilatkoz teljes szövege elérhetó à kõvetkező internetes cimen: https://europe.yamaha.com/en/support/compliance.doc.html | |
| PL | UPROSZCZONEA DEKLARACJA ZGDNOŚCI UE |
| Yamaha Music Europe GmbH niewejszm oświadcz, ze typ urzadzenia radiowego [TT-N503] jest zgodny z dyrektywą 2014/53/UE. Pelny tekst deklaraci zgodnosću UE jest dostepny pod nastepujacym adresem internetowym: https://europe.yamaha.com/en/support/compliance.doc.html | |
| RO | DECLTIA ARAUE DE CONFORMITATE SIMPLIFICATÄ |
| Prin prezenta, Yamaha Music Europe GmbH declaraçă cã tipul de echipamente radio [TT-N503] este in conformitate cu Diretica 2014/53/UE. Textul integral al declaratiei UE de conformitate este disponibil la urmâtoarea adresä internet: https://europe.yamaha.com/en/support/compliance.doc.html | |
| SK | ZJEDNODUŞENE EÜ VYHLASENIE O ZHODE |
| Yamaha Music Europe GmbH týtmö vhylasujé, ze rádioν zariadenie typu [TT-N503] je v súlade so smernicou 2014/53/EU. Üplné EU vhylasenie o zhode je k dispozicii na tejto internetovej adrese: https://europe.yamaha.com/en/support/compliance.doc.html | |
| SL | POENOSTAVLJENA IZ JAVA EU O SKLADNOSTI |
| Yamaha Music Europe GmbH potrjüe, da te tip radijske opreme [TT-N503] skladen z Direktivo 2014/53/EU. Celotno besedilo izjave EU o skladnosti je na voljo na naslednjem spltnem naslovu: https://europe.yamaha.com/en/support/compliance.doc.html | |
| FI | YKSINKERTAISTETTU EU-VAATIMUSTENMUKAISUUSVAKUUTUS |
| Yamaha Music Europe GmbH vakuuttaa, ettã radiolaitetyppi [TT-N503] on direktivin 2014/53/EU mukainen. EU-vaatimustenukaisuusvuukutuksen tãyimiittäinen teksti on saaatvila seuraavassa internetosoitteessa: https://europe.yamaha.com/en/support/compliance.doc.html | |
| TR | BASITLESTIRILMISE AVRUPA BIRLIÖGÜ UYGUNLUKBILDIRIMI |
| Isbu belge ile, Yamaha Music Europe GmbH, radyo cihaz tipinin [TT-N503], Direktif 2014/53/AB'ye uygunluğunu belyer eder. AB uyumu banyinn tam metni asagidaki internet adresinden edinilebilir: https://europe.yamaha.com/en/support/compliance.doc.html | |

| AT | CZ | FR | IE | LU | PT | ES | LI | MK |
| BE | DK | DE | IT | MT | RO | SE | NO | TR |
| BG | EE | EL | LV | NL | SK | UK | CH | ME |
| CY | FI | HU | LT | PL | SI | IS | HR | RS |
| Important Notice: Guarantee Information for customers in EEA* and SwitzerlandFor detailed guarantee information about this Yamaha product, and Pan-EEA* and Switzerland warranty service, please either visit the website address below (Printable file is available at our website) or contact the Yamaha representative office for your country. * EEA: European Economic Area |
| Wichtiger Hinweis: Garantie-Information für Kunden in der EWR* und der SchweizFür ähnere Garantie-Information über这点es Produkt von Yamaha, sowie über den Pan-EWR*- und Schweizer Garantieservice, besuchen Sieitte entweder die folgend angegebene Internetadresse (eine druckfähige Version befindet sich auch auf unserer Seiten), oder wenden Sie sich an den für Ihr Land zuständigen Yamaha-Vertrieb. *EWR: Europäischer Wirtschaftsaorum |
| Remarque importante: informations de garantie pour les clients de l'EE et la SuissePour des informations plus détaillées sur la garantie de ce produit Yamaha et sur le service de garantie applicable dans l'ensemble de l'EEA ainsi qu'en Suisse, consultez notre site Web à l'adresse ci-dessous (le fjichier imprimable est disponible sur notre site Web) ou contactez directement Yamaha dans votre pays de résidence. * EEE : Espace Economique Européen |
| Belangrijke mededeling: Garantie-informatiek voor klanten in de EER* en ZwitserlandVoor gedetailleerde garantie-informatiek over dit Yamaha-product en de garantieservice in heel de EER* en Zwitserland, gaat u maar de onderstaande website (u vind een afdrukbaar bestand op unsere website) of neemt u contact op met de vertegenwoordiging van Yamaha in uw land. * EER: Europese Economische Ruimte |
| Aviso importante: información sobre la garantía para los clienteles del EEE* y SuizaPara una información detallada sobre este producto Yamaha y sobre el soporte de garantía en la zona EEE* y Suiza, visite la direccion web que se incluye más bajo (la version del archivo para imprintir esta disponible en了我的o situ web) o pángase en contacto con el representante de Yamaha en su pays. * EEE: Espacio Econólico Europeo |
| Aviso importante: informazioni sulla garanzia per i clienti residenti nell'EEA* e in SvizzeraPer informazioni dettagliate sulla garanzia relativa a quello prodotto Yamaha e l'assistenza in garanzia nei paesi EEA* e in Svizzera, potete consulhare il site Web all'indirizzo riportato di seguito (è disponibile il file in formato stampabile) oppure contattare l'ufficio di rappresentanza locale della Yamaha. * EEA: Area Economica Europea |
| Viktigt: Garantiinformation für kunder i EES-området* och SchweizFür detaljerad information omenna Yamahaproduktsam garantiservice i hela EES-området* och Schweiz kan du antingen besöka nedanstäende webbaddress (en utskriftsvänlig fil finns på webplatsen) eller kontaktegamma Yamahas officiella representant i ditt land. * EES: Europaiska Ekonomiska Samarbetsområdet |
http://europe.yamaha.com/warranty/
| Precautions and legal information: | English |
| For detailed precaution and legal information about this Yamaha product for customers in EEA*, Switzerland and Turkey, please visit the website address below or contact the Yamaha representative office in your country. * EEA: European Economic Area |
| Sicherheitsvorkehrungen und rechtliche Hinweise: | Deutsch |
| Ausfuhrliche Sicherheitsvorkehrungen undrechtliche Hinweise zu dieserm Yamaha-Produkt für Kunden im EWR*, der Schweiz und derTürkei finden Sie auf der unteren angegebenen Website, oder wenden Sie sich an eine Yamaha-Vertrieb in dem Herem Land. * EWR: Europäischer Wirtschaftswirksam | Français |
| Consignes et informations légales: | Brasilien |
| Les clients résident dans l'EEE*, en Suisse et en Turquie et souhaitant consuluter les consignes détaillées et les informations légales sur ce produit Yamaha peuvent se rendre sur le site Web ci-dessous ou contacter leur bureau de représentation Yamaha local. * EEE: Espacé économique français | Nederland |
| Voorzorgen en juridische informatique: | Nederland |
| Ga voor uitgebende voorzorgen en juridische informatique met betrekking tot dit Yamaha-product voor klanten in de EER*, Zwitzerland en Turkje waar de hieronder vermelde website of neem contact op met de Yamaha-vertegenwoordiger voor uw land. * EER: Europese Economische Ruimte | Yugoslav |
| Precauiones e información legal: | Espanol |
| Para obtener más detalles sobre las precauiones y la información legal de este producto Yamaha para pacientes en el EEE*, Suiza y Turquía, visitee el singularite situob web o póngase en contacto con el representante de Yamaha en su País. * EEE: Espacio Economico Europeo | Italiano |
| Precauzioni e informazioni legali: | Italiano |
| Per precauzioni e informazioni legali dettagliaute su questo prodotto Yamaha parclienti in SEE*, Svizzera e Turchia, visitarile site Web all'indirizzo seguite o rivolgersi all'ufficio di rappresentanza Yamaha nel proprio paese. *SEE: Spazio Economico Europeo | Yugoslav |
| Precauzões e informações legais: | Português |
| Para obterem precauções detalladas e informações legais sobre este produits da Yamaha, os clientses do EEE*, Suiza e Turquía devem visitar o endereço do website abaixo indicado ou contactar o representante da Yamaha nos respetivos paises. * EEE: Espaço Economico Europeu | Yugoslav |
| Προφυλάξεις καινομίκες πλλροφορίες: | Eλληνίας |
| Γιαλίπουμερείς προφυλάξεις καινομίκες πλλροφορίες σχετικό με αὐτο το προίουν Yamaha γία πελάτε στόν ΕΟΧ*, τήν Ελβείτια και τήν Touρία, επιακερτέτει τήν παρακάτω τοῦθείσα web ἡ επικοίνωνησε με το γραφείον του αντιπροσώτου τής Yamaha στη χώρα σας. * EOO: Eupωταικός Μικονομίκος χώρος | Yugoslav |
| Försiktighetsätgärder och juridisk information: | Svenska |
| Besök webblatsen med adress nedan erder kontakte ditt lands Yamaha-representant für detailjerad juridisk information och information om försiktighetsätgärder für kunder i EES*, Schweiz och Turkiet. * EES: Europeiska ekonomiska samarbetsområdet | Dansk |
| Forholdsregler og juridiske oplysninger: | Dansk |
| Kunder i EÖS-landene*, Schweiz og Tyrkiet kan fá detailjerede forholdsregler og juridiske oplysninger om dette Yamaha-produkt ved at gåt nedenstäende websted eller kontakte Yamaha représentationskontor i derees land. * EÖS: Det Europeaiske Økonomiske Samarbejsdismräge | Yugoslav |
| Varotoimet ja oikeudelliset tiedod: | Suomi |
| Tämän Yamaha-tuotteen yksityskohtaiset vartoimet ja oikeudelliset tiedod asiakkaille ETA:ssa*, Sveitsissä ja Turkissaa oval staatavilla alla olevasta osoitteesta tai paikkiliselta Yamaha-edustajalta. *ETA: Europan talousalue | Yugoslav |
| Środki ostrożnosci i informacja prawnie: | Polski |
| Śczegłowowe Środki ostrożnosci i informacja prawnie dotyczne ninejszego produktu firmy Yamaha dla klienów w obszarze EOG*, Szwajcari i Turci są dostepne w wirytnie internetowej pod adresem podanym ponizzej oraz u krajowo przemstawciela firmy Yamaha. * EOG: Europejski Obszar Gospodarczy |
| Bezpečnostni opatényi a právní informace: | Čeština |
| Podrobná bepezćnostní opatényí a právní informace savujejci s tímtó produktem Yamaha pro zákažníky v EHP*, Švycarská a Turecko najdete na webovych strankákuch uvedenych nizé, przypadné si je műžete vyvädat u zastupeni společnosti Yamaha ve vaší zemi. * EHP: Evropský hospodářský prostor |
| Övórendszabályok és jogi informáciok: | Magyar |
| A Yamaha termékekkel kapclosatós, az EGT*-országokban, Svájcban és Törökországban érvényes övórendszabályok és jogi informáciok megtekinésévez keresse fel az alabb feltüntetett webhelyet, vagy érdeklojdön országa Yamaha képviceleténél. *EGT: Europai Gazdasági Térşég |
| Ettevaustabinöud ja öigusteave: | Eesti |
| EMP*, Šveitsi ja Túrgi kliente moleldud uksikasjalikud ettevaustabinöud ja öigusteabe selle Yamaha toote kohta leiate allijargnevalt veebisaidilt või põörduge vastavas rigis olevasse Yamaha einduskontorisse. * EMP: Euroopa Majanduspirkond |
| Piesardzibas pasakumi un juridiskie aspekti: | Latviski |
| Lai pirçëji no EEZ*, Šveices un Turcijas uzzinatu vairrak par piersacdžibas pasakumium un juridiskajem aspektiem, apmeklëjiet tălák noradito timekja vietni vai szainieties ar „Yamaha“ pärstävniecibu savă valstl. * EEZ: Eiropas Ekonomikas zona |
| Atsargumo priemonés ir teisiné informacija: | Lietuviu k. |
| Sio EEE*, Šveicarijos ir Turkijos clientams招投标 „Yamaha" gaminio issamias atsargumo priemones ir teisiné informacija rasite toliau nurodytoje ziniatinklio svetainéje arbaju teiraukitës savo šalies „Yamaha" atstovybëje. * EEE: Europos ekonomine erdve |
| Preventivne opatrenia a právné informácié: | Slovenskiy |
| Podrobnosti k preventivn yopatreniam a právnyn informáciám týkajúcin somto výroboku od spolocnosti Yamaha pre zákažnikov v EHP*, Švajciarská a Turecko najdete na webovce strancke uvedenej nizsie aleboa so bràtte na zastūpenie spolocnosti Yamaha vo vašej krajine. * EHP: Europsky hospodársky priestor |
| Previdnostni ukrepi in pravne informacije: | Slovenskina |
| Za podrobne previdnostne ukrepe in pravne informacije o tem izdelku Yamaha za stranke v EGP*, Švici in Turcji obišcite spoñnde spltno mesto ali stope v stik s predstavništvom Yamaha v svoji državi. * EGP: Evropski gospodarski prostor |
| Прedeцhamу морки иравна Инфомразима: | Бъларску |
| Зma Podobnoи р dedпадзни морки иравна Инфомразима отоною този рожд на Yamaha за постбитени вЕП*, Шевшиари и Турун, моля, посте лдася на уеб сая по-dул ипс с cambрахете с Predstавиеловно на Yamaha bьв вваота дьржава. * EП: Беро点点头 КОНOMINUCСКУ постсанво |
| Māsuri de precautës.si informatições juridice: | Română |
| Pentru detalihi prividm māsrule de precautës.si informatições juridice referitoare la'est produs Yamaha pentruclienti din ZEE*, Eivětá s i Turcía, vizitàti site-ul web de laresha de mai jos contactați biroul representantei Yamaha din tara dvs. *ZEE: Zona Economica Europeana |
| Mjere opreza i pravne informacije: | Hrvatski |
| Detajne mjere opreza i pravne informacije o ovom Yamahinu proizvodu za kupce u EGP-u*, Švicarskoj i Turskoj potražite na mrežnoj stranci u nastavku ili se obratite predstavniku tvrkte Yamaha za svodu zemlju. * EGP: Europski gospodarski prostor |
| Önlemler ve yasal bilgiler: | Türkce |
| AEA', Isvić ve Türkiye'de bulunan ve bu Yamaha ürününün onlemleri ve yasal bilgiler hakkinda da hafa dila bilgi edinmek isteyen misterilerim zaagida verilen web sitesini ziyaret ede bilir vyağ iligi ülke de bulunan yetkili Yamaha temsilcisityle liletşime gelebebilar. *AEA: Avrupa Ekonomik Alani |