USER MANUAL EASY COMFORT BOSCH
Register your new Bosch now: www.bosch-home.com/welcome
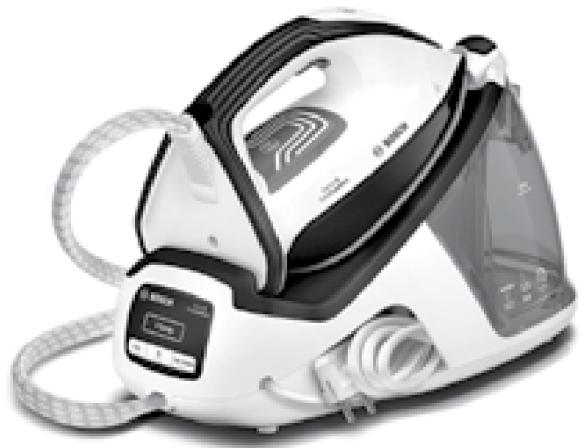
TDS40... Serie 14 EasyComfort

BOSCH
de Gebrauchsanleitung en Operating instructions fr Notice d'utilisation it Istruzioni per l'uso nl Gebruiksaanwijzing da Brugsanvisining no Bruksanvisning
sv Bruksanvisning fi Kayttoohjeet es Instrucciones de uso pt Instruções de utilização el Odyle cxphonc tr Kullanma talimati pl Instrukcja obslugi
hu Hasznalatiutasitask uk IHCTpyKci3 BnKOpNCTaHH ru Hnctpykun n0 3KcnpaTaun ro Instruetiuni de folosire ar kz TaaaHa HyKeHHDeri HcKayabIK
Index
| DEUTSCH | 6 |
| ENGLISH | 14 |
| FRANÇAISE | 22 |
| ITALIANO | 30 |
| NEDERLANDS | 38 |
| DANSK | 46 |
| NORSK | 54 |
| SVENSKA | 62 |
| SUOMI | 70 |
| ESPAÑOL | 78 |
| PORTUGUES | 86 |
| ЕАнIHNA | 94 |
| TÜRKÇE | 102 |
| POLSKI | 110 |
| MAGYAR | 118 |
| ΥΚΑΙΗCbKA | 126 |
| ΥССКИ | 134 |
| ROMÁN | 142 |
| العربية | 157 |
| ΚΑ3ΑΚ | 158 |
DEUTSCH
ESPANOL
ENGLISH
PORTUGUES
FRANÇAISE
EMLHNIKA
ITALIANO
TÜRKÇE
DUTCH
POLISH
DANISH
HUNGARIAN
NORWEGIAN
UKRAINIAN
SWEDISH
RUSSIAN
FINNISH
ROMANIAN
KAZAKH
A
General safety instructions
The appliance must not be left unattended while it is connected to the supply mains. Remove the plug from the socket before filling the appliance with water or before pouring out the remaining water after use. The appliance must be used and placed on a stable surface. When placing the iron on its stand or on its heel, make sure that the surface on which the stand or heel is placed is stable. The appliance should not be used if it has been dropped, if there are visible signs of damage, or if it is leaking water. It must be checked by an authorized Technical Service Centre before it can be used again. To avoid dangerous situations, any work or repair that the appliance may need, such as replacing a faulty mains cable, must only be carried out by qualified personnel from an Authorized Technical Service Centre. This appliance can be used by children aged 8 years and above and persons with reduced physical, sensory, or mental capabilities or lack of experience and knowledge if they have been given supervision or instruction concerning use of the appliance in a safe way and understand the hazards involved. Children shall not play with the appliance. Cleaning and user maintenance shall not be made by children without supervision. Keep the appliance and its cord out of reach of children under 8 years of age when it is turned on or cooling down. This appliance is designed only for household use up to 2000 m above sea level. CAUTION: Hot surface.
Surface is liable to get hot during use.
Important notices
- Carefully read through the operating instructions for the appliance and safeguard them for future reference.
- This appliance has been designed exclusively for normal household use in home environment.
- This appliance must be used only for the purposes for which it was designed, i.e. as an iron. Any other use will be considered improper and consequently dangerous. The manufacturer will not be held responsible for any damage arising from misuse or improper use.
- This appliance is to be connected and used in accordance with the information stated on its characteristics plate.
- This appliance must be connected to an earthed socket. If it is absolutely necessary to use an extension cable, make sure that it is suitable for 16A and has a socket with an earth connection.
- The appliance must never be placed directly under the tap to fill the water tank.
- The electrical plug must not be removed from the socket by pulling the cable.
- Never immerse the appliance in water or any other liquid.
- Do not leave the appliance exposed to weather conditions (rain, sun, frost, etc.)
- This appliance reaches high temperatures and produces steam during use, this could cause scalds or burns if not used properly.
- Do not allow the power cable to come into contact with the soleplate when it is hot.
Advice on disposal
Our goods come in optimised packaging. This basically consists in using non-contaminating materials which should be handed over to the local waste disposal service as secondary raw materials. Your local town council can give you information about how to dispose of obsolete appliances.
This appliance is labelled in accordance with European Directive 2012/19/EU concerning used electrical and electronic appliances (waste electrical and electronic equipment - WEEE).
The guideline determines the framework for the return and recycling of used appliances as applicable throughout the EU.
Description

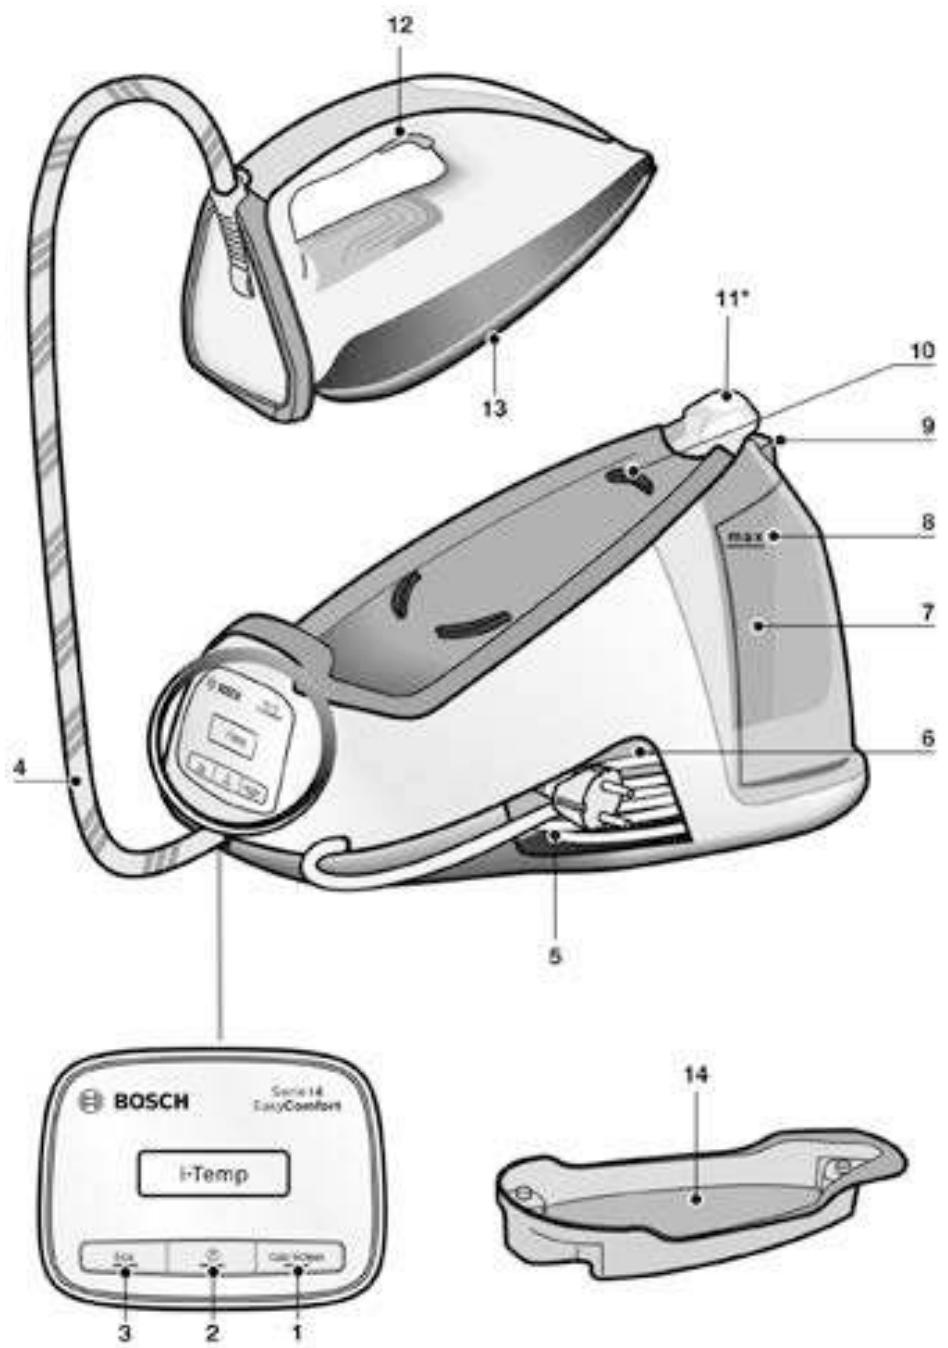
- "Calc'nClean" descending button with indicator light
- "on / off" button with indicator light
- Energy saving "Eco" button with indicator light
- Supply hose
- Mains cable
- Mains cable and supply hose storage compartments
- Water tank
- Level mark for maximum filling
- Filling lid
- Iron pad
- Iron lock system "SecureLock" *
- Steam release button
- Soleplate
- "Calc'nClean" container
Introduction

EasyComfort for simple, fast and safe ironing.
Discover the new way of ironing with EasyComfort – no more changing the temperature of the iron and tedious pre-sorting! Now all ironable materials, from ultra fine delicates to extra thick fabrics, are creasefree in a flash with a single temperature setting. Which means more time to do other things.

1. Filling the water tank
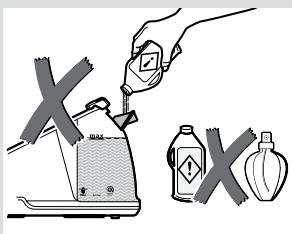
This appliance has been designed to use normal tap water.
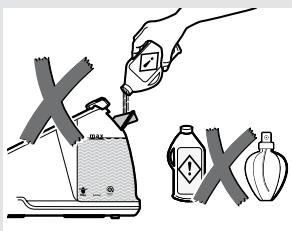
Important: Do not use additives! The addition of other liquids, such as perfume, vinegar, starch, condensation water from tumble dryers or air conditioning systems, or chemicals will damage the appliance. Any damage caused by the use of the aforementioned products will make the guarantee void!
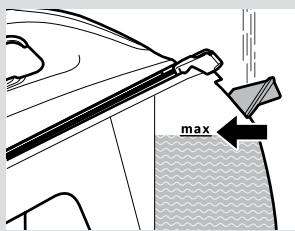
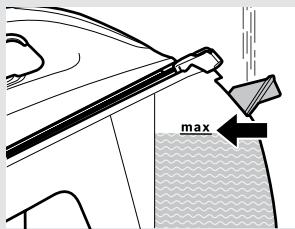
1 Open the filling lid (9). 2 Fill the water tank (7). Never fill beyond the level "max" (8) for maximum filling! 3 Close the filling lid.
Tip: To prolong the optimum steam function, you may mix tap water with distilled or demineralised water 1:1. If the tap water in your area is very hard, mix tap water with distilled or demineralised water 1:2.

2. Heating
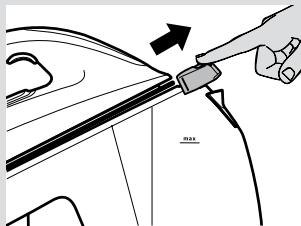
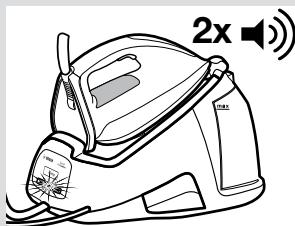
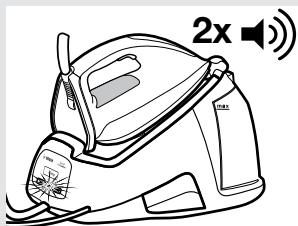
If your steam station is equipped with an iron lock system (11*), release the iron by pressing the button. 2 Unwind the supply hose (4) and the mains cable (5). Plug mains cable into an earthed socket. Press the button (2) to switch the appliance on. The indicator light (2) will flash indicating that the appliance is heating up. 4 When the iron is ready to use, the indicator light (2) will remain permanently lit. Two beeps will be heard.
Important: During the first seconds of use the amount of steam will be lower and it will increase progressively.
3. Ironing
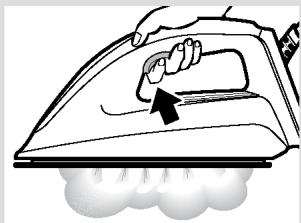
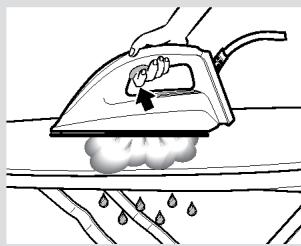
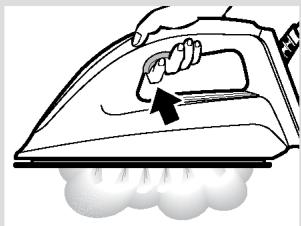
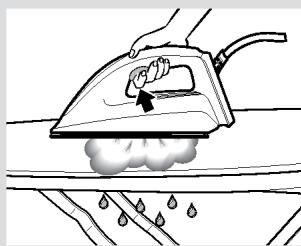
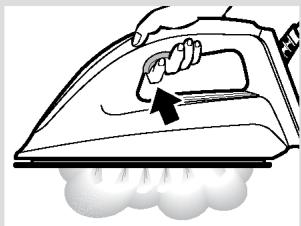
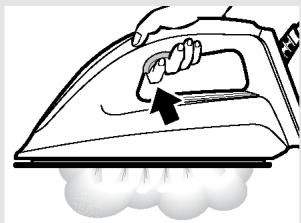
Press the steam release button (12) for ironing with steam.
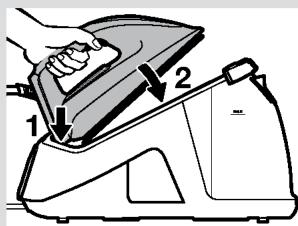
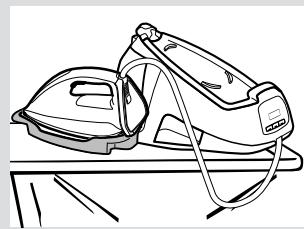
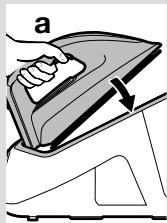
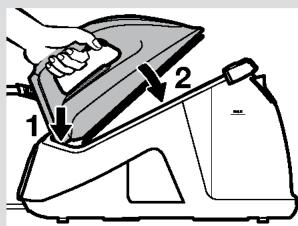
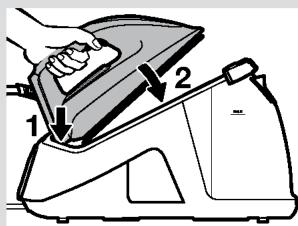
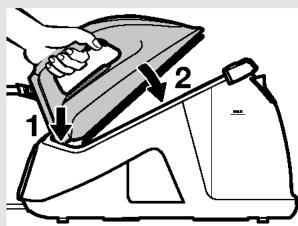
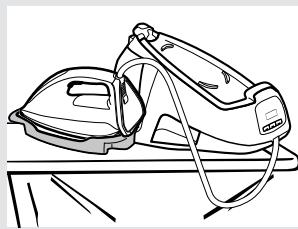
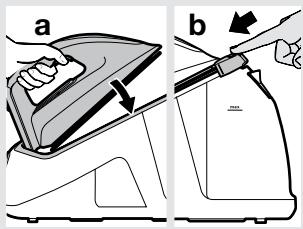
Important: When placing the iron on the pad (10), be sure to first insert the heel in the upper side of the control panel, as shown in the figure.
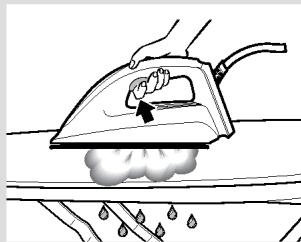
Tip: The most efficient way to iron with steam generators is to use the steam function in a forward direction (the steam permeates the fabric and gives volume back to it) and in a backwards direction without steam (fixing the fabric). This ensures that excessive steam is released and the fabric dries faster while obtaining longterm crease protection. The potential build-up of condensed water can be avoided or at least minimized.
Warning: Ironing with an excessive amount of steam may produce condensation of the hot water and dripping from the ironing board or through any other permeable surface. To prevent scalds or burns, please follow the instructions in this user manual.

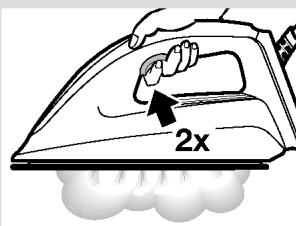
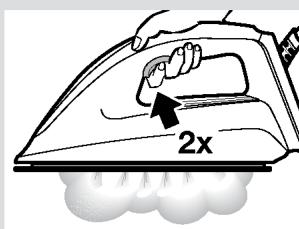
"SteamBoost" function
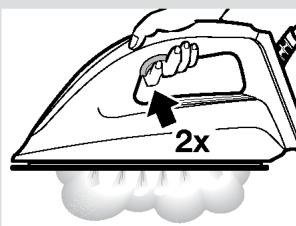
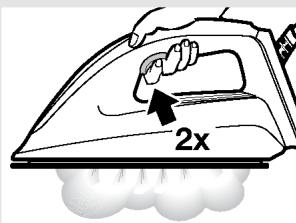
This appliance has a special function for tackling difficult creases.
Press the steam release button (12) two times in quick succession (double-click). Powerful shots of steam will be released.

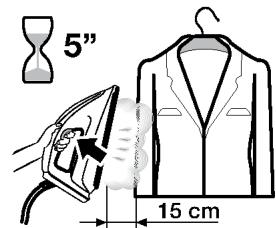
Vertical steam
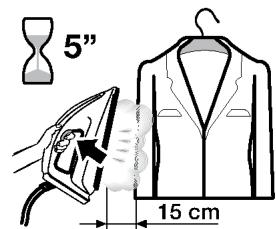
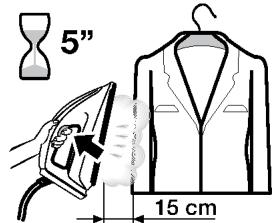
Can be used to remove creases from hanging clothes, curtains, etc.
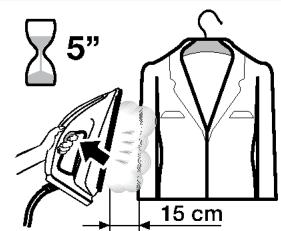
1 Hold the iron in an upright position 15 cm away from the garment to be steamed. Press the steam release button (12) repeatedly with pauses of at least 5 seconds.
Warning! : never point the steam jet at garments being worn, or at people or animals.

4. Energy saving
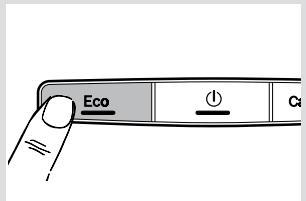
If the energy saving setting is selected, you can save energy and water and still achieve good results when ironing most of your garments.
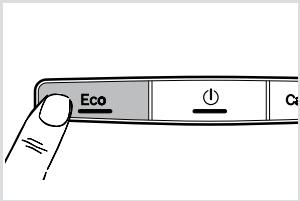
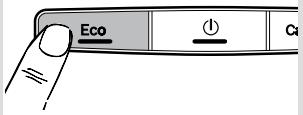
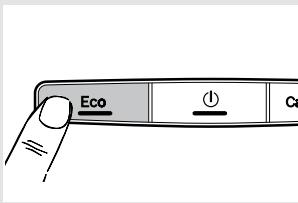
Press the energy saving button "Eco" (3). The indicator light will come on. 2 To switch back to the normal energy setting, press the "Eco" button again. It is advisable to use the normal energy setting to get optimum results on thick and very wrinkled fabrics.
Tips to help you save energy:
- If you tumble dry your fabrics before ironing them, set the tumble drier on the iron dry programme.
- Try to iron the fabrics while they are still damp and reduce the steam setting. Steam will be generated from the fabrics rather than the iron.

5. Auto switch off
For your safety and to save energy, the appliance switches off automatically when it has not been used for 8 minutes.
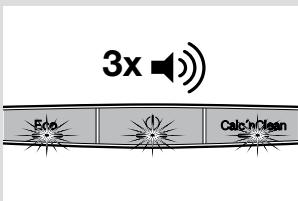
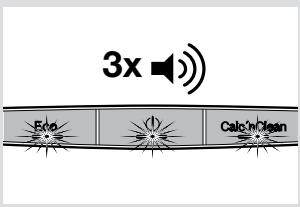
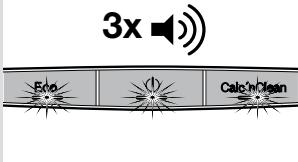
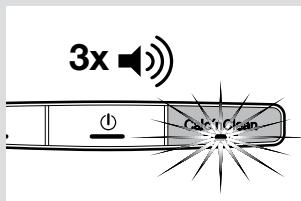
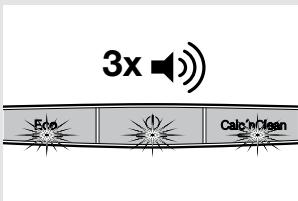
Three beeps will be heard, and all indicator lights (1, 2, 3) will flash.
1 To switch the steam station back on, press the steam release button (12) again.

Cleaning & Maintenance

1. Descaling process
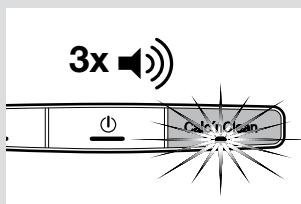
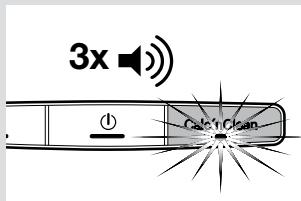
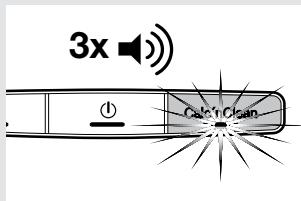
This appliance is equipped with an automatic clean warning indicator, which indicates that scale particles must be removed from inside the steam chamber. When activated, three beeps will be heard and the "Calc'nClean" indicator light (1) will flash, indicating that the process should be performed.
You may continue ironing for a time. Once this time has passed, you will only be able to dry iron (without steam).
To start steam ironing again, follow this descaling process:
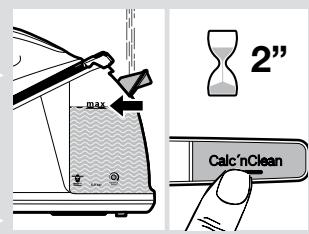
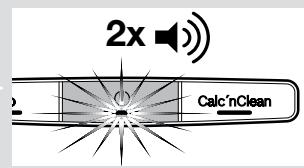
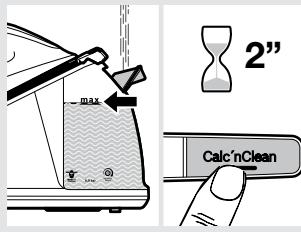
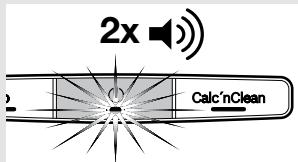
1 Fill the tank (7) with water. 2 Plug in the mains cable (5) and press the button (2) to switch the appliance on. 3 Press the descending button (1) for 2 seconds. Its indicator light will remain permanently lit. 4 Wait until the indicator light (2) stops flashing and remains lit permanently. Two beeps will be heard. 5 Place the iron on the "Calc'nClean" container (14). Make sure that the surface on which the container is placed is stable.
Warnings:
- Do not remove the iron from the container until the process has finished. Boiling water and steam will be released through the soleplate, removing limescale and/or deposits that may be inside.
- The container must only be used to perform the descending process. It must not be used as a stand for the iron while ironing.
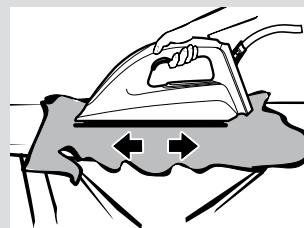
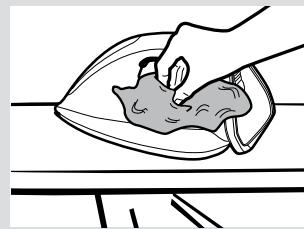
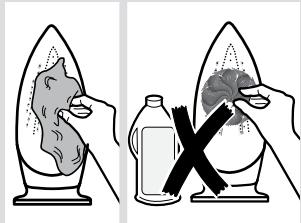
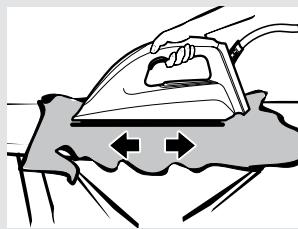
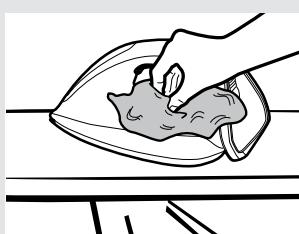
Press the steam release button (12) for 2 seconds. The descending process will start automatically. During this process, short beeps will be heard. After approximately 3 minutes, the iron will stop releasing steam. A long beep will be heard, indicating that the descending process has finished. The appliance will switch off automatically. To clean the soleplate (13), immediately rub off any residue by running the hot iron over a wet cotton cloth. Wipe the housing of the iron with a cloth.
Warning: The container gets hot during the descending process. Let it cool down and then empty the container.

2. Cleaning the appliance
Regularly clean your appliance for proper maintenance. Attention! Burn risk!
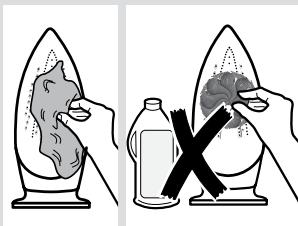
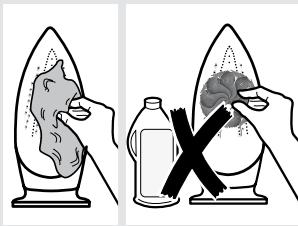
If the appliance is only slightly soiled, wipe it with a damp cotton cloth only, and then dry it. To keep the soleplate smooth, you should avoid contact with hard metal objects. Never use a scouring pad, or chemicals to clean the soleplate.

Storing the appliance
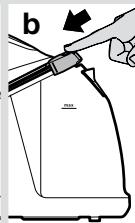
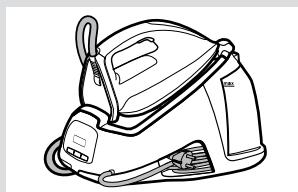
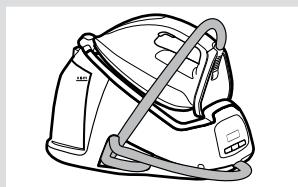
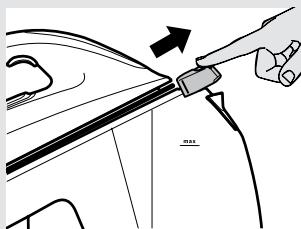
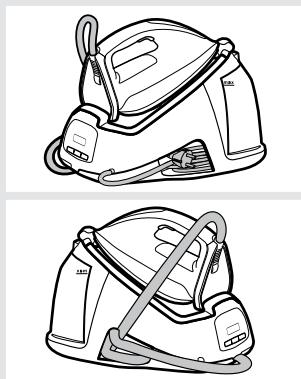
1. Unplug the appliance and let it cool down. Empty the water tank (7). 2. Place the iron on the steam station, standing on the pad (10). If your steam station is equipped with iron lock system (11*), fix the iron to it. First insert the heel and then block the tip moving the lock system against the iron. Store the supply hose (4) and the mains cable (5) in the storage compartments (6).
| Problem | Possible causes | Solution |
| The iron begins to smoke when switched on. | 1. During first use: certain components on the appliance have been lightly greased at the factory and may produce a small amount of smoke when initially heated. | 1. This is completely normal and will stop after a short while. |
| The iron does not produce any steam. | 1. During first use, water has not filled the hose (4) completely.
2. The "Calc'nClean" indicator light (1) will flash. The descaling process has not been completed. | 1. Press and hold the steam release button (12) until steam comes out.
2. Perform a cleaning cycle (see the “Dscaling process” section). |
| Dirt comes out through the soleplate. | 1. There is a build-up of lime scale or minerals in the iron.
2. Chemical products or additives have been used. | 1. Carry out a cleaning cycle (see the “Dscaling process” section).
2. Never add products to the water (see the “Filling the water tank” section).
Clean the soleplate with a damp cloth. |
| The "Calc'nClean" indicator light (1) does not turn off. | 1. The iron descaling process has been stopped before being completed. | 1. Restart and complete the iron descaling process. |
| The appliance makes a pumping sound. | 1. Water is being pumped into the iron.
2. The water tank is empty. | 1. This is normal.
2. Fill the water tank. |
| The iron produces little steam. | 1. The iron has been switched on recently. | 1. It is normal, the iron produces steam gradually until it is stabilized. |
If the above tips do not solve the problem, get in touch with our customer service.
You can download this manual from the Bosch local homepages.
Vertical steam ironing

4. Energy saving
In the energy-saving mode, you can reduce electricity consumption while still getting good ironing results for most fabrics.
1 Press the «Eco» energy-saving mode button (3). The indicator lights up. 2 To return to the normal energy consumption mode, press the «Eco» button again. It is recommended to use the normal energy consumption mode only for optimal ironing of thick and heavily wrinkled fabrics.
Tips for saving energy:
If you use a steam iron, choose a program designed for the type of fabric being ironed. - Try to iron the laundry while it is still damp, setting the steam supply mode to a lower value. In this way, the inner fabrics are steamed, not the surface.

5. Automatic shut-off
To ensure safety and save electricity, the appliance switches off automatically if it is not used for 8 minutes. In this case, you will hear a sound signal, and all indicators (1, 2, 3) will go out.
1 To switch the appliance back on, press the steam release button (12) once.

Cleaning and maintenance

Tips for disposal
Our product is supplied in an optimized package. The packaging is made of environmentally friendly materials that can be disposed of at the local waste disposal site as secondary raw materials. Information about the disposal of used electrical appliances can be obtained from your local administration.
This function can be used for ironing curtains, upholstered furniture, etc.
1 Hold the iron vertically at a distance of 15 cm from the item to be steamed. Press the steam release button (12) several times - the interval between presses should be at least 5 seconds.
Never direct the steam at people or animals.

4. Energy saving
By selecting the energy-saving mode, you can save electricity while getting satisfactory results when ironing most items.
1 Press the «Eco» energy-saving mode button (3). The indicator lights up. 2 To return to the normal energy consumption mode, press the «Eco» button again. It is recommended to use the normal energy consumption mode for optimal ironing of thick and heavily wrinkled fabrics.
Economy of electric energy:
- If you are drying laundry in a tumble dryer, use the program intended for the final drying of laundry. Try to spin the laundry at the highest spin speed, choosing the most intensive spin mode. In this case, the laundry will be dried by the fabric itself, not by the dryer.

5. Automatic switch-off
To ensure your safety and save electric energy, the appliance switches off automatically if it is not used for 8 minutes.
In this case, you will hear three beeps, and all the indicator lights (1,2,3) will start flashing.
1 To switch the steam station back on, press the steam release button (12).

Cleaning and maintenance


(1) ( ab) = ab + ba .

a 1
Ailoojul oolc! Jdd Juaia
8 1 j 1 j
J 1
1
aaii i aii jai jbiiaai i gciigai ai yjbljglai
Jlcl JlsbI jg jg jg .jgeJIy JlsbJ jg Jg
a
8 1 JbJgJgJgJgJgJgJgJgJgJgJgJgJgJgJgJgJgJgJgJgJgJgJgJgJgJgJgJgJgJgJgJgJgJgJgJgJgJgJgJgJgJgJg
. 1
Joo jiee Ie Jbji 1 100
J 1
Jooa aie aoi
2000 1
∴ S ΔAOB = S ΔCOD + SΔBOC
- __SUPPIMER__
Safety instructions. Before using the device, read these instructions carefully and keep them for future reference. If the device is passed on to a third party, these instructions must be included. Use the device only for its intended purpose. If the device is used improperly or without following the safety instructions, the warranty may be void. Before cleaning or maintenance, unplug the device. If the device is damaged, do not use it. Have it repaired by a qualified technician. Do not attempt to repair it yourself. Keep the device away from children and pets. Do not allow children to play with the device. Do not leave the device unattended while it is in use. This device is intended for household use only. Do not use it outdoors. Do not immerse the device in water or any other liquid. If the device falls into water, unplug it immediately and have it checked by a qualified technician. Do not use the device with wet hands. Do not place the device near heat sources or open flames. Do not cover the device while it is in use. Do not use the device in areas where flammable liquids or gases are present. Do not use the device with a damaged cord or plug. If the cord is damaged, it must be replaced by the manufacturer, its service agent, or a similarly qualified person to avoid a hazard. Do not pull the cord to disconnect the device. Always unplug by grasping the plug. Do not wrap the cord around the device. Store the device in a dry place, out of reach of children. Do not use the device for anything other than its intended purpose. The manufacturer is not responsible for any damage caused by misuse or improper operation. This device complies with the essential requirements of the relevant European directives. Keep these instructions for future reference.
Warning:
- When using the device, always follow basic safety precautions to reduce the risk of fire, electric shock, or injury.
- This device is intended for household use only. Do not use it for commercial or industrial purposes.
- This device must be used only with the power supply provided. If the power supply is damaged, it must be replaced by the manufacturer or a qualified technician.
- This device must be connected to a power outlet that matches the voltage specified on the rating label.
- Before using the device, read the user manual carefully. If the device was dropped or damaged, contact the manufacturer or a qualified specialist. Do not use the device if the water container is damaged. Do not immerse the device in water or other liquids. Do not use the device near flammable substances.
- Do not use the device in environments with high humidity (bathroom, sauna, etc.).
- When using the device, do not expose it to high temperatures or direct sunlight. Do not touch the hot surfaces with wet hands.
Maintenance and care
Our products are manufactured in accordance with the requirements of the European Union. For more information about the product, please contact your local dealer or the manufacturer's representative.
This device is marked in accordance with the European Directive 2012/19/EU on waste electrical and electronic equipment (WEEE).
This directive sets out the requirements for the collection and recycling of waste electrical and electronic equipment in all EU member states.
Spare parts

- 1. Indicator light "Cal'niclean" - indicates that the descaling process is needed. 2. Indicator light "Add/Remove" - indicates that the water tank needs to be filled or emptied. 3. Indicator light "Eco" - indicates that the energy-saving mode is active. 4. Descaling indicator.
- 1. Descaling. 2. Cleaning the descaling indicator.
- Water tank
- Maximum fill level indicator
- Dry iron water tank
- Iron soleplate
- Iron with SecureLock™ * 12. By selecting this iron
- Ironing table
- "Calc'nClean" container
Brush

For optimal ironing results, use EasyComfort on delicate fabrics.
With the EasyComfort function, you can iron a wide range of fabrics without pre-washing or pre-treating them. Even at high temperatures, you can iron delicate fabrics without damaging them. This function is especially useful for your everyday ironing needs.

1. Filling the water tank
Unplug the iron before filling the water tank.
Caution: Do not add perfume, vinegar, starch, fabric softener, or other chemicals to the water tank. These substances may damage the iron and will void the warranty.
1 Open the water tank cap (9). 2 Fill the water tank (7) with water. Do not exceed the "max" mark (9). 3 Close the water tank cap.
Tip: To extend the life of this function, you can mix tap water with distilled or demineralized water in a 1:1 ratio. If your tap water is very hard, mix it with distilled or demineralized water in a 1:2 ratio.

2. Ironing
1 If this appliance is equipped with a cord storage compartment (11*), you can store the cord. 2 Unwind the power cord (4) and the cord (5). Plug the cord into a grounded outlet. 3 To turn on the iron, press the power button (2). The indicator light (2) will illuminate, indicating that the iron is heating up. When the iron reaches the set temperature, the indicator light (2) will turn off. The iron is ready for use.
Manual: The pressure gauges should be larger, according to the temperature conditions.
3. Adjustment
1 To adjust, press the start button (12).
Manual: When adjusting, the (10) knob should be turned according to the indications shown in the figure on the control panel.
Note: For these generators, the most important thing is to use this function correctly (this is a separate mode, it will be discussed later) and to use the additional mode (protection mode) correctly. From this, various devices will be able to operate without overheating and will have a long service life. If the condensate is not removed or is removed too late, it may cause damage.
Warning: The device can be adjusted with additional devices, the condensate of the hot water and the adjustment panel, or by using the additional connection. To prevent hot water from freezing or overheating, follow the instructions in the manual.

"SteamBoost" Function
This device has a function designed for creating steam.
1 Press the start button (12) twice. The device will start operating.

Only this operation
It can be used to remove steam from the device, pipes, etc.
Place the device at a distance of 15 cm from the person. 2 Press the start button (12) for 5 seconds.
Warning: Do not use this device for purposes other than those described in the manual, or for purposes not in accordance with the regulations.


4. Power off
If the power off parameters are selected, the power and water will be turned off, and the device will not be able to be used for other purposes.
Press the "Eco" button for 3 seconds. The indicator light will blink. Press the button again to switch to the Eco mode. To avoid damaging the fabric, do not use the Eco mode for delicate items.
Helpful tips for using the button:
- If you have inserted too many items, remove some and then reinsert them properly. This will help the steam penetrate the fabric and remove wrinkles. Do not overfill the steam generator.

5. Ironing
For optimal results and to protect the fabric, the iron should be used in a horizontal position for 8 minutes.
The two indicator lights (1, 2, 3) will illuminate.
To start the steam burst function, press the steam button (12) twice.

Cleaning and Maintenance

1. Descaling process
The iron is equipped with an indicator that alerts you when it is time to descale the appliance. When the indicator light (1) blinks and the "Calc'nClean" indicator light (1) is on, it is time to perform the descaling process.
The steam function may be reduced. After descaling, the steam function will be fully restored.
To restart the descaling process, follow the steps below:
1 Fill the water tank (7) with water. 2 Unplug the power cord (5) and press the steam button (2) for 2 seconds. The indicator light will blink. 3 Press the descaling button (1) for 2 seconds. The indicator light will stay on. 4 Wait until the indicator light (2) stops blinking and the two indicator lights are on. 5 Place the iron over the "Calc'nClean" container (14). The steam will flush out the scale deposits.
Note:
- Do not remove the iron from the container during the process. The water may be hot; use caution when emptying the container.
- Before starting the process, the container must be prepared. During operation, the container must be placed on a flat surface.
6 Press and hold the button (12) for 2 seconds. The process will start automatically. During this process, a short beep will sound. 7 After 3 minutes have passed, the button will stop. A long beep will indicate that the process has been completed. The device will turn off automatically. 8 Before cleaning the container (13), remove the container from the device and empty the contents. Clean the container with a damp cloth.
Warning: Do not touch the container during the process.
9 Rinse the container and dry it.

2. Cleaning the device
Clean the device regularly to keep it in good condition.
Warning! Risk of burns!
1 If the device is not working properly, contact the service center. 2 To avoid damage, do not use abrasive cleaners. For cleaning, use a soft cloth and mild detergent.

Storing the device
1 Unplug the device and let it cool down. Empty the water tank (7). 2 Wind the cord (10) around the base. This base is designed for cord storage, keeping the cord tidy. 3 Store the device in a dry place, away from direct sunlight.
| Mòsene | bíkTmán cèbentepi | ùSeùm |
| Ytīk kòsblɪfànda
tyītin shyīfapa
báctaɪdBi. | 1. Añfau ρet nai dānaHfrānDa:
KþrblflbHbɪN Keɪbɪp
Kþrámác 6ēlwektepi
3aybɪTTa Jæŋl MaɪlaHfrān
JxəHe añfau ρet
KbɪʒdBiþrɪfAH Kēzde
TутɪHɪN a3fAHTaɪ
Meɪlsepiñ shyɪfapuybɪ Mymkɪn. | 1. By Šyafdai Tónbɪktai
kɑʌbɪntbɪ 6oIbɪn TaʊbɪaɪdBi
JxəHe 6ɪpaɪdAn coɪn Tóktan
kɑʌdaɪbɪ. |
| Ytīk iwiñnde 6y
tyzimmeɪdi. | 1. By shyɪfapuy tɪyɪmecɪn (12) 6y
shyɪkcaɪnsha 6acbɪn Tþrblbɪ3. | 1. Añfau ρet nai dānaHny
6apbɪc bɪnda ɪsɪaɪn r (4) cymeh
Tónbɪfblɪmɛh Tóltbɪpblɪfau
JxOK. |
| 2. Ta3aɪay ɛniKlɪn opbɪndaɪbɪz
(“Kaç keɪtpy npoʊeci"
6eɪmɪn Kaɪpəbɪz). | 2. "Calc'nClean" ñndɪkatop
shʌmbl (1) xkɪbɪnlbɪktaɪdBi.
Kak keɪtpy npoʊeci
aɪktaɪlfræn JxOK. |
| Kip tɪyflipdah
shyɪfaɪdBi. | 1. Ytīk iwiñnde kaɪtcah kaK
Hemece minhepallap
XɪnHaɪbɪn KaɪdBi. | 1. Ta3aɪay ɛniKlɪn ətki3ɪhɪ3
(“Kaç keɪtpy npoʊeci" 6eɪmɪn
kɑpaɪbɪz). |
| 2. Xɪmɪyaɪbɪk ɛhɪmdep Hemece
Kocpənlap nai daɪaɪbɪnDi. | 2. Eúkaɪsañ cyfə eɪmɪdep
Kocpənbi3 (“Cy 6aɪbɪn
Tóltbɪpuy" 6eɪmɪn Kɑpaɪbɪz). |
| TþrflipdBi DlbMKbɪn
shybepekneñ Tá3aɪaɪbɪz. |
| "Calc'nClean"
ɪnduɪkɑtop shʌmbl
(1) ëʌneɪdi. | 1. YtɪkTeH kaK keɪtpy npoʊeci
aɪktaɪmən TOktaɪbɪdBi. | 1. YtɪkTeH kaK keɪtpy npoʊeci
kaɪta ɪcke Kocbɪn, aɪfblɪha
deɪiñ Oþiɪn daɪbɪz. |
| Kþrblfbl
copaβtɪn dbɪbɪc
shyɪfapádBi. | 1. Cy ytɪk iwiñe copbɪn
JxTaBIP.
2. Cy 6aɪbɪb 6oc. | 1. By Šaɪk bɪntbɪ Jxafdai. |
| 2. Cy 6aɪbɪn Tóltbɪpblɪbɪz. |
| Ytīk 6ybɪn a3
mènlüepɪn
shyɪfapádBi. | 1. Ytɪk 6wáblɪnda iːcke
Kocbɪnflaɪn. | 1. By Šaɪk bɪntbɪ Jxafdai 6oIbɪn
TábɪlaɪdBi, ytɪk
Tyrpaɪktaɪnfaɪnna 6ybɪn
6iptɪn deɪn shyɪfapádBi. |
If you have any questions or need assistance, contact the customer service center.
This product is suitable for use with Bosch accessories.