
EZ 2 SUPERCLEAN - Cleaning product EUROFLEX - Free user manual and instructions
Find the device manual for free EZ 2 SUPERCLEAN EUROFLEX in PDF.

| Product type | Steam mop |
| Brand | EUROFLEX |
| Model | EZ 2 SUPERCLEAN |
| Power supply | 220-240 V ~ 50/60 Hz |
| Power | 1500 W |
| Boiler capacity | Approx. 500 ml (2 measuring cups) |
| Clean Blast tank capacity | Approx. 50 ml (up to Max mark) |
| Heating time | Approx. 3 to 7 minutes (cold water) |
| Steam temperature | 104°C to 115°C at outlet, 38°C at 25 cm |
| Operating time | Up to 30 minutes depending on use |
| Power cord length | Approx. 6 m |
| Device dimensions | Approx. 30 x 25 x 115 cm (assembled) |
| Device weight | Approx. 5 kg |
| Included accessories | Microfiber pads for hard floors and carpets, carpet glider, measuring cup, Clean Blast bottle |
| Main functions | Steam cleaning, sanitizing with Clean Blast, front nozzles for stubborn stains |
| Safety | Safety cap, automatic shut-off in upright position, burn protection |
| Maintenance | Rinse boiler every 10-15 uses, descale every 3-4 months |
| Pad materials | Microfiber: 90% polyester, 10% polyamide or 80% polyester, 20% polyamide |
| Use | Domestic only |
| Warranty | 2 years (according to local legislation) |
| Country of origin | Italy |
Frequently Asked Questions - EZ 2 SUPERCLEAN EUROFLEX
User questions about EZ 2 SUPERCLEAN EUROFLEX
0 question about this device. Answer the ones you know or ask your own.
Ask a new question about this device
Download the instructions for your Cleaning product in PDF format for free! Find your manual EZ 2 SUPERCLEAN - EUROFLEX and take your electronic device back in hand. On this page are published all the documents necessary for the use of your device. EZ 2 SUPERCLEAN by EUROFLEX.
USER MANUAL EZ 2 SUPERCLEAN EUROFLEX
CLEANING AND RINSING FLOOR STEAMER
90% Polyestere / 10% Polyamide
Lavare solo a mano
80% Polyestere / 20% Polyamide
Lavare solo a mano
IMPORTANT: Before operating the unit for the first time, read these instructions carefully and keep them for future reference
Euroflex relieves itself of any liability for damages that shall be the result of improper use of the appliance, not in conformity with what's written in this instruction manual.
Please contact your closest technical support centre should you require further information or instructions not contained in this document.
Dispose of plastic packaging appropriately, as it may represent a potential hazard for children!
www.euroflex.hv
INSTRUCTION
MANUAL
6811477.3 05/10
EZ2-S
Steam Cleaner
ENGLISH
CE

SAFETY WARNING
This appliance complies with European Directives 2004/108/CEE regarding "electromagnetic compatibility" and 2006/95/CEE regarding "Electrical product safety". The appliance carries CE marking.
The manufacturer reserves the right to make changes to the design and features of the appliance without notice.
- This appliance is solely for household use.
- Do not switch on the appliance if the steam pipe shows signs of damage (cracks/cuts), the power cable is damaged or if the appliance has been potentially subject to non-identifiable damage (e.g. the appliance has been dropped, etc.)
- Do not connect the appliance before having made sure that electrical voltage supply corresponds to the required voltage shown on the machine plate.
- The electric socket should be earthed and equipped with a 16A automatic circuit breaker.
Any extension cables should be checked to ensure they are rated 16A and suitable for the appliance. Cables should be completely unwound prior to use.
- Prior to using the appliance, make sure the iron is securely connected to the ironing board steam valve. Failure to secure the connection could potentially lead to steam escaping, and the risk of scalding.
- Neither the appliance should be used if there are visible signs of damage or leakage.
- The manufacturer declines any responsibility for damage to persons or equipment, in the event that the equipment is damaged as a result of improper use, unauthorised repair or maintenance work.
- Repairs should be carried out solely by personnel authorised by the manufacturer. Equipment repaired by personnel who are not authorised to do so, represent a risk and, as such, are not covered by the warranty.
The power cable should only be replaced by technical support personnel authorised by the manufacturer.
- Do not position the appliance externally.
- Do not expose the appliance to external atmospheric agents, damp or heat.
- Use a dry or slightly damp cloth to clean the appliance.
- Use solely manufacturer-recommended accessories or spare parts.
The steam released from the appliance is extremely hot. Both appliance and accessory tools may scald. Avoid direct contact. The steam symbol (symbol 5597 relative to IEC 60417-1) warns operators that there is the risk of scalding!
This pi is not fable for chen, the phscally or mntly disabled, or persons without the necessary experience and know-how to handle the machine, unless they have been adequately trained by safety personnel.
- Keep out of the reach of children.
- Keep the appliance in a safe dry place out of the reach of children when not in use.
- Do not pull on the cable. Do not use the cable to move the appliance. Do not exert undue pressure on the cable (i.e. when closing a door). Avoid any contact with sharp edges and corners. Keep the cable away from hot surfaces.
- No parts connected to an electrical power supply (switch, plug, electronic components, etc) should be in contact with water.
- Disconnect the appliance from the power supply prior to any maintenance or cleaning operations. Allow the steam unit cooling system to cool down.
- Reservoir loading should only be carried out with water that is free of additives, perfumes, or any other chemical substances.
- Do not overturn or lean the appliance unduly to one side.
- Do not point the jet of steam in the direction of persons, animals or plants.
- Do not point the jet of steam in the direction of electrical or household appliances.
- Do not insert any object in the various openings and do not use the appliance if any opening is obstructed.
- Do not use the appliance with wet hands or bare footed.
- Do not use the appliance when close to flammable or explosive substances.
THIS FLOOR STEAMER WAS DESIGNED TO USE CLEAN BLAST CLEANING SOLUTION ONLY!
DO NOT USE ANY OTHER SOLUTION OR CLEANING AGENT OR YOU WILL HARM THE STEAMER AND VOID THE WARRANTY.
CAUTIONS
- Do not use your Floor Steamer without a Hard Surface Pad or Carpet Glide & Pad attached to the system.
- Never leave your Floor Steamer in one spot on any surface for any period of time.
Always place on the Parking Pad and make sure the Floor Steamer Handle Assembly is in the fully upright position when not in use - this turns the Steamer Off.
- DO NOT disassemble Floor Steamer after assembly. This will cause damage.
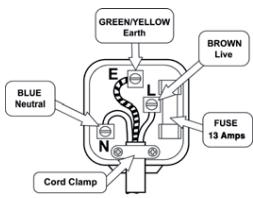
ELECTRICAL CONNECTION (UK ONLY)
Warning: This appliance must be earthed.
The appliance must be connected to a 220-240 volts 50 cycle AC supply by means of a three pin socket, suitably earthed and should be protected by a 13 amp fuse in the plug.
The appliance is supplied with a rewireable 13 amp 3 pin plug fitted with a 13 amp fuse. Should the fuse require replacement, it must be replaced with a fuse rated at 13 amp and approved to BS1362.
If the mains plug is unsuitable for the socket outlet in your home or is removed for any other reason, then the cut off plug should be disposed of safely to prevent the hazard of electric shock. There is a danger of electric shock if the cut off plug is inserted into any 13 amp socket outlet.
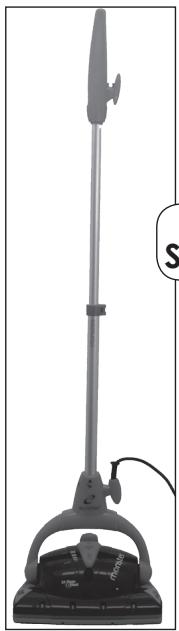
WHAT'S INSIDE? & PRODUCT DESCRIPTION
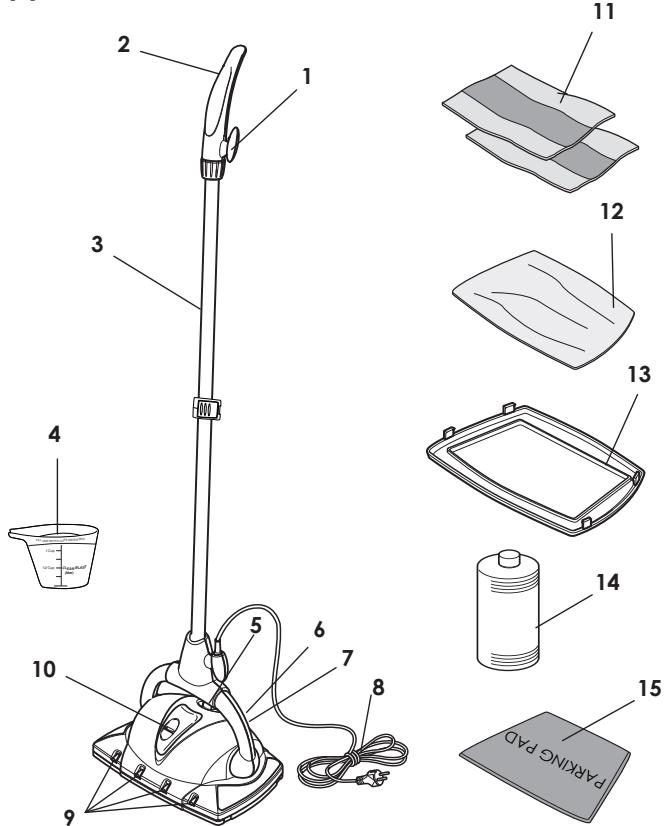
(1) FLOOR STEAMER
1 - Cord Winder
2- Handle
3 - Metal Extension Tube
4 - Measuring Cup (pre-marked)
5- Boiler Cap
6 - Steam Ready Indicator Light (green)
7 - Power Indicator Light (orange)
8 - Power Cord
9 - Steam Nozzles
10 - Clean Blast Tank Cover
11 - Hard Surface Floor Pad
12 - Carpet Floor Pad
13-CarpetGlide
14 - Bottle of Clean Blast
15 - Parking Pad
Before use
Make sure all parts are in the box (see pg 4). IMPORTANT: FOLLOW THESE INSTRUCTIONS CAREFULLY!
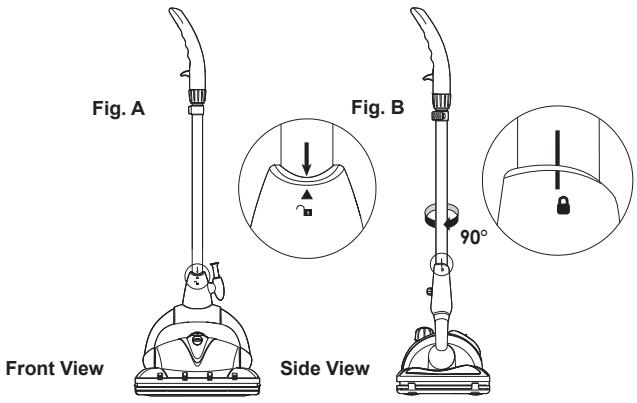
A. Assemble Handle
After removing Handle Assembly from carton:
- Pull Extension Tube apart (shown below).
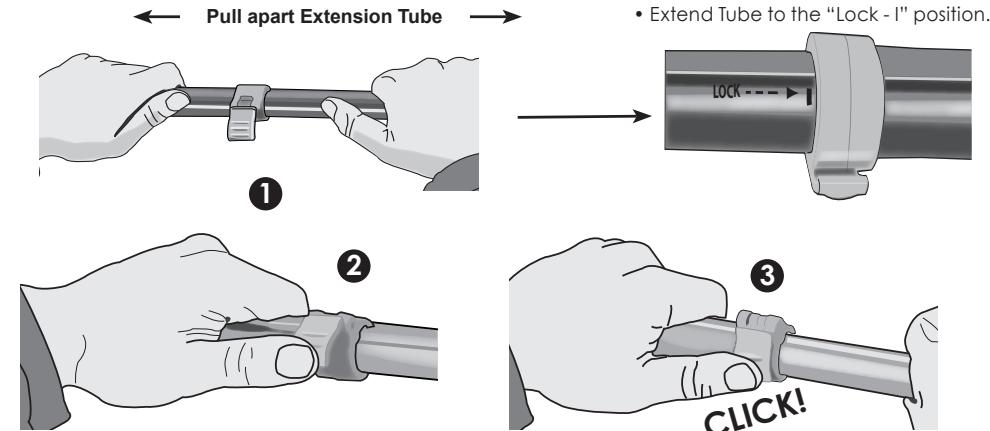
- Snap connector down. When a "click" is heard, the Tube is locked in position.

IMPORTANT
Frontal steam can only be generated when Extension Tube is in the "Maximum Extension" position.
BE SURE EXTENSION TUBE IS FULLY EXTENDED AND LOCKED IN PLACE FOR OPTIMAL STEAM OPERATION.
Use Extension Tube in Collapsed position only with the Carpet Glide (when cleaning upholstery) or when storing.
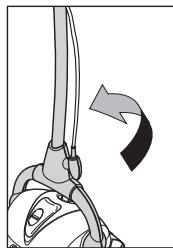
B. Attach Handle to Steamer
- Before starting, remove the self-tapping screw from the bottom of Extension Tube.
- Insert the Handle Assembly into the Floor Steamer Base. Align Arrow on Handle with Arrow on Base (as shown in Fig. A).
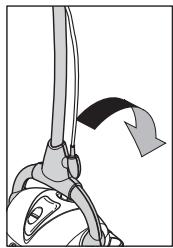
- Once inserted, twist Handle Assembly 90^ clockwise (as shown in Fig. B). Be sure Arrow on the Handle is aligned with Line/Lock Icon on Base.
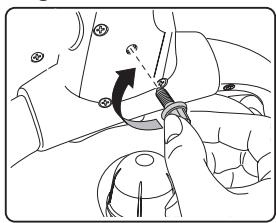
Fig. C
- Align the Handle Assembly screw hole with the opening in the steamer housing.
Secure the handle assembly with self-tapping screw which was removed from bottom of Extension Tube (as shown in Fig. C).
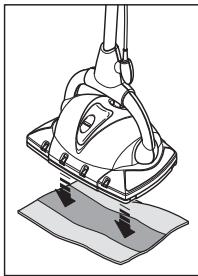
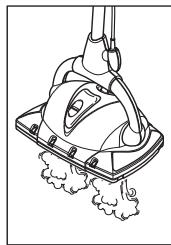
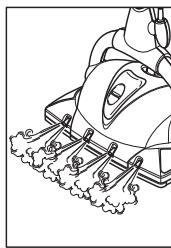
C. Attach Hard Surface Floor or Carpet Pad to Steamer
Affix either the Hard Surface Floor Pad or Carpet Glide with Carpet Pad to your Floor Steamer.
WARNING:
To prevent floor damage, ALWAYS attach either the HARD SURFACE FLOOR PAD or the CARPET GLIDE ACCESSORY with CARPET PAD when using your Floor Steamer. NEVER use without either of these attachments affixed to the machine.
ATTACHING HARD SURFACE FLOOR PAD
Place Floor Pad face down on the floor, wide side forward, with white hook and loop strips facing up. Hold Floor Steamer about 2" above Pad and gently place Floor Steamer onto the Pad. Firmly press down to assure Pad is securely adhered to the Floor Steamer.
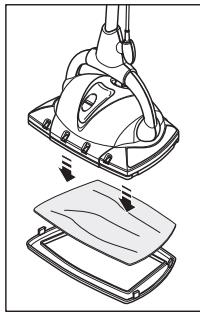
ATTACHING CARPET GLIDE WITH CARPET PAD
Place Carpet Glide face up on floor. Center and place Carpet Pad on top of Carpet Glide, wide side forward, with white hook and loop strips facing up. Hold Floor Steamer about 2^ above Pad and gently place Floor Steamer onto the Pad. Firmly press down to assure Pad is adhered to the Floor Steamer and Carpet Glide is securely attached.
USE ON HARDWOOD FLOORS
For hardwood floors, use only on "sealed" hardwood surfaces. Carefully control the amount of steam used when cleaning, as too much water could cause damage
IMPORTANT NOTE ABOUT LINOLEUM FLOORING
Steam can cause wax to be stripped from, and consequently damage, some varieties of linoleum flooring. ALWAYS test a small, inconspicuous portion of the floor BEFORE using steam to ensure that your linoleum floor does not have this issue.
D. Filling Boiler with Water
WARNING:
- Carefully read all instructions before removing Boiler Cap. Always unplug appliance before filling the Boiler.
IMPORTANT
Use tap water - distilled or demineralized water if tap water is too hard.
DO NOT ad detergents, perfumes, oils or other chemical substances.
Follow these instructions to avoid overfilling the Boiler.
- Be sure appliance is unplugged, and has cooled for at least 10 minutes before filling with water.
- Make sure Handle Assembly is in the upright "off" position.
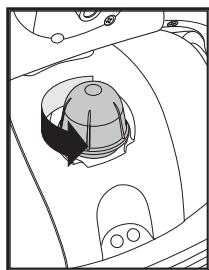
Remove Boiler Cap by pressing it down and turning it counterclockwise.
IMPORTANT
If re-filling the Boiler while Steamer has been in use, be sure to allow Steamer to cool for at least 10 minutes and loosen Boiler Cap slowly to allow any excess steam to escape before completely removing Cap. (See step 2D, "Refilling Boiler During Use" for detailed instructions.)
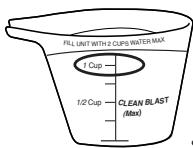
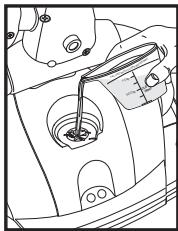
- Pour in two (2) cups of water using the Measuring
Cup provided - fill cup to the "1 Cup" marking two times.
Be careful not to overfill - NEVER add more than 2 cups of water.
- Replace Boiler Cap by pressing it down and turning it clockwise. If using cold water, heating time is about 3-7 minutes. If using warm water, heating time is reduced.
NOTE: You can change the microfiber pad when the unit is warm or hot.
E. The Sanitizing System
This Monster EZ2 Superclean Steamer is equipped with a unique on-demand option designed to sanitize your non-porous hard floor surfaces (sealed wood, tile, marble, granite, linoleoum, etc.). Included in this package is an 8 oz. bottle of "Clean Blast", a special sanitizing agent that will quickly kill up to 99.9% of germs and bacteria - including Norovirus, MRSA, E-coli, Staph, Salmonella and black mold. Be sure to use as directed.

ADDING CLEAN BLAST SANITIZER
- Push Clean Blast Tank Cover in the upward direction (as shown in "A") to reveal opening.
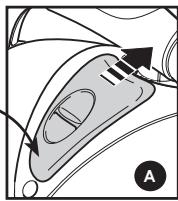
- Use provided Measuring Cup to fill the Clean Blast Tank (Figs. "B" and "C"). Pour Clean Blast into Measuring Cup up to the "Clean Blast (Max)" marking. We recommend tilting the Steamer back when filling the Clean Blast Tank. Be careful not to overfill.
-
Close the Clean Blast Tank Cover "D".
-
You can now sanitize on demand by pulling back the Trigger on the Handle "E".
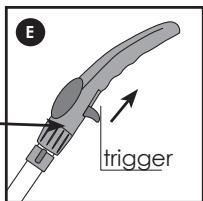
- The sanitizer is delivered to the surface only through the front ports of the EZ2 Steamer "F" WARNING: Only use CLEAN BLAST sanitizer.
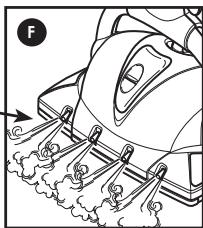
The EZ2 Steamer was designed to be used with Clean Blast only. Any other cleaning solution used may harm your Steamer and will void the warranty.
HINT: A little Clean Blast goes a long way - no need to soak your floor.
USING YOUR FLOOR STEAMER
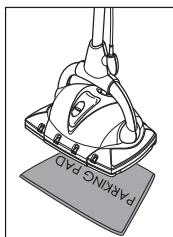
A. Using the Parking Pad
*IMPORTANT*
The Parking Pad is provided to prevent floor damage that can result from leaving a hot steamer on the same spot for more than a few minutes. ALWAYS place Floor Steamer on the Parking Pad when not in use, or while it is cooling before storage.
You can use the Parking Pad if the Steamer is warm or hot.
B. Starting the Appliance
- Be sure Boiler is filled with water, Boiler Cap is securely in place and Clean Blast (if using) has been added to Clean Blast Tank.
- Insert the plug into a-3 prong grounded electrical outlet (orange Power Indicator Light will illuminate).
- Keep the handle in the upright "off" position.
Wait until the (green) Steam Ready Indicator Light illuminates. - Once Boiler is filled and the green Steam Ready Indicator Light illuminates, the EZ2 Floor Steamer is ready to clean.
- Steam temperature at the nozzle end is between 104^ / 219^ and 115^ / 239^ .
- Temperature lowers to 38^ / 100^ at a distance of 25cm / 10 in. from the nozzles.

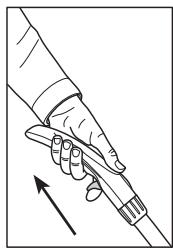
C. Using Floor Steamer
- To start cleaning using the bottom steam ports and a microfiberpad, simply pull the Handle downward. You will find that your Floor Steamer can easily clean and refresh most hard surfaces and floors using the underside steam alone.
NOTE: Some water may be emitted. This is normal.
- To emit steam or Clean Blast from the Steam Nozzles (at front of Steamer), pull the trigger on the Handle.
REMARKER
The Steam Nozzles are meant to be used in steam "bursts" and should never be used on a sustained basis. The Steam Nozzles will loosen especially difficult debris and will also assist in getting into hard to reach areas and corners.
MAXIMUM SANITIZATION will occur when your Steamer is being used with Clean Blast.
NOTE: Depending on the frequency of use of Steam Nozzles, your Boiler will not need to be refilled for up to 30 minutes.
- To stop steam, simply return Handle to the upright position.
The Floor Steamer will stop producing steam when the Boiler is empty. When this happens, refill with water per instructions (see step 2D, "Refilling Boiler During Use") or unplug and store unit.
D. Refilling Boiler During Use
WARNING: Let Steamer cool 10 minutes before opening Boiler Cap. Use care when opening Boiler Cap as it may still be hot and steam may escape, causing burns. If Boiler is still hot, water may spurt out during refilling which can also cause burns.
- Unplug appliance.
- Press trigger on the Handle to clear steam from Steam Nozzles.
-
Press down on and slowly turn Boiler Cap counterclockwise. This will allow remaining steam to escape.
-
Be sure Steamer has cooled 10 minutes before refilling with water.
- Fill Boiler using Measuring Cup provided - two times using the "1 Cup" mark. Be sure Steamer Handler remains in the upright "off" position.
- Firmly push down and screw Boiler Cap back on by turning it clockwise.
- Insert plug into 3-prong electrical outlet.
Always use tap water.
- If tap water is too hard, use distilled or demineralized water to avoid the risk of staining pale colored fabrics.
- Do not add detergents, perfumes, oils or other chemical substances.
CLEANING AND RINSING FLOOR STEAMER
If distilled or demineralized water is regularly used there is no need to clean the Boiler.
Rinsing the Boiler
We recomend you periodically rinse the Floor Steamer to prevent the accumulation of calcium and sediment caused by hard water use. After 10 - 15 uses, fill the Boiler 3/4 full with hot tap water, shake several times and empty out into sink or bathtub. Wipe the Steamer base with a damp cloth and wipe dry.
NEVER HOLD THE STEAMER UNDER TAP TO FILL. Use Measuring Cup provided to fill.
Cleaning the Boiler
If you use tap water, we reccomend cleaning the Boiler every 3-4 months (depending on mineral buildup). Use a Hard Water Mineral Remover (found in most hardware or small appliance stores).
- Remove Boiler Cap and empty water from Boiler into a sink.
- Follow manufacturer's instructions on cleaner package, and fill tank with specified amount of cleaner.
- Empty cleaner from Boiler and fill with water. Rinse thoroughly and empty from Boiler. Repeat until water in tank comes out clear.
- Replace Boiler Cap and store appliance properly.
Cleaning of Boiler and Steamer is the sole responsibility of appliance owner and is not covered by the product warranty.
Before first use after cleaning the Boiler, hold Steamer so it is facing downward and direct steam into a sink or standing shower to clear any leftover residue from Boiler. When clean drops of water appear, wipe clean with soft cloth. Your Steamer is ready for use.
Microfiber Pad Care & Cleaning
Your Microfiber Pads are designed for hundreds of uses. Clean Pads regularly, either by hand (using mild soap and warm water) or in your clothes washer on a delicate cycle, cool water. Never use fabric softener or bleach. We recommend letting Pads air dry to maintain maximum long term effectiveness.
Microfiber washing instructions - ULTRA MICROFIBRE
90% Polyester / 10% Polyamide
Hand wash only
Tumble dry low or air dry
No bleach / No fabric softener
80% Polyester / 20% Polyamide
Hand wash only
Tumble dry low or air dry
No bleach / No fabric softener
| Issues | Possible Causes | Solutions |
| Steam is not coming out of the Steam Nozzles. | Improper Handle assembly. | Call Customer Service to receive instructions to correct the problem. |
| The Hard Surface Floor Pad is not adhering to Steamer. | No enough pressure was applied when attaching Pad. | Position Steamer about 2" above Pad and FIRMLY press it down onto the Pad. |
| The Cleaning Pads are getting soaked (too wet). Why? | Boiler is overfilled. | Let Steamer run until excess water ceases. -OR- Remove some water from Boiler. |
| Green "Steam Ready Indicator Light" is not illuminated. | Wait for green "Steam Ready Indicator Light" to illuminate. | |
| The steam seems to be making my floor too wet. | Steam Nozzles are being used too frequently. | Only use Steam Nozzles in short bursts for cleaning tougher stains or to clean hard to reach areas. |
| The green Steam Ready Indicator Light seems "dull". | Optical illusion. | Because the subtle green light is positioned next to the more vibrant orange light, it is naturally overpowered by the brighter color. |
IMPORTANT QUESTION:
Q: Do I always need to use a Microfiber Pad when cleaning with my Steamer?
A. YES! It is critically important to ALWAYS use your Microfiber Pads. The Floor Steamer should NEVER be used without either a Hard Surface Floor Pad or Carpet Glide with Carpet Pad.
DISPOSAL OF YOUR OLD APPLIANCE
- When this crossed-out bin symbol appears on a product it means that the product is covered by European Directive 2002/96/EC.
- All electrical and electronic products should be disposed of separately from the municipal waste stream via specific collection facilities designated by the government or the local authorities.
- Proper disposal of your old appliance will help prevent potential negative consequences for the environment and human health.
- For more detailed information about disposal of your old appliance, please contact your municipality, the waste disposal service or the shop where you purchased the product.
monster®

euroflex®
EZ2-S
SUPERCLEAN
POUR AJOUTER LE PRODUIT ASSAINISSANT CLEAN BLAST
- To emit steam or Clean Blast from the Steam Nozzles (at front of Steamer), pull the trigger on the Handle.
ZUR BEACHTUNG
90% Polyester / 10% Polyamide
Nur Handwäsche;
80% Polyester / 2 0% Polyamide
Nur Handwäsche;
