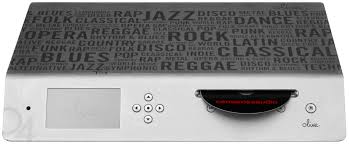
O3HD - Professional audio equipment OLIVE - Free user manual and instructions
Find the device manual for free O3HD OLIVE in PDF.

| Product Type | Network audio player with hard drive |
| Brand | OLIVE |
| Model | O3HD |
| Power supply | Mains (power cord included) |
| Network connectivity | Wi-Fi 802.11n (SMA antenna), Ethernet RJ-45 |
| Audio connectivity | Stereo analog outputs (RCA), optical digital input, infrared input |
| Additional ports | USB (for backup/restore) |
| Internal storage | Hard drive (capacity not specified) |
| Supported audio formats | FLAC, WAV, MP3, etc. (CD encoding in FLAC recommended) |
| Main functions | CD ripping, import from PC/Mac, UPnP/DLNA network playback, internet radio, playlists, CD burning, metadata editing via Maestro |
| Display | Color touchscreen |
| Remote control | Included (batteries provided) |
| Included accessories | User manual, power cord, remote control, batteries, Wi-Fi antenna |
| Cleaning and maintenance | Soft, dry cloth; do not use solvents, alcohol, or abrasive products |
| Safety | Turn off system components before connecting; do not insert objects into openings; do not spill liquid |
| Repairability | Spare parts not mentioned; contact support for repair |
| Warranty | See general terms and conditions |
Frequently Asked Questions - O3HD OLIVE
User questions about O3HD OLIVE
0 question about this device. Answer the ones you know or ask your own.
Ask a new question about this device
Download the instructions for your Professional audio equipment in PDF format for free! Find your manual O3HD - OLIVE and take your electronic device back in hand. On this page are published all the documents necessary for the use of your device. O3HD by OLIVE.
USER MANUAL O3HD OLIVE
1 Package Contents 6
2 Setup & First Steps 6
2.1 Connecting your Olive HD Music Server 6
2.2 Navigation Basics 8
2.3 Connecting to your Network 10
3 Importing Music 11
3.1 Ripping CDs 11
3.2 Importing from a PC or Mac 12
4 Music Library 13
4.1 Finding Music 13
4.2 Play Modes 13
4.3 Playlists 13
4.4 Deleting Music 14
4.5 Burning CDs 14
4.6 Editing Music Information 14
5 Internet Radio 15
6 Remote Control 15
7 Music Streaming over your Network 16
7.1 Network Music Player 16
7.2 Streaming from PC/Mac/NAS to the Olive HD Music Server 16
7.3 Your Music in iTunes & Windows Media Player 16
8 Support 16
8.1 Software updates 16
8.2 Recovery 16
8.3 Backup 16
8.4 Restore 17
8.5 Tips & Tricks 17
8.6 Handling & Care 17
WELCOME
Congratulations and thank you for your purchase of your Olive HD music server. This Quick Start Guide summarizes the most important functionality of your Olive O3HD & O4HD, and highlights a few useful tips and tricks so you can take full advantage of its capabilities.
WARNING To avoid injury or damage to the product, please read all operating instructions in this guide and the safety information listed in the complete User Guide in the support section at www.olivehifi.com before using the Olive HD music server. More questions? Simply send us an email to info@olivehifi.com. We look forward to hearing from you.
1 Package Contents
Your Olive O4HD comes with the following items:
Your Olive O3HD comes with the following items:
- Quick Start Guide
- Power Cable
-
WiFi Antenna
-
Remote Control & Batteries
-
Quick Start Guide
- Power Cable
- Remote Control & Batteries
2 Setup & First Steps
2.1 Connecting your Olive HD Music Server
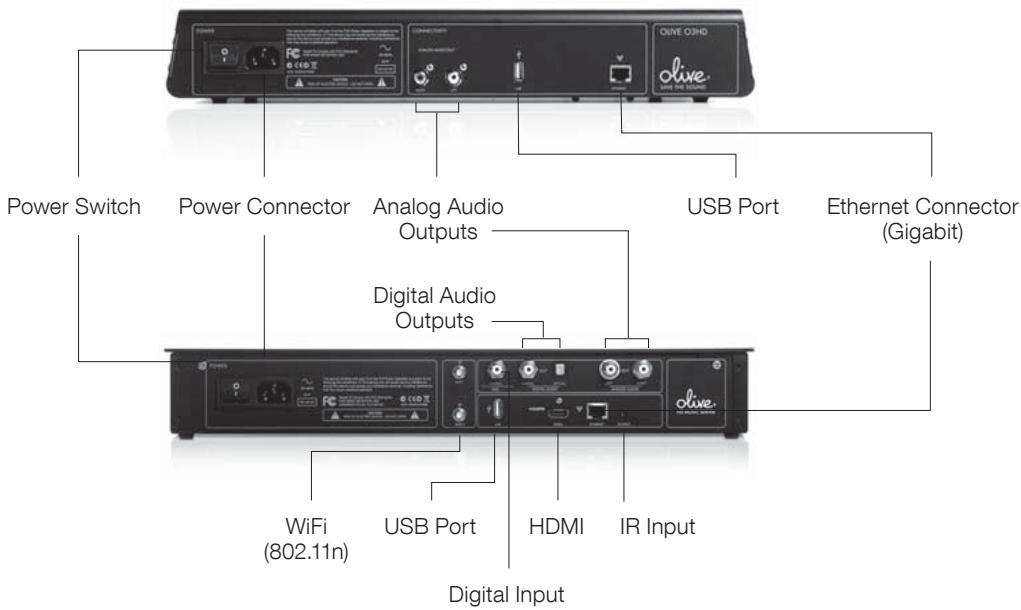
1. CONNECTING TO YOUR NETWORK
Your Olive HD music server can be connected wirelessly or wired to your router.
WIRELESS: Attach the WiFi antenna that came with your Olive 4HD to the main connector marked “WiFi 1”. This antenna should be positioned upright for best performance. We recommend to attach additional WiFi antennas to the connector “WiFi 2” in case the reception is not optimal. For best performance please use WiFi antennas that are on a wire and can be positioned flexibly (WiFi antennas must have a SMA Connector).
Note: The Olive O3HD has no built-in WiFi connection.
WIRED: If you have a wired connection please use the Ethernet Connector for connection to your router.
For more information about connecting to your network please refer to page 10.
2. CONNECTING TO YOUR AMPLIFIER/RECEIVER:
Connect the Analog or Digital outputs to the corresponding inputs on your receiver. The Olive O3HD only comes with analog outputs.
- CONNECTING TO YOUR TV: The Olive O4HD can be connected via HDMI to your TV. It replicates the user interface that you would otherwise see on the LCD of the Olive O4HD. ① To switch between the LCD and the TV interface simply press both the LEFT and RIGHT navigation buttons shortly (page 8).
4. OTHER CONNECTIVITY
USB: To backup and restore your music library (page 16-17).
DIGITAL INPUT: Connect the digital audio output of an additional source (e.g. TV) to take advantage of the high-resolution DAC of the Olive O4HD. To switch to the source simply go to SOURCES in the main menu and select DIGITAL INPUT.
IR INPUT: For connecting an external IR Receiver in case the Olive O4HD is inside a cabinet.
- STARTING UP YOUR OLIVE O3HD & O4HD: Connect the Power Cord to the Power Connector and to the power outlet on your wall. Turn on the Power Switch and your Olive HD Music Server will start up. Booting to the Startup Screen usually takes between 30-45 seconds.
2.2 Navigation Basics
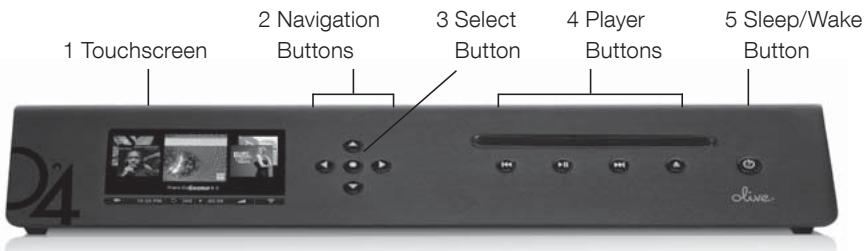
The Olive O3HD and O4HD have many similar features. For illustration purposes, Only the Olive 4HD is shown where features are identical.
ACCESSING THE MENU
Once the Startup Screen appears, tap on the touchscreen (1) or press the Sleep/Wake Button (5) to get to the main menu. ① We recommend using the Sleep/Wake Button on the front of the device to put your Olive HD Music Server to sleep (or wake it). Only switch off your Olive HD Music Server with the Power Switch on the backside if you do not intend to use it for an extended period of time (e.g. going on vacation). ② We also recommend that you unplug the Power Cord when leaving for a long period of time.
TOUCHSCREEN OR BUTTONS?
Navigate your Olive HD Music Server with both the Touchscreen (1) and the buttons. The Navigation Buttons (2) allow you to move up/down and left/right in the menu. The Select Button (3) is a dynamic button and gives you access to different functions depending on where you are in the menu. The Player Buttons (4) allow you to start playback of your music and skip between tracks. ① Keep the play/pause button pressed for a few seconds to stop the music playback. ② Keep the left navigation button pressed to quickly jump back to the main menu at all times.
To navigate with the touchscreen, simply tap on the item on the screen.
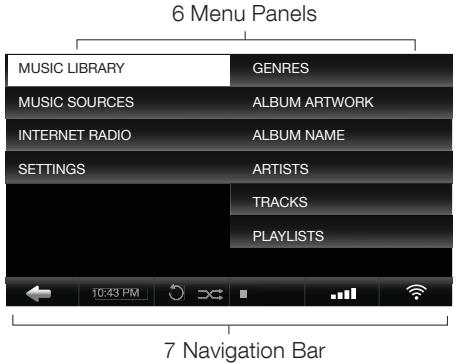
NAVIGATION CONCEPT
The user interface on the touchscreen is split into three areas: two Menu Panels (6) and the Navigation Bar (7). The Left Menu Panel shows the main categories, the Right Menu Panel displays the items that can be found under each category. Select an item in the left panel to see what can be found in each category. Select an item in the right panel and the navigation will shift to the left to reveal the items that can be found in the selected category.
The Navigation Bar (7) is always visible and allows you to access key functionality at all times.
Tap to navigate to the left in the menu structure.
10:25PM Adjust the time and date.
Set your play mode to repeat and/or shuffle.
-03:29 Shows the remaining playback time of the current track. Tap to access the different play screens.
Set the volume or mute your Olive.
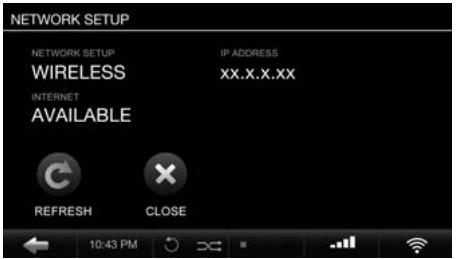
The Networks icon shows the current network connection status and allows you to access the network setup wizard.
Wirelessly connected to your network.
Wired connection to your network.
Not connected to the network.
A white network logo indicates you have network connection and internet access. An orange network logo indicates you are connected to the network, but have no internet connection. For more information about connecting to your network please refer to page 10.
THE MAIN MENU
Here is what you will find in each main category:
MUSIC LIBRARY Access all the music that is stored on your Olive HD Music Server. Browse by genre, album, artist, track or playlist.
MUSIC SOURCES Play music that is stored on an external source such as a PC, Mac or NAS* or start music playback from a source that is connected to the Digital Input.
INTERNET RADIO Browse internet radio stations from all over the world. This feature only appears if the Olive HD Music Server is connected to the internet (page 15).
SETTINGS Access all system settings, including network setup, software update, backup & restore and more.
*PC, Mac or NAS must be in same network as the Olive HD Music Server and music must be shared with a fully UPnP DLNA compliant software package. We support Tversity for PC and Twonky Media for Macintosh.
2.3 Connecting to your Network
To start the network setup wizard simply tap on the network logo in the lower right corner of the Navigation Bar or go to SETTINGS > NETWORK SETTINGS > NETWORK SETUP. Please follow these simple steps:
1. CHOOSE YOUR NETWORK CONNECTION
Select wired or wireless and the setup mode (automatic or manual). We recommend using the automatic mode as it covers most of the network scenarios.
Note: The WIRELESS mode is only available on the Olive O4HD.

2. CHOOSE YOUR NETWORK
If you have chosen a wired (and automatic) connection the system will automatically setup the connection and you are done. If you have chosen wireless, the next screen will show you a list of available networks. Please select your network and press SAVE.
3. CHOOSE YOUR ENCRYPTION
If you have an open network, the Olive HD Music Server will automatically setup the connection and you are done. If your network is secured with a password, an entry mask will appear. Please enter your password (case sensitive) and press SAVE. The Olive HD Music Server will now setup the connection and you are done.
① In rare instances the network login can take several minutes and can happen after the network confirmation window appears (indicating first that the network connection has failed).
What if the Olive HD Music Server does not connect to the network?
Here are a few things to consider:
DISTANCE The Olive HD Music Server should not be more than 20 to 30 feet away from your router (wireless connection only).
ANTENNA Make sure to connect the main antenna to the "WiFi 1" connector on the back and position it upright. You can attach additional WiFi antennas to optimize the reception.
LOCATION If your Olive HD Music Server is placed inside a cabinet you might have to use an external antenna to get reception.
NETWORK CONGESTION Make sure no other WiFi devices are directly next to the Olive HD Music Server. Microwaves and wireless phones can also prevent wireless devices from communicating with each other.
What if the Olive HD Music Server connects to the network but gets no internet access?
This is usually related to the DNS settings. Please email support@olivehifi.com for assistance in setting up your connection.
3 Importing Music
3.1 Ripping CDs
To import CDs into your Olive HD Music Server please follow these simple steps:
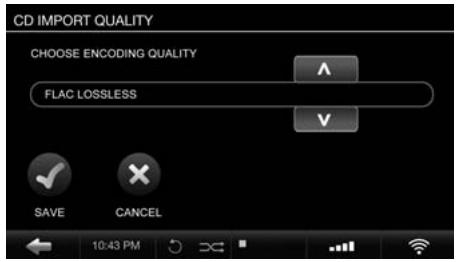
1. SELECT THE AUDIO FORMAT
Go to SETTINGS > CD SETTINGS > CD IMPORT QUALITY and select the quality of the encoding. We recommend FLAC as it preserves the original CD quality while reducing the storage requirement to about 50% of uncompressed music (WAV). Once you set the quality, it will apply to all CDs that you rip.
2. INSERT THE CD
A pop-up screen will appear, displaying the album title, artist and the album artwork.
If the CD is not recognized (i.e. the title of the album and artist show up as “unknown”) we recommend connecting the Olive HD Music Server to the internet to browse the online CD database. If the CD is still not recognized you can edit the information through the Maestro web interface (page 14) later on. Please do not edit the information until the CD is fully transcoded.
Your Olive HD Music Server needs to be connected to the internet in order to get album artwork. If album artwork is not available, an Olive logo will appear as a placeholder.
① The Olive HD Music Server only supports regular Audio CDs. SA-CD and DVD Audio is not supported.
3. RIP THE CD
Tap on the IMPORT button and the CD will be ripped. You can check the import status under SETTINGS > SYSTEM SERVICES > RUNNING SERVICES.
The CD ripping is done in two stages: 1) Copying the music in uncompressed format onto the hard drive (takes 5-7 minutes per CD); 2) Transcoding the music into the format you have selected in step 1 (takes 20-25 minutes per CD).
If you have selected the uncompressed WAV format, the ripping process is complete after the CD has been copied to the HDD.
① The transcoding of CDs takes a lot of processing power and we recommend to pause after importing 20 to 30 CDs so the Olive HD Music Server can finish the transcoding process. During transcoding the navigation of the Olive HD Music Server can appear slow as only limited processing power is available.
3.2 Importing Music from a PC or MAC
WHAT YOU NEED
- Please make sure the PC is connected to the same network as the Olive HD Music Server. We recommend a wired connection if you are transferring large music libraries.
- Note the IP address of your Olive HD Music Server (SETTINGS > NETWORK CONNECTION > NETWORK INFO).
IMPORTING FROM A PC (Windows Operating System)
- Press the WINDOWS + R keys on your keyboard.
- Enter “\” into the pop-up window, followed by the Olive HD Music Server IP address you noted above.
||xx.x.x.xx

- Click OK and an "Import" folder will appear in your network environment.
IMPORTING FROM A MAC
- Go to GO > CONNECT TO SERVER in the main menu on your desktop (or press COMMAND + K).
- Enter the IP address of your Olive HD Music Server, preceded by "smb://" into the pop-up window and click OK.

- An "Import" folder will pop-up.
Drag and drop your complete music folder from your PC/Mac into the Import folder. Once the music is copied over into the Import folder, the Olive HD Music Server will import it into the local library and categorize it. This can take several hours for large libraries.
Your music will only show up in the local library if the Olive HD Music Server has successfully imported it from the Import folder. Once the music is completely imported into the library the Import folder will be empty.
① The Olive HD Music Server will only import music formats that are supported (FLAC, WAV, MP3 and AAC). Please be aware that music in WAV Format does not have metadata and will show up as “Unknown” artist/album/track on your Olive HD Music Server.
① For large libraries we recommend that you split the library into several batches before dragging it into the “Import” folder.
4 Music Library
4.1 Finding Music
Select MUSIC LIBRARY from the main menu and browse your music alphabetically by genre, artist, album, track, or album artwork. Choose the SEARCH function in each category and simply enter a few letters of the word (e.g. "CAL" for "Hotel California"). The Olive O3HD & O4HD will now only display music that includes the search term.
4.2 Play Modes
Pressing the play/pause button allows you to play your music in different ways depending on where you are in the navigation.
TO PLAY: HIGHLIGHT:
All albums ......the ALBUMS category & press play/pause.
One album ......the album name & press play/pause.
All tracks ......the TRACKS category & press play/pause.
One artist ......the artist & press play/pause.
All albums of this artist will be played.
Shuffle and Repeat can only be activated if music is playing. Simply choose your music playback mode above, then set the play mode by tapping the shuffle/repeat icon in the Navigation Bar.
① REPEAT Tap once for repeating only one song.
REPEAT ALL Tap twice to repeat all songs.
SHUFFLE Can only be activated if repeat is set to ALL SONGS or OFF.
4.3 Playlists
To create a playlist simply follow these steps:
1. ADD PLAYLIST
Go to MUSIC LIBRARY > PLAYLISTS >
ADD PLAYLIST and enter the name of your playlist.
2. PLAY TRACK
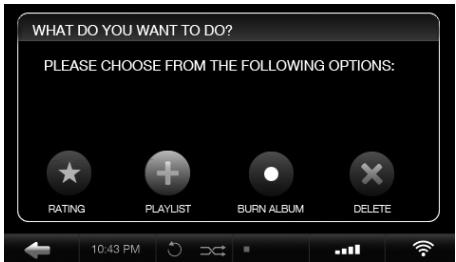
Play the track you want to add to the playlist and press the SELECT Button.
3. ADD TO PLAYLIST
Select ADD TO PLAYLIST in the pop-up window.
Choose the playlist you created in step 1 and press SAVE.
4. REPEAT STEPS
Choose the next track and repeat step 2 and 3 until your playlist is complete.
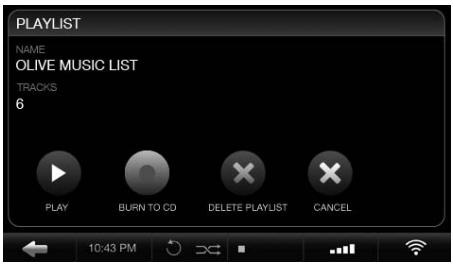
The playlist appears in your music library under the PLAYLISTS menu.
4.4 Deleting Music
To delete music simply play the track and press the SELECT Button. Choose DELETE in the pop-up window and then select to delete the track or the complete album. To delete a playlist simply highlight the specific playlist and press the SELECT Button. Choose DELETE in the pop-up window.
4.5 Burning CDs
You can burn CDs both from albums as well as playlists. To burn an album to CD play a track and press the SELECT Button. Choose BURN ALBUM and insert a blank CD when prompted. To burn a playlist to CD, highlight the specific playlist and press the SELECT Button. Choose BURN TO CD and insert a blank CD when prompted.
4.6 Editing Music Information
To edit the metadata of your music (album title, artist, tracks, artwork etc.) the Olive HD Music Server features a special web-interface called Maestro.

To access this interface please launch the web-browser on your PC/Mac and enter the following address:
http://xx.x.x.xx/maestro.php
(Replace the xx.x.x.xx with the Olive HD Music Server's IP address).
Visit the support section at www.olivehifi.com for more details on the iMaestro application.
① Your PC/Mac must be in the same network as your Olive.
i Currently only the Firefox browser is supported with Maestro.
Download the browser for free at www.firefox.com.
5 Internet Radio
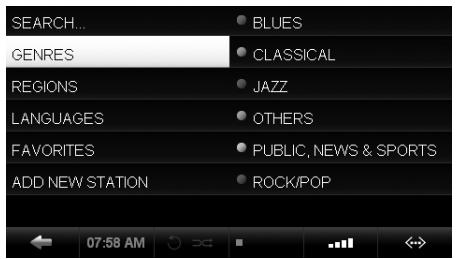
Internet radio will appear as a separate category in the main menu if the Olive HD Music Server is connected to the internet. Stations are categorized into genre, region and public & info. To add a station to your FAVORITES you have to play the station, then press the SELECT Button and choose OK in the pop-up window.
You can also add your own radio station. Select ADD NEW STATION, enter the station name and then the web address. The stream must be in .pls, .mp3 or .m3u format. A detailed description of the internet radio functionality can be found at www.olivehifi.com in the SUPPORT section.
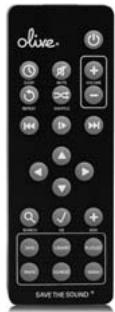
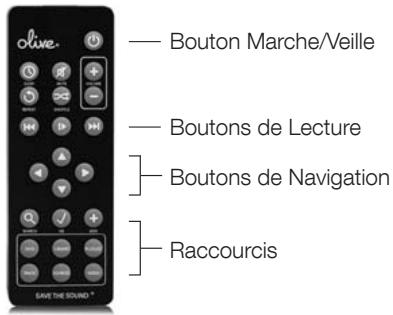
6 Remote Control
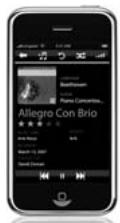
Your Olive HD Music Server comes with a standard infrared remote control to allow you to control key functions conveniently from your couch. If you have an Apple® iPhone™ or iPod™ Touch you can also use Olive's free iMaestro remote control application. Simply enter the App Store on your iPhone™/iPod™ Touch, go to SEARCH and enter “iMaestro.”
![— Sleep/Wake Button — Player Buttons ]— Navigation Buttons ]— Shortcut Buttons](/content/2020/04/19858/images/ab61a11f6b745aa8e712792e2c06dce2e42707c55cf13d42fa5c8b31608518ae.jpg)
7 Music Streaming
7.1 Network Music Player
Olive offers its own network music player to allow streaming of music from the Olive O3HD & O4HD to additional rooms. Therefore, 3rd party network players are not actively supported.
7.2 Streaming from a PC/MAC/NAS to the Olive HD Music Server
The Olive HD Music Server incorporates local storage to allow quick and reliable access to your music content. Therefore we recommend consolidating your music onto the Olive HD Music Server's hard drive, where it is safe from usual computer problems (malware/viruses etc.). Olive provides limited support to streaming from external sources, currently focusing on Tversity (PC) and Twonky Media (Mac).
7.3 Your Music in iTunes & Windows Media Player
Music stored on your Olive HD Music Server can be accessed in most UPnP DLNA compatible software such as iTunes and Windows Media Player. The Olive HD Music Server's library will appear as a separate music source in these software packages.
① Some software packages (e.g. iTunes) do not support the FLAC format and this music will therefore not be accessible.
8 Support
8.1 Software Updates
Olive constantly updates the software for your product so check regularly if a new update is available. Simply go to SETTINGS > SYSTEM SERVICES and select SOFTWARE UPDATE. If you do not have internet access at home you can also upload the software update via a USB stick.
8.2 Recovery
A recovery erases the hard drive of your Olive HD Music Server and installs the operating system and CD database from scratch. All music and playlists are lost, therefore, this should only be done if you have first spoken with Olive's support team. To do a recovery you need a USB stick with at least 4GB of memory. Please contact us at support@olivehifi.com on how to perform a recovery.
8.3 Backup
It is always a good idea to backup your music regularly. To do so please format a USB hard drive in FAT32 and go to SETTINGS > SYSTEM SERVICES and select BACKUP. Follow the on-screen instruction and connect the USB hard drive only when prompted. A pop-up window will confirm when the backup process has started.
① The backup process will erase all data stored on your external hard drive, and replace it with the backup files. Make sure you are using a dedicated hard drive for this process.
① The capacity of the USB hard drive should be at least as big as the amount of capacity used on your Olive HD Music Server (see SETTINGS > ABOUT YOUR OLIVE).
8.4 Restore
The restore process will erase all music on your Olive HD Music Server and will overwrite it with the music from your backup. Go to SETTINGS > SYSTEM SERVICES and select RESTORE. Follow the on-screen instructions and connect the USB hard drive only when prompted. A pop-up window will confirm when the restore has started.
CAUTION Never unplug the USB hard drive during backup or restore. It can damage your Olive HD Music Server and erase your music. Turn off your Olive HD Music Server (Power Switch on backside) when the process is complete and disconnect the USB hard drive.
① The backup and restore process can take several hours depending on the capacity of your Olive HD Music Server. We therefore, recommend that you perform it overnight. ② During the backup and restore process your Olive HD Music Server cannot perform any other operations.
8.5 Care & Handling
TURN OFF OTHER STEREO COMPONENTS BEFORE switching off the Master Power Switch on your Olive HD Music Server. Turn down amplifier/receiver volume before pressing the Sleep/Wake Button to avoid a volume surge that could impact other components.
WHEN PLANNING NOT TO USE YOUR OLIVE for long periods of time (e.g. vacation, etc.) disconnect the Power Cable from the wall outlet. Always grab the plug, never the cable itself.
NEVER PUSH OBJECTS of any kind through the product openings. Never spill liquid of any kind on the product. Contact Olive support if something drops into the case.
DO NOT CLEAN YOUR OLIVE WITH aerosol sprays, chemical solvents, alcohol or abrasives. Do not remove dust with air pressure.
8.6 Tips & Tricks
IS YOUR OLIVE NOT RESPONDING? Please keep the Left arrow button pressed. It should unfreeze the navigation. If this does not work, press and hold the Sleep/Wake Button on the front for about 5 seconds. The system will restart. Allow 40-60 seconds for the main menu to reappear and for network connections to re-establish. If this happens regularly please contact us.
THE TV INTERFACE DOES NOT WORK. Make sure you have updated your Olive O4HD software to the latest version. Also check if your TV is set to a manual resolution of 480P and automatic scaling is switched off. Try connecting the Olive O4HD to another HDMI connector on your TV and make sure the correct source is selected.
TOUCHSCREEN NOT RESPONDING? Please calibrate the touchscreen under SETTINGS > SYSTEM SERVICES > CALIBRATE TOUCHSCREEN. Use a stylus pen for accuracy.
Visit us online at www.olivehifi.com for a complete list of FAQs or email us at support@olivehifi.com if you cannot find an answer to your question.
Inhalt
1. WÄHLEN SIE DAS AUDIO-FORMAT
5 Internetradio
8.1 Software Updates
7 Flux musical
7.1 Lecteur réseau
Connettersi in rete wireless.
4.6 Editing (Editing Music Information)
5 Internet Radio
7.1 Network Music Player

—— 睡眠/响闹按钮
—— 播放操作按钮
导航按钮
快捷按钮
7 音乐串流
7.1 网络音乐播放器
USA This equipment has been tested and found to comply with the limits for a Class B digital device, pursuant to part 15 of the FCC Rules. These limits are designed to provide reasonable protection against harmful interference in a residential installation. This equipment generates, uses and can radiate radio frequency energy and, if not installed and used in accordance with the instructions, may cause harmful interference to radio communications. However, there is no guarantee that interference will not occur in a particular installation. If this equipment does cause harmful interference to radio or television reception, which can be determined by turning the equipment off and on, the user is encouraged to try to correct the interference by one or more of the following measures: Reorient or relocate the receiving antenna; Increase the separation between the equipment and receiver; Connect the equipment into an outlet on a circuit different from that to which the receiver is connected; Consult the dealer or an experienced audio technician for help. Modifications not expressly approved by the manufacturer may void the user's authority to operate the equipment under FCC rules.
CANADA This Class B digital apparatus complies with Canadian ICES-003 and RSS-210. Operation is subject to the following two conditions: (1) this device may not cause interference, and (2) this device must accept any interference, including interference that may cause undesired operation of the device. Industry Canada: The installer of this radio equipment must ensure that the antenna is located or pointed such that it does not emit RF field in excess of Health Canada limits for the general population; consult Safety Code 6, obtainable from Health Canada's Web site www.hc-sc.gc.ca.
EUROPE EU Declaration of Conformity Olive declares that this product complies with the requirements and other relevant provisions of the R&TTE Directive (1999/5/EC). A copy of the full Declaration of Conformance may be obtained at www.olive.us/euro/compliance. In France, operation is limited to indoor use within the band 2.454-2.4835 GHz. (Attention. En France, l'utilisation en intérieur est limitée à la bande de fréquences 2,454-2,4835 GHz.).
RF EXPOSURE REQUIREMENTS To comply with FCC and EU exposure essential requirements, a minimum separation distance of 20cm (8 inches) is required between the equipment and the body of the user or nearby persons.
Disclaimer
DATA LOSS The manufacturer of this device shall not be liable for damage or loss of data including but not limited to music recorded to storage devices. It is the customer's responsibility to maintain the original media and/or appropriate backup copies within the specific rights of the media's copyright holder.
MANUAL DISCLAIMER At the time of printing, the screen shot images in this manual matched the interface screens. However, since these products have the capability of downloading software updates and enhancements on a regular basis, the resulting screen updates may no longer match the images in this manual. Check the Olive website for more information on software updates.
Environment
RECYCLING INFORMATION This symbol on the product or on its packaging indicates that this product shall not be treated as household waste. Instead please deliver it to the applicable collection point for the recycling of electrical and electronic equipment. By recycling this product correctly, you will help conserve natural resources and prevent potential negative environmental consequences. For more detailed information about recycling of this product, please contact your local city office, your household waste disposal service or the store where you purchased the product.
Labels
TRADEMARKS + SERVICE MARKS The Olive logo is a trademark of Olive Media, Inc. Other product names mentioned herein are used for identification purposes only and may be trademarks of their respective companies. MPEG Layer-3 audio coding technology licensed from Fraunhofer IIS and Thomson. Supply of this product does not convey a license nor imply any right to distribute content created with this product in revenue-generating broadcast systems (terrestrial, satellite, cable and/or other distribution channels),
streaming applications (via Internet, intranets and/or other networks), other content distribution systems (pay-audio or audio-on-demand applications and the like) or on physical media (compact discs, digital versatile discs, semiconductor chips, hard drives, memory cards and the like). An independent license for such use is required. For details, please visit http://mp3licensing.com. Supply of this implementation of AAC technology does not convey a license nor imply any right to use this implementation in any finished end-user or ready-to-use final product. An independent license for such use is required. Music recognition technology and some data are provided based on FreeDB. For more information, visit twww.freedb.org.
Licensing
LPGL LIBRARY + GPL PACKAGE WRITTEN OFFER This product contains Linux 2.6.12, which is made available under the GNU GPL license version 2 (hereafter called “The Program”). Olive Media, Inc. hereby offers to deliver or make available, upon request, for a charge no more than the cost of physically performing source distribution, a complete machine-readable copy of the corresponding source code of “The Program” on a medium customarily used for software interchange. This offer is valid for a period of three years after the date of purchase of this product.
MUSIC AS INTELLECTUAL PROPERTY Intellectual property, including music, is subject to worldwide copyright protection. In most countries it is permitted to make a copy of a sound storage medium (e.g. CDs) that has been legally acquired or of music data (e.g. from the Internet) for personal use, except for CDs with copy protection. In no case is it permitted to offer these copies for commercial sale or to pass them to third parties. Always make sure that the music you acquire is properly licensed, i. e. that the party offering them also possesses the rights to the titles being offered.
Warranty
For consumers, who are covered by consumer protection laws or regulations in their country of purchase or, if different, their country of residence, the benefits conferred by this warranty are in addition to all rights and remedies conveyed by such consumer protection laws and regulations. This warranty does not exclude, limit or suspend any rights of consumers arising out of non-conformity with a sales contract. Some countries, states and provinces do not allow the exclusion or limitation of incidental or consequential damages or allow limitations on how long an implied warranty or condition may last, so the limitations or exclusions described below may not apply to you. This warranty gives you specific legal rights, and you may also have other rights that vary by country, state or province. This limited warranty is governed by and construed under the laws of the country in which the product purchase took place.
Olive Media, Inc. (“Olive”) warrants this hardware product against defects in materials and workmanship for a period of one (1) year from the date of delivery. If a defect exists, Olive will, at its option: Repair the product at no charge, using new or refurbished replacement parts, or exchange the product with a product that is new or which has been manufactured from new or serviceable used parts and is at least functionally equivalent to the original product. A replacement product assumes the remaining warranty of the original product or 90 days, whichever provides greater coverage. When a product or part is exchanged, any replacement item becomes your property, while the replaced item becomes Olive property. The following exclusions and limitations apply: Olive is not liable for any damage to or loss of any programs, data, or other information stored on any media not covered by this warranty; Recovery and reinstallation of system and application software and user data are not covered under this Olive Limited Hardware Warranty.
This warranty and remedies set forth above are exclusive and in lieu of all other warranties, remedies and conditions, whether oral and written, express or implied. Olive specifically disclaims any and all implied warranties, including, without limitation, warranties of merchantability and fitness for a particular purpose. If olive cannot lawfully disclaim implied warranties under this limited warranty, all such warranties, including warranties of merchantability and fitness for a particular purpose are limited in duration to the duration of this warranty. Olive is not responsible for direct, special, incidental
or consequential damages resulting from any breach of warranty or condition, or under any other legal theory, including but not limited to lost profits, downtime, goodwill, damage to or replacement of equipment and property, any costs of recovering, reprogramming, or reproducing any program or data stored in or used with olive products, and any failure to maintain the confidentiality of data stored on the product. Olive specifically does not represent that it will be able to repair any product under this warranty or make a product exchange without risk to or loss of programs or data.
Copyright
Both the product described in this user guide and this documentation are protected by copyright law. Copyright remains with the author. Software and documentation may not be copied, reproduced, translated or distributed in any form, not even in part, without prior written consent by the copyright owner. The authors decline any liability with regard to the software described herein. They do not make any warranties for the correctness of the contents of this documentation, nor are they liable for any direct or indirect damages which may arise from the use of, or the inability to use, either the software or the accompanying documentation, even if the possibility of such damages may have been brought to their attention. The authors do not assume responsibility for any bugs or defects in the software. This restriction of liability extends also to their distributors and retailers.
7th Edition Olive Media, Inc.
© September 2010

SAVE THE SOUND
Olive Media Inc.
555 Howard Street
San Francisco, CA 94105
USA
Email: support@olivehifi.com
Web: www.olivehifi.com