JU585G31 EASY FRUIT - Juicer MOULINEX - Free user manual and instructions
Find the device manual for free JU585G31 EASY FRUIT MOULINEX in PDF.
| Product type | Juice extractor |
| Brand | Moulinex |
| Model | JU585G31 EASY FRUIT |
| Power supply | 220-240V, 50/60Hz, 250W |
| Filter material | Stainless steel |
| Body material | Food-grade plastic |
| Main functions | Juice extraction, drip-stop system, lock safety |
| Speeds | 1 speed (control button) |
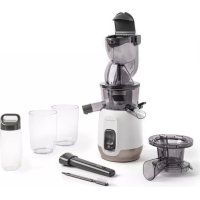
| Pusher included | Yes (A) |
| Feed chute | Yes (B) |
| Drip-stop system | Swiveling drip-stop spout (G) |
| Safety | Lid lock (I), complete stop before opening |
| Cleaning | Removable dishwasher-safe parts (A,B,C,D,E,F,G,H) |
| Motor unit | Clean with a damp cloth, do not immerse |
| Main spare parts | Filter (D), pusher (A), lid (C), collectors (E,H) |
| Recommended use | Ripe fresh fruits and vegetables (apples, pears, carrots, etc.) |
| Not recommended for | Sugar cane, too hard or fibrous fruits, bananas, avocados |
| Continuous use duration | 1 minute max for normal use, 20 seconds for hard ingredients |
| Filter maintenance | Handle with care, replace at first signs of wear or damage |
| Warranty | Subject to exclusive domestic use |
| Included accessories | Pusher, pulp collector, juice collector, filter, lid |
| Use | Household use only |
Frequently Asked Questions - JU585G31 EASY FRUIT MOULINEX
User questions about JU585G31 EASY FRUIT MOULINEX
0 question about this device. Answer the ones you know or ask your own.
Ask a new question about this device
Download the instructions for your Juicer in PDF format for free! Find your manual JU585G31 EASY FRUIT - MOULINEX and take your electronic device back in hand. On this page are published all the documents necessary for the use of your device. JU585G31 EASY FRUIT by MOULINEX.
USER MANUAL JU585G31 EASY FRUIT MOULINEX
FR P1-7
EN P.8-14
NL P.15-21
DE P.22-28
EL P.29-35
IT P.36-42
PT P.43-49
ES P.50-56
NO P.57-63
DA P.64-70
SV P.71-77
P.78-84
TR P.85-91
AR P.98-92
FA P.105-99
Moulinex
frutelia


CONSIGNES DE SECURITE
- Always check the sieve (D) before use.
- Never use the juicer if the sieve is broken, if it is defective, if you see cracks or breaks or if the sieve is torn. If there is any evident damage to the sieve, contact an approved Service centre. The sieve has sharp edges: handle it with care.
- For your safety, this appliance is compliant with applicable standards and regulations:
- Low Voltage Directive
- Electromagnetic compatibility directive
- Regulations governing materials in contact with food.
- Check that the supply voltage shown on the rating plate of the appliance matches that of your electrical system. Any error in connection will invalidate the warranty.
- Do not place or use this appliance on a hotplate or close to an open flame (gas cooker).
- Do not immerse the motor unit or put it under running water.
- If the power cord is damaged, it
must be replaced by the manufacturer, its after-sales service or any person with similar qualifications, in order to avoid any danger.
- Use this appliance on a solid, stable worktop, away from water splashes. Do not turn it over.
- Any maintenance other than routine cleaning and upkeep by customers must be carried out by an approved service centre.
- The appliance must be unplugged:
- if there is a problem or fault during operation.
- before assembly, disassembly or cleaning.
- Never pull on the supply cord to unplug the appliance.
- Only use an electrical extension lead after checking that it is in perfect condition.
- A domestic appliance must not be used:
- if it has fallen on the floor.
- if it is damaged or incomplete.
-
In such cases, or for any other repair, you MUST contact an approved Service centre.
-
This product has been designed for domestic use only. Any commercial use, inappropriate use or failure to comply with the instructions, the manufacturer accepts no responsibility and the guarantee will not apply.
- This appliance is not intended for use by persons (including children) with reduced physical, sensory or mental capabilities, or lack of experience and knowledge, unless they have been given supervision or instruction concerning use of the appliance by a person responsible for their safety.
- Children should not be allowed to play with the appliance.
-
Only use original accessories and components. We cannot accept any responsibility if this is not the case.
-
Never put your fingers or any other object in the feed tube (B) while the appliance is in operation. Always use the pusher (A) provided for this purpose.
- Do not remove the cover (C) until the sieve (D) has stopped completely.
- Do not remove the pulp collector (H) while the appliance is working.
- Always unplug the appliance from the mains after use.
- When you use the appliance for preparations with hard ingredients (for example, sugarcane), you must not run it for more than 20 seconds consecutively.
- Do not leave the appliance unattended whilst plugged in and switched on.
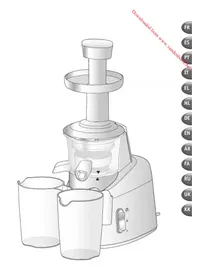
DESCRIPTION
A Pusher
B Feed tube
C Cover
D Sieve
E Juice collector
F Pouring spout
G Non-drip spout
H Pulp collector
Safety clamps
J Control button
K Drive shaft
Motor unit
SAFETY SYSTEM
To start the juicer, the cover (C) must be fitted correctly (Fig. 2). At the end of a cycle, turn the
control button to "0" and wait until the sieve (D) stops completely before removing the cover (C).
BEFORE FIRST USE
We recommend that you wash the removable parts (A, B, C, D, E, F, G, H) before the first use (see section "Cleaning and care").
- Unpack the appliance and then
place it on a solid, stable worktop, remove the cover (C) and take out the protective card on the sieve (D).
USING THE APPLIANCE
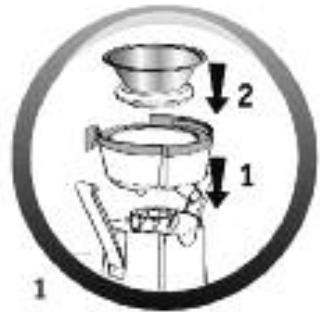
- Place the juice collector (E) on the body of the appliance (see Fig. 1).
- Place the sieve (D) in the juice collector (E). Ensure that the sieve is properly clipped onto the drive shaft (K) (see Fig. 1).
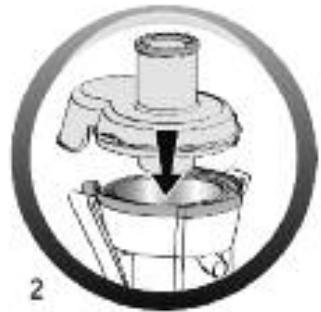
- Fit the cover (C) on the appliance in order to have the pulp evacuation exit to the rear (see fig.2).
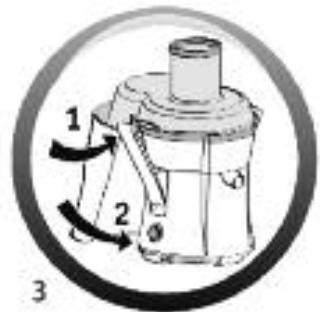
- Fit the pulp collector (H) on the rear of the appliance (see Fig. 3).
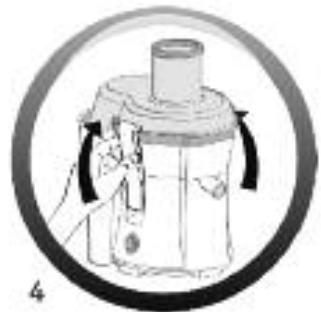
- Lock the two clamps (I) on the cover (C). You will hear an audible "click" (see Fig.4).
- Slide the pusher (A) into the feed tube (B) aligning the groove on
the pusher with the small ridge in the feed tube.
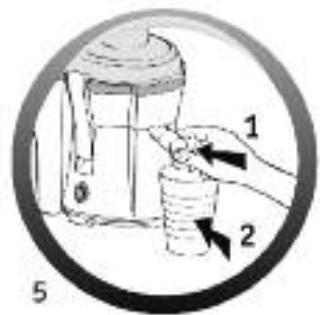
- Your appliance is equipped with a non-drip spout (G). Fit it (spout downwards) on the pouring spout (Fig. 5).
- Place a glass under the non-drip spout in front of the appliance (see Fig. 5).
- Plug in the appliance.
- To start the appliance, use the control button (J).
- Cut the fruits or vegetables into pieces if necessary after removing the stones.
- Insert the fruits or vegetables through the feed tube (B).
- The fruits and vegetables must be inserted only while the motor is
running.
- Do not press too hard on the pusher (A). Do not use any other utensil.
NEVER push food with your fingers.
-
When you have finished, stop the appliance by turning the control button (J) to 0 and wait until the sieve (D) stops completely.
-
When the pulp collector (H) is full, or the juice flow slows down, empty the pulp collector (H) and clean the sieve (D) and the cover (C).
After making your juice, turn the non-drip spout (G) by 180^ before removing the glass to stop the juice flow (see Fig. 6).
| Ingredients | Approximate weight (kg) | Quantity of juice obtained in ml (*) - 1 glass = 200 ml (approximately) |
| Apples | 1 | 650 |
| Pears | 1 | 600 |
| Carrots | 1 | 600 |
| Cucumbers | 1 (about 2 cucumbers) | 600 |
| Pineapple | 1 | 300 |
| Grapes | 1 | 450 |
| Tomatoes | 1 | 600 |
| Celery | 1 | 600 |
Do not use the appliance for more than 1 minute continuously.
(*) The quality and quantity of juice varies widely depending on the freshness of the fruit or vegetables and variety of each vegetable or fruit.
The quantities of juice indicated above are therefore approximate.
PRACTICAL TIPS
- Wash the fruit carefully before stoning.
- You do not need to remove the skin or peel. You only need to peel fruit with thick (and bitter) skin: citrus fruit, pineapple (remove the centre core).
- It is difficult to extract juice from melon, bananas, avocados, blackberries, figs, aubergines and strawberries, etc.
- The juicer should not be used for sugarcane and excessively hard or fibrous fruit.
- Choose fresh, ripe fruit and vegetables, they will yield more juice. This appliance is suitable for fruits such as apples, pears,
oranges, grapes, pomegranates, pineapple, etc. and vegetables such as carrots, cucumbers, tomatoes, beetroot and celery, etc.
- If you use over-ripe fruit, the sieve (D) will tend to get clogged up more quickly.
IMPORTANT:
All juice should be consumed immediately. On contact with air, it is very quickly oxidised, which can change its taste, colour and, above all, nutritional value. Apple and pear juices quickly turn brown. Add a few drops of lemon juice to slow this discolouration.
CLEANING AND CARE
- All removable parts may be cleaned in the dishwasher (A, B, C, D, E, F, G, H). Alternatively wash the parts in warm water and washing up liquid. Don't use an abrasive sponge to do this. The appliance is easier to clean if rinsed with water immediately after use and then cleaned fully later.
Do not use scouring pads, acetone, alcohol, etc. to clean your appliance.
- The sieve (D) must be handled with care. Avoid any mishandling that may damage it. Change your sieve at the first sign of wear or damage.
- Clean the motor unit with a damp cloth.
WHAT TO DO IF YOUR APPLIANCE DOES NOT WORK?
| PROBLEMS | CAUSES | SOLUTIONS |
| The appliance does not work. | The plug is not connected, the switch is not at “1”. | Connect the appliance to a socket with the correct voltage. Operate the appliance. |
| The cover (C) is not properly clamped. | Check that the cover (C) is properly fitted and clamped. | |
| The appliance is giving off a smell or is very hot to the touch or is smoking or making an abnormal noise. | The sieve (D) is not properly fitted. | Check that the sieve (D) is fitted properly. |
| The quantity of food being processed is too great. | Leave the appliance to cool and reduce the quantity to be processed. | |
| The juice does not flow correctly. | The juice collector (E) is not fitted properly. | Check that the juice collector (E) is fitted correctly. |
| The sieve (D) is blocked. | Clean the sieve (D). | |
| If you have any other problem or query please contact the Helpline at the end of this leaflet. | ||
Think of the environment!
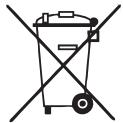
Your appliance contains valuable materials which can be recovered or recycled.
Leave it at a local civic waste collection point.
VEILIGHEIDSVOORSCHRIFTEN
BESCHRIJVING VAN HET APPARAAT
PIN ANO THN INPQTH XPHSH
Eac ouviotoume va ta aapaiouveva eapntmuata(A,B,C,D, E,F,G,H) npiv ano tyn pwn xpon (avatpeixe otny evotnta "Kathetaiouc kai ouvtipnon").
- AnouovkevaoTe n ouokevn kal
σtn ouvexia tootheetnoe tny
navw oia staote np eniapaveia
epyaioac, apaieote to kanaki (C)
kai to ppoateutiko xaptov nou
bpoketalnvw oto pfaltpo (D).
ENAPEH AIEITOYPRIA
TooTheTto DoxetoXuou(E) naW stny kevtpiK nuVadTa nC oukeunc (Te Tnu Euk.1).
TooTheTto tpoD)Meo aTo doxio xmuou (E).BeaowtheTe 0Tu to oiaIpto exei stepewe i Swota npw otov knuTnpio aGova K) (Seite Tnv Euk.1).
Tooetnto kaaki (C) navw otn ouokeun e to tOtou Ekkevwns va kota npoc ta niow (8eite Tnv Euk.2).
TooTheTto doxieo xixac (H) 10 to n oepoc tnc ouokueuc (8eTE tyn Euk.3).
Aospalote touc 2 opiyktnpce (I) navw sto kaanaki (C). Otav aoepalioovu, 0a akovotei eva "kliik" (delta tnv Eik. 4). Eoiayayete tov nieotnpa (A) moea sto sto muo (B) eUOuypaumicovtac
tny eyn tou ntoa me tov uko odny tou otoiuou.
H ouakeun diathetai akpocuoio diaakonnc pocn (G).ToOnoetnoTe to (Me to otómu npoc ta kátw) navw oTo otómu oepipiaatoC (EtK.5).
ToTOnoTeTnOte eva notnpi kAtw ano to akpoquoio diakonnc poNc sto μnpoostivo epcoc tnc ouokevnc (8eite Tny Eik.5).
ΣuvδεσTE ηνοκεύη στο ρεύμα.
Tia tv evapEn leitoupyiac tnc oukeunc, xpoaioonoute to koumu I eitoupyiac (J). -KoyTe ta pOvta n ta laxavika se koumaia, eav xpeiaotel, kal aopaipoe Ta koukoutia.
Eiayayete ta qpouta n ta axavka a 0to oToMIO c (B).
Mny enixepnoe ta eayete ta
RENGJØRING OG VEDLIKEHOLD
-
Alle demonterbare deler kan vaskes i oppvaskmaskin (A, B, C, D, E, F, G, H). Dette apparatet er enklere Å rengjore hvis det gjores straks etter bruk. Ikke bruk skuresvamper, lsemidler, white spirit osv. til Å rengjore apparatet.
-
Filteret (D) må handfternes forsiktig. Unngå all feilhändtering som kan skade det. Bytt filteret sänr det viser tegn på slitasje eller skade.
Rengjor motorenheten med en fuktig klut.
HVA GJØR JEG HVIS APPARATET IKKE FUNGERER?
| PROBLEMER | ÄRSAKER | LØSNINGER |
| Apparatet fungerer ikke. | Støpselet er/DDke satt i stikkontakten, startknappen.står/DDke på "1". | Koble apparatet til en stikkontakt med samme spensing, og trykk på startknappen. |
| Lokket (C) er/DDke riktig festet. | Sjekk at lokket (C) er riktig moniert. | |
| Det lukter av apparatet. Produktet er svært varmt ved berøring. Detkommen røyk eller unnormale lyder fra produit. | Filteret (D) er/DDke riktig moniert. | Sjekk at filteret (D) er riktig moniert. |
| Det presses for mange ingredienser. | La apparatet avkjøles, og press en minre(OP). | |
| Saften renner ikke ut slick den skal. | Saftbeholderen (E) er/DDke riktig moniert. | Sjekk at saftbeholderen (E) er riktig moniert. |
| Filteret (D) er fullt. | Rens filteret (D). | |
| Kontakt nærmeste kundeservice for alle andre problemer eller uregelmessigheter. | ||
AVHENDING AV ELEKTRISKE ELLER ELEKTRONISKE PRODUKTER
Tenk gront!


m = 311
y