PICCOLOBAR - Coffee machine LA PAVONI - Free user manual and instructions
Find the device manual for free PICCOLOBAR LA PAVONI in PDF.

User questions about PICCOLOBAR LA PAVONI
0 question about this device. Answer the ones you know or ask your own.
Ask a new question about this device
Download the instructions for your Coffee machine in PDF format for free! Find your manual PICCOLOBAR - LA PAVONI and take your electronic device back in hand. On this page are published all the documents necessary for the use of your device. PICCOLOBAR by LA PAVONI.
USER MANUAL PICCOLOBAR LA PAVONI
text_image
"LA PAVONI.."
natural_image
Symmetrical decorative emblem featuring two peacocks flanking a central architectural element, enclosed in a circular frame with repeating patterns (no text or symbols)DICHIARAZIONE DI CONFORMITA' CE - EC DECLARATION OF CONFORMITY
DECLARATION DE CONFORMITE CE – EG KONFORMITÄTSERKLÄRUNG – DECLARACIÓ DE CONFORMIDAD CE
La Pavoni S.p.A.
Declare that the following product: Espresso coffee machines for domestic use
to which this declaration relates is, according to the provisions of the specific directives::
73/23/CE, 93/68/CE, 89/336/CE, 93/68/CE, 92/31/CE
RHOS - 2002/95/CE, RAAE - 2002/96/CE
It complies with the following norms:
Before starting the machine, please read carefully the instruction manual.
Attention! Disconnect the machine from main power before taking off the protections.
Attention! Hot surfaces.
Attention ! Surfaces chaudes.

Attention! Particularly important and/or dangerous operations.
Important! Interventions required for proper operation.
Operations that may be carried out by the user.
Operations that can only be carried out by a qualified technician.
We thank you for buying one of our products, made in accordance with the most up-to date technological innovations. Following carefully the simple operations of use contained in this manual, which comply with essential safety regulations, you will get the best performances and notice the remarkable reliability of this product along the years. In case of running troubles, our network of Service Centres is at your complete disposal from now on.
Français
Cher client,
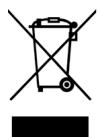
This product complies with EU Directive 2002/96/EC.
The symbol on the product or on its packaging indicates that this product may not be treated as household waste. Instead it shall be handed over to the applicable collection point for the recycling of electrical and electronic equipment. By ensuring this product is disposed of correctly, you will help prevent potential negative consequences for the environment and human health, which could otherwise be caused by inappropriate waste handling of this product. For more detailed information about recycling of this product, please contact your local city office, your household waste disposal service or the shop where you purchased the product.

Français
Cher client,
natural_image
Top-down view of a black plastic enclosure with ventilation grilles and a labeled component (no text or symbols beyond label '2')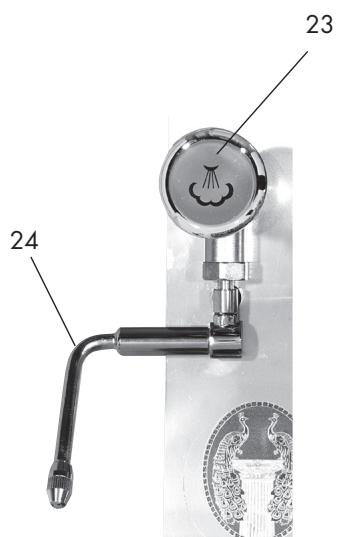
text_image
23 24
text_image
34
natural_image
Technical line drawing of a mechanical component with labeled parts A and B (no text or symbols beyond labels)text_image
A B C D E F Gnatural_image
Pure mechanical diagram showing a pipe connection with no text, numbers, or symbols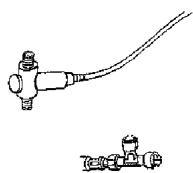
3
COLLEGAMENTI ELETTRICI
10.1 - STEAM DELIVERY NOZZLE CLEANING
10.2 - CAPPUCCINO AUTOMATIC CLEANING
10.3 - BREWING UNIT AND JET CLEANING
10.4 - FILTER AND FILTER - HOLDER CLEANING
10.5 - DRAIN TRAY CLEANING
10.6 - CASING CLEANING
11 - REPLACING THE GROUP GASKET 23
12 - TROUBLESHOOTING 24
1 - INTRODUCTION
This instruction manual is an integral part of the machine, it should be read carefully and should always be available for consultation; it should be kept for the whole life of the machine.
In case of lost or deterioration, you can ask for a new manual from an authorised SERVICE CENTRE.
The manual contains the information regarding the proper use of the machine, to its cleaning and maintenance, and it supplies important indications for carrying out operations requiring special attention and for possible residual risks.
The manual reflects the technological innovations at the time of its publishing; the manufacturer reserves the right to introduce all the technical modifications required on its products and to update the manuals with no obligation to also review the previous versions.
LA PAVONI S.p.A. declines any liability for damages that may be directly or indirectly caused to people or things caused by the following reasons:
- failure to comply with all the prescriptions of the current safety regulations;
- improper installation;
- improper voltage;
- illegitimate or incorrect use of the machine;
- incorrect use as specified in this manual;
- serious maintenance shortcomings;
- alterations on the machine or any unauthorised intervention;
- non original use of spare parts which are not especially meant for the model;
- total or partial failure with the instructions;
- exceptional events.
2 - MACHINE FUNCTION
This machine is suitable for home preparation of espresso coffee using a blend of coffee, for the withdrawal and delivery of hot water and/or steam, and of hot milk.
The user must read carefully and clearly understand the directions contained in the manual, in order to use the machine properly.
2.1 - MACHINE USE
The VEROBAR "S" – VEROBAR "V" – PICCOLOBAR models deliver:
- drinks made out of ground coffee beans
- hot water and steam for the preparation and warming of drinks
- hot milk
- beverages based on coffee and warm / hot milk.
3 - SAFETY WARNINGS

The user has to follow the safety regulations in force in the country where the machine is used, in addition to the rules suggested by common sense and the directions contained in this manual.

In order to guarantee proper operation of the machine and preservation in time of its features, the user is advised to check the right environmental conditions (room temperature must range between 5^ and 35^ C). To avoid the use of the machine in places where jets of water are used in outdoor environments exposed to the action of the weather (sun, rain, etc.).
After removing the machine from its packaging, make sure that it is intact and it is not damaged.
The packaging must be delivered to the proper waste disposal centres and in no case left unattended or to the reach of children or animals.
Before starting the machine, make sure that the power supply voltage specified in
the data plate pla ed under the base of the machine is used in
the country.
Put the machine in a safe place, on a solid base, away from heat sources and out of the reach of children.
Before connecting and disconnecting the machine, make sure that the ON/OFF switch is on the OFF position.
Do not use the machine if it is not working properly or if the main cable or the plug are damaged; the user is advised to replace the main cable or to have the machine checked by an authorised SERVICE CENTRE.
Do not touch the hot surfaces (boiler, unit, filter holder, steam supply nozzle) to avoid burns.
Do not remove the filter-holder during coffee delivery, to avoid possible burns.
Under no circumstances you must put your hands under the unit and the steam supply nozzle, since the liquids or steam delivered are overheated and may cause burns.
Make sure you do not operate the machine without water, to avoid damages to the heating element.
To avoid damages, use only accessories and spare parts that have been approved by the manufacturer.
In case of machine failure or faulty operation, switch it off. Do not try to repair it yourself but refer to an authorised SERVICE CENTRE to have any worn or damaged parts replaced with original spare parts.
In case of unauthorised repairs carried out on the machine, or the use of non original spare parts, the guarantee is not valid anymore and the manufacturer will reserve the right to no longer acknowledge its validity.
Do not use the machine outdoors.
Do not use the machine for any use different from the one for which it has been manufactured.
To avoid fires, electric shocks and personal damage, never immer-se the machine, the main cable or other electrical components in water.
In case of fire, use carbon dioxide (CO2) fire extinguishers. Do not use water or steam extinguishers.
Before any cleaning or maintenance operation, switch the machine off by placing the ON/OFF switch on the OFF position and remove the plug from the power socket without pulling the main cable.
This appliance is for household use. Any repairs or servicing operations, with the exception of normal cleaning and maintenance operations must be undertaken by an authorized service centre.
Check voltage to be sure that the voltage indicated on the plate agrees with your voltage.
Never use warm or hot water to fill the water tank. Use cold water only.
Keep your hands and the cord away from hot parts of the appliance during operation.
Never clean with scouring powders or hard implements.
To avoid your machine scaling up, use purified or bottled water.
Do not immerse base in water.
This appliance must not be used by persons (included children) with physical, sensory
or mental reduced capabilities, or without experience and knowledge unless they had been instructed or supervised by a responsible person for their security.
The children must be supervised to assure that they don't play with the appliance.


This appliance is addressed to domestic use such as: Kitchens reserved to shops staff, offices and other professional rooms; farms, hotels, motels and other residential places and also bed and breakfast.
3.1 - MISUSE
In case of misuse any form of guarantee is not valid and the manufacturer declines any liability for damages to people and/or things.
Will be regarded as misuse:
- any different use from the one declared;
- any intervention on the machine that is not in line with the indications listed in this manual;
- any use of the machine that has been tampered with components or safety devices;
- use of the machine outdoors.
3.2 - RESIDUAL RISKS
The user cannot be protected against direct jets of steam or hot water; therefore he should be extremely careful in handling the machine to avoid burns or scalds.
The manufacturer declines any liability for damages to things, people or animals, caused by any intervention on the machine by non qualified people or who have not been authorised to carry out for these functions.
3.3 -INSTRUCTIONS FOR THE POWER SUPPLY CORD
A short power-supply cord is provided to reduce risks of getting tangled up or tripping over a longer cord.
Longer extension cords are available and may be used if care is exercised in their use.
If a long extension cord is used :
- the marked electrical rating of the extension cord should be at least as great as
the electrical rating of the appliance. - the appliance is of the grounded type, the extension cord should be a grounding type
- the cable does not hang from the table to avoid the risk of getting caught up in it.
3.4 - IMPORTANT SAFEGUARDS
When using electrical appliances, basic safety precautions should always be followed to reduce the risk of fire, electric shock, and/or injury to persons, including the following:
1 Read all instructions and information in this instruction book and any other literature included in this packaging referring to this product before operating or using this appliance.
2 Do not touch hot surface. Use handles or knobs.
3 To protect against fire, electric shock and personal injury do not immerse cord, plugs, or appliance in water or other liquid.
4 Close supervision is necessary when any appliance is used by or near children.
5 Unplug from outlet when not in use and before cleaning. Allow to cool before putting on or taking off parts and before cleaning the appliance.
6 Do not operate any appliance with a damaged cord or plug or in the event of appliance faults or damages, Return appliance to the nearest authorized service centre for examination, repair or adjustment.
7 The use of accessory attachments not raccomended by the appliance manufacturer may results in fire, electric shock or personal injury.
8 Do not use outdoors.
9 Do not let cord hang over edge of table or counter, or touch hot surface.
10 Do not place on or near hot gas or electric burner, or in a heated oven.
11 Always turn appliance to "0", then plug cord into the wall outlet. To disconnect, turn switch to "0", then remove plug from wall outlet.
12 Do not use appliance for other than intended household use.
13 Use extreme caution when using hot steam.


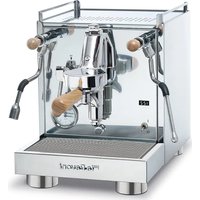
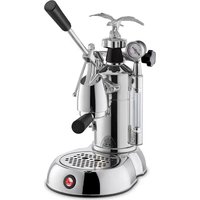
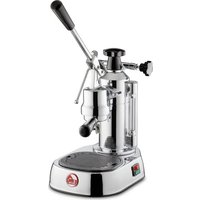
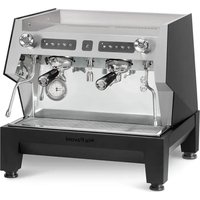
4 - TECHNICAL DIAGRAM AND SPECIFICATIONS
text_image
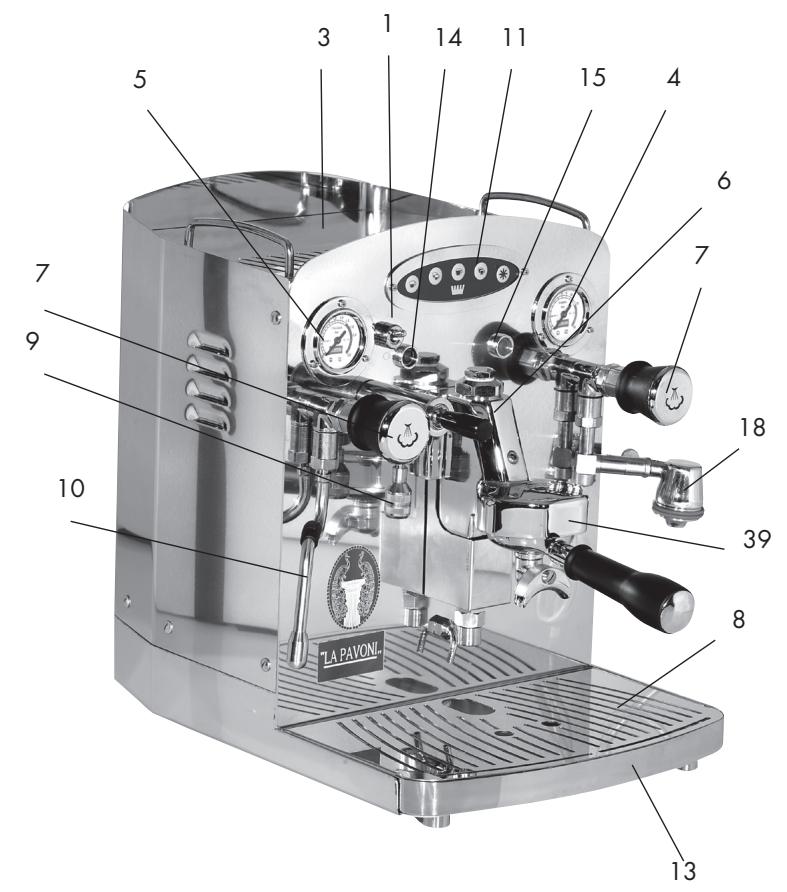
3 1 14 11 15 4 6 7 7 9 18 39 8 10 LA PAVONI. 13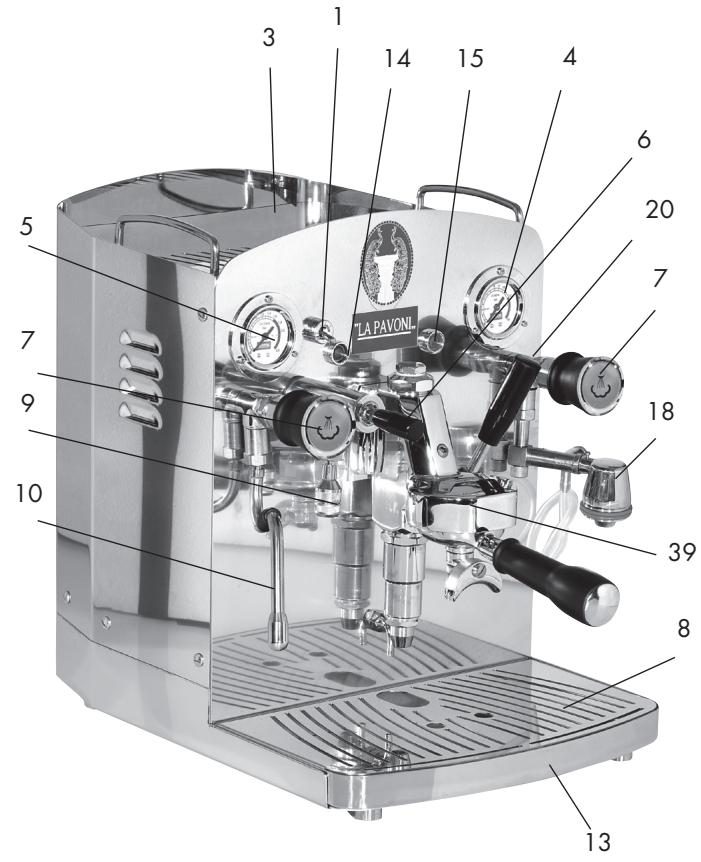
text_image
LA PAVONL 13 8 9 7 5 6 4 15 14 1 3 10 20 7 18 39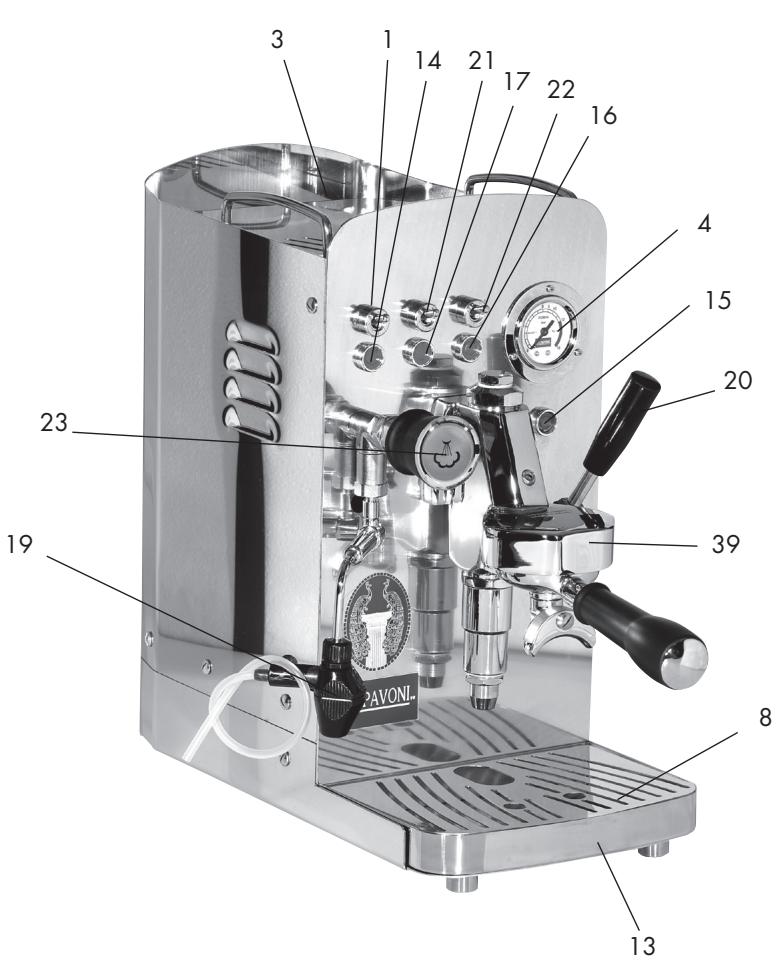
text_image
3 1 14 21 17 22 16 4 15 20 23 39 19 8 13 PRAVONL.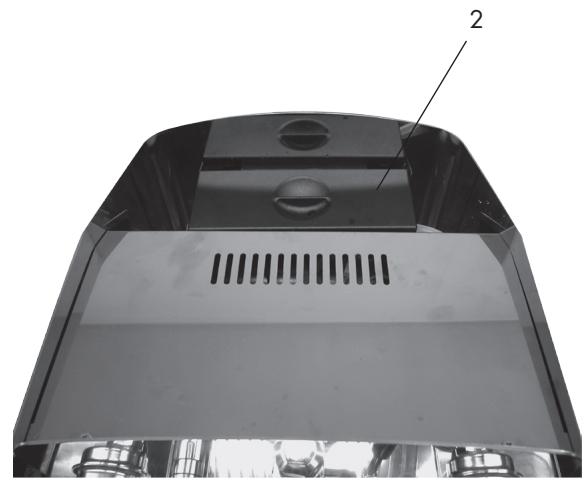
natural_image
Top-down view of a black plastic enclosure with ventilation grilles and a labeled component (no text or symbols beyond label '2')
text_image
23 24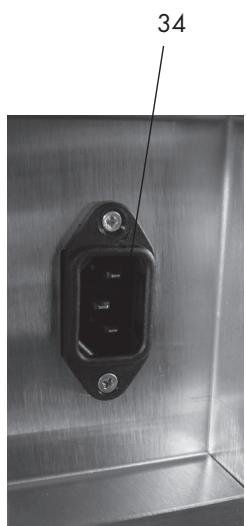
text_image
34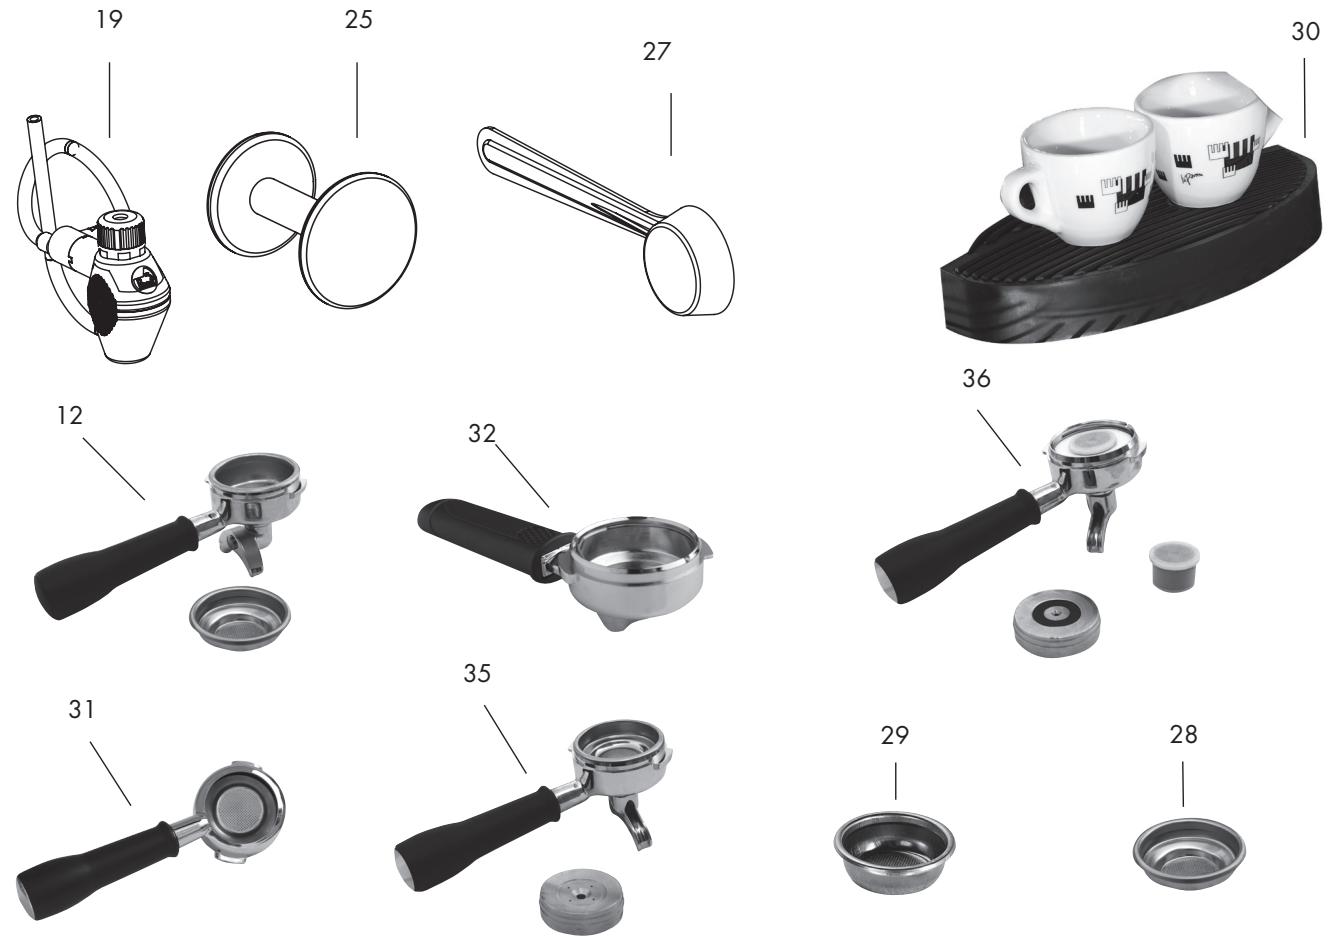
natural_image
Circular black object with a small protrusion and the number 26 labeled on top (no other text or symbols)
natural_image
Close-up of a transparent plastic device with two circular cutouts and a label '38' pointing to it (no readable text or symbols on the device itself)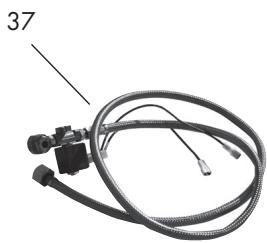
natural_image
Coiled black cable with connectors and a labeled connector (37), no visible text or symbols on the main subject.1 ON/OFF switch
2 Cold water tank
3 Cups warmer
4 Pump pressure gauge
5 Boiler manometer
6 Hot water handle
7 Steam handle
8 Grill tray
9 Hot water jet
10 Steam jet
11 Control group push – button panel
12 Filter holder
13 Drip tray
14 Coffee machine lamp on
15 Cold water tank lamp
16 Steam switch lamp
17 Temperature lamp
18 Cappuccino Automatic (optional)
19 Domestic Cappuccino Automatic (optional)
20 Lever group endowment
21 Hot water supply switch (VRP)
22 Steam switch (VRP)
23 Water/steam handle
24 Hot water/steam jet (VRP)
25 Tamper
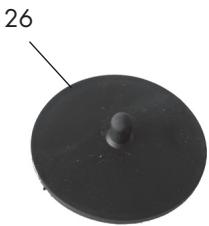
26 Blanking plate rubber
27 Coffee measure
28 1 cup filter 7 gr
29 2 cups filter 16 gr
30 Raised grid
31 Fascino filter holder
32 Lowered filter holder
33 Main cable
34 Main cable connector
35 E.S.E. pods filter holder (optional)
36 Fap capsule filter holder (optional)
37 Water main kit connection (optional)
38 Detergent powder - 1 envelope
39 Endowment group
| MODEL | VEROBAR V (VRV) | VEROBAR S (VRV) | PICCOLOBAR(VRP) | |||
| Voltage supply | 120V | 230V | 120V | 230V | 120V | 230V |
| Frequency | 60Hz | 50Hz | 60Hz | 50Hz | 60Hz | 50Hz |
| Absorbed power | 1400W | 1400W | 1400W | 1400W | 1400W | 1400W |
| Pump pressure | 15 bar | 15 bar | 15 bar | 15 bar | 15 bar | 15 bar |
| Water tank capacity | 2.9 Lt | 2.9 Lt | 2.9 Lt | 2.9 Lt | 2.9 Lt | 2.9 Lt |
| Boiler capacity | 2 Lt | 2 Lt | 2 Lt | 2 Lt | 2 Lt | 2 Lt |
| Dimensions LxHxP mm | 340x445x480 | 340x445x480 | 340x445x480 | 340x445x480 | 250x445x480 | 250x445x480 |
| Weight Kg. | 27 | 27 | 27 | 27 | 20 | 20 |
Follow carefully the instructions before using the machine.
- open the external packing and take the machine out. Inspect the machine to ascertain that it is intact and in good condition. Check for the presence of all the accessories supplied with the machine (see paragraph 4)
- position the machine on a flat surface
- remove the cover and take out the water tank (2) (located inside the machine) and rinse it
- fill the container with clean water, return it to its housing and insert the silicon tubes. Close the cover on the machine
WARNING ! Before making the electric connection, make sure that the main power voltage corresponds to the specifications indicated on the data plate placed under the base of the machine.
5.1- VEROBAR MODEL VRS AND VRV
Press the main power switch (1); the pilot light (14) will be switched on.
The automatic level indicator will start filling the boiler with water until it automatically reaches the prescribed level; the boiler water level is automatically checked and the prescribed level will be automatically refilled.
Then wait until the machine reaches the 1.1 - 1.3 bar operating pressure, by checking the boiler pressure on the pressure gauge (5).
The machine with a basin built-in is provided with a safety device controlling the amount of water contained in the basin itself; when the water level reaches a capacity of approximately 0.5 litres, the device automatically stops all the machine functions.
The red warning light (15), located on the user side of the panel, switches on to indicate that the water is missing in the water tank. As it is filled up, the warning light switches off and the machine is ready again to deliver coffee.
To ensure proper operation of the safety device, avoid placing cups or other items on the tank lid (2).
Fill the filter holder (12) with the brewing group (39)
Thanks to the working of the lever group (20) or thanks to the push – button panel group (11), brew some water to avoid the correct refilling of the coffee exchanger.
WARNING! The coffee brewing and the power supply of the heating element don't work when the water tank lamp (15) is on.
During start-up: when the boiler pressure gauge (5) shows a pressure of approximately 0.5 bar, open slowly the steam tap handle (7) by turning it anticlockwise, to discharge the air contained in the boiler, and wait until steam starts flowing out of the steam supply nozzle (10), then close it.
Wait for the reaching of the pressure and the correct thermic balance, after 10 - 15 minutes.
5.2 - PICCOLO BAR VRP MODEL
Switch on the machine setting the switch on/off (1) on the position "I". The lighting of the lamp (14) confirms the electric feeding.
Fill the filter holder (12) with the brewing group (39).
Put a tank under the water/steam jet (24).
Open the hot water/steam handle (23). Put the lever to supply hot water (21) on the position "I".
When the water comes out from the steam jet spout, put the switch lever to supply hot water (21) on the position "O" and close the handle(23). These operations are useful to effect the right refilling of the boiler.
e) Using the lever of the brewing group (20) make a water supply to avoid the right refilling of the coffee circuit.
WARNING! The coffee supply and the heating feeding don't work when the water tank lamp (15) is on.
The machine with a basin built-in is provided with a safety device controlling the amount of water contained in the basin itself; when the water level reaches a capacity of approximately 0.5 litres, the device automatically stops all the machine functions.
The red warning light (15), located on the user side of the panel, switches on to indicate that the water is missing in the water tank. As it is filled up, the warning light switches off and the machine is ready again to deliver coffee.
To ensure proper operation of the safety device, avoid placing cups or other items on the tank lid (2).
f) After these operations wait for the reaching of the temperature to brew a coffee, light (17) on.
N.B.: the warning light of the reaching of the right temperature will continue to go out and to light up automatically during the heating period.
After having lighted the machine, for the first coffee, wait for the right thermic balance, after 8 – 10 minutes.
6 - COFFEE PREPARATION
In order to obtain an excellent espresso coffee, it is important to use a top quality blended coffee, properly roasted and ground; grinding is correct when the coffee delivery time is between 15-18 seconds for one serving and between 30-35 seconds for two servings. The coffee should be grinded at the time of use. Once ground, the coffee loses its flavour within a short time; if the grinding is too coarse you will obtain light-coloured and weak coffee, without froth; if the grinding is too fine you will obtain dark and strong coffee, with little froth.
Once you have placed the filter into the filter-holder (12), fill the filter with the amount of coffee required for 1 or 2 cups (7 gr. - 14 gr.), level it off, and press the coffee down with the presser, manually clean the filter edge from any coffee residues and fit the filter-holder into the brewing unit (39) moving it rightward tightly in its place.
Place the cups under the spouts and start the brewing using the unit control (11) or (20).
Once you have obtained the desired amount of coffee, stop the delivery using the unit control (11) or (20) and leave the filter-holder in its place.
To prepare additional cups of coffee, remove the filter-holder (12) from the unit, moving it leftward, empty the coffee grounds into the drawer provided and once again follow the previous steps.
Caution! We recommend not to touch the brewing units or the steam and hot-water nozzles when the machine is running, and pay attention not to place your hands under the units or nozzles during the delivery, to avoid possible scalds.
It is advisable to leave the filter-holders, with their own filters and coffee grounds, fitted into the unit throughout your days' work, so that the filter-holder will always preserve an optimal temperature.
Caution! When the machine is new, the filter-holder may not be aligned (perpendicular to the machine itself) as shown in the picture; this however does not affect the proper use of the machine itself. After a short period of use the filter-holder will be gradually settled on the correct position.

natural_image
Technical line drawing of a mechanical component with labeled parts A and B (no text or symbols beyond labels)A = Position of the closed filter-holder when the machine is new. B = Position of the closed filter-holder after the machine has been in use for a brief period.
7 - BREWING UNIT CONTROL
7.1 VRS and VRP MODELS
Machine equipped with semiautomatic, continuous delivery working with a micro switch.
Coffee delivery is obtained moving the small lever of the group (20) placed on the control instrument board; bringing the small lever downwards. The micro switch connected to it will start up the pump for the delivery of water under pressure to the group.
The group through some inner devices, allows, before the pre-infusion and after the infusion of the coffee in several ways.
Once the desired amount of coffee has been obtained, bring the small lever (20) upwards, stop position, to stop delivery.
7.2 VRV MODEL
These models are equipped with automatic, continuous delivery brewing units with solenoid valve and programmable coffee dosing, microprocessor-aided sealed digital brewing control,
control board with 4 different coffee-doses selection positions and a stop button.
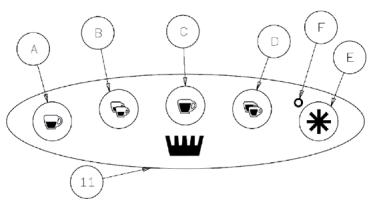
7.3 - DIRECTIONS FOR COFFEE DOSE PROGRAMMING
flowchart
graph TD
    A["A"] --> C["C"]
    B["B"] --> C["C"]
    D["D"] --> C["C"]
    F["F"] --> C["C"]
    E["E"] --> C["C"]
    C["C"] --> H[" crown"]
    H[" crown"] --> I["*"]
Function of keys:
A. 1 normal cup of coffee
B. 1 "large" cup of coffee
C. 2 normal cups of coffee
D. 2 "large" cups of coffee
E. Brewing unit stop/continuous delivery
The (E) button is designed for continuous delivery and delivery stop.
The machine therefore has a double function:
A. By pressing the (E) button, the equipment is semi-automatic.
B. By pressing the 4 selection buttons, the machine operates through electronic dosing.
By holding the (E) pushing botton for few seconds, the machine will enter in the programming phase, as signalled by the low frequency flashing of the LED (F). Release the programming button (the LED will continue to flash) and push the button of the unit related on which you wish to program coffee dosing, at this stage delivery will start; once the desired dose has been reached, press any button of the unit to interrupt the delivery; the dose will be stored in the memory and the machine will exit the programming phase (the LED will stop flashing and will switch it off).
- This operation should be repeated on the remaining selection buttons for the various groups.
- The same operation needs to be repeated if you wish to increase or decrease the set dose.
COFFEE DELIVERY
To obtain the coffee delivery, push the selected button on the brewing unit (11); the red LED (F) in the (E) button will switch on. The coffee delivery will start and will be automatically interrupted once the previous amount set has been reached. The stop of the delivery will be signalled by the LED switched off.
The cancellation of the selection may be interrupted by pressing any key on the brewing unit (11).
The (E) asterisk button, besides interrupting or aborting the delivery, is also designed for continuous delivery, which means that the dose is not previously set, but the unit will continue to deliver coffee until the key is pressed again to interrupt the delivery from that unit.
LACK OF VOLUMETRIC COUNTER IMPULSES
On starting a volumetric control coffee cycle, the correct function of the volumetric counter is checked by the reading of the number of impulses sent by the same to the micro-controller.
Should no impulses by recorded for a period exceeding 5 seconds the LED relative to the selected measure begins flashing (ie. the led relative to key T4).
After one minute in which no impulses are recorded (volumetric counter time out), the measure underway is automatically stopped.
NOTE: To avoid the automatic block of the machine, if within 10 seconds the coffee delivery has not started yet, press one of the selector buttons to cancel the command, replace the coffee contained in the filter basket and repeat the delivery operation.
8 - HOT WATER DELIVERY
VRS – VRV MODEL
Put a tank under the hot water jet (9), press the jointed lever (6) down to avoid the water supply
When you reach the expected quantity of water, stop the pressure, the lever will come back in the stop position breaking off the supply.
VRP MODEL
Put a tank under the steam/hotwater jet (24), turn anticlockwise the water/steam tap handle (23), press the hot water switch (21). From the lower steam/water jet will come out some water at approx 95° When you reach the expected quantity of water turn clockwise the water/steam tap handle (8) and press again the hot water switch (21).
9 - PREPARATION OF OTHER DRINKS
9.1 - MILK, CAPPUCCINO AND OTHER HOT DRINKS
Warning ! Burns danger ! Some sprinkling of hot water can arrive at the beginning of the supply.
The endowment tube can reach high temperature: avoid to touch it directly with the hands.
Before heating any drink, let a small amount of steam out of the steam tube (10) carefully. Turn the steam tap knob (7) anticlock-wise, to eliminate any condensation that may have formed inside the boiler. Pour the liquid to be prepared into a container, immerse the steam delivery nozzle (10) into it and slowly turn the steam tap knob (7) anticlockwise; subsequently open the tap completely, so as to produce a great outflow of steam and bring the liquid to the boiling state. To obtain a thick milk froth for cappuccino, we recommend to use a high and narrow container, only half-filled with milk. Immerse the steam delivery nozzle (10) until you touch the bot-tom of the container and then bring the milk almost to the boiling state. Move the container up and down alternatively with the tap open, until you touch the surface of the milk for a few seconds, until the froth has formed. To make a cappuccino, add the hot whipped milk to the hot coffee in the cappuccino cup.
9.2 MILK, CAPPUCCINO AND OTHER HOT BEVERAGE (VRP MODEL)
Warning ! Burns danger ! Some sprinkling of hot water can arrive at the beginning of the supply. The endowment tube can reach high temperature : avoid to touch it directly with the hands.
When the machine is ready to brew coffee, move the steam jet over the tank (13) open the water/steam handle tap (23) for some seconds, in this way the remaining water can go out from the steam jet; in a short time only steam will come out.
Close the water/steam handle tap (23).
Operate the steam lever switch (22).
When the ligh (17) is on, the machine will be ready to supply steam.
N.B. Do not produce steam for more than 60 seconds.
Put the liquid in a tank, dip the steam jet (10) in the liquid and turn slowly the steam tap handle (7) anticlockwise; then open completely the handle to avoid the exit of a big quantity of steam boiling the liquid.
To obtain the milk froth for the cappuccino, pour the milk to be prepared in a tall and narrow tank until is it is half full, immerse the steam pipe (24) until it touches the bottom of the tank and boil the milk.
Move the tank up and down with the tap opened and allow the steam jet to touch the surface of the milk for a few seconds and obtain the froth.
To obtain the cappuccino, add the hot and frothed milk in the coffee prepared in the cappuccino cup.
At the end turn clockwise the steam handle to stop the steam supply and take away the milk jug.
Put the switch steam lever (21) on the position "OFF".
N.B. to prepare immediately an other coffee, fill up the boiler with water and bring it to correct temperature. Otherwise the coffee could be burnt.
Put an empty cup on the grill.
Don't insert the filter holder
Let the coffee lever down (20) filling up the cup of water. When the
cup is filled, stop the supply.
Afterwards you could prepare other coffee.
9.3 - USE OF THE CAPPUCCINO AUTOMATIC BAR
After having prepared the coffee in the cappuccino cup, insert the automatic cappuccino (18) tube into the milk jug, turn the cappuccino tap knob (7) anticlockwise and regulate the milk flow using the control handwheel of the frother, in order to obtain the desired froth thickness.
To obtain a thick froth, turn it clockwise.
To obtain a foamy froth, turn it anticlockwise.
9.4 TEA, CAMOMILE
Place a container under the hot water delivery nozzle (9), turn the hot water tap knob (6) anticlockwise until you obtain the desired amount of water; now add the tea bag or drink sachet required for the preparation. For hygiene purposes, we recommend in any case to use water from the water system, heated using the steam delivery nozzle (10).
For the model PICCOLOBAR (VRP), follow the instructions of the section (8) for the supply of the hot water.
10 - MAINTENANCE AND CLEANING OPERATIONS
10.1 - STEAM DELIVERY NOZZLE CLEANING
To avoid altering the taste of the drinks to be heated and to prevent the holes of the end part of the steam delivery nozzle getting clogged, clean carefully the nozzle after each use.
10.2 - CAPPUCCINO AUTOMATIC CLEANING
After each brewing, the Cappuccino Automatic has to be cleaned of the milk residues. Immerse the aspiration tube (21) in a container full of water, proceed as normal cappuccino preparation, allowing the dirty water to flow into a suitable container.
10.3 - BREWING UNIT AND JET CLEANING
Remove the filter-holder from the brewing unit. Place the provided seal inside the filter, pour a spoonful of coffee-machine detergent powder and fit the filter holder into the brewing unit to be cleaned. Start the brewing unit using the unit control (11-20) and interrupt the delivery after approximately 4-5 seconds.
Start and interrupt the delivery alternatively for approximately one minute, to allow the removal of coffee and scale deposits. Remove the seal and start the delivery system several times to rinse the unit. Deliver a few serving of coffees so as to eliminate any unpleasant taste from the jets and from the brewing unit.
After a long period of hot water stagnation within the pipes, let the water flow vertically so as to remove any deposit.
10.4 - FILTER AND FILTER-HOLDER CLEANING
Check frequently the filter holes to remove any coffee deposits.
Prepare about a litre of boiling water with four teaspoons of coffee-machine detergent in a suitable container, and immerse the filter baskets and filter-holders in this solution for 20-30 minutes; then rinse thoroughly under running water.
10.5 - DRAIN TRAY CLEANING
Remove the drain tray grid (8) and pull out the lower drain tray (13) in order to clean it from coffee powder residues.
10.6 - CASING CLEANING
Use a damp, non abrasive cloth, without alcohol or solvents, to avoid damaging the sides, the base and any painted parts.
11 - REPLACING THE GROUP GASKET
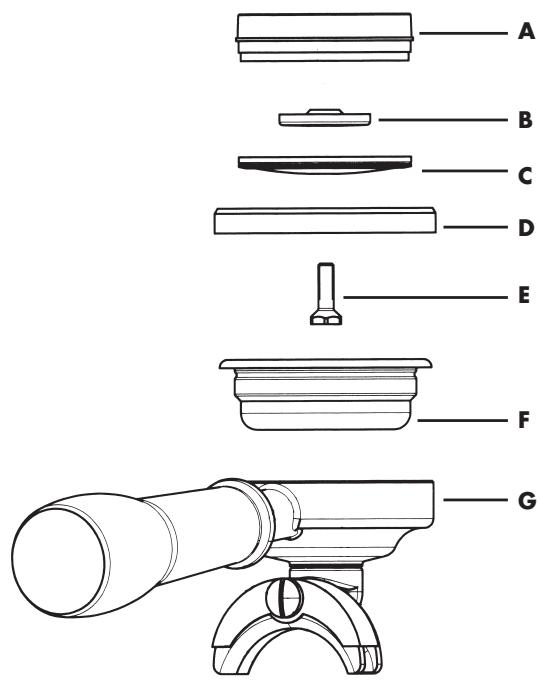
text_image
A B C D E F GA. Round metal block
B. Sprayer
C. Jet
D. Gasket
E. Jet fixing screw
F. Filter
G. Filter-holder
If, during the delivery, the coffee drips out of the edges of the filterholder (G), this may be caused by the obstruction of the filter-holder delivery hole, in which case the hole needs to be cleaned; if the problem persists or, if when fitting the filter-holder into the brewing unit it significantly moves beyond the unit centre, the group gasket needs to be replaced (D).
In order to replace it, unscrew the jet fixing screw (E), remove the jet (C) and the sprayer (B), and then use a screwdriver as a lever to remove the round metal block (A) and subsequently the gasket (D). After having removed the gasket, clean the site properly before placing the new gasket. Reinstall the components by following the above listed steps in reverse order.
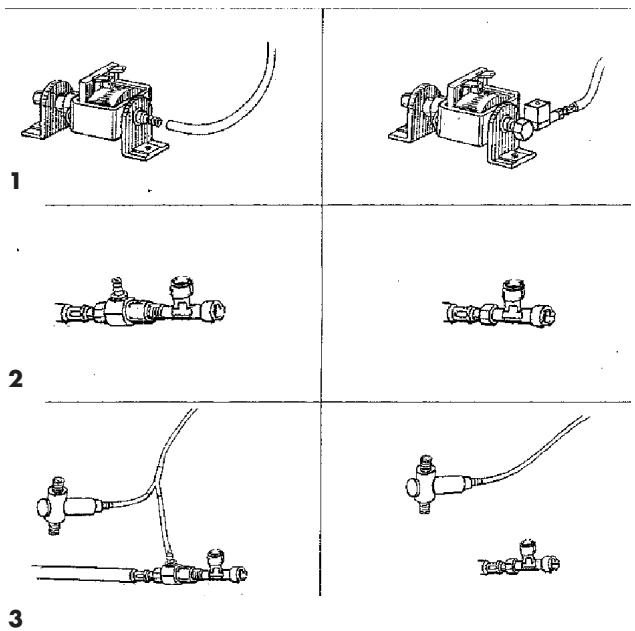
INSTRUCTION FOR THE WATER MAIN CONNECTION
WATER MAIN KIT ASSEMBLY
1 - Remove the silicon pipe from the pump.
Connect the water pipe to the pump inserting the connection.
- Insert the water pipe in the hole under the base of the machine.
2 - Take away the valve and insert the water pipe in the "T" connection 6).
3 - Remove the "Y" connection and the related silicone pipes.
- Insert the longest silicone pipe in the by-pass and put it in the tank for the waste water.
text_image
1 2 3ELECTRIC CONNECTIONS
Disconnect the 3 poles connection of the tank microswitch from the wiring.
Connect the 3 poles connector with a cable (cod. 396550) to the wiring.
Make a parallel connection between the electro valve and the pump feeding.
| PROBLEM | CAUSE | SOLUTION |
| The machine does not work and the ON light does not turn on | 1. No electricity2. The main cable is not properly plugged in3. The main cables damaged | 1. Restore electrical power2. Plug the main cable in correctly3. Contact the nearest SERVICE CENTER for a replacement cable |
| The ON light is on but the water does not heat | 1. Thermostat malfunction, or the manual reset thermostat is active2. Heating element malfunction | 1. Contact the nearest SERVICE CENTER2. Contact the nearest SERVICE CENTER |
| No coffee produced during the coffee cycle | 1. Too little water in tank2. Coffee too finely ground3. Too much coffee in the filter4. Coffee too firmly pressed5. The lines are not primed6. Shower plate obstructed | 1. Fill tank2. Use a coarser grind3. Put less coffee in the filter4. Press the coffee more gently5. See section 5 - Starting the machine6. Clean or replace shower plate |
| Loud pump operation | 1. Too little water in tank2. Pump not primed | 1. Fill tank2. See section 5 - Starting the machine |
| Coffee produced too quickly | 1. Coffee too coarsely ground2. Too little coffee in the filter3. Coffee not pressed enough4. Coffee old or unsuitable | 1. Use a finer grind2. Put more coffee in the filter3. Press coffee more firmly4. Use different coffee |
| Coffee is produced in drips | 1. Coffee too finely ground2. Too much coffee in the filter3. Coffee too firmly pressed | 1. Use a coarser grind2. Put less coffee in the filter3. Press the coffee more gently |
| Coffee leaks between the coffee group and the filter-holder | 1. Filter-holder not properly inserted2. Too much coffee in the filter3. Edge of the filter-holder not clean4. The douche seal is worn or damaged | 1. Insert the filter-holder correctly2. Put less coffee in the filter3. Clean the edge of the filter-holder4. Contact the nearest SERVICE CENTER |
| Coffee is produced without froth | 1. Coffee not suitable for machine2. Improper grind3. Too little coffee in filter | 1. Use different coffee2. Adjust coffee grind3. Put more coffee in the filter |
| Coffee too cold | 1. The machine had not reached the proper temperature2. Filter-holder not preheated3. Cups not preheated4. Pressure switch malfunction. | 1. See section 5.1 - 5.22. Filter-holder must be heated together with the water - see section 5.1 - 5.23. Properly heat the cups4. Contact the nearest SERVICE CENTER |
| Coffee is too hot | 1. Pressure switch malfunction | 1. Contact the nearest SERVICE CENTER |
| The machine does not produce steam | 1. The lines are not primed2. Obstructed outlet hole at end of steam pipe3. Too little water in tank | 1. See section 52. Clean the outlet hole with a needle3. See section 5 |
| Model VRV ALARMS/ MULFUNCTIONSThe switch you are using blinks | 1. Empty water tank. Lack of water. Pump noise.2. Grinding is too fine3. Dirty filter4. Coffee is too pressed | 1. Fill in the water tank with water and repeat the procedures to fill the boiler with water.2. Modify the grinding3. Clean the brewing group filter4. Do not press the coffee too much |
ITALIANO 5 – 14
ENGLISH 15 – 24
FRANÇAIS 25 - 34
INDICE
1 - INTRODUCTION AU MODE D'EMPLOI 26
2 - FONCTION DE LA MACHINE 26
2.1 - EMPLOIS RESERVES A LA MACHINE
3 - CONSEILS DE SECURITE 26
3.1 - UTILISATION INAPPROPRIEE
3.2 - AUTRES RISQUES
3.3 - INSTRUCTION SUR LE CORDON ELECTRIQUE
3.4 - IMPORTANT
4 - SCHEMA ET CARACTERISTIQUES TECHNIQUES 28
5 - PREMIERE MISE EN MARCHE 30
natural_image
Top-down view of a black plastic enclosure with ventilation grilles and a labeled component (no text or symbols beyond label '2')
text_image
23 24
text_image
34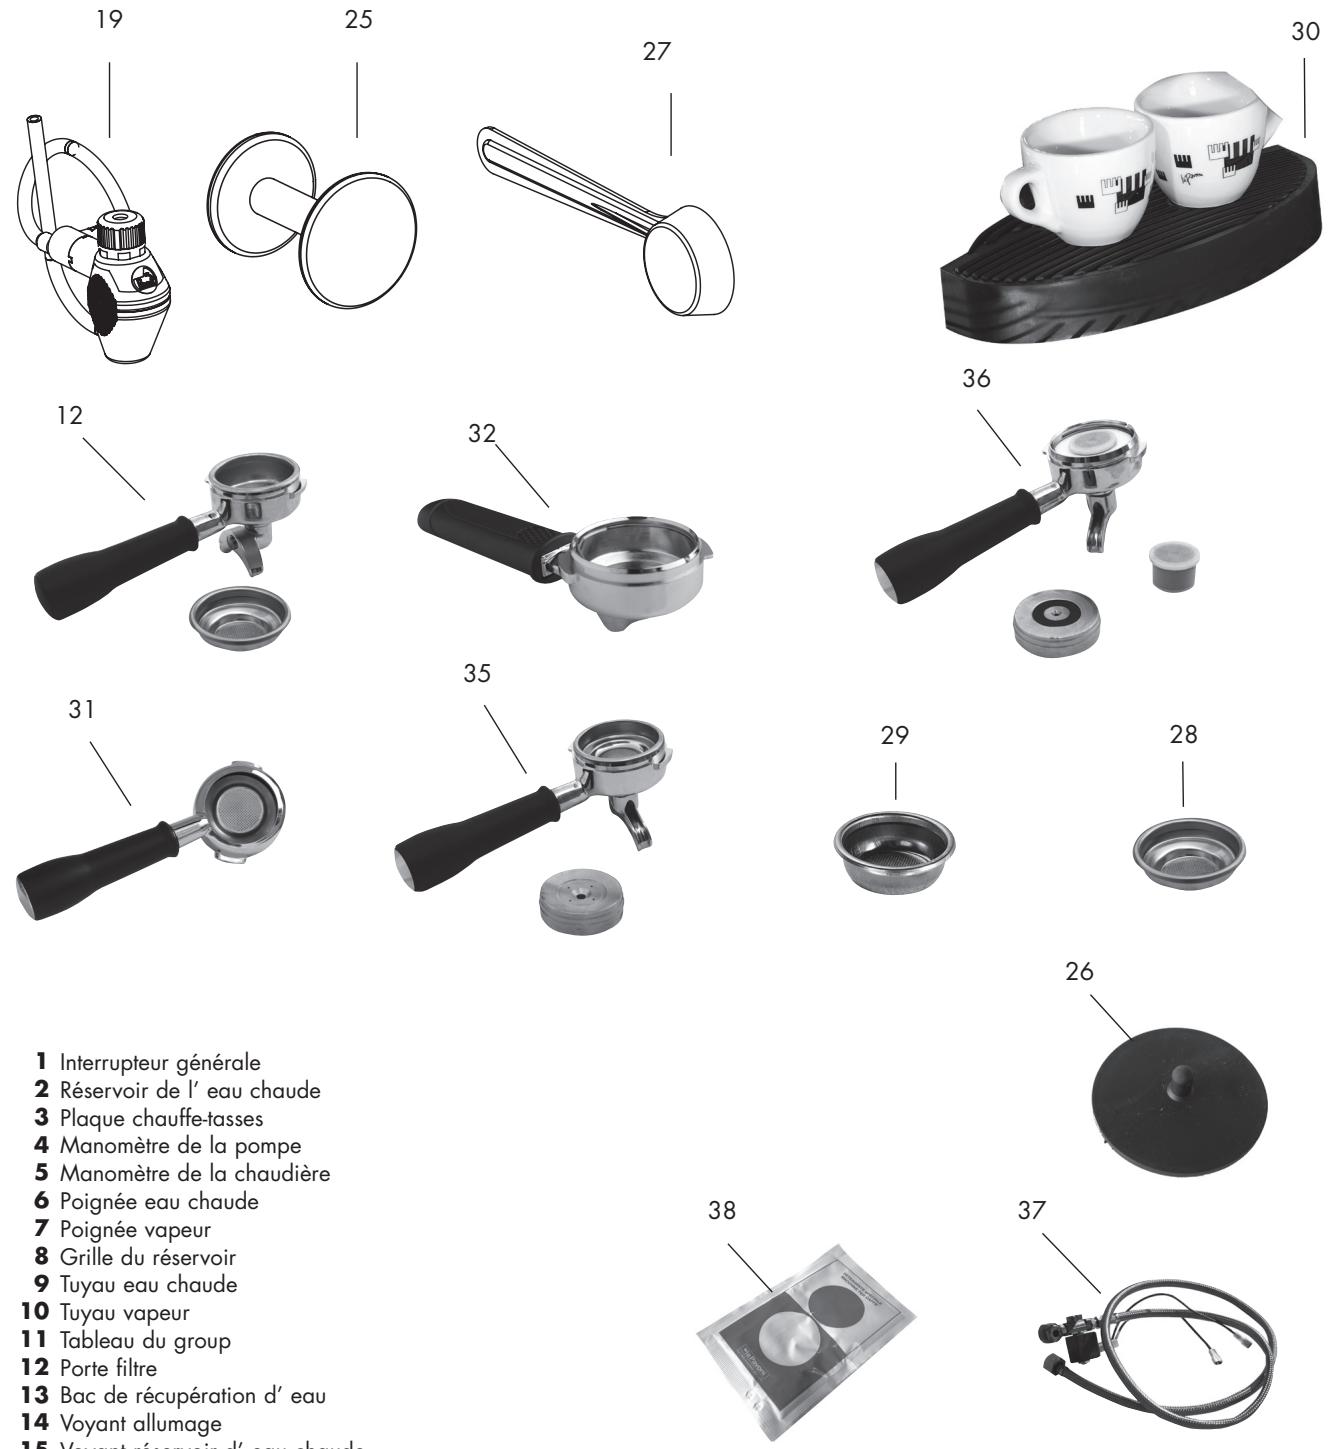
natural_image
Technical line drawing of a mechanical component with labeled parts A and B (no text or symbols beyond labels)text_image
A B C D E F GA. Bloc
B. Gicleur
C. Douchette
D. Joint
E. Vis fixant la douchette
F. Filtre
G. Portefiltre
natural_image
Pure mechanical diagram showing a lever and connecting pipe (no text or symbols)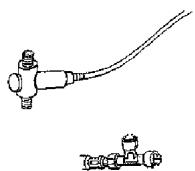
3