NITRO TRI-FORCE 3IN1 RACING WHEEL - Gaming Accessories JOYTECH - Free user manual and instructions
Find the device manual for free NITRO TRI-FORCE 3IN1 RACING WHEEL JOYTECH in PDF.
User questions about NITRO TRI-FORCE 3IN1 RACING WHEEL JOYTECH
0 question about this device. Answer the ones you know or ask your own.
Ask a new question about this device
Download the instructions for your Gaming Accessories in PDF format for free! Find your manual NITRO TRI-FORCE 3IN1 RACING WHEEL - JOYTECH and take your electronic device back in hand. On this page are published all the documents necessary for the use of your device. NITRO TRI-FORCE 3IN1 RACING WHEEL by JOYTECH.
USER MANUAL NITRO TRI-FORCE 3IN1 RACING WHEEL JOYTECH
Joytech is a trademark of Take-Two Interactive Software, Inc
THIS PROA UCT IS NOT 已 立 日 日 SIGNOa, MANUFACTURoA, SPONSORoA OR ONa ORSoa BY MICROSOFTCORPORATION. Microsoft, XBOX and the XBOX logo are either registered trademarks or trademarks of Microsoft Corporation in the U.S. and / or other countries.THIS PROA UCT IS NOT 已 立 日 SIGNOa, MANUFACTURoA, SPONSORoA OR ONa ORSoa BY SONY COMPUToR oNTORTAINMO NT INC. Playstation &Playstation2 are a registered trademarks of Sony Computer Entertainment Inc. Specifications and external appearance are subject to change without prior notice. TouchSenseTM Technology licensed from Immersion Corporation.
No CONVIO NT PAS A UN oNFANT a o MOINS ao 3 ANS
Before operating the Nitro Triforce Racing Wheel, please read this User Guide thoroughly, and retain it for future reference.
Welcome
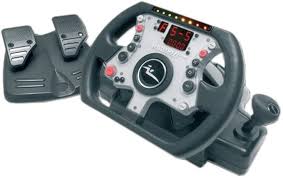
Congratulations on purchasing the Nitro Triforce Racing Wheel for use with PlayStation®2 and Xbox™ consoles and PC. Experience authentic racing action with the Racing Wheel that delivers pole position each and every time! Compatible with PlayStation®2, Xbox® and PC driving games and all current PlayStation®2 Force Feedback compatible software, the Racing Wheel immerses you in the real life rush of driving for the ultimate gaming experience! JOYTECH's State-of-the-Art 'Air Cooled Motors' simulate every bump, jolt, and crash with shocking realism when used with Force Feedback compatible software, even allowing you to adjust the force to play it your way. Customise your control with 'Steering Sensitivity' Modes, monitor the control of your car with an in-built Digital Display and play like the pro's with the Shift-Tronic™ Stick and Wheel-Mounted Paddles for the last word in rac- ing realism!
Features
Line removed
Force Feedback Technology
o Experience every bump, jolt and crash with astonishing realism
o Control the force and adjust the Resistance Level to suit your style
o Three Air-Cooled Motors deliver realistic feedback
Four Wheel-Mounted Paddles and Shift-Tronic™ Stick
Shift gears up or down conveniently with 'Easy-to-Access' controls
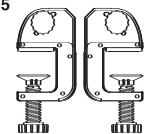
Dual Clamping System
Attach Wheel securely to tabletop or lap
Four Preset Steering Sensitivity Modes
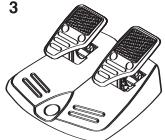
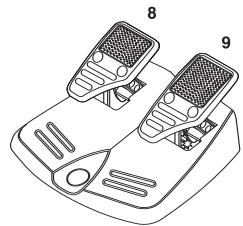
Non-Slip Accelerator and Brake Pedal Set
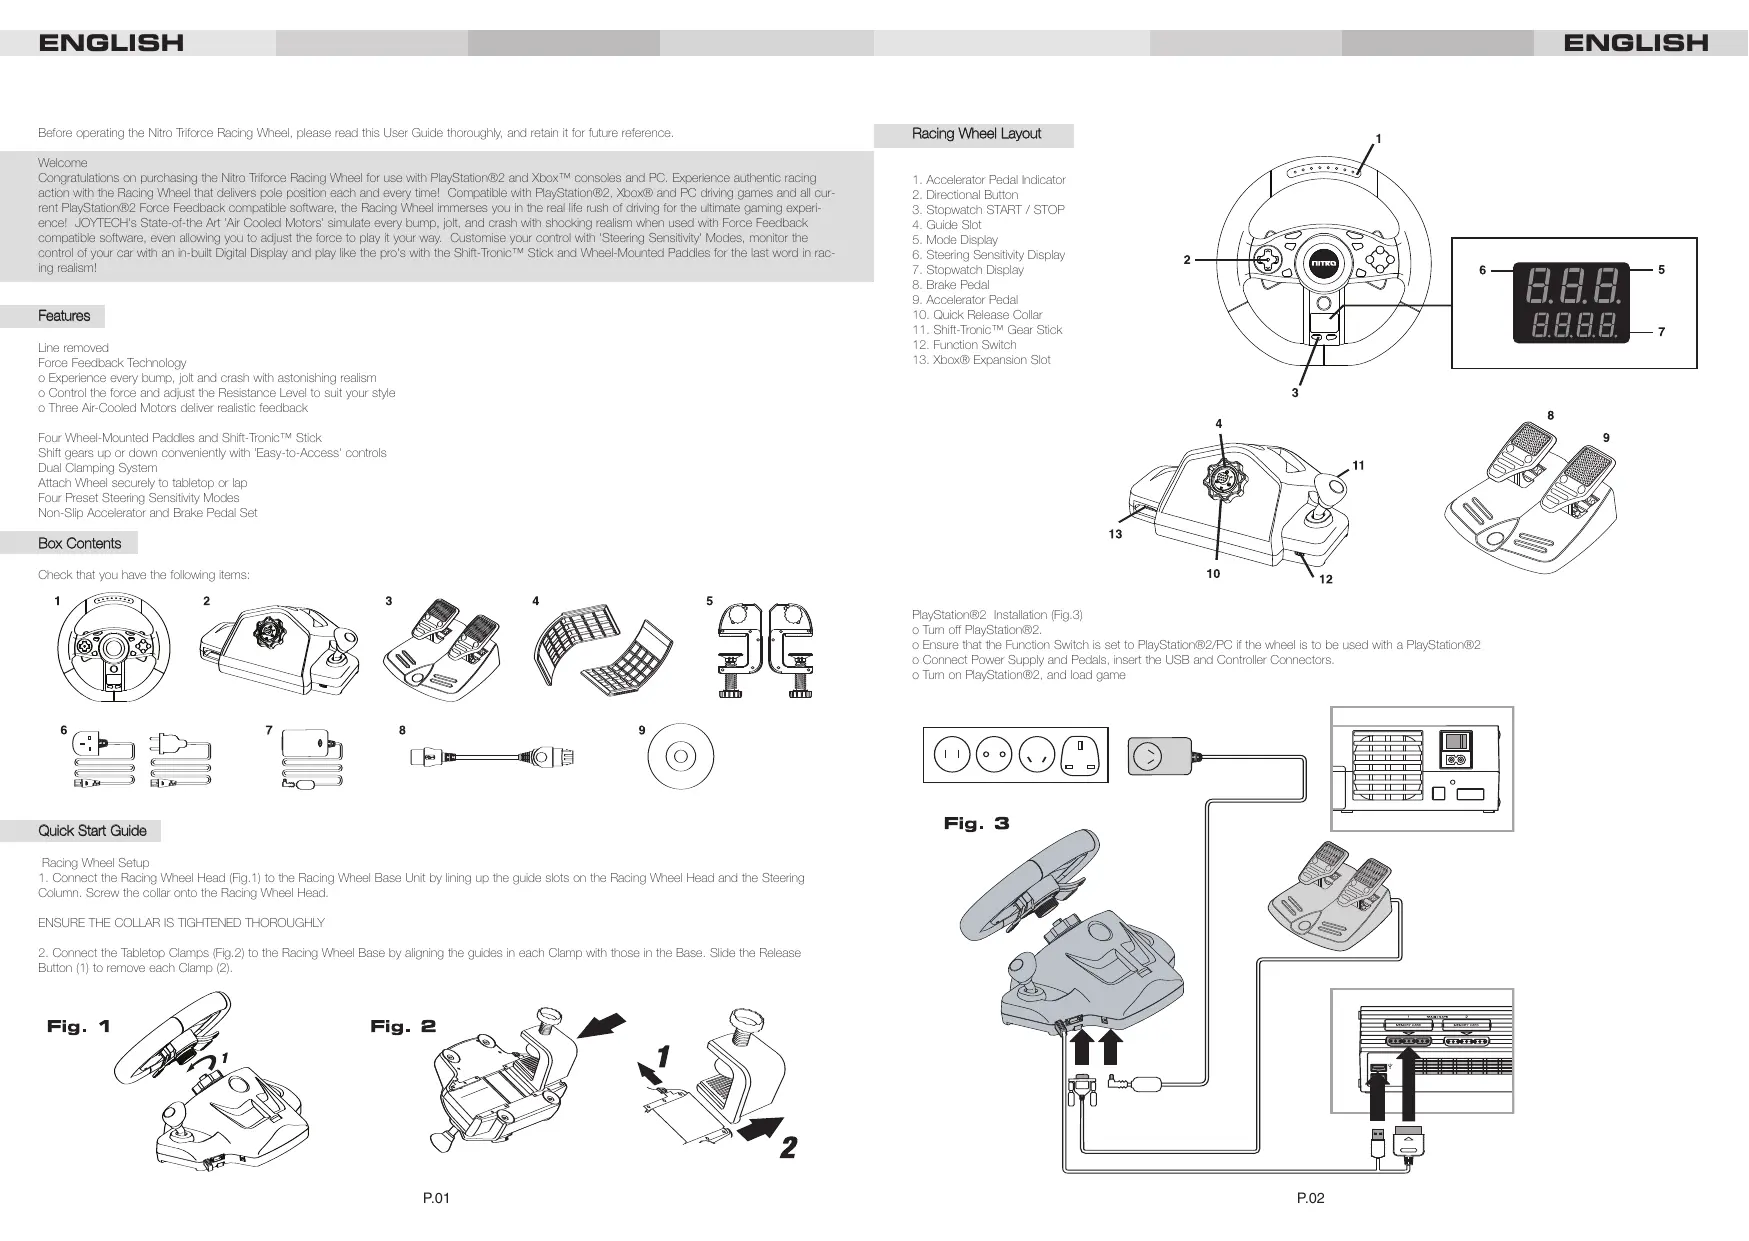
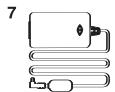
Box Contents
Check that you have the following items:
2
3
4
5

6


8
Quick Start Guide
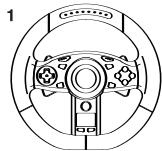
Racing Wheel Setup
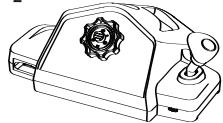
- Connect the Racing Wheel Head (Fig. 1) to the Racing Wheel Base Unit by lining up the guide slots on the Racing Wheel Head and the Steering Column. Screw the collar onto the Racing Wheel Head.
ENSURE THE COLLAR IS TIGHTENED THOROUGHLY
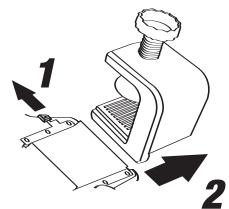
- Connect the Tabletop Clamps (Fig.2) to the Racing Wheel Base by aligning the guides in each Clamp with those in the Base. Slide the Release Button (1) to remove each Clamp (2).
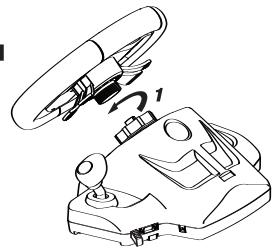
Fig. 1
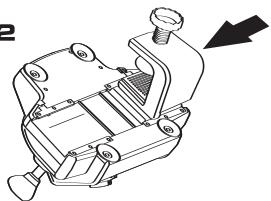
Fig. 2
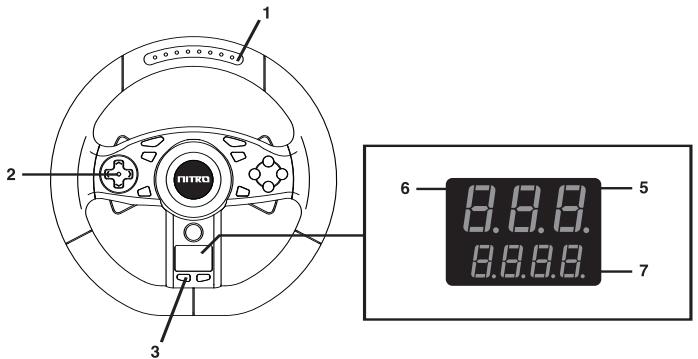
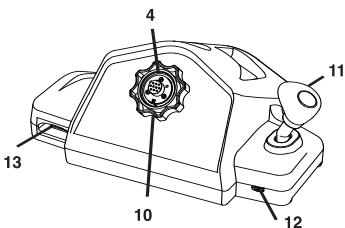
Racing Wheel Layout
- Accelerator Pedal Indicator
- Directional Button
- Stopwatch START / STOP
- Guide Slot
- Mode Display
- Steering Sensitivity Display
- Stopwatch Display
- Brake Pedal
- Accelerator Pedal
- Quick Release Collar
- Shift-Tronic™ Gear Stick
- Function Switch
- Xbox® Expansion Slot
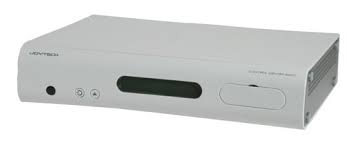
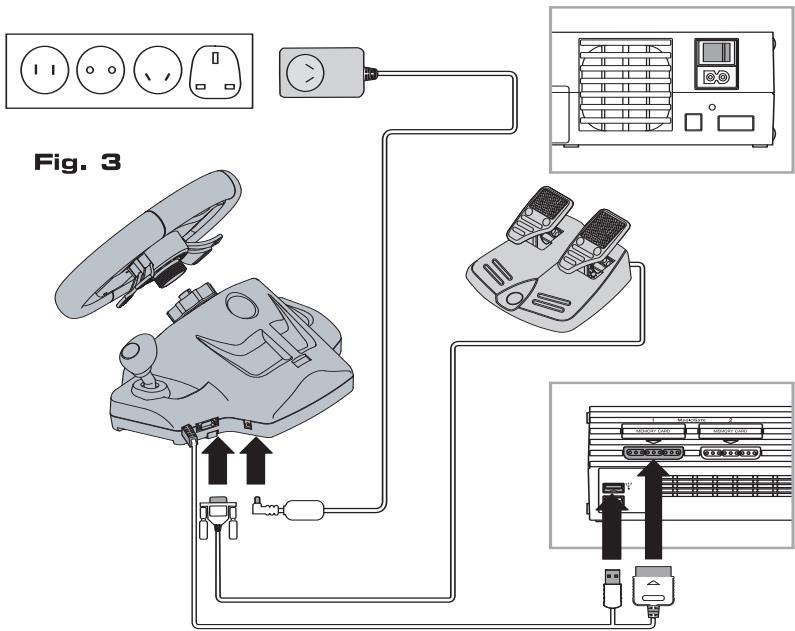
PlayStation®2 Installation (Fig.3)
o Turn off PlayStation®2.
o Ensure that the Function Switch is set to PlayStation®2/PC if the wheel is to be used with a PlayStation®2
o Connect Power Supply and Pedals, insert the USB and Controller Connectors.
o Turn on PlayStation®2, and load game
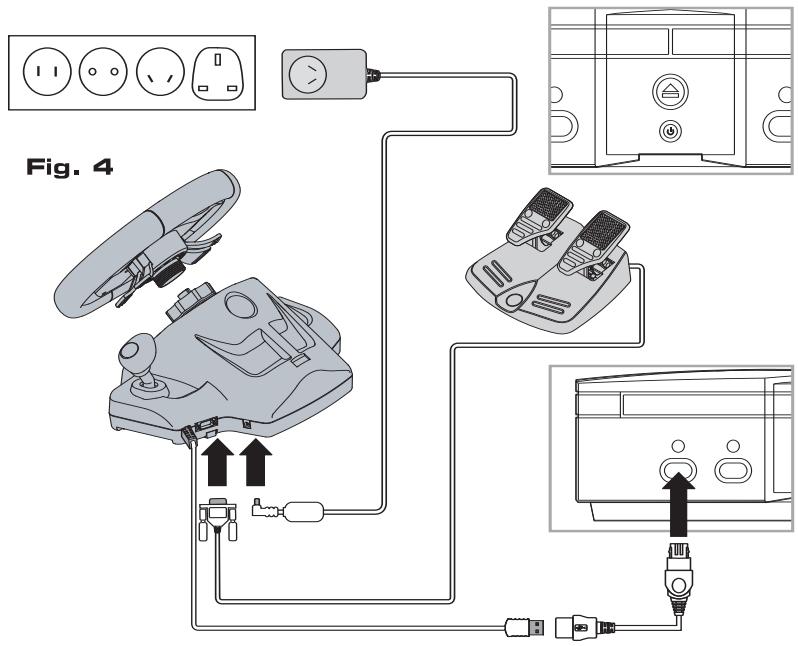
Xbox® Installation (Fig.4)
o Tum off Xbox®.
o Ensure that the Function switch is set to Xbox® and attach the Xbox® USB control port adapter to the USB cable of the wheel (The PlayStation®2 Controller Connector does not need to be attached).
o Connect Power Supply and Pedals, insert the USB controller connector. The PlayStation®2 controller connection is not used with this setup.
o Tum on Xbox® and load game
CAUTION: The Racing Wheel will calibrate itself whilst the game software loads.
DO NOT turn the Racing Wheel Head during this loading period.
Switching the console ON when the Racing Wheel Head is not centred may cause the Racing Wheel to operate incorrectly. To reset the Racing Wheel,
switch the console OFF, rotate the Racing Wheel Head to the centre position, and then turn the console ON.
Before the Racing Wheel can be used with a PC you must first install the software on the CD-Rom provided.
Minimum System Requirements for PC
PC with Pentium® system, 1.0 GHz
WINDOWS® 2000 or XP
DirectX 8.0 or higher.
Available USB Port
Note: If you do not have DirectX, you can download the latest version here:
www.microsoft.com/directx
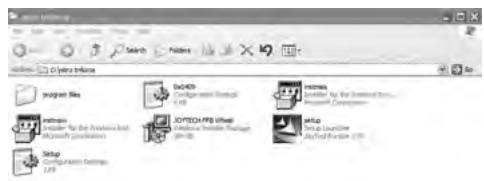
1) Insert the Racing Wheel installation CD into you PC CD-ROM drive. The application will auto-nun, if it does not then open the CD-ROM drive using Windows explorer and click on the 'setup' icon.
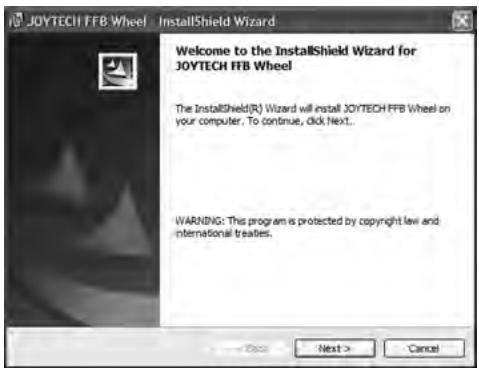
2) You will be presented with the JOYTECH Force Feedback driver installation screen, click on option NEXT
Note: If you are presented with 'Program Maintenance' select screen at this stage please see step 7
1.
2.
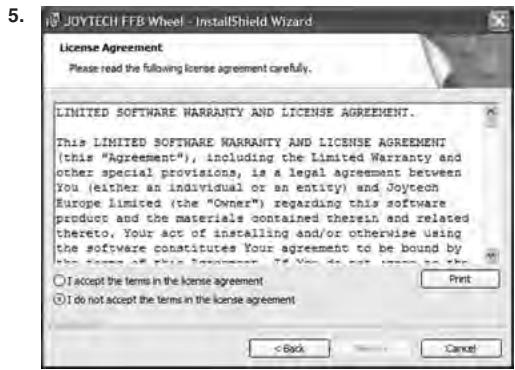
3) Accept the terms of the licence agreement
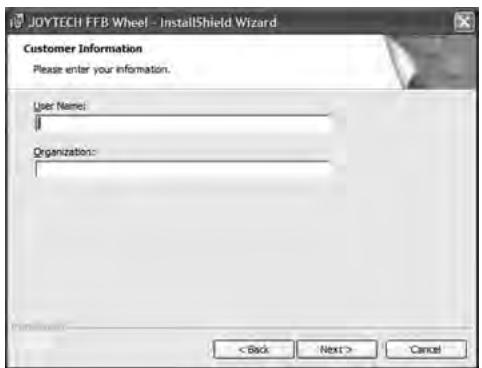
4) Input your name and organization (optional)

3.
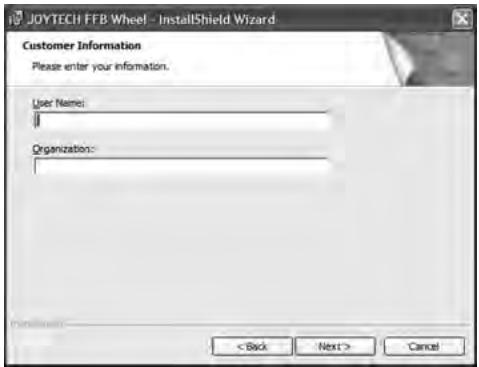
4.
5) Click this Install button to begin installation.
6) Click finish to complete the software installation.
6.
7) If you see the 'Program Maintenance' screen below a previous installation of the Racing Wheel driver is present on your computer.
o Select REPAIR and then Next to install the driver or driver updates.
o Select REMOVE to uninstall the JOYTECH Nitro Triforce driver
o The MODIFY option has no function with this software

8) Set up the wheel unit identically following step 1 and 2 of the PlayStation®2 set up.
9) Ensure that the Function switch is set to PlayStation®2/PC
10) Connect the Wheel USB Connector directly to an available USB Connector on the PC. The PlayStation®2 Controller Connector doesn't need to be attached.
11) If the pedals are not connected to the wheelbase when using the wheel the lower paddles on the back of the wheelhead will operate accelerated (Right paddle) and brake (Left paddle) functions within the game.
Note: The wheel cannot be recognised by the PC if an intermediary USB Hub device is used.
PC Software driver Updates
For the latest software drivers please visit the Joytech website http://www.joytech.net/download.php
Mode Display
The Mode Display shows the Racing Wheel mode and is controlled by the game software.
F - Force Feedback Mode
The game supports Force Feedback
A - Analog Mode
The game is Dual Shock®2 compatible but does not support Force Feedback.
D-Digital Mode
Some PlayStation®2 games do not support Analog control so the Racing Wheel will automatically be set to Digital Mode.
E - Emulation Mode
This mode is for Xbox® titles and provides simulated Force Feedback
Steering Sensitivity Modes
The steering performance of the Racing Wheel can be adjusted to suit personal preference. There are four Steering Sensitivity Modes, making the wheel suitable for a variety of driving games.
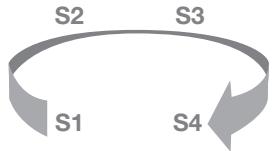
Pressing the 'SENS' button cycles through the different Steering Sensitivity Modes. Each press of the 'SENS' button advances the wheel to the next Mode. The wheel defaults to S-3.
| Steering Sensitivity Mode | Driving Genre |
| S-1 | Formula1 / Indy Car |
| S-2 | Formula1 / Indy Car / Rally |
| S-3 | Rally / Street |
| S-4 | Buggy / Truck |
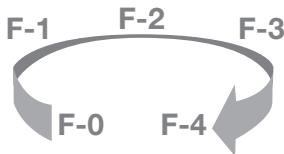
Force Feedback Resistance
Steering resistance in Force Feedback mode can be adjusted for personal preference. Choose from five preset levels of force: F-0, F-1, F-2, F-3 and F-4.
F-0 - Force Feedback is disabled.
F-1 - Minimum Force Feedback.
F-4 - Maximum Force Feedback

To cycle through the Force Feedback levels, press and hold the 'SENS' button and then press and release the 'MODE' button. Each press of the 'MODE' button advances the wheel to the next Force Feedback level. The wheel defaults to F-3.
Function Mapping
The buttons on the Racing Wheel can be mapped (programmed) to different positions. Mapping allows the Racing Wheel to be quickly customised to suit various driving styles. Any action button ( , , , , , , , , , , , , , , L2, L3, R1, R2, R3) can be mapped to the Wheel Mounted Paddles, the Pedals, or the Shift-Tronic™ Stick. Mapping should only be done when the game is paused or displaying a game menu screen.
To program a button, first press and hold the 'SELECT' button, followed by the target button and the source button. For example, to make the L2 paddle function as an 'X' button, the following steps would be used.
- Press and hold 'SELECT'. The mode display flashes.
- Press and hold the L2 Paddle.
- Press 'X'.
- Release all buttons.
To reset all mapped buttons, press and hold 'SELECT' and press 'RESET'. All buttons return to their default function when the Racing Wheel is disconnected from the console or the console is turned off.
Stopwatch
Press 'START/STOP' button once and the Stopwatch will start counting. Press the 'START/STOP' button again to stop counting. To reset the Stopwatch: Press the 'RESET' button once.
Toggle the display between seconds and 1/10th of a second by pressing and holding the 'SENS' button and then pressing and releasing the 'START / STOP' button.
Troubleshooting
The Racing Wheel does not respond.
o Check all connections.
o If the game requests a controller to be inserted in port 1, turn the console OFF and remove the Racing Wheel connector from controller port 1 and connect to controller port 2. Connect a Dual Shock®2 compatible controller to controller port 1 and turn the console on. The Connector should also be connected.
o Make sure that the Function switch is set correctly on the wheel base PlayStation®2/PC or Xbox®
The steering is not correctly centred.
o Turn the console OFF, rotate the Racing Wheel Head to the centre position and then restart the console.
No Force Feedback
o Check the Power Supply is connected to the AC power outlet.
o Check the game supports Force Feedback.
Manual gear changes are not setup on the Shift-Tronic™ Stick or Wheel Mounted Paddles.
o Use Function Mapping to program and customise the buttons.
United States Patents
Force Feedback powered by R0R3® technology.
Protected by United States Patent: 6, 263, 392 B1.
International Patents Pending.
CAUTION
o Do not remove this product when the console power is ON.
o Avoid placing this product near extreme temperatures or humidity.
o Do not submerse or allow this product to come into contact with water. Use in dry locations only.
o An adult should supervise young children when using this product.
o Use of any attachment or accessory with this product not recommended or sold by JOYTECH may result in risk of fire, electrical shock or injury to persons or product.
o Do not clean any parts with alcohol, cleaning solutions containing alcohol or strong abrasives. Use a soft cloth and a little water
o There are no user serviceable parts within this product. Tampering with this product will invalidate your JOYTECH warranty.
IMPORTANT HEALTH WARNINGS
Photosensitive Seizure Warning
A very small percentage of people may experience a seizure when exposed to certain visual images, including flashing lights or patterns that may appear in video games. Even people who have no history of seizures or epilepsy may have an undiagnosed condition that can cause these "photosensitive epileptic seizures" while watching video games.
These seizures may have a variety of symptoms, including light-headedness, altered vision, eye or face twitching, jerking or shaking of arms or legs, disorientation, confusion, or momentary loss of awareness. Seizures may also cause loss of consciousness or convulsions that can lead to injury from falling down or striking nearby objects.
Immediately stop playing and consult a doctor if you experience any of these symptoms.
Parents should watch for or ask their children about the above symptoms - children and teenagers are more likely than adults to experience these seizures.
Taking the following precautions may reduce the risk of photosensitive epileptic seizures:
o Sit further away from the screen
o Use a smaller TV screen
o Play in a well-lit room
o Do not play when you are drowsy or fatigued.
If you or any of your relatives have a history of seizures or epilepsy, consult a doctor before playing.
We also advise you to take regular breaks of 15 minutes every hour.
Design and specifications are subject to change without notice.
Dispos of this product or products contained in this pack in accordance with local and national disposal regulations.
PlayStation®, PSone™ and PlayStation®2 are either trademarks or registered trademarks of Sony Computer Entertainment Inc.
Dual Shock™ and Dual Shock®2 are either trademarks or registered trademarks of Sony Computer Entertainment Inc.
http://www.joytech.net/download.php
Affichage du mode
F-1 - Minimales Force Feedback.
F-4 - Maximales Force Feedback.
Force Feedback powered by ROR3® Technologie.
United States Patents
Force Feedback powered by ROR3® technology.
Protected by United States Patent: 6, 263, 392 B1.
International Patents Pending.
Vorsicht
http://www.joytech.net/download.php
United States Patents
Force Feedback powered by R0R3® technology.
Protected by United States Patent: 6, 263, 392 B1.
International Patents Pending.
Attenzione
Racing Wheel installation
Xbox® installation (Fig.4)