
P57W V7 C52W10-FR - Laptop GIGABYTE - Free user manual and instructions
Find the device manual for free P57W V7 C52W10-FR GIGABYTE in PDF.

| Product type | Laptop |
| Brand | GIGABYTE |
| Model | P57W V7 C52W10-FR |
| Preinstalled operating system | Windows 10 |
| Network connectivity | Wi-Fi, Bluetooth, Ethernet RJ45 |
| USB ports | 2x USB 3.0 (1 left, 1 right), 1x USB 3.1 (right) |
| Video ports | 1x HDMI, 1x Mini DisplayPort, 1x VGA |
| Audio ports | 1x headphone jack, 1x microphone jack |
| Card reader | SD |
| Storage | Removable bay for hard drive or SSD |
| Power supply | AC adapter: input 100-240Vac, output 19.5V/10.3A or 19V/10.5A or 19.5V/9.23A |
| Battery | Rechargeable lithium-ion, do not remove yourself |
| Function keys | Fn+ESC (eject), Fn+F1 (sleep), Fn+F2 (Wi-Fi), Fn+F3/F4 (brightness), Fn+F5 (display), Fn+F6 (touchpad), Fn+F7 (audio), Fn+F8/F9 (volume), Fn+F10 (screen), Fn+F11 (Bluetooth), Fn+F12 (webcam), Fn+Space (keyboard backlight) |
| Preinstalled software | GIGABYTE Smart Manager, Smart USB Backup |
| System recovery | Hidden partition with recovery image, access via F9 or F12, Windows Reset tool |
| Security | Kensington security lock slot |
| Maintenance | Avoid inclined surfaces, temperatures >45°C, blocked ventilation, direct sunlight |
| Warranty | See warranty card or GIGABYTE website |
Frequently Asked Questions - P57W V7 C52W10-FR GIGABYTE
User questions about P57W V7 C52W10-FR GIGABYTE
0 question about this device. Answer the ones you know or ask your own.
Ask a new question about this device
Download the instructions for your Laptop in PDF format for free! Find your manual P57W V7 C52W10-FR - GIGABYTE and take your electronic device back in hand. On this page are published all the documents necessary for the use of your device. P57W V7 C52W10-FR by GIGABYTE.
USER MANUAL P57W V7 C52W10-FR GIGABYTE
Congratulations on your purchase of the GIGABYTE Notebook.
This manual will help you to get started with setting up your notebook. The final product configuration depends on the model at the point of your purchase. GIGABYTE reserves the right to amend without prior notice. For more detailed information, please visit our website at www.gigabyte.com
Using GIGABYTE Notebook for the First Time
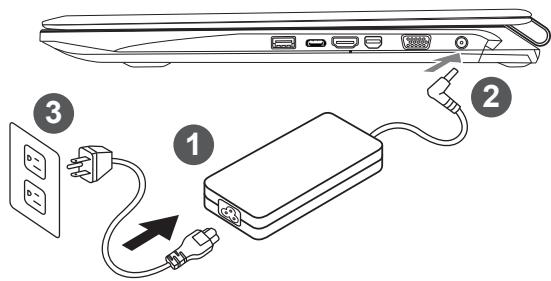
1 Connect the power cord to the AC adapter.
2 Connect the AC adapter to the DC-in jack on the right side of the notebook.
3 Connect the power cord to the power outlet.

IMPORTANT
- Ensure that your Notebook PC is connected to a grounded power adapter before turning it on for the first time.
- When using your Notebook PC on power adapter mode, the socket outlet must be near to the unit and easily accessible.
- Locate the input/output rating label on your Notebook PC and ensure that it matches the input/output rating information on your power adapter. Some Notebook PC models may have multiple rating output currents based on the available SKU.
Power adapter information: Input voltage: 100-240Vac, - Input frequency: 50-60Hz,
Rating output voltage: 19.5V, 10.3A or 19V, 10.5A or 19.5V, 9.23A
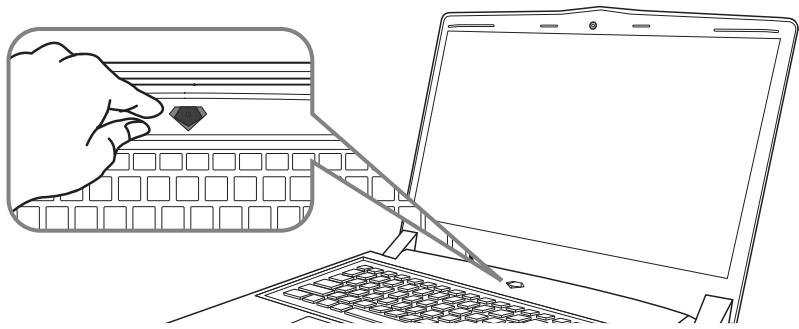
Switching on the Power
After you turn on the Notebook for the very first time, do not turn it off until the operating system has been configured. Please note that the volume for the audio will not function until Windows® Setup has completed.
Booting Up the Notebook for the First Time
Depending on your configuration, the Microsoft® Windows® Boot Screen will be the first screen that you will see as the notebook starts up. Follow the on-screen prompts and instructions and enter your personal information to complete the setup of the Windows® Operating System.
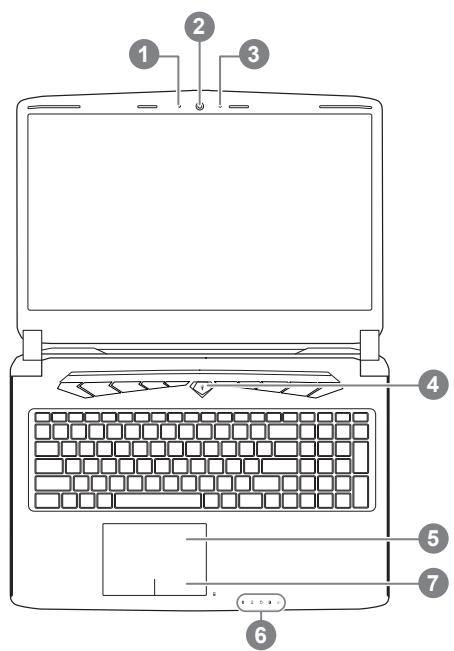
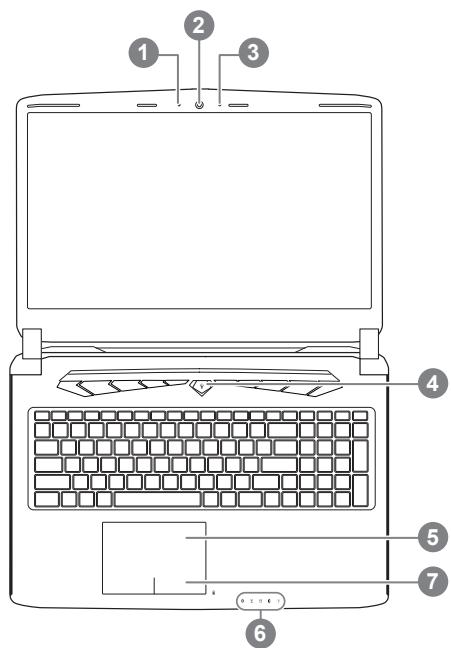
Top View
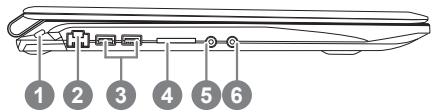
Left View

1 Webcam Status LED Indicator
2 Webcam
3 Microphone
4 Power Button
5 TouchPad
6 LED Indicators 1
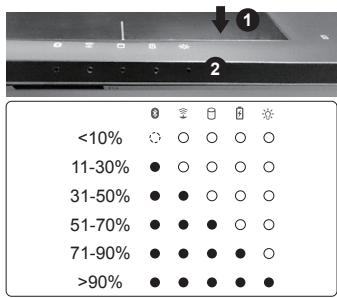
7 Battery Indicator Button 2
Bluetooth Status LED
Wireless Lan Status LED
HDD Status LED
Battery Status LED
Power Status LED
Press the right button of touchpad to check the remaining battery power. Right click to show the remaining power percentage. As shown below, the battery life indicator is available when the laptop is shut down, in stand-by or hibernation.(Battery mode)
1 Kensington Lock Slot
2 Ethernet Port
3 USB 3.0 Port
4 SD Card Reader
5 Headphone Jack
6 Microphone Jack
Right View

1 USB 3.0 Port
2 USB 3.1 Port
3 HDMI Port
4 Mini Display Port
5 External Display (VGA) Port
6 DC-in Jack
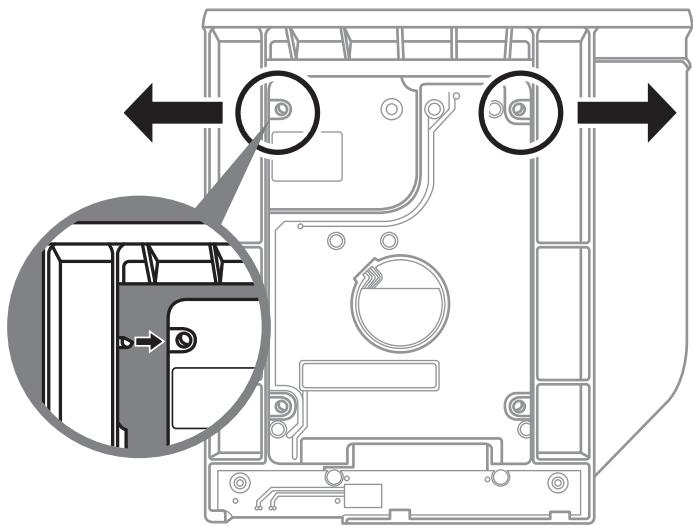
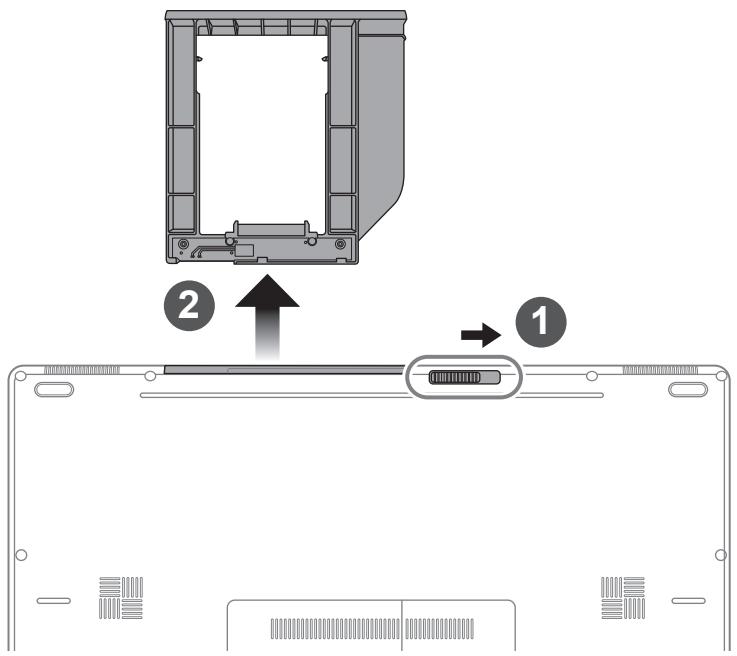
Base View

1 Swappable Storage Bay
2 Speakers

Warning:
DO NOT remove the built-in lithium battery. For any service needs, please contact your local GIGABYTE Authorized Service Center.
- Do not install the Notebook PC on a slant or a place prone to vibrations, or avoid using the Notebook PC in that location for a long time. This increases the risk that a malfunction or damage to the product will occur.
- Do not store and use Notebook PC in direct sunlight or the location where temperatures exceed 112^ ( 45^ ) such as inside a vehicle. There is a danger of Lithium-ion battery expansion and aging.
- Do not use the Notebook PC in a badly ventilated location such as on bedding, on a pillow or cushion, etc, and do not use it in a location such as room with floor heating as it may cause the computer to overheat. Take care that the Notebook PC vents (on the side or the bottom) are not blocked especially in these environments. If the vents are blocked, it may be dangerous and cause the Notebook PC to overheat.
The computer employs hotkeys or key combinations to access most of the computer's controls like screen brightness and volume output. To activate hotkeys, press and hold the
| Hotkey | Function | Description |
| Fn+ESC▲ | Eject ODD | Eject ODD |
| Fn+F1z^2 | Sleep | Put the computer in Sleep mode. |
| Fn+F2 | Wireless LAN | Enables/disable the Wireless LAN function. |
| Fn+F3 | Brightness Down | Decrease the screen brightness. |
| Fn+F4 | Brightness Up | Increase the screen brightness. |
| Fn+F5LCD/☑ | Display Toggle | Switche display output between the display screen, external monitor (if connected) and both. |
| Fn+F6 | Touchpad Toggle | Turn the internal touchpad on and off. |
| Fn+F7 | Speaker Toggle | Turn the speaker on and off. |
| Fn+F8 | Volume Down | Decrease the sound volume. |
| Fn+F9 | Volume Up | Increase the sound volume. |
| Fn+F10 | Screen Display Toggle | Turn the screen display on and off. |
| Fn+F11 | Bluetooth | Enable/disable the Bluetooth function. |
| Fn+F12 | Webcam | Turn the internal webcam on and off. |
| Fn+Space | Keyboard Backlight Toggle | Turn the keyboard backlight on and off. |

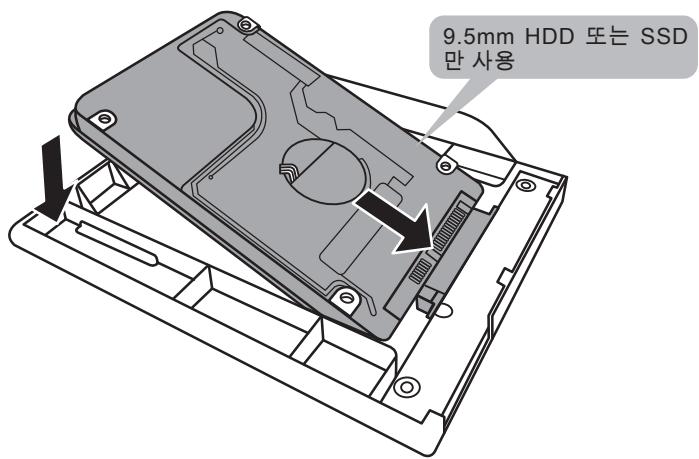
1 Unlock swappable bay locker.
2 Draw the swappable bay out.
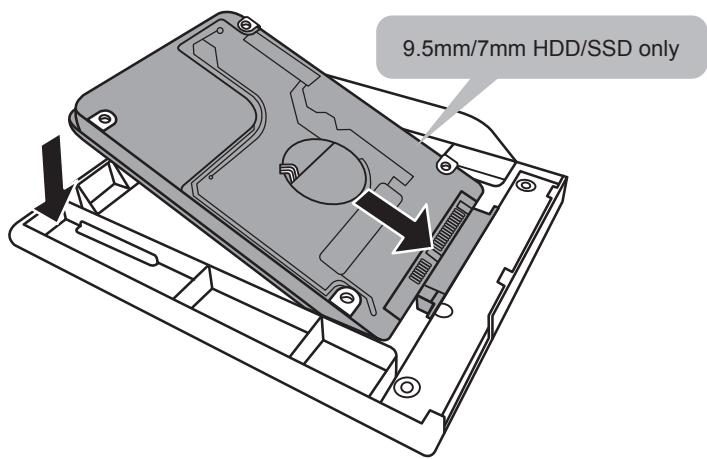
Connect the HDD or SSD pin by sliding it into the connector.

Gently push the plastic frame outwards. Slide in the HDD or SSD until it locks into place. There will be a slight click.
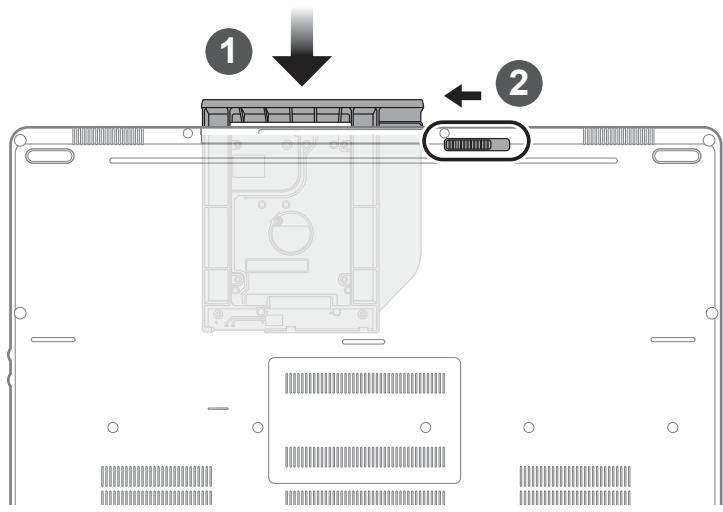
Pull swappable bay back to slot.
2 Lock swappable bay locker.
GIGABYTE Software Application
GIGABYTE Smart Manager
You can activate GIGABYTE Smart Manager by double clicking on the shortcut icon on the desktop if the machine you purchased has the operation system built-in. GIGABYTE Smart Manager is an icon-based control interface, enabling users to intuitionally access common system setup as well as GIGABYTE exclusive utilities. Please be noted that the GIGABYTE Smart Manager interface, icons, utilities and software versions may vary based on the purchased models. Please operate GIGABYTE Smart Manager according to the actual version built-in.
WARNING
- You can backup original recovery image through this application in case of losing by device damage.
- You can backup original recovery image to USB disk and restore the system if any storage system replacement with the recovery USB disk.
- Before you restore the system through the recovery USB disk, please make sure that you have already made the backup of your data.
- Please DO NOT shut down or un-plug the system when performing backup through recovery USB disk.
1

- Please plug in the USB disk which is at least 20GB in capacity to make the original image (backup the data in USB first. All data will be eliminated during the creation of recovery USB disk)
2
- Insert the driver disk to your optical drive and run the install of "Smart USB Backup" (for none-ODD model, please use USB ODD device or download from http://www.gigabyte.com
3

- Run the "Smart USB Backup" after finishing the install.
4
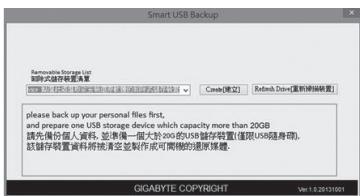
- Select your USB disk from the dropdown list and start to create the recovery USB disk.
5
- The window will pop out when the creation of recovery disk is done.
- Please press F12 on starting the system when you need to restore the system. Select "boot from recovery USB disk" and the system will be restored.
- The time needed for restore will be around 30 mins(time needed may vary by USB disk model).
System Recovery (Restore your laptop operating system)
When something is going wrong with the laptop operating system, the storage of the laptop has a hidden partition containing a full back up image of the operating system that can be used to restore the system to factory default settings.

Note
- If the storage has been switched or the partition deleted, the recovery option will no longer be available and a recovery service will be needed.
- The recovery function is only available on devices with O/S preinstalled. Devices with DOS do not have the recovery function.
Launch System Recovery
The system recovery feature is preinstalled before the laptop is shipped from the factory. The option menu allows you to launch the Windows recovery tool to reinstall the operating system to factory default.
The brief introduction below will show you how to start the recovery tool and restore your system.

All ready to go
Make sure your PC is plugged in. This will take a few minutes.
Windows 10 Recovery Guide
1 Turn off and restart the laptop.


During the laptop turn on process, press and hold F9 key to launch the tool.


Choose "Troubleshoot" to enter the recovery settings. (Also you can choose "Continue" to exit recovery system and continue to Windows 10 for files or data backup.)

There are two options for system recovery
- Reset this PC
You can choose to keep or remove your files and then reinstalls Windows without losing your files.
GIGABYTE Smart Recovery
Your PC settings will be restored to factory default settings.
Caution: All personal data and files will be lost.
4

Choose "Reset this PC"
>Keep my files
Choose an account to continue. All apps will be removed, and settings will back to pure O/S (without GIGABYTE app), but your personal files will be kept.
Remove everything
All apps, setting and personal files will be removed.
Just remove my files
Only personal data and files will be removed, but computer settings will be kept.
Fully clean the drive
The drive will be completely restored to factory default settings. It takes more time. > [Click on "Reset" to execute recovery function.]

Here are what will happen
- All of your personal files and apps will be removed.
- Your PC settings will be restored to pure O/S (without GIGABYTE app).

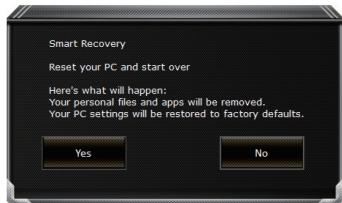
GIGABYTE Smart Recovery
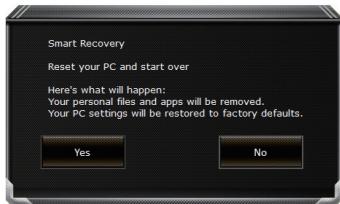
The recovery will be activated and you will see the option buttons on the window. Click on "Yes" to start it.

Caution
- Once the "Recovery" is selected, your personal data and files will be deleted after the laptop starts restoring, and the operating system will be reset to factory default settings.
- A progress indicator bar will show on the window when the recovery process is running. Please make sure the AC-adapter is plugged in and do not turn off the laptop.
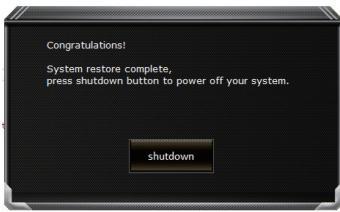
After the system recovery is completed, you will see the option button on the window, please click on "Shutdown".

Advanced options

System Restore
Use a restore point recorded on your PC to restore Windows.

System Image Recovery
Recover Windows using a specific system image file.

Startup Repair
Fix problems that keep Windows from loading.

Command Prompt
Use the Command Prompt for advanced trobeshooting.

UEFI Firmware Settings
Change settings in your PC's UEFI firmware.

Startup Settings
Change Windows Startup behavior.
Warranty & Service:
Warranty and service and related information please refer to the warranty card or GIGABYTE service website as the below link:
http://www.gigabyte.com/support-downloads/technical-support.aspx
FAQ:
FAQ (Frequent Asked Questions) please refer to the below link:
http://www.gigabyte.com/support-downloads/faq.aspx
感謝您選擇技嘉筆記型電腦!
1BeiJtJGJtJtJtJtJtJtJtJtJtJtJtJtJtJtJtJtJtJtJtJtJtJtJtJtJtJtJtJtJtJtJtJtJtJtJtJtJtJtJtJtJtJtJtJtJtJtJt
2 BeiIeIaIaIaIaIaIaIaIaIaIaIaIaIaIaIaIaIaIaIaIaIaIaIaIaIaIaIaIaIaIaIaIaIaIaIaIaIaIaIaIaIaIaIaIaIaIaIaIaIaIaIaa
System Recovery (Restore your laptop operating system)
When something is going wrong with the laptop operating system, the storage of the laptop has a hidden partition containing a full back up image of the operating system that can be used to restore the system to factory default settings.

Note
- If the storage has been switched or the partition deleted, the recovery option will no longer be available and a recovery service will be needed.
- The recovery function is only available on devices with O/S preinstalled. Devices with DOS do not have the recovery function.
Launch System Recovery
The system recovery feature is preinstalled before the laptop is shipped from the factory. The option menu allows you to launch the Windows recovery tool to reinstall the operating system to factory default.
The brief introduction below will show you how to start the recovery tool and restore your system.

All ready to go
Make sure your PC is plugged in. This will take a few minutes.
Windows 10 Guía de recuperación
1 Apaney reinicielequipmentporttil.


Warranty and service and related information please refer to the warranty card or GIGABYTE service website as the below link:
http://www.gigabyte.com/support-downloads/technical-support.aspx
FAQ:
FAQ (Frequent Asked Questions) please refer to the below link:
http://www.gigabyte.com/support-downloads/faq.aspx
Congratulations on your purchase of the GIGABYTE Notebook.
This manual will help you to get started with setting up your notebook. The final product configuration depends on the model at the point of your purchase. GIGABYTE reserves the right to amend without prior notice. For more detailed information, please visit our website at www.gigabyte.com
Using GIGABYTE Notebook for the First Time

1 Connect the power cord to the AC adapter.
2 Connect the AC adapter to the DC-in jack on the right side of the notebook.
3 Connect the power cord to the power outlet.

Wichtig!
Switching on the Power
After you turn on the Notebook for the very first time, do not turn it off until the operating system has been configured. Please note that the volume for the audio will not function until Windows® Setup has completed.
Booting Up the Notebook for the First Time
Depending on your configuration, the Microsoft® Windows® Boot Screen will be the first screen that you will see as the notebook starts up. Follow the on-screen prompts and instructions and enter your personal information to complete the setup of the Windows® Operating System.
Ansicht von oben
Ansicht von links
(Original: Recovery Image USB)

ATTENTION
■ Foire Aux Questions:
CyueCTbYIO T DBe ONUIN DnB OBCtAHOBJeHn CNTeMbI
Remove everything ydaIITb BcE
Bce npinoxeHn, hactpoiKn n IuHbIe paJIbI bdyT ydaJeHbI.
Just remove my files -Удайть толъко мон райлб!
ToIbKO IInuHbIe DaHHbIe nΦaIbI 6ydyT ydaJeHbI, HacTpOKn KOMbIOTepa 6ydyT coXpaHeHbI.
Fully clean the drive -Полноctью очирту ДИСК
ДиСК 6уДET ПОПНOCьЮ BO3ВрашЕн K 3aBOДССКOMY COCTОЧИ NO yMOЛчанЮ.ЭТа npоцеύра 3aHIMаERT 6BJshe BpeMeHN.>[HaxmITE“Reset”ДЯ BыINOLHENHЯ ФункUn BOCCTAHOBNeHЯ.]

B daHHOM cnyuae npon3oJcT cneyUoee:
- BceBaunnIyHbIe paIbIu npInIOKeHn6dyT ydaIeHbI.
- HactpoKn BaWero PK BepHyTcK 3aBODcKm NO yMOnuHaHIO (6e3 npInOxHeN GIGABYTE).

GIGABYTE Smart Recovery
Функця BOCCTaHOBJIeHЯ 6удт akTиBnPoBaHa N Bbl yBnIte KHOJIKOn OIIZHI BOCCTaHOBJIeHЯ BOKHe. HaxMnte "Yes"/Да дЯн Нача paBoTbI.

BHIMAHNE
- Пи Вьборе "Recovery" / BocstahOBNeHЯ, Баши Лунные данны и phаNBы 6удут уданны кak только HOуTБУК NauchNET proц dedуру BOCSTAHOBNeHЯ, a onepaioHnHa NcStema 6удET BOCSTAHOBNeHa K 3aBoDcMn HAcTpoKam NO ymOuIaHnIO. ИndNKatop Iporpeca nOraBtCBA OKhe c Naayam OpaobToI npoceca BOCSTAHOBNeHЯ. POKaJyNCTa, yBeDiNecb, YTO Bao HOYTbK noDKnUChE K CETn nHTaHnI Yepe3 AC aanTpEr n He bIKnUoyaTe HOYtBuK.
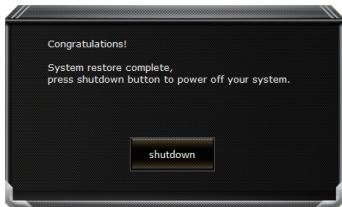
Iocne 3aBepseHnncTeMbI BocCTaHOBJIeHnna, noKaJyIncTa, haxMnte "Shutdown" / BbIKJIOuHTb.

PacunpeHbIe onu

System Restore BocctaHOBJIeHne cIcTeMbI
IcnoIb3yIte ToKy BOCCTaHOBNeHnra, paHee Co3dAnHyU Ha BaWeM PIK, dIy BOCCTaHOBNeHnra Windows.

System Image Recovery BocstaHOBnHeNe 6pa3a cnCTembl
BocctaHOblHne Windows c nOmoIbIO KOHKpeTHoro paIJa o6pa3a CnCTeMbI.

Startup Repair Yctpaenne npo6nem 3arpy3kn
UctpaHntb npo6nembl, He no3B0JraUzne Windows 3arpy3ntbcra.

Command Prompt KomaHdna cTpoka
IcnoB3ObaTb KOMaHdHyU cTPOky IJI npoDbHyTOrO yCTpaHEnHa HeNoJaOK.

UEFI Firmware Settings HacptoKn npounBkne UEFI
I3MeHnTb HacToPoiKn IpoOnu KU EFLBaWero PIK.

Startup Setting Hactpoyn 3anycka
I3MeHnTb HAcToPouKn 3aNycka Windows.
CepBnucHoe 6ocIyXnBaHne:
Iopno6Hyu HOpmauno no o6cnykuaHnO MOxHO haTn Ha oPhiunaJbHom caTe GIGABYTE no ccbInke:
http://www.gigabyte.com/support-downloads/technical-support.aspx
YacTo 3aJaBaEmbIe BOnpocbl:
Cnncok qacto 3aadaabaembIX BOpocOB MOKHO haTn, npeenIy no CcbInke
http://www.gigabyte.com/support-downloads/faq.aspx
Caution: All personal data and files will be lost.
4

System Image Recovery
| HOSSKAN HOTEL HOTEL HOTEL HOTEL HOTEL HOTEL HOTEL HOTEL HOTEL HOTEL HOTEL HOTEL HOTEL HOTEL HOTEL HOTEL HOTEL HOTEL HOTEL HOTEL HOTEL HOTEL HOTEL HOTEL HOTEL HOTFL HOTFL HOTFL HOTFL HOTFL HOTFL HOTFL HOTFL HOTFL HOTFL HOTFL HOTFL HOTFL HOTFL HOTFL HOTFL HOTFL HOTFL HOTFL HOTFL HOTFL HOTFL HOTFL HOTFL HOTFL HOTPL HOTFL HOTFL HOTFL HOTFL HOTFL HOTFL HOTFL HOTFL HOTFL HOTFL HOTFL HOTFL HOTFL HOTFL HOTFL HOTFL HOTFL HOTFL HOTFL HOTFL HOTFL HOTFL HOTFL HOTFL HOTGL HOTFL HOTFL HOTFL HOTFL HOTFL HOTFL HOTFL HOTFL HOTFL HOTFL HOTFL HOTFL HOTFL HOTFL HOTFL HOTFL HOTFL HOTFL HOTFL HOTFL HOTFL HOTFL HOTFL HOTFL HOTML HOTFL HOTFL HOTFL HOTFL HOTFL HOTFL HOTFL HOTFL HOTFL HOTFL HOTFL HOTFL HOTFL HOTFL HOTFL HOTFL HOTFL HOTFL HOTFL HOTFL HOTFL HOTFL HOTFL HOTFL HOTCL HOTFL HOTFL HOTFL HOTFL HOTFL HOTFL HOTFL HOTFL HOTFL HOTFL HOTFL HOTFL HOTFL HOTFL HOTFL HOTFL HOTFL HOTFL HOTFL HOTFL HOTFL HOTFL HOTFL HOTFL HOTFR HOTFL HOTFL HOTFL HOTFL HOTFL HOTFL HOTFL HOTFL HOTFL HOTFL HOTFL HOTFL HOTFL HOTFL HOTFL HOTFL HOTFL HOTFL HOTFL HOTFL HOTFL HOTFL HOTFL HOTFL HOTF HOTFL HOTFL HOTFL HOTFL HOTFL HOTFL HOTFL HOTFL HOTFL HOTFL HOTFL HOTFL HOTFL HOTFL HOTFL HOTFL HOTFL HOTFL HOTFL HOTFL HOTFL HOTFL HOTFL HOTFL HOTFT HOTFL HOTFL HOTFL HOTFL HOTFL HOTFL HOTFL HOTFL HOTFL HOTFL HOTFL HOTFL HOTFL HOTFL HOTFL HOTFL HOTFL HOTFL HOTFL HOTFL HOTFL HOTFL HOTFL HOTFL HOTFI HOTFL HOTFL HOTFL HOTFL HOTFL HOTFL HOTFL HOTFL HOTFL HOTFL HOTFL HOTFL HOTFL HOTFL HOTFL HOTFL HOTFL HOTFL HOTFL HOTFL HOTFL HOTFL HOTFL HOTFL HOTFl HOTFL HOTFL HOTFL HOTFL HOTFL HOTFL HOTFL HOTFL HOTFL HOTFL HOTFL HOTFL HOTFL HOTFL HOTFL HOTFL HOTFL HOTFL HOTFL HOTFL HOTFL HOTFL HOTFL HOTFL HOTIF HOTFL HOTFL HOTFL HOTFL HOTFL HOTFL HOTFL HOTFL HOTFL HOTFL HOTFL HOTFL HOTFL HOTFL HOTFL HOTFL HOTFL HOTFL HOTFL HOTFL HOTFL HOTFL HOTFL HOTFL HOTIL HOTFL HOTFL HOTFL HOTFL HOTFL HOTFL HOTFL HOTFL HOTFL HOTFL HOTFL HOTFL HOTFL HOTFL HOTFL HOTFL HOTFL HOTFL HOTFL HOTFL HOTFL HOTFL HOTFL HOTFL HOTSL HOTFL HOTFL HOTFL HOTFL HOTFL HOTFL HOTFL HOTFL HOTFL HOTFL HOTFL HOTFL HOTFL HOTFL HOTFL HOTFL HOTFL HOTFL HOTFL HOTFL HOTFL HOTFL HOTFL HOTFL HOTNL HOTFL HOTFL HOTFL HOTFL HOTFL HOTFL HOTFL HOTFL HOTFL HOTFL HOTFL HOTFL HOTFL HOTFL HOTFL HOTFL HOTFL HOTFL HOTFL HOTFL HOTFL HOTFL HOTFL HOTFL HOTTL HOTFL HOTFL HOTFL HOTFL HOTFL HOTFL HOTFL HOTFL HOTFL HOTFL HOTFL HOTFL HOTFL HOTFL HOTFL HOTFL HOTFL HOTFL HOTFL HOTFL HOTFL HOTFL HOTFL HOTFL HOTFX HOTFL HOTFL HOTFL HOTFL HOTFL HOTFL HOTFL HOTFL HOTFL HOTFL HOTFL HOTFL HOTFL HOTFL HOTFL HOTFL HOTFL HOTFL HOTFL HOTFL HOTFL HOTFL HOTFL HOTFL HOTVL HOTFL HOTFL HOTFL HOTFL HOTFL HOTFL HOTFL HOTFL HOTFL HOTFL HOTFL HOTFL HOTFL HOTFL HOTFL HOTFL HOTFL HOTFL HOTFL HOTFL HOTFL HOTFL HOTFL HOTFL HOTXL HOTFL HOTFL HOTFL HOTFL HOTFL HOTFL HOTFL HOTFL HOTFL HOTFL HOTFL HOTFL HOTFL HOTFL HOTFL HOTFL HOTFL HOTFL HOTFL HOTFL HOTFL HOTFL HOTFL HOTFL HOTFM HOTFL HOTFL HOTFL HOTFL HOTFL HOTFL HOTFL HOTFL HOTFL HOTFL HOTFL HOTFL HOTFL HOTFL HOTFL HOTFL HOTFL HOTFL HOTFL HOTFL HOTFL HOTFL HOTFL HOTFL HOT FL HOTFL HOTFL HOTFL HOTFL HOTFL HOTFL HOTFL HOTFL HOTFL HOTFL HOTFL HOTFL HOTFL HOTFL HOTFL HOTFL HOTFL HOTFL HOTFL HOTFL HOTFL HOTFL HOTFL HOTFL HOT FX HOTFL HOTFL HOTFL HOTFL HOTFL HOTFL HOTFL HOTFL HOTFL HOTFL HOTFL HOTFL HOTFL HOTFL HOTFL HOTFL HOTFL HOTFL HOTFL HOTFL HOTFL HOTFL HOTFL HOTFL HOTFF HOTFL HOTFL HOTFL HOTFL HOTFL HOTFL HOTFL HOTFL HOTFL HOTFL HOTFL HOTFL HOTFL HOTFL HOTFL HOTFL HOTFL HOTFL HOTFL HOTFL HOTFL HOTFL HOTFL HOTFL HOTFK HOTFL HOTFL HOTFL HOTFL HOTFL HOTFL HOTFL HOTFL HOTFL HOTFL HOTFL HOTFL HOTFL HOTFL HOTFL HOTFL HOTFL HOTFL HOTFL HOTFL HOTFL HOTFL HOTFL HOTFL HOTFU HOTFL HOTFL HOTFL HOTFL HOTFL HOTFL HOTFL HOTFL HOTFL HOTFL HOTFL HOTFL HOTFL HOTFL HOTFL HOTFL HOTFL HOTFL HOTFL HOTFL HOTFL HOTFL HOTFL HOTFL HOTKL HOTFL HOTFL HOTFL HOTFL HOTFL HOTFL HOTFL HOTFL HOTFL HOTFL HOTFL HOTFL HOTFL HOTFL HOTFL HOTFL HOTFL HOTFL HOTFL HOTFL HOTFL HOTFL HOTFL HOTFL HOTL HOTFL HOTFL HOTFL HOTFL HOTFL HOTFL HOTFL HOTFL HOTFL HOTFL HOTFL HOTFL HOTFL HOTFL HOTFL HOTFL HOTFL HOTFL HOTFL HOTFL HOTFL HOTFL HOTFL HOTFL HOTBL HOTFL HOTFL HOTFL HOTFL HOTFL HOTFL HOTFL HOTFL HOTFL HOTFL HOTFL HOTFL HOTFL HOTFL HOTFL HOTFL HOTFL HOTFL HOTFL HOTFL HOTFL HOTFL HOTFL HOTFL HOTDL HOTFL HOTFL HOTFL HOTFL HOTFL HOTFL HOTFL HOTFL HOTFL HOTFL HOTFL HOTFL HOTFL HOTFL HOTFL HOTFL HOTFL HOTFL HOTFL HOTFL HOTFL HOTFL HOTFL HOTFL HOTRL HOTFL HOTFL HOTFL HOTFL HOTFL HOTFL HOTFL HOTFL HOTFL HOTFL HOTFL HOTFL HOTFL HOTFL HOTFL HOTFL HOTFL HOTFL HOTFL HOTFL HOTFL HOTFL HOTFL HOTFL HOT |
- Congratulations on your purchase of the GIGABYTE Notebook.
- Using GIGABYTE Notebook for the First Time
- IMPORTANT
- Switching on the Power
- Booting Up the Notebook for the First Time
- Top View
- Left View
- Right View
- Base View
- Warning:
- GIGABYTE Software Application
- GIGABYTE Smart Manager
- WARNING
- 1
- 2
- 3
- 4
- 5
- System Recovery (Restore your laptop operating system)
- Note
- Launch System Recovery
- All ready to go
- Windows 10 Recovery Guide
- There are two options for system recovery
- - Reset this PC
- GIGABYTE Smart Recovery
- Choose "Reset this PC"
- >Keep my files
- Remove everything
- Just remove my files
- Fully clean the drive
- Here are what will happen
- Caution
- Advanced options
- System Restore
- System Image Recovery
- Startup Repair
- Command Prompt
- UEFI Firmware Settings
- Startup Settings
- Warranty & Service:
- FAQ:
- 感謝您選擇技嘉筆記型電腦!
- Windows 10 Guía de recuperación
- Wichtig!
- Ansicht von oben
- Ansicht von links
- ATTENTION
- ■ Foire Aux Questions:
- CyueCTbYIO T DBe ONUIN DnB OBCtAHOBJeHn CNTeMbI
- Remove everything ydaIITb BcE
- Just remove my files -Удайть толъко мон райлб!
- Fully clean the drive -Полноctью очирту ДИСК
- B daHHOM cnyuae npon3oJcT cneyUoee:
- BHIMAHNE
- PacunpeHbIe onu
- System Restore BocctaHOBJIeHne cIcTeMbI
- System Image Recovery BocstaHOBnHeNe 6pa3a cnCTembl
- Startup Repair Yctpaenne npo6nem 3arpy3kn
- Command Prompt KomaHdna cTpoka
- UEFI Firmware Settings HacptoKn npounBkne UEFI
- Startup Setting Hactpoyn 3anycka
- CepBnucHoe 6ocIyXnBaHne:
- YacTo 3aJaBaEmbIe BOnpocbl:
Brand : GIGABYTE
Model : P57W V7 C52W10-FR
Category : Laptop