
CD-N500 - CD Player YAMAHA - Free user manual and instructions
Find the device manual for free CD-N500 YAMAHA in PDF.
| Product Type | Network CD player with network multimedia playback (DLNA), Internet radio, iPod/USB |
| Dimensions (W x H x D) | 435 x 96 x 313,3 mm |
| Weight | 5,25 kg |
| Power Supply | 230-240 V AC, 50 Hz (European model); power consumption 28 W, standby <0.35 W (network standby off) |
| Main Functions | CD playback (audio and MP3/WMA data), playback from PC/NAS over network, Internet radio (vTuner), iPod/iPhone/iPad playback via USB, USB device playback, Pure Direct mode, programmed playback, A-B repeat, random and repeat modes |
| Network Connectivity | Ethernet 100Base-TX/10Base-T; DLNA 1.5 compatibility |
| Audio Outputs | Analog RCA stereo (2 channels), digital coaxial, digital optical |
| Supported Audio Formats (Network/USB) | WAV (PCM), MP3, WMA, AAC, FLAC, ALAC (depending on source) |
| Compatible Devices | iPod touch/nano (2nd-6th generation), iPhone, iPad, USB devices (MSC FAT16/32) |
| Supplied Accessories | Remote control, stereo RCA cable, AA batteries (x2), power cable, user manual |
| Maintenance and Cleaning | Use a dry, clean cloth; do not use chemical solvents or disc cleaners |
| Safety | Do not expose to moisture or rain; do not open the casing; avoid dropping objects; maintain a minimum distance of 10 cm around the unit for ventilation |
| Spare Parts and Repairability | Repairs to be carried out only by a Yamaha authorized technician; do not attempt to modify or repair yourself |
| General Information | Manual available in multiple languages; firmware update possible via network or USB |
Frequently Asked Questions - CD-N500 YAMAHA
User questions about CD-N500 YAMAHA
0 question about this device. Answer the ones you know or ask your own.
Ask a new question about this device
Download the instructions for your CD Player in PDF format for free! Find your manual CD-N500 - YAMAHA and take your electronic device back in hand. On this page are published all the documents necessary for the use of your device. CD-N500 by YAMAHA.
USER MANUAL CD-N500 YAMAHA
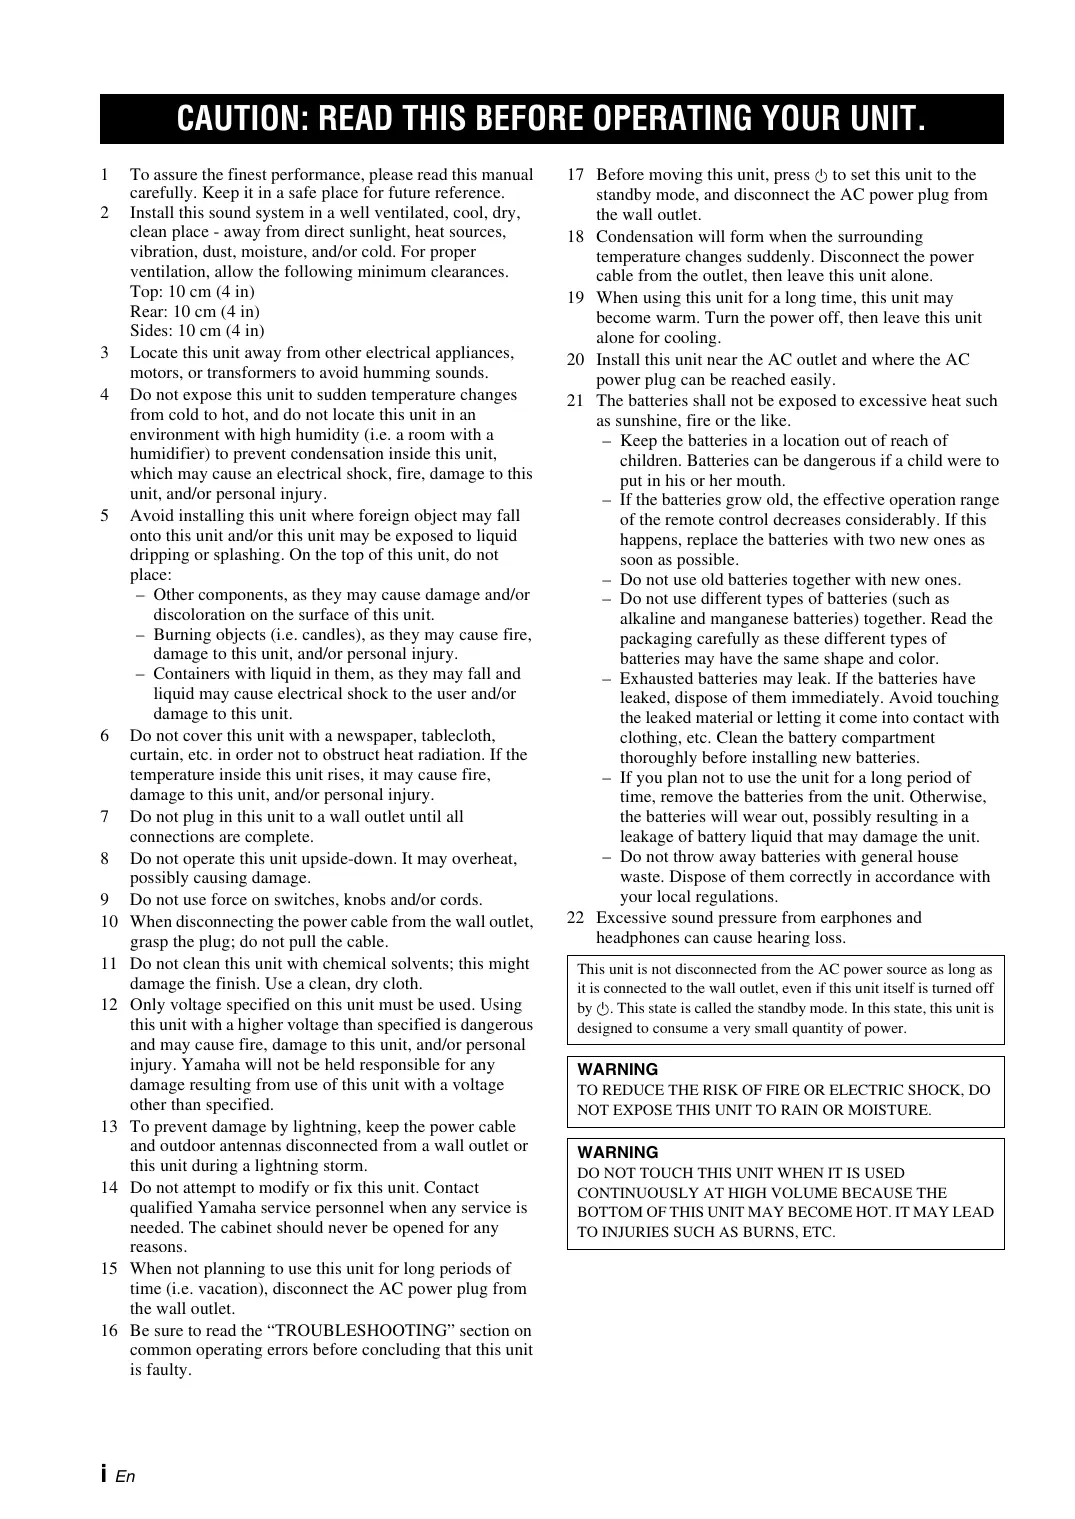
1 To assure the finest performance, please read this manual carefully. Keep it in a safe place for future reference.
2 Install this sound system in a well ventilated, cool, dry, clean place - away from direct sunlight, heat sources, vibration, dust, moisture, and/or cold. For proper ventilation, allow the following minimum clearances.
Top: 10cm (4 in)
Rear: 10cm (4 in)
Sides: 10cm (4 in)
3 Locate this unit away from other electrical appliances, motors, or transformers to avoid humming sounds.
4 Do not expose this unit to sudden temperature changes from cold to hot, and do not locate this unit in an environment with high humidity (i.e. a room with a humidifier) to prevent condensation inside this unit, which may cause an electrical shock, fire, damage to this unit, and/or personal injury.
5 Avoid installing this unit where foreign object may fall onto this unit and/or this unit may be exposed to liquid dripping or splashing. On the top of this unit, do not place:
- Other components, as they may cause damage and/or discoloration on the surface of this unit.
- Burning objects (i.e. candles), as they may cause fire, damage to this unit, and/or personal injury.
- Containers with liquid in them, as they may fall and liquid may cause electrical shock to the user and/or damage to this unit.
6 Do not cover this unit with a newspaper, tablecloth, curtain, etc. in order not to obstruct heat radiation. If the temperature inside this unit rises, it may cause fire, damage to this unit, and/or personal injury.
7 Do not plug in this unit to a wall outlet until all connections are complete.
8 Do not operate this unit upside-down. It may overheat, possibly causing damage.
9 Do not use force on switches, knobs and/or cords.
10 When disconnecting the power cable from the wall outlet, grasp the plug; do not pull the cable.
11 Do not clean this unit with chemical solvents; this might damage the finish. Use a clean, dry cloth.
12 Only voltage specified on this unit must be used. Using this unit with a higher voltage than specified is dangerous and may cause fire, damage to this unit, and/or personal injury. Yamaha will not be held responsible for any damage resulting from use of this unit with a voltage other than specified.
13 To prevent damage by lightning, keep the power cable and outdoor antennas disconnected from a wall outlet or this unit during a lightning storm.
14 Do not attempt to modify or fix this unit. Contact qualified Yamaha service personnel when any service is needed. The cabinet should never be opened for any reasons.
15 When not planning to use this unit for long periods of time (i.e. vacation), disconnect the AC power plug from the wall outlet.
16 Be sure to read the "TROUBLESHOOTING" section on common operating errors before concluding that this unit is faulty.
17 Before moving this unit, press to set this unit to the standby mode, and disconnect the AC power plug from the wall outlet.
18 Condensation will form when the surrounding temperature changes suddenly. Disconnect the power cable from the outlet, then leave this unit alone.
19 When using this unit for a long time, this unit may become warm. Turn the power off, then leave this unit alone for cooling.
20 Install this unit near the AC outlet and where the AC power plug can be reached easily.
21 The batteries shall not be exposed to excessive heat such as sunshine, fire or the like.
- Keep the batteries in a location out of reach of children. Batteries can be dangerous if a child were to put in his or her mouth.
- If the batteries grow old, the effective operation range of the remote control decreases considerably. If this happens, replace the batteries with two new ones as soon as possible.
- Do not use old batteries together with new ones.
- Do not use different types of batteries (such as alkaline and manganese batteries) together. Read the packaging carefully as these different types of batteries may have the same shape and color.
- Exhausted batteries may leak. If the batteries have leaked, dispose of them immediately. Avoid touching the leaked material or letting it come into contact with clothing, etc. Clean the battery compartment thoroughly before installing new batteries.
- If you plan not to use the unit for a long period of time, remove the batteries from the unit. Otherwise, the batteries will wear out, possibly resulting in a leakage of battery liquid that may damage the unit.
- Do not throw away batteries with general house waste. Dispose of them correctly in accordance with your local regulations.
22 Excessive sound pressure from earphones and headphones can cause hearing loss.
This unit is not disconnected from the AC power source as long as it is connected to the wall outlet, even if this unit itself is turned off by . This state is called the standby mode. In this state, this unit is designed to consume a very small quantity of power.
WARNING
TO REDUCE THE RISK OF FIRE OR ELECTRIC SHOCK, DO NOT EXPOSE THIS UNIT TO RAIN OR MOISTURE.
WARNING
DO NOT TOUCH THIS UNIT WHEN IT IS USED CONTINUOUSLY AT HIGH VOLUME BECAUSE THE BOTTOM OF THIS UNIT MAY BECOME HOT. IT MAY LEAD TO INJURIES SUCH AS BURNS, ETC.
WHAT YOU CAN DO WITH THIS UNIT
This unit is a network CD player, on which you can enjoy playing back music files stored on your media server (PC or NAS), audio contents on the Internet, CD, iPod and USB devices, by connecting the unit to your home network (DLNA) and audio system on the same network.

For details on DLNA or NAS, see "ADDITIONAL INFORMATION" (P.30).
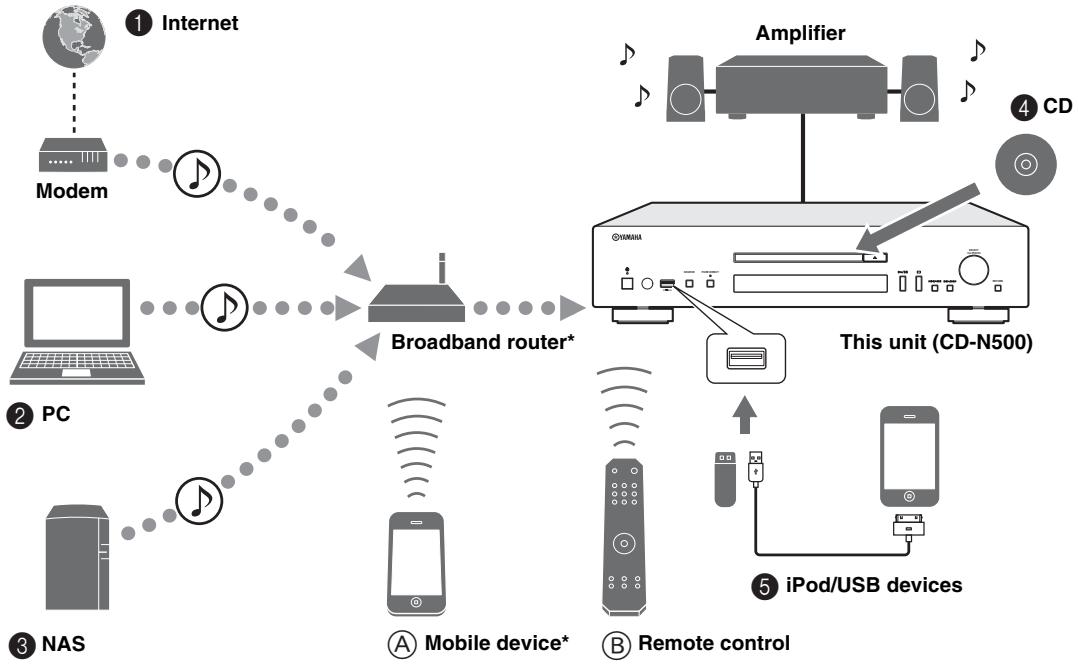
* You need a commercially available WiFi broadband router when you use a mobile device.
Sources that can be played back on this unit
1 Play back audio contents on the Internet (P.16)
2 Play back music files stored on your PC (P.11, 14)
⑧ Play back music files stored on your NAS (P.11, 14)
4 Play back a CD (P.18)
⑤ Play back your iPod or USB devices (P.20)

For details on connecting the devices, see "CONNECTIONS" (P.9).
Devices that can control this unit
Control this unit using your mobile devices (P.11, 13)
Control this unit using the remote control (P.6, 14, 16, 18, 20, 22, 23)
FREQUENTLY ASKED QUESTIONS
What kind of settings do I need to make?
→ For details on settings of your PC, NAS or mobile devices, see “SETUP OF YOUR PC/NAS/MOBILE DEVICES” (P.11).
For details on the setup menu on this unit, see "SETUP MENU" (P.23).
Why can't I find music files on my PC?
Check the media sharing settings of your PC or media server, such as Windows Media Player 12 (P.11).
Check if the music files are playable (P.31).
Can I control this unit with my iPhone?
For details on controlling this unit from your mobile device, see "Operations from your mobile device" (P.13).
I can't find this unit using the dedicated application installed on my mobile device!
Check if this unit is properly connected to the same network via the broadband router.
Check if access to this unit is restricted by MAC address filter function (P.27).
What music files are playable on this unit?
For details on playable files and formats, see "PLAYABLE DISCS AND FILE FORMATS" (P.31).
How can I listen to Internet radio on this unit?
→ For details on listening to Internet radio stations, see “PLAYBACK OF AUDIO CONTENTS ON THE INTERNET” (p.16).
How do I play back my iPod or USB devices?
→ For details on playback of your iPod or USB devices, see “PLAYBACK OF YOUR iPod/USB DEVICES” (P.20).
What do the messages on the front panel display stand for?
For details on the front panel display messages, see "Front panel display messages" (P.29).
For latest information, please visit Yamaha website.
CONTENTS
PREPARATION
WHAT YOU CAN DO WITH THIS UNIT............ 1
FREQUENTLY ASKED QUESTIONS 2
SUPPLIED ACCESSORIES 4
REMOTE CONTROL PREPARATION. 4
CONTROLS AND FUNCTIONS 5
Front panel 5
Remote control. 6
Rear panel 8
CONNECTIONS 9
Connecting to an amplifier. 9
Connecting to a network
(PC/NAS/Internet connection) 10
Turning on this unit. 10
OPERATIONS
SETUP OF YOUR PC/NAS/MOBILE DEVICES....11
Sharing music files stored on your PC 12
Operations from your mobile device 13
Operations from the main unit or remote control 14
PLAYBACK OF AUDIO CONTENTS ON THE
INTERNET 16
Listening to Internet radio stations 16
PLAYBACK OF CDS 18
Playing back a CD 18
Using program playback mode 19
PLAYBACK OF YOUR iPod/USB DEVICES. 20
Connecting your iPod or USB devices 20
Playing back your iPod 20
Using extended playback mode for your iPod 21
Playing back USB devices 22
SETUP MENU 23
Setup menu operations 23
Setup menu list. 24
Advanced setup menu 25
OTHERS
TROUBLESHOOTING 26
Front panel display messages. 29
ADDITIONAL INFORMATION. 30
PLAYABLE DISCS AND FILE FORMATS. 31
Playable media and devices 31
Playable discs and file formats 32
SPECIFICATIONS. 33
(at the end of this manual) Information about software
About this manual
Notes contain important information about safety and operating instructions. indicates a tip for your operation.
- "iPod" described in this manual may also refer to "iPhone" or "iPad".
SUPPLIED ACCESSORIES
Check that you have received all of the following items.
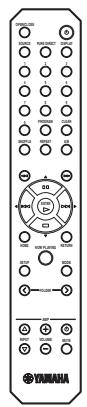
Remote control

RCA stereo cable
Batteries (AA, R6, UM-3) (× 2)

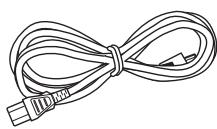
Power cable
Owner's manual
REMOTE CONTROL PREPARATION
Installling the batteries
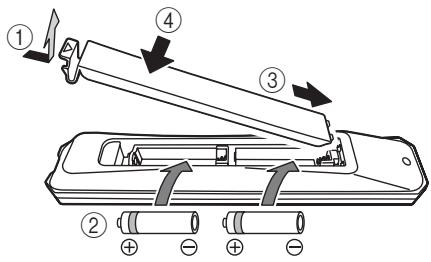
Notes
- Change all batteries if the operation range of the remote control narrows.
- Before inserting new batteries, wipe the compartment clean.
Operation range
Aim the remote control directly at the remote control sensor on the main unit during operation.

Front panel
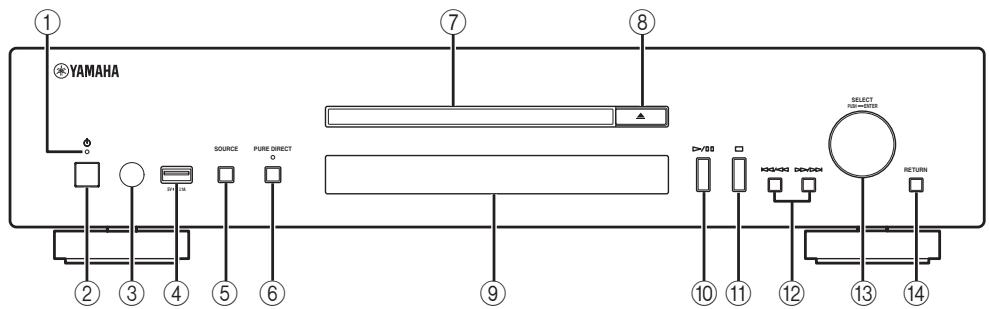
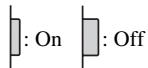
① Power indicator
- Lights up:
This unit is in a state that you can switch the unit to on or standby mode with the remote control or mobile devices (when network standby mode is on), or this unit is turned on.
- Lights up dimly:
This unit is in a state that you can turn the unit on with the remote control (when network standby mode is off).
- Off:
This unit is turned off and you can turn the unit on with the power switch on the front panel of the main unit only.

You can switch the setting of the network standby mode to on or off in the setup menu (P.24).
② Power switch (P.10)
Switches this unit between on and off.
③ Remote control sensor (cP.4)
Receives infrared signals from the remote control.
④ USB port (P.20)
Connects your iPod or USB devices.
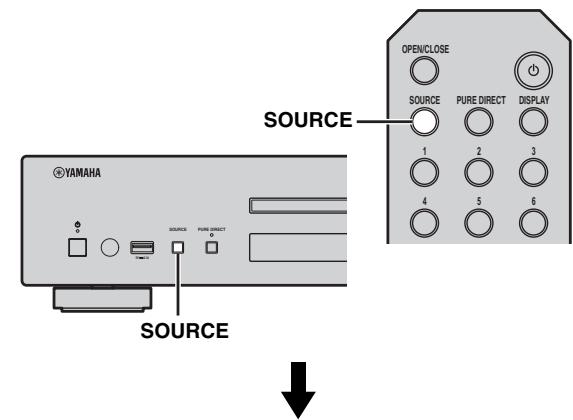
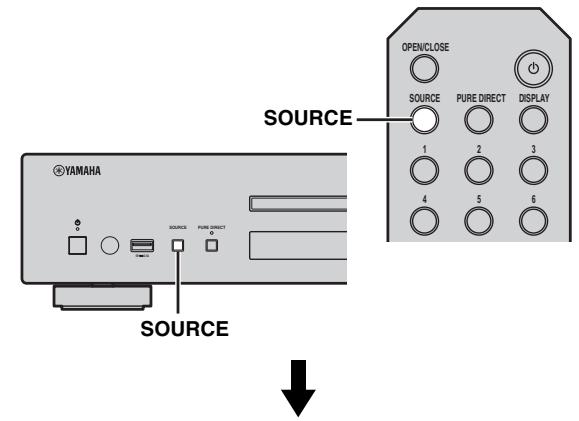
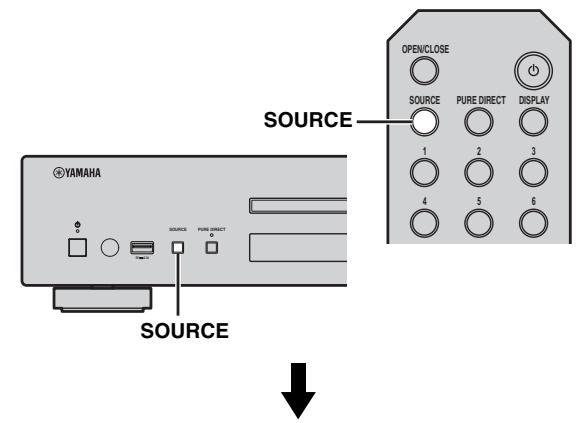
⑤ SOURCE (P.14, 16, 18, 20, 22)
Selects an audio source. Each press cycles the audio sources as follows.
CD USB SERVER NET RADIO Back to CD
(6) PURE DIRECT
Turns on or off PURE DIRECT mode. Audio quality will be improved when PURE DIRECT mode is on.

The PURE DIRECT indicator lights up when PURE DIRECT mode is on.
⑦ Disc tray
Loads a disc.
⑧ (Open/Close)
Opens or closes the disc tray.
9 Front panel display
Shows menu items, playback information, etc.

For details on display messages, see "Front panel display messages" (P.29).
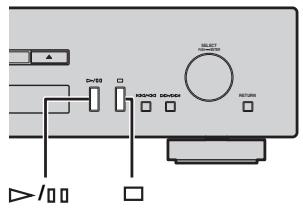
10 // (Play/Pause)
Starts or pauses playback.
⑪ (Stop)
Stops playback.
⑫ ↓/↓ (Skip/Search backward)
> /> (Skip/Search forward)
Skipping back to the previous/beginning of the current track or to the next track, or searches backward/forward.
Operations differ depending on audio sources.
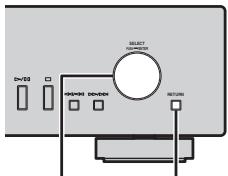
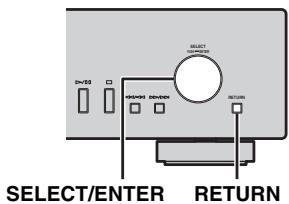
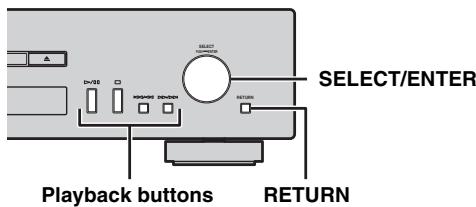
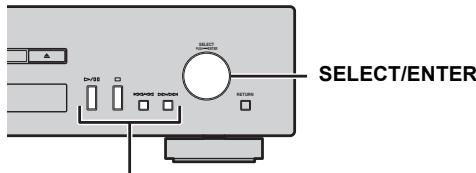
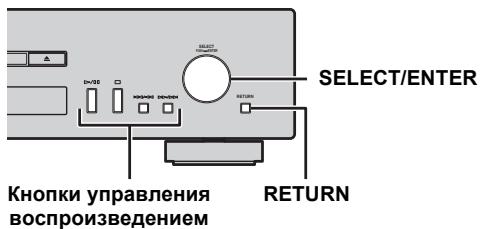
⑬ SELECT/ENTER (jog dial) (P.14, 16, 18, 21, 22, 24)
Rotate to select an item and press to confirm the selection.
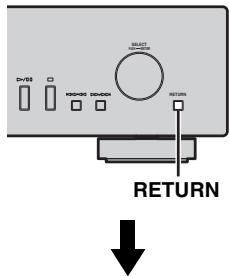
14 RETURN (P.14, 16, 21, 22)
Shows the upper-level menu in the front panel display.
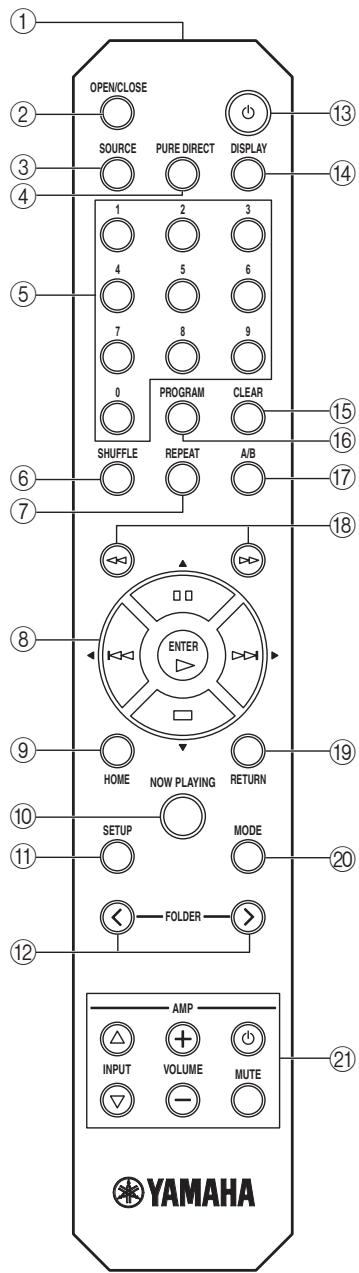
Remote control
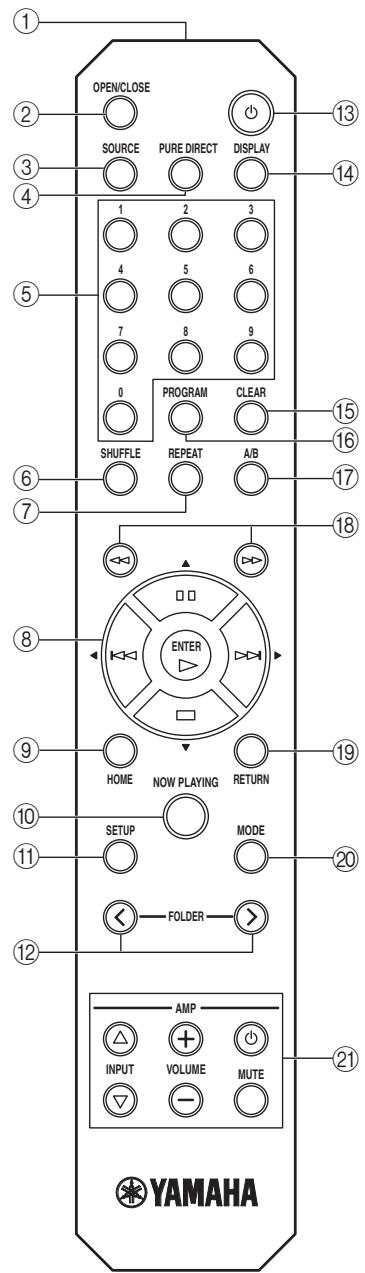
① Remote control signal transmitter
Transmits infrared signals to the main unit.
② OPEN/CLOSE
Opens or closes the disc tray.
③ SOURCE (P.14, 16, 18, 20, 22)
Selects an audio source. Each press cycles the audio sources as follows.
CD USB SERVER NET RADIO Back to CD
(4) PURE DIRECT
Turns on or off PURE DIRECT mode. Audio quality will be improved when PURE DIRECT mode is on.
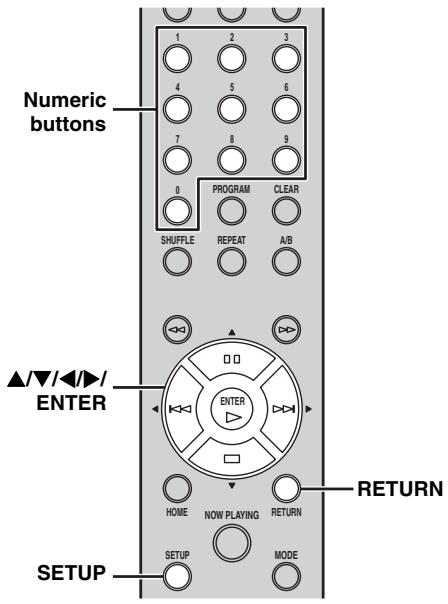
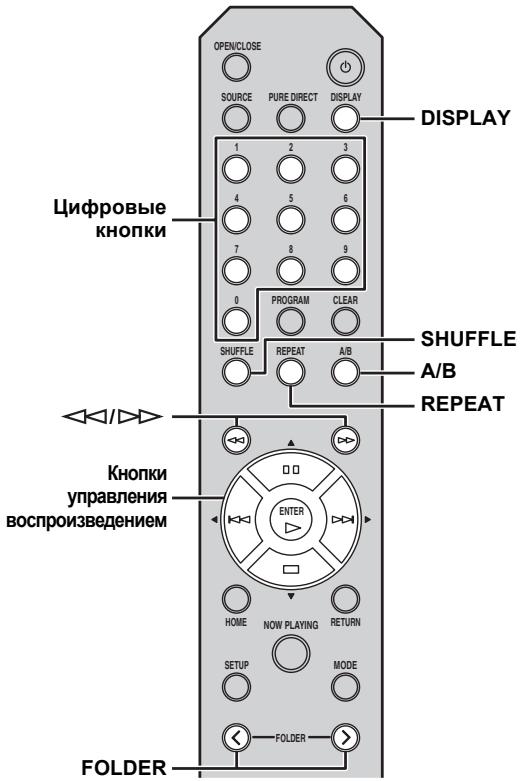
⑤ Numeric buttons (P.18)
Use to select directly a track on the disc or the current folder.
⑥ SHUFFLE (P.15, 18, 21, 22)
Switches shuffle modes.
⑦ REPEAT(P.15, 18, 21, 22)
Switches repeat modes.
⑧ Playback buttons (P.14, 16, 18, 21, 22, 23)
(Play)
Starts playback.
(Stop)
Stops playback.
(Pause)
Pauses playback.
( Skip backward)
Skipping backward.
( Skip forward)
Skips forward.
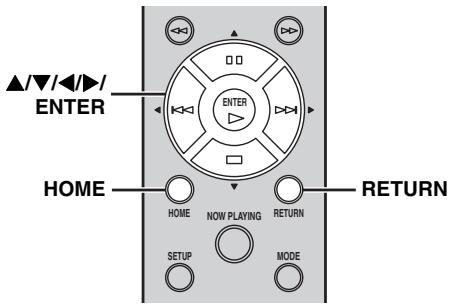
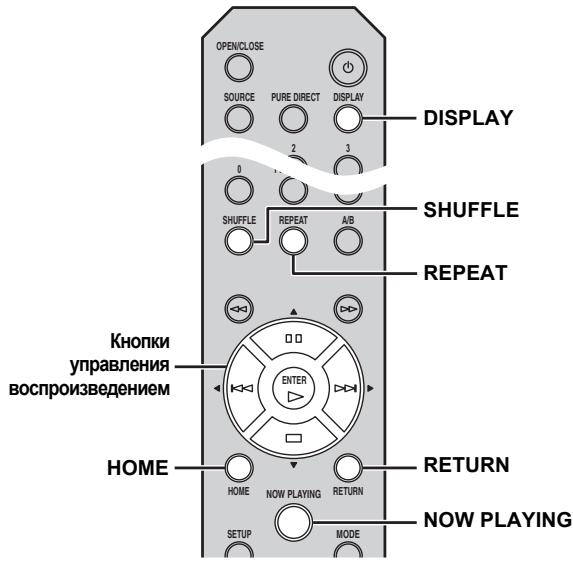
/ (Cursor buttons)/ENTER
Use the cursor buttons to select an item and press ENTER to confirm the selection.
⑨ HOME (P.14, 16, 21, 22)
Shows the top-level menu in the front panel display.
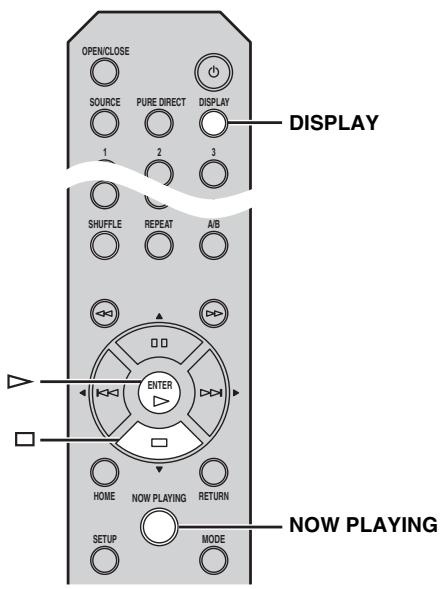
10 NOW PLAYING (P.15, 17, 21, 22)
Shows the playback information in the front panel display.
11 SETUP (P.23)
Shows the setup menu in the front panel display.
12 FOLDER ( / ) (P.18)
Switches playback folders when playing music on data CDs.
(3) (Power) (P.10)
Switches this unit between on and standby mode.
For details on standby mode, see "Front panel" (P.5).
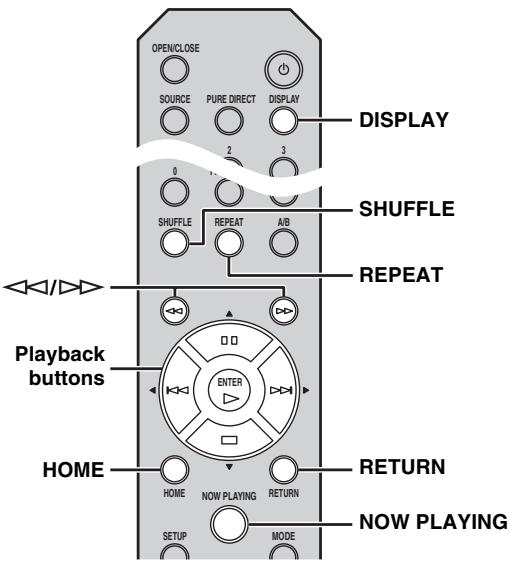
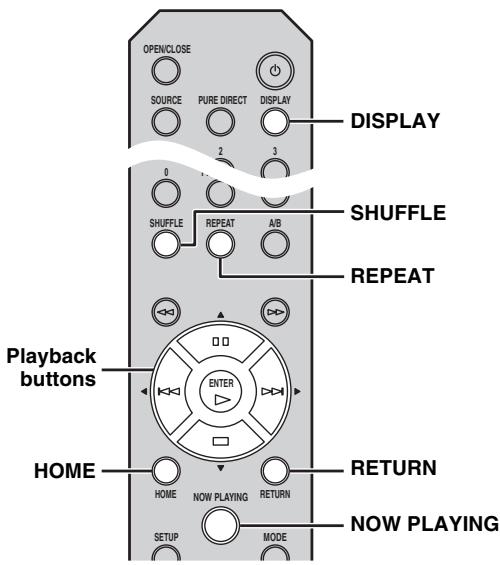
14 DISPLAY (P.15, 17, 18, 21, 22)
Switches information shown in the front panel display, such as playback information.
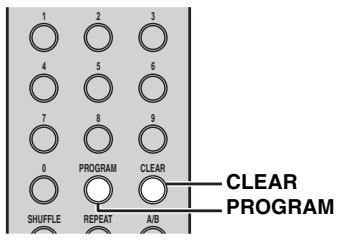
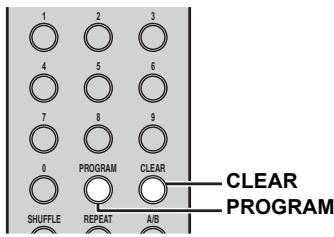
15 CLEAR (P.19)
Erases the last programmed track of an audio CD (except data CDs) during program editing mode.
16 PROGRAM
Turns on or off program playback mode. In program playback mode, you can playback tracks of an audio CD (except data CDs) in a programmed sequence. For details, see "Using program playback mode" (P.19).
⑦ A/B
Repeats playback of a specified section of a track during audio CD playback (except data CDs). To set the starting and end points (A and B), press A/B twice during playback. To cancel the repeat A-B function, press A/B again.
#
- A data CD is defined as a disc in which MP3 or WMA files are recorded.
- You cannot set the repeat A-B function over two tracks.
- You cannot set the repeat A-B function for data CDs and USB devices.
- The repeat A-B function is canceled when (Stop) is pressed.
- You cannot set the repeat A-B function when this unit is in PURE DIRECT mode.
- You cannot set the repeat A-B function when the unit is showing the remaining playback time of the track or disc in the front panel display.
(18) <(Search backward), (Search forward) (C P.18, 21)
Searches tracks backward/forward while the button is pressed and held during playback.
19 RETURN (P.14, 16, 21, 22)
Shows the upper-level menu in the front panel display.
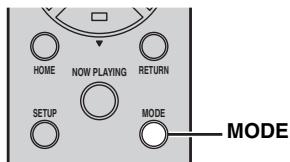
MODE (P.21)
Switches between standard mode and extended mode when playing back your iPod.
② Amplifier control buttons
Controls the corresponding functions of a Yamaha amplifier.
(Power)
Turns your amplifier on and off.
INPUT ( /)
Switches input sources.
VOLUME (+ / - )
Adjusts the volume.
MUTE
Turns mute on or off.
For details on operations, refer to the manual of your amplifier.

These buttons may not work for some Yamaha amplifiers.
Rear panel
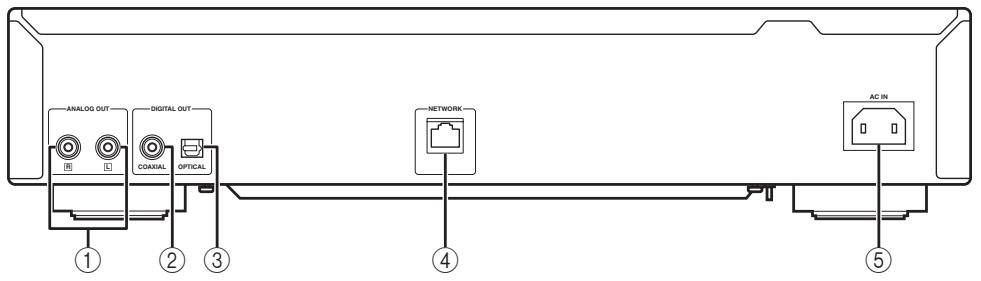
① ANALOG OUT terminal (P.9)
Outputs L/R analog audio signals. Connect to your amplifier or audio system using the RCA stereo cable (supplied).
② DIGITAL OUT terminal (COAXIAL) (P.9)
Outputs digital audio signals. Connect to your amplifier or audio system using a coaxial digital audio cable (commercially available).
③ DIGITAL OUT terminal (OPTICAL) (P.9)
Outputs digital audio signals. Connect to your amplifier or audio system using an optical cable (commercially available).
④ NETWORK terminal (P.10)
Connects to a network using a network cable (commercially available).
⑤ AC IN socket (cP.9)
Connects to an AC outlet using the power cable (supplied).
CONNECTIONS
This section describes connections required before playing back with this unit.
Notes
- Do not connect the power cable of this unit until all connections are completed.
- You need to connect this unit to an amplifier and speakers before playing back.
- This unit can output digital signals up to 192kHz / 24 bits linear PCM signals.
- Proper playback may not be possible depending on the connected device and environment. Verify the settings and specifications of the connected playback source device.
Connecting to an amplifier
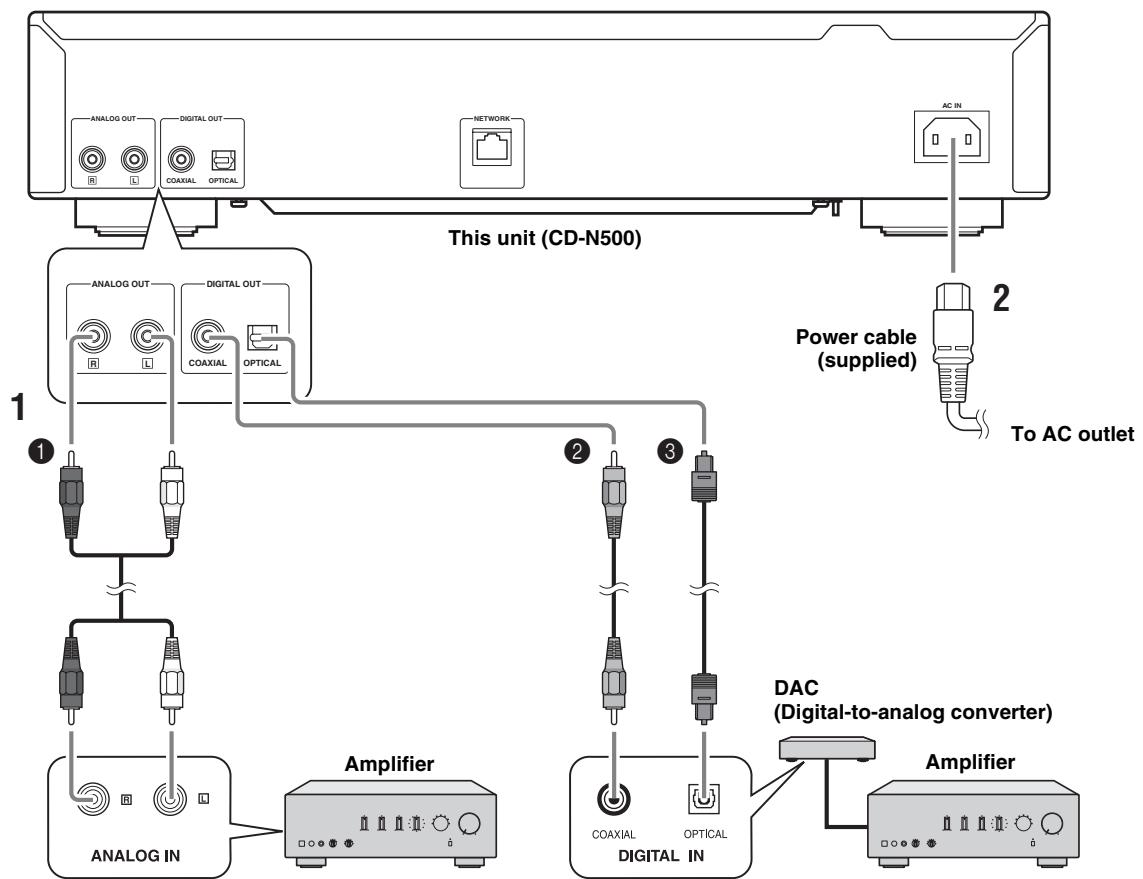
* The digital output is turned off when this unit is in PURE DIRECT mode.
1 Connect this unit to your amplifier with one of the following cables.
1 RCA stereo cable (supplied)
Coaxial digital audio cable (commercially available)
Optical digital cable (commercially available)
2 Connect the supplied power cable to the AC IN socket, then plug into an AC outlet.
中
For details on speaker connections, refer to the manual of your amplifier or speakers.
Note
When using a digital connection, audio output may be interrupted at the beginning of a track depending on the audio system (amplifier, etc.).
Connecting to a network (PC/NAS/Internet connection)
You can play back music files stored on your PC or NAS, audio contents on the Internet, by connecting this unit to a network.
Connect with a commercially available STP (shielded twisted pair) network cable (CAT-5 or higher, straight-through cable).
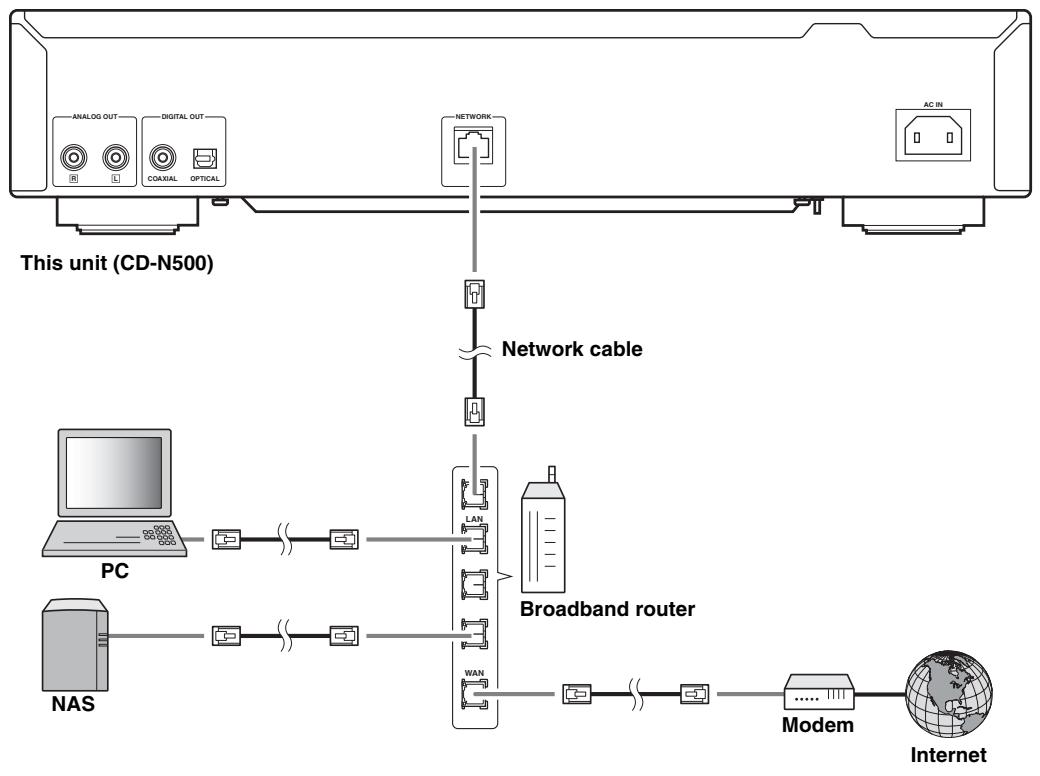
Notes
- All devices other than this unit are sold separately.
- You need to configure your PC or NAS after connecting. For details on settings, see "SETUP OF YOUR PC/NAS/MOBILE DEVICES" (P.11).
- Wired connections are recommended for each device to sustain high sound quality.
Turning on this unit
When you have established all cable connections, turn on this unit and other system components.
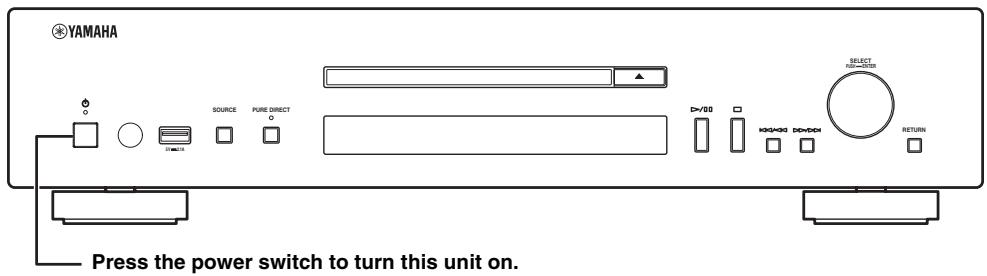
#
- With the power switch on, you can switch this unit to on or standby mode by pressing the power button on the remote control (P.6).
- For details on standby mode, see "Front panel" (P.5).
SETUP OF YOUR PC/NAS/MOBILE DEVICES
Configure your PC or NAS connected to the network to play back music files stored on the PC or NAS, or configure your mobile device to control this unit.

For details on Internet connection, please refer to the manual of your network devices.
Configuring your PC
| What you want to do | Setup | Page |
| Play back music files stored on your PC | You need to configure the media sharing setting of your PC. • Configure the media sharing setting of music files on Windows Media Player 12. | 12 |

You can operate from your PC using Windows Media Player. For details, refer to Windows Media Player help.
Configuring your NAS
| What you want to do | Setup | Page |
| Play back music files stored on your NAS | You need to configure the following settings to access your NAS. • Configure media sharing settings of your NAS. • Enable DHCP setting of your NAS.* Setup operations differ depending on your NAS. Refer to the NAS manual. | — |
- In case that you use DHCP and automatically obtain necessary information for network, such as IP address. If you want to configure the network parameters manually, check that you are using an IP address which is not used by other network devices in your network.
I Configuring your mobile device
| What you want to do | Setup | Page |
| Operate this unit with your mobile device | You need to download the dedicated application, and install it. • Enable DHCP setting of your mobile device.* | 13 |
- In case that you use DHCP and automatically obtain necessary information for network, such as IP address. If you want to configure the network parameters manually, check that you are using an IP address which is not used by other network devices in your network.
Sharing music files stored on your PC
To browse folders (directories) on your PC from this unit, you need to change the media sharing setting of Windows Media Player 12 or Windows Media Player 11 to make those folders accessible from this unit. For details on Windows Media Player, please refer to Windows Media Player help.

You can connect up to 16 media servers to this unit.
When using Windows Media Player 12 (on Windows 7)
1 Start Windows Media Player 12 on your PC.
2 Select "Stream", then "Turn on media streaming".
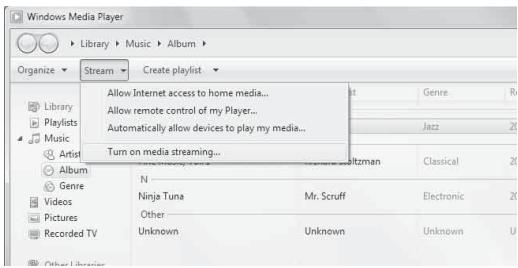
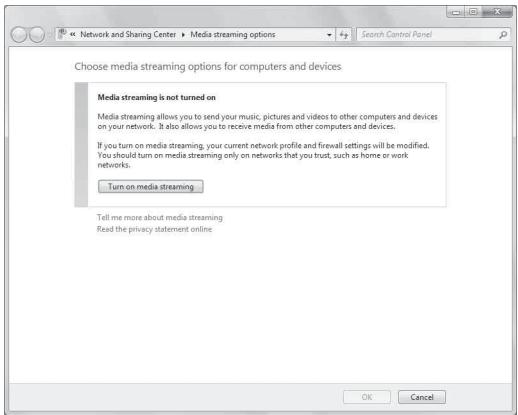
The Control Panel window of your PC appears.
3 Click "Turn on media streaming".
4 Select "Allowed" from the drop-down list next to "CD-N500".
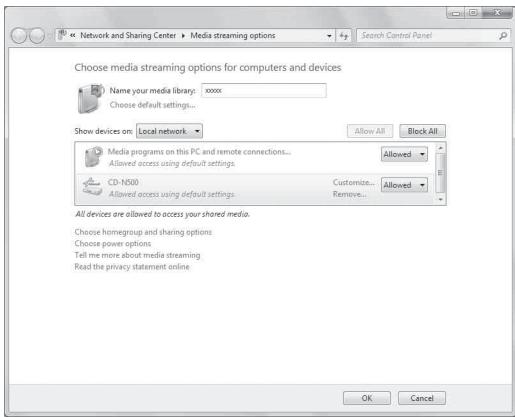
5 In the same way, select the icons for devices to be used as external media controllers (other PCs or mobile devices), then click "Allowed".
6 Click "OK" to exit.
When using Windows Media Player 11
1 Start Windows Media Player 11 on your PC.
2 Select "Library" then "Media Sharing".
3 Check the "Share my media to" box, select the "CD-N500" icon, then click "Allow".
4 In the same way, select the icons for devices to be used as external media controllers (other PCs or mobile devices), then click "Allow".
5 Click "OK" to exit.
Operations from your mobile device
You can operate this unit by viewing the screen of your mobile device.
Using the dedicated application
You can do the following operations from your mobile device using the dedicated application (free application).
- You can select and play back music files stored on your PC or NAS.
- You can select the Internet radio stations.
- You can operate playback of CDs and USB devices.
For configuring the PC or NAS settings, see "SETUP OF YOUR PC/NAS/MOBILE DEVICES" (P.11).
■ About the dedicated application
Download and install the dedicated application on your mobile device.
For details, please visit Yamaha website.
This section describes how to play back using the front panel buttons on the main unit, or the remote control.
Operations from the main unit or remote control

For details on the controls on the main unit or remote control, see "CONTROLS AND FUNCTIONS" (P.5).
1 Press SOURCE repeatedly to switch the audio source to "SERVER".
Main unit/Remote control
Front panel display
Source
SERVER
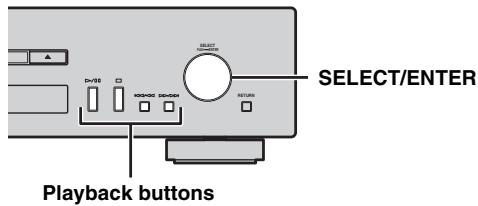
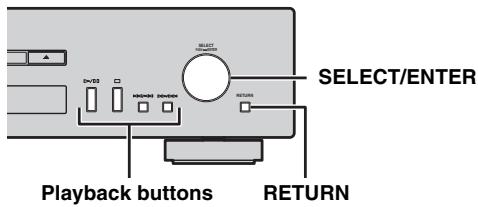
2 Use the following controls to select a menu item until you find a desired music file.
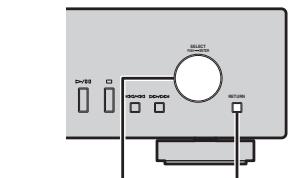
Main unit
SELECT/ENTER RETURN
SELECT/ENTER (Jog dial)
Rotate to select a menu item and press to confirm the selection.
RETURN
Shows the upper-level menu in the front panel display.

Remote control
/4 (Cursor buttons)/ENTER
Press / to select a menu item (or press / to display the gauge indicating the current position of the content), then press ENTER to confirm the selection.
RETURN
Shows the upper-level menu in the front panel display.
HOME
Shows the top-level menu in the front panel display.
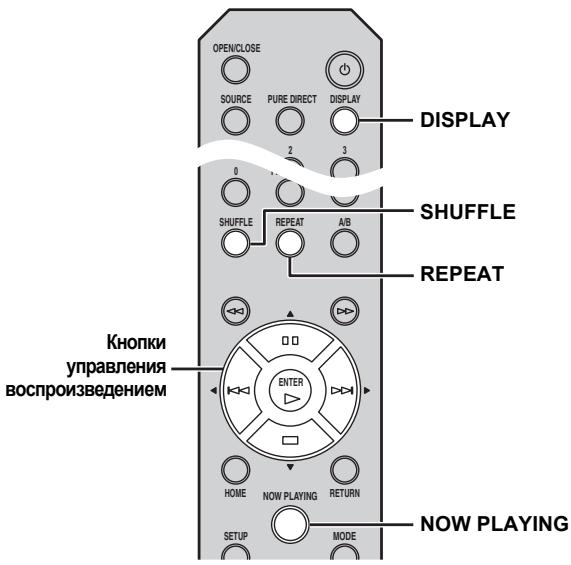
3 When playback starts, use the following controls to operate desired functions.
Main unit
Remote control
SELECT/ENTER (Jog dial)
Rotate while playing to skip to the next track, or back to the previous/beginning of the current track.
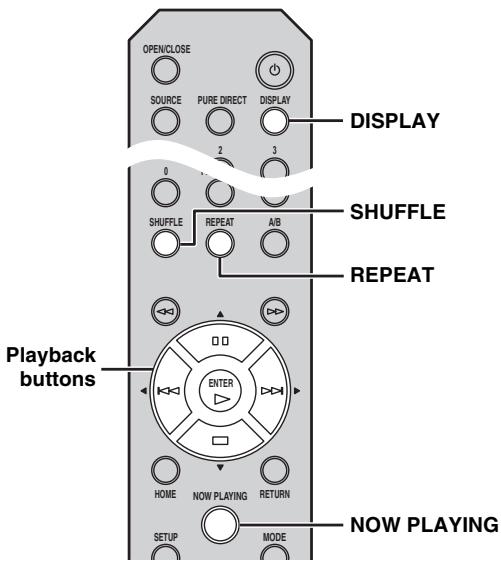
Playback buttons
Use these buttons to operate audio contents (P.5, 6).
DISPLAY
If you press this button while a song is playing or paused, the information on the front panel display will be switched in the following order.

SHUFFLE
Switches shuffle mode in the following order.

REPEAT
Switches repeat mode in the following order.

NOW PLAYING
Shows the current playback information in the front panel display.

- If the song being played is stopped, the track that you listened will start playback from the beginning of the track the next time you play.
- For details on playable files, see "PLAYABLE DISCS AND FILE FORMATS" (P.31).
Listening to Internet radio stations
Operations from the main unit or remote control
1 Press SOURCE repeatedly to switch the audio source to "NET RADIO".
Main unit/Remote control
Front panel display
| Source | NET RADIO |
2 Use the following controls to select a menu item until you find a desired Internet radio station.
Main unit
SELECT/ENTER (Jog dial)
Rotate to select a menu item and press to confirm the selection.
RETURN
Shows the upper-level menu in the front panel display.
Remote control
/ (Cursor buttons)/ENTER
Press / to select a menu item (or press / to display the gauge indicating the current position of the content), then press ENTER to confirm the selection.
RETURN
Shows the upper-level menu in the front panel display.
HOME
Shows the top-level menu in the front panel display.
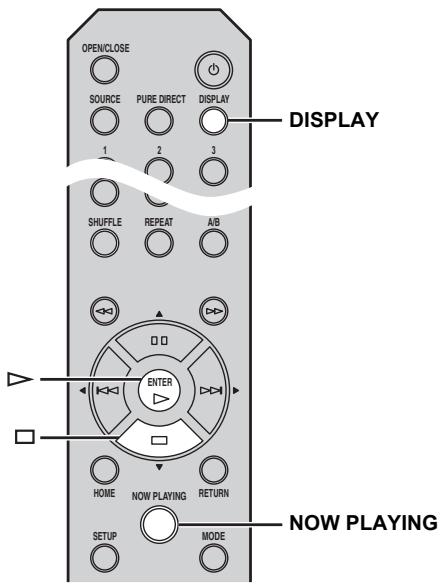
3 When playback starts, use the following controls to operate desired functions.
Main unit
Remote control
//[Play/Pause) or > (Play)
Starts playback.
(Stop)
Stops playback.
DISPLAY
If you press this button while a song is playing or paused, the information on the front panel display will be switched in the following order.

NOW PLAYING
Shows the current playback information in the front panel display.

You can register and bookmark your favorite Internet radio stations by accessing the "vTuner Radio Guide" website. To use this feature, you need the MAC address of this unit (P.24) as the ID for your Media player and your e-mail address to create your personal account.
For details, visit the website below. http://yradio.vtuner.com/
Playing back a CD
1 Press SOURCE repeatedly to switch the audio source to "CD".
Main unit/Remote control
Front panel display
Source
CD
2 Press (Open/Close) on the main unit to open the disc tray, then load a CD.
3 Press (Open/Close) again to close the disc tray.
Playback automatically starts.
4 When playback starts, use the following controls to operate desired functions.
Main unit

Remote control

SELECT/ENTER (Jog dial)
Rotate while playing to skip to the next track, or back to the previous/beginning of the current track.
Playback buttons
Use these buttons to operate audio contents (P.5, 6).
Numeric buttons (Audio CD only)
Use to select directly a track on the CD.
(Search backward)/(Search forward)
Searches backward/forward.
FOLDER (< / >) (Data CD only)
Selects the desired folder.
DISPLAY
If you press this button while a song is playing or paused, the information on the front panel display will be switched in the following order.
Audio CD:

中
-
"Time" cycles through the three steps as follows each time you press this button.
-
Track number and elapsed playback time.
-
Track number and remaining playback time of the track.
-
Remaining playback time of the disc.
-
"Song", "Artist" and "Album" are shown only if text information is included in the disc.
Data CD:

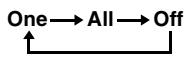
SHUFFLE
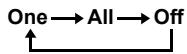
Switches shuffle mode to "Folder", "All" and "Off" as follows.
Audio CD:
Data CD:

A/B (Audio CD only)
Repeats playback of a specified section of a track during audio CD playback (except data CDs) (P.7).
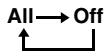
REPEAT
Switches repeat mode in the following order.
Audio CD:
Data CD:

#
- If the song being played is stopped, the track that you listened will start playback from the beginning of the track the next time you play.
- If you press (Stop) while playback is stopped, the first track of the CD you listened will start playback the next time you play.
- For details on playable discs and files, see "PLAYABLE DISCS AND FILE FORMATS" (P.31).
Using program playback mode
In program playback mode, you can play back tracks in a programmed sequence.
1 Press PROGRAM on the remote control while playback is stopped.
This unit enters program editing mode.
2 Select a track by using the numeric buttons and press ENTER to confirm.
3 Repeat step 2 to program the next track.
You can program up to 50 tracks.
中
To cancel the programmed track, press CLEAR during program editing mode. The last programmed track will be deleted.
4 Press / (Play/Pause) on the main unit or (Play) on the remote control.
Playback starts from the beginning of the programmed sequence.
#
- To erase all programmed tracks, press CLEAR while playback is stopped.
- You cannot set a program playback for data CDs.
Note
The programmed tracks are erased when the disc is ejected or this unit is turned off.
Connecting your iPod or USB devices
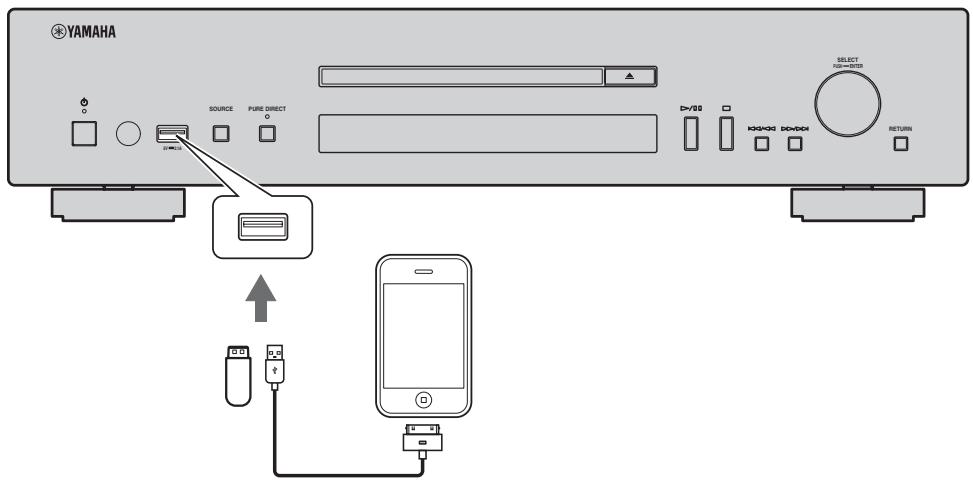

- Connect your iPod using the USB cable supplied with your iPod.
- Remove a USB device after you stop playback.
- Do not use a USB hub. This unit does not recognize a USB device if the USB device is connected via a USB hub.
Playing back your iPod
1 Press SOURCE repeatedly to switch the audio source to "USB".

Main unit/Remote control
Front panel display
Source
USB
2 Connect your iPod to the USB port on the main unit.
3 Start playback on your iPod.
Operate your iPod to start playback, select a track, pause, and stop playback (standard playback mode).

- You can also operate to play, pause, stop, skip forward/ backward, and search forward/backward from the playback buttons on the main unit and remote control during standard playback mode.
Main unit:
//10,□,K/△,D/D
Remote control:
,口,口,口,口,口
- You cannot operate shuffle and repeat modes from your iPod and the remote control during standard playback mode.
Note
iPod may not function properly with this unit if software on iPod is not updated. Be sure to use the latest version of iPod software. For details on supported iPod, see "Supported iPod via USB port" (P.31).
Using extended playback mode for your iPod
You can operate your iPod from the main unit or remote control in extended mode.
1 Press MODE on the remote control while playing back your iPod.
It switches to extended playback mode.
2 Use the following controls to operate desired functions.
Main unit
Remote control
SELECT/ENTER (Jog dial)
Rotate while playing to skip to the next track, or back to the previous/beginning of the current track.
Playback buttons*
Use these buttons to operate audio contents (P.5, 6).
RETURN
Shows the upper-level menu in the front panel display.
(Search backward)/(Search forward)*
Searches backward/forward.
HOME
Shows the top-level menu in the front panel display.
DISPLAY
If you press this button while a song is playing or paused, the information on the front panel display will be switched in the following order.

SHUFFLE*
Switches shuffle mode of your iPod.

REPEAT*
Switches repeat mode in the following order.

NOW PLAYING
Shows the current playback information in the front panel display.
- Operations differ depending on your iPod.

Playable file formats via iPod depends on your iPod.
Playing back USB devices
1 Press SOURCE on the main unit or remote control to switch the audio source to "USB" (P.20).
2 Connect your USB device to the USB port on the main unit.
File name is displayed in the front panel display and playback starts automatically in order by date and time of creation if playable files are in the USB device.
3 When playback starts, use the following controls to operate desired functions.
Main unit
Remote control
SELECT/ENTER (Jog dial)
Rotate while playing to skip to the next track, or back to the previous/beginning of the current track.
Playback buttons
Use these buttons to operate audio contents (P.5, 6).
RETURN
Shows the upper-level menu in the front panel display.
HOME
Shows the top-level menu in the front panel display.
DISPLAY
If you press this button while a song is playing or paused, the information on the front panel display will be switched in the following order.

SHUFFLE
Switches shuffle mode in the following order.

REPEAT
Switches repeat mode in the following order.

NOW PLAYING
Shows the current playback information in the front panel display.

- If the song being played is stopped, the track that you listened will start playback from the beginning of the track the next time you play.
- For details on playable files, see "PLAYABLE DISCS AND FILE FORMATS" (P.31).
You can configure the various settings of this unit using the setup menu.
Setup menu operations
Operations from the remote control
#
For details on the controls on the main unit or remote control, see "CONTROLS AND FUNCTIONS" (P.5).
1 Press SETUP to enter the setup menu (P.24).
To make the advanced setup menu items (P.25) selectable, press SETUP while holding down RETURN (on the main unit).
Remote control
Main unit
Front panel display

1 Network Configuration
2 Press / to select a menu item to configure, then press ENTER.
For some menu items, repeat step 2 to select a submenu item.

1-1 DHCP
3 Press / to select a parameter, then press ENTER.
#
You need to enter a numerical address for some menu items. In this case, press to move the target and to select a number, or use the numeric buttons. Then press ENTER to confirm it.
Setup menu list
| Menu | Submenu | Settings (Bold: default) | Function |
| Network Configuration | DHCP | On, Off | Select “On” to use the DHCP server to automatically configure the network settings of this unit or “Off” to configure manually. |
| IP Address | Specify the IP address when “DHCP” is “Off”. *1 | ||
| Subnet Mask | Specify the subnet mask when “DHCP” is “Off”. *1 | ||
| Default Gateway | Specify the default gateway when “DHCP” is “Off”. *1 | ||
| DNS Server (P) | Specify the primary DNS server when “DHCP” is “Off”. *1 | ||
| DNS Server (S) | Specify the secondary DNS server when “DHCP” is “Off”. *1 | ||
| Network Information | MAC Address | The MAC address of this unit is shown. The MAC address is also used as a vTuner ID. | |
| Status | The network status of this unit is shown (“Connected” or “Not connected”). | ||
| System ID | The system ID number is shown. | ||
| Network Standby | On, Off | Select “On” to enable the network standby mode. | |
| Auto Power Down | 4 Hours, 8 Hours, 12 Hours, Off | This unit automatically enters standby mode if it is left turned on for the selected time without playback or any other operation being performed. | |
| Dimmer | -3 to 0 | Adjust the brightness of the front panel display. | |
| Firmware Version | The firmware version of this unit is shown. | ||
| Firmware Update | Network, USB | Update the firmware of this unit after selecting “Network” or “USB”. When “Press ENTER to start” appears, press ENTER to start firmware update. Do not operate this unit until “UPDATE SUCCESS” appears. Then turn off this unit once and turn it on again. | |
*1: When "DHCP" is "On", you can check the values (IP address, etc.) assigned by the DHCP server.
Advanced setup menu
The following menu items are available only when you enter the setup menu by pressing SETUP (on the remote control) while holding down RETURN (on the main unit).
| Menu | Settings (Bold: default) | Function |
| MAC Address Filter | On, Off | Select “On” to specify the MAC addresses (up to 5) of the network components that will be permitted access to this unit (“Address1” to “Address5”). Select “Off” to disable the MAC address filter function. |
| Gapless Playback | On, Off | Select “On” to skip silence between each track and enable seamless playback. Select “Off” to disable the gapless playback function. This function works on “SERVER” audio contents only. When “Gapless Playback” is “On”, this unit starts to read data of the next track at the end of the current track. Some playback operations (skip, repeat, etc.) will work on the next track during this process. |
| vTuner Account Reset | Yes, No | Select “Yes” and press ENTER on the remote control to reset the vTuner account. • If you reset your vTuner account, your user name, password and bookmarks will be reset. • To create a new account, visit the website below. http://yrdio.vtuner.com/You need the MAC address of this unit as the ID for your Media player and your e-mail address. |
| Initialize | Yes, No | Select “Yes” to reset the settings of this unit to factory default. The reset operation will be reflected the next time you turn on this unit. |
TROUBLESHOOTING
Refer to the table below when this unit does not function properly. If the problem you are experiencing is not listed below or if the instruction below does not help, turn off this unit, disconnect the power cable, and contact the nearest authorized Yamaha dealer or service center.
General
| Problem | Cause | Remedy | Page |
| This unit fails to turn on. | The power cable is not connected to the AC IN socket on the main unit or not plugged into an AC outlet. | Connect the power cable firmly. | 9 |
| This unit has been exposed to a strong external electric shock (such as lightning or strong static electricity). | Turn off this unit, disconnect the power cable, plug it back in after 30 seconds, then use it normally. | — | |
| The protection circuitry has been activated three times consecutively. When this unit is in this condition, the power indicator on the main unit blinks if you try to turn on the power. | As a safety precaution, capability to turn on the power is disabled. Contact your nearest Yamaha dealer or service center to request repair. | — | |
| The power indicator on the front panel flashes. | There is a problem with the internal circuitries of this unit. | Turn off this unit, disconnect the power cable, then contact the nearest authorized Yamaha dealer or service center. | — |
| This unit suddenly turns off. | This unit entered standby mode. | This unit enters standby mode after the time set for “Auto Power Down” in the setup menu has elapsed. | 24 |
| No sound. | The audio cable connection between this unit and amplifier is improper. | Connect the audio cable firmly. If the problem persists, use another audio cable. | 9 |
| The input setting on the amplifier is incorrect. | Select the correct input (from this unit) on the amplifier. | — | |
| The amplifier is not compatible with the digital signals. | Use an analog signal connection. | 9 | |
| Noise is heard. | This unit is too close to the digital or radio-frequency equipment. | Move this unit away from such equipment. | — |
| The audio cable between this unit and the media sever is defective. | Connect the audio cable firmly. If the problem persists, use another audio cable. | — | |
| The remote control does not work or function properly. | Wrong distance or angle. | The remote control functions within a maximum range of 6 m (20 ft) and no more than 30 degrees off-axis from the front panel of the main unit. | 4 |
| Direct sunlight or lighting is striking the remote control sensor of this unit. | Adjust the lighting angle, or reposition this unit. | — | |
| The batteries are weak. | Replace both batteries with new ones. | 4 | |
| The amplifier control buttons on the remote control do not work on the amplifier. | Your amplifier is not one of Yamaha amplifiers. (These buttons may not work on some Yamaha amplifiers.) | Use the remote control of your amplifier. | — |
Network
| Problem | Cause | Remedy | Page |
| The network feature does not function. | The network parameters (IP address) have not been obtained properly. | Enable the DHCP server function on the broadband router and set “DHCP” in the setup menu to “On” on this unit. If you want to configure the network parameters manually, check that you are using an IP address which is not used by other network devices in your network. | 24 |
| This unit does not detect the digital media server (PC). | The media sharing setting is not correct. | Configure the media sharing setting of your PC. | 11 |
| Some security software installed on your PC is blocking the access of this unit to your PC. | Check the settings of security software installed on your PC. | — | |
| This unit and your PC are not in the same network. | Check the network connections and the broadband router settings, then connect this unit and your PC to the same network. | 10 | |
| Access to this unit is restricted by MAC address filter function | Disable MAC address filter function in the setup menu of this unit. | 24 | |
| There are more than two routers in use that are overlapping among the network devices. | Disconnect the Internet connection temporarily and check via your local network, or connect the network devices you want to use to the same router. | — | |
| The files in your PC cannot be viewed or played back. | The files are not supported by this unit or the media server. | Use the file format supported by both this unit and the media server. For details on the supported file formats by the unit, see “PLAYABLE DISCS AND FILE FORMATS”. | 31 |
| Some audio files cannot be played back on this unit. | You are trying to play back DRM audio files you purchased on iTunes Store. | You cannot play back DRM audio files you purchased on iTunes Store. | 31 |
Audio contents on the Internet
| Problem | Cause | Remedy | Page |
| The Internet radio cannot be played. | The selected Internet radio station is currently not available. | There may be a network problem at the radio station, or the service may have been stopped. Try the station later or select another station. | — |
| The selected Internet radio station is currently broadcasting silence. | Some Internet radio stations broadcast silence at certain of times of the day. Try the station later or select another station. | — | |
| Access to the network is restricted by the firewall settings of your network devices (such as the broadband router). | Check the firewall settings of your network devices. The Internet radio can be played only when it passes through the port designated by each radio station. The port number varies depending on the radio station. | — |
CD
| Problem | Cause | Remedy | Page |
| The disc tray does not close completely. | A foreign object is obstructing the tray. | Carefully check the disc tray and remove the foreign object. | — |
| Disc playback does not start. | The disc is damaged. | Check the disc carefully and replace it if necessary. | — |
| There is moisture on the laser pickup. | Wait 20 to 30 minutes after turning this unit on before trying to play back a disc. | — | |
| The disc is loaded upside down. | Reload the disc with the label side up. | — | |
| The disc is dirty. | Clean the disc. | 32 | |
| The format of the MP3 or WMA file is not compatible with this unit. | Replace the disc with a correctly recorded disc playable with this unit. | 31 | |
| Disc playback does not start. | The CD-RW (ReWritable) disc is not recorded correctly. | Replace the disc with a correctly recorded disc playable with this unit. | 31 |
| The disc is a non-standard disc not playable with this unit. | Replace the disc with a correctly recorded disc playable with this unit. | 31 | |
| Playback is delayed, or begins at the wrong place. | The disc is scratched or damaged. | Check the disc carefully and replace it if necessary. | 32 |
| Noise from inside of the disc tray. | The disc is warped. | Replace the disc. | — |
iPod/USB
| Problem | Cause | Remedy | Page |
| iPod playback does not start though iPod is connected. | The connected iPod is not compatible with this unit. | Connect an iPod compatible with this unit. | 31 |
| USB playback does not start. | The USB device is not connected properly. | Connect the USB device again. | 20 |
| The format of the MP3 or WMA file is not compatible with this unit. | Replace the file with a correctly recorded file playable with this unit. | 31 | |
| This unit is set to an audio source than “USB”. | Press SOURCE on the main unit or remote control to switch the audio source to “USB”. | 22 |
Front panel display messages
| Message | Status |
| Access error | This unit cannot access the USB device. |
| This unit cannot access the iPod. | |
| The connected iPod is not supported by the unit. | |
| There is a problem with the signal path from the network to the unit. | |
| Unable to play | This unit cannot play back specified content. |
| List updated | The content list of the media server has been updated. |
| No content | This unit cannot find any content. |
| Not available | The operation you have performed is not available. |
| Searching... | This unit is searching for content. |
| No disc | A CD is not inserted in the disc tray. |
| Connect error | Connection to your iPod or USB device failed. |
| No device | Your iPod or USB device is not connected. |
| USB overloaded | An overcurrent is flowing through the USB device. |
| Loading... | The specified content is being loaded. |
| Unknown iPod | The connected iPod is not compatible. |
ADDITIONAL INFORMATION
This section describes about general ideas of DLNA (Digital Living Network Alliance) and NAS (Network Attached Storage).
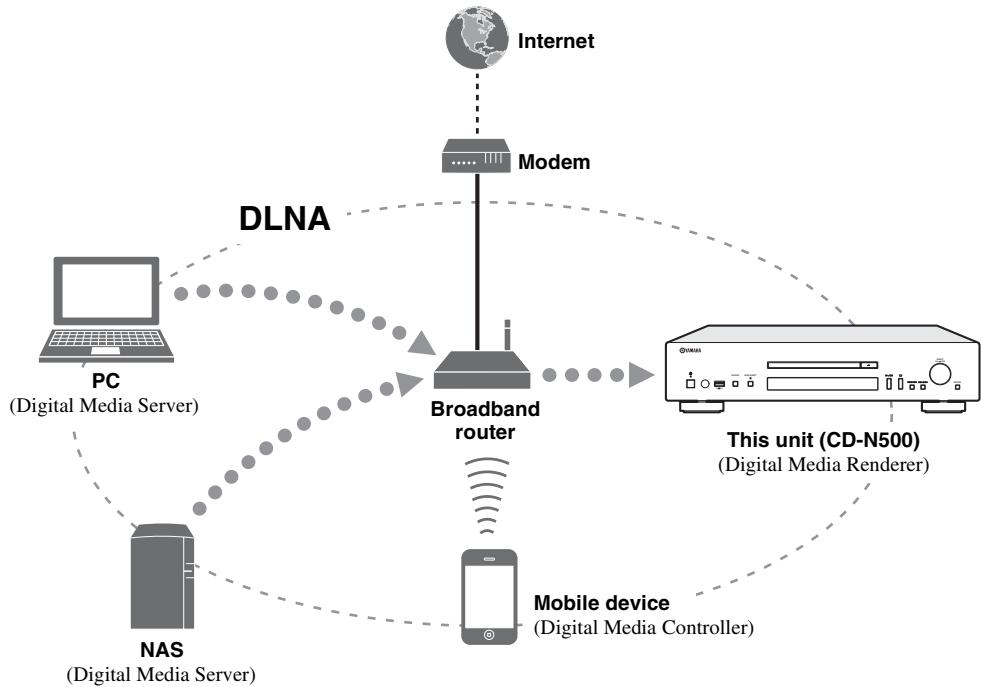
DLNA
"DLNA" stands for Digital Living Network Alliance, and is a guideline to promote standardization of interconnection of home network devices such as digital consumer electronics.
DLNA components are separated into four device classes: Digital Media Server (DMS), Digital Media Renderer (DMR), Digital Media Player (DMP) and Digital Media Controller (DMC).
"Digital Media Server (DMS)" is a device that is used to store or distribute digital contents such as music files. For the system using this unit, PCs and NAS are regarded as "Digital Media Server (DMS)".
"Digital Media Controller (DMC)" is a device to control digital contents. The dedicated mobile device application corresponds to "Digital Media Controller (DMC)" for the system using this unit.
"Digital Media Renderer (DMR)" is a device to receive instructions from "Digital Media Controller (DMC)" and play back digital contents such as this unit.
Similarly, "Digital Media Player (DMP)" is a device that can play back digital contents stored on "Digital Media Server (DMS)".
NAS
"NAS" stands for Network Attached Storage. By connecting your NAS and home network with a network cable directly, NAS can be a storage device, such as a hard disc drive. If your NAS is compatible with DLNA, you can share your music, pictures, or movies on the same home network as a digital media server.
PLAYABLE DISCS AND FILE FORMATS
Playable media and devices
Supported PC
PC with Windows Media Player 11 or Windows Media Player 12 installed.
Supported NAS
NAS that is compatible with DLNA version 1.5.
Supported USB devices
| Device | Class/Protocol | File formats |
| USB memory devices | MSC (Mass Storage Class) | FAT16/32 |
| USB audio player | MSC (Mass Storage Class) | FAT16/32 |
Notes
- Some devices may not work properly even if they meet the requirements.
- This unit does not support encrypted USB memory devices.
- Do not connect devices other than USB mass storage class devices: USB chargers, USB hubs, PCs, external HDD, etc.
- Yamaha and suppliers accepts no liability for the loss of data saved on the USB devices connected to this unit. It is recommended that the files are made backup copies.
- Playability of and power supply to all kinds of USB devices are not guaranteed.
Supported iPod via USB port
| iPod | iPhone | iPad |
| iPod touch, iPod nano (2nd through 6th generations) | iPhone, iPhone 3G, iPhone 3GS, iPhone 4, iPhone 4S | iPad, iPad 2, iPad (3rd generation) |
- As of August 2012
Notes
- iPod is licensed on the condition that individuals perform privately duplication and playback of uncopyrighted material or material legally approved of duplication and playback. Infringement of copyright is prohibited by law.
- Yamaha and suppliers accepts no liability for the loss of data saved on iPod connected to this unit. It is recommended that the files are made backup copies.
Supported mobile devices
For details, please visit Yamaha website.
Playable discs
Use compact discs bearing the marks below.
| Mark | Details |
| COMPACT DISC DIGITAL AUDIO | Compact discs (digital audio) |
| COMPACT DISC DIGITAL AUDIO Recordable | CD-R, CD-RW digital audio discs • CD-R or CD-RW discs bearing one of the following phrases. FOR CONSUMER FOR CONSUMER USE FOR MUSIC USE ONLY • Finalized CD-R or CD-RW discs only. |
| COMPACT DISC Digital Audio ReWritable | Note This unit may not be able to play some CD-R/ CD-RW discs or discs on which recording was not made correctly. |
| COMPACT DISC Digital Audio ReWritable | CD-TEXT discs The disc title, artist name, and track name are also displayed in addition to the time displays when playing back a CD with CD TEXT. |
To play back an 8-cm (3-inch) CD
Place it in the inner recessed area of the disc tray. Do not put a normal 12-cm (5-inch) CD on top of an 8-cm (3-inch) CD.
Notes
- Do not use any nonstandard shaped disc (heart, etc.) available on the market because it might damage the unit.
- Do not use a disc with tape, stickers, or paste on it. If you use such a disc, the disc may get stuck in the unit, or damage to the unit may result.

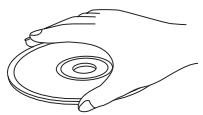
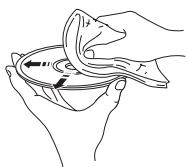
■ About handling discs
- Always handle with care so that the playing surface is not scratched. Do not warp discs.
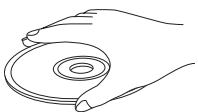
- To keep clean the playing surface, wipe with a clean, dry cloth. Do not use any type of disc cleaner, spray, or any other chemical-based liquid.
- Do not wipe with a circular motion; wipe straight outward from the center.

- Use a soft-tipped pen when writing on the label side of the disc.
- When a disc is not being used, remove it from this unit and store in an appropriate case.
- Do not expose discs to direct sunlight, high temperature or high humidity for a long time.
Note
Do not use any lens cleaners as they may be a cause of malfunction.
Playable discs and file formats
DLNA/USB
| Formats | Sampling frequency (kHz) | Quantization bit |
| WAV*1 | 8 to 192 | 16/24 |
| MP3*2 | 8 to 48 | 16 |
| WMA*3 | 8 to 48 | 16 |
| AAC | 8 to 48 | 16 |
| FLAC | 8 to 192 | 16/24 |
| ALAC*4 | 44.1 to 48 | 16 |
1 Only Linear PCM format files are playable.
2 MP3 PRO files are not supported.
3 WMA PRO and Lossless files are not supported.
4 ALAC stands for Apple Lossless Audio Codec.
#
- Playable file formats via iPod depends on your iPod.
- Files recorded with multi-channels are not supported.
- Playback for USB starts in order by date and time of creation.
Discs
| Formats | Sampling frequency (kHz) | Quontization bit |
| MP3 | 8 to 48 | 16 |
| WMA | 16 to 48 | 16 |
Notes
- Playback for MP3 or WMA files starts in alphanumeric order.
Copyright-protected WMA (DRM) files cannot be played back by this unit. - The disc must be ISO 9660 compatible.
- Elapsed time may not be displayed correctly while playing back variable bitrate contents.
SPECIFICATIONS
INPUT/OUTPUT
- NETWORK Ethernet connection .100Base-TX/10Base-T DLNA version 1.5
ANALOG OUT 2ch (L/R) - DIGITAL OUT Optical. ×1 Coaxial. ×1
- USB. ×1
AUDIO SECTION
Output level 1 kHz, 0 dB, fs 44.1 kHz .2.0 ± 0.3 V
- Signal to noise ratio (IHF-A network)
1 kHz, 0 dB, fs 44.1 kHz 110 dB or more
- Dynamic range
1 kHz, 0 dB, fs 44.1 kHz
100 dB or more
Harmonic distortion 1 kHz, 0 dB, fs 44.1 kHz .0.003% or less
Frequency response (CD) fs 44.1kHz . 2 Hz to 20 kHz, -3 dB (NETWORK) fs 48kHz . 2 Hz to 24 kHz, -3 dB fs 96kHz . 2 Hz to 48 kHz, -3 dB fs 192kHz . 2 Hz to 96 kHz, -3 dB
GENERAL
- Power supply [Europe model] .AC 230-240 V, 50Hz [U.S.A and Canada models] .AC 120 V, 60Hz [Asia model] .AC 110-120/220-240 V, 50 / 60Hz [Australia model] .AC 230-240 V, 50Hz [China model] .AC 220 V, 50Hz
Power consumption 28 W - Standby power consumption when network standby mode is enabled (reference data). 3.5 W
- Standby power consumption when network standby mode is disabled (reference data). 0.35 W
-
Dimensions (W × H × D) 435 × 96 × 313.3 mm (17-1/8 × 3-3/4 × 12-1/3 in)
Weight. 5.25 kg (11.6 lb) -
Please note that all specifications are subject to change without notice.
iPod, iPhone, iPad
iPad, iPhone, iPod, iPod nano, and iPod touch are trademarks of Apple Inc., registered in the U.S. and other countries.
"Made for iPod," "Made for iPhone," and "Made for iPad" mean that an electronic accessory has been designed to connect specifically to iPod, iPhone, or iPad, respectively, and has been certified by the developer to meet Apple performance standards. Apple is not responsible for the operation of this device or its compliance with safety and regulatory standards. Please note that the use of this accessory with iPod, iPhone, or iPad may affect wireless performance.
Android™ is a trademark of Google Inc.
WindowsTM
Windows is a registered trademark of Microsoft Corporation in the United States and other countries.
Windows XP, Windows Vista, Windows 7, Windows Media Audio and Windows Media Player are either registered trademarks or trademarks of Microsoft Corporation in the United States and/or other countries.


DLNA™ and DLNA CERTIFIED™ are trademarks or registered trademarks of Digital Living Network Alliance. All rights reserved. Unauthorized use is strictly prohibited.

Fraunhofer
Institut
MPEG Layer-3 audio coding technology licensed from Fraunhofer IIS and Thomson.
ATTENTION : VEUILLEZ LIRE CE QUI SUIT AVANT D’UTILISER L’APPAREIL.
ACCESSORIES FOURNIS 4
PREPARATION DE LA TÉLECOMMANDE 4
COMMANDES ET FONCTIONS 5
Panneau avant 5
Télécommande 6
Panneau arrête 8
RACCORDEMENTS. 9
⑤ SOURCE (P.14, 16, 18, 20, 22)
⑬ SELECT/ENTER (Commande rotative) (P.14, 16, 18, 21, 22, 24)
14 RETURN (P.14, 16, 21, 22)
③ SOURCE (P.14, 16, 18, 20, 22)
⑥ SHUFFLE (cP.15, 18, 21, 22)
⑦ REPEAT(P.15, 18, 21, 22)
Pourpermuterentrelesmodesderepétition.
⑧ Touches de lecture (P.14, 16, 18, 21, 22, 23)
(Lecture)
Pourmettrelalectureenpause.
(Saut arrrière)
9 HOME (P.14, 16, 21, 22)
10 NOW PLAYING (P.15, 17, 21, 22)
(Alimentation) (P.10)
14 DISPLAY (P.15, 17, 18, 21, 22)
19 RETURN (P.14, 16, 21, 22)
① Borne ANALOG OUT (P.9)
③ Borne DIGITAL OUT (OPTICAL) P.9
/[Lecture/Pause) ou > (Lecture)
⑤ SOURCE (S.14, 16, 18, 20, 22)
14 RETURN (S.14, 16, 21, 22)
③ SOURCE (S.14, 16, 18, 20, 22)
⑦ REPEAT (S.15, 18, 21, 22)
⑧ Wiedergabetasten (S.14, 16, 18, 21, 22, 23)
9 HOME (S.14, 16, 21, 22)
14 DISPLAY (S.15, 17, 18, 21, 22)
⑤ SOURCE (s.14, 16, 18, 20, 22)
③ SOURCE (s.14, 16, 18, 20, 22)
⑦ REPEAT (E8 s.15, 18, 21, 22)
(Sok bakat)/D> (Sokframat)*
Sokerbakat/framat.
HOME
Visar topp-nivåmenyn i frontpanelens display.
DISPLAY
⑤ SOURCE (p.14, 16, 18, 20, 22)
(p.14, 16, 18, 21, 22, 24)
RETURN (p.14, 16, 21, 22)
14 DISPLAY (p.15, 17, 18, 21, 22)
19 RETURN (p.14, 16, 21, 22)
③ Terminale DIGITAL OUT (OPTICAL) (p.9)
10 NOW PLAYING (pag.15, 17, 21, 22)
14 DISPLAY (pag.15, 17, 18, 21, 22)
RETURN (F8 pag.14, 16, 21, 22)
UW PC/NAS/MOBIELE APPARATEN
INSTellenEN 11
Setupmenubediening 23
Setupmenulijst 24
⑤ SOURCE (p. 14, 16, 18, 20, 22)
RETURN (p. 14, 16, 21, 22)
③ SOURCE (p. 14, 16, 18, 20, 22)
⑥ SHUFFLE (p. 15, 18, 21, 22)
Wisselt de willekeurige weergave.
⑦ REPEAT (15, 18, 21, 22)
9 HOME (p. 14, 16, 21, 22)
10 NOW PLAYING (p. 15, 17, 21, 22)
14 DISPLAY (p. 15, 17, 18, 21, 22)
19 RETURN (p. 14, 16, 21, 22)
BOIIPOCSBI I OTBETBI 2
IIPHJIAFAEMbIE IIPIHADJIJEKHOCTN 4
IIOJFTOTOBKA IYJIbTA JINCTAHUHHOY UIPABJIEHNA 4
OPTAHbI YIIPABJIEHHI I ΦYHKIIHII 5
IpeHnaHeJIb. 5
IyJIbT nIcTaHnIOHHOrO ynpaBJIeHn. 6
3aHHra pHaHeJIb 8
IIOJKJIOUeHn.. 9
IIKJIIOUeHHe K yCnJIHTeJIIO 9
IIoIKJIIOUeHHe K cetH (KOMIbIOTep/ycTpOoiCTBO NAS/ IIOIKJIIOUeHHe K INHTepHety) 10
BkJIIOUeHHe yCTpOiCTBa 10
3KCNJYATAU
HACTPOIKA KOMIIbIOTEPA/YCTPOIcTBA NAS/MOBJIbHOFO YCTPOIcTBA. 11
IpeIOCTaBJIeHneO6IIeeroIOcTpyIaKMy3bIkaJIbHbIM
qaiJAM,coXpaHeHHbIMHaKOMJIbIoTepe 12
Pa6oTa c IIMOoiIIO MoHJIbHOrO yctPoIcTba 13
BOCIIPOH3BEJEHNE MY3bIKAJIbHbIX
ФАЛJOB HA KOMПBIOTEPE/
YCTPOHCTBE NAS. 14
Рабota c ПOMOБьIO OCHOBHOrO 6JIOKa HIN ПИЛТа
ДистанцIHOrO yIppaJIeHnI. 14
BOCIIPOH3BVEJEHNE AUYINOCOIDEPJKHMOTO BHHTEPHETE.....16 IpocIyIuBaHne HHTepHeT-paIIOCTaIuI. 16
BOCIIPOH3BEJEHNE KOMIIAKT-ДИСКOB.....18 BOCIIPOH3BEJEHNE KOMIIAKT-DIUSKA 18 ИСПОЛБ3OBaHne peJHMa IIpOgPamMHO BOcIIPOH3BEJEHNA 19
BOCIIPOH3BEJEHNE C YCTPOICTB iPod/USB 20 IIOJIIOUeHHe yctpoiCTb iPod nJIN USB 20 BocpnOH3BeJeHne c yctpoiCTBa iPod 20 HcIOJIb3OBAHne paIINHPENHO peKHMa BOCpON3BEJEHnI dIy yctpoiCTBa iPod 21 BocpnOH3BeJEHne c yctpoiCTB USB 22
MEHIO HACTPOEK 23
Pa6oTa c MeHIO hAcTpoek. 23
CTpyKtypa MeHIO hAcTpoek. 24
MeHIO doIoiJIHTeJIbIbIX hAcTpoek 25
IPOQUEE
IIOHCK H YCTPAHEHNE HEHCIPABHOCTEIN 26
CoooHennHa nIncIIee IpeepHei PaHEn. 29
JOIOJIHHTEJIbHAIHHΦOPMAIIHRA. 30
IIOJIEPKINBAEMbIE INCKHΦOPMATbI ΦAIJIOB. 31
IIoeKHBaembIe HocHTeIN uycPoIcTBA. 31
IIeepKHBaeMbe HcKn H opMaTbI aaiIOB. 32
TEXHHUCKHEXAPAKTEPHCTHKI. 33
(B KOHcE HaCTOaIe rO pyKObOndCTBa) HnΦopMaunr O npOrpaMMHom oBecepeHnn
O daHHOM pyKOBoIDCTBe
- PIPMUEAHNII INBDOIT BAKHYIO HFOpMaIHHIO IO TEXHKe 6e3OIIaCHOCTH I yKa3aHHN IIO 9KCIJIyataIHIN. CIMBOJ OTMeuaET COBET IIO 9KCIJIyATAIHIN.
- TepmHH “iPod” B HactoIeM pyKOBOCTBe MoKet TaKke 063NaTaB yCtpoCTBO “iPhone” HJIH “iPad”.
ПРИЛАГАЕМьIE ПИНHAДПЕХHOCTN
Y6eIntecb B IIOJyueHnB CEx EpeuHcJIeHHbIX HnKe IpnHaJIeXKHOCTe.

IyIbT dIctaHcUOnHHOro yInpabVeHnna

CtepeokaebnRCA

Batapei (AA, R6, UM-3) (× 2)
CnIIOBOKa6eBb

PykoBoCTBO noJIb3ObaTeIa
⑤ SOURCE (v3 Ctp.14, 16, 18, 20, 22)
Bb6op ayDIOHcTOnHHka. _pH KaKOM HaKaTHN ayDIOHcTOnHHKN MeHAnOTc CJeIyIOUHM 6pa3OM. CD USB SERVER NET RADIO Ha3aJ K CD
⑥ PURE DIRECT
BkIIOueHHe H BbIKIOueHHe peKHMa PURE DIRECT.IIpn BkIIIOueHHpeKHMa PURE DIRECT KaueCTBO aydno 6ydet yJIyUHEHO.

EcJIN peKHM PURE DIRECT BkIIOueH,6yJeT ROpetb HnDnKaTop PURE DIRECT.
⑦ JIOTOK DINGKOBOda
3aŋpy3ka nɪska.
(8) (OTKpbItne/3aKpbItne)
OTKpbITHe HJH 3aKpbITHe JOTka NcKOBoJa.
⑨ Dusnnei nepedne naheu
OTo6paKeHHe 3JIeMeHTOB MeHIO, HnΦOpMaHHBocIIpOnH3BeDeEHNn I.T.I.

HaiaJIO HII pIPOCTaHOBka BOCIpOn3BeDeHn.
⑪ (ocTaHOBka)
OctaHOBka BOCIIPOH3BEeHnI.
12 / (nponyck/nonck Ha3aJ)
D>1D>>(nponyck/nonckBnepe)
IepexoJ K ppeIbIyIeIe KOMIO3HIIHH/NaHaJIy TeKyuIeI KOMIO3HIIHH, K CJeIyIOIeIe KOMIO3HIIHH HJIH IOHcB O6paTHOM/IpIaMOM HApIpaBJIeHH.
ДeICTBn3aBnCtOTayDHOHCTOHHka.
13 SELECT/ENTER (nOBOPOTbIy IpepeKJIouaTeJIb) (Ctp.14, 16, 18, 21, 22, 24)
IIOBepHHTe, YTO6bI BbIbpaTb IyHKT, HHaKMHTe, YTO6bI IOITBePHTb BbIbOp.
RETURN (Ctp.14, 16, 21, 22)
IepexoJ K MeHIO 60JIe BbICOKOуpOBnHa IINcIIJIe IpeJeHne IaHeJI.
IyIb m duCmaHcuOHHo2o ynpaeJeHua
IpeepaHa HnppaKpaPacHOro CnHnHa Ha OCHOBHO6JOK.
② OPEN/CLOSE
OTkpbltne HIN 3aKpbltne IOTka HnckOBoJa.
③ SOURCE (vCtp.14, 16, 18, 20, 22)
Bb6op ayDIOHcTOnHHKa. IIpN KaKJOM HaKaTHN ayDIOHcTOnHHKN MeHAnOTc cJIeIyIOHm 06pa3OM. CD USB SERVER NET RADIO Ha3aJ K CD
(4) PURE DIRECT
BkJIIOUeHHe N BbKJIIOUeHHe peKHMa PURE DIRECT.IIpyn BkJIIOUeHHeNpeKHMaPURE DIRECT KauecTBo ayuNo 6ydet yJyuHHeo.
⑤ ΚιφροBBie KHONK (E8 Ctp.18)
HcnoB3yUorC Jn HneHocpeCTBeHHORO Bb6opa KOMn03nHn Ha Nscke HnB Tekuie nPiKe.
⑥ SHUFFLE (Ctp.15, 18, 21, 22)
Bb6oppeKHMa cIyauHnHO BOCpON3BeDHeHH.
⑦ REPEAT (Ctp.15, 18, 21, 22)
BbI6Op pexHMa IOBToPA.
⑥ KhONKN ynpaBNeHnA BOCnpOn3BeDeHnEM (Ctp.14, 16, 18, 21, 22, 23)
(Bocnpon3BeDeneHne)
3aIyck BOCIIPOH3BVeEHHA.
(ocTaHOBka)
OcTaHOBKa BOCINpOn3BeDeHn.
(nay3a)
Приноановka BOCIPON3BEdHЯ.
( nponyck Bnepeq)
14 DISPLAY (Ctp.15, 17, 18, 21, 22)
Bb6op HhOpmaHn,OTobpaKaHOuIeCnaHcIIepeJeHnePiHeJI,Haipmep HhOpmaHnBOcIpOn3BeJeHH.
15 CLEAR (Ctp.19)
YdaJIeHHe IocJIeIHei 3aIporpamMnHOBaHHoI KOMIO3HINN KOMIIaKT-ⅡHcKa Audio CD (KpOme KOMIIaKT-ⅡHcKOB c DaHHbIMH) BpeJHMe H3MeHeHInI pIporpAMMbI.
16 PROGRAM
BkJIIOueHHe N BbIKJIIOueHHe peKHMa IIPOrpaMMHOBOcIIIOHN3BeDeHHN. BpeKHMe IIPOrpaMMHOBOcIIIOHN3BeDeHHN MOxHO BOcIIIOHN3BeCTH KOMIIIO3HINH KOMIIaKT-DnCka Audio CD (KpOme KOMIIaKT-DnCKOB CdaHHbIMN) B 3aIIPOrpaMMHPOBaHHO IIOCJIeIOBAteJIbHOCTH.ДЯ IIIOJIyEHHN IOIIOJIHHTeBJHO INHΦOpMaHH CM. pa3JeI“IcIIIOJb3OBaHHe peKHMa IIPOrpaMMHOBOcIIIOHN3BeDeHHN" (Ctp.19).
17 A/B
18 <(nonck Ha3aД), (nonck BnepeД) (Ctp.18, 21)
HaKMHTe H yIepKHBaHTe 3Tu KHOIIKY BO BVpeMBAOIOHN3BcEHHN, YTO6bI BbIOJIHNHTb IOHCK BHYTpH KOMIO3NIHH BOBpTHOM/IIpRmOM HaIPpaBJeHHN.
RETURN (Ctp.14, 16, 21, 22)
IepexoJ K MeHIO 60JIe BbICOKO YoPBOHa Na HcIIJIe IpeJeHne IaHeJI.
20 MODE (Ctp.21)
Bb6op cTaNapTHORO HIN paIINpeHHOro peKHMa BO BpemBocipOn3BeDeHnC yctpoiCTBa iPod.
② Khonkn ynpabJeHnaYcunntenem
YnpaBJIeHHe COOTBeTCTByIOUHMN yHKIIJMaMH yCHJIHTeJIy Yamaha.
(NTaHne)
BkJIIOUeHHe HJN BbIKJIIOUeHHe ycHJIHTeJIa.
INPUT ( I)
Bb6op nctouHHKOB BXoHnO rHaJa.
VOLUME (+ / - )
Hactpoika rpoMkoctn.
MUTE
BbIKIIOUeHHe IN BKJIIOUeHHe 3Byka.
Длг loJyueHnno JIOJIHHTeJbHOH HΦopMaunn 06 3THX DeIcTBHX cm. pyKOBoDcTBO IIO 3KCIpyaTaUNu ycJIHTeJIa.
#
HACTPOIKA KOMПьОTEPA/YCTPOICTBA NAS/MOBиЛьНО YCTPOICTBA
Hactpoite KOMIIbIOTep HIN yCTpoiCTBO NAS, IIOKJIIOUeHHoe K cETH, YTO6bI BOCIPPOH3BOIDHTb My3bIKaJIbHbe φaJIbI, coXpaHeHHbIe Ha KOMIIbIOTepe HIN yCTpoiCTBe NAS, JIN6o Hactpoite Mo6HJIbHOe yCTpoiCTBO IIyIpaBJIeHHN 3TMM anIIapatom.

IIOJIHNHTeHbHyIO HΦopMaUHO IO NKJIIOUeHHN K INTePHeT MOKHO HAITB BYPOBOCTBE K cTeBBIM yCtpoiCTBaM.
HaCtpoiKa KOMnbIOTepa
NylbT nCTaHcNoHHoro ynpabJeHnA
SELECT/ENTER (noBopOtHbI nepeKnIOuataJIb)
IIOBepHnTe BO BpeMa BOCIpOn3BeJeHnna, YTO6bI IpepeHTN K CJIeJyUOIIeKOMIIO3HUN HIN Ha3aI K IIpeIbIyUIIeKOMIO3HUN/HaJaTy TEkyIIeKOMIO3HUN.
KhonnynpablennBocnpon3BeDeHnEM
HcIOJIb3yIOTcIJIyIpaBJIeHHaayIHocOJIepKHMbIM (Ctp.5,6).
DISPLAY
IIpn HaxkaTIN 3TOI KHOIIKN BO BpeMBAOIOH3BeDEHHN IIN IAY3bI INHOpMaIIHnIpeDHei IIaHeJIIN 6yJET H3MeHrTBcR B CJIeDyIOIeMIOpAKe.

SHUFFLE
Bb6op peKHMa cIyauHOrO BocIpOn3BeJeHnB CJIeDyIOIIeM IopRJKe.

REPEAT
Bb6op peKIma IOBTopa B cIeIyIoUeM IopAKe.

NOW PLAYING
OTo6paKeHHe TeKyuIe HnΦOpMaIHH BocIpOH3BeDEnHna IINcIIeepeIHeI NaHeI.

- EcJIN BOCPPOH3BOHMMA KOMI03Hnna 6yJeT OCTaHOBJIeHa, B CJeJyIOHn pa3 BOCPPOH3BeJeHne HauHETc c Haayala 3Toi KOMIO3HnH.
-IIJIyUyeHnI OIOJIHNTeJIbHOI HhOpMaunI O IIOJIePKHBAEMbIX aJIAx CM.pa3JeI "IIOJIIEPJKHBAEMbIE INCKN IΦOPMATbI ΦAIJOB" (Ctp.31).
Послuyшеве унмер hempaoduocmaцu
Pa6oTa c nOMOuBIO OCHOBHO 6JOKa IJI NpJIbTa INCTaHcNHOHOrO ynpabIeHnA
1 HaxmajTe KhoNky SOURCE, TTo6bI BbIbpaTb aydnoNcTOUHnK "NET RADIO".
OchOBHOI 6JOK/nyIbT IINCTaHcNoHHoro ynpabJIeHnA


Dncnne npedne nane
Source
NET RADIO
2 CnomoIbIO cIeMyOuIcx opraHOB ynpaBJIeHnBaIbepIte pYHKT MeHIO, 706bl NaHTn Tpe6yEmyo nHTepHeTpapAdnoCTaHcIO.
OCHOBHOI 6JOK
SELECT/ENTER RETURN
SELECT/ENTER (noBopOtHbI nepeKnIOuAteJIb)
NylbT nCTaHcNoHHoro ynpabJeHnA
3aIyck BocnpOn3BVeJeHn.
(ocTaHOBka)
OctaHOBKa BOCIIPOIN3BeIeHNIA.
DISPLAY
IIpn HaukaTHN 3TOI KHOJIKN BO BpeMBAOIOH3BeDEHn IIN IIay3bI HhOpMaIHNa HIIpeJHHeI IaHeJIb6yDet H3MeHrTbcB CJIeDyUoIeMIOpAKe.

NOW PLAYING
OTo6paKeHHe TeKyuIe HnΦOpMaunn BocPOn3BVeDHeNHa DnCIIeE PepeDHei PaHeI.
中
HHTepHET-paHocTaHINMOJHO3apeHcTpHPOBaTbNIO6aBHTb B3akIaIKN,IOcETHBBe6-caIT“vTuner Radio Guide”.ДЯ HcIOJIb3OBAHIN3ToIyHKINHNEO6XoIMMo yKa3aTBMAC-aIpec DaHHoro aIInapata(CTp.24)B KaueCTBe HIEHTnΦHKATOPaDIAI pOnHrpBtAEJIa,HNMeTb aIpec 3JIeKTPoHNOIPOTuY,HTo6bIco3dAteJBINuHyIOyueTHyIO3aINCb. IJIaIOJIyuEHNNDOIOJIHNTEJIbHOINHΦOpMaINNIOcETHTe CJIeNyIOUIN Be6 caIT.
http://yradio.vtuner.com/
Bocnpou38edeHue komnakm-ducka
1 HaximmaTe KhoNky SOURCE, yTo6bI Bbl6paTb aydnoNCtOuHnK "CD".
OchOBHoi 6JOK/nyIbT dNCTaHcUHOHOro ynpabLeHn

Dncnne npedne nane
Source
CD
2 Haxmnte KhoNky (OTKpbITne/ 3aKpbITne) Ha OCHOBHom 6JIOKe, YTO6bl OTKpbITb ILOTOK INCKOBOda, N BCTaBBTe KOMnAKT-IMCK.
3 Haxmnte KhoNky (otKpbITne/ 3aKpbITne) eue pa3, YTO6bI 3aKpbITb IOTOK DnCKOBOda.
Bocnpn3BeJeHHe NaHcTcA bTOMaTHueckn.
4 B pexnme Bocnpon3BedeHnna dny npablenHa yHKunmaa annapata nCNoIb3yOTc ONcaHHbIe HNXe opraHbI npablenHa.
OCHOBH06JOK
Khonnky npableny Bocnpon3BeHeHneM
IyblT nctaHnOHHO ynpabJeHn
SELECT/ENTER (noBopOtHbI nepeKnIOuataTeJIb)
IIOBepHHTe BO BpeMBOcIpOn3BeDeEHn, YTO6bI IpepeHTN K CJeJyUIOSei KOMIO3HUN HJIN Ha3aJ K IIpeJIbIyUIIeKOMIO3HUN/HaJaIy TeKyuIIe KOMIO3HUN.
KhoIkn ynpaBHeHn BocpOu3BeHeHnEM
HcIIOJIb3yIOTcI yIyIpaBJIeHHa ayIHocOJIepKHMbIM (Ctp.5,6).
LHpOBbIe KHOII (TOJIbKO KOMNaKT-DnCKN Audio CD)
HcIOJIb3yIOTcJII HeIOcpeICTBeHHOTo BbI6Opa KOMIO3NIIHN Ha KOMIIAKT-DINCKe.
KoMaKaT-
Dnck Audio
CD:
KOMNaKT- HNCK C DAHHBIMH:

A/B (ToJIbKO KOMnakT-DnCK Audio CD)
Повтореные ВOCирон3ВeДeн住房уka3aHHOrоОтpe3Ka KOMIO3HиHHпг ВOCирон3ВeДeнHHКOMПАкТ-ДИСКа Audio CD (КрOME KOMПАкТ-ДИСКOB сДаHHbIMN) (Ctp.7).
REPEAT
Bb6op peKHMIOBTOpa B cIeIyIOUeM IOpAKe.
KOMIaKT- IINCK Audio CD:

KOMIaKTI INCK C DaHHbIM:

#
- EcJIIN BOCIPOH3BOIDHMAR KOMIO3HnIA 6yJET OCTaHOBJIeHa, B CJJeIyIOHn pa3 BOCIPOH3BeJEHHe NaHHTcC hauJaIa 3ToI KOMIO3HnIH.
-Пин haжатин Khoикн (octaHOBka) пин octaHOBJIeHOM BocPOn3BeJehnB CJIeJyIooIIu pa3 пин 3aIpycke BocPOn3BeJehn6 6yIet 3aIyuIeHa IepBaKOMIoO3HIIu Ha IIpoCJiyINBaEMOM KOMIIaKT-DIcKe.
Для пolyчени доллгентьhoинфорmaциnoIpoДержнавсьх дскaxи Файлax cm.раздел"ПОДДЕРЖИBAEMbI EДСКИ ИФОМATыIФАЛIOB"(CtP.31).
IcnoJb306aHue pexuma npo2pamMHO2 8ocnpou3BedeHua
BpeKHMI pOgrpAMMHO BOCIpOn3BeJeHnMaOKHO BOCIpOn3BOJNTb KOMIO3NHN B 3aIIpOgrpAMMPOBaHHo IIOCEIOBAteJIbHOCTN.
1 HaxmTe KhoNky PROGRAM Ha npIbTe dinCTaHcNoHHOrO ynpaBHeHn npn octaHOBJIeHHOM BOCnPOn3BeDeHn.
Annapat IpeeIeT BpeKHM H3MeHeHHn IIporpaMMbl.
2 CnomoBtu cHpObBix KHONOK Bbl6epnTe KOMNo3uHnHaXmTe KhONky ENTER dJa noDTBePckDeHna.
Bb6op peKHMa cIyauHOro BocIpOn3BeJeHnca yctpoiCTBa iPod.

REPEAT*
Bb6op peKHMa IOBtopa B CJIeIyIOUeM IOpAKe.

NOW PLAYING
OTo6paKeHHe TeKyuIe HnΦopMaunn BocPOn3BVeDENHa nCnJIe epeJHe IaHeII.
*ДeиctBnIЗаВисгТОМоДeЛиустpoiCtBA iPod.

IIOJIeKHNBaEMbIeΦOpMaTbIΦaIIIOB Iprn BocIpOn3BeJeHNN c yctpoiCTBa iPod 3aBHCrT OT yctpoiCTBa iPod.
Bocnpou3eedeHue c ycmpoucme USB
1 HaximaiTe KhoNky SOURCE ha OCHOBHOM 6JIOKe IIN Ha NpIbTe DnCTaHcNoHHOro ynpaBJIeHn, YTO6bl BbIbpaTb aydnoNCToUHnK "USB" (Ctp.20).
2 ПОДКЛЮЧИТЕ yCTPOIcTBO USB K noprTy USB Ha ochOBHOM 6JIOke.
HaIinJIepeJHHeI HaneJH OTo6pa3HTc
Ha3BaHHe faJIa H,ecJH Ha yctpoiCTBe USB
HMeIOTe faJIbI, KOTOpBIE MOKHO BOCIIPOH3BecTH
Ha aIIapate, BOCIIPOH3BeJeHHe HaUHeTc
aBTOMaTHueckn C yYeTOM JaTbI H BpeMeHH CO3JaHH
faiIOB.
3 B pexnme Bocnpon3BedeHnnaIynpaBHeHn yHKnmaN annapaTaNCNoJIb3yIoTc ONncaHHbIe HNXeoprAhbl ynpaBHeHn.
OchOBHoi 6Iok
NytbT dntaHnOHHO ynpabNeHn
SELECT/ENTER (noBopOtHbI nepeKnIOuataJIb)
ПовернITE ВВЕМВВОСПОНЗВЕДEHNY,ЧТБИпейTNКСЛЕДУЮШЕКOMПОЗИПИНHAJIHа3адКПпдыДушЕКOMПОЗИПИN/Haчалу TekyшЕKOMПОЗИПИN.
KhONkynypaBHeHnBocpOn3BeDeHnEm
HcIIOJIb3yIOTcI yIyIpaBJIeHHa ayIHOCOJIepKHMbIM (Ctp.5,6).
RETURN
IepexoK MeHIO 6OJIee BbICOKO rypOBnHa IINCIJIe IpeJHeII NaHEJN.
HOME
IepexoK MeHIO BepxHero ypOBnHa IIncIIiee IpepeHHe IIaHeJI.
DISPLAY
IIpn HaxkaTIN 3TOI KHOIIK BO BpeMBAOIIPOH3BeDEHN HII INIay3bI HNΦOpMaIIHA IIpeJHHe IaHEJIIN 6yJeT H3MeHrTbcB CJIeDyIOUeM IIopJKe.

SHUFFLE
Bb6op peKHMa cJyauHHO BOCIPOH3BeJeHHBA CJIeJyIOIIe IOpAJIke.

REPEAT
Bb6op peKHMa IOBToPa B CJIeIyIOUeM IOpAKe.
NOW PLAYING
OTo6paKeHHe TeKyuIe HnΦOpMaIHH BocIpOn3BVeDENHa nIcIIepepeIHe IaHeJI.

- ECJIN BOCIIPOH3BOIDHMaKOMIO3HnIg 6yJeT OCTaHOBJeHa, BV CJJeIyIOuIpa3 BOCIIPOH3BeJeHHe NaHuHTcC hHaJa IToI KOMIO3HnI.
ДлгИйученя ДОПЛHNTeJIbHOI HhФорmaцин O ПОДержнБаembix Файлax сM.раздeЛ "ПОДДЕРЖИBAEMbIE ДИСКИ ΦОРМАТы ΦAIJOB" (Стср.31).
MEHIO HACTPOEK
MeHIO HAcTpoE KIO3BOJIaER yCTaHaBJIHBaTB pa3JIINuHbIe InapaMeTpbl yCTpOIHCTBA.
Paboma c MeHIO Hacmpoek
Pa6Ota c nOMoUbIyNJIbTa DnCTaHcNoHHOrO ynpaBJeHna
中
- O6paIaItec b c IINCKOM aKKypaTHO, YTO6bI He IIOUapAnatb ero IOBepxHocTB. He crn6aIte IINck.
- OuHuaIte IOBepxHocTb IINcKa YHcToI cyXoY TkaHbIO. He HcIOJIb3yIte CpeICTBa IJIA OUHcTKN IINCKOB, a3pO30JIH HII JIIO6Ie DpyrHe XHMueCKe JIKKOCTN.
- IIpoTHpaIte IINCK He KpyTOBbIMN IIBHKeHHaMn, a OT IeHTpa K kpaM.
-ДяHAHeceHЯДПИСeHа3TнКeTKyДИСKa HcIOJIb3yIteФJOMaCTep.
- EcIIN IINCK He HcIOJIb3yETc, H3BJIeKHTe erO H3 aIIIapata H IOJIOXHTe B COOTBeTCTByIOUHfYJIarp.
HeIOBepraIteINCKBO3JeHcTBHIOIpMbIX COJIHeuHbIXJUyEi, BbICOKOI TeIMIIpeaTpybIHbBICOKOBJIaJXHOCTN BTeueHne IJIHTeJIbHOrO BpeMeHH.
PpumeyaHue
He nIIOJIb3yIte KaKHe-ⅡH6O OUnCTHTeJIN DJIa JInH3, TaK KaK 3To MoKet IIpHBecTH K HeNCIIpaBHO pa60te.
Pooepxueaembe ducku u foopmabla auloe
DLNA/USB
| Форматы | Частota Ди stickpeетиЗаци (к Г.) | Глухина Ди stickpeетиЗаци |
| WAV*1 | 8-192 | 16/24 |
| MP3*2 | 8-48 | 16 |
| WMA*3 | 8-48 | 16 |
| AAC | 8-48 | 16 |
| FLAC | 8-192 | 16/24 |
| ALAC*4 | 44,1-48 | 16 |
1 ΠΟДΙερχΑΒΑθότου ΚΙβκο φαιλίνι ΜιΝΕύ ΘΟ ἀΚΜ-φόρΜΑτα.
2 ΦαιЛы МР3 PRO He подержнваютca.
3 ΦαιЛы WMA PROи Lossless He подержнавотя.
4 ALAC obo3haaert "Apple Lossless Audio Codec".
#
-Полдержнаваимьформатыфай IOB пн BOCIPON3BedeHIN c yctpoiCTBa iPod 3aBnCt ot yctpoiCTBa iPod.
-Файлы,заинcaHHbIe c HeckoJIbKHMn KaHaJIaMH, He
ПОДдержИВaIOTс.
BocipnoH3BeHeHne paJIIOB cYcTpoiCTBa USB BbIIOJIHaTeCB IIopJdKe DaTbI b BpeMeHHx Co3JaHHa.
1 Dnckn
This product uses the following free software.
For information (copyright, etc) about each software, read the original sentences stated below.
About The Independent JPEG Group's JPEG software
The Independent JPEG Group's JPEG software
Copyright © 1991-2010, Thomas G. Lane, Guido Vollbeding.
All Rights Reserved except as specified below.
The authors make NO WARRANTY or representation, either express or implied, with respect to this software, its quality, accuracy, merchantability, or fitness for a particular purpose. This software is provided "AS IS", and you, its user, assume the entire risk as to its quality and accuracy.
Permission is hereby granted to use, copy, modify, and distribute this software (or portions thereof) for any purpose, without fee, subject to these conditions:
(1) If any part of the source code for this software is distributed, then this README file must be included, with this copyright and no-warranty notice unaltered; and any additions, deletions, or changes to the original files must be clearly indicated in accompanying documentation.
(2) If only executable code is distributed, then the accompanying documentation must state that "this software is based in part on the work of the Independent JPEG Group".
(3) Permission for use of this software is granted only if the user accepts full responsibility for any undesirable consequences; the authors accept NO LIABILITY for damages of any kind.
These conditions apply to any software derived from or based on the IJG code, not just to the unmodified library. If you use our work, you ought to acknowledge us.
Permission is NOT granted for the use of any IJG author's name or company name in advertising or publicity relating to this software or products derived from it. This software may be referred to only as "the Independent JPEG Group's software".
We specifically permit and encourage the use of this software as the basis of commercial products, provided that all warranty or liability claims are assumed by the product vendor.
About PNG Reference Library
libpng versions 1.2.6, August 15, 2004, through 1.4.5, December 9, 2010, are Copyright © 2004, 2006-2010 Glenn Randers-Pehrson, and are distributed according to the same disclaimer and license as libpng-1.2.5 with the following individual added to the list of Contributing Authors
Cosmin Truta
libpng versions 1.0.7, July 1, 2000, through 1.2.5 - October 3, 2002, are Copyright © 2000-2002 Glenn Randers-Pehrson, and are distributed according to the same disclaimer and license as libpng-1.0.6 with the following individuals added to the list of Contributing Authors
Simon-Pierre Cadieux
Eric S. Raymond
Gilles Vollant
and with the following additions to the disclaimer:
There is no warranty against interference with your enjoyment of the library or against infringement. There is no warranty that our efforts or the library will fulfill any of your particular purposes or needs. This library is provided with all faults, and the entire risk of satisfactory quality, performance, accuracy, and effort is with the user.
libpng versions 0.97, January 1998, through 1.0.6, March 20, 2000, are Copyright ©
1998, 1999 Glenn Randers-Pehrson, and are distributed according to the same disclaimer and license as libpng-0.96, with the following individuals added to the list of Contributing Authors:
Tom Lane
Glenn Randers-Pehrson
Willem van Schaik
libpng versions 0.89, June 1996, through 0.96, May 1997, are Copyright © 1996, 1997 Andreas Dilger Distributed according to the same disclaimer and license as libpng-0.88, with the following individuals added to the list of Contributing Authors:
John Bowler
Kevin Bracey
Sam Bushell
Magnus Holmgren
Greg Roelofs
Tom Tanner
libping versions 0.5, May 1995, through 0.88, January 1996, are Copyright © 1995, 1996 Guy Eric Schalnat, Group 42, Inc.
For the purposes of this copyright and license, "Contributing Authors" is defined as the following set of individuals:
Andreas Dilger
Dave Martindale
Guy Eric Schalnat
Paul Schmidt
Tim Wegner
The PNG Reference Library is supplied "AS IS". The Contributing Authors and Group 42, Inc. claim all warranties, expressed or implied, including, without limitation, the warranties of merchantability and of fitness for any purpose. The Contributing Authors and Group 42, Inc. assume no liability for direct, indirect, incidental, special, exemplary, or consequential damages, which may result from the use of the PNG Reference Library, even if advised of the possibility of such damage.
Permission is hereby granted to use, copy, modify, and distribute this source code, or portions thereof, for any purpose, without fee, subject to the following restrictions:
- The origin of this source code must not be misrepresented.
- Altered versions must be plainly marked as such and must not be misrepresented as being the original source.
- This Copyright notice may not be removed or altered from any source or altered source distribution.
The Contributing Authors and Group 42, Inc. specifically permit, without fee, and encourage the use of this source code as a component to supporting the PNG file format in commercial products. If you use this source code in a product, acknowledgment is not required but would be appreciated.
About zlib Library
Copyright notice:
©1995-2010 Jean-loup Gailly and Mark Adler
This software is provided 'as-is', without any express or implied warranty. In no event will the authors be held liable for any damages arising from the use of this software.
Permission is granted to anyone to use this software for any purpose, including commercial applications, and to alter it and redistribute it freely, subject to the following restrictions:
- The origin of this software must not be misrepresented; you must not claim that you wrote the original software. If you use this software in a product, an acknowledgment in the product documentation would be appreciated but is not required.
- Altered source versions must be plainly marked as such, and must not be misrepresented as being the original software.
- This notice may not be removed or altered from any source distribution.
About FLAC codec Library
Copyright ©2000,2001,2002,2003,2004,2005,2006,2007, 2008,2009 Josh Coalson Redistribution and use in source and binary forms, with or without modification, are permitted provided that the following conditions are met:
-
Redistributions of source code must retain the above copyright notice, this list of conditions and the following disclaimer.
-
Redistributions in binary form must reproduce the above copyright notice, this list of conditions and the following disclaimer in the documentation and/or other materials provided with the distribution.
-
Neither the name of the Xiph.org Foundation nor the names of its contributors may be used to endorse or promote products derived from this software without specific prior written permission.
THIS SOFTWARE IS PROVIDED BY THE COPYRIGHT HOLDERS AND Contributors "AS IS" AND ANY EXPRESS OR IMPLIED WARRANTY, INCLUDING, BUT NOT LIMITED TO, THE IMPLIED WARRANTYES OF MERCHANTABILITY AND FITNESS FOR A PARTICULAR PURPOSE ARE DISCLAIMED. IN NO EVENT SHALL THE FOUNDATION OR COLLABORORS BE LIABLE FOR ANY DIRECT, INDIRECT, INCIDENTAL, SPECIAL, EXEMPLARY, OR CONSEQUENTIAL DAMAGES (INCLUDING, BUT NOT LIMITED TO, PROCUREMENT OF SUBSTITUTE GOODS OR SERVICES; LOSS OF USE, DATA, OR PROFITS; OR BUSINESS INTERruption) HOWEVER CAUSED AND ON ANY THEORY OF LIABILITY, WHETHER IN CONTRACT, STRICT LIABILITY, OR TORT (INCLUDING NEGLIGENCE OR OTHERWISE) ARISING IN ANY WAY OUT OF THE USE OF THIS SOFTWARE, EVEN IF ADVISED OF THE POSSIBILITY OF SUCH DAMAGE.
About IwIP Library
Copyright © 2001-2004 Swedish Institute of Computer Science.
All rights reserved.
Copyright © 2002-2003, Adam Dunkels.
All rights reserved.
Copyright © 2001-2004 Leon Woestenberg
Copyright © 2001-2004 Axon Digital Design B.V., The Netherlands. All rights reserved.
Copyright © 2007 Dominik Spies kontakt@dspies.de All rights reserved.
Redistribution and use in source and binary forms, with or without modification, are permitted provided that the following conditions are met:
- Redistributions of source code must retain the above copyright notice, this list of conditions and the following disclaimer.
- Redistributions in binary form must reproduce the above copyright notice, this list of conditions and the following disclaimer in the documentation and/or other materials provided with the distribution.
- The name of the author may not be used to endorse or promote products derived from this software without specific prior written permission.
THIS SOFTWARE IS PROVIDED BY THE AUTHOR "AS IS" AND ANY EXPRESS OR IMPLIED WARRANTY, INCLUDING, BUT NOT LIMITED TO, THE IMPLIED WARRANTY OF MERCHANTABILITY AND FITNESS FOR A PARTICULAR PURPOSE ARE DISCLAIMED. IN NO EVENT SHALL THE AUTHOR BE LIABLE FOR ANY DIRECT, INDIRECT, INCIDENTAL, SPECIAL, EXemplARY, OR CONSEQUENTIAL DAMAGES (INCLUDING, BUT NOT LIMITED TO, PROCEDURE OF SUBSTITUTE GOODS OR SERVICES; LOSS OF USE, DATA, OR PROFITS; OR BUSINESS INTERruption) HOWEVER CAUSED AND ON ANY THEORY OF LIABILITY, WHETHER IN CONTRACT, STRICT LIABILITY, OR TORT (INCLUDING NEGLIGENCE OR OTHERWISE) ARISING IN ANY WAY OUT OF THE USE OF THIS SOFTWARE, EVEN IF ADVISED OF THE POSSIBILITY OF SUCH DAMAGE.
Copyright © 2002 CITEL Technologies Ltd.
All rights reserved.
Redistribution and use in source and binary forms, with or without modification, are permitted provided that the following conditions are met:
- Redistributions of source code must retain the above copyright notice, this list of conditions and the following disclaimer.
- Redistributions in binary form must reproduce the above copyright notice, this list of conditions and the following disclaimer in the documentation and/or other materials provided with the distribution.
- Neither the name of CITEL Technologies Ltd nor the names of its contributors may be used to endorse or promote products derived from this software without specific prior written permission.
THIS SOFTWARE IS PROVIDED BY CITEL TECHNOLOGIES AND
CONTRIBUTORS "AS IS" AND ANY EXPRESS OR IMPLIED WARRANTYES,
INCLUDING, BUT NOT LIMITED TO, THE IMPLIED WARRANTYES OF
MERCHANTABILITY AND FITNESS FOR A PARTICULAR PURPOSE ARE
DISCLAIMED. IN NO EVENT SHALL CITEL TECHNOLOGIES OR
CONTRIBUTORS BE LIABLE FOR ANY DIRECT, INDIRECT, INCIDENTAL, SPECIAL, EXEMPLARY, OR CONSEQUENTIAL DAMAGES (INCLUDING, BUT NOT LIMITED TO, PROCUREMENT OF SUBSTITUTE GOODS OR SERVICES; LOSS OF USE, DATA, OR PROFITS; OR BUSINESS INTERUCTION)
HOWEVER CAUSED AND ON ANY THEORY OF LIABILITY, WHETHER IN CONTRACT, STRICT LIABILITY, OR TORT (INCLUDING NEGLIGENCE OR OTHERWISE) ARISING IN ANY WAY OUT OF THE USE OF THIS SOFTWARE, EVEN IF ADVISED OF THE POSSIBILITY OF SUCH DAMAGE.
Notice for Windows Media DRM
Use or distribution of such technology outside of this product is prohibited without a license from Microsoft.
Content owners use Windows Media digital rights management technology (WMDRM) to protect their intellectual property, including copyrights. This device uses WMDRM software to access WMDRM protected content. If the WMDRM software fails to protect the content, content owners may ask Microsoft to revoke the software's ability to use WMDRM to play or copy protected content. Revocation does not affect unprotected content. When you download licenses for protected content, you agree that Microsoft may include a revocation list with the licenses. Content owners may require you to upgrade WMDRM to access their content. If you decline an upgrade, you will not be able to access content that requires the upgrade.
Do not disassemble, decompile, or reverse engineer the software included in Yamaha AV products.
About Apple Lossless Audio Codec
Copyright © 2011 Apple Inc. All rights reserved.
Licensed under the Apache License, Version 2.0 (the "License"); you may not use this file except in compliance with the License.
You may obtain a copy of the License at
http://www.apache.org/licenses/License-2.0
Unless required by applicable law or agreed to in writing, software distributed under the License is distributed on an "AS IS" BASIS, WITHOUT WARRANTY OR CONDITIONS OF ANY KIND, either express or implied.
See the License for the specific language governing permissions and limitations under the License.
Information for Users on Collection and Disposal of Old Equipment and Used Batteries


Pb
These symbols on the products, packaging, and/or accompanying documents mean that used electrical and electronic products and batteries should not be mixed with general household waste.
For proper treatment, recovery and recycling of old products and used batteries, please take them to applicable collection points, in accordance with your national legislation and the Directives 2002/96/EC and 2006/66/EC.
By disposing of these products and batteries correctly, you will help to save valuable resources and prevent any potential negative effects on human health and the environment which could otherwise arise from inappropriate waste handling.
For more information about collection and recycling of old products and batteries, please contact your local municipality, your waste disposal service or the point of sale where you purchased the items.
[Information on Disposal in other Countries outside the European Union]
These symbols are only valid in the European Union. If you wish to discard these items, please contact your local authorities or dealer and ask for the correct method of disposal.
Note for the battery symbol (bottom two symbol examples):
This symbol might be used in combination with a chemical symbol. In this case it complies with the requirement set by the Directive for the chemical involved.
Français
Yamaha Music (Russia) LLC.
Room 37, bld. 7, Kievskaya street,
Moscow, 121059, Russia
Tel: +7-495-626-5005
| The laser component in this product is capable of emitting radiation exceeding the limit for Class 1. |
| Le laser de cet appeareil peut émettre un rayonnement dépassant les limites de la classe 1. |
| Die Laser-Komponente in dieser Modèkt kann eine Strahlung abgeben, die den Grenzwert der Klasse 1 übersteigt. |
| Laserkomponenten ienna apparat kan avege en strälning som överskrider gränsvärdet für klass 1. |
| Il laser contento in quello prodotto è in grado di émettere radiazioni accedenti i limiti fissati per la Klasse 1. |
| El componente láser de este produit es capaz de emitir radiación que sobrepasa el limite establecido para la class 1. |
| De laser component in dit product is in staat stralen te producen die de limiet voor Klasse 1 overstijgen. |
| Лаэрный компонент данною Идемия может видал'tь радиашино, певышиаошу огразионnéные уровень радиаший ляя Клесca 1. |
LASER SAFETY
This unit employs a laser. Due to possible eye injury, only a qualified service person should remove the cover or attempt to service this device.
DANGER
This unit emits visible laser radiation when open. Avoid direct eye exposure to beam. When this unit is plugged into the wall outlet, do not place your eyes close to the opening of the disc tray and other openings to look into inside.
LASER
Type Semiconductor laser GaAs/GaAlAs
Wave length 790 nm
Output Power 10 mW
SECURITE LASER
BbIXOHaMAOIOHOCtB 10 MBT
VAROITUS
If the socket outlets in the home are not suitable for the plug supplied with this appliance, it should be cut off and an appropriate 3 pin plug fitted. For details, refer to the instructions described below.
Note
The plug severed from the mains lead must be destroyed, as a plug with bared flexible cord is hazardous if engaged in a live socket outlet.

Special Instructions for U.K. Model
IMPORTANT
THE WIRES IN MAINS LEAD ARE COLOURED IN ACCORDANCE WITH THE FOLLOWING CODE:
Blue: NEUTRAL
Brown: LIVE
As the colours of the wires in the mains lead of this apparatus may not correspond with the coloured markings identifying the terminals in your plug, proceed as follows: The wire which is coloured BLUE must be connected to the terminal which is marked with the letter N or coloured BLACK. The wire which is coloured BROWN must be connected to the terminal which is marked with the letter L or coloured RED.
Make sure that neither core is connected to the earth terminal of the three pin plug.
| Important Notice: Guarantee Information for customers in EEA* and Switzerland | English |
| For detailed guarantee information about this Yamaha product, and Pan-EEA* and Switzerland warranty service, please either visit the website address below (Printable file is available at our website) or contact the Yamaha representative office for your country. * EEA: European Economic Area | |
| Remarque importante: informations de garantie pour les clients de l'EEE et la Suisse | Français |
| Pour des informations plus détaillées sur la garantie de ce produit Yamaha et sur le service de garantie applicable dans l'ensemble de l'EEE ainsi qu'en Suisse, consultez notre site Web à l'adresse ci-dessous (le fichier imprimable est disponible sur notre site Web) ou contactez directement Yamaha dans votre pays de résidence. * EEE : Espace Economique Européen | |
| Wichtiger Hinweis: Garantie-Information für Kunden in der EWR* und der Schweiz | Deutsch |
| Für{nahere Garantie-Information über ceses Produkt von Yamaha, sowie über den Pan-EWR*- und Schweizer Garantieservice, besuchen Sieitte entweder die folgend angegebene Internetadressee (eine druckfähige Version befindet sich auch auf unserer Website), oder wenden Sie sich an den für Ihr Land zuständigen Yamaha-Vertrieb. *EWR: Europäischer Wirtschaftsráum | |
| Viktigt: Garantiinformation für kunder i EES-området* och Schweiz | Svenska |
| Für detailjerad information omenna Yamahaproduktsamt garantiservice i hela EES-området* och Schweiz kan du antingen besoina nedanstående webbaddress (en utskriftsvänlig fil finns på webbplatsen) eller kontakta Yamaha officiella représentant i ditt land. * EES: Europeiska Ekonomiska Samarbetsområdet | |
| Avviso importante: informazioni sulla garanzia per i clienti residenti nell'EEA* e in Svizzera | Italiano |
| Per informazioni dettagliate sulla garanzia relativa a Anythingo prodotto Yamaha e l'assistenza in garanzia nei paesi EEA* e in Svizzera, potete consulutare il site Web all'indirizzo riportato di seguito (è disponibile il file in formato stampabile) oppure contattare l'ufficio di rappresentanza locale della Yamaha. * EEA: Area Economica Europea | |
| Avviso importante: información sobre la garantía para los clienteles del EEE* y Suiza | Español |
| Para una información detallada sobre este producto Yamaha y sobre el soporte de garantía en la zona EEE* y Suiza, visite la direction web que se incluye más bajo (la version del archivo para imprintir esta disponible en是我国 sitio web) o pángase en contacto con el representante de Yamaha en su País. * EEE: Espacio Económico Europeo | |
| Belangrijke meededeling: Garantie-informatie voor klanten in de EER* en Zwitserland | Nederland |
| Voor gedetailleerde garantie-informatie over dit Yamaha-product en de garantieservice in heel de EER* en Zwitserland, gaat u waar de onderstaande website (u vind een afdrukbaar bestand op unsere website) of neemt u contact op met de vertegenwoordiging van Yamaha in uw land. * EER: Europese Economische Ruimte | |
http://europe.yamaha.com/warranty/
