USER MANUAL TDS6030 EASY COMFORT BOSCH
Register your new Bosch now: www.bosch-home.com/welcome
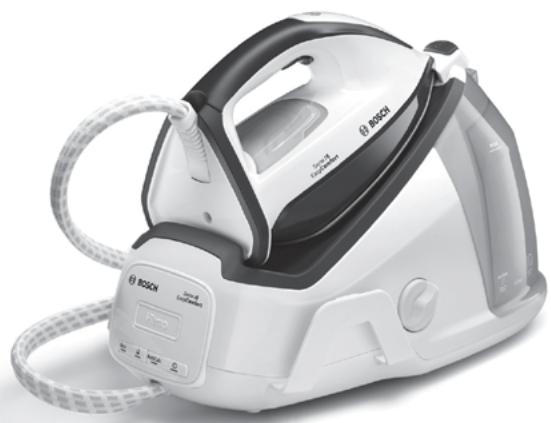
Serie 16 (TDS60..) EasyComfort

BOSCH
de Gebrauchsanleitung en Operating instructions fr Notice d'utilisation it Istruzioni per l'uso nl Gebruiksaanwijzing da Brugsanvising no Bruksanvisning
sv Bruksanvisning fi Käytöhjeet es Instrucciones de uso pt Instruções de utilização el Οδηγίες χρήσης tr Kullanma talimatı pl Instrukcja obsługi
hu Használati utasítás uk Інструкція з використання ru Инструкция по эксплуатации ro Instrucțiuni de folosire ar كتيب الإرشاد kk Пайдалану нұсқаулығы

Index
| DEUTSCH | 6 |
| ENGLISH | 14 |
| FRANÇAISE | 22 |
| ITALIANO | 30 |
| NEDERLANDS | 38 |
| DANSK | 46 |
| NORSK | 54 |
| SVENSKA | 62 |
| SUOMI | 70 |
| ESPAÑOL | 78 |
| PORTUGUES | 86 |
| ЕLVHNIKA | 94 |
| TÜRKQE | 102 |
| POLSKI | 110 |
| MAGYAR | 118 |
| УКPassИСьКА | 126 |
| РУССКИ | 134 |
| ROMÁN | 142 |
| العربية | 157 |
| ΚΑ3ΑΚ | 158 |
DEUTSCH
ESPANOL
ENGLISH
PORTUGUES
FRANÇAISE
ΕΛΛΗΝΙΚΑ
ITALIANO
TÜRKÇE
DUTCH
POLISH
DANISH
HUNGARIAN
NORWEGIAN
UKRAINIAN
SWEDISH
RUSSIAN
FINNISH
ROMANIAN
KAZAKH
General safety instructions
During use, the decalcifying or rinsing aperture of the boiler is under pressure and must not be opened. The appliance must not be left unattended while it is connected to the supply mains. Remove the plug from the socket before filling the appliance with water or before pouring out the remaining water after use. The appliance must be used and placed on a stable surface. When placing the iron on its stand or on its heel, make sure that the surface on which the stand or heel is placed is stable. The appliance should not be used if it has been dropped, if there are visible signs of damage, or if it is leaking water. It must be checked by an authorized Technical Service Centre before it can be used again. With the aim of avoiding dangerous situations, any work or repair that the appliance may need, e.g., replacing a faulty mains cable, must only be carried out by qualified personnel from an Authorized Technical Service Centre. This appliance can be used by children aged from 8 years and above and persons with reduced physical, sensory, or mental capabilities or lack of experience and knowledge if they have been given supervision or instruction concerning use of the appliance in a safe way and understand the hazards involved. Children shall not play with the appliance. Cleaning and user maintenance shall not be made by children without supervision. Keep the appliance and its cord out of reach of children under 8 years of age when it is turned on or cooling down. This appliance is designed only for household use up to 2000m above sea level. CAUTION. Hot surface. Surface is liable to get hot during use.
Important notices
- Carefully read through the operating instructions for the appliance and safeguard them for future reference.
- This appliance has been designed exclusively for normal household use in a home environment.
- This appliance must be used only for the purposes for which it was designed, i.e., as an iron. Any other use will be considered improper and consequently dangerous. The manufacturer will not be held responsible for any damage arising from misuse or improper use.
- This appliance is to be connected and used in accordance with the information stated on its characteristics plate.
- This appliance must be connected to an earthed socket. If it is absolutely necessary to use an extension cable, make sure that it is suitable for 16A and has a socket with an earth connection.
- The appliance must never be placed directly under the tap to fill the water tank.
- The electrical plug must not be removed from the socket by pulling the cable.
- Never immerse the iron in water or any other fluid.
- Do not leave the appliance exposed to weather conditions (rain, sun, frost, etc.)
- This appliance reaches high temperatures and produces steam during use, which could cause scalds or burns if not used properly.
- Do not allow the power cable to come into contact with the soleplate when it is hot.
Advice on disposal
Our goods come in optimised packaging. This basically consists in using non-contaminating materials which should be handed over to the local waste disposal service as secondary raw materials. Your local town council can give you information about how to dispose of obsolete appliances.
This appliance is labelled in accordance with European Directive 2012/19/EU concerning used electrical and electronic appliances (waste electrical and electronic equipment - WEEE).
The guideline determines the framework for the return and recycling of used appliances as applicable throughout the EU.
Description

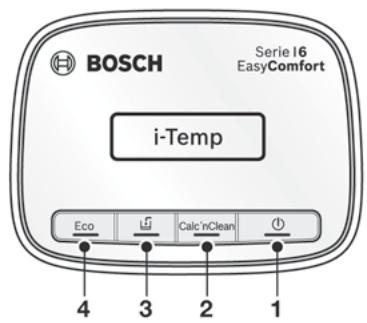
- "on / off" button with indicator light
- "Calc'nClean" descending button with indicator light
- "Water tank empty" button with indicator light
- Energy saving "Eco" button with indicator light
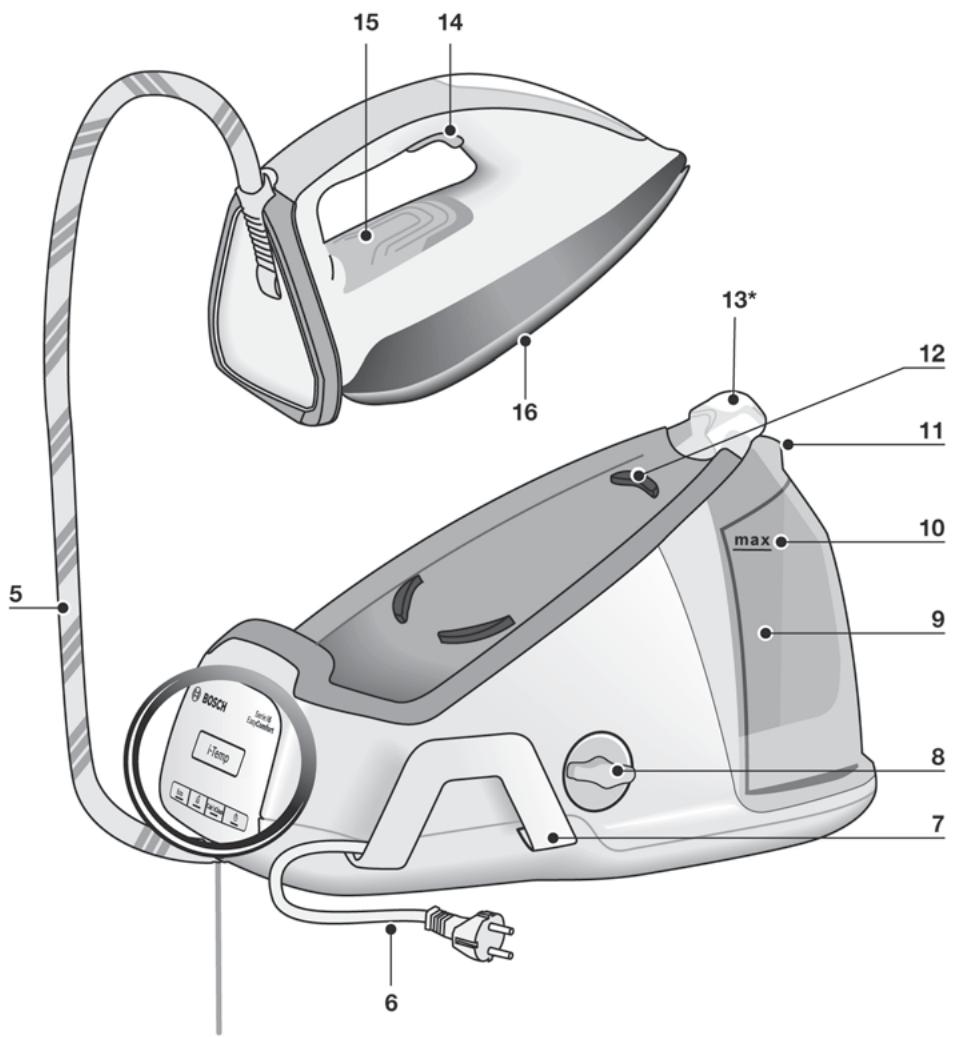
- Steam hose
- Mains cable
- Mains cable and steam hose storage holder
- Boiler cap / "Calc'nClean" scale collector *
- Water tank
- Level mark for maximum filling
- Filling lid
- Iron pad
- Iron lock system "SecureLock" *
- Steam release button
- Iron indicator light
- Soleplate
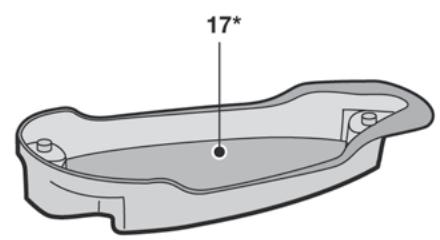
- "Calc'nClean" container *
Introduction

EasyComfort for simple, fast and safe ironing.
Discover the new way of ironing with EasyComfort – no more changing the temperature of the iron and tedious pre-sorting! Now all ironable materials, from ultra fine delicates to extra thick fabrics, are creasefree in a flash with a single temperature setting. Which means more time to do other things.

1. Filling the water tank
This appliance has been designed to use normal tap water.
Important: Do not use additives! The addition of other liquids, such as perfume, vinegar, starch, condensation water from tumble dryers or air conditioning systems, or chemicals will damage the appliance. Any damage caused by the use of the aforementioned products will make the guarantee void!
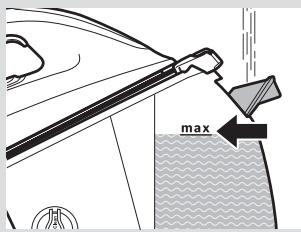
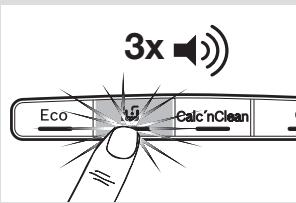
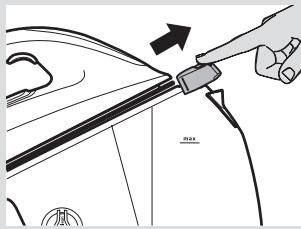
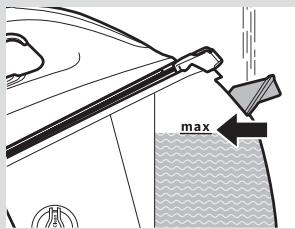
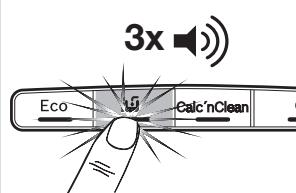
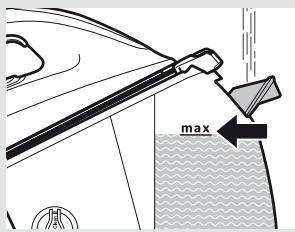
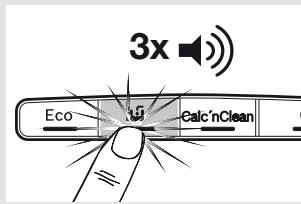
1 Open the filling lid (11). 2 Fill the water tank (9). Never fill beyond the level "max" (10) for maximum filling! 3 Close the filling lid. 4 Refill the water tank when the indicator light (3) comes on. Three beeps will be heard. Important: Once refilled, press button (3).
Tip: To prolong the optimum steam function, you may mix tap water with distilled water 1:1. If the tap water in your area is very hard, mix tap water with distilled water 1:2.

2. Heating
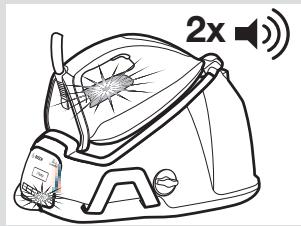
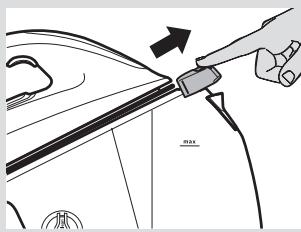
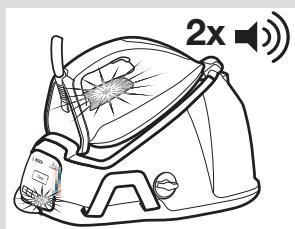
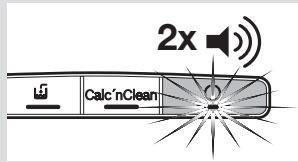
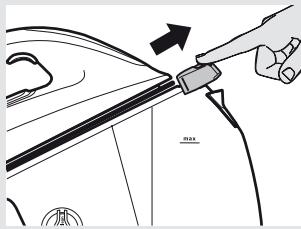
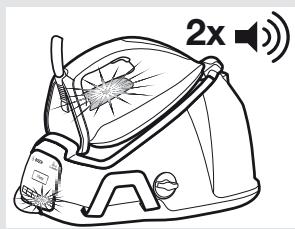
If your steam station is equipped with an iron lock system (13*), release the iron by pressing the button. Unwind the steam hose (5) and the mains cable (6). Plug the mains cable into an earthed socket. Press the button (1) to switch the appliance on. Indicator lights (1, 15) will flash, indicating that the appliance is heating up. When the iron is ready to use, the indicator lights (1, 15) will remain permanently lit, and two beeps will be heard.
3. Ironing
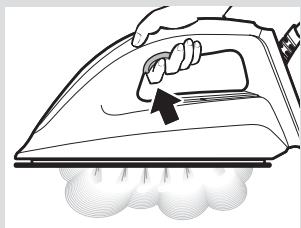
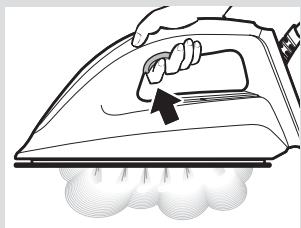
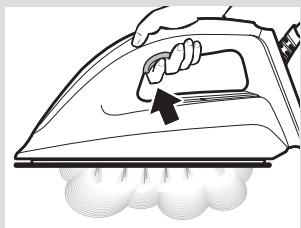
Press the steam release button (14) for ironing with steam.
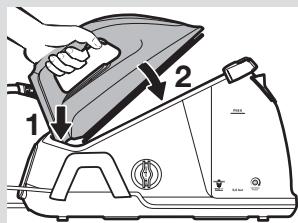
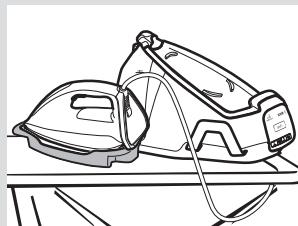
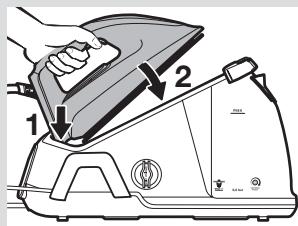
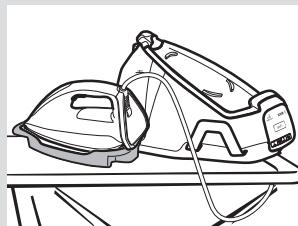
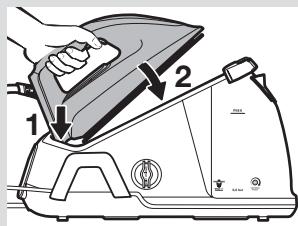
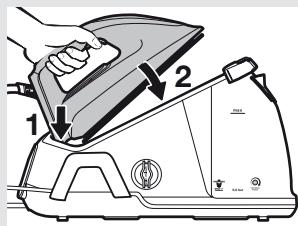
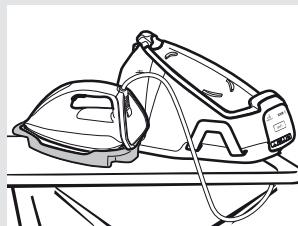
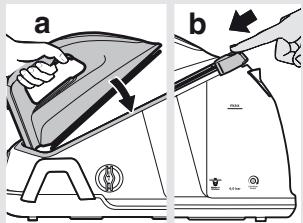
Important: When placing the iron on the pad, be sure to first insert the heel in the upper side of the control panel, as shown in the figure.
Tip: For better ironing results, iron the last strokes without pressing the steam release button (14) to dry the garment.

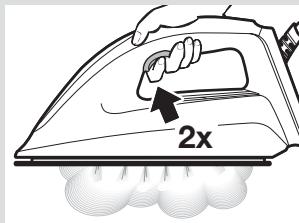
"PulseSteam" function
This appliance has a special function for tackling difficult creases.
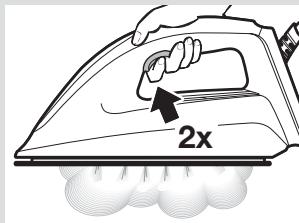
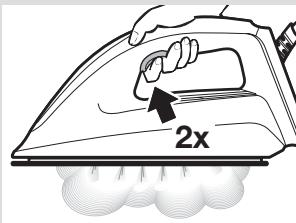
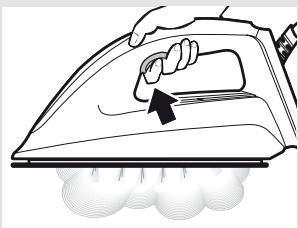
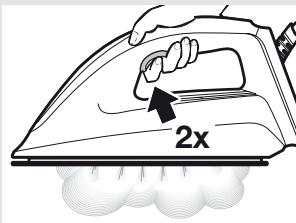
Press the steam release button (14) two times in quick succession (double-click). Powerful shots of steam will be released.

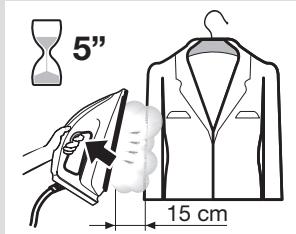
Vertical steam
Can be used to remove creases from hanging clothes, curtains, etc.
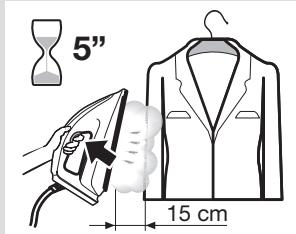
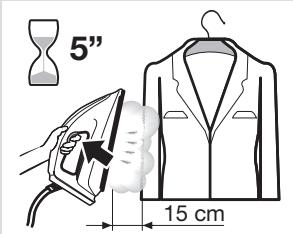
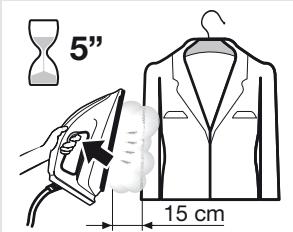
Hold the iron in an upright position 15 cm away from the garment to be steamed. Press the steam release button (14) repeatedly with pauses of at least 5 seconds.
Warning! Never point the steam jet at garments being worn, or at people or animals.

4. Energy saving
If the energy saving setting is selected, you can save energy and water and still achieve good results when ironing most of your garments.
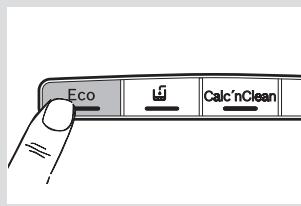
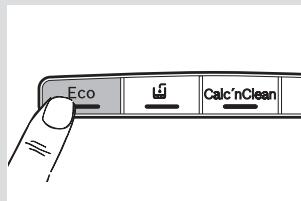
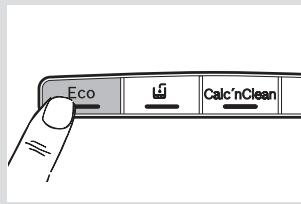
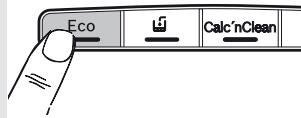
Press the energy saving button "Eco" (4). The indicator light will come on. To switch back to the normal energy setting, press the "Eco" button again. It is advisable to use the normal energy setting to get optimum results on thick and very wrinkled fabrics.

5. Auto switch off
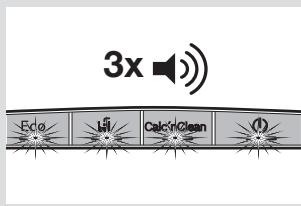
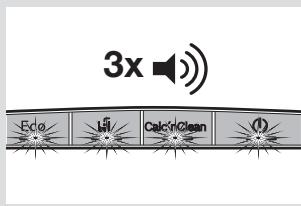
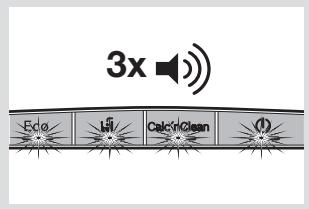
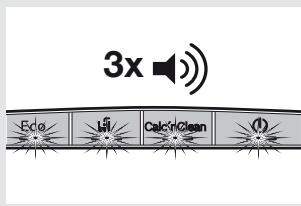
For your safety and to save energy, the appliance switches off automatically when it has not been used for 8 minutes. Three beeps will be heard, and all indicator lights (1, 2, 3, 4) will flash.
1 To switch the steam station back on, press the steam release button (14) again.

Cleaning & Maintenance

1. Descaling process
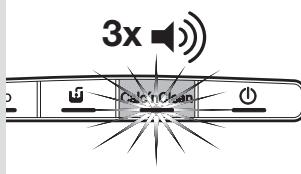
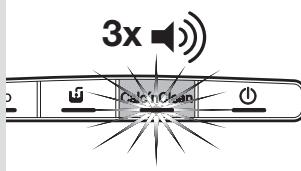
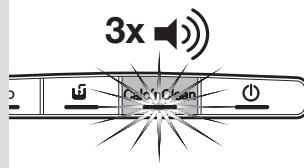
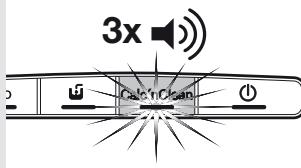
Important: to keep your appliance in good condition for a long time, you should carry out the descaling process after a period of use. The "Calc'nClean" indicator light (2) will flash and three beeps will be heard, indicating that the process should be performed.
Descaling the boiler
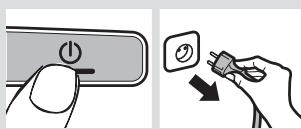
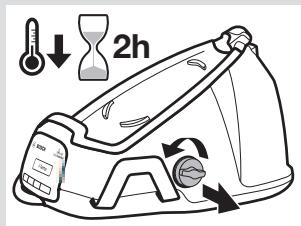
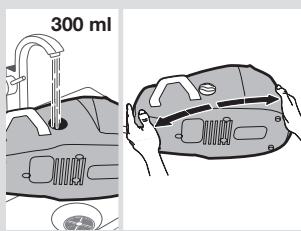
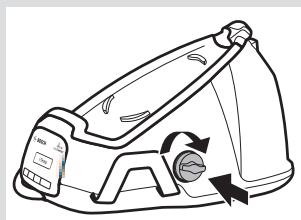
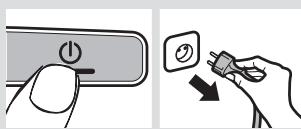
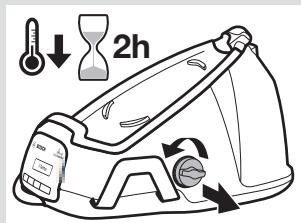
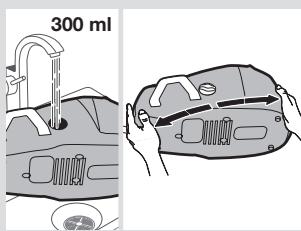
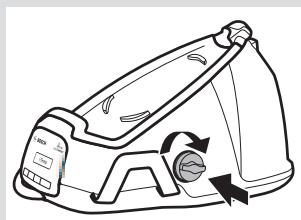
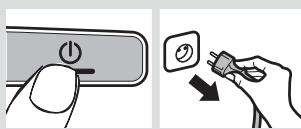
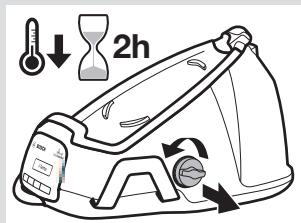
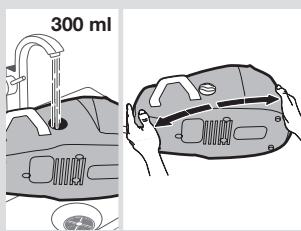
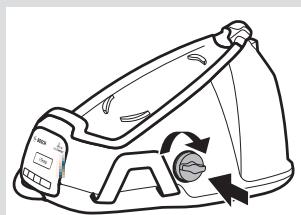
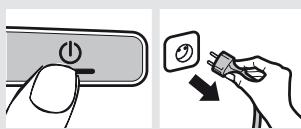
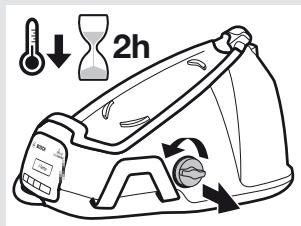
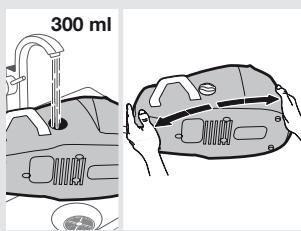
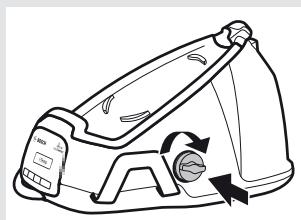
Press the button (1) to switch the appliance off. Unplug the appliance and let it cool down for at least 2 hours. 2 Empty the water tank. 3 Remove the iron from the pad (12). 4 Unscrew and remove the boiler cap (8) and take it out. Empty the boiler completely. 5 Fill the boiler with approximately 300 ml of tap water. Close the boiler cap and shake the base unit for a few moments. Then, empty it completely.
Important: To obtain the best result, we recommend that this operation be performed twice. Before re-closing, make sure no water remains in the boiler.
If your appliance is equipped with scale collector (8*) , it must be washed (see the "Descaling the scale collector" section). 7 Replace and tighten up the cap.
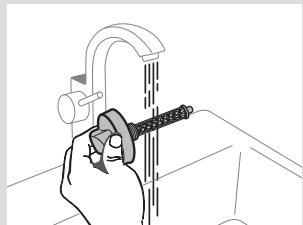
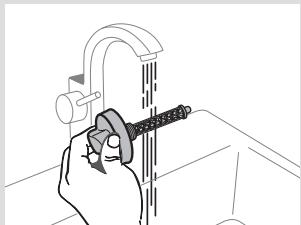
Descaling the limescale collector *
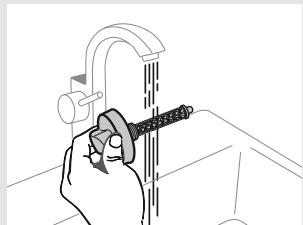
1 Place the limescale collector under the water tap. 2 Wash it up until limescale residues are removed.
Descaling the iron
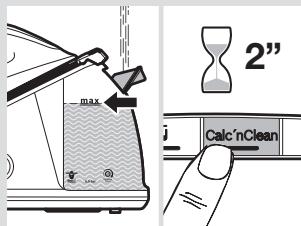
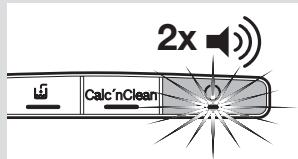
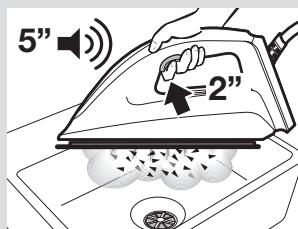
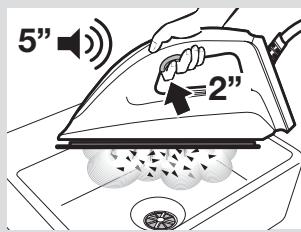
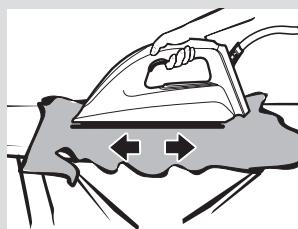
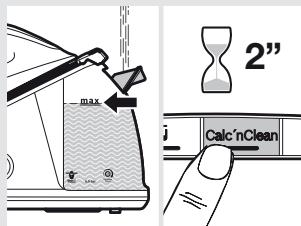
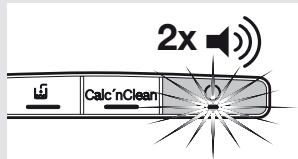
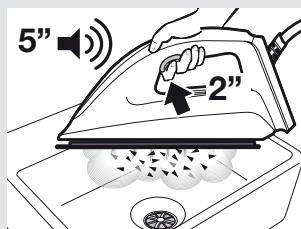
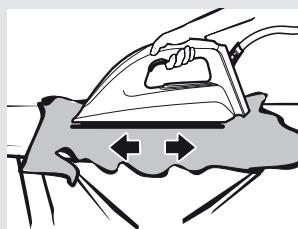
1 Fill the tank (9) with tap water. 2 Plug in the mains cable (6) and press the button (1) to switch the appliance on. Press the descaling button (2) for 2 seconds. Its indicator light will remain permanently lit. 4 Wait until the indicator light (1) stops flashing and remains lit permanently. Two beeps will be heard. Hold the iron in a horizontal position over an empty sink to collect the water. If your appliance is equipped with a "Calc'nClean" container (17*) , place the iron on it. 6 Press the steam release button (14) for 2 seconds. The descaling process will start automatically. Warning: boiling water and steam will be released through the soleplate, carrying limescale and/or deposits that may be inside. During the process, a beep will be heard every 5 seconds. After approximately 3 minutes, the iron will stop releasing steam. A long beep will be heard, indicating that descaling process has finished. The appliance will switch off automatically. To clean the soleplate (16), immediately rub off any residue by running the hot iron over a wet cotton cloth.
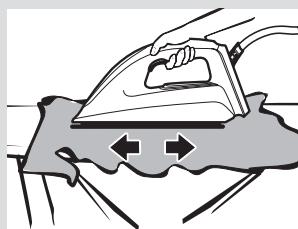
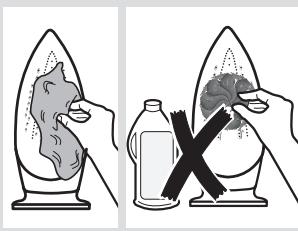

2. Cleaning the appliance
Regularly clean your appliance for proper maintenance. Attention! Burn risk!
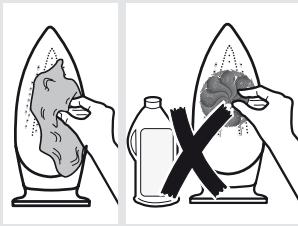
If the appliance is only slightly soiled, wipe it with a damp cotton cloth only, and then dry it. To keep the soleplate smooth, you should avoid contact with hard metal objects. Never use a scouring pad or chemicals to clean the soleplate.

Storing the appliance
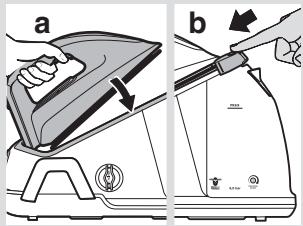
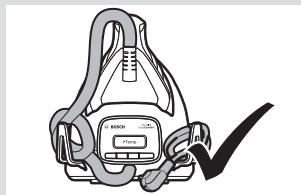
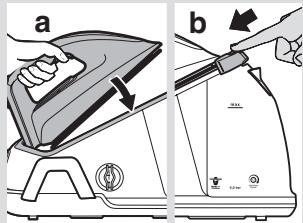
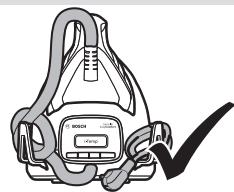
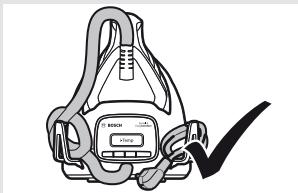
Unplug the appliance and let it cool down. Empty the water tank (9). Place the iron on the steam station, standing on the pad (12). If your steam station is equipped with an iron lock system (13*), fix the iron to it. First insert the heel and then block the tip by moving the lock system against the iron. Store the steam hose (5) and the mains cable (6) on the storage holder (7).

Troubleshooting
| Problem | Possible causes | Solution |
| The iron begins to smoke when switched on. | 1. During first use: certain components on the appliance have been lightly greased at the factory and may produce a small amount of smoke when initially heated.
2. During subsequent use: the soleplate may be soiled. | 1. This is completely normal and will stop after a short while.
2. Clean the soleplate according to the cleaning instructions in this manual. |
| Water flows through the holes on the soleplate. | 1. The water is condensing inside the tubes because steam is being used for the first time or has not been used for a long time. | 1. Point the iron away from the ironing area and press the steam release button until steam is produced. |
| Dirt comes out through the soleplate. | 1. There is a build up of limescale or minerals in the boiler and iron.
2. Chemical products or additives have been used. | 1. Carry out a cleaning cycle (see the “Descaling process” section).
2. Never add products to the water (see the “Filling the water tank” section).
Clean the soleplate with a damp cloth. |
| The “Calc'nClean” indicator light (2) does not turn off. | 1. The iron descaling process has been stopped before being completed. | 1. Restart and complete the iron descaling process. |
| The appliance makes a pumping sound. | 1. Water is being pumped into the steam tank.
2. The sound does not stop. | 1. This is normal.
2. If the sound does not stop, do not use the steam station and contact an authorised technical service centre. |
| Loss of pressure during ironing. | 1. The steam release button has been activated for too long a period of time, meaning it has been pressed too frequently. | 1. Use the steam release button at intervals. |
| Water spots appear on the garment during ironing. | 1. May be caused by steam condensed on the ironing board. | 1. Wipe the textile cover of the ironing board, and iron any water drops to dry them. |
| The hose gets hot during use. | 1. This is normal. It is caused by the steam passing through the hose during steam ironing. | 1. Place the hose on the opposite side so that you do not touch the hose during ironing. |
| Water leakage from the boiler. | 1. Boiler cap (8) is loose. | 1. Tighten the cap. |
If the above tips do not solve the problem, get in touch with our customer service.
You can download this manual from the Bosch local homepages.
Vertical steam ironing
This product is marked in accordance with the European Directive 2012/19/EC regarding waste electrical and electronic equipment (WEEE). The directive establishes the framework for the return and recycling of used appliances across the EU. For more information about recycling this product, please contact your local city office, your household waste disposal service, or the shop where you purchased the product.
This product is marked in accordance with the European Directive 2012/19/EC regarding waste electrical and electronic equipment (WEEE). The directive establishes the framework for the return and recycling of used appliances across the EU. For more information about recycling this product, please contact your local city office, your household waste disposal service, or the shop where you purchased the product.
Description of the appliance

- Steam indicator
- Calc'nClean button with indicator, Water tank empty button with indicator
- Body of the steam generator with «Eco» indicator
- Steam button
- Power cord
- Holder for the iron rest plate
- Filling funnel / collector
For collecting scale «Calc'nClean» *
- Water tank
- Maximum level mark
Filling
- Filling opening lid 12. Iron soleplate
- Iron locking button «SecureLock» *
- Steam release button
- Iron indicator 16. Soleplate
- «Calc'nClean» container
Introduction

Ipacka EasyComfort - a simple, fast and safe ironing assistant.
Discover a new way of ironing with the Ipacka EasyComfort - you will forget what temperature setting and pre-sorting laundry is! Now delicate and sensitive fabrics can be perfectly ironed in just a few minutes using a single temperature setting. This means you can devote more time to more pleasant things.

1. Filling the water tank
Important! When placing the iron on the stand, first insert the rear part into the recess located above the control panel, as shown in the figure.
Tip: For optimal results and to avoid ironing marks, test the iron on a piece of fabric a few times without pressing the steam button (14).

PulseSteam function
The appliance has a special function for ironing stubborn creases.
1 Quickly press the steam button (14) several times (short presses). The iron will emit powerful steam bursts.

Vertical steam
This function can be used for ironing curtains, hanging clothes, etc.
1 Hold the iron in a vertical position at a distance of about 15 cm from the garment to be steamed. 2 Press the steam button (14) several times at intervals of no more than 5 seconds.
Caution! Never direct the steam jet at people or animals, and also at hanging clothes.

4. Energy saving
With the energy-saving mode, you can save electricity and water while still getting good ironing results.
1 Press the energy-saving mode button "Eco" (4). The indicator will light up. 2 To return to the normal energy consumption mode, press the "Eco" button again. It is recommended to use the normal energy consumption mode only for optimal ironing of thick and heavily wrinkled fabrics.

5. MAINTENANCE AND CLEANING
The device will automatically turn off if it is not used for 8 minutes. You will hear three sound signals, and all indicators (1,2,3,4) will go off.
To turn the station back on, press the steam button (14) once.

Cleaning and Care

Removing limescale from the iron
1 Fill the reservoir (9) with tap water. 2 Connect the power cord (6) to the socket and press the button (1) to turn on the device. 3 Press and hold the descaling button (2) for 2 seconds. The indicator will light up with a steady light. Wait until the indicator (1) stops flashing and lights up steadily. Then you will hear two sound signals. 5 Hold the iron horizontally over a sink: water will come out of it. If your device comes with a 'Calc'nClean' (17*) accessory, place the iron on it. 6 Press and hold the steam button (14) for 2 seconds. The descaling process will start automatically. Caution! Limescale and water will come out through the soleplate. During this procedure, you will hear a sound signal every 5 seconds. 7 After about X minutes, the iron will stop releasing water. You will hear a long sound signal indicating the end of the descaling process. Then the device will turn off automatically. 8 To clean the soleplate (16), remove all the scale residues by wiping the soleplate with a damp cloth.

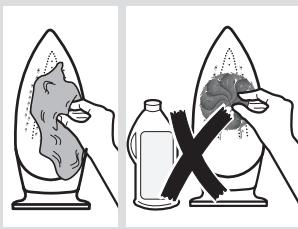

2. Cleaning the iron
Regularly clean the device to ensure its proper functioning.
Caution! Risk of burns!
1 If the device is slightly dirty, wipe it with a damp cloth, then dry it. 2 To maintain the soleplate's smooth surface, avoid contact with metal objects. In any case, do not use abrasive sponges for cleaning dishes or chemical substances for cleaning the soleplate.

Storing the device
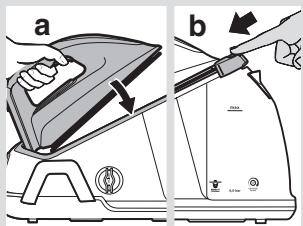
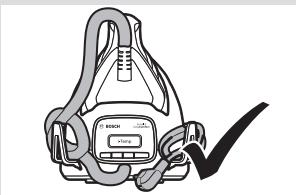
1 Unplug the device from the socket and let it cool down. Empty the water reservoir (9). 2 Place the iron on the base of the steam station (12). If your steam station is equipped with an iron locking device (13*), lock the iron with its help. First, place the front part of the iron into the corresponding recess, then close the iron by sliding it onto the locking device. 3 Store the steam hose (5) and power cord (6) in the designated storage space (7).

Troubleshooting
Problem
The iron is turned on, but no steam comes out.
1. First use: the device is manufactured at the factory, so during the first heating a small amount of smoke may be emitted. 2. During further use, this is possible, but it will decrease.
Solution
- The device must be connected to a standard power supply.
- Clean the device as described in the instructions.
If the problem is not solved by the above recommendations, contact the service center.
The device can be downloaded from the regional website of the Bosch company.
Disposal advice
Our product is supplied in an optimized package. The packaging is made of environmentally friendly materials that must be disposed of at the local waste disposal service as secondary raw materials. Information on the disposal of used electrical appliances can be obtained from the local administration.
The device is marked in accordance with Directive 2012/19/EC on waste electrical and electronic equipment (WEEE). It defines the basic rules for the collection and disposal of used electrical and electronic equipment throughout the EU.
Description

- Power switch with light indicator
- Filter cleaning button with light indicator
- Capacity release button with light indicator
- Eco energy-saving mode button with light indicator
- Lid of the steam generator tank / Calc'nClean* descaling cartridge 9. Water tank
- Maximum fill level mark
- Rear opening cover 12. Iron stand
- Iron locking device «SecureLock»*
- Steam release button
- Iron indicator light 16. Iron soleplate
- «Calc'nClean» cartridge
Introduction

The EasyComfort iron is the ideal solution for simple, fast and safe ironing.
Discover a new way of ironing with the EasyComfort steam iron - and you will forget about adjusting the iron temperature and pre-sorting clothes! Now both the most delicate and the thickest fabrics can be perfectly ironed in minutes, using just one temperature setting. And that means you will have more time for your favorite activities.

1. Filling the water tank
Designed for use with tap water.
Important: Do not use additives! Adding other liquids, such as fabric softener, vinegar, starch, liquid detergent from dry mixes, or air conditioning agents, as well as various chemical agents, will damage the appliance. Any damage caused by using the above-mentioned agents will void the warranty!
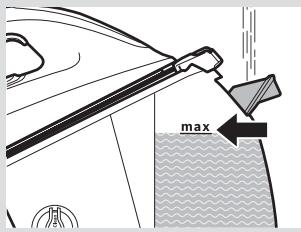
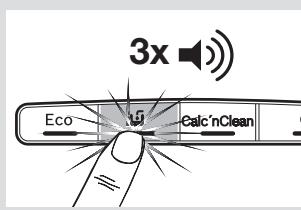
1 Open the cap of the filling opening (11). 2 Fill the water tank (9). Never fill water above the "max" mark (10), which indicates the maximum filling level! 3 Close the cap of the filling opening. 4 Pour water into the water tank after the light indicator (3) goes off. You will hear three beeps.
Important: After filling with water, press the button (3).
Tip: To ensure long-lasting and efficient operation of the steaming system, you can mix tap water with distilled water in a 1:1 ratio. If the tap water in your region is very hard, mix it with distilled water in a 1:2 ratio.

2. Heating
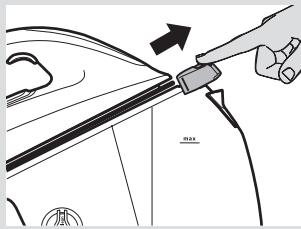
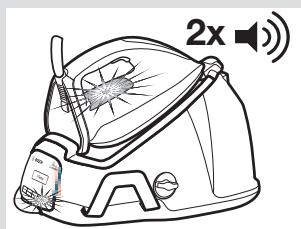
1 If your steam station is equipped with a descaling device (13*), remove it by pressing the button. 2 Unwind the steam hose (5) and the power cord (6). Plug the power cord into a grounded outlet. 3 Press the button (1) to turn on the appliance. The light indicators (1, 15) will start blinking, indicating the heating process of the appliance. 4 When the iron is ready for use, the light indicators (1, 15) will light up with a steady light. At the same time, you will hear two beeps.
3. Ironing
1 Press the steam release button (14) to iron with steam.
Important: When placing the iron on the stand, first insert its rear part into the recess located on the control panel, as shown in the figure.
Tip: To achieve optimal results when ironing an item, before finishing ironing, run the iron over the fabric several times without pressing the steam release button (14).

This function can be used for ironing clothes with vertical steaming, etc.
1 Hold the iron vertically at a distance of 15 cm from the item to be steamed. 2 Press the steam release button (14) several times - the interval between presses should be at least 5 seconds.
Warning: Never direct the steam jet at clothes being worn, nor at people or animals.

4. Energy saving
By selecting the energy-saving mode, you can save electricity while getting satisfactory ironing results for most fabrics.
1 Press the energy-saving mode button "Eco" (4). The light indicator will light up. 2 To return to the normal energy consumption mode, press the "Eco" button again. It is recommended to use the normal energy consumption mode for optimal ironing of thick or heavily wrinkled fabrics.

5. Automatic shut-off
For your safety and to save electricity, the appliance automatically turns off if it is not used for 8 minutes.
In this case, you will hear three sound signals, and all light indicators (1,2,3,4) will start flashing.
1 To turn the steam station back on, press the steam release button on the soleplate (14).

Cleaning and care


(6)(5)
(7)
1
2
3

16 16 16 16
5

8 2015 A
(5.4.3.2)
(14)
Therefore G is AQ
1
aIg

4.1

Aa 1
J 1
s (2) "Calc'nClean"
AaJyIyIyIyIyIyIyIy
a
Jg 1
eolll jzj 2
(12) odell jol olall jll
Jolll 1.
aLlal cbe jol. Jusall lao Jo Jo 300 Jdaiyxlal

2
1.1

EU/19/2012

2
9
10
11
12
"SecureLock" 13
14
15
16
"Calc'nClean" 17
2.1 "la/1jia"
"Calc'nClean" a
Therefore, a1 = 2√5, a2 = -2√5
a 20000000000000000000000000000000000000000000000
15.1
15
aill lll 100/ aill alb.8
*“Calc'nClean”
1
EasyComfort
alilijjul jolglj1
J 1
e 1
j 1
a 1
Ailoojul ool Jia juaaia iia
J 8 n nn Jn Jn Jn Jn
J 1
1
alaijuiyabijj yblaoi Igicgwlg aoyjbljgl jaiy
Jlcl JlsbI jg jg y. jgeJIy JlsbJ jg JleJI
a
8 jn nn Jlslj 1 Jglii n e 1 1 1 1 1 1 1 1 1 1 1 1 1 1
. 1
Jia jie jie lii bji iai xu 1 Juaei jn jin jin jin jin jin jin jin jin jin jin jin jin jin jin jin jin jin jin jin jin jin jin jin jin jin jin jin jin jin jin jin jin jin jin jin jin jin jin jin jin jin jin jin
jSjGJJUusssjjg jIiB
Jooa iia Joo
2b = a + b
During operation, the device must be kept away from heat and open flames. Do not leave the iron unattended while it is plugged in. If the water tank is filled or after use, if water remains, empty it before storing. Clean the soleplate with a damp cloth, do not use abrasive cleaners. When cleaning the soleplate, ensure it is cool before touching. If the iron is damaged or shows signs of malfunction, do not use it. Before cleaning, unplug the iron and let it cool down. Do not immerse the iron in water or any other liquid. Repairs should only be carried out by qualified service personnel. Do not allow children to use the iron without supervision. Keep the iron and its cord out of reach of children under 8 years old. Do not let children play with the iron. Do not allow children to clean or maintain the iron without supervision. If the iron is dropped or damaged, have it checked by qualified personnel before using again. This iron is intended for household use only. WARNING: Hot surface. Risk of burns. Keep away from children.
- Do not immerse the iron in water or any other liquid.
- This iron is designed for household use only, so do not use it for commercial purposes.
- This iron must only be used with the stand provided. If the iron is used on a different stand, it may be unstable and cause a hazard. Do not use the iron if it has been dropped or shows signs of damage.
- This iron must be connected to the appropriate power supply as indicated on the rating plate.
- Add detergent to the rinse compartment. If the water hardness is soft, it is not necessary to add detergent, but it is recommended to add it to prevent limescale buildup. The detergent container must be cleaned regularly to prevent clogging. Do not use liquid detergent without dilution.
- Do not fill the water tank with hot water or other liquids.
- Do not pour cleaning agents (such as bleach, ammonia, etc.) into the water tank.
- Do not operate the appliance at temperatures below freezing or above 40°C, as this may damage the internal components. Do not touch the hot surfaces with wet hands.
Coffee maker
Our products are manufactured in accordance with the EU Directive. For further information on the disposal of this product, please contact your local waste management authority. For information on the disposal of batteries, please contact your local authority.
This appliance complies with the European Directive 2012/19/EU on Waste Electrical and Electronic Equipment (WEEE). This directive sets out the requirements for the collection and recycling of waste electrical and electronic equipment in all EU member states.
Spare parts

- 1. Indicator light for "Rinse/Add" 2. Indicator light for "Calc'nClean" 3. Indicator light for "Water empty" 4. Indicator light for "Eco"
- This appliance
- 7. Power cord 8. Water tank / "Calc'nClean" collector* 9. Water tank 10. Maximum fill level mark 11. Key lock 12. Hot water outlet 13. "SecureLock" for the hot water outlet 14. Drip tray 15. Hot water indicator light 16. Hot water tap 17. "Calc'nClean" container
8. Water tank / "Calc'nClean" collector* 9. Water tank 10. Maximum fill level mark 11. Key lock 12. Hot water outlet 13. "SecureLock" for the hot water outlet 14. Drip tray 15. Hot water indicator light 16. Hot water tap 17. "Calc'nClean" container
Introduction

KapanaiBIM, Kblam epi Kayinci 3yikteyre aphaIraH EasyComfort.
EasyComfort yHKunraCbImeH yIKteyIH KaHa KOJIbIH aUbIb3-6yDaH 6blaYIKTHempepatypbIH e3repTy XHe uapWataTbIH aIbIH aIa cypbINTaydbIH kaxetixKo! EHIiKaIbI3 Tempepatypa napameTpHiH apKaCbIHda YbTpA xHlWke H3IK MaTanapdAH aca KaJIbIH MaTanapra DeiH 6apNkYIKTeNETIH MaTePnAnDap Ke3IH3di AwbIN KymFaHwa 6yknci3 6OJaDb. ByE3 Ke3eriHde BacaTipNIkTepiH3re Ke6ipeK yaKbIT KaNbpaDaI.

1. Cy 6aBbIn TOnTbIpy
BykpybInfbl eDetteri K6bIp cybH naJaIaHy ywiH 3zipHeH.
MaHb3Db: Kocnapab KoJdaH6aHbI Niccy, cipke, kpxmaJI, KeTIpiriS bapa6aHdapdAn HeMece aya caJIbIHdaTy KUeIepiHeN aIbIHFaH KOHDeHcAT Hemece XIMKaTTap CnKrTbI Backa CyblkTBKTAPdbI KOCy KpylbIFBa 3aKbIM KeNTipyi MymKiH. KofapbIa aTaIraH eHIMdePdi KOnDaHydAn TybIHdaFAn Ke3 KeJIreH 3aKbIM KeINDeMe KywiHIn XOJIbNyBuHa aeKeJe!i
1 Kyo MoHbHbIH KaNaIbIH (11) aWbHbI3. 2 Cy 6aBbH (9) TOnTbIbPbIbI3. EwKaaHaMakcMaJIbI bI TOnTbIpyFa apHaJIraH "max" DeHreB 6enriciHeH (11) acbIpMaHbI3! 3 KIIO MOHbIHbIH KaKnaFbIH Xa6bIHbI3. 4 INHdNkATOp WAmbl (3) KOCbJIFaHda cy 6aRbIH KaTa TOJtBIPbIH3. YUdNbObICTbIK CnHaJI ecTIJeDI. MaHbI3DbI: KaTAtoJTBIPfAH COH, TYMeHI (3) 6acbIHbI3.
KeHec: OHTaIbI 6y cyHKUcIbHbIH Mep3iIMH y3apTy yuH, Ky6bIP cybIH dNCTnIeHReH cymen 1:1 KaTbHaCbIHda apanactbpyfa 6oIaIbI. Erep eHiPiIzIerI Ky6bIP cybl eTe kepMeK 6oIca, nIcTIuIeHReH cymen 1:2 KaTbHaCbIHda apanactbIpbIHbI3.

2. Kbl3dbyp
1 Erep 6y cTahnucrby TIKTI KJbInTay JyuecimeH (13*) Ka6dbikTaIfAH 60JCA, TTYMeCih 6acy apKbJIbI TYtIKTI 6OcatbIbI3. 2 By shaHricin (5) XeHe XeJI Ka6eJIiN (6) Xa3bIn aIbIHb3. XeJI Ka6eJIiH XePre TynbIKtaIFaH po3eTKara XaJIfAHbI3. 3 KypblfblHbI Kocy yuH, TyMeHi (1) 6acblbI3. HndkaTOp Wamdapbl (1, 15) XbInblbIKtan, KypblfblHbIH Kb3bn KaTKaHbIH KepceTei. Ytik Jxmbicka daibin 60JFaHda, INHdkatop wamdapbi (1, 15) TpyakTbI TypeJe XaHbIn TypaDbI. Eki Dbl6bICTbIK cnHnBepinei.

3. YtikTey
1 Bymeh yTiktey yuH, 6y uBifapy Tymecin (14) 6aCbIbI3.
MaHbI3dbI:YtikTi Tecemere Koifan Ke3e,ehaJIbIMeH Tabah CypETe KepcetilreHneBacapy naHeJIiH JKofapfbl XafbiHa MiHdETTI Type caJIbHyblKepeK.
Kehec:Ytkey Hntkepeipn JkaKcapTy yuiH,coHfbi 6eJIkTeepin YtikTeReHne KImDi KeNtipy MaKcaTbIHda 6y 1bIfapy Tymecin (14) 6acnaHbI3.

"PulseSteam"Функцясbl
Byn acnanta kypdieni 6ypmeneprj xa3yfa apnaifanapnaibf yHKqna6ap.
1 Press the button (14) for 3 seconds. The device will turn on.

Turning off
To avoid harm to people, pets, etc., the device is designed to be turned off.
1 Place the device on a flat surface at least 15 cm away from walls. 2 Press and hold the button (14) for 5 seconds to turn off the device.
Note: Do not touch the device with wet hands or expose it to liquids.

4. Power saving
If the power saving mode is activated, the device will automatically turn off after a period of inactivity to save energy.
1 Press the "Eco" button (4) to activate power saving mode. The indicator light will turn on. 2 To exit power saving mode, press the "Eco" button again. The device will resume normal operation.

5. Emptying the tank
For safety and power saving, the device will automatically turn off if it has not been used for 8 minutes.
An audible signal will sound and all indicator lights (1,2,3,4) will turn off.
1 To empty the tank, press the button (14) again.

Cleaning and maintenance

1. Cleaning process
Note: To ensure the device operates efficiently, the cleaning process should be performed regularly. The "Calc'nClean" indicator light (2) will illuminate and an audible signal will sound, indicating that cleaning is required.
Boiler drain as a tap
1 Turn off the boiler, close (1) the valve. Open the boiler drain valve, drain 2 liters of water. 2 Close the water supply valve. 3 Press the test button (12) for 2 seconds. 4 Open the boiler drain valve (8) and drain the water. Open the boiler drain valve completely. 5 Rinse the boiler with 300 ml of water through the drain valve. If the boiler drain valve is clogged, clean it with a thin wire. After that, close the drain valve.
Note: To avoid damage to the heating element, we recommend replacing it every two years.
If water does not come out of the drain valve, check the valve.
6 If the boiler is connected to a collector (8*), it must be drained (see "Draining and Cleaning the Collector"). 7 Open the drain valve and drain the water.
Draining and Cleaning the Collector *
1 Open the collector drain valve and drain the water. 2 Clean the collector if it is dirty.
Draining the boiler
1 Turn off the power (9) and close the water supply valve. 2 Disconnect the cable (6) and remove the cover to access the boiler (1). 3 Press the drain button (2) for 2 seconds. The indicator light will turn on and the pump will start. 4 When the indicator light (1) turns off, the pump stops and the boiler is empty. It will beep twice. 5 To fill with water, place the boiler under the water tap and fill it. If the boiler is connected to a "Cal'clean" container, fill it from there. 6 Press the drain button (14) for 2 seconds. The draining process will start automatically. Note: If there is water in the pipes, the pump may run dry. The process will beep every 5 seconds. 7 After 3 minutes, the boiler will stop draining. It will beep and indicate that the draining process is complete. The boiler is now empty. 8 To remove the pump (16), disconnect the power and drain the water from the boiler, then remove the pump.

2. Cleaning the boiler
Clean the boiler regularly to maintain its performance.
Note! Risk of burns!
1 If the boiler is heavily scaled, it must be cleaned with a descaling agent. 2 To protect the pump, do not use aggressive chemicals. Use a mild descaling agent and follow the instructions.

Cleaning the boiler
1 Open the boiler drain valve and drain the water. Close the water supply valve (9). 2 Remove the test button (12) and the cover. The cover is connected to the boiler with a cable (13*). Remove the cover and the heating element. 3 Clean the heating element (5) and the cable (6) with a soft brush (7).

This instruction is intended for the user.
1. Before starting work: Large and small components should be washed and dried, then before starting work, they should be lubricated with oil. 2. During operation: The pipes should be checked periodically.
1. This device should be connected to a power source of the same voltage. 2. The pipe openings should be cleaned of dust and dirt.
| Mòcène | bíkTmán ce6bentepi | IeWiim |
| Cy tvfbyipdaftbicahblaynapdahaftbl. | 1. By anfaw petKoIdaHbIJIfAHbIKTaHHeMece y3ak yakuBIT boByI KoIdaHbIImaI TyprAdbIKTah, cyTvTiKtterdiH iwiHnde 6byfaaiHaIyda. | 1. Ytikti ytiktey aImaftbIHanapbl 6aftblTAN, 6byIbIparbIIMaIbIHua 6byIbIparpy Tymecin 6acblb3. |
| Kip tvfbyipdaHbIfadbl. | 1. Bojlep Men ytik iwiHdeKaTKaH KaK HeMeceMinhepaJdap XInHaJIbI KaIbbl.2. XmIIaIbIK eHIMdep HemeceKocpIaIpaN daIaHaJIbIbl. | 1. Ta3aIay zuklin nEtki3iH3("Kak keTipy npoeci" 6eIIMiHkapaHbI3).2. EwkaIaHsCya eHIMdepKocpHaI3 ("Cy 6aRbHToNTbIpy" 6eIIMiHkapaHbI3).TyrblDbl DlIMkbIJShybepeKnien Ta3aIaHbI3. |
| "Calc'nClean"INHdkaTOp shaMbI(2) eIshneii. | 1. YtikTeH kAc KeTipy npoeciAraKTaIIMaI TOKtTaIbIbl. | 1. YtikTeH kAc KeTipy npoeciKaIaTic 6cke Kocbl, aYbHaI deiH opblDaHbI3. |
| KypblftbicaopatbH dbIbICbIbIFapaIbl. | 1. Cy 6by 6aBbIHa copblbIgKaTbIP.2. DbIbIC TokTamaH MaIbIaBl. | 1. By IaIbIbTIbIg KaFdaI.2. Erpe IbIbIC sbIbIFbyI TokTaMaCa, 6by CTAuncaBlnH KOndaHbAbl3 JxHe eKilletTI TexHkAblK KbI3MeT KepCetU optaIbIFbHa Xa6apLacblbI3. |
| YtikTey kezihndeKbICbIM xOfALbl. | 1. By 6bIbFapu Tymeci y3ak yakuBIT 6bObl 6cke Kocblfam,ЯfHn oTe jxN b6aIbIraH. | 1. By 6bIbFapu Tymecin apalbIKTapmen naIdaIaHaBbI3. |
| YtikTey6apbIbHdaKniIdi cydaKapbIbI naIda6bIaBl. | 1. YtikTey taKTacbHda 6bDblCyra aIHaIbIbHa6aIbIbCTbl 6bOblbI MyMKiH. | 1. YtikTey taKTacbHbI INTObIMaBl yCTIH CYPtIH3JxHe Ke3 KeIgren cy DaKapbIbH KeTTipy ywiHytikTeHi3. |
| Iliannr jxMblc6apbIbHda bICTbl 6bollnKeTei. | 1. By IaIbIbTIbIg KaFdaI MybHn c6e6bi - 6ymeHytikTey 6apbIbHda 6bDblH 6IaHr apkblbl 80tyi. | 1. Iliannrre ytiktey 6apbIsbHdaTImey ywiH, Ohbl Kapama-Kapcsbl JxAKKa KoIbHbI3. |
| BoiIepden cy aftbl Typ. | 1. BoiIep KaKnaBbl (8) 6Ocafan. | 1. KaKnaKbl 6ekemdeH3 |
If the above instructions are not followed, the device may malfunction or be damaged.
This instruction manual can be obtained from the manufacturer's official website.