VIDEOWONDER CARDBUS DUAL - Video expansion card GENUIS - Free user manual and instructions
Find the device manual for free VIDEOWONDER CARDBUS DUAL GENUIS in PDF.
| Product Type | PCMCIA Video Extension Card |
| Brand | GENUIS |
| Model | VIDEOWONDER CARDBUS DUAL |
| Category | Video Extension Card |
| Interface | CardBus PCMCIA |
| Video Inputs | Analog TV antenna, digital terrestrial TV antenna, S-Video, Composite (via AV cable) |
| Audio Inputs | Left and Right (via AV cable) |
| Outputs | No direct output, playback via PC |
| Display Resolution | Full screen or windowed, adaptable resolution |
| Recording Formats | MPEG-1, MPEG-2, VCD, SVCD, DVD (depending on profile) |
| Main Functions | Analog and digital TV reception, PIP (Picture-in-Picture), Twin Mode, Time Shifting, image capture, scheduled recording, DVB audio radio |
| Compatible Operating Systems | Windows 2000 Service Pack 4, Windows XP Service Pack 1 |
| Minimum System Requirements | Pentium III 1 GHz, 256 MB RAM, 100 MB hard disk, CD/DVD drive |
| Power Supply | Via the laptop's CardBus slot |
| Dimensions (estimated) | Approximately 85.6 x 54 x 5 mm (standard CardBus format) |
| Weight (estimated) | Approximately 30 g |
| Package Contents | VideoWonder card, NTSC/PAL adapters, AV cable, portable antenna, installation CD, user manual |
| Maintenance and Cleaning | Avoid moisture and dust. Clean with a dry, soft cloth. Do not use solvents. |
| Safety | Use only on CardBus-compatible laptops. Do not force insertion. |
| Spare Parts and Repairability | No spare parts provided. In case of failure, contact customer service. |
Frequently Asked Questions - VIDEOWONDER CARDBUS DUAL GENUIS
User questions about VIDEOWONDER CARDBUS DUAL GENUIS
0 question about this device. Answer the ones you know or ask your own.
Ask a new question about this device
Download the instructions for your Video expansion card in PDF format for free! Find your manual VIDEOWONDER CARDBUS DUAL - GENUIS and take your electronic device back in hand. On this page are published all the documents necessary for the use of your device. VIDEOWONDER CARDBUS DUAL by GENUIS.
USER MANUAL VIDEOWONDER CARDBUS DUAL GENUIS
Thank you for choosing the VideoWonder CardBus Dual TV tuner and video capture card. This product turns your PC into a powerful desktop multimedia system quickly and easily. Capture video and still images and experience real-time MPEG-1 and MPEG-2 recording. Watch both digital TV and analog TV or video at the same time, on the same screen! The VideoWonder CardBus Dual provides you with a high quality TV viewing experience with true stereo sound!
1.2 Features
- Watch both Digital TV and Analog TV or video simultaneously
- S-Video/composite video inputs for playing VCD, DVD or V8.
- Bundle fantastic software-DVD Moviefactory and Ulead ToolBox2
Support PIP (Picture in Picture) function - Support real-time recording from Digital TV, Analog TV, and Analog inputs like VCD, DVD, or V8
- Watch TV in a resizeable window or full-screen
- Support Time Shifting function
- Capture still images from TV and be a wallpaper on desktop
- Listen to Free-to-air DVB radio
1.3 Package Contents
When removing the contents of the package, please inspect all items to ensure no damage was sustained during shipping. The following items should be included in the package:
VideoWonder CardBus Dual
NTSC connection adapter (x 2)

PAL connection adapter (x 2)

1.4 System Requirements
To successfully use the VideoWonder CardBus Dual solution, please ensure that your system meets the following requirements:
-
Pentium® III 1.0 GHz or faster PC
-
MPEG-1 real-time encoding (analog): PIII® 1.0GHz
- MPEG-2 real-time encoding (analog/digital): P4® 1.6GHz
DVD real-time encoding (analog/digital): P4® 2GHz higher
256 MB RAM (minimum), 512 MB RAM recommended
- CD-ROM or DVD drive
100 MB available hard disk space for installation
TV antenna or TV cable for analog TV
TV antenna or portable Digital terrestrial antenna(included in package) for digital TV
- Windows® 2000(Service Pack 4) or Windows® XP (Service Pack 1)
2. Input & Output Connections
2.1 VideoWonder CardBus Dual Connections
The VideoWonder CardBus Dual supports S-Video, Composite and Analog TV input. See the diagram below for connection details.
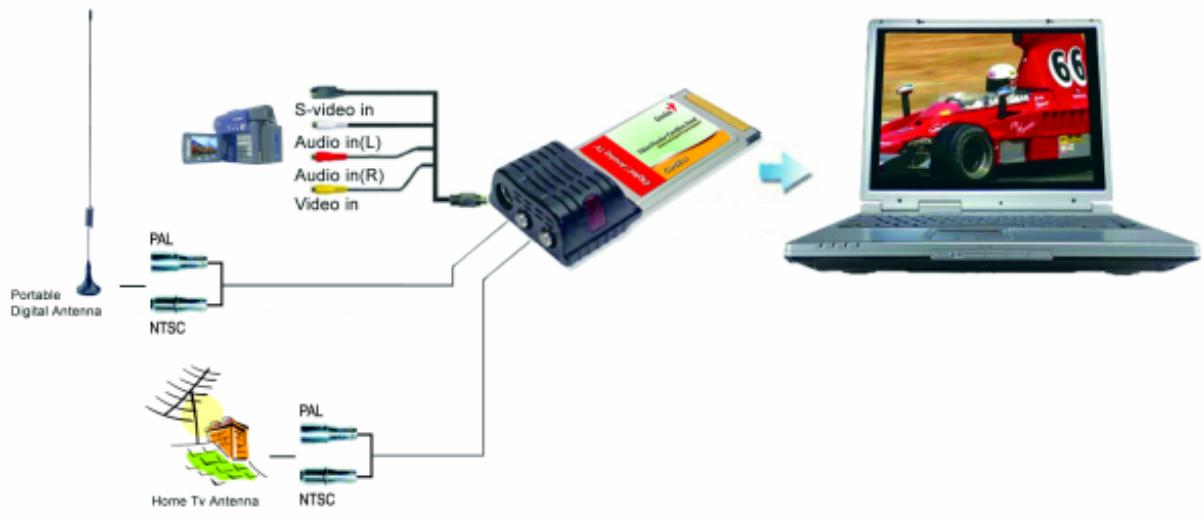
AV Cable: Connect the AV Cable to the 9-pin connector of the VideoWonder CardBus Dual
S-Video: S-Video input for external devices like VCRs or camcorders
Audio (L): Connects to the left audio channel of an external audio device
Audio (R): Connects to the right audio channel of an external audio device
Video In: Composite video input for external devices like VCRs or camcorders
Digital TV Antenna: Connects to your home or room antenna or portable antenna for Digital Terrestrial TV
TV Antenna: Connects to your home antenna or cable for Analog TV
2.2 TV Connections
You can use a home TV antenna or the packaged portable antenna for digital TV reception to connect the digital TV input to the VideoWonder CardBus Dual. Or, you can use a home TV antenna, cable TV line, or another source for your analog TV input.
If you use a home TV antenna for both digital and analog TV reception, you may need to use a signal splitter to connect to the VideoWonder CardBus Dual.

3. Installation
The following sections provide step-by-step instructions on installing and configuring the card, accessories and software.
3.1 Software installation
- First, make sure that Windows® XP (Service Pack 1) or Windows® 2000 (Service Pack 4) is installed in your system. If you are not sure what version of Windows you have, just click the right button of your mouse on "my computer" folder and select "Properties" to see the version. If your PC is not Windows® 2000 (Service Pack 4) or Windows® XP (Service Pack 1), please go to "Start" in the menu bar and choose "Programs", then click "Windows Update" to upgrade your Windows version of Service Pack 4 for Windows® 2000 or Service Pack 1 for Windows® XP using the Internet.
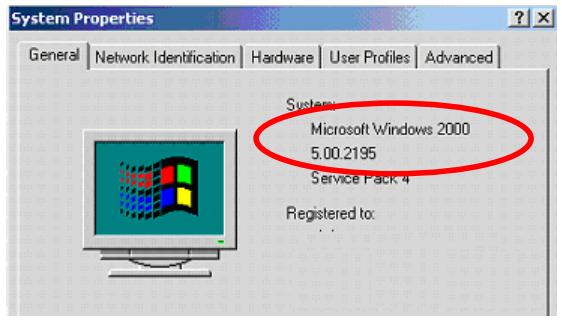
This is an example for checking the version of Windows 2000.
3.1 DirectX
Before installing your VideWonder CardBus Dual, it is necessary to install DirectX 9.0.
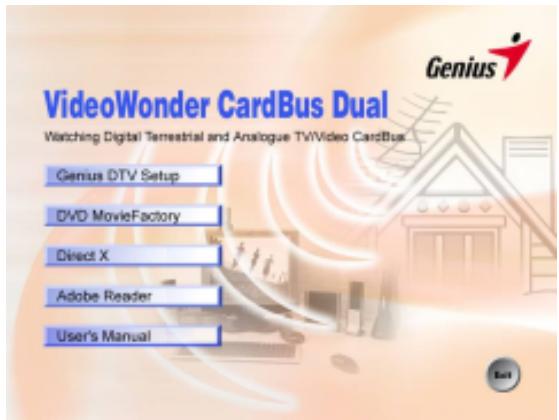
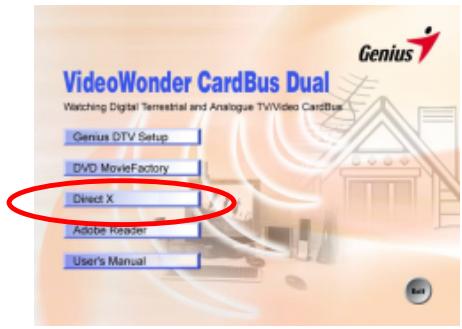
Insert the installation CD and an installation menu should load automatically.
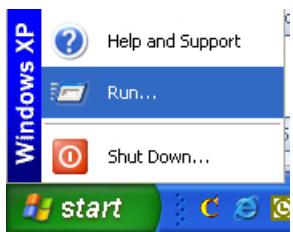
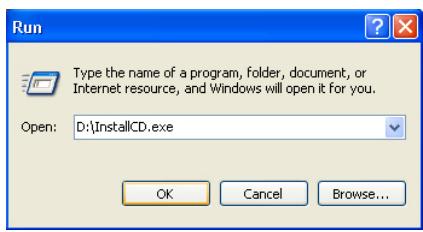
If the Autostart program does not appear automatically when you insert your Installation CD, start it manually by running the InstallCD.exe file located on the Installation CD, or by clicking the Start button, choosing Run..., and type D:\InstallCD.exe. (if D: is your CD-ROM drive)
Click on DirectX and follow the prompts to install DirectX. After the installation is completed, shut down the computer.
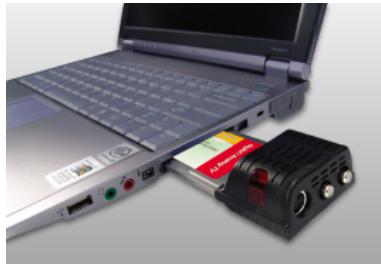
3.2 Installing the VideoWonder CardBus Dual
1) Simply slide the card into your notebook's CardBus PCMCIA slot, and make sure it is fully seated.
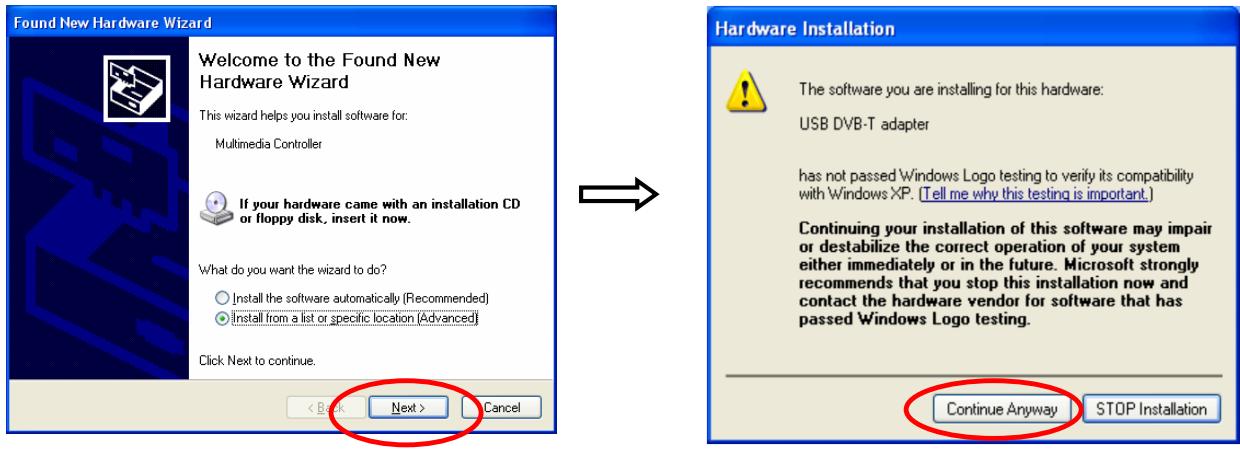
3.3 Driver Installation for Windows 2000 / Windows XP
Windows 2000(Service pack 4) / XP Service Pack 1) will automatically detect the VideoWonder CardBus Dual and brings up the Found New Hardware Wizard window.
If you have not already done so, place the Installation CD into your CD-ROM drive.
Select Install from a list or specific location (Advanced) and click Next and Click "Continue Anyway"
Now select Search for the best driver in these locations, make sure "Search removable media is checked, and click Next.
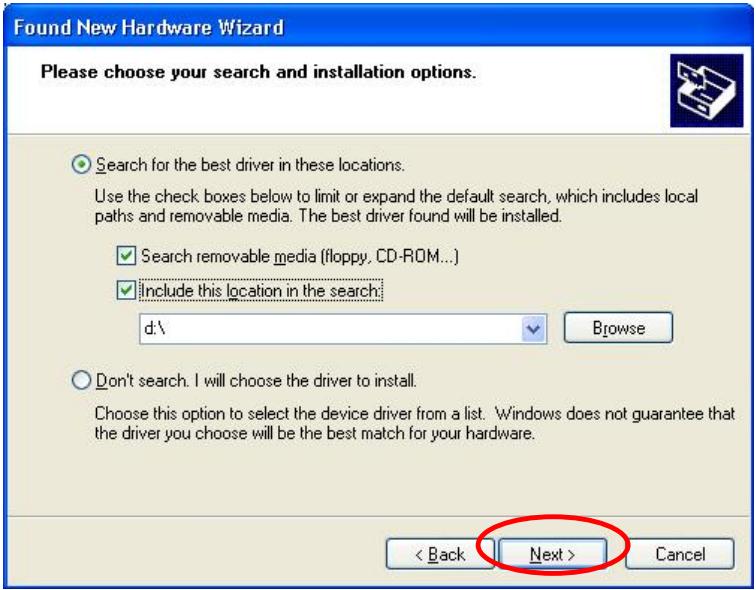
Windows will now find the drivers on the Installation CD and install them automatically. After installing the driver, Windows will inform you that it has done so successfully. Click Finish.
3.4 Installation of DTV
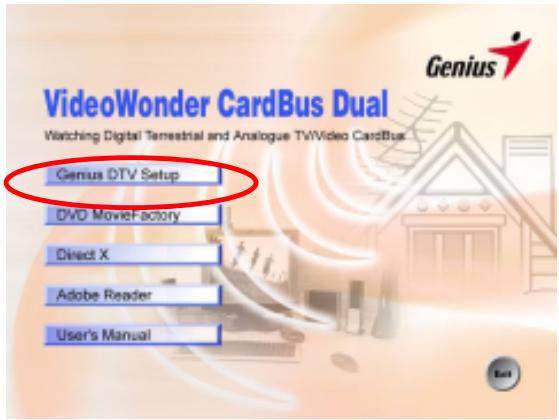
Install the DTV software by clicking on Genius DTV Setup. Just follow the prompts to install the software.
3.5 Installation of DVD MovieFactory
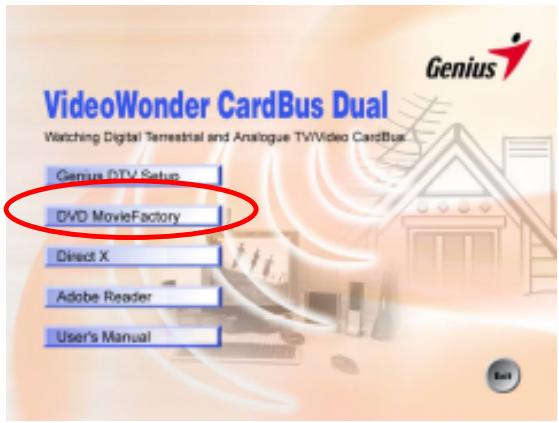
If you want to edit the TV program you recorded, please install the DVD MovieFactory. This software is included so you can edit and burn your own DVDs. If you do not want to install it, please skip this step. To install it, click on DVD MovieFactory and follow the prompts. When asked for the CD-key, you can find it on the envelope of your installation CD.
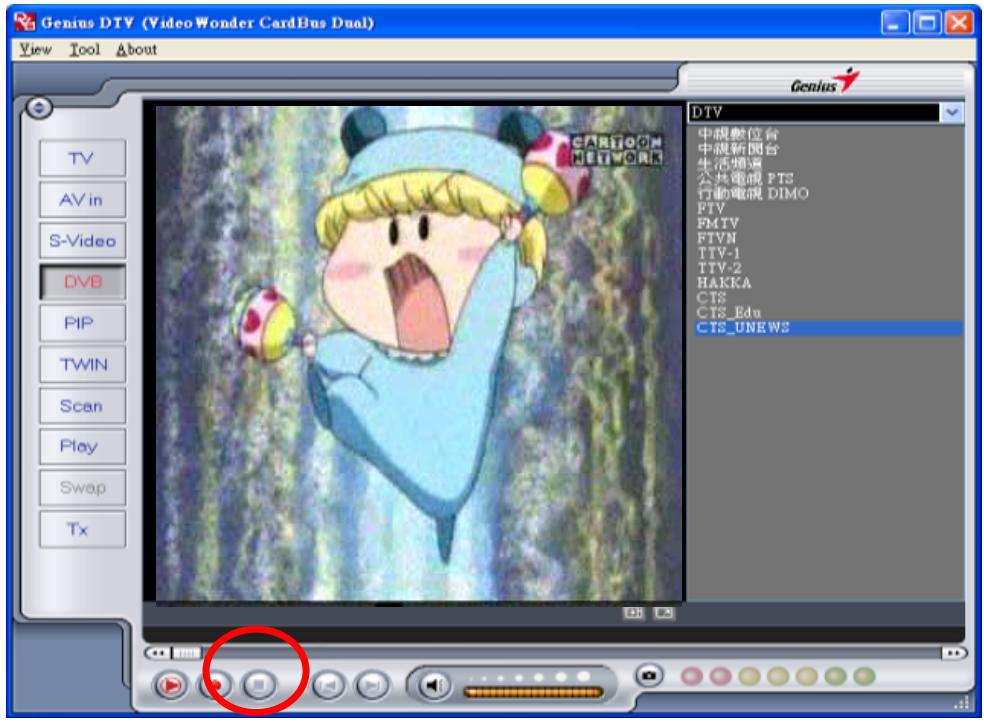
4. DTV
4.1 DTV Interface Overview
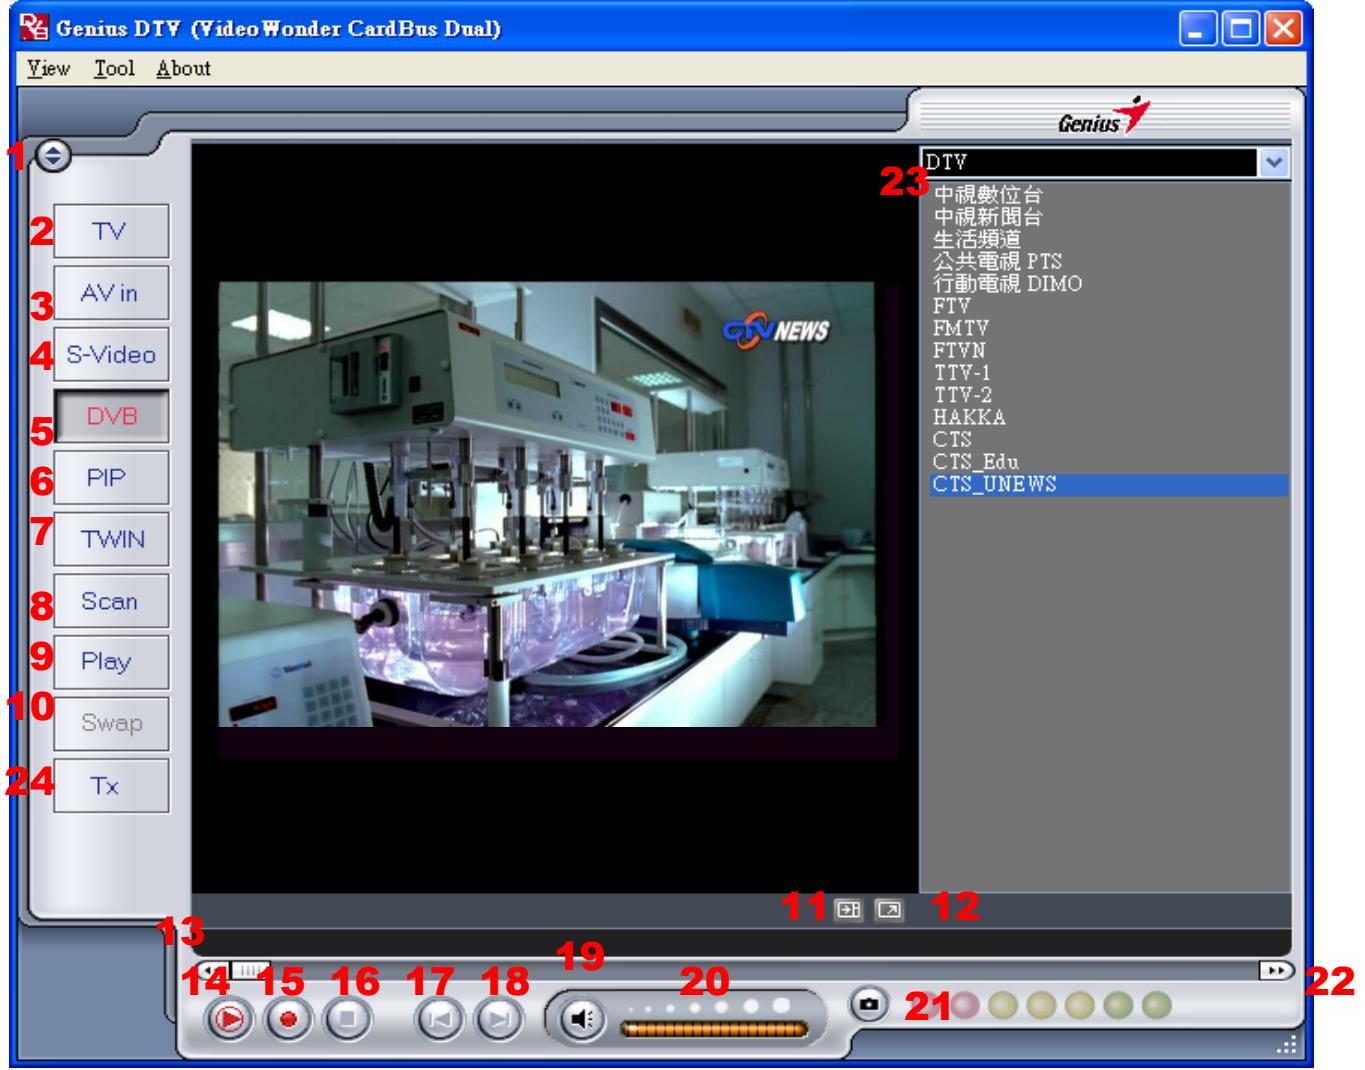
| 1. Change Skin | 13. Rewind |
| 2. Switch to Analog TV | 14. Time Shifting Start/Play/Pause |
| 3. Switch to composite video in | 15. Record Start |
| 4. Switch to S-Video in | 16. Stop |
| 5. Switch to DVB TV | 17. Skip to beginning |
| 6. Start/Stop PIP mode | 18. Skip to end |
| 7. Start/Stop Twin mode | 19. Mute on/off |
| 8. Open Scan settings | 20. Volume bar |
| 9. Switch to Play mode | 21. Snapshot button |
| 10. Swap main and second window (In PIP mode) | 22. Fast Forward |
| 11. Show/hide channel list | 23. Channel list |
| 12. Toggle full screen/windowed viewing mode | 24. Teletex |
4.2 Scanning for TV Channels (Digital)
Before you can watch digital TV, you have to scan for available channels in your area. On the Menu Bar, click on Tool, then click on Scan. You can also click on the Scan button on the left side of the screen.

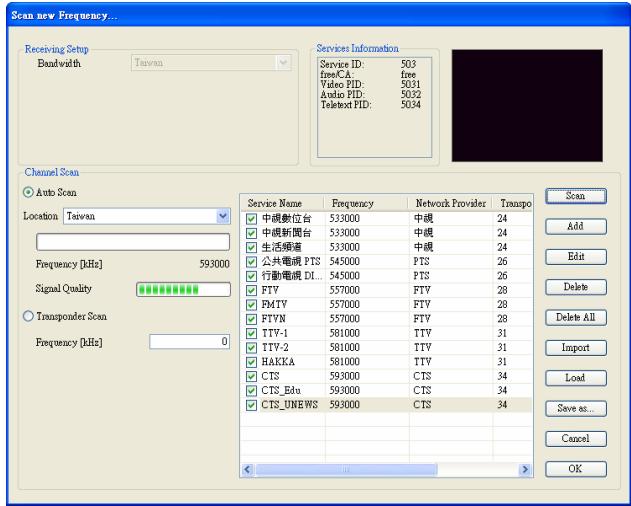
Channel Scan:
There are two ways to scan for available channels, Auto Scan and Transponder Scan.
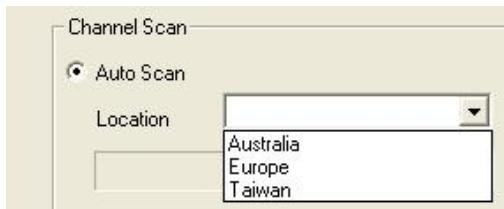
1. Auto Scan:
Select Auto Scan, then select your country from the drop-down box and click Scan.
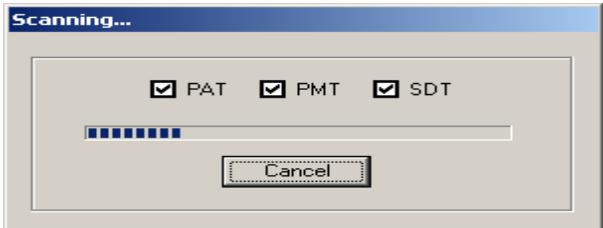
During an Auto Scan, you will see a box showing you the progress of the scan.
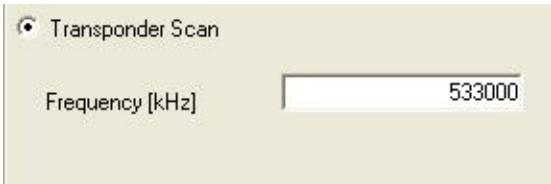
2. Transponder Scan:
You can also enter a frequency manually. Type in the Frequency in kHz, select the modulation, for DVBT, 16QAM or 64QAM is usually correct, and then click "Scan".
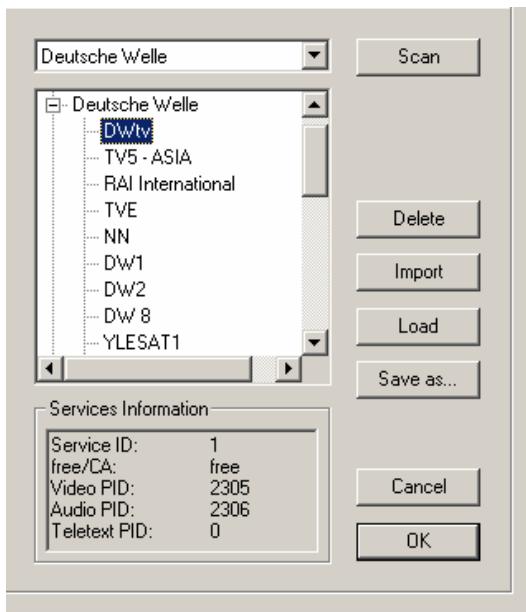
Channels found will be displayed in the window, with information about their TID, SID, Video PID and Audio PID.
Here you can save your frequency list (Save as...) or import one (Import). You can also remove channels from the channel list by selecting the channel and clicking
Delete.
4.3 Scanning and editing channels (Analogue type)
When in Analogue TV mode, choosing Tool then Scan or clicking on the Scan button will open up the following screen.
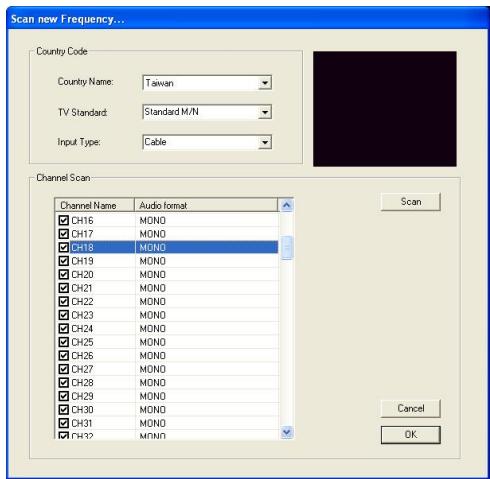
Here, click on the Scan button to automatically scan all channels for availability and remove any bad channels. You can also change your Country to set your TV Standard, or you can change your TV Standard directly by using the dropdown boxes. You can also change the Input Type to designate whether you use an home antenna (Air) or cable TV (Cable).
You can also edit your channel list by using the checkboxes next to the channel name - unchecked channels will be hidden from the channel list. (You will still be able to switch to the channel by typing in the channel number) Click on the name of the channel to edit the name that will appear in your channel list. You can also click on the Audio Format of the channel to choose between MONO or STEREO sound (when
available).
4.4 Choosing your source
VideoWonder CardBus Dual is not limited to digital TV reception – you can also view analog sources at the same time.
On the left side of the main interface, you will find buttons that let you access different sources.

Switches to Analog TV reception
Switches to an external device connected to the composite video input
Switches to an external device connected to the S-Video input
Switches to Digital Terrestrial TV (selected by default)
Turns on and off PIP (Picture in Picture) Mode, which lets you watch both digital TV and an analog source at the same time
Turns on and off Twin Mode, which lets you watch digital TV and an analog source side by side
Brings up the Scan Settings dialog
Enters Play Mode, and lets you view snapshots you have taken and watch video you have captured
Swaps video between the main window and second window (in PIP mode)
Teletex
4.5 Channel list
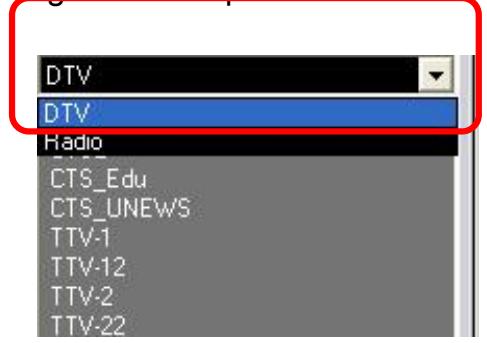
On the right side of the interface is the channel list. Here you will see available channels for Digital TV if you are in DVB mode, and analogue TV channels if you are in analogue TV mode. Simply click on a channel to switch to it, or press the ↑ or ↓ arrow keys on keyboard to switch channels. In DVB mode, you can select DVB Radio by clicking on the dropdown box and choosing Radio to listen to free-to-air radio.
4.6 Volume controls
At the bottom of the interface is the volume bar. Click on the bar to set the volume to that level, or press the or arrow keys on keyboard to decrease or increase the volume. Click on the speaker icon to mute the audio.

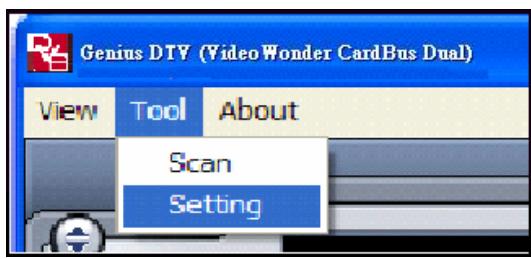
5. Setting
To access the Setting window, on the menu bar, click on Tools -> Setting.
Depending on your current source, there will be different settings available to you.
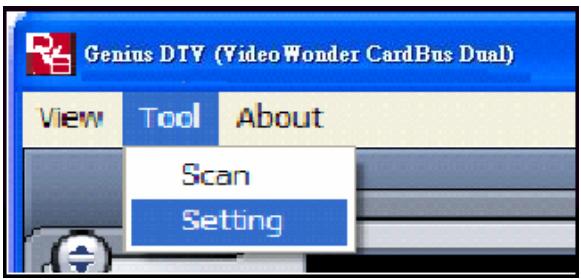
5.1 DVB Settings
When you have DVB as your source, you will see the following options:
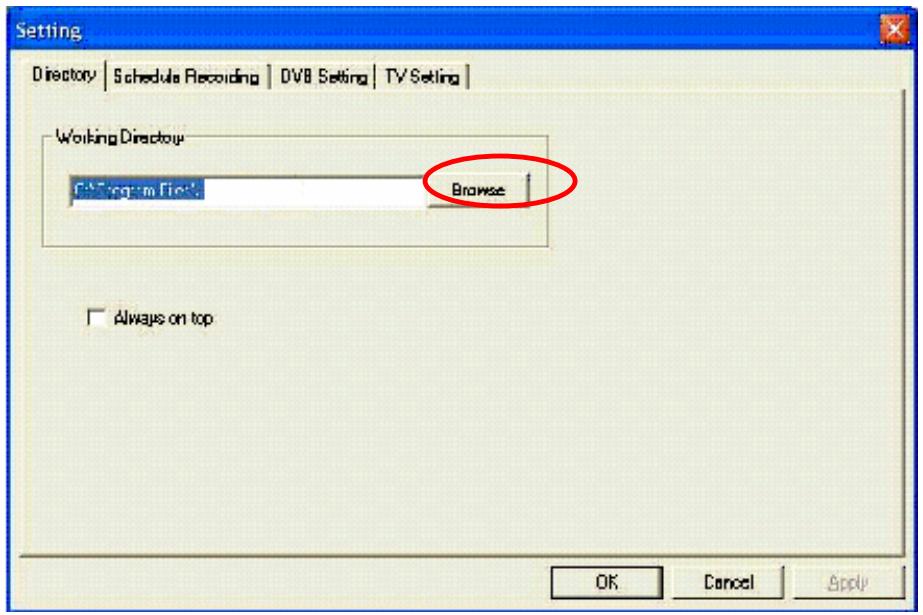
5.1.1 Directory Settings
Here you can change the directory used for saved files. Either type in the path, or click "Browse", go to the folder you want, and click OK. You can also choose to always have the DTV window on top of other applications by checking "Always on top".
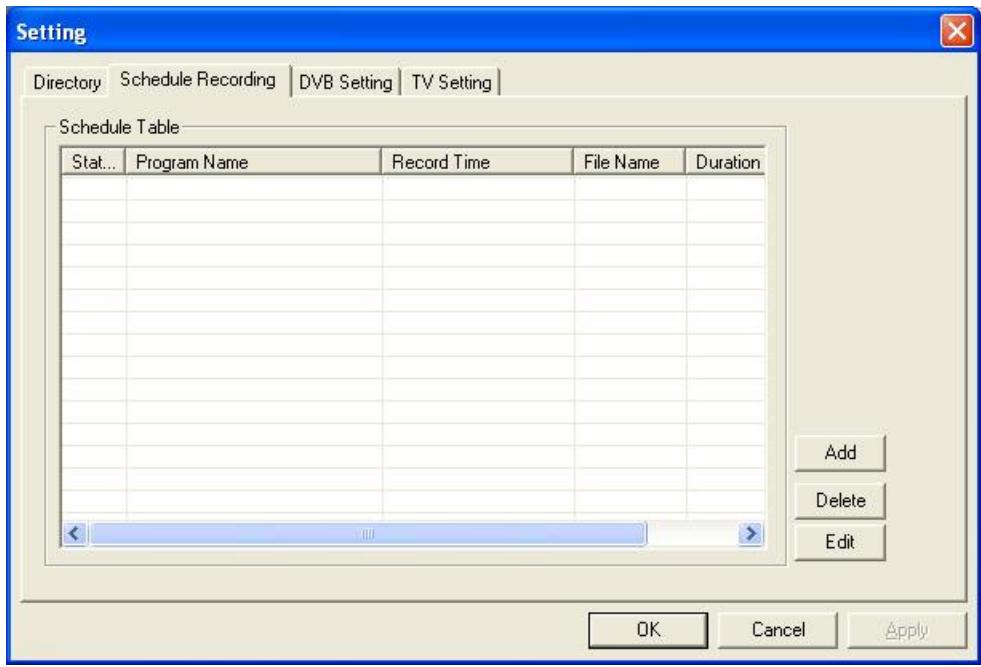
5.1.2 Schedule Recording
Here you find programs scheduled to be recorded.
Please refer to Chapter 7.3 for a description how to use Scheduled Recording.
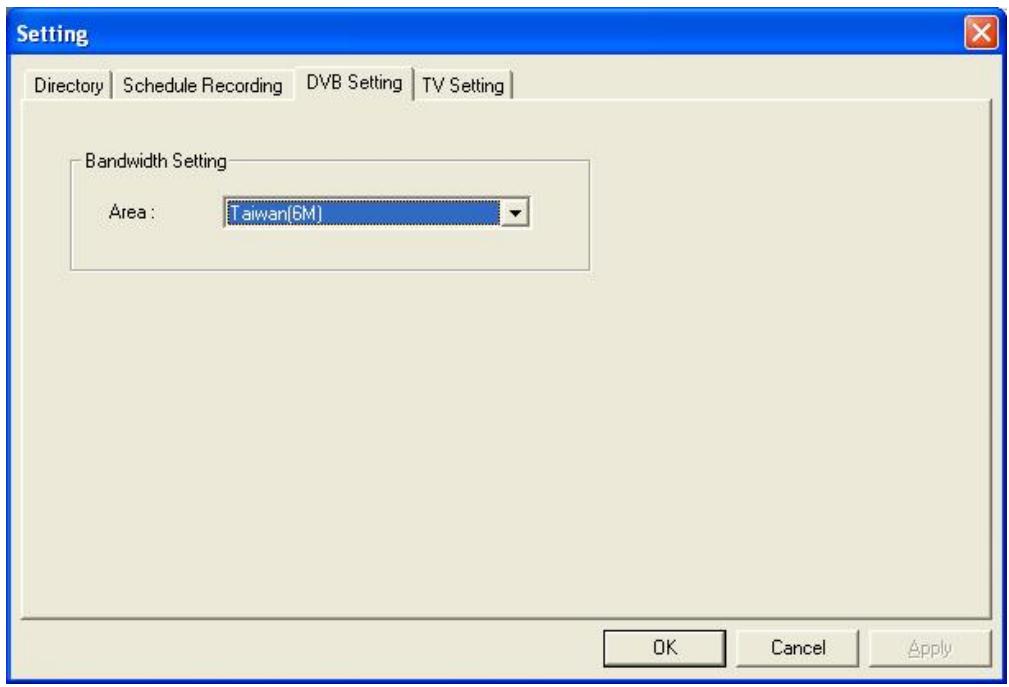
5.1.3 DVB Setting
Some countries use a different bandwidth setting for scanning their frequencies. In general, most countries have a bandwidth of 6 MHz (for Taiwan), 7 MHz (for Australia), and 7/8 MHz (for European countries). Here, you can choose the setting that matches your country.
In case you are in a country that uses 6 MHz Bandwidth, like Taiwan, for example, select the entry with 6M.
After this, you will need to restart your computer.
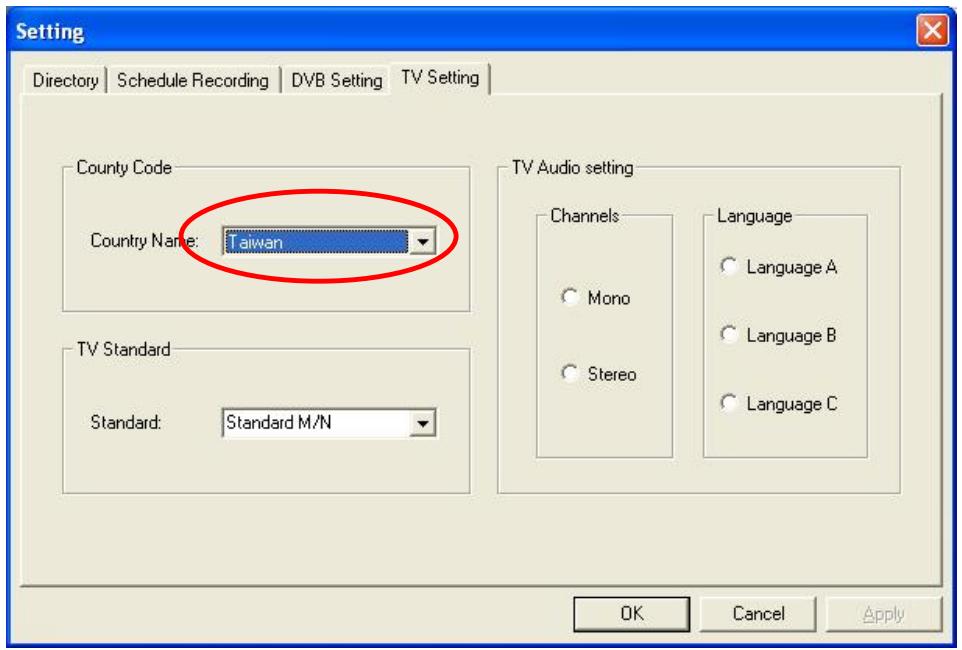
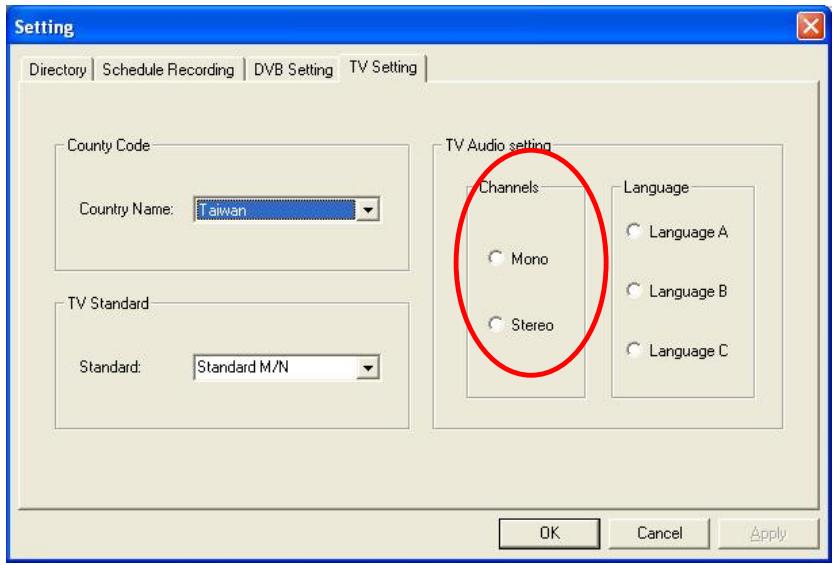
5.1.4 TV Setting
Here you can adjust some analog TV settings. Select your country and TV standard to get proper reception in your area. You can also select whether to receive Mono or Stereo for the currently selected channel, and what Language you wish to receive for multi-language broadcasts when available
5.2 Analogue TV/Video Settings (TV/AV-In/S-Video)
If you want to use TV, AV-in, or S-Video function, please see the following options:
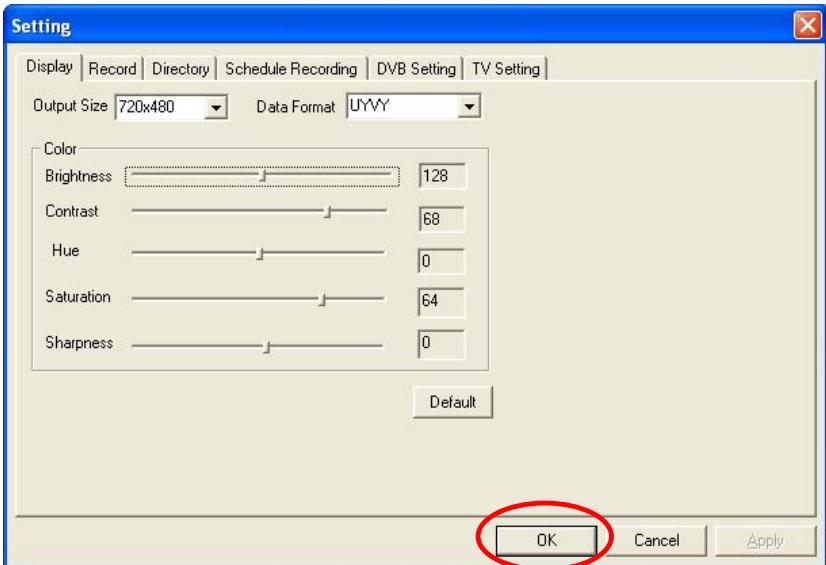
5.2.1 Display Settings
Output Size: Here you can specify the display size of the analog source.
- Data Format: Here you can choose the data format to display video in.
Color: Customize here the Color of the display characteristics like Brightness, Contrast, Hue, Saturation and Sharpness.
- Clicking on "Default" will put the settings back to the factory default.
After finishing setting, please press "OK"
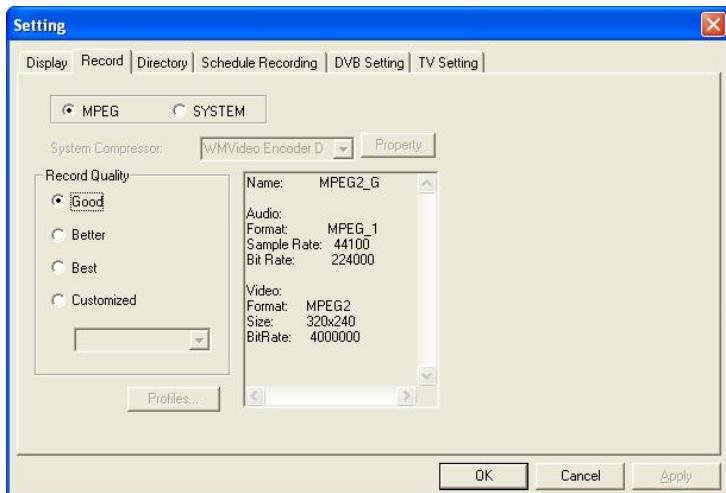
5.2.2 Record Settings
Record Settings let you adjust how you record files from the AV-in and S-Video sources.
Record - MPEG:
Here you can define whether you want to record at Good, Better or Best quality according to predefined settings.
When you choose Customized, you can make a custom setting to record with.
You can choose between the following formats:
- NTSC or PAL MPEG-1
- NTSC or PAL VCD
- NTSC or PAL MPEG-2
- NTSC or PAL SVCD
- NTSC or PAL DVD
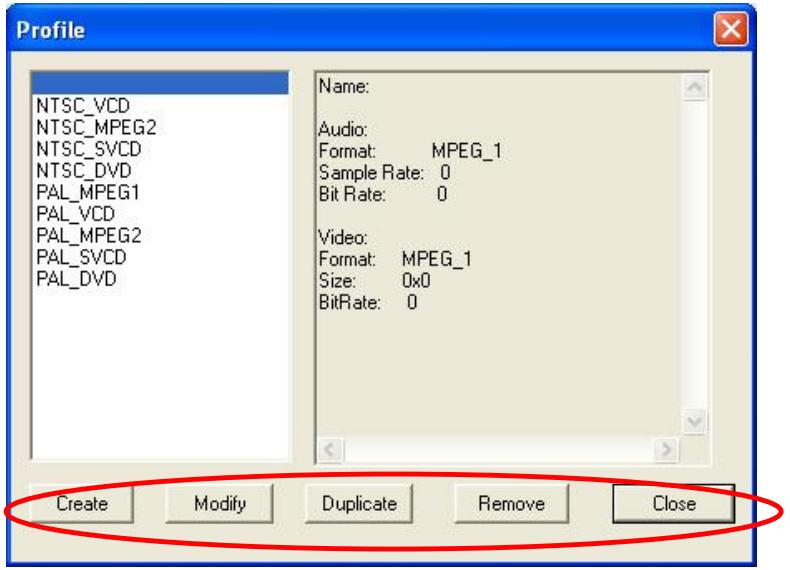
The Profiles... - Button is also available when Customized is selected, and it opens the following screen:
Here you can Create a new profile, Modify an existing one, Duplicate a profile, and Remove one or all of the existing profiles.
Create Profile
General:
Here, enter a name for the profile, and a comment to help identify it. Select MPEG-1 or MPEG-2 to use with the profile.

System:
Depending on the Mode selected in "MPEG-1 General", select what Bitstream mode you want to use with the profile.

Video:
Here, choose the Video Format, the output size, and the Bit Rate you wish to use.
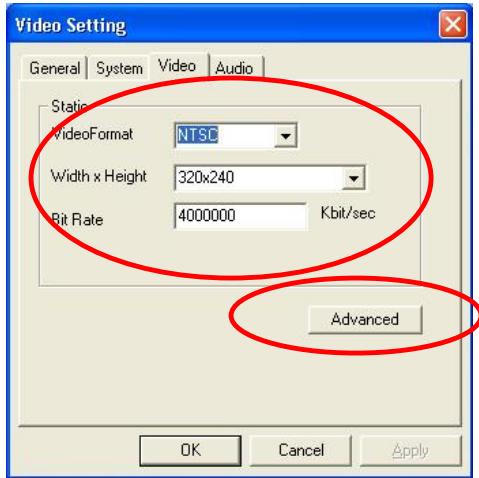
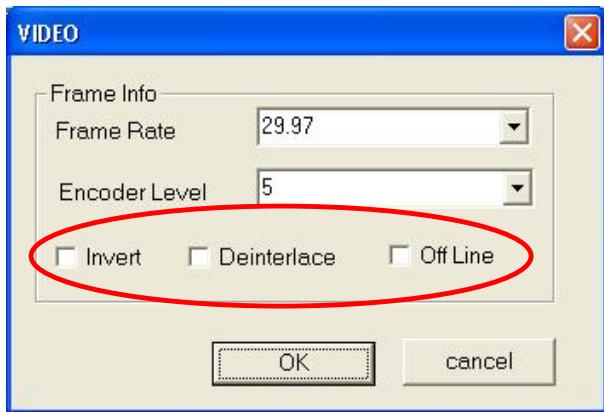
When you click on Advanced from the above window, another window will open where you can select the Frame Rate, the Encoder level and whether the recording should be Inverted, Deinterlace and/or Off Line.
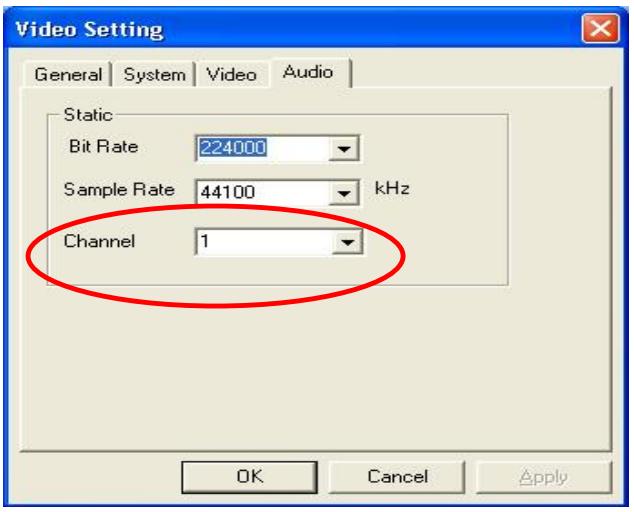
Audio: Here you can choose the Bit Rate, Sample Rate, and how many Channels to use for recorded audio. (1=mono, 2=stereo)
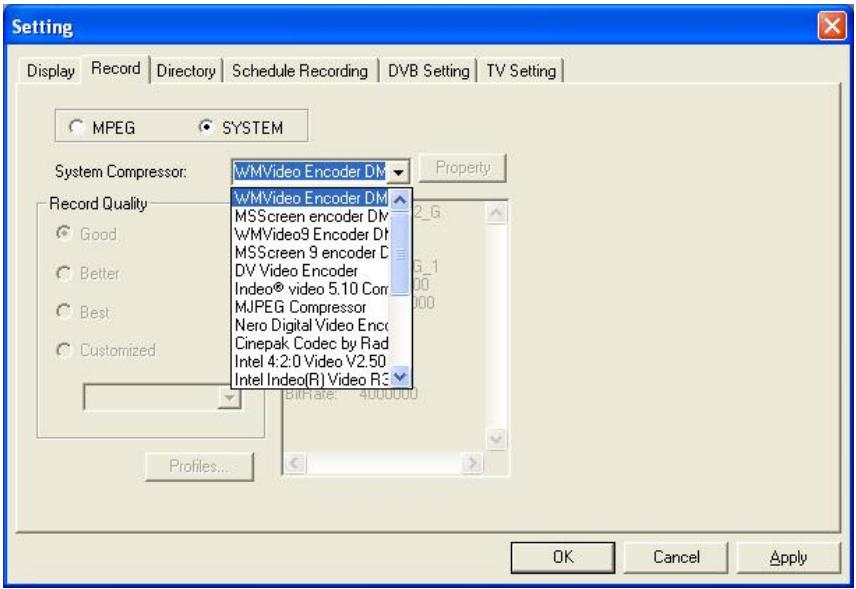
Record - SYSTEM
By selecting SYSTEM in the Record Setting window, you can access the CODES already installed in your system. Depending on the codec, you can access the properties of the codec, and modify their settings by clicking on the Property button. (not available with all CODEs)
6.PIP (Picture-In-Picture)
The PIP function can be accessed from the toolbar on the left.
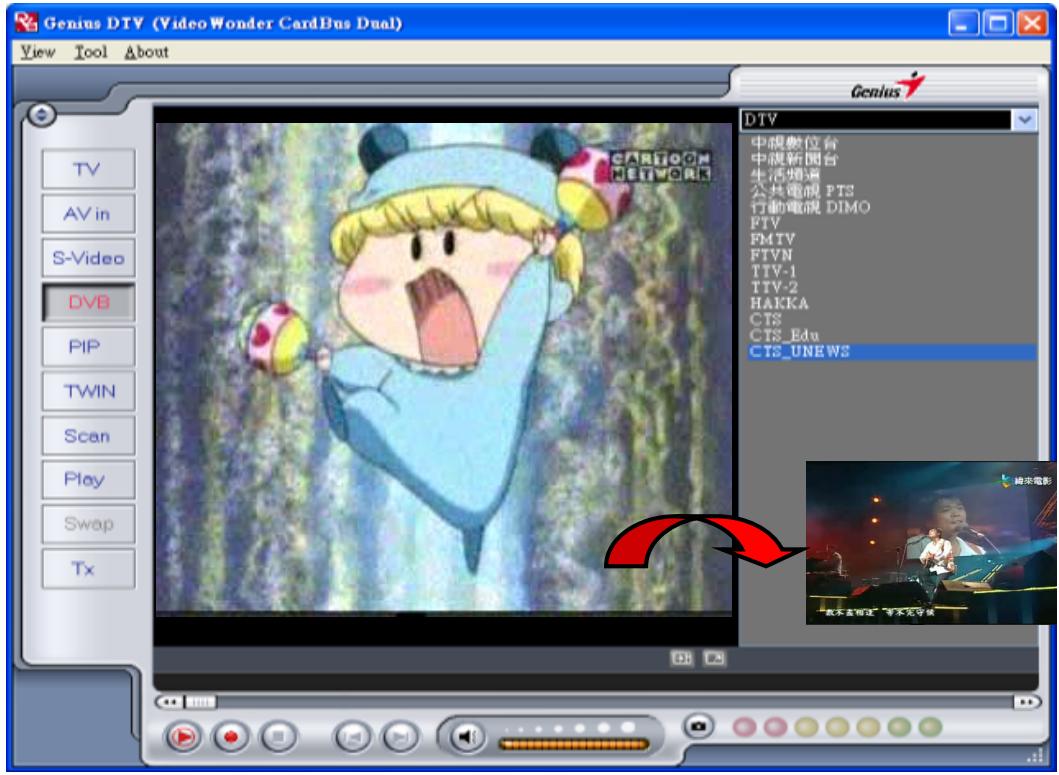
When you click on the PIP Button, you will see a second live stream at the bottom right. When you are in PIP-Mode, you can switch between analogue TV, S-Video, and AV in sources, depending on which connection you want to view in the second window.
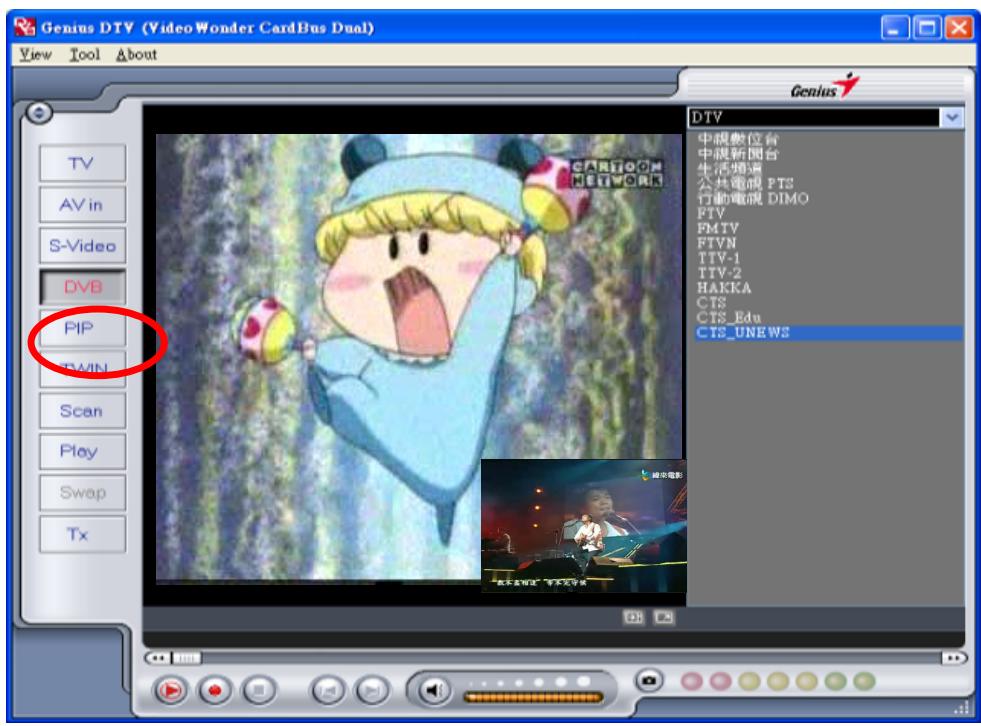
You can move the small window on the main window anywhere on the desktop, and resize it by dragging it on its edges.
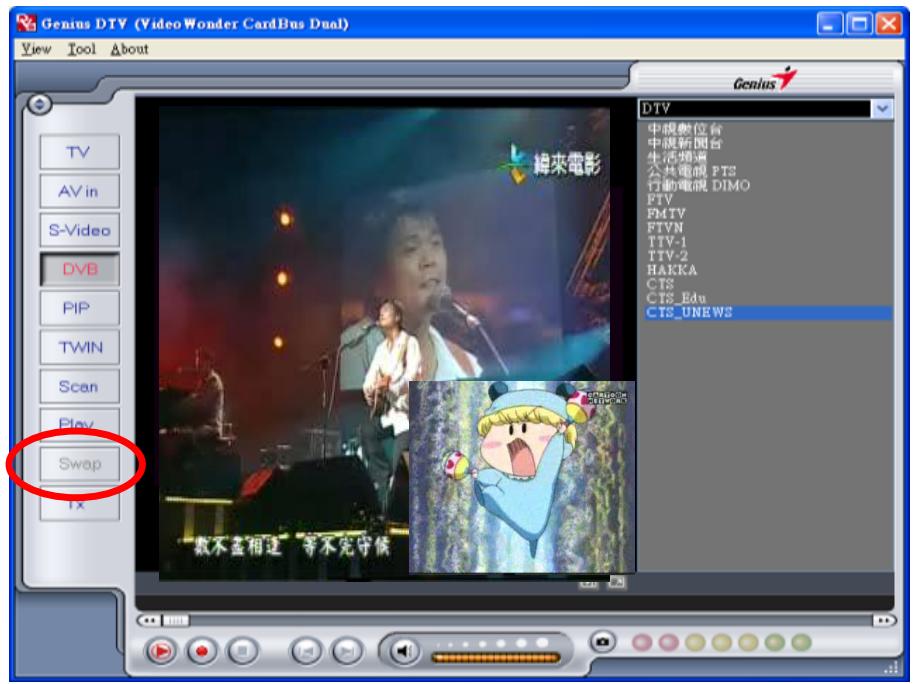
Clicking on the Swap button will swap the main and second windows, so digital TV will be in the second window and your analogue source will be in the main window when you are watching both Analogue TV and Digital TV
To end PIP mode, click on the PIP button again to return to normal viewing.
Note: You cannot use Time Shifting or record when in PIP mode.
7. Recording
7.1 The Recording Button
By clicking the record button, you can record video displayed in the main window. When recording video, then you will see • REC above the play controls.

In DVB-T mode, you can record the pure MPEG-2 Audio and Video signal. In analogue mode (S-Video or AV-In), you can record the signal in the format that you have specified in Record Settings. (Chapter 5.2.2). In both modes, recorded files will be saved to the working directory, which can be specified in Directory Settings. (Chapter 5.1.1 and Chapter 5.2.3). You can watch the movies you have recorded by entering Play Mode. (Chapter 7.5). During recording, you cannot change channels or change video sources.
When you are done recording, click the Stop button (see the circle on the above window)
7.2 The Time Shifting Button
With the Time Shifting function, you can pause live TV, leave, and come back and watch your program right where you left it. You also can fast forward past commercials, or rewind to see a particular scene again.
To begin Time Shifting, simply click the Time Shifting button.

The Time Shifting button will turn into a Pause/Play button, letting you to pause the video. Clicking it again to begin playback right where you left it.

You will see a green bar at the bottom of the screen, with a slider that shows your current position.
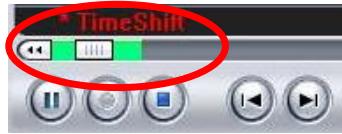
You can rewind or fast forward by using the buttons at the left and right side of the bar, or by dragging the slider left and right.
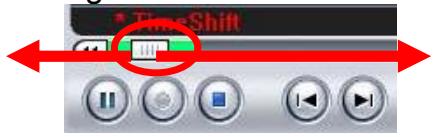
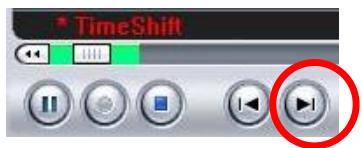
You can also click on the Skip to Beginning button to go to the beginning of the Time Shifting file, and click on Skip to End to move back to what is currently showing.
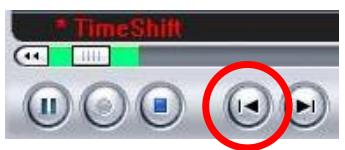
or
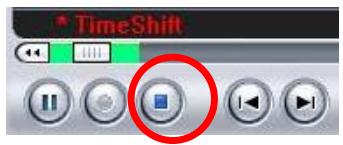
When you want to stop Time Shifting, click on the Stop button. You cannot change channels or video sources while Time Shifting.
7.3 Schedule Recording
You can access Schedule Recording from the Settings Menu as described in Chapter 5.1.2 and Chapter 5.2.4. Here you can see a list of items scheduled to record. By clicking on the Add Button, you are able to add a new scheduled recording, the Delete button cancels the highlighted scheduled recording and the Edit button lets you change the settings of a scheduled recording.
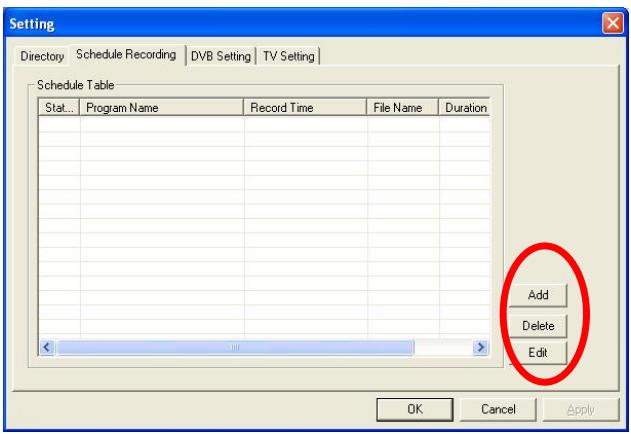
The Add and Edit buttons open the following menu:

First, select the Schedule Type from the right side of the screen. Click “One time” if this is a one-time only recording. To make a weekly recording, click on the days you want the program to record on. Select the Source you want to record from, then the Channel if you are recording from a TV source. Select the Date if this is a one time recording. Enter the Start Time and Duration of the program you want to record. Finally, enter a File Name for the recorded file – if this is a weekly recording, a number will be added to this name for each recording. (Example: FileName01.mpg, FileName02.mpg, etc.)
Click on the Add button to finish scheduling the recording.
7.4 Snapshot
You can take still image snapshots of video and save them to your hard drive. To take a snapshot, click on the "Snapshot" button, and the current video image will be saved to your hard drive in the working directory specified in Directory Settings. (Chapter 5.1.1 and Chapter 5.2.3) You can see the snapshots you have taken by entering Play Mode. (Chapter 7.5)

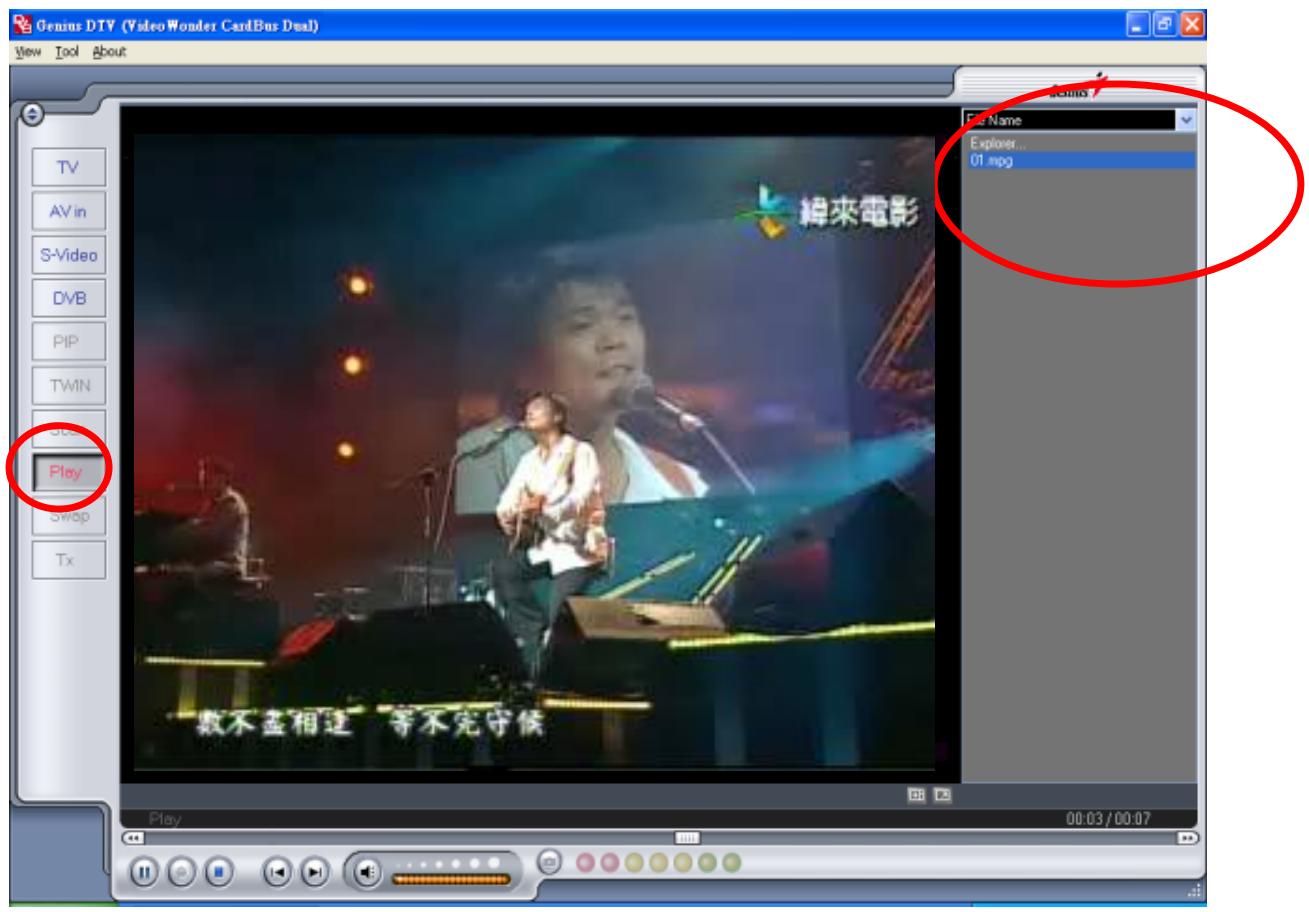
7.5 Play Mode
You can see the files you have already recorded or the images that you captured by clicking on "Play" on the left side of the interface. Here you can select the file you wish to view on the right, and it will display in the main window. If the file is an image, it will be displayed. If the file is a movie clip, it will begin to play. You can pause/play or stop the movie using the Pause/Play and Stop buttons at the bottom of the interface.