TWINWHEEL - Game controller GENUIS - Free user manual and instructions
Find the device manual for free TWINWHEEL GENUIS in PDF.

User questions about TWINWHEEL GENUIS
0 question about this device. Answer the ones you know or ask your own.
Ask a new question about this device
Download the instructions for your Game controller in PDF format for free! Find your manual TWINWHEEL - GENUIS and take your electronic device back in hand. On this page are published all the documents necessary for the use of your device. TWINWHEEL by GENUIS.
USER MANUAL TWINWHEEL GENUIS
How to use the manual?
The game controller is compatible with PC, PlayStation®2 and PlayStation®.
For PC users, please refer to the section A of "Installation for PC system"
For PlayStation®2 and PlayStation®, please refer to the section B of "Installation for
PlayStation®2 and PlayStation®".
A. Installation for PC system
- Make sure you turn your computer on.
- Insert the driver's disc into the CD-ROM drive, and the setup program will start automatically. If not, start the setup program manually by selecting Start/Run and type in "E:\setup" (Where "E:" represents the location of the CD-ROM drive), then press the Enter key. (If you are using Windows 98, just follow the instructions on the screen to finish the installation)
- Please follow the instructions on the screen to finish the driver installation. (Some operating systems will install the DirectX program automatically first, so just follow the instructions on the screen to finish the program installation.)
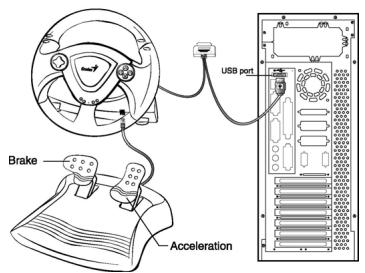
- After the software installation is completed, you can plug the USB connector of the cable to the USB port on your computer or to a USB Hub.
Note: Please power on your USB Hub after connecting this device, because it needs at least 500mA to operate vibration motors. - Click Start / Settings / Control Panel and double click on the "Game controller" or "Gaming Options" icon.
- Attach the racing wheelbase to a sturdy tabletop, or a similar surface. Then use the suction cups on the wheelbase and the C-clamps to secure the wheel to the tabletop.
- Place the pedals on the floor in a convenient-to-reach location and not on an easy-to-slip surface.
- Plug the pedal's connector (RJ-11) to the steering wheel.
- In the "Game controller" or "Gaming Options" screen, you can calibrate and test your game controller before you play any game.
- When you finish the calibration and test, you can now play any game.
Important:
-
The driver will work with the DirectX 7.0a or a newer version in PC system. Please check the DirectX version on your system, and upgrade if necessary.
-
The vibration effect occurs according to game software. For details, refer to the game software manual.
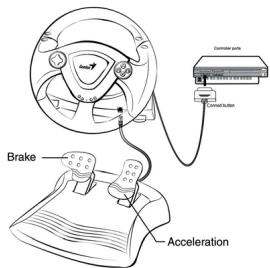
B. Installation for PlayStation®2 and PlayStation®
- Make sure you turn your game controller on.
- Plug the PlayStation's standard interface cable to the Play Station.
- When you finish the connection, you can now play any game.
- The game controller's function is according to the game software you are using. For details, refer to the game software manual.
PlayStation®2 and PlayStation® Function
- Analog Mode: When the controller is in analog mode, the following buttons and sticks may be operated in analog fashion depending on the features supported by the software title. Refer to the game software manual for details. PlayStation®2 format software
Directional buttons buttons/L1,R1, L2,R2,L3,R3buttons.
- Digital Mode: When the controller is in digital mode, all function buttons are operated digitally.
- Vibration function: The vibration function can be set to ON or OFF on the software option screen when the software supports.
- You can switch to the appropriate mode for use. But some software makes this adjustment automatically. In such cases, the software overrides the A/D mode button. For details, refer to the game software manual.
LED Indicator:
LED signal is compatible with PC, PlayStation®2 and PlayStation® system.
- Analog, Digital and Car Mode:
The game device has Analog/Digital/Car. You can switch to the appropriate mode for use.
| Condition | Analog Mode | Digital Mode | Car Mode |
| LED Indicator | Red Light | Green Light | Orange Light |
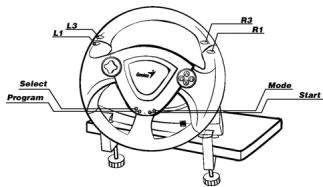
Basic button function setting:
- Play Station and PC function comparison chart
| Play Station | PC | ||||
| Key | Digital | Analog | Car | Digital | Analog |
| 1 | X | X | I | 1 | 1 |
| 2 | □ | □ | II | 3 | 3 |
| 3 | ○ | ○ | A | 2 | 2 |
| 4 | △ | △ | B | 4 | 4 |
| 5 | L1 | L1 | L | 5 | 5 |
| 6 | L2 | L2 | L | 7 | 7 |
| 7 | R1 | R1 | R | 6 | 6 |
| 8 | R2 | R2 | R | 8 | 8 |
| 9 | Select | Select | Null | 9 | 9 |
| 10 | Start | Start | Start | 10 | 10 |
| 11 | Null | L3 | Null | 11 | 11 |
| 12 | Null | R3 | Null | 12 | 12 |
| D-Pad | D-Pad | D-Pad | D-Pad | X,Y-Axis | POV HAT |
| Mode | Mode | Mode | Mode | Mode | Mode |
| Steering | X-Axis Left / Right | X-Axis | X-Axis | X-Axis | X-Axis |
| Pedal_L | Y-Axis/Down | Y-Axis/Down | II | Y-Axis/Down | Y-Axis/Down |
| Pedal_R | Y-Axis/Up | Y-Axis/Up | I | Y-Axis/Up | Y-Axis/Up |
2. Program function setting:
In some games, the foot pedals will not be activated automatically. If you want to use the pedals instead of the analog function buttons on the Twin Wheel, please follow these steps below:
Press the Program button and the LED will be lit.
Then push down one of the two pedals (should push it down over 10 degrees), at the same time, press one of the Analog buttons that you wish to set up. (×, , , , L1, L2, L3, R1, R2, R3) . Then press the Program button again to complete the set up. Use the same steps to set up the other pedal.
Note1:The Program function only can be activated under Digital & Analog modes. Under Car mode, the Program function will not be activated.)
Note2: To terminate the programmed functions, unplug the wheel's cable and re-plug it to the PS2 console, and the programmed function will be reset.