
9045N - Printer TALLY - Free user manual and instructions
Find the device manual for free 9045N TALLY in PDF.
| Product type | Professional laser printer |
| Printing technology | Laser xerography |
| Maximum resolution | 1200 x 1200 dpi (configurable to 600 dpi) |
| Printing speed | Up to 45 ppm (Letter) / 43 ppm (A4) |
| First page time | Approximately 8 seconds |
| Supported paper sizes | A4, A5, A6, Letter, Legal, Legal 13, Statement, B5, Envelopes (Monarch, Com10, DL, C5), custom sizes |
| Paper tray capacity | Tray 1: 150 sheets, Tray 2: 550 sheets (total 700 sheets) |
| Output tray capacity | 500 sheets (face down) |
| Installed memory | 128 MB (expandable up to 512 MB) |
| Printing languages | Adobe PostScript 3, PCL 6 (HP compatible), 136 fonts |
| Connectivity | USB 2.0, Parallel (Centronics), Serial RS232, Ethernet 10/100 Base-TX |
| Power supply | 100-127 V~ / 220-240 V~, 50/60 Hz |
| Power consumption (standby) | 12.8 W (110 V model) / 14.1 W (230 V model) |
| Power consumption (average printing) | 886 W (110 V) / 788 W (230 V) |
| Noise level (operating) | 56.1 dB or less |
| Noise level (standby) | 28.0 dB or less |
| Dimensions (W x D x H) | 422 x 465 x 404 mm |
| Weight | 23.0 kg (without consumables or paper) |
| Maintenance and cleaning | Use a fine filter vacuum cleaner for toner; in case of skin contact, wash with cold water and soap. Do not throw the cartridge into fire. |
| Safety | Do not block ventilation openings; use a power outlet suitable for the voltage; lift with two people using the side handles. |
| Spare parts and options | Toner cartridges (10,000 or 17,000 pages), maintenance kit, duplex unit, additional 550-sheet paper tray, 128/256/512 MB memory, hard drive, Compact Flash. |
| Standards and certifications | CE, WEEE, electromagnetic compatibility (89/336/EEC), low voltage (73/23/EEC). |
Frequently Asked Questions - 9045N TALLY
User questions about 9045N TALLY
0 question about this device. Answer the ones you know or ask your own.
Ask a new question about this device
Download the instructions for your Printer in PDF format for free! Find your manual 9045N - TALLY and take your electronic device back in hand. On this page are published all the documents necessary for the use of your device. 9045N by TALLY.
USER MANUAL 9045N TALLY
This equipment generates and uses radio frequency energy and if not installed and used properly, that is, in accordance with the manufacturer's instructions, may cause interference in radio and television reception. It has been type tested and found to comply with the limits for class B computing devices in accordance with the specification in subpart J of part 15 of FCC rules, which are designed to provide reasonable protection against such interference in a residential installation. However, there is no guarantee that interference will not occur in a partial installation. If this equipment does cause interference to radio or television reception, which can be determined by turning the equipment off and on, the user is encouraged to try to correct the interference by one or more of the following measures:
Reorient the receiving antenna,
Relocate the peripheral away from the receiver,
Move the peripheral away from the receiver
Plug the peripheral into a different outlet, so that the peripheral and receiver are on different branch circuits
If necessary, the user should consult the dealer or an experienced radio/ television technician for additional suggestions. The user may find the following booklet, prepared by the Federal Communications Commission, helpful: "How to Identify and Resolve Radio-TV Interference Problems".
This booklet is available from the U.S. Government Printing Office, Washington DC 20402 Stock No. 004.000.00345.4.
WARNING: To comply with FCC regulations on electromagnetic interference for a class B computing device, the printer cable must be shielded. To assure compliance with FCC regulations for a computing device, use a shielded interface cable with a metal shell connector. The use of cables not properly shielded may result in violating FCC regulations.
This digital apparatus does not exceed the class B limits for radio noise emissions from digital apparatus as set out in the radio interference regulations of the Canadian department of communications.
This unit complies with DOC standard C108.8-M 1983
CE This device fulfils the European standards requirements by complying with the Directive of the Commission dated May 3, 1989 (89/336/EEC) relating to electromagnetic compatibility and the Directive dated February 19, 1973 (73/23/EEC) relating to low-voltage electrical equipment. Conformity with the above mentioned Directives is indicated by the CE symbol attached to the device.
Note: Conformity may be affected by:
using interface cables not complying with the specifications
■ non-observance of important instructions in the operator's manual
■installing components not approved for this device by the manufacturer
■ unauthorized manipulation
For continued protection against risk of fire, replace only with same type and rating of fuse. Only trained and qualified personnel may open covers or remove parts that are not explicitly shown and described in the User Guide as being accessible to the operator.
WARNING
Chapter 1 Introduction. 1
About this manual 1
Conventions 1
General Safety Guidelines 2
Safety Precautions 2
Handling the Printer. 3
Printer Components 4
Chapter 2 Setting Up Your Printer 7
Checking Your Package. 7
Preparing a Location for the Printer 8
Dimensions. 8
Installation Precautions 8
Space Requirements 9
Installation procedure. 10
Removing the Tape 10
Installing Options 10
Installing the Toner Cartridge 11
Loading Paper 14
Connecting the Power Cord 17
Turning the Printer On 18
Printing a Configuration Summary 19
Example of a Configuration Summary. 19
Setting an IP address manually 20
Chapter 3 Installing Software 23
Driver Installation 23
TGNet Admin administration program 24
Chapter 4 Specifications. 25
Noise emission regarding RAL-UZ122 (Blue Angel): 26
WEEE - European Directive on Waste Electrical and Electronic 26
Chapter 5 Options and supplies 27
Chapter 1
Introduction
About this manual
This quick start guide is intended to provide guidance for the proper installation of your printer. If you require more information to install your printer, consult the User Guide located on the CD-ROM. For further help, please contact your dealer or responsible representative (see addresses at the rear cover page of this manual).
Conventions
This following conventions are used throughout this manual to emphasize certain procedures or information:

NOTE: A note is a tip or extra information that may be helpful in installing or using the printer.

CAUTION: A caution message provides information that may help you avoid equipment damage, process failure, or inconvenience. Read all caution messages carefully.

WARNING! A warning message indicates the possibility of personal injury if a specific procedure is not performed exactly as described in the guide. Pay close attention to these sections and read them fully to prevent possible injury.
General Safety Guidelines
Before operating the printer, read the following instructions carefully:
- Follow all the operating procedures provided in this manual.
- Follow all the hazard warnings on the printer and in the manual. Failure to do so can cause injury to yourself or damage to the printer.
- Do not make perform any operation or action in any way other than provided in this manual. When in doubt, contact your dealer or service company.
- Keep in mind that hazard warnings in this manual or on the printer cannot cover every possible case, as it is impossible to predict and evaluate all circumstances beforehand. Be alert and use your common sense.

For detailed informations on Safety Guidelines please refer to the User Guide on the CD-ROM.
Safety Precautions
This printer is available in the power specifications 110V and 230V . The specifications that apply to your printer depend on your machine configuration. To prevent fire or shock hazards, connect the power plug only to a properly rated power outlet.
Handling the Printer
- The weight of the printer without paper tray, toner cartridge, and paper is about 23kg (50 lbs). Never attempt to lift the printer alone.
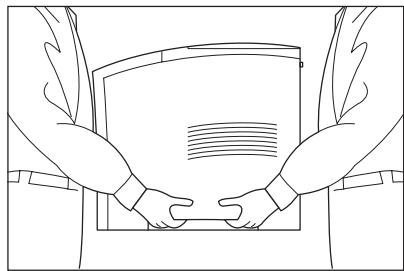
- To lift the printer, have two individuals facing each other from the front and the rear of the printer grasp the recessed areas on each side of the printer. Do not lift the printer by grasping any area other than these recessed areas.
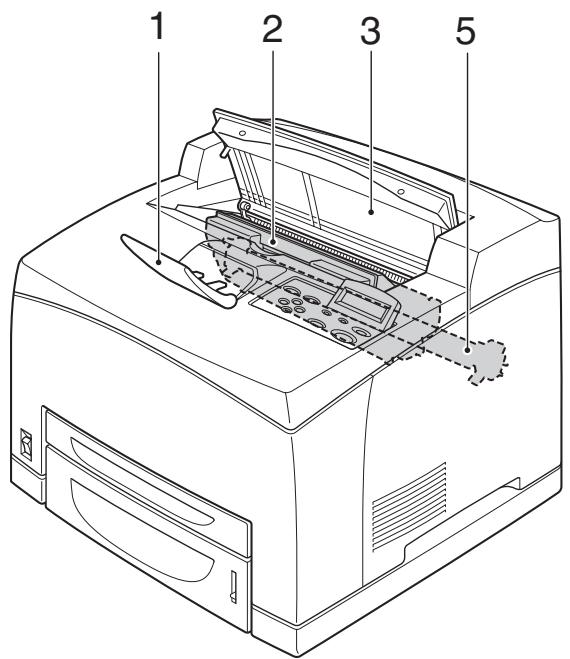
Printer Components
| No. | Name | Description |
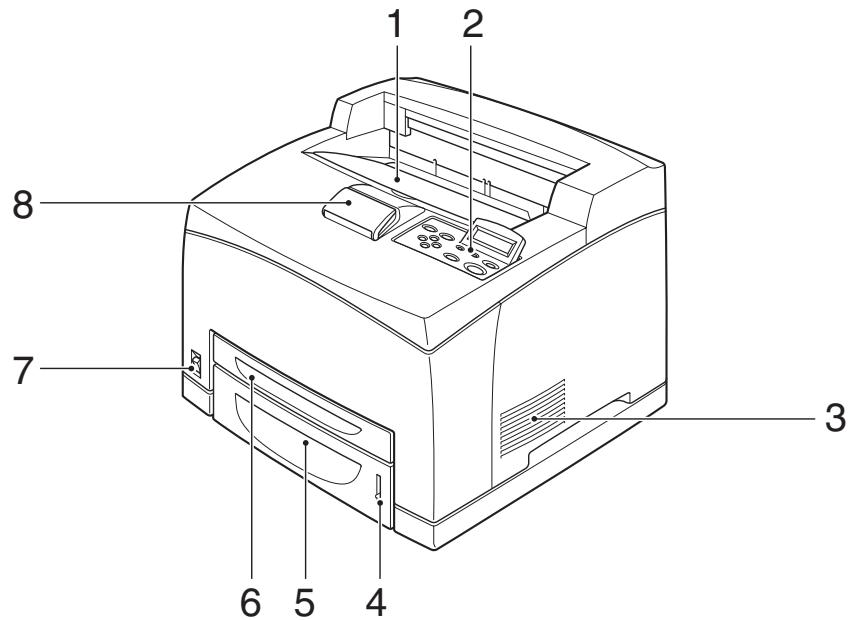
| 1 | Center output tray | Print jobs are output with the printed side facing down. |
| 2 | Control panel | Consists of operation buttons, indicators, and the display. |
| 3 | Ventilation hole | Releases heat to prevent the interior of the printer from heating up. |
| 4 | Paper meter | Indicates the amount of paper remaining. |
| 5 | Paper tray (A4/Letter, 550 sheets) | Load paper here. |
| 6 | Paper tray (A4/Letter, 150 sheets) | Load paper here. |
| 7 | Power switch | Switches the power of the printer on and off. Pushing the switch to the <I> side switches it on and pushing it to the <O> side switches it off. |
| 8 | Paper stopper | Raise this when printing on paper larger than A4 size. |
| No. | Name | Description |
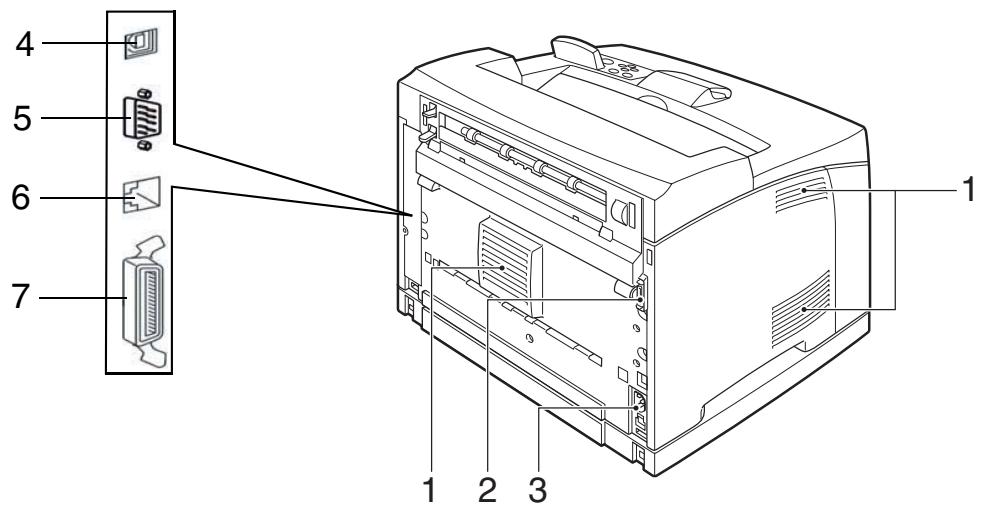
| 1 | Ventilation hole | Releases heat to prevent the interior of the printer from heating up. |
| 2 | Duplex module connector | Connect the optional duplex module here. |
| 3 | Power cord connector | Connect the power cord here. |
| 4 | USB port | Connect the USB cable here. |
| 5 | Serial RS232 port | Connect the Serial cable here. |
| 6 | Ethernet 10/100 Base-Tx port | Connect the Ethernet cable here. |
| 7 | Parallel port | Connect the parallel cable here. |
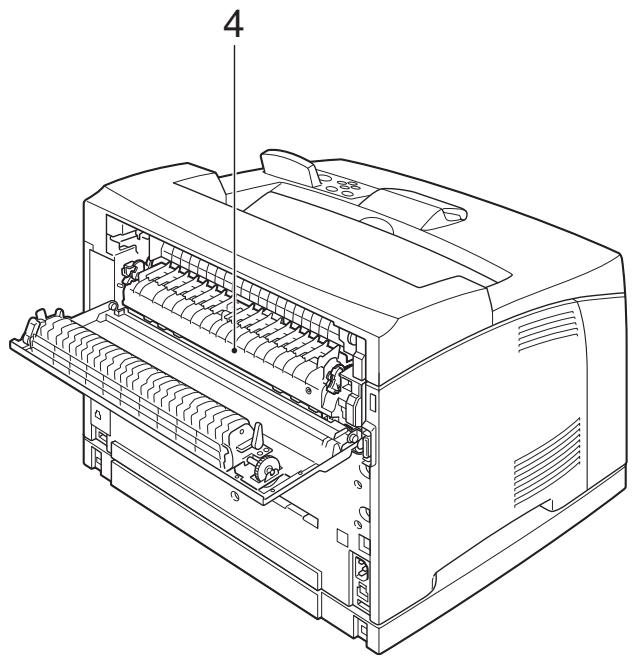
| No. | Name | Description |
| 1 | Paper stopper | Raise this when printing on paper larger than A4 size. |
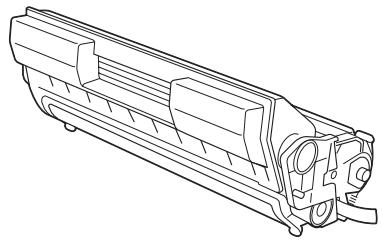
| 2 | Toner Cartridge | Contains the toner and the photosensitive drum. |
| 3 | Top cover | Open this when replacing the Toner Cartridge and removing jammed paper. |
| 4 | Fuser unit | Fixes the toner on the paper. Do not touch this when using the printer as it is hot. |
| 5 | Transfer roll cartridge | Transfers the toner image on the surface of the photosensitive drum to the paper. |
Chapter 2
Setting Up Your Printer
Checking Your Package
Before installing the printer, check that all the items are contained in the package. Should any components be missing or damaged, contact your dealer.
Printer
Toner Cartridge standard Yield (10K) combined toner and drum unit in one self contained unit

Power cord
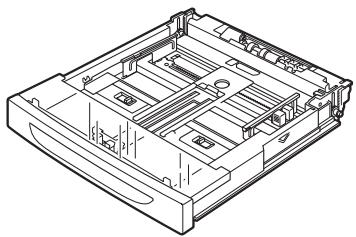
Paper tray (A4/Letter, 150 sheets)
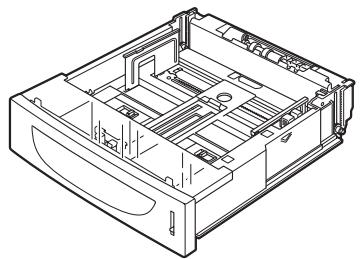
Paper tray (A4/Letter, 550 sheets)
Quick Start Guide and CD-ROM
Preparing a Location for the Printer
Dimensions
- Printer Height: 404 ~mm (15.9 in)
- Printer Width (left to right): 422 mm( 16.6in)
- Printer Depth (front to back): 465 ~mm (18.3 in)
Installation Precautions
Before unpacking your laser printer, it is recommended that you read the following to assist locating a suitable spot for your new laser printer. To make optimum use of the printer, observe the following precautions when locating the printer.
STOP
The installation surface must be stable and very sturdy to support the considerable weight of the printer. If the printer falls over, there is a severe risk of injuries.
- Place the printer on a horizontal, sturdy and stable surface. The printer may cause injury if it falls over.
- Always place the printer under the following conditions:
Temperature: 5 to 35^ (41^95^)
Humidity: 15 to 85% (non-condensation)
- Be sure to keep the temperature to below 28^ ( 82^ ) if the humidity is 85% . If the temperature changes drastically from a cold environment to a warm environment, condensation may develop inside the printer and cause print problems. Therefore, be sure to let the printer rest for some time to adjust to the new temperature.
- Do not subject the printer to direct sunlight or a malfunction may result.
- Do not place the printer in a location with poor ventilation, or high level of dust, otherwise a fire hazard or electric shock may result.
- Do not place the printer near heaters or similar objects, otherwise a fire hazard may result.
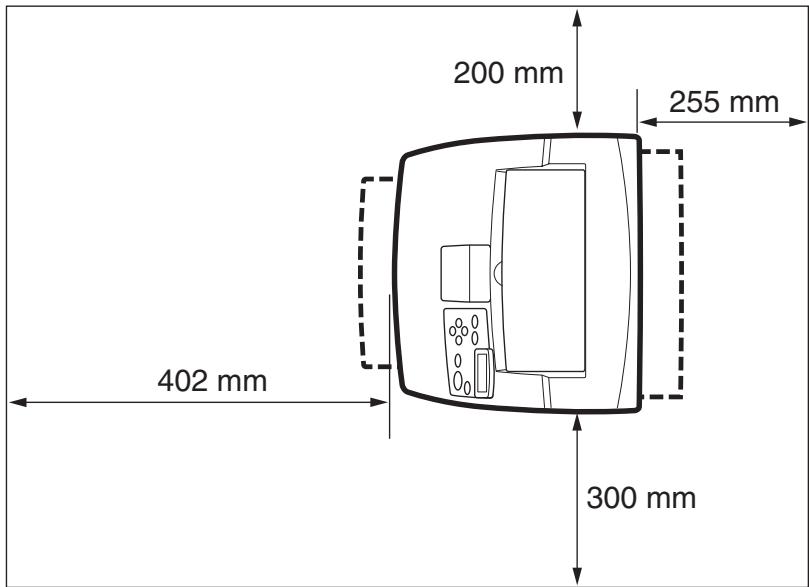
Space Requirements
- Never block the ventilation openings of the printer, otherwise the internal temperature will build up and cause a fire hazard.
- Do not place the printer near alcohol, benzine, or other volatile and flammable materials, or a fire hazard may result.
A certain amount of space is required for proper operation of the printer and also for performing printer maintenance and replacing consumables. Use the following figures to plan for appropriate clearances when determining a location for your printer.

Be sure to leave ample space between the ventilation openings on the printer and the nearest wall or other surface, otherwise overheating may occur leading to a fire hazard. For easy operation, maintenance and replacing of consumables, you should also leave the clearances shown below around the printer. Installation of the printer should be carried out by qualified service personnel.
Installation procedure
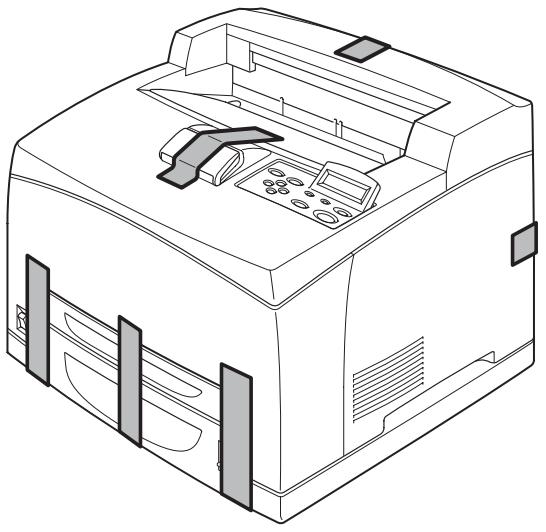
Removing the Tape
When the printer is first taken out of the packaging box, the covers of the printer are taped as shown in the diagram. Remove the tapes. Remove the fuser locking device by pushing the tabs as shown on the instructions at the rear of the printer.
Installing Options
If you have purchased any optional accessories, please refer to the User Guide on the CD ROM.
If there are no optional accessories to install, proceed to the next section, "Installing the Toner Cartridge".
Installing the Toner Cartridge
STOP
When installing the Toner Cartridge, take note of the following points:
Never throw an Toner Cartridge into an open flame. It can cause an explosion and you can get burned.
- Keep the toner cartridge in a location out of reach of children.
- Do not forcibly open the toner cartridge.
- Do not subject it to direct sunlight or strong light.
- When installing the Toner cartridge, select a location not subject to strong light and try to finish the installation within 5 minutes.
- Do not touch the surface of the photosensitive drum.
- Do not stand or place the Toner Cartridge upside down. The drum might get damaged.
- A drum shutter protects the photosensitive drum from light. Do not open the drum shutter.
- Toner is not harmful to the human body, but if some toner has come into contact with your skin, you can wash it off with cold water and soap. If toner gets on your clothing, you should try to immediately remove it with a vacuum cleaner which has got a fine filter.
- Avoid to inhale possibly escaped toner dust.
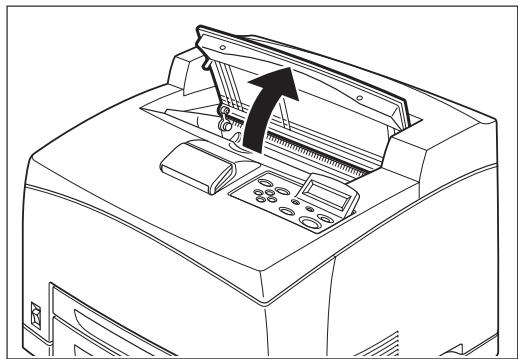
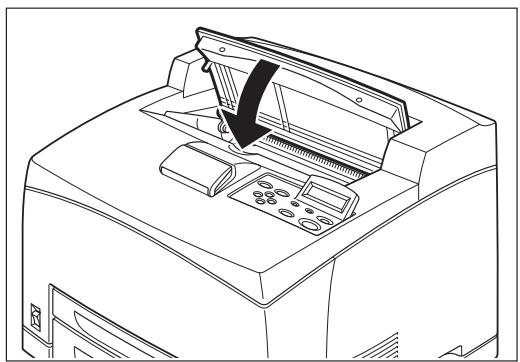
1 Open the top cover.
Do not touch any parts inside the printer.
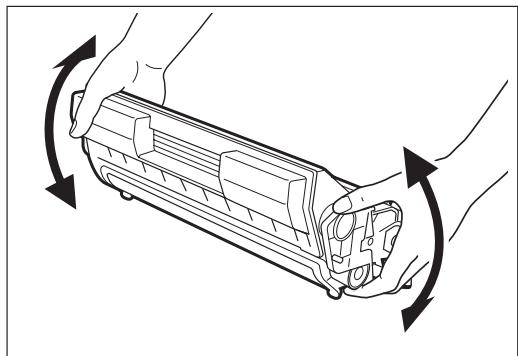
2 Take the Toner Cartridge out of the box and shake it 7 to 8 times as shown in the diagram.

3 Place the Toner Cartridge on a flat surface and pull the seal out horizontally.
When pulling out the seal, pull it out horizontally. The tape might break if it is pulled out diagonally. After the seal has been pulled out, do not shake or bump the Toner Cartridge.
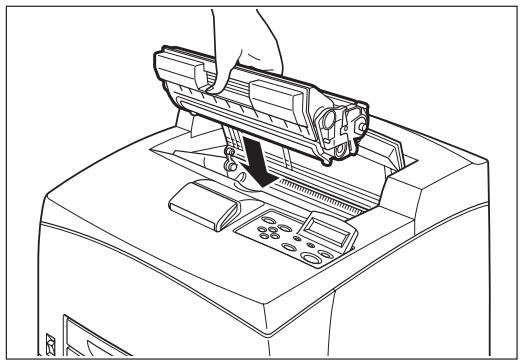
4 Hold the Toner Cartridge by the grip and insert it into the slot inside the printer.

Do not touch any parts inside the printer. Ensure that the Toner Cartridge is firmly set.
5 Close the top cover securely.

When printing text at 5% coverage, you can expect a toner cartridge life of approximately 10,000 pages with the standard toner cartridge supplied with the printer. There is a choice of two toner cartridges available for replacement cartridges. These give either approximately 10,000 or 17,000 pages. See options in chapter 5 for more details.
Loading Paper
See the User Guide on CD-ROM for details on the type and size of paper that can be loaded in the paper tray.
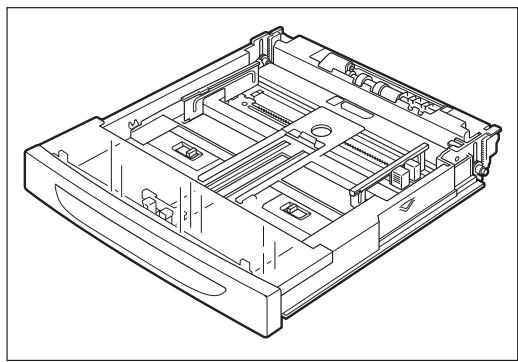
1 Place the paper tray on a flat surface.
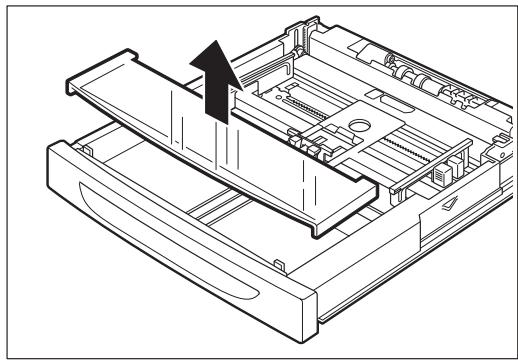
2 Remove the lid of the tray.
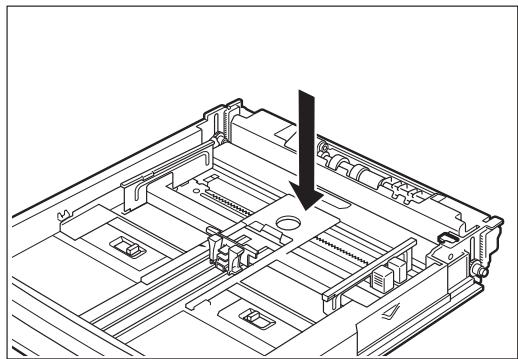
3 If the base plate of the paper tray is raised, push it down.
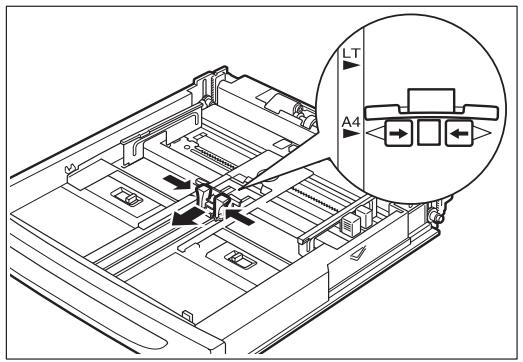
4 Squeeze the length guide and slide it to the desired paper size.
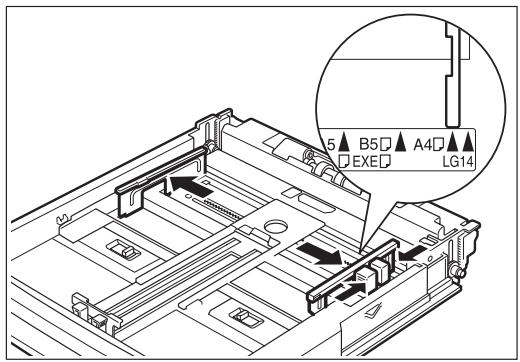
5 Squeeze the right width guide and slide it to the desired paper size.
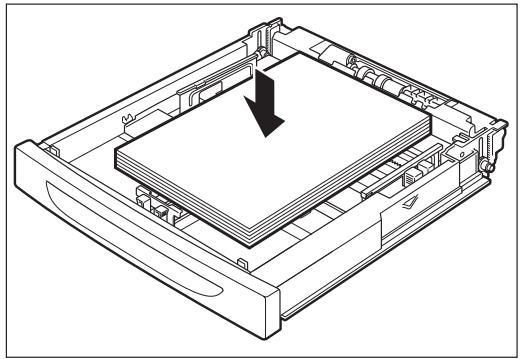
6 Load the paper with the side to be printed facing up and with all 4 corners aligned. Make sure that the right width guide is correctly aligned with the paper size. Do not place paper over the right width guide.

Do not load paper exceeding the maximum fill line or the maximum capacity allowed. Align the right width guide with the paper width correctly. If the right width guide is not in place, the paper will not be properly fed and may cause a paper jam.
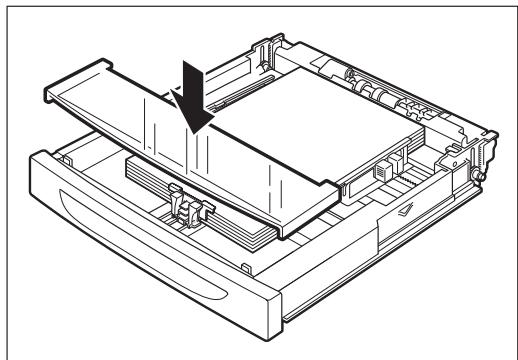
7 Replace the lid of the paper tray.
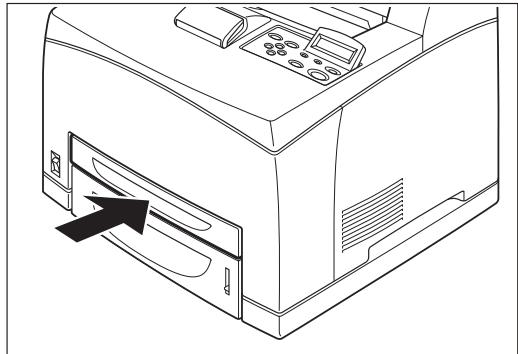
8 The tray must be firmly seated in the printer.
Connecting the Power Cord
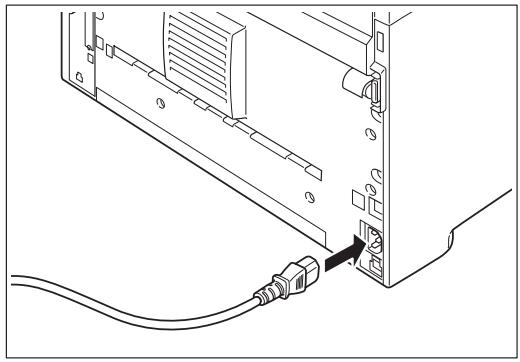
1 Connect the power cord to the power cord connector at the back of the printer.
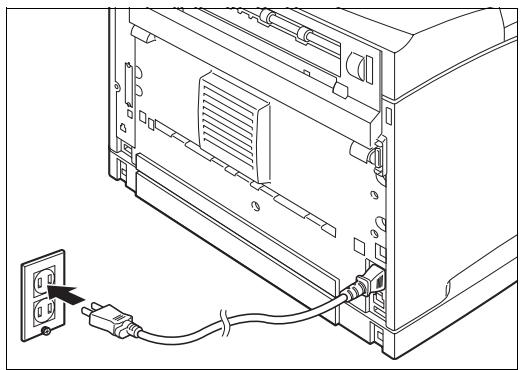
2 Make sure that the power switch has been firmly pushed to the <0> position and then insert the other end of the power cord to a correctly rated power outlet.
Turning the Printer On
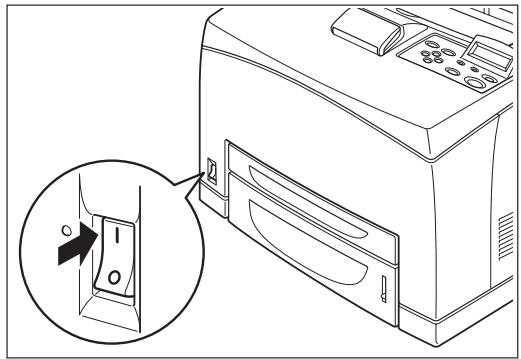
1 Press the power switch to the < |> position to turn the power on.

The printer motors run for 2 or 3 minutes when you first turn the power on.
The top line of the LCD display reads:
Followed by asterisks progressing across the bottom line:
Following an LED self test, asterisks progress across both lines of the display, the beeper sounds ...
... and the Power On Self Test ends with the top line of the display reading:
Loading
Loading
*************
*************
************
Initializing
Ready

While turned on, the printer will go into the standby state if it remains idle for a period of time.
When you have finished using the printer for the day or you do not intend to use it for a long period of time, switch off the power.
Printing a Configuration Summary
Your printer can print a configuration summary that lists the currently selected status of menu options, media selections in trays, options installed and other relevant information about your printer. To print a Configuration Summary, press the INFO key.
Example of a Configuration Summary
TallyGenicom 9045N
MENUS
Paper Menu
Copies = 1
Duplicx = Off
Default Source = Tray 1
Manual Feed = Off
Output Tray = Face Down Tray
Media Size/Type
Tray 1
Media Size = A4
Media Type = Plain
Custom Size
Width = 90
Length = 210
un-Setse = Off
Tray 2
Media Size = A6
Media Type = Plain
Custom Size
Wt=92
Length = 210
auto-Sparse = Off
Tray 3
Media Size = A4
Media Type = Plain
Auto-Sense = Off
Tray 4
Media Type = Plain
Auto-Sense = Or
Tray Linking = Off
Blank Pages = Print
Auto Resize = Off
Separator Page = Off
Custon Size Unit = Millimetre
Interface Menu
Port
a zalkd=On
serial = On
Network Card 1 = On
S甲 = O2
parallel Setup
interpreter Auto Switch
normal = Raw
Mode = Bidirectional
Delay Out Close = Off
Binary PS = Off
Serial Setup
interpreter = Auto Switch
Formula = Raw
Serial Mode = RS232
Load Rate = 9600

Adobe PostScript

Serial Setup cont'd
Data Bits = 8
Step Bias = 1
Parity = None
DTR Ready/Buy = Off
DTR OnOff=Off
PTRError=Off
RTS Ready:Busy = Off
RTS On/Off = Off
RTS Error = Off.
XONReady/Buy = On
XONOnlOff=On
XON Lrrn = Off
DTK Polarity = High
RTS Polarity = High
Robust NON = Off.
Delay Out Close = Off
Binary PS=Off
Network 1 Setup
Interpreter Auto Switch
Format = Raw
Network Address = 00502701EC84
IP Address = 172.020.070.024
Subset Mask = 255.255.000.000
Default Gateway = 172.020.000.253
LPD Banner = Off
DHCP=Off
Delay Out Close = Off
Host Name = Intelligrine9045N01EC84
DNS Primary IP = 000.000.000.000
DNS Secondary IP = 000.000.000.000
DNS Domain Names:
WINS Primary IP = 000.000.000.000
WINS Secondary IP = 000,000,000,000
WINS Host Name = 9045N01EC84
mDNS = On
Local Link = 000.000.000.000
mDNS Host Name = IntelIpline9045N01EC84
mDNS Sys Name = Intellprint 9045N.01EC84
Multi-Session = On
AngleTalk = On
Current Zone = *
Preferred Zone = ^#
Netware Setup
Netware = Off
Nesware Frame Auto-Sense
Nerve Mode = PSERVER
Print Server Name Intelligeine9045N01EC84
DNS Tree Name =
NDSContext=
Job Poll Interval = 0

TallyGenicom*
100
Toner Low = Stop
Page Compression = Off
Integrate = On
Quality Menu
Resolution = 600 dpi
Toper Sverg = Off
Print Density = 1
Date/Time Menu
Month = April
[45N01EC84_NP]
Date/Time Menu cont'd
Day = 25
Year = 2007
Hour = Noon
Mprime = 55
Second = 52
Offset from GMT
Hours = 0
Minutes = 0
STATUS
Tray 1
Media Size = 44
1
1.0%
Troy 2
1
Media Size = A6
Media Type = Plain
Level = OK
Tray 3
Media Size = A4
Media Type = Plain
Level = 0K
Tray 4
Media Size = A5
Media Type = Plain
Level = 0.5
Face Down Tray = OK
Toner = 88%
INFORMATION
Product Version: 1.3
PostScript Version: 3016.103
Engine Version:1.768-39
Network 1 Version: 10/100 Ethernet 1.2
Installed Memory: 128 Mbytes
Printer Name: Intelliprint 9045N 01EC84
Serial Number:CB6C131634A0
Asset Tag
Image Counter : 1211
Sheet Counter: 1120
Tongr Page Count: 1210
HID=AL:0000,A2:00,S1:7;
M1:000000000000.P1:00007035
Date/Time: April 25, 2007 12:55:58 AM
SF1:0000C38F
OPTIONS
Duplex Installed
Tray3 Installed
Tray4 Installed
User FLASH Installed
Extended Font Set 1 Installed
Setting an IP address manually
If you require to set an IP address manually into the printer, as opposed to letting the printer receive one from a DHCP source, then you have to ensure that DHCP is switched off. Use the following procedure to switch DHCP off.
1 Press the MENU button on the control panel.
2 Press the NEXT button until the text "Interface Menu" is shown on the second line of the display.
3 Press the SELECT button to enter the interface menu.
4 Press NEXT until the text "Network 1 Setup" is shown on the display.
5 Press SELECT.
6 Press NEXT until "DHCP" is shown on the display.
7 Press SELECT.
Press the NEXT button until "Off" is shown on the second line of the interface.
9 Press SELECT.
10 Press START/STOP button to finish.
Menu Interface Menu
Interface Menu Network 1 Setup
Network 1 Setup DHCP
DHCP Off
Use the following procedure to enter the interface menu and add the IP Address and other related settings.
1 Press the MENU button on the control panel.
2 Press the NEXT button until the text "Interface Menu" is shown on the second line of the display.
3 Press the SELECT button to enter the interface menu.
4 Press NEXT until the text "Network 1 Setup" is shown on the display.
5 Press SELECT.
6 Press NEXT until "IP ADDRESS" is shown on the display.
7 Press SELECT.
8 Use NEXT/PREVIOUS buttons to change the digit.
9 Press SELECT for the next digit.
10 Press SELECT after all digits are set.
11 The control Panel shows again "IP Address".
12 Press NEXT and "Subnet Mask" is shown on the display.
13 Repeat steps 7 - 10.
Menu Interface Menu
Interface Menu Network 1 Setup
Network 1 Setup IP Address
Network 1 Setup IP Address
Network 1 Setup Subnet Mask
Network 1 Setup Subnet Mask
Network 1 Setup Default Gateway
Network 1 Setup Default Gateway
14 The control Panel shows again "Subnet Mask".
15 Press NEXT and "Default Gateway" is shown on the display.
16 Repeat steps 7 - 10.
17 The control Panel shows again "Default Gateway".
18 Press START/STOP button to finish.

Print a configuration summary to check the proper setting of the IP Address, Subnet Mask and Default Gateway.
Driver Installation
1 Load the cd into the drive.
2 After it loads select I Accept to the License Agreement on the opening screen.
3 Read carefully the instruction about the USB connection.
4 Follow the instructions on the screen.

For plug and play using usb or parallel interface it is recommended to follow the wizard and just install the driver. Then power the printer on so that the system can find the printer and install the correct driver.

Once the driver is installed ensure any additional options present are installed via the device options tab.
TGNet Admin administration program
The printer is supported by the TGNet Admin administration program, available from our web site. Network discovery, administration, remote monitoring and remote panel management options are available to the administrator.
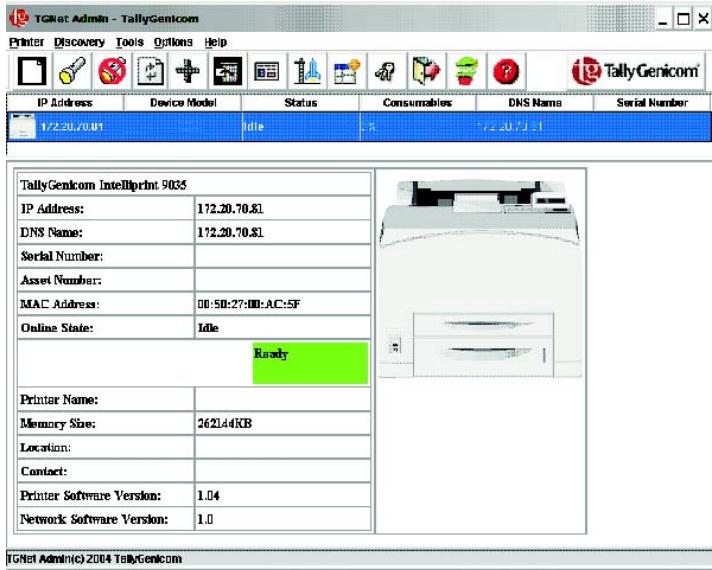
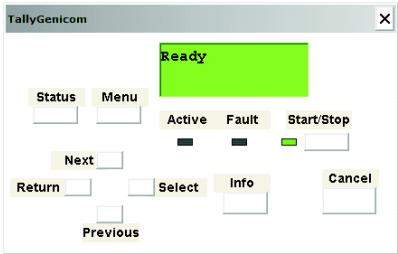
The TGNet Admin program includes a virtual control panel function that allows the user to remotely manage the printer. The virtual control panel functions allow the administrator to remotely control many printers without having to go to each printer to modify the printer settings.
| Machine type | Desktop |
| Printing system | Laser xerography |
| Printing speed | Up to 45 ppm Letter Up to 43 ppm A4 |
| Warm-up time | Maximum of 17 seconds from power on at 22°C |
| First Page Output Time | Approximately 8 seconds |
| Resolution | 1200 dpi and 600 dpi |
| Paper size | Executive, Letter, Legal, Legal 13, Statement, A6, A5, A4, B5 (JIS), Monarch Envelope, Com10 Envelope, DL Envelope, C5 Envelope, Custom NOTE: Media should be tried in the printer prior to purchase. |
| Paper type | Plain (68–105 gsm), Thin (64–67 gsm), Thick1 (106–159 gsm), Thick2 (160–216 gsm), Thick3* (106–216 gsm), transparencies, envelopes**, labels** * For rough or uneven media such as envelope, choose Thick3. When using Thick3, duplex is not available. ** Some envelopes and labels cannot be used due to the paper quality and size. |
| Standard paper tray | Paper tray (A4/Letter 150 sheets): 150 sheets Paper tray (A4/Letter 550 sheets): 550 sheets |
| Optional paper tray | Paper tray (A4/Letter 550 sheets): 550 sheets |
| Standard paper output | 500 sheets |
| Fonts | 136 Adobe PostScript 3; PCL:80 HP compatible (99 scalable, 1 fixed), 5 barcodes, plus Arabic |
| Operating noise | 56.1 dB or less during operation, 28.0 dB or less during standby mode |
| Power | 110 V ± 10%, 50/60 Hz, 12.2 A 230 V ± 10%, 50/60 Hz, 5.8 A |
| Power Consumption in Power Saver Mode | 110 V Model = 12.8 W 230 V Model = 14.1 W |
| Power Consumption during printing (Average) | 110 V Model = 886 W 230 V Model = 788 W |
| Dimensions | 422 mm (W) × 465 mm (D) × 404 mm (H) 16.6 in (W) × 18.3 in (D) × 15.9 (H) |
| Weight | 23 kg, 50 lbs |
Noise emission regarding RAL-UZ122 (Blue Angel):
Sound power level L_WAd : 71.5 dB(A)
NOTE: Office equipment with L_WAd > 63 dB(A) is not suitable for operation in rooms where predominantly intellectual work is done. Due to their noise emissions, these devices should be set up in separate rooms.
WEEE - European Directive on Waste Electrical and Electronic
Information for users on collection and disposal of equipment
This symbol on the products, and/or accompanying documents mean that used electrical and electronic products should not be mixed with general household waste.
For proper treatment, recovery and recycling of old products, please take them to applicable collection points, in accordance with your national legislation and the Directive 2002/96/EC and 2006/66/EC. By disposing of these products correctly, you will help to save valuable resources and prevent any potential negative effects on human health and the environment which could otherwise arise from inappropriate waste handling.
For more information about collection and recycling of old products please contact your local municipality, your waste disposal service or the point of sale where you purchased the items. Penalties may be applicable for incorrect disposal of this waste, in accordance with national legislation.
For business users in the European Union
If you wish to discard electrical and electronic equipment, please contact your dealer or supplier for further information.
Information on disposal in other countries outside the European Union
This symbol is only valid in the European Union. If you wish to discard these items, please contact your local authorities or dealer and ask for the correct method of disposal.
Battery information
The battery in your printer is not user-replaceable and should not require replacement during the life of the product.
Chapter 5
Options and supplies
Contact your dealer to order printing options/supplies, or you can purchase options/supplies directly from the manufacturer (see addresses at the rear cover page of this manual). The table below list available printer options and order numbers.
| Option/Supply | Order No. |
| Add on Tray (1 x 550 sheet) | 043874 |
| Duplex Unit | 043875 |
| Offset catch tray | 062414 |
| Hard disk | MLXXXF-HD |
| Memory Expansion 128 MB | 043843 |
| Memory Expansion 256 MB | 043844 |
| Memory Expansion 512 MB | 043845 |
| 128 MB Compact Flash | 043736 |
| 256 MB Compact Flash | 043737 |
| Toner cartridge High Yield (17K) combined toner and drum unit in one self contained unit | 043848 |
| Toner cartridge Standard Yield (10K) combined toner and drum unit in one self contained unit | 043849 |
| Maintenance Kit (230V) Fuser, Rollers, etc. | 043850 |
| Maintenance Kit (110V) Fuser, Rollers, etc. | 043851 |
Inhaltsverzeichnis
Output Tray = Face Down Tray
Media Size/Type
Tray 1
Media Size = A4
Media Type = Plain Text Format: Sf
Custom Size
Width = 99
Length = 210
abo-Sqnsq = Off
Tray 3
Media Size = A6
Media Type = Plain
Custom Size
W1t=92
Length = 210
at-Sense = Off
Tray 3
Molia Size = A4
Media Type = Plain
Auto-Serve = Off
Tray 4
Media Type = Plain
Tray Linking = Off
Blank Pages = Print
Auto Resize = Off
Separation Page = Off
Interface Menu
parallel = On
serial = On
NetworkCard1=On
SB = On
parallel Setup
screweter = Auto Switch
format Raw
mode = Bidirectional
Delay Out Close = Off
Binary PS = Off
Trial Setup
merpeter Auto Switch
formal = Raw
Serial Mode = RS212
Load Rate = 9600

Adobe PostScript
Serial Setup cont'd
Data Bits = 8
Step Bix = 1
Parity = None
DTR Ready/Busy = Off
DTR On/Off = Off
DTR Error = Off
RTS Ready/Busy = Off
RTS On/Off=0
RTS Error = Off
XON Ready/Busy = On
XONOnl/Off=On
XON Error = Off
DTR Polarity = High
RTS Polarity = High
Robust XON = Off
Delay Out Close = Off
Binary PS = Off
Network 1 Setup
Interpreter Auto Switch
Format = Raw
Network Address = 00502701EC84
IP Address = 172.020.070.024
Subnet Mask = 255.255.000.00
Default Gateway = 172.020.000.253
LPD Banner = Off
DHCP=OH
Delay Out Close = Off
Host Name = Inteligiri9045N01EC84
DNS Primary IP = 000.000.000.000
DNS Secondary IP = 000.000.000.000
DNS Domain Name =
WINS Primary IP = 000.000.000.000
WINS Secondary IP = 000,000,000,000
WINS Host Name = 9045N21EC84
n=0n
1.001.000.000.000
PEN/Her Name:Jinlinan
mNtFgNn
Multi-Session = On
AggTalk = On
Current Zone = *
Preferred
Network Setup
Notes: Off
Print Server Name = Intellgrin9045N01EC4
DNSTreeName=
NDSControl=0
Page Compression = Off
Inferior = On
Quality Menu
Resolution = 600~d pI
Toner Saver = Off
Print Density =
Date/Time Menu
Month = April
p9045N01EC84_NP
Date/Time Menu cont'd
Pw=25
Year=2007
How = Now
Minute = 55
Securt = 57
Offset from GMT
H=0
Maturity = 0
STATUS
Tray 1
Media Size = 44
Media Type = Plain
Level = OK
Tray 2.
1
M
Media Type = Plan
Level = Ok
Tray 3
Media Sinc = A4
Media Type = Plain
Level = OK
Tay 4
Mola Size = A^12
Mola Tore = Rain
Level-0
Face Down Tray = OK
Toner = 88%
INFORMATION
Product Version: 1.3
Toner Page Count: 1210
HID=A1:0000,A2:00,S1:7
M1:0000000000000, P1:00007035
Date/Time: April 25, 2007 12:55:58 AM
SF1:0000C38F
OPTIONS
Duplex Installed
Tray3 Installed
Tray4 Installed
User FLASH Installed
Extended Font Set 1 Installed
Default Source = Tray 1
Manual Feed = Off
Output Tray = Face Down Tray
Media Size/Type
Tray I
Media Size = A4
Media Type = Plain
Custom Size
Width = 99
Length = 210
zto-Snge = Off
Tray 2
Media Size = A6
Media Type = Plain
Custom Size
Width = 99
Length = 210
auto-Sense = Off
Tray 3
Media Size = A4
Media Type = Plain
Auto-Sense = Off
Tray 4
Media Type = Plain
Auto-Sense = On
Tray Linking = Off
Blank Pages = Print
Auto Resing = Off
Separator Page = Off
Custom Size Unit = 8
interface Menu
Port
r a l e l = O n
gral = On
eworkCard1=On
SB = On
Parallel Setup
terpreter Auto Switch
normal = Raw
Mode = Bidirectional
lay Out Close = Off
INDPS=Off
Serial Setup
terpreter Auto Switch
orthat Raw
trial Mode = RS232
aud Rate = 9600

Adobe PostScript

Serial Setup cont'd
Data Bits = 8
Step Bins = 1
Parity = None
DTRRead/Retry=Off
DTR On/Off=Off
DTR Error = 0
RTS Ready/Busy = Off
RTS On/Off=Off
RTS Error = Off.
XONReadyBusy=On
XONOn/Off=On
XON Error = Off
DTR Polarity = High
Delay Out Close = Off
Host Name = Jolllinger9045N01EC84
DNS Primary IP: 000.000.000.000
DNS Secondary IP = 000.000.000.000
DNS Domain Name =
WINS Primary IP = 000,000,000,000
WINS Secretary:IP=000,000,000,000
WINSHovName=9045N01ECM
1.2016年1月1日
MONS Hot Name = 10000000000000000000000000000000000000000000000000000
mDNS Svc Name = Intelligprint 9045N 01EC84
Multi-Session = On
AppleTalk = On
Current Zone = ^ *
Preferred Zone = *
Netware Setup
Netware = Off
NetwareFrame Auto-Sense
Netware Mode = PSERVER
Print Server Name Intelllprin9045N01EC84
DNS Terc Narnm
NDSComex=
1.2PdVill Incrcpal=0

TallyGenicom
Toner Low = Stop
Pure Compression = Off
Intfllher = On
Quality Menu
Resolution = 600 dpi
Toner Saver = Off
Print Density = 1
Date/Time Menu
Month = April
69045N01EC84NP
Date/Time Menu cont'd
Day = 25
Year = 2007
Hour = Noon
Minute = 55
Second = 57
Offset from GMT
Hours = 0
Minutes = 0
STATUS
Tray 1
Media Size = A4
Media Type = Plain
Level = 0%
Tray 2
Media Size = A6
Media Type = Plain
Level = OK
Tray 3
Media Size = A4
Media Type = Plain
Level = OK
Tray 4
Media Size = A^5
Media Type = Plain
Level = 0%
Face Down Tray = OK
Toner = 88%
INFORMATION
Product Version: 1.3
PostScript Version : 3016.103
Engine Version: 1.768-39
Network 1 Version: 10/100 Ethernet 1.2
InstalledMemory:128Mbtyes
Printer Name: Intelliprint 9045N 01EC84
Serial Number : CB6C131634A0
Asset Tag
Image Counter: 1211
Short Counter : 1120
Toner Page Count : 1210
HID=A1:0000.A2:00.S1:7
M1:0000000000.P1:00007035
Date/Time: April 25, 2007 12:55:58 AM
SF1:000C38F
OPTIONS
Duplex Installed
Tray3 Installed
Tray& Installed
User FLASH Installed
Extended Font Set 1 Installed
Output Tray = Face Down Tray
Media Size/Type
Tray 1
Media Size = A4
Media Type = Plain
Custom Size
Width = 99
Length = 210
Auto-Sense = Off
Tray 2
Media Size = A6
Media Type = Plain
Custom Size
Width = 99
Length = 210
AutoSense = Off
Tray 3
Media Size = A4
Media Type = Plain
Auto-Serve = Off
Tray 4
Media Type = Plain
Auto-Serve = On
Tray Linking = Off
Blank Pages = Print
Auto Resize = Off
Separator Page = Off
Custom Size Unit = Millimetres Interface
Interface Menu
FORT
Parallel = Off
Serial = On
NetworkCard1=On
USB=On
Parallel Setup
Interpreter Auto Switch
Formal = Raw
Mode = BiaDirectional
Delay Out Close = Off
Binary PS = Off
Serial Setup
DTR Ready/Busy = Off
DTR On/Off=Off
DTR Error = Off
RTS Ready/Busy = Off
RTS Out/Off = Off
RTS Error = Off
XONReadyBuy=On
XONOnlOff=On
XON Error = 0.
DTR Polarity = High
RTS Polarity = High
Robust XON = Off
Delay Out Close = Off
Binary PS = Off
Network 1 Setup
IP Address = 172.020.070.024
Subnet Mask = 255.255.000.00
Default Gateway = 172.020.000.253
LPD Bamber = Off
DHCP=Off
Delay Out Close = Off
Host Name: Intelligrine9045N01EC84
DNS Primary IP = 000.000.000.000
DNS Secondary IP = 000.000.000.000
DNS Domain Name:
WINS Primary IP = 000,000,000,000
WINS Secondary IP = 000,000,000,000
WINS Host Name = 9045N01EC84
mDNS=On
Legal Link = 000,000,000,000
mDNS Host Name = Imdillingor9045N01EC4
mDNS Svc Name = Intelllortprint 9045N 01EC84
Multi-Session = On
AppleTalk = On
Current Zone = ^#
Preferred Zone =
Netware Setup
Netware = Off
Netware Frame =
Netware Mode = PSERVER
Print Server Name = Intellprint9045N01EC84
DNS Tree Name =
NDSCount=
Job Poll Interval = 0

TallyGenicom*
Toner Low = Step
Page Compression = Off
Intelligiter = On
Quality Menu
Resolution = 600~dpi
Toner Saver = Off
PrintDemir=1
Date/Time Menu
Month = April
g9045N01EC84_NP
Date/Time Menu cont'd
Day = 25
Year = 2007
Hour = Noct
Minute = 55
Second = 57
Offset from GMT
Hours = 0
Minutes = 0
STATUS
Tray 1
Media Size = A4
Media Type = Plain
Level = OK
Tray 2
Media Size = 46
Media Type = Print
Level = OK
Tray 3
Media Size = A4
Media Type = Plain
Level = OK
Tray 4
Media Size = A5
Media Type = Plain
Level=OK
Face Down Tray = OK
Toner = 88%
INFORMATION
Product Version: 1.3
PostScript Version : 3016.103
Engine Version: 1.768-39
Network 1 Version: 10/100 Ethernet 1.2
Installed Memory: 128 Mbytes
Printer Name: Intelliprint 9045N 01EC84
Serial Number: CB6CI
Asset Tag
Image Counter : 1211
Sheet Counter: 1120
Toner Page Count: 1210
HID=A1:0000,A2:00,S1:7
M1:000000000000,P1:00007035
Date/Time: April 25, 2007 12:55:58 AM
SF1:0000C38F
OPTIONS
Duplex Installed
Tray3 Installed
Tray4 Installed
User FLASH Installed
Extended Font Set 1 Installed
Default Source = Tray 1
Manual Feed = Off
Output Tray = Face Down Tray
Media Size/Type
Tray 1
Media Size = A4
Media Type = Plain
Custom Size
Width = 99
Length = 210
a + b Sema = Off
Toy 2
Media Size = A6
Media Type = Plain
Custom Size
Width=92
Length = 210
Toy 1
Media Size = A4
Media Type = Print
Auto-Serve = Off
Toy 4
Media Type = Plain
Auto-Sense = On
Tray Linking = Off
BlankPages Print
Auto Resize = Off
Separator Page = Off
Custom Size Unit = Millimeters
Interface Menu
parallel = On
serial = 0
Network Card 1 = On
SB = On
parallel Setup
merputer Auto Switch
format Raw
mode = Bidirectional
Delay Out Close = Off
Binary PS = Off
Serial Setup
interceptor = Auto Switch
format Raw
Serial Mode = RS232
Load Rate = 9600

Adobe PostScript

Serial Setup cont'd
Data Bits = 8
Step 1:
Parity = None
DTR Ready/Busy = Off
DTR On/Off = Off
DTR Error = Off
RTS Ready/Busy = Off
RTS On/Off=0
RTS Error = Off
XON Ready/Busy = On
XONOnl/Off=On
XON Error = Off
DTR Polarity = High
RTS Polarity = High
Robust XON = Off
Delay Out Close = Off
Binary PS = Off 1: 0.5; 1: 0.5
Network 1 Setup
Interpreter Auto Switch
Format = Raw
Network Address = 00502701EC84
IP Address = 172.020.070.024
Subnet Mark = 255.255.000.000
Default Gateway = 172.020.000.253
LPD Banner = Off
DHCP=OH
Delay Out Close = Off
Host Name = Inteligrine9045N01EC84
DNS Primary IP = 000.000.000.000
DNS Secondary IP = 000.000.000.000
DNS Domain Name =
WINS Primary IP = 000.000.000.000
WINS Secondary IP = 000,000,000,000
WINS Host Name = 9045N01EC84
mDNS = On
Local Link = 000.000.000.000
mDNS Host Name = Inteliphine9045N01EC84
mDNS Svc Name = Intellprint 9045N 01EC84
Multi-Session = On
AppleTalk = On
Current Zone = ^ *
Preferred
Netware Setup
Networks = Off
Netware Frame Auto-Sense
NetwareMok=PSERVER
Prrg Sper Name = Incllgrin945N01LCM
DNS Tree Name:
NDS Control
Job Poll Interval = 0

Tally Genicom
Toner Low = Stop
Page Compression = Off
Incellifor = 0
Quality Menu
Resolution = 600~dpi
Toner Saver = Off
Print Density:
Date/Time Menu
Month = April
69045N01EC84_NP
Date/Time Menu cont'd
Day = 25
Year = 2007
Here Noon.
Minute = 55
Second = $7
Offset from GMT
Hours = 0
Minutes = 0
STATUS
Tray 1
Melia Sirc. = A4
Mola Type = Plan
Level = OK
Tray 2
Majia Sire = 46
M
Media type = Plant
Level 3
Try 3
Media Size = A4
Media Type = Plain
Level = 0
Tray 4
Media Size = A5
Media Type = Plain
1.1.2.1
Face Down Tray = OK
Toner = 88%
INFORMATION
Product Version: 1.3
Toner Page Count:1210
HID=A1:0000,A2:00,S1:7
M1:000000000000, P1:00007035
Date/Time: April 25, 2007 12:55:58 AM
SF1:0000C38F
OPTIONS
Duplex Installed
Tray3 Installed
Tray& Installed
User FLASH Installed
Extended Font Set 1 Installed
Output Tray = Face Down Tray
Media Size/Type
Tray 1
Media
Media Type = Plain
Custom S
Wz 99
Length = 210
Tray 2
Media Size = A6
Media Type = Plain
Custom Size
W.88 = 99
Length = 210
Auto-S
H
M
A
T
May 4
Auto-Sense = On
Troy Linking = Off
Blank Pages = Print
Auto Resize = Off
Separator Page = Off
Custom Size Unit = Millimetre Interfaces Menu
Part
Parallel = On
Serial = On
Network Card 1 = On
USB = 0
Parallel Setup
Interpreter Auto Switch
Format = Rar
Mode = Bidirectional
Delay Out Close = Off
Binary PS = 0 Serial Setup
Interpreter = Auto Switch
Format = Raw
Serial Mode = RS232
Band Rate = 9600

Serial Setup cont'd
Data Bits = 8
SoapBirs = 1
Parity = None
DTR Ready/Busy = Off
DTRONOM
DTR Error = Off
ERR = 100
RTS REAYBAY = OffRTS ON10%=0%
RTS Expt=0.0
XON Ready/Buy = On
XONOnLOff=On
XON Error = Off
DTR Polarity = High
RTS Polarity = High
Robust XON = Off
Delay Out Close = Off
Binary PS = Off 1:0
Network
Interpreter Auto Switch
Formal = Kraw
Network Address = 00502701EC84
IP Address = 172.020.070.024
Subnet Mask = 255.255.000.000
Default Gateway = 172.020.000.253
LPD Barner = Off
DHCP = Off
Delay Out Close = Off
Host Name = Inteligiprine9045N01EC84
DNS Primary IP = 000.000.000.000
DNS Secondary IP = 000.000.000.000
DNS Domain Name
WINS Primary IP = 000.000.000.000
WINS Secondary IP = 000.000.000.000
WINS Host Name = 90
mDNS = On
Local Link = 000.000.000.000
mDNS Host Name = Inteligiprine9045N01EC84
mDNS Svc Name = Intellprint 9045N 01EC84
Multi-Session = On
AppicTalk = On
Current Zone = ^ *
Preferred Zone = *
Netware Setup
Netware = Off
Netware Frame Auto-Sense
Netware Mode = PSERVER
Print Server Name Intelliprint9045N01EC84
DNS Tree Name =
NDS Context =
Job Poll Interval = 0

TallyGenicom
AARNNNCCCTT
Hex Print = Off
Toner Low = Stop
Page Compression = Off
Intellifilter = On
Quality Menu
Resolution = 600 dpi
Toner Saver = Off
Print Density = 1
Date/Time Menu
Month = April
bellprint9045N01EC84_NP
Date/Time Menu cont'd
Day = 21
Year = 2007
Hour = Noon
Minute = 55
Second = 57
Offset from GMT
Hours = 0
Murmators = 0
STATUS
Tray 1
Media Size = A4
Media Type = Plain
Level = OK
Tray 2
Media Size = A6
Moline Type = Plain
Level = 96
Tray 3
Media Size = A4
Media Type = Plain
Level = OK
Tray 4
Media Size = A5
Media Type = Plain
Level = OK
Face Down Tray = OK
Toner = 88%
INFORMATION
Product Version: 1.3
PostScript Version: 3016.103
Engine Version: 1.768-39
Network 1 Version: 10/100 Ethernet 1.2
InstalledMemory:128Mbte
Printer Name: Intelliprint 9045N 01EC84
Serial Number: CB6C131634A0
Assess Tag
Image Counter: 1211
Sheet Counter : 1120
Toner Page Count: 1210
HID=A1:0000,A2:00,S1:7
M1:000000000000.P1:00007035
Date/Time: April 25, 2007 12:55:58 AM
SF1:0000C38F
OPTIONS
Duplex Installed
Tray3 Installed
Tray+ Installed
User FLASH Installed
Extended Font Set 1 Installed
All rights reserved. Translations, reprinting or copying by any means of this manual complete or in part or in any different form requires our explicit approval. We reserve the right to make changes to this manual without notice. All care has been taken to ensure accuracy of information contained in this manual. However, we cannot accept responsibility for any errors or damages resulting from errors or inaccuracies of information herein."
- Centronics is a trademark of Centronics Data Computer Corporation.
- PCL and PCL6 are trademarks of Hewlett-Packard Company.
- IBM and IBM PC are trademarks of International Business Machines Corporation.
- Apple, AppleTalk, TrueType, Laser Writer and Macintosh are trade-marks of Apple Computer, Inc.
- Microsoft, Windows, Windows 9x, Windows 2000, Windows NT and MS-DOS are registered trademarks of Microsoft Corporation.
PostScript is a trademark of Adobe Systems Inc. - All other brand or product names are trademarks of their respective companies or organizations.
WARENZEICHEN
42 Changi South Street 1
Changi South Industrial Estate
Singapore 486763
Phone: (65) 6542 0110
Fax: (65) 6546 1588
Printronix Commercial (Shanghai) Co. Ltd
22F, Eton Building East
No. 555, Pudong Av.
Shanghai City, 200120, P R China
Phone: (86) 400 886 5598
Fax: (86-21) 5138 0564

- WARNING
- Chapter 1 Introduction. 1
- Chapter 2 Setting Up Your Printer 7
- Chapter 3 Installing Software 23
- Chapter 4 Specifications. 25
- Chapter 5 Options and supplies 27
- Chapter 1
- Introduction
- About this manual
- Conventions
- General Safety Guidelines
- Safety Precautions
- Handling the Printer
- Printer Components
- Chapter 2
- Setting Up Your Printer
- Checking Your Package
- Preparing a Location for the Printer
- Dimensions
- Installation Precautions
- STOP
- Space Requirements
- Installation procedure
- Removing the Tape
- Installing Options
- Installing the Toner Cartridge
- Loading Paper
- Connecting the Power Cord
- Turning the Printer On
- Printing a Configuration Summary
- Example of a Configuration Summary
- TallyGenicom 9045N
- MENUS
- Paper Menu
- Media Size/Type
- Tray 1
- Tray 2
- Custom Size
- Tray 3
- Tray 4
- Custon Size Unit = Millimetre
- Interface Menu
- Port
- parallel Setup
- Serial Setup
- Serial Setup cont'd
- Network 1 Setup
- Netware Setup
- TallyGenicom*
- Quality Menu
- Date/Time Menu
- [45N01EC84_NP]
- Date/Time Menu cont'd
- Offset from GMT
- STATUS
- 1
- INFORMATION
- Asset Tag
- OPTIONS
- Setting an IP address manually
- Driver Installation
- TGNet Admin administration program
- Noise emission regarding RAL-UZ122 (Blue Angel):
- WEEE - European Directive on Waste Electrical and Electronic
- Information for users on collection and disposal of equipment
- For business users in the European Union
- Information on disposal in other countries outside the European Union
- Battery information
- Chapter 5
- Options and supplies
- Inhaltsverzeichnis
- Adobe PostScript
- Binary PS = Off
- p9045N01EC84_NP
- Face Down Tray = OK
- Toner = 88\%
- Tray I
- Custom Size Unit = 8
- TallyGenicom
- 69045N01EC84NP
- Custom Size Unit = Millimetres Interface
- USB=On
- Preferred Zone =
- g9045N01EC84_NP
- Binary PS = Off 1: 0.5; 1: 0.5
- Tally Genicom
- 69045N01EC84_NP
- Try 3
- Auto-S
- Custom Size Unit = Millimetre Interfaces Menu
- Binary PS = 0 Serial Setup
- Network
- Preferred Zone = *
- bellprint9045N01EC84_NP
- WARENZEICHEN
Brand : TALLY
Model : 9045N
Category : Printer