
DRW8800APP0403A - DVD Player AOPEN - Free user manual and instructions
Find the device manual for free DRW8800APP0403A AOPEN in PDF.
User questions about DRW8800APP0403A AOPEN
0 question about this device. Answer the ones you know or ask your own.
Ask a new question about this device
Download the instructions for your DVD Player in PDF format for free! Find your manual DRW8800APP0403A - AOPEN and take your electronic device back in hand. On this page are published all the documents necessary for the use of your device. DRW8800APP0403A by AOPEN.
USER MANUAL DRW8800APP0403A AOPEN
Warning: This model does not have a waterproof function. To prevent fire or impact, do not expose it to rain or in a damp environment, nor place it near any water source such as potted landscape, vase, cosmetic bottle, medicine bottle, etc.
This product meets the EMC requirement (89/336/EEC, and revised in accordance with 92/31/EEC and 93/68/EEC).
The acoustic volume generated by this model is lower than 70 dB (ISO7779/DIN45635).
This unit belongs to Grade-B digital model, which meets the ICES003 requirements.
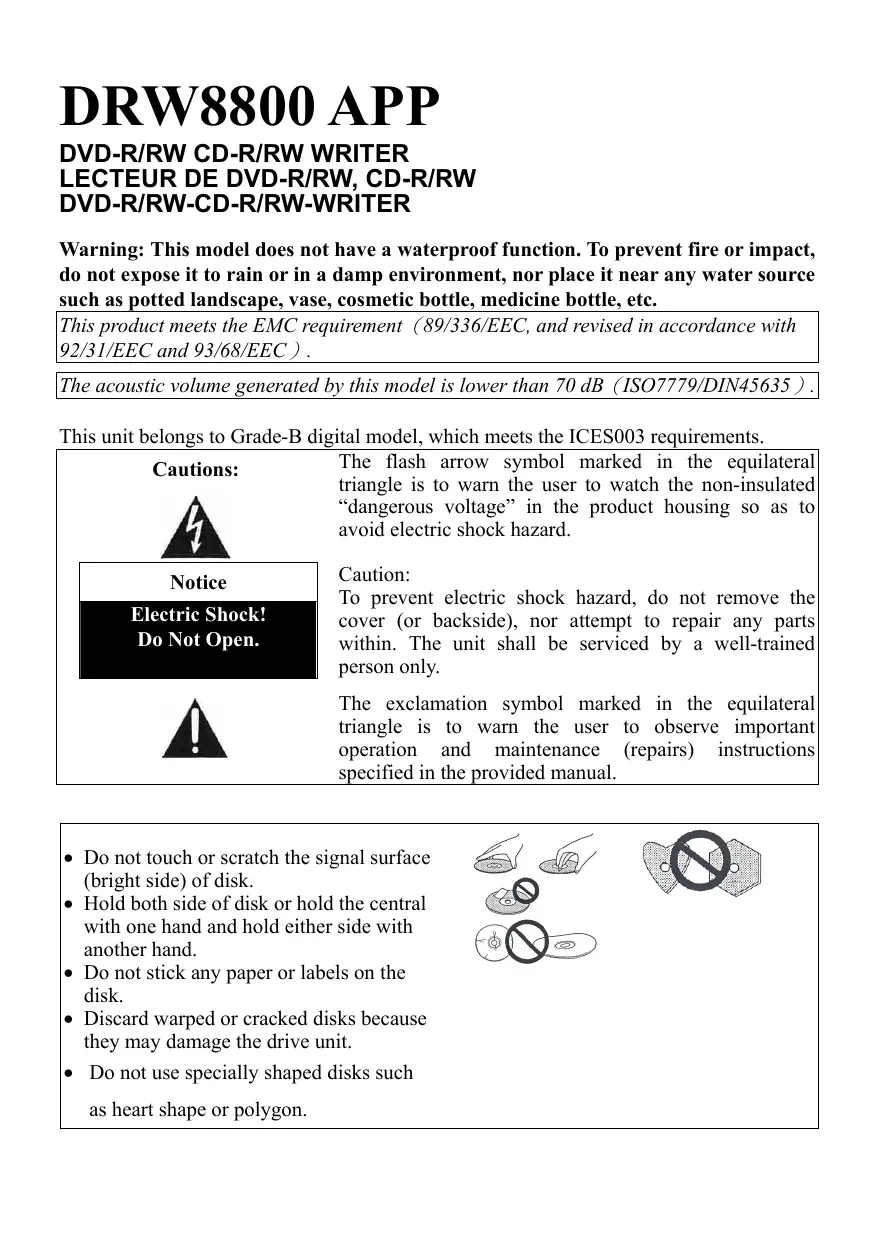
Cautions:

Notice
Electric Shock! Do Not Open.

The flash arrow symbol marked in the equilateral triangle is to warn the user to watch the non-insulated "dangerous voltage" in the product housing so as to avoid electric shock hazard.
Caution:
To prevent electric shock hazard, do not remove the cover (or backside), nor attempt to repair any parts within. The unit shall be serviced by a well-trained person only.
The exclamation symbol marked in the equilateral triangle is to warn the user to observe important operation and maintenance (repairs) instructions specified in the provided manual.
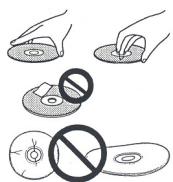
- Do not touch or scratch the signal surface (bright side) of disk.
- Hold both side of disk or hold the central with one hand and hold either side with another hand.
- Do not stick any paper or labels on the disk.
Discard warped or cracked disks because they may damage the drive unit. - Do not use specially shaped disks such as heart shape or polygon.

Note: In accordance with Part 15 of FCC, it has been confirmed that this equipment has passed the test and meets the restrictions on Grade-B digital model. The purpose of design restriction is to provide reasonable protection for home appliance against harmful interference. Because this equipment generates, uses and emits an infinite frequency, harmful interference may be caused to the wireless communication if failure to install and use this equipment according to the instructions contained in the manual. In spite of this, we do not guarantee that interference will not be caused to some specific facilities. In the event the harmful interference is caused to the receiving function of radio or TV (to be judged by turning this equipment on and off), then the user can take any or several of the following measures to correct such interference:
- Reset or change the antenna direction.
- Widen the distance between the equipment and the receiver.
- Plug this equipment into the socket that does not engage the receiver circuit.
- Ask your dealer or professional radio/TV technician to solve the problem.
Instructions for Users:
Any unauthorized modification or revision may cause the user to lose the right of operating this equipment.
Danger: Visible or invisible laser ray may appear upon starting the unit. Do not expose it to direct sunbeams.
Important: Harmful radioactive effect may be caused if use, control, adjustments or execution is done without observing the method specified herein
Important: Your eyes may get hurt if using optical instruments with this product.
Warning: In processing the power cord of this product or the provided wires, you may be contaminated by lead which belongs to a kind of chemical element causing cancer, reproduction problems or other production injuries as verified by the Californian government or other US government agencies.
Caution:
This product contains over Class 1 laser diodes. To ensure continuous safety, do not unpack any cases or attempt to access the internal side of the product.
A qualified person must execute all maintenance services.
This model is affixed with the following caution label that should be tagged at the upper part of the cover.
CLASS.1.LASER.PRODUCT. LASER KLASSE 1
Upon using the equipment provided with a receptacle, then such receptacle shall be placed near the equipment for convenience of use.
Instructions of Safety
To ensure your safety and demonstrate the maximal operation performance of the drive, be sure to read this manual carefully and observe the following safety precautions:
Environment: Do not use the unit in a dusty, high temperature or high humidity environment. Use this equipment in a place free from the effects of vibration or impact.
Power Source: Before installing this equipment in the system, be sure to disconnect his power source and remove power cord from AC socket.
Read the Manual: Before operating the drive, be sure to read all relevant safety and operation manuals.
Preserve the Manuals: Be sure to preserve the safety and operation manuals properly for reference in future.
Observe the Manuals: Be sure to observe all relevant operation and use manuals.
Watch the Warning: All operators must observe all relevant warnings.
Cleaning: Do not use liquid, aerosol cleaner or alcohol; instead, wet rags should be used to clean the housing surface only.
Moisture and Humidity: Do not use this product near a water source.
Power Source : Be sure to operate this product according to the power indicated in the label. IF the power type cannot be ascertained, consult an authorized Pioneer dealer.
Overload: Do not overload the wall socket and power cord to avoid fire or electric shock hazards.
Invasion of Foreign Object and Moisture: Do not put any type of object in this product that could cause a short circuit and lead to fire or electric shock when contacting the hazardous voltage. Do not spray any liquid on this product.
Condensation: When the unit is moved from a cold area into a warm environment, moisture can form around the operational part and damage the performance. To move the unit to a warmer location, place the product in the new environment for 1 to 2 hours before turning it on.
Maintenance: Do not attempt to repair this product, which could put you at risk of contact with a hazardous voltage or other danger after opening or removing the cover. Instead, you should ask a qualified person to perform all maintenance works (please refer to the provided maintenance backup card)
- Remove the dust on the disk with soft cloth or cotton ball by rubbing from inside toward outside instead of circling the disk.
- Do not use disk cleaner or anti-static agent to avoid hurting the disk with the solvent.
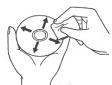
When putting aside, keep all disks in the storage case. Before use, be sure to check if dirt or dust is left on the disk (especially the recording face).
Features
- Writing Speed
DVD-R, at 8X-Zone CLV, 6X-CLV, 4X-CLV, 2X-CLV, 1X-CLV.
DVD-RW, at 4X-CLV, 2X-CLV, 1X-CLV.
DVD + R ,at 8X-Zone CLV,6X-CLV,4X-CLV,2.4X-CLV.
DVD+RW, at 4X-CLV, 2.4X-CLV.
CD-R, at 24X-Zone CLV, 20X-Zone CLV, 16X-CLV, 8X-CLV, 4X-CLV.
CD-RW, at 24X-Zone CLV, 20X-Zone CLV, 16X-CLV, 10X-CLV, 4X-CLV.
Max. Reading Speed:
DVD-ROM (single layer), at CAV 12X
DVD-ROM (double layer), at CAV 8X
DVD-R and DVD-RW, at CAV 8X
DVD-RAM, at CLV 2X
DVD+R and DVD+RW, at CAV 8X
CD-ROM and CD-R, at CAV40X / CD-RW: CAV 32X.
- Buffer Memory Capacity:
2 Mbyte (writing, reading)
- IDE Data Transmission Mode
PIO Mode 4, Multi Word DMA Mode 2, Ultra DMA Mode2
- Backup Video CD
- 5.25" half-height built-in type.
- Stereo signal output.
- LCD Split Server
- Available in horizontal/vertical direction.
- Low-vibration assembly using DRA System.
- Back Up CD-Text format.
Disk Format (reading/writing)
DVD single layer/double layer 120mm disk/80mm disk.
DVD-R (Ver.2.0)
DVD-RW(Ver.1.0 & Ver.1.1 & Ver.1.2)
DVD + R (Ver.1.0 & Ver.1.1 & Ver.1.2)
· DVD + RW (Ver.1.1 & Ver.1.2)
- CD-ROM Mode 1
- CD-ROM XA Mode 2(Form 1, Form 2)
- Photo CD (Single/Multiple Session)
CD-DA
- CD-Extra (CD PLUS)
CD-R
CD-RW, Ultra-speed CD-RW
Note: Special application programs supporting the above-said format must be written.
Interface
Front View
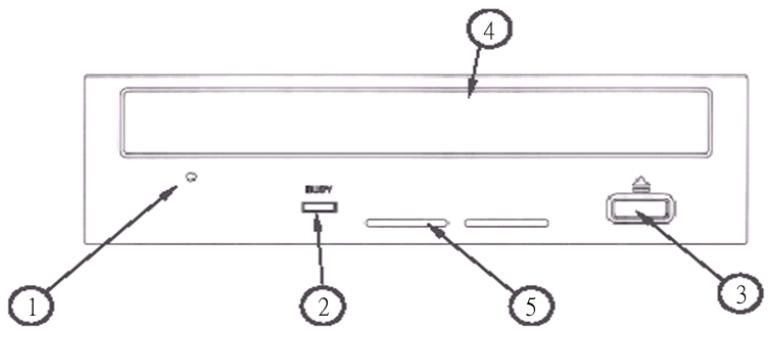
① Force Eject Hole
If the tray fails to eject upon pressing the Eject button, insert the eject pin into the hole and then push out the tray from within. In normal operation, use the Eject button to eject the tray. At this time, confirm the drive power has been disconnected and then wait for over one minute until the disk stops turning before inserting the pin in the eject hole.
Data Processing Indicator
The indicator below shows the operation situation:
Reading
Indicator on
Writing
Indicator on
③ Eject Push Button
Push this button to eject/load the disk.
④ Disk Tray
Push Eject button and open the tray and then load the CD or DVD, with label facing upward. Press the Eject button or push the front part of the loading tray.
⑤ Vent Hole
Cooling air intake port.
Note for playing 8cm (3.15") disk:
When the drive is in the erected position, the unit cannot play 8cm (3.15") disk even if the disk is engaged with the adapter.
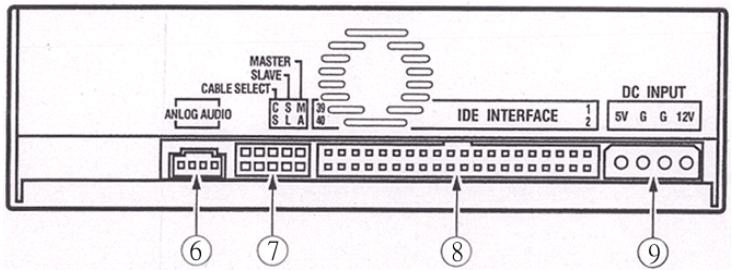
⑥ Audio Output Port
Analog audio output connector used.
Because the Molex 70553 connector is used, a proper connecting cable should be selected.
| Pin | Code | Function |
| 1 | L | Left channel audio output. |
| 2 | G | Grounding |
| 3 | G | Grounding |
| 4 | R | Right channel audio output. |
⑦ Cable Connector:
After inserting the short circuit socket, the switch will be set in the ON position.
Before changing the connector setting, be sure to confirm the drive power source.
Pin #1 has been set at ON position upon delivery.
| Pin | Code | Function | |
| 1 | MA | ON | Main mode for drive. |
| 2 | SL | ON | Associated mode for drive. |
| 3 | CS | ON | Cable selection |
| 4 | Retained | ||
| 5 | Retained | ||
⑧ Host IDE Interface
40-pin input/output connector meeting ATA specification is used.
⑨DC power input port
| Pin | Code | Function |
| 1 | 12V | DC+12V power input pot. |
| 2 | G | Grounding |
| 3 | G | Grounding |
| 4 | 5V | DC+5V power input pot. |
Area Code
The area code can only be changed up to 5 times, including the initial setting. The code becomes permanent after the fifth change. Therefore special care should be used when changing the area code.
- The area code belongs to one part of the DVD standard. However, the area code on the DVD disk is available for an option where the DVD disk without a specific area code can be played in the existing player models.
Installation
① Switch off the PC power. Remove the power cord from the AC socket and then remove the cover or the panel.
② Remove empty panel installed in front of the 5.25" slot.
③ Install fixed glide rails on the drive (contact your dealer or computer manufacturer when glide rails are required).
④ Insert drive into the slot.
⑤ To fix it, please refer to the computer manual.
- Install the unit with the screw less than 5mm , because longer screws may damage the drive.
- If the installed screws loosen, cracking noises may occur due to vibration during disk operation. To prevent this, be sure to tighten the screws securely.
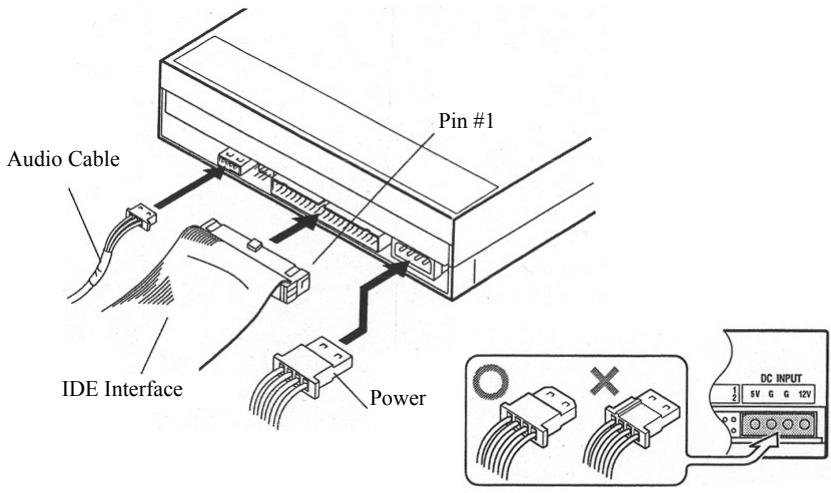
Connection
- Disconnect the PC power.
- Connect the PC cable. Watch the polarity of the cable during connection.
- Connect the IDE interface cable. At this time, ensure that Pin #1 of the drive IDE Connector has properly connected with Pin #1 of the cable.
- When using the Sound Card, be sure to connect the audio output port and the sound card with the audio cable.
Confirm the power required for this product provided by the connected PC. Do not use any other power source besides the PC power.
Specification
[Installation]
This drive is available for vertical and horizontal application.
[Disk Size]
12cm (4.72")/8cm (3.15")*
- 8cm (3.15") cannot be used in vertical application.
[Data Transmission Speed]
Data Reading (continuous type)
DVD Max. 16.62 Mbyte /sec
CD Max. 6 Mbyte /sec
(17.1~40X CAV mode in case of 16-zone transmission)
Data Writing (continuous type)
DVD Max. 11.08 Mbyte/sec (DVD-/+R is 8X)
CD Max. 3.6 Mbyte/sec (CD-R/RW is 24X)
Host Interface Specification:
PIO Mode 4、Multi word DMA Mode 2 16.6 Mbyte/sec
Ultra DMA Mode 2 33.3 Mbyte/sec
- Being limited by the disk condition (scratches, etc.), the unit may not be able to output the data transmission speed.
[Access Time Search Time]
Access Time (random mean value)
DVD-ROM 140ms; CD-ROM 130ms
Search Time (random mean value)
DVD-ROM 130ms; CD-ROM 120ms
[Audio Characteristics]
Line Output 0.75 ± 0.1 Vrms (under 10k load)
[Others]
Power Source DC+12V, 0.8A
DC+5V, 1.1A
Measurement 148 (W) x 42.3 (H) x 198 (D)/mm
(incl. panel) 5-27/32 (W) x 1-11/16 (H) x 7-25/32 (D)/inch
Weight 1.1 kg (2.43 lb)
Operation Temp. 5^0C to 45^0C (41^0F to 113^0F)
Operation Humidity 5% to 85% (without condensation)
Storage Temp - 40^OC to 60^OC (- 40^OF to 140^OF )
Storage Humidity 5% to 90% (without condensation)
Note:
The specification and design may be subject to change without prior notice when improvement is required.