
YM92 - Watch BREIL - Free user manual and instructions
Find the device manual for free YM92 BREIL in PDF.
| Product type | Quartz wrist watch with chronograph |
| Brand | BREIL |
| Model | YM92 |
| Case dimensions | Approx. 40 mm diameter, 12 mm thickness |
| Weight | Approx. 80 g (depending on strap) |
| Power source | Button cell (type not specified, standard watch battery) |
| Main functions | Time display (hour/minute hands), seconds hand, date, 12-hour chronograph with 1/20th second, split time measurement |
| Time setting | Crown in 2nd click position, rotate to set hours/minutes |
| Date setting | Crown in 1st click position, rotate counterclockwise |
| Chronograph | Start/stop by push button, reset to zero, split time measurement |
| Water resistance | Water resistant 30 m (3 ATM) - resists splashes and light rain |
| Crystal material | Mineral glass (not specified, assumption) |
| Case material | Stainless steel (common assumption) |
| Strap | Metal, leather or plastic depending on version (not specified) |
| Shock resistance | Normal daily use, avoid violent shocks |
| Magnetic resistance | Up to 60 Gauss |
| Care and cleaning | Clean with soft cloth; metal strap: soapy water; leather: dry cloth; avoid solvents |
| Safety | Keep batteries out of reach of children; consult a doctor if ingested |
| Periodic inspection | Recommended every 2 years by an authorized center |
| Spare parts and repairability | Repair by authorized center; battery replaceable |
| General information | Manual available in several languages; warranty booklet provided |
Frequently Asked Questions - YM92 BREIL
User questions about YM92 BREIL
0 question about this device. Answer the ones you know or ask your own.
Ask a new question about this device
Download the instructions for your Watch in PDF format for free! Find your manual YM92 - BREIL and take your electronic device back in hand. On this page are published all the documents necessary for the use of your device. YM92 by BREIL.
USER MANUAL YM92 BREIL
When reading this instruction booklet, keep the watch diagram on the left unfolded and in full view. The symbols (A, B, etc.) on the diagram are those referred to in the section describing the operating instructions.
Thank you very much for purchasing a BREIL WATCH. To ensure its correct use, please read these instructions carefully.
In order to be able to make full use of the guarantee service (subject to the guarantee terms), please ensure that the Breil international guarantee card is supplied with the watch at the time of purchase.
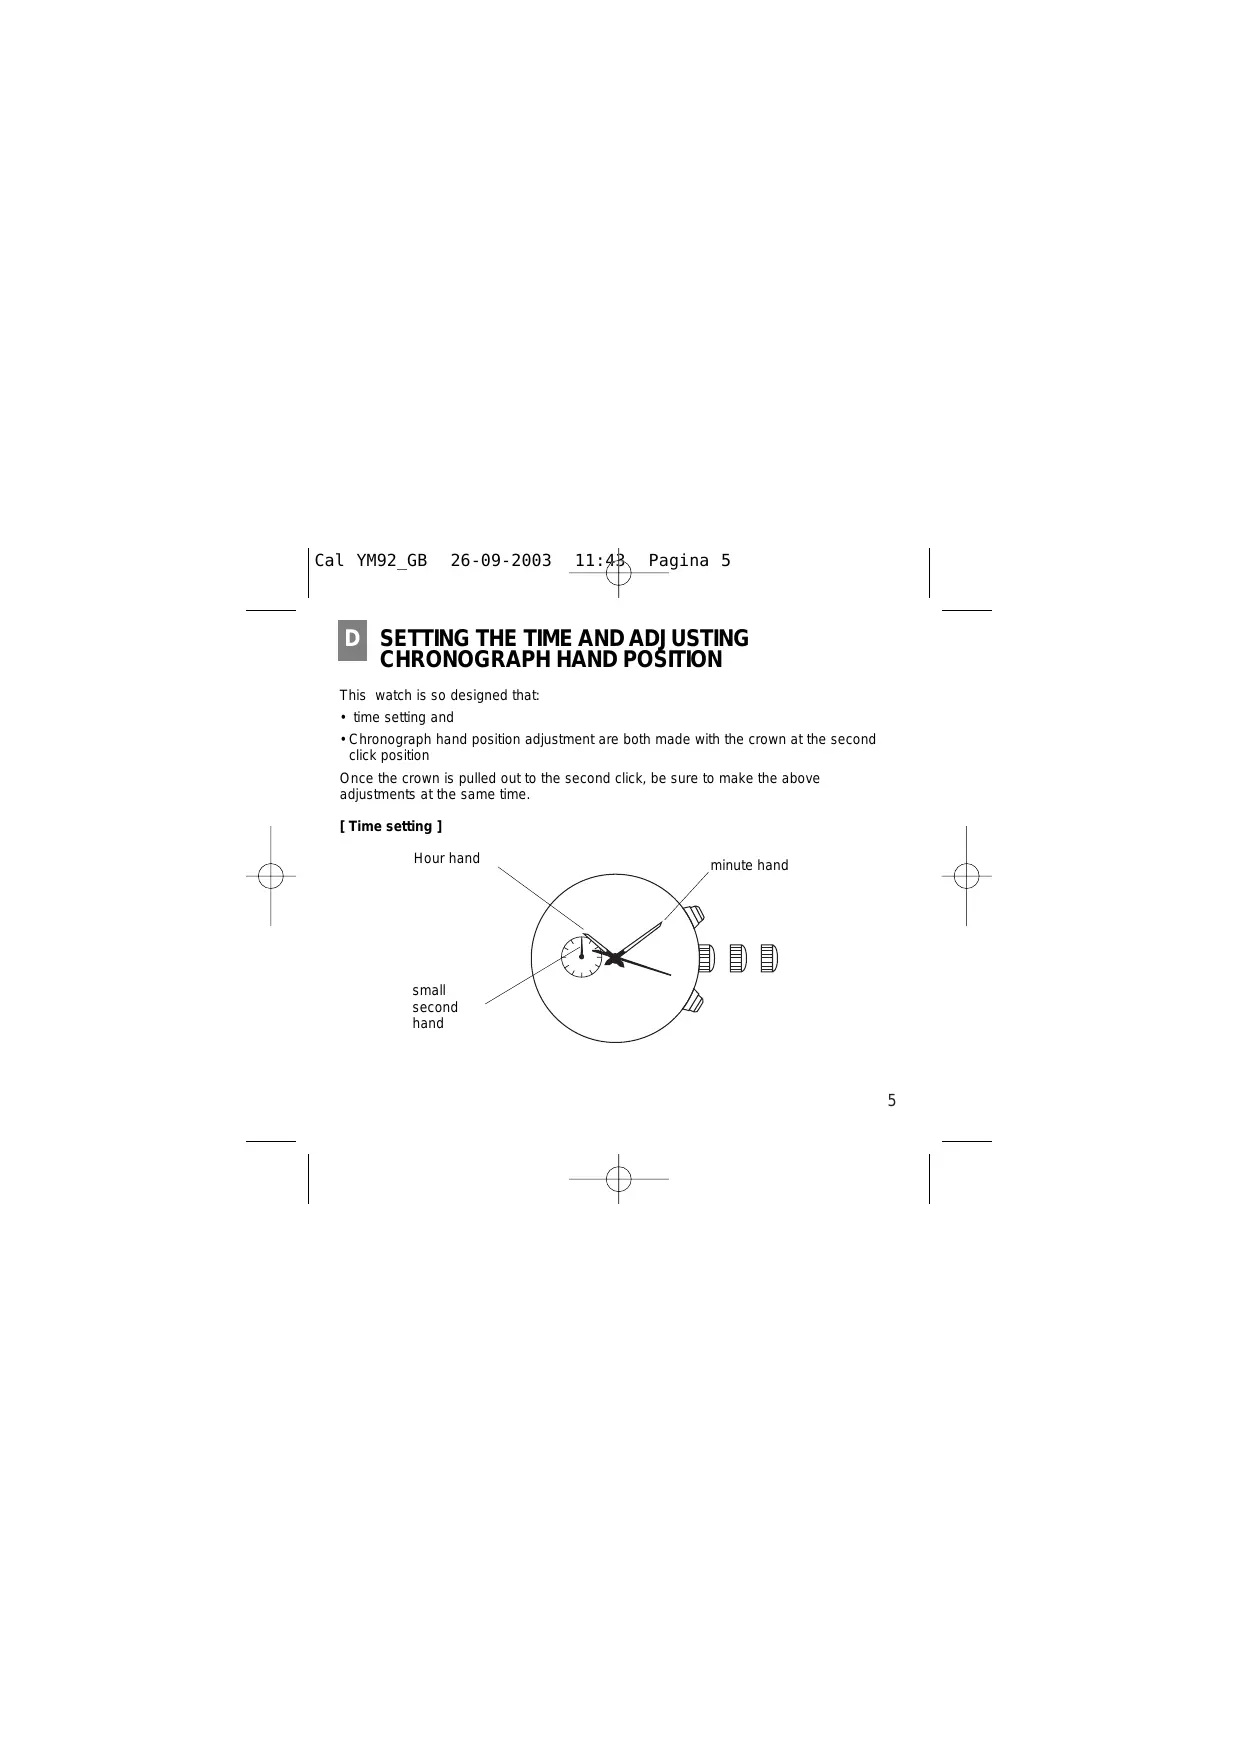
① Hour hand
② Minute hand
③ Chronograph second hand
④ Date
⑤ Small second hand
⑥ Chronograph hour hand
⑦ Chronograph minute hand
⑧ Chronograph 1/20 second hand
Button A
Button 8
Crown
[TIME]
indicated by the hour minute and small second hands.
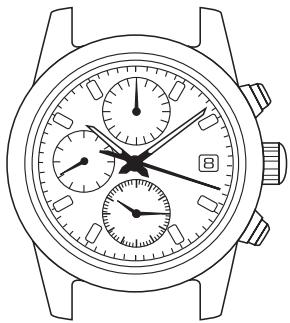
[DATE]
displayed in numerals
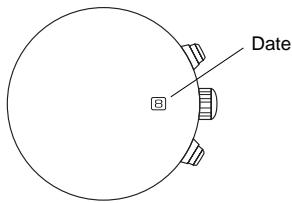
[CHRONOGRAPH]
measure up to 12 hours in 1/20 second increments.
- split time measurement
![BREIL YM92 - [CHRONOGRAPH] - 1](/content/2024/12/183557/images/23c00ad989557372d7012070e008a791cbc93bc6f9998b2586b5edd2ca368402.jpg)
Crown ©:
(A) Normal position : free
(B) First click : date setting
(C) Second click : time setting; adjusting the chronograph hand position.
SETTING THE TIME AND ADJUSTING
CHRONOGRAPH HAND POSITION
This watch is so designed that:
time setting and
- Chronograph hand position adjustment are both made with the crown at the second click position
Once the crown is pulled out to the second click, be sure to make the above adjustments at the same time.
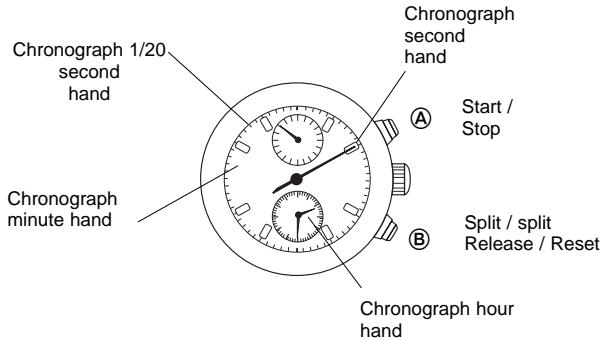
[Time setting]
![BREIL YM92 - [Time setting] - 1](/content/2024/12/183557/images/ab3aa704a5b83ba53ee4e0837eb7ccbd82a6d36165dd26af40e7b374c35d9f49.jpg)
- put out the crown to the second click when the small second hand is at the 12 O'clock position. If the chronograph is measuring or stopped, it is automatically reset to 0
- Turn the crown to set the hour and minute hands. It is recommended that the hands be set to the time a few minutes ahead of the current time, taking into consideration the time required to adjust the chronograph hand position if necessary.
Note: - When setting the hour hand, be sure to check that AM/PM is correctly set. The watch is so designed that the date changes once in 24 hour.
- When setting the minute hand, first advance it 4 to 5 minutes ahead of the desired time and then turn it back to the exact.
[If the chronograph hands are not in the "0" position, follow the procedure below to set them to the 0 position]
![BREIL YM92 - [Time setting] - 2](/content/2024/12/183557/images/93823ff9ce1d43f4f9108376e4b673619b654d7f3e389575306b6761679e9e8e.jpg)
- Press button for 2 seconds to select the chronograph hand (s) to be adjusted this selection is made in the following order by pressing button for 2 seconds.
![BREIL YM92 - [Time setting] - 3](/content/2024/12/183557/images/6fed83a6fd96177352968d6fbd7447d5e2f5de1a2494c7d0558e3974c03533b2.jpg)
*The select hand(s) turn(s) a full circle.
- Press button repeatedly to set the selected chronograph hand(s) to the "0" position. The hand moves quickly if button , is kept pressed.
- After all adjustments are completed, push the crown back into the normal position in accordance with a time signal, checking that the hour and minute hands for time display indicate the current time.
E SETTING THE DATE
Before setting the date, be sure to set the time.
- It is necessary to adjust the date at the end of February and 30 day months.
- Pull out the crow to the first click
- Turn the crown clockwise until the desired date appears
- Push the crown back into the normal position.
Note: Do not set the date between 9:00 p.m and 1:00 a.m. Otherwise, the date may not change properly.
F CHRONOGRAPH
- The chronograph can measure up to 12 hours in 1/20 second increments.
- The measured time is indicated by the four chronograph hands that move independently of the hands for time display.
- When the measurement reaches 12 hours, the chronograph automatically stops counting.
Ex: 2 hours, 30 minutes and 10.35 seconds
MOVEMENT OF THE CHRONOGRAPH 1/20 - SECOND HAND
- After the chronograph is started, the chronograph 1/20 second hand moves for about 10 minutes and automatically stops at the 0 position.
- When the measurement is stopped or split time is measured, it moves to indicate the elapsed 1/20 - seconds.
- After the measurement is restarted or split time is released the chronograph 1/20 second hand moves for about 10 minutes and stop automatically.
- In the same manner, as the chronograph is stopped and restarted repeatedly or split time is measured and released repeatedly the chronograph 1/020 second hand moves for about 10 minutes and stops automatically.
Before using the chronograph, be sure to check that the crown is set at the normal position and that the chronograph hands are reset to the 0 position.
- If the hands do not return to the 0 position, follow the procedure in ISETTING THE TIME AND ADJUSTING THE CHRONOGRAPH HAND POSITION.
CHRONOGRAPH OPERATION
[Standard measurement]

[Accumulated elapsed time measurement]
![BREIL YM92 - [Accumulated elapsed time measurement] - 1](/content/2024/12/183557/images/beb8734d26ae9b6c70a3194a171e009302c7b137036ab6667a9e059b6c1352a6.jpg)
[Split time measurement]
![BREIL YM92 - [Split time measurement] - 1](/content/2024/12/183557/images/15e20f9b21045e9cd6bdeab874858ac9df13f5663fe5c257f4874692a892b951.jpg)
[Measurement of two competitors]
![BREIL YM92 - [Measurement of two competitors] - 1](/content/2024/12/183557/images/3905d531ea9c40243144e10fa7c3c330d614bedbab053b14f7446926ed389550.jpg)
| Indication | Use | |||
| Degree of water resistance | Dial | Case | Spray, sweat, light rain, washing, etc. | Swimming, etc. |
| A | - | - | NO | NO |
| B | WATER RESISTANT 30M (3ATM) | WATER RESISTANT | YES | NO |
| C | WATER RESISTANT 50M (5ATM) | WATER RESISTANT | YES | YES |
| D | WATER RESISTANT 100M (10ATM) | WATER RESISTANT | YES | YES |
| E | WATER RESISTANT 200M (20ATM) or more | WATER RESISTANT | YES | YES |
| "WATER RESISTANT" may sometimes be abbreviated to "WATER RESIST" | ||||
- In order to prevent water coming into contact with the internal mechanism, never pull the crown out when the watch is wet.
- If any watches designed for sportswear or use in water come into contact with salt water or heavy sweating, they should be rinsed in fresh water and dried thoroughly.
| in water | ||
| Skin-diving | Scuba diving | Water-resistance characteristics |
| NO | NO | Not water resistant. Must be kept away from water and moisture |
| NO | NO | Average water resistance. Can withstand spray, sweat, light rain, washing, etc. during daily use |
| NO | NO | Can be worn while swimming but not diving |
| YES | NO | Suitable for skin-diving. |
| YES | YES | |
| * Always keep the crown in its normal position. * Full tighten crown screw lock. | ||
- Contact with water may cause a deterioration in the quality of some leather straps.
- As internal parts of the watch can retain moisture, when the outside temperature is lower than the inside, the watch glass may mist-up.
This phenomenon is purely temporary and should not create any problems.
However, if it persists for any length of time, the watch should be checked by the shop where it was purchased or by the nearest Authorised Service Centre.
Temperature
Do not leave the watch exposed to direct sunlight or temperature extremes for long periods of time.
Long exposure, in fact, may adversely affect the operation of the watch and actually shorten battery life, causing it to gain or lose time and affect its other functions.
Impact
This watch can withstand normal everyday impacts and shocks and those normally imparted by non-contact sports. Serious damage, however, may result if the watch is dropped or subjected to severe shock.
Magnetic fields
This watch is antimagnetic up to 60 gauss, and is therefore not affected by magnetic fields produced by normal domestic appliances. If used near strong magnetic fields, its operation may be temporarily affected.
Static electricity
The integrated circuits present inside the watch are sensitive to static electricity. If the watch is exposed to intense electrical fields, the time display may temporarily lose some of its accuracy.
Chemicals and gases
Avoid wearing the watch in the presence of strong gases or chemical substances. Parts of the watch may discolour, dissolve or even break if brought into contact with benzol or petroleum based products such as solvents, thinners, detergent, adhesives etc. Pay special attention to avoiding contact with chemicals.
The watch case and strap may discolour if they come into contact with mercury from a broken thermometer or other equipment.
Keeping the watch clean
Use an absorbent soft cloth to clean off any dirt or damp from the watch glass.
Wearing the watch when the strap or back of the case is dirty can cause skin irritation.
Cleaning the watch strap:
Metal bands: use a toothbrush and soapy warm to wash the dirt off.
- Plastic or rubber straps: wash with water. Do not use solvents.
- Leather straps: gently rub the face of the strap using a soft dry cloth. Clean the opposite side with a cloth and alcohol.
Periodic inspection
In order to guarantee long trouble-free operation, it is advisable to have the watch checked by an Authorised Assistance Centre once every two years.
Keep batteries out of the reach of children
If a battery is accidentally swallowed, consult a doctor immediately.
INDEX
A PIECES PRINCIPALES 18
B CHARACTERISTIQUES 19
C UTILISATION DU CADRAN ET DU REMONTOIR 20
D REGLAGE DE L'HEURE ET DE LA POSITION DES AIGUILLES DU CHRONOGRAPHE 21
E REGLAGE DE LA DATE 24
F CHRONOGRAPHE 25
PRECAUTIONS D'UTILISATION ET INFORMATIONS UTILES .27

PIECES PRINCIPALES
Bouton A
Bouton ⑧
Remontoir ©

[HEURE]
indiquedeparlaiguille desheures,desminutes etpar la trotteuse.