
LCI-RTS100 - Speakers POLK AUDIO - Free user manual and instructions
Find the device manual for free LCI-RTS100 POLK AUDIO in PDF.

| Product Type | In-wall/in-ceiling speaker |
| Brand | Polk Audio |
| Model | LCI-RTS100 |
| Recommended Amplification | 10-250 W per channel |
| Nominal Impedance | 4 Ohms |
| Frequency Response | 50 Hz - 27 kHz (+/-3 dB) |
| Sensitivity | 92 dB (2.83 V @ 1 m) |
| Speaker Weight | 12.5 lb (approximately 5.7 kg) |
| Cutout Diameter | 31.75 cm (12.5 in) |
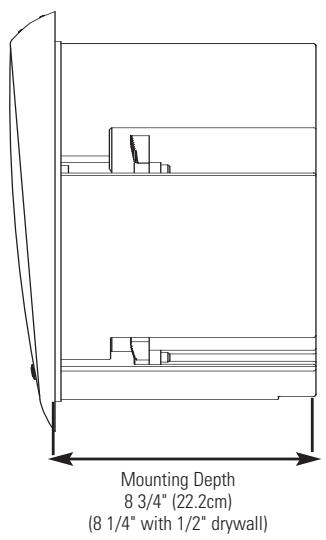
| Mounting Depth | 22.2 cm (8.75 in); 21 cm on 1/2 drywall |
| Overall Diameter | Not specified (see template) |
| Included Grille Type | Perforated metal (paintable) and cloth (dyeable) |
| Available Adjustments | Tweeter attenuator 3 dB (cut/normal); wall distance switch (< 2 ft / > 2 ft) |
| Tweeter Orientation | Yes, aimable |
| Recommended Wiring | 14 gauge or larger (18/16 for short distances) |
| Usage | Indoor only |
| Warranty | 5 years (parts and labor for speaker and electronic components) |
| Box Contents | Speaker, installation template, paint mask, two grilles, eye bolt, nut with logo, manual, registration card |
| THX Compatibility | Yes (use cloth grille and specific settings) |
| Safety Distance from Screens | 30 cm (1 ft) minimum (unshielded speaker) |
Frequently Asked Questions - LCI-RTS100 POLK AUDIO
User questions about LCI-RTS100 POLK AUDIO
0 question about this device. Answer the ones you know or ask your own.
Ask a new question about this device
Download the instructions for your Speakers in PDF format for free! Find your manual LCI-RTS100 - POLK AUDIO and take your electronic device back in hand. On this page are published all the documents necessary for the use of your device. LCI-RTS100 by POLK AUDIO.
USER MANUAL LCI-RTS100 POLK AUDIO
High Performance In-Ceiling Reference Theater Speakers
- Read these instructions.
- Keep these instructions.
- Heed all warnings.
- Follow all instructions.
- Do not use this apparatus near water.
- Clean only with dry cloth.
- Do not block any ventilation openings. Install in accordance with the manufacturer's instructions.
- Do not install near any heat sources such as radiators, heat registers, stoves, or other apparatus (including amplifiers) that produce heat.
- Refer all servicing to qualified service personnel. Servicing is required when the apparatus has been damaged in any way, liquid has been spilled or objects have fallen into the apparatus, the apparatus has been exposed to rain or moisture, does not operate normally, or has been dropped.
- WARNING: To reduce the risk of fire or electric shock, this apparatus should not be exposed to rain or moisture and objects filled with liquids, such as vases, should not be placed on this apparatus.

13/14
Product Disposal - Certain international, national and/or local laws and/or regulations may apply regarding the disposal of this product. For further detailed information, please contact the retailer where you purchased this product or the Polk Audio Importer/Distributor in your country. A listing of Polk Audio Importer/Distributors can be found on the Polk Audio website www.polkaudio.com or by contacting Polk Audio at 5601 Metro Drive, Baltimore, Maryland 21215, USA—Phone: +1 410 358-3600.
TAKE INVENTORY
Inside each LCI-RTS100 speaker container, you should find the following:
- One LC-RTS100 speaker
- Stud Lock Mounting System
- Speaker mounting template
- Paint mask
- Two grilles (one perforated, one cloth)
- Eye Bolt
- Logo Badge
- LCI-RTS100 Manual
- Registration Card
Important Note: If anything is missing or damaged, or if your LCi-RTS100 speaker fails to operate, notify Polk Audio Installer Support Services immediately at 800-377-7655.
INSTALLATION RECOMMENDATION FOR OPTIMUM PERFORMANCE
Important Note: LCi-RTS Series speakers are for inside installation only. They are not designed for use outdoors.
You should have a thorough understanding of and adhere to all local building and fire codes. Also, you should be familiar with the area behind the wall or ceiling into which you plan to install your speakers. Always use wire that meets appropriate building and fire codes. Use at least 14 gauge wire or heavier for the best sound quality. (Note: Wiring is best performed by an experienced professional.)
When installing your LC/ Series In-ceiling Loudspeakers, be aware of the weight of your particular model (see specification page for the weight of your model) and the sturdyness of the material into which you are installing the speaker. Be aware of any concealed studs, electrical wiring or plumbing in the wall or ceiling into which you are installing the speakers.
If you doubt that you possess the necessary skills or tools, consult your Polk Audio dealer or a professional installer.
THX™ PERFORMANCE
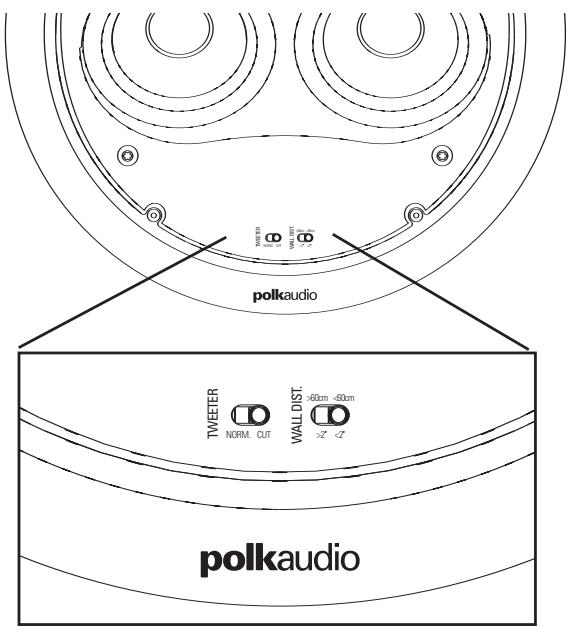
For THX™ performance, use the cloth grille; set the Tweeter Toggle to the "normal" position and the Wall Distance Toggle to the greater than 2 feet (>2) position.
WIRE RECOMMENDATIONS
| Runs | Gauge |
| Lengths up to 25' | 18 or 16 |
| Lengths greater than 25' | 16 or 14 |
| but less than 50' | |
| Lengths greater than 50' | 14 or 12 |
| but less than 75' | |
| Lengths greater than 75' | 12 |
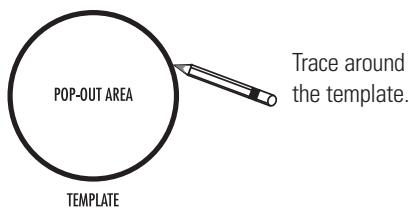
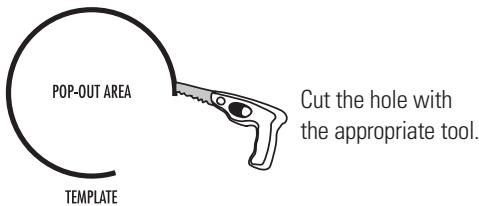
LCi-RTS100 LOUDSPEAKER INSTALLATION
You will need:
- Pencil for marking the location of installation.
Keyhole saw, utility knife or material-appropriate incising implement for cutting drywall or other wall material. - Screwdriver, preferably powered, with Phillips head bit.
- Power drill with appropriate bit (optional, for starting wall cut).
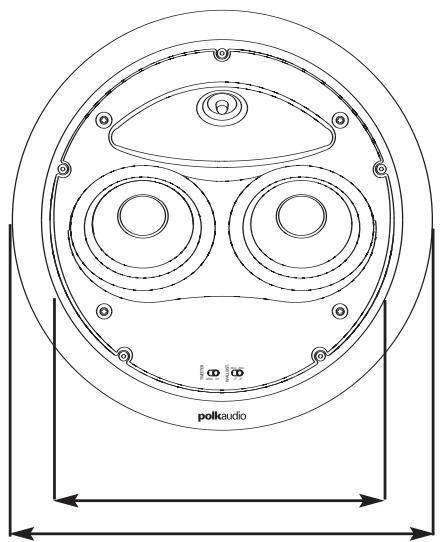
Cutout Diameter
12 1 / 2^ (31.75cm)
Overall Diameter
14" (35.56cm)
STUD-LOCK MOUNTING SYSTEM™ (INCLUDED BUT ALSO SOLD SEPARATELY)
While not absolutely necessary, the Stud-Lock Mounting System™ does help ensure that LCi-RTS Series speakers perform at their optimum. The mounting system creates a rigid platform for the LCi-RTS100, increasing bass performance, clarity and reducing unwanted structure borne vibration.
Stud-Lock Mounting System™ Installation
See the instructions included with each Stud-Lock Mounting System.
Important Note: For new construction: If you are using a pre-construction bracket, always install it first before installing the Stud-Lock Mounting System.
If you are installing a pre-construction bracket (PB100) and a Stud-Lock Mounting System (STL100) together, be aware that the speaker's enclosure can catch on the edge of the pre-construction bracket. Push the bottom of the loudspeaker enclosure up and over The protruding edge of the pre-construction bracket. This will fully seat The loudspeaker in the ceiling.
SPECIFICATIONS
| Model | LCi-RTS100 |
| Recommended Amplification (W/channel) | 10-250 W |
| Impedance (Nominal) | 4 Ohms |
| Frequency Response (+/-3dB) | 50Hz – 27kHz (80Hz-26kHz) |
| Efficiency (2.83V@1M) | 92db |
| Speaker Weight | 12.5 lbs. |
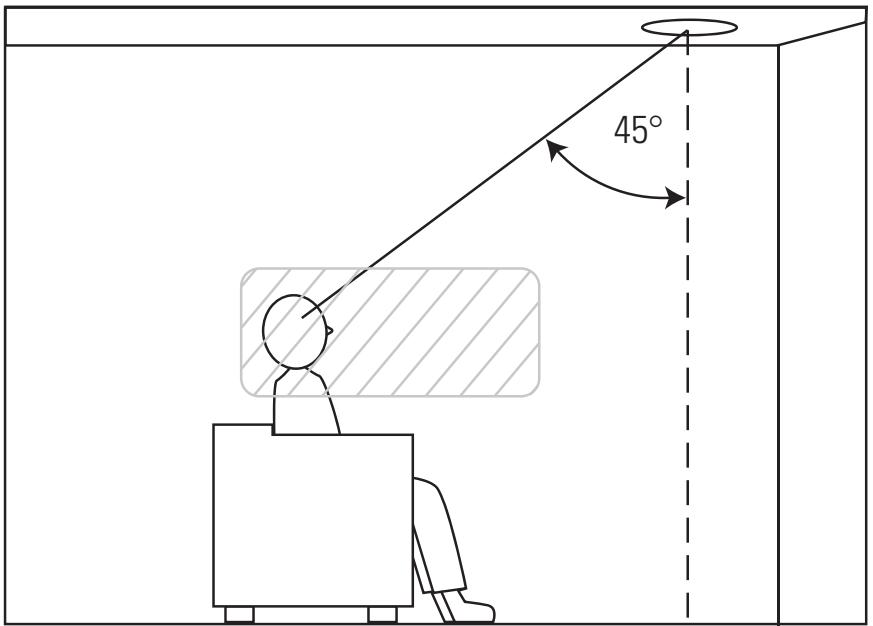
ADJUSTING THE TWEETER
Aiming the tweeter toward your listening position improves imaging and detail. If you are using RTS100 Series as front/main home theater speakers, aim the tweeter toward your listening position. For rear/ surround speakers installed in walls or ceilings, aim the tweeter toward the nearest reflecting surface (an adjacent wall or ceiling) if you desire a more diffuse sound field. For more direct sound, aim the tweeters at your listening position).
Important Note: LCi Series In-wall Loudspeakers are not magnetically shielded and should not be placed closer than 1^ (30cm) from a direct-view television or video monitor.
Room Environment Controls
3dB Tweeter Toggle
If your listening room is very reflective, with smooth sheetrock walls, hardwood floors, and non-cushioned furniture, the sound will be overly "bright" and unnatural. Engaging the LCji tweeter attenuation feature (by selecting the "cut" setting) compensates for the effect of reflectivity in a hard room. Tweeter attenuation flattens room response, without hindering higher frequency response, for warmer, more realistic sound and more accurate imaging.
Wall Distance Toggle
In-wall loudspeakers excel when placed more than 2^ (60cm) from side walls. If position limitations demand that your loudspeakers be installed closer than 2^ (60cm) from side walls, the close proximity of the surface can result in a response "bump" between 50 and 200Hz. This can cause in-wall speakers to sound "boomy." The distance toggle switch flattens response and tunes out "boominess" without sacrificing deep bass response, for more lifelike sound. If the speaker is closer than 2^ to a wall, engage the wall distance toggle ("Wall Dist.") to match the <2^ setting. Recommended speaker distance from side walls is 2 feet (60cm).
PAINTING IN-CEILING GRILLES
Painting in-ceiling grilles
The LC-RTS100 is supplied with two grilles, one perforated aluminum, the other cloth-covered plastic. The perforated aluminum grille may be painted, while you may dye the cloth grille.
Required tools:
- Paint of your choice (grilles must be spray painted).
- A paperclip or corkscrew (for removing the paintable grille).
- Masking tape
- Paint mask (supplied; covers un-paintable parts)
Preparation:
- Separate the parts of the speaker. If the speaker is not yet installed, the grille can be removed simply by pushing the clamp screws forward to push the grille off the speaker from the inside.
- Remove the cloth scrim from the inside of the grill.
- When painting the speaker frame, use the supplied paint masks to carefully mask off the front of the speakers to protect the drivers and baffles. You can do this while the speaker is already installed in the ceiling (if, for instance, you're repainting the room). If you do not have the paint masks, carefully mask the speaker components using paper and masking tape. Use a paper clip to remove the grille.
Painting the aluminum mesh grille:
The grille of the LCJ-RTS Series speaker features an even, protective paint. This paint is an ideal primer.
- Paint the grille.
Note: Grilles must be spray painted. Do not use a brush and paint. Thick, brushed paint may clog the grille holes. Use thin coats of spray paint. If you're using a compressor and spray gun, use the finest, most diffused setting. Be careful not to fill the holes in the grille with paint. - When the paint is completely dry, carefully reinstall the grille by fitting it into its recess so that it is just resting on the frame. Starting with one corner, go around the speaker and push the grille into the grille notch a little bit at a time. Be gentle; the grille may be easily bent by rough handling. You will feel a positive "snap" when the grille is fully in place.
Painting the frame:
- Apply paint to exposed (unmasked) parts. Use two or more thin coats.
- When the paint is completely dry, remove the masking material.
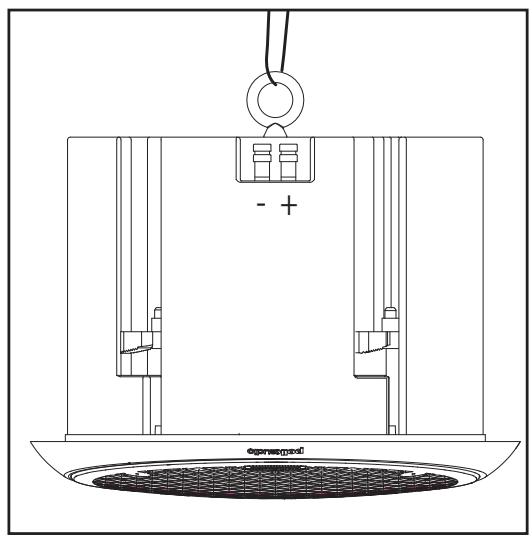
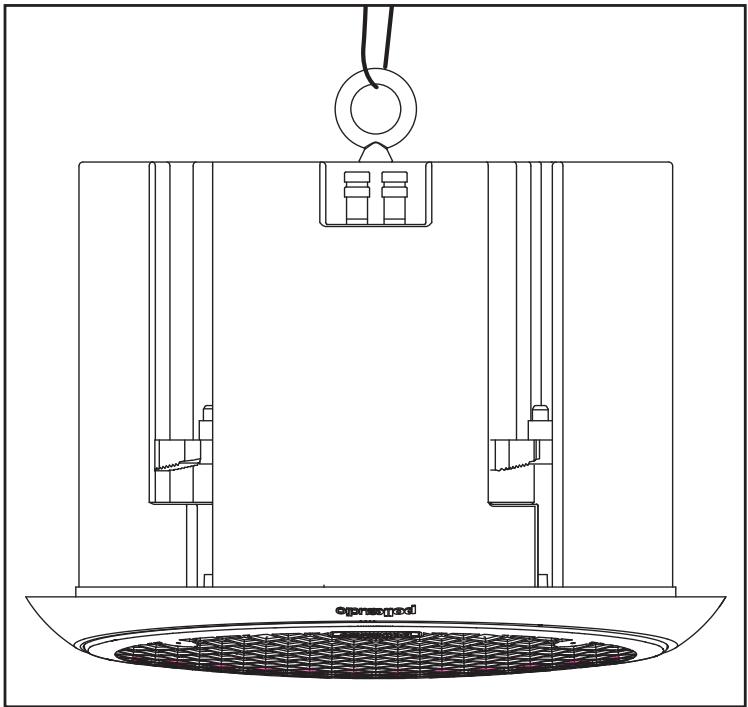
Important note:
The RTS100 comes with an eye-bolt, which must be installed before locating the speaker in a ceiling. Use an appropriate length and weight of wire when installing an RTS100 in a ceiling.
PORTUGUES
INSTRUÇÉS DE SEGURANÇA IMPORTANTES LER ANTÉS DE USAR O EQUIPAMENTO
TYPE DE CÂBLE: RECOMMANDATIONS
14^ (35,56 cm)
SYTÉME « STUD-LOCK MOUNTING™» (VENDU SÉPARÉMENT)
Polk Audio loudspeakers and subwoofer are capable of playing at extremely high volume levels, which could cause serious or permanent hearing damage. Polk Audio, Inc. accepts no liability for hearing loss, bodily injury or property damage resulting from the misuse of its products.
Keep these guidelines in mind and always use your own good judgment when controlling volume:
-
You should limit prolonged exposure to volumes that exceed 85 decibels(dB).
-
High volume in an automobile can hinder your ability to safely operate a vehicle.
-
You are responsible for knowing the local laws governing acceptable mobile volume levels
For more about safe volume levels, go to: www.polkaudio.com/education/article/SPL/.
Or refer to the Occupational Health and Safety Administration (OSHA) guidelines at:
www.oshagov/dts/osta/otm/noise/standards_more.html
AVERTISSEMENT: ÉCOUTEZ BIEN
Polk Audio, Inc., warrants to the original retail purchaser only. This warranty will terminate automatically prior to its stated expiration if the original retail purchaser sells or transfers the Product to any other party.
Polk Audio, Inc., warrants, to the original retail purchaser only, that the LC;IP Speaker on this Polk Audio Loudspeaker Product will be free from defects in material and workmanship for a period of five (5) years from the date of original retail purchase from a Polk Audio Authorized Dealer.
Furthermore, Polk Audio, Inc., warrants, to the original retail purchaser only, that any AMPLIFIER OR OTHER ELECTRONIC COMPONENT that may be included in this Polk Audio Loudspeaker Product will be free from defects in material and workmanship for a period of three (3) years years from the date of original retail purchase from a Polk Audio Authorized Dealer.
To allow Polk Audio to offer the best possible warranty service, please register your new product online at: www.polkaudio.com/registration or call Polk customer service 800-377-7655 in the USA and Canada (outside the USA: 410-358-3600) within ten (10) days of the date of original purchase. Be sure to keep your original purchase receipt.
Defective Products must be shipped, together with proof of purchase, prepaid insured to the Polk Audio Authorized Dealer from whom you purchased the Product, or to the Factory at 2550 Britannia Boulevard, Suite A, San Diego, California 92154. Products must be shipped in the original shipping container or its equivalent; in any case the risk of loss or damage in transit is to be borne by you. If upon examination at the Factory or Polk Audio Authorized Dealer it is determined that the unit was defective in materials or workmanship at any time during this Warranty period, Polk Audio or the Polk Audio Authorized Dealer will, at its option, repair or replace this Product at no additional charge, except as set forth below. All replaced parts and Products become the property of Polk Audio. Products replaced or repaired under this warranty will be returned to you, within a reasonable time, freight prepaid.
This warranty does not include service or parts to repair damage caused by accident, disaster, misuse, abuse, negligence, inadequate packing or shipping procedures, commercial use, voltage inputs in excess of the rated maximum of the unit, cosmetic appearance of cabinry not directly attributable to defect in materials or workmanship, or service, repair, or modification of the Product which has not been authorized or approved by Polk Audio. This warranty shall terminate if the Serial number on the Product has been removed, tampered with or defaced.
This warranty is in lieu of all other expressed Warranties. If this Product is defective in materials or workmanship as warranted above, your sole remedy shall be repair or replacement as provided above. In no event will Polk Audio, Inc. be liable to you for any incidental or consequential damages arising out of the use or inability to use the Product, even if Polk Audio, Inc. or a Polk Audio Authorized Dealer has been advised of the possibility of such damages, or for any claim by any other party. Some states do not allow the exclusion or limitation of consequential damages, so the above limitation and exclusion may not apply to you.
All implied warranties on this Product are limited to the duration of this expressed Warranty. Some states do not allow limitation on how long an implied Warranty lasts, so the above limitations may not apply to you. This Warranty gives you specific legal rights, and you also may have other rights which vary from state to state.
This Warranty applies only to Products purchased in Canada, the United States of America, its possessions, and U.S. and NATO armed forces exchanges and audio clubs.
The Warranty terms and conditions applicable to Products purchased in other countries are available from the Polk Audio Authorized Distributors in such countries.
GARANTIE LIMITEE
San Diego, California 92154.
The THX® logo is a trademark of THX® Ltd. which may be registered in some jurisdictions. All rights reserved.
"Polk Audio" is a trademark of Britannia Investment Corporation.