
FMJ AVR600 - AV amplifier ARCAM - Free user manual and instructions
Find the device manual for free FMJ AVR600 ARCAM in PDF.
| Product type | Audio-video amplifier |
| Brand | ARCAM |
| Model | FMJ AVR600 |
| Category | Audio-video amplifier |
| Insulation class | Class II (double insulation) |
| Power supply | Mains 100-240 V AC, 50/60 Hz |
| Main functions | Multichannel audio and video amplification, surround decoding |
| Maintenance and cleaning | Soft, damp, lint-free cloth. No solvent. |
| Safety precautions | Do not open the casing. Avoid moisture and rain. |
| Technical service | Entrust any repair to qualified personnel. |
| Standards | Compliant with EN60065 and FCC Part 15 |
| Mains protection | Rear switch for isolation |
| Warning | Do not expose to rain or moisture |
| Spare parts | Contact authorized dealer |
| General information | 68-page manual downloadable in PDF |
| Climatic conditions | Operation in moderate climate |
| Speaker cables | Use Class II cables (no grounding) |
| Ventilation | Do not block openings, avoid unstable surfaces |
| Suspicious odor | Disconnect immediately and contact dealer |
Frequently Asked Questions - FMJ AVR600 ARCAM
User questions about FMJ AVR600 ARCAM
0 question about this device. Answer the ones you know or ask your own.
Ask a new question about this device
Download the instructions for your AV amplifier in PDF format for free! Find your manual FMJ AVR600 - ARCAM and take your electronic device back in hand. On this page are published all the documents necessary for the use of your device. FMJ AVR600 by ARCAM.
USER MANUAL FMJ AVR600 ARCAM
HANDBOOK AVR surround amplifier


CAUTION
RISK OF ELECTRIC SHOCK DO NOT OPEN
ATTENTION
RISQUE DE CHOC ELECTRIQUE NE PASOUVIR

CAUTION: To reduce the risk of electric shock, do not remove cover (or back). No user serviceable parts inside. Refer servicing to qualified service personnel.
WARNING: To reduce the risk of fire or electric shock, do not expose this apparatus to rain or moisture.

The lightning flash with an arrowhead symbol within an equilateral triangle, is intended to alert the user to the presence of uninsulated 'dangerous voltage' within the product's enclosure that may be of sufficient magnitude to constitute a risk of electric shock to persons.

The exclamation point within an equilateral triangle is intended to alert the user to the presence of important operating and maintenance (servicing) instructions in the literature accompanying the product.
CAUTION: In Canada and the USA, to prevent electric shock, match the wide blade of the plug to the wide slot in the socket and insert the plug fully into the socket.
Class II product

This equipment is a Class II or double insulated electrical appliance. It has been designed in such a way that it does not require a safety connection to electrical earth ('ground' in the U.S.).
Many of these items are common sense precautions but, for your own safety and to ensure that you do not damage the unit, we recommend that you read them.
Important safety instructions
This product is designed and manufactured to meet strict quality and safety standards. However, you should be aware of the following installation and operation precautions.
1. Take heed of warnings and instructions
You should read all the safety and operating instructions before operating this equipment. Retain this handbook for future reference and adhere to all warnings in the handbook or on the equipment.
2. Water and moisture
The presence of electricity near water can be dangerous. Do not use the equipment near water - for example next to a bathtub, washbowl, kitchen sink, in a wet basement or near a swimming pool, etc.
3. Object or liquid entry
Take care that objects do not fall and liquids are not spilled into the enclosure through any openings. Liquid-filled objects such as vases should not be placed on the equipment.
4. Placing the equipment
Only use a rack or shelf that is stable and strong enough to support the weight of this equipment.
5. Ventilation
Do not place the equipment on a bed, sofa, rug or similar soft surface, or in an enclosed bookcase or cabinet, since ventilation may be impeded.
6. Heat
Locate the equipment away from naked flames or heat-producing appliances such as radiators, stoves or other appliances that produce heat.
7. Climate
The equipment has been designed for use in moderate climates and in domestic situations. Unplug this equipment during lightning storms to prevent possible damage from a strike or mains surge.
8. Cleaning
Unplug the unit from the mains supply before cleaning. The case should normally only require a wipe with a soft, lint-free cloth. Do not use chemical solvents for cleaning. We do not advise the use of furniture cleaning sprays or polishes as they can cause permanent white marks.
9. Power sources
Only connect the equipment to a power supply of the type described in the operating instructions or as marked on the equipment.
The primary method of isolating the equipment from the mains supply is to remove the mains plug. The equipment must be installed in a manner that makes disconnection possible.
10. Power-cord protection
Power supply cords should be routed so that they are not likely to be walked on or pinched by items placed upon or against them. Pay particular attention to the point where they exit from the equipment.
11. Power lines
Locate any outdoor antenna/aerial away from power lines.
12. Speaker connections
Any speakers must be connected to the AVR600 using class II wire (i.e. no connection to Earth should be made). Failure to observe this precaution may cause the unit to become damaged.
13. Non-use periods
If the equipment is not being used for an extended period, we recommend that you unplug the power cord of the equipment from the outlet, to save power.
14. Abnormal smell
If an abnormal smell or smoke is detected from the equipment, turn the power off immediately and unplug the equipment from the wall outlet. Contact your dealer and do not reconnect the equipment.
15. Servicing
You should not attempt to service the equipment. Contact your dealer to arrange servicing.
16. Damage requiring service
The equipment should be serviced by qualified service personnel when:
A. the power-supply cord or the plug has been damaged, or
B. objects have fallen into, or liquid has spilled into the equipment, or
C. the equipment has been exposed to rain, or
D. the equipment does not appear to operate normally or exhibits a marked change in performance, or
E. the equipment has been dropped or the enclosure damaged.
Safety compliance
This equipment has been designed to meet the IEC/EN 60065 international electrical safety standard.
This device complies with Part 15 of the FCC Rules. Operation is subject to the following two conditions:
(1) This device may not cause harmful interference, and
(2) this device must accept any interference received, including interference that may cause undesired operation.


CAUTION
RISK OF ELECTRIC SHOCK DO NOT OPEN
ATTENTION
RISQUE DE CHOC ELECTRIQUE NE PASOUVIR

safety guidelines. E-2
welcome. E-3
before you begin... .E-4
rear panel connectors.. E-7
audio/video connections..E-8
Connection guide.. E-12
radio connectors. E-14
other connectors.. E-16
speakers. E-18
operation. E-20
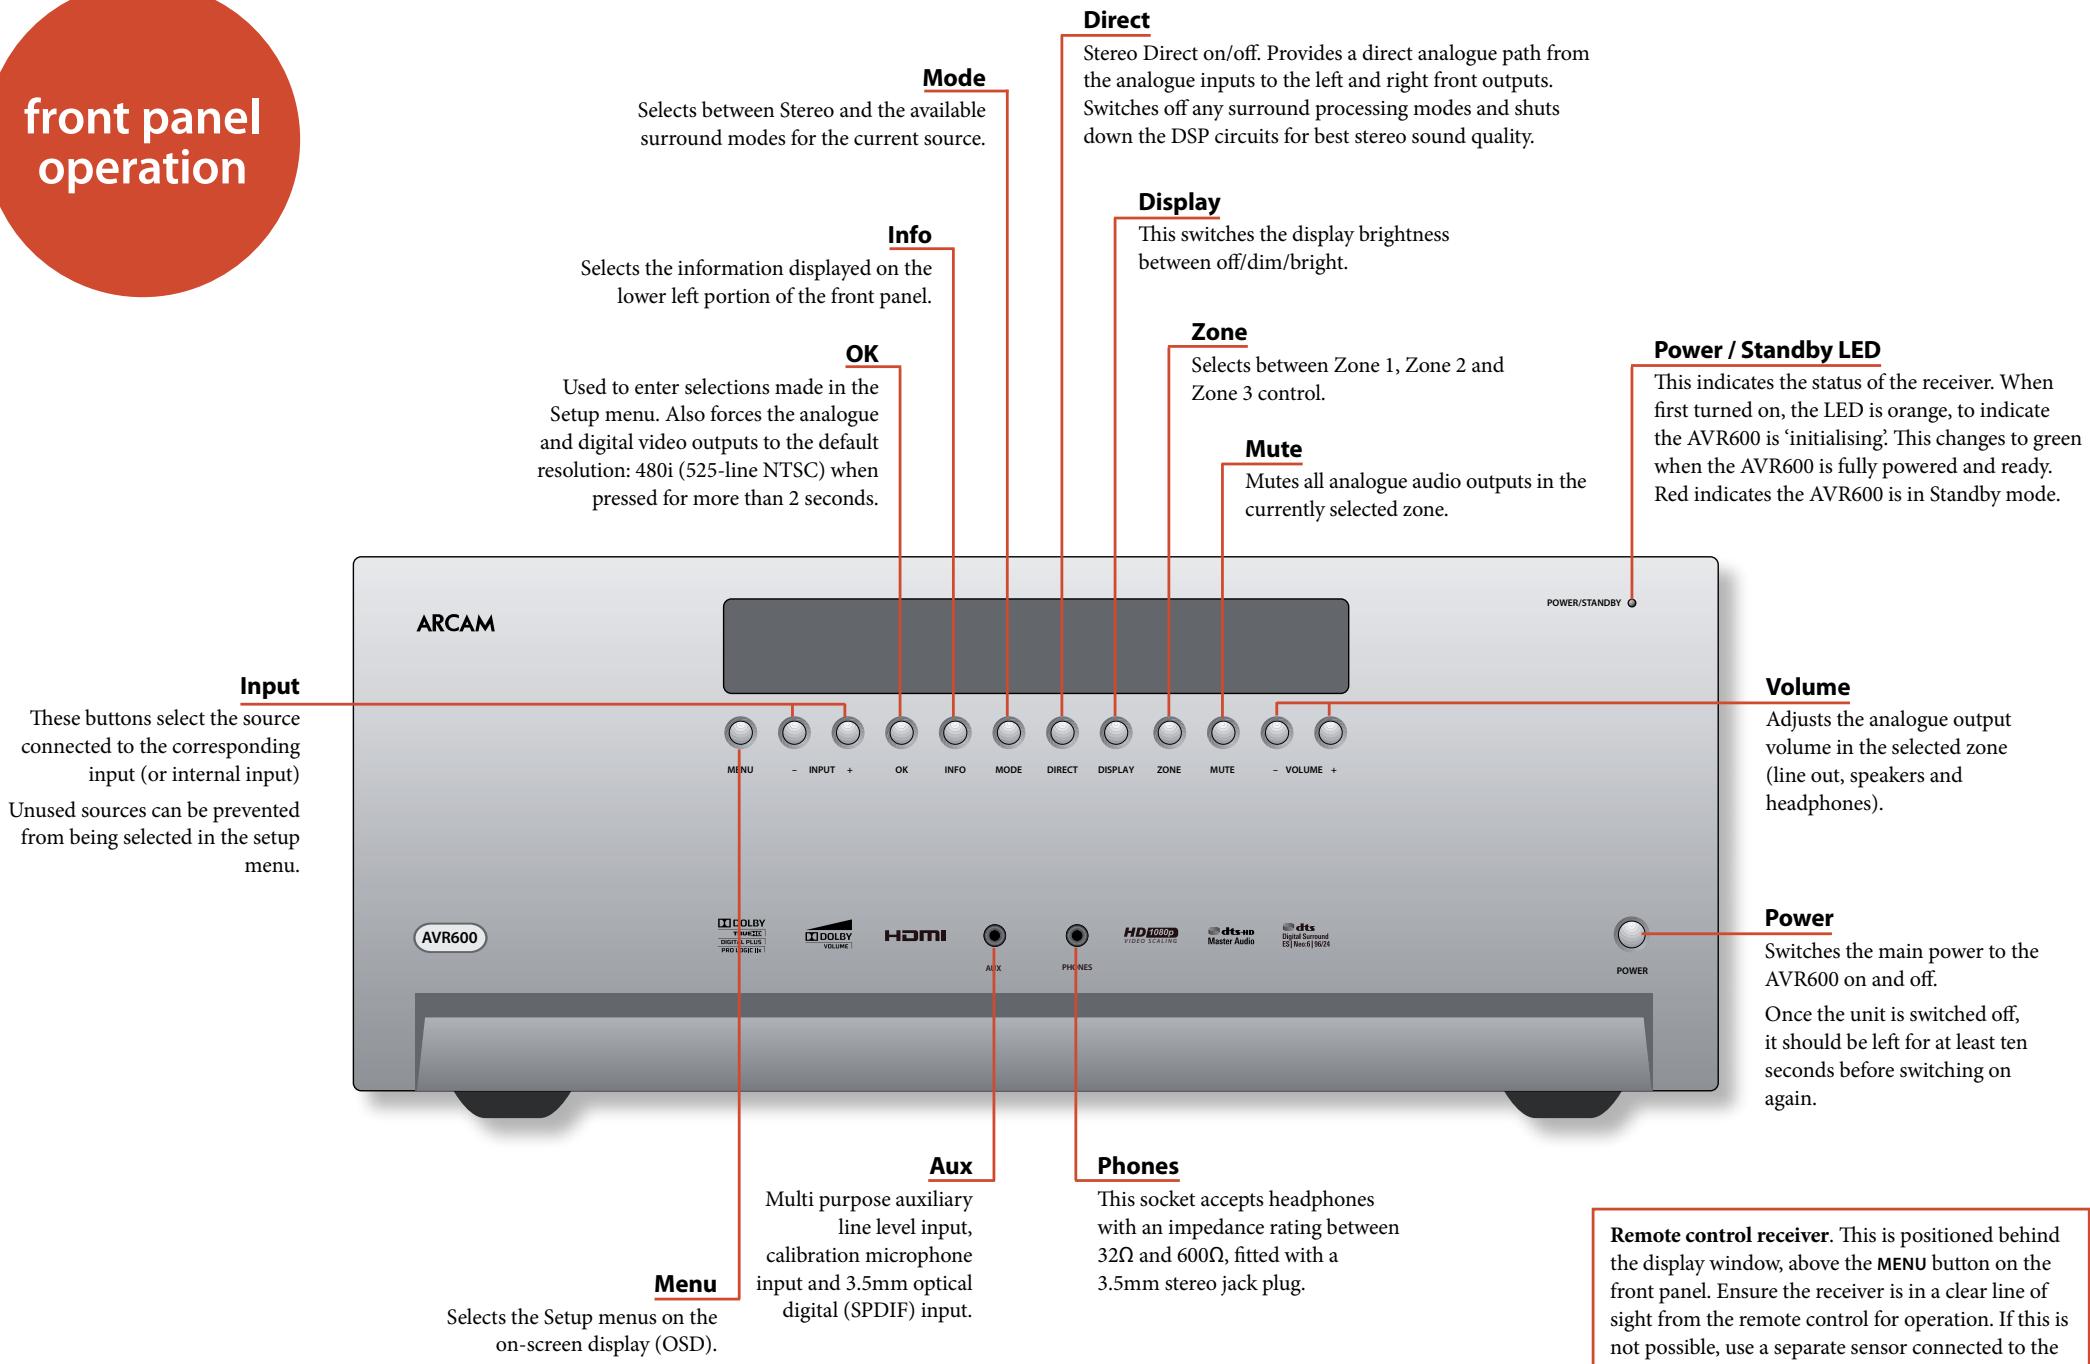
front panel operation. E-22
remote control. E-23
essential setup. E-32
auto speaker setup. E-33
setup menus. E-34
decoding modes. E-40
Dolby volume. E-42
tuner operation. E-44
network/usb operation E-46
external amplifiers. E-47
multi-room set up. E-48
Multi-room connection guide. E-49
customising the CR102. E-50
Command summary.. E-53
Device codes. E-53
troubleshooting. E-54
specifications. E-56
product guarantee E-57
device code tables. 58
Thank you and congratulations for purchasing your Arcam FMJ AVR600 Receiver.
Arcam has been producing specialist audio products of remarkable quality for over three decades and the new AVR600 Receiver is the latest in a long line of award winning Hi-Fi. The design of the FMJ range draws upon all of Arcam's experience as one of the UK's most respected audio companies, to produce Arcam's best performing range of products yet - designed and built to give you years of watching and listening enjoyment.
This handbook is intended to give you a detailed guide to using the AVR600 Receiver. It starts by giving advice on installation, moves on to describe how to use the product and finishes with additional information on the more advanced features. Use the contents list shown on this page to guide you to the section of interest.
We hope that your FMJ receiver will give you years of trouble-free operation. In the unlikely event of any fault, or if you simply require further information about Arcam products, our network of dealers will be happy to help you. Further information can also be found on the Arcam website at www.arcam.co.uk.
The FMJ development team
Professional Installation?
It may be that the AVR600 has been installed and set up as part of your Hi-Fi installation by a qualified Arcam dealer. In this case, you may wish to skip the sections of this handbook dealing with installation and setting up, and move directly to the sections dealing with using the unit. Use the Contents list to guide you to these sections.
DIY setup?
The AVR600 is a powerful and sophisticated piece of AV equipment. If you are setting the unit up yourself, it is recommended that you read this handbook thoroughly before beginning. For instance, correct speaker configuration and placement is a key to getting the most out of your AVR600 and making sure that all the elements of your system work in harmony.
before you begin…
The AVR600 is a high-quality and high-performance home-cinema processor and amplifier built to Arcam's quality design and manufacturing standards. It combines digital processing with high-performance audio and video components to bring you an unrivalled home-entertainment centre.
The AVR600 allows switching and control of eight analogue and seven digital sources in addition to internal AM, FM and DAB radio or a SiriusConnect™ Home Tuner input – as well as networked and USB audio sources – making it an ideal hub for both home-cinema and two-channel stereo systems.
Since many of these source components are also capable of generating video signals, the AVR600 includes broadcast-quality switching for HDMI, Composite, S-Video, RGB and Component video signals. There are audio and video outputs for PVR and VCR recording,
as well as two digital outputs for digital recording of digitised audio sources. DVD-Audio and SACD can be connected via the multi-channel input. Control of the AVR600 is either by front panel control buttons, IR remote control or RS232 port.
The CR102 remote control supplied with the AVR600 is an eight-device 'universal' learning remote control which is simple to use, and once set up is able to control a complete system. It can be programmed using its vast internal code library to control CD and DVD players, PVRs, TVs and other devices.
The installation of the AVR600 in a listening room is an important process which requires care at every stage. For this reason, the installation information is very comprehensive and should be followed carefully to achieve an unrivalled level of performance.
The AVR600 receiver is designed to produce a level of performance that will truly bring music and movies to life.
Placing the unit
Place the unit on a level, firm surface, avoiding direct sunlight and sources of heat or damp.
- Do not place the AVR600 on top of a power amplifier or other source of heat.
- Do not place the amplifier in an enclosed space such as a bookcase or closed cabinet unless there is good provision for ventilation. The AVR600 will run warm during normal operation.
- Do not place any other component or item on top of the amplifier as this may obstruct airflow around the heat-sink, causing the amplifier to run hot. (The unit placed on top of the amplifier would become hot, too.)
Make sure the remote-control receiver on the front panel display is unobstructed, otherwise this will impair the use of the remote-control. If line-of-sight is impractical, a remote-control repeater can be used with the rear panel connector (see page 17).
- Do not place your record deck on top of this unit. Record decks are very sensitive to the noise generated by mains power supplies which will be heard as a background 'hum' if the record deck is too close.
Power
The amplifier is supplied with a moulded mains plug already fitted to the lead. Check that the plug supplied fits your supply - should you require a new mains lead, please contact your Arcam dealer.
If your mains supply voltage or mains plug is different, please contact your Arcam dealer immediately.
The AVR600 can be switched for operation between 195-265V (switch position 230V ) and 85-132V (switch position 115V ).
NOTE
Ensure that the AVR600 is switched off and the power lead removed before changing the position of the voltage range switch.
Push the IEC plug end of the power cable into the socket on the back of the amplifier, making sure that it is pushed in firmly. Plug the other end of the cable into your mains socket and, if necessary, switch the socket on.
The AVR600 can be turned on using the POWER switch on the front panel. While switched on, the front panel LED will glow green.
Standby power
The AVR600 can be switched into standby mode using the button on the CR102 remote control. While in standby mode the front panel LED will glow red and power consumption is around 3 watts.
While in Standby mode, it may be possible to hear a slight residual hum coming from the mains transformer inside the amplifier. This is perfectly normal. However, if the unit is to be left unused for an extended period, we recommend that you disconnect it from the mains supply to save power.
Interconnect cables
We recommend the use of high-quality screened cables that are designed for the particular application. Other cables will have different impedance characteristics that will degrade the performance of your system (for example, do not use cabling intended for video use to carry audio signals). All cables should be kept as short as is practically possible.
It is good practice when connecting your equipment to make sure that the mains power-supply cabling is kept as far away as possible from your audio cables. Failure to do so may result in unwanted noise in the audio signals.
For information on speaker cabling, please refer to the 'Speakers' section, beginning on page 18.
Radio interference
The AVR600 is an audio device containing microprocessors and other digital electronics. It has been designed to very high standards of electromagnetic compatibility.
This is a Class A product. In a domestic environment this product may cause radio interference, in which case the user may be required to take adequate measures.
If the AVR600 causes interference to radio or television reception (which can be determined by switching the AVR600 off and on), the following measures should be taken:
Re-orient the receiving antenna or route the antenna cable of the affected receiver as far as possible from AVR600 and its cabling.
Relocate the receiver with respect to the AVR600.
Connect the affected device and the AVR600 to different mains outlets.
If the problem persists, please contact your Arcam dealer.
Trademark acknowledgements
Arcam is a registered trademark of A & R Cambridge Ltd.
| DOLBY VOLUME | Dolby Volume Manufactured under license from Dolby Laboratories. Dolby and the double-D symbol are trademarks of Dolby Laboratories. |
| DOLBY TRUE DIGITAL PLUS PRO LOGIC IIx | Dolby True HD, Digital, Digital Plus, PL IIx Manufactured under license from Dolby Laboratories. Dolby, Pro Logic, and the double-D symbol are trademarks of Dolby Laboratories. |
| dts-hd Master Audio | DTS-HD Master Audio Manufactured under license under U.S. Patent #s: 5,451,942; 5,956,674; 5,974,380; 5,978,762; 6,226,616; 6,487,535; 7,212,872; 7,333,929; 7,392,195; 7,272,567 & other U.S. and worldwide patents issued & pending. DTS is a registered trademark and the DTS logos, Symbol, DTS-HD and DTS-HD Master Audio are trademarks of DTS, Inc. © 1996-2008 DTS, Inc. All Rights Reserved. DTS-HD High Resolution Audio Manufactured under license under U.S. Patent #s: 5,451,942; 5,956,674; 5,974,380; 5,978,762; 6,226,616; 6,487,535; 7,212,872; 7,333,999 & other U.S. and worldwide patents issued & pending. DTS is a registered trademark and the DTS logos, Symbol, DTS-HD, DTS-HD High Resolution Audio and DTS-HD High Res Audio are trademarks of DTS, Inc. © 1996-2008 DTS, Inc. All Rights Reserved. |
| dts Digital Surround ES| Neo:6| 96/24 | DTS Digital Surround ES|Neo:6|96/24 Manufactured under license under U.S. Patent #s: 5,451,942; 5,956,674; 5,974,380; 5,978,762; 6,226,616; 6,487,535; 7,003,467; 7,212,872 & other U.S. and worldwide patents issued & pending. DTS, DTS Digital Surround, ES, and Neo:6 are registered trademarks and the DTS logos, Symbol and DTS 96/24 are trademarks of DTS, Inc. © 1996-2008 DTS, Inc. All Rights Reserved. |
| AAC/AAC Plus aacPlus is a trademark of Coding Technologies. See www.codingtechnologies.com for more information. | |
FLAC
FLAC Decoder Copyright © 2000, 2001, 2002, 2003, 2004, 2005, 2006, 2007, 2008 Josh Coalson
Redistribution and use in source and binary forms, with or without modification, are permitted provided that the following conditions are met:
-
Redistributions of source code must retain the above copyright notice, this list of conditions and the following disclaimer.
-
Redistributions in binary form must reproduce the above copyright notice, this list of conditions and the following disclaimer in the documentation and/or other materials provided with the distribution.
-
Neither the name of the Xiph.org Foundation nor the names of its contributors may be used to endorse or promote products derived from this software without specific prior written permission.
THIS SOFTWARE IS PROVIDED BY THE Copyright HOLDERS AND Contributors "AS IS" AND ANY EXPRESS OR IMPLIED WARRANTY, INCLUDING, BUT NOT LIMITED TO, THE IMPLIED WARRANTY OF MERCHANTABILITY AND FITNESS FOR A PARTICULAR PURPOSE ARE DISCLAIMED. IN NO EVENT SHALL THE FOUNDATION OR COLNTRIBUTORS BE LIABLE FOR ANY DIRECT, INDIRECT, INCIDENTAL, SPECIAL, EXEMPLARY, OR CONSEQUENTIAL DAMAGES (INCLUDING, BUT NOT LIMITED TO, PROCEDURE OF SUBSTITUTE GOODS OR SERVICES; LOSS OF USE, DATA, OR PROFITS; OR BUSINESS INTERRUPTION) HOWEVER CAUSED AND ON ANY THEORY OF LIABILITY, WHETHER IN CONTRACT, STRICT LIABILITY, OR TORT (INCLUDING NEGLIGENCE OR OTHERWISE) ASING IN ANY WAY OUT OF THE USE OF THIS SOFTWARE, EVEN IF ADVISED OF THE POSSIBILITY OF SUCH DAMAGE.
Ogg/Vorbis
Ogg/Vorbis Decoder Copyright © 2002, Xiph.org Foundation
Redistribution and use in source and binary forms, with or without modification, are permitted provided that the following conditions are met:
-
Redistributions of source code must retain the above copyright notice, this list of conditions and the following disclaimer.
-
Redistributions in binary form must reproduce the above copyright notice, this list of conditions and the following disclaimer in the documentation and/or other materials provided with the distribution.
-
Neither the name of the Xiph.org Foundation nor the names of its contributors may be used to endorse or promote products derived from this software without specific prior written permission.
THIS SOFTWARE IS PROVIDED BY THE COPYRIGHT HOLDERS AND Contributors "AS IS" AND ANY EXPRESS OR IMPLIED WARRANTY, INCLUDING, BUT NOT LIMITED TO, THE IMPLIED WARRANTYES OF MERCHANTABILITY AND FITNESS FOR A PARTICULAR PURPOSE ARE DISCLAIMED. IN NO EVENT SHALL THE FOUNDATION OR COLNTRIButors BE LIABLE FOR ANY DIRECT, INDIRECT, INCIDENTAL, SPECIAL, EXEMPLARY, OR CONSEQUENTIAL DAMAGES (INCLUDING, BUT NOT LIMITED TO, PROCEDURE OF SUBSTITUTE GOODS OR SERVICES; LOSS OF USE, DATA, OR PROFITS; OR BUSINESS INTERRUPTION) HOWEVER CAUSED AND ON ANY THEORY OF LIABILITY, WHETHER IN CONTRACT, STRICT LIABILITY, OR TORT (INCLUDING NEIGHENCE OR OTHERWISE) ASING IN ANY WAY OUT OF THE USE OF THIS SOFTWARE, EVEN IF ADVISED OF THE POSSIBILITY OF SUCH DAMAGE.
| WMA & Microsoft DRM10 | This product is protected by certain intellectual property rights of Microsoft Corporation. Use or distribution of such technology outside of this product is prohibited without a license from Microsoft or an authorized Microsoft subsidiary Content providers are using the digital rights management technology for Windows Media contained in this device (“WM-DRM”) to protect the integrity of their content (“Secure Content”) so that their intellectual property, including copyright, in such content is not misappropriated. This device uses WM-DRM software to play Secure Content (“WM-DRM Software”). If the security of the WM-DRM Software in this device has been compromised, owners of Secure Content (“Secure Content Owners”) may request that Microsoft revoke the WM-DRM Software's right to acquire new licenses to copy, display and/or play Secure Content. Revocation does not alter the WM-DRM Software's ability to play unprotected content. A list of revoked WM-DRM Software is sent to your device whenever you download a license for Secure Content from the Internet or from a PC. Microsoft may, in conjunction with such license, also download revocation lists onto your device on behalf of Secure Content Owners. |
| vTuner | This product is protected by certain intellectual property rights of NEMS and BridgeCo. Use or distribution of such technology outside of this product is prohibited without a license from NEMS and BridgeCo or an authorized subsidiary. |
| MP3 | MPEG Layer-3 audio decoding technology licensed from Fraunhofer IIS and Thomson multimedia |
| iPod | iPod is a trademark of Apple Inc., registered in the US and other countries. |
| Sirius | SiriusConnectTM, channel names and logos and related marks are trademarks of SIRIUS XM Radio Inc. |
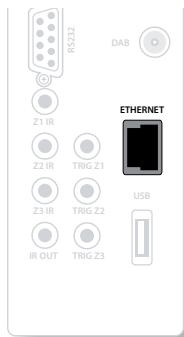
rear panel connectors
NOTE
Please read the 'Placing the unit', 'Power' and 'Interconnect cables' sections on page 5 before connecting up your AVR600 integrated amplifier!

Before connecting your AVR600 to your source components and speakers, please read through the next few pages which will explain all the input and output connectivity that is available. The 'Speakers' section explains how to connect up your speakers to avoid damage to the amplifier and how to arrange your speakers for best performance.
General
The inputs are named to make it easier to reference connected devices (e.g. 'DVD' or 'VCR'). They all have the same input circuit (with the exception of the 'PHONO' input), so there is no reason why you should not connect a different device to any of the inputs. For example, if you had two DVD players and the AV input was not being used, then the second DVD player could be connected to the AV input.
When connecting a video source, its audio must be connected to the corresponding sockets. For example, if you a had a satellite decoder plugged into a SAT video input, the audio must be connected to the SAT audio inputs!
The hierarchy for video connections for best quality is as follows;
HDMI
Component/RGB
S-Video
Composite.
You should connect as many of these as possible. The AVR600 will automatically select the best quality connection for the source available. For any video source to be available in Zone 2 you must have an S-Video or Composite connection between AVR600 and the source.
Making connections
- Wherever possible, connect both the analogue and digital outputs of digital sources. This enables use of a digital input for the main zone and the corresponding analogue input for recording onto an analogue tape deck, VCR or PVR, or for the Zone 2 or 3 output.
Take care to place cables as far from any power supply cabling as is practicable, to reduce hum and other noise problems.
Important notes about Component/RGB video inputs and outputs
When you connect your devices to these connectors, take care to follow the letter/colour coding for each input. No damage will occur but incorrectly coloured or unstable pictures will result.
The Component video inputs have sufficient bandwidth for NTSC (525/60) or PAL (625/50) video and HDTV video signals.

HDMI connectors
AV, SAT, DVD, VCR, PVR
Connect the HDMI video outputs of your source equipment to these corresponding HDMI inputs.
OUT1
Connect this output to the HDMI video input of your main zone display device.
OUT2
Connect this output to the HDMI video input of your second display device or to another HDMI display device in a second living space. As the AVR600 has only one processed video path, this signal will be a copy of the signal on OUT 1.
NOTE
All Zone 1 analogue video outputs will be disabled if an HDMI digital video source is selected.
Zone 3 connectors
Z3 OUT
Connect these analogue audio outputs to your Zone 3 equipment. See 'Multi-room Setup' on page 48 for information.
Component/RGB video connectors
These inputs are suitable for connection to source devices which output Component (YUV or YPbPr) or RGB high quality analogue video signals. These
signals are usually available from DVD players, set-top boxes or games consoles.
If you are connecting up to an RGB source you will also need to connect the source's Composite output to the AVR600 Composite input to act as a video sync. The Composite signal should be on the same named input as the RGB signals.
RGB video outputs on source equipment are often on SCART connectors. You will need to use a SCART to 'RGB+Sync on phono' breakout cable, available from your Arcam dealer.
NOTE
When setting up the AVR600 menus (later in this manual), you will need to select whether the three-wire high quality video input is Component or RGB for each input. This is done on the 'HQ Video In' line in the Input Config menu. Failure to do this can result in a green looking picture or a picture that is unstable.
AV, DVD, SAT, VCR, PVR
Connect the Component video outputs of your source equipment to these inputs.
OUT
Connect this output to the Component video input of your display device.
NOTE
Analogue RGB video output is not available from the AVR600. The analogue three-wire high quality video output is always configured as Component video.
Zone 2 connectors
Connect these analogue audio and video outputs to your Zone 2 equipment. See 'Multi-room Setup' on page 48 for information.
S-Video and Composite connectors
AV, DVD, SAT, VCR, PVR
Connect these inputs to the S-Video and Composite outputs
of your available source equipment.
VCROUT, PVROUT,
These are recording outputs. Connect these to the 'S-Video in' or 'Composite in' sockets (usually labelled 'RECORD') on your recording device.
MAIN OUT
Connect this output to the S-Video or Composite sockets on your primary Zone 1 display.
Digital audio connectors
TAPE, CD, AV, DVD, SAT, VCR, PVR
Connect these inputs to the digital outputs of your available source equipment.
copy of the incoming digital signal. For example, for a 5.1 digital source, the digital output will also be in 5.1 format.
When an analogue-only source is selected, this is digitized by the AVR600 and routed to the digital outputs.
These outputs are muted if a source is selected where the HDMI connection is used and is transmitting HD audio. The digital audio from the HDMI link will not be routed to these outputs.
Phono
This input can be connected directly to a record deck which has a direct output from a moving magnet (MM) cartridge.
MCH input
This multi-channel analogue audio input can be connected to a source device which outputs surround sound on its analogue outputs. Such devices typically include DVD-Audio and SACD players. This input does not pass through any of the audio processing in the AVR600, therefore functions such as speaker size and distance from
the listening position should be copied from the AVR600 Setup menus into the Setup menus of your multi-channel source. Note however that speaker level trims are applied to the MCH input on the AVR600. Therefore speaker level trim settings on multichannel source equipment should be left unset at zero.
Analogue pre-amplifier outputs
All pre-amplifier analogue outputs are buffered, have a low output impedance, are at line level and follow the Zone 1 volume control setting. They are able to drive long cables or several inputs in parallel if required.
For more information on connecting speakers or additional power amplifiers, see page 18 and 47.

Analogue audio inputs
TAPE, CD, AV, DVD, SAT, VCR, PVR
Connect the left and right inputs to the left and right outputs of your source equipment.
Analogue record outputs
VCROUT,PVROUT,TAPEOUT
Connect the left and right outputs to the left and right input sockets of your cassette
deck, PVR or VCR (usually labelled 'RECORD'). The PVR and VCR connectors may be used for a second and third cassette deck. These outputs are fixed at full line level.
Front panel AUX input
The front panel AUX input can be used as an analogue or optical digital input.
For analogue sources, use a stereo 3.5mm lead; for digital sources use a 3.5mm optical lead. The front input is also used for the auto-setup microphone input.
Front panel PHONES socket
This socket accepts headphones with an impedance rating between 32 and 600 , fitted with a 3.5mm stereo jack plug. The headphone socket is always active, except when AVR600 is muted.
When the headphone jack is inserted, the speaker outputs and analogue pre-amplifier outputs are automatically muted.
Connection guide
DVD player
The diagram shows how to make audio and video connections from a typical DVD player.
The preferred video hook-up, in order of preference is:
- use the HDMI connector (if HDMI output is provided by the player), otherwise connect the three Component or four RGB+Sync video connectors.
- use the S-Video connection if HDMI or Component /RGB+Sync outputs are not provided by your player.
- use the Composite connection if HDMI, Component/RGB+Sync or S-Video are not provided by your player.
In each case, connect the video inputs labelled DVD on the AVR600.
The preferred audio hook-up is using the coaxial digital connector (usually marked DIGITAL AUDIO OUT), in addition to the coaxial analogue outputs for left and right channels.
In each case, use the audio inputs labelled DVD on the AVR600.
Satellite receiver
A satellite receiver is connected in the same way as a DVD player, with the same order of preference according to the outputs provided by the satellite receiver.
In each case, use the inputs labelled SAT on the AVR600. Note that digital audio input from a satellite receiver sometimes requires a coaxial/TOSLINK (digital connector) interconnect cable, as some satellite receivers do not implement audio over HDMI properly or at all.
CD player
Connect the digital audio output (if provided by the CD player) to the digital CD input of the AVR600, using a high quality coaxial interconnect cable.
Connect the right and left analogue audio outputs of the CD player to the analogue CD inputs of the AVR600, using a pair of high quality coaxial interconnect cables.
Connecting an iPod using the Arcam rDock
The combination of the AVR600 and Arcam's optional rDock or rLead accessory provides a great platform for your iPod.
Connect the rDock as shown, power on the rDock, slot in your iPod and select iPod as the source.
Navigating through music and podcasts on your iPod is simple using the CR102 remote, with text appearing on the AVR600 display.
More information is given in the rDock quick start guide (or rLead quick start guide) supplied with these accessory units.

Aerial connectors
The AVR600 is fitted with an AM/FM receiver module and Sirius connector or a DAB/FM receiver, depending on the region where it was sold. The type of aerial you need depends on your listening preferences and the local conditions.
Your AVR600 is capable of superb radio reception, but only if it is receiving a good quality transmission signal. Try the aerials supplied with your unit. If you are in a medium to strong signal area, these should be adequate for good reception. In areas with poor signal strength, you may require a roof or loft mounted aerial.
Contact your local Arcam dealer or aerial installation experts for advice about local reception conditions.

DAB
(where fitted)
In strong signal areas,
the DAB "T" ribbon aerial supplied can be used with reasonable results. Mount the aerial as high up as possible on a wall.
In the UK the "T"-elements need to be positioned vertically for DAB reception since broadcasts are vertically polarised. In other localities, check with your Arcam dealer or try both horizontal and vertical reception.
Try each usable wall of the room to see which gives best reception and use tacks or adhesive tape to secure the aerial in a 'T' shape, but note that no tacks should come into contact with the internal wire of the aerial.
When installed and receiving DAB, check the signal strength by pressing the front panel or remote control's INFO button until the signal quality indicator is displayed.
In weak signal areas, a high-gain, externally-mounted or roof-mounted aerial is desirable in order to receive the highest number of services.
In Band III transmission areas (such as the UK), use a multi-element Yagi aerial with the elements mounted vertically, as the transmissions are vertically polarised. If you are close to more than one transmitter, use an omnidirectional or folded dipole aerial.
If the DAB services in your area are transmitted on L-band, then ask your dealer for advice for the best aerial to use.
Sirius
(where fitted)
Sirius Satellite Radio is a subscription radio service available in North America.
For more information, visit www.sirius.com or contact dealer (USA and Canada or
The AVR600 is designed for use with the 'SiriusConnect™ Home
Tuner' package which should be connected via the cable supplied in that package to the Sirius socket.
NOTE
The AVR600 provides power for the Sirius receiver, so an external power supply is not needed.
FM
Connecting an aerial

A suitable FM aerial must be connected to the AVR600 before FM radio can be received.
In strong signal areas, the FM ribbon aerial supplied can be used with reasonable results. Mount this as high up as possible on a wall with the top of the "T"-elements positioned
vertically or horizontally, depending on the reception in your area. Try each usable wall of the room to see which gives best reception and use tacks or adhesive tape to secure the aerial, but note that no tacks should come into contact with the internal wire of the aerial.
When installed and receiving FM radio, check the signal strength by pressing the front panel or remote control's INFO button until the signal indicator is displayed.
In weak signal areas, or for optimal FM radio reception, a roof- or loft-mounted aerial is advised as this will give superior reception.
In some areas, cable radio may be available or, in an apartment building, a distributed aerial system may be installed. In either of these cases you should have sockets in your home marked FM or VHF (do not use those marked TV); these should be connected to the FM coaxial connector on the rear of the AVR600.
AM
Connecting an aerial
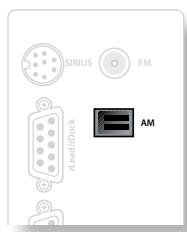
An AM aerial is required to receive AM/medium wave radio signals, so a simple loop aerial is supplied with the AVR600. Follow the assembly instructions in the diagram below.
Make sure that the aerial is positioned well away from the AVR600 itself, TVs, computers
and other sources of RF 'interference'. Rotate the aerial to discover which position gives the best reception.
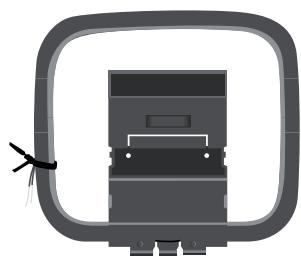
- Release the tie-wrap and unwind the twisted lead. Fold the plastic stand forward through the loop frame.

- Push the tab into the open slot in the base of the stand. Press until the tab clicks home.

- Connect the lead wires to the AM socket at the rear of the AVR600 (the wires are not polarised). Rotate the aerial's stand until you obtain the best reception.
Data connectors
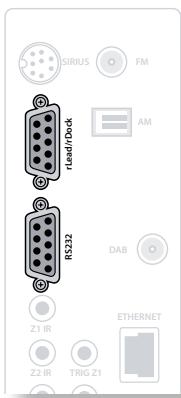
rLead/rDock
For use with an Arcam rLead or rDock accessory. See page 13 and the accessory documentation for details.
RS232 serial connector
Use with control devices having an RS232 serial port (for example, Crestron and AMX touch screen controllers). This connection is also used for upgrading the AVR600's internal software.
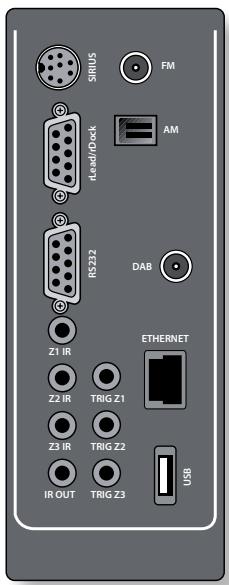
Network connectors
This section deals with installation of the unit into an existing home network. For information on how to use the AVR600's network features, the USB socket, and for a list of supported file types, refer to page 46.
Networking is a large subject and only the briefest guidelines are presented in this handbook. Please contact your Arcam dealer or specialist installer for more information about introducing the AVR600 into your computer network.
Ethernet
If an Ethernet cable is connected, the AVR600 will automatically attempt to connect to your network.
You should use CAT5 cable plugged into the RJ45 socket labelled ETHERNET on the rear panel.
If your network uses static IP addressing rather than DHCP, you will need to provide any gateway, DNS and proxy information. See page 39 for information on setting up the network.
USB connector
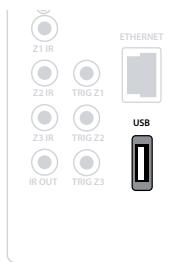
The AVR600 can play files stored on a USB mass storage device, typically a pen drive, but any USB device that complies with the 'mass storage device' class is compatible.
The AVR600 only supports the direct connection of USB devices and will not support devices connected through a hub. If
regular access to the USB socket is required, you may find it convenient to use a USB extension lead.
See page 46 for details of supported file types.
Trigger connectors
The trigger connectors (TRIG Z1, TRIG Z2 and TRIG Z3) provide an electrical signal whenever the AVR600 is switched on and the relevant zone enabled.
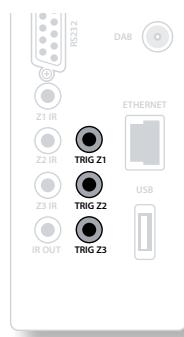
The trigger signal can be used to switch on and off compatible pieces of home entertainment equipment, for example, you could set up a trigger to turn on your television and DVD player whenever the AVR600 was switched on.
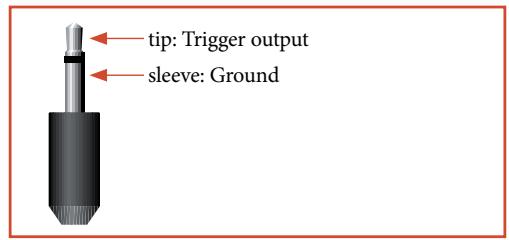
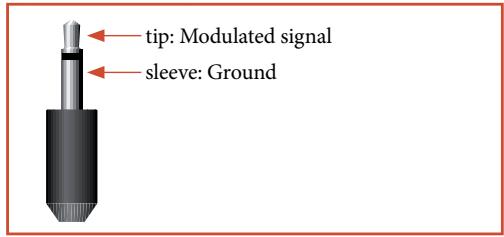
There are three trigger output sockets on the AVR600, each capable of outputting a 12V, 70mA switching signal. The
socket is designed for mono 3.5mm jacks: tip is the trigger output, sleeve is ground.
TRIG Z1
Use for remotely turning on and off power amps or source equipment for Zone 1. On = 12V Off = 0V
TRIG Z2
Use for remotely turning on and off power amps or source equipment for Zone 2. On = 12V Off = 0V
TRIG Z3
Use for remotely turning on and off power amps or source equipment for Zone 3. On = 12V Off = 0V
NOTE
Sockets with the prefix 'Z2' or 'Z3' refer to connections used in multi-room installation. For more information on these connectors, see page 48.
Infra-red (IR) connectors
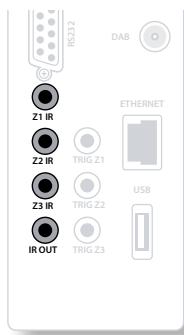
The infra-red inputs (Z1 IR, Z2 IR and Z3 IR) allow the connection of external IR receivers, either when the AVR600 front panel IR receiver is fully or partially obstructed or to allow the use of a remote control in Zone 2 or Zone 3.
There are three IR inputs on the AVR600, each designed for stereo or mono 3.5mm jacks. Tip is the modulated signal, sleeve is ground.
Z1IR
This input is intended for use with a local IR receiver when the front panel of the AVR600 is blocked.
Connecting an IR receiver to Z1 IR will disable to front panel IR receiver to prevent problems with multiple commands if the front panel IR receiver is only partially obstructed.
Z2IR
This input is intended for use with an IR receiver in Zone 2 to allow remote control of AVR600 from a second room.
Z3IR
This input is intended for use with an IR receiver in Zone 3 to allow remote control of AVR600 from a third room.
IROUT
This output is an electrical combination of the Z1 (or front panel) +Z2 + Z3 infra-red signals above. It can be used to drive external IR emitters or can be connected directly to other Arcam equipment which have an IR input. This function can be useful as an IR 'repeater' so that someone in any of the zones can control the functions of a CD player in the main zone, for example. Tip is the modulated electrical IR signal, sleeve is ground.
A supplier of infra-red receivers and emitter accessories and systems is Xantech. See www.xantech.com for more information, or ask your Arcam dealer.
NOTE
The IR inputs on the AVR600 are designed for modulated signals. If the external IR receiver demodulates the IR signal, it will not work. Also the AVR600 does not provide power for external receivers on the IR jack, therefore an external power source will be required.
speakers
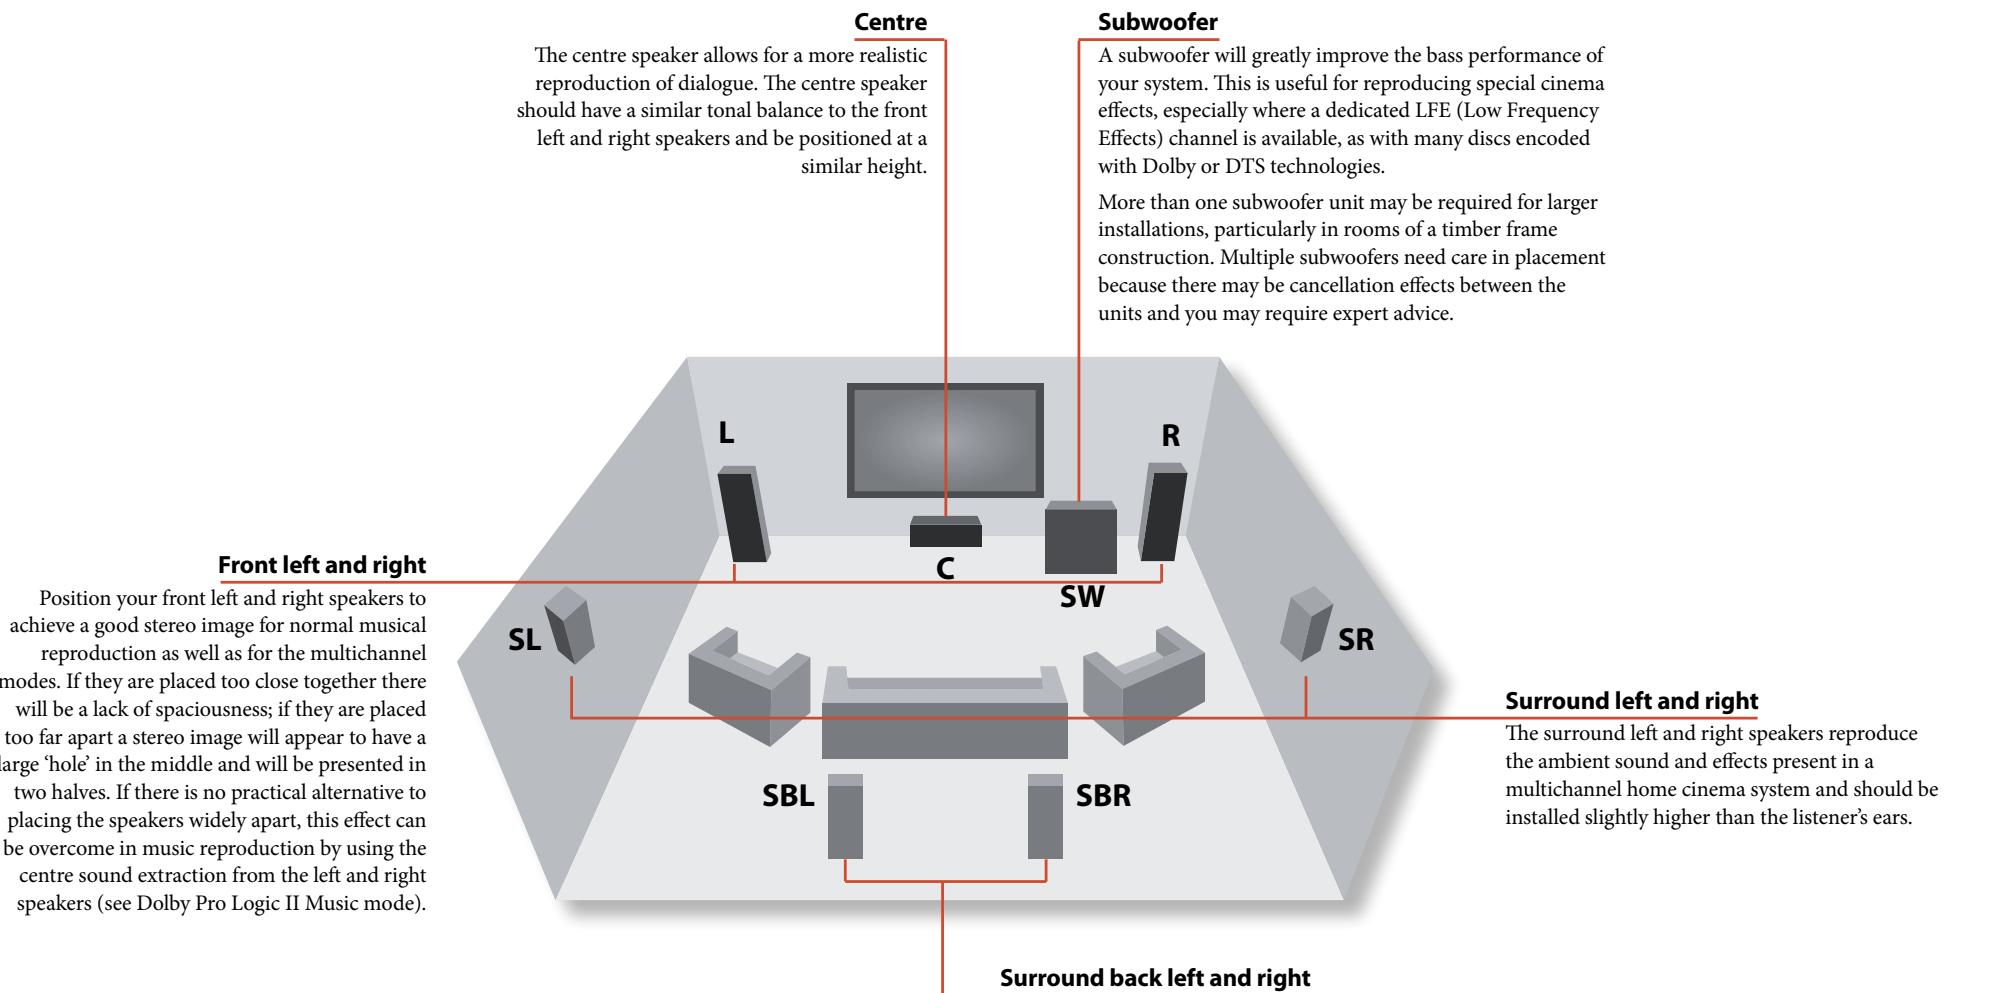
The AVR600 allows you to connect up to seven speakers and three active subwoofoers in the main system. The output channels correspond to speakers installed in the front left, centre, front right, surround left, surround right, surround back left, surround back right and an active subwoofer.
The configuration and placement of your speakers is very important. All speakers, with the exception of the subwoofer, should be arranged around your normal viewing/listening position. The subwoofer should be placed in a position which gives an even frequency response in all listening positions. Incorrect placement leads to bass boom in some areas. Often the only way to find a good position for your subwoofer is by experimentation. A good place to start experimenting is close to a wall but at least 1m away from any corners. You can also consult your subwoofer handbook for placement suggestions.
Connecting speakers
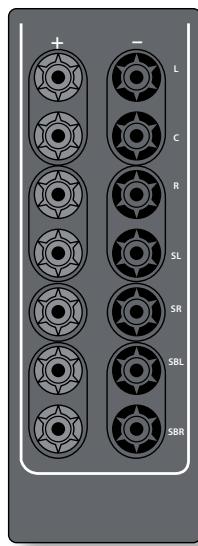
To connect each of the speakers, unscrew the corresponding terminals on the back of the AVR600, insert the speaker wires through the hole in each post and screw the terminals back up. Make sure that the red (positive/+) terminal of the speaker is connected to the red (positive/+) terminal on the back panel, and the black (negative/-) terminal of the speaker is connected to the black (negative/-) terminal on the back panel.
It is important that no stray strands of wire from these connections are allowed to touch another cable or the product casing. Failure to
ensure this can cause a short circuit and damage your AVR600.
Do not over-tighten the loudspeaker terminals, or use a wrench, pliers, etc., as this could damage the terminals and this would not be covered under the product's warranty.
Connecting subwoofoers
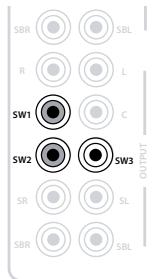
The AVR600 also allows up to three active subwoofoers to be connected to the SW1, SW2 or SW3 outputs.
See your subwoofer handbook for the correct setting up and connection for your particular subwoofer.
Speaker cables
The speakers should be connected to the amplifier using good-quality, high-purity, low impedance copper cables. Cheap speaker cables should be avoided - they are a false economy and can significantly degrade the sound quality.
The cable runs to the speakers should be as short as practicable. Connections to the speaker terminals should always be finger tight, whether using bare wires or spade connectors.
Surround back left and right
The surround back left and right speakers are used to add extra depth and better sound localisation and should be installed approximately one metre higher than the listener's ears. Place the two surround back speakers such that there is an arc of approximately 150 degrees between each surround back speaker and the centre speaker. The surround back speakers should face the front of the room as shown in the diagram to provide the largest 'sweet spot'.
Single surround back centre speaker
It is also possible to use a single surround back speaker positioned centrally behind the listening position instead of two. In this case connect it to the SBL speaker output. Follow the instructions in the 'Spkr Types' section of the Setup Menus for how to configure the AVR600 for this setup.

Operating your AVR600
For information display we recommend you use the OSD (On-Screen Display) on your display device whenever possible.
Switching on
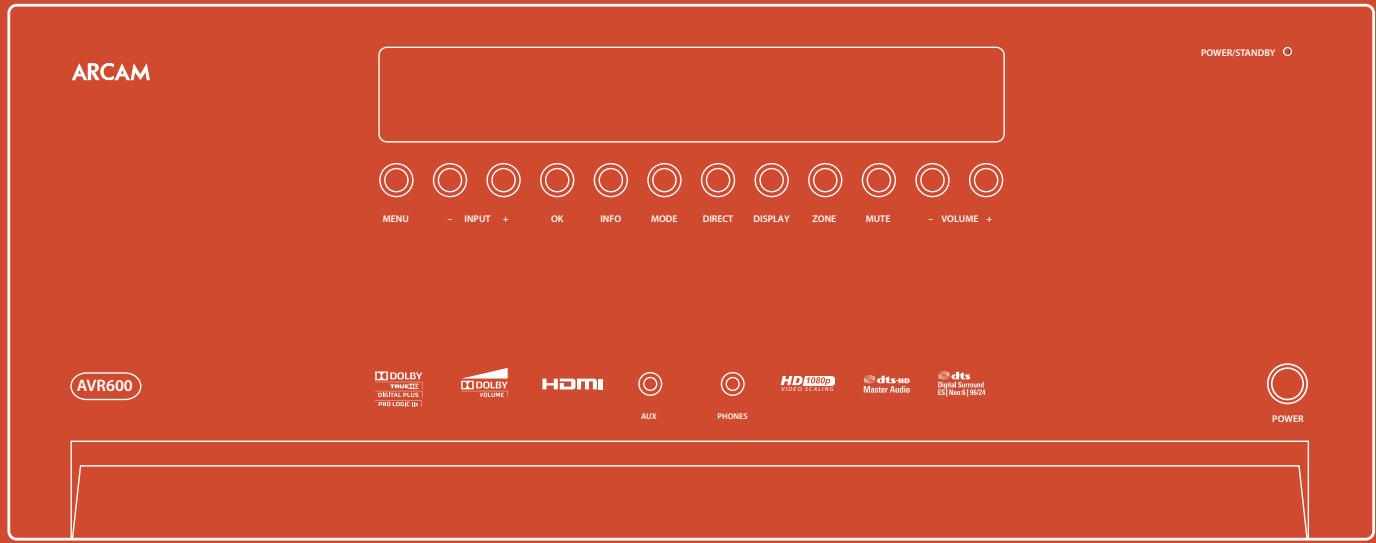
Press the front panel power button in. The power LED will glow orange, the front display shows the word 'ARCM', followed by the volume setting and the name of the selected input. After initialization is complete, the power LED changes colour to green.
Please wait until the unit has finished initialising before operating the AVR600. It is recommended that if the unit is switched off, you should wait at least 10 seconds before switching the unit back on.
Standby
The AVR600 has a standby mode which can be entered by pressing STANDBY on the remote control. When in standby mode, the display is blank and the POWER LED glows red.
While in Standby mode, it may be possible to hear a slight residual hum coming from the mains transformer inside the amplifier. This is perfectly normal. However, if the unit is to be left unused for an extended period, we recommend that you disconnect it from the mains supply to save power.
To switch on from standby
Press the STANDBY button on the remote control or any key on the front panel (other than the power button).
Front panel display
The AVR600 is ready for use after about four seconds.
DVD
Dolby Digital
70.0
The display window shows the currently selected source and the last selected information view setting (this information line can be changed using the INFO button).
The active zones (Z1, Z2 or Z3) are highlighted - the example screen above shows that only Z1 (i.e. Zone1) is active. The current volume setting (70.0dB in the above example) is also displayed.
Selecting a source
To select a particular source, press the -INPUT or INPUT + buttons until that source is shown on the front panel display, or (if available) press the corresponding source button on the remote. The following sources are available:
| CD | Compact Disc player input |
| AV | Audio-Visual input |
| DVD | DVD player input |
| SAT | Satellite receiver input |
| VCR | Video Cassette Recorder input |
| PVR | Personal Video Recorder input |
| PHONO | Phono (MM cartridge) input |
| MCH | Selects MCH (multi-channel) analogue input |
| TAPE | Audio only tape deck input |
| AUX | Auxiliary (front panel) input |
| AM/FM | Internal tuner input |
| DAB* | Internal tuner input |
| NET | Internal (Ethernet) and external USB solid-state device (e.g. pen drive) input. |
| SIRIUS* | Requires an external receiver - see www.sirius.com for more information |
| IPOD | Requires an iPod® and Arcam rDock or rLead. |
| *These sources are market dependent and may not be available on your AVR600 | |
Upon selecting a source, the AVR600 will normally select an active digital input in preference to an analogue input. If you want to override the digital input and select the analogue input, press and hold the source button for at least two seconds. Some inputs (AM/FM, PHONO, MCH, SIRIUS, IPOD) do not have a digital input.
The processing mode and Stereo Direct functions are remembered and recalled for each individual input.
The MCH input is intended for direct analogue pass-through of DVD Audio or SACD sources. Apart from volume control and level trim, no processing modes are possible on this input, including AVR600 bass management and delays. Please set bass management, speaker size and speaker delays in the source player. You can copy the distances and relative speaker levels from the Setup menus in the AVR600.
Tape operation
Three analogue audio outputs are provided for recording, VCR, PVR and TAPE OUT. The selected analogue input are routed to each of these outputs.
If the VCR input is selected, the VCR OUT output is muted to prevent feedback loops in recording equipment. Similarly the PVR OUT and TAPE OUT outputs are muted when their respective inputs are selected to prevent feedback.
VCR operation
Two outputs are provided for recording (Composite and S-Video only), VCR and PVROUT. The selected video input is routed to each of these outputs.
Stereo Direct
To listen to a pure analogue stereo input, press the DIRECT button. The Stereo Direct mode automatically bypasses all processing and any surround functions. In direct mode, digital processing is shut down to improve the sound quality and reduces digital noise with the AVR600 to an absolute minimum.
Note: when Stereo Direct mode is selected, no digital output is available and no bass management is performed, meaning that bass signals will not be redirected to a subwoofer.
Volume control
It is important to realise that the level of the volume indicator is not an accurate indication of the power delivered to your loudspeakers. The AVR600 often delivers its full output power long before the volume control reaches its maximum position, particularly when listening to heavily recorded music. In comparison, some movie sound tracks can appear very quiet, as many directors like to keep maximum levels in reserve for special effect sequences.
Headphones
To use headphones with the AVR600, plug the headphones into the PHONES socket in the centre of the front panel.
When headphones are plugged into the front panel PHONES socket, the outputs for Zone 1 are muted and the audio will be down-mixed to two channels (2.0). The two-channel down-mix is required so that the centre channel and surround information can be heard via the headphones.
Using Zone 2 and 3
Zone 2 provides the option for the occupants of the master bedroom, conservatory, kitchen, etc. to view or listen to a different source at a different volume level from the main zone (Zone 1).
Zone 3 provides for a third living space to have a copy of the audio signal in Zone 2 at a different volume level.
Extended front panel menu
Pressing the MENU key and holding it for longer than four seconds will bring up the Extended Menu, allowing you to perform the following:
Restore to factory defaults
This option allows you to restore all settings on your AVR600 to the defaults that it left the factory with. Note that this also erases any secure backups stored on the AVR600.
Change remote code
The default RC5 system code the AVR600 responds to is 16. If required, for example due to another device in your system also using this RC5 system code, it can be changed to 19.
Updating firmware using a PC
Using a PC application (available on request from Arcam), you can update the firmware in your AVR600 using the back panel RS232 port connected to your PC.
front panel operation
remote control
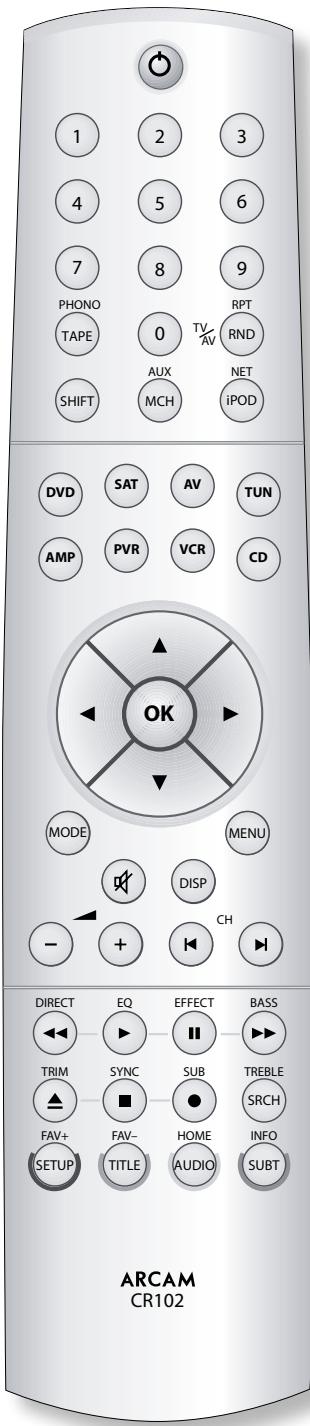
The CR102 universal remote controller
The CR102 is a sophisticated 'universal' backlit remote control that can control up to eight devices. It is preprogrammed for use with the AVR600 and many other Arcam products (FM/DAB tuners, CD players and DVD players).
With its extensive built-in library of codes, it can also be used with thousands of third party audio-visual components - TVs, satellite and set-top boxes, PVRs, CD players, etc. See the list of codes at the back of this handbook, beginning on page 58.
The CR102 is a 'learning' remote, so you can teach it almost any function from an old single-device remote. You can also program the CR102 to issue a sequence of commands ('macros') from a single button press.
Using the remote control
Please keep in mind the following when using the remote control:
Ensure there are no obstacles between the remote control and the remote sensor on the AVR600. The remote has a range of about 7 metres. (If the remote sensor is obscured, the Z1 IR remote control input jack on the rear panel is available. Please consult your dealer for further information.)
Remote operation may become unreliable if strong sunlight or fluorescent light is shining on the remote sensor of the AVR600.
- Replace the batteries when you notice a reduction in the operating range of the remote control.
Inserting batteries into the remote control

- Open the battery compartment by pressing the button on the back of the handset.
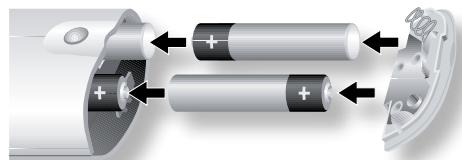
- Insert four 'AAA' batteries into the battery compartment - two facing the top of the unit, and two facing the end, as in the diagram.
- Lower the end cap onto the plastic locating plate in the handset. This acts as a hinge, and you can now push the end cap firmly into its locked position with a click.
Notes on batteries:
Incorrect use of batteries can result in hazards such as leakage and bursting.
Do not mix old and new batteries together.
- Do not use non-identical batteries together - although they may look similar, different batteries may have different voltages.
Ensure the plus (+) and minus (-) ends of each battery match the indications in the battery compartment.
Remove batteries from equipment that is not going to be used for a month or more.
- When disposing of used batteries, please comply with governmental or local regulations that apply in your country or area.
Useful information
Backlight
A blue backlight comes on for five seconds whenever a key is pressed. This helps you use the handset in subdued lighting conditions. It may be possible to hear a quiet tone being emitted from the remote control when the backlight is on. This is perfectly normal.
Power LED blinks
Short blinks indicate a valid key press.
Multiple short blinks convey information (such as a device code) or signal the beginning and successful completion of a programming sequence.
Long blinks indicate an invalid key press or entry. The symbol _^ is used in the manual to indicate a power LED blink.
Timeouts and unassigned keys
Time out - After 10 seconds the CR102 exits the programming state and returns to normal operation. Stuck key timeout - After any key is pressed continuously for 30 seconds, the CR102 stops sending IR transmission to conserve battery life. The CR102 remains off until all keys are released.
Unassigned keys - the CR102 ignores any unassigned key presses for a particular Device Mode and does not transmit IR.
Low voltage indicator
When the batteries are running down, the IR transmit indicator on the CD102 (the LED under the Power button) flashes five times whenever you press a button:

If this happens, please fit four new AAA alkaline batteries as soon as possible.
Device Mode / Source keys
As the CR102 can control your AVR600 as well as a range of other equipment, many of the buttons have more than one function depending on the 'device mode' selected on the remote control.
The Device Mode keys (shown below) select the source on the AVR600. If one of these keys is pressed briefly, a command is transmitted to change the source on the AVR600. Also the functionality of the remote control changes to operate the selected source device. it's like having eight different remotes in your hand!
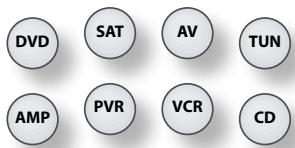
| DVD | DVD player |
| SAT | Satellite set-top box |
| AV | Audio-visual sound input (use with TV) |
| TUN | DAB, Sirius, FM or AM tuner |
| AMP | Controls the amplifier and setup features of the AVR600 |
| AUX | Auxiliary input, or an iPod® via an Arcam rDock or rLead |
| PVR | Personal Video Recorder (or Digital Video Recorder) |
| CD | Compact Disc player |
If you press and hold a Device Mode key for about four seconds, you change the Device Mode of the CR102 without changing the signal source on the AVR600. This can also be done by pressing (Shift) followed by a Device Mode key (within two seconds). These two methods allow you to change which device the CR102 controls without also changing the AVR600 source, allowing uninterrupted listening.
Each Device Mode changes the behaviour of many of the CR102 keys to control the source device appropriately. For example:
In CD mode plays the previous CD track.
In AV mode issues the TV 'channel down' command.
The CR102 remains in the last selected Device Mode so it is not necessary to press a Device Mode key before every command key if all you are doing is playing or skipping tracks on a CD, for example.
Navigation keys

The Navigation keys steer the cursor in Setup menus or on-screen menus. They also replicate the navigation functions of original remotes supplied with other home entertainment devices in your system. OK confirms a setting.
Volume control
By default, the CR102 is set up so that the volume control buttons always control the volume of the AVR600, regardless of which Device Mode the remote is currently set for. This is known as volume 'punch through'.
For example, if you are listening to a CD, you will probably have the CR102 in CD Device Mode to control the CD player. You can use the volume controls on the remote directly to adjust the volume of the AVR600 without first having to press the AMPP to put the remote into AMP Device Mode. The volume buttons 'punch through' the CD Device Mode on the remote to the AMP Device Mode. Volume 'punch through' can be disabled individually for any Device Mode if desired.
The CR102 complies with Part 15 of the FCC rules
This equipment has been tested and found to comply with the limits for a class B digital device, pursuant to part 15 of the FCC Rules. These limits are designed to provide a reasonable protection against harmful interference in a residential installation. This equipment generates, uses, and can radiated radio frequency energy and if not installed and used in accordance with the instructions, may cause harmful interference to radio communications. However, there is no guarantee that interference will not occur in a particular installation. If this equipment does cause harmful interference to radio or television reception, which can be determined by turning the equipment off and on, the user is encouraged to try to correct the interference by one or more of the following measures:
Reorient or relocate the receiving antenna.
Increase the separation between the equipment and receiver.
Connect the equipment into an outlet or a circuit different from that to which the receiver is connected.
Consult the dealer or an experienced radio/TV technician for help.
Controlling other devices
Method 1 (Direct code setup)
This section describes the simplest (preferred) way to program the CR102's Device Mode keys to control the non-Arcam devices in your system.
Some of the modes are locked to Arcam operation but can be unlocked if required (see page 52).
AMP mode only controls Arcam equipment.
| DVD mode | Locked |
| SAT mode | Unlocked |
| AV mode | Unlocked |
| TUN mode | Locked |
| AUX mode | Locked |
| VCR mode | Unlocked |
| CD mode | Locked |
Here is a specific example of how to program the key to control an Addison television. The principles for controlling other devices are exactly the same.
- Make sure your device is switched on (not just on standby).
- Find the correct Device Code table (e.g. TV) for the type of device you want to control from the CR102.
- Find the row containing the codes for the manufacturer of your device (e.g. Addison) (page 58). The most popular code is listed first.
- Press the appropriate Device Mode key (e.g. ) on the CR102.
- Press and hold (Shift) until the red Power LED blinks twice: (It actually blinks once when you press the key, then twice after about three seconds).
- Enter the first four-digit device code using the number keys. The power key blinks twice:
- Aim the CR102 at the device and press . If the device switches off, the setup is complete.
- Turn your device back on and test all the CR102's functions to ensure they are working properly.
- Important! Write your device code down on the right hand side of the page so you can remember it if you ever reset the CR102.
What if I still can't control my device?
If your device doesn't respond, repeat the above steps until one of the device codes listed for your brand works.
If none of the codes listed for your brand operates your device, or if your brand is not listed at all, try the Library Search Method described in the next section.
Notes:
Some codes are quite similar. If your device does not respond or is not functioning properly with one of the codes, try another code listed under your brand.
If your device's original remote control does not have a (POWER) key, press instead of when setting up your device.
Remember to press the corresponding device key before operating your device.
Many TVs do not switch on pressing. Please try pressing a number key ('channel select') to switch your TV back on.
To search for the code for another device follow the instructions above, but press the appropriate device key instead of () during step 2.
Method 2 (Library search)
This section describes another way to program the CR102 to control third-party equipment.
Library Search allows you to scan through all the codes contained in the CR102's memory. It can take a lot longer than the previous method, so only use this method if:
- Your device does not respond to the CR102 after you have tried all the codes listed for your brand.
- Your brand is not listed at all in the Device Code tables.
Example: To search for a TV code
- Switch your TV on (not standby) and aim the CR102 at it.
- Press on your CR102.
- Press and hold (Shift) until the power LED blinks twice.
- Press ⑨ ①. The power LED key blinks twice:
- Press
- Aim the CR102 at your Television and press repeatedly until your Television turns off.
Every time you press the CR102 sends out a POWER signal from the next code contained in its memory. In the worst case, you may have to press this key up to 150 times, so patience is required! If you skip past a code, step back by pressing. Remember to keep pointing the CR102 at your Television while pressing this key. - As soon as your television turns off, press SHIFT to store the code.
Notes:
Many TVs do not switch on by pressing . Try pressing a number key ('channel select') to switch your TV back on.
If you cannot control your Television properly, please continue the Search Method: you may be using the wrong code.
To search for the code for another device follow the instructions above, but press the appropriate Device Mode key instead of during step 2.
If your device's original remote control does not have a (STANDBY) key, press instead during step 5.
Code blink-back
Once you have set up your CR102, you can blink back your device set-up codes for future reference.
Example: To blink back your Television code
- Press the appropriate Device Mode key (e.g. (AV) once.
- Press and hold SHIF until the red Power LED blinks twice (It actually blinks once when you press the key, then twice after about three seconds).
- Press ⑨ ⑨ ⑩. The key blinks twice.
- For the first digit of your four-digit code, press 1 and count all the red blinks. If there are no blinks, the digit is '0'.
- For the second, third and fourth digits, repeat the previous step, pressing ② ③ or ④ in order.
Now you have the four-digit code.
Make a note of the codes
Write down the codes for your devices in the boxes below for future reference.
| Device | Code |
| 1 | |
| 2 | |
| 3 | |
| 4 | |
| 5 | |
| 6 | |
| 7 | |
| 8 |

AMP Device Mode
The M P Device Mode button configures the CR102 to control the AVR600. Pressing this button does not affect the currently selected input on the AVR600.
IMPORTANT: The CR102 must also be in AMP Device Mode to control the following sources: PHONO, MCH (multi-channel analogue), AUX, NET (optional network audio), USB, IPOD (for use with the optional Arcam rLead or rDock).
However to control the internal Tuner (AM/FM/DAB or Sirius if fitted) the CR102 must first be in TUN Device Mode (see later).
The functionality of the CR102 is context sensitive for the internal sources and is described in the following table.
| Single press - Toggles AVR600 power between standby and on in the current zone (zone in which the command is received). Press and hold - Forces all AVR600 zones into standby, regardless of which zone the command was received in. | |
| The number keys can be used for source selection (without changing the CR102 Device Mode). Alternatively the Device Mode buttons can also be used with the SHIFT key. ① SAT (satellite) input ① PHONO input ② AV input ③ TUNER input ④ DVD input ⑤ TAPE input ⑥ VCR input ⑦ CD input ⑧ AUX (front panel) input ⑨ MCH (multichannel) input | |
| PHONO TAPE | Selects Tape input on the AVR600 SHIFT + TAPE selects PHONO input on the AVR600 |
| RPT RND | (for IPOD and NET sources) |
| SHIFT | Modifies many keys (see individual key descriptions below). |
| AUX MCH | Selects MCH (multichannel) input on the AVR600 SHIFT + MCH selects AUX input on the AVR600 |
| NET IPOD | Selects IPOD input on the AVR600 SHIFT + IPOD selects network (NET) internal input on the AVR600 |
| OK ON | Navigate menus OK confirms a setting (equivalent to 'Enter' or 'Select' on some remote controls) Press and hold OK to force the analogue and digital video outputs to the default resolution: 480i (525-line NTSC). SHIFT + OK decreases the picture resolution. SHIFT + OK increases the picture resolution. SHIFT + OK turns current zone (in which command is received) on SHIFT + OK turns current zone (in which command is received) off. |
| MODE | Cycles through the available surround and downmix modes. |
| MENUS | Displays the AVR600 setup menu on the On Screen Display (see page 34). |
| DISP | Cycles through the front panel display's brightness options |
| OK | Toggles the mute function of the AVR600 |
| Track control for IPOD and NET sources)SHIFT + Follow Zone1 source.When the command is received in Zone2 or Zone3, the source for that zone follows whatever input source is selected in Zone1 | |
| Decrease (-) and increase (+) AVR600 volume | |
| DIRECT | Stereo direct on/off. Provides a direct analogue path from the analogue inputs to the left and right front outputs. Switches off any surround processing modes and shuts down the DSP circuits for the best stereo sound quality. |
| EQ | Displays the room EQ settings menu |
| EFFECT | (for IPOD and NET sources) |
| BASS | Calls up a pop-up (and front screen) to adjust the bass setting for a particular input. |
| TRIM | Brings up the speaker trim menu.Use the , , and navigation buttons. Press TRIM again to exit the speaker trim menu.As this is a temporary adjustment, these additional trim levels are reset to zero when the unit is turned off or the selected input is changed, but are retained if the unit is put into standby. These temporary trim levels are independent of the speaker levels found in the setup menu. |
| SYNC | Delays may be introduced into the video signal by video processing which causes a mismatch between the audio and video timing. You will notice this by speech sound being out of synchronization with the lip movements in the video. To compensate for this, you can adjust the lip sync delay. Press the SYNC button and use the ④ and ⑥ navigation buttons. Press again to exit the lip sync trim menu. |
| SUB | Brings up the subwoofer trim menu. Use the ⑧ and ⑨ navigation buttons. Press SUB again to exit the sub trim menu |
| TREBLE | Calls up a pop-up (and front screen) to adjust the treble setting for a particular input. |
| SRCH | |
| FAV+ | (for IPOD and NET sources) |
| SETUP | |
| FAV- | (for IPOD and NET sources) |
| TITLE | |
| HOME | (for IPOD and NET sources) |
| AUDIO | |
| INFO | Cycles through the information displayed on the lower left portion of the front panel display. |
| SUBT |
iPod commands
The iPod interface is selected by pressing (iPod) in AMP Device Mode on the CR102. When connected to an iPod via an optional rLead/rDock, the keys below are used to navigate music files in AMP Device Mode.

Navigate the files on screen.
OK selects/play the highlighted file.
RPT

Toggles random (shuffle) play of the playlist
on and off.
SHIFT + (ND) cycles through the repeat options

Selects the previous/next track in the current playlist

Begins or resumes playback at the currently highlighted track

Toggles pause and playback of the current track

Stops playback
Network commands
The AVR600 Network client is selected by pressing + in AMP Device Mode on the CR102.
When using the network client, the keys below are used to navigate music files in AMP Device Mode.
| OK RND | Navigate the files and menus on the screen. OK selects the highlighted file or enters the highlighted menu on the screen |
| RPT | Toggles random ('shuffle') play of the playlist on and offSHIFT + RND cycles through the repeat options |
| RND | Selects the previous/next track in the current playlist |
| EQ | Begins or resumes playback at the currently highlighted track |
| EFFECT | Toggles pause and playback of current track |
| II | |
| SYNC | Stops playback |
| FAV+ | Adds the currently displayed file or radio station to favourites list when using the network client |
| SETUP | |
| FAV-TITLE | Removes the currently displayed file or radio station from favourites list when using the network client |
| HOME | Returns navigation to the top level of the music files structure ('Home') |
| AUDIO | |
| INFO | Cycles through the information displayed on the lower left portion of the front panel display |
| SUBT |
TUN TUN Device Mode
The TUN Device Mode button configures the CR102 to control the tuner functions of the AVR600. Pressing this button also selects TUNER as the source.
When switching to TUNER from a different source, the AVR600 enters the last used tuner band, be it AM / FM / DAB (if fitted) / Sirius (if fitted). Further presses of the TUN Device Mode button cycle through the available tuner bands.
Further information on the tuner can be found in the 'Tuner Operation' section on page 44.
| (0) | (not used) |
| ①...⑨ | Number keypad used to store and recall presets |
| ▲▲ | Allows selection of previously stored Tuner presets. |
| ▲▲ | AM/FM Tuner: allows frequency tuning. DAB/Sirius Tuner (where fitted): scrolls through the channel list. |
| OK | Selects (tunes to) the currently displayed preset, or selects the currently displayed DAB or Sirius channel (or category) when strolling through the channel (or genre) list. |
| SETUP | Page up to the previous 10 presets on screen |
| TITLE | Page down to the next 10 tuner presets on screen |
| AUDIO | Delete the currently highlighted preset. |
DVD Device Mode
The Device Mode button configures the CR102 to control the DVD functions of Arcam DVD players, although this can be changed (see page 25). Pressing this button also selects DVD as the AVR600 source.
| 0...9 | Toggles power between standby and on |
| 0...9 | Searches for and plays the track corresponding to the key pressed |
| PHONO | Selects Tape input on the AVR600. |
| TAPE | SHIFT + TAPE selects PHONO input on the AVR600 |
| RPT | Toggles random ('shuffle') play on and off. |
| RND | SHIFT + RND cycles through the repeat options (track, disc, etc) |
| SHIFT | Modifies many keys (see individual key descriptions, below) |
| AUX | Selects multichannel (MCH) input on the AVR600 |
| MCH | SHIFT + MCH selects AUX input on the AVR600 |
| NET | Selects IPOD input on the AVR600. |
| IPOD | SHIFT + IPOD selects network (NET) internal input on the AVR600 |
| OK | Navigate setup and DVD programme selection menus. |
| OK | OK confirms a setting ('Enter' or 'Select' on some remotes). |
| SHIFT | SHIFT + to switch on from standby |
| SHIFT | SHIFT + to switch to standby from on. |
| MODE | Cycles through available surround sound modes. |
| SHIFT + MODE changes the HDMI setting. | |
| MEM | Activates DVD player menu, if available. |
| DISP | Cycles through the front panel display's brightness options. |
| SHIFT + DISP enables RPT A-B functionality | |
| X | Toggles the mute function. |
| By default this key operates the AVR600 Mute | |
| Press and release to skip back to the beginning of the current/previous track. | |
| Press and release to skip forwards to the beginning of the next track. | |
| → + | Decrease (-) and increase (+) AVR600 volume |
| ← | Fast rewind. SHIFT + ← cycles through slow play backwards speeds |
| ► | Starts the playback of a DVD. SHIFT +► cycles through the Angle options on an Arcam DVD player. |
| II | Pauses DVD play-back. Press ➔ to restart playback. SHIFT + II cycles through Zoom options. |
| ► | Fast forward. SHIFT +► cycles through slow forward speeds |
| TRIM | Ejects disc. SHIFT + ⋆ displays speaker Trim menu on Arcam DVD players. |
| ■ | Stop playback of a DVD |
| ● | Start recording (on products that have this feature). |
| SRCH | Displays Search menu with Title, Track and Time options. |
| FAV+ | Displays Setup menu. SHIFT + SETUP displays programming screen on Arcam DVD players |
| SETUP | Displays Title menu. SHIFT + TITLE clears bookmark, search and program display entries on Arcam DVD players |
| FAV- | Changes Audio decode format (Dolby Digital, DTS, etc.). SHIFT + AUDIO displays the 'Memory' function (Bookmarks) |
| TITLE | Cycles through DVD subtitle language options, if available. SHIFT + SUBT displays STATUS INFO on Arcam DVD players |
| INFO | Cycles through DVD subtitle language options, if available. SHIFT + INFO displays STATUS INFO on Arcam DVD players |

SAT Device Mode
The Device Mode button configures the CR102 to control the functions of a satellite receiver. You will need to configure this Device Mode to work with your equipment. Pressing this button also selects SAT as the AVR600 source.
| ⑤ | Toggles power between standby and on |
| ①...⑨ | Functions as original remote number key. |
| PHONO TAPE | Selects Tape input on the AVR600. SHIFT + TAPE selects PHONO input on the AVR600 |
| TV/AV RND | Toggles between the available inputs on your satellite receiver |
| SHIFT | Modifies many keys (see individual key descriptions, below) |
| AUX MCH | Selects multichannel (MCH) input on the AVR600. SHIFT + MCH selects AUX input on the AVR600. |
| NET IPOD | Selects IPOD input on the AVR600 SHIFT + IPOD selects network (NET) internal input on the AVR600 |
| MODE | Navigate menus. OK confirms a setting (equivalent to 'Enter' or 'Select' on some remotes). |
| MENU | Performs same function as on original remote, if available. |
| DISP | On some Satellite and Cable set top boxes this key functions as the Guide key to open the EPG (Electronic Program Guide). |
| OK | Toggles the mute function. By default this key operates the AVR600 Mute |
| K | Channel down |
| N | Channel up |
| - + | Decrease (-) or increase (+) AVR600 volume |
| ← | Fast rewind |
| → | Starts the playback |
| II | Toggles pause of playback |
| Fast forward |
| (not used) |
| Stop playback |
| Start recording |
| (not used) |
| Duplicates function of RED key for some Satellite and Cable set-top boxes |
| Duplicates function of GREEN key for some Satellite and Cable set-top boxes |
| Duplicates function of YELLOW key for some Satellite and Cable set-top boxes |
| Duplicates function of BLUE key for some Satellite and Cable set-top boxes |

AV Device Mode
The Device Mode button configures the CR102 to control the functions of a television or other display device. You will need to configure this Device Mode to work with your equipment. Pressing this button also selects AV as the AVR600 source.
| 0...9 | Toggles power between standby and on. (Some TVs require you to use a number key to turn them on.) |
| PHONO TAPE | Functions as original remote number key – usually for channel selection. |
| TV/AV RND | Toggles between the available inputs on your display device (e.g. TV/AV) |
| SHIFT | Modifies many keys (see individual key descriptions, below) |
| AUX MCH | Selects multichannel (MCH) input on the AVR600. SHIFT + MCH selects AUX input on the AVR600. |
| OK | Navigate setup and programme selection menus. OK confirms a selection (equivalent to ‘Enter’ or ‘Select’ on some remotes). |
| MODE | EXIT function on some models. |
| MENUL | Functions as original remote key, if available. |
| DISP | Display INFO or OSD (On Screen Display) function, if available. |
| X | Toggles the mute function. By default this key operates the AVR600 Mute |
| K | Channel down |
| K | Channel up |
| - + | Decrease (-) and increase (+) AVR600 volume. |
| < | Toggles TEXT page on/off |
| > | TEXT page off |
| II | Turns Programme-In-Programme (PIP) on, if available |
| → | Activates PIP move, if available |
| ▲ | Activates PIP swap, if available |
| ■ | Activates PIP freeze, if available |
| ● | Activates PIP channel up, if available |
| SRCH | Activates PIP channel down, if available |
| SETUP (RED) | Duplicates function of RED key for Text TV |
| TITLE (GREEN) | Duplicates function of GREEN key for Text TV |
| AUDIO (YELLOW) | Duplicates function of YELLOW key for Text TV |
| SUBT (BLUE) | Duplicates function of BLUE key for Text TV |
The Device Mode button configures the CR102 to control the functions of a video recorder or similar device. You will need to configure this Device Mode to work with your equipment. Pressing this button also selects PVR as the AVR600 source.
| ⑤ | Toggles power between standby and on. |
| 0...9 | Functions as original remote number key. |
| PHONO TAPE | Selects Tape input on AVR600. SHIFT + TAPE selects PHONO input on the AVR600. |
| TV/AV RND | Toggles between available inputs (e.g. AV1, AV2) |
| SHIFT | Modifies many keys (see individual key descriptions, below) |
| AUX MCH | Selects multichannel (MCH) input on AVR600. SHIFT + MCH selects AUX input on the AVR600. |
| NET IPOD | Selects IPOD input on AVR600. SHIFT + IPOD selects network (NET) internal input on the AVR600. |
| OK MODE | Navigate setup and programme selection menus. OK is equivalent to 'Enter' or 'Select' on some remotes. |
| MODE | Operates the Exit function if the PVR uses this feature |
| MENU | Turns on the Menu function if the PVR uses this feature |
| DISP | Toggles display between TV and PVR |
| OK | Toggles the mute function. By default this key operates the AMP Mute |
| K | Channel down |
| H | Channel up |
| - + | Decrease (-) and increase (+) AVR600 volume |
| ← | Fast rewind |
| → | Play |
| II | Toggles pause of playback |
| ▶ | Fast forward |
| ▲ | Operates the Favourites function if the PVR uses this feature. |
| ■ | Stop playback |
| ● | Starts recording |
| SRCH | (not used) |
| SETUP (RED) | Duplicates function of RED key (if used) |
| TITLE (GREEN) | Duplicates function of GREEN key (if used) |
| AUDIO (YELLOW) | Duplicates function of YELLOW key (if used) |
| SUBT (BLUE) | Duplicates function of BLUE key (if used). |
The Device Mode button configures the CR102 to control the functions of a video recorder or similar device. You will need to configure this Device Mode to work with your equipment. Pressing this button also selects VCR as the AVR600 source.
| 0...9 | Functions as original remote number key. |
| PHONO TAPE | Selects Tape input on AVR600. SHIFT + TAPE selects PHONO input on the AVR600. |
| TV/AV RND | Toggles between available inputs (e.g. AV1, AV2) |
| SHIFT | Modifies many keys (see individual key descriptions, below) |
| AUX MCH | Selects multichannel (MCH) input on AVR600. SHIFT + MCH selects AUX input on the AVR600. |
| NET IPOD | Selects IPOD input on AVR600. SHIFT + IPOD selects network (NET) internal input on the AVR600. |
| OK | Navigate setup and programme selection menus. OK is equivalent to 'Enter' or 'Select' on some remotes. |
| MODE | Operates the Exit function if the VCR uses this feature |
| MENU | Turns on the Menu function if the VCR uses this feature |
| DISP | Toggles display between TV and VCR |
| X | Toggles the mute function, if available. By default this key operates the AMP Mute |
| K | Channel down |
| K | Channel up |
| - + | Decrease (-) and increase (+) amplifier volume |
| ← | Fast rewind |
| → | Play |
| II | Toggles pause of playback |
| ▶ | Fast forward |
| ▲ | Ejects tape |
| ■ | Stop playback |
| ● | Starts recording |
| SRCH | (not used) |
| SETUP (RED) | Duplicates function of RED key (if used) |
| TITLE (GREEN) | Duplicates function of GREEN key (if used) |
| AUDIO (YELLOW) | Duplicates function of YELLOW key (if used) |
| SUBT (BLUE) | Duplicates function of BLUE key (if used). |
The Device Mode button configures the CR102 to control the CD functions of Arcam CD players, although this can be changed (see page 25). Pressing this button also selects CD as the AVR600 source.
| Toggles power between standby and on. | |
| 0...9 | Functions as original remote number key. |
| PHONO TAPE | Selects TAPE input on the AVR600. SHIFT + TAPE selects PHONO input on the AVR600. |
| RPT RND | Toggles random ('shuffle') play on and off. SHIFT + RND cycles through the repeat options (track, disc, etc.). |
| SHIFT | Modifies many keys (see individual key descriptions, below) |
| AUX MCH | Selects multichannel (MCH) input on AVR600. SHIFT + MCH selects AUX input on the AVR600. |
| NET IPOD | Selects IPOD input on AVR600. SHIFT + IPOD selects network (NET) internal input on the AVR600. |
| OK OK | Navigates track listings if supported by the player. OK selects the currently highlighted track if supported by the player |
| MODE | Changes the time display modes on Arcam CD player |
| MENU | (not used) |
| DISP | Cycles through the front panel display's brightness options. SHIFT + DISP enables RPT A-B functionality if supported by the player. |
| Toggles the mute function. By default this key operates the AVR600 Mute. | |
| Press and release to skip back to the beginning of the current/previous track. | |
| Press and release to skip forwards to the beginning of the next track. |
| Decrease (-) and increase (+) AVR600 volume. | |
| Fast rewind | |
| Play | |
| Toggles pause of playback | |
| Fast forward | |
| Open/close disc tray | |
| Stop playback | |
| Start recording (on products that have this feature) | |
| Scans first 10 seconds of each track on CD, if supported by the player (Audio search) | |
| Starts Program mode | |
| Cleared programmed item | |
| (not used) | |
| (not used) |
essential setup
Before you use your AVR600 it is essential that you enter some information into the Setup menus about your speaker configuration. This allows the AVR600 to process any surround sound digital source to exactly match your system and give you the ultimate surround sound experience.
There are three pieces of vital information which are outlined in the sections: 'Speaker Types', 'Speaker Distances' and 'Speaker Levels'.
The way you enter this information manually into the AVR600 is given later in the 'Setup Menus' section on page 34. The settings can also be established automatically using the Arcam Auto Speaker Setup function. However it is important to understand why these speaker settings must be entered, which is why this section is presented first.
Speaker types
You need to set the type of speakers that you have connected to your AVR600:
| Large | capable of full frequency range reproduction |
| Small | not capable of full frequency range reproduction at the low frequency end |
| None | speaker not present in your configuration |
The terms 'Large' and 'Small' do not necessarily relate to the physical size of your speakers. As a rule of thumb, if a speaker cannot reproduce a flat frequency response down to about 40Hz (and very few can!) it is often better to consider them as 'Small' for setup purposes of home cinema.
When a speaker is set to 'Small', very low frequency sounds are redirected away from that speaker to a 'Large' speaker or a subwoofer, which are far better suited to reproducing these low frequency sounds.
Note that it is not possible to set all speakers to 'Small' unless there is a subwoofer in your speaker configuration. If you do not have a subwoofer, you will be forced to set your front speakers to 'Large'.
(Advanced users may wish to automatically override the 'Small' speaker setting for purely stereo music listening when not watching movies. This can be achieved in the 'Input Config.' menu - see page 35.)
Single Surround Back speaker
If you have just one Surround Back speaker in your configuration instead of two, ensure it is connected to the SBL speaker connector and set Surr. Back L/R in the Spkr Types menu to either '1 Small' or '1 Large' as appropriate.
Crossover frequency
If you have set any speakers as being Small, then you will be required to set a value for the crossover frequency. This is the frequency below which signals are filtered away from these Small speakers and redirected to Large speakers or the subwoofer (if present). A frequency of 80Hz is often a good starting point, however you will probably have to experiment with different values to find the best value for your system or consult your speaker handbook.
MCH sub level
If a subwoofer is present, this setting allows for a 10dB compensation on the subwoofer output when using the MCH input as required by many DVD-A players with audio outputs.
Use Surround Back channels
If not used in the main zone, it is possible to assign the Surround Back channels to bi-amp the Front Left/Right channels or to provide an amplified output to Zone 2.
Speaker Distances
It is essential for the distance from each speaker to the listening position to be accurately measured and entered into the 'Setup' menu. This ensures that the sounds from the various speakers arrive at the listening position at the correct time to recreate a realistic surround effect. The distance can be entered in centimetres or inches.
Speaker Levels
Finally the levels of all the speakers in the system need to be adjusted to match each other at the listening position, again to create a proper surround effect. To help with this the AVR600 can generate a test noise for each speaker which should be measured with a sound pressure level (SPL) meter. The meter should be set to 'C' weighting and slow response. The level of noise measured at the listening position from each speaker should be adjusted on the Speaker Trims page of the Setup menu so that the meter reads 75dB SPL. It does not matter what the system volume setting of the AVR600 is before turning the test noise on as the volume setting is over-ridden for the duration of the speaker noise test.
There are several basic SPL meters on the market at reasonable prices aimed at home cinema enthusiasts. Check your local technology store, search online or ask your dealer.
If you do not have an SPL meter, you can try to adjust the noise level of each speaker by ear. In this case it is not possible to adjust the speakers to the absolute 75dB SPL volume level, but you should aim for all speakers sounding equally loud. Setting speaker test noise levels by ear is not recommended as it is very difficult to do accurately, but is often better than doing nothing at all!
auto speaker setup
There is a proprietary automatic loudspeaker setup function built into your AVR600. The Arcam Auto Speaker Setup function attempts to set all the essential speaker settings for all the speakers in your system. It also calculates room equalisation (Room EQ) filter values to remove some of the worst effects of resonant frequencies in the listening room.
Your AVR600 package is supplied with a calibration microphone, which should be inserted into the AUX jack socket on the front panel and positioned at the main listening position. This microphone picks up the special calibration tones generated by the speakers when Auto Speaker Setup is run. The AVR600 then analyses the signal and computes:
which speakers are present,
speaker type,
speaker distance,
speaker level,
crossover frequency to the subwoofer (or large front speakers if no subwoofer is present),
problem resonant frequencies in the room which need control by filtering.
It also warns if any of the speakers are too close to the microphone or if the measured tone is clipped.
To help the system be as accurate as possible when performing Auto Speaker Setup, there are a few guidance rules that should be followed:
■ Minimise any background sounds in the listening room and other nearby rooms.
Close all windows and doors in the listening room.
Turn off all fans including air-conditioning systems.
If holding the microphone in the hand rather than mounting on a tripod or similar, keep your hand and fingers still to avoid generating 'handling noise'.
Position the set up microphone pointing upwards at roughly head height in the normal listening position. It is not necessary to point the microphone directly at the speaker generating the test tone. (It helps if you are able to position the microphone exactly where your head would normally be for listening, with the microphone in direct unobstructed view of all speakers.)
If your system includes an active subwoofer, start by setting its output level/gain control to a value halfway between maximum and minimum.
When activated, a calibration tone is played through each channel of the AVR600 in turn, including the subwoofer channel. The calibration tone cycles round each of the speakers twice. If you do not have a full 7.1 speaker configuration there will be periods of silence between some speaker channels. Follow the 'progress' information on-screen.
After all the channels have been measured, a summary of the speaker configuration will be displayed on-screen. You can then choose to accept the settings, re-measure your system again or cancel Auto Speaker Setup without storing the settings.
The Auto Speaker Setup function is found within the Setup menus, see page 37. By default, Room EQ is not applied to any of the source inputs. You should enable Room EQ on inputs you think benefit from this feature, as required, by listening when playing typical source material through each input. This is enabled from within the Input Config menu.
While room equalisation can help to reduce problems with listening room acoustics, it is usually far better to try to solve these problems with the room directly. Proper loudspeaker positioning, acoustic wall treatments and moving the listening position away from walls should produce far better results overall. However it may be difficult to do this in a home environment, so Room EQ is your next best choice.
Problems
We advise you to look over the reported measurements on the screen following Auto Speaker Setup for any obviously incorrect results, in particular to ensure the reported speakers match your configuration and that the speaker distances to the listening position appear look roughly correct. If the results are not what you expected re-run Auto Speaker Setup.
The Auto Speaker Setup function is normally quite accurate but occasionally false results can be generated. Problems may be as a result of:
external sounds or rumbling / handling noises picked up by the microphone
sound reflections off hard surfaces (e.g. windows or walls) close to the listening position,
very strong acoustic resonances within the room.
If you are still experiencing difficulties or you wish to have the most accurate results for ultimate surround performance, we recommend using the manual method of establishing speaker distances and levels.
Using a subwoofer
If your system includes an active subwoofer you may need to re-run Auto Speaker Setup with the subwoofer output level / gain control set to a higher or lower value, if the summary screen reports problems setting the subwoofer up.
Auto Speaker Setup will attempt to choose a crossover frequency that allows the smoothest low frequency transition from the main speakers to the subwoofer. However if this does not produce pleasing results we recommend manually trying other crossover frequencies to find something more to your preference.
See the next sections for information of how to enter or change speaker settings manually.

The Setup menus allow you to configure all aspects of your AVR600. The next few pages will go through the menu items and explain their function. The Setup menus will probably look quite daunting if you are new to setting up home cinema, but the majority of them need only be configured once when you first install the system (or if your system changes or you move house!)
The only way to view the Setup menus is on your display device (TV or projector) using the on-screen display (OSD) capability of the AVR600. To view the OSD for the initial setting up, connect any of the video outputs to your display device. You do not need to have a video source connected to the AVR600 video inputs.
Entering Setup mode
To enter the setup menu, press the MENU button on the remote control or font panel. The front panel display shows 'MENU' and the setup menu (pictured right) is displayed.
Unstable OSD menu or picture display?
The default AVR600 output video resolution when first powered up out of the box is 525-line/60Hz NTSC for analogue video and 480i/60 for digital video. This has been chosen as most display devices can synchronise to this automatically. This can be changed in the Video Outputs section of the Setup Menus.
If the output resolution and frame rate is forced to a setting your display device does not support, the picture may become unstable or may not display at all. To reset the output video resolution and frame rate to the default values to restore the display, press and hold the OK button for three seconds.
Menu panel
The left-hand panel lists the setup screens available for adjustment. The selected menu is highlighted with a grey band.
Adjustment panel
The upper right-hand panel lists the parameters you can change as a user. The selected line is highlighted with a black band. Lines that cannot be selected are greyed-out.
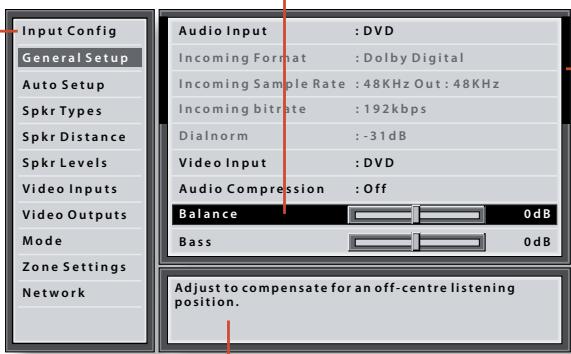
Scroll bars
These indicate the position of the displayed screen within longer menus.
Help screen
The lower right-hand panel gives a short help text for the feature being adjusted.
Navigating the setup menu
... using the remote control
The setup menu can be navigated by using the cursor (arrow) keys on the remote control. This is by far the easiest method.
- To enter the setup menu, press the MENU button (which is located immediately under the navigation buttons).
- Use the and keys to navigate up and down the main section headings in the left-hand panel.
- Once you have the main section that you require highlighted, use the key to enter the section.
- Use the and keys to navigate up and down the section settings in the left-hand panel. Some settings may be greyed out. These are either for information only (e.g. incoming sampling
frequency) or are not currently selectable (e.g. network IP address when DHCP is used). Scroll bars on the sides of the right hand panel indicate your position in the settings list where there are more items than can be displayed at once.
- Pressing OK selects a setting to change it, pressing OK again de-selects the setting.
- At any time, press the MENU button to exit the menu. Any changes to settings are saved.
... using the keys on the front panel
The AVR600 front panel controls can be used to configure the unit. Follow the instructions for using the remote control, in this case using INPUT- for left, INPUT+ for right, VOLUME- for down and VOLUME+ for up.
Input Config.
The audio and video settings on this page of the Setup menu can be tailored specifically and independently to the currently selected input.
When a different input is selected on the Input line, all the input-specific settings for that input are displayed below it. These settings are applied to the named Input only and are stored in memory and recalled each time the unit is powered up and whenever that input is selected.
Input - The currently selected input connectors to which the settings below relate.
Name - The display name of the input. You can change the name of any input to more closely match your setup. For example, if you had two satellite receivers, you could connect the main receiver to the Sat audio and video input connectors and change the Name to 'SAT 1'. You could then connect the second satellite receiver to the VCR audio and video input connectors, but change the VCR Name to 'SAT 2'. It is then clearer to users of your AVR600 which inputs they wish to select when scrolling though.
Lip Sync - Each input can have its own setting to add a time delay between the audio and video signals to compensate for the sound and picture not being synchronised. This is normally required when video processing is used in the system for scaling or de-interlacing video. The range of lip sync delay is -5 to +220 milliseconds.
The lip sync adjustment can only correct for delayed video. If the audio is late set lip sync to its minimum.
Mode - Sets the initial audio decode mode for stereo sources on this input.
Last Mode recalls the last used setting for this input when a stereo source was applied. See section 'Multi-channel source modes' on page 41 for more information.
Ext.Mode - Sets the initial audio decode mode for multi-channel digital sources on this input.
Last Mode recalls the last used setting for this input when a stereo source was applied. See section 'Multi-channel source modes' on page 41 for more information.
Treble - Bass -
These allow you to alter the bass and treble tone controls for all currently active speakers for each individual
input. For example, if your PVR source sounds a little bass light, you can always correct for this by selecting PVR on the Input line at the top of this menu and add 2 or 3dB to the Bass control. Then, whenever the PVR input is selected, the bass is automatically boosted for as long as that input is selected.
Room EQ - When the Auto Speaker Setup function is run it also calculates Room Equalisation coefficients to remove some of the worst effects of resonant frequencies of the room at the listening position. By default Room EQ is not applied to any of the source inputs, however you can enable them on a per-input basis as you wish.
Not Calculated: (Information only) Auto Speaker Setup has not been run or has errors so cannot be selected.
On: Room EQ is applied to the current source.
Off: Room EQ is not applied to the current source.
Input Trim - Sets the maximum analogue input signal level (sensitivity) on this input before the ADC (Analogue-to-Digital converter) signal path clips. Options are 0.5, 1, 2 and 4 volts RMS maximum input. The default is 2Vrms maximum.
For example, analogue sources with low output levels may benefit by choosing the 1V maximum setting, or the 0.5V maximum setting if the source has a very low output. This helps maximise signal-to-noise performance of the AVR600 and also helps keep the various analogue sources sounding about the same level for any given AVR600 volume control setting.
Dolby Volume-Dolby Volume is an intelligent system that improves the perceived audio frequency response at lower listening levels and corrects for volume inconsistencies between sources (e.g. a rock radio station and a DVD) and between programming (e.g. a TV show and advertisement breaks).
Off: (default) Dolby Volume is not applied to this input.
Cinema: enables Dolby Volume for this source and configures the input for audio which comes mostly from movie soundtracks.
Music: enables Dolby Volume for this source and configures the input for audio which comes from other sources (CD, TV, Satellite, Tuner, etc.).
Dolby Leveller - This setting of Dolby Volume controls how closely quiet and loud sources and programme content are matched to each other, based on the ear's perception of loudness. The range of values is 0 (minimal levelling) to 10 (maximum levelling). The default setting is 9, however we recommend
experimenting with lower values if all your source material is more closely matched in level. If the Volume Leveller function is set off, no level matching between sources and programme material is performed. Note however that turning the Dolby Leveller setting of Dolby Volume to 'Off' is not the same as turning the entire function of Dolby Volume to 'Off', as volume related frequency response processing is still active. See Dolby Volume on page 42 for more information.
DV Calib. Offset - The Calibration Offset parameter of Dolby Volume allows you to compensate for speaker efficiencies and listening position. The default value is 0 and this should normally produce a good result when the AVR600 speaker levels are set using a sound pressure level meter.
See the Dolby Volume section on page 42 for further information on Calibration Offset.
Surround EX - Sets how the AVR600 should configure its decode mode when a Dolby Digital EX bitstream is received. Note that this setting only applies if you have Surround Back loudspeakers. You may wish to experiment with these two decode modes to see which you prefer with Dolby Digital EX encoded material. Options are Auto DD EX, Auto PLIIx and Manual.
Auto DD EX: When a Dolby Digital EX-flagged bitstream is detected, the decode mode automatically changes to Dolby Digital EX. This can be temporarily overridden by pressing the MODE button on the remote or front panel.
Auto PLIIx: When a Dolby Digital EX-flagged bitstream is detected, the decode mode automatically changes to Pro Logic IIx Movie. This can be temporarily overridden by pressing the MODE button on the remote or front panel.
■ Manual: The received Dolby Digital EX is treated as if it is an ordinary Dolby Digital stream in that it does not automatically select the EX or PLIIx decode modes. Instead, the previously used decode mode for a multi-channel digital source on this input is applied. However, either of the EX or PLIIx decode modes can be applied manually by pressing the MODE button.
Stereo Mode - If you have configured your system to have a subwoofer, then you have the flexibility to choose how bass information is distributed between the front left/right speakers and the subwoofer when listening to stereo (two channel only) analogue and digital sources. Choose the option which gives you the most solid, even sounding bass. If you are using a subwoofer for stereo, please also see Sub Stereo
below to set the level of the subwoofer. For best results test with a set-up disc or live programme material. This setting can be used to override your normal speaker settings in the Spkr Types menu whenever the AVR600 plays stereo material. It is quite common to find that two channel stereo music listening is best done with a slightly different sub/ speaker setting than for surround movies.
As Spkr Types: When an analogue or digital stereo source is played, your normal speaker configuration (as in Spkr Types menu) is used to reproduce the signal.
- Left/Right: Full frequency stereo information. All audio is sent to the front left and right speakers only without any bass redirection. You can use this setting if you consider your front left/right speakers to be able to handle the full frequency range of music. If you have set your front left/right speaker size as Small in the Spkr Types setup page, you may wish to use this option to override the setting to Large for stereo music listening, if you have full frequency range left/right speakers.
It can often be beneficial to set full frequency range speakers to Small in the Spkr Types setup page for use with movies, if you have a subwoofer in your system. Doing so may deliver more impact on movie soundtracks as subwooers are designed to handle reproduction of high bass content. However you may find that for stereo music a better overall result is obtained by not using the subwoofer and effectively treating the front left/right speakers as Large.
- Left/Right+Sub: Full frequency range stereo is fed to the front left and right speakers and extracted bass is sent to the subwoofer. In this case the low frequency information is effectively duplicated.
Sat+Sub: Use this setting if you really do have Small satellite front left and right speakers, or if you prefer the overall sound of bass being handled by the subwoofer. Full bass management is used so that analogue and digital stereo sources are fed to the DSP where the bass is filtered off front left and right and redirected to the subwoofer.
NOTE
The Stereo Mode function is not available when using an analogue source in Stereo Direct mode.
Sub Stereo - If Left/Right+Sub or Sat+Sub is selected in Stereo Mode above, this setting adjusts the level of the subwoofer when the source is two channel stereo.
Brightness - Sets the video brightness for this input. This setting can be used to compensate for an overly dark or bright source picture on this input when compared with other video sources.
Contrast - Sets the video contrast for this input. This setting can be used to compensate for too much or too little contrast in the source picture on this input when compared with other video sources.
Colour - Sets the video colour saturation for this input. This setting can be used to compensate for too much or too little colour in the source picture on this input when compared with other video sources.
Picture Mode - Sets how the video processor in the AVR600 interprets the video on this input. Normally the video processor automatically detects the original source type and correctly sets either Video mode or Film mode processing. In the unlikely event that the video processor misinterprets the video type, resulting in subtle picture artefacts, the video processor can be manually forced into Video mode or Film mode. This function should normally be set to Auto.
Edge Enhancement - Sharpens the picture from a source on this input.
Mosquito N.R. - Removes haziness that sometimes appears around objects in a picture from a source on this input.
Noise Reduction - Removes random noise within the picture from a source on this input.
Block N.R. - Removes block artefacts in overly compressed digital video from a source on this input.
Component Mode - Configures the current three-wire high quality analogue video input for component (YUV) video signals or RGB video signals. It is important to match the setting to the incoming video format otherwise the colours will be incorrect and the picture may be unstable.
Options are Normal, RGsB and RGB+Sync.
Normal: (default) the three-wire input is configured for normal Component (YUV / YPbPr) analogue video.
RGsB: the three-wire input is configured for RGB analogue video with video 'sync-on-green'.
RGB+Sync: the three wire input is configured for RGB analogue video, with the video sync signal on the composite input for the current named source.
You should typically select RGB+Sync if you are using a standard SCART to 4-wire phono breakout cable to connect an RGB SCART source.
NOTE: If RGB+Sync is selected, the S-Video and Composite inputs cannot be selected as video inputs for the current source.
HDMI Audio - Selects whether you wish to enable or disable audio input over HDMI for this source. This option does not apply if you are not using this HDMI input. If you are not using HDMI for audio input on this source, selecting No will force the AVR600 to only use the SPDIF digital input or analogue audio inputs.
Options are Yes and No.
- Yes: (default) the AVR600 will use audio over HDMI if an HDMI signal is detected.
No: the AVR600 will not use HDMI audio for this source, it will use SPDIF digital or analogue audio inputs instead.
Video Source - Selects whether the video signal detection for this source is automatic or forced to a particular signal type. When a source is selected the AVR600 looks for the highest quality video signal type that is connected in the order: HDMI - Component/ RGB - S-Video - Composite.
If the video input type is not HDMI, there will be a delay in detecting the type of video that is connected, resulting in longer switching times between sources. To speed up source switching times you can force the AVR600 to look at only the specific video connection type you have for each source. Select from the list the video type you are using on this source.
Auto: (default) the AVR600 scans through the various video input connectors/formats for the current source and selects the highest quality available for this source.
HDMI: the AVR600 is forced to use the HDMI video input for this source.
Component: the AVR600 is forced to use the COMPONENT/RGB video input for this source.
S-Video: the AVR600 is forced to use the S-VIDEO input for this source.
Composite: the AVR600 is forced to use the COMPOSITE video input for this source.
General Setup
General information and system controls.
Source Input - (Information only) The currently selected input to which the settings below relate.
Incoming Format - (Information only) The format of the digital audio stream connected to this input, if present.
Incoming Sample Rate - (Information only) The sample rate of the digital audio stream connected to this input, if present.
Incoming Bit Rate - (Information only) The bit rate of the digital audio stream connected to this input, if present.
Dialnorm - (Information only) If a Dolby Digital audio stream is connected to this input, this is the Dialogue Normalisation setting requested by the stream.
Video Input - The currently selected video input. For inputs that have video connections (e.g. SAT, PVR etc), audio and video inputs normally switch over together. However, here you can temporarily select a different video source for the current audio source. This feature may be useful, for example, if you are watching a sports game on satellite but on this occasion wish to listen to the commentary on the radio instead. This temporary override is reset when the input source is changed so that the Video Input follows the Audio Input setting (or the setting in the Video Inputs menu, if applicable).
Audio Compression - Allows selection of compression which is ideal for late night listening. The compression effect increases the volume of the quiet passages and decreases the volume of the louder passages. Compression only applies to some Dolby Digital and DTS soundtracks that support this function.
Off: (default) no audio compression is applied.
On: Audio compression is applied whenever a soundtrack supporting compression is received.
On / Auto: As for On above, except for Dolby TrueHD soundtracks which support an additional Auto on/off setting
This setting applies to all inputs when a relevant digital audio stream is detected. It is stored in memory and recalled each time the unit is powered up.
Balance - To alter the sound balance temporarily between front left and right speakers. You can alter the sound stage to either the left or the right by up to 6dB. Note that it is not possible to shift the audio signal
completely over to one channel. This function resets to equal left/right balance when the input is changed.
PLII Dimension -
PLII Centre Width -
PLII Panorama –
These allow the adjustment of the sound field for Dolby Pro Logic II Music mode decoding of two-channel sources. These setting apply to all inputs when PLII or PLIIx Music decoding is selected. The settings are stored in memory and recalled each time PLII or PLIIx Music mode is selected.
Dimension: Allows the user gradually to adjust the sound field either towards the front or towards the rear. Settings range from -3 to +3. We recommend Dimension is set to 0 for normal use.
Centre Width: Controls the centre image width. With Pro Logic decoding, dominant centre signals come only from the centre speaker. If no centre speaker is present, the decoder splits the centre signal equally to the left and right speakers to create a phantom'centre image. The Centre Width control allows variable adjustment of the centre image so it may be heard only from the centre speaker; only from the left/right speakers as a phantom image; or from all three front speakers to varying degrees. We recommend Centre Width is set to 3 for normal use.
Panorama: Extends the front centre image to include the surround speakers for an exciting 'wrap-around' effect with side-wall imaging.
Digital Output Freq. - Sets the sampling frequency of the audio Analogue-to-Digital converter. This setting applies to all inputs when analogue audio is being processed (i.e. not Stereo Direct mode). It is stored in memory and recalled each time the unit is powered up.
Volume Adjustment - Sets the step size of the volume control.
Normal: (default) volume control is in 1dB steps
Fine: volume control is in 0.5dB steps
Maximum Volume - Limits the maximum volume setting the system can be turned up to in the main zone. This is a useful feature to prevent accidental overdriving of low power-handling speakers (for example). It is stored in memory and recalled each time the unit is powered up.
Max On Volume - Limits the maximum volume the system operates in the main zone when it is switched on or comes out of Standby. The system comes on at this stored volume setting if the last used (possibly very
loud) volume exceeds this value. It is stored in memory and recalled each time the unit is powered up.
Audio In iPod - If you have an iPod connected to the AVR600 using an Arcam rDock or rLead, this control allows you to set which audio input is used.
Auto Setup
Auto Speaker Setup of your loudspeakers and subwoofer (if present) is controlled by this menu. A full description of how Auto Speaker Setup works is given on page 33. Remember to insert the calibration microphone into the AUX input on the front panel and position the microphone at the listening position before running Auto Setup.
Run Auto Setup - Press OK (or on the remote) to start Auto Speaker Setup. The process will generate test tones from the speakers and will typically take less than two minutes. The test tone generator will cycle round each speaker twice.
Accept Setup - When Auto Speaker Setup has completed without errors you can choose to accept or reject the settings
No: The settings are not stored in memory.
- Yes: All the speaker settings (speakers present, type, distance, level and crossover frequency) are stored in the relevant sections of the Setup Menu and overwrite any previous settings.
Auto Setup Progress - Gives a summary of what Auto Speaker Setup is doing as it progresses, starting with which speaker is being tested.
Calculating EQ: Data gathered from each of the speakers is being processed.
Completed Error: A problem was detected with the speaker setup. See the descriptions for each of the individual speakers, below. Alternatively an invalid speaker configuration was detected.
Front Left -
Centre-
Front Right -
Surr. Right -
Surr. Back Right -
Surr. Back Left -
Surr. Left -
Subwoofer -
If the above speakers are correctly detected as present in your speaker configuration, their size (Small or Large), distance from the listening position and trim level (dB)
will be displayed. Note that size does not apply to the subwoofer. Otherwise one of the following messages will be displayed:
Not Present: A speaker was not detected on this channel.
- Clipped: The test tone detected by the microphone was distorted or clipped. This could be because you have very sensitive speakers and they are very close to the listening position. However it is more likely that the detected signal was corrupted by microphone handling noise or other external sounds. Try running Auto Speaker Setup again.
- Mic too close: The speaker is too close to the listening position to be able to calculate its distance. If possible, try moving the speaker slightly further away from the listening position and run Auto Speaker Setup again.
Crossover Freq. - The frequency at which Auto Speaker Setup determined is the best point to filter low frequency sounds away from Small speakers and into the subwoofer (or Large speakers if a subwoofer is not present).
Spkr Types
Settings for the types of loudspeaker you have connected in your configuration. These settings are applied to all audio inputs and are stored in memory and recalled each time the unit is powered up.
Front Left / Right -
Centre -
Surr.Left/Right
Surr.BackL/R-
Here you set the type of speakers that you have connected to your AVR600:
Large: capable of full frequency range reproduction
Small: not capable of full frequency range reproduction at the low frequency end
None: speaker not present in your configuration
Subwoofer: Set whether a subwoofer is present or not. For Surr. Back L/R, the number before Large and Small in the dropdown options list is the number of Surround Back speakers in your configuration. If you only have one Surround Back speaker connect it to the SBL output.
NOTE
It is not possible to set all speakers to Small unless there is a subwoofer in your speaker configuration. If you do not have a subwoofer, you will be forced to set your front speakers to Large.
Crossover Freq - This is the frequency at which loudspeakers set as Small start to redirect bass signals to the Subwoofer or Large speakers in your system. Small speakers redirect bass to the subwoofer, if present. The exception is the Centre speaker which, if Small, redirects its bass to front left/right provided that they themselves are Large. This is done to help keep Centre bass directly in front of the listening position.
MCH Sub Levels - This setting controls the subwoofer level from an externally decoded multi-channel source (DVD-A, SACD, etc). Most DVD players require a +10dB compensation on the subwoofer channel to maintain the correct balance with the main channels.
+10dB comp.: for normal DVD players which output the analogue subwoofer channel at the low 0dB level. Gain compensation of +10dB is added to the subwoofer channel of the MCH INPUT in the AVR600.
No comp.: for DVD players which output the analogue subwoofer channel at the correct +10dB level. No subwoofer gain compensation is needed on the subwoofer channel of the MCH INPUT in the AVR600.
Use Channels 6+7 for - If your main zone speaker set up does not include Surround Back Left and Right speakers, you can choose to use the Surround Back amplifier channels to Bi-Amp the Front Left and Right pair, or as a stereo power amplifier for Zone 2.
Spkr Distance
Calibration settings for the distances between the loudspeakers and the listening position.
NOTE
Speakers that are not present in your configuration will be greyed out.
These settings are applied to all audio inputs and are stored in memory and recalled each time the unit is powered up.
Units - Select whether you wish to measure distances in centimetres or inches.
Front Left -
Centre -
Front Right -
Surr. Right -
Surr. Back Right -
Surr. Back Left -
Surr. Left -
Subwoofer -
As described in 'essential setup' on page 32, measure the distance from each loudspeaker in your system to your ear in the main listening position and enter the values. This allows the AVR600 to calculate the correct relative delay for each loudspeaker.
Spkr Levels
Calibration settings for the test noise signal level through the loudspeakers and measured at the listening position.
NOTE
Speakers that are not present in your configuration will be greyed out.
These settings are applied to all audio inputs and are stored in memory and recalled each time the unit is powered up.
Use the 念 and navigation buttons on the remote control to select the relevant speaker. Press OK to enable/disable the calibration noise and the and navigation buttons to adjust the noise level from each speaker.
Front Left -
Centre -
Front Right -
Surr. Right -
Surr. Back Right -
Surr. Back Left -
Surr.Left-
Subwoofer -
As described in 'essential setup' on page 32, adjust the level of the test noise from each speaker so that an SPL meter at the listening position measures 75dB SPL.
Video Inputs
Settings to optionally assign a video source to each of the normally audio-only inputs.
These settings are stored in memory and recalled each time the unit is powered up.
Video Input Tape -
Video Input CD -
Video Input Aux -
Video Input AM/FM
Video Input Phono -
Video Input MCH -
Video Input iPod -
Video Input Net -
Video In Digital Radio -
The default for each of the audio inputs is 'None',
however for example you could associate the satellite 'Sat' video with AM, FM and Digital Radio audio if you wished. This way you could listen to the FM or AM or
Digital Radio commentary of a sports game but have the pictures from the satellite coverage.
Video Outputs
The settings in this menu control the output resolution from the video processor in the AVR600 as well as the operation of the two HDMI outputs.
These settings are applied to all video inputs and are stored in memory and recalled each time the unit is powered up.
NOTE
Important points to remember:
For analogue outputs
The analogue output resolution should be chosen carefully; Composite and S-Video connections can only carry 480i (525-line NTSC) or 576i (625-line PAL) signals. If an output resolution higher than this is chosen in Out 1 Resolution, the Composite and S-Video main zone outputs will be disabled. You should also set the frame rate (50Hz Interlaced for PAL, 60Hz Interlaced for NTSC) and the aspect ratio (4:3 standard or 16:9 widenscreen) to match your display device. Note that S-Video and Composite can only carry Interlaced video. If you select Progressive analogue video, Zone 1 S-Video and Composite outputs will be disabled.
For HDMI outputs
The output resolution, frame rate and display aspect ratio can be automatically determined by the AVR600. Alternatively these settings can be manually selected. If you have two HDMI display devices connected, you can also configure which of the two HDMI outputs takes priority.
Zone 1 OSD - Selects whether the main zone pop-up OSD messages are On or Off. It is stored in memory and recalled each time the unit is powered up.
- When On, all user adjustments that are made during the general use of the AVR600 are displayed on screen as well as the front panel display. This includes the adjustment of volume, subwoofer level, lip sync, tone controls, etc. It is stored in memory and recalled each time the unit is powered up.
- When Off, the above user adjustments will not appear on screen, only on the front panel display. This leaves the picture on your display device clear of pop-up text. However, regardless of this setting the Setup menus are always displayed on screen.
Analogue Output - This setting controls the output resolution of the analogue video outputs of Zone 1.
This applies to all Zone 1 analogue video outputs: Component, S-Video and Composite. This setting is only valid if neither of the HDMI outputs OUT 1 or OUT 2 are being used at the time. See 'Important points to remember' above regarding analogue resolutions.
The dropdown list shows all the resolutions that the AVR600 video processor can output.
Analogue Frame Rate - This setting controls the output frame rate of the analogue video outputs of Zone 1. This applies to all Zone 1 analogue video outputs: Component, S-Video and Composite. This setting is only valid if neither of the HDMI outputs OUT 1 or OUT 2 are being used at the time. See the Note 'Important points to remember' regarding analogue frame rates.
Display Type - Set the aspect ratio of your display device; 4:3 standard or 16:9 widenscreen.
Output Switching - This setting controls the operation of the two HDMI outputs.
- Auto-Priority Out 1/Out 2 senses which display device is turned on and gives priority to the named output (OUT 1 or OUT 2) if both display devices are on at the same time. When both display devices are on at the same time, the output with the highest priority is used to configure the settings of the AVR600 video processor.
Output 1 or Output 2: forces only the named HDMI output to be enabled.
Output 1 & 2: enables both HDMI outputs simultaneously. In order to do this however, the settings of the AVR600 video processor are reduced down to the highest common set that can be supported by both display devices.
Out 1 Resolution - This setting controls the output resolution of HDMI output OUT 1. This setting is only valid if HDMI output OUT 1 is the only active HDMI output at the time.
The dropdown list shows all the resolutions that the AVR600 video processor can output. Resolutions that are not supported by the connected display device are greyed out and cannot be selected.
- Preferred: sets the OUT1 resolution to be the preferred resolution that is requested by the display device. This is often the highest resolution the display device can receive.
Out 1 Frame Rate - This setting controls the output frame rate of HDMI output OUT 1. This setting is only
valid if HDMI output OUT1 is the only active HDMI output at the time.
The dropdown list shows all the frame rates that the AVR600 video processor can output. Frame rates that are not supported by the connected display device at the above resolution are greyed out and cannot be selected.
Auto sets the OUT1 frame rate to be the preferred frame rate that is requested by the display device for the currently used resolution.
Lipsync 1 - (Information only) Displays how much lip sync is automatically applied to HDMI output OUT 1 to compensate for video processing delays in the attached display device. Not all display devices support this function.
Out 2 Resolution - This setting controls the output resolution of HDMI output OUT2. This setting is only valid if HDMI output OUT2 is the only active HDMI output at the time.
The dropdown list shows all the resolutions that the AVR600 video processor can output. Resolutions that are not supported by the connected display device are greyed out and cannot be selected.
- Preferred: sets the OUT2 resolution to be the preferred resolution that is requested by the display device. This is often the highest resolution the display device can receive.
Out 2 Frame Rate - This setting controls the output frame rate of HDMI output OUT2. This setting is only valid if HDMI output OUT2 is the only active HDMI output at the time.
The dropdown list shows all the frame rates that the AVR600 video processor can output. Frame rates that are not supported by the connected display device at the above resolution are greyed out and cannot be selected.
Auto: sets the OUT 2 frame rate to be the preferred frame rate that is requested by the display device for the currently used resolution.
Lipsync 2 - (Information only) Displays how much lip sync is automatically applied to HDMI output OUT 2 to compensate for video processing delays in the attached display device. Not all display devices support this function.
Out 1 & 2 Resolution - This setting controls the output resolution when both HDMI outputs are used simultaneously. This setting is only valid if Output Switching is set to Output 1 & 2.
The dropdown list shows all the resolutions that the AVR600 video processor can output. Resolutions that are not supported by the connected display devices are greyed out and cannot be selected.
Best: sets the HDMI output to be the highest common resolution that is supported by both display devices.
Out 1 & 2 Frame Rate - This setting controls the output frame rate when both HDMI outputs are used simultaneously. This setting is only valid if Output Switching is set to Output 1 & 2.
The dropdown list shows all the frame rates that the AVR600 video processor can output. Frame rates that are not supported by the connected display devices at the above resolution are greyed out and cannot be selected.
Auto: sets the HDMI output to be the highest preferred common frame rate that is supported by both display devices for the above resolution.
Lipsync 1 & 2 - (Information only) Displays how much lip sync is automatically applied to HDMI outputs OUT 1 and OUT 2 simultaneously to compensate for video processing delays in the attached display devices. Not all display devices support this function.
Mode
Lists the decode and downmix options you wish to include when cycling through the options on the MODE button. Settings are Yes or No. The list is divided into two sections depending on the source audio type. See section 'Multi-channel source modes' on page 41 for more information on each processing a decoding mode. These settings are applied to all audio inputs and are stored in memory and recalled each time the unit is powered up.
For Stereo sources:
Dolby ProLogic -
Dolby PLIIx Movie -
Dolby PLIIx Music -
Dolby PLIIx Matrix -
Dolby PLIIx Game -
Neo:6 Cinema -
Neo:6 Music -
The first section, 'Stereo sources' is the list of processing modes you wish to make available for stereo signals (analogue stereo, digital PCM stereo, Dolby 2.0, DTS 2.0, etc). When a stereo signal is applied, each press of the MODE button cycles through the processing modes you have enabled in the 'Stereo sources' section. The unprocessed Stereo option is always available for stereo signals therefore it is not shown in the list.
For Multi-channel sources:
Stereo Downmix -
Dolby Digital EX -
Dolby PLIIx Movie -
Dolby PLIIx Music -
The second section, 'Multi-channel sources' is the list of processing modes you wish to make available for multi-channel digital signals (any Dolby or DTS digital stream that has more channels than stereo 2.0). When a multi-channel digital signal is applied, each press of the MODE button cycles through the processing modes you have enabled in the 'Multi-channel sources' section.
Zone Settings
Lists the volume and control settings for Zone 2 and Zone 3. These settings are applied to all audio inputs and are stored in memory and recalled each time the unit is powered up.
Z2 Audio Input - Selects the analogue audio to be routed to Zone 2.
Z2 Video Output - Selects the analogue video to be routed to Zone 2 for the current audio input.
Zone 2 Volume - The current volume in Zone 2.
Zone 2 Max. Vol - Limits the maximum volume setting the system can be turned up to in the Zone 2. This is a useful feature to prevent accidental overdriving of low power-handling speakers, for example.
Zone 2 Fixed Vol - The Zone 2 volume control can be locked at the current value for use with an external amplifier with its own volume control in Zone 2.
Zone 2 Max On Vol - Limits the maximum volume the system operates in the Zone 2 when it is switched on or comes out of Standby. The system comes on at this volume if the last used (possibly very loud) volume exceeds this value.
Zone 3 Volume - The current volume in Zone 3.
Zone 3 Max. Vol - Limits the maximum volume setting the system can be turned up to in the Zone 3. This is a useful feature to prevent accidental overdriving of low power-handling speakers (for example).
Zone 3 Fixed Vol - The Zone 3 volume control can be locked at the current value for use with an external amplifier with its own volume control in Zone 3.
Zone 3 Max On Vol - Limits the maximum volume the system operates in the Zone 3 when it is switched on or comes out of Standby. The system comes on at this volume if the last used (possibly very loud) volume exceeds this value.
Standby - When a Standby command is received by an infra-red eye in Zone 2, this setting controls which parts of the AVR600 to turn on and off:
When Local Only, the Standby IR command only affects the zone it was received in (Zone2 or Zone3).
When All Off, the Standby IR command affects the entire AVR600 system in all zones.
Network
The AVR600 is fitted with an network audio client which is capable of playing internet radio stations as well as stored music on a network storage device such as a PC, or on a USB flash drive.
Use DHCP - Select if your network uses DHCP
No: To assign a fixed IP address manually.
Yes: To use network parameters given by the DHCP server.
MAC address - (Information only) The unique address of the network card in your AVR600.
IP Address - If not using DHCP, enter the IP address you have assigned to the AVR600 for your network.
Subnet Mask - If not using DHCP, enter the subnet mask for the AVR600 on your network.
Gateway - If not using DHCP, enter the IP address of the router the AVR600 is connected to.
Primary DNS - If not using DHCP, enter the Primary DNS IP address of your internet service provider.
Alternate DNS - If not using DHCP, enter the Secondary DNS IP address of your internet service provider.
Use Proxy - Select if you connect to the network via a Proxy Server.
No: If you connect directly onto the network.
Yes: If you connect to the network via a Proxy Server.
Proxy Address - If connecting via a Proxy Server, enter its IP address.
Proxy Port - If connecting via a Proxy Server, enter the port number to which the Proxy responds.
decoding modes
Introduction
Your AVR600 receiver provides all the key decoding and processing modes for analogue and digital signals, including the latest high definition audio formats over HDMI.
Modes for digital sources
Digital recordings are usually encoded to include information about their format type. The AVR600 detects automatically the relevant format in a digital signal - such as Dolby TrueHD, Dolby Digital Plus, DTS-HD Master Audio, Dolby Digital, or DTS - and switches in the appropriate decoding.
Modes for analogue sources
Analogue recordings do not contain information about their encoding formats, so the desired mode - such as Dolby Pro Logic - needs to be selected manually.
Mode memory
Dolby Digital or DTS audio (including the high definition formats) can be output in two mix modes, selected using the MODE button:
Surround (e.g., five main channels plus a subwoofer for a 5.1 source)
Stereo downmix.
Two-channel audio, regardless of whether it is analogue or digital can also be output in two mix modes, selected using the mode button:
Surround (e.g., Dolby Pro Logic II Movie, Neo:6 Music, etc.)
Stereo.
The AVR600 stores the settings for each source (except MCH). Thus the decoding mode for the following groups of source material can be stored independently:
Dolby Digital (multi-channel) and DTS source material
Two channel Dolby, PCM or Analogue source material
Two-channel source modes
The following decoding and surround modes are available for standard and high definition Dolby Digital 2.0, DTS 2.0, PCM or analogue sources:
Stereo
Pro Logic II Movie
Pro Logic II Music
Pro Logic II Game
Pro Logic IIx Movie
Pro Logic IIx Music
Pro Logic IIx Game
Pro Logic
Neo:6 Cinema
Neo:6 Music
NOTE
Pro Logic IIx modes are only selectable when Surround Back speakers are present.
Stereo
In this mode the AVR600 works as a conventional high quality audio amplifier. Note that if the subwoofer is enabled in stereo mode, then some processing of the signal will be carried out. To achieve ultimate sound quality with analogue sources, select the Stereo Direct function if an analogue connection is present.
Dolby Pro Logic II
Dolby Pro Logic II decoding is designed to produce five-channel output from two-channel source material.
There are three different modes available in Pro Logic II: 'Movie', 'Music' and 'Game' modes, which are intended for use as their names suggest. Due to the different recording methods used for movies, music and video games, it is recommended that the correct decoding mode for your source material is used to obtain best results.
Movie mode: This is intended for use with 'cinematic' material, which is mixed and monitored in a calibrated multi-channel environment. Movie mode is a 'fixed' mode that is designed to give a similar sound when listening using a home cinema system to that obtained in a cinema.
Music mode: Stereo music is not designed for surround processing, although good surround effects can be obtained through careful production.
As the optimum decoding method varies according to the recording, Music mode allows the user adjustment of the processing characteristics.
Game mode: Video games today are extremely sophisticated, with dramatic 5.1 surround audio tracks. Game mode gives augmented bass management to capture the full effect of game sounds panned to the surrounds, ensuring the bass impact from purer surround effects are fully delivered to the subwoofer.
Dolby Pro Logic IIx
Dolby Pro Logic IIx is an extension of the Dolby Pro Logic matrix-decoding method. The decoder allows the processor to derive seven outputs from a two or multi-channel (up to 5.1 with EX) source to take better advantage of all amplifiers and speakers in a 7.1 setup. As with Pro Logic, there are three different modes available: Movie, Music and Game. Due to different recording methods used for movies and music, you should select the correct mode for your source material.
Dolby Pro Logic
Dolby Pro Logic is a legacy mode that is designed to produce a five-channel output from two-channel source material. It should be used only when the source material is encoded as Dolby Pro Logic; otherwise, we recommend the use of Dolby Pro Logic II. This is because Pro Logic processing on straight stereo sources can sound muffled and compressed.
DTS Neo:6
DTS Neo:6 provides up to six full-band channels of decoding from stereo material. The AVR600 will derive separate channels corresponding to the standard home theatre layout.
Cinema: A movie mode designed to reproduce a movie theatre environment. Neo:6 technology allows various sound elements within a channel or channels to be steered separately, and in a way which follows the original presentation naturally.
Music: A music mode designed to produce a lively, high-integrity surround-effect from most two-channel music sources from all available speakers. Neo:6 music mode expands stereo recordings into the five or six-channel layout without diminishing the subtlety and integrity of the original stereo recording.
Multi-channel source modes
Digital multi-channel source material is normally provided as '5.1 audio'. The '5.1 channels' comprise of: left, centre and right front speakers, two surround speakers and a low frequency effects (LFE) channel. Since the LFE channel is not a full range channel, it is referred to as '1'.
Surround systems decode and reproduce the 5.1 channels directly. Dolby Digital EX and DTS-ES matrix enhanced decoding systems create one extra rear channel from information buried in the two surround signals of the 5.1 source. These EX and ES enhanced systems are sometimes referred to as '6.1' systems. This extra surround back channel is normally reproduced through two separate loudspeakers, creating a '7.1' system.
DTS-ES discrete is a true '6.1' source, with six discretely encoded channels, plus the '1' LFE channel.
Dolby Digital Plus, Dolby True-HD and DTS-HD are high-resolution surround formats found on Blu-Ray and HD-DVD discs
Decoding modes
The modes given in the following table are available for multi-channel digital sources.
Special modes such as DTS-ES 6.1 discrete, Dolby Digital Plus, Dolby Tru-HD and DTS-HD are only available from the correct source material.
| High resolution audio sources | |
| Dolby True-HD | Provides up to 7.1 full channel at 96kHz, 24bit resolution, with potentially no losses in the compression process. Data rates can be up to 18Mbps. |
| Dolby Digital Plus | Provides up to 7.1 discrete channels of audio with less compression than traditional Dolby Digital encoding. Data rates can be up to 6Mbps. |
| DTS-HD Master Audio | Provides up to 7.1 full channel at 96kHz, 24bit resolution, with potentially no losses in the compression process. Data rates can be up to 24.5Mbps. |
| For Dolby Digital sources | |
| Dolby Digital 5.1 | The most commonly used sound format for DVD video, and is also the standard for US television. Dolby Digital 5.1 sources deliver sound with five discrete full-range channels; left, centre, right, surround left, surround right, plus a low frequency effects (LFE) channel. |
| Dolby Digital 5.1 Stereo Downmix | Provides a stereo downmix of the source material for use with headphones. |
| Dolby Digital EX | This is an extension to Dolby Digital decoding that provides a 6-channel output from a 5-channel input. The extra channel is the centre-surround channel (for which the two surround back speakers are used), and is derived from the left and right surround channel information. This decode mode should be used only when the source material is 'Surround EX' encoded (which is normally indicated on the disc packaging and should be detected automatically by the AVR600), but may be used at other times if desired. |
| Dolby Digital 5.1 + Pro Logic IIx Movie | This mode is used to derive information for the individual surround back channels from the surround channels, using the Pro Logic IIx Movie decoder. |
| Dolby Digital 5.1 + Pro Logic IIx Music | This mode is used to derive information for the individual surround back channels from the surround channels, using the Pro Logic IIx Music decoder. The controls for adjusting Pro Logic IIx Music in 'General Setup' can be used in this mode. |
| For DTS sources | |
| DTS 5.1 | Less common than the Dolby Digital format, but generally recognised within the audio industry as being of superior sound quality. DTS 5.1 delivers surround sound with five full range channels plus an LFE channel. |
| DTS 5.1 Stereo Downmix | Provides a stereo downmix of the source material for use with headphones. |
| DTS-ES 6.1 Matrix | This is a 6.1 channel format based on DTS 5.1. It has the sixth channel matrix encoded into the surround left and surround right channels. The sixth channel is a surround centre channel and is directed to the surround back left and surround back right speakers. |
| DTS-ES 6.1 Discrete | This is a true discrete 6.1 channel sound format (unlike DTS-ES Matrix). DTS-ES discrete mode operates only on sources with DTS-ES 6.1 discrete audio encoding. |
| DTS96/24 | Provides up to 5.1 channels of audio at 96kHz, 24bit resolution for superior sound quality compared to standard DTS 5.1 |
Dolby volume

DOLBY
VOLUME
Dolby Volume is a sophisticated new
technology that resolves the problem of
different volume levels between programme content (e.g. a TV show and advert breaks) and between sources (e.g. a rock radio station and DVD, or between two TV stations). It lets the listener enjoy everything at the same preferred listening level without having to reach for the volume control to compensate for the different recording/output levels. This is the Volume Leveller function of Dolby Volume.
Dolby Volume also works in conjunction with the AVR600 volume control setting to compensate for the ear's changing sensitivity at different frequencies depending on how loud the audio is. It is based on a model of how human hearing works. It properly balances low, mid and high frequencies to maintain all the nuances and impact of the original audio regardless of the actual selected playback volume level. This is the Volume Modeller function of Dolby Volume.
Dolby Volume measures, analyses and maintains volume levels based on how people perceive sound. A variety of audio parameters are monitored including spectral- and time-based loudness to ensure that perceived dynamics, timbre and bass performance remain consistent at all volume levels.
Dolby Volume also lets the listener control a programme's dynamic range - the range between loud and quiet sounds. For example, with the volume turned down for late-night viewing, dynamic range can be adjusted so that speech remains clear and loud effects or music passages retain their impact without waking up the family.
Settings
Dolby Volume can be applied to any analogue or digital stereo source or any digital multi-channel source. It is not available in Stereo Direct or on the analogue multi-channel input. Dolby Volume can even be applied to processing of stereo signals (e.g. PLII Music) or when down-mixing a digital multi-channel source (e.g. Dolby Digital 5.1 down to stereo).
Dolby Volume can be enabled and configured separately for each audio input in the Input Config menu. The default is Off for 'audiophile' listening to analogue or digital stereo sources, however you may wish to enable Dolby Volume on some or all inputs to maintain the
same perceived overall listening level between sources and frequency response regardless of the volume setting. There are two modes for Dolby Volume: 'Cinema' and 'Music', which calibrate the system to match the type of audio material generally played on each input. Movie should be selected for sources which typically play movie soundtracks. Music should be selected for all other sources (CD, TV, Satellite, Tuner, etc). Most of the controlling parameters of Dolby Volume are automatic as they are dependent on analysis of the audio signal and the volume setting of the AVR600. However, the Volume Leveller and Calibration Offset controls (see below) can be adjusted to your preference.
Volume Leveller
The Volume Leveller function of Dolby Volume controls how closely quiet and loud sources and programme content are matched to each other, based on the ear's perception of loudness. The range of values is 0 (minimal levelling) to 10 (maximum levelling). The default setting is 9. If the Volume Leveller function is turned off, no level matching between sources and programme material is performed. This is not the same as turning Dolby Volume off as volume related frequency response processing is still active.
When Dolby Volume is being applied to the current input, a Dolby Volume processing mode indicator is shown on the OSD and the front panel display.
Calibration Offset
The Calibration Offset parameter of Dolby Volume allows you to compensate for speaker efficiencies and listening position - effectively moving the reference listening level up or down the volume scale. The default value is 0 and this should normally produce a good result when the AVR600 speaker levels are set using a sound pressure level meter at the listening position (75dB SPL, 'C' weighting, slow response).

The AVR600 is fitted with an internal AM/FM tuner. Depending on your location, it may also be fitted with a DAB tuner (Europe) or Sirius satellite radio connection (Americas). Sirius requires the purchase of the 'SiriusConnect™ Home Tuner' kit and Sirius subscription - please visit www.sirius.com for details.
This section deals with tuner operation, for information on setting up the tuner and installing aerials, see page 14.
When a tuner input is selected, the OSD shows a list of radio presets plus an information panel giving all available information about the current frequency (for AM and FM) or channel (for DAB or Sirius).
The front panel will also give the same information, pressing the INFO key will cycle through the various items of information:
AM
- Processing mode (default)
Frequency - Signal strength
FM
- Processing mode (default)
- Radiotext (if available; shows 'No radiotext' if none present)
Programme type (if available)
Signal strength
DAB
- Processing mode (default)
- Radiotext (if available; shows 'No radiotext' if none present)
Programme type
Signal quality - Bit-rate of transmission
Sirius
- Processing mode (default)
- Artist Name: Song Title
Composer (if available) - Category Name
- Signal quality
Tuning/Channel Selection
When switching to the internal TUNER source, the AVR600 enters the last used tuner band, be it AM / FM / DAB (if fitted) / Sirius (if fitted). Repeatedly pressing TUN cycles through the available tuner bands on your AVR600.
FM/AM analogue radio
Frequency tuning on FM and AM radio is done using the and buttons on the CR102 remote control in TUN device mode. Individual presses move the frequency down and up one step. If you press and hold either of the tuning buttons for two seconds, the tuner scans to the next strong signal. You can stop a scan at any time by pressing one of the tuning buttons again.
In Europe, the internal FM radio is capable of receiving RDS (Radio Data System) radiotext signals that are transmitted on some stations. The RDS information typically includes the radio station name, the music or speech genre as well as additional information related to the current programme. On music stations this is often information on the currently playing track.
DAB digital radio
If your AVR600 is fitted with the optional DAB tuner you will need to scan for available stations before being able to listen to them.
To scan for DAB stations, first select the DAB tuner then press and hold until the display indicates scanning has started. The AVR600 will then scan all the DAB radio frequencies and compile a list of the stations that are available.
When the scan is complete, you can scroll through the station list using the and buttons on the CR102 remote control. To listen to the currently displayed station press the OK. If you do not press OK within two seconds, the display will revert to displaying the currently playing station.
Internet radio
Please see the Network/USB Operation section on page 46 for details of internet radio operation.
Saving and selecting Presets
Preset selection uses the and keys on the remote to browse and OK to select the preset when the CR102 is in TUN device mode.
Up to 99 presets can be stored and these can be from any band, for example Preset 1 could be an AM station, preset two a DAB station, etc. Pressing the OK key causes the next available preset number to be displayed, then pressing the OK key again stores the current frequency/ channel in that preset. If a different preset number is required, press the or keys until the desired number is displayed before pressing the OK key for a second time.
Deleting Presets
When in tuner browse mode (using and to scroll through the presets), the yellow button on the CR102 remote is used to delete the currently highlighted (but not playing) station or frequency.
Sirius satellite radio
In this section it is assumed that you already have a 'SiriusConnect' Home Tuner kit and a Sirius subscription, and that the antenna is already correctly placed to receive Sirius broadcasts. Please visit www.sirius.com for more information.
Add to your subscription
Before being able to receive satellite radio broadcasts you will need to update your Sirius subscription to add the ID number of the Sirius receiver module in your AVR600. The Sirius ID can be found by switching to the Sirius source and selecting channel 0. The AVR600 displays the 12-digit number on the OSD and on the front panel display. You should make a note of this ID number, then select Sirius channel 184 while you apply this ID number to your account at www.sirius.com or by calling 1.888.539.SIRIUS (7474).
Once your subscription is updated, a code is sent over Sirius channel 184. When this code is received the AVR600 displays 'SUBSCRIPTION UPDATED'. This display remains until cleared by pressing any button. The Sirius radio module is now fully operational.
Please note that, depending on your subscription, some channels may not be available. If a channel is not part of your subscription package, you are invited to subscribe to the station -CALL 888-539-SIRIUS To Subscribe'
is displayed and audio is muted. If you have any queries about your subscription, please contact Sirius.
Operation
In addition to the channel and preset selection, previously mentioned, you can also cycle through the station categories (Rock, Pop, Country, etc.) using the and keys. The first station in each category is displayed. You can then scroll through other stations in that particular category using the or buttons on the CR102 remote. On the OSD a star (*") is shown before the category name to show you are scrolling through stations only in the current category. Press OK to select the currently displayed station to listen to it otherwise the display times out and returns to the currently playing station information.
Locking Channels
The Sirius module in the AVR600 has a parental lockout feature which allows you to assign a 4-digit code to any stations you do not wish to be generally available to users.
Channels can be locked out individually by pressing and holding the MODE key. 'Lock?' also appears on the lower line of the On Screen Display. Pressing OK confirms and applies the parental lock to the channel and the display returns to the channel name.
If a locked channel is selected, the audio will be muted and the user prompted on the display to enter the unlocking code. 'Unlock code :_____ ' is displayed.
The default unlock code is 0000.
If the code is entered correctly the audio for this channel unmutes. If the code is not entered correctly, the previously played channel is re-selected.
To remove the parental lock from one of the locked channels (so that the unlocking code is no longer required to listen to them), navigate to the channel, select it and enter the unlocking code to unmute the channel. Press and hold the MODE key until the display shows 'Unlock?' Press OK to remove the lock from the channel.
NOTE
The locking code is reset to 0000 if a factory reset of the AVR600 is performed.
Sirius errors
If an invalid channel is selected, the AVR600 displays 'INVALID CHANNEL' and the channel reverts to the previous valid channel.
If there is a loss of signal, the AVR600 displays 'ACQUIRING SIGNAL:
If the antenna is disconnected, the AVR600 displays 'ANTENNA ERROR'.
During the channel map update, the message 'Updating channels - xxx' is displayed. Note that audio is muted until the update is complete. When complete, the AVR600 retunes to the original channel and restores the audio.
network/usboperation

The AVR600 is fitted with a network audio client which is capable of playing internet radio stations as well as stored music on a network storage device such as a PC, or from a USB flash drive.
For information on installing the AVR600 on your network, see page 16.
The AVR600 supports the following file formats:
MP3
WMA (Windows Media Audio)
WAV
FLAC (Free Lossless Audio CODEC)
MPEG-4 AAC (iTunes) with DRM10 support
Ogg Vorbis
Favourites
You can store tracks or radio stations in your 'favourites' folder for easy access later. Once playing, pressing the FAV+ key adds the track to the 'favourites' folder. Pressing FAV- removes the track from the 'favourites' folder (this key only has an effect if the track is in the favourites folder).
Selecting the playback source
Selecting the network client will allow playback of internet radio stations and stored music on a networked storage device or USB memory device.
To select the network source the CR102 remote must first be in AMP device mode (press M P ). Then press H I T on the remote to select the Network source. You can also cycle to it using the -INPUT/INPUT+ keys on the front panel.
The 'home' page will display all available storage devices, as well as your 'favourites' folder. Navigate through these devices using the , , and keys. Folders that may contain playable files have a symbol, playable files have a symbol. Once you reach the track you wish to play, press OK or the key.
Once playing, pressing OK again or II will pause the track.
Pressing the key skips forward one track. If the last track is reached the key is ignored.
Pressing the key skips back one track. If the first track is reached, the key is ignored.
Pressing and holding the OK or key for two seconds stops playback.
Pressing the RND key on the remote plays the tracks in the current folder in a random order.
Pressing the key on the remote repeats the current track, pressing it again repeats all the files in the current folder, pressing it again cancels the repeat function.
NOTE
For playback from a network device, the network device needs to running a universal plug and play (uPnP) service, such as Windows Media Player 11. This can be downloaded free of charge from www.microsoft.com or installed via the Windows update installer. Windows Vista™ has this functionality built in.
Other free and paid-for uPnP services are available for other computer operating systems. Some network attached storage (NAS) systems include a built-in version of a uPnP service.
USB playback
Insert a USB device into the socket on the AVR600 and select select the network client input. The USB device appears in the list of folders that can be navigated. Navigate to the music file and press the OK or key.
Internet radio stations
Although you can manually enter the URL of an internet radio station, the AVR600 uses the vTuner service to allow easy browsing of internet radio stations and podcasts. To set up this service for your AVR600, please visit www.arcamradio.co.uk
There, you will be asked to enter the Media Access Controller (MAC) address which is the unique ID of your AVR600. This MAC address can be found in the network section of the setup menu.
Once you have entered the MAC address, you can then browse stations and podcasts and set up groups of favourite stations. When you next connect your AVR600 to the internet, these groups will appear in the selection list.
Pressing the INFO key will cycle what is shown on the lower right portion of the front panel display between:
Elapsed Time (default)
Processing mode
■ Album (if available)
Artist (if available)
File information (bitrate, type).
iPod
It is possible to connect an iPod to your AVR600 using either the Arcam rLead or rDock accessories (please contact your dealer).
Connect the 9-way plug into the socket marked 'rLead/rDock' and the audio leads to the AV input. If your iPod has video output and you are using the rDock, connect the composite and S-Video leads to the AV video inputs.
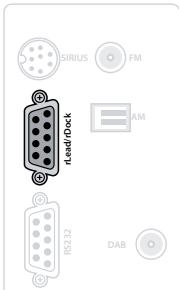
To select the iPod input, press the (iPod) key on the remote while in AMP Device Mode, or cycle to it using the -INPUT/INPUT + keys on the front panel.
external amplifiers
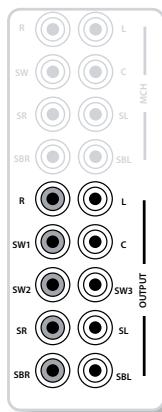
Analogue pre-amplifier outputs
All pre-amplifier analogue outputs are buffered, have a low output impedance and are at line level. They are able to drive long cables or several inputs in parallel if required.
R, L, C
Connect these to the equivalent (Right, Left and Centre) front channels of your power amplifier.
SW1
Main subwoofer output. Connect this to the input of your active subwoofer, if present.
SW2, SW3
Subwoofer 2 and Subwoofer 3 auxiliary outputs. These are equivalent to SW1 but they allow the use of multiple subwoofoers.
SR, SL
Surround Right and Surround Left outputs. Connect these to the Surround Right and Left power amplifier inputs.
SBR, SBL
Surround Back Right and Surround Back Left outputs (only used in 6.1 and 7.1 channel systems). Connect these to the Surround Back Right and Surround Back Left power amplifier inputs.
For 6.1 channel speaker configurations, connect the single Surround Back power amplifier to the SBL output.
The AVR600 allows independent routing and control of analogue audio, Composite and S-Video to a separate set of equipment, typically used for a second living space, e.g., bedroom or lounge. The AVR600 also allows a copy of the Zone 2 analogue audio to be routed to and controlled in a third living space, Zone 3.
The connection guide on the following page shows how the AVR600 is normally connected in a multi-room installation.
Zone 2
Zone 2 receives only signals obtained by the AVR600 from the analogue audio, Composite and S-Video inputs. The analogue inputs are required because there is no analogue-to-digital, digital-to-analogue or DSP processing available for Zone 2 signals - the AVR600 only converts video formats for Zone 1.
For this reason, we recommend that in addition to any digital connections, the Composite and/or S-Video outputs from your source devices are connected to the AVR600.
Video outputs
The Z2 S-Video and/or Composite output connectors of the AVR600 should be connected to the analogue video inputs (usually labelled S-VIDEO IN or
COMPOSITEVIDEO IN) of the display device in Zone 2.
If you wish to make an HDMI connection to Zone 2, you must accept the limitations of the AVR600 video processing system.
HDMI OUT 1 and OUT 2 both carry the same signals (as there is only one video processing engine) and are primarily intended for use in Zone 1. Full HDMI video functionality in Zone 2 can only be achieved if Zone 1 is not being used at the same time.
If Zone 1 is being used at the same time as Zone 2, Zone 2 must follow the Zone 1 source selection if you wish to receive HDMI signals in Zone 2. Zone 2 must also be the same video resolution as Zone 1. If you wish to watch a different source in Zone 2 than is currently showing over HDMI in Zone 1, Zone 2 will be forced to use the analogue video connections into and out of the AVR600.
Due to the complications of using HDMI in Zone 2 we recommend the use of analogue video connections instead, particularly as it is not possible to apply audio lip sync to Zone 2 audio to compensate for video processing delays.
Audio outputs
The Z2 OUT, R and L phono sockets should be connected to the analogue audio inputs (Usually labelled
ANALOGUE AUDIO IN) of the Zone 2 display device, or to the inputs of an additional stereo power amplifier in Zone 2 (for example, the Arcam P38).
Zone 3
A line-level signal from the stereo analogue audio is available for Zone 3. This is a copy of the Zone 2 audio signal, but has its own independent volume control.
Audio outputs
The Z3 OUT, R and L phono sockets should be connected to the inputs of an additional stereo power amplifier in Zone 3 (for example, the Arcam P38).
Zone 2 and 3 control outputs
The AVR600 also allows remote control from Zones 2 and 3.

Z2 IR and Z3 IR
This allows the AVR600 to be controlled remotely from Zone 2 or Zone 3 via Infra-red remote control. Connect a remote IR receiver in Zone 2 or Zone 3 to allow control of the AVR600 from these listening/viewing areas.
For more information on remote IR receivers, see 'Z1 IR' on page 17.
TRIG Z2 and TRIG Z3
This allows the AVR600 to remotely switch on devices in Zone 2 or 3 when the appropriate Zone is selected. For example you could set your television in Zone 2 to switch on
when 'Zone 2' is selected on AVR600.
For more information on triggers, see 'Trigger connectors' on page 17. Please note that not all AV devices have this feature, nor are triggers essential for listening and viewing in a separate zone.
Multi-room connection guide
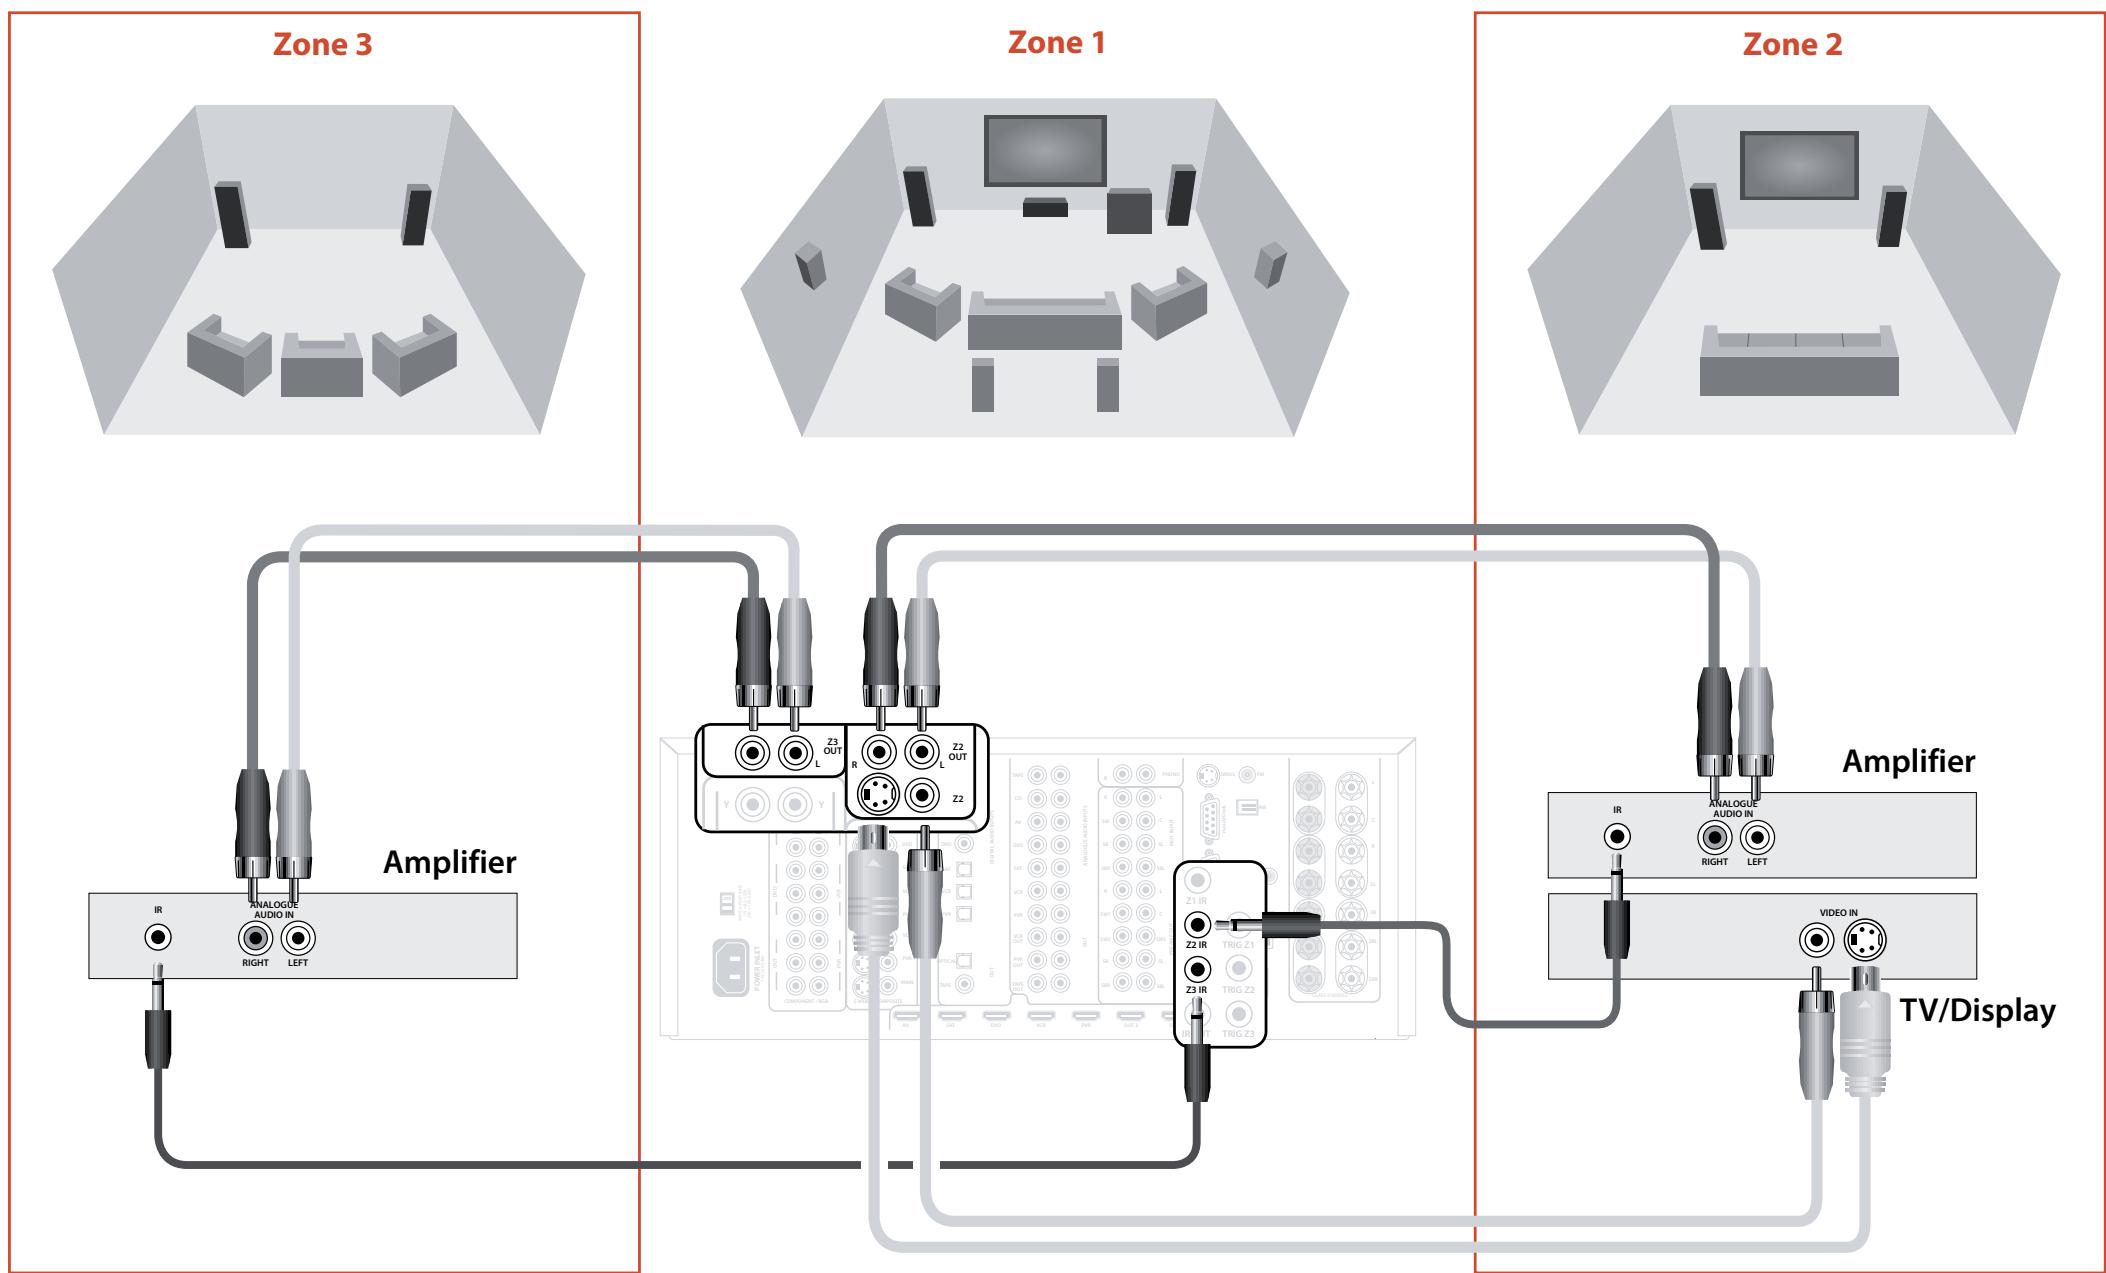

Code Learning
The CR102 comes with a complete library of preprogrammed codes. After you have set up the CR102 for your device, you may find that there are one or more functions on your original remote which do not have a place on the CR102 keypad. For convenience, the CR102 offers a Code Learning feature that allows you to copy up to 16 functions from an original remote control onto the CR102 keypad.
Before you start, make sure that:
The original remote control is working correctly.
The remotes are not pointing at your device.
The remotes have new batteries.
The remotes are not in direct sunlight or under strong fluorescent lights.
Learned functions are mode-dependent: You could theoretically assign up to eight different functions to a single key (the CR102 can handle a total of 16 learned functions).
Example: To copy the 'text hold' function from a TV remote onto the key of your CR102
- Place both remotes on a flat surface, 2 to 5cm apart, with the IR ports facing each other.
-
On the CR102, press and hold (SHFT) until the power LED blinks twice:
-
Press ⑨ ⑦ ⑤ . The power LED blinks twice:
- On the CR102, press the device key that matches the 'source' device (e.g. if you're learning a TV function, press AV).
- On the CR102, press the key to which you want to assign the learned function (e.g. ). The device key blinks rapidly.
- On the original remote, press and hold the function key that you want to learn (e.g. TEXT HOLD) until the CR102 device key blinks twice:
- If you want to learn other functions from the same source device, simply repeat steps 5 and 6 pressing the next key you want to learn.
-
To exit Code Learning mode, press and hold until the device key blinks twice:
-
To use the learned function on the CR102, press the Device Mode key, followed by the function key. In this example, you'd press

followed by
Shifted Learning
You can assign a learned function to a CR102 key without sacrificing its original function.
You can assign Shifted Learning functions to any key except for: Device Mode keys (e.g. AV), SHIFT, or number keys (0 to 9).
- To assign a Shifted Learning function, simply follow Code Learning steps in the previous section. During step 5, press (SHIFT) once before you press the key to which you want to assign the learned function.
- To access the shifted function, press SHIFT and then the target key.
Important notes
Once you start a Code Learning session, you have approximately 10 seconds to conduct each step. Any longer, and a timeout means that you'll have to start the process again.
The Learning feature is mode-specific - you can copy one feature per mode onto a key.
The CR102 can learn approximately 16 functions in total.
To replace a learned function, simply assign a new one to the same key.
- Learned functions are retained when you change batteries.
If Code Learning fails, try altering the distance between the two remotes; make sure that the light in the area is not too bright.
To delete a learned function
- Press and hold until the power LED blinks twice:
- Press ⑨ ⑦ ⑥ . The power LED blinks twice:
- Press a Device Mode key once. For example, if you want to delete one of your learned TV functions, press AV
- Press twice on the key you want to deassign. The handset blinks twice: _^ to confirm.
The original function of the CR102 is restored.
To delete a Shifted Learned function:
To delete a Shifted Learned function, press SHIFT before you press the key to be deassigned (during step 4 above).
To delete ALL learned functions within a given Device Mode
- Press and hold (Shift) until the power LED blinks twice:
- Press ⑨ ⑦ ⑥ - the power LED blinks twice:
- Press the appropriate Device Mode key twice.
Creating Macros
You can program your CR102 to issue a sequence of commands when you press a single key. Any sequence of commands you regularly use can be reduced to a single key press for your convenience.
For example, you might want to turn off your TV, VCR and Satellite at the same time.
A key programmed with a Macro is available in all modes; it will replace that key's different functions for all modes.
A Macro can consist of up to eight key presses.
Example: To assign a Macro to the key
- Press and hold (SHIFT) until the power LED blinks twice:
- Press⑨⑨⑤.
- Press (SRCH) (the Macro will be assigned to this key).
- Press a, , VCR, , SAT, . (These are the Macro steps you wish to record.)
- To store the Macro, press and hold shift until the power LED blinks twice:
Now, whenever you press (SRCH), the CR102 will toggle the power to your TV, VCR and Satellite.
The important word here is 'toggle'. For example, if the TV and Satellite devices are currently on, but the VCR is off, pressing switch off the TV and Satellite and switch on the VCR (rather than switching all three devices on or off). - When using Macros, remember that you may need to change mode or use (SHIFT), and that each key press (including changing modes and pressing (SHIFT) counts as one of the Macro steps. You cannot use a Macro key within another Macro.
If the amount of memory storage for a particular Macro is exceeded, the power LED comes on for five seconds. You can, however, save the macro steps up to that point by pressing SHIFT, or you can cancel the Macro recording by pressing any other key.
The delay between key presses is recorded as part of the Macro. A delay of up to 30 seconds is permitted.
Example: To deassign the Macro associated with the src key
- Press and hold until the power LED blinks twice:
- Press⑨⑨⑤
- Press (SCH).
- Press and hold (SHIFT) until the power LED blinks twice:
Volume punch-through
Volume punch-through means that, no matter which Device Mode is selected, the CR102 controls the AVR600 volume. You don't need to press on your CR102; this feature is switched on by default.
There are times, however, when you might want to control a device's volume directly when in a specific Device Mode.
Example: To cancel volume punch-through for a TV (AV mode)
- Press (A) once.
- Press and hold until the power LED blinks twice:
- Press⑨⑨③.
- Press . The power LED blinks four times.
Now, while in TV (AV) mode, you will be able to control the volume or mute functions of your TV directly.
To completely cancel all volume punchthrough settings
- Press and hold until the power LED blinks twice:
- Press⑨⑨③.
- Press () . The power LED blinks four times
Now, whichever mode you're in, you will have direct access to that device's volume or mute functions, assuming they are available. You would need to switch to AMP mode to alter the AVR600 volume.
Example: To restore default volume punchthrough settings to all Device Modes
- Press and hold until the power LED blinks twice:
- Press⑨⑨③.
- Press . The power key LED blinks twice:
Key Mover
Sometimes you might find that a key you use a lot for your system is in the 'wrong' place on the CR102 keypad for your comfort. It's quite easy to reassign a favourite function to a more accessible key. It is even possible to move a function from one Device Mode to another Device Mode.
Example: To assign the DISP function to the (MENU) key in SAT mode
- Press [SAT]
- Press and hold until the power LED blinks twice:
- Press⑨⑨④.
- Press the key you want to move (e.g. P )
- Press the key you want to move the key to (e.g. MEN ). Now, pressing either DISP or MEN while in SAT Device Mode makes the CR102 transmit the DISP function.
To completely swap over the functionality of the two keys to put the MENU functionality on the DISP key, repeat the above process again, but swap over the DISP and MENU key presses in the example.
Note that the function that is copied over to the new key is always the original function of the old key.
Restore a moved key
To restore a key to its previous function, repeat the example above, pressing the key to be restored twice (copy it back to itself).
Restore all moved keys for a Device Mode
To restore all keys in a Device Mode to their original functional positions, repeat the example above, but press the relevant Device Mode key (e.g. AMP) at points 1,4 and 5 in the example.
Copy a key between Device Modes
It is possible to copy functions between Device Modes. However, remember that button functions are Device Mode specific and therefore effectively 'punch-through' to the original Device Mode when copied over.
The following example copies the AVR600 DIRECT function from the CR102 AMP device mode to the shifted function of the button on AV Device Mode.
- Press and hold until the power LED blinks twice:
- Press ⑨ ⑨ ④.
- Press the Device Mode key of the function you want to move (e.g. AMP).
- Press the function key you want to move (e.g. DIRECT)
- Press the key of the Device Mode you want to copy the function to (e.g. )
- Press the SHIFT button graphic
- Press the key you want to copy the function to (e.g.
If you prefer to copy the key to the main function of the button instead of the 'shifted' function, omit point 6 in the above example.
Mode Mover
If your home entertainment setup contains devices of the same type (e.g. two TVs, perhaps from different manufacturers) you can still control both those devices with the CR102. You simply need to reassign an unused Device Mode key.
NOTE
Before using Mode Mover, make sure both the source and destination Device Mode keys are unlocked (see next section).
Example: To use the SAT key to control a second TV
- Press and hold until the power LED blinks twice:
- Press⑨⑨②.
- Press the Device Mode key for the type of device you want to control (e.g. for a TV, press ()
- Press the Device Mode key you want to use (e.g. SAT).
- Don't forget to set up the CR102 to control the second device, using one of the methods on page 25.
Note that volume punch-through is not applied to a Device Mode that has been copied using Mode Mover. However, AVR600 volume punch-through functionality can be restored when you have used Mode Mover, by copying 一 , + and 四 from the AMP Device Mode to the same physical buttons on the new moved Device Mode using the last example shown in Key Mover.
To restore a moved Device Mode key to its original state
- Press and hold (SHIFT) until the power LED blinks twice:
- Press⑨⑨②.
- Press the Device Mode key you want to restore twice.
Locking/Unlocking a specific Device Mode
When you first unpack your CR102 and insert the batteries, for your convenience it is able to control certain Arcam components automatically (e.g. DVD players, Amplifiers, Tuners and CD Players). We achieve this by preprogramming specific Arcam device codes onto the relevant Device Mode keys, then locking the Device Modes so you don't reprogram them inadvertently.
If you want to override these locked default settings - to control a third-party DVD player, for example - you will first need to unlock DVD Mode before setting up the CR102 using one of the methods described at the start of this guide.
Here are the factory default settings:
| Device Mode | Default status | Default Arcam codes |
| DVD | Locked | 0762 |
| SAT | Unlocked | 1205 |
| AV | Unlocked | 0586 |
| TUN | Locked | 2009 |
| AMP | Locked | 1242 |
| PVR | Unlocked | 1930 |
| VCR | Unlocked | 0111 |
| CD | Locked | 2010 |
Alternative codes are available for multi-room solutions, or in the case of code clashes with other manufacturer's products.
For example:
DVD (system code 12) 1655
AMP (system code 19) 1954
You will need to change the system code on the product you wish to control, as well as the CR102.
NOTE
The AMP Device Mode can only be used to control Arcam amplifiers like the AVR600, either on its default or alternative IR system codes.
To toggle a Device Mode lock setting:
- Press the Device Mode key you want to unlock (e.g. DVD)
- Press and hold (SHIFT) until the power LED blinks twice:
- Press⑨⑧②.
The power LED blinks twice when being locked, and blinks four times when being unlocked.
If you enter an invalid key sequence, the power LED gives one long blink and returns to normal operation.
While the Device Mode key is locked, the Direct Code Setup and Move Mode functions are not available.
Mode key IR punch-through
The Mode key IR punch-through default is 'on'.
Example: To set the Mode key IR punchthrough to AMP
- Press and hold until the power LED blinks twice:
- Press ⑨ ⑦ ① . The power LED blinks twice:
- Press to punch through IR from it.
Now, whenever you press and release a Mode key, the IR data assigned to AMP is transmitted, no matter what the current mode is (i.e. it 'punches through' any other device).
To cancel Mode key IR punch-through
- Press and hold shift until the power LED blinks twice:
- Press ⑨ ⑦ ① . The power LED blinks twice:
- Press until the power LED blinks twice:
Resetting the CR102
Resetting the CR102 will erase all learned functions across all modes, as well as some other programmed functions like Macros. It will not reset the Device Mode keys; these will remain programmed to your choice of component.
- Press and hold until the power LED blinks twice:
- Press ⑨ ⑧ ⑩. The power LED blinks four times:
- Press and hold (SHIFT) until the power LED blinks twice:
- Press⑨⑨③.
- Press . The power key LED blinks twice:
- Press and hold until the power LED blinks twice:
- Press ⑨ ⑦ ① . The power LED blinks twice:
- Press . The power key LED blinks twice:
Command summary
Direct code setup
(e.g. AV mode, NNNN=code number)
AV SHHT NNNN
Library search
(e.g. AV mode)
AV SHIFT 9 ⑨ 1 until unit turns off
Shift to save
Code blink back
AV SHIFT ⑨ ⑨ 0
① count blinks for first N
② count blinks for second N
③ count blinks for third N
count blinks for fourth N
Code learning
(e.g. AV mode fast forward key)
SHF 975 AV (many rapid blinks)
(Press key on original remote that you wish to copy)
SHIFT
Delete a learned function
(e.g. AV mode fast forward key)
SHF ⑨⑤ N
Delete all learned functions with a device
(e.g. AV mode)
SHF ⑨⑦5AVAV
Creating macros
(e.g. SRCH key)
SHIFT 9 95 SRCH AV VCR SAT SHFT
Deassign macro
SHIFT ⑨ ⑨ ⑤ SRCH SHIFT
Key mover
(e.g. SAT mode, DISP key to MENU key)
SATSHIFT ⑨⑨④ DISPMENU
Mode mover
(e.g. change SAT to TV(AV))
SHF ⑨②AV SAT
Restore device mode
(e.g. restore SAT)
SHF ⑨⑨② SAT
Locking/unlocking a mode
(e.g. DVD mode)
DVID SHIFT ⑨⑧②
(i.e. two blinks for lock)
DWD SHIFT ⑨⑧②
(i.e. four blinks for unlock)
Cancel all volume punch-through
SHF ⑨③+
Restore volume punch-through
SHIFT ⑨③
Mode key IR punch-through
SHIF ⑨⑦① AMP
Cancel mode key IR punch-through
SHIFT ⑨ ⑦ ①
NOTE
As elsewhere in this Handbook, a single 'blink' of the red LED behind the power button is indicated by the symbol .
Device codes
The tables that begin on page 58 (in the final section of this Handbook) list the four-figure codes for different manufacturers' devices.
Use these when setting your CR102 up to control your devices, as described in Method 1 (see page 25).
If more than one code number is listed, try the first number. If the results are unsatisfactory, continue trying the numbers for that manufacturer to get the best 'fit' with the functionality required.
If the manufacturer of your equipment is not listed, you can try Method 2, the Library Search (see page 25). This allows you to scan through every set of codes contained in the CR102's memory.
trouble-shooting
| Problem | Check that... |
| There are no lights on the unit | ■ the power cord is plugged into the AVR600 and the mains socket it is plugged into is switched on.■ the power button is pressed in.If a red LED is present, the AVR600 is in standby mode. Press any button on the front panel or remote control. |
| The unit responds erratically or not at all to the remote control | ■ there are fresh batteries in the remote control.■ the front panel window is visible and you are pointing the remote control towards it. |
| The front panel display is blank | ■ the display hasn't been turned off. Press the DISPLAY button on the front panel or remote control. |
| No picture is being produced | ■ your viewing device is turned on and switched to display your AVR600. Test by pressing the MENU button on the AVR600 or on the remote and look for the main menu screen on your display device.■ the correct video input is selected on the AVR600.■ the video source is on, is operating normally, and is in 'play' mode if appropriate.■ you have the AVR600 in a video resolution that is compatible with the connection you are using and with your display device. For example, composite video is only capable of carrying 480i and 576i resolutions. Test this by pressing and holding the OK key for more than two seconds to force 480i / 576i output resolutions. |
| There are bright edges or 'ghosts' on the picture | ■ the cables used for analogue video connections are designed to carry video (i.e., they are 75Ω coaxial cables).■ ensure the 'sharpness' control on your display device is switched off or set to near minimum.■ for HDMI connections, try using a shorter cable or alternatively a different brand. |
| No sound is produced | ■ the correct input has been selected.■ the source equipment is on, is operating normally and is in 'play' mode if appropriate.■ the volume is turned up to a reasonable level and the AVR600 is not in mute mode. |
| The sound is poor or distorted | ■ you have not excessively increased the input sensitivity (i.e. reduced the maximum input signal voltage) in the Input Config. menu if an analogue input is being used.■ you have selected the correct size of speakers to suit your system in the setup menu. |
| Sound only comes from some of the speakers | ■ you have an appropriate surround source selected and playing. ■ the DVD disc is encoded in the appropriate format, and the correct format has been selected in the disc start menu of the DVD player (if applicable). ■ the DVD player has been set to output 'bitstream' audio on the digital output. ■ the display window indicates that the disc you are playing is a multichannel recording (you may need to press the INFO key several times until you get to the 'incoming format' display). ■ all the speakers are correctly connected to the speaker terminals and are secure. ■ you have not selected 'Stereo' as the decoding mode. ■ your speaker balance is correct. ■ you have configured the AVR600 to include all the speakers in your system. |
| Unable to select Dolby Digital or DTS decoding modes | The AVR600 can only apply Dolby Digital and DTS decoding to sources which have been encoded in the same format. Check that: ■ digital source is selected and connected. ■ the source is playing appropriately encoded material. ■ the DVD disc is encoded in the appropriate format and that the correct format has been selected in the disc start menu of the DVD player (if applicable). ■ the DVD player has been set to output 'bitstream' audio on the digital output. |
| When playing a Dolby Digital DVD, the AVR600 selects Dolby Pro Logic | ■ you have a digital connection from your DVD player. ■ sometimes Dolby Digital DVD discs contain material at either the beginning or the end of the main movie that is not in full 5.1 format, but in two-channel or Pro Logic decoding. |
| Hum on the analogue input | ■ all cables are making a good connection. If necessary withdraw the cable from the connector and plug it fully in again (turn the power off before doing this). ■ the connections inside the source cable connector are not broken or badly soldered. ■ if the hum originates only when one particular source component is connected, that an aerial cable, or dish connection to this source is ground isolated. Contact your installation contractor. |
| There is radio or television reception interference | ■ where the interference is coming from. Switch off each source component in turn, then any other equipment. Most electronic equipment does generate low levels of interference. ■ try re-arranging cabling from the nuisance source away from other cabling. ■ ensure that the cabling used is high quality, specified for its purpose, and is properly screened. ■ if the problem persists, contact your dealer. |
| Problem | Check that... |
| The source switching changes randomly or freezes on one source | ■ there are no static or impulse interference problems caused by nearby power equipment switching, e.g., heating or air conditioning control. Switch the AVR600 off, wait ten seconds, then switch it on again to clear an operating problem. Contact your installer if the problem returns or persists. ■ there is no direct sunlight shining on the infra-red detector behind the front panel display. |
| Volume is always too loud when I turn on | ■ the ‘max on volume’ setting is not set too high. |
| When Zone 2 or 3 is put into standby, the main zone is also switched off | ■ the ‘zone standby’ setting in the setup menu is set to LOCAL. |
| When a USB memory device is connected, ‘USB’ is not shown in the network client's list of folders | ■ a USB memory device is connected that conforms to the mass storage class. ■ a USB hub is not being used. |
| If files on a USB memory device cannot be played: | ■ the USB device is formatted in FAT16 or FAT32. ■ the USB device does not have multiple partitions. ■ the files are in a compatible format. |
| If files on a computer cannot be played | ■ the files are in a compatible format. ■ the computer is connected via a network and not USB – the AVR600 USB port cannot be used for a direct connection to a computer |
| If you cannot connect to a wired network | ■ the Ethernet cable you are using is correctly connected between the AVR600 and the network hardware. ■ the network is set up for fixed IP addressing and you have the AVR600 set to use DHCP. ■ the network is set up for DHCP and you have the AVR600 set to use fixed IP addressing. |
| If you cannot connect to a favourite internet radio station | ■ the station is still broadcasting or is not congested – try again later. |
| If the internet radio station sound quality is poor or broken | ■ the radio station does not have a low bit rate (use the INFO key to find this or look on the OSD). ■ the network is not slow or congested. |
specifications
Continual improvement policy
Arcam has a policy of continual improvement for its products. This means that designs and specifications are subject to change without notice.
| Continuous power output (20Hz-20kHz at 0.05% THD), per channel | |
| 2 channels driven | 150W |
| All channels driven | 120W |
| THD at full rated power | <0.2% |
| Residual noise & hum | <0.25mV unweighted 20Hz - 22kHz |
| Inputs | |
| Phono input: | |
| Input sensitivity at 1kHz | 5mV |
| Input impedance | 47kΩ |
| Signal/noise ratio (CCIR, 65W) | 88dB |
| Overload margin | 31dB |
| Line inputs: | |
| Nominal sensitivity | 500mV-4V (user adjustable) |
| Input impedance | 47kΩ |
| Signal/noise ratio (CCIR, 65W) | 100dB |
| Preamplifier outputs | |
| Max output level | 6V RMS |
| Output impedance | <50Ω |
| THD+N (20Hz-20kHz) | -100dB |
| Video inputs | |
| Component video signal/noise | 85dB |
| Composite video signal/noise | 70dB |
| Headphone output | |
| Maximum output level into 600Ω | 4V p-p |
| Output impedance | <5Ω |
| General | |
| Mains voltage | 110-120V or 220-240V |
| Power consumption (maximum) | 1.5kVA (Thermal dissipation approx. 2300 BTU/hour) |
| Power consumption (idle, typical) | 120VA (Thermal dissipation approx. 410 BTU/hour) |
| Power consumption (standby) | 3VA |
| Dimensions W x D x H (including feet) | 432 x 450 x 180mm |
| Weight (net) | 25.0kg |
| Weight (packed) | 28.0kg |
| Supplied accessories | Mains lead CR102 remote control 4 x AAA batteries Manual HDMI lead support bar DAB aerial (if DAB module fitted) FM aerial AM loop aerial Calibration microphone |
| E&OE | |
| NOTE: All specification values are typical unless otherwise stated. | |

Worldwide Guarantee
This entitles you to have the unit repaired free of charge, during the first two years after purchase, at any authorised Arcam distributor provided that it was originally purchased from an authorised Arcam dealer or distributor. This is extended by a further three years (five years total) on the return of your product registration card. The manufacturer can take no responsibility for defects arising from accident, misuse, abuse, wear and tear, neglect or through unauthorized adjustment and/or repair, neither can they accept responsibility for damage or loss occurring during transit to or from the person claiming under the guarantee.
The warranty covers:
Parts and labour costs for two years (or five years total on return of your product registration card) from the purchase date. After two years (or five years total on return of your product registration card) you must pay for both parts and labour costs. The warranty does not cover transportation costs at any time.
Claims under guarantee
This equipment should be packed in the original packing and returned to the dealer from whom it was purchased, or failing this, directly to the Arcam distributor in the country of residence.
It should be sent carriage prepaid by a reputable carrier - not by post. No responsibility can be accepted for the unit whilst in transit to the dealer or distributor and customers are therefore advised to insure the unit against loss or damage whilst in transit.
For further details contact Arcam at:
Arcam Customer Support Department,
Pembroke Avenue, Waterbeach, CAMBRIDGE, CB25 9QR, England
or via www.arcam.co.uk.
Problems?
If your Arcam dealer is unable to answer any query regarding this or any other Arcam product please contact Arcam Customer Support at the above address and we will do our best to help you.
On-line registration
You can register your product on-line at www.arcam.co.uk.
Correct disposal of this product

This marking indicates that this product should not be disposed with other household waste throughout the EU.

To prevent possible harm to the environment or human health from uncontrolled waste disposal and to
conserve material resources, this product should be recycled responsibly.
To dispose of your product, please use your local return and collection systems or contact the retailer where the product was purchased.
device code tables
TV
| 888 | 0294 | ||
| A.R. Systems | 0067 0382 0586 | ||
| 0404 0485 | |||
| Accent | 0039 0067 0586 | ||
| Acoustic Research | 1299 | ||
| Acura | 0039 | ||
| Adcom | 0655 | ||
| Addison | 0683 0138 | ||
| ADL | 1247 | ||
| Admiral | 0123 0193 0448 | ||
| 0294 | |||
| Advent | 0906 | ||
| Adyson | 0247 0246 | ||
| AEA | 0067 0586 | ||
| AEG | 0636 1193 | ||
| Agashi | 0246 0294 0247 | ||
| Aiko | 0039 0067 0586 | ||
| 0246 0065 0463 | |||
| 0294 0247 | |||
| Aim | 0067 0586 0783 | ||
| 0238 0736 | |||
| Aiwa | 1535 | ||
| Akai | 0039 0632 0238 | ||
| 0586 0067 0463 | |||
| 0065 0783 0193 | |||
| 0759 0744 0745 | |||
| 0578 0510 0247 | |||
| 0661 0246 0294 | |||
| 0208 0407 0636 | |||
| 1067 0503 1289 | |||
| 1278 | |||
| Akashi | 0890 0039 | ||
| Akiba | 0485 0067 0586 | ||
| Akira | 0448 | ||
| Akito | 0067 0586 | ||
| Akura | 0067 0294 0586 | ||
| 0698 0039 0744 | |||
| Alaron | 0246 | ||
| Alba | 0039 0067 1067 | ||
| 0586 0744 0448 | |||
| 0400 0698 0246 | |||
| 0193 0517 0473 | |||
| Alkos | 0065 | ||
| All-Tel | 0895 | ||
| Allorgan | 0247 | ||
| Allstar | 0067 0586 | ||
| Amplivision | 0247 0400 | ||
| Amstrad | 0039 0067 0294 | ||
| 0463 0586 1067 | |||
| Anam | 0067 0680 | 0586 | 0039 |
| Anam National | 0067 | 0586 | 0680 |
| Andersson | 1193 | 1179 | |
| Anglo | 0039 | 0294 | |
| Anitech | 0039 | 0294 | 0067 |
| 0586 | |||
| Ansonic | 0400 | 0067 | 0586 |
| 0039 | 0698 | 0404 | |
| 0193 | |||
| AOC | 0039 | 0090 | 0123 |
| 0138 | 0208 | ||
| Aolingpike | 0294 | ||
| Apex Digital | 1247 | ||
| Apollo | 0503 | ||
| Arc en Ciel | 0139 | ||
| Arcam | 0246 | 0247 | |
| Ardem | 0516 | 0744 | 0067 |
| 0663 | 0586 | ||
| Aristona | 0586 | 0067 | |
| Arthur Martin | 0193 | ||
| ASA | 0135 | 0376 | 0100 |
| Asberg | 0067 | 0586 | |
| Asora | 0039 | ||
| Astra | 0067 | 0586 | |
| Asuka | 0247 | 0246 | 0294 |
| ATD | 0728 | ||
| Atlantic | 0067 | 0586 | 0246 |
| Atori | 0039 | ||
| Auchan | 0193 | ||
| Audiosonic | 0039 | 0067 | 0404 |
| 0850 | 0139 | 0586 | |
| 0744 | 0745 | 0247 | |
| 0400 | 0294 | 0516 | |
| Audioton | 0247 | 0516 | 0400 |
| 0294 | |||
| Audioworld | 0728 | ||
| Aumark | 0090 | ||
| Autovox | 0247 | ||
| AWA | 0039 | 0404 | 0067 |
| 0586 | 0246 | 0636 | |
| 0247 | 0138 | 0294 | |
| 1406 | |||
| Axxent | 0039 | ||
| Axxon | 0744 | ||
| B&D | 1247 | ||
| Baier | 0906 | ||
| Baihe | 0039 | 0294 | |
| Baile | 0039 | 0404 | 0691 |
| Baird | 0139 | 0373 | 0247 |
| 0238 | 1226 |
| Bang & Olufsen | 0595 | ||
| BaoHuaShi | 0294 | ||
| Baosheng | 0039 | ||
| Barco | 0193 | ||
| Basic Line | 0039 0404 0067 | ||
| 0193 0698 0586 | |||
| 0247 0485 1067 | |||
| Bastide | 0247 | ||
| Bauer | 0039 | ||
| Baur | 0039 0067 0542 | ||
| 0225 0586 1535 | |||
| Bazin | 0247 | ||
| Beaumark | 0208 | ||
| Beijing | 0039 0238 0256 | ||
| 0294 0404 0512 | |||
| 0691 | |||
| Beko | 0400 0744 0065 | ||
| 0516 0745 0067 | |||
| 0448 1067 0586 | |||
| 0636 0838 | |||
| Belson | 1221 | ||
| Bennett | 0586 0067 | ||
| Beon | 0067 0586 0448 | ||
| Berthen | 0698 | ||
| Best | 0400 | ||
| Bestar | 0067 0586 0400 | ||
| 0404 | |||
| Bestar-Daewoo | 0404 | ||
| Binatone | 0247 | ||
| Black Diamond | 0850 1067 0586 | ||
| 0783 1193 | |||
| Black Strip | 0065 | ||
| Blaupunkt | 0225 0230 0357 | ||
| 0485 0200 | |||
| Blue Sky | 0067 0586 0698 | ||
| 0744 1067 0517 | |||
| 0745 1939 0485 | |||
| 1221 0838 1393 | |||
| Boots | 0247 0039 | ||
| Bosch | 0357 | ||
| BPL | 0067 0586 0926 | ||
| Brandt | 0139 0655 0365 | ||
| 0373 0590 | |||
| Brandt Electronique | 0365 | ||
| Brinkmann | 0067 0586 0698 | ||
| 0448 0516 | |||
| Brionvega | 0067 0586 | ||
| Britannia | 0246 0247 | ||
| Brother | 0294 | ||
| Bruns | 0516 | ||
| BSR | 0193 | ||
| Bush | 0039 1067 0067 | ||
| 0744 0698 0193 | |||
| 0404 0728 0294 | |||
| 0517 0238 0247 | |||
| 0586 0808 1289 | |||
| 1278 | |||
| C-Tech | 0926 0921 | ||
| Caihong | 0039 | ||
| Caishi | 0921 | ||
| Capsonic | 0294 | ||
| Carad | 0640 0067 0586 | ||
| 0698 1067 | |||
| Carena | 0485 0067 0586 | ||
| Carrefour | 0100 0067 0586 | ||
| Carver | 0200 | ||
| Cascade | 0039 0067 0586 | ||
| Casio | 0067 0586 0193 | ||
| Cathay | 0067 0586 | ||
| CCE | 0067 0247 0586 | ||
| Celestial | 0850 | ||
| Centrex | 0810 0921 | ||
| Centrum | 1067 |
| Centurion | 0067 | 0586 | |
| CGE | 0104 | 0448 | 0400 |
| 0193 | |||
| Changcheng | 0039 | 0294 | 0404 |
| 0691 | |||
| Changfei | 0039 | 0404 | |
| Changfeng | 0294 | 0783 | |
| Changhai | 0039 | ||
| Changhong | 0850 | 0039 | 0294 |
| 0538 | |||
| Chengdu | 0039 | ||
| Ching Tai | 0039 | ||
| Chun Yun | 0039 | ||
| Chunfeng | 0039 | 0294 | |
| Chung Hsin | 0138 | ||
| Chunsun | 0039 | ||
| Cimline | 0039 | ||
| Citizen | 0090 | ||
| City | 0039 | ||
| Clarivox | 0067 | 0448 | 0586 |
| 0100 | |||
| Clatronic | 0067 | 0400 | 0744 |
| 0294 | 0586 | 0247 | |
| 0039 | 0636 | 1193 | |
| Clayton | 1067 | ||
| CMS | 0246 | ||
| CMS hightec | 0247 | ||
| Cobolt | 0921 | ||
| Concorde | 0039 | ||
| Condor | 0067 | 0400 | 0586 |
| 0246 | 0039 | 0448 | |
| 0193 | 0294 | ||
| Conia | 0784 | 0850 | |
| Conrac | 0838 | ||
| Conrad | 0067 | 0586 | |
| Conrowa | 0039 | 0294 | 0728 |
| 0783 | 1200 | ||
| Contec | 0039 | 0246 | 0294 |
| 0067 | 0586 | ||
| Continental Edison | 0139 | 0517 | |
| Cosmel | 0039 | 0067 | 0586 |
| Crosley | 0104 | 0193 | |
| Crown | 0039 | 0742 | 0067 |
| 0400 | 0516 | 0586 | |
| 0448 | 0517 | 0744 | |
| 0636 | 0745 | 0238 | |
| 0683 | 1067 | ||
| CS Electronics | 0246 | ||
| Curtis Mathes | 0090 | 0123 | |
| Cytronix | 1328 | ||
| D-Vision | 0067 | 0586 | |
| Daewoo | 0664 | 0691 | 0404 |
| 1939 | 0529 | 0067 | |
| 0586 | 0039 | 0246 | |
| 0247 | 1167 | 0208 | |
| 0200 | 0910 | 0138 | |
| 0906 | 0895 | ||
| Dainichi | 0246 | ||
| Dansai | 0067 | 0586 | 0294 |
| 0065 | 0246 | 0039 | |
| 0247 | 0238 | ||
| Dantax | 0400 | 0516 | 0744 |
| 0636 | 0745 | ||
| Datsura | 0238 | ||
| Dawa | 0039 | 0067 | 0586 |
| Daytek | 0728 | 0736 | 1406 |
| Dayton | 0039 | ||
| Daytron | 0039 | 0404 | 0067 |
| 0586 | |||
| Dayu | 0404 | 0691 | |
| de Graaf | 0238 | 0578 | 0193 |
| DEC | 0890 | 0921 |
| Decca | 0067 1167 | 0586 0247 |
| Deitron | 0067 | 0586 0404 |
| Denko | 0294 | |
| Denver | 0067 1219 | 0586 0636 |
| Desmet | 0067 | 0586 0039 |
| Diamant | 0067 | 0586 |
| Diamond | 0294 0855 | 0728 0039 |
| 0246 | 0890 | |
| 0850 | ||
| Digatron | 0067 | 0586 |
| Digihome | 1179 | |
| Digiline | 0067 0698 | 0586 0135 |
| DigLogic | 0067 | 0586 |
| Digitex | 0850 | |
| Digitor | 0067 | 0586 |
| DigiX | 0910 | |
| DiK | 0067 | 0586 |
| Dixi | 0039 0247 | 0067 0586 |
| DL | 0921 0617 | 0810 0067 |
| 0895 | ||
| Domeos | 0698 | |
| Domland | 0424 | |
| Dongda | 0039 | |
| Donghai | 0039 | |
| Dream Vision | 1734 | |
| Dreon | 0067 | |
| DSE | 0850 | |
| DTS | 0039 | |
| Dual | 0247 0586 | 0373 0067 |
| 0382 0424 | ||
| 0193 1167 | 0661 | |
| 1179 | 1067 | |
| Dual Tec | 0247 | |
| Dumont | 0100 | 0247 |
| Dunai | 0193 | |
| Durabrand | 0067 | 0586 0208 |
| Dux | 0067 | 0586 |
| DVX | 0921 | |
| Dynatech | 0247 | |
| Dynatron | 0067 | 0586 |
| e:max | 0636 | |
| Easy Living | 1278 | 1289 |
| Ecco | 0803 | 0736 |
| ECE | 0067 | 0586 |
| Edison-Minerva | 0517 | |
| Elbe | 0400 | 0193 0067 |
| 0586 | 0640 0247 | |
| Elcit | 0193 | |
| Electrograph | 1785 | |
| Elekta | 0039 0294 | 0067 0586 |
| 0294 | ||
| Elfunk | 1238 | 1067 |
| ELG | 0067 | 0586 |
| Elin | 0067 | 0246 0578 |
| 0586 | 0135 0193 | |
| 0039 | ||
| Elite | 0067 | 0586 |
| Elta | 0039 | 0294 0246 |
| Emerson | 0208 | 0744 0067 |
| 0586 | 0100 1939 | |
| 0516 | 0400 0193 | |
| 0698 | ||
| Enzer | 0783 | |
| Erae | 1401 | |
| Erres | 0067 | 0586 |
| ESC | 0067 | 0586 0247 |
| Estèle | 0193 | |
| Ether | 0039 |
| Etron | 0039 | 0067 | 0586 |
| 0193 | 0850 | ||
| Eurofeel | 0294 | 0247 | |
| EuroLine | 0067 | ||
| Euroman | 0246 | 0294 | 0067 |
| 0586 | 0247 | 0400 | |
| Europa | 0067 | 0586 | |
| Europhon | 0067 | 0193 | 0247 |
| 0586 | 0246 | ||
| Evesham | 1278 | 1289 | |
| Excel | 0067 | 0586 | |
| Expert | 0193 | ||
| Exquisit | 0067 | 0586 | |
| Fagor | 0067 | 0586 | |
| FairTec | 1221 | ||
| Family Life | 0067 | 0586 | |
| Feilang | 0039 | ||
| Fellu | 0039 | ||
| Feiyan | 0294 | ||
| Feiyue | 0039 | ||
| Fenner | 0404 | 0039 | |
| Ferguson | 0067 | 0139 | 0655 |
| 0365 | 0373 | 0590 | |
| 0586 | 0065 | 0683 | |
| 0138 | 0578 | 0473 | |
| 1067 | |||
| Fidelity | 0193 | 0246 | 0542 |
| 0067 | 0586 | 0294 | |
| Filsai | 0247 | ||
| Finlandia | 0238 | 0376 | 0578 |
| 0193 | 0373 | ||
| Finlux | 0067 | 0135 | 0100 |
| 0586 | 0744 | 0376 | |
| 0247 | 0193 | 0745 | |
| 0661 | 0522 | 0510 | |
| 0503 | 0448 | 0636 | |
| 0838 | |||
| Firstar | 0039 | ||
| Firstline | 0039 | 0067 | 0246 |
| 0586 | 0247 | 0404 | |
| 0698 | 0744 | 0193 | |
| 1939 | 0238 | 1067 | |
| 1221 | 0838 | 1393 | |
| 1193 | 1401 | ||
| Fisher | 0247 | 0238 | 0400 |
| 0193 | |||
| Flint | 0067 | 0485 | 0586 |
| 0640 | 0294 | ||
| Force | 1179 | ||
| Formenti | 0067 | 0193 | 0586 |
| 0516 | 0246 | ||
| Formenti-Phoenix | 0246 | ||
| Fortress | 0123 | ||
| Fraba | 0067 | 0586 | 0400 |
| 0039 | 0067 | 0586 | |
| 0400 | 0529 | 0640 | |
| Frontech | 0193 | 0294 | 0247 |
| 0039 | |||
| Fujimaro | 0895 | ||
| Fujitsu | 0713 | 0883 | 0247 |
| 0193 | 0039 | 0382 | |
| 0067 | 0586 | ||
| Fujitsu General | 0039 | 0247 | 0193 |
| Fujitsu Siemens | 1328 | 1289 | 1278 |
| 1193 | |||
| Funai | 0698 | 0294 | |
| Furi | 0294 | ||
| Furichi | 0890 | ||
| Futronic | 0294 | 0890 | |
| Future | 0067 | 0586 | |
| Galaxi | 0067 | 0586 | 0193 |
| Galaxis | 0400 | 0448 | 0067 |
| 0586 | |||
| Galeria | 0039 | ||
| Gateway | 1785 |
| GBC | 0193 | 0039 | 0404 |
| GE | 0373 | 0208 | 0123 |
| 0590 | 0139 | 0365 | |
| 0655 | |||
| Geant Casino | 0193 | ||
| GEC | 0067 | 0193 | 0247 |
| 0586 | |||
| Geloso | 0039 | 0193 | 0404 |
| General | 0139 | ||
| General Electric | 0373 | ||
| General Technic | 0039 | ||
| Genesis | 0039 | 0067 | 0586 |
| Genexxa | 0193 | 0067 | 0586 |
| 0039 | |||
| Gericom | 0895 | 1328 | 1247 |
| 0910 | |||
| Gevalt | 1401 | ||
| Giant | 0247 | ||
| Go Video | 0090 | ||
| Goldfunk | 0698 | ||
| Goldhand | 0246 | ||
| GoldStar | 0039 | 0067 | 0208 |
| 0400 | 0407 | 0247 | |
| 0586 | 0246 | 0193 | |
| 0139 | 0636 | 0744 | |
| 0745 | 0485 | ||
| Gooding | 0517 | ||
| Goodmans | 0664 | 1289 | 1278 |
| 0067 | 1067 | 0529 | |
| 0247 | 0586 | 0744 | |
| 0373 | 0698 | 1939 | |
| 0404 | 0294 | 0039 | |
| 0517 | 0065 | 0510 | |
| 0590 | 0365 | 0691 | |
| 0910 | 0617 | 1406 | |
| Gorenje | 0400 | ||
| Gradienté | 0067 | 0683 | 0200 |
| 0586 | |||
| Graetz | 0193 | 0744 | 0067 |
| 0586 | 1193 | ||
| Granada | 0067 | 0586 | 0238 |
| 0256 | 0247 | 0138 | |
| 0503 | 0365 | 0590 | |
| 0193 | 0373 | 0578 | |
| Grandin | 0067 | 0586 | 0039 |
| 0193 | 0640 | 0744 | |
| 0745 | 0698 | 0404 | |
| 0485 | 1067 | 0895 | |
| 1221 | 0910 | ||
| Gronic | 0247 | 0193 | |
| Grundig | 0225 | 0538 | 1401 |
| 0067 | 0100 | 0517 | |
| 0586 | 0617 | 0473 | |
| 0736 | 0039 | 0400 | |
| 0208 | 1406 | 0373 | |
| Grunkel | 1193 | ||
| H&B | 0838 | ||
| Haaz | 0736 | ||
| Haier | 0728 | 0921 | 0294 |
| Haihong | 0039 | ||
| Haiyan | 0294 | ||
| Halifax | 0294 | 0246 | 0247 |
| Hallmark | 0208 | ||
| Hammerstein | 0294 | 0090 | |
| Hampton | 0246 | 0247 | |
| Hankook | 0208 | ||
| Hanseatic | 0067 | 0586 | 0529 |
| 0193 | 0691 | 0424 | |
| 0664 | 0400 | 0039 | |
| 0247 | 0407 | 0744 | |
| 0838 | 0516 | ||
| Hantarex | 0039 | 0067 | 0586 |
| Hantor | 0067 | 0586 | |
| Harsper | 0895 | ||
| Harwa | 0803 | 1226 | 1299 |
| Harwood | 0039 0067 0586 | |
| 0517 | ||
| Hauppauge | 0067 0586 | |
| Havermy | 0123 | |
| HCM | 0039 0067 0586 | |
| 0247 0448 0294 | ||
| Hedzon | 0586 0067 | |
| helios | 0895 | |
| Hema | 0247 0039 | |
| Hifivox | 0139 | |
| Higashi | 0246 | |
| Highline | 0294 0067 0586 | |
| Hinari | 0039 0238 0067 | |
| 0586 0193 0473 | ||
| 0517 0294 | ||
| Hisawa | 0485 0640 0744 | |
| HISense | 1393 0238 0039 | |
| 0538 0783 1200 | ||
| 1238 0810 0586 | ||
| Hitachi | 0193 0208 1255 | |
| 0039 0608 0135 | ||
| 0138 0503 0373 | ||
| 0247 0139 0511 | ||
| 0529 0067 0538 | ||
| 0586 0578 0664 | ||
| 0774 1067 1167 | ||
| 1200 0522 1511 | ||
| 0542 0510 1606 | ||
| 1179 | ||
| Hitachi Fujian | 0138 | |
| Hitsu | 0039 0640 0485 | |
| Hoher | 0744 0895 | |
| Home Electronics | 0636 | |
| Hongmei | 0039 0123 0294 | |
| Hongyan | 0294 | |
| Hornyphon | 0067 0586 | |
| Hoshai | 0485 | |
| Hua Tun | 0039 | |
| Huafa | 0039 | |
| Huanghaimei | 0039 | |
| Huanghe | 0039 | |
| Huanglong | 0039 | |
| Huangshan | 0039 0294 | |
| Huanyu | 0246 0404 0294 | |
| Huaqiang | 0294 | |
| Huari | 0294 | |
| Hugoson | 0920 1247 | |
| Hygashi | 0247 0246 | |
| Hyper | 0039 0246 0247 | |
| Hypson | 0067 0294 0586 | |
| 0744 0745 0247 | ||
| 0485 1067 0698 | ||
| 0516 | ||
| Hyundai | 0067 0895 0586 | |
| 0736 0890 0783 | ||
| 0906 | ||
| Iberia | 0067 0586 | |
| ICE | 0247 0294 0067 | |
| 0039 0586 0246 | ||
| ICES | 0246 | |
| Ict | 0067 1167 0586 | |
| IISonic | 1406 | |
| Iiyama | 1247 0920 | |
| Imperial | 0067 0104 0193 | |
| 0400 0448 0586 | ||
| Imperial Crown | 0039 0294 0404 | |
| 0691 | ||
| Indiana | 0067 0586 | |
| InFocus | 0782 1194 | |
| Ingenlen | 0193 0517 0640 | |
| 0744 | ||
| Ingersoll | 0039 | |
| Inno Hit | 0039 0067 0586 | |
| 0247 1193 |
| Kingsley | 0246 | |
| Kioto | 0736 | 0586 |
| Kiton | 0586 | 0067 0698 |
| KLL | 0067 | |
| Kneissel | 0067 | 0400 0640 |
| 0404 | 0529 0586 | |
| Kolin | 0138 | |
| Kolster | 0067 | 0586 |
| Kongque | 0039 | 0294 |
| Konichi | 0039 | |
| Konka | 0067 | 0586 0744 |
| 0448 | 0617 0784 | |
| Kontakt | 0517 | |
| Korpel | 0067 | 0586 |
| Korting | 0400 | |
| Kosmos | 0067 | 0586 |
| Kotron | 0294 | |
| Koyoda | 0039 | |
| Kreisen | 0906 | |
| KTV | 0247 | |
| Kuaile | 0039 | 0294 |
| Kuba | 0193 | |
| Kuba Electronic | 0193 | |
| Kulun | 0039 | |
| Kunlun | 0238 | 0256 0294 |
| 0404 | 0691 | |
| Kyoshu | 0448 | 0294 |
| Kyoto | 0193 | 0246 0247 |
| L&S Electronic | 0895 | 0744 |
| LaSAT | 0516 | 0400 |
| Lavis | 1067 | 0067 0193 |
| Leader | 0039 | |
| Lecson | 0067 | 0586 |
| Legend | 0039 | |
| Lenco | 0067 | 0039 0193 |
| 0404 | 0586 0617 | |
| 1067 | ||
| Lenoir | 0039 | |
| Levis Austria | 0067 | 0586 |
| Lexsor | 1226 | |
| Leyco | 0067 | 0294 0586 |
| LG | 0067 | 0208 0400 |
| 0039 | 0407 1295 | |
| 0586 | 0247 0744 | |
| 0246 | 0674 0193 | |
| 0090 | 0138 0636 | |
| 0139 | 0728 0745 | |
| 1667 | 1221 | |
| Liesenk & Tter | 0067 | 0357 0586 |
| Liesenkotter | 0067 | 0357 0586 |
| Lifetec | 0067 | 0039 0404 |
| 0698 | 0542 1067 | |
| 1167 | 0586 0294 | |
| 0713 | 1278 1289 | |
| 0744 | ||
| Lloyd's | 0039 | |
| Local Malaysia TV | 0728 | |
| Lodos | 1067 | 1179 |
| Loewe | 0542 | 0663 0820 |
| 0067 | 0586 0400 | |
| Logik | 0090 | 0728 0803 |
| 0039 | 0294 0910 | |
| 1247 | 1067 | |
| Logix | 0698 | |
| Longjiang | 0294 | |
| Luma | 0067 | 0193 0586 |
| 0404 | 0039 | |
| Lumatron | 0067 | 0586 0193 |
| 0247 | 0294 | |
| Lux May | 0067 | 0039 0586 |
| Luxor | 1193 | 0510 | 0522 |
| 0238 | 0578 | 0193 | |
| 0376 | 0503 | 1067 | |
| 0247 | 0661 | ||
| LXI | 0208 | ||
| Madison | 0067 | 0586 | |
| Magnadyne | 0193 | ||
| Magnafon | 0246 | ||
| Magnavox | 0067 | 0586 | 0736 |
| 0810 | |||
| Magnum | 0744 | 0067 | 0586 |
| 0745 | 1319 | ||
| Mandor | 0294 | ||
| Manesth | 0067 | 0247 | 0586 |
| 0294 | 0065 | 0193 | |
| Manhattan | 0067 | 0906 | 0586 |
| 0698 | 1067 | 0193 | |
| 0808 | |||
| Marantz | 0067 | 0586 | |
| Mark | 0067 | 0586 | 0247 |
| 0246 | 0404 | 0039 | |
| 0744 | 0745 | ||
| Master's | 0529 | 0067 | |
| Mastro | 0810 | 0728 | |
| Masuda | 0039 | 0294 | 0067 |
| 0247 | 0586 | ||
| Matsui | 0039 | 0067 | 0586 |
| 0065 | 0517 | 0238 | |
| 0247 | 0473 | 0463 | |
| 0485 | 0193 | 0225 | |
| 0365 | 0744 | 1067 | |
| Matsushita | 0680 | ||
| Matsuyama | 0617 | ||
| Maxam | 0294 | ||
| Maxdorf | 0803 | ||
| Maxent | 1785 | ||
| MCE | 0039 | ||
| Meck | 0921 | 0728 | |
| Mediator | 0067 | 0586 | |
| Medion | 0067 | 0698 | 0744 |
| 1067 | 0838 | 0586 | |
| 0542 | 1167 | 0728 | |
| 1278 | 1289 | 0910 | |
| 1319 | |||
| Megas | 0640 | ||
| Megatron | 0208 | ||
| MEI | 1067 | 0067 | 0586 |
| Meile | 0294 | ||
| Melectronic | 0039 | 0376 | 0067 |
| 0542 | 0139 | 0373 | |
| 0193 | 0135 | 0247 | |
| 0404 | 0510 | 0522 | |
| 0246 | 0586 | 0664 | |
| 0225 | 0691 | 0744 | |
| Memorex | 0039 | 1067 | 0208 |
| 0680 | 0090 | ||
| Memphis | 0039 | ||
| Mercury | 0067 | 0039 | 0586 |
| Mermaid | 0067 | ||
| Merritt | 0578 | 0193 | |
| Metronic | 0655 | ||
| Metz | 0418 | 0477 | 0776 |
| 1193 | 0225 | 0067 | |
| 0586 | 0617 | 0698 | |
| 1067 | 1563 | ||
| MGA | 0208 | 0067 | 0586 |
| Micromaxx | 0067 | 0586 | 0698 |
| 1067 | 0838 | ||
| Microstar | 0838 | ||
| MicroTEK | 0850 | ||
| Mikomi | 1179 | ||
| Minato | 0067 | 0586 | |
| Minerva | 0100 | 0517 | 0225 |
| 0138 | |||
| Minoka | 0067 | 0586 |
| Mitsubishi | 0138 0237 0542 |
| 0067 0208 0586 | |
| 0238 1067 | |
| Mitsuri General | 0193 |
| Mivar | 0246 0400 0639 |
| 0247 | |
| Monaco | 0039 |
| Morgan's | 0067 0586 |
| Motorola | 0123 |
| MTC | 0090 0400 0542 |
| 0193 0246 | |
| MTLogic | 0744 |
| Mudan | 0039 0238 0256 |
| 0294 | |
| Multitech | 0067 0586 0516 |
| 0698 1067 | |
| Multitech | 0039 0246 0516 |
| 0067 0247 0400 | |
| 0586 0294 | |
| Murphy | 0246 0193 |
| Musikland | 0067 0586 |
| MyCom | 1406 0208 |
| Myryad | 0586 0067 |
| NAD | 0208 0193 |
| Naiko | 0067 0636 0586 |
| Nakimura | 0404 0067 0586 |
| Nanbao | 0039 0294 |
| Nansheng | 0294 |
| Naonis | 0193 |
| NAT | 0256 |
| National | 0256 0238 0538 |
| NEC | 0200 0617 1200 |
| 0208 0039 0485 | |
| 0404 0247 0067 | |
| 0586 0294 0538 | |
| 1734 0529 0683 | |
| 0691 | |
| Neckermann | 0067 0448 0247 |
| 1535 0230 0193 | |
| 0357 0230 0193 | |
| 0542 | |
| NEI | 0067 0586 0193 |
| Neovia | 0895 1401 0906 |
| 1406 | |
| Netsat | 0067 0586 |
| Neufunk | 0067 0039 0586 |
| 0640 0744 | |
| New Tech | 0067 0039 0586 |
| 0373 0247 | |
| Newave | 0039 0208 0123 |
| Nicamagic | 0246 |
| Nikkai | 0065 0067 0586 |
| 0246 0247 0294 | |
| 0039 | |
| Nikkei | 0744 |
| Nikko | 0208 |
| Nishi | 0512 |
| Nobilex | 0067 0294 0512 |
| Nobiko | 0100 0246 |
| Nogamatic | 0139 |
| Nokia | 0193 0503 0510 |
| 0578 0636 0522 | |
| 0661 0238 0404 | |
| 0376 0640 0139 | |
| Nordic | 0247 |
| Nordmende | 0139 0744 0921 |
| 0373 0590 0225 | |
| 0067 0586 0365 | |
| 0193 1289 1278 | |
| Norfolk | 0193 |
| Normerel | 0067 0586 |
| Novak | 0067 0586 |
| Novatronic | 0067 0135 0404 |
| 0586 | |
| NU-TEC | 0485 0728 |
| Nurnberg | 0193 | ||
| Oceanic | 0193 0578 | 0238 0510 | 0503 |
| Odeon | 0294 | ||
| Okano | 0400 0294 | 0067 0039 | 0586 |
| Olidata | 1406 | ||
| Omega | 0294 | ||
| Omni | 0810 | 0921 | 0728 |
| Onwa | 0632 | 0463 | |
| Opera | 0067 | 0586 | |
| Optimus | 0680 | ||
| Optonica | 0123 | ||
| Orbit | 0067 | 0586 | |
| Orion | 0067 0744 | 0473 0039 | 0586 0294 |
| 0444 0910 | 0586 1226 | ||
| Orline | 0067 | 0586 | |
| Ormond | 0698 0586 | 1067 | 0067 |
| Osaki | 0247 | 0294 | 0067 |
| 0404 | 0586 | ||
| Osio | 0067 | 0586 | |
| Osume | 0067 | 0586 | |
| Otto Versand | 1535 | 0067 | 0247 |
| 0373 | 0123 | 0542 | |
| 0586 | 0225 | 0139 | |
| 0256 | 0039 | ||
| Pacific | 0067 | 0586 | 1167 |
| 0744 | 1067 | 0473 | |
| Pael | 0246 | ||
| Palladium | 0400 | 0067 | 0448 |
| 0744 | 1167 | 1535 | |
| 0230 | 0586 | 0357 | |
| 0193 | 0247 | ||
| Palsonic | 0294 | 0803 | 0067 |
| 0247 | 0407 | 0728 | |
| 0586 | 0448 | 0808 | |
| 1226 | |||
| Panama | 0039 | 0247 | 0294 |
| 0246 | 0067 | 0586 | |
| Panasonic | 0680 | 0256 | 0138 |
| 1340 | 0067 | 0586 | |
| 0193 | 0238 | 0538 | |
| 0926 | 0578 | 0883 | |
| 0208 | 0090 | ||
| Panavision | 0067 | 0586 | |
| Panda | 0039 | 0810 | 0238 |
| 0256 | 0294 | 0736 | |
| 0921 | 0538 | 0728 | |
| Papouw | 0067 | 0586 | |
| Pathe Cinema | 0193 | 0246 | 0400 |
| Pathe Marconi | 0139 | ||
| Pausa | 0039 | ||
| Peng Sheng | 0921 | ||
| Penney | 0208 | 0090 | |
| Perdio | 0193 | 0067 | 0246 |
| 0586 | |||
| Perfekt | 0067 | 0586 | |
| Philco | 0067 | 0104 | 0448 |
| 0586 | 0193 | 0400 | |
| 0511 | 0208 | ||
| Philex | 0193 | ||
| Philharmonic | 0247 | ||
| Philips | 0067 | 0586 | 0373 |
| 0208 | 0138 | 0404 | |
| 0802 | 0039 | 0230 | |
| Phocus | 1319 | 0744 | |
| Phoenix | 0067 | 0586 | 0400 |
| 0516 | 0193 | 0246 | |
| Phonola | 0067 | 0586 | 0246 |
| Pilot | 0586 | 0067 | 0742 |
| 0736 |
| Pioneer | 0790 0067 0139 |
| 0200 0193 0586 | |
| 1290 0400 0373 | |
| 0516 0542 | |
| Pionier | 0400 0516 |
| Plantron | 0067 0586 0294 |
| 0039 | |
| Playsonic | 0744 0067 0247 |
| 0745 | |
| Polaroid | 0895 |
| Policom | 0139 0193 0100 |
| 0104 | |
| Poppy | 0039 |
| Portland | 0404 1939 |
| Powerpoint | 0517 0067 0586 |
| 0728 | |
| Precision | 0247 |
| Premier | 0039 0294 |
| President | 0890 |
| Prima | 0039 0294 1299 |
| Princess | 0728 |
| Prinston | 1067 |
| Profex | 0039 0193 |
| Profi | 0039 |
| Profitronic | 0067 0586 |
| Proline | 0067 0586 0655 |
| 0664 1406 | |
| Prosonic | 0067 0586 0400 |
| 0404 0698 0744 | |
| 0246 0247 | |
| Protech | 0039 0067 0586 |
| 0247 0294 0448 | |
| 0698 0193 0516 | |
| 1067 | |
| Proton | 0208 0039 0674 |
| Provision | 0529 0067 0586 |
| 1067 0744 | |
| PVision | 1221 0906 |
| Pye | 0067 0586 0404 |
| Pymi | 0039 |
| Qingdao | 0238 0256 0294 |
| Quasar | 0680 0895 0039 |
| Quelle | 0067 1535 0100 |
| 0104 0139 0542 | |
| 0247 0357 0135 | |
| 0698 0586 0225 | |
| 0230 0294 1067 | |
| 0376 0039 | |
| R-Line | 0067 0586 0193 |
| Radialva | 0139 0193 0067 |
| 0586 | |
| Radiola | 0067 0586 0247 |
| Radiomarelli | 0067 0586 |
| RadioShack | 0067 0586 0208 |
| Radiotone | 0039 0067 0586 |
| 0400 0448 0698 | |
| 0294 1067 | |
| Rank | 0100 |
| Rank Arena | 0632 0783 |
| RBM | 0100 |
| RCA | 0090 0648 0123 |
| 0655 0208 0590 | |
| 0365 0373 0783 | |
| Realistic | 0208 |
| Recor | 0067 0448 0586 |
| Rectiligne | 0067 0586 |
| Rediffusion | 0578 0376 |
| Redstar | 0067 0586 |
| Reflex | 0067 0586 1067 |
| 0698 | |
| Relisys | 0895 0906 0907 |
| 1328 | |
| Reoc | 0744 0664 1939 |
| Revox | 0067 0586 0400 |
| Rex | 0193 0294 |
| RFT | 0400 0294 0067 |
| 0586 0516 | |
| Rhapsody | 0246 |
| Ricoh | 0067 0586 |
| Rinex | 0803 0448 |
| Roadstar | 0039 1067 0294 |
| 0448 0067 0586 | |
| 0744 0698 1219 | |
| Rodex | 0067 0586 |
| Rover | 0907 |
| Rowa | 0067 0294 0728 |
| 0039 0247 0742 | |
| 0246 0617 0586 | |
| Royal Lux | 0400 0365 |
| Rukopir | 0586 0067 |
| Saba | 0139 0655 0193 |
| 0590 0365 0373 | |
| 0578 0680 0744 | |
| Sagem | 0640 0485 0860 |
| 1343 0648 | |
| Saige | 0039 |
| Saisho | 0039 0294 0247 |
| 0193 | |
| Saivod | 0067 0586 1193 |
| 0698 0742 1067 | |
| Sakai | 0193 |
| Sakyno | 0485 |
| Salora | 0193 0578 0238 |
| 0510 | |
| Salsa | 0365 |
| Sampo | 1785 0039 0123 |
| 0208 0680 | |
| Samsung | 0090 0648 0674 |
| 0512 0617 0796 | |
| 0067 0208 0586 | |
| 1279 0039 0123 | |
| 1265 0247 0400 | |
| 0294 0246 0238 | |
| 0193 0256 0655 | |
| Sandra | 0246 0247 |
| Sanjian | 0294 |
| Sansui | 0067 0759 0586 |
| 0736 0632 0485 | |
| 0783 1401 | |
| Santon | 0039 |
| Sanyo | 0238 1238 0400 |
| 0246 0247 0039 | |
| 0538 0193 0067 | |
| 0138 0586 0516 | |
| 0200 | |
| Sanyuan | 0039 0123 |
| Save | 0067 0586 |
| SBR | 0067 0586 |
| Schaub Lorenz | 0578 0744 0636 |
| 0516 0404 1221 | |
| Schneider | 0067 1167 0586 |
| 0698 0424 0382 | |
| 0373 0247 1067 | |
| 0193 0744 1939 | |
| 0100 | |
| Scotch | 0208 |
| Scotland | 0193 |
| Scott | 1219 0208 |
| Sears | 0208 |
| Seaway | 0664 |
| Seelver | 0586 1067 0067 |
| SEG | 0067 0247 0586 |
| 0294 1067 0698 | |
| 0517 0039 0193 | |
| 0664 0246 1193 | |
| 1939 0744 | |
| SEI | 1535 0193 0067 |
| 0586 | |
| Sei-Sinudyne | 1535 0067 0586 |
| Seitech | 1247 | ||
| Seleco | 0193 | 0294 | 0376 |
| Sencora | 0039 | ||
| Sentra | 0065 | 0039 | |
| Serie Dorada | 0208 | ||
| Serino | 0640 | 0485 | 0246 |
| 0123 | |||
| Shancha | 0294 | ||
| Shanghai | 0039 | 0238 | 0256 |
| 0294 | |||
| Sharp | 0123 | 0039 | 1223 |
| 1423 | 0683 | 0680 | |
| 0230 | 0790 | 1193 | |
| Shen Ying | 0039 | ||
| Shencai | 0039 | 0294 | |
| Sheng Chai | 0039 | ||
| Sheng Chia | 0039 | 0123 | |
| Shenyang | 0039 | 0294 | 0783 |
| Sherwood | 0039 | ||
| Shintoshi | 0067 | 0586 | |
| Shivaki | 0067 | 0586 | 0473 |
| 0404 | 0208 | ||
| Show | 0448 | 0039 | |
| Siam | 0067 | 0586 | |
| Siarem | 0193 | ||
| Siemens | 0067 | 0225 | 0230 |
| 0357 | 0586 | ||
| Siera | 0067 | 0586 | 0617 |
| Siesta | 0400 | ||
| Silva | 0067 | 0586 | 0246 |
| 0475 | 0193 | ||
| SilverCrest | 1067 | 0067 | 0586 |
| Singer | 0039 | 0067 | 0586 |
| 0365 | 0193 | ||
| Sinotec | 0803 | ||
| Sinudyne | 0193 | 1535 | 0067 |
| 0586 | |||
| Sky | 0067 | 0910 | 0208 |
| 0586 | |||
| SKY Brasil | 0910 | ||
| Skymaster | 0135 | ||
| Skysonic | 0783 | ||
| Skyworth | 0067 | 0586 | 0039 |
| 0294 | 0728 | 0783 | |
| Sliding | 0895 | 0910 | |
| SLX | 0698 | ||
| Smaragd | 0517 | ||
| Soemtron | 0895 | 1328 | |
| Solavox | 0193 | 0578 | 0067 |
| 0586 | |||
| Songba | 0039 | ||
| Soniko | 0067 | 0586 | |
| Sonitron | 0238 | 0400 | 0247 |
| Sonneclair | 0067 | 0586 | |
| Sonoko | 0039 | 0067 | 0586 |
| 0294 | 0247 | ||
| Sonolor | 0193 | 0238 | 1535 |
| 0578 | |||
| Sontec | 0067 | 0586 | 0400 |
| 0039 | |||
| Sony | 1535 | 0104 | 1681 |
| 0680 | 0683 | 1781 | |
| 0383 | 0067 | 0586 | |
| 0123 | 0200 | ||
| Sound & Vision | 0404 | 0067 | 0586 |
| Sounddesign | 0208 | ||
| Soundwave | 0067 | 0448 | 0586 |
| 0745 | |||
| Sowa | 0090 | 0256 | 0208 |
| Soyea | 0803 | ||
| Spectra | 0039 | ||
| Ssangyong | 0039 |
| Staksonic | 0039 | ||
| Standard | 0039 0586 | 0067 1067 | 0247 0404 |
| Starlite | 0039 0586 | 0193 0294 | 0067 06294 |
| Stern | 0193 | 0294 | |
| Strato | 0067 0039 | 0586 | 0294 |
| Strong | 1193 0067 | 1179 0586 | 1067 039 |
| Stylandia | 0247 | ||
| Sunic Line | 0067 | 0586 | |
| Sunkai | 0485 0586 | 0640 0517 | 0067 0895 |
| Sunstar | 0067 0294 | 0586 | 0039 |
| Sunwatt | 0485 | ||
| Sunwood | 0067 | 0586 | 0039 |
| Superla | 0246 | 0247 | |
| SuperScan | 0123 | ||
| Supersonic | 0238 0294 | 0586 0485 | 0728 |
| SuperTech | 0039 0586 | 0246 | 0067 |
| Supra | 0208 | 0404 | 0039 |
| Susumu | 0365 | ||
| Sutron | 0039 | ||
| SVA | 0617 | 0895 | |
| Swisstec | 0910 | ||
| Sydney | 0246 | 0247 | |
| Synco | 0090 | 0123 | 0208 |
| Syline | 0067 | 0586 | |
| Sytong | 0246 | ||
| T+A | 0477 | ||
| Tacico | 0208 | 0039 | |
| Tai Yi | 0039 | ||
| Taishan | 0039 | 0404 | |
| Tandberg | 0139 | 0193 | |
| Tandy | 0123 | 0247 | 0193 |
| Targa | 1401 | ||
| Tashiko | 0247 | 0680 | 0200 |
| 0246 | 0193 | ||
| Tatung | 0039 | 0067 | 0586 |
| 0090 | 0247 | 1401 | |
| 1289 | 1278 | 1221 | |
| TCL | 0736 | 0728 | |
| TCM | 0744 | 1319 | 0838 |
| Teac | 0039 | 0728 | 0067 |
| 0542 | 0294 | 1067 | |
| 0448 | 0586 | 0485 | |
| 0742 | 0698 | 0247 | |
| 0736 | 1939 | 0208 | |
| 0200 | 0744 | 1179 | |
| 1785 | |||
| TEC | 0247 | 0039 | 0365 |
| 0067 | 0586 | 0193 | |
| Tech Line | 0067 | 0586 | 0698 |
| 1193 | |||
| Tech Lux | 1219 | ||
| Technics | 0680 | ||
| TechniSat | 0067 | 0586 | 0193 |
| Technisson | 0744 | 1319 | |
| Technosonic | 0067 | 0586 | |
| Techwood | 1193 | ||
| Tecnimagen | 0586 | ||
| Teco | 0039 | 0123 | 0208 |
| 0294 | 0683 | ||
| Tedelex | 0247 | 0448 | 0636 |
| 0039 | 0736 | 0238 | |
| 0728 | 0617 | 0921 | |
| 0067 | 0586 | ||
| Teiron | 0039 | ||
| Teknika | 0090 | ||
| Tele System | 0906 |
| Teleavia | 0139 | 0373 | |
| Telecor | 0067 | 0586 | 0193 |
| 0247 | 0424 | ||
| Telefunken | 0655 | 0104 | 0590 |
| 0139 | 0617 | 0365 | |
| 0728 | 0373 | 0742 | |
| 0850 | 0926 | 0784 | |
| 0067 | 0586 | 0516 | |
| 0744 | 0376 | ||
| Telefusion | 0067 | 0586 | |
| Telegazi | 0067 | 0193 | 0294 |
| 0586 | |||
| Telemeister | 0067 | 0586 | |
| Telesonic | 0067 | 0586 | |
| Telestar | 0039 | 0067 | 0586 |
| Teletech | 0039 | 0067 | 0586 |
| 0698 | 1067 | ||
| Teleton | 0247 | 0193 | |
| Televideon | 0193 | 0246 | |
| Teview | 0067 | 0586 | |
| Tempest | 0039 | 0067 | 0586 |
| 0294 | |||
| Tennessee | 0067 | 0586 | |
| Tensai | 0067 | 0586 | 0247 |
| 0039 | 0135 | 0404 | |
| 0407 | 0745 | 0193 | |
| 1067 | |||
| Tenson | 0039 | ||
| Tesla | 0067 | ||
| Tevion | 1278 | 1328 | 0067 |
| 1289 | 0586 | 0838 | |
| 0698 | 1167 | 0744 | |
| 1067 | 1319 | ||
| Texet | 0246 | 0247 | 0404 |
| 0039 | |||
| Thomson | 0139 | 0655 | 0590 |
| 0373 | 0365 | 0067 | |
| 0586 | 0246 | ||
| Thorn | 0065 | 0138 | 0067 |
| 0139 | 0104 | 0373 | |
| 1535 | 0529 | 0542 | |
| 0586 | 0365 | 0404 | |
| 0100 | |||
| Thorn-Ferguson | 0138 | 0373 | 0139 |
| 0365 | 0529 | 0065 | |
| Tiane | 0123 | ||
| Tiny | 1226 | 1299 | |
| TMK | 0208 | ||
| Tobo | 0039 | 0294 | |
| Tokai | 0067 | 0586 | 0698 |
| 0193 | 0247 | 0404 | |
| 0039 | 1067 | ||
| Tokaido | 1067 | ||
| Tokyo | 0246 | 0065 | |
| Tongguang | 0294 | ||
| Tongtel | 0810 | 0617 | |
| Topline | 1067 | 0698 | |
| Toshiba | 0538 | 0090 | 0680 |
| 1538 | 0039 | 0065 | |
| 0123 | 1734 | 1194 | |
| 1319 | 0100 | 1295 | |
| 0744 | 0294 | 0247 | |
| 0139 | 0225 | 0648 | |
| 0674 | 0728 | 0067 | |
| 1193 | |||
| Towada | 0247 | ||
| Toyoda | 0039 | 0294 | |
| Trakton | 0039 | 0294 | 0247 |
| Trans Continens | 0698 | 0247 | 1067 |
| 0067 | 0586 | 0516 | |
| TRANS-continents | 0895 | ||
| Transonic | 0067 | 0728 | 0586 |
| 0742 | 0485 | 0617 | |
| 0542 | 0294 | 0448 | |
| 0039 |
| Transtec | 0246 | ||
| Triad | 0067 | 0586 | |
| Trident | 0247 | ||
| Tristar | 0294 | ||
| Triumph | 0376 | 0586 | 0067 |
| TunTEX | 0039 | ||
| TVTEXT 95 | 0586 | ||
| Uher | 0067 | 0586 | 0404 |
| 0448 | 0516 | 0400 | |
| 0510 | |||
| Ultravox | 0404 | 0246 | 0193 |
| 0067 | 0586 | ||
| Unic Line | 0067 | 0586 | 0503 |
| 0485 | |||
| United | 0744 | 0067 | 0745 |
| 0586 | 1067 | 0617 | |
| Universal | 0744 | 0067 | 0586 |
| Universum | 0067 | 0376 | 0104 |
| 0135 | 0225 | 0294 | |
| 0503 | 0400 | 0522 | |
| 0510 | 0230 | 0448 | |
| 0542 | 0100 | 0193 | |
| 0586 | 0357 | 1535 | |
| 0698 | 0247 | 0139 | |
| 0661 | 0039 | 1067 | |
| 0200 | 1193 | 1179 | |
| 0648 | |||
| Univox | 0067 | 0586 | 0193 |
| Utax | 0193 | ||
| V7 Videoseven | 1785 | 0208 | 0910 |
| 1406 | 1247 | ||
| Vestel | 0067 | 0193 | 0247 |
| 0586 | 0698 | 1067 | |
| 1193 | |||
| Vexa | 0039 | 0067 | 0586 |
| Victor | 0683 | 0680 | |
| Videocon | 0538 | ||
| Videologic | 0246 | ||
| Videologique | 0246 | 0247 | |
| VideoSystem | 0067 | 0586 | |
| Videotechnic | 0246 | 0247 | 0404 |
| Videoton | 0193 | ||
| Vidtech | 0208 | ||
| Viewpia | 0906 | ||
| ViewSonic | 1785 | ||
| Visiola | 0246 | ||
| Vision | 0067 | 0294 | 0586 |
| 0247 | |||
| Vortec | 0067 | 0586 | |
| Voxson | 0193 | 0208 | 0067 |
| 0586 | 0448 | ||
| Waltham | 0247 | 0448 | 0067 |
| 0586 | 0698 | 0139 | |
| 1067 | 0193 | 0473 | |
| Wards | 0208 | ||
| Warumaia | 0404 | 0691 | |
| Watson | 0067 | 1067 | 1278 |
| 1289 | 0586 | 0193 | |
| 0039 | 0698 | 0424 | |
| 1406 | 0357 | ||
| Watt Radio | 0193 | 0246 | |
| Wega | 0067 | 0586 | |
| Wegavox | 0039 | 0067 | 0586 |
| Weipai | 0039 | ||
| Welltech | 0744 | ||
| Weltblick | 0067 | 0586 | 0247 |
| Westinghouse | 0920 | ||
| Weston | 0067 | 0586 | |
| Wharfdale | 0067 | 0926 | 0586 |
| White | 0067 | 0246 | 0586 |
| Westinghouse | 1939 | ||
| Windsor | 0698 | 1067 | |
| Windy Sam | 0586 | ||
| Wintel | 0744 |
| World-of-Vision | 0910 1319 1247 | 0920 1328 | 0895 0907 |
| Worldview | 0485 | ||
| X-View | 1221 | ||
| Xenius | 0664 | 0691 | |
| Xiahua | 0039 0803 | 0294 | 0728 |
| Xianghai | 0039 | ||
| Xiangyang | 0294 | ||
| Xihu | 0294 | ||
| Xingfu | 0039 | ||
| Xinghai | 0294 | ||
| Xingyu | 0039 | ||
| XLogic | 0728 | 0890 | |
| Xoro | 1226 | 1247 | |
| Xrypton | 0067 | 0586 | |
| Yamaha | 0680 | 1606 | |
| Yamishi | 0485 0247 | 0067 | 0586 |
| Yingge | 0039 | ||
| Yokan | 0067 | 0586 | |
| Yoko | 0067 0586 | 0247 | 0294 |
| 0039 | 0400 | ||
| 0246 | |||
| Yonggu | 0039 | ||
| Yousida | 0039 | ||
| Yuhang | 0039 | ||
| Zanussi | 0247 | ||
| Zenith | 1939 | 0208 | 1295 |
| Zhuhai | 0039 | 0404 | |
| Zonda | 0728 |
VCR
| Accent | 0102 | ||
| Admiral | 0078 | ||
| Adventura | 0030 | ||
| Adyson | 0102 | ||
| Aiko | 0308 | ||
| Aim | 0308 | 0672 | 0378 |
| Aiwa | 0030 | 0378 | 0382 |
| 0067 | 0772 | 1167 | |
| 0062 | |||
| Akai | 0067 | 0136 | 0345 |
| 0672 | 0382 | 0270 | |
| 0378 | |||
| Akashi | 0102 | ||
| Akiba | 0102 | ||
| Akura | 0102 | ||
| Alba | 0308 | 0102 | 0382 |
| 0030 | 0345 | 0378 | |
| 0111 | |||
| Allorgan | 0270 | ||
| Allstar | 0111 | ||
| America Action | 0308 | ||
| Amstrad | 0030 | 0308 | 0102 |
| Anam | 0067 | 0256 | 0270 |
| 0308 | |||
| Anitech | 0102 | ||
| Ansonic | 0030 | ||
| Aristona | 0111 | ||
| ASA | 0067 | 0111 | |
| Asha | 0270 | ||
| Asuka | 0102 | 0067 | 0111 |
| 0030 | |||
| Audiosonic | 0308 | ||
| Audiovox | 0067 | 0308 | |
| AVP | 0382 | 0030 | |
| AWA | 0067 | 0308 | 0672 |
| 0073 | |||
| Baird | 0136 | 0308 | 0134 |
| 0030 | |||
| Basic Line | 0308 | 0102 | 0134 |
| Beaumark | 0270 | ||
| Beko | 0134 | ||
| Bell & Howell | 0134 | ||
| Bestar | 0308 | ||
| Black Diamond | 0672 | 0308 | |
| Black Panther | 0308 | ||
| Blaupunkt | 0256 | 1592 | 0111 |
| Blue Sky | 0067 | 0378 | 0102 |
| 0382 | 0308 | 0030 | |
| 0510 | 0672 | 1167 | |
| Bondstec | 0102 | ||
| Brandt | 0350 | ||
| Brinkmann | 0378 | ||
| Broksonic | 0378 | ||
| Bush | 0102 | 0308 | 0345 |
| 0382 | 0030 | 0378 | |
| 0111 | 0672 | 0772 | |
| Calix | 0067 | ||
| Carena | 0111 | ||
| Carrefour | 0075 | ||
| Carver | 0111 | ||
| Casio | 0030 | ||
| Cathay | 0308 | ||
| CCE | 0102 | 0308 | |
| CGE | 0030 | ||
| Cimline | 0102 | ||
| Cineral | 0308 | ||
| CineVision | 1167 | ||
| Citizen | 0067 | 0308 | |
| Clatronic | 0102 | 0030 | |
| Colt | 0102 |
Combitech 0382
Condor 0308
Craig 0067 0102 0270
Crown 0067 0308 0102 0510
Cybernex 0270
Cyrus 0111
Daewoo 0308 0672 0667
1167 0075 0378
0382
Dansai 0102 0308
Dantax 0382
Dayton 0308 de Graaf 0072 0196 0111 0134 0078
Decca 0030 0111 0097 0378 0382
Deitron 0308
Denko 0102
Denon 0072
Diamant 0067
Diamond 0308
Digitor 0672
DSE 0672
Dual 0111 0308 0030 0378
Dumont 0030 0111 0134
Durabrand 0672
Dynatech 0030
Elbe 0308
Elcatech 0102
Electrohome 0067
Electrophonic 0067
Elin 0270
Elsay 0102
Elta 0102 0308
Emerex 0062
Emerson 0030 0102 0067 0075 0073 1167 0308
ESC 0308 0270
EuroLine 0378
Ferguson 0350 0030 0308
Fidelity 0030 0102
0462 0382 Finlandia 0134 0111
0196 0030 0078
0067 0073 0136
Finlux 0030 0111 0134 0072
Firstline 0102 0378 0073 0067 0075 0072 0308 1167
Fisher 0134
Flint 0378
Frontech 0102
Fujitsu 0030
Fujitsu General 0067
Funai 0030
Galaxy 0030
Galaxis 0308
Garrard 0030
GE 0350 0078 0270
GEC 0111
General Electric 0067
General Technic 0378
Genexxa 0134
Go Video 04621167
Goldhand 0102
GoldStar 0067 0510 0030 1167
Goodmans 0030 0102 0270 0308 0067 0111
0378 0667 0382 0672
GPX 0067
Gradiente 0030
Graetz 0134 0270
Granada 0134 0078 0111 0270 0067 0256 0072 0030
Grandin 0102 0067 0030 0308
Grundig 0270 0377 0111 0256 0350 0378 0102 0382 0772
Haaz 0378
Hanimex 0382
Hanseatic 0067 0308 0111
Harley Davidson 0030
Harman/Kardon 0111
Harwood 0102
HCM 0102
Hinari 010203820308
0270
Hisawa 0382
Hischito 0075
Hitachi 0072 0196 0030 0270 0111 0134
Hoher 0308 0672
Hornyphon 0111
Hughes Network 0072
Systems
Hypson 0102 0308 0382 0030 0067 0510
Imperial 0030 0270
Ingersoll 0270
Inno Hit 0270 0308 0102
Interbuy 0067 0102
Interfunk 0111 0134
Internal 0308 0667
International 0308 0067
Intervention 0030 0308 0067
0378
Irradio 010200670111
1167
ITT 0136 0134 0270
ITT Nokia 0078
ITV 0308 0067
JMB 03820378
Joyce 0030
JVC 0097
Kaisui 0102
Kambrook 0067
Karcher 0308
KEC 0067 0308
Kendo 0136 0345 0378
0102006/0308
Kenwood 0097
KIC 0030
Kioto 0378
KLH 0102
Kneissel 038203780067
0308
Kodak 0067
Kolster 0378
Korpel 0102
Kyoto 0102
Lenco 0308
Leyco 0102
LG 0067 0510 0030
0308 1167
Lifetec 0378
Lloyd's 0030
Loewe 0111 1592 0256 0067
Logik 0270 0102 0136
Lumatron 0308
Lux May 0102
Luxor 0136 0073 0102 0134 0078 0345
LXI 0067
Magnasonic 0308
Magnavox 0111 0030 0672
Magnin 0270
Magnum 0672
Manesth 0102 0075 0111
Marantz 0111
Mark 0308
Marta 0067
Mastec 0672
Master's 0308
Matsui 0378 0067 0270
0382 0030 0772
Mediator 0111
Medion 0378 0382
Melectronic 0030 0067
Memorex 0134 0030 0067 0078 0378 0270
Memphis 0102
Metronic 0111
Metz 159203770866
0111 0256 0067
MGA 0073
MGN Technology0270
Micormay 0378
Micromaxx 0378
Migros 0030
Minolta 0072
Mitsubishi 0073 0097 0078
0111 0510 0030
06/2
Motorola 0078
MTC 0270
Multitec 0067
Multitech 0030 0102 0134
Murphy 0030
Myryad 0111
NAD 0134
Naiko 0672
National 0256
NEC 0097 0070 0134 0067 0308 1167
Neckermann 0111
Nesco 0102 0030 0382
Neufunk 0067
Nikkai 0102 0308
Nikko 0067
Noblex 0270
Nokia 013401360345
0308 0270 0078 0078 0164
0072
Nordmende 0350
NU-TEC 0378
Oceanic 0030 0078 0136 0111 0134
Okano 0345 0378 0102
0308
Olympus 0256
Onimax 0672
Optimus 0067
0462 7.11 1100
Orbit 0102
Orion 0382 03/8 07/2
Orson 0030
Osaki 0030 0067 0102
Osume 0102
Otto Versand 0111
Pace 0382
Pacific 0030
Palladium 0102 0345 0067
0270 0378 0462
Palsonic 0102 0030 0672
Panasonic 025615920866
Pathe Cinema 0073
Penney 0067 0070 0072
0270
Pentax 0072
Perdio 0030
Philco 0102
Philips 0111
Phoenix 0308
Phonola 0111
Pilot 0067
Pioneer 0097 0111 0072
Portland 0308 0667
Prinz 0030
Profitronic 0111 0270
Proline 0030 0308 0350
0672
ProSCO 0308
Prosonic 0308 0030
Protech 0102 0111 0308
Provision 0308
Pye 0111 0030
Quasar 0308
Quelle 0111
Radialva 0067 0102 0111
0078
Radiola 0111
Radionette 11670067
RadioShack 0030
Radix 0067
Randex 0067
RCA 013600720078
0350 0270
Realistic 0030 0067 0078
0134
Reoc 037806670308
RFT 0102
Roadstar 0270 0102 0067
0308 07/2 0111
Royal 0102
Saba 0350 0308
Saisho 0378
Salora 0073 0136 0134
Samsung 0270
Sanky 0078
Sansei 0078
Sansui 0097
0102
Sanyo 0134 0270 0078
0097
Saville 0382 0308 0270
SBR 0111
ScanSonic 0270
Schaub Lorenz 0134 0030 0136
0345
Schneider 0102 0030 0067
011103080270116700720382
1167 0072 0382
0672
Scott 0073
Sears 0030 0067 0072
0134
Seaway 0308
SEG 0102 0270 0308
0672 0111 0667
SEI 0111
Sei-Sinudyne 0111
Seleco 0067
Semivox 0075
Semp 0075
Sentra 0102
Setron 0102
Sharp 0078 0067 0599
Shintom 0102 0134
Shivaki 0067
Shogun 0270
Siemens 0067 0134 0111
0350 0377
Siera 0111
Silva 0067
Silver 0308
SilverCrest 0672
Singer 0378 0075 0102
Sinudyne 0111 0382
Smaragd 0378
Sonneclair 0102
Sonoko 0308
Sonolor 0078
Sontec 0067 0308
Sonwa 0672
Sony 0062 0030 0136
Soundwave 0067 0378
Ssangyong 0102
Standard 0308
Starlite 0067 0134
Stern 0308
STS 0072
Sunkai 0378 0308
Sunstar 0030
Suntronic 0030
Sunwood 0102
Supra 0067 0270 0378
0308
Sylvania 0030 0073 0111
Symphonic 0030 0102
T + A 0256
Tandberg 0308
Tandy 0030 0134
Tashiko 0030 0078 0270
0111 0067
Tatung 0030 0111 0078
00/3 03/8 0382
Tchibo 0378
TCM 0378
Teac 0102 0030 0308
067
0307TEC 03080102
Tech Line 0102
Technics 0256
TechniSat 0378
Tedelex 0067 0378 0672
Teknika 0030