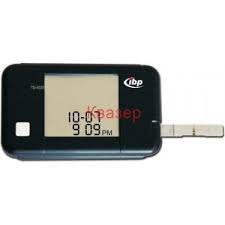
TD 4222 - Medical measuring device IBP - Free user manual and instructions
Find the device manual for free TD 4222 IBP in PDF.


| Product Type | Blood glucose meter (glucometer) |
| Brand and model | IBP TD 4222 |
| Dimensions | 78 x 46 x 17 mm |
| Weight | Approximately 40 g (with battery) |
| Power supply | 1 lithium battery 3V CR2032 |
| Battery life | Approximately 1000 measurements |
| Measuring range | 20 – 600 mg/dL (1.1 – 33.3 mmol/L) |
| Measuring time | 10 seconds |
| Sample | Whole capillary blood, 2 µL |
| Memory | 450 results with date and time |
| Calculated averages | 7, 14, 21, 28, 60 and 90 days |
| Measurement units | Switchable mg/dL or mmol/L |
| Operating temperature | +10 °C to +40 °C, 10–90 % RH |
| Storage temperature | -20 °C to +70 °C, 5–95 % RH |
| Display | LCD screen with symbols |
| Coding | Automatic by code strip |
| Maximum altitude | 3,275 m without effect on result |
| Maintenance and cleaning | Clean with a damp cloth (water and mild detergent); dry with a lint-free cloth. Do not expose to moisture or extreme temperatures. Store in the carrying case. |
| Safety | Do not use for newborns. Keep batteries and lancets out of reach of children. Never modify medical treatment based on results without medical advice. Consult a doctor in case of HI/LO values or symptoms. |
| Spare parts and repairability | 3-year warranty (material or manufacturing defects). Customer service: ibp Service-Center, Am Weimarer Berg 6, 99510 Apolda, Germany. Spare parts: test strips, lancets, control solutions, CR2032 battery. |
| General information | In vitro diagnostic device CE 0123 certified according to directive 98/79/EC. Personal use, not suitable for diabetes diagnosis. Use only IBP test strips and control solutions. |
Frequently Asked Questions - TD 4222 IBP
User questions about TD 4222 IBP
0 question about this device. Answer the ones you know or ask your own.
Ask a new question about this device
Download the instructions for your Medical measuring device in PDF format for free! Find your manual TD 4222 - IBP and take your electronic device back in hand. On this page are published all the documents necessary for the use of your device. TD 4222 by IBP.
USER MANUAL TD 4222 IBP
Blood sugar measuring system for simple, rapid and precise measurement
Blood sugar measurement results
Table according to Krall, L.P., and Beaser, R.S.: Joslin Diabetes Manual. Philadelphia: Lea and Febiger (1989), 138, for the comparison of your blood sugar values with values from persons without diabetes
| Time of day | Values from persons without diabetes (mg/dL) / (mmol/L) | Your measured blood sugar values (mg/dL) / (mmol/L) |
| Before breakfast | (70~105) / (3,9~5,8) | __________ (mg/dL) / (mmol/L) |
| Before lunch/supper | (70~110) / (3,9~6,1) | __________ (mg/dL) / (mmol/L) |
| 1 hour after meals | less than (160) / (8,9) | __________ (mg/dL) / (mmol/L) |
| 2 hours after meals | less than (120) / (6,7) | __________ (mg/dL) / (mmol/L) |
| Between 2 and 4 in the morning | more than (70) / (3,9) | __________ (mg/dL) / (mmol/L) |
1 introduction 2
2 important safety information 3
3 before operating / the blood sugar measuring system / included in delivery /symbols used 4-5
4 the device 6
5 description of display symbols 7
6 test strips / test strip sections / important information about test strips 8-9
7 calibrating the device / carrying out a self-test / why coding? 10 before first use / how to check the coding 11
8 checking the system / control solutions / important information about control solutions 12-13 how to check using control solutions 14-15
9 the blood sugar test / preparation 16
how to get a blood drop / how to carry out the test 17-20
10 measurement results / different measurement results 21
11 measured value memory / how to call up average values 22
how to call up individual values / how to quit the memory section. 23
12 device settings how to set date and time / how to set measurement and temperature units 24-25 how to delete memory contents and quit setting mode 26
13 the battery / changing the battery 27
14 general information / cleaning and care of the system 28
error messages and solutions 29-32
15 specifications/guarantee 33-34
1 introduction
dear customer,
we are delighted that you have decided to purchase this blood sugar measuring system. The device measures your blood sugar with extremely high accuracy. It is fitted with an automatic memory for 450 measured values with date and time. In addition, the device can calculate average values based on blood sugar measured values carried out over the last 7,14, 21, 28, 60 and 90 days. This enables you to follow changes easily and tell your doctor about them in good time. The system is intended for use by private persons for active blood sugar checks. It is not suitable for the determination of diabetes or for the determination of blood sugar values for newborn babies. When testing, use only fresh, capillary whole blood. This instruction manual is for your information. Please read it carefully and completely, follow all instructions and carry out all control tests as described before you actually carry out a blood sugar test. Keep this instruction manual in a safe place.
Subject to technical alterations.
Preliminary notes!
This blood sugar measuring device conforms with the requirements of EU guideline 98/79 for "in vitro"
diagnostic devices and has been issued with the "CE 0123" conformity sign.
The ibp company confirms conformity with these requirements for the device
supplied together with this instruction manual. The conformity declaration is available.
CE 0123
- Never change prescribed predicament quantities by yourself because of your measured blood sugar values. Only your doctor can evaluate measured results.
- Results which lie below 3.3mmol/L ( 60mg/dL ) are an indication of "hypoglycemia", blood sugar levels which are too low. If the results are above 13.3mmol/L ( 240mg/dL ), it is possible that symptoms of too high a blood sugar level ("hyperglycemia") can occur. You should visit the doctor if your measured results are regularly above or below these limit values.
- If the measured results show "HI" or "LO", carry out the measurement again. If you again receive measured results of "HI" = over 600 mg/dL (33.3 mmol/L) or "LO" = below 20 mg/dL (1.1 mmol/L), please carry out your doctor's instructions or contact him immediately.
- Lack of water or large fluid losses (such as through sweating) can cause falsified measured values. If you suspect that you are suffering from dehydration, in other words lack of fluids, you should visit a doctor as soon as possible.
- If your level of red blood cells (hematotic value) is very high (over 55% ) or very low (below 30% ), this can lead to falsified measured results.
- If have read all the instructions in this instruction manual and symptoms are still occurring which are not compliant with your blood sugar levels or your blood pressure, please contact a doctor.
3 before operation
the blood sugar measuring system
Your blood sugar measuring system can be used to measure blood sugar levels up to a height of 3275m above sea level without affecting the test results. The blood sugar measuring system consists of three components: the blood sugar measuring device, the test strips and the control solutions. These components were specially designed to match each other, tested and quality-confirmed in our R&D department. This enables this measuring device to measure and display the blood sugar level extremely precisely (whole blood calibrated measurement results). Only use test strips and control solutions approved for use with this blood sugar measuring device. If you have any questions about your measured values, please contact your doctor.
included in delivery
The following parts are included in delivery and are contained in the packaging:
- 1 blood sugar measuring device
- 25 sterile lancets
- 1 check code strips
- 1 instruction manual
-
1 practical carry bag
-
25 test strips
- 1 pricking aid
- 2 different control solutions
- 1 quickstart guide with troubleshooting
- 1 lithium battery 3V CR2032

Caution: Check that the box packaging seal is unbroken! If the seal has been broken or is missing, please return the device to your dealer immediately.
symbols used
The following symbols on the device, packaging and in the instruction manual are used to give important information.
Symbol Meaning

To be used only once

Observe instruction manual

Protect from sunlight

Protect from moisture

Working temperature range

Manufactured on
Symbol Meaning
LOT (LOT) batch designation
REF Product number
SN Series number

Caution = danger to device/materials

Warning = danger to user

Use-by date (to be used up to last day of month)
4 the device
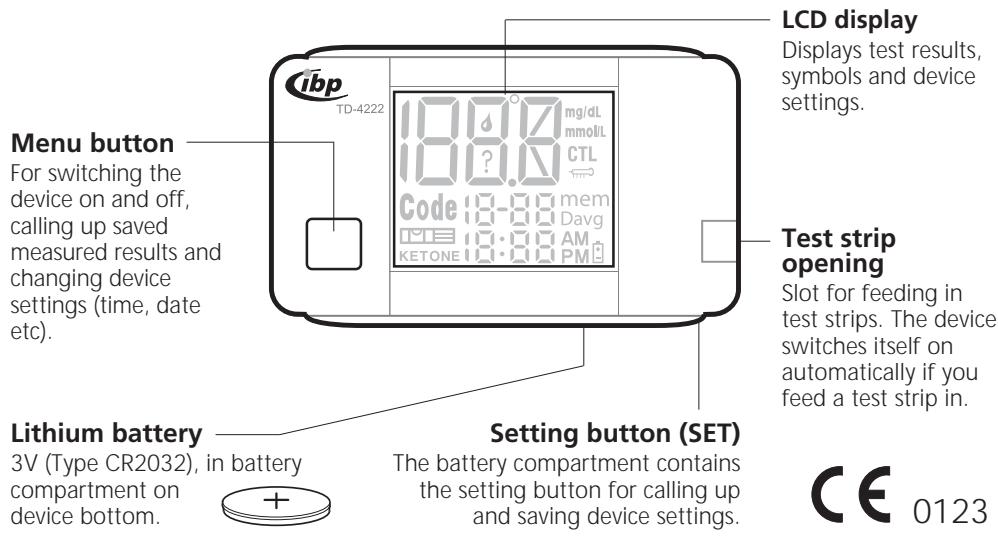
the device components
description of display symbols 5
Results/
error messages
Area for display of measured results and error messages.
Blood drop symbol
Shows that the device is ready to accept the sample and to carry out measurement.
Code
Appears together with the test strip code number when it is fed in.
Test strip symbol
Is displayed constantly as long as the device is carrying out various self-tests. Flashes when device is switched on and no test strip has been fed in.
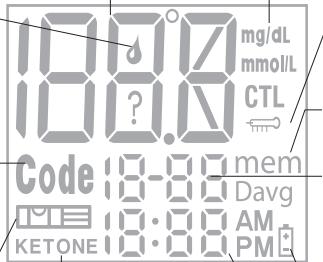
Ketone symbol
Important: if the measured result is above 240 mg/dL (13.3 mmol/L), the "KETONE" and "?" symbols show a warning. Repeat the measurement.
Measurement units
This field displays the units (mg/dL or mmol/L) set.
Temperature symbol
Is displayed together with the surrounding temperature.
Memory symbol
Displays saved measured results.
Date
The date (month and day) is displayed here.
Battery symbol
Shows that the battery is becoming weak and must be replaced.
Time
The time (hours in minutes) is displayed here.
6 test strips
Your measuring device determines the sugar levels in your blood. When you put a drop of blood on the absorption gap on the test strip to do a test (chemical components of test strip: 1. Glucose oxidase (A. niger) 30 IU, 2. Electron shuttle 1.5mg , 3. Enzyme protector 0.13mg , 4. Non-reactive ingredients 2.5mg , 5. Each vial cap with 3.0g molecular sieve), the blood is automatically sucked into the reaction cell. A reaction now takes place here.
Test strip components
Contacts
Feed this end of the test strip into the blood sugar measuring device. Push the strip firmly into the device up to the stop.
Control window
This little window on the test strip shows you whether you have applied enough blood.
Absorption gap
Place a small drop of blood in contact with the absorption gap. The blood is sucked into the test strip by itself.
Handle
Grip the test strip at this end while applying blood and feeding the strip into the device.
important information about test strips:
- Keep the test strips in a cool, dry place (only in original container, below 40^ or 104^ ). Protect the strips from direct sunshine and do not freeze them.
- Only touch the test strips with clean, dry hands. When taking the strips out of the container and feeding them into the measuring device, try to hold them only by the handle.
- When you take a test strip out of the container, put the cover back on the container straight away and make sure that it is closed to form an airtight seal. Always use each test strip as soon as you have taken it out of the container.
- Write the opening date on the container label when you open it for the first time. You should use the rest of the test trips up within 90 days of opening.
- Do not use any test strips which are past their use-by date, since this can falsify the measured results. The use-by date is printed on the container.
- Only apply blood samples or the control solutions supplied to the gap on the test strip. Application of other substances leads to inaccurate or false measured values.
- The test strips must not be bent, cut or otherwise altered in any way.

Warning:
Keep the container with the test strips away from children! The sealing cap means there is a danger of suffocation. In addition, the sealing cap contains drying materials which could be hazardous to health if breathed in or swallowed. This can lead to skin or eye irritations.
7 calibrating the device
carrying out a self-test
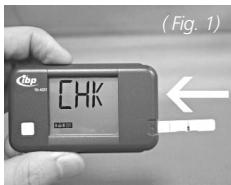
Every time you feed a test trip into the measuring device (Fig. 1), the display will show "CHK" for check and the "Test strip" symbol. These show that the system is briefly carrying out various self-tests. Once the self-test is finished, you will hear a long beep followed by a short one. When the test trip is removed, you will hear a shorter beep.
why coding?
The code numbers are used to calibrate the test strips with the device in order to achieve exact test results. Before you use a device for the first time, and every time you use a new container of test strips, you must first feed the check/code strips into the device. After this, every time you carry out a test you should check that the number which appears in the display is the same as the code number on the test strip container.

Warning:
If the code number displayed is not the same as the code number on the test strip container, the measured results can be falsified.
before first-time use
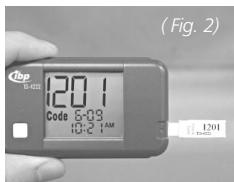
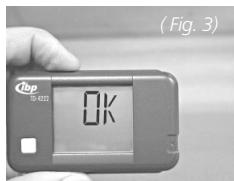
Before you use the measurement system for the first time, feed the check/code strip into the device until the code number is shown in the display (Fig. 2). Then pull the check/code strip out again. The display will then show "OK" (Fig. 3). This shows that the system is now calibrated and that you can start the test.
how to check the coding
- Feed the test strip into the device when switched off (Fig. 1) to switch it on. The display will show "CHK" and the "Test strip" symbol. After this, the surrounding temperature is displayed, and then the code number is shown for three seconds.
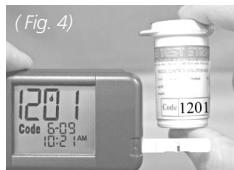
- Compare the code number displayed with the code number on the test strip container (Fig. 4). If the code numbers are the same, you can start the blood sugar test. If this is not the case, please proceed as described above ("before first-time use").
Note: Every time you open a new container of test strips, the device must be calibrated by feeding in the new check/code strip.
8 checking the system
control solutions
The control solutions are used to check the entire blood sugar measurement system. This allows you to determine whether the device and the test strips are working together optimally, and whether the test is being carried out correctly. It is important to carry out the test with the control fluids regularly in order to ensure that you are receiving precise measured results.
The control solutions contain a specified proportion of glucose which is precisely known. When you carry out the blood sugar test with this liquid, you can check afterwards whether the measured value is within the range of the actual value. The actual value for the control solutions is printed on the test strip container. There are two different, colour-coded control solutions, one for the "normal" value range (green) and the other for the "high" value range (red).
The control solutions should be used:
to practise the blood sugar test.
to ensure that the device and the test strips are working perfectly together.
to check that the test has been carried out correctly.
Before you carry out the first blood sugar test, you should carry out three successful tests with the control liquid one after the other. This makes sure that you are able to carry out the test correctly, and that the device is working perfectly. If all three test results reach the value which is printed on the test strip container, you can start carrying out the actual blood sugar measurement.
When should you carry out a test with the control solution?
- at least once per week
- when you open a new container of test strips
-
if the measured results do not agree with the way you feel
-
if the device has been dropped
- every time when you suspect that the blood sugar measuring system is not working correctly
important information about control solutions
- Only use control solutions included in delivery.
- Write the date of opening on the bottle.
- Check the use-by date for the solution. Never use solutions past their use-by date.
- The control solution should reach room temperature (20^ to 25^ / 68^ to 77^) before you use it.
- Shake the bottle of test solution well before you open it. Wipe the first drop away, and then use the second drop to ensure that you have a good sample for precise measure results.
- You should use the control solution up within 90 days of opening.
- Keep the solutions safely closed away at room temperature (below 30^ ). Never freeze them!

Warning:
The measured value for the solutions which is printed on the test strip container is only used to check the measuring system. It is not intended as a recommended value for your blood sugar level!
8 checking the system
how to check using control solutions
-
Feed your test strip into the test strip opening with the contacts first, and the device display facing you (see Page 19). You should ensure that the test strip is firmly located in the device to achieve exact measured results. The device switches itself on automatically. The display will show "CHK" and the "Test strip" symbol. After this, the surrounding temperature, the symbol and the code number are displayed. You should calibrate your device (see Page 10) if the code number shown in the display is not the same as the code number on the test strip container.
-
If you press the Menu button once, "CTL" is shown in the display. If the "CTL" symbol is being shown in the display, any blood sugar levels measured will not be saved to the internal memory. This means that you will not be influencing your measured values statistics when carrying out tests with the solutions. If you want to save the following measurement to the memory, however, press the Menu button again and "CTL" will no longer be shown in the display.
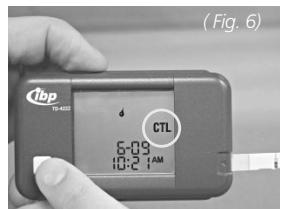

Warning: Every time you carry out a test with the control solution, you should always activate the CTL mode beforehand so that your saved measured value statistics are not falsified!
checking the system 8
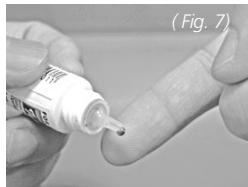
- Shake the control solution well before using it. Unscrew the cap and squeeze one drop out. Wipe the first drop away, and then squeeze another one out. Put the drop onto your fingertip (Fig. 7).
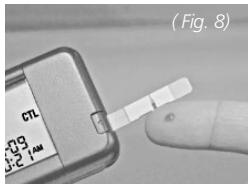
Note: In order to make sure that the control solution is not contaminated by contact with the test strip, do not apply the drop directly to the strip, but first apply it to something clean or to your fingertip. - Apply the drop onto the absorption gap. The solution is sucked into the gap. When the control window is completely full of the solution, the blood sugar measuring device starts a 10 second countdown.
- The glucose measurement takes place after the countdown has finished, and then the result is shown in the display. Check to see that the result is the same as the stipulated control solution value. This value is printed on the test strip container.

Warning:
If you achieve incorrect measurement results with the control solution which deviate from the stipulated value time after time, the measurement system is no longer working correctly. In this case, you should stop using the device to measure your blood sugar level. Please see the chapter entitled "troubleshooting" on Pages 29-31. If you are still unable to solve the problem, please contact our customer service department (see guarantee page).
9 the blood sugar test
preparation
Ensure that you have read all the information about the device, the test strips and all of this chapter through carefully before you start the test.
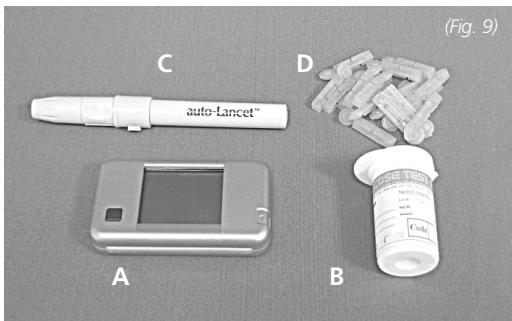
- Make sure you have all materials required for the blood sugar test (Fig. 9) ready:
A your ibp measuring device
B the test strips
C the pricking aid
D the sterile lancets
- Wash your hands thoroughly with warm water and dry them well.
how to obtain a blood drop
important information about avoiding infection:
- Never use a lancet or picking aid together with another person.
- Always use a new sterile lancet for each test. Lancets should only be used once.
-
Try to prevent hand lotion, or oils or dirt getting in or onto the lancet or pricking aid.
-
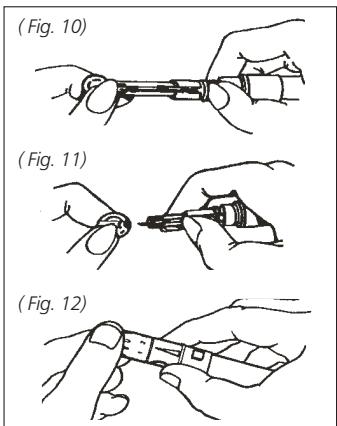
Open the pricking aid by turning the cap anticlockwise and removing it. Feed the lancet into the pricking aid up to the stop (without turning it at the same time) (Fig. 10).
- Unscrew the protective cap from the lancet (Fig. 11).
- Place the cap on the pricking aid again and tighten it by turning it clockwise (not too firmly).
The adjustable tip can be adjusted to 5 different pricking depths. Turn the end cap in the appropriate direction until the arrow points to the number for the required pricking depth (Fig. 12).
How to find a suitable pricking depth for yourself:
1-2 for soft or thin skin
3 for normal skin
4-5 for thick or calloused skin
9 the blood sugar test
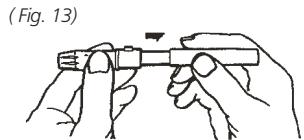
- Tension the pricking aid by pulling it apart (as shown in Fig. 13) until it engages with a "click". If it does not engage, it was probably tensioned already when inserting the lancet.
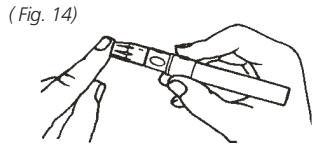
- Place the pricking aid against your fingertip (on the side if possible) and then press the trigger button (Fig.14). Help the blood drop to emerge by massaging the location softly.
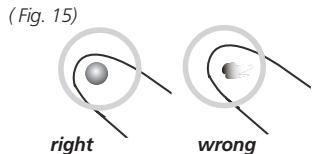
Ensure that the blood drop does not smear (Fig. 15) and then carry out the test as described on Page 15.
Note: Your system only requires a small drop of blood to carry out a test. You can obtain this from one fingertip. You should always use a different location for each test. Repeated pricks in the same location can cause inflammation and loss of feeling.
6. Open the pricking aid again by turning the cap anticlockwise and removing it. Remove the used lancet carefully by pulling it out, and then dispose of it carefully in order to avoid injuries to other people. Put the cap on once again and close it firmly.
how to carry out the test
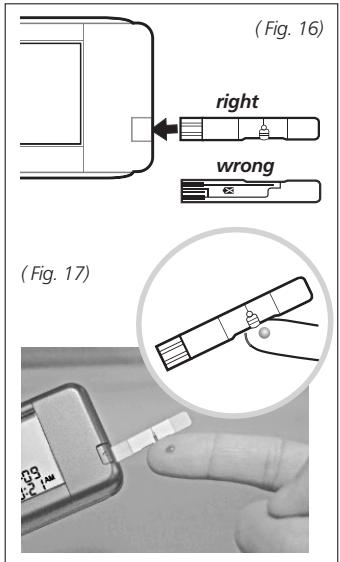
- Feed the test strip into the test strip opening with the contacts first and the device display facing you (see Fig. 16). You should ensure that the test strip is firmly located in the device to achieve exact measured results. The device switches itself on automatically. The display will show "CHK" and the "Test strip" symbol. After this, the surrounding temperature, the symbol and the code number are displayed. You should code your device (see Page 11) if the code number shown in the display is not the same as the code number on the test strip container.
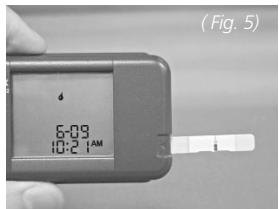
- Use the pricking aid to obtain a rounded blood drop of at least 2 microlitres. When the symbol flashes in the display, apply the blood drop to the absorption window on the test strip at the location where the window and gap meet. Do not press your finger against the test strip, and do not apply smeared samples.
- The control window in the test strip must be completely filled with blood before the device can start the countdown (Fig. 17). If the control window is not completely filled with blood (Fig. 18) and the device starts the measuring process, do not apply more blood sub
9 the blood sugar test
sequently. Pull the test strip out to stop the test process. Start again from the beginning by feeding in a new test strip and applying the necessary blood drop. If you cannot manage to fill the test strip with enough blood, please contact our service department.
Note: If you do not apply blood to the test strip within three minutes, the device switches itself off automatically. Remove the strip, and then feed it into the device again to start the test procedure once more.
- After the device has finished the countdown, the measured results are shown in the display. The blood sugar test measured values are automatically stored in the memory. To turn the device off, pull the test strip out.

Warning: Dispose of used to test trips and used lancets very carefully in order to prevent injury or infection to other persons.
The measured results produced by your "ibp TD 4222" blood sugar measuring device are precise whole blood-calibrated test results (Fig. 19), which can be directly compared with laboratory results.
(Fig. 18)
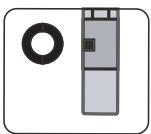
Example: correct blood application
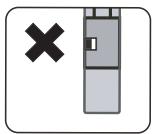
Example: insufficient blood application
(Fig. 19)
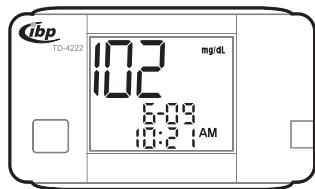
Example: whole blood-calibrated result
deviating measured results
Your " ibp TD 4222" blood sugar measuring device measures results between 1.1 and 33.3mmol / l (20 and 600~mg / dl)
- If the measured results lie below 1.1 mmol/l (20 mg/dl), "LO" appears in the display (Fig. 20). This shows severe hypoglycemia (blood sugar level too low). In this case, you should follow your doctor's instructions as soon as possible.
- If the measured results lie above 33.3 mmol/l (600 mg/dl), "HI" appears in the display (Fig. 21). This shows severe hyperglycemia (blood sugar level too high). In this case, you should seek medical help as soon as possible.
- If the measured results lie above 13.3 mmol/l (240 mg/dl), "KETONE" and "?" appear in the display (Fig. 22). This indicates an increased blood sugar level. In this case, you should also seek medical help.
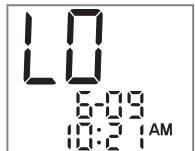
(Fig. 20)
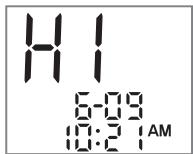
(Fig. 21)
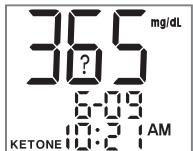
(Fig. 22)
11 the measured value memory
how to call up average values
Your measuring device saves the newest 450 blood sugar level values in its memory. In addition, the ibp TD 4222 can calculate average values based on blood sugar measured values carried out over the last 7, 14, 21, 28, 60 and 90 days. Proceed as follows to call up the measured values from the memory.
- If the device is switched off, press the Menu button once, and then once again after the beep. The 7-day average value is shown in the display, and also shows you that you are in the memory. Each time you press the Menu button again, the average values for the last 14, 21, 28, 60 and 90 days are shown one after the other. After this, you can call up the last 450 measured results in sequence.
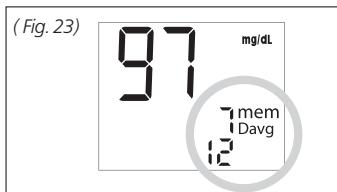
The 7-day average value is obtained from the blood sugar tests
carried out over the last 7 days. In addition, the display shows you how many tests you have carried out during this period, in the example (Fig. 23) 12 tests in the last 7 days. When you use the device for the first time, the display shows "7 Davg ---". This shows that no measured results have been saved.
The 14-day average value is obtained from the blood sugar tests carried out over the last 14 days. In this case, the device also shows you how many tests you have carried out in this period. When you use the device for the first time, the display shows "14 Davg ---". This shows that no measured results have been saved. The same procedure also applies to the average values for 21,20 8,60 and 90 days.
how to call up individual measured values
- If the device is switched off, and you press the Menu button 8 times, the last measured test results will be shown in the display with date and time (after the 90-day average value) (Fig. 24). If you press the Menu button again, the test result prior to this one will be called up. By pressing the Menu button again and again, you will call up the previous measure result (up to 450 saved measured values) each time. If the measured value memory is full, the oldest measured value will be deleted as soon as a new value is saved.
Note: If you are using the device for the first time, the display will show "mem —" to show you that no test results have been saved yet.
how to quit the memory section
- Press the Menu button and hold it down for at least 3 seconds. The display shows "OFF" and the device will switch itself off.
Note: To completely delete all memory contents, please read the chapter entitled "device settings" on Page 26.
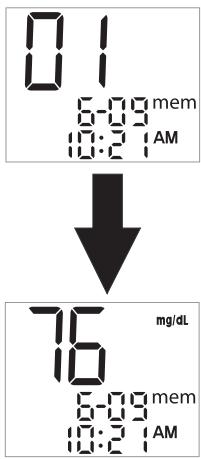
(Fig. 24)
12 device settings
When your measuring device is delivered, the time, date, measuring units and temperature units are preset. If you want to change the settings, to replace the battery or to delete the memory contents, you must switch to setting mode before carrying out changes.
how to set the time and date
- Setting the year:
Leave the device switched off. Remove the battery compartment cover on the bottom of the device, and press the Setting button (SET) in the battery compartment. The display will show the year flashing (Fig. 25). Press the Menu button to change the year. Once the required year is shown in the display, press the Setting button (SET) in the battery compartment to confirm the setting and to switch to the month.
- Setting the month:
The month is flashing (Fig. 26). Press the Menu button to set the month. Press the Setting button (SET) to confirm the setting and to switch to the day.
- Setting the days, hours and minutes:
Proceed in a similar manner to set the day, and minute, and to switch to setting the measurement unit (mmol/L or mg/dL).
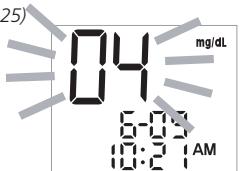
(Fig. 25)
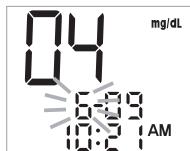
(Fig. 26)
Note: Your device saves the average blood sugar measured values for the previous 7,14, 21, 28, 60 and 90 days. If you alter the date, the average value will be calculated for the new period.
how to set the measurement unit and temperature unit
Your device can show you the measured results in millimol per litre (mmol/L) or milligram per decilitre (mmg/dL). The unit mmg/dL is standard in the USA, in Canada the standard is mmol/L. Within Europe, both measurement units are common.
- Setting the measurement unit:
The measurement unit is flashing (Fig. 27). Press the Menu button to set the required unit. Press the Setting button (SET) to confirm the setting and to switch to the temperature unit.
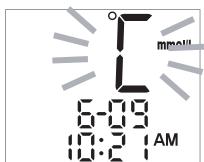
- Setting the temperature unit (^ or ^ F)
The temperature unit is flashing (Fig. 28). Press the Menu button to select the required temperature unit, and then the Setting button (SET) to confirm the setting and to switch to the "Delete memory" mode (dEL).
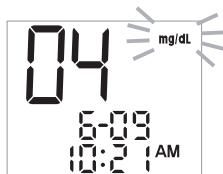
(Fig. 27)
(Fig. 28)
12 device settings
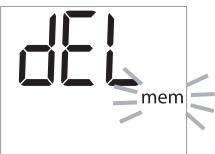
In order to delete the memory contents, you will have to carry out the steps for setting time, date, measurement unit and temperature unit first. After you have confirmed the temperature unit, "dEL" and "mem" appear in the display.
how to delete memory contents and quit setting mode
- Deleting memory contents:
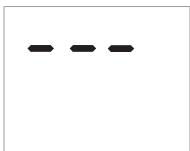
The display shows "dEL" and "mem" (flashing) (Fig. 29). You can now delete the entire memory contents by pressing the Menu button once. The display now shows "---" (Fig. 30) and then "OK", to show you that the memory contents have been deleted.
- Quitting setting mode:
When you have completed the settings, press the Setting button (SET) to quit setting mode and to switch the device off.
Notes: - If you can see "dEL" in the display, and "mem" is flashing but you do not want to delete the memory contents, on no account press the menu button. In this case, just press the Setting button (SET) to turn the device off.
- When you are in setting mode, and no button at all is pressed over a period of one minute, the device will switch itself off automatically.
(Fig. 29)
(Fig. 30)
changing the battery
The device will warn you that the battery is getting low using two different display symbols.
- When you switch the device on, the battery symbol 3 appears in the display. All other display symbols are showing operational readiness. In this case, there is still enough energy for around 50 tests available. Test results will be precise, but you should still replace the battery nevertheless.
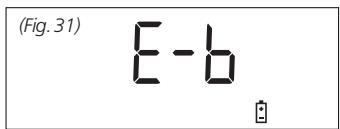
- The display is now showing the battery symbol and "E-b" (Fig. 31). In this case, there is no longer enough energy for a test available. Replace the old battery with a new 3V CR2032 battery.
- Switch the device off, and open the battery compartment on the rear of the device by pressing the locking tab and lifting the battery compartment cover upwards.
- Press the setting button in the battery compartment for three seconds.
- Remove the old battery, and replace it with a new 3V CR2032 lithium battery. Insert the new battery so that the positive terminal (+) is facing upwards, and then close the battery compartment cover.
Note: Replacing the battery does not affect the memory contents. Sometimes you may have to re-set the time and date. Dispos of empty batteries at a recycling point. If you are no longer using the device, remove the battery from the battery compartment.
Battery safety-information:
- Keep away from children!
-
Not rechargeable!
-
Do not short-circuit!
- Do not incinerate!
14 general information
cleaning and care of your system
The device does not require any particular cleaning as long as it does not come into contact with blood or control liquids. Please therefore observe the following information:
- Your blood sugar measuring device is a precision instrument. Please handle it very carefully in order not to damage the electronics and to avoid malfunctions.
- Do not subject the device to extreme temperatures or high levels of humidity.
- Take care to ensure that dirt, dust, blood, control fluids or water do not penetrate into the device interior through the test strip opening, the connecting plugs or the button.
- You should always keep the device in the carry bag supplied after using it.
- You can clean the device surface with a moist cloth (with water and a mild cleansing agent). After cleaning, dry the device off with a lint-free cloth.
error messages and solutions
The following table explains possible error messages.
| Display | Meaning | Solution |
| E-b | Battery empty, no more tests possible. | Replace the battery immediately. |
| E-U | Test strip already used, or permanent electronics error. | Repeat the test using a new test strip. If the problem continues, please contact our service department. |
| E-C | Defective or incorrect test strip, or test strip inserted wrongly. | Check to see that the number shown in the display is the same as the code number on the test strip container. Code the device, or reinsert the test strip. |
| E-t | Surrounding, device or test strip temperatures were too high or too low in order to carry out a test. | Repeat the test using a new test strip once the device and the test strip have reached the operating temperature (+ 10 °C to + 40 °C). |
14 general information
| Display | Meaning | Solution |
| E-E | A device error has occurred. | Re-read the instruction manual, and repeat the measurement using a new test strip. If the problem continues, please contact our service department. |
| E-O | Problem with device or test strip. | Repeat the test using a new test strip. If the problem continues, please contact our service department. |
| E-g | You have removed the test strip after applying blood to the absorption window. | Please re-read the instruction manual and repeat the test using a new test strip. |
| E-A | A device error has occurred. | Please re-read the instruction manual and repeat the test using a new test strip. If the problem continues, please contact our service department. |
general information 14
| Problem | Meaning | Solution |
| The device shows nothing in the display after you have fed the test strip in. | - The battery is completely discharged. | Replace the battery. |
| - The battery is inserted wrongly or is missing. | Check that the battery has been inserted correctly (is the "+" terminal facing upwards?). | |
| - The test strip has been inserted with the top side facing downwards or is not completely inserted. | Insert the test strip fully, with the contacts first and the positive side facing upwards (page 19). | |
| - The device is faulty. | Please contact our service department. | |
| After the test strip has been fed him, and the test material has been applied, the test procedure does not start. | - Insufficient application of blood. | Repeat the test using a new test strip and larger drop of blood. |
| - Defective test strip. | Repeat the test using a new test strip. | |
| - The test material has been applied after the device has switched itself off (3 minutes after the last user action). | Repeat the test using a new test strip. You can only apply blood to the test strip as long as the symbol ↓ is flashing in the display. | |
| - Defective device. | Please contact our service department. |
14 general information
Note: All measured values saved in the ibp TD 4222 can be transferred to a computer. To do this, you will require a cable for data transfer and suitable software (neither are included in delivery). The data transfer cable can be obtained from our customer service department on request. An English-language software is available on the manufacturer's web site at www.taidoc.com.
| Model | : | ibp TD 4222 |
| Measuring unit | : | switchable between mg/dL and mmol/L |
| Sample material | : | capillary whole blood |
| Sample volume | : | 2 microlitres |
| Measuring range | : | 20 to 600 mg/dL (1.1 to 33.3 mmol/L) |
| Measuring time | : | 10 seconds |
| Measured results | : | whole blood-calibrated |
| Display | : | large liquid crystal display (LCD) |
| Memory | : | 450 measured results with time and date |
| Operating temperature | : | +10 °C to +40 °C, 10 to 90 % relative humidity (non-condensing) |
| Storage/transport temperature | : | -20 °C to +70 °C, 5 to 95 % relative humidity |
| Power supply | : | 1 x 3V CR2032 lithium battery |
| Battery operating life | : | for around 1000 measurements |
| Dimensions | : | 78 x 46 x 17 mm |
| Weight | : | approx. 40 g (including batteries) |
| CE certification | : | The device is certified to 98/79/EC, for "in vitro" diagnostic devices and the following standards: IEC 60601-1, IEC 61010-1, IEC 61010-1-2, IEC 61326 and ISO 15197 |
We reserve the right to make changes to technical details without notification for reasons of updating.
GUARANTEE
Your blood sugar measuring system was checked to ensure its faultless quality before despatch. Please send the appliance for checking or repair together with the purchase document or receipt and the description of the faults and/or of the desired check to the adress below.
From the date of purchase (date of the purchase document) repairs will be carried out free of charge for 36 months, if your appliance should be defective due to a production or material fault.
The guarantee does not cover any damage occurring as a result of faulty operation, improper treatment, storage and care or unusual influences. All further claims as well as damages shall likewise be excluded.
Should you have any reason to avail yourself of the warranted services under the guarantee, send the appliance with the guarantee documents to the customer service department:
ibp International Business Products Limited
6 Newfield Court
West Houghton
Bolton BL5 3 SA England
Phone: +44-(0) 19 42 - 81 96 95
Distributed by: sano health care products pvt. Ltd. ibp group
Corporate Office: 28 • Lansdown Terrace, 1st Floor • Kolkata - 700 026
Phone No: +91 33 2465 0383-85
Manufactured by: Taidoc Technology Co., Taiwan
Chere cliente, Cher client,

- Blood sugar measurement results
- introduction
- dear customer,
- Preliminary notes!
- before operation
- the blood sugar measuring system
- included in delivery
- symbols used
- Symbol Meaning
- the device
- description of display symbols 5
- Results/
- error messages
- Blood drop symbol
- Code
- Test strip symbol
- Ketone symbol
- Measurement units
- Temperature symbol
- Memory symbol
- Date
- Battery symbol
- Time
- test strips
- Test strip components
- Contacts
- Control window
- Absorption gap
- Handle
- important information about test strips:
- Warning:
- calibrating the device
- carrying out a self-test
- why coding?
- before first-time use
- how to check the coding
- checking the system
- control solutions
- important information about control solutions
- how to check using control solutions
- checking the system 8
- the blood sugar test
- preparation
- how to obtain a blood drop
- important information about avoiding infection:
- how to carry out the test
- deviating measured results
- the measured value memory
- how to call up average values
- how to call up individual measured values
- how to quit the memory section
- device settings
- how to set the time and date
- how to set the measurement unit and temperature unit
- how to delete memory contents and quit setting mode
- changing the battery
- general information
- cleaning and care of your system
- error messages and solutions
- general information 14
- GUARANTEE
- Chere cliente, Cher client,
Brand : IBP
Model : TD 4222
Category : Medical measuring device