
METE-ON 3 - Electronic thermometer/hygrometer IROX - Free user manual and instructions
Find the device manual for free METE-ON 3 IROX in PDF.
| Product Type | Electronic Thermometer / Hygrometer with radio-controlled reception and Meteotime weather forecasts |
| Brand | IROX |
| Model | METE-ON 3 |
| Power Supply | 2 LR6 AA batteries (alkaline or lithium) |
| Main Functions | Radio-controlled time reception (HBG/DCF77), Meteotime weather data reception, day/night weather forecasts with 15 symbols, precipitation probability (%), alarm with snooze (4/8/12 min), indoor temperature, backlight, date/day/location display, selection of 60 regions in 16 countries |
| Settings | Time zone (-11 to +12), language (D, GB, F, I, NL, E), snooze time, display location (country and city) |
| Display | LCD with backlight (5 seconds) |
| Weather Reception | Between 10 PM and 4 AM (UT) for day forecasts, available from 3 AM; night forecasts available from 6 AM |
| Reception Test | Integrated TEST function to assess reception quality |
| Batteries | Battery life approx. 12 months (varies with backlight usage); use alkaline or lithium batteries |
| Maintenance and Cleaning | Clean with a dry cloth; replace batteries as soon as contrast weakens; avoid sources of electrical interference |
| Spare Parts and Repairability | Not specified; refer to www.irox.com |
| General Information | Compatible with Meteotime system; requires one night for initial forecasts; keep the important PMC brochure |
Frequently Asked Questions - METE-ON 3 IROX
User questions about METE-ON 3 IROX
0 question about this device. Answer the ones you know or ask your own.
Ask a new question about this device
Download the instructions for your Electronic thermometer/hygrometer in PDF format for free! Find your manual METE-ON 3 - IROX and take your electronic device back in hand. On this page are published all the documents necessary for the use of your device. METE-ON 3 by IROX.
USER MANUAL METE-ON 3 IROX
Instructions for use
Instructions for use for the METE-ON 3
Table of contents
Introduction
- Check of the accessories supplied with the system Page 4
- Basic information about the Mete-On 3
- Determine place of installation
- Putting the device into operation
- Basic settings of the Mete-On 3
5.1 Time zone / language setting / snooze time
5.2 Setting the display location
- Operating the device
6.1 Display options in the INFO WINDOW
6.2 Display options in the WEATHER WINDOW
6.3 Wake-up call function Page 10
6.4 Lighting Page 10
- TEST function / The Meteotime symbol
- Batteries
- More information about the device 'METEOTIME' Page 12
- Possible faults, their causes and their correction Page 12
Introduction
With the Mete-On 3, you hold a genuine global innovation in your hands! In addition to the Mete-On 1 from Irox, the Mete-On 3 was only the second appliance with the METEOTIME function at the time of going to press of these instructions for use!
Accordingly, putting it into operation and operating it requires a new kind of procedure. Please therefore take the time and proceed as follows when putting the device into opera-
tion:

1- Please be sure to read through the brochure 'Personal Meteo Centre PMC Important'
2- Make the basic settings as described in these instructions for use.
3-Carry out the 'TEST'!
If you follow these steps exactly, the Mete-On 3 will give you a reliable weather forecast for each day and the following night every time it wakes you. Everything straight away and at a glance!
The functions described in these instructions may deviate from the programme installed on the device. You can download the latest instructions for use on your PC from the Internet (www.irox.com).
Product number of these instructions for use: IRM03.06.S01

Check of the accessories supplied with the device
- Mete-On 3 (main device)
-
Personal Meteo Centre PMC 'Important'
-
Instructions for use (this document)
- 2 x LR 6 AA batteries (in the device)

Basic information about the Mete-On 3
The Mete-On 3 is a highly developed product based on the radio clock technology with the additional function of the Meteortime weather data reception depicting the weather forecasts for the current day.
With the wake-up signal, you can see the forecasts in the morning for both the day and the evening by means of one of the 15 weather symbols. Furthermore, you can also see the expected temperatures and the precipitation probability for the whole day in %.
These weather forecasts are broadcast via the time signal transmitters HBG in Switzerland and DCF77 in Germany. The Meteotime device broadcasts the weather forecasts for a particular location and day once a day.
The weather forecasts depicted by the Mete-On 3 are received between 10 pm and 4 am (UTC time; in Central Europe this is +1 hour in the winter and +2 hours in the summer). This means that to be able to read the first forecasts after the device is put into operation you need to wait a night!
The new forecasts for the day are available from 3 am.
The new forecasts for the night are available from 6 am.
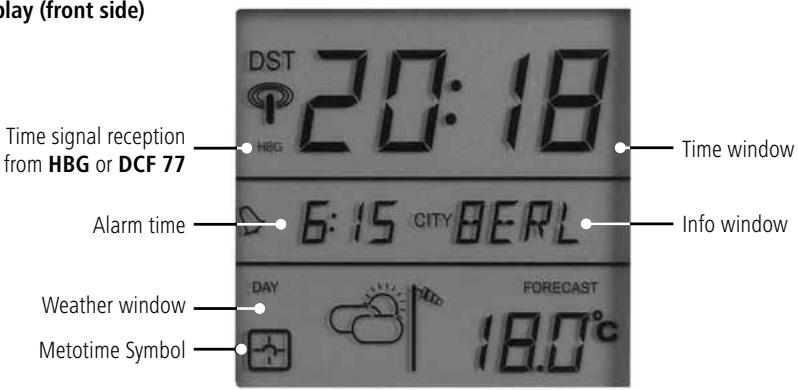
Display(front side)
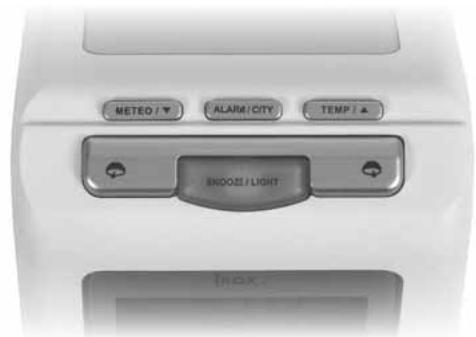
View from the top
Operating keys
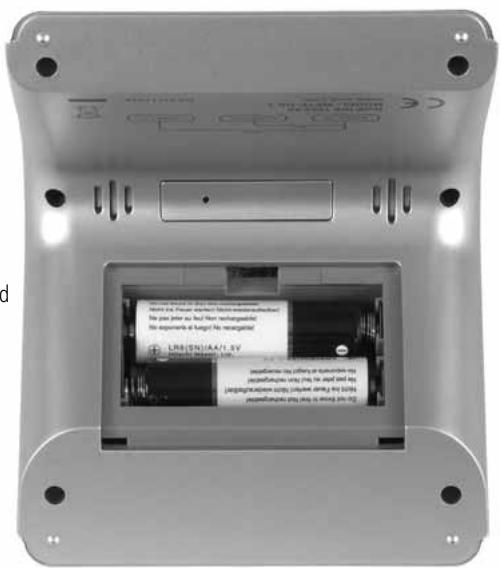
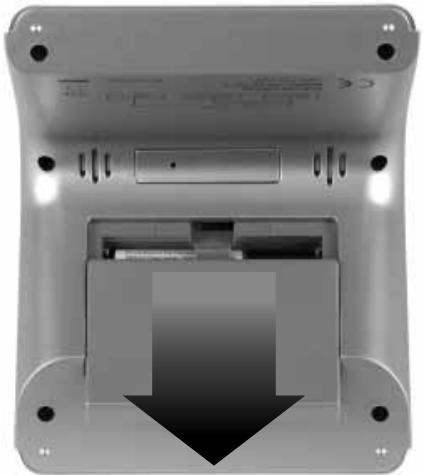
View from the bottom
Battery compartment opened
3. Determine place of installation
Look for a place to install the Mete-On 3 where, if possible, no electrically interfering devices can restrict the reception of the time and the weather data.
More detailed instructions regarding the place of location can be found in the Meteortime brochure 'Important information'. We strongly recommend that you assess the place of installation using the 'TEST' function. The description of the 'TEST' function can be found in Chapter 7.
4. Putting the device into operation
The Mete-On 3 device is battery-operated.
The batteries installed when the device is shipped are deactivated with isolating strips. To activate the batteries, the isolating strips have to be removed. To do this, you need to open the battery compartment. For this, the cover on the inner side of the device is pulled downwards.
Now remove the isolating strips. The Mete-On 3 then starts according to the sequence described below.
If this should not be the case, you need to remove the two batteries from the device and put them back in again after approx 1 minute in the right polarity.
Start procedure of the Meteo-On 3:
- The full segment display appears briefly, the snooze button lights up briefly and a short acoustic signal sounds out. The seconds in the display then begin to run.
- After approx. 10 seconds, the measured interior temperature appears and a rolling weather symbol (4 symbols alternating). The clock now begins to receive the time. Now the settings described in the following chapters can already be started.
Depending on the signal quality, the time reception lasts between 3 and 10 minutes. The following displays appear on the left of the time:
Flashes cyclically: Data is being received and the signal is good
Firmly displayed: Time has been received and is synchronous
No display (or flashes irregularly) There is interference to reception of the time or reception is not possible. If the symbol is not on the display for a longish period of time, the time has not aligned itself to the transmitter for more than 12 hours.
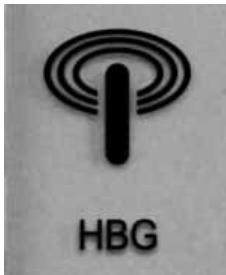
HBG or DCF: Displays which transmitter the device is receiving data from. The Mete-On 3 searches independently for the best transmitter in each case
DST Summer time is active ('Daylight Saving Time'). This symbol does not appear in the winter.
The Mete-On 3 has two basic settings that can be made and which are described in Chapters 5.1 and 5.2 below.
In every setting the following general rule applies:
If no key is pressed for approx. 20 seconds, the settings made are adopted and the Mete-On 3 exits the setting mode independently.
5.1 Time zone / language setting / snooze time
The SET mode is activated by simultaneously pressing and holding (3 seconds) the keys

and
ALARM/CITY
Settings can be made to the respective flashing segment.
- Time zone (-11 to +12 hours, deviation from the valid time in Central Europe)
The time received by the time signal transmitters HBG and DCF77 is the time valid in Central Europe. For Central Europe, therefore, you do not need to make any settings here.
As a presetting, you get the current hour (e.g. 14:-- if the current time is 14:38)
The value can be changed with the keys / .
In order to adjust the time zone for England, for instance (England = -1 hour), the key is pressed once.
In the example above, 14:- thus becomes a 13:-
Note: If a time zone is entered that deviates by more than -3 hours from the time received, the synchronisation and the weather forecast reception will be deactivated.
Continue to the next setting: Press
ALARM/CITY
once.
Language setting
The language selection of the display of the day in 3 letters is:
D: German (basic setting)
NL: Dutch
GB: English
I:Italian
F: French
E: Spanish
The language can be changed with the keys / .
Continue to the next setting: Press
ALARM/CITY
once.
- Snooze time
The alarm clock has a SNOOZE function (slumber function or wake-up call repeat after x minutes if the SNOOZE key is pressed during the acoustic wake-up signal. This SNOOZE time x can be set in this menu: 4, 8 or 12 minutes.
The snooze time can be changed with the keys /
Continue to the next setting: Press
ALARM/CITY
once.
Exit SET function: Press the pears again.
ALARM/CITY
key for at least 3 seconds until the normal display ap
5.2 Setting the display location
The Mete-On 3 can display weather information of up to 60 regions in Europe. You will find a pre-programmed selection of towns and cities in these regions in the device.
The weather region Berne/Switzerland is pre-set on delivery. Another location can be set as follows:
Press and hold (3 seconds) the key
ALARM/CITY
The following settings can be made to the respective flashing segment.
Country
Sixteen countries are available (the pre-programmed list of towns and cities in the Mete-On 3 is attached at the end of these instructions).
The abbreviation for vehicles is used for each country (e.g. CH for Switzerland, D for Germany, F for France, etc.)
The country can be selected with the keys /
Continue to the next setting: Press
ALARM/CITY
·City
A different number of places is available per country. Please select the location nearest to your place of residence. If you are unsure, there is a tool on the Internet page www.meteotime.com where the region valid for your place is residence is indicated.
Each location is displayed with a 4-letter abbreviation (see list at the end of these instructions).
The appropriate location in the selected country can be selected with the keys /
Exit SET function: Press the key
ALARM/CITY
The normal display then appears. If weather forecasts are available, these now appear in the display. More on this in Chapter 6.2.
The required location can be changed at any time. The Mete-On 3 has all data received stored in the memory.

Operating the device
6.1 Display options in the INFO WINDOW

Press down for approx. 3 seconds (until a short acoustic signal sounds out).
Each time the key is pressed like this, the following info will be displayed sequentially:
- Running seconds (basic setting)
- Date ('DATE') in the format date/month
Day of the week (according to the language selected, see Chapter 5.1) - Selected location ('CITY')
- Precipitation probability ('RAIN') in % (if no data are yet available, dashes appear before the % sign)
6.2 Display options in the WEATHER WINDOW
- Weather and temperature forecasts
The forecasts and the temperature measured in the device are displayed here.
You can switch between the potential displays with the keys


Alternating of the display between the weather forecast DAY (DAY') and night (.NIGHT')
Switching between the temperature forecast ('FORECAST') for the period (day/ night) selected with the key above and the room temperature ('INDOOR'). Temperatures are displayed in ^ C
In addition to this manual selection, an integrated logic system will add the valid forecast to the display at specified times: 03:00 The forecast day ('DAY') is added to the display
18:00 The forecast night ('NIGHT') is added to the display
Note: If weather data is not yet available, dashes appear in the display of the forecast temperature ('FORECAST'). As a forecast, 4 different alternating symbols are displayed. When first weather data are received is described in Chapter 2!
The weather forecast is displayed using the 15 different pictograms listed here. The forecast 'Sunny' means 'clear' at night.
| Signi-cance | Day | Night |
| Sunny (Clear at night) | ||
| Light cloud | ||
| Mostly cloudy | ||
| Overcast | ||
| Stratus clouds |
| Significance | Day | Night |
| Fog | ||
| Showers | ||
| Light rain | ||
| Heavy rain | ||
| Frontal storms |
| Signi-f- cance | Day | Night |
| Heat storms | 4 | 4 |
| Sleet showers | ||
| Snow showers | ||
| Sleet | ||
| Snow |
New forecasts are made on a daily basis by professional meteorologists in the Meteotime network. Forecast reliability is therefore based at all times on state-of-the-art technology and the most up-to-date weather models available
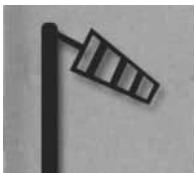
- Forecast of weather situations that require special attention
This symbol indicates storm or gusty wind
6.3 Wake-up call function
The wake-up call function is operated via the following keys:

Short press once: The wake-up time flashes and can now be set via the keys / eingestellt werden. Each time the / keys are pressed, the wake-up call time is increased or reduced by 1 minute. If the corresponding key is pressed and held, the wake-up time changes rapidly. After 10 seconds of holding the key, the display jumps forwards/backwards in 10-minute steps.
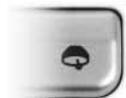
As soon as the wake-up time is changed, the wake-up alarm is activated (the pictogram of the bell appears on the left of the set wake-up time)

This key has 3 functions:
1) Short press: The background light is switched on (see Chapter 6.4) and...
2) ... when the alarm is active, the snooze cycle is started.
The adjustment of the SNOOZE time is described in Chapter 5.1. The following times are available: 4 minutes, 8 minutes or 12 minutes.
3) Long press (≥ 3 seconds): Selection of the display options in the INFO WINDOW (see Chapter 6.1)
An active wake-up alarm also triggers, in addition to the acoustic sound, a flashing of the SNOOZE key (permits the device to be found easily in a dark room). The acoustic signal has the following sequence:
First wake-up signal at the specified time: 2 minutes in total, in 4 levels
Level 1: Slow and gentle
Level 2: Slow and loud
Level 3: Medium speed and loud
Level 4: Fast and loud
If the key SNOOZE is not pressed within 2 minutes, the alarm clock switches itself off automatically until the next day ('24h OFF').

In the case of the SNOOZE cycle activated via the key 'SNOOZE', the alarm clock signal is reactivated when the snooze time has expired. But now straight to Level 4!
During a snooze cycle, the bell flashes in the display. During this time, no setting can be made on the Mete-On 3. For this, the SNOOZE cycle needs to be interrupted via the key (y).
6.4 Lighting

With this key, the display is illuminated for approx. 5 seconds. This key can be pressed repeatedly at any time, including during settings. During the setting of the wake-up time, the display lighting stays on when this is activated once and a setting with the keys / is made within 5 seconds.
As described in the brochure «Personal Meteo Centre PMC Important» the 'TEST' function serves to find a place where the device has a good reception. During this test, each individual unit of data transmitted is verified and rated as good or bad.
This function is started with the combination of the keys Proceed as follows:

1) Press both keys together and hold them like this for approx. 3 seconds until 'TEST' appears on the display in the INFO WINDOW.
2) On the left at the bottom of the display you will see the Meteortime symbol. This has the following significance as long as the test is running (=TEST in the info window):

Flashing: The test is running; reception is good (you can leave the appliance in this position)
Flashing: The test is running; reception poor (please continue to look for a better position)
3) Keep the device upright (as if you were placing it on a table or hanging it on the wall) and look for a place in your room where the symbol is displayed in its entirety. Please be sure to keep the required distance to possible sources of interference (as described in the PMC brochure).
4) The test lasts approx. 1 minute. You can stop the test at any time by pressing one of the two keys
METEO/
or
TEMP/▲
If, after completion of the test, you would like to set up the device in another position, even if it's only in another direction, we recommend that you do the test again.
During normal operation, the METEOTIME Symbol -1 serves to assess the quality of reception of the weather data. During reception of the relevant data at night, at least 75% of the data must be received well. The symbol is thus displayed in its entirety during the day. If this is not the case, the symbol is 'empty':
If during the day, including straight after the device is put into operation, the TEST function is started and the reception is rated as good, the METEOTIME symbol appears completely and remains so after conclusion of the TEST function. However, particularly after the device is put into operation for the first time, this does not mean that the weather data are also already being received. This does not occur until at night as described in Chapter 2. Only after such a reception does the symbol indicated whether at least 75% of the receptions were good or not.

Batteries
At night, the Mete-On 3 has continuous reception in order to ensure a constant depiction of the forecasts of all regions. Nevertheless, the device has a high battery lifetime of approx. 12 months.
Please, however, note the following:
- The battery lifetime also depends on how often you use the background lighting. Regular and repeated use of the background light shortens the battery lifetime.
-
The type of battery used has a major influence on the lifetime. Please therefore only use batteries of the type 'alkaline' or 'lithium'; others could have perceptibly shorter lifetimes!
-
Weak batteries that need to be changed can be detected by a weakening contrast in the LCD. Increasing problems in data reception can also be caused by weak batteries. Consequently, please replace batteries with difficult-to-read displays like this immediately.
- All data and settings are lost when the battery is changed.

More information about the 'METEOTIME' device
More info about the system can be found on the Internet at www.meteotime.com
10:
Possible faults, their causes and their correction
ERROR
- incorrect time and date in the display
CAUSE
The radio reception of Mete-On 3 has been disrupted.
CORRECTION
The place of installation of the Mete-On 3 is unsuitable.
Find a place of installation where there is no interference to the radio reception.
Use the,TEST' function from the instructions for use.
- the Meteotime symbol in the status area is not fully displayed
- there are gaps in the weather forecasts or they are not available
There was interference to the radio reception of Mete-On 3 in the night and less than 75% ofthe data received are correct.
There is electrical interference at the place of installation of the Mete-On 3 or the reception is too weak.
Use the,TEST' function from the instructions for use to find a more favourable place of installation or to remove the interfering device.
As the interference may occur at night, please look for another place as a precautionary measure. It may be sufficient to turn the device 30 - 90^
- the rings on the radio tower are missing

It has not been possible to update the time during the previous 12 hours.
There is interference to the reception at the place of installation of the Mete-On 3.
Use the,TEST' function from the instructions for use to find a more favourable place of installation.
- the contrast in the display is becoming weaker or is poor.
The batteries have been used up.
Replace the batteries.
(2 x LR6 AA battery - alkaline or lithium)
- the forecast pictogram is constantly alternating, in the temperature forecast there are only dashes. Nevertheless, the Meteotime symbol is fully on
In normal operation: It has not been possible to receive the respective weather data for 2 days.
This interference to reception may be temporary; if it occurs often, a more favourable place of installation should be sought.
After the system is put into operation for the first time or after a change in batteries.
No data have yet been received.
Wait until the morning (see Chapter 2)