SMART D1 - Media player DUNE HD - Free user manual and instructions
Find the device manual for free SMART D1 DUNE HD in PDF.
| Product Type | Full HD 1080p Media Player |
| Brand | DUNE HD |
| Model | SMART D1 |
| Processor | Sigma Designs 8642/8643 |
| Maximum Video Resolution | 1080p (Full HD) |
| Supported Audio Formats | Dolby TrueHD, DTS HD Master Audio, LPCM, FLAC, MP3, WAV, APE |
| Supported Video Formats | MKV, MP4, AVI, TS, M2TS, etc. (including HD) |
| Network Connectivity | Ethernet (LAN), WiFi via optional USB adapter |
| USB Ports | 3 USB 2.0 ports (2 at rear), 1 USB client port |
| eSATA Port | 1 eSATA port (external hard drive) |
| SD Card Slot | 1 SD card slot (front) |
| Internal Hard Drive | Optional (3.5" eSATA) |
| Video Outputs | HDMI 1.3, Composite, Component (Y/Pb/Pr) |
| Audio Outputs | HDMI, Digital Optical, Analog Stereo |
| Network Functions | NAS (SMB/FTP), UPnP, Internet browser, IPTV, Internet radio, BitTorrent |
| Remote Control | Infrared, with AAA batteries (not included) |
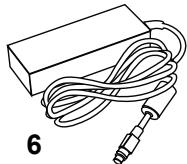
| Power Supply | 12V DC via external adapter (included) |
| Power Consumption | Varies by mode (hardware standby ~0W, simple standby ~10W) |
| Dimensions (L x W x H) | Approximately 250 x 180 x 50 mm (category-based estimate) |
| Weight | Approximately 1.2 kg (estimate) |
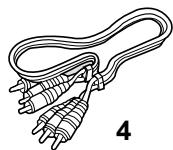
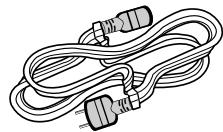
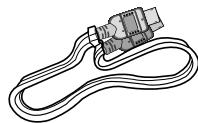
| Box Contents | Player, remote control, HDMI cable, A/V cable, power cord, external adapter, quick guide |
| Maintenance | Clean with a soft dry cloth. Do not use solvents. |
| Safety | Do not block ventilation slots. Unplug before cleaning. |
Frequently Asked Questions - SMART D1 DUNE HD
User questions about SMART D1 DUNE HD
0 question about this device. Answer the ones you know or ask your own.
Ask a new question about this device
Download the instructions for your Media player in PDF format for free! Find your manual SMART D1 - DUNE HD and take your electronic device back in hand. On this page are published all the documents necessary for the use of your device. SMART D1 by DUNE HD.
USER MANUAL SMART D1 DUNE HD
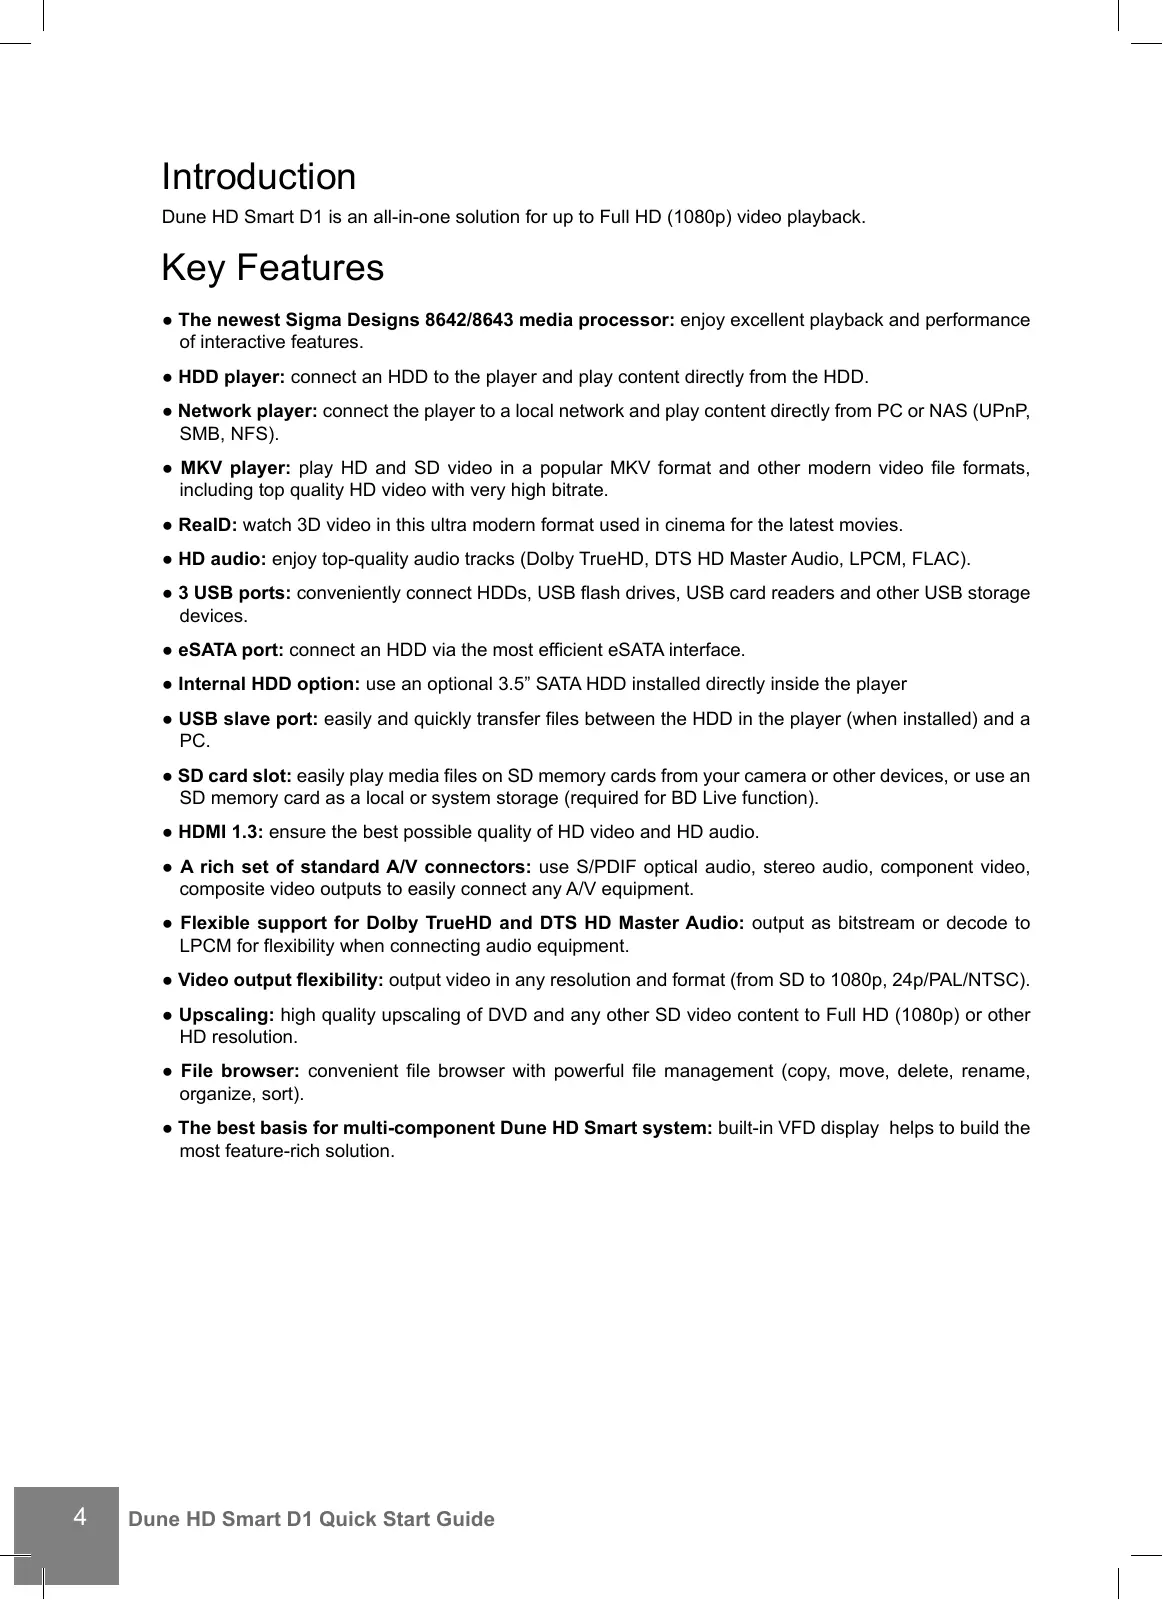
Dune HD Smart D1 is an all-in-one solution for up to Full HD (1080p) video playback.
Key Features
- The newest Sigma Designs 8642/8643 media processor: enjoy excellent playback and performance of interactive features.
- HDD player: connect an HDD to the player and play content directly from the HDD.
- Network player: connect the player to a local network and play content directly from PC or NAS (UPnP, SMB, NFS).
- MKV player: play HD and SD video in a popular MKV format and other modern video file formats, including top quality HD video with very high bitrate.
RealD: watch 3D video in this ultra modern format used in cinema for the latest movies. - HD audio: enjoy top-quality audio tracks (Dolby TrueHD, DTS HD Master Audio, LPCM, FLAC).
- 3 USB ports: conveniently connect HDDs, USB flash drives, USB card readers and other USB storage devices.
- eSATA port: connect an HDD via the most efficient eSATA interface.
- Internal HDD option: use an optional 3.5" SATA HDD installed directly inside the player
- USB slave port: easily and quickly transfer files between the HDD in the player (when installed) and a PC.
- SD card slot: easily play media files on SD memory cards from your camera or other devices, or use an SD memory card as a local or system storage (required for BD Live function).
- HDMI 1.3: ensure the best possible quality of HD video and HD audio.
- A rich set of standard A/V connectors: use S/PDIF optical audio, stereo audio, component video, composite video outputs to easily connect any A/V equipment.
- Flexible support for Dolby TrueHD and DTS HD Master Audio: output as bitstream or decode to LPCM for flexibility when connecting audio equipment.
- Video output flexibility: output video in any resolution and format (from SD to 1080p, 24p/PAL/NTSC).
- Upscaling: high quality upscaling of DVD and any other SD video content to Full HD (1080p) or other HD resolution.
- File browser: convenient file browser with powerful file management (copy, move, delete, rename, organize, sort).
- The best basis for multi-component Dune HD Smart system: built-in VFD display helps to build the most feature-rich solution.
Extra Functions
- High-quality music playback: play very high-quality (up to 192 Khz / 24-bit) music files in various formats (FLAC, Monkey's Audio APE, WAV/PCM, DTS, etc).
- Playlists: build playlists from your folders, use your own playlists, use repeat and shuffle functions.
- NAS function: access files on storage devices (HDD, optical drive, etc) attached to the player from the local network (using SMB or FTP).
- BitTorrent: use built-in BitTorrent client to download files from P2P networks.
- Customizable user interface: work with media collections using cover art and icon browsing (with Full HD graphics).
- Flash applications: extend the player functionality with FlashLite applications.
- Internet radio: playback and record various Internet radio stations (HTTP/MP3).
- IPTV: playback and record IPTV streams (multicast UDP/RTP) from your Internet provider*.
- Digital TV option: playback and record Digital TV channels using an optional Digital TV USB dongle**.
-
Internet browsing: view Internet Web sites on your TV using the built-in Web browser***.
-
Check availability of multicast UDP/RTP streams with your Internet provider.
** Digital TV USB dongle is not included; this option can be purchased separately.
*** Built-in Web browser has limitations and may not allow to view some Internet Web sites.
Package Contents
1
5
2
3
- Dune HD Smart D1 media player
-
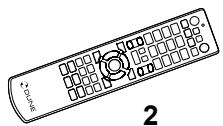
Remote control (batteries may not be included)
-
HDMI cable
- AV cable
-
Power supply cord
-
External power supply
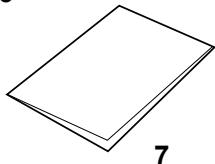
- Quick start guide
NOTE: Additional items (optional) may be included into the package, depending on player configuration, region, and distributor.
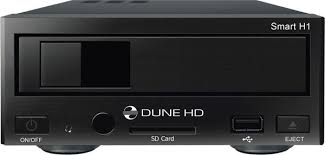
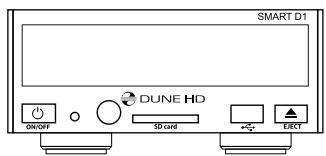
Exterior
Front view
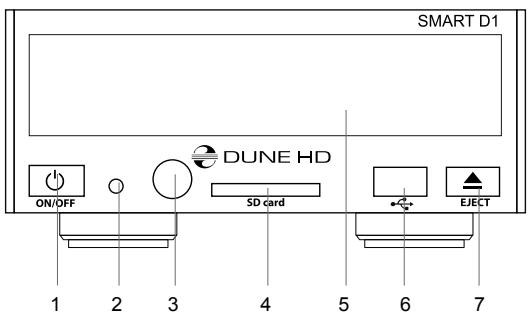
- On/off button
- LED indicator
- IR eye
- SD card slot
- Display
- USB 2.0 host
-
Eject button (*)
-
For controlling an external optical drive (when connected)
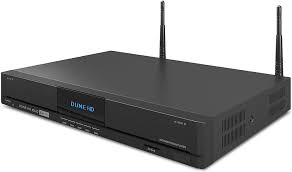
Rear view
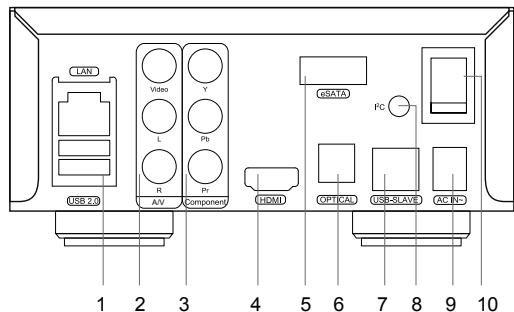
- LAN and 2xUSB 2.0 host
- Composite video and analog stereo audio output
- Component (Y/Pb/Pr) video output
4.HDMI 1.3
5.eSATA host - Optical digital audio output
- USB Slave
- Dedicated bus connector (I²C) (for future connecting external devices)*
- DC power 12V
-
Power switch
-
Not for headphones or other A/V devices; connecting headphones or other A/V devices may damage your equipment
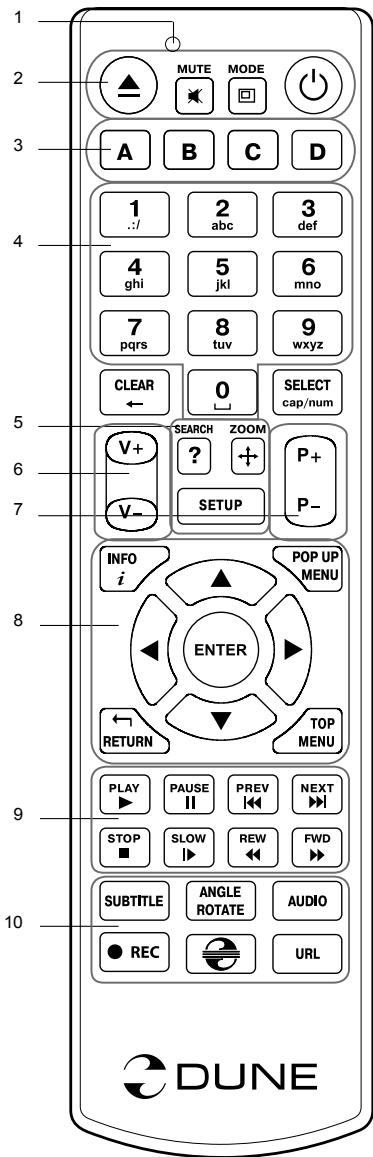
Remote Control
- Command indicator — flashes in response to RC button pressing.
- EJECT — open/close the optical drive tray. MUTE — turn the sound on/off. MODE — switch the video output mode; control some other player functions. POWER — toggle the standby mode.
- A (Red), B (Green), C (Yellow), D (Blue) — access Blu-ray disc features; control some other player functions.
- 0-9 — enter numbers and text; control some other player functions.
- SEARCH — jump to a specified playback position. ZOOM — change the zoom factor for the video content being played. SETUP — enter/leave the setup menu; adjust playback settings during playback.
- V+/V- (volume up / volume down) — adjust the volume.
- P+/P- (page up / page down) — scroll up and down in various lists; control some other player functions.
- Arrows (LEFT, RIGHT, DOWN, UP), ENTER, RETURN, TOP MENU, POP UP MENU, INFO — main buttons for controlling the player (navigate across the items on the screen, open/use the currently selected item, go back to the previous screen, go to main menu, show popup menu with actions, show information, control some other player functions).
- PLAY, PAUSE, STOP, SLOW, REW, FWD, PREV, NEXT — control the playback.
- SUBTITLE, ANGLE/ROTATE, AUDIO, REC, DUNE, URL — control the playback and some other player functions.
NOTES:
- Use alkaline AAA batteries.
- Observe polarity when inserting batteries.
- Direct the remote control to the player. There must be no obstacles between the RC and the player.
- If RC functions only at short distances or stops functioning, make sure to replace the batteries.
- Some RC buttons may have several functions depending on the current player mode.
- Some RC buttons may be available only in certain player modes or only during playback of a certain content.
Getting Started
Remove the transparent protecting film from the front panel of the player to ensure good look of the player.
Ensure there is enough space around the player for proper cooling. The space at each side should be not less than 10 cm.
Ensure the RC has batteries installed.
Connect the player to your TV and to other A/V equipment in an appropriate way. Use HDMI connection to get the best possible quality of video and audio. Make sure to switch off the player and all relevant A/V equipment before connecting them. Ensure your TV and other A/V equipment are configured to use proper inputs.
Switch on the player. The player will perform its initial loading procedure, which may take up to about 1 minute. During the loading procedure, "DUNE" logo is shown on the TV.
- If you do not see "DUNE" logo on the TV when you switch on the player, it may mean some problem with the connection between the player and the TV or that a wrong video input is chosen in the TV or A/V receiver/switch. In such a case, recheck the cables and the settings of the TV or A/V receiver/switch, or try to use different cables or a different way of connecting the player to the TV.
- If you see "DUNE" logo on the TV when you switch on the player, but then the picture disappears and no other picture appears during at least 10 seconds, it may mean that a wrong video output mode is configured in the player. In such a case, press the "MODE" RC button, and then press one of the RC buttons "1", "2", "3", "4" or "5" to switch to a different video output mode (see "Quick Setting of Video Output Mode").
Finally, you should see the main screen of the player menu. The main screen shows items allowing to use different player functions and access all storage devices and network drives connected to the player.
Adjust the player settings as needed using "SETUP" item on the main screen of the player menu (or by pressing the "SETUP" RC button). In particular, you may want to adjust video settings, audio settings, and network settings.
To choose the language of the player menu, use "Setup / General / Interface language" setting.
Use the RC buttons "LEFT", "RIGHT", "UP", "DOWN", "ENTER", "RETURN" to navigate through the player menu. Use the "MENU" RC button to show the list of available commands. Use the "POP UP MENU" RC button to show the information about the selected item.
Quick Setting of Video Output Mode
The "MODE" RC button allows quick setting of video output mode without entering the player setup menu. This way of video output configuration may be required if you see no picture on the screen after connecting your player to a TV.
Press the "MODE" RC button and then one of the RC buttons "1", "2", "3", "4", or "5" to switch to one of the following video output modes respectively:
- Composite/Component, PAL
- Composite/Component, NTSC
3.HDMI,480i,60Hz
4.HDMI,720p,60Hz
5.HDMI,1080i,60Hz
After you see a picture on the TV, press the "ENTER" RC button, and then go to the player setup menu to perform a more precise configuration of the video output mode if needed.
NOTE: The procedure of quick setting of video output mode can not be used during playback. To ensure this procedure can be used, switch the player off, then switch the player on, and the wait about 1 minute to ensure the player loading is finished.
Connecting USB Drives
To connect a USB drive, ensure you are on the main screen of the player menu and connect the USB drive to an USB port of the player. The player will recognize the USB drive, and will show an item corresponding to the USB drive on the main screen.
When connecting a USB drive requiring significant power (such as USB HDD), use an external power supply for the USB drive. Power provided by the USB ports of the player may not be enough for correct functioning of the USB drive.
Do not disconnect or switch off the USB drive when some write operation is in progress.
Using SD Memory Cards
To insert an SD memory card, ensure you are on the main screen of the player menu and insert the memory card into the SD card slot of the player. The player will recognize the memory card, and will show an item corresponding to the memory card on the main screen. Some SD memory cards may not be recognized by the player or may work incorrectly; in such a case, use other models of SD memory cards.
Do not eject the SD memory card when some write operation is in progress.
Connecting eSATA Drives
To connect an eSATA drive, switch off both the player and the eSATA drive, connect the eSATA drive to the eSATA port of the player (and connect the eSATA drive to its power supply), switch on the eSATA drive, and, as the last step, switch on the player. The player will recognize the eSATA drive, and will show an item corresponding to the eSATA drive on the main screen of the player menu.
Switch off and disconnect the eSATA drive only after switching off the player.
Using USB Slave Function
To connect the player with an installed internal HDD via USB slave, switch off the player, connect the USB slave port of the player to the USB host port of the PC, and then switch on the player. The PC will recognize a new USB device. After finishing working with the player in the PC, ensure the USB device is correctly stopped in the PC («Safely remove hardware» or a similar function), switch off the player, and then disconnect the USB slave port of the player from the USB host port of the PC.
Accessing Network Drives
To connect a network drive using SMB or NFS protocol, ensure you are on the main screen of the player menu, press the "MENU" RC button, and choose "Create Network Folder", then fill the parameters of the network drive as needed. The player will show an item corresponding to the configured network drive on the main screen.
To browse the list of network resources accessible via SMB or UPnP protocols, use "Network Browser" item on the main screen of the player menu. NOTE: If some network resources are not shown by the player, you may need to wait some minutes and then retry (or press the "MENU" RC button and choose "Refresh" command).
Formatting HDD
To format a HDD attached to the player, select the drive item on the main screen of the player menu, press the "INFO" RC button and choose "Format Disk" (to format the entire disk) or "Format Partition" (or to format an already existing disk partition only). The player will format the disk using "EXT2" filesystem. NOTE: To use disks formatted by the player on a Windows PC, you may need to install additional software on the PC, such as "EXT2FSD" (http://www.ext2fsd.com/).
Switching the Player On and Off
To switch on the player, ensure the power switch on the rear panel is in "on" state, and press the "POWER" RC button or the "on/off" button on the front panel.
To put the player into the standby mode, press the "POWER" RC button or the "on/off" button on the front panel. To exit the standby mode, press any of these buttons again.
Depending on the player settings (see the player setup menu), the "hardware standby" or "software standby" mode may be used. In the "hardware standby" mode, almost complete power-off takes place and the player consumes almost no power. In the "software standby" mode, the player produces no signal on the video output, but is still functioning. For example, if you have some storage devices connected to the player, you may still access them from network ("NAS" function of the player). Exiting the "software standby" mode takes just a few seconds. When the player is in the "software standby" mode, it still consumes significant power. It is not recommended to keep the player in the "software standby" mode for a while if you do not need it.
To switch off the player completely, toggle the power switch on the rear panel. Do not do it if some drive is connected to the player and some write operation is in progress.
NOTE: After switching off the player or putting the player into the "hardware standby" mode, it is recommended to wait about 1 minute before switching it on again.
NAS (Network Attached Storage)
You can access storage devices connected to the player from the local network using FTP and SMB protocols. On a Windows PC, just type "ftp://ip_address" or "\ip_address" in the Windows explorer, where "ip_address" is the IP address of the player.
WiFi
You can use a USB WiFi adapter to connect the player to the local network via WiFi.
Please see here for the information on supported USB WiFi adapters:
http://dune-hd.com/support/hw_compat/
Internal 3.5" SATA HDD
A possibility to install the internal 3.5" SATA HDD may depend on your reseller. Please contact your local reseller for more information.
Limitations
Compatibility of the player with a particular hardware (A/V equipment, network equipment, disk drives, etc) may depend on various factors (particular hardware model, specifics of hardware installation and usage, configuration of the player and the hardware, etc). If the player does not correctly work with a particular hardware, try to adjust the configuration of the player or hardware, try to use the hardware in a different way, or try to use some other hardware.
Compatibility of the player with a particular media content (files, discs, etc) may depend on various factors (specifics of media content encoding, specifics of the configuration of the player, etc). If the player does not play correctly a particular media content, try to adjust the configuration of the player, or try to use media content encoded in a different way.
Updating Your Player and Getting More Information
Please check here for updated versions of player firmware (which may improve player functioning and extend player possibilities):
http://dune-hd.com/firmware/
(Note: You can also connect the player to Internet and use the online firmware upgrade function, see Setup / Misc / Firmware Upgrade.)
Please check here for more detailed and up-to-date documentation and information on player usage:
http://dune-hd.com/manuals/
http://dune-hd.com/support/
Modular System of Player Configuration
Dune HD Smart players allow to create custom configurations based on the primary (head) unit like Dune HD Smart B1/H1/D1 and several optional extension modules of choice, which can be combined to form an integrated player.
The Dune HD Smart player itself is a head unit which can be extended at user's desire with extension modules, such as the following:
- Dune HD Smart HE (adds the option for easy installation of SATA 3.5" HDD with hot swap feature).
- Dune HD Smart ME (adds the option for installing different additional modules).
- Dune HD Smart BE (adds the option for Blu-ray/DVD/CD playback) (including commercial Blu-ray/DVD discs).
Extension modules can work exclusively with the head unit (Dune HD Smart player) and use a common control system, implemented via the head unit. The number of connected modules may vary in a wide range: the user can compile his/her own Dune HD Smart system of e.g. two, three and even six components.
In order to group SMART devices by 2 or 3 horizontally, special mounts can be used. For example, a group of 3 modules, including the head unit, combined this way, will comprise a new player of a standard size like the model Dune HD Max.
Besides, grouping the required number of modules allows to supersede the functionality of Dune HD Max, providing more flexibility at the same time. In particular, the modular approach provides the possibility to group modules in any order at any time depending on user's demands, as well as replacing (upgrading) particular modules instead of replacing the entire set of equipment.
Additional information is available on the Internet site http://www.dune-hd.com
Introduction
http://dune-hd.com/firmware/.
- Composite/Component, PAL
- Composite/Component, NTSC
3.HDMI,480i,60Hz
4.HDMI,720p,60Hz
5.HDMI,1080i,60Hz
NAS (Network Attached Storage)
http://dune-hd.com/firmware/.
NAS (Network Attached Storage)
Dune HD Smart D1 is an all-in-one solution for up to Full HD (1080p) video playback, combining a universal high definition media player and a modern Blu-ray disc player in one device.
Characteristicas principales
NAS (Network Attached Storage)
NAS (Network Attached Storage)
- Komno3HTbI/KomNoHeHTbI, PAL
- Komno3HTbI/KomnoHeHTbI, NTSC
3.HDMI,480i,60T
4.HDMI,720p,60T
5.HDMI,1080i,60T
IocneToR,KaKn3o6paXeHHeHa3kpaH No8BnIOcB,HaKMITE «ENTER»,a 3aTeM 3aIITe B MeHo HAcTpoek npOnrpbBaTeTЯ dJa 6OJIe DeTaIbHOH NaCTpOKeBn BInDeOpExKIMa,ecN3TO HeO6xOIMO.
ПРIMEЧАНЕ: Пюцениха бichtporо Изменинь Вдeоржима HeIoCtУнha BO BpeMЯ BOCpOIN3BedeHry. ДяТOrO, ChTo6bI rapaHTnPoBaHNo BblIOHnTb 3Tu пОцeDуpy, BblKIIOnHte npOriRpbIbAteJIb, 3aTeM BkIIOnHte erO ChOBa I NOJOKdIte OKONO OdHoi MInyTbI ДяТOrO, ChTo6bI OH yCpenплpoВeCTN пОцeDуpy NaHaJIbHoy 3aRpy3Kn.
NAS (Network Attached Storage)
Mожно пolyuHTь дocTyн К накОптелЯm, поКЛIOЧЕНБИМ K npOIrpBbIaTeJILO, ИЗ ЛOKальHoN сети поnpOTokoJAM FTPи SMB.ΗΚΟΝΙΤΕρе c Windows npocTo habepnTE «ftp://ip_address» ил «\ip_address» в ПобODиke (Windows Explorer), рд «ip_address» — IP-адpec npOriRpBbIaTeЯ.
WiFi
Moxho nCpOJIb30BaTb WiFi-aIaIaTeP, noKJIuOHaembl no USB, dIy noKJIuOHeHn npOnIrpaTeJ K 6ecnpoBODHOi (WiFi) IokaJIbHOi cETn.
3a INΦopMaζηe O ΠΟДερχΝΑεMbIx USB-WiFi-aДaπTEpax σβασaιΤεсь Na CΤρaΗΙΥ:
http://dune-hd.com/support/hw_compat/
BHyTp. 3,5" HDD сиntepeirom SATA
Bo3MOxHocb yctahOBKn BHTpb yctpOietBa 3,5" HDD c nHTeppeom SATA onpeJeTcra nCTpn6bIyTOpor mI INIJIePOM B KAKDOM KOHKpeTHOM perNoHe. IJRA noJIyuHnI DOONHtBJHOINΦOpMaun, CBXKITcB C BAUM DInJIePOM.
OrpaHnueHn
CobmeCTHMOCTb npoINrpbIBaTeTc KOKKpeTbIM O6OpyIDOBaHMe (ayDIO-BuDEoo6OpyIDOBaHne, ceTeBOeO6OpyIDOBaHne, HAKONITeNn T.n.) MoKeT 3aBnCeTb OT pa3IuNbIX fakTopOB (KOKKpeTHo MOdEIn N o6OpyIDOBaHn, OC6eHHocTe annapathOn IHCTaJIaUcNn I ee nCNoIb3OBaHn, HAcTpoEKNpOINrpbIBaTeTn O6OpyIDOBaHn, n T.n.). EcJIn npoINrpbIBaTeJB He pa6Otaet KoppeKTHO C HeKOTOpbIM O6OpyIDOBaHnEM, nonItaHTecb INMmHTb KOHfumpyaunIO npoINrpbIBaTeJnNtO6OpyIDOBaHn, nonPObyIe INCNOlb3OBAbTB O6OpyIDOBaHne dpyrIM M obpa3OM, IIO BO nCNObl3OBAbT dpYroe O6OpyIDOBaHne.
CoBmecTImoCTb npOnrpbIbATEn C KOHKeTbHM BIDOM MeDnAmaTePnaJIOB (paJIbI, DnCKN I T.I.) MOKET 3aBnCtB OT pa3NIuHbIX fakTopOB (OCO6eHHocT N KoDInpOBAHnmeDnAmaTePnaJIOB,OCO6eHHocT NaCTPOE K pOnrpbIbATEn I T.I.).EcI npOnrpbIbATEnb He BOCnpON3BODNT KoppeKTHO HeKOTOpblc MeDnAmaTePnaJbl, nonpO6yIte n3MeHNb HAcTPOIKn npOnrpbIbATEn INI INCNoJIb3OBAbMb MeDnAmaTePnaJbl, 3aKoDnIpOBAHbbl B OTNIuHOM fOpMaTe.
OboBHeHne pIeepa n DoI.NHOpMaucnA
PtoKnyIa, npoBepaTe DoCTynHocTb OboHOBJIeHn IpoRpaMMHO ObeCneHn IpoINrPBbATEn («Pno- shuBkn») Ha cIeMyUOSe HntepHeT-CTpAHnCe (3TO MOKeT yIyUHNTb FyHKUHOHaJIbHOCTb IpoINrPBbATEn I paacSnprNtB erO BO3MOXHOCTn):
http://dune-hd.com/firmware/
(3ameuahne: BbI TaKKe MoKTe POnkHouHTb PJIeep K INTepHET N BOCNoB3OBAtbcra cyHKnEe OHJaHOBHbENH pOoWNBKn, cm. HAcTpoNk / Pa3Hoe / O6HOBJeHne IpoWNBKn.)
Ioxayncta, obaaTecsb K cneyUoIm nHTepHET-CTpaHnam dIra noJyueHna 6oonee noDpo6hoN aKtyaIbHO JOKymentaunu INOpMaunu OBC NcNoB3OBAHNn POnrpbBaTeTn:
http://dune-hd.com/manuals/
http://dune-hd.com/support/
Módylbna CnCTema KOMNOHOBK NJIeepa
PpOINrpBbATEnn Dune HD Smart no3BOJIAOT CO3aBaTb nOB3oBaTeJIckNe KOHcIpyaunn Ha 6a3e OHOBHoro (rONOBHoro) ycTpoIcTBa n HeCKoJIbKnx ONUHOJIbHbIX MOyJe pAcuInpeHnra nO Bbl6opy, KOTOpbIe MoXHO, NOIO6HO KOHCTpyKTopy, KOMNOHOBAb B eINHb I pIeep.
CamaonrpmbateIb Dune HD Smart yBnIeTcra roOBHbIM ycTpoIcTBOM, KOtOpb moKHO 6yTe T no JeNaHIO BlaJeIbca DoONHHTb, HapnPmep, cIeDyUoIIMM MoDyIaMn paCunpeHn:
He BvmkaTe USB-hakonuBya, nd vac onepaui 3anncy.
MódylbHa CSCTeMa KOMNoHyBaHnI npOrpaBaay
IporpaBauDune HD Smartdo3BnOJIObCTBOpOBaTN Bnachi KOHphiIpyaui Ha OCHOBi nepBHHnx Ta onuohahnHx HanaTuBaHb, kki MoKyTb 6ytno6'EdHaHi Ira CTBopeHHKOMPJIeKCHOro piueHH.
IodatKOBy IHOpMaIIO MOXHa OTPMaTn Ha IHTepHc-TaiTi
http://www.dune-hd.com