
GM-04015U-R - Mouse GENIUS - Free user manual and instructions
Find the device manual for free GM-04015U-R GENIUS in PDF.
| Product type | Wireless mouse |
| Reference | GM-04015U/R |
| Connection technology | Radio frequency (RF) |
| Receiver interface | USB or PS/2 |
| Power supply | 2 AAA batteries |
| Main buttons | Left, right, scroll wheel (Magic-Roller) |
| Special functions | Magic-Roller, EasyJump, Auto Panorama, Zoom |
| System compatibility | Windows |
| Indicative range | Approximately 10 m² (interference-free area) |
| Number of ID codes | 256 |
| Minimum receiver distance | 20 cm from other devices |
| Approximate dimensions | 10 x 6 x 3.5 cm |
| Approximate weight | 100 g (with batteries) |
| Maintenance and cleaning | Clean with a dry cloth; avoid liquids |
| Safety | Observe battery polarity; keep away from water |
| Extended storage | Remove batteries if unused for more than 2 weeks |
Frequently Asked Questions - GM-04015U-R GENIUS
User questions about GM-04015U-R GENIUS
0 question about this device. Answer the ones you know or ask your own.
Ask a new question about this device
Download the instructions for your Mouse in PDF format for free! Find your manual GM-04015U-R - GENIUS and take your electronic device back in hand. On this page are published all the documents necessary for the use of your device. GM-04015U-R by GENIUS.
USER MANUAL GM-04015U-R GENIUS
Hardware Installation 1
Software Installation 2
Factory Setting 2
Button Assignments 3
Pycckn 4
Deutsch 7
Français 10
Italiano 13
Espanol 16
Portugués 19
Brasil 22
Nederlands 25
Česky 28
Magyar 31
Polski 34
Türkce 37
40
中文 43
Federal Communications Commission (FCC) Notice
This device complies with Part 15 of the FCC Rules. Operation is subject to the following two conditions: (1) this device may not cause harmful interference, and (2) this device must accept any interference received, including interference that may cause undesired operation.
This equipment has been tested and found to comply with the limits of a Class B digital device, pursuant to Part 15 of the FCC Rules. These limits are designed to provide reasonable protection against harmful interference in a residential installation.
This equipment generates, uses and can radiate radio frequency energy and, if not installed and used in accordance with the instructions, may cause harmful interference to radio communications. However, there is no guarantee that interference will not occur in particular installations, if this equipment does cause harmful interference to radio or television reception, which can be determined by turning the equipment off and on, the user is encouraged to try to correct the interference by one or more of the following measures:
- Reorient / Relocate the receiving antenna.
- Increase the separation between the equipment and receiver.
- Connect the equipment into an outlet on a circuit different from that the receiver is connected.
- Consult the dealer or an experienced radio / TV technician for help.
CAUTION: Changes or modifications not expressly approved by the manufacturer responsible for compliance could void the user's authority to operate the equipment.
Disclaimer
The following does not apply to any country where such provisions are inconsistent with local law: KYE Systems Corp. makes no warranties with respect to this documentation, whether expressed or implied. All material is provided "as is". This includes, but is not limited to, any implied warranties of merchantability and fitness is for a particular purpose. The information covered in this document is subject to change without notice.
KYE Systems Corp. assumes no responsibility for any errors that may appear in this document.
All brand names mentioned in this manual are trademarks or registered trademarks of their respective companies.
Copyright © 2005 KYE Systems Corp. All rights reserved.
EC-Conformity Declaration
For the following equipment:
Wireless Mouse
(Product Name)
GM-04015U/T
GM-04015U/R
(Model Designation)
is herewith confirmed to comply with the requirements set out in the Council Directive on the Approximation of the Laws of the Member States relating to R&TTE Directive (99/5/EC). For the evaluation regarding the electromagnetic compatibility, the following standards were applied:
EN 300 220-1 (2000 V1.3.1)
EN 300 220-3 (2000 V1.1.1)
EN 301 489-1 (2002 V1.4.1)
EN 301 489-3 (2002 V1.4.1)
EN 60950 (2000)
The following importer/manufacturer is responsible for this declaration:
KYE SYSTEMS CORP.
(Company Name, Importer/manufacturer)
No. 492, Sec. 5, Chung Hsin Rd., San Chung City, Taipei Hsien, Taiwan R.O.C.
(Company Address, Importer/manufacturer)
Person responsible for this declaration
Y.J.-LAI Manager of TSD
(Name, Surname, Position/Title)

(Adres firmy, importer/producent)
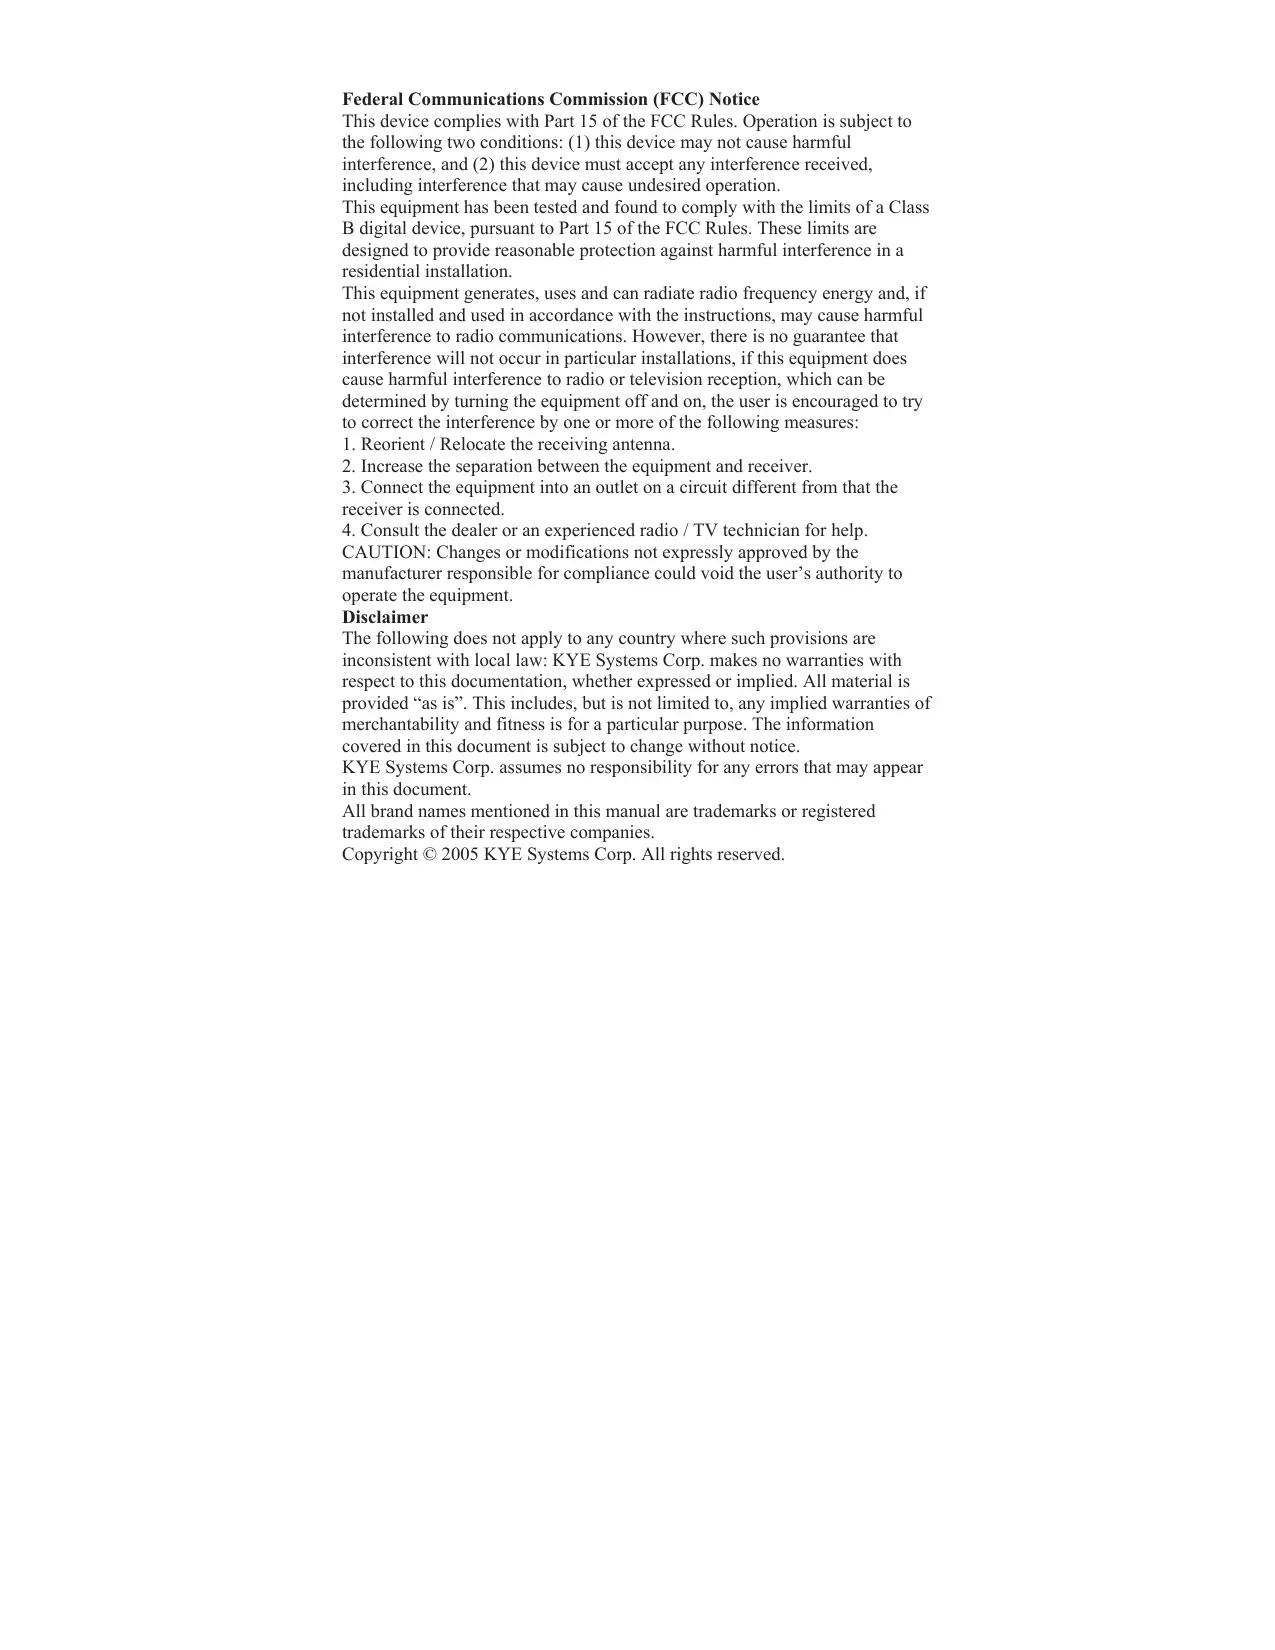
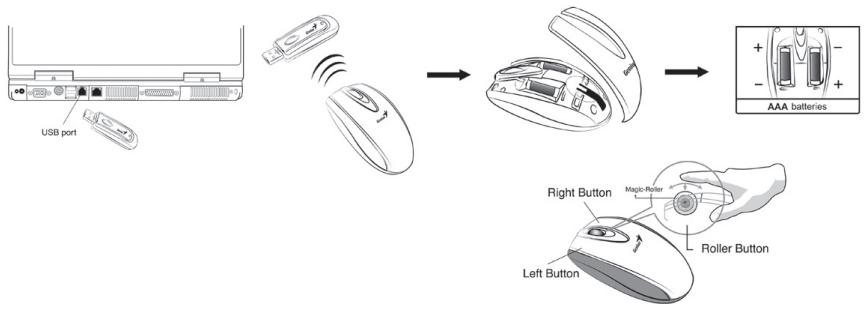
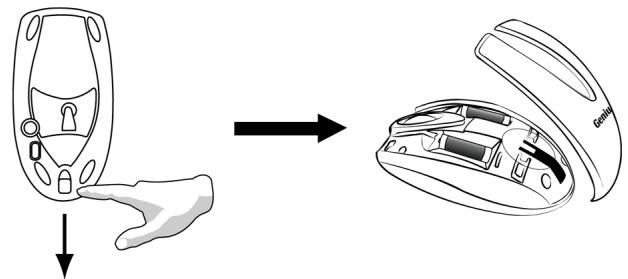
Hardware Installation
- You can connect the receiver to a USB port of a PC
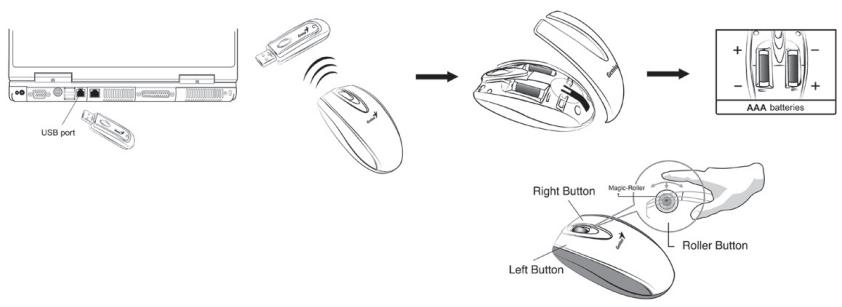
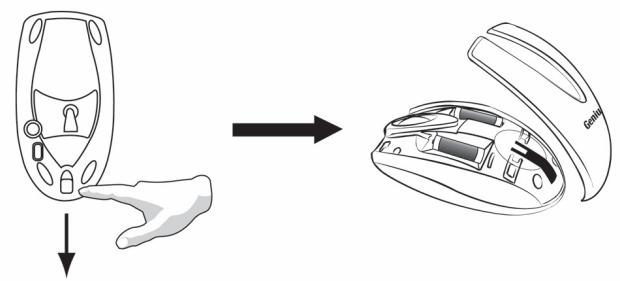
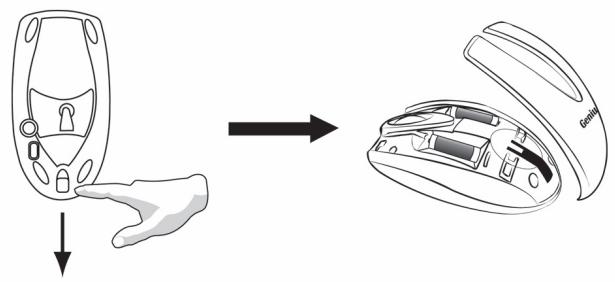
- Install two AAA batteries in the mouse.
- Turn on your computer.
- After you open Windows, please press the button on the receiver first and then press the button under the mouse for channel setting.
Important: Remember do not put the batteries in the wrong direction, use the same types of batteries. Also, keep all drinks away! If any spill occurs on the receiver, unplug the USB connector first and clean the receiver immediately. Please switch the button to "off" under the mouse if you don't use it for a long time, and remove the batteries if you do not use this device for at least two weeks.
Warning: (Troubleshooting)
- Please do not use Wireless Mini Navigator on a desk which is made of glass, mirror, iron, or black velvet. Also, a flat surface is necessary or the Optical Sensor will error easily. When you use Wireless Mini Navigator on a desk that is made of metal, try using a pad and reduce the receiving distance.
- Before the first installation is completed (channel setting ready), the mouse will not work in DOS.
-
The Wireless Mini Navigator channel provides 256 ID-codes, and it automatically selects the ID # for your mouse. You can only set up one Wireless Mini Navigator at a time. But if you have additional Wireless Mini Navigator sets in an area of 10 square meters, more interference will occur between the receiver and your mouse.
-
If you feel the mouse does not move smooth as usual, then the batteries have lost their charge, so please replace them.
- The Wireless Mini Navigator with radio frequency gives you free movement and an enjoyable experience. For optimal performance, place the receiver at least 8 inches (about 20~cm ) away from the mouse and other electrical devices, such as the computer, monitor, and etc.
- Press any button on the mouse when the mouse is in sleep (power saving) mode.
Factory Setting
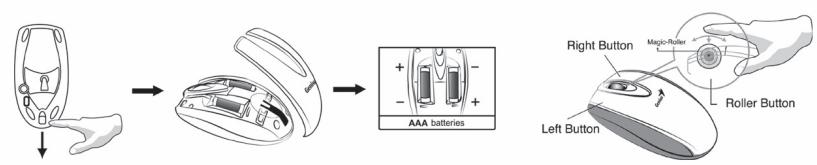
Changing the Faceplate
ENGLISH
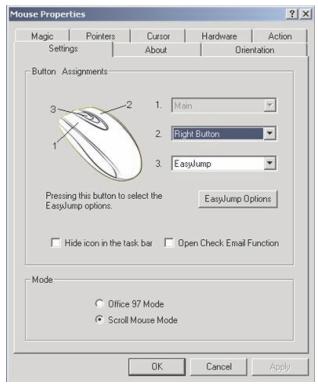
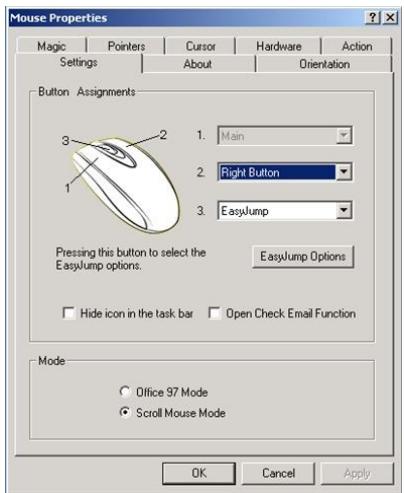
Button Assignments
The Button Assignment feature lets you work in a more efficient way because you can assign the most frequently used commands in Windows to the mouse buttons.
Magic-Roller Press the "Magic-Roller" to surf the Internet and Windows documents
Left Button Provides traditional mouse functions such as click, double click and drag.
Right Button You can assign this button frequently used keyboard and mouse functions in addition to features like EasyJump, Auto-Panning, Zoom, etc.
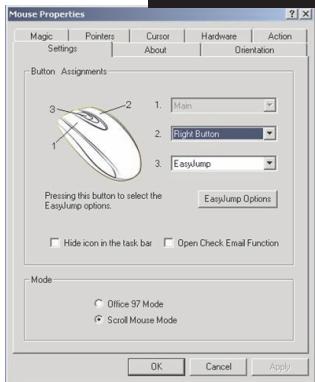
Roller Button You can assign this button frequently used keyboard and mouse functions in addition to features like EasyJump, Auto-Panning, Zoom, etc.
YCTaHOBKa
1.BbMOKeTe IIOJKIIOUHTb IIpHEmHHK K IIOpy USB BaIIero PIK
2.YctaHOBHTe BMbIb IBa 3JIeMeHTa IIITaHnTtIIA AAA.
3.BKIIIOHHTe KOMIbIOTep.
4.IocIe 3aRpy3KN Windows IJIa Bb6opa KaHaJa cHaJa HaXMMTe KHOIIky, paIOJIOKeHHyIO Ha IIpHeMHnke, a 3aTeMaXMMTe KHOIIKn, paIOJIOKeHHbIe IOJ MblIbI.0.
Baekhoe zameuhe: Co6lodoaime noIapHocmb 3IeMeHMO6 numaHua, ucnolb3yume 3IeMeHmbl numahua mo2 oce muna. IepKcme Hanumku bdaun om 3aprdnozo ycmpoicma? B clyue ae cnu kacay-nio hucokcmb nploBemca na 3apdHOe ycmpoicmb6, chauia omkIOUcme USB-pa3bem, a 3aem He meedJeNo npompume 3apdHOe ycmpoicmb6. Eclb he cobupaemecb noIb3obamcbMbuib6 meueHue dImelbHOO 6pemu (0be HeedeU u 6olee), nepe6edume nepeKIOuyameh ha dne 6 noIOXcHHe «6bIKL» u 6bHNbme 3IeMeHmbl numaHua.
Ipeynpckdeneue:
1.Данная ONTNueckaMbIb He IpeIHa3HaueHa JIA HcIOJIb3OBAHHa HA cTeKJIHHbIX, 3epKaIbHbIX,MeTJIINuecknI HembIX bapXaTHbIX IOBepxHOCTNX.KpOME TOrO,JIЯ pa6oTBi ONTNueckOTo DaTPhKA Heo6xoJIMO, YTO6bl IOBepxHOCTb 6blia IIIOscKOeK.EcJIb BbI pa6oTaTe C yTPOIcTBom Wireless Mini Navigator Ha metaJIINueckoPA6ooy IOBepxHOCTN,HcIOJIb3yIte KOBpHK,a TAKKe yMeHbIInTe paCtOAHHe Do II pIPhemHHka.
2.До 3aBepHHeHЯперBOHaJaIbHOи уCTaHOBKN (KaHaJI Bbl6paH)MbIIb He 6yIeT pa6OtaTB DOS.
3.KaHaJI yctpoIcTBA Wireless Mini Navigator IIOIIepeKINBaET IO 256 IHeHTHΦHKaTOPOB YcTPOIcTb; HIEHTHΦHKaIHHOHHbIe HOMepa IJIa MblIIN BblOpHaOTcABTOMaTHueCKN. OIOHBpeMeHNO Bbl MoJcTe HAcTPOHb TOJIbKO OIOHO yCTPOIcTBO Wireless Mini Navigator. Ecln Ha IIOIuaDN B10 KBAIpaTHbIX MeTPOB paCIOJOKeHO eIe OIOHO yCTPOIcTBO Wireless Mini Navigator, To Iprn B3aHMOeIcTBBH MblIIN H IpHemMHnKa 6yUyt BO3HNKaTb IIOIOJIHHTeJIbHbIe IOMEXH.
4.EcHn BbI 3aMeTHHJ, YTO DBHXeHHy yKa3aTeJIy MblH CTaJIH He TaKHM IIaBbIMH, KAK O6bIuHO, TO 3TO O3HaueT, YTO 9JIeMeHTb IINTaHHpa3pIINHCb. 3aMeHHTe 9JIeMeHTb IINTaHH.
5.ФункионнуюшeeВ paДиндапаоhe yctpoICTBO Wireless Mini Navigator obecneuHbaeT CBO6Ooby IpepeBnkeHn H NOCTABJIAET HAcTOIeE yIOBOJIbCTBHe BO BVPempa6oTBi.ДлЯ habluyшie pa6Obly cYctpoCTBa IOMeCTHTe IIpHemHNK Ha paccToHn He MeHee 20 caHTMmptOB T Mbln IN pyrTO GJIeKtPOHHORO obopyIOBaHn: KOMIIbOTepa,MOHITopaHnIp.
6.HaKMHTe HaJIIO6yIO KHOIIkyMbIIHN,KoIgJaMbIIb HAXOINTCBpeKHMe 3Heproc6epeKeHH.
YctaHOBka IporpamMHorO oecneueHn
1.Y6eIHTecb, YTOMbIIb IIOKJIHOueHb K KOMIIbIoTepy.
2.BCTaBtye yctaHOBOHyU INCKeTy (HJIN CD) B INCKOBOI.
3.Дязавершениустановкипограмногообеси ueHHЯ слду Te BBIOHMbIM Ha ькраз HHCTpyKIIHМ.
3aBoDcKne yCTaHOBKn

3aMeHa nHeJn
Ha3naYeHne KHOJOK
Bolihe6hbi pornk
IIyIyTeIeCTBnI IIO
HHTepHETy HIN IIpOKpyTKN
IOKymENTOB Windows
HaXMMITEceHCop "BoJIe6HbI
poJHK
JIeBaJ KHONka
PeaH3yET TaKHe 06bUHbIe yHKIIINMbIIIN KAK IIeJIYOK, IBOHHOIIeJIYOK IN IpeTaCKNBAHHe.
PpabKa KHONka
3ToI KHOIIke MOrYt 6bITb IIpHcBOeHbI YaCTO HIOJIb3yEmbIe fYHKIIHH KJIaBHaTpyI H MbIIN B IO IepexoJ,“ABTOI-HopamHPOBaHHe”,“I3meh
KhoNka-poJNK
三 T o i KHOIIke MOryT 6bIT IIpHcBOeHbI qacto HcIO Ib3yEmbIe yHKIIIN KJIaBHaTpyI INMbIIIN BdoIO JHeHne KfYHKIIINM "EbiCTpbI IepexOJ","ABTOIaH- opAMHpOBaHNe”,"I3MeHeHne MacIIra6a"N T.II.
Hardware installieren
Jiaai jia jia jia jia jia jia jia jia jia jia jia jia jia jia jia jia jia jia jia jia jia jia jia jia jia jia jia jia jia jia jia jia jia jia jia jia jia jia jia jia jia jia jia jia jia jia jia jia jia jia j
.DOS JJIJIJIJIJIJIJIJIJIJIJIJIJIJIJIJIJIJIJIJIJIJIJIJIJIJIJIJIJIJIJIJIJIJIJIJIJIJIJIJIJIJIJIJIJIJIJIJIJIJIJIJIJIJIJIJIJIJIJIJIJIJIJIJIJIJIJIJIJIJIJIJIJIJIJIJIJIJIJIJIJIJIJIJIJIJIJIJIJIJIJIJIJIJ
256 Wireless Mini Navigator
12
Wireless Mini Navigator
J 10 a 1
J 1 J
dill 15c c k j d l y j bll 12 10 14 13 12 11 10 10 10 10 10 10 10 10 10 10 10 10 10 10 10 10 10 10 10 10
y

J 5-
8 aI 11aI 11aI 11aI 11aI 11aI 11aI 11aI 11aI 11aI 11aI 11aI 11aI 11aI 11aI 11aI 11aI 11aI 11aI 11aI 11aI 11 aI 20)
Jg Jg Jg Jg Jg Jg Jg Jg Jg Jg Jg Jg Jg Jg Jg Jg Jg Jg Jg Jg Jg Jg Jg Jg Jg Jg Jg Jg Jg Jg Jg Jg Jg Jg Jg Jg Jg Jg Jg Jg Jg Jg Jg Jg Jg Jg Jg Jg Jg Jg Jg
jssll jg wglall jgs 1-
2- 3-
Gall

sgl 1
1.25 2.
a
i 1
Windows
j 1
jall jall J1a 1y jall sll
j 21
aagglgallbgljll
di 1000000000000000000000000000000000000000000
gill jil g
(EasyJump)
/ (Auto-Panning)
sii j
j
aagglgallbgljll
di 1000000000000000000000000000000000000000000
gbsll jgsj 1
/ (Auto-Panning)