
CQ2100 - Desktop PC COMPAQ - Free user manual and instructions
Find the device manual for free CQ2100 COMPAQ in PDF.


User questions about CQ2100 COMPAQ
0 question about this device. Answer the ones you know or ask your own.
Ask a new question about this device
Download the instructions for your Desktop PC in PDF format for free! Find your manual CQ2100 - COMPAQ and take your electronic device back in hand. On this page are published all the documents necessary for the use of your device. CQ2100 by COMPAQ.
USER MANUAL CQ2100 COMPAQ
The only warranties for Hewlett-Packard products and services are set forth in the express statements accompanying such products and services. Nothing herein should be construed as constituting an additional warranty. HP shall not be liable for technical or editorial errors or omissions contained herein.
HP assumes no responsibility for the use or reliability of its software on equipment that is not furnished by HP.
This document contains proprietary information that is protected by copyright. No part of this document may be photocopied, reproduced, or translated to another language without the prior written consent of HP.
Hewlett-Packard Company
P.O.Box 4010
Cupertino, CA 95015-4010
USA
Copyright © 2000-2008 Hewlett-Packard Development Company, L.P.
This product incorporates copyright protection technology that is protected by U.S. patents and other intellectual property rights. Use of this copyright protection technology must be authorized by Macrovision, and is intended for home and other limited viewing uses only unless otherwise authorized by Macrovision. Reverse engineering or disassembly is prohibited.
Microsoft and Windows Vista are U.S. registered trademarks of Microsoft Corporation.
The Windows logo and Windows Vista are trademarks or registered trademarks of Microsoft Corporation in the United States and/or other countries/regions.
Wi-Fi CERTIFIED 802.1n based on Draft 2.0
Draft 2.0 refers to the version of the not-yet-ratified IEEE 802.11n standard used in Wi-Fi Alliance testing as of June 2007.
The specifications of the 802.11n WLAN (wireless local area network) are draft specifications and not final. If the final specifications differ from the draft specifications, it may affect the ability of this device to communicate with other 802.11n WLAN devices.
HP supports lawful use of technology and does not endorse or encourage the use of our products for purposes other than those permitted by copyright law.
The information in this document is subject to change without notice.
Table of Contents
Setting Up Your Computer 1
Checking the Computer Installation 1
Connecting Speakers or Microphone 4
Connecting to a Network 7
Connecting a Modem 8
Connecting the Television Signal and Video Cables 8
Turning On Your Computer for the First Time 15
Turning Off the Computer 16
Restarting the Computer 18
Connecting to the Internet 18
Adjusting the Speaker Volume 20
Selecting the Microphone 21
Protecting Your Computer 22
Configuring the Computer for Automatic Microsoft Software Updates 23
Setting Up User Accounts 24
Guidelines for Installing Software and Hardware Devices 25
Transferring Files and Settings from an Old Computer to Your New Computer 26
Special Features of Your Computer 27
Using the Memory Card Reader 27
Using a Vertical CD/DVD Drive 29
Using LightScribe Technology 30
Using the Remote Control. 31
HP Easy Backup 32
Peripheral Device Landing Pad and Cable Routing 32
Using Software 33
Getting More Information 35
Using the Onscreen Help and Support Center 35
Accessing Support on the Web 35
Finding Guides on the Web 35
Finding Onscreen Guides 36
Using the PC Help & Tools Folder 36
Using HP Total Care Advisor Software 37
Using the Computer with Safety and Comfort 37
Troubleshooting and Maintenance 39
Troubleshooting Computer Problems 39
Repairing Software Problems. 57
Maintenance 60
SystemRecovery. 63
Performing the Post-Recovery Procedure 67
Index 69
Setting Up Your Computer

WARNING: The power supply is preset for the country/region in which you purchased your computer. If you move, please check the voltage requirements for your new location before plugging the computer into an AC power outlet.

WARNING: Please read "Safety Information" in the Limited Warranty and Support Guide before installing and connecting the computer to the electrical power system.
Follow the steps on the setup poster to set up the computer:
1 Connect a keyboard and a mouse to the computer.
2 Connect a display (monitor) to the computer.
Your computer may have a graphics card with an HDMI (High-Definition Multimedia Interface) connector. If you use it to connect your display (monitor) to the computer, you should also connect analog speakers to the computer if you want to hear sound during the initial setup of the computer.
3 Connect power to the computer.
4 Follow the steps on the setup poster to turn on the computer. See "Turning On Your Computer for the First Time" on page 15.
Checking the Computer Installation
Place the computer in the proper location so that:
All ventilation openings are unobstructed.
All cabling is out of the way. Do not place any cable in a walkway or where it can be stepped on or damaged from placing furniture on it.
- Protect the monitor, computer, and connected accessories by connecting all power cords to a power surge protection device. Use a power strip specifically labeled as having surge protection, or an uninterruptible power supply (UPS), or similar device.
If the computer has a television tuner, or a modem or telephone connection, protect the computer by using the surge protection with these signal inputs, as well. Connect the television cable or the telephone line cord to the inputs and outputs of the surge protection device and then to the computer.
- Look in the computer box for printed details or updates regarding the computer.
Connecting other devices to the computer
(Select models only)
Connect the main hardware devices, such as the monitor, keyboard, and mouse, to the back of the computer. See your setup poster for information on connecting your mouse, keyboard, monitor, and speakers.
Other peripheral devices can plug into connectors on the back of the computer or on the front of the computer (select models only).
NOTE: Do not connect or add other devices to the computer until after you turn on the computer for the first time and complete the initial setup. See "Turning On Your Computer for the First Time" on page 15.
Computer connectors
Some, but not all, connectors that may be on the computer appear in the following tables in this order:
Power cord and devices (mouse, keyboard, USB, and so on)
Network
Modem
Display video output (monitor or TV)
For audio and speaker connectors, see "Connecting Speakers or Microphone" on page 4.
For television connectors and video input with audio, see "Connecting the Television Signal and Video Cables" on page 8.
NOTE: The location, availability, and number of connectors on the computer may vary.
| Power cord and devices | Icon/Label | Description and function |
| Power connector. | ||
| Mouse (PS/2 connector). | ||
| Power cord and devices | Icon/Label | Description and function (continued) |
| Keyboard (PS/2 connector). | ||
| Universal Serial Bus (USB) 2.0 for mouse, keyboard, digital cameras, or other devices with USB connectors. |
| Network | Icon/Label | Description and function |
| ETHERNET | ETHERNET | Ethernet LAN connector to connect to an Ethernet (RJ-45) local area network (LAN) hub or any broadband connection. This wired LAN connector is a network interface adapter (also called a network interface card, or NIC). The green LED indicates a valid connection. |
| Modem | Icon/Label | Description and function |
| LINE | Modem (Line In RJ-11) (select models only) to connect the computer modem to a telephone wall jack for dial-up connections to the Internet. | |
| Display video output | Icon/Label | Description and function |
| NOTE: For specific information, see the documentation that came with the display device. | ||
| VGA/Monitor | VGA/Monitor (blue) display output connector, to connect to a VGA monitor. You may need to use a VGA-to-DVI adapter to connect a display with only a DVI connector to the computer. | |
| HDMI | HDMI display output connector, to connect to an HDMI monitor or TV display. You may need to use an HDMI-to-DVI adapter to connect a display with only a DVI connector to the computer. NOTE: Adjust settings to hear sound through the HDMI connector. See “HDMI-connected display produces no sound.” on page 42. | |
| DVI | Digital video output connector (select models only), to connect to a TV or monitor. You may need to use a VGA-to-DVI or an HDMI-to-DVI adapter to connect the display to the computer. | |
| VGA-DVI | VGA-to-DVI adapter, to adapt a TV or a monitor video cable so it can connect to the computer. | |
| HDMI-DVI | HDMI-to-DVI adapter, to adapt a TV or a monitor video cable so it can connect to the computer. | |
Connecting Speakers or Microphone
This section describes connecting speakers, headphones, or a microphone to your computer. Speakers are available separately, or may be included with the monitor (select models only). Headphones are available separately.
Your computer model may include audio connectors on the back of the computer. Some computers have connectors on the front of the computer, as well. The connectors are stereo mini-jacks that connect from the computer to active (powered) speakers or speaker systems, to headphones, or to an input device such as a microphone, webcam, or audio player.
Some, but not all, audio connectors that may be on the computer appear in the following table.
NOTE: The location, availability, and number of connectors on the computer may vary.
| Audio connectors | Icon/Label | Description and function |
| Microphone In (Mic) (pink) to connect a microphone. May function as a center/subwoofer Line Out in a multichannel audio configuration. | ||
| Headphones Out connector (green) to connect headphones. | ||
| Audio Line Out (lime green) to connect front left and front right analog speakers. | ||
| Audio Line In (blue) connector to connect input to the computer from an analog audio device, such as a CD player. May function as rear Line Out in a multichannel audio configuration. | ||
| Centerline C/Sub (gold) connector to connect Center/Subwoofer speakers in a multichannel audio configuration. | ||
| RearLine Rear (black) connector to connect rear speakers in a multichannel audio configuration. | ||
| SideLine Side (gray) connector to connect side speakers in an eight-speaker system (7.1). |
Connecting speakers
Speakers are available separately, or included with the monitor.
Your computer supports only active (powered) speaker systems; the speaker system must have its own power source, such as batteries or a separate power cord.
For detailed instructions about how to connect and configure other multichannel speakers, go to the Web support page for your model; see "Accessing Support on the Web" on page 35.
Connecting a stereo-speaker system
To connect active speakers, such as left/right stereo speakers or a 2.1 system of two speakers and a subwoofer, to the computer:
1 Make sure the computer is turned off. Make sure the speaker system is turned off and unplugged.
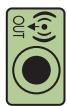
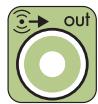
2 Connect the speaker system cable to the lime green Audio Line Out connector that matches the back of your computer.
Or
For 2.1 speakers or other multichannel speakers that were shipped with your computer (select models only), connect the subwoofer to the Audio Line Out connector on the computer, and connect the left and right speakers to the subwoofer.
NOTE: Always turn on the computer before you turn on the speaker system.
Connecting headphones
Headphones are available separately.
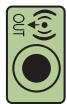
Your computer comes with a headphones connector (lime green) on the front of the computer. The headphones connector is labeled with a headphones icon.
You can also connect headphones to the Line Out connector (lime green) on the back of your computer.
When headphones are plugged in, the sound to the speakers (and the subwoofer) is usually muted.

Connecting a microphone
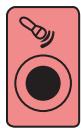
Your computer comes with a microphone connector on the back of the computer. Some models have a second microphone connector on the front of the computer (select models only).
Connect the microphone to the microphone connector on the computer.
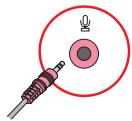

To adjust the recording volume or select the microphone, see "Selecting the Microphone" on page 21.
Connecting to a Network
This section describes connecting to a network through a wired or wireless connection.
Setting up a wired Ethernet network connection
The Ethernet connection may be called a network interface adapter, network interface card, or NIC. It provides a high-speed or broadband connection to an Ethernet (10BaseT) or Fast Ethernet (100BaseT) network. After you connect this interface to a network, such as a LAN, you can connect to the Internet through the network.
1 Connect an Ethernet cable to the Ethernet (RJ-45) connector (A) on the back of the computer, and to the network router or LAN device.
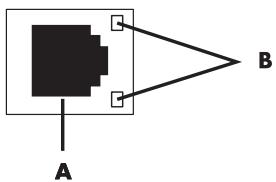
2 With the computer turned on, check the indicator lights (B) next to the Ethernet connector for the status:
ACTIVITY - Lit yellow during network data transfer activity
LINK - Lit green when there is a valid network connection
NOTE: Your Ethernet connector may have only one indicator light.
Setting up a wireless network connection
(Select models only)
You can connect the computer to a wireless network supporting IEEE 802.11b, 802.11g, or 802.11n (select models only) by using the antenna that is included with the computer. Connect the external antenna to the wireless antenna connector on the network card to increase the range and sensitivity of the wireless radio signal.
NOTE: For the best wireless performance, place the antenna on the computer or in an elevated and open area.
You need an existing wireless LAN with an Internet connection. Consult your Internet Service Provider (ISP) for further information.
To verify that the integrated WLAN device is installed on the computer correctly, see "Checking the wireless LAN device installation" on page 19.
For more information about setting up a wireless network: Click the Windows Vista start button™ on the taskbar, click Help and Support, and then type Setting up a wireless network into the Search Help box and press Enter.
Connecting a Modem
(Select models only)
The modem connects the computer to the telephone line. Use it to connect to an ISP that provides a telephone dial-up connection to the Internet. If you use a network connection, you may not need a modem connection.
NOTE: Your computer may not come with a modem. The modem may be a connector on the back of the computer or it may be an external device that plugs into a computer USB connector.
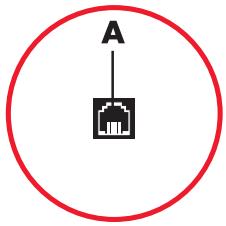
Before you can use telephone dial-up to connect to the Internet and send or receive e-mail and faxes, you must connect your telephone service line to the modem (A).
Plug a modem/telephone cable into the computer modem connector (A). Note that the modem connector on the computer may be green.
2 Plug the other end of the modem/telephone cable into the telephone service line wall jack connector.
Connecting the Television Signal and Video Cables
(Select models only)
This section describes how to connect the computer to a television and which cables to use.
Use cables to connect:
TV signal source coaxial cable for video/audio in to the computer.
Or
TV signal source S-video or composite video in to the computer.
TV signal source audio in to the computer.
Or
Video out from the computer.
You may need to purchase cables, a coaxial cable signal splitter, or other accessories separately. Your computer may not include all the cables you need for the computer setup.
NOTE: The location and number of connectors on the computer may vary by model.
| Video input with audio | Icon/Label | Description and function |
| S-Video | S-video In connector to connect video input from a TV set-top box output connector. | |
| Composite Video | Composite Video In connector (yellow) to connect video input from a TV set-top box. | |
| S-Video 2 | Secondary S-video connector to connect video input from a VCR, video camera, or other analog video source to the computer. | |
| Video | Composite Video 2 | Secondary composite video connector (yellow) to connect video input from a VCR, video camera, or other analog source to the computer. |
| A/V In Audio 1 L | Primary left audio input from a TV set-top box connector (white). NOTE: You can record audio by using this Audio In connector, which is connected to the motherboard. Some computers include this primary left audio input connector on the front of the computer (select models only). | |
| A/V In Audio 1 R | Primary right audio input from a TV set-top box connector (red). NOTE: You can record audio by using this Audio In connector, which is connected to the motherboard. Some computers include this primary right audio input connector on the front of the computer (select models only). | |
| Video input with audio | Icon/Label | Description and function (continued) |
| A/V In Audio 2 L | Secondary left audio input connector (white). NOTE: This Audio In connector is connected to the TV tuner. You must use the Audio In connector, which is connected to the motherboard and located on the back of the computer, to record audio only (select models only). | |
| A/V In Audio 2 R | Secondary right audio input connector (red). NOTE: This Audio In connector is connected to the TV tuner. You must use the Audio In connector, which is connected to the motherboard and located on the back of the computer, to record audio only (select models only). |
| Television output | Icon/Label | Description and function |
| Analog Video | Analog Video Out: S-video or composite video connector (select models only), to connect video output to a TV. |
| Television input | Icon/Label | Description and function |
| TV/Cable Ant | TV In (TV antenna or cable input from wall outlet with no set-top box). | |
| ATSC | TV In connector for TV cable or antenna, to receive ATSC (Advanced Television System Committee) channels, which are over-the-air digital transmission channels. | |
| CATV | TV In connector for TV cable or antenna, to receive CATV (Community Antenna Television) channels or cable TV channels. | |
| NTSC | TV In connector for TV cable or antenna, to receive NTSC (National Television System Committee) channels, which are over-the-air analog transmission channels. |
Connecting the TV signal source coaxial cable (no set-top box)
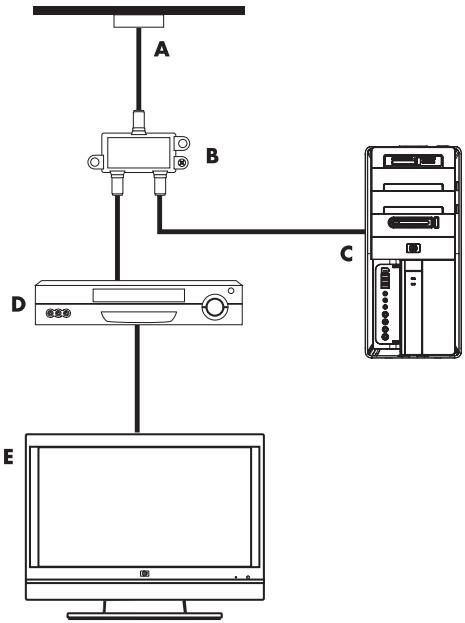
To connect the computer into an existing setup for the TV signal source without a set-top box, insert (add) a splitter (B) to route the coaxial TV signal cable from the wall outlet (A) to the computer connector (C).
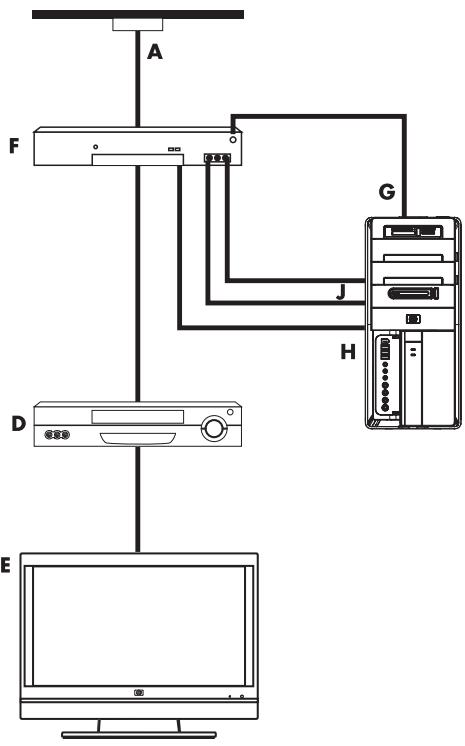
Callouts
A TV signal cable (coaxial) wall outlet (from antenna or cable)
B Splitter
Computer coaxial TV In connector
D Video recorder
TV
F Set-top box/satellite box
G Remote control IR blaster cable (select models only)
H Computer S-video In connector
J Computer right and left audio (analog) connectors
Connecting the TV signal source with a set-top box
To connect the computer into an existing setup for the TV signal source with a set-top box (cable or satellite), insert (add) a splitter (B) to route the coaxial TV signal cable from the set-top box (F) to the computer connector (C).
Connect the remote control cable/IR blaster (select models only) (G) to the IR OUT connector on the computer, and then position the blaster on the set-top box. This enables the computer to change the channel on the box. See "Using an infrared receiver (IR) blaster" on page 13 for blaster placement details.
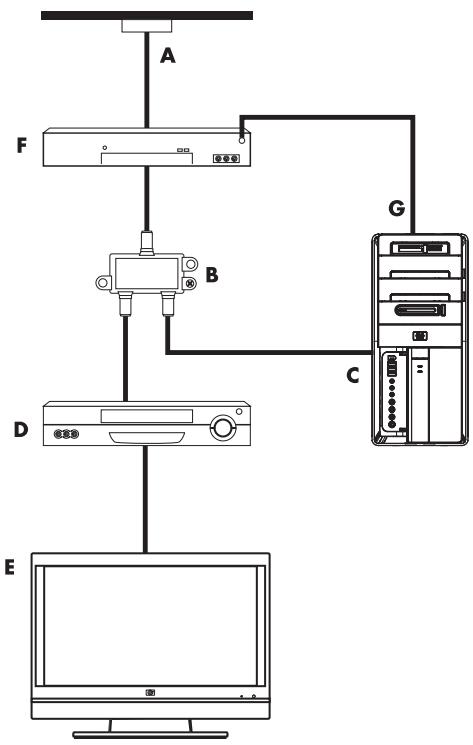
Connecting the TV signal source with a set-top box and using S-video or composite video cable to the computer
To use video output from the set-top box (F), add the cables to route video and audio to the computer:
- Do not detach any cables from the existing setup.
Connect an S-video cable (or you can use an S-video-to-composite cable adapter) to the S-Video In connector (H) on the computer. - Connect audio cables to the audio right (red) and left (white) connectors (J) on the computer.
- Connect the remote control cable/IR blaster (select models only) (G) to the IR OUT connector on the computer, and then position the blaster on the set-top box. This enables the computer to change the channel on the box. See "Using an infrared receiver (IR) blaster" on page 13 for blaster placement details.
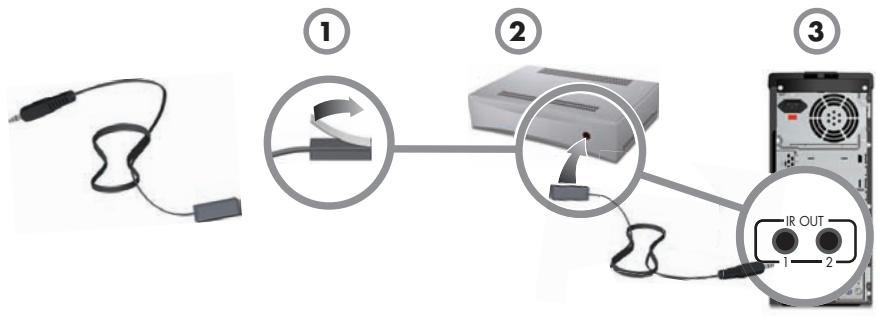
Using an infrared receiver (IR) blaster
(Select models only)
If you have a cable TV or satellite TV set-top box, you can control the set-top box from the computer by using the remote control sensor cable/IR blaster (select models only) and the connector on the computer (not available on all models). Remove the tape (1) on the end of the blaster, adhere it to the IR receiver on the set-top box (2), and connect it to the IR OUT connector (3) on the back of the computer. Point the remote control at the remote control sensor on the front top of the computer.
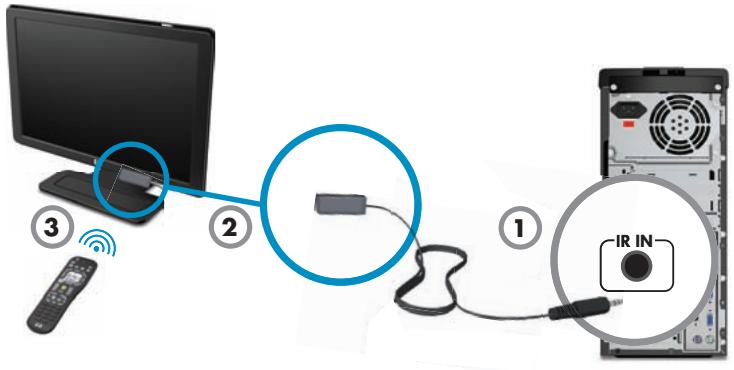
Using an external IR receiver
(Select models only)
If you do not have a direct line of sight to the remote sensor on the front of the computer, you can use an external IR receiver (select models only) and place the IR receiver in a location that can receive a signal from the remote control.
Connect the external receiver to the red IR IN connector on the back of the computer (1). Place the IR receiver (2) in a location with a direct line of sight to the remote control. Point the remote control (3) at the external IR receiver.
Turning On Your Computer for the First Time
After you have completed the steps on the setup poster, you are ready to turn on the computer.
NOTE: Do not connect or add other devices to the computer until after you turn on the computer for the first time and complete the initial setup.
To turn on the computer:
1 Turn on the monitor.
2 Turn on the computer.
3 Turn on the external speakers, if they are present.
4 Set up the computer and Microsoft® Windows Vista® by following the onscreen instructions:
If prompted, select the country/region in which you are physically located, and wait while the computer makes preparations. (When you select an alternate language, it may take up to 30 minutes for this one-time language setup on the computer.)
- Follow the onscreen instructions to register with HP or Compaq, sign up for updates, and get online.
The antivirus software may automatically open. Follow the onscreen instructions to set up this tool, which protects the computer and your privacy.
5 When you see the Windows Vista desktop, the initial setup is complete.
For help with getting started using your computer, see the remaining topics in this section.
NOTE: If you stop during the initial setup procedure, when you are ready to finish, double-click the Easy Setup icon on the desktop to run the first-time wizard.
Turning Off the Computer
For best results when using Windows Vista, do not shut down the computer except when you must turn off the power for safety reasons: to make repairs, to install new hardware or cards in the computer, or to change a battery.
As an alternative to shutting down the computer, you can lock it or put it into either Sleep or Hibernate mode, if it is available. You can set the power management timers to put the computer automatically into Sleep or Hibernate mode.
The computer has these reduced power states:
- Sleep mode saves your work to memory, so you can resume quickly. It saves memory to the hard disk drive, and then goes into a reduced-power state. During Sleep mode, the computer hardware light remains on, and the computer is ready to wake quickly and resume your work where you left off.
- Highbenate mode (available as an advanced power setting) saves the system memory to a temporary file on the hard disk and then turns off the hardware. When you turn on the computer again, the programs, folders, and documents that you had open are restored to the screen.
| Action | Click the Windows Vista start button and click: | Description |
| Shut Down | The Arrow button next to the Lock button, and then click Shut Down. | When you shut down the computer, you safely stop the operating system and turn off the computer. NOTE: Before you shut down the computer, close any open software programs by clicking the X at the upper-right corner of each program window. To start the computer after a shut down, press the On button on the front of the computer. |
| Lock | The Lock button. | When you lock the computer, it continues to operate and only you or an administrator can log on to it by using a password. |
| Action | Click the Windows Vista start button and click: | Description (continued) |
| Sleep | The Power button. Or The Arrow button next to the Lock button, and then click Sleep. | When you select Sleep mode, the computer goes into a reduced-power state, and the monitor is blank, as if it were turned off. (You can set the computer to retrieve e-mail, receive faxes, or download information from the Internet during Sleep mode.) NOTE: You can also simply press the Sleep button on the keyboard, if it is present. To wake the computer from Sleep mode: Press the Sleep button on the keyboard. Or Quickly press the On button on the front of the computer. |
| Hibernate | The Arrow button next to the Lock button, and then click Hibernate. If Hibernate is not present, you can set up the computer to go into Hibernate mode automatically; see "Automatic Sleep or Hibernate mode" on page 17. | When you select Hibernate mode, the computer saves to the hard disk drive everything that is in computer memory, turns off the monitor and the hard disk drive, and then turns itself off. When you turn on the computer again, the programs, folders, and documents that you had open are restored to the screen. To start the computer from Hibernate, quickly press the On button on the front of the computer. |
Automatic Sleep or Hibernate mode
You can set the computer to go into Sleep or Hibernate mode automatically when it is idle for a specified number of minutes. To put the computer into a mode automatically, modify the power management settings:
1 Click the Windows Vista start button on the taskbar.
2 Click Control Panel.
3 Click System and Maintenance.
4 Click Power Options.
5 In the left panel, click Change when the computer sleeps.
6 For Sleep mode, select an option from the Put the computer to sleep drop-down menu, and then click Save changes.
Or
For Highbrate mode:
Click Change advanced power settings.
b Click the plus sign (+) next to Sleep.
c Click an item and make your selections, and then click Apply.
d Click OK.
Restarting the Computer
When you restart the computer, the computer clears some settings and starts over using the operating system and software in its memory. Restarting is the easiest and most effective way to solve many software issues for the computer.
Also, you may want to install additional software programs or hardware devices onto the computer, and doing so may require that you restart the computer after installation.
To restart the computer:
1 Click the Windows Vista start button on the taskbar.
2 Click the Arrow button next to the Lock button.
3 Click Restart.
Or

Quickly press the On button on the front of the computer.
Connecting to the Internet
The computer can connect to the Internet through the telephone modem, a local area network (LAN), or digital subscriber line (DSL). Check with your Internet Service Provider (ISP) for specific information on the connection.
1 Refer to "Setting Up Your Computer" on page 1 to make the hardware connections. You need:
For a network connection, see "Connecting to a Network" on page 7. To check a wireless LAN device installation, see page 19.
For a modem, see "Connecting a Modem" on page 8.
2 To connect to the Internet:
Sign up with an ISP. If you already have an account with an ISP, skip this step and follow the instructions provided by the ISP.
If you did not set up the computer for Internet service during the initial setup, do so now by using Online Services:
a Click the Windows Vista start button on the taskbar.
b Click All Programs.
c Click Online Services and then click Get Online.
d Follow the onscreen instructions to select an ISP and set up Internet service.
NOTE: Online Services provides a list of ISPs, however, you may choose another ISP or transfer an existing account to this computer. To transfer existing accounts, follow the instructions provided by the ISP.
3 Connect to the Internet. You must connect through your ISP.
For dial-up only, double-click the ISP-provided icon on the desktop, and then log in.
4 Open your Web browser and browse the Internet.
You can use any Web browser; most computers have Microsoft Internet Explorer®. To open Internet Explorer:
a Click the Windows Vista start button on the taskbar.
b Click Internet Explorer.
NOTE: If you have issues connecting to the Internet, see "Internet access" on page 49.
Checking the wireless LAN device installation
You can verify that the integrated WLAN device is installed on the computer correctly by using the Windows Vista operating system Device Manager:
1 Click the Windows Vista start button on the taskbar.
2 Type Device Manager into the Start Search box, and then click Device Manager to open the Device Manager window.
3 Click Network adapters. Your WLAN device should be listed here. The WLAN device may include the term wireless, wireless LAN, or 802.11.
NOTE: If no WLAN device is listed, either the computer does not have an integrated WLAN device, or the driver for the device is not properly installed.
4 Click the Windows Vista start button on the taskbar.
5 Type Network and Sharing Center into the Start Search box, and then click Network and Sharing Center to open the Network and Sharing Center window.
6 Click Connect to a network, and then follow the onscreen instructions.
Using wireless security features
When you set up a home WLAN or access an existing public WLAN, always enable security features to protect the network from unauthorized access. The most common security levels are Wi-Fi Protected Access Personal (WPA-Personal) and Wired Equivalent Privacy (WEP).
When setting up a network, use one or more of the following security measures:
■ Enable WPA-Personal or WEP security encryption on the router.
Change the default network name (SSID) and password.
Set up a firewall.
Set security on your Web browser.
Adjusting the Speaker Volume
There are several ways to adjust volume. Use the Volume icon on the Windows Vista taskbar to set speaker volume. Then, you can adjust the volume by using:
The Volume knob or buttons on the keyboard (select models only).
The Volume knob on the speakers (select models only).
To set speaker volume, use the Volume icon on the taskbar:
1 Click the Realtek High Definition Audio volume icon on the taskbar.
2 Adjust the volume by clicking the slider bar and moving it.
3 When you are satisfied with the sound level, click outside the window to close it.
Or

1 Right-click the Volume icon on the taskbar, and then click Open Volume Mixer.
The Volume Mixer settings window opens.

2 Adjust the volume by clicking the slider bar and moving it.
3 When you are satisfied with the sound level, close the window by clicking the X in the upper-right corner.
For help with audio, check the troubleshooting items in "Audio and speakers" on page 47. For more information, open the Help and Support Center or refer to the Support Web site; see "Getting More Information" on page 35.
Enabling an HDMI-connected display
(Select models only)
After you turn on the computer for the first time and complete the initial setup, you need to adjust some settings to hear sound through an HDMI-connected display (monitor); see "HDMI-connected display produces no sound." on page 42 to change settings and hear sound from your display.
Selecting the Microphone
The microphone connector on your computer is ready to use. If you have more than one microphone connected, select the microphone that you would like to use in Windows Vista.
NOTE: When you have a webcam or an audio player connected to the computer, because of the audio input from the device, Windows Vista may recognize each as a microphone input.
To select the microphone that you would like to use in Windows Vista:
1 Right-click the Volume icon on the taskbar, and then click Recording Devices. The Sound window opens.
2 Select the Recording tab.
3 Double-click Microphone, and then select the General tab.
4 Click the microphone connector that you want to use, and then click Apply.
5 Click OK.

Adjusting microphone recording level in Windows Vista
To adjust the recording level of the microphone:
1 Right-click the Realtek HD Audio Manager Volume icon on the taskbar, and then click Audio Devices.
2 Click the Recording tab.
3 Double-click Microphone, and then click the General tab.
4 Click the microphone connector that you want to use.
5 Click the Levels tab.
6 Adjust the recording level for the microphone by clicking the slider bar and moving it.
7 Click OK, and then click OK again.
Protecting Your Computer
Protect your computer, personal settings, and data from a variety of risks by using:
■ Passwords.
Antivirus software.
Firewall software.
Critical security updates.
NOTE: Security solutions are designed to act as deterrents, but they may not be able to prevent software attacks or to prevent the computer from being mishandled or stolen.
| Computer risk | Computer feature |
| Unauthorized use of the computer or user account | User password |
| Computer viruses | Antivirus program |
| Unauthorized access to data | Firewall program Windows Vista updates |
| Unauthorized access to Setup Utility, BIOS settings, and other system identification information | Administrator password |
| Ongoing or future threats to the computer | Windows Vista critical security updates from Microsoft |
Using passwords
A password is a group of characters that you choose to secure the computer information. Several types of passwords can be set, depending on how you want to control access to your information. Passwords can be set in the Windows Vista operating system on the computer.

CAUTION: To avoid being locked out of the computer, record each password you set. Because passwords are not displayed as they are set, changed, or deleted, it is essential to record each password immediately and store it in a secure place. Do not store passwords in a file on the computer.
You can use the same password for more than one Windows Vista security feature. A password set in Windows Vista must be entered at a Windows Vista prompt.
For information on Windows Vista passwords: Click the Windows Vista start button on the taskbar, click Help and Support, and then type passwords into the Search Help box and press Enter. See "Using the Onscreen Help and Support Center" on page 35.
Using antivirus software
When you use the computer for e-mail, network, or Internet access, you expose it to computer viruses. Computer viruses can disable or damage the operating system, software programs, or computer utilities.
Antivirus software can detect most viruses, remove them, and, in most cases, repair any damage that they have caused. To provide ongoing protection against newly discovered viruses, you must keep the antivirus software up to date.
The antivirus program, which is preinstalled on the computer, includes antivirus and firewall components. The software includes a free trial subscription of protection updates. To protect the computer against new viruses beyond the trial period, purchase an extended update service. Instructions for using and updating the antivirus software, and for purchasing extended update service, are provided within the program.
For more information about computer viruses: Click the Windows Vista start button on the taskbar, click Help and Support, and then type viruses into the Search Help box and press Enter. See "Using the Onscreen Help and Support Center" on page 35.
Using firewall software
When you use the computer for e-mail, network, or Internet access, unauthorized persons may be able to gain access to information about you, your computer, and your data. To protect your privacy, use firewall software:
Windows Vista includes firewall software preinstalled on the computer.
The antivirus program, which is preinstalled on the computer, includes a firewall program.
Firewall features include logging, reporting, and automatic alarms to monitor all incoming and outgoing communications.
Under some circumstances, a firewall can block access to Internet games, interfere with printer or file sharing on a network, or block authorized e-mail attachments. To solve the problem temporarily, disable the firewall, perform the task that you want to perform, and then enable the firewall again. To resolve the problem permanently, reconfigure the firewall.
Configuring the Computer for Automatic Microsoft Software Updates
Microsoft continually updates the Windows Vista operating system. Run Windows Vista Update monthly to install these updates, or keep the operating system up to date by using the Automatic Updates feature.
When you are connected to the Internet, Windows Vista Update automatically notifies you (through a pop-up message or icon in the notification area) when critical updates are available. When you see the Windows Vista Update message, allow the updates to download to your system. If you update the system weekly, or even monthly, the time required for download is minimal.

CAUTION: To reduce the risk of information damage or loss from security breaches and computer viruses, install all critical updates from Microsoft as soon as you receive an alert.
Additional updates to the operating system and other software may have become available after the computer was shipped. Download all available updates and install them onto the computer.
Setting Up User Accounts
When you share a computer with several people, you can set up a user account for each computer user. Windows Vista uses the information in the user account to determine what files and folders the computer user can access, when they can make changes to the computer, and their personal preferences. Each person can access only their own files and settings.
You, as the administrator, set the privileges for each computer user when you set up the user account. For example, you can set the software programs that the user is allowed to access. Windows Vista provides three types of user accounts:
Administrator:
Is allowed to change account types for other users, to change passwords, to change system-wide settings, to access all files on the computer, and to install software and drivers that are compatible with Windows Vista.
(Windows Vista requires at least one administrator user account.)
Limited - Standard User:
Is not allowed to change other user settings or passwords. A limited account may not be able to install or run some software.
Is allowed to change the limited account picture, and to create, edit, or delete the account password.
Guest:
Is allowed to use most software and change system settings that do not affect other users or the security of the computer.
Is not allowed to change other user settings or passwords, or install software.
Does not have access to password-protected files, folders, and settings.
Creating multiple user accounts on the same computer has certain advantages, as well as some drawbacks.
Advantages to multiple user accounts:
Ability to create individual user settings
Ability to limit access to software for certain users
Drawbacks to multiple user accounts:
More memory (RAM) usage
Multiple Temporary Internet Files folders to remove during Disk Cleanup
More data to back up
Longer time to complete virus scan
To create or change a user account:
1 Click the Windows Vista start button on the taskbar, and then click Control Panel.
2 Under User Accounts and Family Safety, click Add or remove user accounts. Click Continue in the User Account Control window.
3 Click Create a new account, or click the account user name you want to change.
4 Follow the onscreen instructions or click an action to proceed.
Guidelines for Installing Software and Hardware Devices
After you set up the computer and complete the initial setup, you may want to install additional software programs or hardware devices. Keep in mind the following important guidelines:
Before installation, make a restore point by using the Microsoft System Restore program. The restore point is a snapshot of the computer settings. By using System Restore, you ensure that you have a stable set of settings to use.
Choose software that is compatible with the computer; check the operating system, memory, and other requirements listed for the new software.
Install the new software according to the directions provided by the software manufacturer. If you need help, check the manufacturer documentation or customer service information.
For antivirus software, uninstall the existing software program before reinstalling it or installing a new antivirus program.
NOTE: Use only licensed original software. Installing copied software may be illegal, or may result in an unstable installation, or it may infect the computer with a virus.
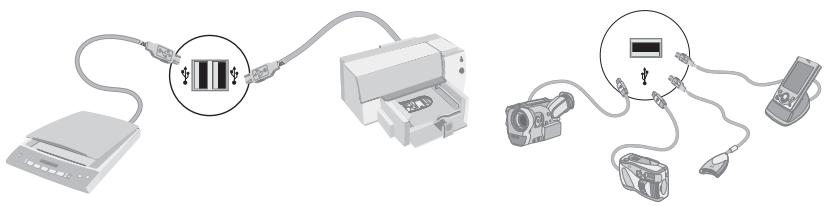
Connecting USB devices
Connect USB peripheral devices to the computer by using any available USB connector. These peripheral devices include printers, scanners, video cameras, digital photo cameras, memory card readers, and personal digital assistants (PDAs) or handheld computers. Refer to the documentation that came with your device for more information.
NOTE: Some peripheral devices are not included with the computer.
Transferring Files and Settings from an Old Computer to Your New Computer
You can copy files from the old computer to your new computer by using CDs or DVDs, memory sticks, or personal media drives, or by using the Windows Easy Transfer cable. To transfer files and copy certain settings, such as Web browser Favorites and address books, use Windows Easy Transfer software, which is included with Windows Vista.
Windows Easy Transfer software guides you to copy files and settings to a storage device or across the Easy Transfer Cable connected to the old computer. The Easy Transfer Cable is a USB cable designed to specifically connect two computers and work with the Windows Easy Transfer software. (The cable is sold separately.) A standard USB cable does not work.
To transfer your files and settings:
1 Click the Windows Vista start button on the taskbar.
2 Click Tools.
3 Click Windows Easy Transfer.
4 Follow the onscreen instructions in the Windows Easy Transfer Wizard to transfer your files from an old computer to your new one.
For more information, click the Windows Vista start button on the taskbar, click Help and Support, and then type moving files into the Search Help box and press Enter. See "Using the Onscreen Help and Support Center" on page 35.
Special Features of Your Computer
Using the Memory Card Reader
(Select models only)
Your computer may come with a multi-format memory card reader (optional, select models only). Digital cameras and other digital imaging devices use memory cards, or media, to store digital picture files. The memory card reader can read from and write to a variety of types of memory cards and the IBM Microdrive disk drive.
The card reader is accessible directly on the front of the computer. It has four or two horizontal card slots, which accept the media.
You can place media in one or more of the card slots and use each media independently. Place only one piece of media in a slot at one time.
Each card slot has its own drive letter and icon. When you insert media, the display label may change to the title of the media, if a title is available.
When you insert media, the Safely Remove Hardware window may appear. If it opens, or if you open the Safely Remove Hardware window by mistake, click Close.

CAUTION: Do not click Stop in the Safely Remove Hardware window with the USB Mass Storage Device selected. Doing so removes the operating system recognition of the memory card reader from your computer, and you must restart the computer to see the memory card reader again.
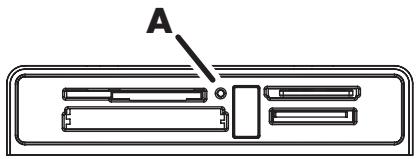
The activity light (A) blinks to indicate that the computer is accessing the memory card to read or write.
To use the memory card reader:
Insert the media into the card slot until it stops.
The activity light (A) on the memory card reader lights, and the computer automatically detects the media.
NOTE: You must insert media correctly. Note the direction of the notched corner on the media. For more information, open the Help and Support Center or refer to the Support Web site; see "Getting More Information" on page 35. Also:
- CompactFlash and Microdrive media are keyed and cannot be inserted incorrectly. Insert the receptacle edge (holes) of this media into the slot.
Some memory cards, such as CF Ultra/III, are not compatible with the memory card reader that came with your computer. - Do not use SM and xD media in the memory card reader at the same time. The reader recognizes only the first one that is inserted.
2 Select a program to access your files. You can copy files from or to the media. Or
If the AutoPlay window does not open, click the Windows Vista start button on the taskbar, click Computer, and then double-click the Memory Card icon to display the files on the media. You can copy files from or to the media.
3 When you are finished, right-click the drive icon, click Eject, check that the memory card reader activity light is on or off, but not blinking, and then remove the media.

CAUTION: Do not try to remove media when the activity light is blinking. Doing so may cause loss of data.
Using a Vertical CD/DVD Drive
(Select models only)
Your computer may have an optical disc drive that is installed in a vertical position. Press the Eject button on or near the drive door (A) to eject the CD/DVD tray. Place a standard-sized disc in the tray with the label facing out, and then press the front of the tray to close it.
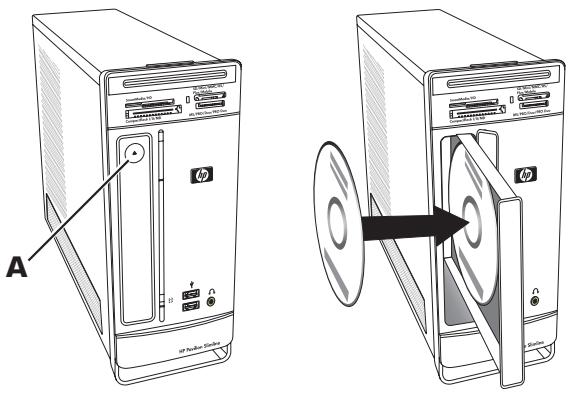
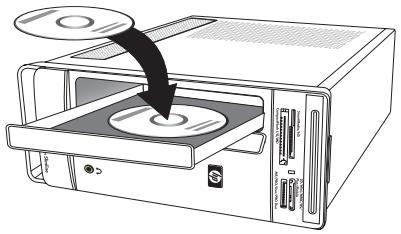
To use a minidisc with a vertical drive, you must first place the computer on its right side (select models only) before you insert the minidisc:
1 Face the front of the computer and lay the computer down on its right side.
2 Press the Eject button to open the CD/DVD tray.
3 Place the minidisc into the recess inside the tray with the label facing out, and then press the front of the tray to close it.
Using LightScribe Technology
(Select models only)
The following section provides instructions for making a disc label by using LightScribe technology with your LightScribe optical disc drive. For more help using LightScribe, click the Help icon within the program to open the Help information.

What is LightScribe?
LightScribe is an innovative technology that uses a special disc drive, special media (LightScribe writable CDs or DVDs), and label-making software to burn labels directly onto the disc. A LightScribe-enabled CD or DVD drive uses the optical laser in the drive to burn a label onto a thin dye coating on the label side of the disc. There is no ink to smear or paper to curl, and there are no adhesives to loosen.
LightScribe requirements
Burning a label with LightScribe requires three things:
A LightScribe-enabled optical disc drive (select models only), identified by the LightScribe logo
Labeling software that supports LightScribe
A writable LightScribe disc (sold separately)

Making a LightScribe label by using CyberLink LabelPrint
You may burn data, music, and videos to the disc before or after labeling it.
To make a LightScribe label:
1 Place the disc into the drive with the top of the disc facing down. The top is the gold non-reflective side of the disc, opposite of the side that you record data onto.
2 Close the drive.
3 Click the Windows Vista start button, click All Programs, and then click CyberLink DVD Suite.
4 Click the disc icon in the lower-right corner of the window to open a list of CyberLink programs, and then click LabelPrint.
5 Under Step 1: Select Label Type, select one of following:
Disc Label (LightScribe label)
Or
MiniDisc Label (LightScribe label)
6 Click the arrow button at the bottom of the window to continue.
7 Under Step 2: Edit Disc Information, design the disc label:
a Type in the disc title, author, and date.
b Type in song titles, and other file information.
Or
Click the Import icon to import MP3 information.


8 Click the arrow button at the bottom of the window to continue.
9 Under Step 3: Edit Layout:

a Select a layout style by clicking Select under Layout Style. Select the style you want, and then click OK.
b Select a background image by clicking Select under Background Image. Highlight the image you want, and then click OK.
c If you are creating a paper label, select a paper size under Paper Template by using the drop-down menu.
10 Click the arrow button at the bottom of the window to continue.
11 When you are ready to create the LightScribe label, click the Print icon.
12 Click OK to create the LightScribe label. The program shows the estimated time to complete the label, along with a progress bar. You can continue to work on the computer while the LightScribe label is created.

For more help using CyberLink LabelPrint, click the Help icon to open the Help information.

Using the Remote Control
(Select models only)
NOTE: Only use alkaline batteries in the remote control.
With your remote control, you can open Windows Media Center to view television broadcasts, to record and play TV programs, and to play music, movies, or video.
To open Windows Media Center, point the remote control at the remote control sensor on the top front of the computer, and press the Windows Media Center Start button on the remote control.
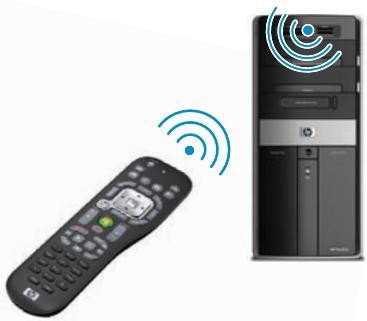
To use the remote control, point it in a direct line of sight at the remote sensor. The remote control and the sensor can be no farther than 8 meters apart. The remote control can be no more than 22.5 degrees (45 degrees total) from the center of the remote sensor.
NOTE: Bright, direct light aimed toward the sensor might interfere with the remote control operation.
HP Easy Backup
(HP Elite Series models only)
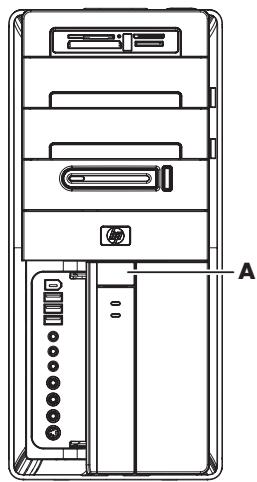
HP Easy Backup makes it easy to protect your treasured photos, music, and files. After you back up files the first time, HP Easy Backup prompts you to set a schedule for automatic backup, or to back up anytime you choose, with one touch of a button: the HP Easy Backup button (A) on the front of the computer.
Pressing the HP Easy Backup button works only when the computer is fully powered on. The backup can not start while the system is in one of the following modes: standby, locked, protected screen saver, or suspend.
To perform manual backups between scheduled automatic backups:
1 Connect an external storage device to your computer, or place a blank CD or DVD in the CD/DVD drive.
2 Press the HP Easy Backup button. Follow the onscreen instructions.
3 If you are using a CD or DVD, label the backup media clearly, and store it in a safe place.
Peripheral Device Landing Pad and Cable Routing
(HP Elite Series models only)
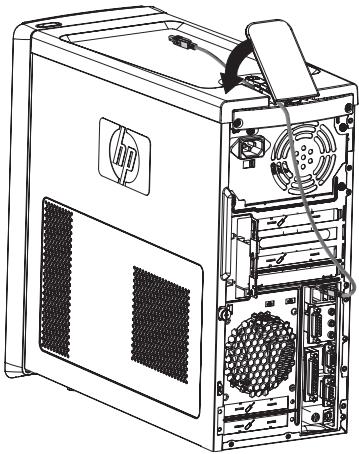
On the top of the computer is a soft, protective rubber surface called the Peripheral Device Landing Pad. You can place peripherals on this surface and they do not get scratched or slide around. Use the cable-routing feature (at the rear top) to manage external cables.
1 Place on the landing pad on top of the computer any peripheral devices such as a digital camera, a portable music player with docking station, or a small printer.
2 Open the cable-routing cover.
3 Thread the cables of the peripheral devices through the slots on the cable-routing feature. This keeps the cables organized while they are attached to the back of the computer.
4 Close the cable-routing cover.
Using Software
(Select models only)
Your computer includes a number of software programs that:
Record and play CDs.
Record data CDs.
Import and edit video files.
Record video CDs and DVDs.
- Organize digital media files.
The following table describes the functionality that is specific to each of these programs. Use the table to determine which program to use to perform a task.
Note that some of the programs that are listed may not be included with your model, and that this is not a complete list of all included software.
NOTE: The computer box may have included a software update CD. You may need to install the update from this CD before using the DVD Writer/CD Writer drive. To do this, follow the installation instructions that came with the CD.
To open any of these programs, click the Windows Vista start button on the taskbar, click All Programs, select the program folder (for example, CyberLink DVD Suite), and then click the program name to open the software.
With this program: You can:
muvee Reveal (select models only)

CyberLink DVD Suite (select models only)

- Add your own style to your movies with music, pictures, titles, scene transitions, and captions.
Edit your home movies.
Use the magicSpot feature to control the motion effects applied to your pictures.
Record data and music files.
Record a copy of an existing music or data CD to use on the computer.
Create customized music CDs from CDs in your collection, or from .wav, .mp3, or .wma files. These CDs can be played in your home or car stereo.
Copy and share data files.
Create archive CDs or DVDs from files on your computer.
Verify that the disc has been created without errors.
Record movie files to create VCDs and DVDs that you can play on some DVD players.
Copy and share video files.
Capture video files.
Edit video files.
| With this program: | You can: (continued) |
| HP Total Care Advisor (select models only) | ■ Quickly organize the Web links you want available on your desktop. ■ Comparison-shop using the convenient shopping search engine. ■ Get HP software and driver updates. ■ Get important messages from HP. ■ Access PC Health and Security and PC Help tools. |
| Microsoft Windows Movie Maker (select models only) | ■ Import audio, video, and other media files from videotape, audiotape, Web cameras, or television broadcasts. ■ Record audio and video files to create a video project that becomes a Windows Media source file with a .wmv extension. ■ Edit and preview files. ■ Send a movie in an e-mail or upload it to a Web server. ■ Add music files (.mp3). ■ Import audio files such as .mp3, .asf, or .wma; video files such as .wmv, .asf, .avi, or .mpg; or image files such as .jpg or .gif. ■ Create .avi and .wmv (Windows Media Video) files. |
Getting More Information
Using the Onscreen Help and Support Center
(Select models only)
Information about your computer is in the onscreen Help and Support Center (select models only). Here, you can find links to driver updates, access to technical support options, and information about commonly asked questions.
To open the Help and Support Center:
Press the Help button (select models only) on your keyboard.
Or
- Click the Windows Vista start button on the taskbar, and then click Help and Support.
Accessing Support on the Web
You can find information for your computer by using the Internet to access the Support Web site address listed in the Limited Warranty and Support Guide, or use the following steps:
1 Go to http://wwwHp.com/support in your Web browser.
2 Select your country/region and language.
3 Click Support and Drivers.
4 Enter the model number of your computer, and then click Search. Click an item to view it.
Finding Guides on the Web
You can find guides for your computer by using the Internet to access the Support Web site:
1 Go to the Support Web site and search for your model number using the previous procedure.
2 Click Manuals.
3 Locate the manual you want, and then do one of the following:
- Click the title to display the file in Adobe Acrobat Reader (which you can download from the Manuals page if it is not currently installed on your computer).
Or - Right-click the title, click Save Target As, specify a location on the computer where you want to save the file, rename the file (retaining the .pdf extension), and then click Save.
Finding Onscreen Guides
(Select models only)
You can find onscreen guides for your computer in the User Guides folder (select models only).
1 Click the Windows Vista start button on the taskbar.
2 Click All Programs.
3 Click User Guides.
Click an item to view or use it.
NOTE: If there are no guide titles listed in the folder, your computer has no onscreen guides.
Using the PC Help & Tools Folder
The PC Help & Tools folder contains special utilities for computer owners, such as support information and programs.
To see the items in the PC Help & Tools folder:
1 Click the Windows Vista start button on the taskbar.
2 Click All Programs.
3 Click PC Help & Tools.
4 Click Hardware Diagnostic Tools to view or use these tools.
Using the hardware diagnostic tools
The hardware diagnostic tools help you to:
View the computer system information, such as memory usage, drive capacity and CPU usage.
Find alerts about your computer.
View information and run diagnostic tests on computer the hardware and on some computer peripheral hardware, such as printers, monitors, speakers, and network adapters.
Run a computer system test.
Using HP Total Care Advisor Software
HP Total Care Advisor is a desktop tool you use to monitor and access system health information about key areas of your computer. HP Total Care Advisor has four major areas:
PC Health & Security provides a dashboard view of the status of key areas of your computer.
PC Action Center receives messages and alerts that inform you of changes in the status of your computer health.
PC Help provides simple access to help and support information for your computer.
■ Products Showcase provides a listing of products and services available for your computer, and presents comparison-shopping information about those items.
To open HP Total Care Advisor:
1 Click the Windows Vista start button on the taskbar.
2 Click All Programs.
3 Click HP Total Care Advisor.
Using the Computer with Safety and Comfort

WARNING: To reduce the risk of serious injury, read the Safety & Comfort Guide. It describes proper workstation setup, posture, and health and work habits for computer users. It also provides important electrical and mechanical safety information.
Before you begin using the computer, arrange the computer and your work area to maintain your comfort and productivity. Refer to the Safety & Comfort Guide for important ergonomic information:
- Click the Windows Vista start button on the taskbar, click All Programs, click User Guides, and then click Safety & Comfort Guide.
Or
Type
http://www.hp.com/ergo
into the Web browser address box, and then press Enter on the keyboard.
Troubleshooting and Maintenance
This section contains:
Troubleshooting tables in "Troubleshooting Computer Problems" on page 39.
Software repair information in "Repairing Software Problems" on page 57.
■ Maintenance information and guidelines in "Maintenance" on page 60.
For more information, refer to the Help and Support Center or access the Support Web site. (See "Getting More Information" on page 35).
Refer to the documentation provided by the product manufacturer for information about peripheral-specific problems, such as issues with a monitor or a printer.
Troubleshooting Computer Problems
These tables present some symptoms of issues you may encounter while installing, starting up, or using your computer. The tables also provide possible solutions you can try.
The troubleshooting tables appear in the following order:
"Computer does not start" on page 40
"Power" on page 41
"Display (monitor)" on page 41
"Keyboard and mouse (with cable)" on page 43
"Wireless keyboard and mouse" on page 44
"Audio and speakers" on page 47
"Internet access" on page 49
"CD and DVD players" on page 50
"Video" on page 52
"Hardware installation" on page 53
"Performance" on page 55
"Wireless devices" on page 55
"Remote control" on page 56
"Memory card reader" on page 56
Computer does not start
| Symptom | Possible solution |
| Computer will not turn on or start. | Ensure that the cables connecting the computer to the external power source are plugged in properly. When the cables connecting the computer to the external power source are plugged in properly, and the wall outlet is functioning, the green power supply light on the back of the computer should be on; if it is not, refer to the Limited Warranty and Support Guide to contact Support. |
| If the display (monitor) is blank, the monitor may not be properly connected. Connect the monitor to the computer, plug it in, and turn it on. See “Display (monitor)” on page 41. | |
| Set the line voltage selection switch to the correct setting for your country/region, or refer to the Limited Warranty and Support Guide to contact Support. | |
| Test the wall outlet by connecting a different electrical device to it. | |
| Incompatible memory (RAM) may have been installed. Reinstall the old memory to return your computer to its original state. For instructions, refer to the Upgrading and Servicing Guide. | |
| Computer seems to be locked up and is not responding. | Use the Windows Task Manager to close any programs not responding, or restart the computer: 1 Press the Ctrl, Alt, and Delete keys on the keyboard simultaneously. 2 Click Start Task Manager. 3 Select the program that is not responding, and then click End Task. If closing programs does not work, restart the computer: 1 Press the Ctrl, Alt, and Delete keys on the keyboard simultaneously. 2 Click the arrow next to the red Shut Down button, and then click Restart. Or 1 Press and hold the On button for 5 or more seconds to turn off the computer. 2 Press the On button to start the computer. |
| Error message: Hard disk drive error. | Refer to the Limited Warranty and Support Guide to contact Support. |
| Error message: Invalid system disk or Non-System disk or disk error. | When drive activity stops, remove the disk and press the spacebar on the keyboard. The computer should start up. |
| Computer does not turn off when the On button is pressed. | Press and hold the On button until the computer turns off. Check Power Settings. |
| Computer shuts down automatically. | The computer may be in an exceedingly hot environment. Let it cool down. Ensure computer air vents are not blocked and internal fan is running. Note that your computer may not have an internal fan. |
Display (monitor)
| Symptom | Possible solution (In addition to the information listed here, also refer to the documentation that came with your monitor.) |
| Screen is blank, and monitor power light is not lit. | Reconnect the power plug to the back of the monitor and to the wall outlet. |
| Press the On button on the front of the monitor. | |
| Screen is blank. | Press the space bar on the keyboard or move the mouse to make the screen display visible again. |
| Press the Sleep button (select models only), or the Esc key on the keyboard, to resume from Sleep mode. | |
| Press the On button to turn on the computer. | |
| Inspect the monitor video connector for bent pins: ■ If any of the pins are bent, replace the monitor connector cable. ■ If no pins are bent, reconnect the monitor connector cable to the computer. |
Display (monitor) (continued)
| Symptom | Possible solution (In addition to the information listed here, also refer to the documentation that came with your monitor.) |
| HDMI-connected display produces no sound. | If you use an HDMI connector on the graphics card (select models only) to connect your display (monitor) to the computer, because the default setting is the DVI connector, you hear no sound from your display. You should connect analog speakers to the computer Audio Line Out connector if you want to hear sound during the initial setup of the computer.To change settings and hear sound from your HDMI-connected display:NOTE: If you ever need to recover the computer operating system by using the Recovery Manager, you must repeat this procedure to activate sound for the HDMI connector.1 Right-click the white Microsoft Volume icon (white speaker) on the taskbar, and then click Playback Devices. The Sound window opens.2 On the Playback tab, click Digital Output Device (HDMI) if it is present. If it is not, click Realtek HDMI Output.3 Click Set Default.4 Click Apply.If you used Digital Output Device (HDMI), click OK to close the window. This completes the steps to activate HDMI sound for this option.If you used Realtek HDMI Output, continue with step 5.5 Double-click Realtek HDMI Output. The Realtek Digital Output Properties window opens.6 Click the Supported Formats tab.7 Place a check in the 48.0 KHz check box, and ensure that there is no check in the Dolby Digital check box and all other check boxes.NOTE: For most TVs to play back audio, the sample rate must be 48.0 KHz.8 Click OK to close the window. This completes the steps to activate HDMI sound for this option. |
| Images on the screen are too large or too small, or the images are fuzzy. | Adjust the monitor resolution setting in Windows Vista:1 Right-click an empty area on the desktop, and then click Personalize.2 Click Display Settings.3 Adjust Resolution as necessary, and then click Apply. |
Keyboard and mouse (with cable)
| Symptom | Possible solution |
| Keyboard commands and typing are not recognized by the computer. | Turn off the computer by using the mouse, unplug and reconnect the keyboard to the back of your computer, and then turn on your computer. |
| Mouse (with cable) does not work or is not detected. | Unplug and reconnect the mouse cable to your computer. |
| If the mouse is still not detected, turn off the computer, unplug and reconnect the mouse cable, and then restart the computer. | |
| Cursor does not respond to mouse movement. | Restart your computer by using the keyboard:1 Press the Alt and Tab keys on the keyboard simultaneously to navigate to an open program.2 Press the Ctrl and S keys on the keyboard simultaneously to save your changes in the selected program (Ctrl+S is the keyboard shortcut for Save on most-not all- programs).3 Repeat step 1 and step 2 to save changes in all open programs.4 After saving changes in all open programs, press the Ctrl and Esc keys on the keyboard simultaneously to display the Windows Start Menu.5 Use the arrow keys to select the Arrow button next to the Lock button. Select Shut Down, and then press the Enter key on the keyboard.6 After the shutdown is complete, unplug and reconnect the mouse connector to the back of your computer, and then turn on your computer. |
Keyboard and mouse (with cable) (continued)
| Symptom | Possible solution |
| Cursor responds slowly, moves only vertically or horizontally, or does not track smoothly. | For a mouse with a roller ball: ■ Clean the roller ball: Remove the roller ball cover from bottom of mouse (rotate it counterclockwise), remove the ball, and clean it with a damp, lint-free cloth (not paper). Also clean the rollers on which the ball moves. ■ Use a mouse pad or other rough surface under the mouse. For an optical mouse: ■ Clean the optical mouse: Gently wipe the light sensor lens on the bottom of the mouse with a lint-free cloth (not paper). ■ Use a mouse pad, white sheet of paper, or other less reflective surface under the mouse. For detailed cleaning instructions, go to: http://www.hp.com/support Select your country/region and language, search on your computer model number, and then search on the keyword cleaning. |
| I cannot move the cursor using the arrow keys on the number key pad. | Press the Num Lock key on the keyboard to turn off the Num Lock light. The Num Lock light should not be on if you want to use the arrow keys on the number key pad. |
Wireless keyboard and mouse
| Symptom | Possible solution |
| Wireless keyboard or mouse does not work or is not detected. | A Check for these problems: ■ Ensure you are using the wireless keyboard or wireless mouse within range of the receiver, approximately 10 meters for normal use, and within 30 cm during initial setup or for resynchronization. ■ Replace the batteries in the keyboard and mouse; do not use rechargeable batteries: Turn the devices over, turn the mouse off, take off the battery cover, remove the old batteries, and insert new alkaline batteries, and then turn on the mouse. ■ Ensure the mouse is not in Suspend mode, which occurs after 20 minutes of inactivity. Click the left mouse button to reactivate it. |
Wireless keyboard and mouse (continued)
Symptom
Possible solution
Wireless keyboard or mouse does not work or is not detected. (continued)
B Resynchronize the keyboard and mouse to the receiver:
The receiver, wireless keyboard, and wireless mouse shown in the illustrations are examples; your models may vary.
IMPORTANT: During these steps, place the wireless keyboard and wireless mouse on the same level as the receiver, within 30~cm of the receiver, and away from interference from other devices.
1 Unplug and reconnect the receiver into a USB connector on the computer. Your computer model may have a connector dedicated to the receiver. If you have a choice, use a USB connector on the front of the computer.
2 The receiver may have an LED light or a Connect button, which is also an LED light. Skip this step if your receiver has no Connect button (A).
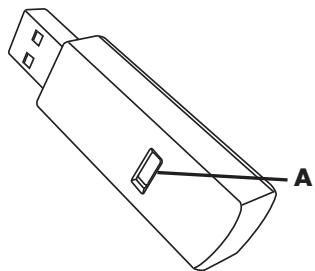
Push the Connect button (A) on the receiver (which is also the LED light), and hold it for 5 to 10 seconds until the light starts to flash.
Wireless keyboard and mouse (continued)
Symptom
Possible solution
Wireless keyboard or mouse does not work or is not detected. (continued)
3 Check that the mouse is on (B), and push and hold the Connect button (C) on the underside of the mouse for 5 to 10 seconds until the LED (A) on the receiver lights or stops flashing.
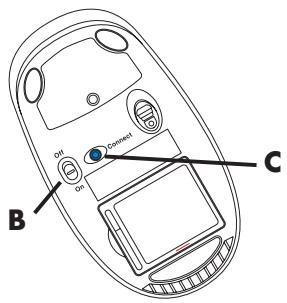
NOTE: The receiver connection session times out after 60 seconds. To ensure the connection was established, and that the receiver did not time out instead, move the mouse and check for response on the screen.
4 After the mouse connection is established, continue with the steps that follow to repeat the procedure for the keyboard.
5 Skip this step if your receiver model has no Connect button (A).
Push the Connect button on the receiver (A), and hold it for 5 to 10 seconds until the light starts to flash.
Push and hold the Connect button (D) on the underside of the keyboard for 5 to 10 seconds until the LED (A) on the receiver lights or stops flashing.
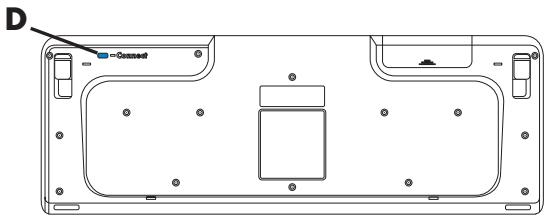
Refer to the documentation that came with the keyboard and mouse for more information.
| Symptom | Possible solution |
| No sound is produced. | If you use an HDMI connector on the graphics card (select models only) to connect your display (monitor) to the computer, you should also connect analog speakers to the computer. Audio Line Out connector if you want to hear sound during the initial setup of the computer.Refer to the setup poster to connect analog speakers.Refer to “HDMI-connected display produces no sound.” on page 42 to change settings and hear sound from your HDMI-connected display.Press the Mute button on the keyboard to see whether the Mute feature is enabled.Or1 Click the Windows Vista start button, and then click Control Panel.2 Click Hardware and Sound, and then click Adjust system volume.3 If programs are muted, click the Mute button to unmute.If you are using built-in monitor speakers, use the monitor front panel volume button to adjust volume. Use the front panel buttons to enter the onscreen display (OSD) and ensure audio is enabled and volume is set appropriately.To increase the volume, click the Volume icon on the task bar, or use the keyboard controls. Check the volume setting in your software program.Make sure that you connected powered (active) speakers and that they are turned on.Turn off your computer, and then unplug and reconnect the speakers. Ensure the speakers are connected to an audio connector, not a Line In or headphone connector.To resume from Sleep mode, press the Sleep button (select models only), or press the Esc key on the keyboard.Unplug headphones if they are connected to your computer (or speaker system). |
Audio and speakers (continued)
Symptom
Possible solution
Volume is very low or unsatisfactory.
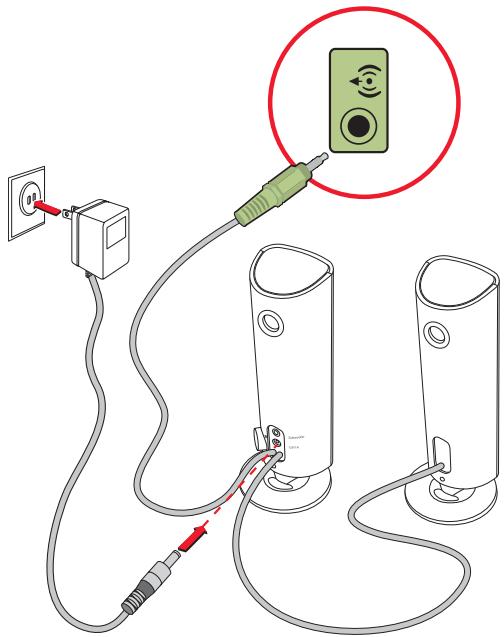
Make sure you connected the speakers to the Audio Out (lime green) connector on the back of the computer. (Additional audio connectors are used for multiple-channel speakers.) Detached non-powered speakers (speakers without a separate power source, such as batteries or a power cord) do not produce satisfactory sound. Replace the non-powered speakers with powered speakers.
| Symptom | Possible solution |
| I cannot connect to the Internet. | Contact your ISP for assistance. |
| Verify that you are using the proper cables for your Internet connection type. Your computer may have a modem and an Ethernet network adapter (also called a network interface card, or NIC). A modem uses a standard telephone cable to make a dial-up connection. The NIC uses a network cable to connect to a local area network (LAN). Do not connect a telephone cable to the NIC. Do not plug a network cable into a telephone service line; doing so may damage the NIC. | |
| For more information about connecting to the Internet, open the Help and Support Center; see “Using the Onscreen Help and Support Center” on page 35. | |
| Run the wireless setup wizard:1 Click the Windows Vista start button, and then select Network.2 In the Network window, click Network and Sharing Center.3 In the Network and Sharing Center window, click Set up a connection or network to open the wizard.4 Follow the onscreen instructions. | |
| If your system has an external antenna, try to move the antenna to a better position. If the antenna is internal, try to move the computer. | |
| Try to connect again later, or contact your ISP for assistance. | |
| Internet programs do not start automatically. | Log in to your ISP, and start the desired program. |
| The CD or DVD drive cannot read a disc, or it takes too long to start. | Ensure the disc is inserted with the label facing up and centered in the tray. |
| Wait at least 30 seconds for the drive to determine the type of media. | |
| Clean the disc with a disc cleaning kit, available from most computer stores. | |
| The driver may be corrupted or outdated. For detailed information about restoring and updating drivers, see “Updating drivers” on page 57. | |
| I cannot remove a CD or DVD. | Turn on your computer, and press the Eject button nearest the drive to open the tray. |
| If you suspect a problem with the Eject button itself: 1 Click the Windows Vista start button, and then click Computer. 2 Right-click the CD or DVD drive you want to open. 3 Select Eject from the menu. | |
| My minidisc CD is falling down inside the computer. | Vertical slot-loading disc players cannot play non-standard discs. |
| For the CD/DVD drive with a tray that is installed in a vertical position, standard-sized discs with the label facing out fit into the drive tray vertically. To use a minidisc with a vertical drive tray, you must first place the computer on its right side (select models only) before you insert the minidisc. | |
| 1 Face the front of the computer and lay the computer down on its right side. 2 Press the Eject button to open the CD/DVD tray. 3 Place the minidisc into the recess inside the tray, and then press the front of the tray to close it. |
CD and DVD players (continued)
| Symptom | Possible solution |
| I cannot create (record) a disc. | Ensure the disc is inserted with the label facing up and centered in the tray. |
| Verify that you are using the correct disc type (media) for the drive. Try a different brand of disc. | |
| Ensure the disc is clean and undamaged. If recording stopped during a recording session, the disc may be damaged; use a different disc. | |
| Use the correct type of disc for the type of files you are recording. | |
| When using a CD-R disc, ensure it is blank if recording music, and that it is blank or appendable (with space to add more data files) if recording data. | |
| Verify that you are using the correct disc type when you make a copy of a disc. Some recording programs can record only to the same disc type as the source. For example, you can record a DVD only to a DVD+R/-R or a DVD+RW/-RW disc, and you can record a CD only to a CD-R or a CD-RW disc. | |
| Ensure that the disc is in the correct drive, and that you specify the same drive in the CD or DVD recording software. | |
| Select a slower write speed for the recording drive, if a slower speed is available. | |
| The recording software may not let you add a track if it exceeds the available space on your disc. You can make space available by removing one or more tracks from the list before recording the files to the disc. | |
| Close all software programs and windows before recording. | |
| Ensure you have enough available space on your hard disk drive to store a temporary copy of the content. Click the Windows Vista start button, and then click Computer. Right-click the hard disk drive, and then click Properties to view the available space. |
CD and DVD players (continued)
| Symptom | Possible solution |
| I cannot create (record) a disc. (continued) | If you are on a network, copy the files from a network drive to your hard disk drive first, and then record them to disc. |
| Close all programs and windows, and then restart your computer. | |
| I cannot play a DVD movie on a DVD player. | Your DVD player cannot play video files that were recorded onto the DVD as data files. To play a movie properly, use a video recording program. Some video files may be viewed on a computer, but not on a home DVD video player. |
Video
| Symptom | Possible solution |
| Some video files do not play. | Your file may be corrupt or in an unsupported format. Open the video file in a video editor, and then resave the file in a supported format. |
| Codec error messages appear when I try to play certain video files. | Open the file in Windows Media Player. Ensure Windows Media Player is configured to automatically download codecs. ■ If the correct codec is available, the file will play. Note that you must be connected to the Internet to download the codec file. ■ If the correct codec is not available, check to see whether there is an update available for Windows Media Player. For more information, open Windows Media Player Help and search for codec. |
| Error message: Files Needed To Display Video Are Missing or Corrupt. | 1 Click the Windows Vista start button, right-click Computer, and then click Properties. 2 Under Tasks, click Device Manager. 3 Click the plus sign (+) next to Sound, video and game controllers. 4 Right-click TV tuner (select models only), and then click Update Driver Software. 5 Select Search automatically for updated driver software. 6 Follow the instructions to update the driver. 7 If you are prompted, restart the computer. |
| A new device is not recognized as part of the system. | Install the device driver from the CD provided with the device, or download and install the driver from the device manufacturer Web site.You may need an updated driver for Windows Vista. Contact the device vendor directly for an update.For HP peripheral devices, visit the HP Web site. For details, refer to the Limited Warranty and Support Guide. |
| Ensure that all cables are properly and securely connected and that the pins in the cable or connector are not bent. | |
| Turn off the computer, turn on the external device, and then turn on the computer to integrate the device with the computer. | |
| Restart the computer, and follow the instructions for accepting the changes. | |
| Disable the automatic settings in the operating system for the new device, and choose a basic configuration that does not cause a resource conflict.You can also reconfigure or disable devices to resolve the resource conflict. | |
| A new device does not work. | To install or uninstall a device driver, you must be logged in with administrative privileges. If you need to switch users, click the Windows Vista start button, click the Arrow button next to the Lock button, and then click Switch User. Choose a user with administrative privileges. |
Hardware installation (continued)
Symptom
Possible solution
A device does not work after installing a new device.
To resolve a device conflict, you may need to disable one of the devices or uninstall an old device driver:
1 Click the Windows Vista start button, right-click Computer, and then click Properties.
2 Under Tasks, click Device Manager.
3 Click the plus sign (+) next to the problem device and check for an exclamation point in a yellow circle near the device icon. The exclamation point means there is a device conflict or problem with the device. Exclamation points do not always appear when a device is not working properly.
4 If you have removed a hardware device, but the device driver is still listed in the Device Manager, this may be causing the device conflict. To uninstall the old driver so that the new device driver works properly, right-click the device, click Uninstall, and then click OK.
5 Double-click the name of the device, and then select Properties.
6 Click the Resources tab to verify that there is a device conflict.
7 Click the General tab to see whether your device is enabled and working properly. If it is available, click the Troubleshoot button, and follow the onscreen instructions in the device troubleshooter wizard.
8 Restart the computer. Click the Windows Vista start button, click the Arrow button next to the Lock button, and then click Restart.

Performance
| Symptom | Possible solution |
| Computer displays a processor speed that is lower than expected. | This happens when the processor is automatically running in a lower power state, because the applications running do not require the maximum processing power. |
| Software programs and files take longer than expected to open or respond. | If you created multiple user accounts on your computer, ensure other users are not logged in. If there are multiple users logged in simultaneously, system resources must be shared among them. For information about other tasks, see “Maintenance tasks to improve performance” on page 61. |
Wireless devices
| Symptom | Possible solution |
| Bluetooth device is not working. | Ensure the device and your computer are the correct distance apart—not too far and not too near. For the correct distance, refer to the device instructions. |
| Remove and then reinstall the device:1 Click the Windows Vista start button, and then click Control Panel.2 Click Hardware and Sound, and then click Bluetooth Devices.3 Select the device that is not working, and then click Remove.4 Click Add, press the reset button on the device, place a check mark in the My device is set up and ready to be found check box, and then click Next.5 Follow the onscreen wizard instructions. | |
| The device may have too many connections. Either wait until the device is less busy, or set the other devices so they are not discoverable. For information on how to turn off discoverability, refer to the device instructions. | |
| Ensure other devices that use radio frequencies (for example, microwave ovens, cordless phones, and 802.11 wireless networks) are not creating interference. Try moving the device that is not working farther away from other devices. |
Remote control
| Symptom | Possible solution |
| Remote sensor is not receiving a signal from the remote control (select models only). | ■ Be sure to point the remote control at the sensor.■ Be sure the remote control has fresh batteries.■ For an external sensor with a USB connector, try enabling the IR connection by following these steps:1 Click the Windows Vista start button, right-click Computer, and then select Properties.2 Under Tasks, click Device Manager.3 Click the plus sign (+) next to Universal Serial Bus controllers.4 If eHome Infrared Receiver is listed under Universal Serial Bus Controllers, Windows Vista is properly detecting the IR receiver. If it is not listed, go to the next step.5 Unplug the end of the USB cable on the remote sensor from the computer, and then plug it back into the same USB connector.6 Disconnect all other USB devices, leaving the remote sensor connected, and then restart the computer. Connect other USB devices after the remote sensor appears in the Device Manager window. |
Memory card reader
| Symptom | Possible solution |
| Memory card reader (select models only) cannot read the memory card. | Do not insert or remove memory cards when the in-use (activity) light is flashing. Doing so may cause data loss or permanent damage to the card reader. |
| Some memory cards have a Read/Write or a Security switch. Ensure the switch is set to Write Enabled before you attempt to write data to the card. | |
| Ensure the amount of stored data does not exceed the storage limit of the memory card. |
Memory card reader (continued)
| Symptom | Possible solution |
| Memory card reader (select models only) cannot read the memory card. (continued) | Ensure the memory card is one of the supported types: CompactFlash (I, II, and Microdrive), Memory Stick, Memory Stick Pro, MultiMedia, Secure Digital, SmartMedia, or xD. Some models may support additional types, such as SDHC (Secure Digital High-Capacity) memory cards. |
| Ensure the memory card is fully inserted into the correct slot. | |
| Inspect the ends of the memory cards for dirt or material that closes a hole or spoils a metal contact. Clean the contacts with a lint-free cloth and a small amount of isopropyl alcohol. Replace the memory card if necessary. |
Repairing Software Problems
Your computer uses the operating system and installed software programs during normal operation. If your computer works improperly or stops because of the software, you may be able to repair it.
Some software repairs are as simple as restarting your computer, and others require performing a system recovery from files on your hard disk drive.
Software repair overview
This section lists the available methods for fixing your computer if you are experiencing software problems. You must perform the procedures in the order listed in this overview:
1 Restarting your computer (See "Restarting the Computer" on page 18.)
2 Turning off your computer (See "Turning Off the Computer" on page 16.)
3 Updating drivers (See below, page 57.)
4 Microsoft System Restore (See page 58.)
5 Software program and hardware driver reinstallation (See page 59.)
6 System recovery (See "System Recovery" on page 63 for details.)
Updating drivers
A driver is a software program that enables your computer to communicate with an attached device, such as a printer, hard disk drive, mouse, or keyboard.
Complete the following procedure to update a driver, or to revert to an earlier version of the driver if the new one does not solve your problem:
1 Click the Windows Vista start button, right-click Computer, and then click Properties.
2 Under Tasks, click Device Manager.
3 Click the plus sign (+) to expand the type of device you want to update or rollback. (For example, DVD/CD-ROM drives.)
4 Double-click the specific item (for example, HP DVD Writer 640b).
5 Click the Driver tab.
6 To update a driver, click Update Driver, and then follow the onscreen instructions. Or
To revert to an earlier version of a driver, click Rollback Driver, and then follow the onscreen instructions.
Microsoft System Restore
Microsoft Windows Vista includes a feature that enables you to restore your computer configuration to that of a previous time when the current software problem did not exist. The feature does this by creating a restore point where it records the computer settings at that time and date.
When a new program is installed, the operating system automatically creates a restore point before it adds the new software. You can also set restore points manually.
If you experience a problem that you think may be due to software on your computer, use System Restore to return the computer to a previous restore point.
NOTE: Always use this System Restore procedure before you use the system recovery program.
1 Close all open programs.
2 Click the Windows Vista start button, All Programs, and then click Accessories.
3 Choose System Tools, System Restore, and then click Next.
4 Follow the onscreen instructions.
To manually add restore points:
1 Close all open programs.
2 Click the Windows Vista start button, and then Control Panel.
3 Click System and Maintenance, and then System.
4 Click System protection.
5 Under Automatic Restore Points, select the disk for which you want to create a restore point.
6 Click Create.
7 Follow the onscreen instructions.
For more information about software restore points:
1 Click the Windows Vista start button, and then click Help and Support.
2 Type system restore in the Search Help box, and then press Enter.
Software program and hardware driver reinstallation
If an individual factory-installed software program or hardware driver is damaged, you can reinstall it by using the Recovery Manager program (select models only).
NOTE: Do not use the Recovery Manager program to reinstall software programs that came on CDs or DVDs included in the computer box. Reinstall these programs directly from the CDs or DVDs.
Before you uninstall a program, be sure you have a way to reinstall it. Check that it is still available from where you initially installed it (for example, discs or the Internet). Or check that the program is in the list of programs you can reinstall from the Recovery Manager.
To check the list of installable programs in the Recovery Manager:
1 Click the Windows Vista start button, All Programs, PC Help & Tools, and then click Recovery Manager.
2 Click Advanced Options, Reinstall software programs that came with your computer, and then click Next.
3 Click Next at the Welcome screen.
A list of programs opens. Check whether your program is there.
To uninstall a program:
1 Close all software programs and folders.
2 Uninstall the damaged program:
a Click the Windows Vista start button, and then click Control Panel.
b Under Programs, click Uninstall a program.
c Select the program you want to remove, and then click Uninstall.
d Click Yes if you want to continue with the uninstall process.
To reinstall a program using the Recovery Manager:
1 Click the Windows Vista start button, click All Programs, click PC Help & Tools, and then click Recovery Manager.
2 Click Advanced Options, click Reinstall software programs that came with your computer, and then click Next.
3 Click Next at the Welcome screen.
4 Choose the program you want to install, click Next, and follow the onscreen instructions.
5 When you have finished reinstalling, restart the computer.
NOTE: Do not skip this last step. You must restart the computer after recovering software programs or hardware drivers.
Maintenance
This section includes information about tasks you can perform to help ensure trouble-free operation of your computer, and to ease the recovery of important information on your computer if problems arise in the future.
Maintenance tasks
It is important that you perform simple maintenance of your computer to ensure that it works at peak performance.
Weekly
| Software Cleanup | Using Disk Cleanup or safe third-party cleaning tools removes junk files and temporary files that accumulate and slow down your system. Also, check for programs you no longer need and uninstall them. |
| Defragmentation | Running Disk Defragmenter keeps your hard disk in good condition, as well as improves system performance. Frequently performing this task does not harm your system. |
| Virus Scan | Performing a full virus scan every week can catch anything that may have slipped through unnoticed. Most anti-virus products have a scheduling feature to keep track of this automatically. |
Monthly
| Hardware Cleanup | Thoroughly clean the inside and outside of your computer. |
| Software Updates | Using Windows Updates can fix operating system bugs and improve performance. Also, be sure to check for driver updates for your hardware and new versions of your favorite programs. |
| Hard Disk Diagnostic | Sometimes a failing hard disk can be caught beforehand, saving you a lot of surprises in the future. |
Yearly
| System Recovery | In time, your system may still get bogged down, depending on the usage of the computer. Use System Recovery to wipe your Windows® operating system installation clean, restoring it to the original configuration when you first powered up your system. Remember to make a backup first! Before proceeding with a recovery, see “System Recovery” on page 63 for further details. |
Creating data backup discs
Use CD or DVD recording (or burning) software that is installed on your computer to create backup discs of important information, including personal files, e-mail messages, and Web site bookmarks. You can also move data to an external hard disk drive.
When writing data to a backup disc, use software that includes write verification functionality. This feature compares the data on your hard disk drive with the data copied to the disc to ensure it is an exact copy. Depending on your disc recording software, you may need to manually enable this feature (refer to the software documentation).
If you encounter recording issues, try alternate media (different types or brands). Also, use the Windows Explorer tool to view your files and verify content was copied over. To open Windows Explorer, right-click the Windows Vista start button, and then click Explore.
Creating system recovery discs
This is a one-time procedure that you should perform while your computer is working properly. If you encounter problems with your computer later, you can restore it to its original factory settings by using the system recovery discs that you created. Refer to "Creating recovery discs" on page 63 for details.
Maintenance tasks to improve performance
These maintenance tasks may improve computer performance. Perform them as needed.
Remove unused programs, which take up memory space and may slow down the computer.
Use Windows Update to check for updates or to schedule automatic updates.
■ Run the Disk Cleanup program to free up file storage space on your computer hard disk drive by removing temporary and unused files.
■ Run the Disk Defragmenter program to consolidate together any fragmented files stored on your hard disk drive. This does not affect the location of the files and folders on your computer, but improves the file retrieval time when you open a file.
Check the hard disk drive for errors by selecting Error-checking from the Tools tab in the Windows Vista Properties window for the Computer.
For more information, search for the topic in the Help and Support Center. See "Using the Onscreen Help and Support Center" on page 35.
Keeping the computer free of dust and dirt, and heat
Keeping your computer system free of dust and dirt, and heat will prolong its life. Dust, pet hair, and other particles can build up, creating a blanket effect; as a result, components can overheat, or, in the case of the keyboard and mouse, not work smoothly and effectively. Check your system once a month for visible signs of dust and debris, and clean it about once every three months.
Cleaning the computer and monitor
1 Unplug the computer from its power source.
2 Unplug the monitor from its power source.
3 Use a clean, dry cloth to dust the computer case and the monitor.
4 Use a clean cloth dampened with warm water to wipe the computer case and the monitor case clean.
Do not use water on the monitor screen.
NOTE: If there is sticker residue or a spill on the computer or monitor case, use isopropyl or rubbing alcohol and a lint-free cloth to remove it.
5 Use a clean cloth to dry the computer and monitor case.
6 Use a clean, dry cloth to clean the monitor screen, or, for more thorough cleaning use an antistatic screen cleaner and a clean cloth.
Cleaning the computer vents
Air vents keep the computer and monitor cool. To maintain efficient air flow, keep these vents clean by using a small battery-powered vacuum cleaner. (A battery-powered vacuum cleaner eliminates the risk of electric shock.)
1 Run the vacuum over the vents in the computer case and the monitor case.
2 Remove any debris that has accumulated in and around the computer connectors (for example, the Ethernet and USB connectors).
Cleaning the keyboard and mouse
When cleaning the keyboard keys, use a low setting on the battery-powered vacuum cleaner, to avoid removing key caps and springs.
Vacuum between the keys of the keyboard and along the grooves.
2 Use a clean, dry cloth and isopropyl alcohol to clean buildup on the keyboard keys and along its edges.
3 Wipe the body of the mouse and the mouse cord with cleaning wipes or a cloth and cleanser.
If you have a roller ball mouse, clean the ball and rollers inside:
1 Turn the mouse upside down.
2 Rotate the ball-cover ring counterclockwise to remove the ring and release the roller ball.
3 Rinse the roller ball with soap and warm water.
4 Clean the rollers inside the mouse with a cotton swab dampened with isopropyl alcohol.
5 After the roller ball and rollers are completely dry, replace the ball and ball-cover ring.
System Recovery
System recovery completely erases and reforms the hard disk drive, deleting all data files you have created. System recovery reinstalls the operating system, programs, and drivers. However, you must reinstall any software that was not installed on the computer at the factory. This includes software that came on CDs included in the computer accessory box, and software programs you installed after purchase.
You must choose one of the following methods to perform a system recovery:
- Recovery Image — Run the system recovery from a recovery image stored on your hard disk drive. The recovery image is a file that contains a copy of the original factory-shipped software. To perform a system recovery from a recovery image, see "System recovery from the Windows Vista Start Menu" on page 64.
NOTE: The recovery image uses a portion of the hard disk drive that cannot be used for data storage.
Recovery Discs - Run the system recovery from a set of recovery discs that you create from files stored on your hard disk drive. To create recovery discs, see the next section.
Creating recovery discs
Complete the procedure described in this section to create a set of recovery discs from the recovery image stored on your hard disk drive. This image contains the operating system and software program files that were originally installed on your computer at the factory.
You can create only one set of recovery discs for your computer. Furthermore, the recovery discs you create can be used only with your computer.
After creating the recovery discs, you can delete the recovery image if you want to make extra space available on your hard disk drive.
NOTE: Do not delete the recovery image until you have made recovery discs.
Choosing recovery discs
To create recovery discs, your computer must have a DVD writer.
Use DVD+R, DVD-R, DVD+R DL, or DVD-R DL blank media to create your system recovery discs.
You cannot use DVD+RW, DVD-RW, DVD+RW DL, DVD-RW DL, or CD discs to create recovery discs.
Use high-quality discs to create your set of recovery discs. The verification standard for the recovery disc creation process is very high. You may see error messages such as Recording failure when writing disc or Error detected during disc verification.
Your discs may be rejected if they are not defect-free. You will be prompted to insert a new blank disc to try again. It is normal that some of your discs may be rejected.
The number of discs in the recovery disc set depends on your computer model (typically 1-3 DVD discs). The Recovery Disc Creator program tells you the specific number of blank discs needed to make the set.
The process takes some time to verify that the information written on the disc is correct. You can quit the process at any time. The next time you run the program, it resumes where it left off.
To create recovery discs:
1 Close all open programs.
2 Click the Windows Vista start button, click All Programs, click PC Help & Tools, and then click Recovery Disc Creation.
3 Follow the onscreen instructions. Label each disc as you make it (for example, Recovery 1, Recovery 2).
4 Store the recovery discs in a safe place.
System recovery options
You should attempt a system recovery in the following order:
1 Through the hard disk drive, from the Windows Vista Start menu.
2 Through the hard disk drive, by pressing the F11 key on the keyboard during system startup.
3 Through recovery discs that you create.
4 Through recovery discs purchased from HP Support. To purchase recovery discs, go to http://www.hp.com/support and visit the Software & Driver downloads page for your computer model.
System recovery from the Windows Vista Start Menu
If the computer is working, and Windows Vista is responding, use these steps to perform a system recovery.
NOTE: System recovery deletes all data and programs you created or installed after purchase. Therefore, ensure you have backed up, to a removable disc, any data you want to keep.
1 Turn off the computer.
2 Disconnect all peripheral devices from the computer, except the monitor, keyboard, and mouse.
3 Turn on the computer.
4 Click the Windows Vista start button, click All Programs, click PC Help & Tools, and then click Recovery Manager.
5 In the Recovery Manager Welcome window, click the Advanced options button.
6 Choose the system recovery option that recovers your computer to its original factory condition, and then click Next.
7 Click Next at the next screen that prompts you to do so.
Your computer restarts.
NOTE: If your system does not detect a recovery partition, it will prompt you to insert a recovery disc. Insert the disc and proceed to Step 7 in the section "Starting system recovery from recovery discs" on page 66.
8 When prompted to perform a system recovery, click Yes, and then click Next.
9 If you are prompted to back up your files, and you have not done so, click the Back up your files first button. Otherwise, click the Recover without backing up your files button, and then click Next.
System recovery begins. After system recovery is complete, click Finish to restart the computer.
10 Complete the registration process, and wait until you see the desktop.
11 Turn off the computer, reconnect all peripheral devices, and turn the computer back on.
12 Perform the procedure "Performing the Post-Recovery Procedure" on page 67.
System recovery at system startup
If Windows Vista is not responding, but the computer is working, use these steps to perform a system recovery:
NOTE: System recovery deletes all data and programs you created or installed after purchase. Therefore, ensure you back up, to a removable disc, any data you want to keep.
1 Turn off the computer. If necessary, press and hold the On button until the computer turns off.
2 Disconnect all peripheral devices from the computer, except the monitor, keyboard, and mouse.
3 Press the On button to turn on the computer.
As soon as you see the initial company logo screen appear, repeatedly press the F1 key on your keyboard until the Recovery Manager window opens.
5 Click Advanced options.
6 Choose the system recovery option that recovers your computer to its original factory condition, and then click Next.
7 If you are prompted to back up your files, and you have not done so, click the Back up your files first button. Otherwise, click the Recover without backing up your files button, and then click Next.
System recovery begins. After system recovery is complete, click Finish to restart the computer.
8 Complete the registration process, and wait until you see the desktop.
9 Turn off the computer, reconnect all peripheral devices, and turn the computer back on.
10 Perform the procedure in "Performing the Post-Recovery Procedure" on page 67.
Starting system recovery from recovery discs
This section contains the procedure for performing a system recovery from the recovery discs you created as described in "Creating recovery discs" on page 63.
NOTE: System recovery deletes all data and programs you created or installed after purchase. Therefore, ensure you back up, onto a removable disc, any data you want to keep.
To perform a system recovery using recovery discs:
If the computer is working, create a backup DVD containing all the data files you want to save. When you are done, remove the backup disc from the drive tray.

CAUTION: All data on the hard disk drive will be deleted. You will lose data if it is not backed up.
2 Insert recovery disc #1 into the DVD drive tray, and close the tray.
3 If the computer works, click the Windows Vista start button, click the Arrow button next to the Lock button, and then click Shut Down.
Or
If the computer is not responding, press and hold the On button for approximately 5 seconds, or until the computer turns off.
4 Disconnect all peripheral devices from the computer, except the monitor, keyboard, and mouse.
5 Press the On button to turn on the computer.
A window may open, prompting you to choose between running system recovery from the discs or from your hard drive.
6 Choose to run from the recovery discs, and then click Next.
7 In the Welcome to the Recovery Manager window, click the Advanced Options button.
8 Choose Recover your computer to its original factory condition, and then click Next.
9 If you are prompted to back up your files, and you have not done so, click the Back up your files first button. Otherwise, click the Recover without backing up your files button, and then click Next.
10 If you are prompted to insert the next recovery disc, do so.
11 When the Recovery Manager is finished, remove all recovery discs from the system.
12 Click Finish to restart the computer.
Performing the Post-Recovery Procedure
1 At the Welcome to Microsoft Windows screen, follow the onscreen setup instructions, and then click Start in the last screen to display the Windows desktop.
2 Configure your Internet connection.
3 Turn off your computer, reconnect all peripheral devices that were originally connected to it, and then turn the computer back on.
4 Reinstall software that originally came in the box with your computer, and also any additional software you purchased.
The system recovery software might have already installed some of the software that came in the box.
If you installed updates to any software programs, reinstall those as well. You can typically download these updates from the software manufacturer's Web site.
5 Use Windows Update to get critical updates from Microsoft:
Click the Windows Vista start button, and then click Control Panel.
b Under Security, click the Check for Updates button.
c Click Install Updates.
6 Restart your computer. (Some updates will not finish installing until you restart.)
7 Use HP Update to get critical updates from HP:
a Click the Windows Vista start button, click All Programs, click the HP folder, and then click HP Update.
b Follow the onscreen instruction to download driver and software updates.
8 If you performed a backup before the system recovery, copy the backup data files from the backup media to your hard disk drive.
9 Ensure your system is running up-to-date security software.
Index
A
antivirus, installing program 25
audio connector
Audio Line In 5
Audio Line Out 5
audio input, left and right connectors 10
B
backup 61
buttons
Eject, for the CD/DVD drive 29
HP Easy Backup 32
Off, See turning off computer 16
C
card reader, memory 27
carpal tunnel syndrome 37
CD minidisc, using 29
CD/DVD drive, using 29
cleaning 61
Composite video connector 9
computer
cleaning 61
Help & Tools 36
setting up 1
transferring files 26
turning on the computer 15
connecting
devices 26
peripherals 2
TV 8
connection
modem 8
wired network 7
connector
Audio Line In 5
Audio Line Out 5
Composite Video In 9
computer 2
headphones 5
IR IN 13
IR OUT 13
modem 3
monitor 4
S-video In 9
TV/Cable Ant 10
CyberLink DVD Suite
features 33
CyberLink LabelPrint
creating a LightScribe label 30
D
devices
connecting 26
devices, peripheral device landing pad and
cablerouting32
digital camera
connecting 26
digital picture 27
documentation, onscreen 36
drivers, update 57
E
eject a CD/DVD disc 29
Ethernet connection 7
Ethernet network hub 3
H
HDMI, hearing sound from the display 42
headphones
connecting 6
connector 5
Help and Support 35
Hibernate mode 16, 17
HP Easy Backup 32
HP Total Care Advisor 34, 37
1
Internet security 23
IR
blaster 13
connection, enable 56
receiver 13
L
LAN (local area network)
antenna 7
checking wireless LAN device 19
connecting Ethernet LAN 3
connecting wireless LAN device 7
setting up 7
landing pad and cable routing 32
LightScribe, creating a LightScribe disc
label 30
locking the computer 16
M
maintenance tasks 60
memory card reader, using 27
microphone
adjusting recording levels 21
connecting 6
connector 5
connector type 4
selecting in Windows Vista 21
minidisc, using 29
modem
connection 8
connector 3, 8
monitor
connector 4
HDMI-connected, settings to hear sound 42
muvee Reveal, features 33
N
network interface adapter 3
Network Interface Card (NIC) 7
P
passwords 22
peripheral device landing pad and cable
routing 32
peripherals 2
power connector 2
primer
connecting 26
R
recording level, adjusting 21
Recovery Manager 59
reinstall a software program 59
remote control 31
repairing software 57
repetitive strain injury (RSI), see Safety &
Comfort Guide
restarting the computer 18
restore your computer configuration 58
S
Safety & Comfort Guide 37
safety warnings 1, 37
setting up computer 1
shut down the computer 16
Sleep mode 16, 17
software programs
CyberLink DVD Suite 33
CyberLink LabelPrint 30
HP Total Care Advisor 34
muvee Reveal 33
reinstall 59
Windows Movie Maker 34
software repairs 57
speakers
connecting 6
connector type 4
Support Web site 35
surge protector 1
S-video In connector 9
System recovery 57, 63
system recovery discs, making 61, 63
System Restore 58
System Restore, Microsoft 58
T
television 8
transferring information to your new
computer 26
troubleshooting tables 39
turning off computer 16
U
update
drivers 57
system 23
Windows Vista 23
user accounts, creating 25
V
video cables for TV 8
volume, adjusting in Windows Vista 20
W
WEP 20
Windows Movie Maker, features 34
Windows Vista update 23
wired network connection 7
wireless
LAN connection 7
network device, checking installation 19
network security 20
wireless LAN 7
WLAN security 20
working in comfort 37
WPA 20
Démarrage rapide
Copyright © 2000-2008 Hewlett-Packard Development Company, L.P.
http://www_hp.com/support
antivirus, installation 25
cables video pout television 8
carted'interfacereseau3
carted'interfacereseau (NIC) 7
HP Total Care Advisor 34, 37
1
imprimante
connexion 26
IR
connexion, activer 56
emetteur 13
récepteur 13
L
LAN (réseau local)
antenna 8
configuration 7
HP Total Care Advisor 34
muvee Reveal 33
reinstaller 59
Windows Movie Maker 34
R
Copyright © 2000-2008 Hewlett-Packard Development Company, L.P.
Volume is erg laag of geluid is slecht.
HP Total Care Advisor 34, 37
1
internetbeveiliging 23
IR
blaster 13
ontvanger 13
verbinding, inschakelen 56
K
LAN (Local Area Network)
antenne 7
RSI (Repetitive Strain Injury), zie Handleiding
HP Total Care Advisor 34
muvee Reveal 33