
C 419 III - Microphone AKG - Free user manual and instructions
Find the device manual for free C 419 III AKG in PDF.
Download the instructions for your Microphone in PDF format for free! Find your manual C 419 III - AKG and take your electronic device back in hand. On this page are published all the documents necessary for the use of your device. C 419 III by AKG.
USER MANUAL C 419 III AKG
- Phantomspeiseadapter MPA III L 1 Precaution/Description Please make sure that the piece of equipment your microphone will be connected to fulfills the safety regulations in force in your country and is fitted with a ground lead.
1.1 Precaution
1.2 Unpacking
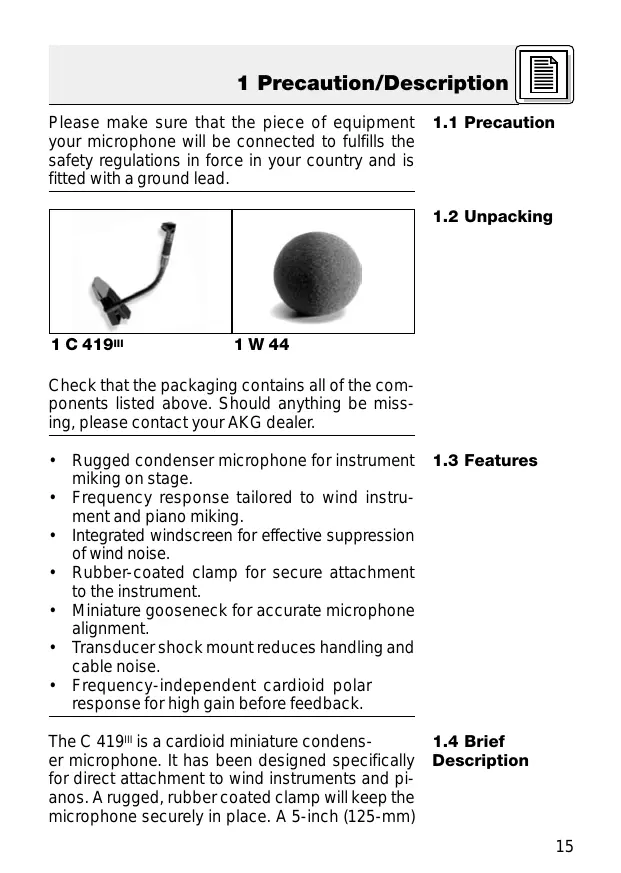
1 C 419III 1 W 44 Check that the packaging contains all of the components listed above. Should anything be missing, please contact your AKG dealer.
- Rugged condenser microphone for instrument miking on stage.
- Frequency response tailored to wind instrument and piano miking.
- Integrated windscreen for effective suppression of wind noise.
- Rubber-coated clamp for secure attachment to the instrument.
- Miniature gooseneck for accurate microphone alignment.
- Transducer shock mount reduces handling and cable noise.
- Frequency-independent cardioid polar response for high gain before feedback.
1.3 Features
The C 419III is a cardioid miniature condenser microphone. It has been designed specifically for direct attachment to wind instruments and pianos. A rugged, rubber coated clamp will keep the microphone securely in place. A 5-inch (125-mm) 1 Description gooseneck allows you to align the microphone precisely as required. A frequency-independent cardioid polar pattern provides high gainbefore-feedback and reduces spillover from neighboring instruments to a minimum. The transducer is suspended in a dedicated shock mount for maximum suppression of handling noise. A built-in windscreen reduces wind and blowing noise and an external windscreen for additional wind noise attenuation is included with the microphone.
1.5 Versions
C 419III PP: C 419III L:
1.6 Optional
Accessories The C 419III is available in two versions:
- With 3-pin XLR connector with integrated adapter for 9 to 52 V universal phantom power.
- With locking mini XLR connector for use with the B 29 L battery power supply, MPA III L phantom power adapter, or AKG bodypack transmitters.
- MK 9/10 microphone cable: 10-m (30-ft.) 2-conductor shielded cable w/male and female XLR connectors
- MPA III L phantom power adapter
- B 29 L, B15 battery power supplies
- N 62 E, N 66 E, B 18 phantom power suppplies
2 Interfacing The C 419III is a condenser microphone and therefore needs a power supply.
2.1 Introduction
Using any power supply other than those recommended by AKG may damage your microphone and will void the warranty. Important!
1. Connect the phantom power adapter (1) on the
microphone cable to a balanced XLR microphone input with phantom power.
2. Switch the phantom power on. (Refer to the instruction manual of the unit to which you
connected your microphone.)
3. If your mixer provides no phantom power:
Connect the phantom power adapter (1) to an optional AKG phantom power supply (2) (N 62 E, N 66 E, B 18, B 15) and use an XLR cable (3) (e.g., an optional MK 9/10 from AKG) to connect the phantom power supply to the desired balanced input.
2.2 C 419III PP
2.2.1 Connecting
to Balanced Inputs Refer to fig. 1. XLR XLR
Fig. 1: Connecting to a balanced input. You may connect the phantom power supply (2) to unbalanced inputs, too. Use a cable (3) with a female XLR connector and TS jack plug:
2.2.2 Connecting
to Unbalanced Inputs Refer to fig. 2.
Fig. 2: Connecting to an unbalanced input.
1. On the XLR connector (4), use a wire bridge to
connect pin 1 to pin 3 and the cable shield.
2. Connect the inside wire of the cable to pin 2
on the XLR connector (4) and the tip contact of the jack plug (5). Note: Unbalanced cables may pick up interference from stray magnetic fields near power or lighting cables, electric motors, etc. like an antenna. This may introduce hum or similar noise when you use a cable that is longer than 16 feet (5 m).
2.3 C 419III L
2.3.1 Using the
Optional B 29 L The optional B 29 L battery supply allows you to connect the microphone to balanced or unbalanced inputs with no phantom power. Connecting the cable:
1. Push the mini XLR connector (1) on the microphone cable into one of the two mini XLR
sockets on the B 29 L (2) to the stop. The connector will lock automatically. Refer to fig. 3. Disconnecting the cable:
To disconnect the cable, press the unlocking button on the mini XLR connector (1) and pull the connector (1) out of the socket. 2 Interfacing
Fig. 3: Using the B 29 L to power the microphone. To avoid damaging the cable, never try to pull out the cable itself! Important!
2. Connect the B 29 L (2) to the desired input.
Use a commercial XLR cable (3) to connect the B 29 L (2) to a balanced input. Balanced input: Refer to fig. 3. Refer to section 2.2.2 above. Unbalanced input:
1. Push the mini XLR connector (1) on the microphone cable into the mini XLR socket (2) on the
cable of the MPA III L (3) to the stop. Mini XLR
2.3.2 Using the
MPA III L
Refer to fig. 4. Mini XLR MPA
Fig. 4: Connection diagram with MPA III L.
2 Interfacing The connector will lock automatically. Disconnecting the cable: Refer to section 2.3.1 above. Refer to fig. 4.
2. Connect the MPA III L (3) to a balanced XLR
microphone input with phantom power.
3. Switch the phantom power on. (Refer to the instruction manual of the unit to which you
connected your microphone.)
4. If your mixer provides no phantom power:
Connect the MPA III L (3) to an optional AKG phantom power supply (4) (N 62 E, N 66 E, B 18, B 15) and use an XLR cable (5) (e.g., an optional MK 9/10 from AKG) to connect the phantom power supply (4) to the desired balanced input.
Connecting to a Bodypack Transmitter Refer to the manual of your bodypack transmitter.
3 Using Your Microphone The best way to get the ultimate sound is to experiment with various microphone positions. The following sections describe proven techniques that you may want to use as starting points for your own experiments.
3.1 Introduction
3.2 Saxophone
Fig. 5: Microphone position on the saxophone.
1. Clamp the microphone on the bell.
2. Aim the microphone at the rim of the bell.
For subtone playing, you might like to align the microphone with the middle of the bell. Be prepared, though, to get a lot of wind noise along with the saxophone sound. You can reduce excessive key noise by placing a narrow strip of foam between the microphone clamp and the instrument. Note: Note:
3 Using Your Microphone
3.3 Clarinet
Fig. 6: Microphone position on the clarinet. Since the clarinet radiates low frequencies through the keys and high frequencies through the bell only, we recommend to use two microphones:
1. Clamp the C 419III on the bell.
2. Aim the C 419III at the rim of the bell.
3. Point a stand-mounted microphone (e.g., a
C 5900 or C 535 from AKG) at the keys. Alternative technique:
If you do not wand to use an extra stand-mounted microphone, you can use a single C 419III instead:
1. Clamp the microphone on the bell so that the
microphone will look at the outside of the clarinet.
2. Point the microphone at the lowest key. This is
the only area where all frequencies are radiated at approximately equal intensity. 3 Using Your Microphone
3.4 Tuba
Fig. 7: Microphone position on the tuba.
1. Clamp the microphone on the bell.
2. Experiment to find the optimum microphone
position. If you get too much wind noise, aim the microphone at the rim of the bell and/or slip the supplied external windscreen on the microphone. Note:
3.5 Trombone
Fig. 8: Microphone position on the trombone.
1. Clamp the microphone on the bell.
2. Aim the microphone at the rim of the bell.
3 Using Your Microphone Note: Note: If you use a mute, be sure to position the microphone outside of the bell to clear the mute. If you get too much wind noise, slip the supplied external windscreen on the microphone.
3.6 Trumpet
Fig. 9: Microphone position on the trumpet.
1. Clamp the microphone on the bell.
2. Place the microphone as far away from the instrument as possible and aim the microphone
at the bell. Note: Note:
If you use a mute, be sure to position the microphone outside of the bell to clear the mute. If you get too much wind noise, slip the supplied external windscreen on the microphone. 3 Using Your Microphone
3.7 Piano
Fig. 10: Using two C 419III microphones to mic up an upright piano. The best way to capture the full range of the piano is to use two microphones:
1. Clamp one microphone on the frame above the
2. Clamp the second microphone on the frame
strut in the octave above Middle C.
3. Align the two microphones so that all notes will
be reproduced at roughly the same level. You can reduce mechanical noise from the dampers by switching in the highpass filters on both microphone channels. If your mixer provides no highpass filters you can use the EQ cautiously to roll off the low frequencies. Note: 4 Cleaning To clean the microphone case, use a soft cloth moistened with water.
5 Troubleshooting Problem Possible Cause Remedy No sound: 1. Power to mixer
1. Switch power to
and/or amplifier is mixer or amplifier off. on.
2. Channel or master 2. Set channel or
fader on mixer, or master fader on volume control on mixer or volume amplifier is at zero. control on amplifier to desired level.
3. Microphone is not 3. Connect microconnected to mixphone to mixer or
er or amplifier. amplifier.
4. Cable connectors 4. Check cable
are seated loosely. connectors for secure seat.
5. Cable is defective. 5. Check cable and replace if damaged.
6. No supply voltage. 6. Switch phantom
power on. Phantom power supply: connect to power outlet or insert battery (batteries). Check cable and replace if necessary. Distortion: 1. Gain control on the mixer set too high.
2. Mixer input sensitivity too high.
1. Turn gain control
2. Connect a 10-dB
preattenuation pad between microphone cable and input. 6 Specifications Type: Polar pattern: Frequency range: Sensitivity at 1 kHz: Impedance: Recommended load impedance: Max. SPL for 1%/3% THD: Equivalent noise level: Power requirement: Current consumption: Cable length/Connector: Finish: Size: Net/shipping weight: pre-polarized condenser microphone cardioid 20 Hz to 20,000 Hz 7 mV/Pa (-43 dBV re 1 V/Pa) 200 Ω ≥2000 Ω 126/130 dB SPL 31 dB (A) (to DIN 45412) C 419III PP: 9 to 52 V universal phantom power C 419III L: B 29 L battery power supply, MPA III L phantom adapter, AKG WMS bodypack transmitters approx. 2 mA C 419III PP: 3 m (10 ft.) / 3-pin male XLR C 419III L: 1.5 m (5 ft.) / 3-pin mini XLR matte black length: 180 mm (7.1 in.); dia.: 35 mm (1.4 in.) C 419III PP: 141 g (5 oz.) / 462 g (16.3 oz.) C 419III L: 77 g (2.7 oz.) / 398 g (14 oz.) This product conforms to EN 50 082-1 provided it is connected to equipment with a CE mark. Frequency Response Polar Diagram
2 Raccordement Mini XLR
Printed in Austria on recycled paper. 10/01/9100 U 1038 For other products and distributors worldwide see our website: http://www.akg.com 914 Airpark Center Drive, Nashville, TN 37217, U.S.A., Tel: (615) 620-3800, Fax: (615) 620-3875, http://www.akgusa.com, e-mail: akgusa@harman.com AKG ACOUSTICS, U.S. Microphones · Headphones · Wireless Microphones · Wireless Headphones · Headsets · Electroacoustical Components Mikrofone