WFT-1 - Internet radio receiver SANGEAN - Free user manual and instructions
Find the device manual for free WFT-1 SANGEAN in PDF.


User questions about WFT-1 SANGEAN
0 question about this device. Answer the ones you know or ask your own.
Ask a new question about this device
Download the instructions for your Internet radio receiver in PDF format for free! Find your manual WFT-1 - SANGEAN and take your electronic device back in hand. On this page are published all the documents necessary for the use of your device. WFT-1 by SANGEAN.
USER MANUAL WFT-1 SANGEAN
Important safety instructions. 2-3
Controls 4-5
Remote control 6
Before you can use this product 7
Language setup 7
Connecting to wired network 7
Connecting to a wireless network 8
After you have connected to your network 8
Listen to the Internet Radio 8-10
My favorite and My added station 11-13
Clock Operation 14-17
Radio station preset 18
Music player 19-23
Internet Software Upgrade 24-25
Factory reset 25
Radio Information 25
Troubleshooting - connecting to an internet station 26
Headphone socket 27
Line out socket (3.5mm Jack) 27
Specification 28
Important safety instructions
- Read and understand all safety and operating instructions before the radio is operated.
- Retain instruction: The safety and operating instructions should be retained for future reference.
- Heed warnings. All warnings on the appliance and operating instructions should be followed.
- Follow all operations and use instructions.
- Water and moisture: The appliance should not be used near water. Do not use near a bathtub, washbowl, laundry tub, kitchen sink, wet basement, swimming pool, etc.
- Unplug the radio from the AC power outlet before cleaning. Use only a damp cloth for cleaning the exterior of the radio. Clean the radio only with dry cloth.
- Do not place the radio on an unstable cart, stand, bracket or table. The radio may fall, causing serious personal injury and damage to the radio.
-
Ventilation: This radio should be situated so that its location or position does not interfere with its proper ventilation. For example, the radio should not be used on a bed, sofa, rug or other soft surfaces that may block the ventilation openings. It should not be placed in a built-in situation like a cabinet that may reduce air flow through the ventilation openings.
-
Don't install near any heat sources such as radiators, heat registers, stoves, or other apparatus (include amplifiers) that produce heat.
- Don't install defeat the safety purpose of the polarized or grounding-type plug. A polarized plug has two blades with one wider than the other. A grounding-type plug has two blades and a third grounding prong. The wide blade or the third prong are provided for your safety. If the provided plug doesn't fit into your outlet, consult an electrician for replacement of the obsolete outlet.
- Power sources: The radio should be operated only from the type of power source indicated on the marking label. If you are not sure of the type of power supply to your home, consult your radio dealer or power company.
- Power cords: The power cord should be positioned so it is not walked on, pinched, or items placed on top of it. Pay particular attention to cords at plugs, convenience receptacles, and the point where they exit from the unit. Unplug the power cord by gripping the power plug, not the cord. Operate the radio using only the current type of power source indicated. If you are not sure of the type of power supply to your home, consult your dealer or local power company.
-
Do not overload wall outlets or extension cords. This can result in a risk of fire or electrical shock. Never insert objects of any kind into the radio through opening. The objects may touch dangerous voltage points or short out parts. This could cause a fire or electrical shock.
-
Only use attachment/accessories specified by the manufacture.
- If the radio is left attended and unused for long periods of time, unplug it form the wall outlet. This will prevent damage caused by lightning or power line surges.
- If the radio is left unattended and unused for a long period of time, remove the batteries. The batteries may leak and damage furniture of your radio.
- Do not attempt to service the receiver yourself. Removing the cover may expose you to dangerous voltage, and will void the warranty. Refer all servicing to authorized service personnel.
- Object and Liquid Entry-Never push objects of any kind into this radio through opening as they may touch dangerous voltage points or short-out parts that could result in a fire or electric shock. Never spill liquid of any kind of product.
- The appliance should be serviced by qualified service personnel when:
A. The power supply cord or the plug has been damaged.
B. Objects have fallen or liquid had been spilled into the radio.
C. The radio has been exposed to rain or water.
D. The radio does not appear to operate normally or exhibits a marked change in performance.
E. The radio has been dropped, or the enclosure damaged.
Controls
(Front)
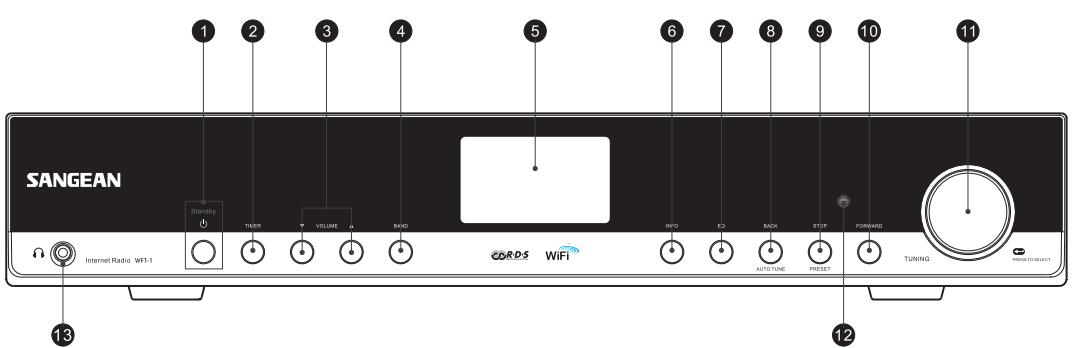
- POWER button
- TIMER button
- VOLUME button
- BAND button
- LCD display
- INFO button
-
EQ button
-
BACK button
- STOP button
- FORWARD button
- TUNING knob
- Infra-red sensor
- Headphone socket
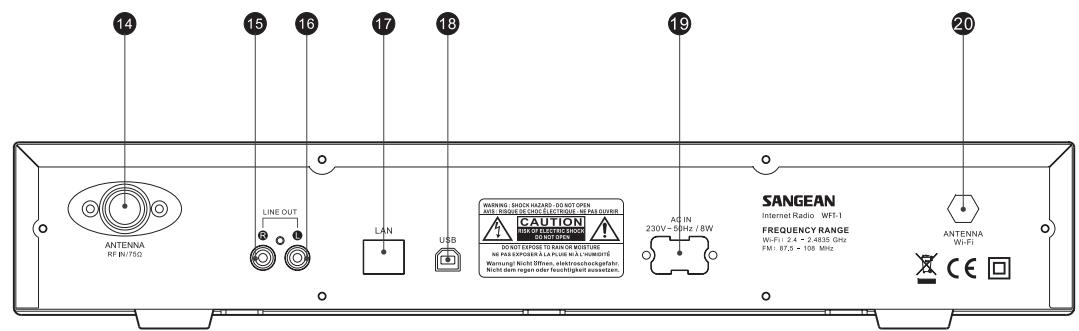
Controls
(Rear)
-
FM antenna
-
USB socket
-
LINE OUT jack (right)
-
Power cord socket
-
LINE OUT jack (left)
-
Wi-Fi antenna
-
LAN socket (Ethernet)
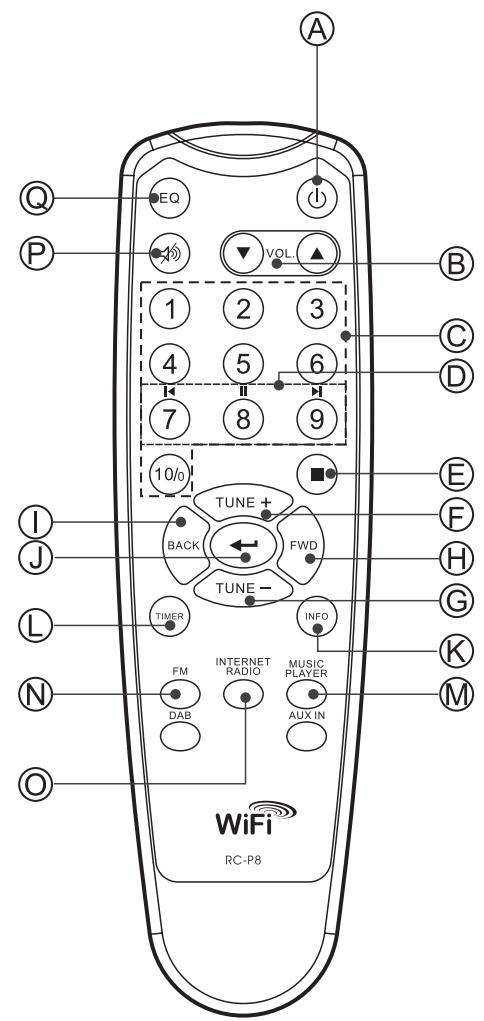
Remote control
A. Power button
B. VOLUME buttons
C. Radio Preset buttons 1-6 and 10.
D. Radio Preset buttons 7-9 also for back, pause and forward
E. STOP button
F. TUNE UP button
G. TUNE DOWN button
H. Forward button
I. Back button
J. Enter button
K. INFO button
L. TIMER button
M. Music player button
N FM button
O. iRadio button
P. Mute button
Q. EQ button
Before you can use this product
Before you can use your Internet radio, you must have the following:
- A broadband Internet connection or
- A wireless access point (Wi-Fi) or a wired Ethernet connection (10 or 100 M bits/sec with RJ45 connection) connected to your broadband Internet, preferably via a router. In many cases the broadband modem, router and wireless access point will be a single combined unit supplied by your Internet Service Provider or bought from a computer store.
- If your wireless network is configured to use Wired Equivalent Privacy (WEP) or Wi-Fi Protected Access (WPA) data encryption then you need to know the WEP or WPA key so you can get the Internet radio to communicate with the network.
IMPORTANT:
Before you continue, make sure that your wireless access point or router is powered up and working with your broadband Internet service (use your computer to verify this). To get this part of the system working you must read the instructions supplied with the wireless access point or router.
Language setup
(The direction of Language setup is Main menu > System setup > Language)
- Language setup selects the user interface language.
- Press the Back button if needed until "Main menu" is shown.
- Rotate and press the TUNING knob to enter "Main menu", then enter "System setup", then "Language".
- Rotate and press the TUNING knob to select the language of user interface.
Connecting to wired network
(The direction of Wired selection is
System setup > Internet setup > Wizard > Wired)
- If planning to use a wired network, connect the Ethernet cable into the LAN (RJ-45) socket at the back of the radio. (If a wired connection is present then the radio will use this in preference to a wireless connection).
- Turn on the radio by pressing POWER button.
- Rotate the TUNING knob until "System setup" is shown, the press the TUNING knob.
- Press the TUNING knob again to enter the Internet setup.
- Press the Tuning knob again to enter the Wizard, and the display will show "Network wizard scanning", then shows all the internet connections.
- Rotate the TUNING knob until the “[Wired]” is pointed. Then press the TUNING knob. And the display will show “Please wait connecting” and then show “connected”. Then press the BACK button twice to go back to the main menu.
If you have problems with your wired connection, the lights by the LAN (RJ-45) connector may help you to identify the possible cause of the problem:
Green ON = Link established, Flashing = Data transfer
Yellow ON = 100M bps link, OFF = 10M bps link
Connecting to a wireless network
(The direction of Wired selection is
System setup > Internet setup > Wizard > ...)
- In the environment with WiFi access point (AP), turn on the radio by pressing the POWER button.
- Rotate the TUNING knob until "System setup" is shown, the press the TUNING knob.
- Press the TUNING knob again to enter the Internet setup.
- Press the Tuning knob again to enter the Wizard, and the display will show all the Internet connections.
- Rotate the TUNING knob until the wireless internet connection you would like to connect with is pointed. Press the TUNING knob.
- If there is a security password should be entered, the display will show "key:" and use rotating and pressing the TUNING knob to enter the password.
the < symbol = back space
the symbol = enter
the 'C' symbol = cancel
- When the wireless is connected, press BACK button twice to go back to the main menu.
After you have connected to your network
Band selection (under the main menu)
There are 3 bands in this device which are
- Internet radio
- Music player
- FM
There are 3 ways of switch amount these bands.
a. Press the BAND button on the unit or
b. Use the TUNING knob under the main menu or
c. Press iRadio (Internet Radio), FM, Mplayer or DAB buttons on the remote control.
Listen to the Internet Radio
(The direction of Time menu is Main menu > Internet radio>...
- Press the POWER button to switch on the radio.
- When the first item "Internet radio" is pointed, press the TUNING knob. And the radio will play the last played radio station. If you would like to select the Internet radio station, follow the instruction below. (If it is not in the main menu, press the BACK button until you see "Main menu", then press the TUNING knob).
- Rotate the TUNING knob until the "Station" is pointed, and then press the TUNING button.
- Then the display shows the 5 ways of internet radio station searching:
- To go back to the previous menu, press the BACK button.
By Location -
enables you to choose a radio station from the list first by geographic region and then by country.
a. When "Location" is pointed, press the TUNING knob, then the display shows the continents.
b. Rotate the TUNING knob until the desired continent is pointed, then press the knob to select the continent. Then use the same way to select the country (and state).
c. Use the same way to select the music type.
d. Press the TUNING knob to select the radio station and listen to it.
By Genre -
enables you to choose radio stations according to their content, for example Classic, Rock, Sport, News, etc.
a. Rotate the TUNING knob until the "Genre" is pointed. Then press the TUNING knob.
b. Rotate the TUNING knob to scroll through the list of genre (music types), and press the TUNING knob to select the music type.
c. Use the same way to select the country.
d. Use the same way to select the radio station and listen to it.
By Search station
a. Rotate the TUNING knob until the "Search station" is pointed. Then press the TUNING knob.
b. Rotate the TUNING knob, the display will show the numbers and letters.
c. Input the key word of the radio station name you would like to search for, by rotating the TUNING knob, pressing the BACK, FORWARD buttons to select the letter or number, and press the TUNING knob to input the letter or number. When entering the key, the < symbol = back space the symbol = enter the 'C' symbol = cancel
d. When the key word is typed, set the enter' to be flashing then press the TUNING knob. It will pop out the result of radio stations.
e. Rotate the TUNING knob to select the ratio station and press the TUNING knob to enter the radio station.
By Popular station
a. Rotate the TUNING knob until the "Popular station" is pointed. Then press the TUNING knob.
b. The display will show the most popular radio stations. Rotate the TUNING knob to select the station, then press it to tune into the station.
By New station
a. Rotate the TUNING knob until the "New station" is pointed. Then press the TUNING knob.
b. The display will show the newest listed radio stations. Rotate the TUNING knob to select the station, then press it to tune into the station.
Podcast
(The direction of Podcast is
Main menu > Internet radio > Podcast)
Allows users to navigate to Podcast and listen-again services by location, genre, or by doing a search by alphabets.
- Rotate and press the TUNING knob to navigate to the direction of Main menu Internet radio Podcast.
- After entering the Podcast sub-menu, it will show 3 searching ways of Podcast stations, which are Location, Genre and Alphabets.
- To search by Alphabet, key in the keyword then select enter by rotating and pressing the TUNING knob. Or select clear 'C' to end the Alphabet searching.
My favorite and My added station
The function of my favorite and My added stations allows you to add internet radio stations on Frontier's website and listen to those stations on your radio.
Before the 1^st time you use these 2 functions, please follow the instruction to register the website:
- Rotate the TUNING knob to enter the direction of Main menu>>Internet radio>>Help>>Get access code. The display will show the Access code.
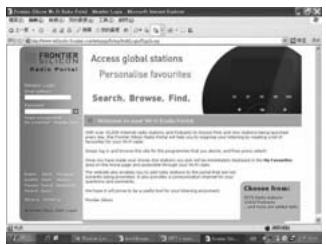
- Visit the website using your computer http://www.wifiradio-frontier.com/then click on "register here" and fill out the form with the access code shown on the display. You can leave blank on "WiFi radio model".
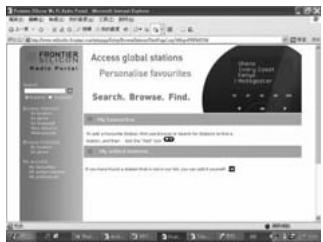
- After the registration, the webpage shows "My favorite" and "My added station" for operating these 2 functions. After this one time registration, every time you would like to use these functions, just go to the website: and enter the email address and password.
A. My favorite
- After log in the website, on the computer, use Browse or Search for stations to find a station, and then click the "Add" icon, and the station is added to My favorite folder.
- Rotate and press the TUNING knob to enter the direction of Main menu>>Internet radio>>My favorites, and the radio display will show the stations that you have added to My favorite from your computer.
- Rotate and press the TUNING knob to enter the station you would like to listen to.
B. My added stations
It allows you to add the internet radio stations while you know the web address of the internet radios.
- After log in the website, on the computer, click on the arrow under My added stations and it will show as below:
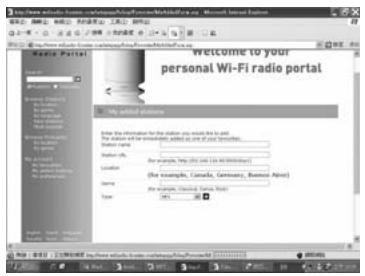
- Fill out the form. Please mind that radio station URL has to be follow the form as described on the webpage.
- Rotate and press the TUNING knob, of the radio, to the direction of Main menu>> Internet radio >> My added stations. And you will see the stations you added on the radio display.
- Rotate and press the TUNING knob to enter the station you would like to listen to.
Listen to the FM Radio
(The direction of Time menu is Main menu > FM)
- Press the POWER button to switch on the radio.
- Press the FM button on the remote control, then go to step 5, or go to the main menu. (If it is not in the main menu, press the BACK button until you see "Main menu", then press the TUNING knob).
- Go to the main menu. (If it is not in the main menu, press the BACK button until you see "Main menu", then press the TUNING knob).
- Rotate the TUNING knob to let the "FM" is pointed, and then press the TUNING button.
- Rotate the TUNING knob to select the FM radio station frequency, then listen to it.
Clock Operation
Setting the time
(The direction of Time menu is
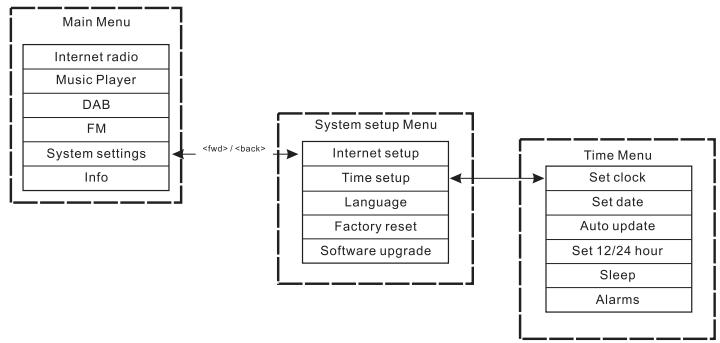
Main menu > System setup > Time setup > Set clock)
- Go into the main menu. (press the BACK button to go to the top menu if it is not under the top menu). Rotate the TUNING knob until the "Main menu" is pointed. Then press the TUNING knob.
- Use the same way to enter the "System setup".
- Use the same way to enter the "Time setup".
- Use the same way to enter the "Set clock".
- Rotate the TUNING knob to set the hour digits.
- Press the TUNING knob and rotate it to set the minute digits.
- Press the TUNING knob then the time is set.
Setting the date
(The direction of Date menu is
Main menu > System setup > Time setup > Set date)
- Rotate the TUNING knob until the "Set date" is pointed. Then press the TUNING knob.
- Rotate the TUNING knob to set the month, then press the TUNING knob.
- Rotate the TUNING knob to set the date, then press the TUNING knob.
- Rotate the TUNING knob to set the year, then press the TUNING knob. Then the date is set.
- You can always start over the menu to the top level by pressing the BACK button.
Auto update (for DAB version)
Auto update menu allows the user to select whether or not the time is to be synchronized with the DAB broadcaster clock. If 'No update' is selected, then the clock remains as manually set by the user.
Set 12/24 hour
(The direction of 12/24 hour menu is
Main menu > System setup > Time setup > Set 12/24 hour)
The Set 12/24 hour menu allows selection of clock display format for either 12 or 24 hour.
- Same way as how to set the time and date: Rotate and press the TUNING knob to enter the Set 12/24 hour, by the direction of Main menu System settings Time setup Set 12/24 hour.
- Rotate the TUNING knob and press it to "Select Set 12 hour" or "Select Set 24 hour".
Sleep timer
(The direction of Sleep menu is
Main menu > System setup > Time setup > Sleep)
Your radio can be set to turn off after a preset time has elapsed. The sleep setting can be adjusted to 15, 30, 45 or 60 minutes.
- Press the TIMER button on the front panel and go to #4. Or, go into the main menu. (press the BACK button to go to the top menu if it is not under the top menu). Rotate the TUNING knob until the "Main menu" is pointed. Then press the TUNING knob.
- Rotate the TUNING knob to let the "System setup" is pointed, then press the TUNING knob.
- Rotate the TUNING knob to let the "Time setup" is pointed, then press the TUNING knob.
- Rotate the TUNING knob to let the "Sleep" is pointed, then press the TUNING knob.
- Rotate the TUNING knob to set the sleep timer time as 15, 30, 45 or 60 minutes, or off. And press the TUNING knob. And it is set.
- To turn off the sleep timer, just select "OFF" under the same menu.
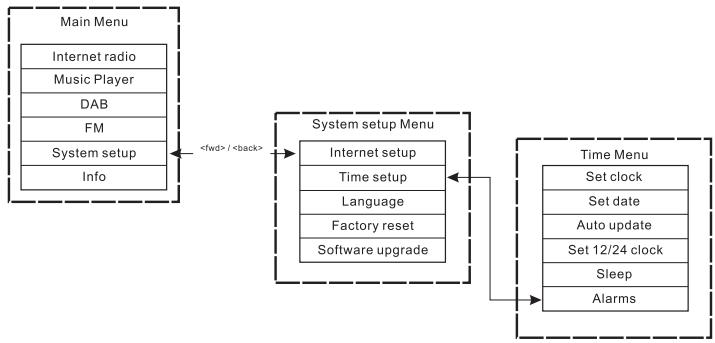
Setting alarms
(The direction of Alarm menu is
Main menu > System setup > Time setup > Alarms)
The radio must have the clock / date set to use the alarm functionality.
- The alarms menu can be accessed in two ways:
i. Press the TIMER button on the unit or the remote control. Then rotate the TUNING knob until you see Alarm 1 and Alarm 2.
ii. As a submenu off the Time menu (Main menu > System setup > Time setup > Alarms)
a. Press the BACK button until you see the "Main menu". Then press the TUNING knob.
b. Rotate the TUNING knob until the "System setup" is pointed, then press the TUNING knob.
c. Rotate the TUNING knob until the "Time setup" is pointed, then press the TUNING knob.
d. Rotate the TUNING knob until the "Alarms" is pointed, then press the TUNING knob.
- When you get into the Alarms menu, the display shows Alarm1 and Alarm 2. There are 2 alarms for setting up. Rotate the TUNING knob to select Alarm 1 or Alarm 2, then press the TUNING knob.
- Set up the alarm time:
a. When the "TIME" is pointed, press the TUNING knob. Then rotate the TUNING knob to set the hour digit.
b. Press the TUNING knob and rotate it to set the minutes. Then press the TUNING knob.
- Turn on the alarm:
a. Rotate the TUNING knob to let the "OFF" is pointed.
b. Press the TUNING knob to let it showing "ON".
- Set the alarm mode (Buzzer, Internet radio, FM, last listed, or Preset)
a. Rotate the TUNING knob to let the "Mode" is pointed. Then press the TUNING knob. Then rotate the TUNING knob to select the "Buzzer", "Internet radio", "or FM". Then press the TUNING knob. Or you can also
b. Rotate the TUNING knob to let the "Last listed" is pointed, and press the TUNING knob. Then select "Last listed or Preset (if Preset is programmed). And then press the TUNING knob.
- Set the alarm Volume:
a. Rotate the TUNING knob to let the "Volume" is pointed, and press the TUNING knob.
b. Rotate the TUNING knob to adjust the alarm volume. Then press the TUNING knob.
- Save the alarm: The settings will not be saved and activated until the 'Save' menu item has been selected. If 'Save' is not selected and the Alarm Setting menu is exited, then any updated values will be lost. Rotate the TUNING knob to let the "Save" is pointed, then press the TUNING knob. Then the alarm is saved and activated.
Turn off the alarm
-
By rotating and pressing the TUNING knob to the direction of Main menu > System setup > Time setup > Alarms.
-
Rotate the TUNING knob to let which alarm you would like to turn off. Then press the TUNING knob.
-
Rotate the TUNING knob to let the "On" is pointed, then press the TUNING knob.
-
Then "OFF" will be shown.
-
Rotate the TUNING knob to let the "Save" is pointed, then press the TUNING knob. Then the alarm is off.
Radio station preset
Presets are available in the following modes:
Internet Radio
DAB
FM
On the remote control, a short press on the numbers is used to recall a preset; a long hold of a key is used to store a preset.
The example below is for DAB:
BBC Radio 5 Live
Preset stored
Preset Set splash screen
If the preset is currently upset, then another splash screen is displayed with 'Preset empty' on the bottom line:
BBC Radio 5 Live
Preset empty
Preset Empty splash screen
In the case of DAB, FM and Internet radio, presets point to a defined service. This is not possible in Music Player mode, which consequently has no presets.
Music player
(Playing music stored in computer)
The Media Player allows you to play audio files which are stored on a computer or a computer on your network.
Your radio supports two file access methods. It can connect to ShardFolders on the network. It can also connect with file server applications using the Universal Plug and Play (UPnP) protocol known as Shared Media.
All of the supported file types are playable in Windows Shares mode. When using a UPnP server, the playable file types are dependant on the server software used. For example, Microsoft Windows Media Player11 can serve MP3, WMA and WAV files. To be able to play the other supported file types via UPnP you may need to install additional third-party software.
When using Windows Shares, music selection is by Artist, by Album and optionally by track within an Album. When using a Shared Media UPnP server, the search and selection criteria are determined by the server, but typically include additional options such as Genre. Many server applications also allow you to access files according to the folders within which they are stored.
Shared Folders Setup
Computer:
Configuring a shared drive
Setting up your Windows PC to allow the radio to access your audio files via Windows Shares.
- Ensure that your PC is available on the same network as your Internet radio. Using Windows Explorer, locate the folder where your audio files are stored.
- Right click on the folder.
- Select 'Properties'.
- Click on 'Sharing'.
- Select 'Share this folder on the network' and 'Allow network users to change my files'.
Wi-Fi Radio:
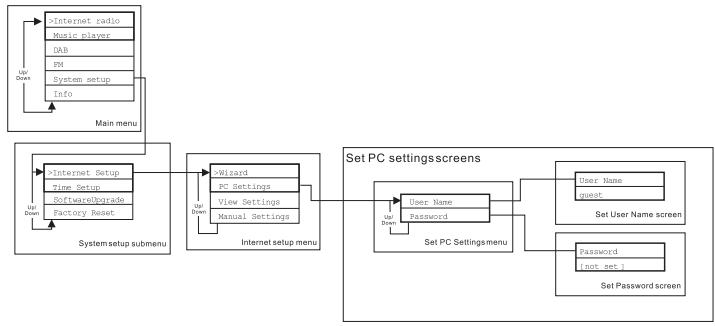
username and password for PC if one has been set After the shared folders are set on the PC, set up the radio so that it knows the username and password (if one has been set) for the shared folder on the PC. The direction is shown in the figure below:
Locate the audio file of Shared Folders using the radio
- Turn on the radio. Press the BACK button and use the TUNING knob to access the Main menu, and under the main menu, access the Shared folders.
- It will show all the names of computers on the network. Rotate and press the TUNING knob to select the computer. If the computer's security setting is required, the radio may ask for a user name and password.
- The radio will show all the shared folders. Rotate and press the TUNING knob to select the folder and music you should like to listen to.
- When the music is playing, use the BACK and FORWARD buttons to select next/previous track, press STOP button to stop the playing.
- To go back to the previous menu, rotate the TUNING knob and press the BACK button.
Shared Media (UPnP) Set up
Shard Media uses Windows Media Player (WMP) 11 and above as media server. This mode does not require any setting in the radio, but the PC needs to be configured to allow the radio access to the media. You will only have to do it once, following the next steps.
- If your PC is running Microsoft Windows XP or Windows Vista then you can use Microsoft's Windows Media Player 11 (WMP 11) to act as your UPnP (Universal Plug and Play) media server. If not already installed on your PC, Windows Media Player 11 may be downloaded from Microsoft's website and installed it, or by using Microsoft's Windows Update facility.
- Once installed, WMP 11 can create a library from all the media files available to it on your PC. To add new media files to the library, select 'File > Add to Library... > Advanced Options', click 'Add' and choose the files you wish to add and click 'OK'.
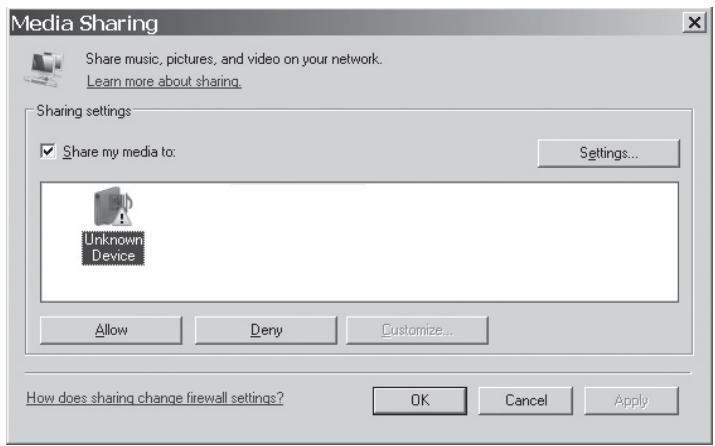
The Internet radio is presented as an "Unknown Device".
Make sure that the device has access to the shared media by selecting it and clicking
The PC is now ready to stream the music to the radio.
GB
Locate the audio file of Shared Media(UPnP) using the radio. Once the Shared Media (UPnP) server has been configured to share media files with your Internet radio, you select the files that you will play as follows:
- Turn on the radio. Press the BACK button and use the TUNING knob to access the Main menu, and under the main menu, access the Shared Media.
- It will show all the names of computers on the network. Rotate and press the TUNING knob to select the computer. If the computer's security setting is required, the radio may ask for a user name and password.
- The radio will now list the media categories which are made available by the UPnP server - for example, 'Music' and 'Playlists'.
- Rotate and press the TUNING knob repeatedly to select the media files that you wish to play.
- When the music is playing, use the BACK and FORWARD buttons to select next/previous track, press STOP button to stop the playing.
- To go back to the previous menu, rotate the TUNING knob and press the BACK button.
Note:
In Shared Media (UPnP) mode the search criteria offered and the file types made available to the radio are a function of the UPnP server software installed on your PC.
Media selection
Whether you access your files using Windows Shares or using Shared Media(UPnP), the file selection mechanisms are the same. The only difference between the two methods is that when using Shared Media (UPnP) you will generally have a wider choice of search criteria, as determined by the Shared Media (UPnP) server software on your computer. Some third party server applications allow customization of the search criteria and indexing methods, which can be useful if you have a very large collection of stored music files.
The selection mechanism allows you to search by a given information type (Album, Artist, etc.) and then to narrow the search, either just to an album or to a particular track within an album. The selected album or track is then added to a queue of tracks to be played. You can add more albums or tracks to the queue while music is playing, or you can jump between tracks in the queue. You can also clear the queue if you wish to make a fresh selection. The searches described here are examples of the possibilities available.
Internet Software Upgrade
There are two mechanisms to upgrade the radio.
Upgrade via Internet
The main one, and the only one available though the menu system is the Internet Software Upgrade. To access this feature:
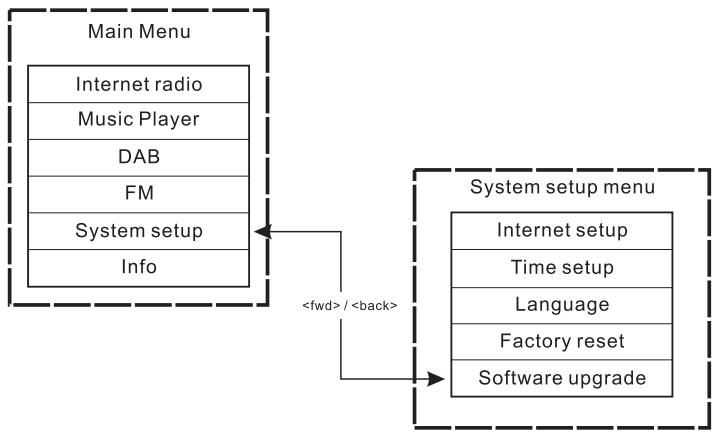
- Rotate and press the TUNING knob to navigate to the Software upgrade option in the menu. The direction is:
Main Menu System setup Software upgrade
If there is a newer version of software available, the user will be asked to confirm the upgrade. Once the process is initiated, a progress bar will show in the display and a splash screen displayed periodically will remind the user not to remove power. This is very important in order to keep the radio operational. If the radio lost power during the upgrade, it may restart automatically in USB upgrade mode.
Once the process completes, the user is presented with the result (either upgrade successful or failed). If successful, pressing
Note:
After a software upgrade all the user settings are preserved.
Upgrade via USB
A user may choose to use this method instead of Internet Software Upgrade if a network connection is not available or the power was removed from the radio during Internet software upgrade, the radio needs to have an upgradeable binary within the Flash and you need an upgrade.exe for the binary.
You also need a cable to connect the radio to a PC. Not all releases are provided with suitable .exe upgrade files.
It is important that the USB cable should only be connected during the actual upgrade, and should be removed once the upgrade is complete.
- Start the upgrade.exe utility on the PC.
- Utility will ask you to run the Software upgrade wizard on the Wi-Fi radio.
- If the radio is not yet in upgrade mode (showing the text "Waiting for PC wizard..."), enter the Software upgrade mode by removing the power, then holding down the keys
and while turning the radio on again. - The upgrade will automatically start and takes approximately 2 minutes. Upon completion, the radio will automatically reboot and load the new software.
Factory reset
(The direction of Factory reset is
Main menu > System setup > Factory reset)
If you wish to completely reset your radio to its initial state this may be performed by following this procedure.
- Turn on the radio by pressing the POWER button.
- Rotate and press the TUNING knob to enter the sub-menu of Factory reset. The direction is Main menu > System setup > Factory reset.
- After entering the Factory reset, and press SELECT to confirm rest. Then press the TUNING knob. And the display will show "Restarting" for several seconds.
- When the display shows "Welcome to Internet radio", the Factory reset is done.
Radio Information
Under the sub-menu "Info", you can check the radio software version and radio ID. Rotate and press the TUNING knob to navigate the direction of Main menu >Info> and the display will show "SW version", and "Radio ID". Enter either of them to check the information.
Troubleshooting - connecting to an internet station

Radio attempts to connect the wifinetetwork (Connecting.)
PossibleCause
Checklist

Radio attempts to connect to internet portal to get internet radio listings [Please Wait] [Loading...]

Show Internet radio topLevelmenu
My Favourites.
Stations
Podcast
My Added Stations
User selects a station to be played
Radio attempts to connect to the interradio
[Connecting...]

Radio attempts to play the radio stream [Loading]

[Playing]

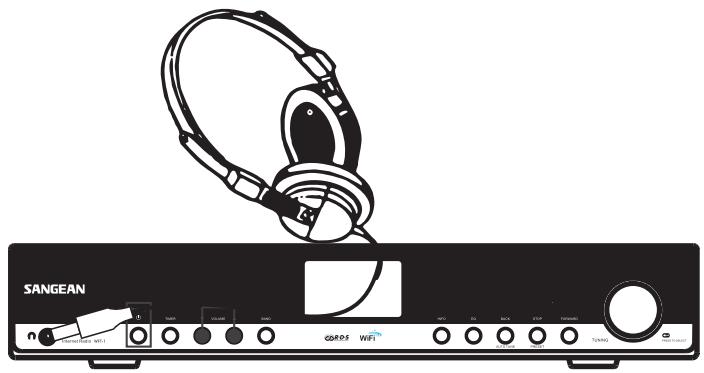
Headphone socket
A 3.5mm Headphone Socket located on the front of your radio is provided for use with headphones.
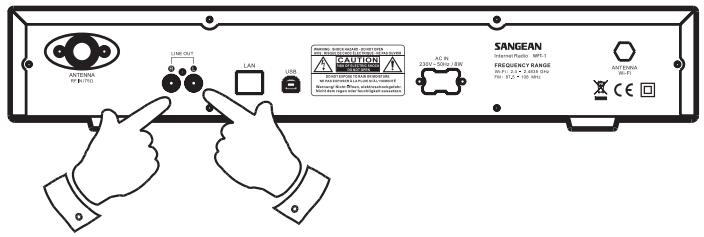
Line out socket (3.5mm Jack)
A3.5mm Line Out socket located on the rear of your radio is provided for connecting the audio signal to an external amplifier. Set the volume control on the radio to minimum if desired.
Specification
Power: AC 230 volts, 50 Hz, or AC 110 volts, 60 Hz. 8 Watts.
Connectivity Wired Ethernet Wi-Fi 10/100M bits/sec via
RJ-45 802.11b and 802.11g supported WEP and WPA
encryption supported. 2.4-2.4835 GHz
If at any time in the future you should need to dispose of this product please note that: Waste electrical products should not be disposed of with household waste. Please recycle where facilities exist. Check with your Local Authority or retailer for recycling advice. (Waste Electrical and Electronic Equipment Directive)
GB
Sommaire
Radio attempts to connect the wifinetetwork (Connecting.)
PossibleCause
Checklist

Radio attempts to connect to internet portal to get internetradio listings [Please Wait] [Loading...]

Show Internet radio top-levelmenu
My Favourites
Stations.
Podcast
My Added Stations
User selects a station to be played
Radio attempts to connect to the interradio
[Connecting...]

Radio attempts to play the radio stream [Loading...]

[Playing]

F
Specifications techniques
Alimentation: CA 230volts, 50Hz, ou CA110volts, 60Hz. 8Walts.
Connectivite Connecteur Ethernet Wi-Fi 10/100M bits/sec via
A. My favorite (Mi favorites)
Internet Software Upgrade
Upgrade via Internet
Radio attempts to connect the wifinetetwork (Connecting.)
PossibleCause
Checklist

Radio attempts to connect to internet portal to get internet radio listings [Please Wait] [Loading...]

Show Internet radio topevelmenu
My Favourites
Stations
Podcast
My Added Stations
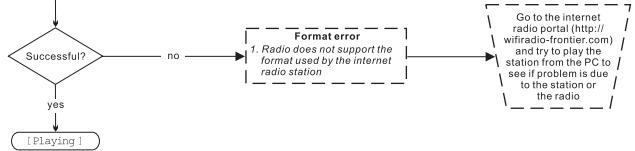
User selects a station to be played
Radio attempts to connect to the interradio
[Connecting...]

Radio attempts to play the radio stream [Loading...]

NL
110
Verbindingen Wired Ethernet Wi-Fi 10/100M bits/sec via RJ-45 802.11b
en 802.11g WEP en WPA ecn cryptie ondersteund 2.4-2.4835GHz