
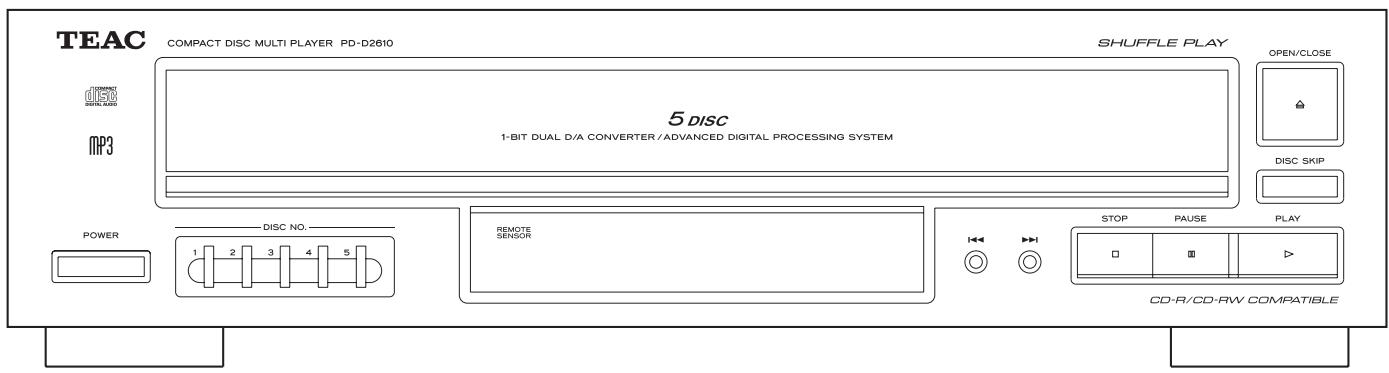
PD-D2610 - CD Player TEAC - Free user manual and instructions
Find the device manual for free PD-D2610 TEAC in PDF.
| Product type | 5-disc CD changer |
| Brand | TEAC |
| Model | PD-D2610 |
| Dimensions (W x H x D) | 435 x 115 x 390 mm |
| Net weight | 6.2 kg |
| Power supply | 230 V~ 50 Hz (Europe) / 120 V~ 60 Hz (USA/Canada) |
| Power consumption | 12 W |
| Supported formats | CD audio, CD-R, CD-RW, MP3 (CD) |
| Number of discs | 5 (carousel) |
| Laser pickup | 3-beam |
| D/A converter | 1-bit dual linear |
| Digital filter | 4x oversampling |
| Frequency response | 20 Hz - 20 kHz ±2 dB |
| Total harmonic distortion | Less than 0.02% (1 kHz) |
| Signal-to-noise ratio | Greater than 100 dB |
| Channel separation | Greater than 85 dB (1 kHz) |
| Analog output | 2.1 Vrms (RCA) - L/R channels |
| Digital output | Coaxial (RCA) and optical (TOSLINK) |
| Playback modes | Normal, programmed (up to 32 tracks), random, repeat (1 track, all, program), intro (10s) |
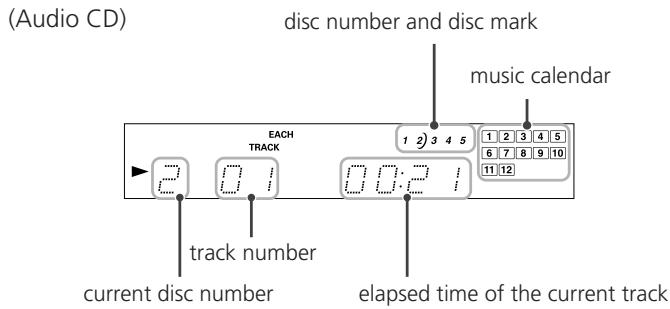
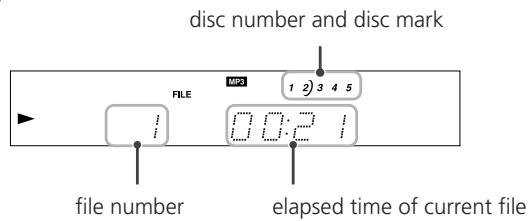
| Display | Music calendar, track numbers/elapsed/remaining time |
| Supplied accessories | RCA cable (1x), remote control RC-1122, AA batteries (2x), user manual, warranty card |
| Operating temperature | +5 °C to +35 °C |
| Operating humidity | 5% to 85% (no condensation) |
Frequently Asked Questions - PD-D2610 TEAC
User questions about PD-D2610 TEAC
0 question about this device. Answer the ones you know or ask your own.
Ask a new question about this device
Download the instructions for your CD Player in PDF format for free! Find your manual PD-D2610 - TEAC and take your electronic device back in hand. On this page are published all the documents necessary for the use of your device. PD-D2610 by TEAC.
USER MANUAL PD-D2610 TEAC
Compact Disc Changer
OWNER'S MANUAL
MANUEL DU PROPRIÉTAIRE
MANUAL DEL USUARIO

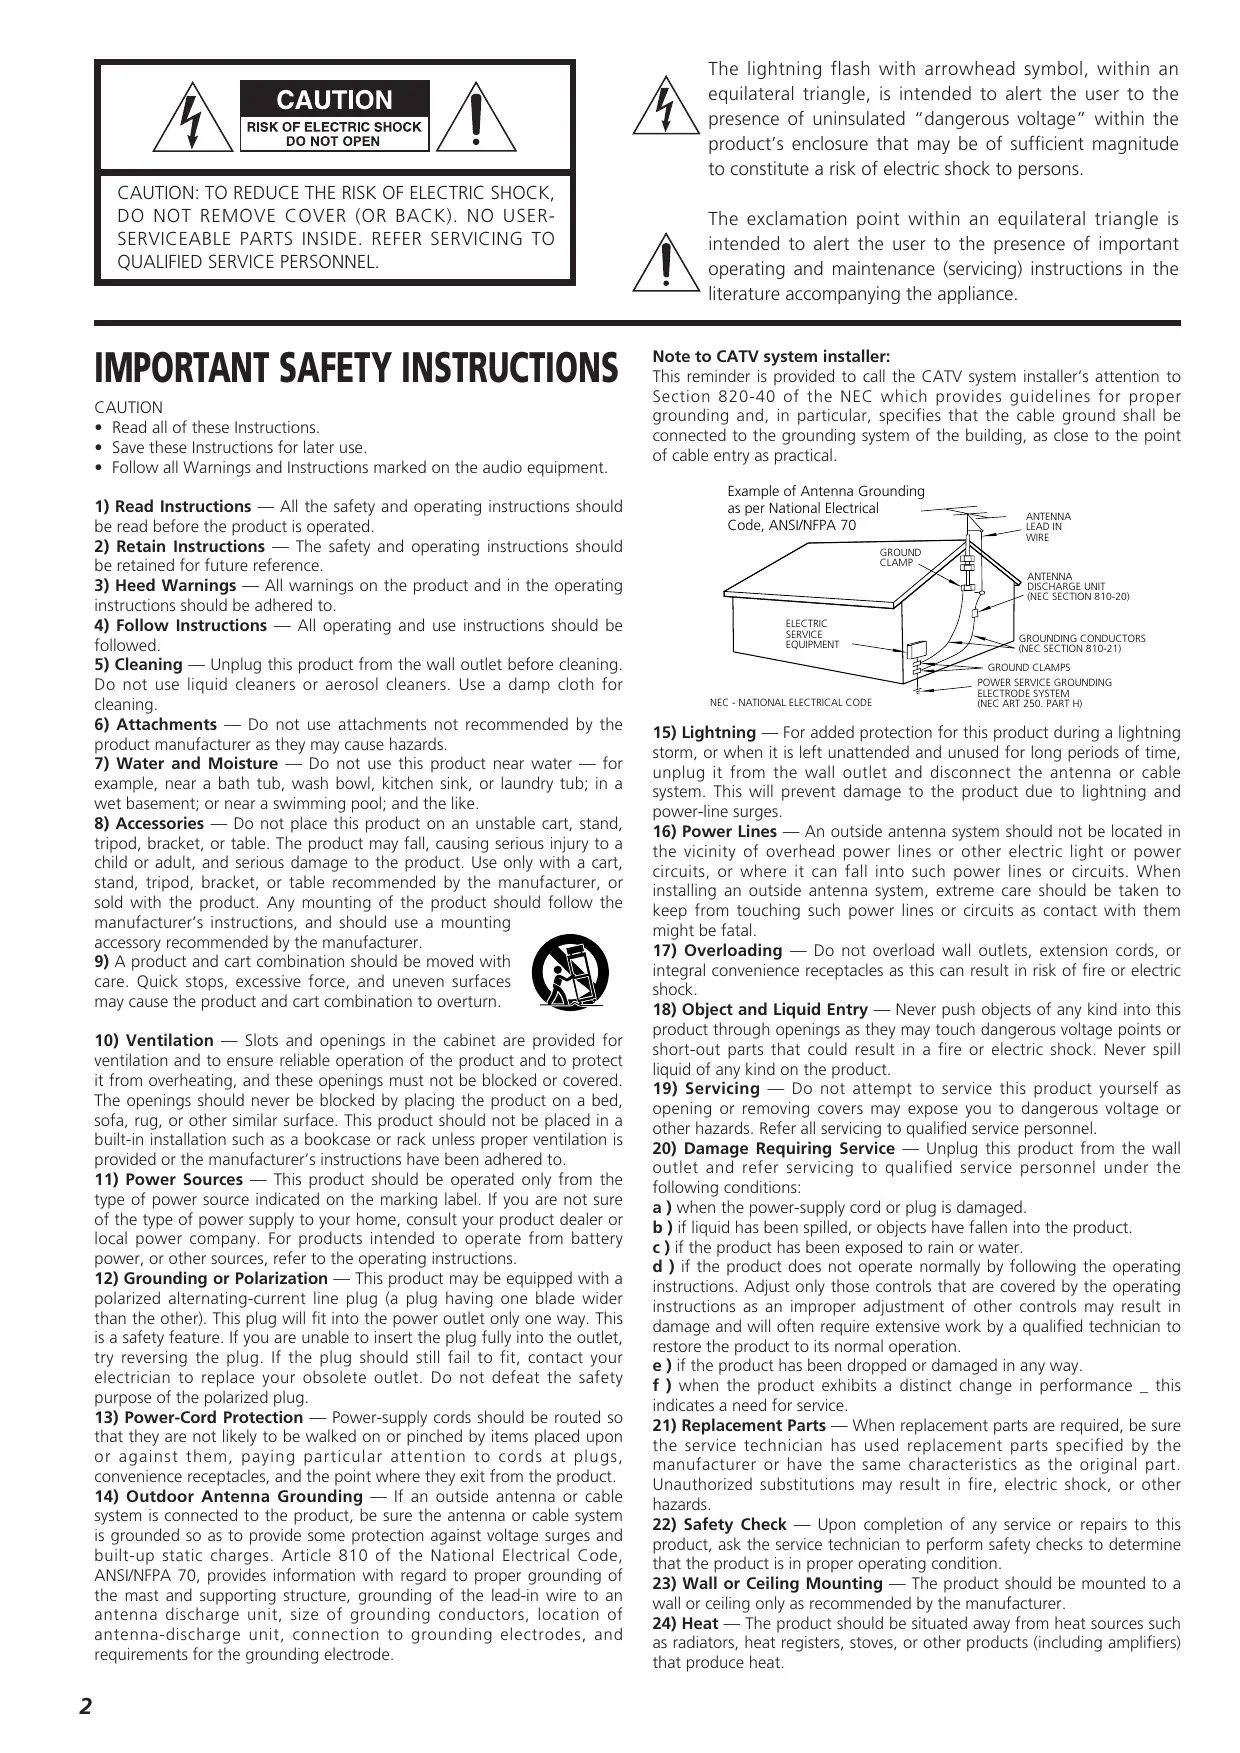
CAUTION: TO REDUCE THE RISK OF ELECTRIC SHOCK, DO NOT REMOVE COVER (OR BACK). NO USER- SERVICEABLE PARTS INSIDE. REFER SERVICING TO QUALIFIED SERVICE PERSONNEL.
IMPORTANT SAFETY INSTRUCTIONS
CAUTION
- Read all of these Instructions.
- Save these Instructions for later use.
- Follow allWarnings and Instructions marked on the audio equipment.
1) Read Instructions — All the safety and operating instructions should be read before the product is operated.
2) Retain Instructions — The safety and operating instructions should be retained for future reference.
3) HeedWarnings — All warnings on the product and in the operating instructions should be adhered to.
4) Follow Instructions — All operating and use instructions should be followed.
5) Cleaning — Unplug this product from the wall outlet before cleaning. Do not use liquid cleaners or aerosol cleaners. Use a damp cloth for cleaning.
6) Attachments — Do not use attachments not recommended by the product manufacturer as they may cause hazards.
7) Water and Moisture — Do not use this product near water — for example, near a bath tub, wash bowl, kitchen sink, or laundry tub; in a wet basement; or near a swimming pool; and the like.
8) Accessories — Do not place this product on an unstable cart, stand, tripod, bracket, or table. The product may fall, causing serious injury to a child or adult, and serious damage to the product. Use only with a cart, stand, tripod, bracket, or table recommended by the manufacturer, or sold with the product. Any mounting of the product should follow the manufacturer's instructions, and should use a mounting accessory recommended by the manufacturer.
9) A product and cart combination should be moved with care. Quick stops, excessive force, and uneven surfaces may cause the product and cart combination to overturn.
10) Ventilation — Slots and openings in the cabinet are provided for ventilation and to ensure reliable operation of the product and to protect it from overheating, and these openings must not be blocked or covered. The openings should never be blocked by placing the product on a bed, sofa, rug, or other similar surface. This product should not be placed in a built-in installation such as a bookcase or rack unless proper ventilation is provided or the manufacturer's instructions have been adhered to.
11) Power Sources — This product should be operated only from the type of power source indicated on the marking label. If you are not sure of the type of power supply to your home, consult your product dealer or local power company. For products intended to operate from battery power, or other sources, refer to the operating instructions.
12) Grounding or Polarization — This product may be equipped with a polarized alternating-current line plug (a plug having one blade wider than the other). This plug will fit into the power outlet only one way. This is a safety feature. If you are unable to insert the plug fully into the outlet, try reversing the plug. If the plug should still fail to fit, contact your electrician to replace your obsolete outlet. Do not defeat the safety purpose of the polarized plug.
13) Power-Cord Protection — Power-supply cords should be routed so that they are not likely to be walked on or pinched by items placed upon or against them, paying particular attention to cords at plugs, convenience receptacles, and the point where they exit from the product.
14) Outdoor Antenna Grounding — If an outside antenna or cable system is connected to the product, be sure the antenna or cable system is grounded so as to provide some protection against voltage surges and built-up static charges. Article 810 of the National Electrical Code, ANSI/NFPA 70, provides information with regard to proper grounding of the mast and supporting structure, grounding of the lead-in wire to an antenna discharge unit, size of grounding conductors, location of antenna-discharge unit, connection to grounding electrodes, and requirements for the grounding electrode.
Note to CATV system installer:
This reminder is provided to call the CATV system installer's attention to Section 820-40 of the NEC which provides guidelines for proper grounding and, in particular, specifies that the cable ground shall be connected to the grounding system of the building, as close to the point of cable entry as practical.
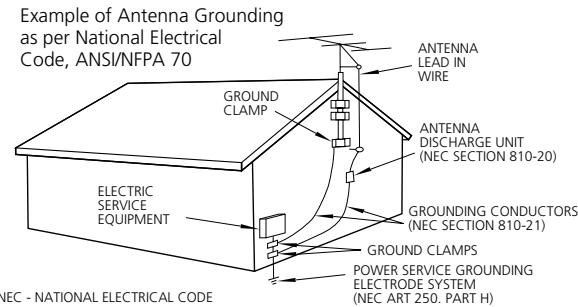
15) Lightning — For added protection for this product during a lightning storm, or when it is left unattended and unused for long periods of time, unplug it from the wall outlet and disconnect the antenna or cable system. This will prevent damage to the product due to lightning and power-line surges.
16) Power Lines — An outside antenna system should not be located in the vicinity of overhead power lines or other electric light or power circuits, or where it can fall into such power lines or circuits. When installing an outside antenna system, extreme care should be taken to keep from touching such power lines or circuits as contact with them might be fatal.
17) Overloading — Do not overload wall outlets, extension cords, or integral convenience receptacles as this can result in risk of fire or electric shock.
18) Object and Liquid Entry — Never push objects of any kind into this product through openings as they may touch dangerous voltage points or short-out parts that could result in a fire or electric shock. Never spill liquid of any kind on the product.
19) Servicing — Do not attempt to service this product yourself as opening or removing covers may expose you to dangerous voltage or other hazards. Refer all servicing to qualified service personnel.
20) Damage Requiring Service — Unplug this product from the wall outlet and refer servicing to qualified service personnel under the following conditions:
a) when the power-supply cord or plug is damaged.
b) if liquid has been spilled, or objects have fallen into the product.
c) if the product has been exposed to rain or water.
d) if the product does not operate normally by following the operating instructions. Adjust only those controls that are covered by the operating instructions as an improper adjustment of other controls may result in damage and will often require extensive work by a qualified technician to restore the product to its normal operation.
e) if the product has been dropped or damaged in any way.
f) when the product exhibits a distinct change in performance _ this indicates a need for service.
21) Replacement Parts — When replacement parts are required, be sure the service technician has used replacement parts specified by the manufacturer or have the same characteristics as the original part. Unauthorized substitutions may result in fire, electric shock, or other hazards.
22) Safety Check — Upon completion of any service or repairs to this product, ask the service technician to perform safety checks to determine that the product is in proper operating condition.
23) Wall or Ceiling Mounting — The product should be mounted to a wall or ceiling only as recommended by the manufacturer.
24) Heat — The product should be situated away from heat sources such as radiators, heat registers, stoves, or other products (including amplifiers) that produce heat.
- Do not expose this apparatus to drips or splashes.
- Do not place any objects filled with liquids, such as vases, on the apparatus.
- Do not install this apparatus in a confined space such as a book case or similar unit.
- The apparatus draws nominal non-operating power from the AC outlet with its POWER switch in the off position.
- The apparatus should be located close enough to the AC outlet so that you can easily grasp the power cord plug at any time.
- An apparatus with Class I construction shall be connected to an AC outlet with a protective grounding connection.
- Batteries (battery pack or batteries installed) shall not be exposed to excessive heat such as sunshine, fire or the like.
WARNING: TO PREVENT FIRE OR SHOCK HAZARD, DO NOT EXPOSE THIS APPLIANCE TO RAIN OR MOISTURE.
CAUTION
- DO NOT REMOVE THE EXTERNAL CASES OR CABINETS TO EXPOSE THE ELECTRONICS. NO USER SERVICEABLE PARTS ARE WITHIN!
- IF YOU ARE EXPERIENCING PROBLEMS WITH THIS PRODUCT, CONTACT TEAC FOR A SERVICE REFERRAL. DO NOT USE THE PRODUCT UNTIL IT HAS BEEN REPAIRED.
- USE OF CONTROLS OR ADJUSTMENTS OR PERFORMANCE OF PROCEDURES OTHER THAN THOSE SPECIFIED HEREIN MAY RESULT IN HAZARDOUS RADIATION EXPOSURE.
For CANADA
AC POWER CORD CONNECTION
CAUTION: TO PREVENT ELECTRIC SHOCK, MATCH WIDE BLADE OF PLUG TO WIDE SLOT, FULLY INSERT.
Pour le CANADA
CORDE DE CONNEXION CA
ATTENTION:
POUR ÉVITER LES CHOCS ÉLECTRIQUES, INTRODUIRE LA LAME LA PLUS LARGE DE LA FICHE DANS LA BORNE CORRESPONDANTE DE LA PRESE ET POUSSER JUSQU'AU FOND.
For U.S.A.
This equipment has been tested and found to comply with the limits for a Class B digital device, pursuant to Part 15 of the FCC Rules. These limits are designed to provide reasonable protection against harmful interference in a residential installation. This equipment generates, uses, and can radiate radio frequency energy and, if not installed and used in accordance with the instructions, may cause harmful interference to radio communications. However, there is no guarantee that interference will not occur in a particular installation. If this equipment does cause harmful interference to radio or television reception, which can be determined by turning the equipment off and on, the user is encouraged to try to correct the interference by one or more of the following measures:
- Reorient or relocate the equipment and/or the receiving antenna.
- Increase the separation between the equipment and receiver.
- Connect the equipment into an outlet on a circuit different from that to which the receiver is connected.
- Consult the dealer or an experienced radio/TV technician for help.
CAUTION
Changes or modifications to this equipment not expressly approved by TEAC CORPORATION for compliance will void the user's warranty.
This product has been designed and manufactured according to FDA regulations "title 21, CFR, chapter 1, subchapter J, based on the Radiation Control for Health and Safety Act of 1968", and is classified as class 1 laser product. There is not hazardous invisible laser radiation during operation because invisible laser radiation emitted inside of this product is completely confined in the protective housings.
The label required in this regulation is shown ①.
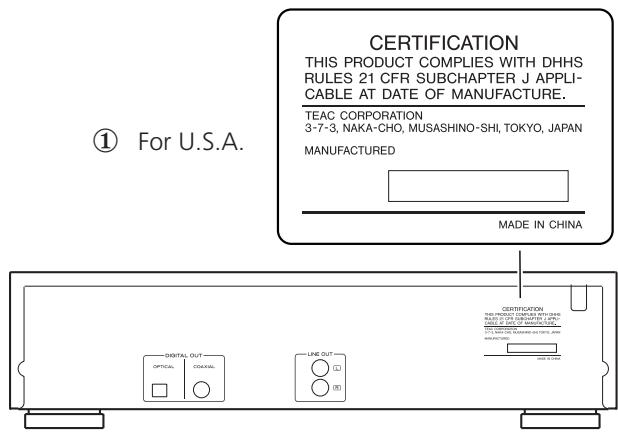
Optical pickup:
Type SF-P101NXR
Manufacturer : SANYO Electric Co . Ltd
Laser output : Less than 0.5 mW on the objective lens
Wavelength : 765 - 815 nm
Contents
Thank you for choosing TEAC. Read this manual carefully to get the best performance from this unit.
Important Safety Instructions 2
Before Use 4
Discs. 5
Name and Function. 6
Remote Control Unit. 7
Connection. 8
Playback 9
RepeatPlayback 11
ShufflePlayback 11
ProgramedPlayback 12
Intro Check. 13
Time Display 14
Troubleshooting 15
Specifications 15
Before Use
Read this before operation
- As the unit may become warm during operation, always leaves sufficient space around the unit for ventilation.
- The voltage supplied to the unit should match the voltage as printed on the rear panel. If you are in any doubt regarding this matter, consult an electrician.
- Choose the installation location of your unit carefully. Avoid placing it in direct sunlight or close to a source of heat. Also avoid locations subject to vibrations and excessive dust, heat, cold or moisture.
- Do not place the unit on the amplifier/receiver.
- Do not open the cabinet as this might result in damage to the circuitry or electrical shock. If a foreign object should get into the unit, contact your dealer or service company.
- When removing the power plug from the wall outlet, always pull directly on the plug, never yank the cord.
- To keep the laser pickup clean, do not touch it, and always close the disc tray.
- Do not attempt to clean the unit with chemical solvents as this might damage the finish. Use a clean, dry cloth.
- Keep this manual in a safe place for future reference.
DO NOT MOVE THE UNIT DURING PLAYBACK
During playback, the disc rotates at high speed. Do NOT lift or move the unit during playback. Doing so may damage the disc or the unit.
WHEN MOVING THIS UNIT
When changing places of installation or packing the unit for moving, be sure to remove the disc and return the disc tray to its closed position in the player. Then, press the power switch to turn the power off, and disconnect the power cord. Moving this unit with the disc loaded may result in damage to this unit.
Beware of condensation
When the unit (or a disc) is moved from a cold to a warm place, or used after a sudden temperature change, there is a danger of condensation; vapor in the air could condense on the internal mechanism, making correct operation impossible. To prevent this, or if this occurs, leave the unit for one or two hours with the power turned on. Then the unit will stabilize at the temperature of its surroundings.
Maintenance
If the surface of the unit gets dirty, wipe with a soft cloth or use diluted neutral cleaning liquid. Be sure to remove any fluid completely. Do not use thinner, benzine or alcohol as they may damage the surface of the unit.
Discs which can be played on this unit:
- Conventional audio CDs bearing the COMPACT DISC DIGITAL AUDIO logo on the label:

- Properly finalized CD-R and CD-RW discs
- MP3 CDs
Note:
- Depending on the quality of the disc and/or the condition of the recording, some CD-R/CD-RW discs may not be playable.
- Copy-protected discs and other discs that do not conform to the CD standard may not play back correctly in this player. If you use such discs in this unit, TEAC Corporation and its subsidiaries cannot be responsible for any consequences or guarantee the quality of reproduction. If you experience problems with such non-standard discs, you should contact the producers of the disc.
- Always place the disc on the disc tray with the label side up. (Compact discs can be played or recorded only on one side.)
- To remove a disc from its storage case, press down on the center of the case and lift the disc out, holding it carefully by the edges.
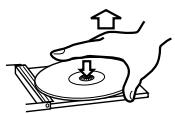
How to remove the disc

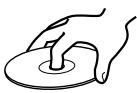
How to hold the disc
- Should the disc become dirty, wipe the surface radially (from the center hole outward towards the outer edge) with a soft, dry cloth:
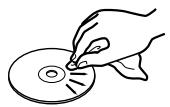
- Never use such chemicals as record sprays, antistatic sprays or fluid, benzine or thinner to clean the discs. Such chemicals will do irreparable damage to the disc's plastic surface.
- Discs should be returned to their cases after use to avoid dust and scratches that could cause the laser pickup to "skip."
- Do not expose discs to direct sunlight or high humidity and temperature for extended periods. Long exposure to high temperatures will warp the disc.
- Do not play any disc that is warped, deformed or damaged. Playing such discs may cause irreparable harm to the playing mechanisms.
-
CD-R and CD-RW discs are more sensitive to the effects of heat and ultraviolet rays than ordinary CDs. It is important that they are not stored in a location where direct sunlight will fall on them, and away from sources of heat such as radiators or heat-generating electrical devices.
-
Printable CD-R and CD-RW discs aren't recommended, as the label side might be sticky and damage the unit.
- Do not stick papers or protective sheets on the discs and do not use any protective coating spray.
- Use a soft oil-based felt-tipped pen to write the information on the label side. Never use a ball-point or hard-tipped pen, as this may cause damage to the recorded side.
- Never use a stabilizer. Using commercially available CD stabilizers with this unit will damage the mechanisms and cause them to malfunction.
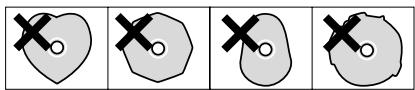
- Do not use CDs with an irregular shape (octagonal, heart shaped, business card size, etc.). CDs of this sort can damage the unit:
- If you are in any doubt as to the care and handling of a CD-R/CD-RW disc, read the precautions supplied with the disc, or contact the disc manufacturer directly.
MP3 files
- This unit can play MP3 files recorded on a CD-R or CD-RW.
- File names of MP3 should be alphanumeric characters. This unit cannot display symbols and full-size or double-byte characters (such as Japanese, Chinese, etc.) correctly. Also, be sure to use the file extension. (.mp3")
- MP3 files are monaural or stereo MPEG-1 Audio Layer 3 format. This unit can play MP3 files with sampling frequency 44.1kHz or 48kHz , bit-rate 320kbps or less.
- The disc must be finalized in order to play.
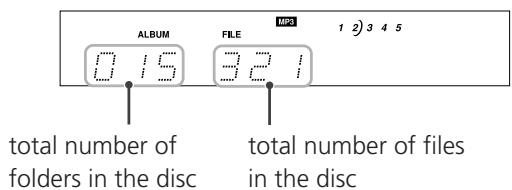
The CD-ROM must be ISO 9660 compatible. - When more than 512 files (including folders) are recorded on the disc, the unit might not be able to play it correctly.
- When a MP3 disc is loaded, it may take several minutes until the unit can start to play depending on the numbers of recorded files or the complexity of the folder tree.
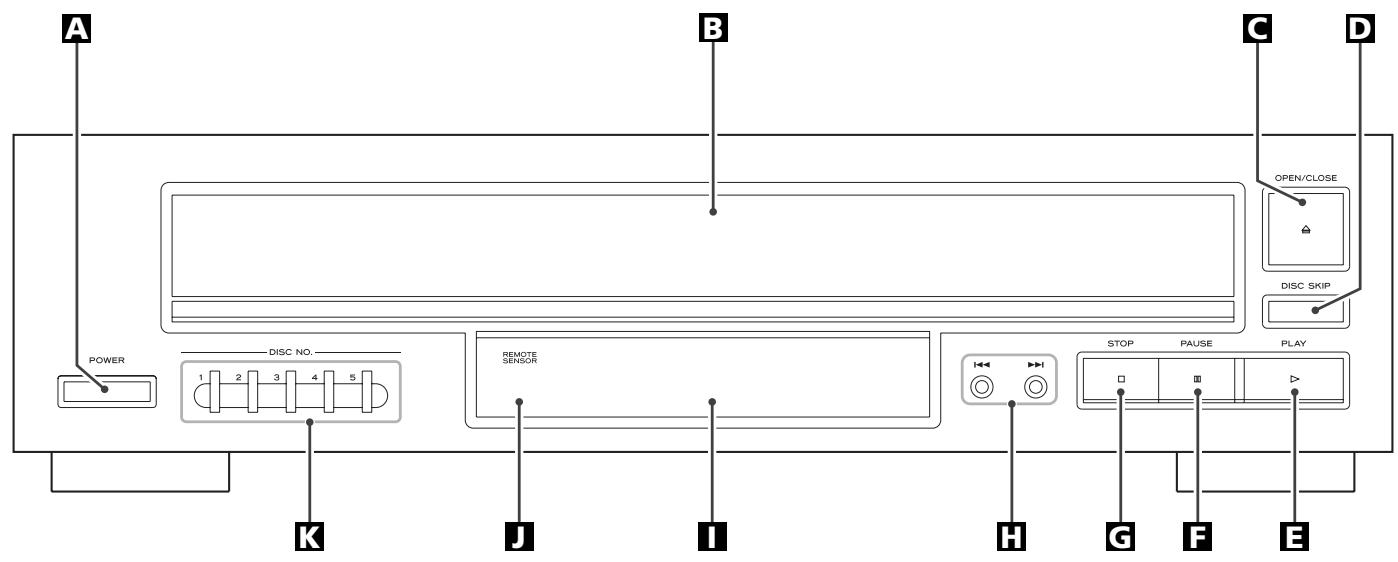
A POWER
Press this button to turn the unit on or off.
The equipment draws nominal non-operating power from the AC outlet with its POWER switch in the OFF position.
B Disc tray
C OPEN/CLOSE
Use this button to open and close the disc tray.
DISC SKIP
Use this button to skip discs.
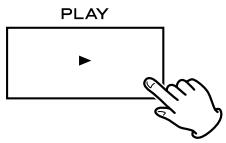
PLAY
Use this button to start playback.
FAUSE (II)
Use this button to pause playback.
STOP
Use this button to stop playback.
Skip/Search buttons
Use these buttons to skip or search tracks.
Display
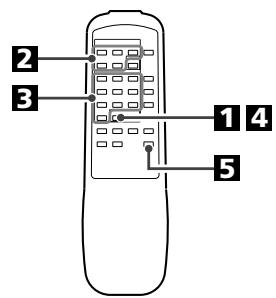
Remote Sensor
When operating the remote control unit, point it towards the remote sensor.
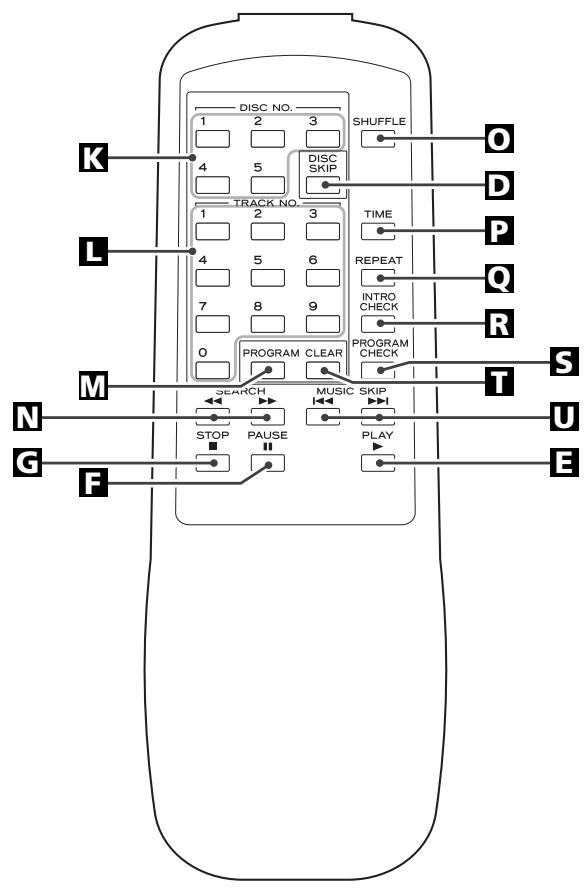
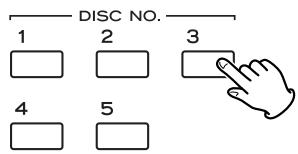
DISC NO.
Use these buttons to select a disc.
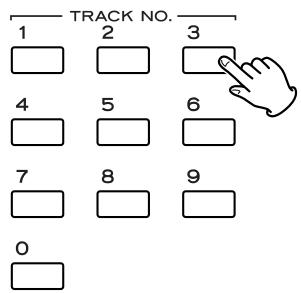
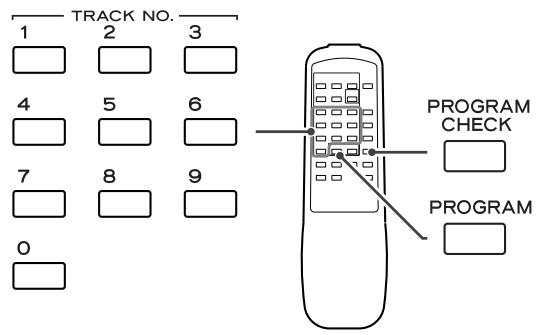
L TRACK NO.
Use these buttons to select a track number. For instance, to select track number 35, press "3" and "5".
PROGRAM
Use this button to enter the program mode. In program mode, use this button to enter selections.
N SEARCH (←/▶)
During playback, use these buttons to search the part you want to listen to.
SHUFFLE
Use this button for shuffle playback.
TIME
During playback, use this button to change the time display.
Q REPEAT
Use this button to select repeat modes.
INTRO CHECK
Use this button to start the intro check playing.
PROGRAM CHECK
Use this button to check programed contents.
T CLEAR
Use this button to clear a program.
USKIP(1i)
Use these buttons to skip tracks.
The provided Remote Control Unit allows the unit to be operated from a distance.
When operating the remote control unit, point it towards the REMOTE SENSOR on the front panel of the unit.
- Even if the remote control unit is operated within the effective range, remote control operation may be impossible if there are any obstacles between the unit and the remote control.
- If the remote control unit is operated near other appliances which generate infrared rays, or if other remote control devices using infrared rays are used near the unit, it may operate incorrectly. Conversely, the other appliances may operate incorrectly.
Battery Installation
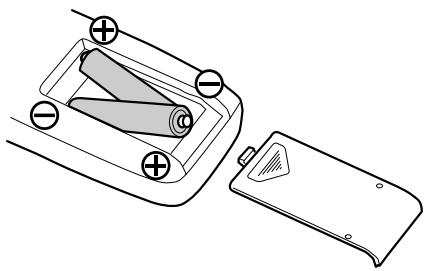
- Remove the battery compartment cover.
- Insert two "AA" dry batteries. Make sure that the batteries are inserted with their positive “⊕” and negative “ ” poles positioned correctly.
- Close the cover.
Battery Replacement
If the distance required between the remote control unit and main unit decreases, the batteries are exhausted. In this case replace the batteries with new ones.
Precautions concerning batteries
- Be sure to insert the batteries with correct positive “⊕” and negative “ ” polarities.
- Use batteries of the same type. Never use different types of batteries together.
- Rechargeable and non-rechargeable batteries can be used. Refer to the precautions on their labels.
- When the remote control unit is not to be used for a long time (more than a month), remove the batteries from the remote control unit to prevent them from leaking. If they leak, wipe away the liquid inside the battery compartment and replace the batteries with new ones.
- Do not heat or disassemble batteries and never dispose of old batteries by throwing them in a fire.
CAUTION:
- Switch off the power to all equipment before making connections.
- Read the instructions of each component you intend to use with this unit.
- Be sure to insert each plug securely. To prevent hum and noise, avoid bundling the signal interconnection cables together with the AC power cord or speaker cables.
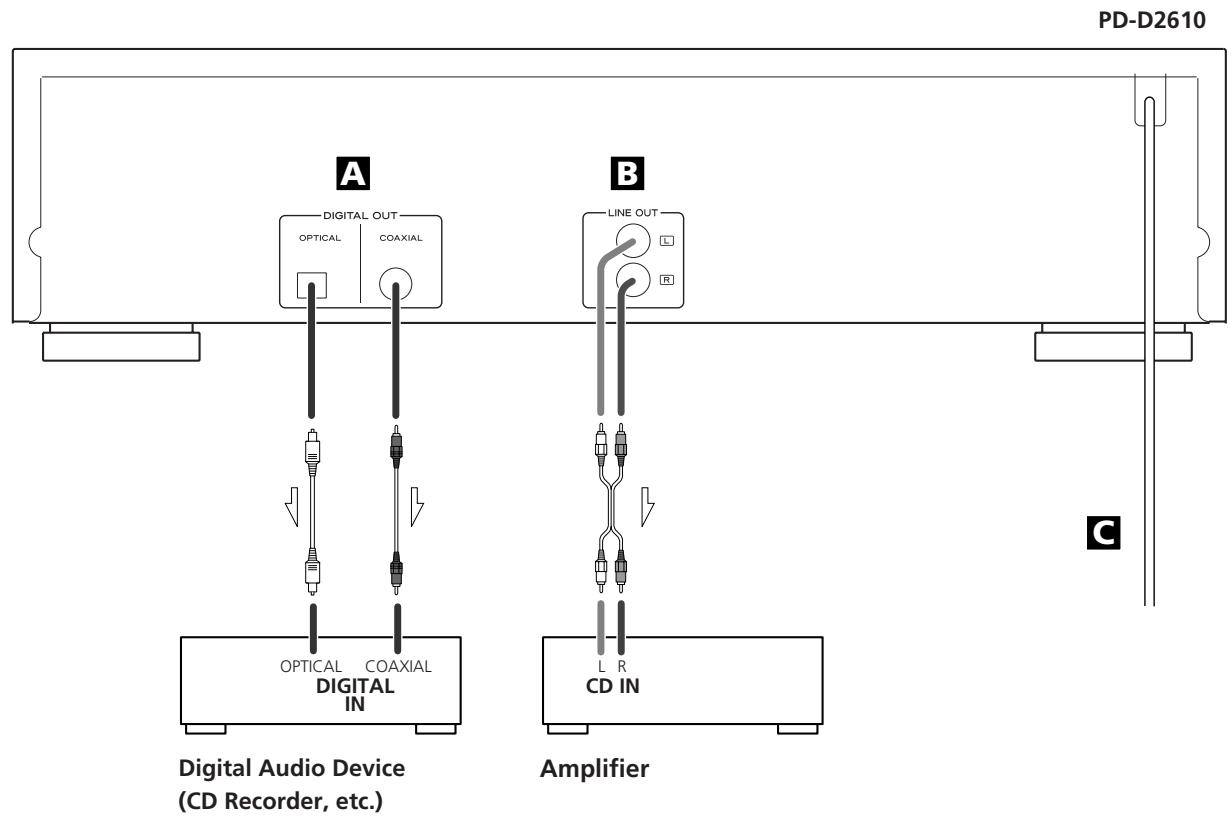
A DIGITAL OUT terminal
Connect the digital output terminal to the digital input terminal of a digital device such as a CD recorder, MD deck, etc. Use a commercially-available optical or coaxial digital cable.
- Keep the supplied cap to cover the optical digital terminal when it is not in use.
LINE OUT jack
Analog 2-channel audio signal is output from this jack. Connect this jack to the CD input jack of the amplifier with an RCA cable.
Make sure to connect: white plug white jack (L: left channel) red plug red jack (R: right channel)
AC Power Cord
After all other connections are complete, connect the plug to the AC wall socket.
Be sure to connect the power cord to an AC outlet which supplies the correct voltage.
Grasp the plug, not the cord when plugging or unplugging the power cord.
Press the POWER button to turn the unit on.
Press the OPEN/CLOSE button (△).
Place a disc on a tray with the printed label face up.

- Never place more than a disc on a tray.
- To place a disc on the hidden tray, press the DISC SKIP button.
- Do not touch the carousel while it is rotating.
- The disc must be loaded centrally into the disc tray. If the disc is not correctly loaded, it may not be possible to open the tray again once it has closed, so you should ensure the disc is always centrally loaded in the tray.
- Do not force open or close the tray.
4 Press the OPEN/CLOSE button () to close the tray.
Press the PLAY button () to start playback.
The unit starts searching disc. If a disc is found the playback will start.
- If you want to select other disc, press the DISC SKIP button or the desired DISC NO. button.
(MP3 disc)
- All the buttons and switches still function normally even when the tray is opening or closing.
- When the unit detects a disc on the tray, the disc mark " )" will light.
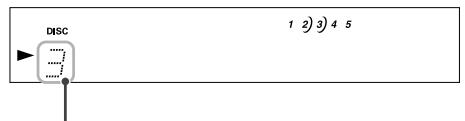
When the unit detects no disc on the tray, the disc number will go out. - If the disc is CD, the music calendar lights to show the available unplayed tracks. If there are more than 14 tracks on the disc, the track number 1-14 and OVER will light.
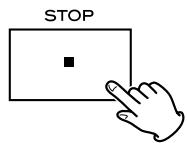
A To stop playback
Press the STOP button (■) to stop playback.
To suspend playback temporarily (pause mode)
Press the PAUSE button (I) during playback.
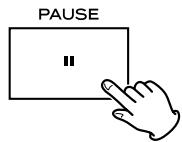
Playback stops at the current position, and is displayed.
To resume playback, press the PLAY button (▶) or the PAUSE button (■).
C To skip to the next or a previous track/file
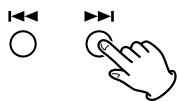
During playback, repeatedly press the SKIP button (I or ) until the desired track/file is found. The selected track/file will be played from the beginning.
In the stop or pause mode, press the SKIP button (▶or▶) repeatedly until the track you want to listen to is found. Press the PLAY button (▶) to start playback from the selected track.
- When the button is pressed during playback, the track being played will be played from the beginning. To return to the beginning of the previous track, press the button twice.
- When the button is pressed during playback of the last track of the disc, the first track of same disc will be played. When the button is pressed twice during playback of the first track of the disc, the last track of the same disc will be played.
- During programed playback, the next or previous track in the program is played.
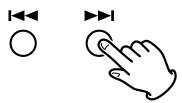
D Search for a part of a track/file
During playback, hold down the 口 or button and release it when the part you want to listen to is found.
On the remote control use the SEARCH button (or).
E To select a disc
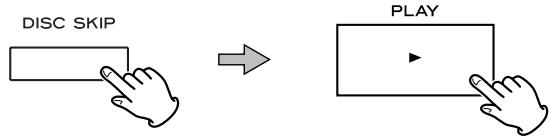
Press the DISC SKIP button repeatedly until the desired disc number is displayed, then press the PLAY button (▶).
Or press the DISC NO. button you want to listen to. The selected disc will be played automatically.
disc number
- When tracks/files are programmed, the DISC SKIP button and the DISC NO. buttons don't work.
F Direct Playback
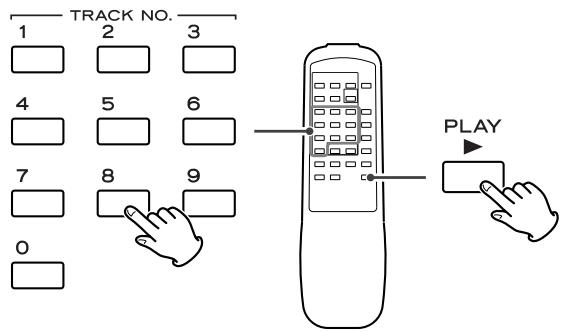
During stop or playback of CD, you can use the numeric buttons of the remote control to select tracks/files.
Press the numeric buttons to select a track/file, then press the PLAY (▶) button. Playback starts from the selected track/file.
For instance, to select track number 35, press "3" and "5".
- DirectPlayback do not work with MP3 discs. When you want to select a file, use the SKIP buttons (144/74).
Repeat Playback
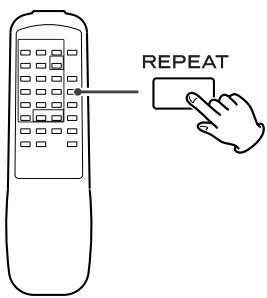
Each time the REPEAT button is pressed, the mode is changed as follows:

REPEAT ALL
All tracks or files of all discs will be played repeatedly.
REPEAT ONE
The track/file being played will be played repeatedly. If you select another track/file in REPEAT ONE mode, the track/file selected will be played repeatedly.
- During programed playback, if the REPEAT button is pressed, the programed contents will be played repeatedly.
- If both the INTRO CHECK and REPEAT buttons are pressed, the first 10 seconds of tracks/files will be played repeatedly.
- If both the SHUFFLE and REPEAT buttons are pressed, the disc shuffle play will start. When all tracks/files of a disc have been played once, the next disc will start playing. All tracks/files on all discs are thus continuously shuffle played.
- If the INTRO CHECK, REPEAT and SHUFFLE buttons are all pressed, the first 10 seconds of tracks/files are shuffle played. When shuffle intro play of a disc is once over, the next disc will start playing. The first 10 seconds of all tracks/files on all discs are thus continuously shuffle played.
ShufflePlayback

Shuffle mode turns on/off by pressing the SHUFFLE button.
During shuffle mode, SHUFFLE indicator lights. In shuffle mode the tracks/files of the disc are played randomly.
When all tracks/files of a disc have been played once, the next disc will shuffle play. The unit will stop when all discs have been played.
- If you press the button during shuffle playback, next track/file will be randomly selected and played. If you press the button, the currently played track/file will be played from the beginning. In any other cases, one and the same track/file is not replayed.
- The numeric buttons does not work during shuffle playback.
- If tracks/files are programmed, the SHUFFLE button does not work.
- If both the SHUFFLE and REPEAT buttons are pressed, the disc shuffle play will start. When all tracks/files of a disc has been played once, the next disc will start playing. All tracks/files on all discs are thus continuously shuffle played.
- If the INTRO CHECK, REPEAT and SHUFFLE buttons are all pressed, the first 10 seconds of tracks/files are shuffle played. When shuffle intro play of a disc is once over, the next disc will start playing. The 10 seconds of all tracks/files on all discs are thus continuously shuffle played.
- Up to 32 tracks can be programmed in the desired order.
- If the shuffle mode is on, the PROGRAM button does not work.
Press the PROGRAM button in the stop mode.

"PROGRAM" lights on the display.
If you want to select a track/file in another disc, press the corresponding DISC NO. button (1-5).
Press the numeric button to select a track or file.
You can also use the SKIP buttons (I▶/▶) to select a track.
- If the unit has not yet detected the contents of the disc, you can not enter 3-digit numbers with the numeric buttons. In this case use the SKIP buttons (I▲/■).
-
You can not also enter numbers other than those detected as specifying tracks/files in the disc.
-
Before you press the numeric buttons, "A" is displayed instead of the track/file number. If you press the PROGRAM button without pressing the numeric buttons, you can program a whole disc.
Press the PROGRAM button to enter your selection.

Repeat steps 2 to 4 to program more tracks/files.
- If you made a mistake, press the CLEAR button. The last programed number will be deleted.
- Up to 32 tracks/files can be programmed.
When programming has been finished, press the PLAY button to start programmed playback.

When playback of all the programmed tracks has finished, or if one of the following buttons is pressed, the programmed playback stops:
STOP, OPEN/CLOSE
But the programed contents aren't lost. You can return to the programed playback by pressing the PLAY button.
- If the power is turned off, the programmed contents will be erased.
- When in the program mode, the following buttons don't work:
SHUFFLE, DISC NO., DISC SKIP
To check the programed order

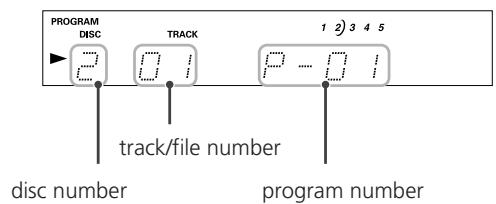
In the stop mode, press the PROGRAM CHECK button repeatedly. The track and program numbers will be shown on the display.
To add a track/file to the program
If you want to add a track/file to the end of the program, press the PROGRAM CHECK button repeatedly until "A" appears after the end of the program.
Then select a track/file number using the numeric buttons and press the PROGRAM button. The track/file is added to the program.
- If "A" is displayed in the middle of the program, it means a whole disc is programmed.
- If you want to rewrite a track/file, press the PROGRAM CHECK button repeatedly until the program number which you want to rewrite appears on the display.
Then select a new track/file.
To delete a track/file from the program

In the stop mode, press the PROGRAM CHECK button repeatedly until the program number to be deleted appears on the display, then press the CLEAR button. The selected track/file is deleted from the program.
To clear the program
In the stop mode, press and hold the CLEAR button for more than 2 seconds.
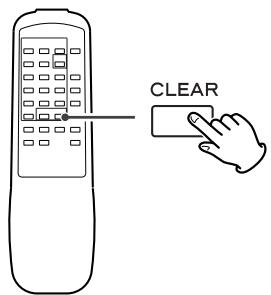
- If the power is turned off, the programmed contents will be erased.
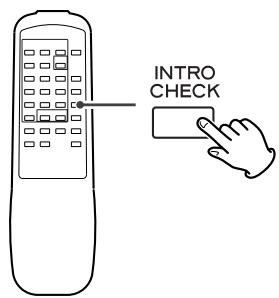
Intro check mode turns on/off by pressing the INTRO CHECK button
In intro check mode, INTRO indicator lights. During playback the first 10seconds of the tracks/files are played.
When all tracks/files have been played once, the unit will stop playback.
- If the INTRO CHECK, REPEAT and SHUFFLE buttons are all pressed, the first 10 seconds of tracks/files are shuffle played. When shuffle intro play of a disc is once over, the next disc will start playing. The 10 seconds of all tracks/files on all discs are thus continuously shuffle played.
- During programmed playback, if the INTRO CHECK button is pressed, the first 10 seconds of the tracks/files will be played in a programed order.

During playback, each time the TIME button is pressed the display changes as follows:
When the disc is CD:
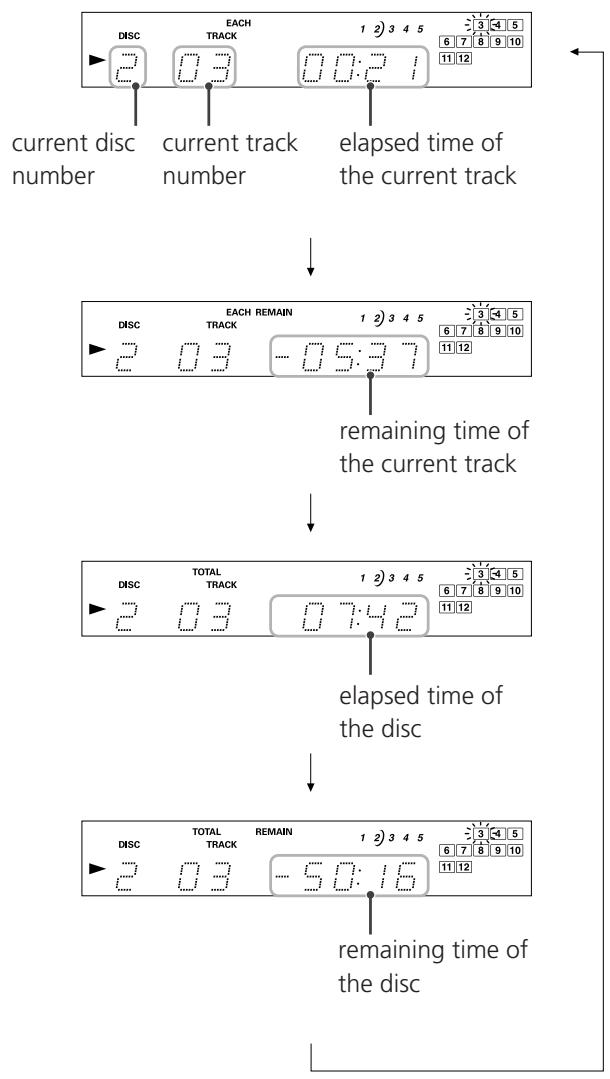
In stop mode:
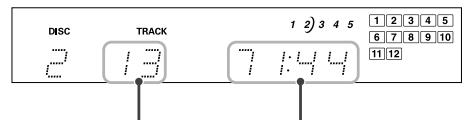
total number of tracks in the disc
total time of the disc
When the disc is MP3:
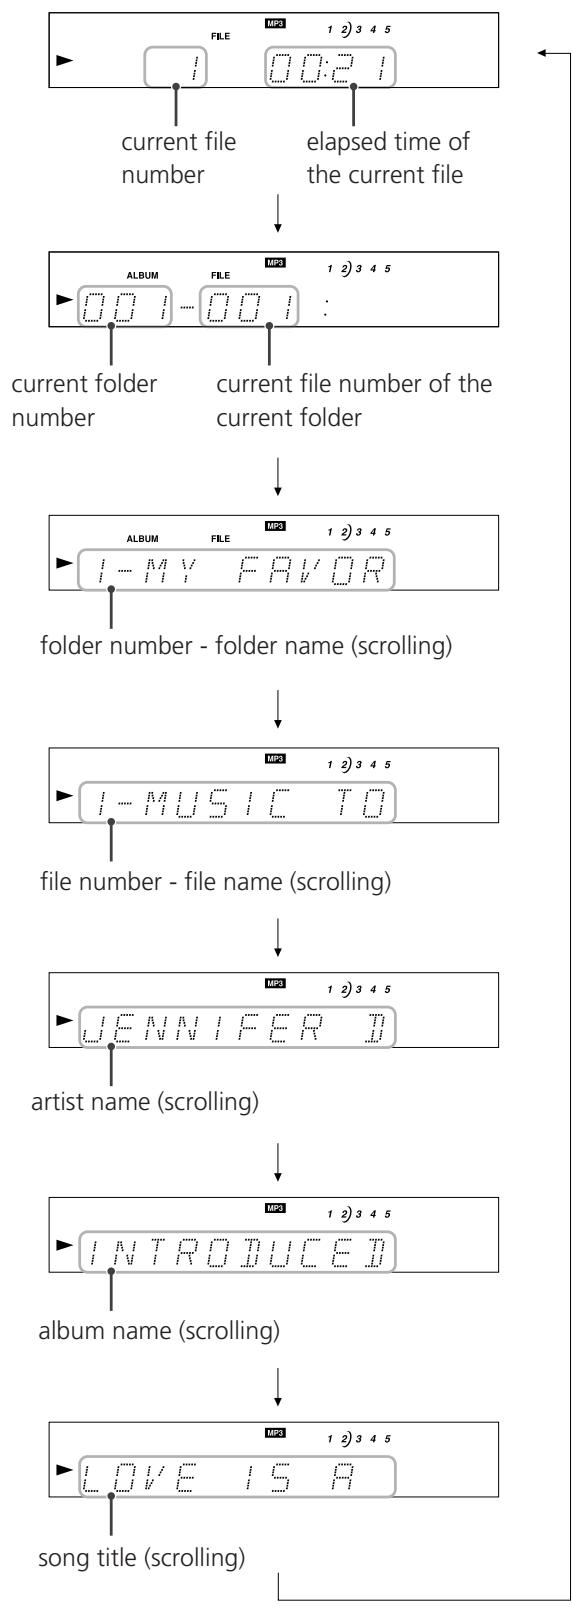
In stop mode:
Troubleshooting
If you experience any problems with the unit, please take a moment to look through this chart and see if you can solve the problem yourself before you call your dealer or a TEAC service center.
General
No power
Check the connection to the AC power supply. Check and make sure the AC source is not a switched outlet and that, if it is, the switch is turned on. Make sure there is power to the AC outlet by plugging another item such as a lamp or fan.
No sound
Check the connection to the amplifier.
Check the operation of the amplifier.
Cannot play.
Load a disc with the playback side facing down.
If the disc is dirty, clean the surface of the disc.
A blank disc has been loaded. Load a prerecorded disc.
Depending on the disc, etc. it may not be possible to play back CD-R/CD-RW discs. Try again with another disc.
You cannot play back unfinalized CD-R/CD-RW discs. Finalize such a disc in a CD recorder and try again.
Sound skips.
Place the unit on a stable place to avoid vibration and shock.
If the disc is dirty, clean the surface of the disc.
Don't use scratched, damaged or warped discs.
Remote Control Unit
Remote control doesn't work.
If the batteries are exhausted, change the batteries.
Use remote control unit within an effective range (5m) and point at the front panel.
Clear obstacles between the remote control unit and the main unit.
If a fluorescent light is near the unit, turn it off.
MP3
There is no sound even if the PLAY button () is pressed.
Non-playable file formats cannot be played.
Some unknown characters are displayed on the display panel.
This unit cannot display symbols and full-size or double-byte characters (such as Japanese, Chinese, etc.) correctly. File name of MP3 should be alphanumeric characters.
If normal operation cannot be recovered, unplug the power cord from the outlet and plug it again.
Specifications
CD Player
Pickup 3-beam laser
D/A converter . Dual 1-bit linear
Digital filter 4-times oversampling
Frequency Response 20 Hz - 20 kHz, ±2dB
Total Harmonic Distortion .Less than 0.02% (1 kHz)
Signal-to-Noise Ratio (S/N) . More than 100 dB
Channel separation . More than 85 dB (1 kHz)
Output. Analog: 2.1 Vrms (RCA)
Digital: COAXIAL/TOS OPTICAL
General
Power Requirement . . . . . AC 230 V, 50 Hz (European Model)
AC 120 V, 60 Hz (U.S.A./Canada Model)
Power Consumption 12 W
Dimensions (W x H x D) 435 x 115 x 390 mm
(17 1/8" x 4 1/2" x 15 3/8")
Weight (Net) 6.2 kg (13 11/16 lb)
Operating temperature. +5^ C + 35^ C
Operating humidity . . . . . . . . . . . . . . . . . . . . . . . . . . . . . . . . . . . . . . . . . . . . . . . . . . . . . . . . . . . . . . . . . . . . . . . . . . . . . . . . . . . . . . . . . . . . . . 1Operating temperature 25 °C to 30 °C (no condensation)
Storage temperature. -20^ + 55^
Standard Accessory. RCA cable x 1
Remote control unit (RC-1122) x 1
Batteries (AA) x 2
Owner's manual x 1
Warranty card x 1
- Design and specifications are subject to change without notice.
- Weight and dimensions are approximate.
- Illustrations may differ slightly from production models.
For European customers Disposal of your old appliance
- When this crossed-out wheeled bin symbol is attached to a product it means the product is covered by the European Directive 2002/96/EC.
- All electrical and electronic products should be disposed of separately from the municipal waste stream via designated collection facilities appointed by the government or the local authorities.
- The correct disposal of your old appliance will help prevent potential negative consequences for the environment and human health.
- For more detailed information about disposal of your old appliance, please contact your city office, waste disposal service or the shop where you purchased the product.

Sommaire
H Skip/Search buttons
Beware of condensation
When the unit (or a disc) is moved from a cold to a warm place, or used after a sudden temperature change, there is a danger of condensation; vapor in the air could condense on the internal mechanism, making correct operation impossible. To prevent this, or if this occurs, leave the unit for one or two hours with the power turned on. Then the unit will stabilize at the temperature of its surroundings.
Maintenance
If the surface of the unit gets dirty, wipe with a soft cloth or use diluted neutral cleaning liquid. Be sure to remove any fluid completely. Do not use thinner, benzine or alcohol as they may damage the surface of the unit.
Discosutilizables:
A Terminal DIGITAL OUT
Whenever you want to use the botón (or vice versa) for your purposes, please use our dedicated botón. Besides, you can also use the botón for other purposes. For example, you can use it to help your child with his or her homework.
This appliance has a serial number located on the rear panel. Please record the model number and serial number and retain them for your records.
- IMPORTANT SAFETY INSTRUCTIONS
- CAUTION
- Note to CATV system installer:
- For CANADA
- Pour le CANADA
- ATTENTION:
- For U.S.A.
- Optical pickup:
- Contents
- Thank you for choosing TEAC. Read this manual carefully to get the best performance from this unit.
- Before Use
- Read this before operation
- DO NOT MOVE THE UNIT DURING PLAYBACK
- WHEN MOVING THIS UNIT
- Beware of condensation
- Maintenance
- Discs which can be played on this unit:
- Note:
- MP3 files
- A POWER
- B Disc tray
- C OPEN/CLOSE
- DISC SKIP
- PLAY
- FAUSE (II)
- STOP
- Skip/Search buttons
- Display
- Remote Sensor
- DISC NO.
- L TRACK NO.
- PROGRAM
- N SEARCH (←/▶)
- SHUFFLE
- TIME
- Q REPEAT
- INTRO CHECK
- PROGRAM CHECK
- T CLEAR
- USKIP(1i)
- Battery Installation
- Battery Replacement
- Precautions concerning batteries
- CAUTION:
- A DIGITAL OUT terminal
- LINE OUT jack
- AC Power Cord
- A To stop playback
- To suspend playback temporarily (pause mode)
- C To skip to the next or a previous track/file
- D Search for a part of a track/file
- E To select a disc
- F Direct Playback
- During stop or playback of CD, you can use the numeric buttons of the remote control to select tracks/files.
- Repeat Playback
- REPEAT ALL
- REPEAT ONE
- ShufflePlayback
- STOP, OPEN/CLOSE
- To check the programed order
- To add a track/file to the program
- To delete a track/file from the program
- To clear the program
- Intro check mode turns on/off by pressing the INTRO CHECK button
- Troubleshooting
- General
- No power
- No sound
- Cannot play.
- Sound skips.
- Remote Control Unit
- Remote control doesn't work.
- MP3
- There is no sound even if the PLAY button () is pressed.
- Some unknown characters are displayed on the display panel.
- If normal operation cannot be recovered, unplug the power cord from the outlet and plug it again.
- Specifications
- CD Player
- For European customers Disposal of your old appliance
- Sommaire
- H Skip/Search buttons
- Discosutilizables:
- A Terminal DIGITAL OUT
Brand : TEAC
Model : PD-D2610
Category : CD Player