
CD-GT2 - CD Player TEAC - Free user manual and instructions
Find the device manual for free CD-GT2 TEAC in PDF.


| Product Type | Portable CD Guitar Trainer |
| Brand | TASCAM (TEAC Professional Division) |
| Model | CD-GT2 |
| Weight | 550 g (1.2 lbs) without batteries |
| Power Supply | 4 AA batteries or DC 5V (PS-P520 adapter sold separately) |
| Power Consumption | 2.5 W (with AC adapter) |
| Compatible Discs | CD-DA, CD-TEXT, CD-R, CD-RW (12cm/8cm) |
| Frequency Response | 20–20,000 Hz (+0.5/-5 dB) |
| Signal-to-Noise Ratio | 85 dB |
| Dynamic Range | 90 dB |
| Total Harmonic Distortion | 0.05% or less |
| Input Jack | GUITAR/MIC IN (6.3 mm mono phone jack) |
| Output Jacks | LINE OUT (3.5 mm stereo minijack), PHONES (3.5 mm stereo minijack) |
| Special Features | VSA (tempo change without pitch), Key control, Guitar cancel, Loop playback, Built-in effects, Metronome, Tuner, Footswitch support |
| Battery Life | Alkaline: approx. 5 hours; NiMH: approx. 6.5 hours |
| Display | LCD with multiple screens (time, tempo, effects, etc.) |
| Laser Class | Class 1M (no hazardous radiation under normal use) |
| Cleaning Instructions | Use a dry cloth; do not use solvents or chemicals |
| Safety Precautions | Do not expose to rain/moisture; use only specified AC adapter; avoid heat sources |
| Service | Refer all servicing to qualified personnel; no user-serviceable parts inside |
Frequently Asked Questions - CD-GT2 TEAC
User questions about CD-GT2 TEAC
0 question about this device. Answer the ones you know or ask your own.
Ask a new question about this device
Download the instructions for your CD Player in PDF format for free! Find your manual CD-GT2 - TEAC and take your electronic device back in hand. On this page are published all the documents necessary for the use of your device. CD-GT2 by TEAC.
USER MANUAL CD-GT2 TEAC
TEAC Professional Division
CD-GT2
Portable CD
Guitar Trainer
This device has a serial number on the rear panel. Please record it and retain it for your records.
Serial number:
D00996120A
OWNER'S MANUAL
IMPORTANT SAFETY INSTRUCTIONS


CAUTION: TO REDUCE THE RISK OF ELECTRIC SHOCK, DO NOT REMOVE COVER (OR BACK). NO USER-SERVICEABLE PARTS INSIDE. REFER SERVICING TO QUALIFIED SERVICE PERSONNEL.

The lightning flash with arrowhead symbol, within equilateral triangle, is intended to alert the user to the presence of uninsulated "dangerous voltage" within the product's enclosure that may be of sufficient magnitude to constitute a risk of electric shock to persons.

The exclamation point within an equilateral triangle is intended to alert the user to the presence of important operating and maintenance (servicing) instructions in the literature accompanying the appliance.
FOR U.S.A.
TO THE USER
This equipment has been tested and found to comply with the limits for a Class B digital device, pursuant to Part 15 of the FCC Rules. These limits are designed to provide reasonable protection against harmful interference in a residential installation. This equipment generates, uses, and can radiate radio frequency energy and, if not installed and used in accordance with the instruction manual, may cause harmful interference to radio communications. However, there is no guarantee that interference will not occur in a particular installation. If this equipment does cause harmful interference to radio or television reception, which can be determined by turning the equipment off and on, the user is encouraged to try to correct the interference by one or more of the following measures.
a) Reorient or relocate the receiving antenna.
b) Increase the separation between the equipment and receiver.
c) Connect the equipment into an outlet on a circuit different from that to which the receiver is connected.
d) Consult the dealer or an experienced radio/TV technician for help.
CAUTION
Changes or modifications to this equipment not expressly approved by TEAC CORPORATION for compliance could void the user's authority to operate this equipment.
WARNING: TO PREVENT FIRE OR SHOCK HAZARD, DO NOT EXPOSE THIS APPLIANCE TO RAIN OR MOISTURE.
IMPORTANT SAFETY PRECAUTIONS
1 Read these instructions.
2 Keep these instructions.
3 Heed all warnings.
4 Follow all instructions.
5 Do not use this apparatus near water.
6 Clean only with dry cloth.
7 Do not block any ventilation openings. Install in accordance with the manufacturer's instructions.
8 Do not install near any heat sources such as radiators, heat registers, stoves, or other apparatus (including amplifiers) that produce heat.
9 Do not defeat the safety purpose of the polarized or grounding-type plug. A polarized plug has two blades with one wider than the other. A grounding type plug has two blades and a third grounding prong. The wide blade or the third prong are provided for your safety. If the provided plug does not fit into your outlet, consult an electrician for replacement of the obsolete outlet.
10 Protect the power cord from being walked on or pinched particularly at plugs, convenience receptacles, and the point where they exit from the apparatus.
11 Only use attachments/accessories specified by the manufacturer.
12 Use only with the cart, stand, tripod, bracket, or table specified by the manufacturer, or sold with the apparatus. When a cart is used, use caution when moving the cart/ apparatus combination to avoid injury from tip-over.

13 Unplug this apparatus during lightning storms or when unused for long periods of time.
14 Refer all servicing to qualified service personnel. Servicing is required when the apparatus has been damaged in any way, such as power-supply cord or plug is damaged, liquid has been spilled or objects have fallen into the apparatus, the apparatus has been exposed to rain or moisture, does not operate normally, or has been dropped. Do not expose this apparatus to drips or splashes.
- Do not place any objects filled with liquids, such as vases, on the apparatus.
- Do not in st all I th is apparatus in a confined space such as a book case or similar unit.
- The apparatus draws nominal non-operating power from the AC outlet with its STANDBY/ON in the Standby position.
- The apparatus should be located close enough to the AC outlet so that you can easily grasp the power cord plug at any time.
- An apparatus with Class I construction shall be connected to an AC outlet with a protective grounding connection.
- Batteries (battery pack or batteries installed) should not be exposed to excessive heat such as sunshine, fire or the like.
- Excessive sound pressure from earphones and headphones can cause hearing loss.
SAFETY INFORMATION
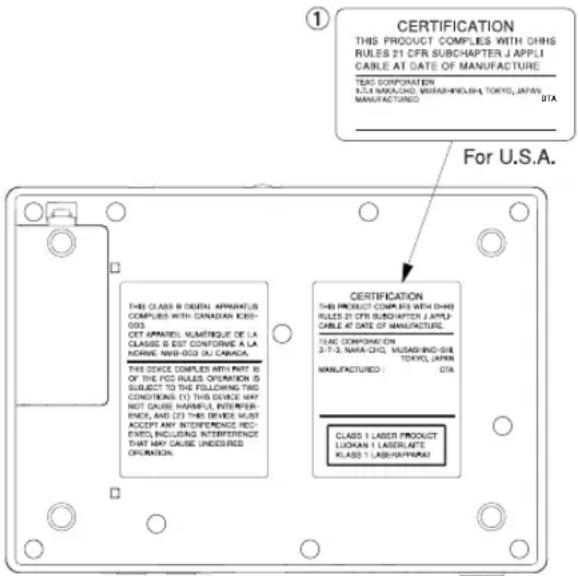
This product has been designed and manufactured according to FDA regulations “title 21, CFR, chapter 1, subchapter J, based on the Radiation Control for Health and Safety Act of 1968,” and is classified as a class 1 laser product. There is no hazardous invisible laser radiation during operation because invisible laser radiation emitted inside of this product is completely confined in the protective housings.
The label required in this regulation is shown at ①.
CAUTION
- DO NOT REMOVE THE PROTECTIVE HOUSING USING A SCREWDRIVER.
- USE OF CONTROLS OR ADJUSTMENTS OR PERFORMANCE OF PROCEDURES OTHER THAN THOSE SPECIFIED HEREIN MAY RESULT IN HAZARDOUS RADIATION EXPOSURE.
- IF THIS PRODUCT DEVELOPS TROUBLE, CONTACT YOUR NEAREST QUALIFIED SERVICE PERSONNEL, AND DO NOT USE THE PRODUCT IN ITS DAMAGED STATE.
- CLASS 1M INVISIBLE LASER RADIATION WHEN OPEN AND INTERLOCKS DEFEATED. DO NOT VIEW DIRECTORY WITH OPTICAL INSTRUMENTS.
The CD-GT2 uses either a SONY or a SAMSUNG transport.
Optical pickup:
Type: KSM-900AAA
Manufacturer: SONY Corporation
Laser output: Less than 1 mW on the objective lens
Wavelength: 775 to 816 nm
Type: CMS-M93BG6
Manufacturer: Samsung Electro-Mechanics Co., Ltd.
Laser output: Less than 0.4 mW on the objective lens
Wavelength: 760 to 800 nm
Contents
Introduction 7
Features of this device 7
Using this manual 7
Accessories 7
About this manual 8
Environmental considerations 8
Beware of condensation 8
Cleaning the unit 8
Handling of compact discs 9
Batteries 10
Inserting batteries.... 10
Quick Start Guide—Basic Operation 11
Preparation 11
Playback 12
Playing guitar 13
Turning off the power 14
Restore all settings to original values 14
About Power 15
Using batteries 15
Operation with an AC adapter 15
Turning the power ON and OFF 16
Names and functions of parts 17
Front 19
Rear 19
Making connections 20
Screen appearance and operation 21
Screen overview 21
TIME DISPLAY screen 21
Other screens 23
Making settings 23
Listening to CDs 24
Basic CD playback 24
Jumping back a few seconds (FLASH BACK) 24
Adjusting the volume 25
Changing the tempo 25
Changing the pitch with the tempo 25
Changing only the pitch 26
Reducing the sound of recorded guitars 26
Loop playback 27
Selecting the play mode 28
Repeat playback 28
Using guitars and mics 29
Setting the input 29
Adjusting the input level 29
Adjusting the monitoring volume 29
Playing along with a CD 29
Using built-in effects 30
Other functions 32
Using the metronome 32
Stopping the metronome 33
Using the tuner 33
AUTO (chromatic tuner) 33
GUITAR (guitar tuner mode) 34
OSC. (oscillator mode) 34
Using a footswitch 35
Connecting a footswitch 35
Setting the function 35
Making various settings 36
Mono monitoring 36
Splitting the CD and guitar sounds 36
Setting the time display 37
Changing the display contrast 37
Restoring all settings to their default values 37
Specifications.... 38
Effect preset lists 40
Guitar effects 40
Vocal effects 41
Effect module parameter list 42
Introduction
Thank you for purchasing the TASCAM CD-GT2.
This CD player allows you to change the playback speed of recorded music without changing its pitch, making it ideal for guitar practice. If you are trying to learn a part that is too difficult to catch at ordinary playback speed, you can use this player to slow the playback to a speed that makes learning the notes easier. You can also plug your guitar into the unit and mix your own playing with music from a CD.
Features of this device
CD player functions
- Change playback speed without changing pitch
- Change pitch without changing playback speed
- Reduce the recorded lead guitar sound during CD playback
- Loop playback of passages that you select
Other functions
- Operates with batteries (4 AA) or an AC adapter (sold separately)
- Guitar effects built-in
- Mic effects built-in
- Play along on guitar as you listen to a CD
- Tuner built-in
- Metronome built-in
• Headphone jack and line output jack - Operate with a footswitch (sold separately)
Using this manual
This manual includes a Quick Start Guide and reference chapters.
The Quick Start Guide explains the basics, from preparation and standard CD playback to the use of effects, in a step-by-step manner. Read this when you want to use the CD-GT2 after purchase. Please note that not all functions are explained in this section.
The reference chapters explain the use of every control key and all the CD-GT2 functions in detail. It also includes specifications and other information. Please read this part because it also has cautionary warnings and other important details about using the unit.
Accessories
- Owner's Manual (this manual) ....1
- Warranty card ....1
- Troubleshooting guide ....1
Please contact TASCAM if any of these items are missing.
Introduction
About this manual
When we refer to a key or connector or control on the CD-GT2, the typeface looks like this: PLAY.
When we refer to items shown on the display, the typeface looks like this: MENU.
Environmental considerations
The CD-GT2 may be used in most places, but you should observe the following environmental conditions to maintain top performance and prolong operating life:
- The nominal temperature should be between 5°C and 35°C (41°F and 95°F).
• Relative humidity should be 30 to 90 percent. - As the unit may become hot during operation, always leave sufficient space above the unit for ventilation. Do not install this unit in a confined space such as a bookcase, and do not put anything on top of the unit.
- Avoid installing this unit on top of any heat-generating electrical device such as a power amplifier.
- Make sure that the unit is mounted in a level position for correct operation.
Beware of condensation
If the unit (or a compact disc) is moved from a cold to a warm place, or used after a sudden temperature change, there is a danger of condensation. Vapor in the air could condense on the internal mechanism, making correct operation impossible. To prevent this, or if this occurs, let the player sit for one or two hours at the new room temperature before using.
Cleaning the unit
Wipe dirt from the unit with a dry cloth. Never use thinner, benzene or other solvents because they may cause acrylic parts and coated surfaces to dissolve, labels to be eroded or other damage.
Introduction
Handling of compact discs
The CD-GT2 has been designed for the playback of CD-DA (standard audio) format discs. In addition to ordinary 5-inch and 3-inch CDs, it can also play properly recorded CD-R and CD-RW discs.
• Always insert a compact discs into the unit with its label facing upward.
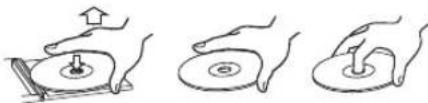
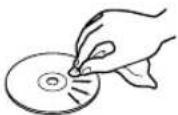
- To remove a disc from its case, press down on the center of the disc holder, then lift the disc out, holding it carefully by the edges.
natural_image
Three-step illustration showing hands performing a mechanical operation: press, disc, and press (no text or symbols)- Avoid getting fingerprints on the signal side (the non-label side). Grime and dust may cause skipping, so keep discs clean and store them in their cases when not being played. To clean the signal side of a disc, wipe gently with a soft dry cloth from the center towards the outside edge.
- Do not use any record spray, anti-static solutions, benzene, paint thinner or other chemical agents to clean CDs as they
could damage the delicate playing surface. It may cause CDs to become unplayable.
- Discs should be returned to their cases after use to avoid serious scratches that could cause the laser pickup to "skip."
- Keep discs away from direct sunlight and places of high heat and humidity. If left in such places, warping could result.
- Do not affix any labels or stickers to the label side of the disc. Do not write on the disc with a ballpoint pen.
- Do not insert discs that have adhesive remaining from tape or stickers that have been removed. If they are inserted into the player, they could stick to the internal mechanism, requiring removal by a technician.
- Do not use cracked discs.
- Only use circular compact discs. Avoid using promotional, discs and other discs that are not circular.

• The CD-GT2 cannot play unfinalized CD-R/RW discs.
- Music discs with copy control, a copy-protection system, have been released from several record companies in an attempt to protect their copyrights. Since some of these discs do not comply with the CD specifications, they might not be playable on the CD-GT2.
Introduction
Batteries
If batteries are used improperly, or if leakage or breakage occurs, the unit will not function.
Please observe the cautions indicated on the batteries and their packaging to ensure proper usage.
- Confirm + and – polarity and follow the indications when inserting new batteries into the unit.
- Do not use old and new batteries together.
- Even if batteries are the same size, their voltage may differ. Do not use batteries of different specifications together.
- Do not attempt to recharge batteries that are non-rechargeable.
- Do not open or disassemble batteries, throw them into a fire or put them in water.
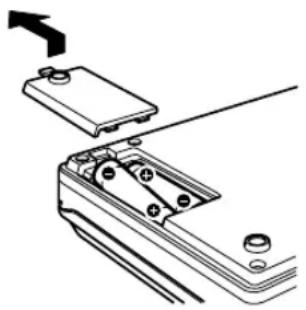
Inserting batteries
1 Open the lid.
2 Confirm +/- polarity, and insert four AA batteries.
3 Close the lid.
natural_image
Technical line drawing of a mechanical assembly with no visible text or symbolsNOTE
This device does not include batteries when purchased. We recommend nickel hydride or alkaline batteries.
Quick Start Guide—Basic Operation
Let's start using the unit right away. In this section, we will teach you the basics, including how to setup the unit, play a CD, connect your guitar and play along with prerecorded music.
Preparation
Turn the power on
Remove the battery case cover from the underside of the unit, and insert four ordinary AA batteries, aligning them with the + and - symbols inside the case. (See “Batteries” on page 10.)
Turn the power ON after inserting the batteries.
Press and hold the POWER switch on the rear of the unit for about one second. Release it when "TASCAM" appears on the display. Start-up completes after a few seconds and the TIME DISPLAY screen appears.
NOTE
You can also use a PS-P520 AC adapter (sold separately) for power instead of batteries. Connect the AC adapter to the DC IN 5V jack on the rear of the unit.
Setting a CD
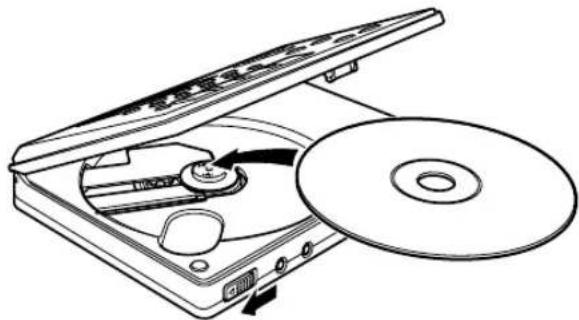
All the controls for this device are on the CD tray cover. The OPEN switch is on the front of the unit. Slide it left and open the tray cover. Put a CD in the CD tray and press it into place gently until the disc clicks. Close the tray cover after setting the CD.
natural_image
Diagram of a CD or DVD disc with an open case and internal components, showing no text or symbols.NOTE
The keys cannot be used when the tray cover is open.
Quick Start Guide—Basic Operation
Connecting headphones
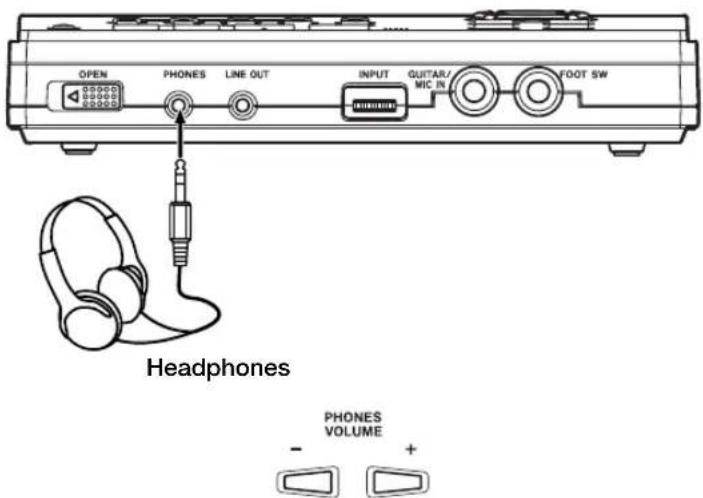
Connect headphones to the PHONES jack on the front of the unit. Turn the volume down to the minimum level using the PHONES VOLUME (−) key on the control panel.
NOTE
Use the LINE OUT jack when monitoring with an audio system or speakers with built-in amplification.
Playback
Playing a CD
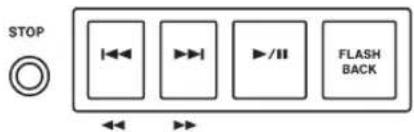
Press the ▶/□ key to start. Press the ▶/□ key again to pause playback. Press the STOP key to stop playback. Press the ◀◀◀ or ▶◀◀ key to skip to the beginning of the previous or next track. Press and hold the ▶◀◀ or ◀◀◀ key during playback to fast forward (▶◀◀) or fast reverse (◀◀◀) through the current track. Press the FLASH BACK key during playback to jump to the point three seconds earlier in the current track.
NOTE
You can change the number of seconds that pressing the FLASH BACK key jumps in the track. (See "Jumping back a few seconds (Flash Back)" on page 24.)
Quick Start Guide—Basic Operation
Adjusting the volume
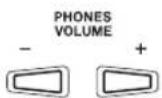
Use the PHONES VOLUME (+, -) keys to adjust the headphones volume.
Changing playback tempo
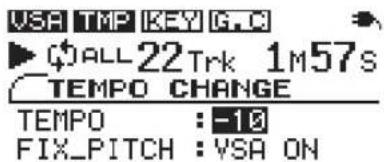
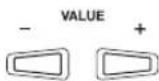
Press the TEMPO key to open the TEMPO CHANGE screen. With the TEMPO value selected as shown below, use the VALUE (+,-) keys to change the tempo value.
When the product is shipped new, the VSA function is ON, allowing tempo to be changed without changing the pitch.
NOTE
To change the pitch along with the tempo, use the ▼ CURSOR key on the TEMPO CHANGE screen to select the FIX PITCH item, and then use the -VALUE key to select USA OFF.
Playing guitar
Connecting a guitar
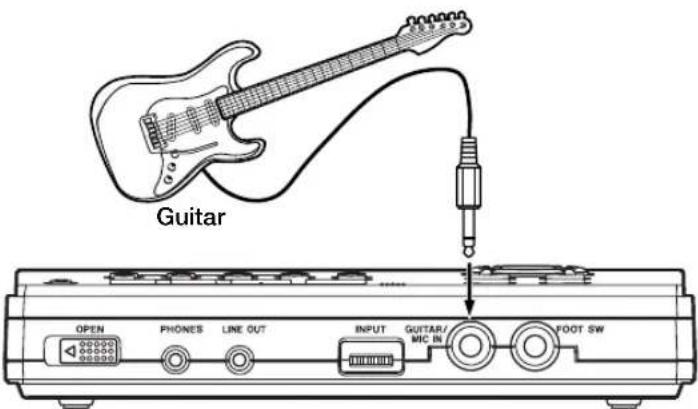
Connect a guitar to the GUITAR/MIC IN jack on the front of the unit. Before connecting, turn the INPUT dial next to the jack down to 0. Turn the volume up after connecting.
NOTE
You can also connect a mic to this jack. Switch to mic input mode in this case. (See "Setting the input" on page 29.)
Quick Start Guide—Basic Operation
Using the Effects
To apply effects to your guitar sound, press the EFFECT key to open the EFFECTOR screen. When the BANK value is highlighted as shown below, use the VALUE (+, -) keys to select one of the effect banks (01–10).
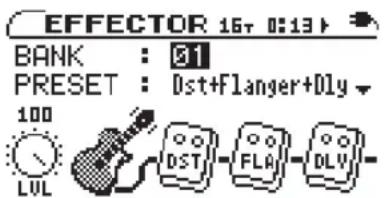
After selecting an effect bank, select an effect preset by using the down CURSOR (▼) key to highlight the PRESET value. Then use the VALUE (+, -) keys to select a preset. Each preset uses a different combination of effect modules. (See the "Effect preset lists" on page 40.)
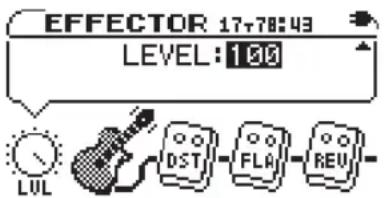
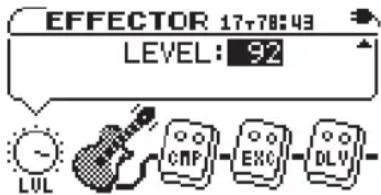
Press the right CURSOR key (▶) to open the effect level adjustment screen. Use the VALUE (+, -) keys to change the level.
NOTE
You can change the parameter settings for every effect. (For details, see "Using built-in effects" on page 30.)
Playing guitar along with a CD
You can listen to the sound from both a CD and your guitar at the same time through headphones. To change the volume balance between the CD and the guitar, press the LEVEL key to open the LEVEL screen. Press the right CURSOR key (▶) twice to highlight the IN LEVEL value, then use the VALUE (+,-) keys to adjust the guitar volume. (See “Adjusting the input level” on page 29)
Turning off the power
When you stop using the player, press the POWER switch on the back of the unit for about one second. Release the switch when "TRAINER SERIES" appears on the display.
Restore all settings to original values
If you press and hold both the ◀◀ and ▶▶ keys when you turn the player power ON, the INITIALIZE screen appears. After startup, follow the onscreen instructions and press the ▶/■ key to restore every effect parameter, playback setting and other adjustable setting to the values they were set at when they unit was shipped from the factory.
About Power
Using batteries
See “Batteries” on page 10 for information about installing batteries.
Battery level display
When using batteries, the battery icon in the upper right part of the display shows the approximate remaining power level of the batteries.

The remaining power level of the batteries is high.

The remaining power level of the batteries is about half of the original amount.

The remaining power level of the batteries is low.

The batteries are out of power and the unit power is about to turn OFF. Put in new batteries.
Battery life
• Fully charged new nickel hydride batteries: about 6.5 hours
• Alkaline batteries: about 5 hours
NOTE
Since this product has special functions, including CD playback tempo alteration and guitar effects, battery life is shorter compared to other portable CD players.
Battery life varies according to use conditions, including temperature, humidity and the ON/OFF status of the various special functions.
When the remaining power level of the batteries you are using is low, the player may not function properly even though the battery icon shows that the remaining power level is high. In this case, change the batteries or use an AC adapter.
Operation with an AC adapter
Use the TASCAM PS-P520 (sold separately) AC adapter. Do not use any other adapter because this may cause the player to malfunction.
Connect the DC plug from the AC adapter to the DC IN 5V jack on this device and connect the AC plug to a standard outlet.
About Power
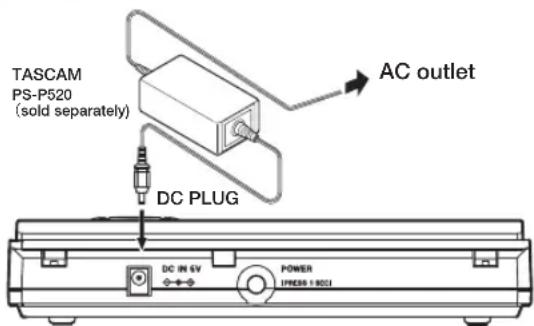
When using the AC adapter, “” appears in the upper right of the display.
NOTE
Unplug the AC adapter when not using the unit.
Turning the power ON and OFF
Press and hold the POWER switch on the rear of the unit for about one second to turn its power ON. Release the button when the screen below appears on the display.

Startup completes in a few seconds and the TIME DISPLAY screen appears.
To turn the power OFF, press and hold the POWER switch on the rear of the unit for more than one second. Release the button when the screen below appears on the display.

NOTE
Always use the POWER switch to turn the power ON and OFF. When the unit is operating, if you disconnect the power adapter or remove the batteries to turn the power OFF, your settings may not be saved. All the settings might even be initialized, reverting them to their default values.
When using this player with batteries, the power turns OFF temporarily if you remove or connect the AC adapter.
Names and functions of parts
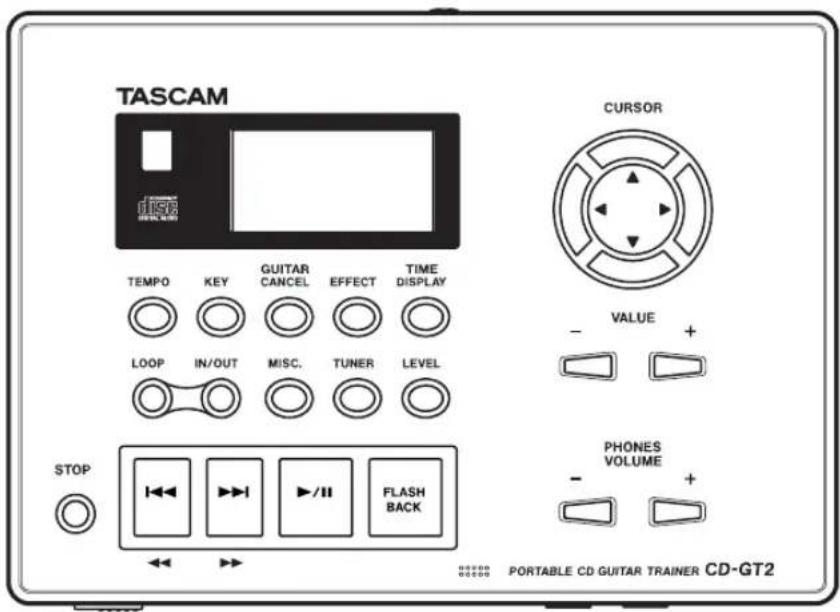
Control panel
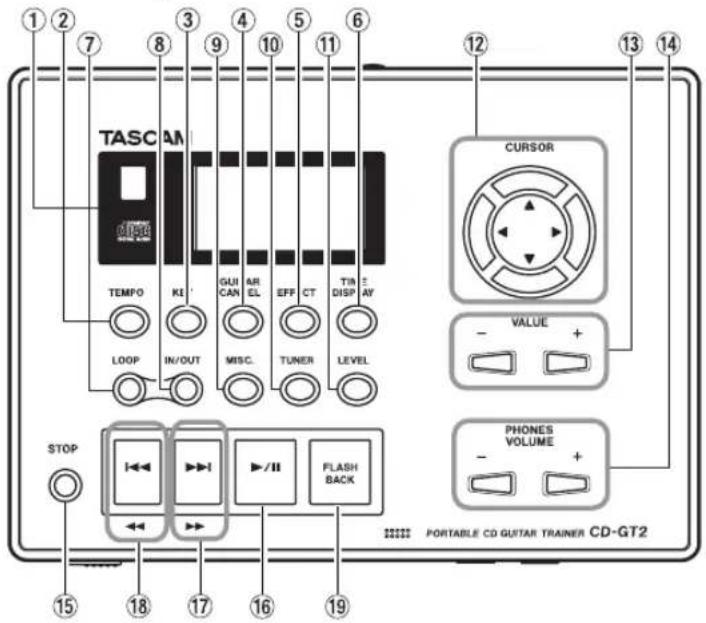
① Display
Shows CD status during playback, device settings and other information.
② TEMPO key
Press this key to open the TEMPO CHANGE screen. You can change the playback tempo and turn the VSA function ON and OFF on this screen. (See “Changing the tempo” and “Changing the pitch with the tempo” on page 25.)
③ KEY key
Press this key to open the KEY & PITCH screen. You can change the playback pitch on this screen. (See "Changing only the pitch" on page 26.)
④ GUITAR CANCEL key
Press this key to open the GUITAR CANCEL screen. Turn the guitar cancel function ON and OFF and change its settings on this screen. (See "Reducing the sound of recorded guitars" on page 26.)
⑤ EFFECT key
Press this key to open the EFFECTOR screen. Make guitar and mic effect settings on this screen. (See "Using built-in effects" on page 30.)
⑥ TIME DISPLAY key
Press this key to open the TIME DISPLAY screen, which shows the status of the CD during playback and other information. (See “TIME DISPLAY screen” on page 21.)
⑦ LOOP key
Turns the loop playback and repeat playback functions ON
Names and functions of parts
and OFF. When IN and OUT points are set, this key turns loop playback ON and OFF. When they are not set, it turns repeat playback ON and OFF. (See “Loop playback” on page 27 and “Repeat playback” on page 28.)
⑧ IN/OUT key
Use this key to set the loop playback IN and OUT points. (See “Loop playback” on page 27.)
⑨ MISC. key
Press this key to open the SETUP & MISC screen. Set and use the metronome and make various device settings on this screen.
⑩ TUNER key
Press this key to open the TUNER screen. Use this screen for help tuning your instrument. (See “Using the tuner” on page 33.)
⑪ LEVEL key
Press this key to open the LEVEL screen. Select whether to use the GUITAR/MIC IN jack for guitar input or mic input and make independent adjustments for the input signal and CD playback volumes on this screen. (See "Using guitars and mics" on page 29.)
⑫ CURSOR (▲, ▼, ◀, ►) keys
Select among setting items on the screen with these keys.
⑬ VALUE (+, -) keys
Change the value of the item selected on the screen.
⑭ PHONES VOLUME (+, -) keys
Adjust the volume sent to your headphones using these keys. The PHONES VOLUME screen appears during adjustment.
⑮ STOP key
Stops a CD that is playing or paused.
⑯ ▶/II key
Starts playback of a stopped or paused CD. Pauses a playing CD.
⑰ ▶▶▶, ▶▶ key
Press briefly to skip to the next track. Press and hold this key to fast forward through a track that is playing or paused. Press and hold this key when the CD is stopped to automatically skip forward (increment) though the tracks.
⑱ ◀◀, ◀◀ key
Press briefly to skip to the previous track. Press and hold this key to fast reverse through a track that is playing or paused. Press and hold this key when the CD is stopped to automatically skip backward (decrement) though the tracks.
⑲ FLASH BACK key
Press during playback to jump to a point in the track a few seconds earlier and continue playback. Set the number of seconds in the SETUP & MISC. screen. (See “Jumping back a few seconds (FLASH BACK)” on page 24.)
Names and functions of parts
Front
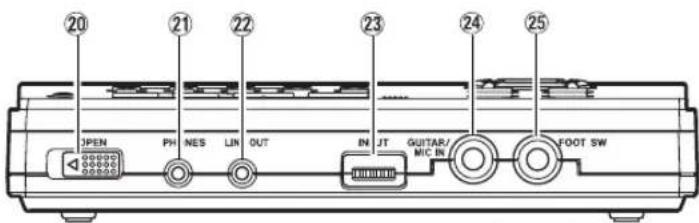
⑳ OPEN switch
Slide this switch away from the PHONES jack to open the control panel and insert and remove discs.
②1 PHONES jack (stereo minijack)
Connect headphones to this jack to output the CD playback signal and the input signal from the GUITAR/MIC IN jack.
②2 LINE OUT jack (stereo minijack)
Outputs the CD playback signal and input signal from the GUITAR/MIC IN jack. Connect an audio system, speakers with built-in amplifiers or similar equipment.
②3 INPUT dial
Adjusts the input level of the GUITAR/MIC IN jack signal.
②4 GUITAR/MIC IN jack (standard phone jack) Connect an electric guitar or microphone.
②5 FOOT SW jack (standard phone jack)
Connect a TASCAM RC-30P or other momentary footswitch (non-latching). Set the footswitch function on the SETUP & MISC. screen.
Rear
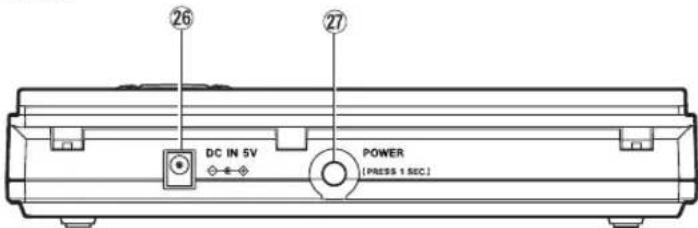
②6 DC IN 5V jack
Connect a TASCAM PS-P520 AC adapter (sold separately).
⑳ POWER switch
Turn the power ON and OFF. Press and hold the switch for more than one second to turn the power ON and OFF.
Making connections
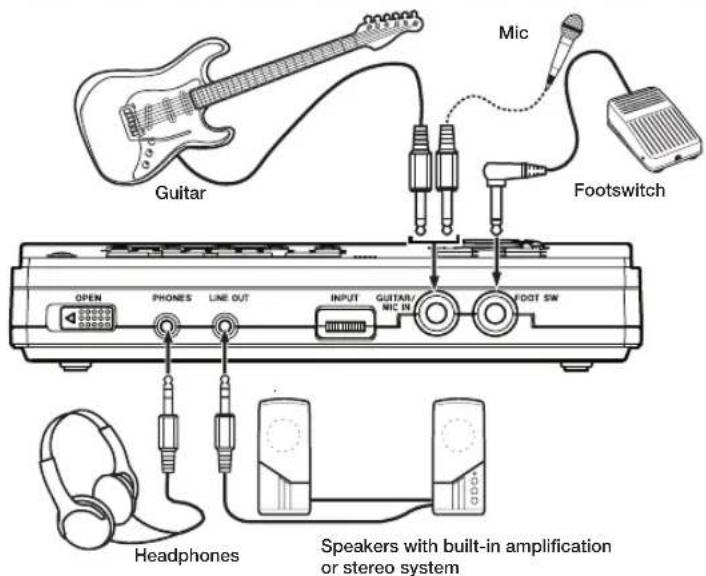
• PHONES jack: headphones
• LINE OUT jack: audio system, speakers with built-in amplifiers, etc. (Use a conversion cable as necessary.)
• GUITAR/MIC IN jack: guitar or mic
- FOOT SW jack: TASCAM RC-30P or other momentary footswitch (non-latching)
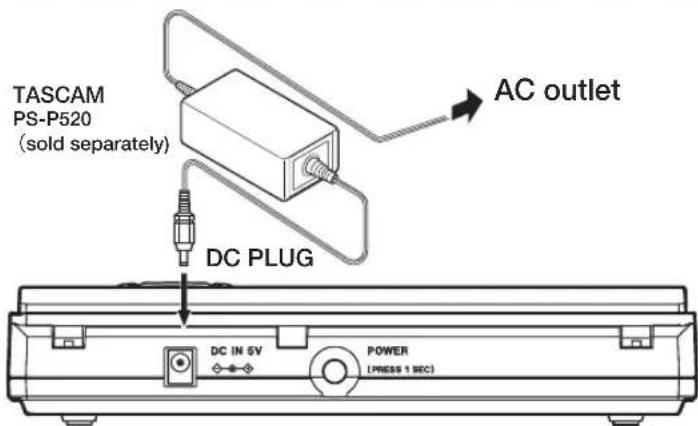
- DC IN 5V: PS-P520 AC adapter (sold separately) (See "Operation with an AC adapter" on page 15.)
Screen appearance and operation
Screen overview
The unit display shows one of the following screens according to the active function. All of these screens can be opened by pressing their dedicated keys. The TIME DISPLAY screen also appears immediately after the unit's power is turned ON.
| Screens Keys | |
| TIME DISPLAY TIME DISPLAY | |
| TEMPO CHANGE TEMPO | |
| KEY & PITCH KEY | |
| GUITAR CANCEL GUITAR CANCEL | |
| EFFECTOR EFFECT | |
| LEVEL LEVEL | |
| TUNER TUNER | |
| SETUP & MISC. MISC. | |
| PHONES VOLUME PHONES VOLUME (+,-) | |
TIME DISPLAY screen
The TIME DISPLAY screen appears immediately after the player's power is turned ON.
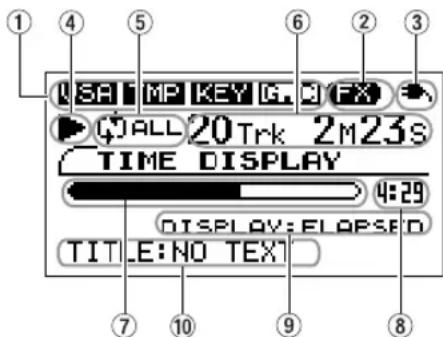
① VSA, TMP, KEY, G.C icons The VSA, tempo change, key change and guitar cancel icons appear in inverse when their functions are on.
② FX icon This icon lights when the guitar or mic effects are operating.
③ Power status indicator Shows the status of batteries when they are in use (See “Using batteries” on page 10.). “→” appears when AC power is in use.
Screen appearance and operation
④ Playback status
When the CD is playing (▶), paused (■), fast forwarding (▶▶), or fast reversing (◀◀) the corresponding icon appears. No icon appears when playback is stopped.
⑤ Playback mode
When the loop mode, repeat mode or single mode is ON, its corresponding icon appears. (See “Loop playback” on page 27, and “Repeat playback” and “Selecting the play mode” on page 28.)
⑥ CD time display
Shows the CD time. Set the displayed time mode on the SETUP & MISC screen. (See “Setting the time display” on page 37.)
⑦ CD playback position
Shows the current playback position of the CD with a bar display.
⑧ Time elapsed/remaining
Depending on the setting, shows the elapsed time or remaining playback time of the current track or the total remaining playback time of the CD. (See “Setting the time display” on page 37.)
⑨ CD time display mode
Shows the CD time display mode. (Settings cannot be made on this screen.)
⑩ Title
When playing a CD with CD text data, the titles of the CD and playing track appear.
Screen appearance and operation
Other screens
Shared features
The screen name, power status, CD player operation status, track number and CD playback time are shown on every screen.
The EFFECTOR, LEVEL and TUNER screens appear as follows. All other screens appear the same as the TIME DISPLAY screen. (See the "TIME DISPLAY screen" on page 21.)
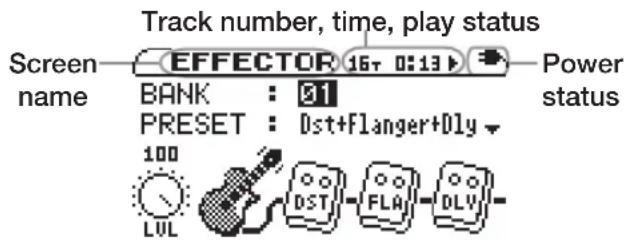
Display of playback functions (VSA, TMP, KEY, G.C)
The status of every playback function is shown at the top of the TEMPO screen, KEY & PITCH screen, GUITAR CANCEL screen, and SETUP & MISC. screen in the same way as on the TIME DISPLAY screen.
Settings
Every screen other than the TIME DISPLAY screen has settings. See “Making settings” on page 23 for details.
Making settings
Settings and selections can be made as necessary on every screen except the TIME DISPLAY screen. Use the CURSOR and VALUE keys as necessary to make settings and selections.
Selecting items for setting
Use the CURSOR (▲, ▼) keys.
The value of the selected item is shown in highlighted in inverse.
On the EFFECTOR and LEVEL screens, some items are selected by the CURSOR (◀, ▶) keys.
NOTE
When there are other items above or below the items currently onscreen ▲ or ▼ appears on the right side of the screen.
Setting item values
Use the VALUE (+, -) keys. The selected values (settings) take effect immediately. (Confirmation is not necessary.)
Listening to CDs
Basic CD playback
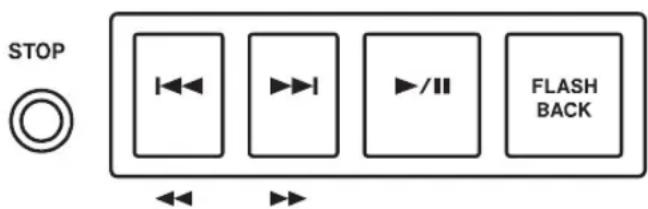
Starting playback
When the CD is stopped or paused, press the ▶/■ key to start playback.
Stopping playback
When the CD is playing, press the STOP key to stop playback.
Selecting tracks
Press the ▶▶ or ◀◀ key when the CD is playing, paused or stopped to skip to the beginning of the previous or next track. Press and hold the ▶▶ or ◀◀ key when stopped to increase or decrease the track number.
Searching forward and backward
Press and hold the ▶▶ or ◀◀ key when the CD is playing or paused during playback to fast forward or fast reverse.
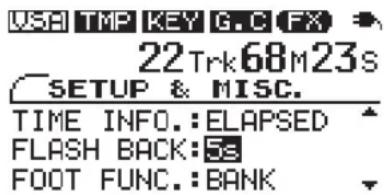
Jumping back a few seconds (FLASH BACK)
Press the FLASH BACK key during playback when you want to jump back to a point a few seconds in the track and continue play. The initial default setting for this jump is 3 seconds, but you can set it between 1 and 5 seconds using the following procedure.
1 Press the MISC. key to open the SETUP & MISC. screen.
2 Use the CURSOR (▲, ▼) keys to select FLASH BACK.
3 Use the VALUE (+, -) keys to set the value between one and five seconds (1 s-5 s).
Listening to CDs
Adjusting the volume
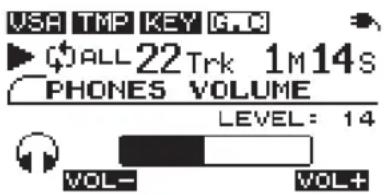
When listening through headphones, use the PHONES VOLUME (+, -) keys to adjust the volume.
When you use the PHONES VOLUME keys, the PHONES VOLUME screen appears showing the headphones output level as a numerical value and a bar. After a few seconds, the display automatically returns to the previous screen.
Changing the tempo
You can change the playback tempo, slowing it by up to 50%.
1 Press the TEMPO key to open the TEMPO CHANGE screen.
2 When the TEMPO item is selected, use the VALUE (+, -) keys to adjust the tempo (%).
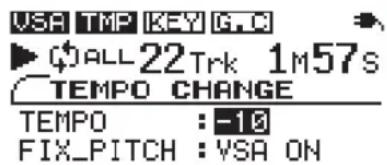
When the TEMPO value is set to anything other than 0, the tempo mode is ON, and playback follows the set tempo. TMP appears in inverse at the top of the screen.
NOTE
Press both VALUE (+, -) keys simultaneously to reset the tempo adjustment to 0.
Changing the pitch with the tempo
When the Variable Speed Audition (VSA) function is ON, the playback pitch of a track does not change when the tempo is changed. If you want the pitch rise and fall as the tempo is increased and decreased like conventional tempo control, turn the VSA function OFF. (The default setting for VSA is ON.)
1 Press the TEMPO key to open the TEMPO CHANGE screen.
2 Use the CURSOR ▼ key to select the FIX PITCH item, and the VALUE (−) key to select USA OFF.
Listening to CDs
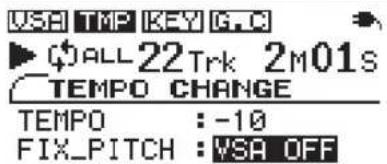
When the VSA function is OFF, the 169 at the top of the screen appears normally.
Changing only the pitch
You can change the pitch without changing the tempo.
1 Press the KEY key to open the KEY & PITCH screen.
2 With the KEY item selected, use the VALUE (+, -) keys to adjust the pitch up or down in semitones.
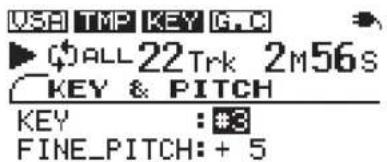
The KEY item allows the pitch to be raised or lowered 1 to 6 semitones ( 6 - 6 ). Any setting other than changes the playback pitch and the play icon appears in inverse.
3 Use the CURSOR ▼ key to select the FINE PITCH item and the VALUE (+, -) keys to make minute adjustments to the pitch in cents (1/100 semitone).
NOTE
Select the KEY or FINE PITCH item and press both VALUE (+, -) keys simultaneously to reset the adjustment of that setting to 0.
Even if the KEY item setting is "0", the KEY at the top of the screen appears in inverse if FINE PITCH is adjusted.
Reducing the sound of recorded guitars
You can reduce the recorded sound of guitars on a CD.
1 Press the GUITAR CANCEL key to open the GUITAR CANCEL screen.
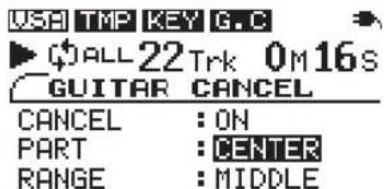
2 With the CANCEL item selected, use the VALUE (+, -) keys to turn the setting ON.
Listening to CDs
When the guitar cancel function is ON, the F.C. at the top of the screen appears in inverse.
Depending on the music, the guitar cancel function may not reduce the recorded guitar sound sufficiently. If this occurs, changing the PART and RANGE settings might make the reduction more effective. Listen to the music as you adjust the settings to achieve the best effect.
NOTE
Depending on the recording of the music, reduction of the guitar part with this function may not be possible.
PART
Adjust this setting to match the stereo position of the sound that you want to reduce between LEFT 10 and RIGHT 10. The initial setting is CENTER.
RANGE
Select MIDDLE or ALL for the range of sound reduction. The default setting is MIDDLE.
Loop playback
With this function you can continuously repeat the playback of a selection that you make (loop playback).
1 Press the IN/OUT key during playback to set the point when you want to start loop playback. The current position is set as the IN point, and the Symbol
appears below the playback position display bar at that point.
2 Press the IN/OUT key at the point when you want loop playback to stop. The current position is set as the OUT point, and the symbol appears below the play-back position display bar at that point. After setting the OUT point, loop playback begins between the IN and OUT points.
The Playmode icon appears on the left of the display.
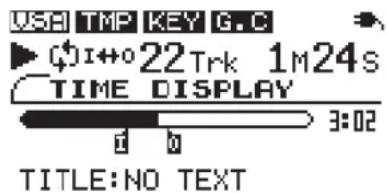
To stop loop playback, press either the LOOP key or the IN/OUT key.
If you press the LOOP key, the loop interval settings are saved, and if you press the LOOP key again loop playback of the set interval begins again.
If you press the IN/OUT key, the loop interval settings (IN point and OUT point settings) are canceled.
27 TASCAM CD-GT2
Listening to CDs
Selecting the play mode
This device has the two following play modes.
ALL mode (initial setting)
This is the ordinary mode. Once you start playback, the disc will play through to the end.
SINGLE mode
After playback of a track is started, that track will play to the end.
Use the following procedures to select the play mode.
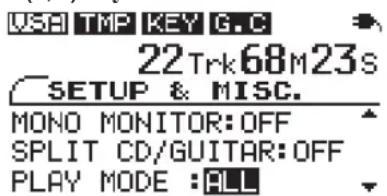
1 Press MISC. to open the SETUP & MISC. screen.
2 Use the CURSOR ▲/▼ keys to select PLAY MODE and the VALUE (+, -) keys to select ALL or SINGLE.
NOTE
If you select SINGLE, appears to the left of the time display.
Repeat playback
In repeat playback mode, depending on the play mode setting, all tracks (ALL play mode) or the current track (SINGLE play mode) will play back repeatedly.
When loop playback in (out ) points are not set, press the LOOP key to start repeat playback.
NOTE
Use the REPEAT item on the SETUP & MISC. screen to set repeat playback ON and OFF.
When the repeat setting is set to ALL, Appears.
When the repeat setting is set to SINGLE, it appears.
Using guitars and mics
By connecting a guitar or mic to this player, you can mix the input from the guitar or mic with the CD playback sound. You can also use the built-in guitar and mic effects for guitar and singing practice
Setting the input
When shipped from the factory, the GUITAR/MIC IN jack is set for guitar input. Use the following procedures to set the unit for mic input.
1 Press the LEVEL key to open the LEVEL screen.
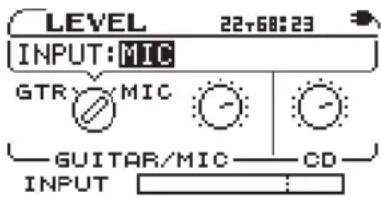
2 Use the CURSOR (▶) key to choose INPUT (initial setting is GUITAR), and use the VALUE (+) key to set it to MIC.
NOTE
The effects available change according to the INPUT setting (See "Using built-in effects" on page 30.).
Adjusting the input level
Use the INPUT volume control to the right of the GUITAR/MIC
IN jack to adjust the input level. Use the input level meter at the bottom of the LEVEL screen as shown on the preceding page for guidance.
Adjusting the monitoring volume
Use the PHONES VOLUME (+, -) keys to adjust the headphones output volume. Follow the same procedure used when adjusting the playback volume of a CD. (See “Adjusting the volume” on page 25.)
NOTE
Adjust the volume on the external device when using an audio system or speakers with built-in amplifiers to monitor through the LINE OUT jack. You cannot adjust the output level of this device's LINE OUT jack.
Playing along with a CD
This device combines the signal input through the GUITAR/MIC IN jack and the CD playback signal and outputs this mix to the PHONES and LINE OUT jacks. In other words, you can play your guitar or sing through a mic connected to the player and hear this sound along with the playing CD.
Using guitars and mics
Use the following procedures to adjust the CD playback signal and input signal levels independently to achieve the mix balance that you desire.
1 Press the LEVEL key to open the LEVEL screen.
The GUITAR/MIC and CD knob icons appear. These adjust the levels of the input signal from the GUITAR/MIC IN jack and the CD playback signal.
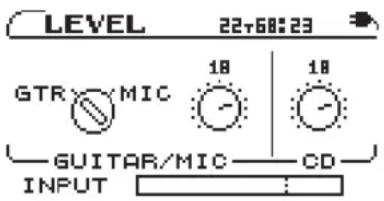
2 Use the CURSOR (◀, ▶) keys to select the knob that you want to adjust. The level value of the selected knob appears as a pop-up in inverse.
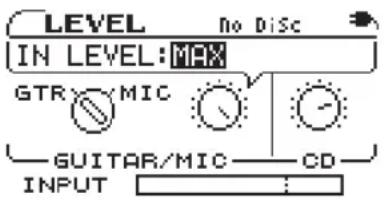
3 Use the VALUE (+, -) keys to adjust the level. The level knob icon rotates as you change the value.
Using built-in effects
This device has a built-in multi-effects processor.
Depending on the INPUT setting (GUITAR/MIC IN jack input settings) on the LEVEL screen, either the guitar or mic effects are usable. (See “Setting the input” on page 29.)
Press the EFFECT key to open the EFFECTOR screen.
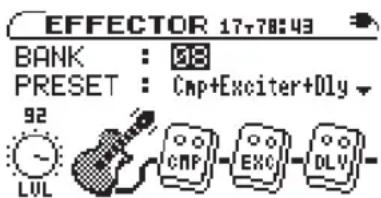
On the EFFECTOR screen, use the CURSOR (▲, ▼) keys to select items and the VALUE (+, -) keys to adjust settings in the same way as on other screens. Use the CURSOR (◀, ▶) keys to move between level knobs and effect modules.
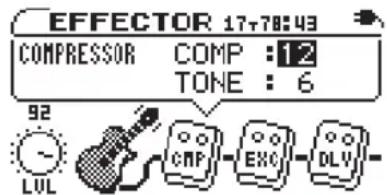
As shown in the figure above, in addition to BANK and PRESET, the EFFECTOR screen also shows the LUL (level) knob and icons for up to three guitar or microphone effect modules. The guitar or microphone icon shows whether the effects that can currently be used are for a guitar or mic and have no settings, but all other icons contain adjustable settings. The types of effect modules change depending on the GUITAR/MIC IN jack input setting.
When you select the L ∪L knob or effect modules, a pop-up appears for the setting items. Use the CURSOR (▲, ▼) keys to
Using guitars and mics
select settings in the pop-up, and use the VALUE (+, -) keys to adjust these settings.
BANK
Select bank 01-18 or BYPASS.
Using the PRESET item explained below, you can set a preset effect for each bank. By making presets of settings that you use frequently in each bank, you can quickly recall the settings you desire just by switching through the banks. You can save separate settings for each BANK for both GUITAR and MIC input settings.
Select BYPASS if you do not want to use effects.
PRESET
Choose the effect preset that you want. Each preset has a different combination of up to three effect modules.
Either guitar or mic presets are available depending on the GUITAR/MIC input setting.
See the “Effect presets list” on page 39 for details about the effect modules in each preset.
LVL knob
Adjusts the output level of the effect. Use the CURSOR (◀, ▶) keys to select the LUL knob and open the pop-up with the level value highlighted. Use the VALUE (+, −) keys to adjust the level setting between 0–100.
Effect modules
Use the CURSOR (◀, ▶) keys to select the module icons and open a pop-up with parameter settings as shown in the figure below. The parameters depend on the type of module. For details about the parameters for each module type, see the “Effect module parameter list” on page 42.
NOTE
When the LUL knob or an effect module parameter is selected, use the CURSOR (◀, ▶) keys to move between modules and the CURSOR (▲, ▼) keys to move between settings.
Other functions
Using the metronome
This device has a built-in metronome that you can use in guitar practice, for example.
1 Press the MISC. key to open the SETUP & MISC screen.
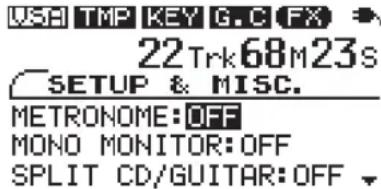
2 Use the CURSOR (▲, ▼) keys to select the METRONOME item.
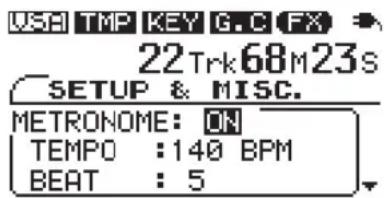
3 Use the VALUE (+) key to turn it ON. The metronome starts with the tempo and beat settings last used (or the default settings if this is the first time used).
4 When the metronome is ON, its TEMPO and BEAT settings appear. Use the CURSOR (▲, ▼) keys to select the items, and the VALUE (+, -) keys to change their settings.
NOTE
Turning the metronome ON will stop CD playback.
TEMPO
Set the tempo between 40 and 220 beats per minute (BPM).
BEAT
Set the rhythmic pulse between 2 and 6 or set it to “☐” for no accented beats.
NOTE
TEMPO and BEAT settings are save when the power is turned OFF and will be the same the next time that you use the metronome.
If you press the CURSOR ▼ key when the BEAT item is selected, the MONO MONITOR item is selected and the metronome settings window disappears. Press the CURSOR ▲ key to return to the metronome settings.
Other functions
Stopping the metronome
Do one of the following:
- Press the STOP key.
- Turn the METRONOME item OFF on the SETUP & MISC screen.
NOTE
Pressing any of the CD player operation keys will also turn the metronome OFF.
Using the tuner
This device has a built-in tuner that can be used not only for tuning a guitar, but also for outputting a tuning pitch that you select.
First, select the tuner mode.
1 Press the TUNER key to open the TUNER screen.
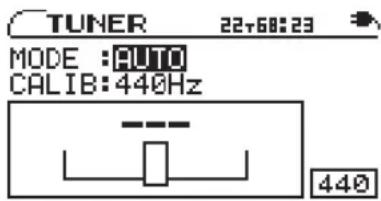
2 With the MODE value selected, use the VALUE (+, -) keys to select one of the following tuner modes.
AUTO chromatic tuner
GUITAR guitar tuner
OSC. oscillator mode
These modes are explained separately in the following sections.
AUTO (chromatic tuner)
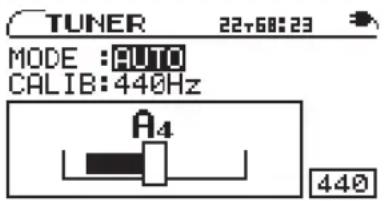
In this ordinary mode, you do not need to change settings for each of the strings being tuned. The tuning meter and input signal pitch appear on the screen (see the preceding figure). (“-- -” appears when there is no input).
1 Connect a guitar to the GUITAR/MIC IN jack and play the string that you want to tune. The pitch closest to the string's frequency appears at the top of the meter.
2 Tune the guitar roughly until the desired pitch name is shown. Fine tune the guitar until the center of the meter is highlighted. A bar appears to the left if the tuning is too low and a bar appears to the right if it is too high. The longer the bar is the more out of tune the string is.
NOTE
Use the CURSOR ▼ key to select CALIB, and the VALUE (+,-) keys to set the standard frequency of middle A between 435 Hz and 445 Hz. This setting affects all tuner modes.
This setting affects all tuner modes.
Other functions
GUITAR (guitar tuner mode)
Change the setting for each string to be tuned.
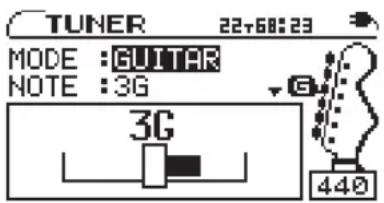
1 Use the CURSOR ▼ key to select CALIB, and the VALUE (+, -) keys to set the standard frequency of middle A between 435 Hz and 445 Hz.
This setting affects all tuner modes.
2 Use the CURSOR ▲ key to select NOTE, and use the VALUE (+, -) keys to select the string that you are tuning (1E, 2B, 3G, 4D, 5A, 6E).
The note name of the selected string appears at the top of the meter. (A guitar peg also appear at the right side of the screen.)
3 The guitar is tuned when the center of the meter is highlighted. The tuning procedures are the same as described above for the AUTO mode.
OSC. (oscillator mode)
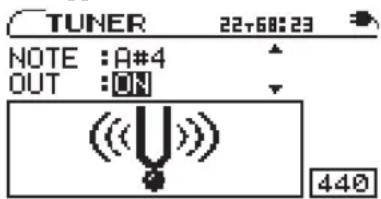
The built-in oscillator can output a sine wave of a pitch in the three octaves between C4 and B6 through the PHONES and LINE OUT jacks. The oscillator mode has the following four setting items. Use the CURSOR (▲, ▼) keys to select the items and the VALUE (+, −) keys to change their settings.
NOTE
Set the output pitch (C4–B6).
OUT
Set whether or not the oscillator sound is output from the PHONES and LINE OUT jacks. When ON, an image of a vibrating pitchfork appears on screen.
Other functions
LEVEL
Adjust the output sound level between 0 and 100 with the VALUE (-, +) keys.
CALIB
Set the standard frequency of middle A between 435 Hz and 445 Hz. This setting affects all tuner modes.
Using a footswitch
You can use a footswitch to control certain operations. A footswitch can be set to control FLASH BACK, fast reverse or fast forward, as well as to change the effect bank or turn the effects ON and OFF.
Connecting a footswitch
Connect a TASCAM RC-30P or other momentary footswitch (non-latching) to the FOOT SW jack on the front of the unit. After connection, press the MISC. key to open the SETUP & MISC screen and make settings as necessary.
Setting the function
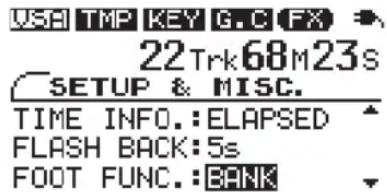
Use the CURSOR (▲, ▼) keys to select FOOT FUNC, and the VALUE (+, -) keys to choose one of the following functions.
FLASH functions like the FLASH BACK key
REW functions the same as the ◀◀/◀◀ key
FF functions the same as the ▶▶/▶▶ key
BANK changes the effect bank
EFFECT turns the effects ON and OFF
Setting the polarity
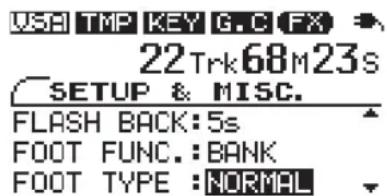
When using a footswitch other than a TASCAM RC-30P, the polarity might need to be changed. Use the CURSOR (▲, ▼) keys to select the FOOT TYPE item and the VALUE (+, -) keys to select NORMAL or INVERT according to the type of footswitch used.
Making various settings
You can change various settings to optimize the device for your use environment and other requirements. All of the following items are on the SETUP & MISC screen.
Press the MISC. key to open the SETUP & MISC. screen. Use the CURSOR (▲, ▼) keys to select the desired item and the VALUE (+, -) keys to set the value.
Mono monitoring
You can output a mono signal from the PHONES and LINE OUT jacks.
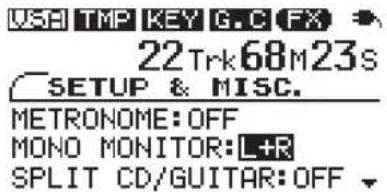
Select one of the following MONO MONITOR settings.
OFF ordinary stereo monitoring (default setting)
L+R both channel signals are mixed and output in mono
L left channel signal is output on both channels
R right channel signal is output on both channels
Splitting the CD and guitar sounds
You can split the CD playback signal and guitar (or mic) signal output through the PHONES and LINE OUT jacks so that only the CD is on the left and only the guitar is on the right.
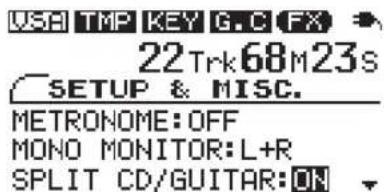
Turn the SPLIT CD/GUITAR setting ON to output the CD playback signal to the L channel in mono and the GUITAR/MIC IN signal to the R channel.
Making various settings
Setting the time display
You can set how the CD time is displayed.
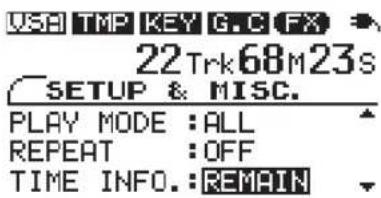
Select one of the following TIME INFO settings.
ELAPSED elapsed time of current track REMAIN remaining time of current track TOTAL REMAIN remaining time of entire disc
NOTE
The selected time display mode is shown on the TIME DISPLAY screen.
Changing the display contrast
You can change the display contrast as needed to suit the surrounding lighting and other conditions.
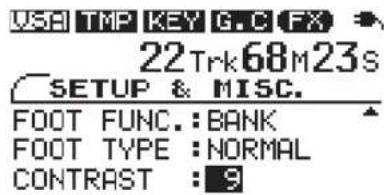
Set the CONTRAST between 1 and 10 with higher numbers providing greater contrast.
Restoring all settings to their default values
Press and hold the ◀◀ and ▶▶ keys simultaneously as you turn the power ON to open the INITIALIZE screen at startup.
Follow the instruction on screen after startup, and press the ▶/□ key to restore every effect parameter, playback setting and other function to the default values set when the unit was shipped from the factory.
Specifications
CD player
Compatible CD formats: CD-DA (audio CD), CD-TEXT
Compatible disc formats: 12cm/8cm CD, CD-R, CD-RW
A/D converter: 24-bit
D/A converter: 24-bit
Internal DSP calculations: 32-bit
Sampling frequency: 44.1 kHz
Quantization bit rate: 16-bit linear
Frequency characteristics: 20–20,000 Hz +0.5/−5 dB
S/N ratio: 85 dB
Dynamic range: 90 dB
Harmonic Distortion: 0.05% or less (200 Hz–20 kHz)
Channel separation: 80 dB
Audio input and output ratings
GUITAR/MIC IN jack
Connector: 6.3 mm (1/4") mono phone jack
Standard input levels: -15 dBV (GUITAR)
$$ 4 0 \mathrm{dBV} (\text { MIC }) $$
Maximum input levels: +6 dBV (GUITAR)
$$ - 1 9 \mathrm{dBV} (\text { MIC }) $$
LINE OUT jack:
Connector: 3.5 mm (1/8") stereo minijack
Standard output level: -10 dBV
Maximum output level: +6 dBV
PHONES jack:
Connector: 3.5 mm (1/8") stereo minijack
Maximum output: 15mW + 15mW (into 32
Other characteristics
Power: 4 AA batteries or
DC-5V (requires PS-P520 AC adapter sold separately)
Power consumption: 2.5 W (during AC adapter use)
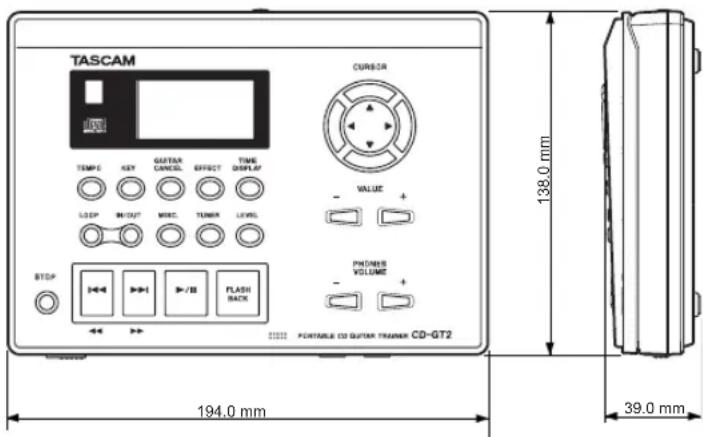
Maximum external dimensions (width x height x depth):
Weight: 550 g (1.2 lbs) (not including batteries)
Accessories: Owner's Manual, Troubleshooting Guide, Warranty Card
- Specifications and appearance may be changed without notice for the purpose of product improvement.
- Illustrations and other details in this Owner's Manual may differ from the actual product.
Notes
Effect preset lists
Guitar effects
| Preset number | Preset Name |
| 1 | Dst+Flanger+Rev |
| 2 | Dst+Flanger+Dly |
| 3 | Dst+Phaser+Rev |
| 4 | Dst+Phaser+Dly |
| 5 | Dst+Exciter+Rev |
| 6 | Dst+Exciter+Dly |
| 7 | Dst+Chorus+Rev |
| 8 | Dst+Chorus+Dly |
| 9 | Dst+Tremolo+Rev |
| 10 | Dst+Tremolo+Dly |
| 11 | Dst+Vibrato+Rev |
| 12 | Dst+Vibrato+Dly |
| 13 | Dst+Autowah+Rev |
| 14 | Dst+Autowah+Dly |
| 15 | Dst+Pitch+Rev |
| 16 | Dst+Pitch+Dly |
| 17 | Dst+Reverb |
| 18 | Dst+Delay |
| 19 | Dstortion |
| 20 | O.D+Flanger+Rev |
| 21 | O.D+Flanger+Dly |
| 22 | O.D+Phaser+Rev |
| 23 | O.D+Phaser+Dly |
| 24 | O.D+Exciter+Rev |
| 25 | O.D+Exciter+Dly |
| 26 | O.D+Chorus+Rev |
| 27 | O.D+Chorus+Dly |
| 28 | O.D+Tremolo+Rev |
| Preset number Preset Name |
| 29 O.D+Tremolo+Dly |
| 30 O.D+Vibrato+Rev |
| 31 O.D+Vibrato+Dly |
| 32 O.D+Autowah+Rev |
| 33 O.D+Autowah+Dly |
| 34 O.D+Pitch+Rev |
| 35 O.D+Pitch+Dly |
| 36 Overdrive+Rev |
| 37 Overdrive+Dly |
| 38 Overdrive |
| 39 Cmp+Flanger+Rev |
| 40 Cmp+Flanger+Dly |
| 41 Cmp+Phaser+Rev |
| 42 Cmp+Phaser+Dly |
| 43 Cmp+Exciter+Rev |
| 44 Cmp+Exciter+Dly |
| 45 Cmp+Chorus+Rev |
| 46 Cmp+Chorus+Dly |
| 47 Cmp+Tremolo+Rev |
| 48 Cmp+Tremolo+Dly |
| 49 Cmp+Vibrato+Rev |
| 50 Cmp+Vibrato+Dly |
| 51 Cmp+Autowah+Rev |
| 52 Cmp+Autowah+Dly |
| 53 Cmp+Pitch+Rev |
| 54 Cmp+Pitch+Dly |
| 55 Compressor+Rev |
| 56 Compressor+Dly |
| Preset number Preset Name |
| 57 Compressor |
| 58 Flanger |
| 59 Flanger+Delay |
| 60 Flanger+Reverb |
| 61 Phaser |
| 62 Phaser+Delay |
| 63 Phaser+Reverb |
| 64 Exciter |
| 65 Exciter+Delay |
| 66 Exciter+Reverb |
| 67 Chorus |
| 68 Chorus+Delay |
| 69 Chorus+Reverb |
| 70 Tremolo |
| 71 Tremolo+Delay |
| 72 Tremolo+Reverb |
| 73 Vibrato |
| 74 Vibrato+Delay |
| 75 Vibrato+Reverb |
| 76 Autowah |
| 77 Autowah+Delay |
| 78 Autowah+Reverb |
| 79 Pitch |
| 80 Pitch+Delay |
| 81 Pitch+Reverb |
| 82 Reverb |
| 83 Delay |
Effects preset lists
Vocal effects
| Preset number Name | Effect | Parameter range | |
| VOCAL_01 | Chorister Layered vocal sound created by detuning | 0—20 | |
| VOCAL_02 | Emphasis Brings out vocals that are hard to hear | 0—20 | |
| VOCAL_03 | Shout Distortion for vocals 0—30 | ||
| VOCAL_04 | Mood Moody vocal sound 0—30 | ||
| VOCAL_05 | Echo 1 Echo sound with compression for vocals | 0—20 | |
| VOCAL_06 | Echo 2 Echo sound with vibrato for vocals | 0—99 | |
| VOCAL_07 | Quivering | Adds vibrato to vocals | 0—30 |
| VOCAL_08 | Duet | Adds female or male vocal harmony | -17—+17 |
| VOCAL_09 | Lo-Fi Adds a lo-fi sound to vocals | 0—12 | |
| VOCAL_10 | Megaphone | Makes vocals sound like they are sung through a megaphone | 0—99 |
| VOCAL_11 | Screaming | Flanger for vocals | 0—30 |
| VOCAL_12 | Panning | Pan vocals left and right | 0—30 |
Effect module parameter list
This table explains the features of all the effect modules that comprise the effect presets of this device. Some individual effects have greater results when used in combination with other effect modules. If you are unable to achieve the sound you seek even after experimenting with all the parameters of each module in an effect preset, try a different preset.
| Module Effect | Parameter Details Range | |||
| Distortion (DST) | Heavily distorts the guitar sound, making it stand out with thickness and sustain for a nice lead sound. | DIST | Adjusts the amount of distortion 0–30 | |
| TONE | Adjusts the tone 0–12 | |||
| Overdrive (OD) | Lightly distorts the guitar sound giving it the sound of an overdriven amplifier—great for creating a warm classic rock sound. | DRIU | Adjusts the amount of overdrive 0–30 | |
| TONE | Adjusts the tone 0–12 | |||
| Compressor (CMP) | Compresses the guitar sound, giving it clarity and sustain—good for creating appealing, clean sounds. | COMP | Adjusts the amount of compression 0–30 | |
| TONE | Adjusts the tone 0–12 | |||
| Flanger (FLA) | Gives the sound a moving modulation that can be compared to the sound of a jet engine. | SPD | Adjusts the speed of modulation 0–30 | |
| MIX | Adjusts the amount of the effect 0–20 | |||
| Phaser (PHA) | Gives the sound a rough modulation useful for creating 70s funk style sounds. | SPD | Adjusts the speed of modulation | 0–30 |
| MIX | Adjusts the amount of the effect | 0–20 | ||
| Exciter (EXC) | Adds high frequencies to the original sound to make rich, shimmering tones that stand out. | FREQ | Adjusts the added high frequencies | 0–30 |
| MIX | Adjusts the amount of the effect | 0–20 |
Effect module parameter list
| Module Effect Parameter Details Range | ||||
| Chorus (CHO) | Adds a slightly detuned sound to create a wide, ensemble-like tone. This effect was popular in 70s hard rock and fusion. | DPTH | Adjusts the modulation depth 0–30 | |
| MIX | Adjusts the amount of the effect 0–20 | |||
| Tremolo (TRM) | Creates a cyclical variation in the volume. A sound like a rotary speaker can be achieved by combining it with delay. | SPD | Adjusts the speed of the effect. 0–30 | |
| MIX | Adjusts the amount of the effect 0–20 | |||
| Vibrato (VIB) | Creates a cyclical variation in the frequency for a regular pitch variation. | SPD | Adjusts the speed of the effect. 0–30 | |
| MIX | Adjusts the amount of the effect 0–20 | |||
| Autowah (WAH) | Creates a sound like a wah pedal that is great for funky sounds. Vary your picking force when using this effect. | SENS | Adjusts sensitivity to picking force 0–30 | |
| MIX | Adjusts the amount of the effect 0–20 | |||
| Pitch Shifter (PIT) | Changes the pitch of the input signal and can be used to create a doubled lead sound, for example. Set PIT between 6 and 17, or -6 and -17, for semitone changes. | PIT | Adjusts pitch in semitones (±6–17) or in smaller intervals (-5 to +5) | ±17 |
| MIX | Adjusts the amount of the effect 0–20 | |||
| Reverb (REV) | Creates reflections, like the echoes in a stone church, to give the sound greater width. Surf rock uses this effect extensively. | TIME | Adjusts the reverberation time | 0–25 |
| MIX | Adjusts the amount of the effect 0–20 | |||
| Delay (DLY) | Adds echoes to the sound. Adjust the TIME and turn the MIX level up for a rockabilly sound. | TIME | Adjusts the delay time | 0–99 |
| MIX | Adjusts the amount of the effect 0–20 | |||
TASCAM
TEAC Professional Division
CD-GT2
TEAC CORPORATION
Phone: +81-422-52-5082 www.tascam.com
3-7-3, Nakacho, Musashino-shi, Tokyo 180-8550, Japan
TEAC AMERICA, INC.
Phone: +1-323-726-0303 www.tascam.com
7733 Telegraph Road, Montebello, California 90640
TEAC CANADA LTD.
Phone: +1905-890-8008 www.tascam.com
5939 Wallace Street, Mississauga, Ontario L4Z 1Z8, Canada
TEAC MEXICO, S.A. De C.V
Phone: +52-555-581-5500 www.tascam.com
Campesinos No. 184, Colonia Granjes Esmeralda, Delegacion Iztapalapa CP 09810, Mexico DF
TEAC UK LIMITED
Phone: +44-8451-302511 www.tascam.co.uk
Unit 19 & 20, The Courtyards Hatters Lane, Watford, Hertfordshire. WD18 8TE, U.K.
TEAC EUROPE GmbH
Phone: +49-611-71580 www.tascam.de
- CD-GT2
- Portable CD
- Guitar Trainer
- IMPORTANT SAFETY INSTRUCTIONS
- FOR U.S.A.
- TO THE USER
- CAUTION
- IMPORTANT SAFETY PRECAUTIONS
- SAFETY INFORMATION
- Optical pickup:
- Contents
- Introduction
- Features of this device
- CD player functions
- Other functions
- Using this manual
- Accessories
- About this manual
- Environmental considerations
- Beware of condensation
- Cleaning the unit
- Handling of compact discs
- Batteries
- Inserting batteries
- NOTE
- Quick Start Guide—Basic Operation
- Preparation
- Turn the power on
- Setting a CD
- Connecting headphones
- Playback
- Adjusting the volume
- Changing playback tempo
- Playing guitar
- Connecting a guitar
- Using the Effects
- Playing guitar along with a CD
- Turning off the power
- Restore all settings to original values
- About Power
- Using batteries
- Battery level display
- Battery life
- Operation with an AC adapter
- Turning the power ON and OFF
- Names and functions of parts
- Front
- Making connections
- Screen appearance and operation
- Screen overview
- TIME DISPLAY screen
- Other screens
- Shared features
- Display of playback functions (VSA, TMP, KEY, G.C)
- Settings
- Making settings
- Selecting items for setting
- Setting item values
- Listening to CDs
- Basic CD playback
- Starting playback
- Stopping playback
- Selecting tracks
- Searching forward and backward
- Jumping back a few seconds (FLASH BACK)
- Changing the tempo
- Changing the pitch with the tempo
- Changing only the pitch
- Reducing the sound of recorded guitars
- PART
- RANGE
- Loop playback
- Selecting the play mode
- ALL mode (initial setting)
- SINGLE mode
- Repeat playback
- Using guitars and mics
- Setting the input
- Adjusting the input level
- Adjusting the monitoring volume
- Playing along with a CD
- Press the LEVEL key to open the LEVEL screen.
- Using built-in effects
- BANK
- PRESET
- LVL knob
- Effect modules
- Using the metronome
- TEMPO
- BEAT
- Stopping the metronome
- Using the tuner
- AUTO (chromatic tuner)
- GUITAR (guitar tuner mode)
- (oscillator mode)
- OUT
- LEVEL
- CALIB
- Using a footswitch
- Connecting a footswitch
- Setting the function
- Setting the polarity
- Making various settings
- Mono monitoring
- Splitting the CD and guitar sounds
- Setting the time display
- Changing the display contrast
- Restoring all settings to their default values
- Specifications
- CD player
- Audio input and output ratings
- Other characteristics
- Notes
- Effect preset lists
- Effects preset lists
- Effect module parameter list
- TASCAM
- TEAC Professional Division
- TEAC CORPORATION
Brand : TEAC
Model : CD-GT2
Category : CD Player