
PCD450iP - CD Player TEAC - Free user manual and instructions
Find the device manual for free PCD450iP TEAC in PDF.


| Product Type | Portable CD Player with iPod/iPhone Dock |
| Brand | TEAC |
| Model | PCD450iP |
| Dimensions (approx.) | 200 x 150 x 30 mm (7.9 x 5.9 x 1.2 in) |
| Weight (approx.) | 0.5 kg (1.1 lbs) |
| Power Supply | AC adapter (DC 9V) or 6 x C-size batteries |
| Disc Compatibility | CD, CD-R, CD-RW, MP3-CD |
| iPod/iPhone Support | Compatible with iPod (30-pin) and iPhone (via dock) |
| Radio Tuner | AM/FM radio with digital tuning |
| Audio Output | Headphone jack (3.5mm), line output (RCA) |
| Display | LCD display with track and time information |
| Playback Features | Program play, repeat, random, intro scan |
| Remote Control | Includes remote control for convenience |
| Care and Cleaning | Wipe with a soft, dry cloth; do not use solvents. Clean CD lens with a lens cleaner. |
| Safety | Do not expose to moisture; use only recommended power supply; keep away from heat sources. |
| Spare Parts and Repairability | Contact TEAC service center for replacement parts; battery compartment cover, remote control, AC adapter available. |
| General Information | Designed for personal audio enjoyment with CD and iPod integration. User manual available for free download at notice-facile.com. |
Frequently Asked Questions - PCD450iP TEAC
User questions about PCD450iP TEAC
0 question about this device. Answer the ones you know or ask your own.
Ask a new question about this device
Download the instructions for your CD Player in PDF format for free! Find your manual PCD450iP - TEAC and take your electronic device back in hand. On this page are published all the documents necessary for the use of your device. PCD450iP by TEAC.
USER MANUAL PCD450iP TEAC
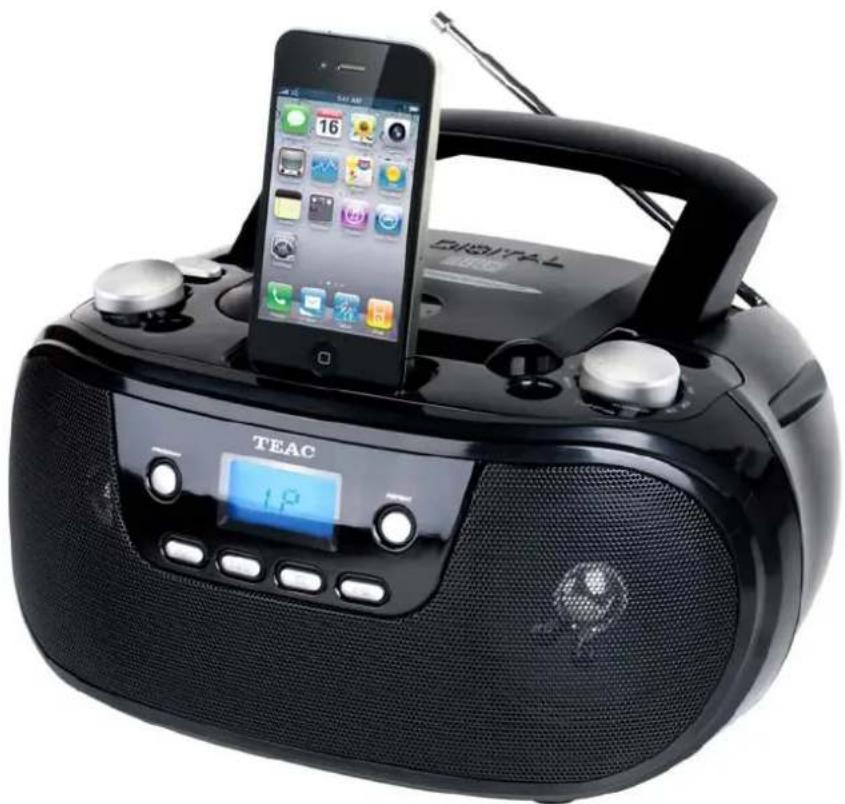
CD Radio with Docking for iPhone/iPod
natural_image
Black digital portable radio with a smartphone displaying the Home Studio app, no visible text or symbols on the device itself.Made for

iPod

iPhone
INSTRUCTION MANUAL
IMPORTANT!
WARRANTY INFORMATION INSIDE. PLEASE READ
TEAC
WARRANTY PROCEDURE
v1.5.2: DEC 2011
Please read the owner's manual carefully and ensure that you have followed the correct installation and operating procedures.
- Please read this warranty card.
- Keep your purchase receipt to enable you to proceed quickly in the event of a Warranty Service.
- If you require Warranty Service, please contact the TEAC Customer Support Hotline at 1300 553 315 for assistance. Please ensure that you have the model number, serial number and purchase receipt ready when you call.
Please complete the section below and keep this information for your own records.
Owner's Name
Owner's Address
Postcode
Model Name/No.
Serial No.
Dealer's Name
Dealer's Address
Postcode
Authorised Service Centres in Major Australian Cities
NSW
151 Arthur Street
Homebush West, NSW 2140
South Australia
11 McInnes Street
Ridleyton, SA 5008
Queensland
Unit 1, 320 Curtin Ave West
Eagle Farm, QLD 4009
Victoria
282 Normanby Road
South Melbourne, VIC 3205
Western Australia
Unit 2, 50 Pilbara Street
Welshpool, WA 6106
Thank you for selecting a TEAC product
If you should require assistance with your product regarding its setup or operation, or if any difficulties arise, please call us directly for advice between Monday to Friday at 8.30AM – 6PM AEST at the
TEAC Customer Support Hotline
1300 553 315
teacservicesupport@awa.com.au
www.teac.com.au
Our goods come with guarantees that cannot be excluded under the Australian Consumer Law. You are entitled to a replacement or refund for a major failure and for compensation for any other reasonably foreseeable loss or damage. You are also entitled to have the goods repaired or replaced if the goods fail to be of acceptable quality and the failure does not amount to a major failure.
Warranty Terms & Conditions
- TEAC warrants that this product is free from defects in material and workmanship under normal domestic use with reasonable care and skill. Maintenance and cleaning (i.e. laser head) is not covered by this warranty. The TEAC warranty only applies to TEAC products purchased, used and serviced in Australia.
- The benefits to the consumer given by this Warranty are in addition to other rights and remedies of the consumer under a law in relation to goods or services to which the warranty relates, being the Australian Consumer Law.
- Refund or replacement via your retailer is available for a period of 14 days after purchase for goods that have been inspected and determined to have a major failure. Refund and exchange is not applicable for change of mind.
- Subject to the terms herein, this warranty effectively covers the equipment as specified in the Warranty Periods Table below from the date of purchase.
| TEAC PRODUCT | WARRANTY PERIOD |
| LED/LCD TV 32" (80 cm) and above | 1 Year (In-Home Service/ Pick up Available)* |
| All other TEAC products | 1 Year (Carry-in Service) |
5. In Home Service/Pick up\* Service
This service will only be provided as part of this warranty if all the following conditions are met;
a) The product is indicated in the Warranty Period Table.
b) The product is within the warranty period.
c) The product is located within the normal service area of the local TEAC Authorised Service Centre.
If TEAC determines that the product is not repairable on site, TEAC can complete the repair by taking the product to a TEAC Authorised Service Centre.
Carry-in Service
Where In-Home service/Pick up* is not available, the purchaser is required to send the product to the nearest TEAC Authorised Service Centre for repair. In this event, proof of purchase is required to support a warranty claim. After the repair, the product will be available for collection by or return to the purchaser at a fee upon request. TEAC in-home service can be made available at a fee upon request.
- A 12-month replacement warranty is applicable to all Accessories such as Remote, Power Adaptors and Cables.
- TEAC will ensure to the best of its abilities that all required parts are made available for any required service/repair.
- TEAC Australia Pty Ltd and its Authorised Service Centres will use their best endeavours to complete product repairs within a reasonable period based on available resources and workload during the time when service is requested and performed.
- Refurbished parts may be used to repair the product. In the case of a replacement, the product may be replaced, with a refurbished unit of the same type or, if one is unavailable, a similar refurbished model with equal or better features & specifications.
- Please be advised that if the product presented for repair is capable of retaining user-generated data, the data may be lost during servicing. Customers are strongly encouraged to back up all important information/data before sending the product in for service/repair.
- Service will be provided only during normal business hours and under safety conditions and circumstances. TEAC and its authorised service agents can refuse any repair if safety, in relation to OH&S, becomes a concern to its staff or authorised service agents' personnel.
- The warranty is void and warranty claims may be refused, subject to the Australian Consumer Law, if:
a) The product was not transported, installed, operated or maintained according to manufacturer instruction, or
b) The product was abused, damaged, tampered, altered or repaired by any unauthorised persons, or
c) Product failure is due to accidents during use, installation or transit, power surges, use of defective or incompatible external devices, exposure to abnormal conditions such as excessive temperatures or humidity, or entry of liquids, objects or creatures into the product.
- No one is authorised to assume any liability on behalf of TEAC or impose any obligation on it, in connection with the sale of any equipment other than as stated in this warranty and outlined above.
- TEAC reserves the right to inspect and verify whether the product is exhibiting a major failure as claimed by customers/retailers.
- LCD dead pixel policy, please contact TEAC Customer Support Hotline on 1300 553 315 for assistance.
SAFETY PRECAUTIONS

CAUTION
The voltage supplied to the unit should match the voltage as printed on the AC adapter. If you are in any doubt regarding this matter, consult an electrician.
Do not open the cabinet because this might result in damage to the circuitry or electrical shock. If a foreign object should get into the unit, contact your dealer or service company.
When removing the AC power plug from the wall socket, always pull directly on the plug, never yank on the cord.
Placement of the device
Choose the installation location of your unit carefully. Avoid placing it in direct sunlight or close to a source of heat. You should also avoid locations that are subject to vibration, excessive heat, cold or moisture.
As the unit may become warm during operation, always leave sufficient space around it for ventilation.
Do not place the unit on an amplifier, a receiver or any other device that generates heat.
When the unit is turned on, if a TV is turned on nearby lines may appear on the TV screen depending on the frequency of the broadcast. This is not a malfunction of the unit or the TV. If you see such lines, move the unit and the TV further apart.
Maintenance
If the surface of the unit gets dirty, wipe with a soft cloth or use a diluted mild liquid soap. Allow the surface of the unit to dry completely before using.

For safety, disconnect the AC power plug from the outlet before using.
Never spray liquid directly on this unit.
Do not use thinner and alcohol as they could damage the surface of this unit.
TABLE OF CONTENTS
1. Introduction
Location of Controls 6
Power Supply 7
Using DC Power 7
2. Basic Function
General Operation 8
Aux In 8
Radio 8
3. iPod/iPhone operation
Basic Playback 9
4. CD Player I
Playing a CD 10
5. Maintenance&Safety
Precautions & General Maintenance --- 11
CD player and CD handing 11
6. Reference
Troubleshooting 12
Package Contents 13
Features 13
Technical Specification 13
LIST OF MAIN PARTS
 |  | 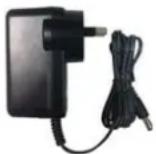 |  |
| Master Unit | Manual | DC Adaptor | Contact card |
1. INTRODUCTION
LOCATION OF CONTROLS
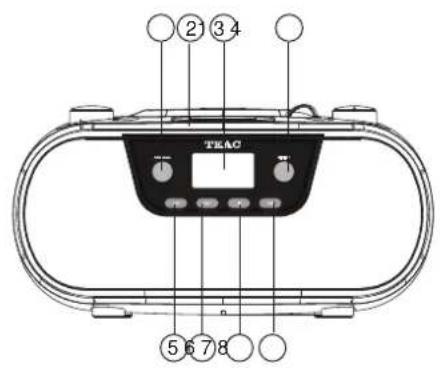
1. PROGRAM
- program and review programmed track number
2. iPod DOCK
- docking the iPhone/iPod vertically
3. DISPLAY
-show the CD function
4. REPEAT
- play the track with repeat mode.
5. SKIP
- skip track backward.
6. SKIP
- skip track forward.
7.
- stop CD playback
8. ▶ / II
- Starts or pause CD/iPhone/iPod play.
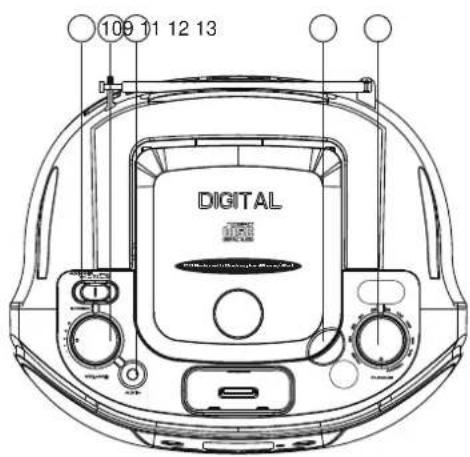
9. FUNCTION SELECTOR
- select audio input source: FM, Aux In, iPhone, CD
10. VOLUME KNOB
- adjust volume level
11. AUX IN JACK
- 3.5mm AUX IN jack
12. CD DOOR
- raise here to open/close the CD door
13. TUNING CONTROL
- select FM station
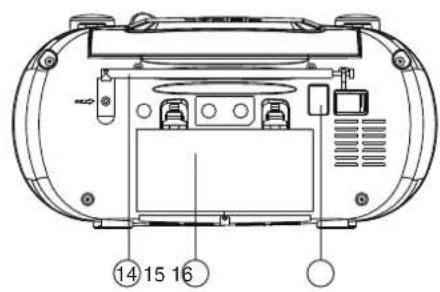
14. FM ANTENNA
- to improve FM reception.
15. BATTERY DOOR
- battery compartment.
16. DC MAINS
POWER SUPPLY
AC OPERATION: Connect the SURYLGHG□DC adaptor□R□WKH□EDFN□RI□KH□XQL□ provided before inVHUNLQJ□WKH□SOXJ□LQto a standard DC□ZD□ outlet.
%\77(5<23(5\7,21
Open the lid of the battery compartment on the rear and insert 6□[□6ize C□EDWHULHV (not supplied) with the + and - SRODULVA □marks correctly aligned, then close the lid. To switch from DC power supply to battery power supply, VZLWFK□RII□' &□SRZHU□DV□NKH□' & ZD□RXWCHHV, then disconnect WKH□' &□SRZHU□FDE□H□URP □WKH□' &□RXWCHW□DQG□WKH□main unit.
The batteries need to be replaced when:
The volume decreases, or sound is distorted during operation.
Notes on batteries
- Do not mix different types of batteries or old batteries with new ones.
- Never recharge the batteries, apply heat to them or take them apart.
- BatterLHV☐VKRX0G not be exposed to excessive heat such as sunshine, fire or the like.
- Attention should be drawn to the environmental aspects of battery disposal.
NOTE: In order to avoid leakage, always remove the batteries when unit will not be used for a long period of time.
USING DC POWER
- Check if the power voltage, as shown on the CDEHODORFDWHG on the back of the set, corresponds to your local DC power supply. If it does not, consult your dealer or service centre.
- Connect the power cord to the DC MAINS inlet and the wall outlet. The power supply is now connected and ready for use.☐1 RXH☐6 ZVIFK☐RII☐SRZHU☐ZKHQ☐P DNLQJ☐FRQQHFWRQV☐
- To switch off completely, unplug the power cord from the wall outlet.
- Unplug the power cord from the wall outlet to protect your set during heavy thunderstorms.
- If the electric cable is damaged, it must be replaced by the manufacturer, or by LKV DX/KRULVHG/VHUYLFH/SHUVRQQH/RQ\WR/DYRLG/GDQJHU.
2. BASIC FUNCTION
GENERAL OPERATION
- To select your sound source adjust the FUNCTION select to FM, Aux In, iPhone, CD.
- Adjust the sound with the VOLUME controls.
AUX IN
To play music from personal audio player
- Slide the FUNCTION selector to Aux In position.
- Connect your personal audio player to the AUX IN Jack.
- Set the audio player to play.
- Rotate the volume knob on your audio system to the level you require. If the volume is not setting high enough you may need to increase the volume on your audio.
RADIO
Radio reception
- Slide the FUNCTION selector to FM position.
- Rotate the TUNING control to find the desired stations.
- For FM, pull out the telescopic antenna. Inline and turn the antenna, Reduce is length if the signal is too strong (too close to a transmitter)
3. iPod/iPhone operation
BASIC PLAYBACK
Carefully align and gently insert the iPod/iPhone into the dock. Remove any case or skin from the iPod/iPhone before attempting to dock.
Slide the FUNCTION selector to iPhone position.
- Press the ▶ button to skip to next track.
- Press the ◀ button to skip back to the beginning of track currently play, press the button again immediately to skip to previous track.
Temporarily stopping playback:
Press the PLAY/PAUSE ▶/II button. To resume play, press the button again.
Warning:
When connecting an iPod/iPhone to this iPod dock, please ensure that the correct dock adapter is used. Failure to do so may result in damage to the iPod/iPhone.
Before use:
Open the iPod holder, dock the iPod/iPhone correctly.
Note:
The iPod/iPhone will be charged when the unit is powered on or in standby mode.
This unit is compatible with the following iPod/iPhone models:

iPhone 4 16GB 32GB

iPhone 3GS
8GB 16GB 32GB

iPhone 3G
8GB 16GB

iPhone
4GB 8GB 16GB

iPod touch
3rd generation
32GB 64GB

iPod touch
2nd generation
8GB 16GB 32GB

iPod touch
1st generation
8GB 16GB 32GB

iPod nano
5th generation (video camera)
8GB 16GB

iPod nano
4th generation (video)
8GB 16GB

iPod nano
3rd generation
(video)
4GB 8GB
iPod nano
2nd generation
(aluminum)
2GB 4GB 8GB

iPod nano
1st generation
1GB 2GB 4GB

iPod classic
120GB 160GB (2009)

iPod classic 160GB (2007)

iPod classic 80GB

iPod
5th generation
(video)
60GB 80GB

iPod
5th generation
(video)
30GB
"Made for iPod" and "Made for iPhone" mean that an electronic accessory has been designed to connect specifically to iPod or iPhone, respectively, and has been certified by the developer to meet Apple performance standards. Apple is not responsible for the operation of this device or its compliance with safety and regulatory standards. Please note that the use of this accessory with iPod, iPhone, or iPad may affect wireless performance.
iPhone, iPod, iPod classic, iPod nano, iPod shuffle, and iPod touch are trademarks of Apple Inc., registered in the U.S. and other countries.
4. CD PLAYER
Playing a CD
This CD-player can play Audio discs, CD-R, and CD Rewritable. Do not try to play CD-ROM, CDI, VCD, DVD or computer software CDs.
1 Adjust the FUNCTION selector to CD
2 To open the CD door, press the CD door at the edge marked CLOSE/OPEN.
3 Insert a CD, CD-R or CD-RW with the printed side facing up and press the CD door gently to close it.
4 Press PLAY/PAUSE ▶/II on the set to start playback.
5 To pause playback press PLAY/PAUSE▶/II. To resume, press PLAY/PAUSE again.
6 To stop CD playback, press STOP ■ .
Selecting a different track
During playback you can use ◀ or ▶ to select a particular track.
- If you have selected a track number in the Stop or Pause position, press PLAY/PAUSE▶/II to start playback.
- Press▶ once briefly for the next track, or press repeatedly until the desired track number appears on the display.
- Press ◀ more than once briefly for a previous track.
REPEAT MODE:
REPEAT1-plays the current track continuously
REPEAT ALL-plays the entire CD continuously
- Press REPEAT button repeatedly to through the repeat mode listed below REPEAT 1>REPEAT ALL>NORMAL
Programming track numbers into a playlist:
You may store up to 20 tracks in the desired sequence. If you like, store any track more than once.
- In STOP mode, press the PROGRAM button
-the display shows"01"and"PROG" briefly. - Press ◀ or ▶ for your desired track.
- Press PROGRAM button to store the track
- Repeat steps 1 to 3 to store all desired tracks in this way.
- To play your playlist, press PLAY/PAUSE ▶/II.
• Reviewing your set playlist - In the stop mode, press ◀ or ▶, the display will show you stored tracks.
Erasing a program
You can erase the contents of the playlist with the following actions:
-Opening the CD door;
-Selecting other audio input sources;
-Pressing STOP ■ button twice
5. MAINTENANCE&SAFETY
Precautions & General Maintenance
- Place the set on a hard and flat surface so that the system does not tilt.
- Do not expose the set, batteries or CDs to humidity, rain, sand or excessive heat caused by heating equipment or direct sunlight.
- Do not cover the set. Adequate ventilation with a minimum gap of 6 inches between the Ventilation holes and surrounding surfaces is necessary to prevent heat build-up.
- The mechanical parts of the set contain self-lubricating bearings and must not be oiled to lubricate.
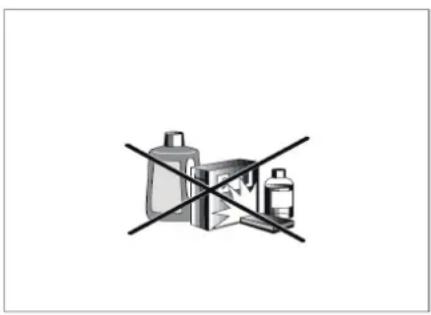
- To clean the set, use a soft dry cloth. Do not use any cleaning agents containing alcohol, ammonia, benzene or abrasives as these may damage the housing.
natural_image
Symbolic illustration of a battery and two containers crossed by a diagonal line (no text or labels)CD player and CD handing
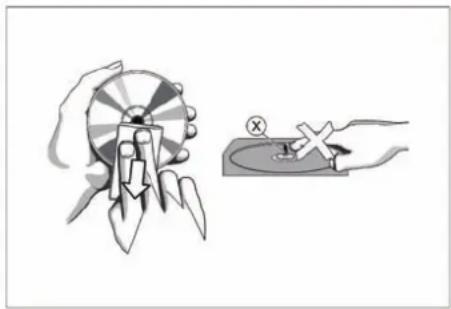
- The lens of the CD player should never be touched!
- Sudden changes in the surround temperature can cause condensation to form and the Lens of your CD player to cloud over. Playing a CD is then not possible. Do not attempt clean the lens but leave the set in a warm environment until the moisture evaporates.
- Always close the CD door to keep the CD compartment dust-free. To clean, dust the compartment with a soft dry cloth.
- To clean the CD, wipe in a straight line from the centre towards the edge using a soft, lint-free cloth. Do not use cleaning agents as they may damage the disc.
- Never write on a CD or attach any stickers to it.
natural_image
Illustration of a hand holding a dartboard and a compass, with no visible text or symbols6. REFERENCE
TROUBLESHOOTING
If a fault occurs, first check the points listed below before taking the set for repair.
Do not open the set as there is a risk of electric shock.
If you are unable to remedy a problem by following these hints, consult your dealer or service center.
WARNING: Under no circumstances should you try to repair the set yourself, as this will invalidate the warranty. Repairs should only be done by TEAC's authorised personnel.
| Symptom | Possible Problem | Solution |
| The unit does not respond (no power). | AC Adaptor is not plugged into a wall outlet or the connector is not plugged into the power supply jack on the back of the unit. | Plug the AC adaptor into a wall outlet and plug the connector into the supply jack on the unit. Connections must be secure. |
| Wall outlet is not functioning. | Plug another device into the same outlet to confirm the outlet is working. | |
| iPod/iPhone does not respond to the system. | iPod/iPhone is not installed properly. | Remove your iPod/iPhone from the dock and check for obstruction on the connectors in the dock and on your iPod/iPhone. Then reseat it on the dock. |
| Your iPod/iPhone is locked up. | Please make sure that your iPod/iPhone is working properly before docking into the unit. Please refer to your iPod/iPhone manual for info on resetting the iPod/iPhone. | |
| iPod/iPhone does not charge. | Unit turned to CD or radio mode. | Select other modes for iPod charging. |
| iPod/iPhone is not installed properly. | Remove your iPod/iPhone from the dock and check for obstruction on the connectors in the dock and on your iPod/iPhone. Then reseat it in the dock. | |
| iPod/iPhone is locked up/ frozen. iPod/iPhone battery has problems. | Please make sure your iPod/iPhone is working properly before docking into the unit. Please refer to your iPod/iPhone manual for details on resetting. | |
| Weak FM reception | FM antenna wire is not fully extended. | Extend or reposition the wire antenna for best reception. |
| CD player will not play | - Unit not in CD function mode.- CD is not loaded properly.- If the CD is self- compiled, the media used may not be compatible with the player. | - Select CD function mode.- Load CD with label side up.- Use better quality blank media and retest. |
| CD skips while playing | - Disc is dirty or scratched. | - Wipe CD with clean cloth or use another disc. |
| Intermittent sound from CD player | - Dirty or defective disc- Dirty pick up lens- Player is subject to excessive shock or vibration | - Clean or replace the defective disc.- Use a CD lens cleaning disc to clean the lens.- Relocate the player away from shock or vibration. |
FEATURES
Features:
• FM Analogue Tuning Radio
• CD/CD-R/CD-RW compatible
- AUX IN jack
- iPod/iPhone socket
TECHNICAL SPECIFICATION
Specification:
• Power supply : DC 9V—2A ⊙-⊕+ or 6 x C Size Batteries
• Frequency range : FM 88-108MHz.
- Antenna : FM-TELESCOPIC ANTENNA
- CD Section : TOP LOADING PLAYER.
- CD Size : 5"&3"COMPATIBLE.
- AUX IN Jack : 3.5mm.
- Speaker output : 2 x1.5W RMS
- Weight : 1.4KG
- Dimensions : 29.4Wx24.4Dx14.8H cm
Specifications are subject to change without notice.
Weight and dimension are approximate.
TEAC®
TEAC CUSTOMER SUPPORT HOTLINE (TCS) 1300 553 315
Between Monday to Friday – EST 9AM to 6PM
- CD Radio with Docking for iPhone/iPod
- INSTRUCTION MANUAL
- IMPORTANT!
- TEAC
- WARRANTY PROCEDURE
- Authorised Service Centres in Major Australian Cities
- Thank you for selecting a TEAC product
- Warranty Terms & Conditions
- In Home Service/Pick up\* Service
- Carry-in Service
- SAFETY PRECAUTIONS
- CAUTION
- Placement of the device
- Maintenance
- TABLE OF CONTENTS
- Introduction
- Basic Function
- iPod/iPhone operation
- CD Player I
- Maintenance&Safety
- Reference
- LIST OF MAIN PARTS
- LOCATION OF CONTROLS
- PROGRAM
- iPod DOCK
- DISPLAY
- REPEAT
- SKIP
- SKIP
- 7.
- ▶ / II
- FUNCTION SELECTOR
- VOLUME KNOB
- AUX IN JACK
- CD DOOR
- TUNING CONTROL
- FM ANTENNA
- BATTERY DOOR
- DC MAINS
- POWER SUPPLY
- The batteries need to be replaced when:
- Notes on batteries
- USING DC POWER
- GENERAL OPERATION
- AUX IN
- RADIO
- BASIC PLAYBACK
- CD PLAYER
- Playing a CD
- Precautions & General Maintenance
- CD player and CD handing
- TROUBLESHOOTING
- FEATURES
- Features:
- TECHNICAL SPECIFICATION
- Specification:
- TEAC®
Brand : TEAC
Model : PCD450iP
Category : CD Player