
PICO4 - Virtual reality headset TEAC - Free user manual and instructions
Find the device manual for free PICO4 TEAC in PDF.


User questions about PICO4 TEAC
0 question about this device. Answer the ones you know or ask your own.
Ask a new question about this device
Download the instructions for your Virtual reality headset in PDF format for free! Find your manual PICO4 - TEAC and take your electronic device back in hand. On this page are published all the documents necessary for the use of your device. PICO4 by TEAC.
USER MANUAL PICO4 TEAC
CD Copy Station Pico-4
User's manual
To ensure the smooth handling of your warranty please write the serial number of your device into the box. In the case of warranty you are expected to send it together with a copy of your invoice to your nearest TEAC sales representative.
- Changes in specifications and features may be made without notice or obligation.
Copyright © 2002, TEAC Deutschland GmbH. All rights reserved. First edition: March 2002 - Company and product names provided herein are trademarks of their respective companies.
CONTENTS
INTRODUCTION 32
IMPORTANT SAFETY PRECAUTIONS 32
IMPORTANT (for U.K. Customers) 32
IMPORTANT (for U.S.A. Customers) 33
For the Consumers in Europe 33
- IMPORTANT SAFETY INSTRUCTIONS 34
2.GENERAL DESCRIPTION 37
2.1 Installing the Pico-4 38
2.2 Components of the Pico-4 38
2.3 Basic Operations 41
3.MODES 43
3.1Disc Copy 43
3.2 Test Write Mode 46
3.3 Possible Problems When Copying or in Test Write Mode .... 47
3.4 Compare CD-ROM 49
3.5 Play Audio Track 51
3.6 Setting the Writing Speed 53
- SPECIFICATION 54
- TECHNICAL SUPPORT 55
Technical Service Depots (Europe) 55
WARRANTY 57
INTRODUCTION
The stand-alone CD Copy Station reproduces CDs without the necessity for a PC, additional software packages, or any kind of adapter cards. It is equipped with four TEAC IDE Writers and an IDE CD-ROM drive, and so can copy CDs quickly and without any problems – the data are simply read by the CD-ROM. So: insert the "master CD", put the blank CDs into the recorders and start the burn procedure at the press of a button. It could not be any easier!
IMPORTANT SAFETY PRECAUTIONS
IMPORTANT (for U.K. Customers)
DO NOT cut off the mains plug from this equipment.
If the plug fitted is not suitable for the power points in your home or the cable is too short to reach a power point, then obtain an appropriate safety approved extension feed or consult your dealer. If nonetheless the mains plug is cut off, remove the fuse and dispose the plug immediately, to avoid a possible shock hazard by inadvertent connection to the mains supply.
If this product is not provided with mains plug, or one has to be fitted, then follow the instructions given below:
IMPORTANT:
The wires in this mains lead are coloured in accordance with the following code:
This apparatus must be earthed.
As the colours of the wires in the mains lead of this apparatus may not correspond with the coloured markings identifying the terminals in your plug proceed as follows:
The wire which is coloured GREEN-and-YELLOW must be connected to the terminal in the plug which is marked by the letter E or by the safety earth symbol or coloured GREEN or GREEN-and-YELLOW.
The wire which is coloured BLUE, must be connected to the terminal which is marked with the letter N or coloured BLACK.
The wire which is coloured BROWN must be connected to the terminal which is marked with the letter L, or coloured RED.
When replacing the fuse only a correctly rated approved type should be used and be sure to re-fit the fuse cover.
IF IN DOUBT - CONSULT AN APPROVED ELECTRICIAN.
IMPORTANT (for U.S.A. Customers)
This equipment has been tested and found to comply with the limits for a Class A digital device, pursuant to Part 15 of the FCC Rules. These limits are designed to provide reasonable protection against harmful interference when the equipment is operated in a commercial environment. This equipment generates, uses, and can radiate radio frequency energy and, if not installed and used in accordance with the instruction manual, may cause harmful interference to radio communications.
Operation of this equipment in a residential area is likely to cause harmful interference in which case the user will be required to correct the interference at his own expense.
CAUTION
Changes or modifications to this equipment not expressly approved by TEAC Deutschland GmbH for compliance could void the users authority to operate this equipment.
For the Consumers in Europe
WARNING
This is a Class A product in a domestic environment. This product may cause radio interference in which case the user may be required to take adequate measures.
1. IMPORTANT SAFETY INSTRUCTIONS
CAUTION:
- Read all of these instructions.
- Save these Instructions for later use.
- Follow all warnings and instructions later on the audio equipment.
1) Read Instructions – All the safety and operating instructions should be read before the product is operated.
2) Retain Instructions – The safety and operating instructions should be retained for future reference.
3) Head warnings - All warnings on the product and in the operating instructions should be adhered to.
4) Follow Instructions – All operating and use instructions should be followed.
5) Cleaning – Unplug this product from the wall outlet before cleaning. Do not use liquid cleaners or aerosol cleaners. Use a damp cloth for cleaning.
6) Attachments - Do not use attachments not recommended by the product manufacturer as they may cause hazards.
7) Water and Moisture – Do not use this product near water – for example near bath rub, wash bowl, kitchen sink, or laundry tab, in a wet basement; or near a swimming pool; and the like.
8) Accessories – Do not place this product on an unstable cart, stand, tripod, bracket, or table. The product may fall, causing serious injury to persons, and serious damage to the product. Use only with a cart, stand, tripod, bracket, or table recommended by the manufacturer, or sold with the product. Any mounting of the product should follow the manufacturer's instructions, and should use a mounting accessory recommended by the manufacturer.
9) A product and cart combination should be moved with care. Quick stops, excessive force, and uneven surfaces may cause the product and cart combination to overturn.
10) Ventilation – Slots and openings in the cabinet are provided for ventilation and to ensure reliable operation of the product and to protect it from overheating, and these openings must not be blocked or covered. The openings should never be blocked by placing the product on a bed, sofa, rug, or other similar surface. This product should not be placed in a built-in installation such as a bookcase or rack unless proper ventilation is provided or the manufacturer's instructions have been adhered on.
11) Power Sources – This product should be operated only from the type of power source indicated on the marking label. If you are not sure of the type of power supply to your home, consult your product dealer or your local power company.
12) Grounding or Polarization – This product may be equipped with a polarized alternating-current line plug (a plug having one blade wider than the other). This plug will fit into the power outlet only one way. This is a safety feature. If you are unable to insert the plug fully into the outlet, try reversing the plug. If the plug should still fail to fit, contact your electrician to replace your obsolete outlet. Do not defeat the safety purpose of the polarized plug.
13) Power-Cord Protection – Power-supply cords should be routed so that they are not likely to be walked on or pinched by items placed upon or against them, paying particular attention to cords at plugs, convenience receptacles and the point where they exit from the product.
14) Lightning – For added protection for this product during a lightning storm, or when it is left unattended and unused for long periods of time, unplug it from the wall outlet and disconnect the cables system. This will prevent damage to the product due to lightning and power-line surges.
15) Overloading – Do not overload wall outlets, extension cords, or integral convenience receptacles as this can result in the risk of fire or electric shock.
16) Object and Liquid Entry – Never push objects of any kind into this product through openings as they may touch dangerous voltage points or short-out parts that could result in a fire or electric shock. Never spill liquid of any kind on the product.
17) Servicing – Do not attempt to service this product yourself as opening or removing covers may expose you to dangerous voltage or other hazards. Refer all servicing to qualified service personnel.
18) Damage Requiring Service – Unplug this product from the wall outlet and refer servicing to qualified service personnel under the following conditions:
a) When the power supply cord or plug is damaged.
b If liquid has been spilled, or objects have fallen into the product.
c) If the product has been exposed to rain or water.
d) If the product does not operate normally by following the operating instructions. Adjust only those controls that are covered by the operating instructions as an improper adjustment of other controls may result in damage and will often require extensive work by a qualified technician to restore the product to its normal operation.
e) If the product has been dropped or damaged in any way.
f) When the product exhibits a distinct change in performance – this indicates a need for service.
19) Replacement Parts – When replacement parts are required, be sure the service technician has used replacement parts specified by the manufacturer or have the same characteristics as the original part. Unauthorized substitutions may result in fire, electric shocks, or other hazards.
20) Safety check – Upon completion of any service or repairs to this product, ask the service technician to perform safety checks to determine that the product is in proper operating condition.
21) Heat – The product should be situated away from heat sources such as radiators, heat registers, stoves, or other products (including amplifiers) that produce heat.
2. GENERAL DESCRIPTION
The Pico-4 CD duplicator provides you with a quick and simple method of copying your original audio material in CD format at more than real-time speeds, using easily-obtainable, low-cost CD-R and CD-RW media, with no auxiliary equipment or computer system required. It is especially useful for duplicating material produced using the TEAC CD Writer series on CD-R media. The Pico-4 can also be used to duplicate CD-ROM material of which you own copyright or for which you have appropriate permission.
NOTE
This product is designed to aid professional users in publishing small CD-based circulations. To copy and distribute CDs you have to own the copyright, or the permission from the copyright owner or the rightful licensor. Unless you own the copyright, or have obtained the appropriate permission from the copyright owner or the rightful licensor, your unauthorized recording, reproduction or distribution thereof, may result in severe civil and criminal penalties under copyright laws and international copyright treaties. If you are uncertain about your rights, contact your legal advisor. Under no circumstances will TEAC Deutschland GmbH be responsible for any consequences of any illegal copying performed using the Pico-4.
Depending on the quality of the source CD, it is possible to copy material at up to eight times the real-time rate (selectable from the front panel), making it convenient for rapid duplication of a number of identical discs, etc.
Please consider that it is impossible to copy UDF-CDs (Incremental Packet Writing). Please consider also that copying of CDs with copy protection or scratched surface may be impossible.
NOTE
Although the operation of the Pico-4 is relatively straightforward, we strongly suggest that you read this manual before starting operations. There are a few factors affecting the production of CD-R discs using the Pico-4 which may not be immediately obvious.
2.1 Installing the Pico-4
There are no connections to be made to and from the Pico-4 other than the power connection on the rear Panel, as the unit is completely self-contained.
2.2 Components of the Pico-4
On the rear side of the Pico-4 the power connector is located which has to be connected with the shipped power cord.
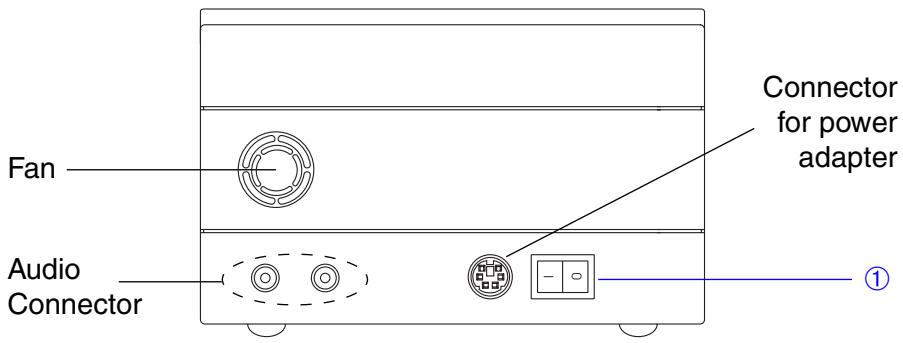
The Rear Panel of the Pico-4
① POWER switch
Press this switch once to power on the unit, and again to turn it off.
In the following a description of the user controls is given which are located on top of the Pico-4.
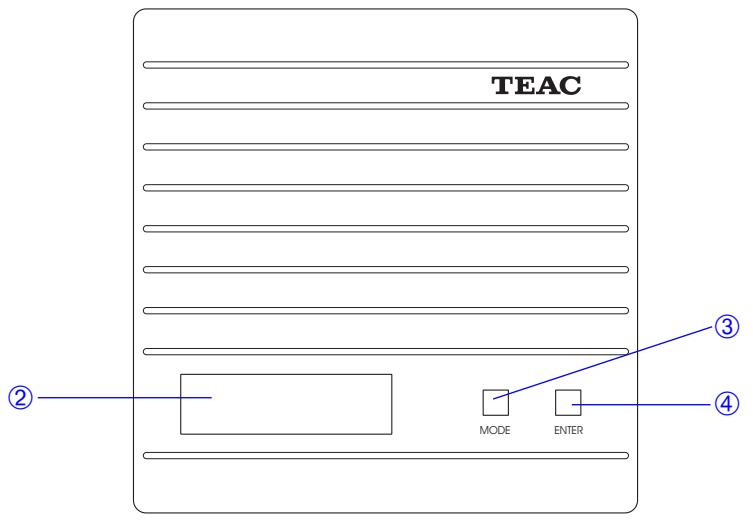
② Display
The 2 x 16 LCD display displays the menus and submenus available, and also provides information on the status of the current operation, as well as displaying error messages, etc.
③ MODE key
The MODE key is used to cycle through the different menus and options available to put the unit into the different modes, as explained below.
④ ENTER key
The ENTER key is used to confirm the selection of menu items and options, and also acts as a "start" key to start operations.
In the following a description of the user controls is given which are located on the front of the Pico-4.
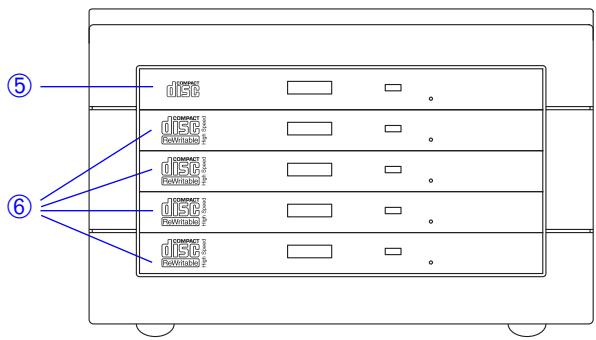
(5) MASTER drive
The MASTER drive is used to hold the source CD. This may be a prerecorded audio CD or CD-ROM which you have permission to copy, or a CD-R disc. The eject button is used to eject the master disc when no operation is in progress. The indicator on this drive shows when the disc is being accessed. In the "Play audio" mode (see 3.5 "Play Audio Track"), a prerecorded CD may be inserted into this drive, and played back, track by track.
⑥ SLAVE drive
The SLAVE drive holds the destination CD. This must be a CD-R or CD-RW disc. The eject button is used to eject the slave disc when no operation is in progress. The indicator on this drive shows when the disc is being accessed for reading or writing.
NOTE
If a disc is in a drive and cannot be removed by using the eject button, you can insert a thin stiff wire (such as the end of a paperclip) into the hole on the front panel of the drive (under the tray). This will open the tray.
2.3 Basic Operations
2.3.1 Power-up procedure
When the unit is powered up using the POWER switch ①, it performs a self-check operation, and the screen shows the following:
Initializing Please wait...
If the self-check is passed, the display will show the first menu screen, otherwise an error message will be displayed.
2.3.2 Inserting discs
Press the eject button of the MASTER or the SLAVE drives to open the disc tray. Place discs label side uppermost in the disc tray. If a disc is placed into a tray upside-down or off-center, an error message will appear on the display. Close the tray by shifting it into the slot until it is locked.
2.3.3 Power down
Before powering down the unit, eject discs from all drives (the eject mechanism requires power to work, and so you will not be able to eject the discs once power is turned off).
NOTE
Do not turn off the Pico-4 while writing to the slave discs (i.e., part of the way through a disc copy operation). If you do, the disc will be corrupt, and unusable.
2.3.4 Care of CD-R/CD-RW media
The Compact Disc medium is a robust medium, and the disc can survive a good deal of physical abuse. However, there are precautions that you should take when handling CD-R discs which are different to those you should take when handling ordinary CDs.
Avoid touching the recording (non-label) side of a disc on which you will be recording. Recording on a disc requires a cleaner surface than playing back, and fingerprints, grease, etc. can cause errors in the recording process.
CD-R discs are more sensitive to the effects of heat than ordinary CDs. It is important that they are not stored in a location where direct sunlight will fall on them, and which is away from sources of heat such as radiators or heat-generating electrical devices.
Always, store CD-R discs in their „jewel cases“ to avoid dirt and dust accumulating on their surfaces.
When labeling CD-R discs, always use a soft felt-tipped pen to write the information. Never use a ballpoint or hard-lipped pen, as this may cause damage to the recorded side.
Dirty discs may be cleaned using a soft dry cloth and/or a commercial CD cleaning fluid or ethyl alcohol.
Do not use thinner, gasoline, benzene or LP cleaning fluid, as these will damage the disc. If you are in any doubt as to the care and handling of a CD-R disc, read the precautions supplied with the disc, or contact the disc manufacturer directly.
2.3.5 Disks recommended for use with the Pico-4
The best results and the highest performance are ensured when using TEAC write-once CD-R media respectively CD-RW media.
Your dealer will tell you the sources of those CD-Rs/CD-RWs.
3. MODES
The different modes available are:
- Copy
- Test write
Compare CD-ROM - Play audio
Write speed selection
These are accessed by pressing the MODE key. Details of these modes are given below.
When the required mode is shown on the top line of the display press the ENTER key to enter the mode. When the word „Exit“ appears on the display, the ENTER key will halt the current operation.
3.1 Disc Copy
NOTE
You should own the copyright, or have obtained the appropriate permission from the copyright owner or the rightful licensor, your unauthorized recording, reproduction or distribution thereof, may result in severe civil and criminal penalties under copyright laws and international copyright treaties
This procedure copies the material from the disc (either an audio CD or a CD-ROM) in the MASTER drive to the CD-Rs/CD-RWs in the SLAVE drives. You may find it useful to test the copy procedure before committing yourself to an actual copy, however. See 3.2, "Test Write Mode" for details.
NOTES
Once a copy operation has started, it cannot be stopped before the disc has been finalized. The only way to stop a copy operation is to turn off the power to the unit. However, this will make the CD-R/CD-RW disc useless for any purpose. Do not use warped discs or discs with off-center holes with the Pico-4. While the copy operation is in progress, make sure that the Pico-4 is not subjected to vibration or mechanical shocks.
- Press the MODE key until the display appears as below (the 8x may also read 4x or 2x, and indicates the speed at which the copy will be made – see 3.6 „Setting the Writing Speed“ below).
Mode select 1 Copy : 8X
- Press the ENTER key.
Copy : 8X Ready ?
- Place the source disc in the MASTER disc tray, and a blank CD-R respectively CD-RW disc in the SLAVE disc tray. If you decide that you do not want to make a copy at this stage, press the MODE key to return to the mode selection menu.
- Press ENTER to start the copy operation. If the trays are not closed the error message „Error, ## TRAY Open ##“ is shown. Close the trays and continue by pressing the keys MODE or ENTER. Start the copying process again. The Pico-4 will read the master CD and it checks the CD-Rs respectively the CD-RWs inserted in the slave drives (Checking Media, Cheching Data).
If a CD-RW is inserted into one of the slave drives to which was written before the following message appears:
CD-RW in driveN Erase disk?
N is the number of the corresponding slave drive 1 to 4.
If you will not overwrite the CD-RW you have to cancel the copying process for this CD-RW with the MODE key.
If you press ENTER, you will see the following message:
Erasing CD-RW disk
The copying will be resumed after approx. 30 seconds.
If the Pico-4 does not detect any potential problems with the discs it will write the TOC information onto the slave CDs. The screen contains the following message during this process:
Writing TOC
- After this the copying is started. The percentage which has been written is shown on the display, along with an animated display to indicate that writing is currently in progress:
Writing 7%
This operation may take a minute or more, depending on the complexity of the disc.
- When the finalization operation is complete, the display will show:
Copy Complete
The trays are opened automatically. You can now remove the discs using the eject buttons on the drives (these are disabled while the copy process is taking place). Alternatively, you can compare the original with the copy (see: 3.4. _Compare CD-ROM").
If one or more of the CD-RW(s) is/are skipped, the corresponding drive N is shown with this message: Copy complete, Err at [N].
3.2 Test Write Mode
The test operation is functionally similar to the write operation, except that the writing of data to the slave disc is simulated. This is useful to make sure that data can be transferred at the selected rate between the master and the slave discs.
- Press the MODE key until the display shows:
Mode select 2 Test write: 8X
- Press ENTER
Test write: 8X Ready?
- Insert the disc into the disc tray (original in the MASTER, and the blank CD-Rs/CD-RWs in the SLAVE drives) and press the EN-TER key. The test operation continues in exactly the same way as the copy operation described above.
If a CD-RW is inserted into one of the slave drives to which was written before the following message appears:
CD-RW in driveN Continue?
N is the number of the corresponding slave drive 1 to 4. ENTER is used to accept while with MODE the test is skipped for this CD-RW.
At the beginning of the test the Pico-4 simulates writing the TOC information. The display shows the same messages under the same circumstances, except that the word Copy is replaced by the word Test in all these messages.
Test Writing 36%
At the end the following is shown:
Test write Complete
NOTE
There is one other important difference between test write mode and copy mode. You can interrupt the test write mode part of the way through the operation without affecting the slave CD-R/CD-RW media. If you interrupt a copy procedure part of the way through the operation, the CD-R/CD-RW becomes unusable. To interrupt the test write operation, press and hold down the MODE key. The display will show Exit. When this is displayed, press the ENTER key. This cancels the test write process, and the display returns to the initial status screen. If you press the MODE key while Exit is shown on the display, the display returns to the test write display screen.
3.3 Possible Problems When Copying or in Test Write Mode
If the MASTER or SLAVE drives does not contain a disc, or if the disc cannot be read by the drive (it is upside-down or badly positioned in the tray), the display will show No disc.
If the SLAVE drive does not contain a recordable CD-R disc, or a CD-R disc which has been previously partly recorded, the display will show Bad disc.
The standard maximum length of an audio CD is set at 74 minutes. However, some commercial CDs are recorded with a running time a little longer than this. If the master audio CD exceeds 74 minutes in length (or the standard maximum amount of data (650 MB) for a CD-ROM), the display will show:
Master:Insufficient disc space
The message above will also be shown if the slave disc is of a smaller capacity than the source disc. In these instances, it is impossible to copy from the master to the slave disc. If using CD-R media of a respective capacity it is possible to copy master CDs up to 700 MB also. If the master disc is scratched, damaged or unreadable for any reason, the copy process will halt, and the display will appear as below.
Error Master:Bad disc
If the slave disc is scratched, damaged or otherwise unwritable, the display will appear as below.
Error Slave:Bad disc
If master CDs shall be copied which can't be read or which contain a copy protection this message appears:
Copy failed Master:Disc Err
In the event of any of these errors being displayed, pressing the MODE key will return to the main mode selection menu. Correct the problem, if possible (replace the offending disc correctly in the disc tray, try again with a different disc, etc.) before attempting the copy operation again.
3.4 Compare CD-ROM
This mode is used for comparing CD-ROM which has just been duplicated using the copy mode. It cannot be used for audio CDs (Message: Audio compare is not supported).
- Press the MODE key until the display shows the following:
Mode select 3 Compare CD-ROM
- Press ENTER:
Compare CD-ROM Ready?
- Make sure that the original disc is in the MASTER drive disc tray, and the copy discs are in the SLAVE drives disc tray.
- Press ENTER:
Comparing 4%
As the comparison process proceeds, the percentage of the process which has been completed is shown on the display. Note that the comparison process is carried out quicker than recording or testing. The time taken for comparison is independent on any speed settings made (these only affect the recording speed).
- When the comparison has finished successfully, the display shows:
Compare CD-ROM complete
If there has been an error on the copying (i.e. the two CD-ROMs do not match) or if they do not match in any other way (the wrong pair of discs has been loaded), the compare operation will stop at the point at which the mismatch was detected, and the display will show:
Compare CD-ROM
Slave:Disc Err
3.4.1 Error conditions
If no disc has been placed in either the MASTER or the SLAVE drives, the display will show a No disc error message with the drive from which the disc is missing.
If the master or slave disc is damaged, scratched, or is otherwise unreadable, the display shows Disc Err, with either Master or Slave as appropriate. If the discs are different, the display shows a No match message.
The compare operation can be stopped at any time by pressing and holding down the MODE key and pressing the ENTER key. An error message will be displayed and you should use the MODE key to return to the mode selection.
3.5 Play Audio Track
Since it is impossible to make a bit-by-bit comparison of audio CDs, this function is provided for you to „audition“ a CD copy. Plug audio equipment like an amplifier to the audio connectors at the rear of the Pico-4. Insert the CD to test into the master drive.
- Press the MODE key until the display shows the following:
Mode select 4 Play audio
- Press ENTER.
- After the ENTER key has been pressed, a Please wait ... message is briefly shown and track 1 will start playing.
Track 01 Play 1 Next track
Pressing ENTER again will jump to the next track and start playback. If the last track is reached in this mode, and the ENTER key is pressed, playback will start at the first track.
- If the MODE key is pressed while for example the fifth track is played the following is displayed:
Track 05 Play 2 Previous track
Pressing the ENTER key will start playing the track before the current track. If the first track is currently being played, and the EN-TER key is pressed, the last track will start playing.
- Pressing the MODE key from the display shown above will change the display again:
Track 05 Play 3 Exit
- Press the ENTER key from this screen to exit the audio play mode and return to the main mode selection screen. An appropriate error message is displayed if there is no disc in the drive (No disc), or if the disc is unreadable for any reason (it is not a finalized disc, or is wrongly inserted into the drive, does not contain audio data, etc. (Bad disc)).
If the master drive does not contain a CD or the CD is not of the audio type you will get this message:
Error Master:No disc
NOTE
If the copied CD contains audio errors, you will be able to hear them, but no message will appear on the display. If a copied CD contains audible errors, you may want to consider rerecording at a lower speed, which will almost certainly reduce the error rate.
3.6 Setting the Writing Speed
The Pico-4 SLAVE drives are capable of writing information to a CD or CD-ROM drive at double (2X), four times (4X) or eight times (8X) normal speed. The writing speed is set as described below. Once the speed is selected, it is used in the CD copying and testing modes. It has no effect on the compare operations.
- Press the MODE button until the display shows:
Mode select 5 Write speed
- Press ENTER.
Speed select 8X Write
- Press the MODE key to cycle between eight-times-speed (8X), quadruple-speed (4X), and double-speed (2X) mode.
- Press ENTER to confirm the selection.
NOTE
If you are in doubt what speed will work best, pick 2X first and experiment with the faster settings later. Usually, however, you should be able to copy most discs at the 8X speed.
4. SPECIFICATION
| 1. CD-ROM: TEAC CD-W28E | |
| Performance | 24x read |
| 2. 4 CD-Writer: TEAC CD-W28E | |
| Performance | 24x read/8x write/8xrewrite |
| 3. Drive performance | |
| Access time | 110ms (average) |
| Transfer Rate | 3.6MB/s read 1.2MB/s write - 1.2MB/s rewrite |
| Buffer size | 2MB |
| 4. CD | |
| Compatibility | CD-ROM Mode1, CD-ROM Mode2, Enhanced-CD, CD-ROM-XA Mode2, CD-DA, Photo-CD, CD-RW |
| Recording mode | Disk-at-once, Track-at-once, Multisession |
| Disc Loading | Motorized Tray (moves the tray automatically out, moving in or out manually) |
| 5. Rear panel | |
| Power supply | 230V, 60Hz, 1.6A |
| 6. Operating environment | |
| Place of operation | Room Temperature 5 to 30°C, Humidity 20 to 80% (noncondensing) |
| Place of storage | Temperature -30 to 55°C, Humidity 10 to 80% (noncondensing) |
| 7. Dimensions/weight | |
| Dimensions (WxHxD) | 159 x 110 x 164mm |
| Weight | 1.9kg |
| 8. Safety standards | CE |
| 9. Reliability | |
| MTBF | 60,000hrs. |
5. TECHNICAL SUPPORT
In case the TEAC Pico-4 does not operate normally in the environment specified in this manual, contact the representative from whom you purchased the drive or our nearest sales office to you.
Technical Service Depots (Europe)
Technical Support Tel: 0180 5 999 588 (EUR 0.12/min (Germany))
Mo-Fr from 8:30-20:00 CET
Sa from 10:00 - 16:00 CET
Technical Support Fax: +49 (0) 611 7158 666
Online RMA: http://www.teac.de/RMA
Technical Support Freecall: 0800 08 53 704 (U.K. only)
Mo-Fr from 8:30-20:00 CET
Sa from 10:00 - 16:00 CET
Technical Support Fax: +49 (0) 611 7158 666
Online RMA: http://www.teac.de/RMA
TEAC FRANCE S.A. (France)
Technical Support Tel: +33 (0) 155590155
Mo-Fr from 9:00-16:00 CET
Technical Support Fax: +33 (0) 1 55 59 01 56
Online RMA: http://www.teac.de/RMA
Contact us by email: Support@teac.fr
TEAC Service Centre Poland
Ul. Osiedlowa 31
68-114 Tomaszowo
Technical Support Tel: +48 (0) 68 36 06 300
Mo-Fr from 9:00-16:00 CET
Technical Support Fax: +48 (0) 68 36 06 309
Online RMA: http://www.teac.de/RMA
All other countries please call:
+49 611 7158 600
WARRANTY
Model
Pico-4
Serial No.
Owner's name
Address
Dealer's name Date of purchase
Dealer's address
Warranty Period
TEAC Deutschland GmbH, hereinafter called TEAC, warrants this product against any defect in material and workmanship for two (2) years from the date of purchase by the original retail purchaser. According to the following terms this TEAC product will be repaired without charge of labor and materials by the authorized TEAC service stations, by the authorized TEAC dealers and/or their authorized service stations. TEAC, the authorized TEAC service stations, the authorized TEAC dealers and/or their authorized service stations may decide wether the defective product will be repaired or replaced as a whole or partially. The TEAC dependencies, the authorized TEAC service stations, the authorized TEAC dealers and/or their authorized service stations will also honour this warranty in the other EC and EFTA member states based on the terms in this warranty conditions.
What is Covered and What is Not Covered.
Except as specified below, this warranty covers any defects in materials and workmanship of this product. The following are not covered by the warranty:
- Damage to or deterioration of the external cabinet.
-
Any unit that has been altered or on which the serial number has been defaced, modified, or removed.
-
Damage, deterioration or malfunction resulting from:
(a) accident, misuse, abuse or neglect;
(b) failure to follow instructions supplied with the product;
(c) any shipment of the product. Any damage arising of transportation is the liability of the freight company. Any damage arising of transportation and any implicit and explicit risks are the liability of the freight company. This is expressly not a liability of TEAC;
(d) repair or attempted repair by anyone not authorized by TEAC to repair this product;
(e) causes other than product defects, including lack of technical skill, competence or experience of the user. Especially damages which may arise of incidental use respectively by improper ventilation,
(f) damages caused by improper or incorrect installation of software,
(g) periodic check-ups,
(h) maintenance respectively repair of parts due to normal wear and tear,
(i) adoptions or adjustments to the product in order to conform to different national technical or safety standards of any country other than the one for which the product was originally designed and manufactured.
Who May Enforce the Warranty
This warranty may be enforced only by the original retail purchaser.
What We Will Pay For
We will pay all labor and material expenses for items covered by the warranty. Payment of shipping and insurance charge is discussed in the next section of this warranty.
How You Can Get Warranty Service
- If your unit needs service during the warranty period, please contact the local authorized distributor for this product. If you are unable to locate such a distributor, please contact your TEAC facility at the address indicated below.
- After identifying the nearest authorized service station for this product, the product or any parts believed to be defective must be shipped freight and insurance prepaid to such service station, together with a copy of this warranty certificate and a copy of your sales receipt, showing the date of purchase. Please ensure to fill out the warranty certificate correctly (do not forget the serial number of the product). TEAC reserves the right to refuse the guarantee service if the documents are missing or incomplete in the understanding of this terms.
If the necessary repairs are covered by the warranty, and if you have sent the product or parts of it to the nearest authorized service station, the return freight and insurance charges will be prepaid. Please do not return your unit to the TEAC factory without out prior authorization (see also RMA form)!
Limitations of Liability and Exclusion of Implied Warranties
Unless considered unenforceable or unlawful under the applicable national law:
-
TEAC's liability for any defective product is limited to repair or replacement of the product, at TEAC's option and the option of authorized service stations, authorized dealers and their authorized service stations. No one is authorized to assume any greater liability on TEACs behalf. TEAC shall not be liable for any damage to any other properties independent of their virtual or real nature especially there is no liability for any damage to any kind of software and/or any kind of databases caused by TEAC products. Furthermore TEAC is not liable for damages arising out of loss of use, loss of revenue or profits, or any other damages, wether incidental, consequential, or otherwise.
-
All implied warranties or conditions, including but not limited to warranties or conditions of merchantability and fitness for a particular purpose, hereby are excluded.
These warranty terms do not affect any statutory rights of consumers which were granted by the respective national laws.
TEAC UK LIMITED DATA STORAGE PRODUCTS DIVISION:
5 Marlin House, Marlin Meadow, Croxely Business Park,
Watford, Hertfordshire, WD18 8TE, U.K.
TEAC FRANCE S.A.
92182 ANTONY CEDEX, France
GARANTIE
TEAC UK LIMITED DATA STORAGE PRODUCTS DIVISION:
5 Marlin House, Marlin Meadow, Croxely Business Park,
Watford, Hertfordshire, WD18 8TE, U. K.
TEAC FRANCE S.A.
17 rue Alexis de Tocqueville, CE 005, 92182 ANTONY CEDEX, France