
WS-A70 - Pregnant TEAC - Free user manual and instructions
Find the device manual for free WS-A70 TEAC in PDF.


| Product Type | Active wireless speaker system |
| Driver Configuration | Coaxial two-way speakers with passive radiators |
| Audio Inputs | DIGITAL IN (optical), LINE IN (RCA), USB, Bluetooth, Wi-Fi, Ethernet |
| Supported Audio Formats | Linear PCM (via digital input) |
| Wireless Connectivity | Bluetooth 4.2? (A2DP, AVRCP), Wi-Fi (2.4/5 GHz), Chromecast built-in, AirPlay |
| Wired Network | Ethernet (LAN) port |
| Control | Control Dial, STANDBY/ON, SOURCE, MENU, ENTER buttons; TEAC HR AirCast app |
| Display | Multi-segment display showing volume, input source, settings |
| Power Supply | AC power cord (included); main POWER switch |
| Standby Power Consumption | Yes (eliminated by turning main POWER switch off) |
| Automatic Power Saving (APS) | Configurable auto-standby timer |
| Bass Equalizer (BASS EQ) | Adjustable bass emphasis |
| SLEEP Timer | Configurable auto-off timer |
| Input Source Selection | Manual via SOURCE button; automatic with app playback |
| Remote Control | Via smartphone app (TEAC HR AirCast) or Bluetooth device |
| Maintenance | Clean with dry cloth; avoid moisture; disconnect power before cleaning |
| Safety | Do not expose to rain/moisture; no user-serviceable parts; unplug during storms |
| Included Accessories | Power cord, wireless LAN antennas (2), grille, quick start guide, owner's manual |
| Placement | Leave 20 cm clearance around unit for ventilation; avoid heat sources |
| Repairability | Refer servicing to qualified personnel; no user-serviceable parts |
Frequently Asked Questions - WS-A70 TEAC
User questions about WS-A70 TEAC
0 question about this device. Answer the ones you know or ask your own.
Ask a new question about this device
Download the instructions for your Pregnant in PDF format for free! Find your manual WS-A70 - TEAC and take your electronic device back in hand. On this page are published all the documents necessary for the use of your device. WS-A70 by TEAC.
USER MANUAL WS-A70 TEAC
natural_image
Technical line drawing of a two-port electronic device labeled 'TEAC' (no other text or symbols)
CAUTION: TO REDUCE THE RISK OF ELECTRIC SHOCK, DO NOT REMOVE COVER (OR BACK). NO USER-SERVICEABLE PARTS INSIDE. REFER SERVICING TO QUALIFIED SERVICE PERSONNEL.
The lightning flash with arrowhead symbol, within an equilateral triangle, is intended to alert the user to the presence of uninsulated "dangerous voltage" within the product's enclosure that may be of sufficient magnitude to constitute a risk of electric shock to persons.

The exclamation point within an equilateral triangle is intended to alert the user to the presence of important operating and maintenance (servicing) instructions in the literature accompanying the appliance.
WARNING: TO PREVENT FIRE OR SHOCK HAZARD, DO NOT EXPOSE THIS APPLIANCE TO RAIN OR MOISTURE.
CAUTION
- DO NOT REMOVE THE EXTERNAL CASES OR CABINETS TO EXPOSE THE ELECTRONICS. NO USER SERVICEABLE PARTS ARE INSIDE.
- IF YOU ARE EXPERIENCING PROBLEMS WITH THIS PRODUCT, CONTACT THE STORE WHERE YOU PURCHASED THE UNIT FOR A SERVICE REFERRAL. DO NOT USE THE PRODUCT UNTIL IT HAS BEEN REPAIRED.
- USE OF CONTROLS OR ADJUSTMENTS OR PERFORMANCE OF PROCEDURES OTHER THAN THOSE SPECIFIED HEREIN MAY RESULT IN HAZARDOUS RADIATION EXPOSURE.
1) Read these instructions.
2) Keep these instructions.
3) Heed all warnings.
4) Follow all instructions.
5) Do not use this apparatus near water.
6) Clean only with dry cloth.
7) Do not block any ventilation openings. Install in accordance with the manufacturer's instructions.
8) Do not install near any heat sources such as radiators, heat registers, stoves, or other apparatus (including amplifiers) that produce heat.
9) Do not defeat the safety purpose of the polarized or grounding-type plug. A polarized plug has two blades with one wider than the other. A grounding type plug has two blades and a third grounding prong. The wide blade or the third prong are provided for your safety. If the provided plug does not fit into your outlet, consult an electrician for replacement of the obsolete outlet.
10) Protect the power cord from being walked on or pinched particularly at plugs, convenience receptacles, and the point where they exit from the apparatus.
11) Only use attachments/accessories specified by the manufacturer.
12) Use only with the cart, stand, tripod, bracket, or table specified by the manufacturer, or sold with the apparatus. When a cart is used, use caution when moving the cart/apparatus combination to avoid injury

natural_image
Symbolic icon of a person pushing a ladder inside a circle (no text or symbols)13) Unplug this apparatus during lightning storms or when unused for long periods of time.
14) Refer all servicing to qualified service personnel. Servicing is required when the apparatus has been damaged in any way, such as power-supply cord or plug is damaged, liquid has been spilled or objects have fallen into the apparatus, the apparatus has been exposed to rain or moisture, does not operate normally, or has been dropped.
- The apparatus draws nominal non-operating power from the AC outlet with its POWER or STANDBY/ON switch not in the ON position.
- The mains plug is used as the disconnect device; the disconnect device shall remain readily operable.
CAUTION
- Do not expose this apparatus to drips or splashes.
- Do not place any objects filled with liquids, such as vases, on the apparatus.
- Do not install this apparatus in a confined space such as a book case or similar unit.
● The apparatus should be located close enough to the AC outlet so that you can easily reach the power cord plug at any time.
For European Customers
Disposal of electrical and electronic equipment and batteries and/or accumulators
a) All electrical/electronic equipment and waste batteries/accumulators should be disposed of separately from the municipal waste stream via collection facilities designated by the government or local authorities.
b) By disposing of electrical/electronic equipment and waste batteries/accumulators correctly, you will help save valuable resources and prevent any potential negative effects on human health and the environment.
c) Improper disposal of waste electrical/electronic equipment and batteries/accumulators can have serious effects on the environment and human health because of the presence of hazardous substances in the equipment.
d) The Waste Electrical and Electronic Equipment (WEEE) symbols, which show wheeled bins that have been crossed out, indicate that electrical/electronic equipment and batteries/accumulators must be collected and disposed of separately from household waste.
If a battery or accumulator contains more than the specified values of lead (Pb), mercury (Hg), and/or cadmium (Cd) as defined in the Battery Directive (2006/66/EC), then the chemical symbols for those elements will be indicated beneath the WEEE symbol.
e) Return and collection systems are available to end users. For more detailed information about the disposal of old electrical/electronic equipment and waste batteries/accumulators, please contact your city office, waste disposal service or the shop where you purchased the equipment.
Compliance of radio transmitter and interference
Model for EEA (European Economic Area)
This product has the function of broadband transmitter using 2.4GHz and 5.0GHz Bands.

Hereby, TEAC Corporation declares that the radio equipment type is in compliance with Directive 2014/53/EU., and the other Directives, and Commission Regulations.
The full text of the EU declaration of conformity is available at the following internet address. Please contact us by e-mail.
http://www.teac-audio.eu/en/
TEAC Corporation
1-47 Ochiai, Tama-shi, Tokyo, 206-8530, Japan
CAUTION
Authorization of wireless devices are different in countries or regions. Please use only in the country where you purchased the product.
- Depending on the country, restrictions on the use of Bluetooth wireless technology might exist.
Confirm the laws and regulations of the country or region where you want to use the unit before use.
Radiation Exposure requirements
This equipment meets the regulation, which is recognized internationally, for the case of human exposure to radio waves generated by the transmitter.
Statement of compliance
Model for EEA (European Economic Area)
This equipment complies with EN.62311; Assessment of electronic and electrical equipment related to human exposure restrictions for electromagnetic fields; the harmonised standard of DIRECTIVE 2014/53/EU.
CAUTION
Changes or modifications not expressly approved by the party responsible for compliance could void the user's authority to operate the equipment.
Thank you for choosing TEAC.
Read this manual carefully to get the best performance from this unit. After reading it, keep it in a safe place for future reference.
IMPORTANT SAFETY INSTRUCTIONS ....2
Wireless equipment precautions....4
Included items 6
Using the TEAC Global Site....6
Before use....7
Placement precautions 7
Maintenance 7
Bluetooth® notes....7
Connections....8
Connecting the wireless LAN antennas .....9
Names and functions of parts....10
Basic operation....12
Turning the main power on....12
Turning the unit on and putting it into standby .... 12
Adjusting the volume....13
Selecting the input source 13
Automatic power saving function.... 14
Display 14
Capabilities of this unit....15
Using as a Bluetooth speaker 16
Pairing (initial setup) 16
Playback from a Bluetooth device....17
Preparations....18
Installing TEAC HR AirCast....18
Connecting to a network....18
Using as an AirPlay speaker 21
Listening to audio from digital playback devices
(DIGITAL IN)....21
Listening to audio from analog playback devices
(LINE IN) 22
Settings....23
SLEEP....24
DIMMER....24
APS (automatic power saving function) ..... 24
PS-MODE (power saving mode)....25
BASS EQ (bass equalizer) 25
Wi-Fi CONF (Wi-Fi setting)....25
PAIRING....25
INFORMATION 26
RESET....26
Troubleshooting....27
General 27
Bluetooth function....27
Specifications....28
Important Notice Regarding Software .... 30
Important Notice Regarding Other Third-Party Software....36
WARRANTY/GARANTIE/GARANTÍA/GARANTIE/GARANZIA/
GARANTIE/GARANTI 43
Europe/Europa 43
In countries/regions other than Europe ..... 43
Included items
Check to be sure the box contains all the included items shown below.
Please contact the store where you purchased this unit if any of these items are missing or have been damaged during transportation.
Power cord × 1
Wireless LAN antennas × 2
Grille × 1
Owner's manual (this document) × 1
- See page 43 for warranty information.
Quick start guide × 1
ATTENTION
The grille is attached using powerful magnets. When attaching or removing a grille, be careful not to let a finger become caught between the cabinet and the grille.
Using the TEAC Global Site
You can download updates for this unit from the TEAC Global Site: http://teac-global.com/
"DSD" is a registered trademark.
The Bluetooth ^® word mark and logos are registered trademarks owned by Bluetooth SIG, Inc. and any use of such marks by TEAC CORPORATION is under license.
Wi-Fi, Wi-Fi Protected Access® (WPA), the Wi-Fi logo and Wi-Fi Alliance are registered trademark of Wi-Fi Alliance. Wi-Fi CERTIFIED and Wi-Fi Protected Setup are trademark of Wi-Fi Alliance.
Android, Google Play, Google Play logo, Chromecast built-in and Chromebook are trademarks of Google Inc.
Apple, AirPlay, the AirPlay logo, iPad, iPhone, iPod touch and Mac are trademarks of Apple Inc., registered in the U.S. and other countries. App Store is a service mark of Apple Inc.
IOS is a trademark or registered trademark of Cisco in the U.S. and other countries and is used under license.
Other company names, product names and logos in this document are the trademarks or registered trademarks of their respective owners.
Information about copyrights and licensing related to open-source software is provided in the "Important Notice Regarding Software" at the end of this document.
1 Open the TEAC Global Site.
2 In the TEAC Downloads section, click the desired language to open the Downloads website page for that language.
NOTE
If the desired language does not appear, click Other Languages.
3 Click the product name in the "Products" section.
4 Select and download the updates that are needed.
Placement precautions
- Do not install this unit in a location that could become hot. This includes places that are exposed to direct sunlight or near a radiator, heater, stove or other heating equipment. Moreover, do not place it on top of an amplifier or other equipment that generates heat. Doing so could cause discoloration, deformation or malfunction.
- When installing this unit, leave a little space (at least 20 cm or 11") between it and walls and other devices in order to allow good heat dissipation. Failure to provide these gaps could cause heat to build up inside and result in fire.
- Do not strike the enclosure (cabinet) or front grill with hard objects. Doing so could cause scratching or damage the speakers.
- Avoid contact with rubber and vinyl for long periods of time, because it could damage the surface.
- This product has been designed to minimize magnetic effects, but you should not place cards, tapes and discs that use magnetic recording or other items that are easily affected by magnetic force on top of it. Failure to do so could result in data loss or damage.
Maintenance
The enclosure is made of natural wood, so exposure to moisture could cause harm and should be avoided. Wipe with a dry cloth.

For your safety, disconnect the power cord from the outlet before cleaning.
When using this unit with a mobile phone or other Bluetooth devices, they should be no more than about 10 m (33 ft) apart.
Depending on the circumstances of use, however, the effective transmission distance might be shorter.
Wireless communication with every device that supports Bluetooth wireless technology is not guaranteed.
To determine the compatibility between this unit and another device that supports Bluetooth wireless technology, refer to that device's operation manual or contact the shop where you purchased it.
Profiles
This unit supports the following Bluetooth profiles.
● A2DP (Advanced Audio Distribution Profile)
● AVRCP (Audio/Video Remote Control Profile)
In order to transfer audio using Bluetooth wireless transmission, the Bluetooth device must support A2DP.
In order to control playback on the Bluetooth device, it must support AVRCP.
Even if a Bluetooth device supports the same profiles, though, its functions might differ according to its specifications.
Transmission security
This unit supports security functions during Bluetooth wireless transmission in accordance with the Bluetooth standard specifications, but it does not guarantee the privacy of such transmissions.
TEAC CORPORATION will bear no responsibility should an information leak occur during Bluetooth wireless transmission.
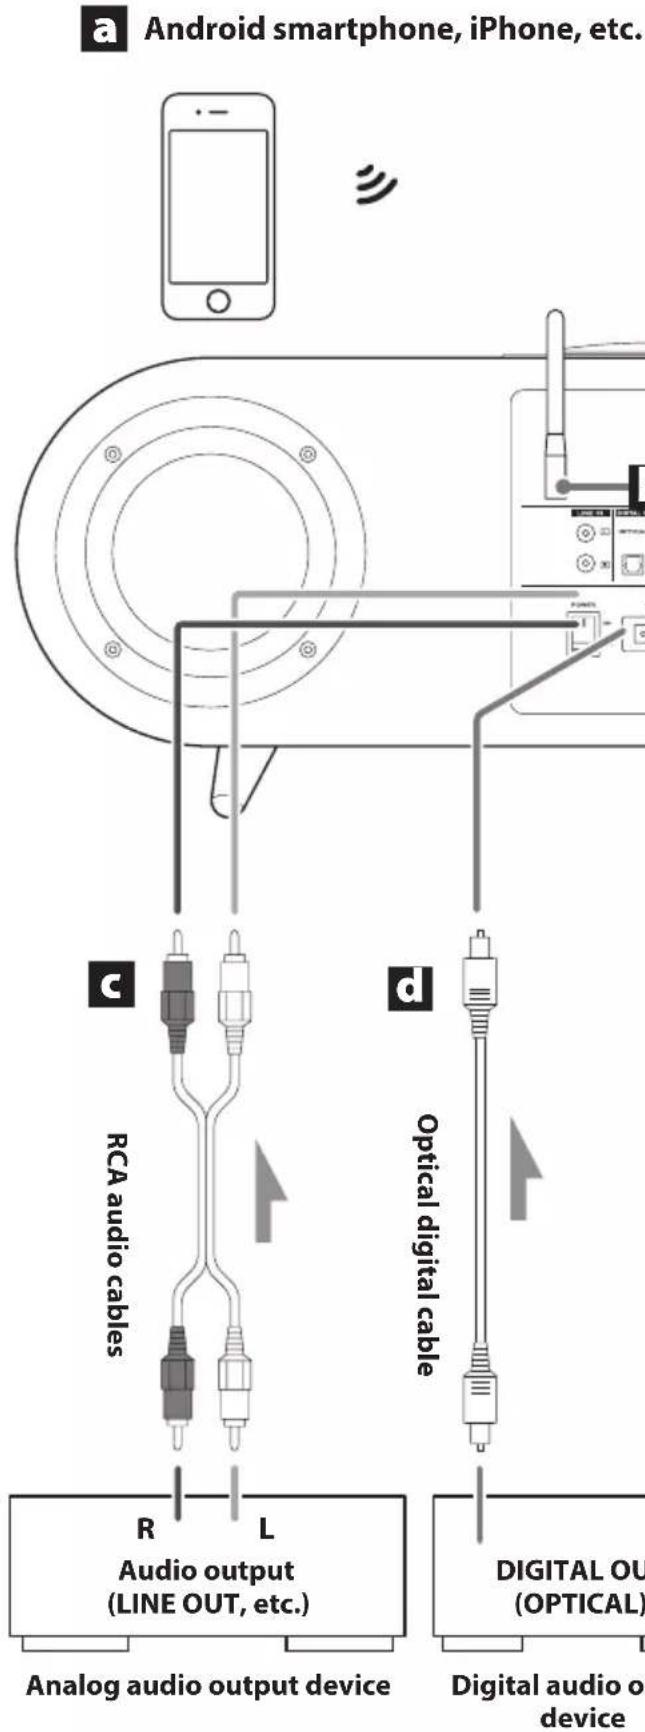

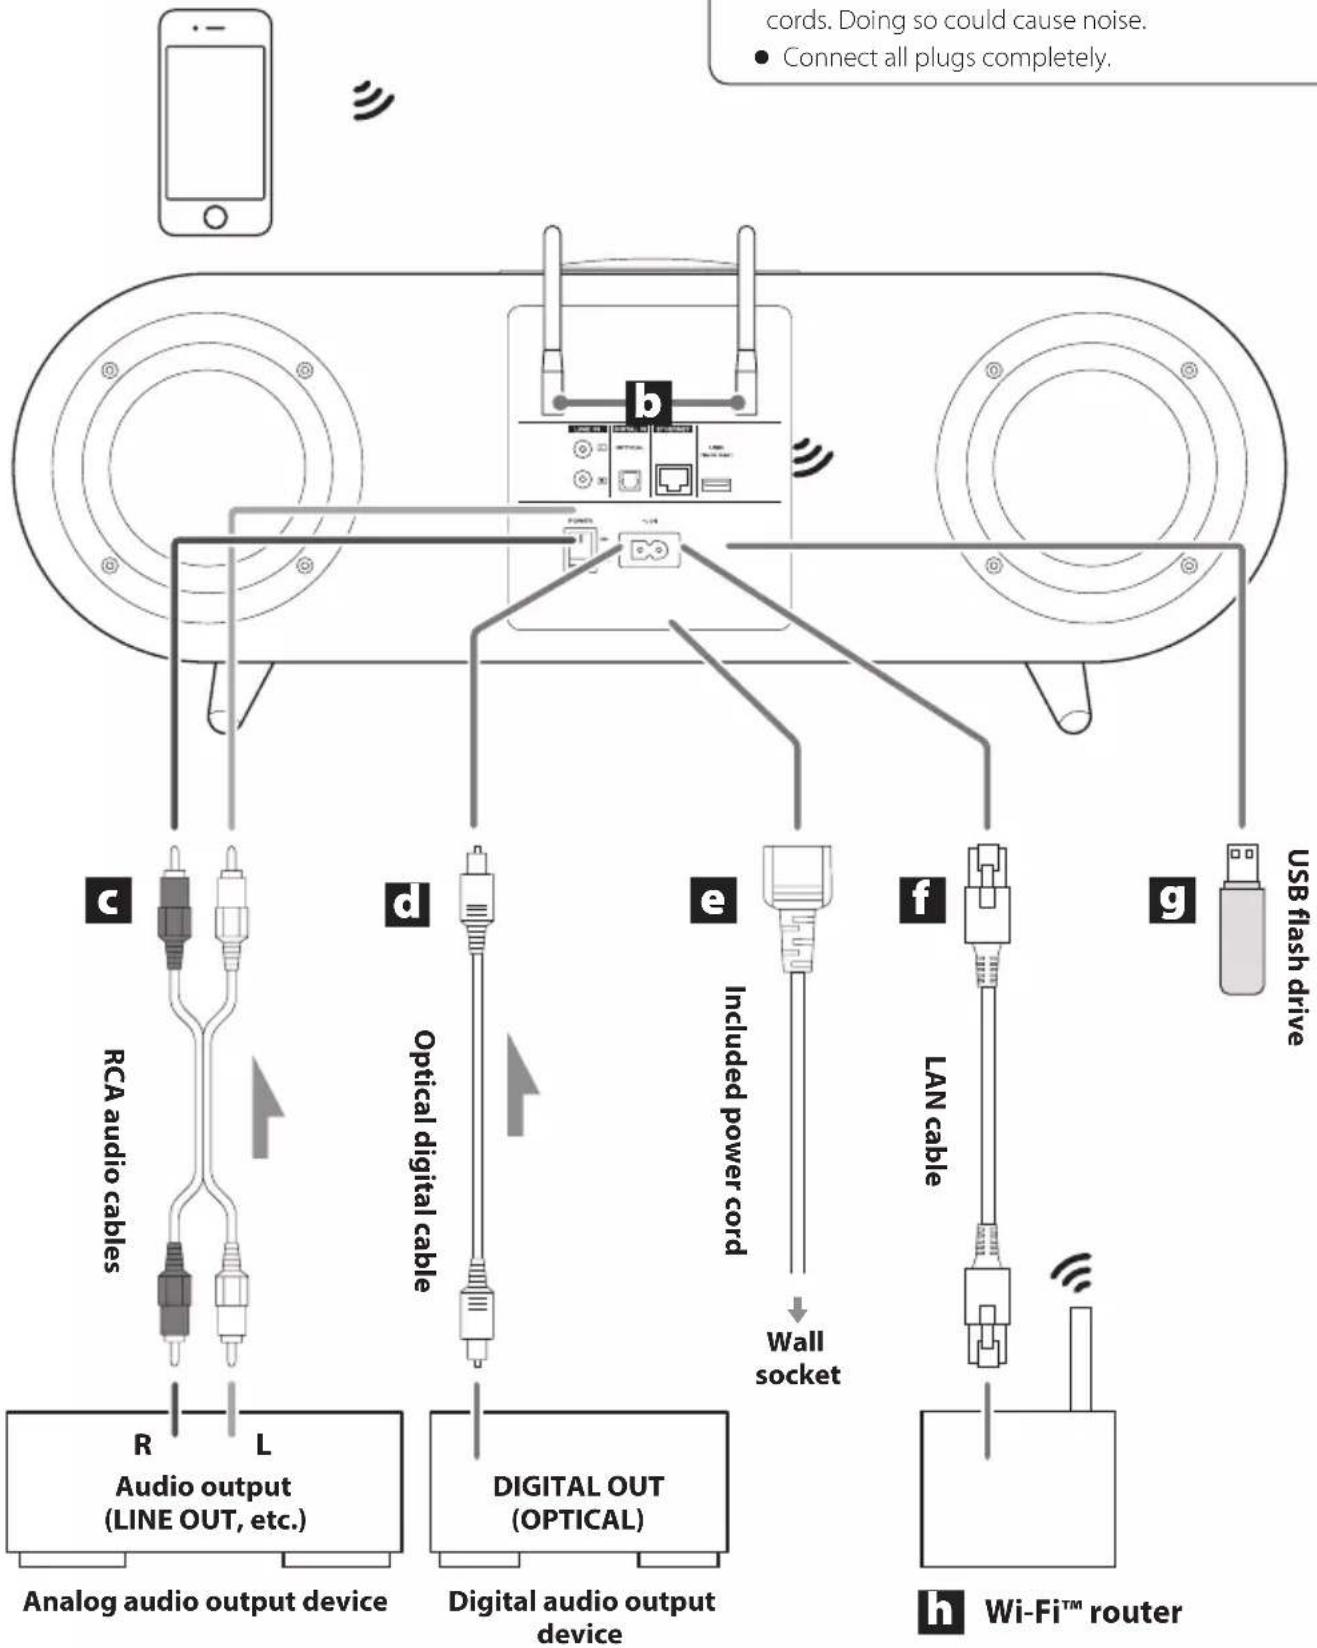
Complete all other connections before turning the unit on.
- Carefully read the manuals of the devices that you are connecting and follow their instructions when making connections.
- Do not bundle connecting cables with power cords. Doing so could cause noise.
- Connect all plugs completely.
flowchart
graph TD
    A["Smartphone"] --> B["Analog audio output device"]
    B --> C["RCA audio cables"]
    C --> D["Audio output (LINE OUT, etc.)"]
    D --> E["Analog audio output device"]
    B --> F["Digital audio output device"]
    F --> G["Digital OUT (OPTICAL)"]
    G --> H["Digital audio output device"]
    B --> I["Digital audio output device"]
    I --> J["Digital audio output device"]
    B --> K["Digital audio output device"]
    K --> L["Digital audio output device"]
    B --> M["Digital audio output device"]
    M --> N["Digital audio output device"]
    B --> O["Digital audio output device"]
    O --> P["Digital audio output device"]
    B --> Q["Digital audio output device"]
    Q --> R["Digital audio output device"]
    B --> S["Digital audio output device"]
    S --> T["Digital audio output device"]
    B --> U["Digital audio output device"]
    U --> V["Digital audio output device"]
    B --> W["Digital audio output device"]
    W --> X["Digital audio output device"]
    B --> Y["Digital audio output device"]
    Y --> Z["Digital audio output device"]
    B --> AA["Digital audio output device"]
    AA --> AB["Digital audio output device"]
    B --> AC["Digital audio output device"]
    AC --> AD["Digital audio output device"]
    B --> AE["Digital audio output device"]
    AE --> AF["Digital audio output device"]
    B --> AG["Digital audio output device"]
    AG --> AH["Digital audio output device"]
    B --> AI["Digital audio output device"]
    AI --> AJ["Digital audio output device"]
    B --> AK["Digital audio output device"]
    AK --> AL["Digital audio output device"]
    B --> AM["Digital audio output device"]
    AM --> AN["Digital audio output device"]
    B --> AO["Digital audio output device"]
    AO --> AP["Digital audio output device"]
    B --> AQ["Digital audio output device"]
    AQ --> AR["Digital audio output device"]
    B --> AS["Digital audio output device"]
    AS --> AT["Digital audio output device"]
    B --> AU["Digital audio output device"]
    AU --> AV["Digital audio output device"]
    B --> AW["Digital audio output device"]
    AW --> AX["Digital audio output device"]
    B --> AY["Digital audio output device"]
    AY --> AZ["Digital audio output device"]
a Android smartphone, iPhone, etc.
Install the app to control this unit.
b Wireless LAN antenna connectors and LAN antennas
Connect the included wireless LAN antennas.
C Analog audio input (LINE IN) connectors
Connect an analog audio output device.
Use commercially-available RCA audio cables for connections.
Connect this unit's R input connector to the R output connector of the audio output device, and this unit's L input connector to the L output connector of the other device.
RCA audio cables

d Digital audio input (DIGITAL IN) connector
Connect a digital audio output device.
Use a commercially-available optical digital cable with rectangular connectors for connection.
e Power inlet (\~IN)
Connect the supplied power cord here.
After all other connections are complete, connect the power cord's plug to a wall outlet.

Do not use any power cord other than the one included with this unit. Use of other power cords could result in fire or electric shock.

Unplug the cord from the outlet when not using the unit for a long time.
f ETHERNET port
Connect a LAN cable to this port when you want to this unit to a network with a wired connection.
Use a commercially-available LAN cable for connection.
- When a LAN cable is connected, this unit's wireless LAN function (Wi-Fi) will be disabled.
g USB port
Connect USB flash drives here.
- Install the dedicated app onto a smartphone or tablet in advance, and use it to work with this device.
h Wi-Fi™ router
Connect this unit, media servers, smart phones and other devices to a router and create a network.
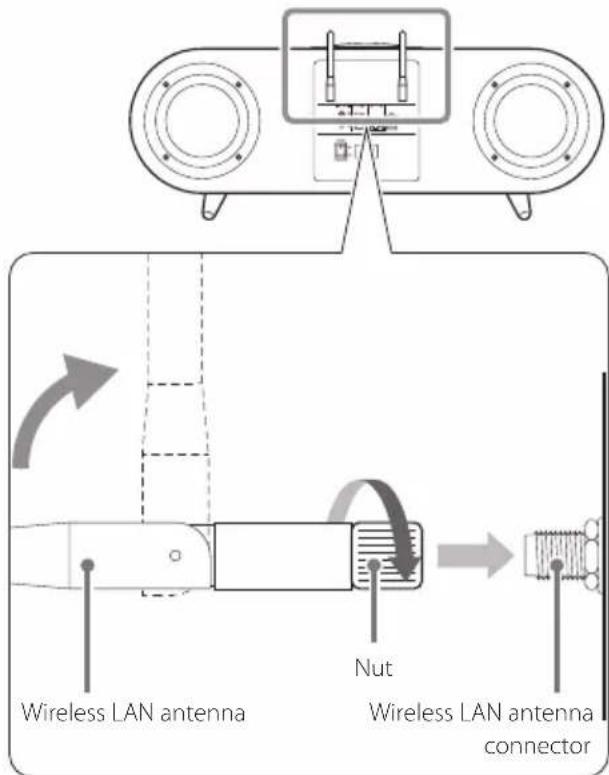
Connecting the wireless LAN antennas
Follow these procedures to connect each of the two included antennas.
1 Insert the antenna into an antenna connector.
2 Turn the antenna nut to secure it in the antenna connector.
3 Raise the antenna.
ATTENTION
- Be careful of the direction that you bend the antennas. The antennas only bend in one direction. Do not forcibly bend the antennas.
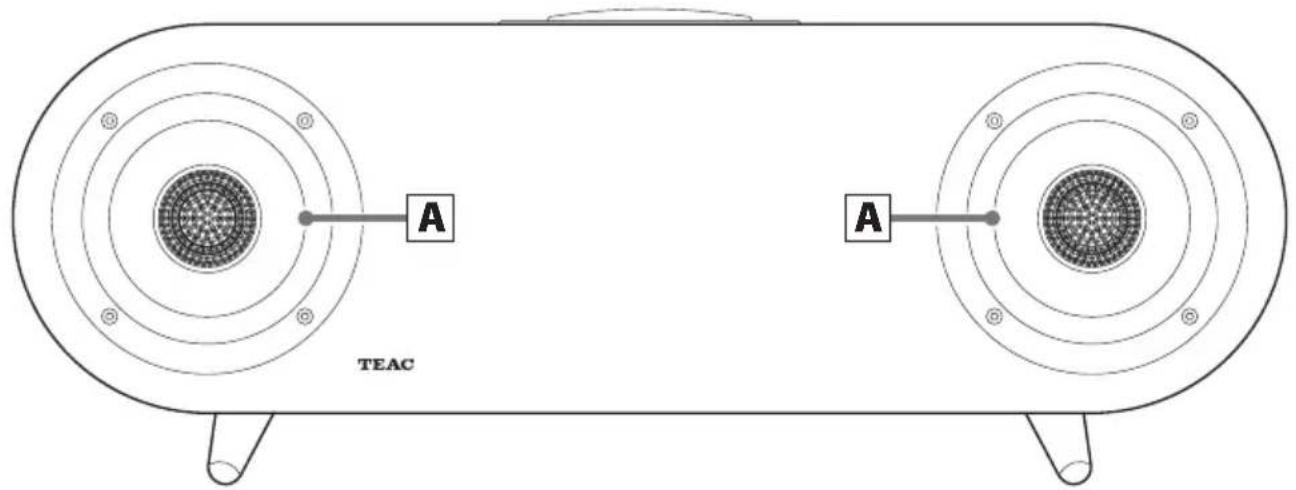
Front
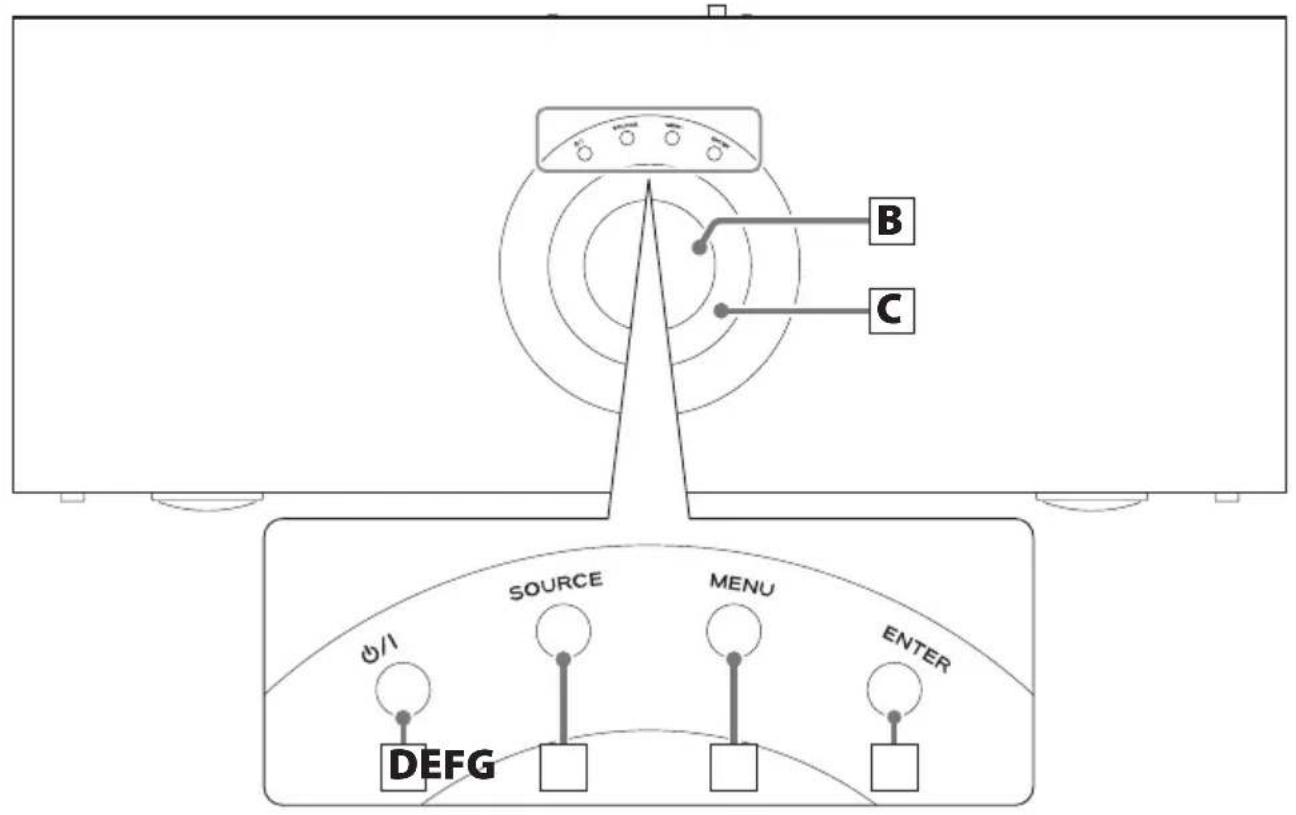
Top
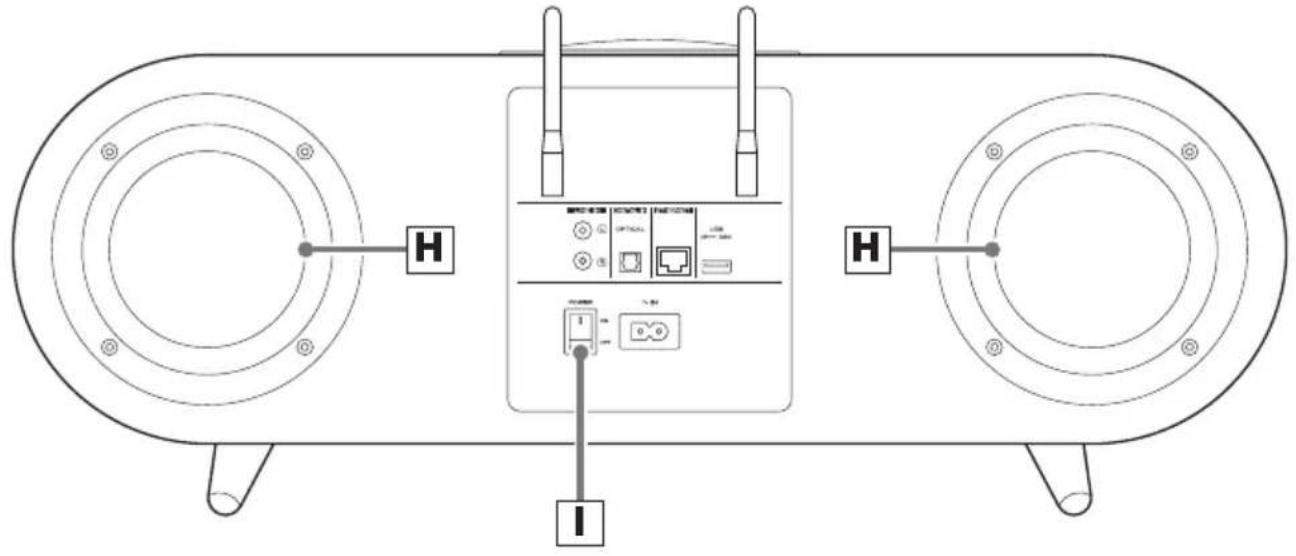
Rear

Coaxial two-way speakers
These coaxial two-way units provide an excellent sense of stereo positioning.

Display
This shows the volume, input source and menu.

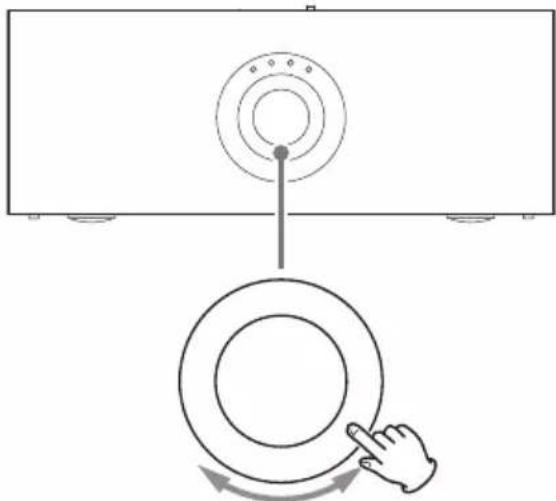
Control Dial
Use to adjust the volume. Turn clockwise to increase the volume. Turn counterclockwise to decrease the volume.
In addition, use it in various setting operations.

STANDBY/ON button ( ⏻/1 )
Press to put the unit into standby mode or turn it on (page 12).
When on, the ring around the Control Dial lights.

SOURCE button
Use to select the input source (page 13).

MENU button
Use to make various settings (page 23).

ENTER button
Press to confirm the selected item.

Passive radiators
These primarily amplify low frequencies.
Since these move backward and forward, make sure that no cables or other objects touch them.

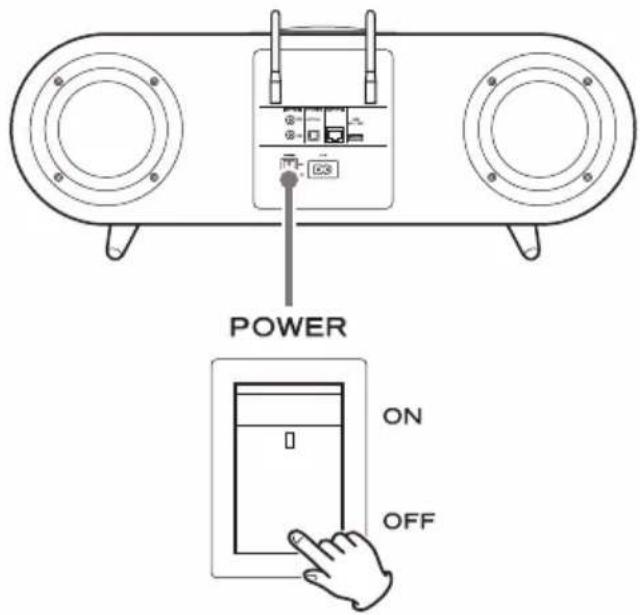
Main POWER switch
Use to turn the unit on and off.
- If this main POWER switch is not on, pressing the standby/on (☐/I) button will not turn the unit on.
Turning the main power on
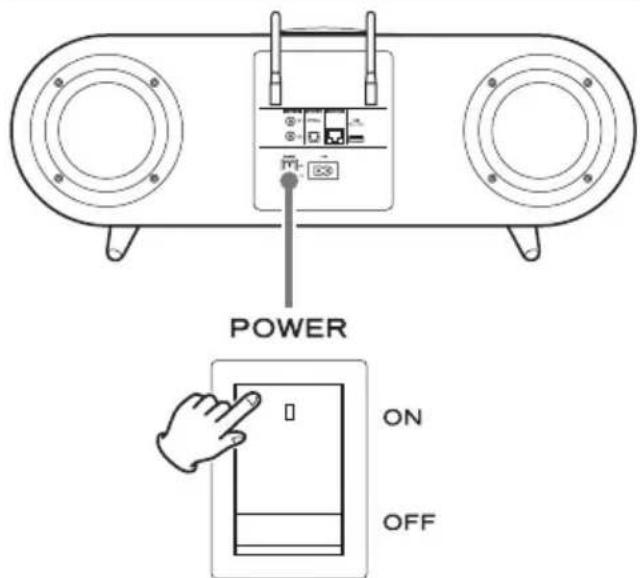
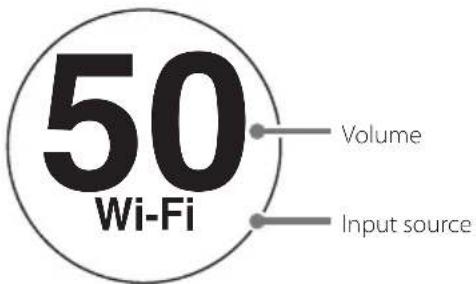
When the main POWER switch is set to ON, a progress bar will appear on the display and the unit will start up. Do not press any other buttons until the unit complete starting up. The Home Screen shown below appears after the unit starts up.
Display example
ATTENTION
The volume will be set to 50 immediately after the main POWER switch is set to ON.
NOTE
After turning the main power on immediately after purchase or after resetting the unit to its defaults, "Wi-Fi" will appear blinking on the display. If connected to a network using a LAN cable, however, "ETHERNET" will appear as the input source.
Turning the unit on and putting it into standby
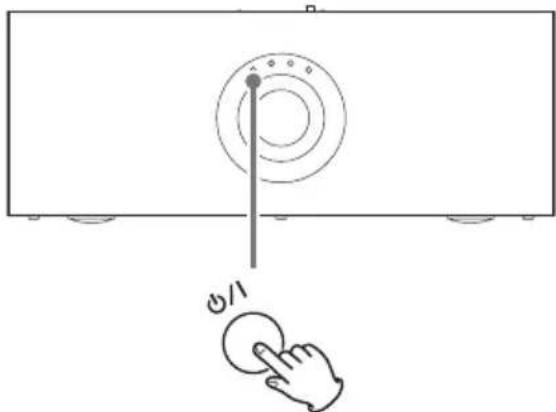
When the unit is on, press the standby/on (⏻/l) button to put it into standby. Press it once more to turn it on again.
natural_image
Simple line drawing of a monitor with a circular dial and a hand pressing a button (no text or symbols)- When the unit is in standby, starting playback from an app will automatically turn it on.
NOTE
The unit consumes standby power when in standby mode. To eliminate standby power consumption, set the main POWER switch on the rear panel to OFF.
Adjusting the volume
Turn the Control Dial when the Home Screen is open.
Display example
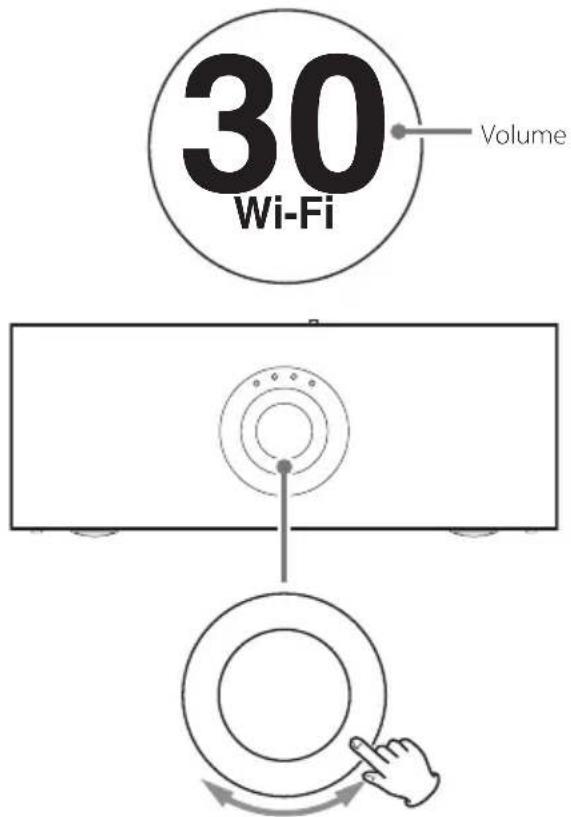
Turn it clockwise to increase the volume. Turn it counterclockwise to decrease the volume.
The minimum volume is 00, and the maximum is 99.
Selecting the input source
1 Press the SOURCE button.
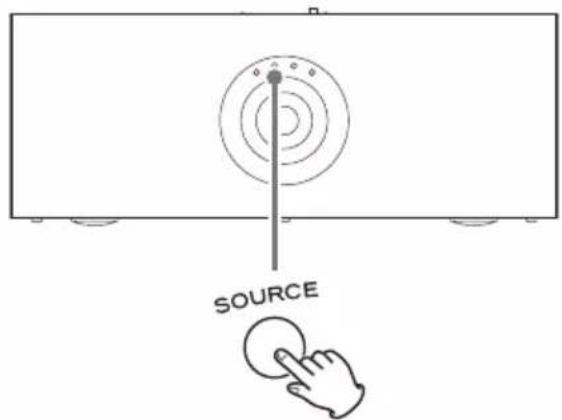
The display changes to show input source selection.
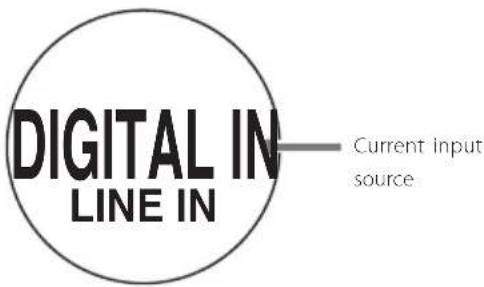
2 Turn the Control Dial to change the input source shown in the middle of the display.
natural_image
Diagram showing a monitor with a circular dial and a hand interacting with a circular ring, indicating rotation or adjustment (no text or symbols present)Turn the Control Dial clockwise to change the input source in the following order.
DIGITAL IN
↓ LINE IN
- Turn the Control Dial counterclockwise to change the input source in reverse order.
- If no operation is taken and the input source is not changed for one minute, the Home Screen will reopen.
DIGITAL IN
Select this to use the digital audio input on the rear of the unit.
LINE IN
Select this to use the analog audio inputs on the rear of the unit.
NOTE
When using Wi-Fi, Ethernet, Bluetooth or a USB flash drive attached to the rear of the unit, the input source will be changed automatically when a play-back operation is conducted with an app.
3 Press the ENTER button to confirm the input source.
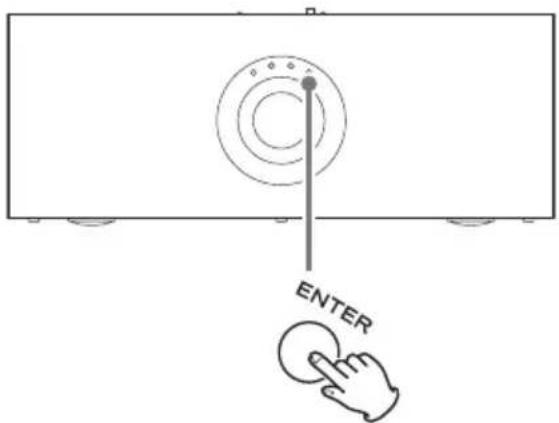
● After showing the confirmed source for a few seconds on the display, the Home Screen will automatically reappear.
Display example
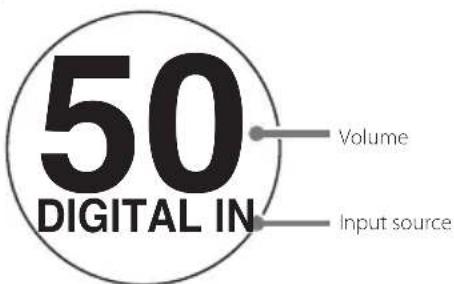
- Press the SOURCE button before pressing the ENTER button to cancel input source selection.
4 Start playback.
See "Capabilities of this unit" on page 15 for information about playback operations.
CAUTION
Minimize the volume before starting playback and gradually increase it whenever you change the input source and immediately after turning the power on by pressing the main POWER switch or the standby/on (⏻/l) button.
Automatic power saving function
When the unit is on, it will automatically enter standby mode if it is not used for a certain amount of time. See "APS (automatic power saving function)" in "Settings" for details (page 24).
Display
The display of this unit will automatically dim after a certain amount of time to prevent screen burn-in. See "DIMMER" in "Settings" for details (page 24).
flowchart
graph LR
    A["Bluetooth\nAirPlay\nSmartphone audio files"] --> B["Central Device"]
    B --> C["Internet radio and music streaming services, etc. (Chromecast built-in)"]
    B --> D["Media servers, including NAS and PCs"]
    D --> E["USB flash drive"]
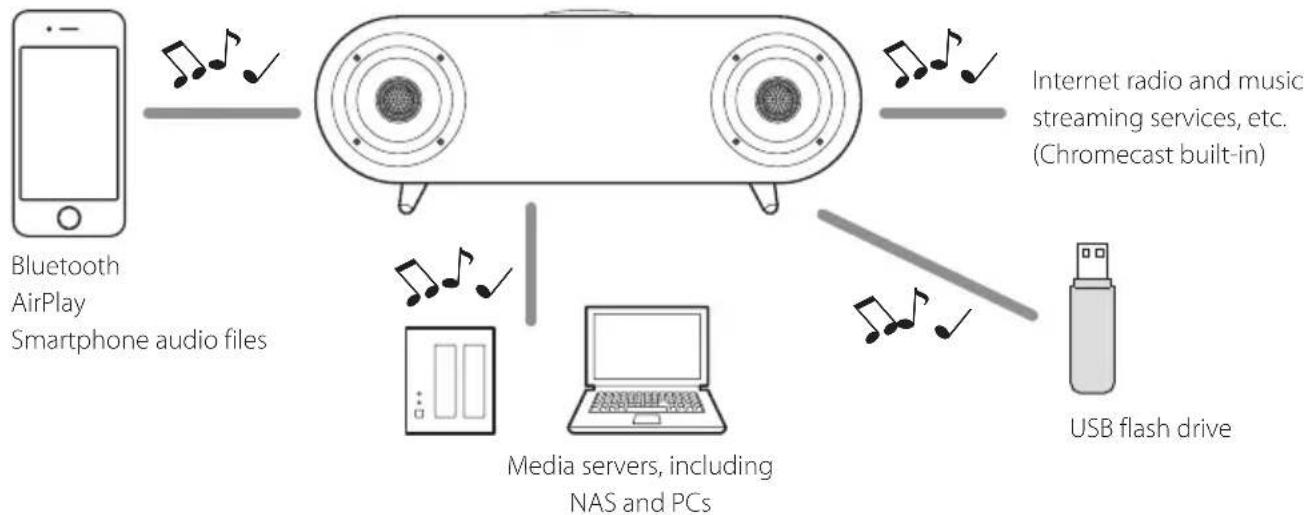
Using as a Bluetooth speaker (page 16)
Using as an AirPlay speaker ^1 (page 21)
Listening to audio files on smartphones and tablets ^1,2
Listening to audio files on media servers, including NAS and PCs ^1,2
Listening to audio files on USB flash drives ^1,2
Listening to Internet radio and music streaming services, etc. (Chromecast built-in) ^1,3
Listening to audio from digital playback devices (DIGITAL IN) ^4 (page 21)
Listening to audio from analog playback devices (LINE IN) ^5 (page 22)
Support information
For detailed operation procedures using smart phones and tablets, see the Network Application Manual. The Network Application Manual can be downloaded from the following TEAC website.
http://teac-global.com/

Notes about Chromecast built-in
Chromecast built-in is a platform that lets you stream your favorite music from your phone, tablet or laptop right to your speakers.
Easily control your speakers with apps you already know and love from your iPhone, iPad, Android phone or tablet, Mac or Windows laptop, or Chromebook.
1 This unit must be connected to a network.
2 Install the dedicated TEAC HR AirCast app on the smartphone or tablet.
^3 The network being used must be connected to the Internet.
4 CD players, digital audio players and other devices with optical digital audio outputs.
5 Televisions, record players with built-in phono amps (line outputs) and other devices with analog audio output.
Pairing (initial setup)
- Pairing this unit with another Bluetooth device is necessary the first time it is used and when connecting to a different Bluetooth device for the first time.
- When pairing with another Bluetooth device, they should be within a few meters of each other. If they are too far apart, pairing and connection afterwards might become impossible.
- For details, refer to the operation manual of that Bluetooth device.
1 Press the MENU button, and select PAIRING.
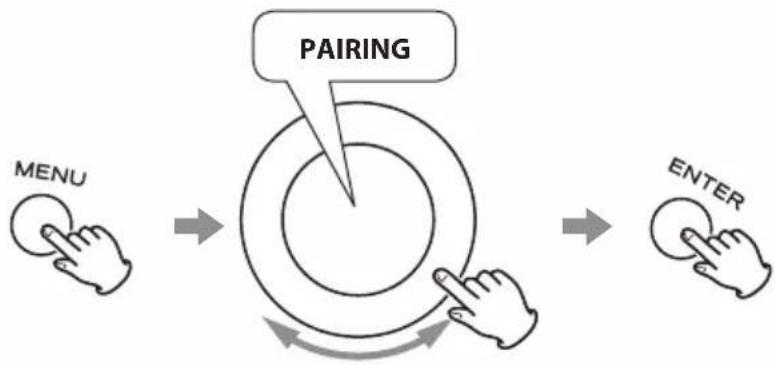
flowchart
graph LR
    A["MENU"] --> B["PAIRING"]
    B --> C["ENTER"]
Pairing becomes possible when PAIRING blinks on the display.
2 Turn on the Bluetooth function of the smartphone or other device.
Example with Android
Open Settings > Bluetooth, and turn Bluetooth on.
Example with iPhone
Open Settings > Bluetooth, and turn Bluetooth on.
3 Select this WS-A70 unit from the device list on the smartphone or other device.
Example with Android
After opening Settings > Bluetooth, select "WS-A70 xxxxxx" from the "Available Devices" list.
Example with iPhone
After opening Settings > Bluetooth, select "WS-A70 xxxxxx" from the "Devices" list.
After pairing completes, "Bluetooth" will appear at the bottom of the display.

Confirm the connection with the smartphone or other Bluetooth device.
Example with Android
After opening Settings > Bluetooth, check "Paired Devices".
Example with iPhone
After opening Settings > Bluetooth, check "My Devices".
NOTE
- Complete pairing within five minutes of enabling pairing 1.
- If pairing did not complete, repeat the operations from 1. Please also refer to the operation manual of the Bluetooth device you are using.
Playback from a Bluetooth device
1 Turn on the Bluetooth function of the smartphone or other device and connect to this WS-A70 unit.
Example with Android
Open Settings > Bluetooth, and turn Bluetooth on. Select "WS-A70 xxxxxx" from "Paired Devices", and make it "connected".
Example with iPhone
Open Settings > Bluetooth, and turn Bluetooth on. Select "WS-A70 xxxxxx" from the "Devices" list, and make it "connected".
After connection completes, "Bluetooth" will appear at the bottom of the display.
50
Bluetooth
NOTE
- Connecting with a Bluetooth device will automatically switch the input source of this unit to Bluetooth.
- If connection is not complete, try pairing again or turning the main POWER switch on this unit OFF and ON again.
Please also refer to the operation manual of the Bluetooth device you are using.
2 Playing back from smartphones and other Bluetooth devices
For playback procedures, refer to the operation manual of that Bluetooth device.
Installing TEAC HR AirCast
The dedicated TEAC HR AirCast allows you to use smartphones as remote controls for this unit.
Search for TEAC HR AirCast on Google Play or the App Store, or access one of the addresses below, and install the app.
https://play.google.com/store/apps/
details?id=com.teac.teachraircast
https://itunes.apple.com/us/app/teac-hr-aircast/
id1204063749?l=ja&ls=1&mt=8
Connecting to a network
Internet
Wi-Fi™ router
By connecting this unit to a network, you can enjoy music from a media server and listen to Internet radio.
There are several ways to connect to a network as shown below.
A) Use "SET UP NEW AIRPLAY SPEAKER" for an iPhone or other iOS device (page 19)
This method is simple when using an iPhone.
B) Use the Google Home app
Select this method when using an Android smartphone, for example. For details, refer to the Network Application Manual.
C) Use a LAN cable to connect (page 20)
Wired connections enable stable network connections because they are not affected by electromagnetic wave conditions.
A) Use "SET UP NEW AIRPLAY SPEAKER" for an iPhone or other iOS device
1 Turn this unit on.
2 Press the MENU button, and select "Wi-Fi CONF" > "iOS(WAC)".
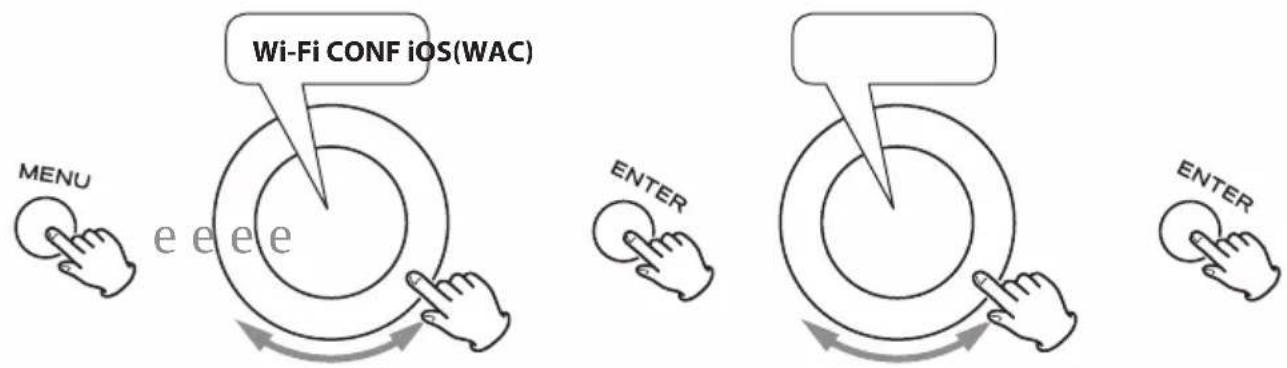
flowchart
graph TD
    A["Menu"] --> B["Wi-Fi CONF iOS(WAC)"]
    B --> C["Enter"]
    C --> D["Enter"]
    style A fill:#f9f,stroke:#333
    style B fill:#ccf,stroke:#333
    style C fill:#cfc,stroke:#333
    style D fill:#fcc,stroke:#333
When "iOS(WAC)" appears on the display, the unit is ready for connection.

3 On the iPhone or other iOS device, open "Settings" > "Wi-Fi".
Swipe up, and select "WS-A70xxxxxx" under "SET UP NEW AIRPLAY SPEAKER". Then, follow the instructions that are shown on the device to complete connection setup.
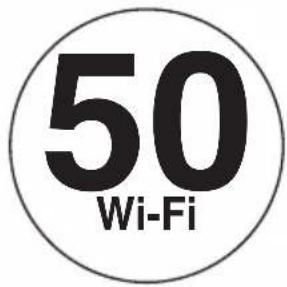
After connection completes, "Wi-Fi" will appear at the bottom of the display.
C) Use a LAN cable to connect
1 Set the main POWER switch on this unit to OFF.
2 Connect the LAN cable.
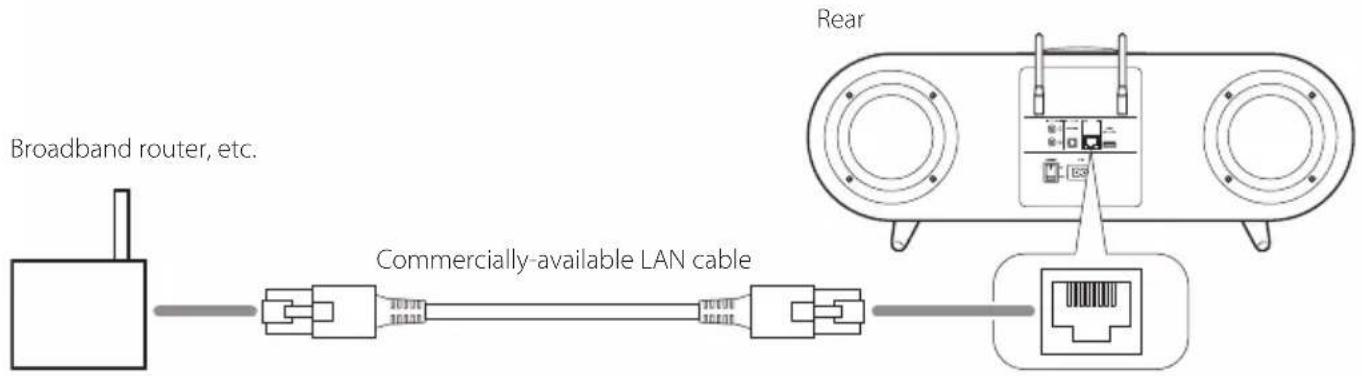
flowchart
graph LR
    A["Broadband router, etc."] --> B["Commercial LAN cable"]
    B --> C["Rear"]
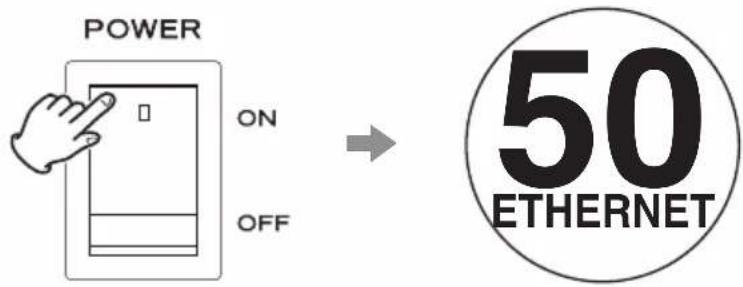
3 Set the main POWER switch on this unit to ON.
After the unit starts up, "ETHERNET" will appear at the bottom of the display.
NOTE
When a LAN cable is connected, this unit's Wi-Fi function will be disabled.
1 Select this unit as the audio output device on the iPhone or iPod, for example.
Example with iPhone
Swipe up from the bottom of the screen to open the Control Center, and tap the AirPlay icon. Tap "WS-A70 xxxxxx" in the list.
NOTE
When using AirPlay, "Wi-Fi" will appear at the bottom of the display.
2 Play audio using the music app, for example.
Listening to audio from digital playback devices (DIGITAL IN)
1 Press the SOURCE button, and select DIGITAL IN.
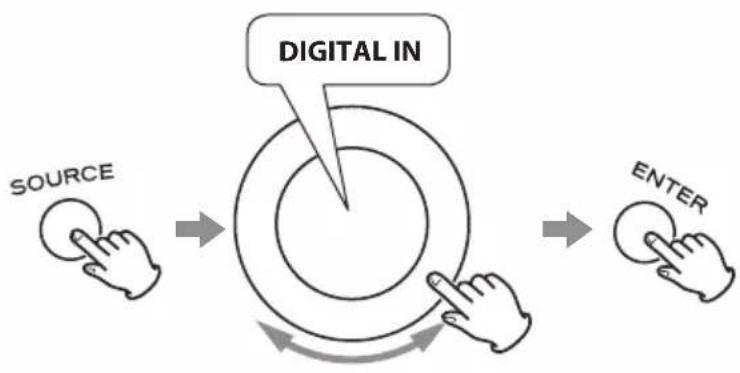
flowchart
graph LR
    A["SOURCE"] --> B["DIGITAL IN"]
    B --> C["ENTER"]
    C --> D["Feedback Loop"]
    D --> B
"DIGITAL IN" will appear at the bottom of the display.

2 Play audio on the digital playback device.
For playback procedures, refer to the operation manual of that device.
ATTENTION
This unit only supports the linear PCM format. Inputting signals in other formats could cause noise or sound output to stop. If this happens, set the output of the device being used to linear PCM. For details, refer to the operation manual of that device.
1 Press the SOURCE button, and select LINE IN.
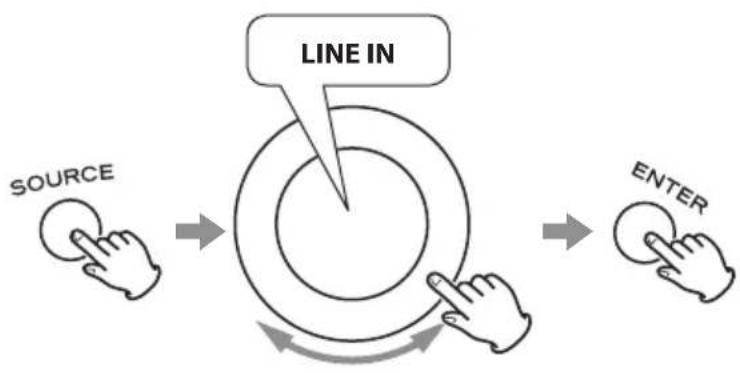
flowchart
graph LR
    A["SOURCE"] --> B["LINE IN"]
    B --> C["ENTER"]
"LINE IN" will appear at the bottom of the display.

2 Play audio on the analog playback device.
For playback procedures, refer to the operation manual of that device.
Follow these procedures to change the settings of this unit.
- Settings are retained even when the unit is in standby mode or the main POWER switch is set OFF.
1 Press the MENU button to open the menu screen.
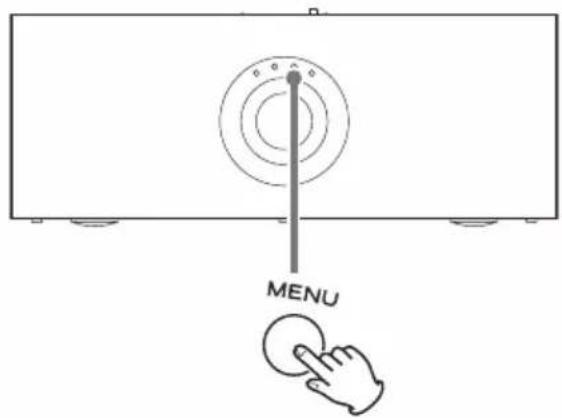
Display example
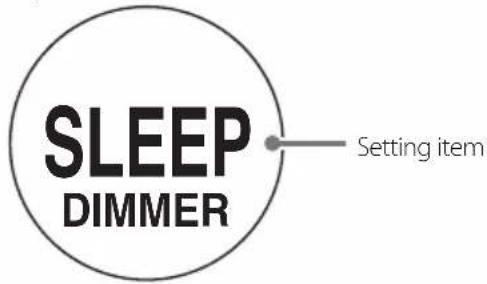
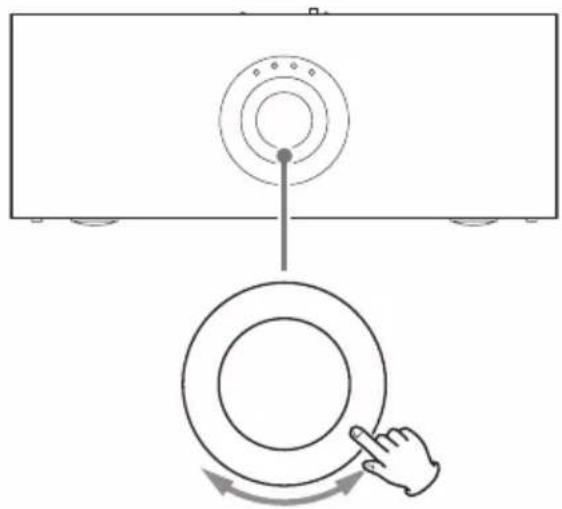
2 Turn the Control Dial until the item to set is shown in the middle of the display.
natural_image
Diagram showing a monitor with a circular dial and a hand interacting with a circular button (no text or symbols)Turn the Control Dial clockwise to change the input source in the following order.
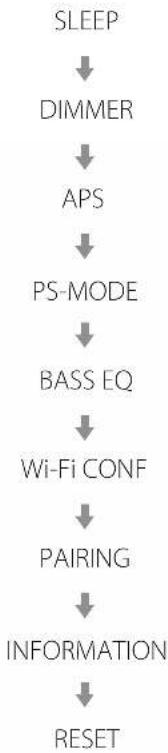
flowchart
graph TD
    A["SLEEP"] --> B["DIMMER"]
    B --> C["APS"]
    C --> D["PS-MODE"]
    D --> E["BASS EQ"]
    E --> F["Wi-Fi CONF"]
    F --> G["PAIRING"]
    G --> H["INFORMATION"]
    H --> I["RESET"]
- Turn the Control Dial counterclockwise to change the input source in reverse order.
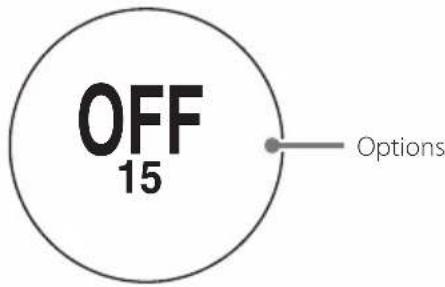
3 Press the ENTER button to show the options for that setting.
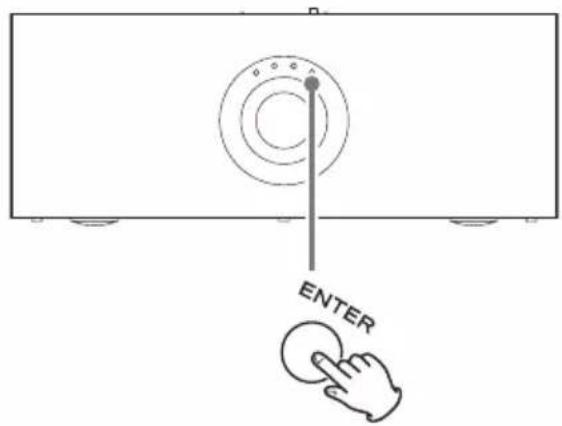
Display example
- CAUTION
- For European Customers
- Disposal of electrical and electronic equipment and batteries and/or accumulators
- Compliance of radio transmitter and interference
- Model for EEA (European Economic Area)
- Radiation Exposure requirements
- Statement of compliance
- Included items
- ATTENTION
- Using the TEAC Global Site
- NOTE
- Placement precautions
- Maintenance
- Profiles
- Transmission security
- Complete all other connections before turning the unit on.
- a Android smartphone, iPhone, etc.
- b Wireless LAN antenna connectors and LAN antennas
- C Analog audio input (LINE IN) connectors
- RCA audio cables
- d Digital audio input (DIGITAL IN) connector
- e Power inlet (\~IN)
- f ETHERNET port
- g USB port
- h Wi-Fi™ router
- Connecting the wireless LAN antennas
- Insert the antenna into an antenna connector.
- Turn the antenna nut to secure it in the antenna connector.
- Raise the antenna.
- Rear
- Coaxial two-way speakers
- Display
- Control Dial
- STANDBY/ON button ( ⏻/1 )
- SOURCE button
- MENU button
- ENTER button
- Passive radiators
- Main POWER switch
- Turning the unit on and putting it into standby
- Adjusting the volume
- Turn the Control Dial when the Home Screen is open.
- Selecting the input source
- Press the SOURCE button.
- Turn the Control Dial to change the input source shown in the middle of the display.
- DIGITAL IN
- LINE IN
- Press the ENTER button to confirm the input source.
- Start playback.
- Automatic power saving function
- Support information
- Notes about Chromecast built-in
- Pairing (initial setup)
- Press the MENU button, and select PAIRING.
- Turn on the Bluetooth function of the smartphone or other device.
- Example with Android
- Example with iPhone
- Select this WS-A70 unit from the device list on the smartphone or other device.
- Playback from a Bluetooth device
- Turn on the Bluetooth function of the smartphone or other device and connect to this WS-A70 unit.
- 50
- Bluetooth
- Playing back from smartphones and other Bluetooth devices
- Installing TEAC HR AirCast
- Connecting to a network
- A) Use "SET UP NEW AIRPLAY SPEAKER" for an iPhone or other iOS device
- C) Use a LAN cable to connect
- Select this unit as the audio output device on the iPhone or iPod, for example.
- Play audio using the music app, for example.
- Listening to audio from digital playback devices (DIGITAL IN)
- Press the SOURCE button, and select DIGITAL IN.
- Play audio on the digital playback device.
- Press the SOURCE button, and select LINE IN.
- Play audio on the analog playback device.
- Press the MENU button to open the menu screen.
- Turn the Control Dial until the item to set is shown in the middle of the display.
- Press the ENTER button to show the options for that setting.
Brand : TEAC
Model : WS-A70
Category : Pregnant