
WAP-AX250 - Hi-Fi TEAC - Free user manual and instructions
Find the device manual for free WAP-AX250 TEAC in PDF.


| Product Type | Integrated Amplifier |
| Brand | TEAC |
| Model | WAP-AX250 |
| Power Output | 50W per channel (8 ohms) |
| Total Harmonic Distortion | 0.05% |
| Frequency Response | 20 Hz - 20 kHz |
| Signal-to-Noise Ratio | 90 dB |
| Dimensions (W x H x D) | 280 x 85 x 305 mm |
| Weight | 5.5 kg |
| Power Supply | AC 120V/230V, 50/60 Hz |
| Power Consumption | 150 W |
| Inputs | 3x RCA, 1x Phono (MM), 1x Aux |
| Outputs | Speaker terminals, Headphone jack, Pre-out |
| Features | Volume control, Tone control (bass/treble), Remote control |
| Cleaning | Use a soft dry cloth. Do not use liquids. |
| Safety | Do not expose to rain or moisture. Do not open the cover. |
| Repairability | Contact an authorized TEAC service center for repairs. |
| Warranty | 2 years limited warranty (check local regulations) |
Frequently Asked Questions - WAP-AX250 TEAC
User questions about WAP-AX250 TEAC
0 question about this device. Answer the ones you know or ask your own.
Ask a new question about this device
Download the instructions for your Hi-Fi in PDF format for free! Find your manual WAP-AX250 - TEAC and take your electronic device back in hand. On this page are published all the documents necessary for the use of your device. WAP-AX250 by TEAC.
USER MANUAL WAP-AX250 TEAC
Wireless Audio Player
INSTRUCTION MANUAL
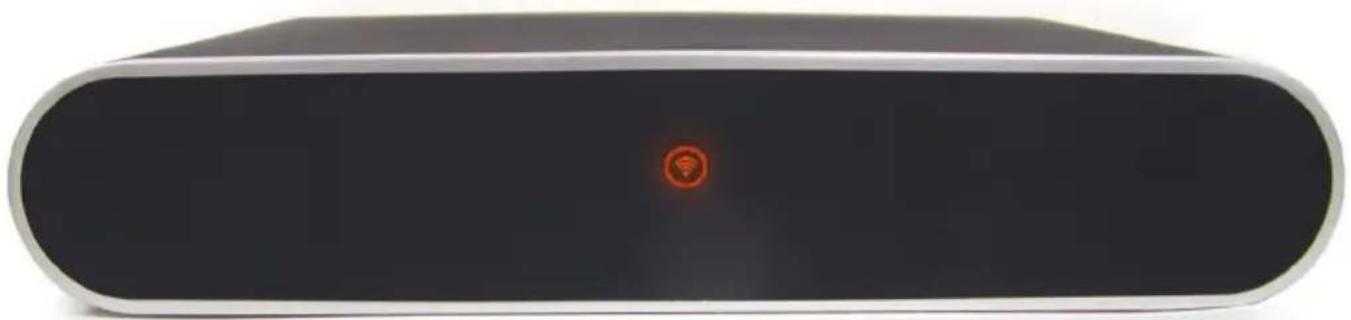
natural_image
Front view of a modern, rounded electronic device with a glowing orange sensor icon on the screen (no text or symbols visible)Copyright Notices
Copyright (c) 2009 by TEAC Europe GmbH – All Rights Reserved.
The Product "TEAC WAP-AR100, -AX100, -AX250" (hereinafter referred to as the "Product") includes Open-Source software packages. These Open-Source software packages are subject to specific licenses, disclaimers and notices, which are reproduced on the CD-ROM provided with the Product (see "Licenses.txt"). Please refer to those licenses, disclaimers and notices for your exact rights hereunder as well as to the following Open-Source Notices. The source code of Open-Source software packages is available for download under http://www.wap-opensource.teac.de.
Additionally TEAC offers to provide the source code of the Open-Source software packages to you on CD-ROM for a fee for the physical act of transferring a copy, such as the cost of the media and shipping, upon written request to TEAC Europe GmbH, code “Source-Code”, Bahnstraße 12, 65205 Wiesbaden, Germany. This offer is valid for a period of three years from the distribution of this product by TEAC.
Open-Source Notices
Part of this product's software (this program) is free software: you can redistribute it and/or modify it under the terms of the respective GNU General Public License or GNU Lesser General Public License as published by the Free Software Foundation, either version 2 (or 2.1 respectively) of the License, or (at your option) any later version.
This program is distributed in the hope that it will be useful, but WITHOUT ANY WARRANTY; without even the implied warranty of MERCHANTABILITY or FITNESS FOR A PARTICULAR PURPOSE. See the respective GNU General Public License or GNU Lesser General Public License for more details.
You should have received a copy of the GNU General Public License and the GNU Lesser General Public License along with this program. If not, see http://www.gnu.org/licenses/.
Portions of this product's software are copyright © 2006-May-12 The FreeType Project www.freetype.org. All rights reserved.
Portions of this product's software are available under the Mozilla Public License 1.1 (MPL 1.1). Any modification or contribution to such portions of this software are available in Source Code form under the terms of the Mozilla Public License 1.1 via the internet under TEAC's website as mentioned above.
Portions of this product's software are subject to the following disclaimer: THIS SOFTWARE IS PROVIDED BY THE COPYRIGHT HOLDERS AND CONTRIBUTORS "AS IS" AND ANY EXPRESS OR IMPLIED WARRANTIES, INCLUDING, BUT NOT LIMITED TO, THE IMPLIED WARRANTIES OF MERCHANTABILITY AND FITNESS FOR A PARTICULAR PURPOSE ARE DISCLAIMED. IN NO EVENT SHALL THE COPYRIGHT HOLDER OR CONTRIBUTORS BE LIABLE FOR ANY DIRECT, INDIRECT, INCIDENTAL, SPECIAL, EXEMPLARY, OR CONSEQUENTIAL DAMAGES (INCLUDING, BUT NOT LIMITED TO, PROCUREMENT OF SUBSTITUTE GOODS OR SERVICES; LOSS OF USE, DATA, OR PROFITS; OR BUSINESS INTERRUPTION) HOWEVER CAUSED AND ON ANY THEORY OF LIABILITY, WHETHER IN CONTRACT, STRICT LIABILITY, OR TORT (INCLUDING NEGLIGENCE OR OTHERWISE) ARISING IN ANY WAY OUT OF THE USE OF THIS SOFTWARE, EVEN IF ADVISED OF THE POSSIBILITY OF SUCH DAMAGE.
TEAC.
Contents
Copyright Notices....2
After unpacking....5
Controls and connectors....6
Assembly 8
BRC stand usage and battery charge....9
Initial System Setup 10
Operation....18
Audio Server operation 19
USB/SATA-HDD Audiomanager....21
Direkt-/Playlist toggle function 22
Internet Radio....23
FM Radio (optional).... 24
My Favorites (station memory) 25
Line Input....26
Special functions....27
Balance Control....27
Multiroom....27
Recording of Internet Radio and FM Radio contents ....27
Import of Internet Stations by USB storage....29
Harddisk Slot....30
SMR Settings....32
Date & Time....32
Language 32
Sleep 32
Startup 32
Maintenance....33
Name....33
Upgrade: 33
Reset....34
Config....34
Reboot....34
Backup....34
BRC Setup 34
Information 35
Search SMR 35
Select SMR 35
Advanced....35
Language 35
Network 35
AD-HOC and Infrastructure....35
AP Search....35
Manual network settings.... 36
Network Interface....36
WLAN Settings....36
IP Settings for LAN and WLAN....36
Troubleshooting....37
Advice on location, care and safety....40
Specifications....42
CE – Declaration of conformity 43
Notes on WEEE 43
Dear User,
we are pleased that you have chosen a wireless audio player from TEAC and congratulate you on this choice.
With your TEAC WAP-AR100/-AX100/-AX250 you have acquired a modern piece of wireless audio technology that is in equal measure attractive and of high quality. We are sure that this product will provide useful service and a lot of fun over the coming years.
... your TEAC team!
After unpacking
After unpacking you should first check that the contents are complete. In addition to this printed manual there should be:
- The WAP-AR100/-AX100/-AX250 Wireless Audio Player (SMR in this manual)
●A mains cord with AC plugs for the SMR
●One audio connection cable with mini phone plug and RCA plugs
●The installation CD. Beside the Media Server software, you will also find latest firmware, instruction manual in PDF format and a PC background picture to decorate your PC desktop.
Required accessories (optional)
● The bidirectional remote control (BRC in this manual) e.g. WRC-8600
●A power supply for BRC with DC connector.
●The charging stand for the BRC.
Controls and connectors
Bidirectional Remote Control (BRC): e.g. WRC-8600 (optional)
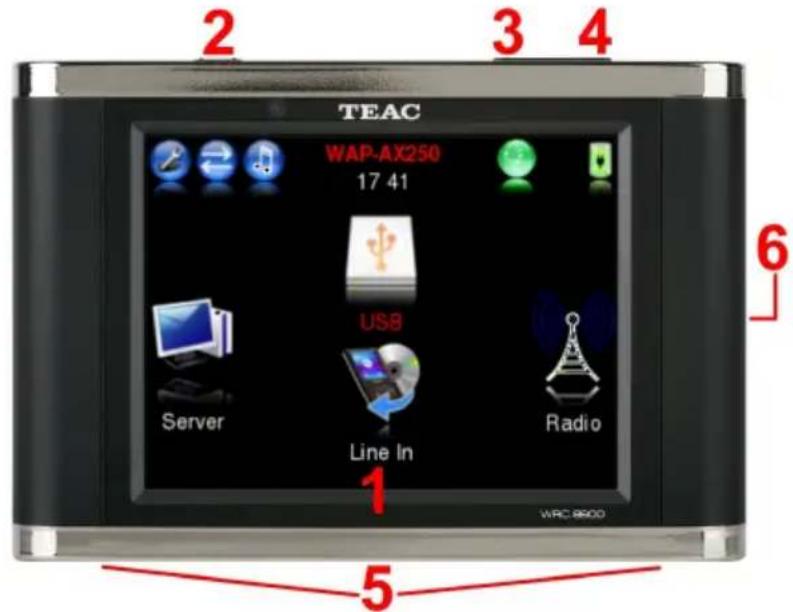
1 = Touchscreen LC-Display 4 = Volume increase (+)
2 = Standby/Muting 5 = Battery connectors (bottom side)
3 = Volume lowering (-) 6 = Battery cabinet (backside)
Wireless Audio Player (SMR):
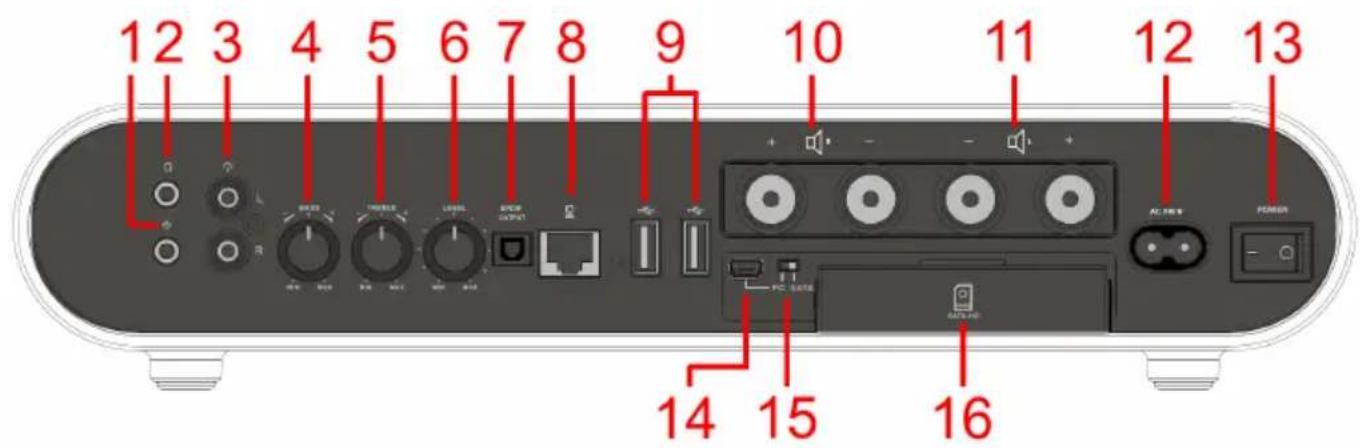
1 = Line-input (mini phono) 10 = Speaker output right (only for
2 = Phones output (mini phono) WAP-AX100 and WAP-AX250)
3 = Line output left+right / 11 = Speaker output left (only for active subwoofer (RCA) WAP-AX100 and WAP-AX250)
4 = Sound control Bass 12 = Mains input connector
5 = Sound control Treble 13 = Mains ON/OFF switch
6 = Level pre control 14 = USB HDD to PC connector
7 = S/PDIF optical digital output 15 = Selector PC / SATA
8 = Ethernet connector (RJ-45) 16 = SATA 2.5" HDD slot (for HDDs with
9 = USB port max. 9.5mm height)
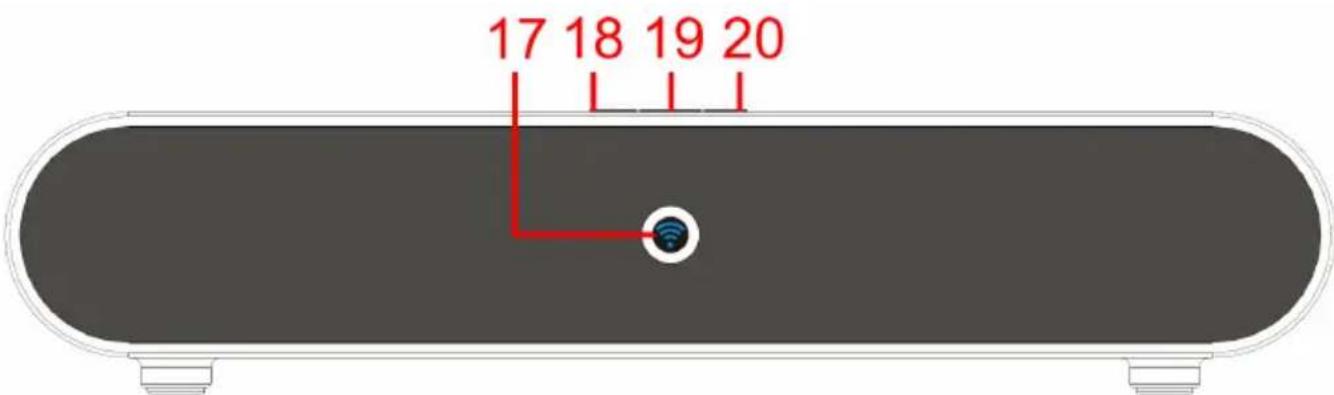
17 = Status LED 18 = Volume - button
red \~ Standby 19 = Muting button
green \~ Ad-Hoc (direkt) Mode 20 = Volume + button
blue \~ Network Mode (LAN/WLAN)
flashing green/blue \~ Configuration Mode
Assembly
Switching standby on/off as well as volume can be done by the buttons on top of the BRC. All other functions will be controlled by the touchschreen of the BRC The LC display in the BRC does not only display the received commands but it can also receive contents from SMR such as music track playback data, cover pictures etc, all displayed in the remote control right in your hand!
Thanks to the touchscreen, display contents of WAP can be selected or you can scroll in the lists by a simple touch of your fingertips.
There are few separate keys at the top of the control just for On and Muting (short push) / Standby/Config menu (long push >2 sec) and volume control.
Basic assembly of this system is very easy to do.
Please connect all components only when they are switched off.
- Connect your speakers directly to the speaker outputs (only for WAP-AX100 resp. WAP-AX250).
- Connect the SMR to your audio system via audio cable – or directly connect your headphones to the phones connector.
- Adjust the sound controls first to their middle position, the level pre control adjust to maximum.
- Setup and connect your computer network, if required.
●Plug the mains cable in the mains connector of your SMR (12). - Connect the BRC charger stand to the BRC power supply (DC connector) and place the BRC on the charge stand as shown on page 1.
●Before connections, check your mains power system to be appropriate to the WAP power supply. - Connect the power adaptors to mains supply.
●Power on the SMR by its mains ON/OFF switch (13).
●To switch on the BRC, shortly press the POWER button (2) on top of it. - By a long push on the POWER button (2), the whole WAP system (BRC and SMR) can be switched into standby (a short push on POWER toggles the MUTE function between on and off)
Since WAP can playback audio files from LAN, WLAN, Internet Radio and connected USB storages, there are various settings possible. Please read the related chapters to setup your WAP correctly for best performance with all sources.
Tip: please visit www.teac.de to check for new firmware for your WAP. New firmware contains latest corrections and often it adds essential new features into your device!
-- We do recommend, always to update for the latest firmware! --
TEAC is always active to offer you the best possible features for your WAP!
BRC stand usage and battery charge
The BRC (optional accessory) contains a powerful rechargeable Lithium Ion battery, which allows many hours of wireless operation for the WAP system, due to high battery capacity and the integrated power saving management of the BRC.
Before first wireless BRC usage, the battery requires recharging.
Connect the BRC power supply to the backside connector of the stand.
The BRC can be operated while placed in the stand.
Note: Charging control even works when the BRC is switched to Standby!
The charging progress you can control by the flashing battery symbol in the display headline: Red = battery low, Yellow = medium charge, Green = fully charged. When the battery is fully charged, flashing of the battery symbol stops. In case of green and not flashing battery symbol, charging procedure is switched off. If you keep the BRC on the stand with power supply connected, even uninterrupted display and SMR connection will not discharge the battery.
Note: If you aim for not using your WAP for longer time, disconnect the BRC from charger and disconnect it from mains, to avoid unexpected discharge of the battery. Also disconnect the power supply of the SMR.
Under normal usage conditions after full charge, the BRC might be operated for several days before recharging will be required. In case of extensive usage (display all time active) the BRC can be operated apprx. 8 hours. But uninterrupted usage is not usual without power supply. If you aim for continuous display and instand access all time, you can connect the BRC to power supply (operate the BRC on the stand).
Li-Ion battery replacement:
●The Battery compartment is placed at the back of the BRC cabinet.
●The battery cover slider can be unlocked by slight pushing the cover at the dotted area and shifting down for approx. 5mm. After unlocking, the cover can easily be removed.
- Please pull out the small battery connector carefully, replace the battery and plug-in the small battery plug again.
- Then lay the battery cover back on the opening and let it slide-in until you recognize it was locked again.
●The BRC now is ready to use.
Initial System Setup
By the following initial system setup, you will connect the BRC and the SMR to each other and to your network and also do basic settings to prepare the operation.
The data interchange between BRC and SMR of the WAP is realized by a WLAN connection. Benefits of the WLAN connection are the definite identification between the connected partners and the transmission by radio signals, which do not require visible connection between transmitter and receiver and offer a wide operation area. You may even control your SMR from a neighbour room, just depending from your WLAN network capabilities.
BRC and SMR both do transmit and receive data. BRC and SMR each are individual network devices, which need to be setup accordingly. The setup is a simple step by step procedure, setting up BRC and SMR in one turn by a guiding “wizard”. Its a very easy dialog system to support you for the most common settings. Please keep in mind, BRC as well as SMR are individual network devices, which require to be setup each for network connection, even though the simple setup procedure may be suggestive of just installing one device/system!
Please follow the below mentioned steps for connecting BRC and SMR:
●Power ON the SMR. The SMR will boot and after approx. 1 Minute it shows flashing green/blue indicator. This means the SMR is in config mode and awaiting the following settings.
●Power on the BRC. "Language Setting" will be displayed. Select your preferred language and follow the screen instructions. After this procedure, the BRC root screen welcomes you in your selected language.
- Next, the time zone screen appears. Select your time zone and confirm the required daylight saving option for your area.
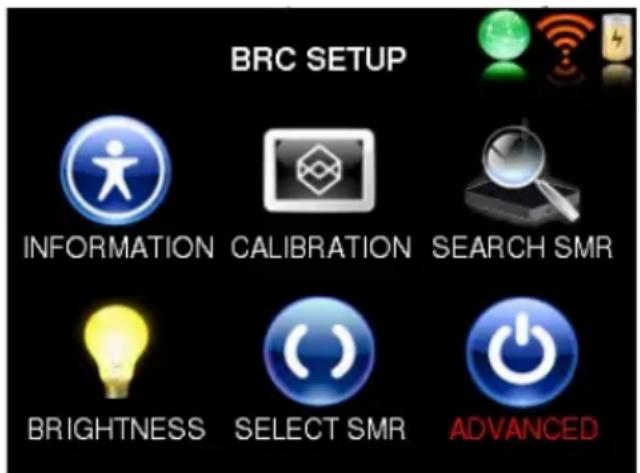
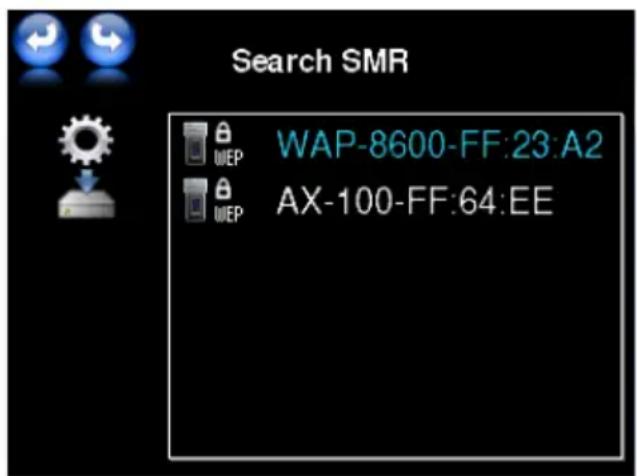
●The wizard leads you to the "Search SMR" screen, showing all SMRs that are available for setup. To help identify the SMR device, the default SMR name contains the last 6 digits of its individual MAC number. The MAC number of the SMR you can find on its bottom label.
- Select the SMR you like to connect to.
- Next, you have the possibility to rename the SMR according to its place in the system, e.g. "Livingroom".
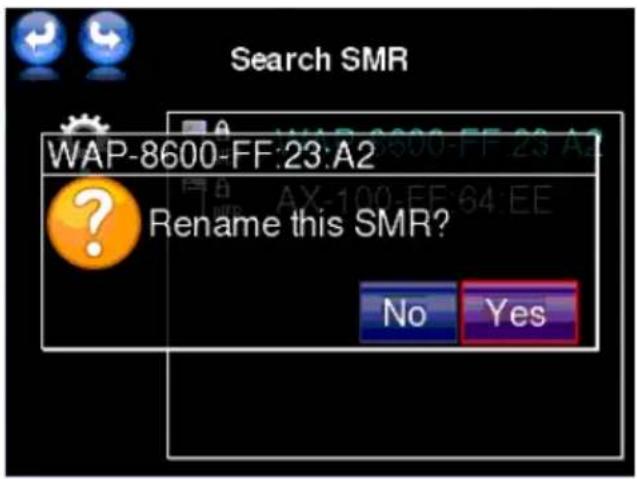
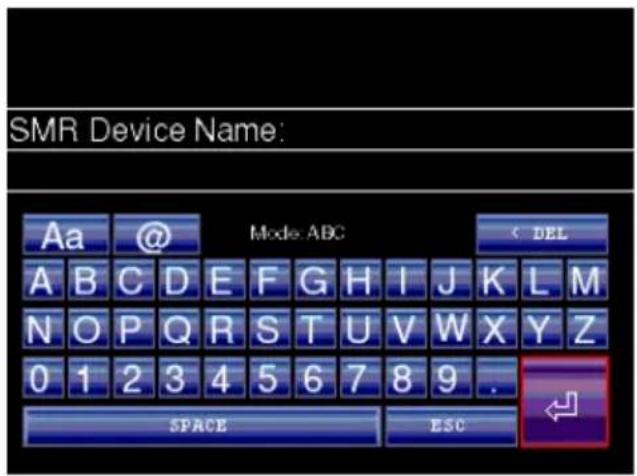
Select "Yes" and input the desired name for the SMR device and confirm by the "return" button.
●Now, the Network Type screen appears.
The Network Type screen offers you 3 wizards and two manual choices to easily setup WAP. Select the connection wizard according to your available network:
1. Wired Network (LAN) Wizard: If the SMR is connected to a LAN network
(DHCP), the BRC directly controls the SMR by WLAN connection (ad-hoc mode).
Connect the Ethernet cable from Router to the SMR and select the LAN wizard.
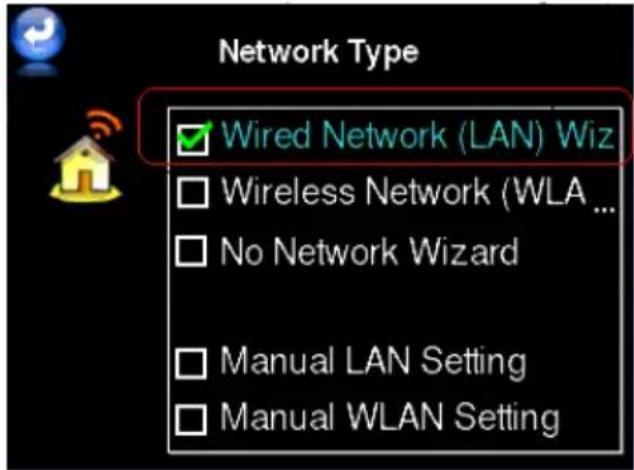
The network wizard now transmits the settings to the selected SMR and the SMR connects to the network. During this procedure you can see the SMR screen again.
After few seconds you can read a message window "SMR connected!".
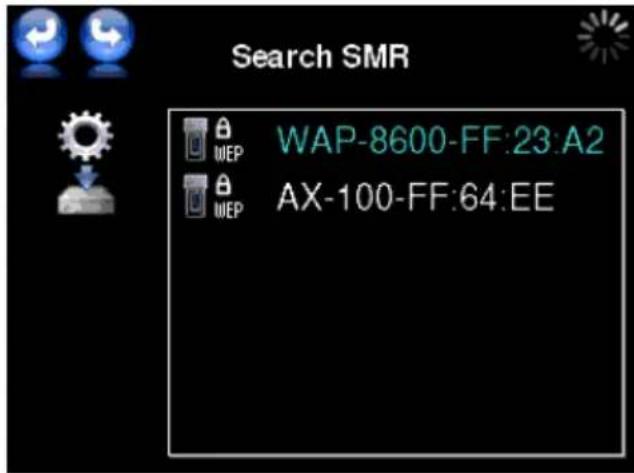
Now, the BRC also connects itself to the network. Once the BRC is connected to network, the mainscreen of the selected SMR appears.
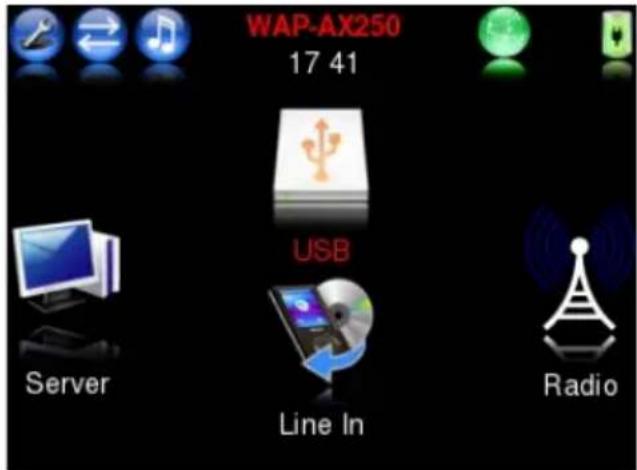
- Wireless Network (WLAN) Wizard: SMR and BRC are each connected to a WLAN Network Router or Access-Point.
Chose the Wireless (WLAN) Network Wizard
If you chose this option, you will see the "Select AP" screen where you can chose the WLAN (DHCP) to connect to. Select your router/AP from the list.
You will be prompted to confirm to change to the selected network.
Press on "Yes".
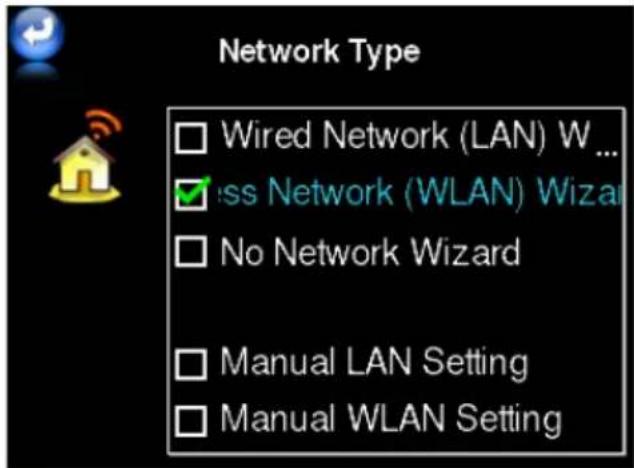
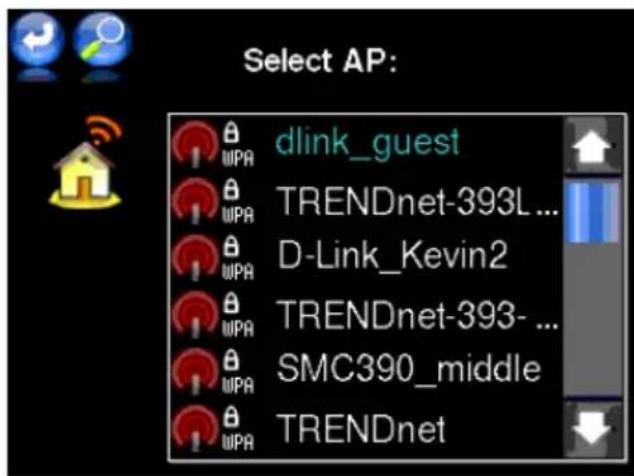
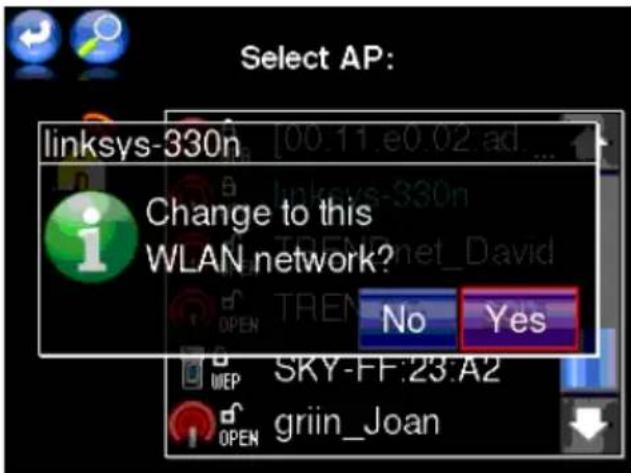
Next, you will see the virtual keyboard to input your WLAN security password. Input the password. Please care for upper- and lowercase letters. Then confirm by touching the "return" button field.
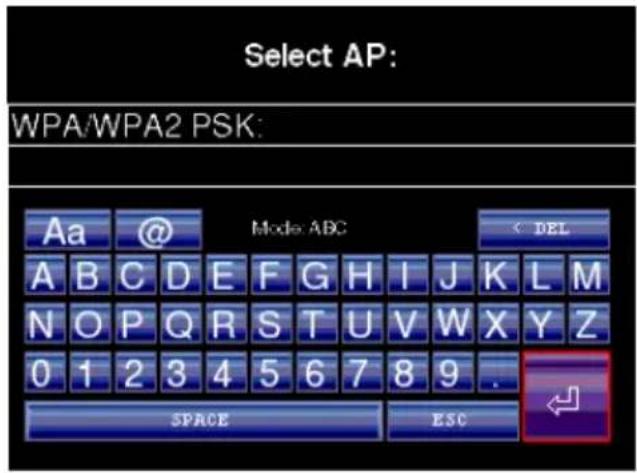
The network wizard now transmits the settings to the selected SMR and the SMR connects to the network. During this procedure you can see the SMR screen again.
After few seconds you can read the message window "SMR connected!".
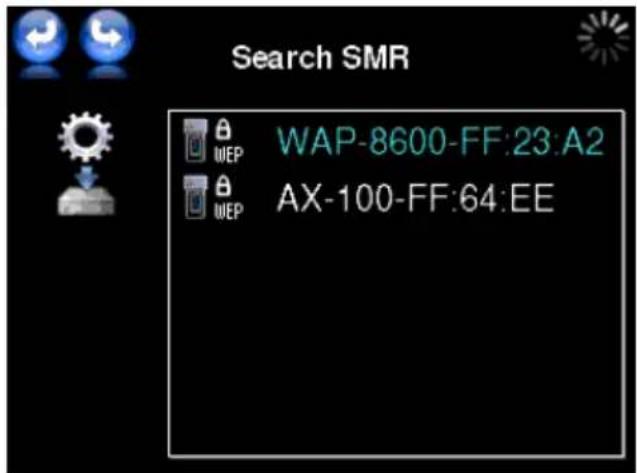
Now, the BRC also connects itself to the network. Once the BRC is connected to network, the mainscreen of the selected SMR appears.
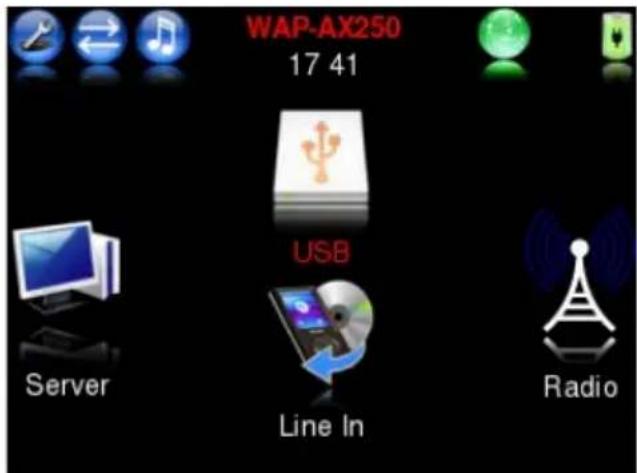
- No Network Wizard: If the WAP will NOT connect to any network, the BRC controls the SMR by a direct (so-called "ad-hoc") WLAN connection.
Operation without network connection just allows to use the USB playback function.
Select the "No Network Wizard".
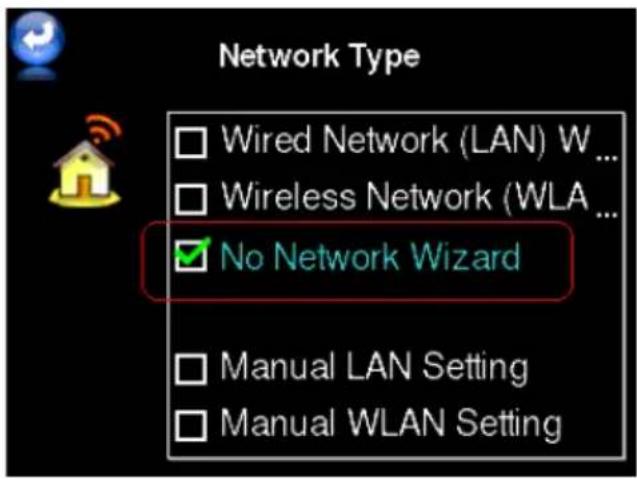
The network wizard now transmits the settings to the selected SMR. During this procedure you can see the SMR screen again.
After few seconds you can read the message window "SMR connected!".
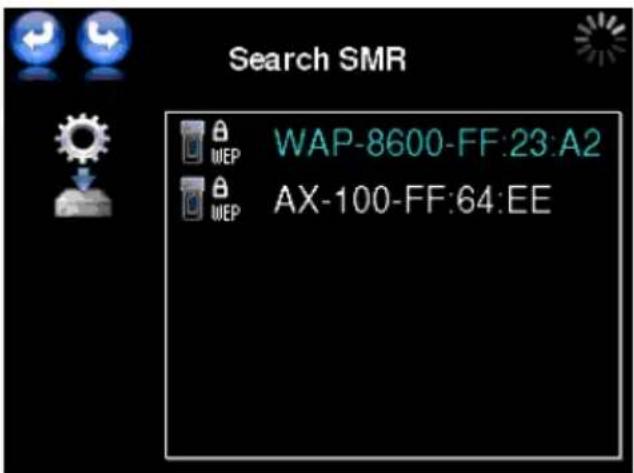
Now, the BRC also connects itself to the SMR. Once the BRC is connected to the SMR, the mainscreen of the selected SMR appears.
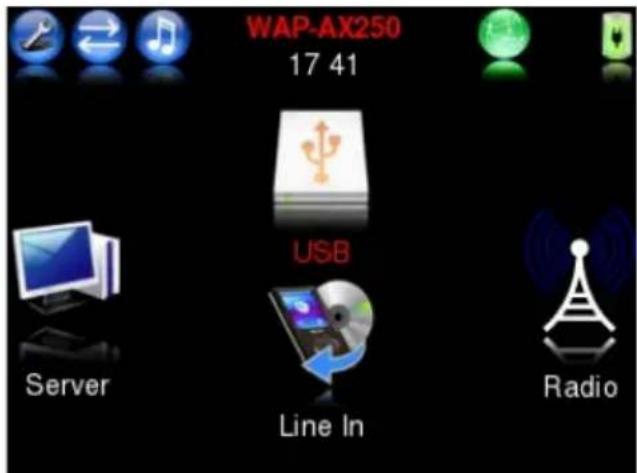
- Manual settings for LAN or WLAN: this offers individual settings without guidance by a “wizard”. For experienced users or if your network offers specific requirements like manual Wlan security and IP settings etc.
Example: manual WLAN setting
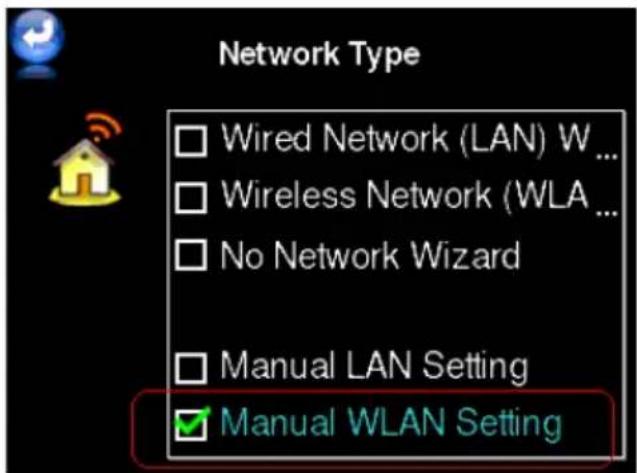
●After above Network Type setting is finished, BRC and SMR are connected and the main screen will be displayed. The LEDs on the SMR stop flashing.
Attention: if connection failed (SMR LED keeps flashing green/blue), you simply press on the “BACK” arrow top left on the BRC screen, go to “Search SMR” and repeat the above procedure.
After the SMR has connected, you can call the SMR's "Settings" menu by pushing on the tools symbol in mainscreen, to do further settings. Please refer the section "SMR Settings" in this manual.
Notes:
Just after power on the SMR, it may take some waiting period to boot up and recognize the device by BRC, until it is available in the SMR listing.
The SMR will be ready for playback when the LED indicates static green (Ad-Hoc) or static blue (LAN and WLAN) light.
If you power on the SMR mains and the BRC at the same time, the BRC is ready much earlier than the SMR and cannot connect to the SMR though. The BRC will then show a message window. Just wait until the SMR is ready and then press on „Yes“ to connect.
To return to the BRC root menu, do a long push of the power button on top of the BRC and select “Back to BRC”. Please refer the section “BRC Root Menu” in this manual.
If you need to repeat the connection procedure during the initial config setup, you can short press the “RESET” button on the SMR backside, to force the SMR to return into “config mode”, the indication shall flash green/blue again.
Attention: long push on the SMR's RESET button until there is red flashing LED will completely RESET all settings in the SMR back to default values and then also returns into config mode with flashing green/blue.
Operation
The main screen contains several areas:
options- and status area (headline) – functions area (below)
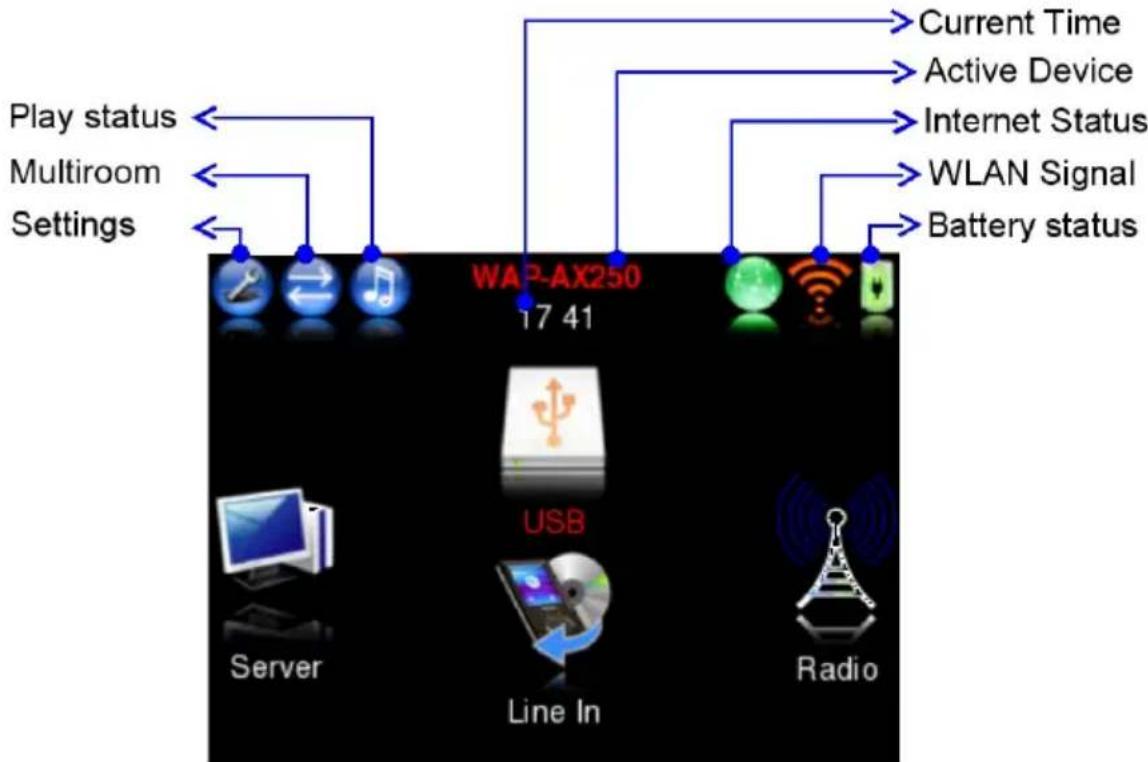
- Options keys – these three buttons change their function dependant from actual screen. In main screen:
Settings: settings for display, date/time, network and upgrading.
Multiroom: Directly opens the device list for selecting the SMR device to control.
Choice from multiple SMRs if available.
Playback functions: Stop/Play/+Playlist depending the actual playback.
- Status indications – show up various system informations:
Name of the currently controlled SMR unit
Time – a touch on the time indication brings up the calendar screen!
Network status (connected=green, disconnected=red)
WLAN connection quality (small=low, medium, large=high)
Battery status (charging=flashing, low=red, medium=yellow, full=green)
- Functions area – main functions are:
-
Audio Server: to browse media server and choose tracks to listen.
-
USB Storage: to browse USB/SATA disk contents and choose tracks to listen, to call previously stored playlists and Internet-Radio-playlists from PC, to store Internet Radio recordings as well as device settings and playlists created by the WAP
-
Radio: for playback of radio stations from internet or from FM Radio (optional).
-
Line-In: for playback of audio sources, connected to Line Input
Select the desired function by light touching the screen symbol by your fingertip The selected symbol confirms the function call by changing its colour.
Audio Server operation
For browsing media server content and choose tracks to play.
When searching through the lists during playback, light touching the button "BACK" (top left corner) brings you back to the previous screen.
The scroll bar offers quick scrolling up/down in the list. The scroll arrows move the scrollbar up/down.
Select the desired contents by simply touching it.
When you touch the magnifier symbol, you can search for track, artist etc. Input the required search word and confirm by touching the "return" key.
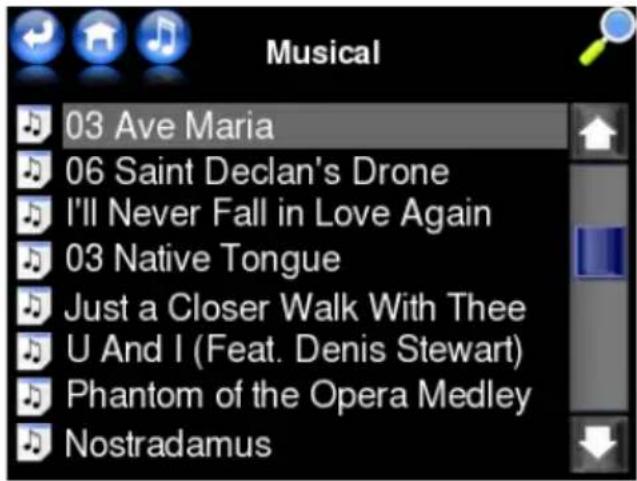
When you play a track, the playback screen appears.
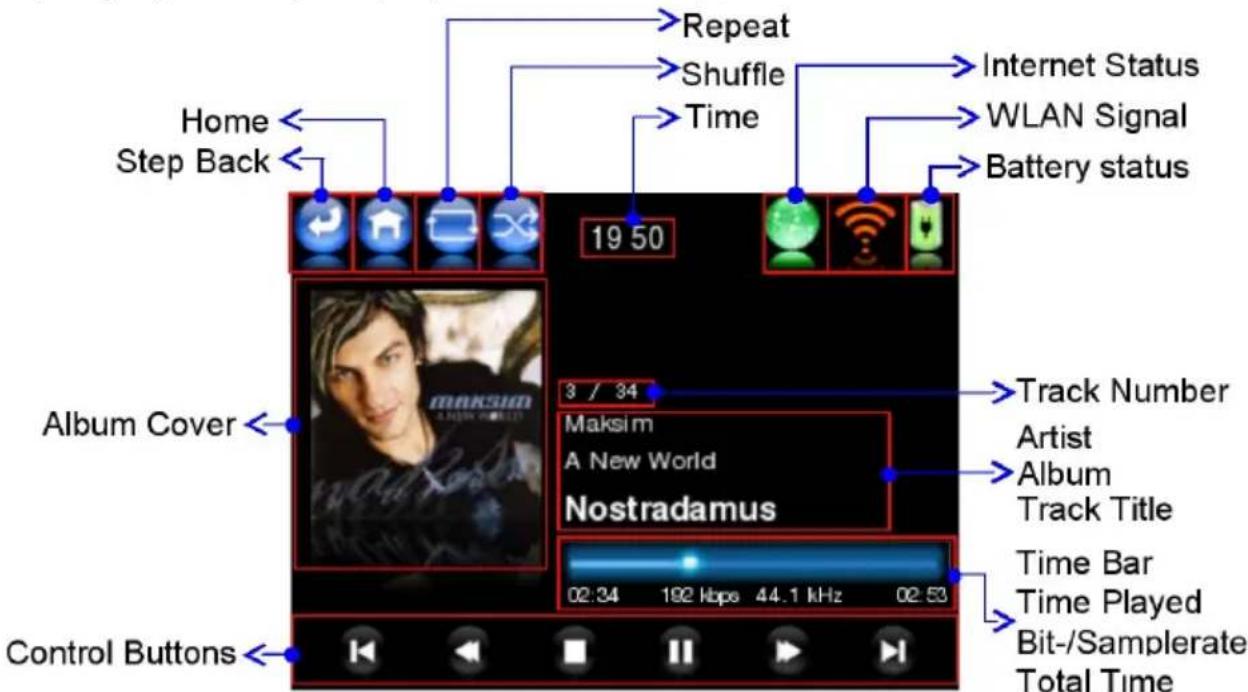
The options buttons in the playscreen (top left area) enable/disable playback options such as REPEAT and RANDOM/SHUFFLE.
A touch on the time display opens the calendar screen.
A touch on the text area (Artist, Album, Track Title) opens the actual playlist. Here you will find further editing options. Please read the chapter about Playlists for more informations.
Auto-fullcover mode: after some seconds of playback without any touch on screen, the cover fullscreen display appears. Here you can also skip to previous/next track by the skip buttons. By touching on the cover picture, you will return to the playback menu.
The play buttons at the bottom of the playback screen enable to "STOP" playback, a short touch on the PLAY button toggles "Play/Pause" function, a long touch on the PLAY button toggles between the playmodes DIRECT/PLAYLIST(+), also you will find fast forward and fast rewind buttons for the actual track as well as Skip back/forward buttons which offer track skip and additional quick track preview beside the cover picture.
Note: in case you switched to another screen during audio playback, the playback screen returns after 20 seconds, when there was no more touch of any functions.
Note: Make sure the media server on your networking PC is up and running and your WAP is well connected to your network.
To browse and playback the audio files stored on your computer (connected to your network), a media server software is required. With WAP, the Media Server software is provided on the installation CD.
Attention: WAP cannot find and playback your audio files, stored on a networked PC without the audioserver installed. Before playback from network computers, ensure properly installed media server software!
Cover pictures: the WAP supports cover display for each audiofile with ID3 tag. To achieve cover display, you can import a cover picture into each audio file, using your PC. This and more ID3 tasks can be proceeded comfortably by a wellknown freeware software, such as MP3tag (Win), ID3X (MAC) or EasyTAG (Linux).
Please note: there are some programs which support audiofiles and related cover pictures, like WMP, iTunes or Amarok, but they have an incompatible solution based on an internal directory where they store cover pictures separate from audiofiles, but not in the audiofile's ID3 tags. These pictures do not appear if you open the audiofile by other applications or by your WAP.
If you want to have the cover pictures available for your WAP and also for your portable audio devices forever, simply import the cover pictures into the ID3 tags.
USB/SATA-HDD Audiomanager
disk content browsing and tracks playback.
The USB Audiomanager integrated in the WAP offers comparable comfort to an audioserver, for precisely sorted access to your USB audio data by the ID3 contents stored in your audio files.
Note: USB input has disk insertion auto-detection. Please wait until you find the green marking in the USB icon of the BRC main screen before using this function.
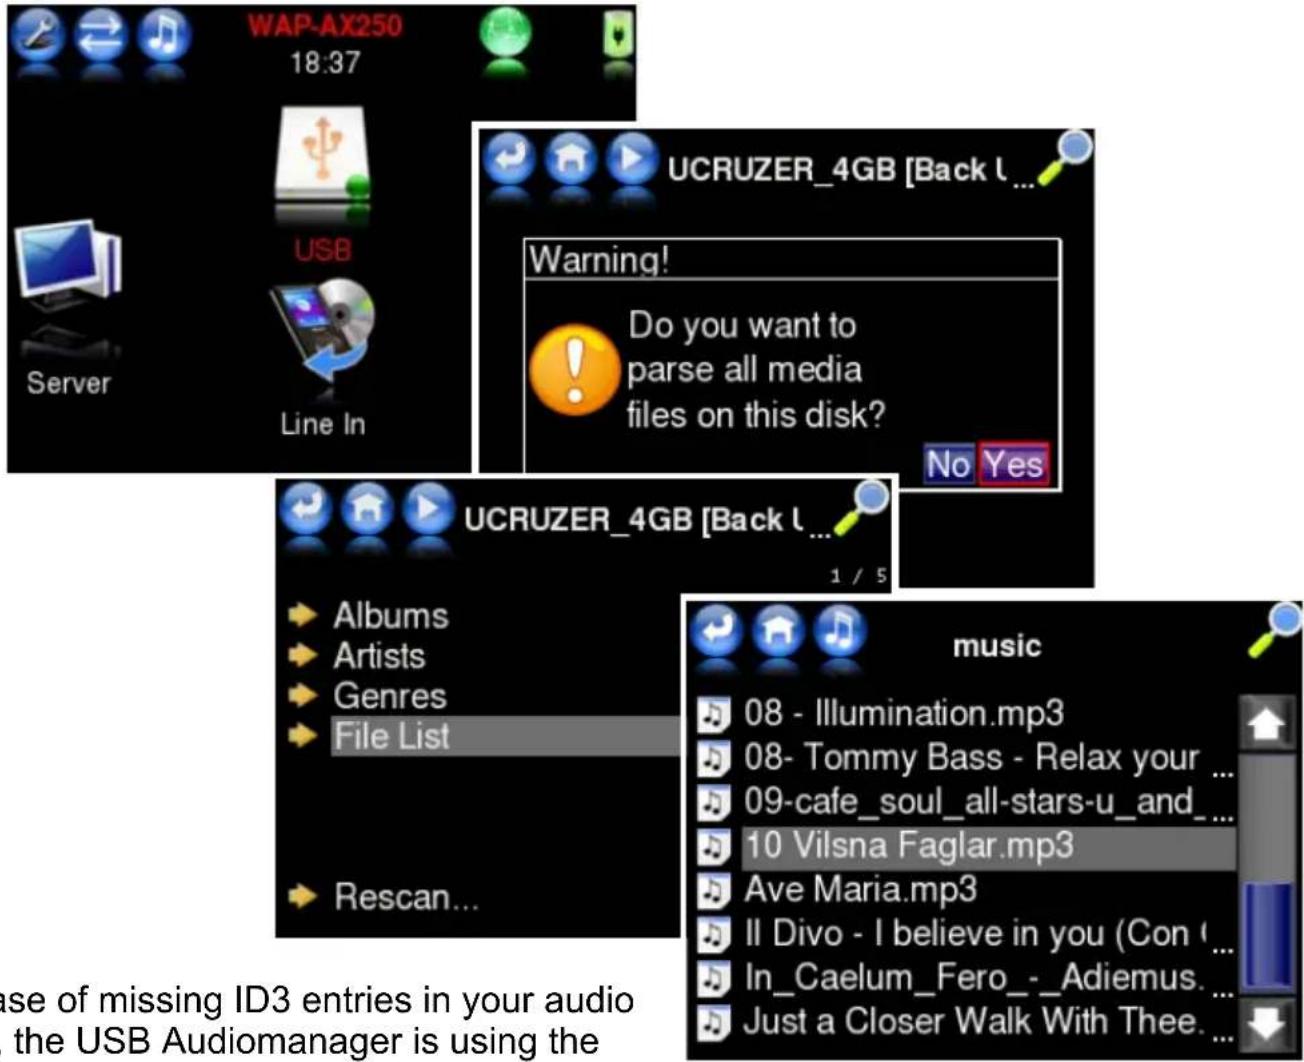
In case of missing ID3 entries in your audio files, the USB Audiomanager is using the file names.
When you play a track, the playback screen appears.
Tip: for the utmost comfortable use of your audio data through the USB Audiomanager, we recommend to utilize an ID3 tagging software on your PC to organize your data. With the ID3 tagger, you can easily – and often in one step even for complete albums – add trackname, album, artist, genre and cover pictures etc. for the usage of these informations by audioserver and USB Audiomanager.
Note: depending from USP storage capacity, the first parsing of the audio tracks might take from few seconds (< 1 GB) up to more than one hour (multiple of hundreds of GB). During the initial parsing, the ID3 tags of all audiofiles will be read and then stored in a database, which will be stored then into a special directory on the USB storage. In case you addedor removed files, a “RESCAN” will be required,
which searches for changes in the directories to add them to the database. If a complete new parsing of all files is required, you can delete ort rename the MediaDB directory on your USB storage device. If there is no MediaDB, the initial parsing procedure will proceed.
Direkt-/Playlist toggle function
This item toggles the function mode between “direct playback” and “ playback from playlist”. The choice between the modes “direct playback” and “playlist playback” can be achieved in main screen by long push onto the “Play Status” button or in playback screen by long push on the PLAY button.
The selection of tracks for audioserver and USB/SATA HDD storage playback is explained above. The reaction upon the selection depends on the currently activated playback mode:
- Direct playback: instantly playback the selected track.
- Playlist playback: the “play” screen symbol shows an additional “+” marking. Audio tracks selected under “Audioserver” or “USB-Storage” are not played instantly but will be appended to the internal actual playlist and playback once the previously appended tracks in this playlist had been played.
●To append a complete album to your playlist: touch on the album name entry for more than 2 seconds. You will be prompted to append it. -
To view the playlist: in playback screen touch on the text area (Artist, Album, Track Title). Now you see your current playlist. You can scroll in your playlist by the scrollbar and the UP/DOWN buttons.
●To edit in the playlist: select from the editing options in the top right area of the playlist screen. There are following edit functions: -
Create NEW Playlist.
- Erase the highlighted track from actual playlist.
- Move the track in the playlist up/down to another position.
- Backup the playlist to USB storage.
●Another touch of the cover picture will return to playback screen.
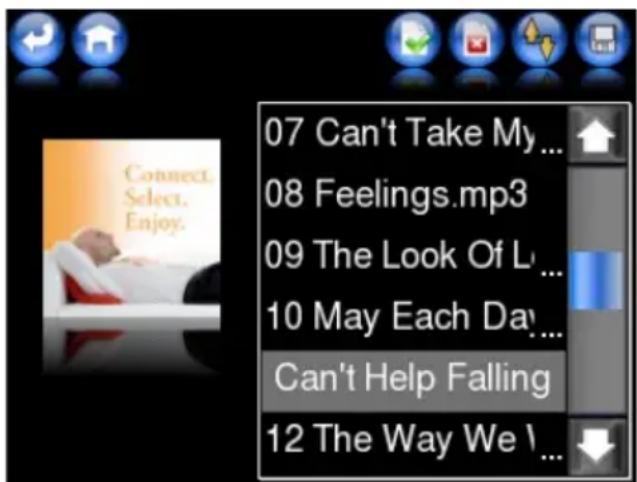
Note: The USB storage has to be attached to your SMR before storing the playlist! Your WAP automatically creates a playlist name for you. You can change the playlist name with your USB storage connected to your PC (to read the playlist contents, you may open the playlist by a simple text editor software).
Internet Radio
By WAP, you can listen to Internet Radio stations without the help of a PC. You can store your favorite stations for quick access and even „record“ the current Internet Radio contents to a connected USB storage!
Note: Make sure your WAP is well connected to your network!
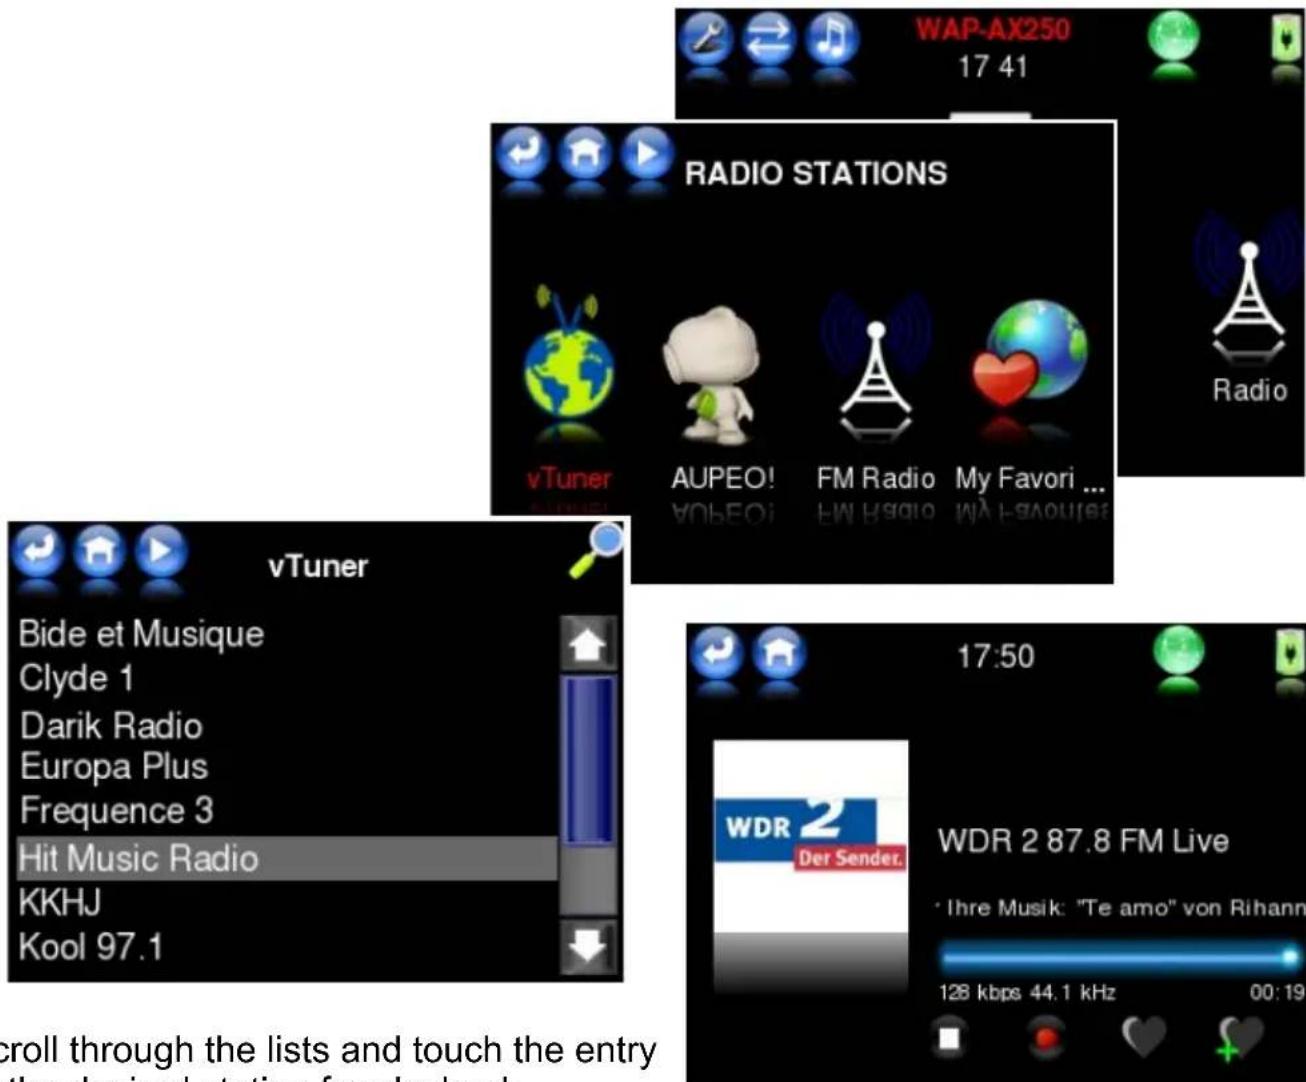
Scroll through the lists and touch the entry of the desired station for playback.
By touching the magnifier symbol you can search for desired stations. Simply input the station name and confirm by "return" key. WAP will show you all stations available of that name.
When you play a station, the playback screen appears.
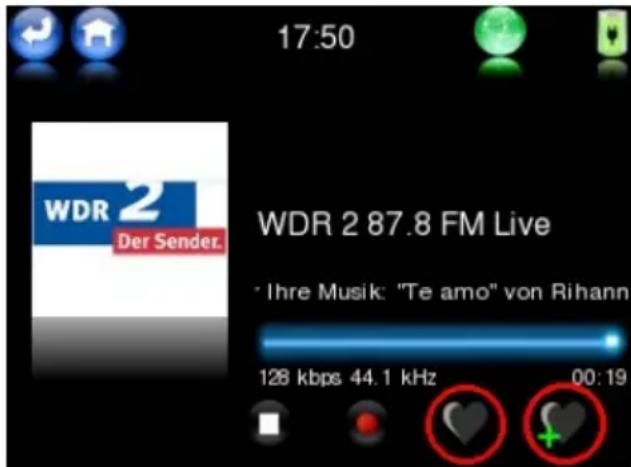
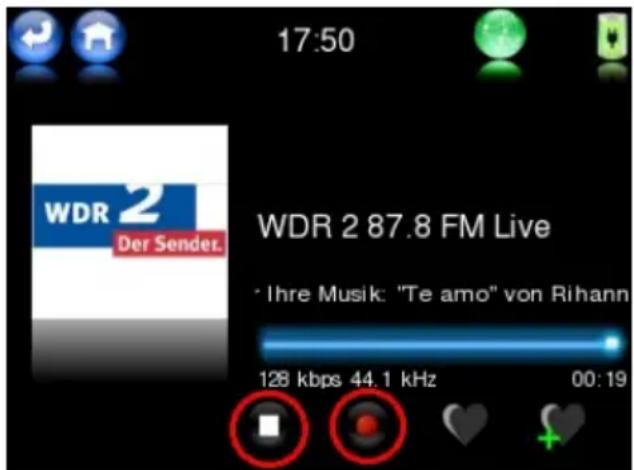
The play buttons at the bottom of the playback screen enable to "STOP" playback, to "Record" from present radiostream, to the heart symbol to show up the list of "My Favorites" or add the actual station to your favorites list by touching the "+heart" button.
vTuner: The integrated vTuner (www.vtuner.com) browser serves you thousands of well-sorted internet radio stations for instant access!
WAP provides you the full lifetime license to the vTuner Premium Service!
Aupeo!: This is another kind of webradio service (www.aupeo.com), providing you selectable playlists of artists, genres or moods on your choice. Blue dot stations are free service but yellow stars require subscription by Aupeo! You may use the free limited service as installed or order the full Aupeo! service at a low cost.
Auto-fullcover mode: after some seconds of playback without any touch on screen, the station cover fullscreen display appears. By touching on the cover picture, you will return to the playback menu.
FM Radio (optional)
WAP can playback from FM broadcast stations and it can store your preferred FM stations in a favorite list for quick access.
Note: for FM radio, the optional USB FM radio stick "FM-100" is available.
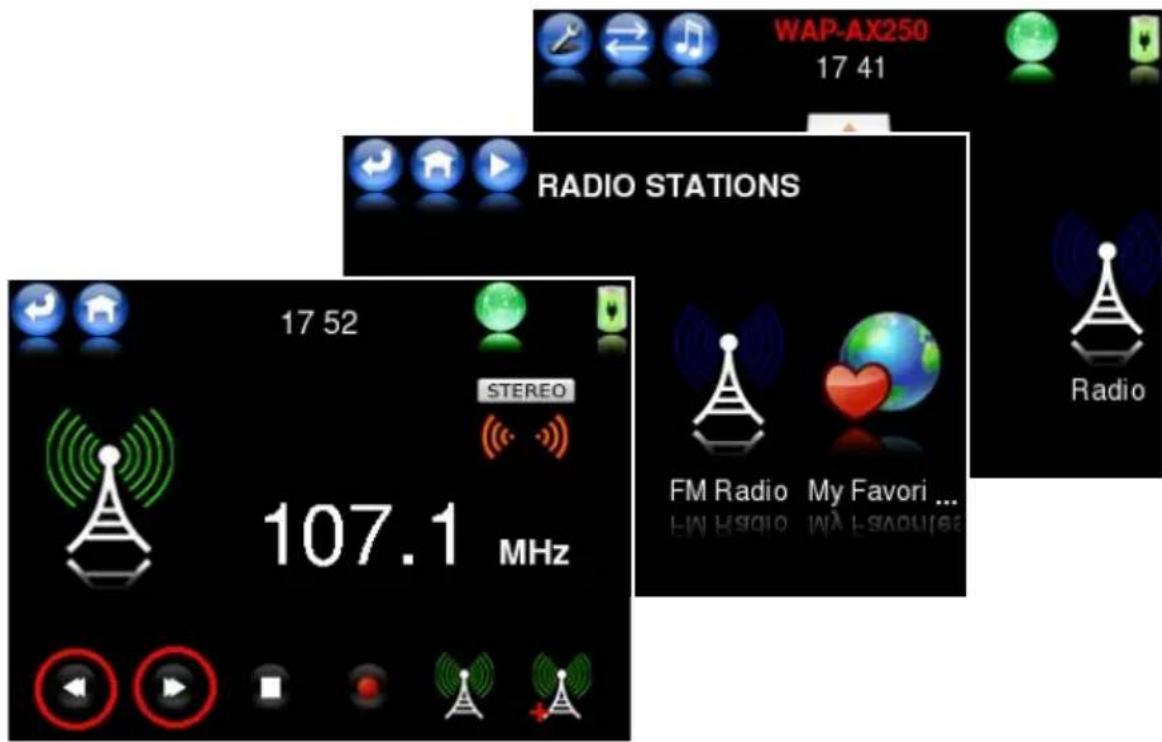
Station search:
For step-by-step manual search press the "<<" or ">>" search buttons.
For automatic search press the “<<” or “>>” search buttons a little longer (apprx. 1 s). When a strong enough station is found, the automatic search is stopped and the FM station will playback.
When starting playback, the FM playback screen appears.
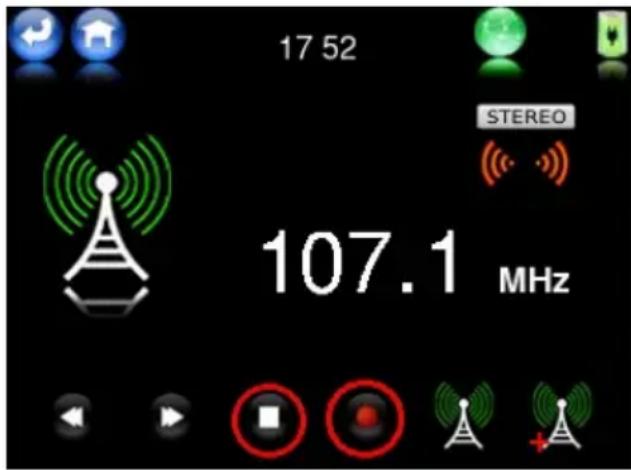
The further FM playback menu buttons provide to finish FM playback and return to radio menu, to start/stop recording the current FM radio contents to USB/SATA storage, to store current FM station in the FM favorites list (including free station naming option) or to open the FM favorites list to scroll the favorites list and select the desired station for playback.
My Favorites (station memory)
your personal preselection. Browse "My Favorite Stations" list, as you have previously saved from internet radio playback screen.
From optional FM radio tuner you can store FM stations into a separate FM favorites list and name each station individually.
Adding stations to the My Favorites list:
- During radio playback you can open the options menu by pressing the “+” button. By this function, you can store the actual playing station url for quick access.
- To store the station url, touch any place number in this list – probably any empty line - to save the station url to the selected listing place. An attention window will prompt you to confirm in case you intend to overwrite an existing entry.
●Up to 50 station urls can be stored in your My Favorites list. - You will be returned to internet playback screen automatically after the station url was stored successfully.
Attention: In case you store the new station on a place which was already occupied, this will erase the previously stored url and store the new url at the same position!
If you do not want to erase a previously
stored station url, select an empty line to store the new station.
Note: Please refer chapter Import of Internet Stations by USB storage to add stations which are not available by the vTuner list!
Line Input
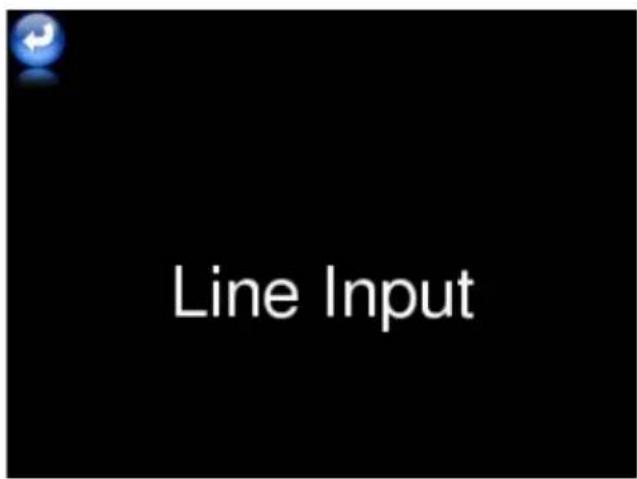
the line input provides connection to any external audio device, like e.g. a CD player for playback through your WAP.
Special functions
Balance Control
When pushing the volume buttons (3 or 4) a popup window appears, showing the actual volume setting position through a bar graph. Right above the volume bar in this window, there is a double speaker symbol. Press on the symbol to change over to balance control function. The function of the volume control buttons as well as the popup window will change for balance function. You can now shift the balance of the audio channels by the volume buttons (3 or 4) from left to right. At center position of the balance bar, you will achieve normal stereo playback (with both channels at same output level).
Note: just same as the popup volume window, the balance window automatically disappears once no volume buttons are pressed.
Multiroom
The WAP system can operate with various SMR devices controlled through one BRC! By this multiroom feature, you only need to use one BRC – e.g. while you walk in your house – to control a number of SMR devices in different rooms.
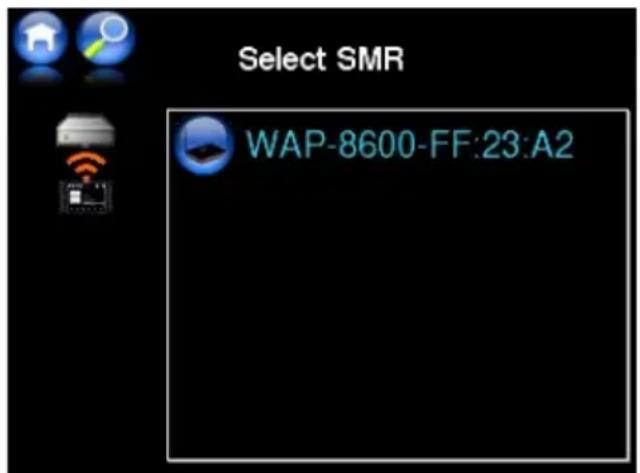
The menu for selecting the SMR for control you can reach by the Multiroom button in the main screen. This is the quick way for multiroom selection. You can also find the "Select SMR" function by long push on the BRC power button and in the BRC settings menu.
When there are already various SMR devices available, touch on the desired SMR name to activate the connection.
The BRC then releases control of the current SMR device – playback of the current device continues! – and changes over to control the new selected SMR.
Note: just one BRC can be connected to a SMR station at a time!
SMR device name: WAP allows to rename the SMR devices upon demand individually, e.g. you can input „Livingroom“ for easier identification. In the settings menu under Maintenance, you will find the “Name” function to edit the name of the actually connected SMR device.
Recording of Internet Radio and FM Radio contents
The WAP can record the contents of the actual playing internet radio or FM radio station and store it as an audio file onto your USB or SATA storage device.
NOTE: for the recording function, an USB/SATA storage with free available memory connected to the SMR is required! The USB storage must not be separated from SMR during the recording session!
ATTENTION: please consider the recording requires – depending from datastream quality – approx. 0.5-3 MB memory per minute! It is recommended to provide plenty of USB storage memory when starting a recording!
●Start Internet Radio playback as explained above.
- To start the recording, touch the "Record" button. You will see a window "Recording started" and the record button is flashing.
●Recording is working! Playback of internet radio is continued at the same time.
- To stop the recording, touch the "Record" button again. You will see a window "Recording stopped" and the record button no more flashing.
●The recording will be stored to USB storage under an automatically created track name, which contains the station name, date and a running count number. The File can be found in the root directory of your USB storage.
NOTE: in case of reception interruptions during a recording session, the actual file will be closed and the recording is continued in another file once the received audio stream continues. Since WAP can playback audio files in a row "gapless" (without interruptions between tracks), the resulting tracks (files) can playback smoothly in one turn, under the precondition there was no data loss during the recording session.
The digital audio stream will be recorded to the USB storage exactly as it is received from internet radio station. Therefore, the provided audio quality is not changed during the recording session.
During FM radio recordings, a non-compressed WAV file is created. Please consider to preserve enough storage space prior to your recordings!
In radio streams, there is no standard marking for tracks separation. Therefore, the data stream will be recorded without blanks in a single file (comparable to a classic tape recording of radio broadcast). For long recordings, it can be useful to note down e.g. internet radio informations, in case they are provided.
If you require renaming, cutting and transcoding of a recording file, this can easily be done with your USB storage connected to a PC. There are numerous audio editing programs available from commercial and from free sources.
A famous example of a free Audio Editor is "Audacity".
Import of Internet Stations by USB storage
Create/Add your own Internet radio URL entries.
This function needs Windows™ Media Player or WinAmp™ application program.
- Download and install Windows Media Player or WinAmp onto your PC.
●Run Windows Media Player or WinAmp.
●Plug your USB storage into a USB connector on your computer. - Follow the procedures below to export Internet radio URL entries to your USB storage.
Using Windows Media Player:
●Run Windows Media Player.
- Choose Guide > Radio Tuner.
- Select an Internet radio station.
- Choose File > Add To Library > Add Currently Playing Playlist
- Save the current station URL entry to USB storage.
- Repeat steps 3\~5 to collect more URL entries.
- Remove the USB storage from the computer.
●Plug your USB storage into the USB port on the SMR.
Using WinAmp
●Run WinAmp
- Click the PL and ML buttons. Three windows should open: WINAMP, PLAYLIST EDITOR, and MEDIA LIBRARY.
- On the MEDIA LIBRARY window, choose Internet Radio under Streaming Media. WinAmp lists all Internet radio stations at the right-hand side panel.
- Double click the station you want; WinAmp plays the station and adds it to the PLAYLIST EDITOR window.
- Repeat above steps to collect more URL entries.
- On the PLAYLIST EDITOR window, click Manage Playlist and choose Save Playlist to save the current station at M3U file format. Save this file to USB storage.
- Remove the USB storage from computer.
- Plug your USB storage into SMR's USB port. The WAP automatically shows the flash drive contents. Otherwise go to Music > USB Disk to search for the M3U format files to play.
- Acess your USB directory now via USB Storage - ... - Files, to show up the stored files (extension WPL - WindowsMediaPlayer or M3U - WinAmp).
- Now you can browse the WPL/M3U files by WAP and select them for playback: scroll on the file and touch the list entry. The included internet radio station url will be called for playback.
- As final step you can easily - as usual - store the station to your My Favorites list in your WAP, as described in section Internet Radio.
Harddisk Slot
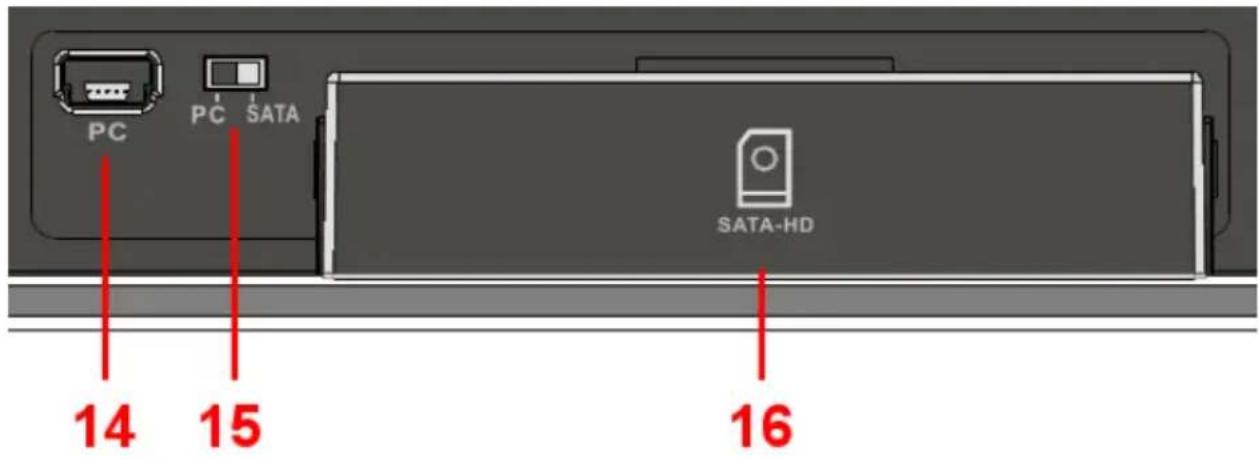
The harddisk slot of your WAP is provided to hold one optional 2,5" SATA harddisk (2.5" Sata HDD with max. 9.5mm height) for your music library, playlists, radio recordings and to store backups of the system settings. The installed SATA HDD will be equal to any externally connected USB storages, but is fully protected by the internal HDD slot and requires no external connections for usage. The internal SATA HDD is surely integrated into the power management of the system, to be driven down by energy saving mode during the "standby" times.
Installing the SATA harddisk:
- Please make sure to do the HDD installation under the precondition the SMR is set to standby or power off!
●Make sure the HDD you install is a standard 2.5" SATA harddisk with max. 9.5mm height.
Note: the WAP supports the file systems FAT32 and NTFS. Please take care the installed harddisk shall be equipped with one of these file systems to ensure the compatibility to your WAP!
- Open the HDD slot by grasping the cover (16) at both ends, press together a little bit to release its locking pins and pull it out backwards.
- Slide in the 2.5" SATA HDD with its connectors side first. The HDD label must point UP!
●With light force press in the HDD into the internal SATA connector until it snaps in.
Attention: the end of the harddisk shall be facing out of the back panel of the SMR for approx. 15mm (depends on model), to make it easy to pull out the HDD if required! Never press in the HDD by strong force!
●Re-install the HDD slot cover to protect the HDD.
Removing the SATA harddisk:
- Please make sure to do the HDD installation under the precondition the SMR is set to standby or power off!
- Open the HDD slot by grasping the cover (16) at both ends, press together a little bit to release its locking pins and pull it out backwards.
●Pull out the harrdisk from the slot.
●Re-install the HDD slot cover to close the cabinet.
Sata/PC selector switch (15):
Your WAP provides the usage for the internal HDD on two different ways:
- Internal usage (switch position "SATA INT"): HDD as a data source for the WAP. On position "SATA INT" the HDD is connected to the internal USB-Port of the SMR. You can access to all contents of the internal SATA HDD through the "USB Storage" function in the main screen of your WAP.
- External usage (switch position "SATA EXT"): to copy or transfer files between a PC and the HDD without the need of any other helping devices.
To connect to a PC, switch the selector to position "SATA EXT" and connect the small USB terminal "SATA/PC" (14) to a USB-Port of the PC. Now you can use the WAP's internal SATA HDD like any other external USB storage to your PC.
Note: To re-connect the SATA harddisk for the normal usage with your WAP, switch back the selector into position "SATA INT" after you have finished the transactions with your PC!
SMR Settings
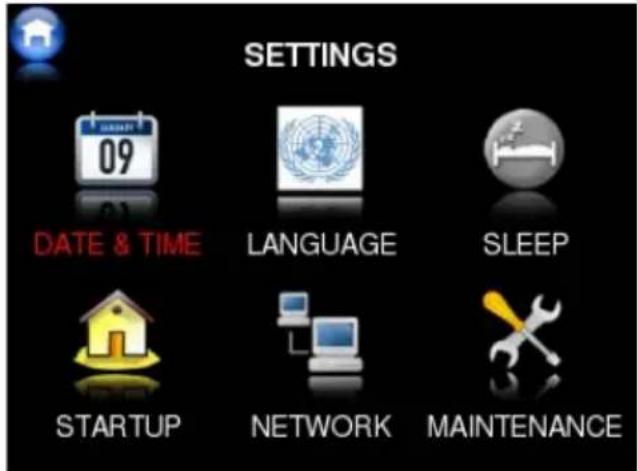
Provide all SMR settings:
Date & Time
Touch the NTP checkbox to enable/disable the network time synchronization.
Check/uncheck for daylight saving time setting.
Scroll the Time Zones and touch to select your appropriate time zone.
In case you do not use the NTP function (NTP deactivated), you can set the system time and date manually.
Additionally, under time you can select the format of 12 or 24 hours time display.
Language
here you can select your preferred display language. In the language select screen touch on the preferred country flag representing the language. After you selected a new language, the system will reboot to enable all text entries in that language.
Sleep
Set the system sleep countdown timer. Select between Off- and 30-60-90 minutes. You can set Sleep function also in the calendar screen by the top right button.
Startup
here you can chose your default start function, where you always like to start operation of your WAP after power-on. Chose from: Mainscreen – Previous Playback – Audioserver – USB-Disk – Internet-Radio – Clock. If you switch on your SMR from Standby it will start with the selected function.
Network
Here you will find informations about the current network settings of the SMR, such as IP address, MAC number, SSID name, etc..
Maintenance
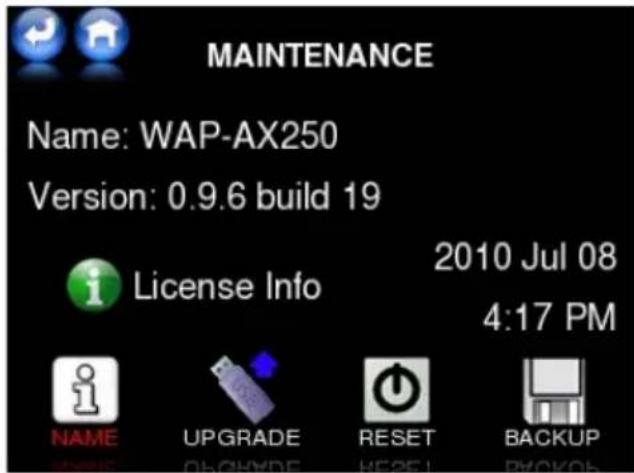
The Maintenance menu shows the device name and the actual firmware informations of your System.
In the Maintenance menu you can rename the SMR, update the system's firmware, reset the system to factory defaults and backup your settings including all entries of My Favorites list to your USB storage device.
Name
Let your system have a useful name, for clear identification in a multiroom environment.
Upgrade:
firmware (F/W) upgrade of SMR and BRC.
- Download the new firmware from www.teac.de
●Copy the new firmware file from PC to your USB storage device.
●Plug the USB storage to a SMR USB port. Wait until the USB device is recognized by WAP, the green dot appears on the USB symbol. - Switch to Settings-Maintenance-Upgrade. The USB files list appears.
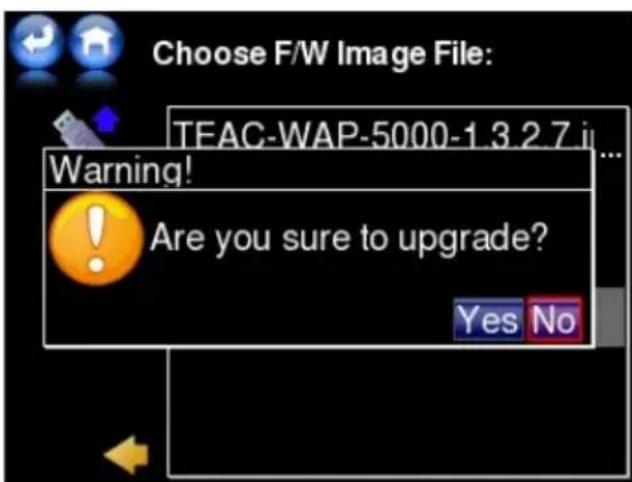
- Scroll to the firmware file and select it from list by touching on the file name. Now the system will check if this file is OK to upgrade and then bring up a warning message.
- Touch on "YES" if you are sure to upgrade. Now the WAP system will start upgrade procedure.
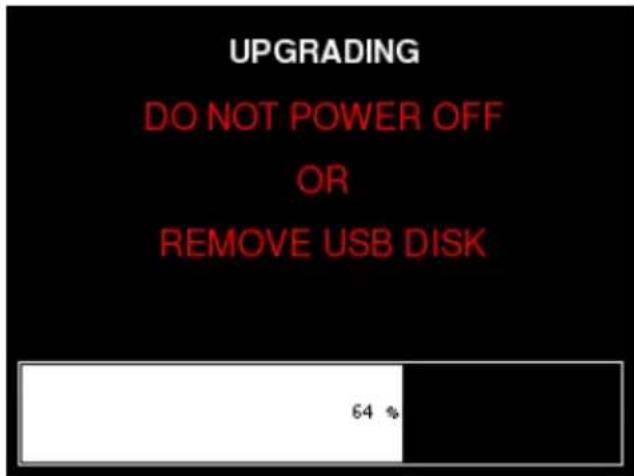
ATTENTION: During the firmware upgrade, there must be no interruption of the power supply! The USB device from which the firmware is downloaded must not be disconnected during the whole firmware upgrade procedure!
After the progress bar goes to 100%, system will reboot.
Reset
With this entry, the SMR can be reset to the factory defaults and then it returns to Config mode (green/blue flashing LED). You will be prompted to confirm to reset the system, for security reasons.
Attention: all Settings and the favorites will be erased by the reset!
Tip: before reset, proceed a USB backup of your settings.
Note: After the reset, the startup wizard will be available to guide you through the basic settings.
Config.
With this button the current network settings will be erased and BRC and SMR return to config mode. You will be prompted by a confirmation window, before activating this function. If you have confirmed by "Yes", you can configure the network settings again. Please refer the informations under Initial System Setup!
Attention: all Settings and the favorites will be erased by new configuration!
Reboot
With this button, the SMR will reboot. All settings and favorite stations are fully kept unchanged!
Backup
With this item, you can backup all settings of your SMR in a file onto your USB storage device and load back into your system if required.
This is a comfort feature e.g. to copy identical settings to a number of SMR devices.
Note: for this function, a USB device with free memory, connected to SMR, is required!
BRC Setup
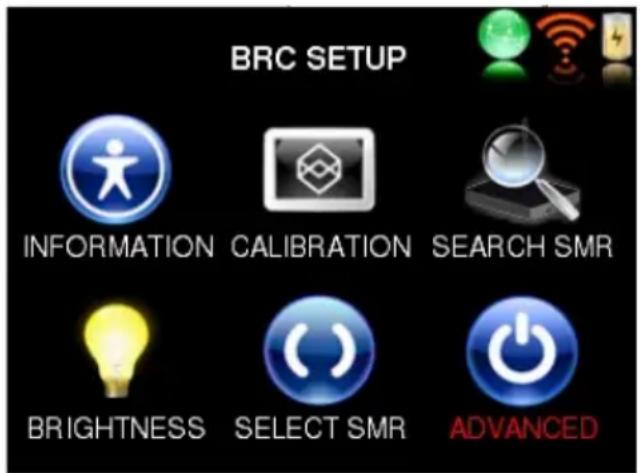
touch the BRC power button for more than 2 seconds. Then, the BRC settings menu will show up.
In this menu, you will find functions (from left to right) for device informations, touchscreen calibration, search for and pair with SMR devices, set the LCD brightness automatic/manually, select/erase in the SMR device list and setup other BRC functions.
Almost all informations shown in your BRC's display are transmitted from SMR device to BRC, just before displaying, are contents that are controlled by the SMR. Just the changing from one SMR device to another cannot be controlled by a SMR, the BRC shall manage this – internally - on her own.
Information
here you will find informations concerning firmware and maintenance, license info, network info and a RESET function for the BRC.
Search SMR
If the SMR LED shows green/blue flashing during config mode, you can search for the SMR for new configuration. The SMR just appears in this screen when in config mode! If the SMR is already configured for network or ad-hoc connection, you can find it in the „Select SMR“ screen.
Please refer the description under Initial System Setup
Select SMR
here you can - same as the multiroom SMR list you reach from main menu – select the desired SMR device for control.
Advanced
Language
here you can select your preferred display language. In the language select screen touch on the preferred country flag representing the language. After you selected a new language, the system will reboot to enable all text entries in that language.
Network
AD-HOC and Infrastructure
Here you can set the BRC to Ad-Hoc (direkt) mode or Infrastructure (WLAN) Mode. This function offers you the choice to control networked SMR devices and ad-hoc controlled devices by the same BRC, if you have both of them installed.
AP Search
Manually changes of the BRC network settings. Please refer under Manual Network Settings
Manual network settings
Network Interface
You have the choice between LAN (via Ethernet cable) and WLAN (wireless). For return to Network settings main menu simply touch the arrow left from the choice list. Not available items will be greyed out.
WLAN Settings
Here are the settings for your WLAN:
SSID: input the SSID
Security: you can select the security options here.
No Security: WEP and WPA functionality is switched off!
WEP: enter the WEP security key. When the key is complete, touch the ENTER button. Then you will be prompted whether the key is ASCII (common) or Passphrase type. Select the appropriate entry to finish this setting.
WPA/WPA2 PSK: enter the WPA security key. When the key is complete, touch the ENTER symbol in the screen.
Note: the WEP or WPA key is the same as the key for your router. You have to input the key by the screen keyboard. Please care for correct key (upper case or lower case letters etc.)! When the key is complete, the letter's colour changes and you can finish by touching the ENTER button.
IP Settings for LAN and WLAN
If you run your network with static IP addresses (no DHCP) you can input the required IP settings here.
Each of the items you have to input by the screen keyboard, separated by dots. To confirm the input, at the end of completed input touch on the ENTER symbol in the screen keyboard. You can always check your settings in the network main menu.
The actual settings will be displayed in the network main screen once the connection in the network is valid.
Network mode: you can select between DHCP or static IP address mode.
If your network uses static IP addresses, the following informations are required to log onto your wireless network. Check the user manual of your router to find the following informations:
IP Address: input the IP address for WAP
Netmask: input the netmask IP address
Gateway: input the default gateway IP address
DNS: input the Dynamic Name Server IP address
Tip: If you need to change the settings on your router to access it, be sure the settings you choose are secure. Please refer your the router's user documentation for more informations.
Troubleshooting
Often after time spent troubleshooting, the problem is traced to something as simple as a loose connection. Check the following before proceeding to the problem-specific solutions.
COMMON PROBLEMS AND SOLUTIONS
- Use some other electrical device to confirm that the electrical outlet is working.
●Make sure both devices (BRC and SMR) are powered on, ensure you see the LEDs of the SMR and the Display of the BRC light up...
●Ensure all connectors are securely attached.
●Ensure attached devices are turned on.
TIPS FOR TROUBLESHOOTING
In each problem-specific section, try the steps in the order suggested. This may help you to solve the problem more quickly. Try to pin point the problem and thus avoid replacing non-defective parts. Keep a record of the steps you take when troubleshooting: The information may be useful when calling for technical support or for passing on to service personnel.
PROBLEM: THE SMR DOES NOT RESPOND TO THE BRC
●Short press any button and check the BRC connection indicator of the SMR.
- To recover from power save mode and for certain functions, the WAP takes a few seconds to respond.
●There could be a reception shadow at the BRC position. Try pressing the button again at other position, followed by few seconds pause.
PROBLEM: THE WAP CAN NOT PLAY MEDIA CLIPS
●Make sure the files are supported by WAP. WAP supports .AAC/M4A, MP3, WMA, OGG, FLAC und WAV.formats.
PROBLEM: THE WAP CAN NOT PLAY PLAYLISTS
●Make sure the playlist format is supported. WAP only supports M3U, ExtendedM3U, ASX, WAX, PLS, WPL..
PROBLEM: THE WAP CAN NOT PLAY SONGS WITH DRM (DIGITAL RIGHTS MANAGEMENT) PROTECTION
- DRM tracks can only playback under DRM compatible audio servers (e.g. Windows™ Media Player 11 in audio server mode).
Problem: The WAP cannot recognize a connected USB storage or the installed internal SATA harddisk
●The WAP unsupports the file systems FAT32 and NTFS. Please make sure the storage devices used with your WAP are formatted to one of the supported file systems!
- External, portable USB storages of the 2.5" type are often used without a separate mains power supply. The WAP supports the supply for external USB storages under the limitations according to the USB standards.
Unfortunately, there are some external, portable 2.5" USB storages which have requirements exceeding the USB standards (e.g. too high current consumption), which causes no recognition between the USB storage and the SMR USB ports or the USB storage cannot boot up, even if this storage can be operated connected to a PC without separate power supply for the storage. In such a case it can be beneficial to drive the external, portable USB storage by a separate, external power supply, to allow the usage in spite of its deviating USB conditions.
PROBLEM: THE TITLE OF THE SONG IS ILLEGIBLE
●WAP does not support all language encodings. WAP currently supports character set by UTF-8. Other characters are not supported yet.
AUDIO PROBLEMS
PROBLEM: THERE IS NO SOUND
- Increase the volume by the BRC or by the level pre-control (7).
- Confirm the volume is not muted.
●Use headphones to check sound output.
NETWORK PROBLEMS
PROBLEM: THE WAP CAN NOT FIND THE MEDIA SERVER
●Wait a moment and try to search again.
- Close and open the Media Server program.
- Confirm the Media Server is shared and allows WAP to access media content.
- Confirm a network link is established.
- Check whether the IP address, default gateway address, and DNS address of the Media Server are correctly configured, when a static IP address is used.
- Check if the Windows firewall setting is set accordingly.
PROBLEM: THE WAP IS UNABLE TO CONNECT TO NETWORK
Wired:
- Check the switch, hub, or router is turned on.
- Check the Ethernet cable is connected to the WAP and the switch, hub, or router.
- If Static (fixed IP address) is selected, check the IP address is not already in use.
- Check the IP address and subnet mask are in the same range, if you are using a static IP address.
- If Static (fixed IP address) is selected, check the Default GW IP address is properly assigned.
Wireless:
- Check the signal strength is acceptable.
- Check the WLAN security setting, if enabled, is correct.
- Follow steps of static wired connection to confirm the IP address is properly configured.
PROBLEM: WINDOWS SECURITY ALERT IS DISPLAYED AT STARTUP.
- If you are running Windows XP Service Pack 2 (SP2), the Windows Firewall may block the Media Server program from accepting connections from the Internet or the network when you start the program in an attempt to protect your computer from possible malicious code or virus attacks. When you see the security alert message: Click Unblock to continue and run the program.
PROBLEM: THE WAP IS UNABLE TO CONNECT TO INTERNET RADIO
- An Internet connection is not available. Confirm the Internet connection works. If not, refer to the router/gateway manual for Internet connection settings.
●The Internet radio service is not available. The Internet radio station might be off line or exceed its service capacity. Wait for a few minutes and retry.
●The Internet radio streaming format is not supported. The WAP only supports MP3/WMA Internet radio content.
PROBLEM: THE WAP IS UNABLE TO PLAY SOME INTERNET RADIO STATIONS SMOOTHLY
- Internet radio playback depends on network traffic. Most Internet radios need 128 kbps or 64 kbps bandwidth. If other applications such as FTP, WebTV or P2P are using the Internet connection, it might affect Internet radio playback.
PROBLEM: THE WAP IS UNABLE TO PLAY ITUNES
- iTunes uses Apple's proprietary protocol. The WAP does not support iTunes' music sharing protocol. MAC users can also install the server software provided with their WAP. The WAP supports the audio formats.AAC/M4A, MP3, WMA, OGG, FLAC und WAV.
Advice on location, care and safety
●To connect your WAP with power supply system, please make sure to have a socket close to your sound-system.
- If the WAP is not in use for a longer period of time, be sure that the power source is disconnected from your system.
- Do not use alcohol, benzene, thinner or acids to clean the cabinet.
- Do not place your WAP near radiators, airconditioning or radio-controlled systems.
●Avoid leaving the WAP in permanent strain such as direct sunlight, extreme moist or dryness, exceptional cold or heat, mechanical vibrations or shock.
- Do not touch the player with bare hands if the built-in battery is leaking. In this case, contact service center for help since the liquid may remain in the player. If your body or clothes has been contacted with the battery liquid, wash it off thoroughly with water. Also, if some of liquid gets into your eyes, do not rub your eyes but immediately wash them with clean water, and consult a doctor.
●Never use the player while driving a car or using other vehicles to avoid traffic accidents. This is also content of the law of some countries. Even while walking it may be dangerous especially when crossing the street.
●Hearing experts' advice against the constant use of personal stereos played at high volume. Constant exposure to high volumes can lead to hearing loss. If you should experience ringing in the ears or hearing loss, discontinue use and seek medical advice.
●Never disconnect the player from PC during downloading, uploading and formatting to avoid failures and losses of data.
- Only use batteries, charging adapters, and accessories which were approved from TEAC for using it with a certain device model. Using other types of equipment may void the approval for use, and/or warranty claims. Furthermore there may be dangerous implications. Please ask in case your vendor for approved accessories.
- Supplied or connected to units cabling is subject to wearout. Especially carrying it in trouser pockets or other insufficient carrying cases, bending it, strong pulling, or buckling it, may lead to premature failure and to damages. Please ensure correct handling and keep the cabling carefully furled in cases which will void stresses to it. Whenever cables are disconnected never pull the cable. Pull the plug instead.
- The supplied batteries are subject to wearout. Their capacity and therefore their life time depend on the number of charge/decharge cycles. And even without using them there is a deterioration of capacity. Changes in temperature like high or low temperatures, mechanical stress (like dropping down) or other environmental influences may reduce the capacity of the batteries. So use batteries within the limits of the specification only and take them out of the device, if it is not used for a longer period of time or run from wall outlet.
- Prior to take batteries out of the unit, you have to switch off the device and disconnect it from the charging adapter. Check charging adapters for their model number prior using it for charging the device.
●Avoid losses of data by regularly making backups of your data.
●Do not open the cabinet, contact qualified personnel only.
●For service staff: Never open cabinet, when speaker system is connected to 230 V AC power supply system.
●CAUTION !! Power ON / OFF switch does not separate mains power!
●Deliberate harm to the equipment is not covered by the guarantee. - Please contact your dealer in case of technical problems.
Specifications
●Wireless audio player with bidirectional data radio display remote control (optional available)
- Colour LC touchscreen for function and track informations (ID3 tags, album cover, file name etc.)
●Rechargeable Lithium-Ion battery included, user-replacable
●On/Standby, mute and volume by separate device buttons and all functions also controlled via bidirectional remote control
●Audioserver playback: UPnP and DLNA compatible client
- Internet Radio Stations acces, Podcasts etc. via vTuner, Aupeo, Favorites list and by playlist files from USB storage
●Network connection by WLAN (wireless) or LAN (Ethernet cable)
- Slot for internal 2.5" SATA harddisk (optional, for HDDs with max. 9.5mm height), choice of internal USB connection or USB connection to PC for data transmission
●Supports FAT32 and NTFS file systems
●2 USB storage device connectors
- USB FM tuner (optional) with station search and stations memory
- USB Audiomanager with integrated database for quick USB access
● Supported audio formats: AAC/M4A, MP3, WMA, OGG, FLAC and WAV up to 24 Bit / 96 kHz sampling rate
●Gapless playback of seamless continuing track contents for audioserver and USB storage contents playback
●Playlist management for audioserver and USB storage contents, create/store own playlists, use foreign playlists via USB storage
●Line In (3.5mm jack), Line Out / active Subwoofer (Cinch/RCA), Kopfhörerausgang (3.5mm jack), S/PDIF digital optical output (Toslink)
●Class-D stereo amplifier, 2x 50W (RMS) / 4 Ohm (WAP-AX100) or 2x125W (RMS) / 4 Ohm (WAP-AX250) gold plated binding posts
●Sound control for Bass and treble with level pre-control
●Multiroom: The WAP system can operate with various SMR devices controlled through one bidirectional remote control.
● Frequency range: 20 - 20.000 Hz, S/N > 95 dB
●Mains power: 230 Volts \~ 50/60 Hz
●Dimensions: 350 x 245 x 75 mm Wireless Audio Player (SMR) 141 x 50 x 22 mm Bidirektional Remote Control (WRC-8600)
●Media Server Software and Instruction Manual on installation CD
- System requirements: media server on networked PC/NAS and/or internet connection by network and/or USB storage device.
TEAC
CE!
CE – Declaration of conformity
We herewith declare, the TEAC Wireless Audio Player
WAP-AR100, WAP-AX100 and WAP-AX250
complies with the following norms or normative documents:
EMC Directive 1999/5/EC
EN 301 489-1 V1.8.1:2008-04, EN 301 489-17 V2.1.1:2009-05, EN 55022:2006/A1:2007, EN 61000-3-2:2006, EN 61000-3-3:2008, EN 61000-4-2:2008, EN 61000-4-3:2008, EN 61000-4-4:2004, EN 61000-4-5:2005, EN 61000-4-6:2008, EN 61000-4-11:2004
LVD Directive 2006/95/EC
EN 60065:2002/A11:2008
Specific Absorption Rate (SAR)
EN62311 2008
This statement is based on the test reports of an EMV - laboratory.
All texts and illustrations were produced with greatest care. TEAC cannot however accept any legal or other responsibility for any remaining incorrect information and its consequences.
Changes in specifications and features may be made without notice or obligation. Company and product names provided herein are trademarks of their respective companies.ve owners. Contents, designs and specifications may change without notice.
In case there is audible noise, possibly caused be strong radio waves (e.g. by mobile phones) we recommend to turn down the volume control of the unit.
If you have special questions to the product and cannot find a solution in this introduction, you can look for more informations at our homepage Thank you!
www.teac.de
Notes on WEEE
The device may not be disposed of with household rubbish. This appliance is labelled in accordance with European Directive 2002/96/EG concerning used electrical and electronic appliances (waste electrical and electronic equipment - WEEE). The guideline determines the framework for the return and recycling of used appliances as applicable throughout the EU. To return your used device, please use the return and collection systems available to you.


- Copyright Notices
- Open-Source Notices
- TEAC.
- Contents
- Dear User,
- After unpacking
- Required accessories (optional)
- Controls and connectors
- Assembly
- BRC stand usage and battery charge
- Before first wireless BRC usage, the battery requires recharging.
- Initial System Setup
- Wired Network (LAN) Wizard: If the SMR is connected to a LAN network
- Notes:
- Operation
- Audio Server operation
- USB/SATA-HDD Audiomanager
- Direkt-/Playlist toggle function
- Internet Radio
- FM Radio (optional)
- My Favorites (station memory)
- Line Input
- Special functions
- Balance Control
- Multiroom
- Recording of Internet Radio and FM Radio contents
- Import of Internet Stations by USB storage
- Harddisk Slot
- Installing the SATA harddisk:
- Removing the SATA harddisk:
- Sata/PC selector switch (15):
- SMR Settings
- Date & Time
- Language
- Sleep
- Startup
- Network
- Maintenance
- Name
- Upgrade:
- Reset
- Attention: all Settings and the favorites will be erased by the reset!
- Config.
- Attention: all Settings and the favorites will be erased by new configuration!
- Reboot
- Backup
- BRC Setup
- Information
- Search SMR
- Select SMR
- Advanced
- AD-HOC and Infrastructure
- AP Search
- Manual network settings
- Network Interface
- WLAN Settings
- SSID: input the SSID
- IP Settings for LAN and WLAN
- Troubleshooting
- COMMON PROBLEMS AND SOLUTIONS
- TIPS FOR TROUBLESHOOTING
- PROBLEM: THE SMR DOES NOT RESPOND TO THE BRC
- PROBLEM: THE WAP CAN NOT PLAY MEDIA CLIPS
- PROBLEM: THE WAP CAN NOT PLAY PLAYLISTS
- PROBLEM: THE WAP CAN NOT PLAY SONGS WITH DRM (DIGITAL RIGHTS MANAGEMENT) PROTECTION
- Problem: The WAP cannot recognize a connected USB storage or the installed internal SATA harddisk
- PROBLEM: THE TITLE OF THE SONG IS ILLEGIBLE
- AUDIO PROBLEMS
- PROBLEM: THERE IS NO SOUND
- NETWORK PROBLEMS
- PROBLEM: THE WAP CAN NOT FIND THE MEDIA SERVER
- PROBLEM: THE WAP IS UNABLE TO CONNECT TO NETWORK
- Wired:
- Wireless:
- PROBLEM: WINDOWS SECURITY ALERT IS DISPLAYED AT STARTUP.
- PROBLEM: THE WAP IS UNABLE TO CONNECT TO INTERNET RADIO
- PROBLEM: THE WAP IS UNABLE TO PLAY SOME INTERNET RADIO STATIONS SMOOTHLY
- PROBLEM: THE WAP IS UNABLE TO PLAY ITUNES
- Advice on location, care and safety
- Specifications
- TEAC
- CE!
- CE – Declaration of conformity
- EMC Directive 1999/5/EC
- LVD Directive 2006/95/EC
- Specific Absorption Rate (SAR)
- Notes on WEEE
Brand : TEAC
Model : WAP-AX250
Category : Hi-Fi