
350X - Drill bit sharpener DRILL DOCTOR - Free user manual and instructions
Find the device manual for free 350X DRILL DOCTOR in PDF.
| Product type | Drill bit sharpener |
| Brand | DRILL DOCTOR |
| Model | 350X |
| Power supply | Electric, mains plug |
| Compatible drill bit diameters | 2.5 mm to 13 mm (3/32 in to 1/2 in) |
| Types of sharpenable drill bits | High-speed steel, cobalt, carbide, TiN coated, masonry |
| Grinding wheel | Diamond grinding wheel, 180 grit (standard), reversible |
| Point angle | 118° (standard), convertible to 135° |
| Noise level | Up to 85 dB(A) |
| Weight | Approximately 2.5 kg (estimated) |
| Dimensions (L x W x H) | Approximately 25 x 15 x 15 cm (estimated) |
| Warranty | 3 years |
| Maintenance | Regular cleaning of the sharpening compartment and chuck |
| Safety | Safety glasses recommended, hearing protection advised |
| Spare parts | Replacement diamond grinding wheel (DA31320GF 180 grit, DA31325GF 100 grit) |
| Customer service | 1-888-693-7455 (USA and Canada), email: tech@DrillDoctor.com |
Frequently Asked Questions - 350X DRILL DOCTOR
User questions about 350X DRILL DOCTOR
0 question about this device. Answer the ones you know or ask your own.
Ask a new question about this device
Download the instructions for your Drill bit sharpener in PDF format for free! Find your manual 350X - DRILL DOCTOR and take your electronic device back in hand. On this page are published all the documents necessary for the use of your device. 350X by DRILL DOCTOR.
USER MANUAL 350X DRILL DOCTOR
...for purchasing a Drill Doctor. It is sure to become a valuable tool because you will always have sharp drill bits before a project, during a project, and after a project.
As president of this company, I am very proud of the quality of our products—and I am equally proud of the great people at Drill Doctor who design and produce them. If you have questions or need help with your Drill Doctor, please contact us and one of our customer representatives will be there to help. We support what we build!
Use this User's Guide and the DVD video to learn to operate your Drill Doctor® quickly and easily. I'd also like to invite you to visit our website at www.DrillDoctor.com. There you will find:
- Demonstrations of all operations with the sights and sounds leading to successful drill bit sharpening
- Downloadable copies of the User's Guide
Warranty registration
Service and contact numbers
Again, thank you for buying a Drill Doctor. Now go enjoy its convenience and quality.
Haeh0Daoghl2
Hank O'Dougherty
President, Drill Doctor
Contents
English 1
Important Safety Instructions. 2
Getting to Know Your Drill Doctor 5
Identifying Basic Drill Bits. 6
Anatomy of a Drill Bit 6
The Drill Doctor® Sharpening Process 7
Aligning the Drill Bit. 7
Sharpening the Drill Bit. 8
Identifying Correctly Sharpened Drill Bits 10
Sharpening Bits of Different Lengths and Diameters 11
Aligning and Sharpening Masonry Drill Bits. 12
Questions and Answers 14
Drill Doctor® Maintenance. 16
Accessories 19
Warranty 20
Espanol 21
Francais 42
IMPORTANT SAFETY INSTRUCTIONS
For your own safety, please read this User's Guide before operating the Drill Doctor.
Installation
- Carefully unpack the Drill Doctor drill bit sharpener and set it on a table. Check to see that no damage has occurred in shipment. Check all packing material to be sure that all parts are present. See User's Guide for part identification diagram.
- The unit is completely assembled; the Drill Doctor only needs to be placed on a flat stable tabletop.
- Connect to properly wired outlet.
Precautions
When using electric tools, basic safety precautions should always be followed to prevent the risk of fire, electric shock, and personal injury.
- KEEP WORK AREA CLEAN. Cluttered areas and bench invite accidents.
DO NOT USE IN DANGEROUS ENVIRONMENT. Do not use in damp or wet locations, avoid exposure to rain. Keep work area well lit. Do not use tools in the presence of flammable liquids or gases. - GUARD AGAINST ELECTRIC SHOCK. Avoid body contact with earthed or grounded surfaces (e.g., pipes, radiators, ranges, refrigerators).
- KEEP OTHER PERSONS AWAY. Do not let persons, especially children, not involved in the work touch the tool or the extension cord and keep them away from the work area.
- STORE IDLE TOOLS. When not in use, tools should be stored in a dry, locked-up place out of the reach of children.
DO NOT FORCE THE TOOL. It will do the job better and safer at the rate for which it was intended.
DRESS PROPERLY. Do not wear loose clothing or jewelry; they can be caught in moving parts. Wear protective hair covering to contain long hair.
- USE PROTECTIVE EQUIPMENT. Use safety glasses. Use face or dust mask if working operations create dust.
DO NOT ABUSE THE CORD. Never yank the cord to disconnect it from the socket. Keep the cord away from heat, oil and sharp edges.
MAINTAIN TOOL WITH CARE. Keep the Drill Doctor® clean for best and safest performance. Follow instructions for maintenance and changing accessories. Inspect cords periodically and if damaged have them repaired by an authorized service facility. Inspect extension cords periodically and replace if damaged. Keep unit dry, clean and free from oil and grease.
- DISCONNECT TOOLS. Always disconnect the Drill Doctor® when cleaning, inspecting, and changing accessories, such as the diamond sharpening wheel. When not in use, disconnect from the power supply. Never touch internal parts of the sharpener when it is turned on or plugged in. The rotating diamond wheel can cause injury.
- AVOID UNINTENTIONAL STARTING. Make sure switch is in the "OFF" position before plugging in.
STAY ALERT. Watch what you are doing, use common sense and do not operate the tool when you are tired.
- CHECK DAMAGED PARTS. Before use of the tool, it should be carefully checked to determine that it will operate properly and perform its intended function. Check for alignment of moving parts, binding of moving parts, breakage of parts, mounting and any other conditions that may affect its operation. A guard or other part that is damaged should be properly repaired or replaced by an authorized service center unless otherwise indicated in the instruction manual. Have defective switches replaced by an authorized service center. Do not use the tool if the switch does not turn it on and off. Do not use if the grinding wheel is damaged. Use only grinding wheels recommended by Drill Doctor.
WARNING. The use of any accessory or attachment other than one recommended in the instruction manual may present a risk of personal injury.
- HAVE YOUR TOOL REPAIRED BY A QUALIFIED PERSON. This electric tool complies with the relevant safety rules. Repairs should only be carried out by qualified persons using original spare parts; otherwise this may result in considerable danger to the user.
- NEVER LEAVE TOOL RUNNING UNATTENDED.
USE EAR PROTECTION DURING USE. The Drill Doctor can generate up to 85 dB (A) noise emissions when in operation.
For Service Contact:
Professional Tool
210 E. Hersey St.
Ashland, OR 97520
USA
Phone: 1-888-MYDRILL (693-7455)
FAX: 541-552-1377
Email: tech@drillDoctor.com
WARNING:
Some dust created by power sanding, grinding, miscellaneous construction activities, as well as contents from the machine including the molding, wiring, grinding wheel, or any other parts may contain chemicals known to the State of California to cause cancer, birth defects or other reproductive harm and can be hazardous to your health.
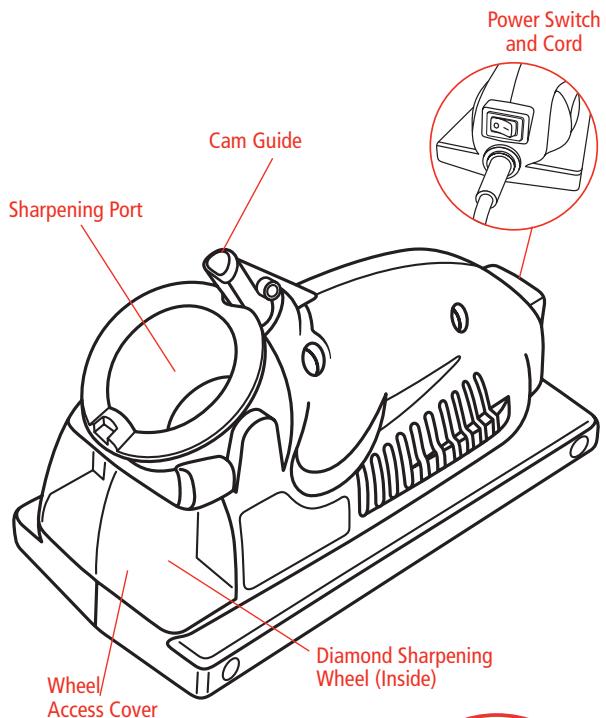
Getting to Know Your Drill Doctor
Watch the User Video included with your Drill Doctor® and become a sharpening expert in minutes!
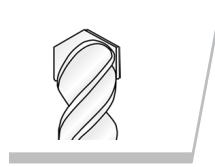
Identifying Basic Drill Bits
The Drill Doctor is most efficient when used to sharpen a drill bit's original point angle. With its standard Diamond Sharpening Wheel it will sharpen high-speed steel, cobalt, TiN-coated, carbide and masonry drill bits.
The Model 350X has been designed and engineered to sharpen the most common drill point types:
Standard Point
This general-purpose point (normally 118^ ) is used for drilling softer materials like cold rolled steel, aluminum, and wood.
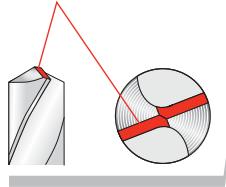
Masonry Bits
Masonry bits have a carbide insert at the point and are used for drilling materials like cement, brick, and ceramic.
Anatomy of a Drill Bit
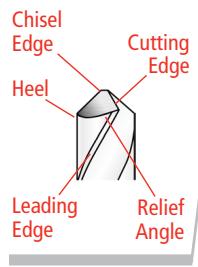
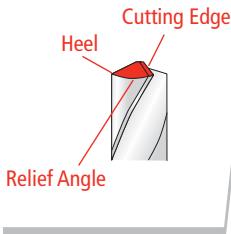
It is important to understand that each bit has a Chisel Edge, a Cutting Edge, a Heel, a Relief Angle, and a Leading Edge. (The Leading Edge will be important in bit alignment.)
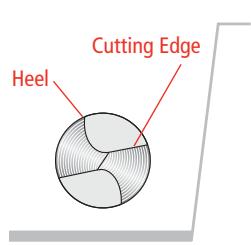
When viewing a well-sharpened bit from the end, the entire surface from the Cutting Edge to the Heel will have a finely ground surface without ridges or indentations. The Heel will always be lower than the Cutting Edge; this is called positive relief.
The Drill Doctor® Sharpening Process
The sharpening process includes 2 easy procedures:
- Aligning the bit in the Chuck.
- Sharpening the bit.
Aligning the Drill Bit
This makes sure that the Drill Doctor creates the right geometry. It also sets the bit so that only a small amount of the tip is taken off during sharpening.
(See page 12-13 to align and sharpen a masonry drill bit.)
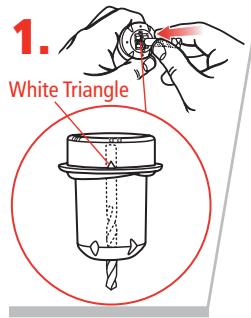
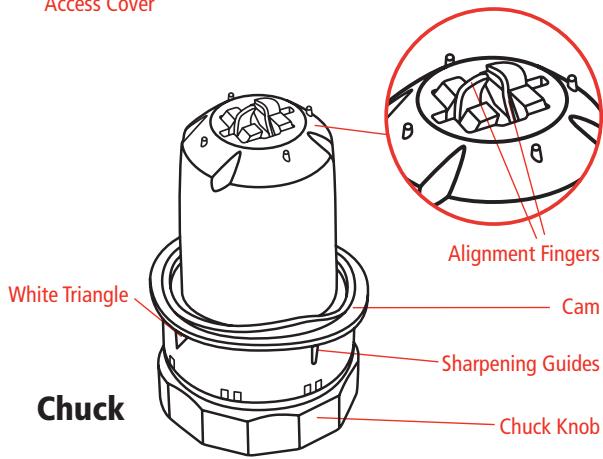
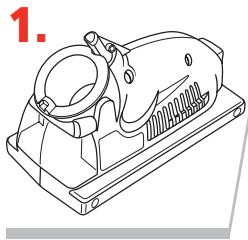
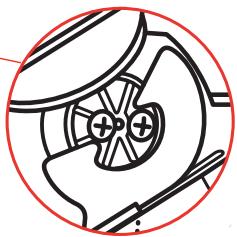
Insert bit in Chuck.
Hold the Chuck with the White Triangle facing up. Insert the bit into the front of the Chuck, leaving 1 / 2 of bit sticking out the front.

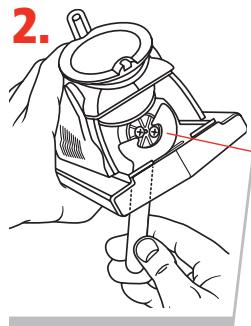
Tighten Chuck slightly.
Tighten the Chuck by turning the Chuck Knob clockwise just to the point where the bit is snug but can still be slid in and out. The Chuck should not be completely tightened until we set the bit depth for sharpening in the next step. Rotate the drill bit in the Chuck so that the Leading Edge of the flute is against the Alignment Finger. This aligns the bit for accurate sharpening.
Note: A good test to see if the Chuck is tightened the correct amount is to make sure it moves when you pull on it with your fingers, but will not fall out when you turn the Chuck upside down.
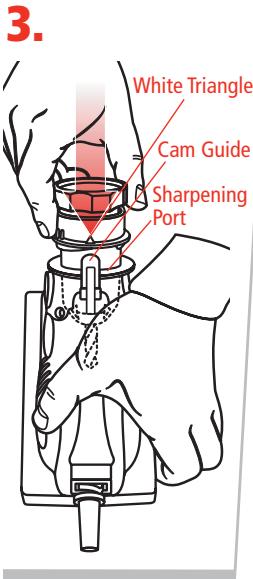
Set depth of bit and tighten Chuck.
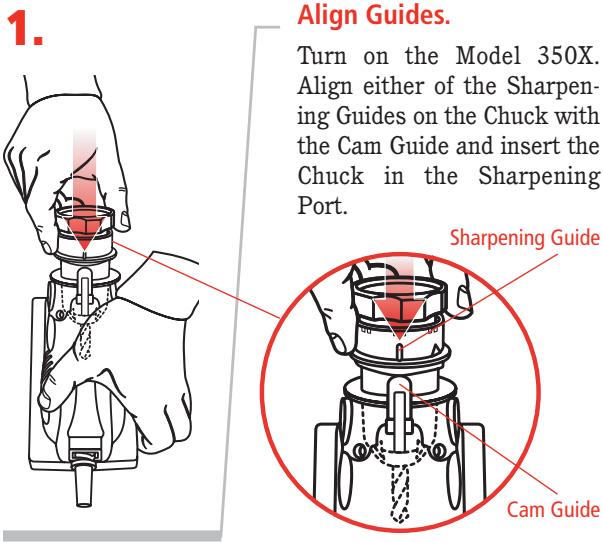
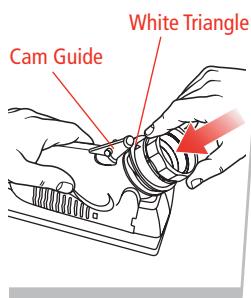
With the machine turned off, align the White Triangle on the Chuck with the Cam Guide. While keeping the Chuck against the Cam Guide on the 350X, insert the Chuck into the Sharpening Port. Push the Chuck all the way into the Port.
Tighten the Chuck Knob while it's still in the Sharpening Port.
Remove the Chuck and make sure it is tight so the bit won't move when you sharpen it.
Sharpening the Bit
Before sharpening you should know:
- Keep the Cam in contact with the Cam Guide as you sharpen—push the Chuck straight into the Port.
- Only light pressure is required.
- You will hear a grinding noise (zzzzzzzz) as you complete each half-turn and each side of the bit face is ground.
- The Chuck will rock as you turn it and the Cam rides on the Guide.
2. Turn until sharp.
Making sure that the Chuck rests firmly against the Cam Guide, turn the Chuck one half-turn to the right—to the other Sharpening Guide.
Turn from Guide to Guide in a smooth and even motion until the bit is sharp. To sharpen both sides of the bit evenly, always use an even number of half-turns. The number of half-turns needed to sharpen the bit depends on its size.
Turn the Chuck an even number of half-turns with light inward pressure:
3/32-inch bits—use 2 to 4 half-turns,
1/8-inch bits—use 4 to 6 half-turns,
3/8-inch bits—use 16 to 20 half-turns.
Note: Use just enough pressure to keep the Cam against the Cam Guide. Let the machine do the sharpening.
Identifying Correctly Sharpened Drill Bits (and what to do with those that aren't!)
Correctly Sharpened Bits
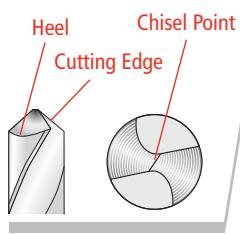
The entire surface from the Cutting Edge to the Heel will have a finely ground surface without ridges or indentations. The Heel will always be lower than the Cutting Edge (positive relief).
Problem
The Chisel Edge is ground flat.
Cause
Alignment Fingers did not position the drill bit properly in the aligning process (page 7-8).
Solution
Realign the bit by carefully following steps 1 through 3 on page 7-8.
Problem
Surface of the bit isn't smooth and/or heavy grinding sound.
Cause
Too much drill bit is sticking out of the end of the chuck.
Solution
Realign the bit. During the re-alignment process, be sure to keep the White Triangle against the Cam Guide as you insert the Chuck into the Sharpening Port to set the depth of the bit. The bit should be pushed up inside the Chuck and should rotate slightly as the Chuck is plunged into the Sharpening Port and contacts the Diamond Sharpening Wheel. Push until the Chuck is fully inserted into the Port.
Problem
Heel same height or higher than the cutting edge
Cause
Bit is misaligned or the Cam failed to stay in contact with the Cam Guide during sharpening.
Solution
Carefully repeat the alignment and sharpening procedure, making sure to use light pressure to keep the Cam in contact with the Cam Guide during sharpening.
Problem
Bit backing out or slipping out of the jaws when you are sharpening
Cause
Too much pressure during sharpening, dirty Chuck, or Chuck not tightened enough.
Solution
Use just enough pressure to keep the Cam in contact with the Cam Guide. If the bit continues to slip, clean the Chuck as described on Page 17.
Sharpening Bits of Different Lengths and Diameters
Drill Bits Of Different Sizes
Too many rotations of a small-diameter bit may result in incorrect sharpening and too few on a large bit may not sharpen enough.
3/32-inch bits—use 2 to 4 half-turns,
1/8-inch bits—use 4 to 6 half-turns,
3/8-inch bits—use 16 to 20 half-turns.
Large Drill Bits
Large drill bits (3/8" to 1/2") will require more half-turns of the Chuck. A well-sharpened bit will have a smooth surface from Cutting Edge to Heel. It may take two or three complete sharpenings (repeat all steps) to re-sharpen a very dull or chipped large drill bit. A 1/2" bit will need a minimum of 20 half-turns.
Short Drill Bits
The new Chuck design on the 350X enables you to sharpen short bits as easily as longer ones. Simply align the bit in the Chuck as normal. Then sharpen the bit using very light pressure and fewer half-turns. The bit should only briefly contact the Sharpening Wheel. Note that it is OK for the Chuck Fingers to come into contact with the Sharpening Wheel. This will not damage the Chuck.
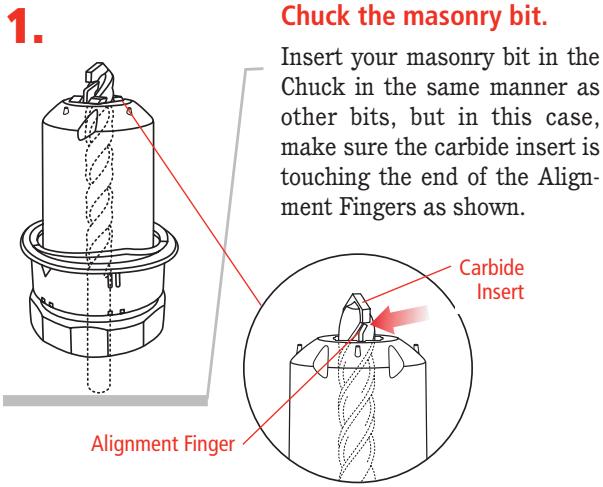
Aligning and Sharpening Masonry Drill Bits
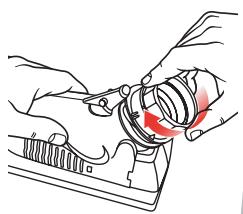
To sharpen a masonry bit, you do not turn the Chuck. Instead you insert the Chuck until it touches the wheel, remove, and repeat on the other side.
2.
Tighten
Tighten the Chuck while checking that the insert is touching the end of the Alignment Fingers. Tighten until the bit no longer moves in the chuck
3.
Plunge until sharp.
Align the White Triangle on the Chuck with the Cam Guide on the machine. Plunge the Chuck into the Sharpening Port until it contacts the Sharpening Wheel. Remove the Chuck and rotate one half-turn to the opposite White Triangle. Plunge the Chuck into the Sharpening Port again to sharpen the other side of the carbide insert. Start with four plunges. Inspect the bit. Then sharpen more if needed.
Questions and Answers
1. Question:
Why was my drill bit sharpened improperly?
Answer:
The most common cause of improper sharpening is improper drill bit alignment.
Key causes are:
- Chuck not pushed all the way into the Sharpening Port.
- Drill not aligned in the Alignment Fingers correctly.
- Chuck is dirty and the bit slipped out of alignment. See page 17, "Cleaning the Chuck," to correct.
- Too many rotations of a small-diameter bit results in incorrect sharpening, and too few on a large bit may not sharpen enough. See page 11-12, "Drill Bits of Different Sizes."
In order to correct these problems be sure the Chuck is all the way in the Sharpening Port with the Guides correctly matched up.
2. Question:
When I aligned the drill bit and sharpened it, why was no material removed?
Answer:
This happens when the bit is not protruding out of the Chuck far enough. The Chuck may not have been tightened enough and the bit may have slipped in the Chuck. Carefully realign the bit in the Chuck and set its depth in the Sharpening Port again.
3. Question:
I sharpened the bit. Why will it not cut?
Answer:
This happens when the Heel on the bit is higher than the Cutting Edge (negative relief). Realign the drill bit and resharpen in the Sharpening Port.
- Maintain consistent inward light pressure during the half-turns of the Chuck.
- You may have a specialty drill bit. Slow and fast spiral, helix, turbo flutes, and raised margin drill bits are considered specialty bits. Your Drill Doctor does not sharpen these types of bits.
- Follow the normal sharpening procedure. You may have to realign and sharpen more than once to ensure that the bit is sharpened correctly. If the problem persists contact the Technical Service Department.
4. Question:
Why is the drill point off center?
Answer:
If the tip of the drill bit appears to be sharpened off center, check the following items:
- You may not have completed an even number of half-turns when you sharpened and one face of the bit was ground more than the other. Always use an even number of half-turns when you sharpen.
Make sure the Chuck is clean. - Make sure the bit is not loose in the Chuck.
- During the sharpening process be sure to keep the same pressure on each half-turn.
5. Question:
What can I do about flat spots on the bit point between the Cutting Edge and the Heel?
Answer:
The flat spots on a sharpened bit are the result of an incomplete or paused half-turn of the Chuck in the Sharpening Port. To correct, apply light, inward pressure and rotate the Chuck smoothly while sharpening. Be sure to complete the half-turns.
6. Question:
Why is the Chisel Edge on my drill bit flat?
Answer:
During the alignment process the Alignment Fingers may have been gripping the high points of the drill bit. Reinsert the drill bit in the Chuck making sure that the Alignment Fingers grip the narrowest section of the bit (the flutes) and the Leading Edge of the Flute is against the Alignment Finger. (See page 7-8.)
7. Question:
Why does the drill bit back up into the Chuck during the sharpening procedure?
Answer:
Make sure the bit is tight in the Chuck before sharpening. Your Chuck may be dirty. Clean the Chuck as described on page 17.
8. Question:
Can I change a 135^ drill bit into a 118^ drill bit?
Answer:
You can change the point angle of any drill bit from 135^ to 118^ by using normal sharpening procedures.
Drill Doctor® Maintenance
After sharpening 20 to 25 drill bits, the drill bit grinding dust will accumulate in the grinding compartment. Grinding particles will promote wear in the Sharpening Port and Chuck, so cleaning on a consistent basis can add life to your machine. Before any maintenance or cleaning is performed, be sure to disconnect your Drill Doctor.
Removing the Wheel Access Cover
With the Drill Doctor unplugged, use your nail or the tip of your finger to pull the Wheel Access Cover forward. It will come completely off for easy access. To close, insert the Cover in the slots and snap it back into place.
Cleaning Your Drill Doctor
With the Drill Doctor unplugged, shake accumulated drill bit grinding dust from behind the Wheel Access Cover into a disposable container. Remove dust particles around the wheel with a small, dry brush. Dispose of the container and drill bit dust in a safe and environmentally approved manner. With a dry cloth wipe the inside and outside of the Sharpening Port to remove any grinding dust that may have accumulated. A standard 1" vacuum hose works equally well.
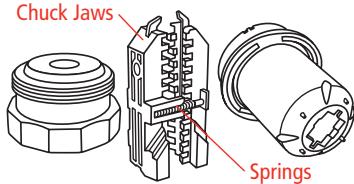
Cleaning the Chuck
Unscrew the Knob from the body and clean both threads with a soft brush or cotton swab. Re-assemble the Chuck and operate the Knob through its travel to ensure it turns
freely. When the Knob is removed, be careful not to lose the small springs that separate the Chuck Jaws.
Determining if Replacing the Diamond Grinding Wheel Is Required
You can double the life of the Diamond Sharpening Wheel by reversing it before you replace it. The Diamond Sharpening Wheel supplied with the Drill Doctor is designed to give you long and trouble free service, with an average of more than 200 sharpenings for 3/32'' to 1/2'' drill bits.
The Sharpening Wheel may need to be changed if:
- Sharpened drill bits burn or turn blue no matter how fast or slow you rotate the Chuck.
- When touching the Sharpening Wheel (with the machine unplugged), the lower portion feels too smooth (nonabrasive).
- When sharpening the drill bit, it takes too many half-turns to sharpen.
Contact the store or dealer where you purchased the Drill Doctor, or contact Drill Doctor directly, to purchase a replacement Sharpening Wheel.
Reversing or Replacing Your Diamond Sharpening Wheel
Disconnect your Drill Doctor, make sure machine is cool, then remove Wheel Access Cover.
Use wrench supplied with your Drill Doctor to lock sharpening wheel in place.

With Phillips-head screwdriver, remove the two screws and wheel retainer.
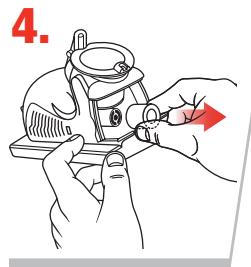
Remove worn wheel by twisting slightly and lifting wheel off shaft. Install new wheel and reinstall wheel retainer and screws. Don't over-tighten mounting screws. Remove the wrench and replace the Wheel Access Cover before turning on the machine.
Accessories
Order Accessories through our website: www.DrillDoctor.com, or by contacting us at the phone number listed on the Warranty page (page 20), or at the retailer where you purchased your Drill Doctor.
Standard Diamond Sharpening Wheel (180 grit)
DA31320GF
Coarse Diamond Sharpening Wheel (100 grit)
DA31325GF
WARNING:
The use of any accessory other than one recommended in this user's manual may present a risk of personal injury.
Drill Doctor Warranty
USA and Canada Only
See Warranty Card insert for countries outside the USA and Canada.
Your Drill Doctor is warranted to be free of defects due to workmanship or design for 3 years from the purchase date. If your Drill Doctor fails to operate, or if any operating problem occurs, contact Drill Doctor Technical Service at:
1-888-693-7455 (toll-free USA and Canada only)
1-541-552-1301
Please call 8:00 AM - 3:30 PM Pacific Time.
Do not return this product to the store where you purchased it. Do not attempt any service or repairs other than those suggested by a Drill Doctor Technical Service Representative (TSR). During the period of warranty, Drill Doctor will, at our discretion, repair or replace this product free of charge and refund postage or shipping charges providing that the following conditions are met:
- A copy of the proof of purchase is provided.
- The product has been operated for the purpose intended as described in the operating instructions and has not been abused or mishandled in any way.
- The product has not been dismantled and no service or repairs have been attempted other than those suggested by a Drill Doctor TSR.
- The Return Goods Authorization number (RGA #) (assigned by the Drill Doctor TSR) is written on the shipping label. Please make certain to package items in such a way as to eliminate further damage during shipping. Ship via a traceable carrier and properly insure the package.
No CODs are accepted. Unapproved shipping charges are non-refundable.
Complete and mail back the Warranty Registration & Customer Survey, or register online at:
www.DrillDoctor.com
Please Fill in the Following for Your Records.
Drill Doctor Model #:
Date of Purchase: / /
Purchased from:
Contenido
English 1
Espanol 21
President, Drill Doctor
Ashland, Oregon 97520
EE.UU.
FAX: 541-552-1377
Correo electrónico: tech@drillDoctor.com
ADVERTENCIA:
The Drill Bit Sharpener
Phone/Telefono/Teléphone:
1-888-MYDRILL (693-7455)
Professional Tool Manufacturing, LLC
P.O.Box 730
210 E. Hershey St.
Ashland, OR 97520
USA
tech@DrillDoctor.com
Drill Doctor ⑧ is a registered trademark of
Professional Tool Manufacturing, LLC.
Professional Tool Manufacturing, LLC.
Professional Tool Manufacturing, LLC.

Drill Doctor
The Drill Bit Sharpener
Phone/Telephone:
1-888-MYDRILL (693-7455)
Professional Tool Manufacturing, LLC
P.O.Box 730
210 E. Hershey St.
Ashland, OR 97520
USA
tech@DrillDoctor.com
Drill Doctor ® is a registered trademark of
Professional Tool Manufacturing, LLC.
Drill Doctor es unamarcacommercial registrada de
Professional Tool Manufacturing, LLC.
Professional Tool Manufacturing, LLC.