
750X - Drill bit sharpener DRILL DOCTOR - Free user manual and instructions
Find the device manual for free 750X DRILL DOCTOR in PDF.
| Brand | DRILL DOCTOR |
| Model | 750X |
| Product Type | Drill bit sharpener |
| Usage | Sharpening HSS, cobalt, TiN coated, carbide, and masonry drill bits |
| Drill Diameter | 2.5 mm to 19 mm (3/32" to 3/4") |
| Adjustable Point Angle | From 115° to 140° |
| Variable Grinding Function | Yes, from 0 to 0.40" in 0.005" increments |
| Split Point Function | Yes, self-centering |
| Diamond Wheel Supplied | 180 grit (standard) |
| Optional Diamond Wheel | 100 grit (large bits) |
| Chuck Included | Large drill chuck 2.5-19 mm |
| Variable Alignment | Yes, to adjust relief and clearance angles |
| Debris Evacuation Tube | Yes, compatible with 25.4 mm vacuum |
| Power Supply | 120 V, 60 Hz (North American standard) |
| Power | Approximately 100 W |
| Noise Level | Up to 85 dB(A) |
| Weight | Approximately 3 kg |
| Dimensions (L x W x H) | 30 x 20 x 20 cm (estimated) |
| Warranty | 3 years (USA and Canada) |
| Customer Service | 1-888-693-7455 / tech@DrillDoctor.com |
| Maintenance | Regular debris cleaning, wheel can be reversed |
| Repairability | Spare parts available (wheel, chucks, etc.) |
| Safety | Safety glasses recommended, unplug before cleaning |
Frequently Asked Questions - 750X DRILL DOCTOR
User questions about 750X DRILL DOCTOR
0 question about this device. Answer the ones you know or ask your own.
Ask a new question about this device
Download the instructions for your Drill bit sharpener in PDF format for free! Find your manual 750X - DRILL DOCTOR and take your electronic device back in hand. On this page are published all the documents necessary for the use of your device. 750X by DRILL DOCTOR.
USER MANUAL 750X DRILL DOCTOR
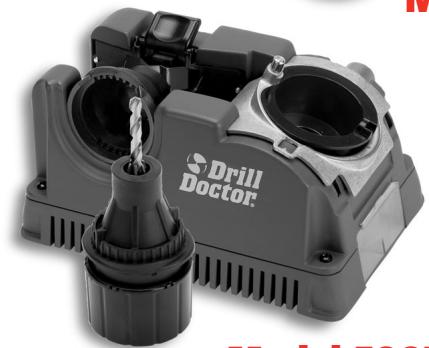
Model 750X
Model 500X
500X & 750X
User's Guide Guía del Nombre Mode d'emploi
Thank you
...for purchasing a Drill Doctor. It is sure to become a valuable tool because you will always have sharp drill bits before a project, during a project, and after a project.
As president of this company, I am very proud of the quality of our products—and I am equally proud of the great people at Drill Doctor who design and produce them. If you have questions or need help with your Drill Doctor, please contact us and one of our customer representatives will be there to help. We support what we build!
Use this User's Guide and the DVD video to learn to operate your Drill Doctor® quickly and easily. I'd also like to invite you to visit our website at www.DrillDoctor.com. There you will find:
- Demonstrations of all operations with the sights and sounds leading to successful drill bit sharpening
- Downloadable copies of the User's Guide
Warranty registration
Service and contact numbers
Again, thank you for buying a Drill Doctor. Now go enjoy its convenience and quality.
Haeh0Daoghl2
Hank O'Dougherty
President, Drill Doctor
Contents
English 1
Important Safety Instructions 2
Getting to Know Your Drill Doctor 5
Identifying Basic Drill Bits. 6
Anatomy of a Drill Bit 6
The Drill Doctor Sharpening Process 7
Choosing Your Drill Bit Point Angle on the Model 500X. .7 Model 750X. .8
Aligning the Drill Bit. 8
Sharpening the Drill Bit 10
Identifying Correctly Sharpened Drill Bits 12
Split Points 13
Creating or Replacing a Split Point 14
Identifying Correctly Split Bits 15
Grit Tube Attachment. 16
Sharpening Bits of Different Lengths, Diameters and Types Large Drill Bits 16 Short Drill Bits and Bits Smaller than 1 / 8'' 17 Masonry Drill Bits 17
Using the Variable Alignment to Adjust Chisel and Relief Angle 19
Using the Variable Material Take-Off on the 750X...20
Questions and Answers 21
Drill Doctor® Maintenance. 24
Accessories and User-Replaceable Parts. 27
Warranty 28
Espanol 29
Francais 60
IMPORTANT SAFETY INSTRUCTIONS
For your own safety, please read this User's Guide before operating the Drill Doctor.
Installation
- Carefully unpack the Drill Doctor drill bit sharpener and set it on a table. Check to see that no damage has occurred in shipment. Check all packing material to be sure that all parts are present. See User's Guide for part identification diagram.
- The unit is completely assembled; the Drill Doctor only needs to be placed on a flat stable tabletop.
- Connect to properly wired outlet.
Precautions
When using electric tools, basic safety precautions should always be followed to prevent the risk of fire, electric shock, and personal injury.
- KEEP WORK AREA CLEAN. Cluttered areas and bench invite accidents.
DO NOT USE IN DANGEROUS ENVIRONMENT. Do not use in damp or wet locations, avoid exposure to rain. Keep work area well lit. Do not use tools in the presence of flammable liquids or gases. - GUARD AGAINST ELECTRIC SHOCK. Avoid body contact with earthed or grounded surfaces (e.g., pipes, radiators, ranges, refrigerators).
- KEEP OTHER PERSONS AWAY. Do not let persons, especially children, not involved in the work touch the tool or the extension cord and keep them away from the work area.
- STORE IDLE TOOLS. When not in use, tools should be stored in a dry, locked-up place out of the reach of children.
DO NOT FORCE THE TOOL. It will do the job better and safer at the rate for which it was intended.
DRESS PROPERLY. Do not wear loose clothing or jewelry; they can be caught in moving parts. Wear protective hair covering to contain long hair.
- USE PROTECTIVE EQUIPMENT. Use safety glasses. Use face or dust mask if working operations create dust.
DO NOT ABUSE THE CORD. Never yank the cord to disconnect it from the socket. Keep the cord away from heat, oil and sharp edges.
MAINTAIN TOOL WITH CARE. Keep the Drill Doctor® clean for best and safest performance. Follow instructions for maintenance and changing accessories. Inspect cords periodically and if damaged have them repaired by an authorized service facility. Inspect extension cords periodically and replace if damaged. Keep unit dry, clean and free from oil and grease.
- DISCONNECT TOOLS. Always disconnect the Drill Doctor® when cleaning, inspecting, and changing accessories, such as the diamond sharpening wheel. When not in use, disconnect from the power supply. Never touch internal parts of the sharpener when it is turned on or plugged in. The rotating diamond wheel can cause injury.
- AVOID UNINTENTIONAL STARTING. Make sure switch is in the "OFF" position before plugging in.
STAY ALERT. Watch what you are doing, use common sense and do not operate the tool when you are tired.
- CHECK DAMAGED PARTS. Before use of the tool, it should be carefully checked to determine that it will operate properly and perform its intended function. Check for alignment of moving parts, binding of moving parts, breakage of parts, mounting and any other conditions that may affect its operation. A guard or other part that is damaged should be properly repaired or replaced by an authorized service center unless otherwise indicated in the instruction manual. Have defective switches replaced by an authorized service center. Do not use the tool if the switch does not turn it on and off. Do not use if the grinding wheel is damaged. Use only grinding wheels recommended by Drill Doctor.
WARNING. The use of any accessory or attachment other than one recommended in the instruction manual may present a risk of personal injury.
- HAVE YOUR TOOL REPAIRED BY A QUALIFIED PERSON. This electric tool complies with the relevant safety rules. Repairs should only be carried out by qualified persons using original spare parts; otherwise this may result in considerable danger to the user.
- NEVER LEAVE TOOL RUNNING UNATTENDED.
USE EAR PROTECTION DURING USE. The Drill Doctor can generate up to 85 dB (A) noise emissions when in operation.
For Service Contact:
Professional Tool
210 E. Hersey St.
Ashland, OR 97520
USA
Phone: 1-888-MYDRILL (693-7455)
FAX: 541-552-1377
Email: tech@drillDoctor.com
WARNING:
Some dust created by power sanding, grinding, miscellaneous construction activities, as well as contents from the machine including the molding, wiring, grinding wheel, or any other parts may contain chemicals known to the State of California to cause cancer, birth defects or other reproductive harm and can be hazardous to your health.
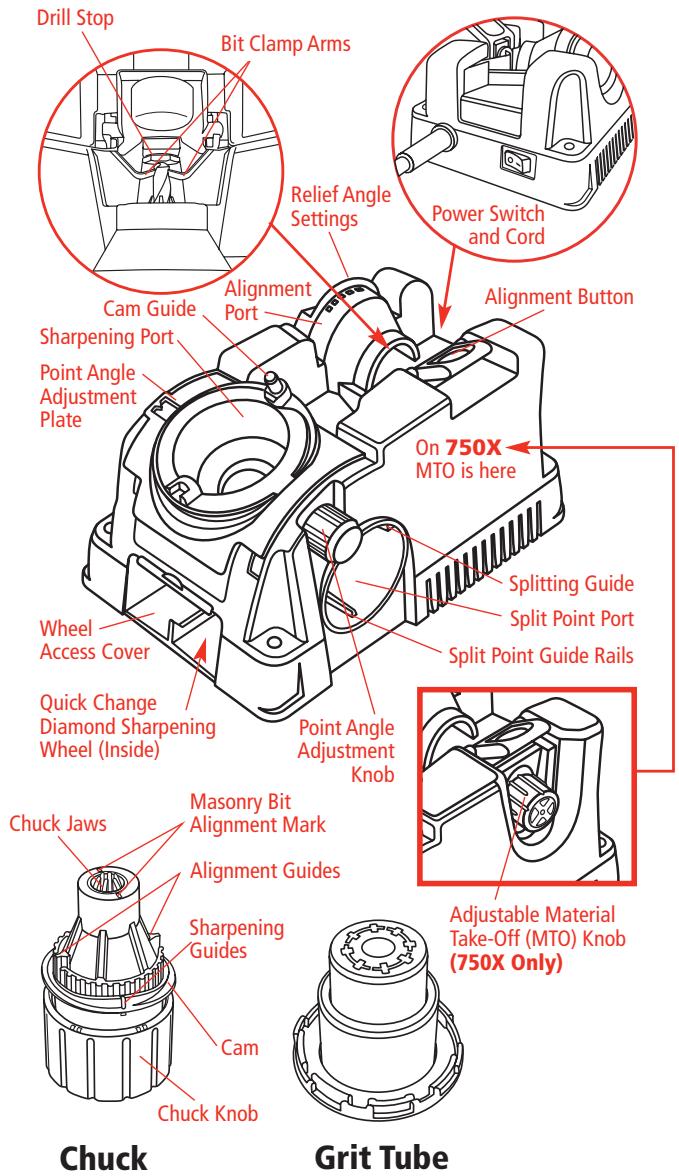
Getting to Know Your Drill Doctor
Watch the User DVD included with your Drill Doctor® and become a sharpening expert in minutes!
Identifying Basic Drill Bits
The Drill Doctor is most efficient when used to sharpen a drill bit's original point angle. With its standard Diamond Sharpening Wheel it will sharpen high-speed steel, cobalt, TiN-coated, carbide and masonry drill bits.
It has been designed and engineered to sharpen three of the most common drill bit types and offer you an ability to customize your point:
Standard Point
This general-purpose point is used for drilling softer materials like cold rolled steel, aluminum, and wood.
Split Point
Split-point bits are self-centering and are generally used for tempered steels, hard alloys or hard cast materials.
Masonry Bits
Masonry bits have a carbide insert at the point and are used for drilling materials like cement, brick, and ceramic.
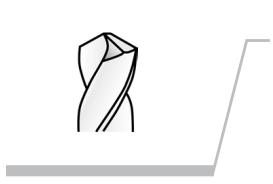
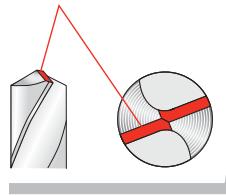
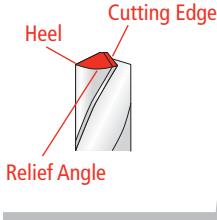
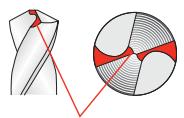
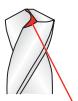
Anatomy of a Drill Bit
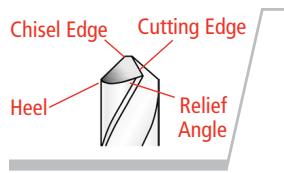
It is important to understand that each bit has a all of these characteristics.
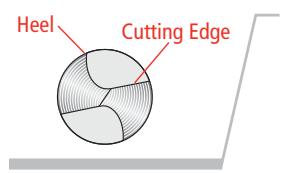
When viewing a well-sharpened bit from the end, the entire surface from the Cutting Edge to the Heel will have a finely ground surface without ridges or indentations. The Heel will always be lower than the Cutting Edge.
The Drill Doctor® Sharpening Process
The sharpening process includes 4 easy procedures:
- Determine the type and angle of the drill bit.
- Align the bit in the Chuck.
- Sharpen the bit.
- Split the point (if you choose).
Be sure to complete the first three procedures in order to sharpen a bit; and always sharpen a bit prior to splitting it.
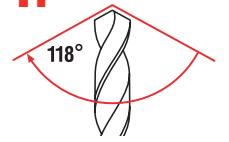
Choosing Your Drill Bit Point Angle
When drilling into certain difficult materials, a shallower point or 135^ point angle produces a better-finished hole. Your Drill Doctor allows you to sharpen bits with either the standard 118^ or the flatter 135^ point angle. You can also adjust the "chisel and relief angle." (Refer to page 19 for the benefits of using Variable Alignment to adjust the Chisel and Relief angles.)
Depending on the material you are drilling in, you may choose to increase or decrease these angles.
On the Model 500X
1.
Check your drill bit angle
Most bits are 118^ or 135^ . Hold your bit point up to the key to the left to see which type your bit looks like. If you can't tell due to small size or damage on the tip, set your Drill Doctor based on the application. Most wood and soft metal applications should use 118 degree. Harder materials such as stainless steel and tool steel should
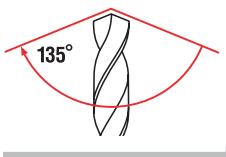
use 135^ or if you are drilling contoured materials such a car fender and plan on splitting the point.
2. Point Angle Adjustment Knob
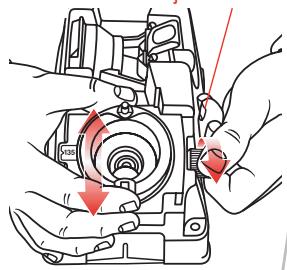
Choose the angle
Loosen the Point Angle Adjustment Knob on the right side of the Sharpening Port and slide the metal Point Angle Adjustment Plate to either the standard 118^ or the flatter 135^ point angle. Then re-tighten the Knob.
On the Model 750X
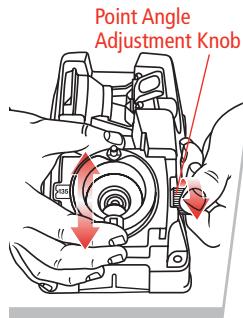
Choose the angle
The Model 750X has additional advanced features that enable you to fine-tune your bit geometry. Loosen the Point Angle Adjustment Knob to the right of the Sharpening Port and slide the metal Point Angle Adjustment Plate to 118^ , 135^ or
the custom angle of your choice. Choose your point angle based on the application you're drilling. Then re-tighten the Knob.
Aligning the Drill Bit
This makes sure that the Drill Doctor creates the right geometry. And, it sets the bit so that only a small amount of the tip is taken off.
See page 17 to align and sharpen a Masonry drill bit.)
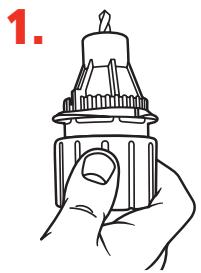
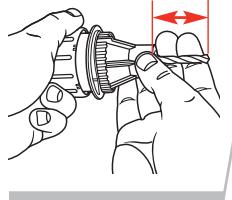
1.
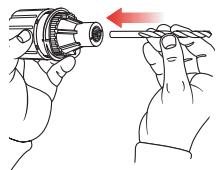
Insert bit in Chuck and tighten
Insert the bit into the Chuck Jaws and close the Jaws just to the point where the bit slides in and out. Do not over tighten the Chuck; the bit needs to be able to move in and out until Step 4. (Model 750X users refer to "Using the Variable Material Take-Off (MTO)" on page 20.)
A good test to see if the Chuck is tightened the correct amount is to make sure it moves when you pull on it with your fingers, but will not fall out when you turn the Chuck upside down.
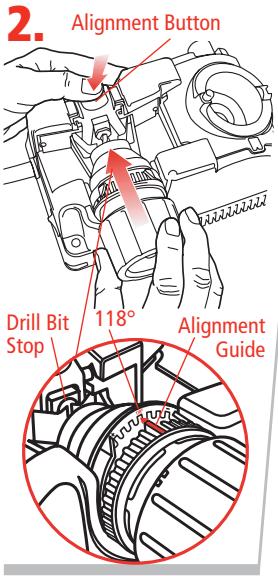
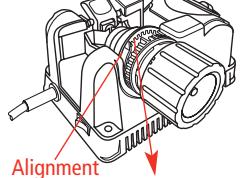
Insert Chuck into Alignment Port
Press the Alignment Button down and hold it. Match the either of the Alignment Guides on the Chuck with the 118^ Notch on the Alignment Port. Insert the Chuck. While holding the button down, slide the drill bit forward until it touches the Drill Stop and the Chuck is pushed all the way into the Alignment Port. Release the Alignment Button.
If you are using a Model 750X and have chosen a custom bit point (between 115^ and 140^ ),
start your alignment in the closest setting to the point angle you are using. (For example, if you are setting the point angle below 118^ , than set the alignment in the 118^ setting.) Refer to "Using the Variable Alignment to Adjust the Chisel and Relief Angle" on page 19.
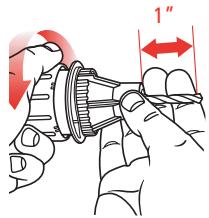
3. Adjust Bit Position
Look at your bit and make sure the Clamp Arms are in the bit's narrowest spot. If they aren't, turn the bit in the chuck so that it is held by the Bit Clamp Arms at the narrowest width. This is important because this setting determines the angle at which your bit will be sharpened.
Drill Bit Stop
Bit Clamp Arms
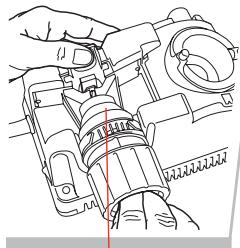
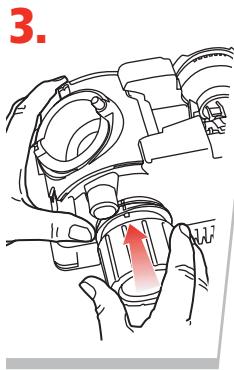
4. Tighten Chuck
Hold onto the Chuck and tighten the Chuck Knob. (Avoid over-tightening the Chuck in the Alignment Port. This could damage the Chuck and Port.)
5. Remove and re-tighten
Press the Alignment Button and remove the chucked drill bit. Tighten the Chuck once more to ensure the bit won't move when you sharpen it.
You are now ready to sharpen the drill bit.
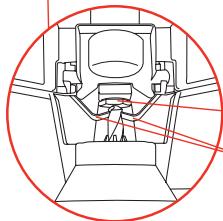
Sharpening the Drill Bit
Before sharpening you should know:
-
Keep the Cam in contact with the Cam Guide as you sharpen—push the Chuck straight into the Port.
Only light pressure is required. -
You will hear a grinding noise (zzzzzzzz) as you complete each half-turn and each side of the bit face is ground.
- The Chuck will rock as you turn it and the Cam rides on the Guide.
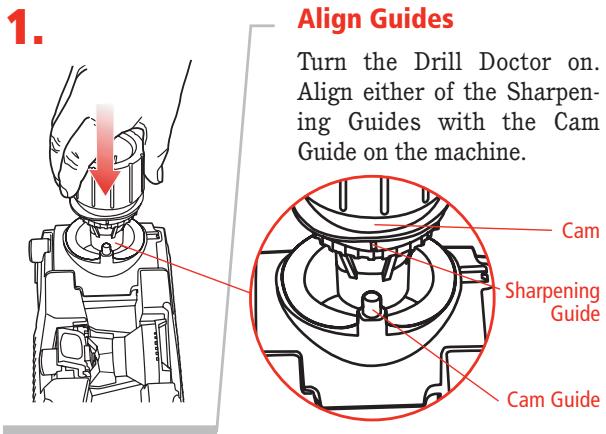
2. Cam Insert Chuck and turn against until the bit is sharp

Insert the Chuck in the Sharpening Port. Making sure you keep the Cam against the Cam Guide, rotate the Chuck one half-turn in a clockwise direction—from Sharpening Guide to Sharpening Guide—an even number of times. Your motion should be smooth and
even. To sharpen both sides of the bit evenly, always use an even number of half-turns. The number of turns needed to sharpen the bit depends on the size.
Turn the Chuck an even number of half-turns with light inward pressure:
3/32-inch bits—use 2 to 4 half-turns,
1/8-inch bits—use 4 to 6 half-turns,
3/8-inch bits—use 16 to 20 half-turns.
Note: Use just enough pressure to keep the Cam against the Cam Guide. Let the machine do the sharpening.
Identifying Correctly Sharpened Drill Bits (and what to do with those that aren't!)
Correctly Sharpened Bits
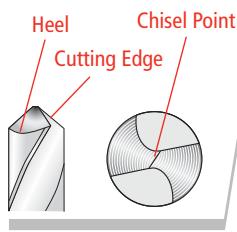
The entire surface from the Cutting Edge to the Heel will have a finely ground surface without ridges or indentations. The Heel will always be lower than the Cutting Edge. The Chisel Edge will be clean and straight.
Incorrectly Sharpened Bits
Problem
The Chisel Edge is ground flat.
Cause
Chuck Jaws did not grip drill bit properly in the aligning process (Page 8).
Solution
Realign the bit by carefully following steps 1 through 5 on Pages 8 to 10.
Problem
The Chisel Edge is not clean or straight.
Cause
The bit isn't completely ground yet.
Solution
Continue sharpening the bit until the chisel is clean and straight. If the machine quits removing material before the chisel is clean, realign and sharpen again. (Model 750X users can increase or decrease MTO (material take-off) to speed up this process.
Problem
Insufficient (Negative) relief or a slow cutting drill bit.
Cause
Drill bit alignment.
Solution
Re-align the drill using the Adjustable Alignment procedure on page 19. To increase relief, insert the alignment guide on the chuck closer to the (+) side of the alignment port, then sharpen the bit.
Problem
Bit backing out or slipping out of the jaws when you are sharpening
Cause
Chuck too loose or too much pressure when sharpening.
Solution
Use more torque when tightening the Chuck or less pressure when sharpening. Clean the Chuck w/ compressed air if the problem persists.
Split Points
Split point drill bits prevent walk-around on the material before they begin to cut.
This feature is described as self-centering. The need to center punch is effectively eliminated. A standard drill bit chisel point has to wear an area in the middle of the hole to be drilled before the cutting edges will remove material. Due to its additional cutting lips along the chisel edge, a split point will begin cutting immediately. Up to 70% less thrust (when compared to a non-split or conventional point) is required to drill a hole with a split point.
Creating or Replacing a Split Point
Leave bit in Chuck after sharpening
Always align and sharpen a bit before splitting it. To split the point, do not remove the bit from the Chuck after sharpening.
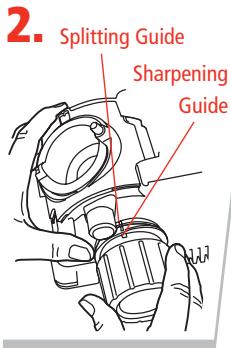
Align Guides
Align one of the Sharpening Guides on the Chuck (short white marks) with the Splitting Guide on the Splitting Port. Make sure the Alignment Guides insert into the Split Point Guide Rails in the Splitting Port.
Split the point
Press Chuck slowly and firmly into the Splitting Port until it stops. Remove the chuck, rotate one-half turn, and repeat.
Check the tip of the bit carefully to determine that both sides of the bit are split equally. Compare it to the illustrations. If it does not match, study the information following.
Identifying Correctly Split Drill Bits (And What to Do With Those That Aren't!)
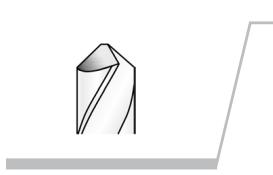
Correctly Split
Split line
Split lines are nearly straight across.
Undersplit
Split lines do not meet in the center but Chisel Edge remains.

Not enough material has been removed from the Heel of the drill bit.
Solution
More grinding is needed for larger drill bits. If one side of the bit is undersplit, insert the Chuck into the Splitting Port again and split both sides. Push the Chuck into the Port until it stops. Repeat until the split sides are equal and look like the correctly split bit shown above.
Oversplit
Too much material removed. Split lines are joined in the center and Chisel Edge has been removed.


Solution
Reinsert the chucked bit into the Sharpening Port and remove enough of the tip until the split tip looks like the correctly split bit above.
Grit Tube Attachment
The Grit Tube attachment is designed to keep any sparks caused by sharpening safely inside the machine and away from you. In addition, the Grit Tube reduces the sharpening dust in the air and on your workbench.
Simply insert the Grit Tube into the Splitting Port of your Drill Doctor when sharpening. It will catch the grit that is formed from the sharpening process. Clean the inside of your Drill Doctor and the Grit Tube on a regular schedule. The grit tube is designed to accept a standard 1" shop vacuum for extended periods of sharpening.
Sharpening Bits of Different Lengths, Diameters, and Types
Drill Bits Of Different Sizes
Too many rotations of a small-diameter bit may result in incorrect sharpening and too few on a large bit may not sharpen enough. Continue to sharpen until the Chisel Edge is clean and straight and the entire surface from the Cutting Edges to the Heel is finely ground.
3/32-inch bits—use 2 to 4 half-turns,
1/8-inch bits—use 4 to 6 half-turns,
3/8-inch bits—use 16 to 20 half-turns.
Large Drill Bits
The Model 500X sharpens bits from 3/32 to 1/2 . (You can also purchase a Large Bit Chuck that sharpens bits up to 3/4 .) The Model 750X comes equipped with that Large-Bit Chuck. It sharpens bits from 3/32 to 3/4 inches.
Large bits are sharpened just like any other bit.
It is important to sharpen these bits so that the entire face of the drill bit is sharpened. A large bit requires more pressure and will require more half-turns to sharpen it.
Bits 1/2 or larger will need a minimum of 40 half turns. A 3/4 bit may require up to 60 half turns. It may take two or three complete sharpenings (repeat all steps) to re-sharpen a very dull or chipped large drill bit.
Your Drill Doctor is delivered with a 180-grit Diamond Sharpening Wheel. If you regularly sharpen larger bits between 12 and 34 , you may wish to purchase the coarser 100-grit Diamond Sharpening Wheel, which sharpens larger bits faster.
Short Drill Bits and Bits Smaller than 1/8"
Set the point angle for 118^ . Put the bit in the Chuck as normal, but tighten Chuck so that it is just snug enough for the bit to move freely. Push and hold the Alignment Button. Partially insert the Chuck in the Alignment Port, but do not push the Chuck all the way in. Use the Chuck Knob to rotate the bit until it can be held by the Bit Clamp Arms in the narrowest width of the bit. Make sure that the bit is touching the Drill Stop, then release the Alignment Button. Turn the Chuck until the Alignment Guide on the Chuck aligns with the 118^ notch on the Alignment Port. Now, push the Chuck the rest of the way in. Tighten the Chuck, remove, and tighten again.
Sharpen the small bit as usual.
Aligning and Sharpening Masonry Drill Bits
To sharpen a masonry bit, you do not turn the Chuck. Instead you insert the Chuck until it touches the wheel, remove, and repeat on the other side.
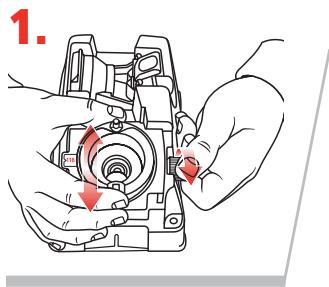
Set the point angle to 118^
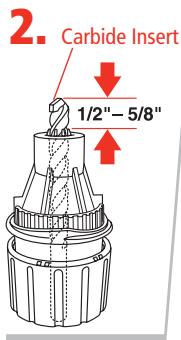
Masonry Sharpening Marks
Align the bit with the Masonry Sharpening Marks
Insert the bit into the Chuck and line up the carbide insert on the tip of the bit so that it is parallel to the Masonry Sharpening Marks on the end of
the chuck. Leave about 1 / 2^ - 5 / 8^ of bit sticking out past the nose of the chuck. Tighten the chuck just to the point that the bit slides in and out.
3. Set the depth
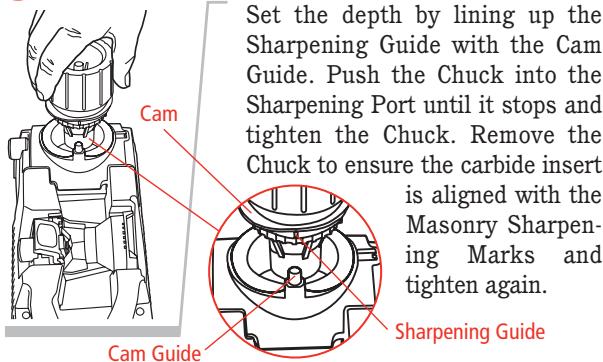
Set the depth by lining up the Sharpening Guide with the Cam Guide. Push the Chuck into the Sharpening Port until it stops and tighten the Chuck. Remove the Chuck to ensure the carbide insert
is aligned with the Masonry Sharpening Marks and tighten again.
Sharpening Guide
4. Sharpen by "plunging"
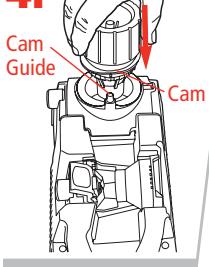
Line up the Sharpening Guide on the Chuck with the Cam Guide on the machine. Plunge the Chuck into the Sharpening Port until it touches the Sharpening Wheel. Remove the Chuck, rotate one half-turn clockwise and repeat the plunge action. Start with four plunges and always use an even number.
Inspect the bit and continue until the cutting surfaces are sharp. If the bit stops grinding before the edges are sharp, loosen the Chuck, push the bit out slightly. Make sure carbide insert is still aligned with Masonry Sharpening Marks. Tighten the Chuck, and continue sharpening.
Using the Variable Alignment to Adjust the Chisel and Relief Angles
Both Models 500X and 750X enable you to adjust the Chisel and Relief Angles of your drill bit. The Chisel and Relief Angles have a direct effect on the performance of your drill. By increasing the Relief Angle, you can increase the speed of the drill in softer materials. To improve the quality of the hole you can adjust the drill to be less aggressive. A less-aggressive drill has a lower Chisel and Relief Angle. Your Drill Doctor enables you to adjust both angles in one setting.
Chuck bit as usual
To prepare your bit for this fine adjustment, follow all the Steps for chucking your bit given previously in this User's Guide.
2. Insert Chack into Alignment Port
To adjust the Chisel and Relief Angles, simply align the bit as usual with the following adjustment;
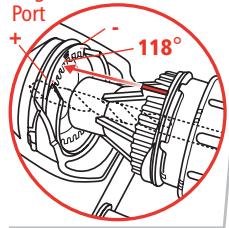
To increase Relief—position the Chuck in the Alignment Port so that the Alignment Guide is closer to the (+) position. This will make a more aggressive drill point.
To decrease Chisel and Relief—position the Chuck in the Alignment Port so that the Alignment Guide is closer
to the (-) position. This will make a more precise hole. Take care not to adjust Relief too far as this will actually cause the drill to lose all Relief and therefore not drill a hole. Each notch in the Alignment Port is approximately a 10^ change in Chisel Angle.
3. Adjust bit position, tighten Chuck, and sharpen as usual
Refer to pages 9-10 for these Steps. Experiment with a few different settings to find the one that best suits your drill bits and application. You may find it helpful to mark this setting for future use.
Using the Variable Material Take-Off (MTO)
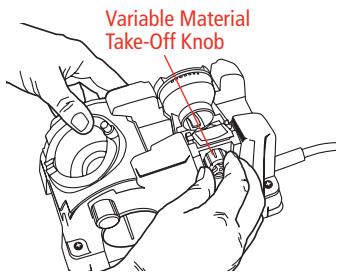
The Model 750X enables you to remove more or less material from the tip of your bit when you sharpen. If your bit is only slightly dull and you simply wish to "touch up" its point, turn the Material Take-Off Knob
clockwise to reduce the amount of time it takes to sharpen the bit. If your drill bit is quite dull or damaged, turn the Material Take-Off Knob counter-clockwise to increase the amount of material removed. Your MTO adjusts from 0 to .040 of an inch in increments of .005. Prior to aligning the bit, turn the MTO Knob counter-clockwise until it stops. (This is the maximum material that can be removed in one sharpening.) Then turn it clockwise 3 marks on the MTO knob. This is a good place to start for most bits.
Now turn the MTO knob either direction to adjust the desired MTO. Each mark on the MTO knob is equal to .005" change in material removed from the bit.
Note: After you have sharpened your bits on the Drill Doctor at least one time, it is desirable to turn the MTO Knob such that only a small amount of material is removed from the bit each time you sharpen. This will significantly decrease the time to sharpen as well as extend your bit and wheel life. Once you've made your adjustment, align and sharpen your bit as usual.
Questions and Answers
1. Question:
Why was my drill bit sharpened improperly?
Answer:
The most common cause of improper sharpening is drill bit alignment.
Key causes are:
- Chuck not pushed all the way into the Alignment Port.
- Drill not aligned in the Chuck Jaws correctly.
- The type of drill requires an angle adjustment to achieve the desired Chisel and Relief Angles. Try using the Variable Alignment to adjust the Chisel and Relief Angle (see page 19).
- Chuck is dirty or the bit slipped out of alignment. See pg 25, "Cleaning the Chuck."
- Too many rotations of a small-diameter bit results in incorrect sharpening, and too few on a large bit may not sharpen enough. See page 16, "Drill Bits of Different Sizes."
2. Question:
When I aligned the drill bit and sharpened it, why was no material removed?
Answer:
This happens when the bit is not protruding out of the Chuck far enough. You may have allowed the Alignment Button to knock the drill back into the Chuck when aligning the bit. Carefully realign the bit in the Alignment Port again. Make sure the drill bit is pushed all the way against the Drill Stop before you release the Alignment Button
3. Question:
I sharpened the bit. Why will it not cut?
Answer:
This happens when the Heel on the bit is higher than the Cutting Edge (negative relief). To correct this problem, follow the instructions in "Using the Variable Alignment to Adjust the Chisel and Relief Angle" on page 19.
You may have a specialty drill bit. Slow and Fast Spiral, Helix, Turbo Flutes, and Raised Margin drill bits are considered specialty bits. If you're getting insufficient relief on specialty bit types, try aligning all the way in the (+) setting on the alignment port. This will help improve the sharpening on these types of bits.
4. Question:
What can I do about flat spots on the bit point between the Cutting Edge and the Heel?
Answer:
The flat spots on a sharpened bit are the result of an incomplete or paused half-turn of the Chuck in the Sharpening Port. To correct, apply light, inward pressure and rotate the Chuck smoothly while sharpening. Be sure to complete the half-turns.
5. Question:
Why is the drill point off center?
Answer:
If the tip of the drill bit appears to be sharpened off center, check the following items:
- You may not have done an even number of half-turns when you sharpened and one face of the bit was ground more than the other. Always use an even number of half-turns when you sharpen.
- Make sure that there are no particles between the Chuck Jaws and the drill bit that could hold it off center. Check the drill to ensure it is straight and free of burrs.
- Make sure the bit is not loose in the Chuck.
- During the sharpening process be sure to keep the same pressure on each half-turn.
6. Question:
Why is the chisel edge on my drill bit flat?
Answer:
During the alignment process the Bit Clamps were gripping the high points of the drill bit. Realign the drill bit making sure that the Bit Clamps are located in the narrowest section of the bit. See page 10.
7. Question:
Why was my drill bit sharpened improperly?
Answer:
The most common cause of improper sharpening is improper drill bit alignment.
Key causes are:
- Drill point not pushed all the way to the Drill Stop.
- Chuck not pushed all the way into the Alignment Port.
- Drill not aligned in the Bit Clamps correctly.
In order to correct these problems be sure the Chuck is all the way in the Alignment Port. The drill point must be against the Drill Stop and the Bit Clamps must be at the narrowest part of the drill bit.
8. Question:
Why is my split point uneven?
Answer:
Page 15 shows a drill point that is undersplit and a drill point that is correctly split. To correct an uneven point split, insert the Chuck into the Splitting Port and split both sides again. Push the Chuck into the Port until it stops. Repeat until the split sides are equal and look like the correctly split bit shown above.
9. Question:
Why does the drill bit back up into the Chuck during the sharpening procedure?
Answer:
Make sure the bit is tight in the Chuck before sharpening. Your Chuck may be dirty. Follow the steps for cleaning the Chuck on page 25.
10. Question:
When splitting, why don't I hear a grinding sound?
Answer:
The Chuck is not seated properly in the Splitting Port. The Chuck's Sharpening Guide must line up with the Splitting Guide on the top of the Split Point Port. Firmly and slowly push the Chuck into the hole until the grinding sound stops.
11. Question:
Can I change a 135^ drill bit into a 118^ drill bit?
Answer:
You can change the degree angle of any drill bit from 135^ to 118^ . The alignment and sharpening procedure will need to be performed three or more times to remove the old angle and produce the new angle desired.
Drill Doctor Maintenance
After sharpening 20 to 25 drill bits, the drill bit grinding dust will accumulate in the grinding compartment. Grinding particles will promote wear in the Sharpening Port and Chuck, so cleaning on a consistent basis can add life to your machine. Before any maintenance or cleaning is performed, be sure to disconnect your Drill Doctor.
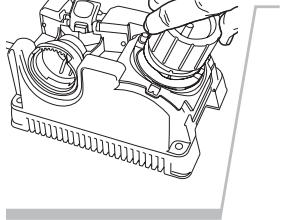
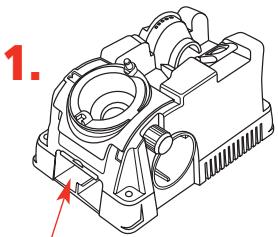
Removing the Wheel Access Cover
With the Drill Doctor unplugged, use your nail or the tip of your finger to pull the Wheel Access Cover down. It will come completely off for easy access. To close, insert the Cover in the slots and snap it back into place.
Cleaning Your Drill Doctor
With the Drill Doctor unplugged, shake accumulated drill bit grinding dust from behind the Wheel Cover into a disposable container. Remove dust particles around the wheel with a small, dry brush. Dispense of the container and drill bit dust in a safe and environmentally approved manner. With a dry cloth wipe the inside and outside of the Sharpening Port to remove any grinding dust that may have accumulated. A standard 1" vacuum hose works equally well.
You can also use the Grit Tube attachment as shown on page 16.
Cleaning the Chuck
With compressed air, blow out the Chuck from the Knob end or brush out with a small, dry brush.
Determining if Replacing the Diamond Sharpening Wheel is Required
You can double the life of the Diamond Sharpening Wheel by reversing it before you replace it. The Sharpening Wheel supplied with the Drill Doctor is designed to give you long and trouble free service, with an average of more than 200 sharpenings for 3 / 32'' to 1 / 2'' drill bits.
The Diamond Sharpening Wheel may need to be changed if:
- Sharpened drill bits burn or turn blue no matter how fast or slow you rotate the Chuck.
- When touching the Sharpening Wheel (with the machine unplugged), the lower portion feels too smooth (nonabrasive).
- When sharpening the drill bit, it takes too many half-turns to sharpen.
Contact the store or dealer where you purchased the Drill Doctor, or contact Drill Doctor directly, to purchase a replacement Sharpening Wheel.
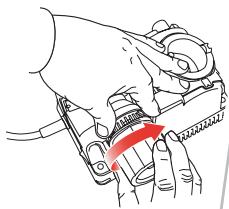
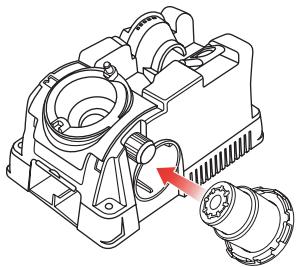
Reversing or Replacing Your Diamond Sharpening Wheel
Wheel Access Cover
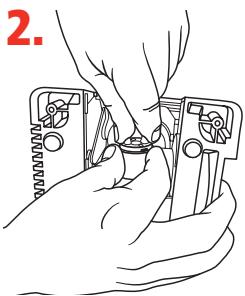
Unplug your Drill Doctor, make sure machine is cool, then remove wheel cover.
Drill Doctor seen from below.
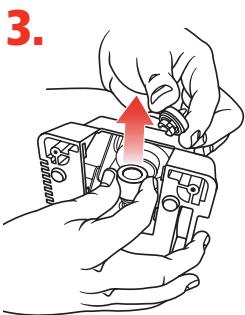
Turn the Quick Change Knob clockwise while holding the Sharpening Wheel to keep it from turning.
Drill Doctor seen from below.
Remove the wheel, replace, and tighten the Quick Change Knob by turning counter-clockwise while holding the wheel to keep it from spinning.
Accessories
Order accessories through our website: www.DrillDoctor.com, or by contacting us at the phone number listed on the Warranty page (page 28), or at the retailer where you purchased your Drill Doctor.
3/32" to 3/4" Large Bit Chuck
Part # DA70100PF
3/32" to 1/2" Left-handed Bit Chuck
(for 3/32"-1/2" reverse twist drill bits)
Part # DA02105PF
Standard Diamond Sharpening Wheel
(180 grit)
Part # DA31320GF
Coarse Diamond Sharpening Wheel
(100 grit)
Part # DA3132GF
WARNING:
The use of any accessory other than one recommended in this user's manual may present a risk of personal injury.
Drill Doctor Warranty
USA and Canada Only
See Warranty Card insert for countries outside the USA and Canada.
Your Drill Doctor is warranted to be free of defects due to workmanship or design for 3 years from the purchase date. If your Drill Doctor fails to operate, or if any operating problem occurs, contact Drill Doctor Technical Service at:
1-888-693-7455 (toll-free USA and Canada only)
1-541-552-1301
Please call 8:00 AM - 3:30 PM Pacific Time.
Do not return this product to the store where you purchased it. Do not attempt any service or repairs other than those suggested by a Drill Doctor Technical Service Representative (TSR). During the period of warranty, Drill Doctor will, at our discretion, repair or replace this product free of charge and refund postage or shipping charges providing that the following conditions are met:
- A copy of the proof of purchase is provided.
- The product has been operated for the purpose intended as described in the operating instructions and has not been abused or mishandled in any way.
- The product has not been dismantled and no service or repairs have been attempted other than those suggested by a Drill Doctor TSR.
- The Return Goods Authorization number (RGA #) (assigned by the Drill Doctor TSR) is written on the shipping label. Please make certain to package items in such a way as to eliminate further damage during shipping. Ship via a traceable carrier and properly insure the package.
No CODs are accepted. Unapproved shipping charges are non-refundable.
Complete and mail back the Warranty Registration & Customer Survey, or register online at:
www.DrillDoctor.com
Please Fill in the Following for Your Records.
Drill Doctor Model #:
Date of Purchase: / /
Purchased from:
Índice
English 1
Espanol 29
Familiarices con su Drill Doctor 34
President, Drill Doctor
Ashland, Oregon 97520
EE.UU.
FAX: 541-552-1377
Correo electrónico: tech@drillDoctor.com
ADVERTENCIA:
Favor delenar lofollowingeparasusrecords.
The Drill Bit Sharpener
Phone/Telefono/Telphone:
1-888-MYDRILL (693-7455)
Professional Tool Manufacturing, LLC
P.O.Box 730
210 E. Hershey St.
Ashland, OR 97520
USA
tech@DrillDoctor.com
Drill Doctor ® is a registered trademark of
Professional Tool Manufacturing, LLC.
Professional Tool Manufacturing, LLC.
Professional Tool Manufacturing, LLC.

Drill Doctor
The Drill Bit Sharpener
Phone/Telefono/Telephone:
1-888-MYDRILL (693-7455)
Professional Tool Manufacturing, LLC
P.O.Box 730
210 E. Hershey St.
Ashland, OR 97520
USA
tech@DrillDoctor.com
Drill Doctor ® is a registered trademark of
Professional Tool Manufacturing, LLC.
Drill Doctor es unamarcacommercial registrada de
Professional Tool Manufacturing, LLC.
Professional Tool Manufacturing, LLC.