
ETS 125 REQ-PLUS - Orbital sander FESTOOL - Free user manual and instructions
Find the device manual for free ETS 125 REQ-PLUS FESTOOL in PDF.

| Product type | Random orbital sander |
| Brand | FESTOOL |
| Model | ETS 125 REQ-PLUS |
| Nominal power | 250 W |
| Supply voltage | 120 V / 60 Hz |
| No-load speed | 6000 - 12000 rpm |
| Maximum speed | 16000 rpm |
| Sanding stroke | 2.0 mm (5/64") |
| Pad diameter | 125 mm (5") |
| Weight (without cable) | 1.2 kg (2.6 lbs) |
| Protection class | II (double insulation) |
| Abrasive attachment | StickFix (hook and loop) |
| Dust extraction system | Integrated with Longlife bag or vacuum hose connection (Ø 27 mm) |
| Electronic functions | Soft start, constant speed control, variable speed adjustment via thumbwheel |
| Edge guard | Yes (Protector) |
| Sanding type | Dry sanding only |
| Compatible materials | Wood, plastic, stone, composites, paints, varnishes, fillers |
| Prohibited materials | Metal and asbestos |
| Supplied in | Systainer (stackable case) |
| Cable length | Not specified (detachable Plug-it cable) |
Frequently Asked Questions - ETS 125 REQ-PLUS FESTOOL
User questions about ETS 125 REQ-PLUS FESTOOL
0 question about this device. Answer the ones you know or ask your own.
Ask a new question about this device
Download the instructions for your Orbital sander in PDF format for free! Find your manual ETS 125 REQ-PLUS - FESTOOL and take your electronic device back in hand. On this page are published all the documents necessary for the use of your device. ETS 125 REQ-PLUS by FESTOOL.
USER MANUAL ETS 125 REQ-PLUS FESTOOL
Instruction manual - Eccentric sander
Page 6
IMPORTANT: Read all instructions before using.
Original operating manual
About this manual. 6
Symbols 7
Safety instructions 8
General safety instructions 8
Machine-related safety instructions ... 9
Health hazard by dust 9
Intended use 10
Technical data 10
Functional description 10
Commissioning 11
Settings 11
Electronics 11
Replacing the sanding pad [3] 11
Attaching sanding accessories using StickFix [4] 12
Dust extraction 12
Working with the machine. 14
Service and maintenance 14
Accessories 15
Environment 16
About this manual
Save these instructions
It is important for you to read and understand this manual. The information it contains relates to protecting your safety and preventing problems. The symbols below are used to help you recognize this information.
| DANGER | Description of imminent hazard and failure to avoid hazard will result in death. |
| WARNING | Description of hazard and possible resulting injuries or death. |
| CAUTION | Description of hazard and possible resulting injuries. |
| NOTICE | Statement including nature of hazard and possible result. |
| HINT | Indicates information, notes, or tips for improving your success using the tool. |
Symbol Significance

Warning of general danger
Risk of electric shock

Read operating instructions and safety notices!

Wear ear protection.

Wear a dust mask.

Wear protective goggles.

Do not dispose of as domestic waste.

Tip or advice

Handling instruction
Symbol Significance

Safety class II
V
volts
A
amperes
Hz
hertz
\~a.c.
alternating current
--- d.c.
direct current
n 0
no load speed
rpm
revolutions per minute
min-1
”
inch
lbs
pound

diameter
^ C
degree centigrade
^ F
degree Fahrenheit
Nm
Newton metre
mm
millimetre
Ah
ampshour
General safety instructions
WARNING Read all safety warnings, instructions, illustrations and specifications provided with this power tool. Failure to follow all instructions listed below may result in electric shock, fire and/or serious injury.
Save all warnings and instructions for future reference.
The term "power tool" in the warnings refers to your mains-operated (corded) power tool or battery-operated (cordless) power tool.
1 WORK AREA SAFETY
a. Keep work area clean and well lit. Cluttered or dark areas invite accidents.
b. Do not operate power tools in explosive atmospheres, such as in the presence of flammable liquids, gases or dust. Power tools create sparks which may ignite the dust or fumes.
c. Keep children and bystanders away while operating a power tool. Distractions can cause you to lose control.
d. Never leave the power tool unattended. Only leave the power tool when the tool in use has come to a complete standstill.
2 ELECTRICAL SAFETY
a. Power tool plugs must match the outlet. Never modify the plug in any way. Do not use any adapter plugs with earthed (grounded) power tools. Unmodified plugs and matching outlets will reduce risk of electric shock.
b. Avoid body contact with earthed or grounded surfaces, such as pipes, radiators, ranges and refrigerators. There is an increased risk of electric shock if your body is earthed or grounded.
c. Do not expose power tools to rain or wet conditions. Water entering a power tool will increase the risk of electric shock.
d. Do not abuse the cord. Never use the cord for carrying, pulling or unplugging the power tool. Keep cord away from heat, oil, sharp edges or moving parts. Damaged or entangled cords increase the risk of electric shock.
e. When operating a power tool outdoors, use an extension cord suitable for outdoor use. Use of a cord suitable for outdoor use reduces the risk of electric shock.
f. If operating a power tool in a damp location is
unavoidable, use a residual current device (RCD) protected supply. Use of an RCD reduces the risk of electric shock.
3 PERSONAL SAFETY
a. Stay alert, watch what you are doing and use common sense when operating a power tool. Do not use a power tool while you are tired or under the influence of drugs, alcohol or medication. A moment of inattention while operating power tools may result in serious personal injury.
b. Use personal protective equipment. Always wear eye protection. Protective equipment such as a dust mask, non-skid safety shoes, hard hat or hearing protection used for appropriate conditions will reduce personal injuries.
c. Prevent unintentional starting. Ensure the switch is in the off-position before connecting to power source and/or battery pack, picking up or carrying the tool. Carrying power tools with your finger on the switch or energising power tools that have the switch on invites accidents.
d. Remove any adjusting key or wrench before turning the power tool on. A wrench or a key left attached to a rotating part of the power tool may result in personal injury.
e. Do not overreach. Keep proper footing and balance at all times. This enables better control of the power tool in unexpected situations.
f. Dress properly. Do not wear loose clothing or jewellery. Keep your hair and clothing away from moving parts. Loose clothes, jewellery or long hair can be caught in moving parts.
g. If devices are provided for the connection of dust extraction and collection facilities, ensure these are connected and properly used. Use of dust collection can reduce dust-related hazards.
h. Do not let familiarity gained from frequent use of tools allow you to become complacent and ignore tool safety principles. A careless action can cause severe injury within a fraction of a second.
4 POWER TOOL USE AND CARE
a. Do not force the power tool. Use the correct power tool for your application. The correct power tool will do the job better and safer at the rate for which it was designed.
b. Do not use the power tool if the switch does not turn it on and off. Any power tool that cannot be controlled with the switch is dangerous and must be repaired.
c. Disconnect the plug from the power source and/ or remove the battery pack, if detachable, from the power tool before making any adjustments, changing accessories, or storing power tools. Such preventive safety measures reduce the risk of starting the power tool accidentally.
d. Store idle power tools out of the reach of children and do not allow persons unfamiliar with the power tool or these instructions to operate the power tool. Power tools are dangerous in the hands of untrained users.
e. Maintain power tools and accessories. Check for misalignment or binding of moving parts, breakage of parts and any other condition that may affect the power tool's operation. If damaged, have the power tool repaired before use. Many accidents are caused by poorly maintained power tools.
f. Keep cutting tools sharp and clean. Properly maintained cutting tools with sharp cutting edges are less likely to bind and are easier to control.
g. Use the power tool, accessories and tool bits etc. in accordance with these instructions, taking into account the working conditions and the work to be performed. Use of the power tool for operations different from those intended could result in a hazardous situation.
h. Keep handles and grasping surfaces dry, clean and free from oil and grease. Slippery handles and grasping surfaces do not allow for safe handling and control of the tool in unexpected situations.
5 SERVICE
a. Have your power tool serviced by a qualified repair person using only identical replacement parts. This will ensure that the safety of the power tool is maintained.
b. Only use original Festool parts for repair and maintenance. The use of incompatible accessories or spare parts can result in electric shocks or other injuries.
Machine-related safety instructions
- Dust that is harmful to your health may be produced as you work (e.g. paint products containing lead and some types of wood). Contact with or inhalation of this dust may pose a risk for the operating personnel or persons in the vicinity. Observe the safety regulations that apply in your country.

Wear a P2 respiratory mask to protect your health. In enclosed spaces, ensure that there is sufficient ventilation and connect an extraction system.

Always wear protective goggles to protect against sanding hazards.
- Clean work equipment soaked in oils, for example sanding pad or polishing felt, with water and allow to dry. Work equipment soaked in oil may combust spontaneously.
- Attention: Risk of fire! Avoid overheating the grinding material and the sander. Always empty the dust container before taking a break. Swarf in the filter bag or filter of the mobile dust extractor may self-ignite in unfavourable conditions such as flying sparks when grinding metals. Particular danger exists if the swarf is mixed with paint, polyurethane residue or other chemical materials and the grinding material is hot after long periods of work.
- If the power tool is dropped or falls, check for damage to the machine and sanding pad. Remove the sanding pad for closer inspection. Repair damaged parts before using again. Broken sanding pads and damaged machines can cause injuries and machine instability.
- Always use original Festool sanding pads. Foreign pads are not suitable for the speed of the sander and may break.
Health hazard by dust

WARNING! Various dust created by power sanding, sawing, grinding, drilling and other construction activities contains chemicals
known (to the State of California) to cause cancer, birth defects or other reproductive harm. Some examples of these chemicals are:
- lead from lead-based paints,
crystalline silica from bricks and cement and other masonry products, and - arsenic and chromium from chemically treated lumber.
The risk from these exposures varies, depending on how often you do this type of work. To reduce your exposure to these chemicals: work in a well ventilated area, and work with ap
proved safety equipment, such as dust masks that are specially designed to filter out microscopic particles. Wash hands after handling.

WARNING
TO REDUCE THE RISK OF INJURY, USER MUST READ INSTRUCTION MANUAL.
Intended use
The sanders are designed for sanding wood, plastic, stone, composites, paint/varnish, filler and similar materials as directed. Metals and materials that contain asbestos must not be processed.
To guarantee electrical safety, the machine must not be damp or operated in a damp environment. The machine must only be used for dry sanding.

The user is liable for improper or non-intended use.
Technical data
| Eccentric sander | ETS 125 REQ |
| Power | 250 W |
| No-load speed | 6000 - 12000 min-1 |
| Max. speed1 | 16000 min-1 |
| Sanding stroke | 5/64" (2.0 mm) |
| Sanding pad | Dia 5" (125 mm) |
| Weight (without mains cable, with sanding pad) | 2.6 lbs (1.2 kg) |
| Safety class | ☐ /II |
- Max. speed in the event of faulty electronics.
Functional description
The pictures for the functional description are on a fold-out page at the beginning of the instruction manual. While reading the manual you can fold out the page for comparison and quick reference.
[1-1] On/Off switch
[1-2] Plug it-connection
[1-3] Speed control
[1-4] Extractor connector
[1-5] Sanding pad
[1-6] Protector
[1-7] Long-life dust bag
[1-8] Dust bag adapter
[1-9] Handle (insulated gripping surface)
Accessories shown or described are sometimes not included in the scope of delivery.

WARNING
Unauthorised voltage or frequency!
Risk of accident
The mains voltage and the frequency of the power source must correspond with the specifications on the machine's name plate.
In North America, only Festool machines with the voltage specifications 120 ~V / 60 ~Hz may be used.
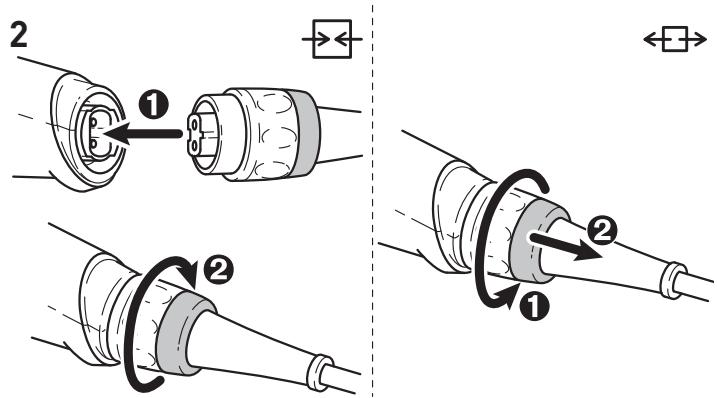
Connecting and detaching the mains power cable - see Fig. [2].
The switch [1-1] is an on/off switch (I = ON, 0 = OFF).
In case of a power failure or if the mains connector is removed, move the on/off switch immediately to the Off position. This prevents uncontrolled restarting.
Settings

WARNING
Risk of injury, electric shock
Always pull the mains plug out of the socket before performing any type of work on the machine!
Electronics
Smooth start-up
The electronically controlled smooth start-up ensures that the machine starts up jolt-free.
Constant speed
The preselected motor speed is kept constant through electronic control. This means that, if the machine is used as intended (reasonable contact pressure), a constant sanding speed is achieved.
Setting and adjusting the speed
The speed can be set [1-3] between 6000 and
12000 ^-1 using the adjusting wheel.
This enables you to optimise the sanding speed to suit the material (see chapter Working with the machine).
Replacing the sanding pad [3]
An optimal work result can only be achieved using original accessories and consumables. The use of non-original accessories or consumables invalidates the right to claim under warranty.
Warning! Do not perform any structural changes in the open interior space of the machine when the sanding pad is dismantled.
Undo the four screws.
Remove the sanding pad by pulling it downwards.
3 Attach the new sanding pad.
Use four screws to tighten it by hand (2.5 Nm).
![FESTOOL ETS 125 REQ-PLUS - Replacing the sanding pad [3] - 1](/content/2019/10/17287/images/f67253158f90b0dcbaa93ea03c41c64994ef9096924e1866d0f2c782ce853248.jpg)
3
Hardness of the sanding pad
Adapted to the surface being processed, the machine can be equipped with sanding pads of different hardnesses.
Soft: Universal for coarse and fine sanding, for flat and convex surfaces.
Extra-soft: Fine sanding of moulded parts, arches, radii. Do not use on edges.
Attaching sanding accessories using Stick-Fix [4]
The suitable StickFix sandpaper and StickFix sand-ing cloth can be attached quickly and simply to the StickFix sanding pad.
Press the self-adhesive sanding accessory onto the sanding pad [1-5].
![FESTOOL ETS 125 REQ-PLUS - Attaching sanding accessories using Stick-Fix [4] - 1](/content/2019/10/17287/images/d3e4a6b09423f27edc5f773e73eb992cf1f3aa327eb589e3d0f7d738772a4e9a.jpg)
In the case of a weakening adhesive effect of the StickFix surface, the sanding pad acces-
sories, in particular those which are not yet touching the workpiece, may come loose from the sanding pad and cause injuries. Replace the sanding pad!
![FESTOOL ETS 125 REQ-PLUS - Attaching sanding accessories using Stick-Fix [4] - 2](/content/2019/10/17287/images/0531ac4811089194d2ba6a30a1b60b36ec9ca5bc15e807e0050c19a2ce87ff17.jpg)
4
Dust extraction
![FESTOOL ETS 125 REQ-PLUS - Attaching sanding accessories using Stick-Fix [4] - 3](/content/2019/10/17287/images/df0243dc98e5f32d42aef3fb9c99a093017ae0cc43f82a970efc2752842c56fa.jpg)
WARNING
Dust hazard
Dust can be hazardous to health. Always work with a dust extractor.
Always read applicable national regulations before extracting hazardous dust.
Integral dust extractor with long-life dust bag
As standard, the sanders are equipped with an integral dust extractor. The sanding dust is extracted through extraction openings in the sanding pad and is collected in the dust bag.
Installing the dust bag [5]
Slide the dust bag adapter onto the extractor connection piece.
Slide the dust bag onto the adapter until it clicks into place.
![FESTOOL ETS 125 REQ-PLUS - Installing the dust bag [5] - 1](/content/2019/10/17287/images/a3af6e51e547e618ccc33fd5404920b82195075e07d62b39a13ba351ce860aae.jpg)
5
Dust extraction with Festool's mobile dust extractor
To prevent having to frequently empty the dust bag when carrying out sanding work for a long period of time, you can connect Festool's mobile dust extractor (with an extraction hose diameter of 27 ~mm ) to the extractor connection piece [1-4].
Recommendation: Use anti-static extractor hose! This helps reduce the electric charge.
Edge protector [6]
![FESTOOL ETS 125 REQ-PLUS - Edge protector [6] - 1](/content/2019/10/17287/images/aa89299dfe45aa71e6ef0b99ab8fea7f55d62bab49222dd6eb1e39055b49ccf1.jpg)
![FESTOOL ETS 125 REQ-PLUS - Edge protector [6] - 2](/content/2019/10/17287/images/2642ea616b88090d2f7a0d522d67c186284b88566c45d0d4becda80a38fa3bc6.jpg)
If the suction power is decreasing, empty the dust bag.
Press the dust bag onto the actuating elements.
2 Remove the dust bag by moving it towards the rear.
3 Open the flap on the dust bag.
Empty the dust bag and dispose of the waste.
![FESTOOL ETS 125 REQ-PLUS - Edge protector [6] - 3](/content/2019/10/17287/images/382f67372586c4faf3342b6dfcbe18fd11e32ca0217a08fa66040fa0503ed8cd.jpg)
![FESTOOL ETS 125 REQ-PLUS - Edge protector [6] - 4](/content/2019/10/17287/images/42125161c9d91a9c05b2a21ef8bbc9efcbfa3b5b5777654aec47ff26daa56f92.jpg)
![FESTOOL ETS 125 REQ-PLUS - Edge protector [6] - 5](/content/2019/10/17287/images/463297d1a25bbfead85c37ec5a468d5a79b03e5809843d37fedbf580f77a1f13.jpg)
![FESTOOL ETS 125 REQ-PLUS - Edge protector [6] - 6](/content/2019/10/17287/images/e9b18330a461591d7c429d6360cf6c5f2f12c1bec789e0728102d69144b9d96f.jpg)
The edge protector [1-6] prevents the sanding pad circumference from coming into contact with a surface (e.g. when sanding along a wall or a window), thus preventing back-kick of the machine, or machine damage.
![FESTOOL ETS 125 REQ-PLUS - Edge protector [6] - 7](/content/2019/10/17287/images/1b51d30fa551055b0de4a05f32727e16c587d11a37d034fc5a66c119113c104f.jpg)
![FESTOOL ETS 125 REQ-PLUS - Edge protector [6] - 8](/content/2019/10/17287/images/d64dfb0e98fd07476c96751613f88ff5d3a382a21e62d99711d9cd6c89e863c5.jpg)
![FESTOOL ETS 125 REQ-PLUS - Edge protector [6] - 9](/content/2019/10/17287/images/3e1cb9906fb668e6425998a4daf3a2d4ab9aa8cdaf313bc88ee62ea69b658cf7.jpg)
WARNING
Risk of injury
Always secure the workpiece in such a manner that it cannot move while being machined.
Observe the following instructions:
- Do not overload the machine by pressing with excessive force! The best sanding results are achieved with moderate application pressure. The sanding capacity and quality are mainly dependent on the selection of the correct abrasive.
- Hold the machine with one hand on the handle [1-9].
For sanding, we recommend the following settings for the adjusting wheel [1-3]:
Sanding work
Adjusting wheel setting
- Sanding with max. abrasion 5 - 6
- Sanding off old paint
- Sanding of wood and veneered surface prior to paintwork
- Intermediate sanding of paintwork on surfaces
Sanding work
Adjusting wheel setting
- Sanding thinly applied undercoat 4 - 5
- Sanding wood with sanding cloth
- Edge breaking on wooden parts
-
Smoothing primed wooden surfaces
-
Sanding solid wood and veneered edges 3 - 4
- Sanding rebate of windows and doors
- Intermediate sanding of paintwork at edges
- Light sanding of natural wood windows using sanding cloth
- Smoothing wooden surfaces using sand-ing cloth before staining
-
Rubbing or removing excess limestone residue using sanding cloth
-
Intermediate sanding of paintwork on 2-3 stained surfaces
- Cleaning natural wood window rebate using sanding cloth
- Sanding stained edges 1 - 2
- Sanding of thermoplastics
Service and maintenance

WARNING
Any maintenance or repair work that requires opening of the motor or gear housing should only be carried out by an authorised Customer Service Centre (name supplied by your dealer)!
- Maintenance or repair work carried out by an unauthorised person can lead to the wrong connection of the power cord or other components, which in turn can lead to accidents with serious consequences.

CAUTION
Certain cleaning agents and solvents are harmful to plastic parts.
- Some of these include, but are not limited to: Gasoline, Acetone, Methyl Ethyl Ketone (MEK), Carbonyl Chloride, cleaning solutions containing Chlorine, Ammonia, and household cleaners containing Ammonia.

WARNING
Risk of injury, electric shock
Always disconnect the battery pack from the machine before any cleaning or maintenance!
All maintenance and repair work which requires the motor housing to be opened, must only be carried out by an authorised service workshop.

Customer service and repair only through manufacturer or service workshops: Please find the nearest address at: www.festoolusa.com/service

Use only original Festool spare parts! Order No. at: www.festoolusa.com/service
The machine is equipped with special carbon brushes. If they are worn out, the power is interrupted automatically and the machine comes to a standstill.
To ensure constant air circulation, always keep the cooling air openings in the motor housing clean and free of any obstruction.
In the event of a slowdown in performance or increased vibrations, blow and clean cooling air openings.
Accessories
Use only original Festool accessories and Festool consumable material intended for this machine. These components are designed specifically for this machine. Using accessories and consumable material from other suppliers will most likely affect the quality of your results and limit warranty claims. Machine wear or your own personal workload may increase depending on the application. Protect yourself and your machine, and preserve your warranty claims by always using original Festool accessories and Festool consumable material!
The order numbers of the accessories and tools can be found in the Festool catalogue or on the Internet under "www.festoolusa.com".
Systainer
Many Festool products are shipped in a unique system container, called "Systainer". This provides protection and storage for the tool and accessories. The Systainers are stackable and can be inter
locked together. They also can be interlocked atop Festool CT dust extractors.
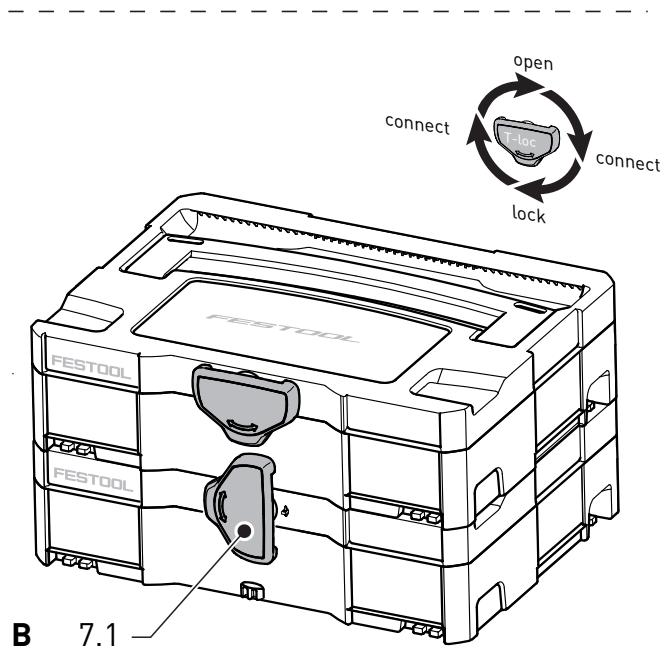
To open the Systainer

Turn the T-loc [7-1] to this position.
To lock the Systainer

Turn the T-loc [7-1] to this position.
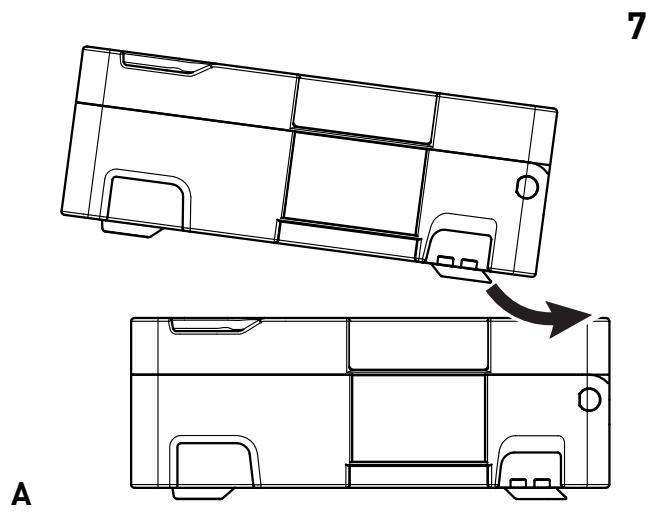
To connect two Systainers
Place one Systainer on the top of the other (Fig. [7 A]).

Turn the T-loc [7-1] to one of this positions (Fig. [7 B]).
The Systainers are connected and locked.
(1) A new generation Systainer is connectable on top of a previous generation Systainer by the four latches of the previous Systainer.
Environment
Do not dispose of the device as domestic waste!
Dispose of machines, accessories and packaging at
an environmentally responsible recycling centre.
Observe the respective national regulations.
--- d.c. courant continu
- Original operating manual
- About this manual
- Save these instructions
- Symbol Significance
- General safety instructions
- WORK AREA SAFETY
- ELECTRICAL SAFETY
- PERSONAL SAFETY
- POWER TOOL USE AND CARE
- SERVICE
- Machine-related safety instructions
- Health hazard by dust
- WARNING
- Intended use
- Technical data
- Functional description
- Unauthorised voltage or frequency!
- Risk of accident
- Settings
- Risk of injury, electric shock
- Electronics
- Smooth start-up
- Constant speed
- Setting and adjusting the speed
- Replacing the sanding pad [3]
- Hardness of the sanding pad
- Attaching sanding accessories using Stick-Fix [4]
- Dust hazard
- Integral dust extractor with long-life dust bag
- Installing the dust bag [5]
- 5
- Dust extraction with Festool's mobile dust extractor
- Edge protector [6]
- Risk of injury
- Observe the following instructions:
- Sanding work
- Adjusting wheel setting
- Service and maintenance
- Any maintenance or repair work that requires opening of the motor or gear housing should only be carried out by an authorised Customer Service Centre (name supplied by your dealer)!
- CAUTION
- Certain cleaning agents and solvents are harmful to plastic parts.
- Accessories
- Systainer
- To open the Systainer
- To lock the Systainer
- To connect two Systainers
- Environment
Brand : FESTOOL
Model : ETS 125 REQ-PLUS
Category : Orbital sander