
89 - DVD player CAMBRIDGE AUDIO - Free user manual and instructions
Find the device manual for free 89 CAMBRIDGE AUDIO in PDF.
User questions about 89 CAMBRIDGE AUDIO
0 question about this device. Answer the ones you know or ask your own.
Ask a new question about this device
Download the instructions for your DVD player in PDF format for free! Find your manual 89 - CAMBRIDGE AUDIO and take your electronic device back in hand. On this page are published all the documents necessary for the use of your device. 89 by CAMBRIDGE AUDIO.
USER MANUAL 89 CAMBRIDGE AUDIO
80 Series DVD Player
DVD player / DVD-Spieler / Lecteur de DVD / Reproductor DVD /
Lettore DVD/DVD-speller/Dvd-afspiller/DVD-npounrpbBaTeIb
User's manual / Bedienungsanleitung / Mode d'emploi / Manual del usuario /
Manuale per l'utente / Gebruikershandleiding / Brugermanual / Руховостwo ля польозатулу
English 2
Deutsch 28
Francais 54
Espanol. 80
Italiano 106
Nederlands 132
Dansk 158
Pycckn 184
CONTENTS
Introduction 3
Limited warranty. 4
Safety precautions 5
Important safety instructions 6
Rear panel connections. 7
Connection to a TV/Display 8
Connection to a TV/Display (With DVI-D/DVD89 only) 9
Connection to a TV/Display (With HDMI/DVD89 only) 10
Front panel controls. 13
Operating instructions (DVD menu display) 14
Operating instructions 16
Progressive Scan 19
Display settings. 20
Operations 21
DVD Audio 22
Using the remote handset (DVD85) 23
Using the remote handset (DVD89) 24
Troubleshooting 25
Specifications 26
INTRODUCTION
Congratulations on purchasing this Cambridge Audio 80 Series DVD player. We hope that you will enjoy many years of rewarding ownership.
The DVD85, 86 and 89 models all support normal CD and DVD discs, while the DVD89 is also a 'universal' player that supports DVD-Audio (DVD-A) and Super Audio CD (SACD). These new audiophile formats allow even greater sound quality than CD/DVD and also allow multichannel surround-sound audio.
In addition, the DVD85, 86 and 89 all support DivX® playback for good quality highly compressed video and audio often downloaded from the internet. The DVD89 also features the very latest DVD-D and HDMI outputs for true all digital transmission of video to the TV screen for the very best picture quality currently available.
To maximise the performance from this equipment we would encourage you to use only high quality viewing equipment, amplification and loudspeakers. Of course we particularly recommend amplification from the Cambridge Audio range, which has been designed to the same exacting standards as this DVD player.
Cabling is also an area that should not be overlooked. Please do not compromise your system's performance by using poor quality cables to connect either your DVD to your television and amplifier or the amplifiers' output to your loudspeakers. A system is only as good as its weakest link. Your dealer can supply quality Cambridge Audio interconnects that will ensure your whole system realises its full potential.
Thanks for taking the time to read this manual; we do recommend you keep it for future reference.

Matthew Bramble Technical Director
LIMITED WARRANTY
Cambridge Audio warrants this product to be free from defects in materials and workmanship (subject to the terms set forth below). Cambridge Audio will repair or replace (at Cambridge Audio's option) this product or any defective parts in this product. Warranty periods may vary from country to country. If in doubt consult your dealer and ensure that you retain proof of purchase.
To obtain warranty service, please contact the Cambridge Audio authorised dealer from which you purchased this product. If your dealer is not equipped to perform the repair of your Cambridge Audio product, it can be returned by your dealer to Cambridge Audio or an authorised Cambridge Audio service agent. You will need to ship this product in either its original packaging or packaging affording an equal degree of protection.
Proof of purchase in the form of a bill of sale or receipted invoice, which is evidence that this product is within the warranty period, must be presented to obtain warranty service.
This Warranty is invalid if (a) the factory-applied serial number has been altered or removed from this product or (b) this product was not purchased from a Cambridge Audio authorised dealer. You may call Cambridge Audio or your local country Cambridge Audio distributor to confirm that you have an unaltered serial number and/or you purchased from a Cambridge Audio authorised dealer.
This Warranty does not cover cosmetic damage or damage due to acts of God, accident, misuse, abuse, negligence, commercial use, or modification of, or to any part of, the product. This Warranty does not cover damage due to improper operation, maintenance or installation, or attempted repair by anyone other than Cambridge Audio or a
Cambridge Audio dealer, or authorised service agent which is authorised to do Cambridge Audio warranty work. Any unauthorised repairs will void this Warranty. This Warranty does not cover products sold AS IS or WITH ALL FAULTS.
REPAIRS OR REPLACEMENTS AS PROVIDED UNDER THIS WARRANTY ARE THE EXCLUSIVE REMEDY OF THE CONSUMER. CAMBRIDGE AUDIO SHALL NOT BE LIABLE FOR ANY INCIDENTAL OR CONSEQUENTIAL DAMAGES FOR BREACH OF ANY EXPRESS OR IMPLIED WARRANTY IN THIS PRODUCT. EXCEPT TO THE EXTENT PROHIBITED BY LAW, THIS WARRANTY IS EXCLUSIVE AND IN LIEU OF ALL OTHER EXPRESS AND IMPLIED WARRANTYES WHATSOEVER INCLUDING, BUT NOT LIMITED TO, THE WARRANTY OF MERCHANTABILITY AND FITNESS FOR A PRACTICAL PURPOSE.
Some countries and US states do not allow the exclusion or limitation of incidental or consequential damages or implied warranties so the above exclusions may not apply to you. This Warranty gives you specific legal rights, and you may have other statutory rights, which vary from state to state or country to country.
SAFETY PRECAUTIONS
Checking the Power Supply Rating
For your own safety please read the following instructions carefully before attempting to connect this unit to the mains.
Check that the rear of your unit indicates the correct supply voltage. If your mains supply voltage is different, consult your dealer.
This unit is designed to operate only on the supply voltage and type that is indicated on the rear panel of the unit. Connecting to other power sources may damage the unit.
This equipment must be switched off when not in use and must not be used unless correctly earthed. To reduce the risk of electric shock, do not remove the unit's cover (or back). There are no user serviceable parts inside. Refer servicing to qualified service personnel. If the power cord is fitted with a moulded mains plug the unit must not be used if the plastic fuse carrier is not in place. Should you lose the fuse carrier the correct part must be reordered from your Cambridge Audio dealer.
The lightning flash with the arrowhead symbol within an equilateral triangle is intended to alert the user to the presence of un-insulated 'dangerous voltage' within the product's enclosure that may be of sufficient magnitude to constitute a risk of electric shock to persons.


The exclamation point within an equilateral triangle is intended to alert the user to the presence of important operating and maintenance instructions in the service literature relevant to this appliance.
This product complies with European Low Voltage (73/23/EEC) and Electromagnetic Compatibility (89/336/EEC) Directives when used and installed according to this instruction manual. For continued compliance only Cambridge Audio accessories should be used with this product and servicing must be referred to qualified service personnel.

The crossed-out wheeled bin is the European Union symbol for indicating separate collection for electrical and electronic equipment. This product contains electrical and electronic equipment which should be reused, recycled or recovered and should not be disposed of with unsorted regular waste. Please return the unit or contact the authorised dealer from whom you purchased this product for more information.

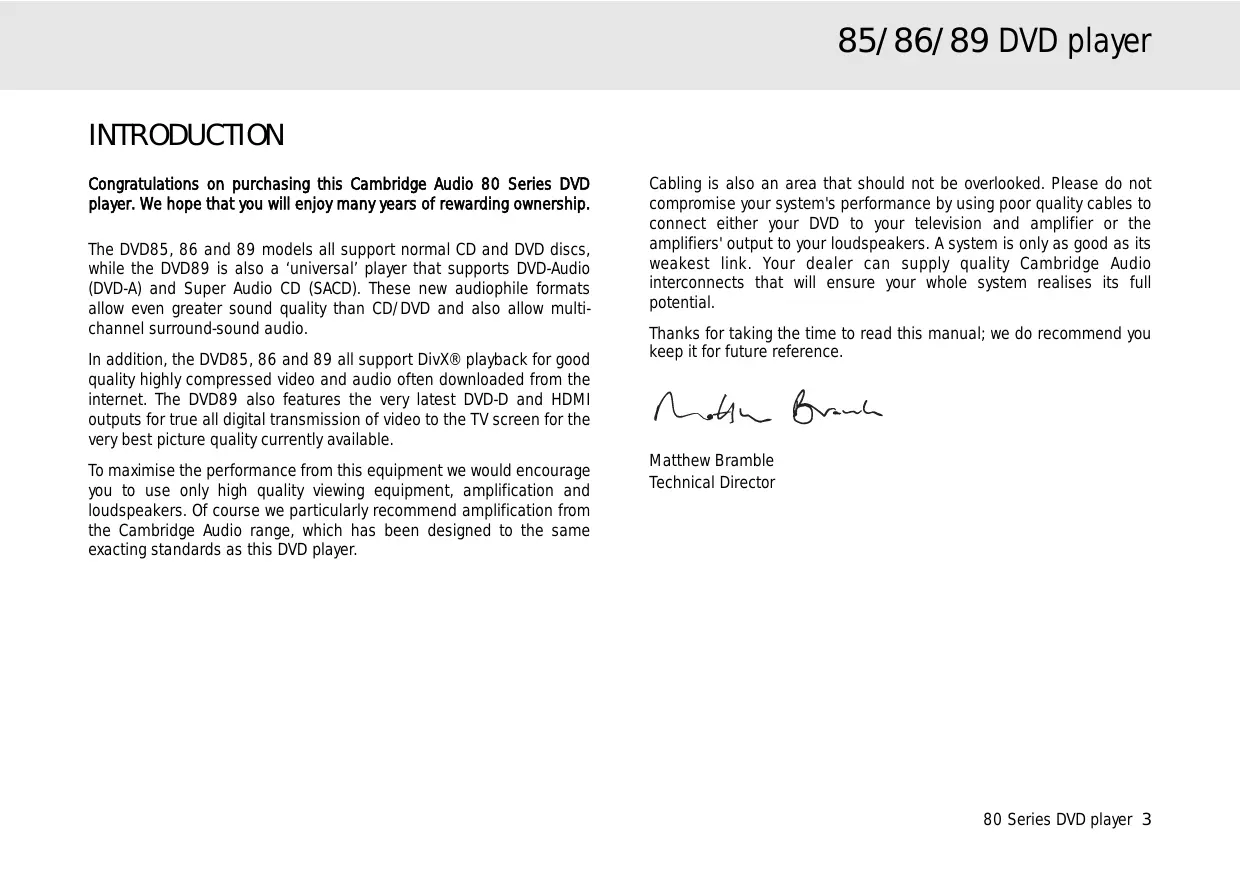
Plug Fitting Instructions (UK Only)
The cord supplied with this appliance is factory fitted with a 13 amp mains plug fitted with a 3 amp fuse inside. If it is necessary to change the fuse, it is important that a 3 amp one is used. If the plug needs to be changed because it is not suitable for your socket, or becomes damaged, it should be cut off and an appropriate plug fitted following the wiring instructions below. The plug must then be disposed of safely, as insertion into a 13 amp socket is likely to cause an electrical hazard. Should it be necessary to fit a 3-pin BS mains plug to the power cord the wires should be fitted as shown in this diagram. The colours of the wires in the mains lead of this appliance may not correspond with the coloured markings identifying the terminals in your plug. Connect them as follows:
The wire which is coloured BLUE must be connected to the terminal which is marked with the letter 'N' or coloured BLACK.
The wire which is coloured BROWN must be connected to the terminal which is marked with the letter 'L' or coloured RED.
The wire which is coloured GREEN/YELLOW must be connected to the terminal which is marked with the letter 'E' or coloured GREEN.
If your model does not have an earth wire, then disregard this instruction.
If a 13amp (BS 1363) plug is used, a 3amp fuse must be fitted, or if any other type of plug is used a 3amp or 5amp fuse must be fitted, either in the plug or adaptor, or on the distribution board.
IMPORTANT SAFETY INSTRUCTIONS
Please take a moment to read these notes before installing your DVD player, they will enable you to get the best performance and prolong the life of the product. We advise you follow all instructions, heed all warnings and keep the instructions for future reference.
The unit is of Class 1 construction and must be connected to a Mains socket outlet with a protective earthing connection. This unit must be installed on a sturdy, level surface.
The unit requires ventilation. Do not situate it on a rug or other soft surface and do not obstruct any air inlets or outlet grills. Do not place in a sealed area such as a bookcase or in a cabinet. Any space open at the back (such as a dedicated equipment rack) is fine however.
WARNING - To reduce the risk of fire or electric shock, do not expose this unit to rain or moisture. This unit must not be exposed to dripping or splashing water or other liquids. No objects filled with liquid, such as vases, shall be placed on the unit. In the event, switch off immediately, disconnect from the mains supply and contact your dealer for advice.
To clean the unit, wipe its case with a dry, lint-free cloth. Do not use any cleaning fluids containing alcohol, ammonia or abrasives. Do not spray an aerosol at or near your DVD player.
Ensure that small objects do not fall through any ventilation grille. If this happens, switch off immediately, disconnect from the mains supply and contact your dealer for advice.
Do not route the power cable so that it can be walked upon or damaged by other items near it.
If you do not intend to use this unit for a long period, switch it to Standby and unplug it from the mains socket. Also unplug the unit during lightning storms.
Refer all servicing to qualified service personnel. Servicing is required when the unit has been damaged in any way, such as a damaged power-supply cord or plug, liquid has been spilled or objects have fallen into the unit, the unit has been exposed to rain or moisture, does not operate normally, or has been dropped.
If you have checked the Troubleshooting guide in the manual with no improvement, do not attempt to repair, disassemble or reconstruct the unit. A serious electric shock could result if this precautionary measure is ignored.
REAR PANEL CONNECTIONS

Video Connections
The DVD85 is equipped with Composite (CVBS), S-Video (SVHS), SCART (RGB and CVBS) and Component Video (YC_bC_r) connections. The DVD89 also incorporates DVI-D and HDMI Digital Video Interfaces.
Audio Connections
Digital outputs - The DVD89 also incorporates optical and a coaxial digital output. These allow for a digital soundtrack on a DVD disc to be sent to a suitably equipped AV receiver for decoding and amplification. Both outputs perform the same function- simply choose the type that best suits your needs.
Analogue outputs - Both units have a conventional stereo RCA (phono) out that outputs stereo audio for connection to a conventional stereo amplifier. Also a six channel decoded output is featured in Dolby Digital 5.1 format that enables connection to a suitable 6 channel amplifier. SACD and DVD audio disc will only output through the 5.1 analogue outs. See 'An Introduction to DVD Audio' on page 22.
Note: A DTS encoded disc will only output the DTS soundtrack through the digital outputs for external decoding. (DTS passthrough).
AC power socket
Once you have completed all connections to the amplifier, plug the AC Power Cable into an appropriate mains socket.
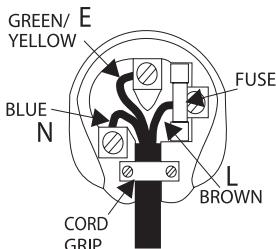
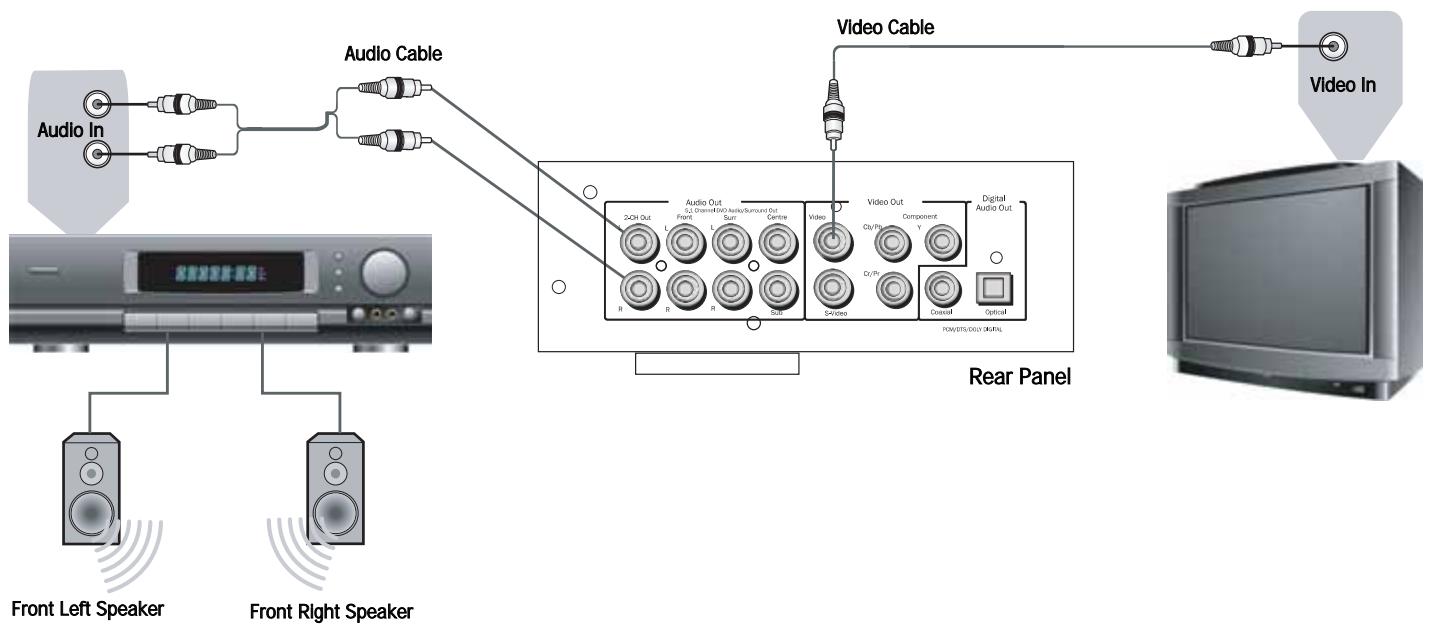
Connections to a TV/Display
The DVD85 and 89 feature a wide range of video outputs. You should always use the best quality connection your TV supports. In order of increasing quality you should use one of composite (CVBS), S-Video, RGB Scart, Component Video (YUV), DVI and finally HDMI.
If it is desired to connect the Audio Out of the DVD player to your TV, the '2-CH out' sockets should be connected to your TV's Audio In terminals.
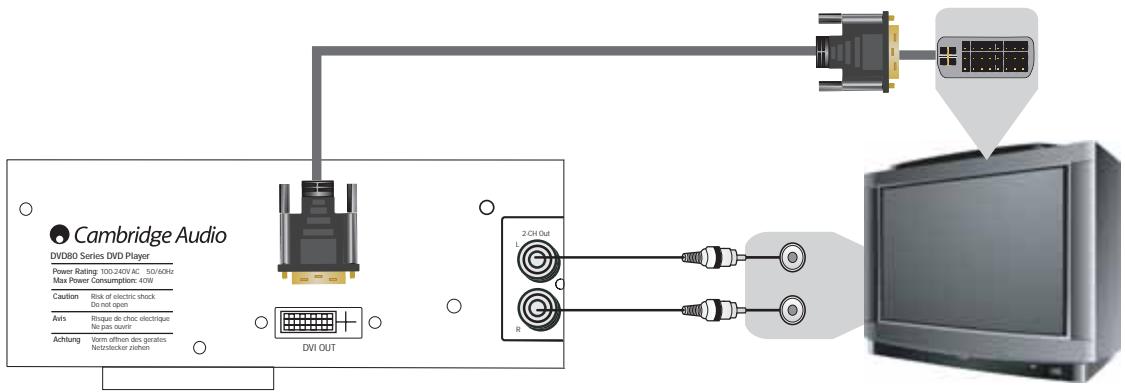
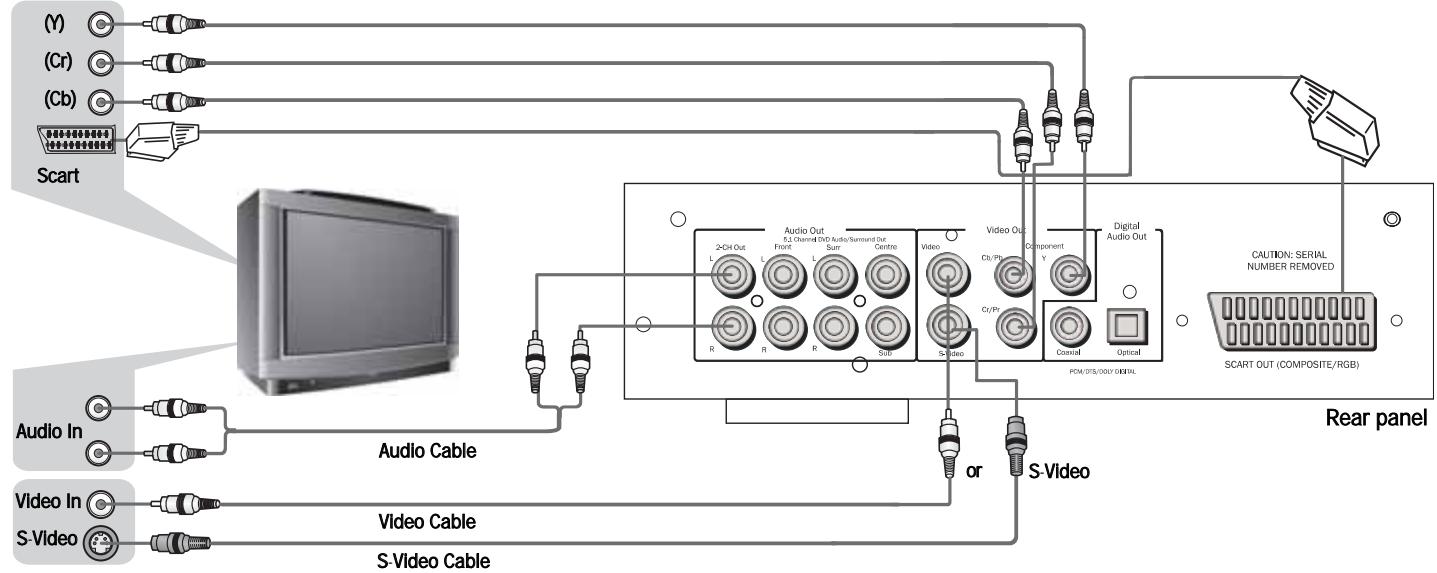
Connecting to a Digital TV set with DVI-D (DVD89 only)
DVI-D
DVDI-D allows the transfer of the digital video signal from the DVD player to the television without the need for Digital to Analogue conversation. This reduces signal loss resulting in the purest transfer of video information.
To select the DVI-D output mode
(Press the DVI/HDMI button on the remote)
NTSC
Default-HDMI Off
PAL
Default-HDMI Off
Press once 480p
Press again 720p
60Hz
1.576p
2.720p
50Hz
Press again 1080i
- 1080i
Progressive scanning is also available from Component Video Outs - NTSC & PAL. See page 19 for more information.
Note: When in analogue output mode, the general setup page is set to P-Scan.
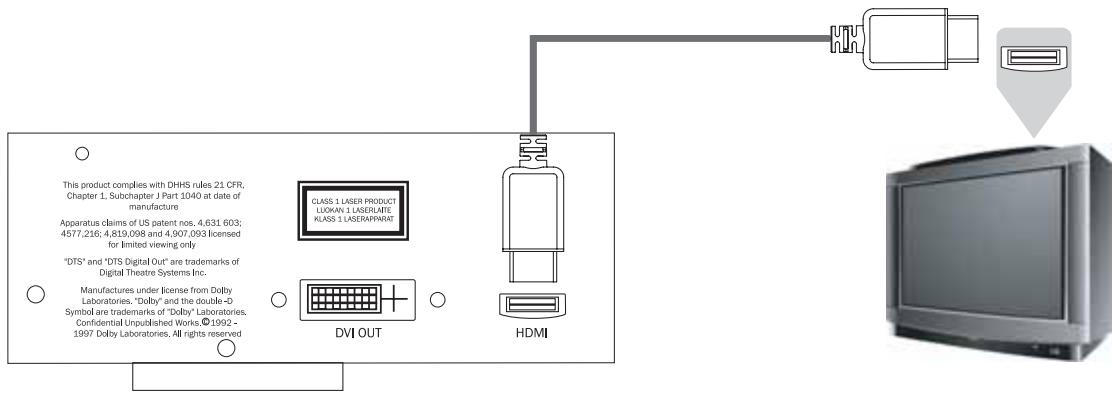
Connecting to a Digital TV set with HDMI (DVD89 only)
HDMI
The DVD89 also features a HDMI (High-Definition Multi-media Interface) an industry-supported, uncompressed, all-digital audio/video interface.
HDMI transfers the digital audio and video signals from the DVD player to the television without the need for Digital to Analogue conversation. This reduces signal loss resulting in the purest transfer of video and audio information.
To select the HDMI output mode
(Press the DVI/HDMI button on the remote)
NTSC
Default-HDMI Off
PAL
Default-HDMI Off
Press once 480p
Press again 720p
60Hz
1.576p
2.720p
50Hz
Press again 1080i
- 1080i
Progressive scanning is also available from Component Video Outs - NTSC & PAL. See page 19 for more information.
Note: When in analogue output mode, the general setup page is set to P-Scan.
Connection to a 2 Channel Audio System/TV
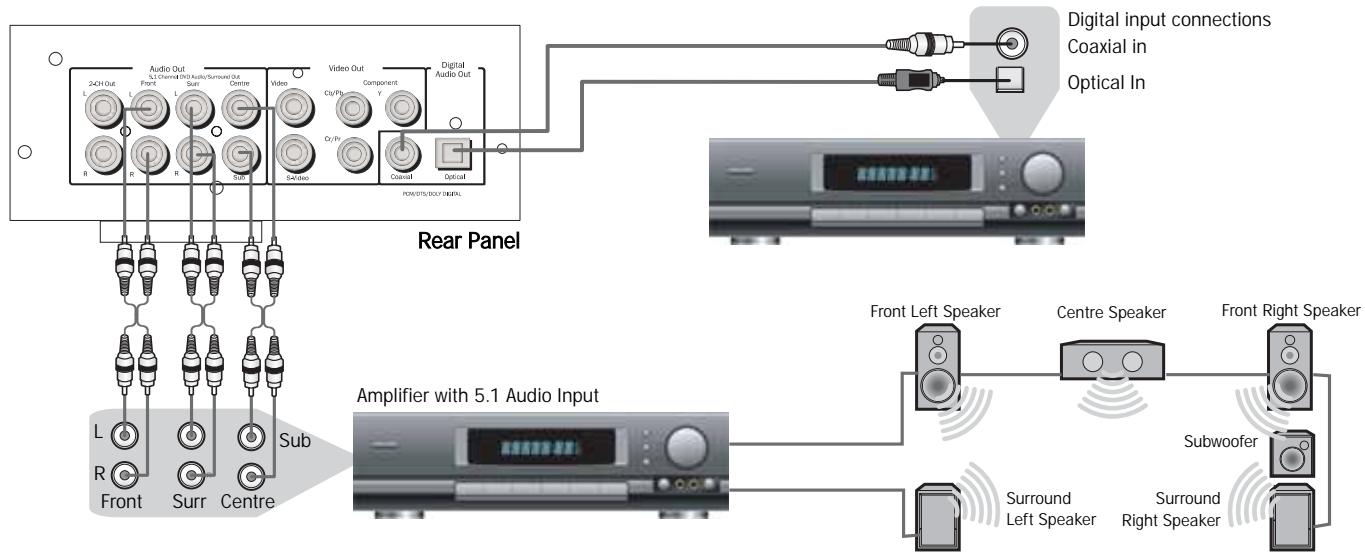
Connecting to a 5.1 Input Audio System
Connecting to an amplifier with Dolby Digital or DTS
The built-in Dolby Digital decoder inside your 80 Series DVD player makes it possible to play discs recorded with Dolby Digital. This is achieved simply by connecting your player to an amplifier and an appropriate home theatre loudspeaker package
"5.1" means 5 main channels of output (front left, front right, centre, surround left, surround right) plus subwoofer (the ".1").
Manufactured under license from Dolby laboratories. "Dolby and the double-D symbol are trademarks of Dolby Laboratories. Confidential unpublished works. 1992-1997 Dolby Laboratories. All rights reserved.
FRONT PANEL CONTROLS

Power On/Off
Switches the unit from Off to On.
Open/Close
Allows you to open and close the disc tray to load a disc. The disc will begin loading when the tray is closed. Pressing Play will also close the tray and start the Disc.
Play/Pause
Plays the disc and pauses play.
Stop
Stops the Disc playing. If Play is pressed shortly afterwards, the DVD will resume play in the place where it was stopped. Pressing stop twice will take you to the start of the disc. A Compact disc will stop and a message will appear on screen. Press PLAY to continue.
Skip/Scan
Allows for skipping between the chapters on the DVD disc or tracks on a CD.
Note: To perform the scan function from the player it requires the button to be held down for a few seconds and then released. Repeating this process will increase the speed of the scanning function.
OPERATING INSTRUCTIONS - DVD MENU DISPLAY
All of these menus are accessed from the blue Cambridge Logo screen that appears when the DVD player is on with no disc in the tray. Pressing the SETUP button on the remote brings up the DVD menu display. It is accessed by the cursors and select button in the centre of the remote.
When you press the setup button two options will be displayed, common and professional.
Press the common setup, to setup basic functions, or the professional setup for more advanced settings.

General Setup
TV Display: Allows you to alter between 16.9 widenscreen and 4.3 conventional image.
SCART: Switches the SCART output between RGB and Composite Video. You will need a suitably equipped television to handle a component signal.
Screensaver: If the DVD is left on and inactive, it will switch to a screenshot to minimise energy consumption and screen burn. It can be switched off here.
SACD: Allows you to switch between 2 channel, multi channel and CD Mode output.
PSCAN: Allows you to switch between interlace and progressive scan outputs via the component video connections.
DVD89 Only
Spectrum: Turns On/Off the on-screen 13 bar EQ display.
Analogue Output Mode: Switches between interlaced or progressive video scanning.
Speaker Set Up
Downmix: Switches off the surround soundtrack (5.1 analogue output section) and outputs a stereo signal from the 2 channel Left and Right Outputs.
Front, Centre and Rear Speaker Settings: adjusts the DVD decoder to compensate between large and small speakers and the size of the signal it sends to the subwoofer.
Subwoofer Off/On: Informs the player if a subwoofer is present. If it is present the low frequencies are split off and sent to the subwoofer, if not the complete audio spectrum will be heard through the front channel.
Channel Delay: Allows the distance between the listening position and the centre, subwoofer, rear left and rear right speakers to be individually set (in cm). This is to enable the surround sound to be optimised for different listening room sizes and shapes.
Audio Setup Page
EO: Adjusts the final effect of the stereo output with a number of optional presets.
Soundfield: Adjusts the final effect of the decoder output with a number of surround effects presets.
SPDIF output: Switches the digital audio section of the decoder/output between bitstream (Raw) and uncompressed stereo digital out (PCM). The bitstream (Raw) must be selected to enable surround sound (Dolby digital/DTS) to be sent to an external decoder via the audio digital output (coaxial or optical). If only a stereo speaker system is to be used then it is only necessary to set this option to PCM, then only two channels of information are decoded and sent to the stereo audio outputs (and the coax/optical digital audio output).
LPCM Out: This sets the maximum data rate for the digital audio output (not the actual data rate from source) for connection to an external decoding amplifier. The internal decoder will downsample if the recorded material has a higher audio data rate although it will not upsample if the recorded material has a lower audio data rate.
Dolby Digital setup/Dynamic: This allows the adjustment of the Dynamic compression applied to the audio. This can be useful when listening to action films (large dynamic range between talking and explosions) late at night. When set to maximum this will force the quiet and loud parts of the signal to a similar level.
Channel Trim: Allows adjustment of the decoder levels for each individual channel in turn to optimise audio setup.
Note: When a film is playing it is not possible to access the setup menu unless the stop button is pressed twice (clearing the film position altogether).
Video Setup Page
The various settings on this screen are all concerned with fine tuning your DVD picture. You can adjust settings here whilst leaving the television settings as they are.
Preference Page
TV Type: the DVD player can be set for either a European PAL television or an NTSC unit. Alternatively AUTO will allow the DVD to adjust automatically, following the TV format of the DVD disc.
Audio Setting: Setting a particular language here will mean the DVD will automatically look for that language on any DVD inserted into the machine.
Subtitle: Setting a particular language here means that the DVD will look for this particular language. Setting it to the same as the Audio setting will cancel the subtitles out.
Disc Menu: This allows adjustment of the Scene selection/Special features menu where permissible by the disc.
Parental: Adjusting this blocks films above a set classification level (ie PG13) from playing on the player if children are using it, if you wish.
Password: This is how to alter the above settings. The password default is 7890 and can be changed by correctly entering the default followed by your new password.
Default: This can restore all of the original factory settings if required.
OPERATING INSTRUCTIONS
Loading and unloading discs
- Press the Power switch.
- Press the Open/Close button.
- When the disc tray has opened fully, place a disc carefully in the tray with the label side facing up.
- To close the disc tray, press the OPEN/CLOSE button again. When the tray with a correctly loaded disc is fully closed, the disc will start turning automatically. After the DVD player has read the disc it will start to play. Pressing PLAY will also close the tray and start playing the disc.
- The disc tray can be opened at any time by pressing the OPEN/CLOSE button. Only remove the disc after the tray has fully opened.
Note:
Do not put anything except a DVD/CD sized disc into the tray, foreign objects may damage the mechanism.
Do not force the tray by hand during the opening and closing operations.
To avoid dirt and dust entering the mechanism, keep the disc tray closed.
If the Disc is seriously scratched or too dirty the player may not be able to read it or play it.
Never load more than one disc into the disc tray at one time.
Normal disc play
- Switch on your television and if you have an amplifier, set its input selector to the correct position and reduce the volume control to a minimum.
- Press the Power switch. Most televisions will automatically switch to the channel/input that the DVD is connected to.
- Press the Open/Close button to open the disc tray, and load a disc.
- Press the Open/Close button again to close the tray. The DVD player will read the disc and begin to load. Alternatively, pressing Play will close the tray and start playing the disc. Note: CD's will automatically play.
- The DVD disc should load to the opening menu (where scene selection, sound/special features can be accessed). Some discs will begin playing the film but can be returned to the menu by pressing the Menu button.
- To stop the disc at any point, press the Stop button. Pressing the Play button on the front of the DVD player while the disc is playing will pause the disc. Pressing play on the remote will have no effect as there is a separate pause button. When the disc is paused the pause icon appears on screen, play can be resumed by pressing the PLAY button again.
When the DVD has finished playing, it will cycle back to the start menu, a CD will return to standby mode. If the REPEAT button has been pressed, the DVD player will start the film or CD again.
Locating a specific point in the DVD
Start the disc as mentioned in the previous chapter. It is often possible to locate the point that you wish to view through the Chapter/Scene Selection on the disc menu that is navigated by the cursor keys. These chapters can be accessed by the skip buttons on the remote or on the front panel of the player.
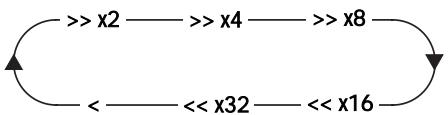
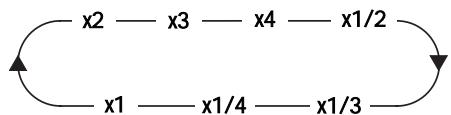
It is also possible to search within the chapter using the Search buttons on the remote control handset. Pressing the Search button repeatedly will speed the playback up from x2 through x32 speed. This can also be done in reverse.
Repeating DVD discs and tracks
- Ensure that the disc is playing.
- Each press of the REPEAT button scrolls through the available options displayed on your TV screen.

Repeating CD discs and tracks
- Ensure that the disc is playing.
- Each press of the REPEAT button scrolls through the available options displayed on your TV screen.

It is also possible to repeat a favourite point of a CD/DVD disc by using the A-B function. Pressing the button once "marks" the beginning of the section you wish to repeat, pressing it again "marks" the end. The player will now repeat this section of the disc.
Note: This function is unavailable on certain discs.
Zoom
- When playing a disc, press the Zoom button repeatedly to zoom into a specific area of the TV screen display.
MPEG4Playback
The MPEG4 is the standard publicised by MPEG4 (Moving Picture Experts Group). MPEG4 allows video and audio to be compressed to a fraction of its original size.
With a scalable bitstream, it can be adapted to dynamically varying requirements.
PC-created disc compatibility. Discs created using a computer may not be playable in this unit due to the setting of the application software used to create the disc. In these particular instances, check with the software publisher for more detailed information.
Disks recorded in packet write mode (UDF format) are not compatible with this player. Check the DVD-R/RW or CD-R/RW software disc boxes for additional compatibility information.
Note: DivX version is still upgrading continuously and the latest version of this unit is DivX 5.1. Some discs labelled with MPEG4 on the market actually are.rm/.ram/*.rmm and others which are incompatible. Please take care when buying discs.
Playing MPEG4 Files
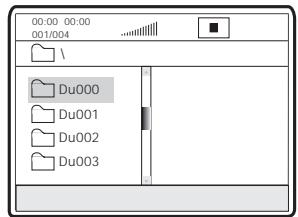
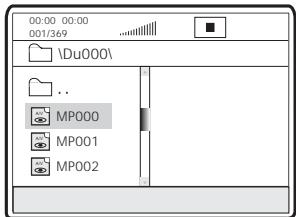
When you insert a MPEG4 disc, the TV screen displays the operation menu as shown in Figure A (the displayed contents vary with the disc.)
A:
B:
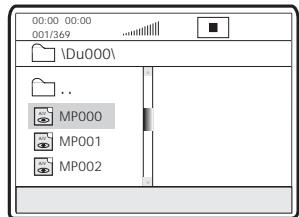
Press UP/DOWN arrows to select the desired directory. Press SELECT for verification. For example, you select the directory DU000 in Figure A and press SELECT as shown in Figure B.
The window returns back to the Press UP/DOWN arrows to select the desired directory. Press SELECT for verification. For example, you select the directory DU000 in Figure A and press SELECT as shown in Figure B. The window returns back to the previous directory when you select [ ] in the first line or press LEFT arrow.
Press UP/DOWN arrows in Figure B to select the desired MPEG4 file. Press SELECT for verification. The player will then play the MPEG4 files.
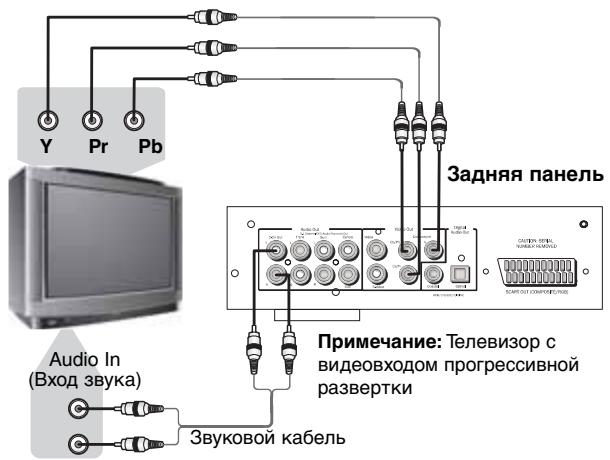
CONNECTION TO A PROGRESSIVE SCAN TV/DISPLAY
Some televisions and monitors are equipped with component video inputs and are capable of reproducing a progressively scanned video signal. Connecting to these inputs allows you to view higher quality pictures with less flicker.
To enable progressive scan via the component output please refer to page 13 under general setup to explain how to access this in the menu.
If you find that you have no display but are getting sound from your speakers, you have set the DVD player to progressive scan mode. Simply press the I-Scan button on your remote control.

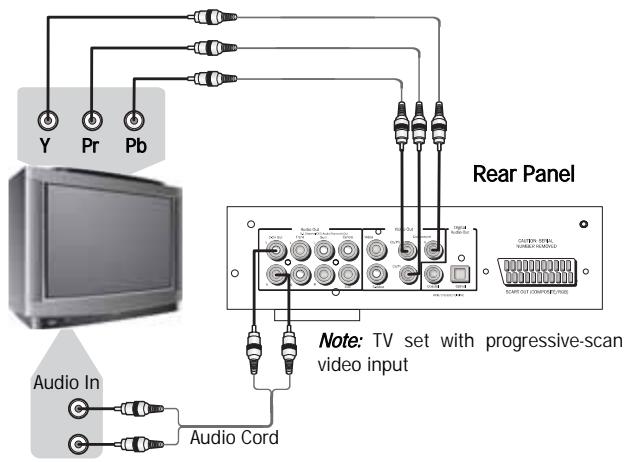
If your progressive scan TV has Y, Pb Pr video inputs you can use the players Y, Cb/Pb, Cr/Pr outputs. Press the P-Scan button to switch the player to the progressive scan video output mode.
If this player's audio outputs are also connected to the TV, the L/R channels of 2-CH OUT should be connected to the TV's AUDIO IN terminals.
It is imperative that you use high quality component video cables to ensure the best possible performance.
DISPLAY SETTINGS
Screen sizes and disc formats
DVD-Video discs come in several different screen aspect ratios, ranging from TV programs, which are generally 4:3, to CinemaScope widescreen movies, with an aspect ratio of up to about 7:3. Televisions, too, come in different aspect ratios; 'standard' 4:3 and widescreen 16:9.
Widescreen TV users
If you have a widescreen TV, the TV Screen setting of this player should be set to 16:9 (Wide)
When you watch discs recorded in 4:3 format, you can use the TV controls to select how the picture is presented. Your TV may offer various zoom and stretch options; see the instructions that came with your TV for details.
Please note that some movie aspect ratios are wider than 16:9, so even though you have a widescreen TV, these discs will still play in a 'letter box' style with black bars at the top and bottom of the screen.
Standard TV users
If you have a standard TV, the TV Screen setting of this player should be set to 4:3 (Letter Box) or 4:3 (Pan&Scan) depending on which you prefer.
Set to 4:3 (Letter Box) widescreen discs are shown with black bars top and bottom.

Set to 4:3 (Pan&Scan) widescreen discs are shown with the left and right sides cropped. Although the picture looks larger, you don't actually see the whole picture.

Please note that many widescreen discs override the player's settings so that the disc is shown in letter box format regardless of the setting.
OPERATIONS
Info menu
Pressing the info button brings up the menu shown below:
Note: This display may vary due to the formatting and programming of your DVD disc.
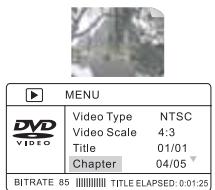
This enables you to conveniently perform several DVD disc functions of title, chapter, sound, subtitle, angle, title time, chapter time, repeat play and time display. Use the navigation and select keys on the remote control to navigate through the menu.
Pressing the info button again takes you back to full screen video.
CD Mode (DVD89 Only)
Pressing the CD Mode button on the remote control turns off any connected display device. This function is designed to reduce "screen burn" when playing audio only discs.
Pressing the CD Mode button again turns on any connected display device.
Note: Only when a CD is played.
Problems using DVI and HDMI
To ensure this connection works correctly please ensure:
- That the DVI connection is DVI-D to DVI-D
- That your screen supports HDCP (High-Definition Copy Protection).
- That your screen is capable of displaying the resolution being output by the DVD Player.
Note: Cables which run over 5m may cause sync or grounding issues.
DVD AUDIO
What is DVD Audio?

AUDIO
Using MLP lossless from Dolby Laboratories. DVD-Audio discs can store up to six channels of 24-bit/96 kHz audio, including a separate low-frequency bass channel. Compare that to two channels of 16-bit/44.1 kHz sound from CD's! For stereo buffers, a DVD-Audio disc can alternatively hold two channels of 24-bit/192 kHz audio, exceeding the quality of any music audio format previously available.

DVD-Audio discs can also add a visual element to your music. Discs can carry picture galleries, lyrics, notes, or any combination of still images, animation, and text. Producers and artists can even add audio commentary, similar to that found on many DVD-Video discs. And, as with DVD-Video, each DVD-Audio disc can also contain full-motion video, with accompanying Dolby Digital sound in up to 5.1 channels.
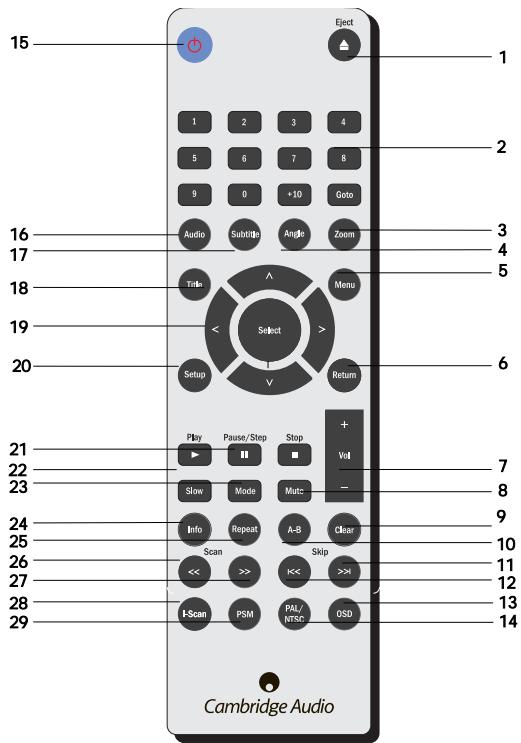
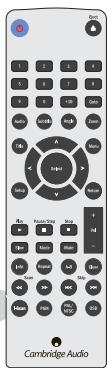
USING THE REMOTE (DVD85)
When you have unpacked your remote handset, insert the supplied AAA batteries to activate it. The remote can control all of the standard playback options but is also important in setting up your DVD player as many of the menus are most easily accessed from the remote.
- Eject 11. Skip Fwd 21. Play/Stop/Pause
2.Number buttons 12.Skip Back 22.Slow - Zoom 13. OSD 23.Mode
- Angle 14. PAL/NTSC 24. Info
- Menu 15. Standby 25. Repeat
- Return 16. Audio 26. Scan Prev
- Volume 17. Subtitle 27. Scan Rev
- Mute 18. Title 28. I-Scan
9.Clear 19.Select 29.PSM - A-B Button 20. Setup
Keep in mind the following when using the remote control:
- Make sure that there are no obstacles between the remote and the remote sensor on the unit.
- The remote has a range of about 7m .
- Remote operation may become unreliable if strong sunlight or fluorescent light is shining on the unit's remote sensor.
- Remote controllers for different devices can interfere with each other. Avoid using remotes for other equipment located close to this unit.
- Replace the batteries when you notice a fall off in the operating range of the remote.
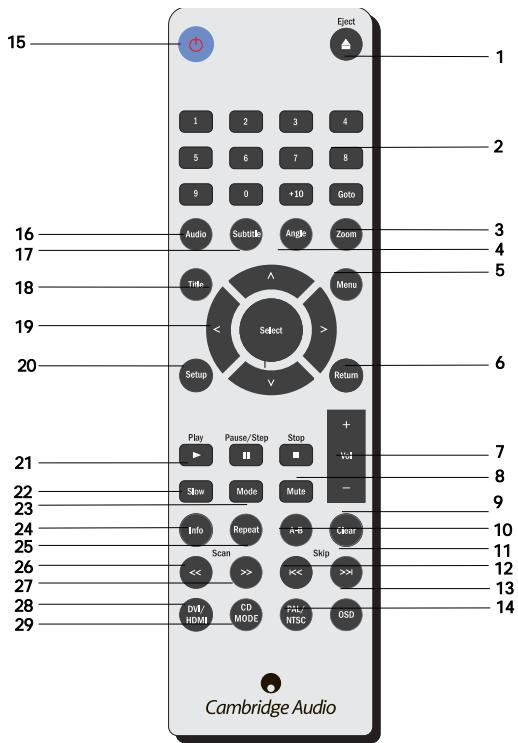
USING THE REMOTE (DVD89)
When you have unpacked your remote handset, insert the supplied AAA batteries to activate it. The remote can control all of the standard playback options but is also important in setting up your DVD player as many of the menus are most easily accessed from the remote.
- Eject 11. Skip Fwd 21. Play/Stop/Pause
2.Number buttons 12.Skip Back 22.Slow - Zoom 13. OSD 23.Mode
- Angle 14. PAL/NTSC 24. Info
- Menu 15. Standby 25. Repeat
- Return 16. Audio 26. Scan Prev
- Volume 17. Subtitle 27. Scan Rev
- Mute 18. Title 28. DVI/HDMI
9.Clear 19.Select 29.CD MODE - A-B Button 20. Setup
Keep in mind the following when using the remote control:
- Make sure that there are no obstacles between the remote and the remote sensor on the unit.
- The remote has a range of about 7m .
- Remote operation may become unreliable if strong sunlight or fluorescent light is shining on the unit's remote sensor.
- Remote controllers for different devices can interfere with each other. Avoid using remotes for other equipment located close to this unit.
- Replace the batteries when you notice a fall off in the operating range of the remote.
TROUBLESHOOTING
There is no power
Ensure the AC power cord is connected securely.
Ensure the plug is fully inserted into the wall socket and is switched on.
Check fuse in the mains plug or adaptor.
The player will not read the disc
Check the disc is not loaded upside down. Check that the disc is not too scratched or dirty.
There is no sound
Ensure that the amplifier is set correctly. Check that the interconnects are inserted correctly.
The disc is skipping
Check that the disc is not too scratched or dirty.
Ensure the player is on a firm surface and not subject to vibrations.
There is a hum coming from the speaker
Ensure that all cable connections are secure.
The remote handset will not function
Check that the batteries have not expired.
Ensure that nothing is blocking the remote sensor.
There is no image, but sound
You have set the DVD player to progressive scan mode. Simply press the I-Scan button. Press CD Mode button.
Note: Static electricity or other external influences may cause malfunctioning of this unit. In this case, unplug the power cord and then plug back in. This will usually reset the unit for proper operation.
SPECIFICATIONS
| Disc types | DVD, DVD-A, DVD-V, CD-RW, CD-R, CD-DA, DIVX, SACD |
| Audio formats | 5.1 and stereo downmix LPCM 16 bit 44.1kHz Dolby Digital 5.1 24 bit 96kHz DTS output (digital audio out only) DVD audio 2 channel 24 bit 192kHz DVD audio 5.1 (MLP) 24 bit 96kHz |
| Video | Composite Video (CVBS) S-Video (SVHS) RGB DVI-D & HDMI Component (YCbCr) PAL/NTSC Interlaced/Progressive scan |
| THD (unwelghed) | < 0.01% |
| Dynamic Range | >100dB |
| Frequency response | 20Hz - 20kHz |
| Video amplitude | 1.0V pk-pk (75 ohms) |
| S-Video amplitude | Y: 1.0V pk-pk n (75 ohms) C: 0.286V pk-pk (75 ohms) |
| Power supply | 100-240V AC~50/60Hz |
| Max power consumption | 40W |
| Dimensions (mm) (H x W x D) | 55 x 430 x 263 |
| Weight (kg) | 2.56 kg |
Note: Not all features applicable to all models.
The DivX standard is continuously being upgraded, this unit supports the latest version DivX 5.1.
Some discs labelled MPEG4 on the market are actually .rm/.ram/*.rmm (incompatible formats). Pleases take care when buying discs.
Functions on some discs may not work on this unit. This is not a malfunction of the player.
Cambridge Audio's policy is one of continuous improvement. Design and specifications are therefore subject to change without prior notice.
INHALTSVERZEICHNIS
Ensure the AC power cord is connected securely.
Ensure the plug is fully inserted into the wall socket and is switched on.
Check fuse in the mains plug or adaptor.
CONNECTION AD UN TV/SCHERMO A SCANSIONE PROGRESSIVA
TILSLUTNING TIL TV/DISPLAY MED PROGRESSIV SCANNING
PnoBepka COOTBetCTBnHaHnpJxHeHH NtTaHH
IaBaaeien Co6bTeHNHO 630NaOacHcTn, NOXaNlyiCTa, BHNMaTeIbHO npOnHTaTe neDyUoHne NHTpyKuun neped nonbIKKn noCDcoEINHTb 3TO yCTPOCTBO K 3NeKTPmecckO CETn.
PpOBeBpTe, YTo6bI Ha 3aDHei NaHei BaaWero yCtpoCtBa 6bIIO yKa3aHO npabInbHoe HapJxKeHne nHTaHn. EcII HapJxKeHne B BaWeI 3JIeKTPuYeCKo Cetn OTNIuAeTcI, pOKOHcybTnpUyTecb y BaaWero DInepa.
3To yctpoiCTBO npedHa3NaueHO dny npimHeHnro TOnbko npri BEnuHne nTne nIetaoUeero HanpaxHnru, yka3aHHoro Ha 3aDnei naHenny yctpoiCTBA.1oCoeHNHeHnE K DpymN IcTOCHNKam PntAHnM MoKet NOBpeDnTBycPTOCTBO.
3To 06OpuyoBaHHe DOnJxHO 6bItb BvKnIOueHo, KOrda OHO He IcNoB3yETcra, nOHO He DOnJXHO pIIMeHITbCpI rOCTCBNHaDnEkaUero 3a3eMNEHn. 4To6bI yMeHbWntb Pnck 3NeKTOPOkA, He ydAnJIte RkpIKy UeYTOPOCTBA (mNn 3aDHIIO CTENK). BHTpr HET NHKAKINu ChTeN, NDoJnxKaunx 6CbNyKbBaHnIO nonb3OBaTeHem. dNIA ObcLyKbBaHnI OBpaauTecb K KBaINPfUPOBaHnOMy ObcLyKbBAIoUeMy nepcohany. EcnN uHp nITAHn CHa6JHEn BnKoN C nIbTbIM KOpYNCM, To yCTPOCTBO He DOnJxHO mCOnJb3OBaTcB, eCNI ONOTCYTCTByET nIactMaccobB IeMeHt C nIpaBKMnPepdoxAHNTEB. B Cnyae YtePr dEpxaTeHn npdeoxpaHnTeHn HyxHn DeTaJIb DoJxHa 6bItb 3aka3ana y BaWero dInepaΦnpMb iCambridge Audio.
PpeDynpexJaIOuIpaBHOCTOpOHnTpeYroJIbHcC CmMBOIOM MOHN Co CTpeKoI PpeHa3NaueH dIa PpeDynpexDeHn
nonb3OBAteJI O HAIyHm HEN3OJnPOBaBANHO 'OnaCHOH NaPjaKeHH BNYTpN KOpNyca YcTpoIcTB, KOtOpoe MoKET MeMb IOCTaTOHyO BeINuHNy, YTObI COCTaBnTb PnCK nopAeHHe NIODe JNEKTPoWOKOM.


3NaB BocKnlaHnB npeJelax paBHOCTOPOHHrTopeyrobnHnKa npEHa3Haen DnI pEduPexDeHnNONb3OBateJI OTOHCnteJbHo IMeIOxxCB B cepBcHOn DOKOpMeHTaUN Baxhblx yka3aHnO pa6oTe N o6CnykBaHNIO, pImeHMbIX K 3TOMy np6bopy.
3To n3dJIne COOTBeTCTByeT EbponeNcKIM DInpeKTHBAM IO
Hn3KOMy HnpanjxehnIO (73/23/EEC) n 3neKtpomarHTHoHOBMecTMMOCTN (89/336/EEC), KOrda OHO yCTaHOBNEHO nCNOnb3yETcC corlacho 3OTMy pykoBOdCTBY dIJI NOnb3OBaTeHN. Dnra rapantIN HepepeBbHOOBmecTMMOCTN 3TOrO n3DeJINn DOXhBi nCNoIb3OBAtBcR
nckluuTeIbHo npHaIeJxHocTn KOMpaHn Cambridge Audio n
06cIyXnBaHne doJXHO 6bITb IOBepeHO KBaIINpUPOBaHOMy
06cIyXnBaIOoMeMy nepcoHany.

JiKc KOnecamn n c Kpctom - 3TO CmBol Ebpocio3a dIy Iyka3aHnHa OtJeBHyU KOJIeKUHO 3NeKtpueckoro I3NeKtpoHHOrO 06OpdyOBaHn. 3To N3dEnne CoedePknT 3NeKtpuYeCKne I 3NeKtpoHHBe KOMNoHbTe, KOTopIbe DoJXhbl 6bItb NOBtPOHcNcONb3OBAHbI, NepepaBoTaHbI nnBOcCTaHOBHeHn He DOnXhbl yTuIN3rPoBaTbC RoMecTHO c HecOpTnpoBAHHbIM NoBuHbIM OTxOdaMn. NocTapaiTeCb

BO3BpATINb yCTPOIcTB O IIN o6paTInTeCb K ABTOpIN3OBAHHOMy dIJIePy, y KOtOporo Bbl npio6peI INTO n3dEInne, dIJI nOnyUeHn DOnOpHNITbHOINHfOpMaunu.
BAXHbIE YKA3AHNIO OBCNEUHIO BE3ONACHOCTN
YdJIInTe HEMHOrO BpeMeHN, YTObI IPOuHTaB 3TN pImeuaHNapeed yCTaHOBKoB
BaHoeO npOnrPbIBaTeNOMKaNT-dmCKOB cepri Azur, OHn no3BONrT Bam
ObecneHTb HauNyUe NcKnpyatauOnHbte KaeeCTBa n npOJnTB Xn3Hb
n3dJe. PekOMeHdyETc C6bNoJatB BCE yka3aHry, yUnbTaBt Bce
npedynpejckdeHn i CoXpaHaTb INHCTpykUIM dnnocleDyUOero pImeHHeN.
3To ycTpoiCTBO OTHOCITC KKnaccy 1 NdoJxho nOdkNIOuATbCSB R po3eTke 3NeKtpnuecko CETn C 3aunTHbIM 3aemIHOUzM COeINHHeHEM.
He HapuahTe 3aunTHbIe CBOCTBa NpAHPoBn BUNKcCfNCKPObAHHbIM NOJoxEHMe BVEEDHIN B PO3ETKY) INN BUNKc C 3a3EmJIHOOM KOHTAKTOM. PONPAH BNkA NMeET DBA ne3Bm, ODO n3 KOTobIx Umpe dpyrOro. BNka c 3a3emJIHOUM KOHTAKTOM NMeET DBA ne3BnN TpeTN 3a3emJIHOUM StbIpeK. SHIpOKOE ne3BnNE INN TpeTN StbIpeK cnykat dnon o6ecneueHn BAwei 6e0anachoctn. Ecnn pInnaRaMaBn k He BXoNT B BAuy po3ETKY, nocOBetyntEc c 3JeKTPNOM OTHOCTeJIbHO 3aMeHbY cTapeBwei po3ETKn.
YCTPOIeTBO CNeDyET yCTaHABINBabTb TAK, YTOBI bIIO BO3MOXHO OTKIIIOHTBERO NITAOUIO BYIKNY OT PO3ETKN 3NEKTPnueckO CETN (NII ON COEHNHTBHOPO pa3BeMa C3aDN YCTPOIeTBA).
3To yctpoiCTBO cneJeTy yctaHaBnBaTb Ha ycToHmBo, pOBHO NOBepxHOCTN.
VcTPOIcTBO HxkDaetCB BHeHTnAunm. He yctaHabImBaIe ero Ha KOBpIK nI I dpyTyIO MArkyIO NobepXHOCTb N He 3akpbIbaIe peWTeKN dJI BxOda IIN bIxOda BO3dya.
He pa3MeIaIe Iero B 3AmKHyTuO NIOCTb TnIa KNIXHOro uKafo aNIM TYM6oHKn. BnOJIne npHemLeMo IIOoBe IpocTpaHcTBo, OTKpbIToe c3aDi (noD6Hoe npedHa3ueHHoI dR o6OpDobAHn cTOKn).
He pa3MeuaiTe ero B6nImi IIObix INTOCHNIOB TEINa: paIaNtOpOB, neHbIX 3acLOHOK, KxyOHbIX PIIIT NII INHbIX aNNapaTob (BKNIOyA ycINITeI), KOtOpBe 3NUYaOT TEINo.
ПЕДОCTEPEKEHWE - Дд снженя риca пожари плпскрша He nopeberpaite эу tcpoctBTO BO3dteBTHO дхдг Алгг. ЗTo усрьтбо He dONKHO nopeberpaTcBO3dteBTHO kanen ninn bpl3r BObln npdynx XHKnKoste. He yctahabmBaite He u cypoctBTO hNkakne npedMeTb Tnna Ba3,
HanoJIHeHHbIX XnJDKocTbO. B Cnyaae nonadAHnB Hero XnJDKocTn, HEmedJeHHO BbIKyUHTe yCTpOCTBO, OTOceHNHnEOT OE NkETPNeCKoCtN cTeN n 6paTntEcK bAueHm dynepe IINI NOYeHHn PekOMeHaDauCn.
TObbl OCHNTb yctpoCTBO, npToHpaIte ero BnaXhoN TkaHbIO 6e3 BOpCnHok. He cnOJIb3yIte HNKaKne XnDKOCTn DnA YnCTKn, codepxJauie CnIPT, AMMnak nII I a6p3nBbl. He paCbIyIte a3pO30nl Ha BaI pOnIrpbIbaTeN KbOMnKaT-DnCKOB nII b6nIHIero.
Clemdte 3a tem, Tc6bI cheep3 IIObOy m3 BeHTUNRIUHOHbIX peWeTOK He nonaJdnn MeKHe npEMeTbI. Ecni 3TO npOn3oJIo, HeMeDneHNO OTKIOuHTe erO, oTOeMHnTe OT nITaOoue cetN IObPatNTecb K BauEMy dInnepy Ira NOnyHeHH peKOMeHdaun.
He npoklaaba Te Hpy nntaHn Ta, YTO6bHa Hero MoIIN HaCTyNTb IIN OH MOR 6bITb NOBpeXdE dpyrMM COeDHMM ppeMetAM.
EcInn Bbl He HamepeBaetcB hCOnNoB3OBAbT 3To yCTpoIcTB O TeueHne IaNTeHbHO rnpnoDa BpeMeHN, TO nepeKJIIOUHTe ERO B pexmOxNdAHn IOTCOeMHITe OTpOeTKn 3NeKtpuYeCKo CeTN. TaKxe OTcoeDINHrTe yCTpoIcTBO BO BpEMr rpo3.
IpeoctabnTBe Cbe onepaun no 6cbnykBaHIno KBaHnFmHpObaHHOMy cepBCHOMy nepcohany. OcbnykBaHIne Tpe6yeTcB C clyae IIOb0r NOBpeJednry yCtpoCTBa: npOua shypura nITaan HIN BUNK, IOnaDaHne BHytpb Hero BObl nn pReMeTO, yCtpoCTBO nOdBepraLoCb Bo3dEiCTBNO DojA nn Blanr, HapuShaena erO paObTa nn OHO ynano.
Ecnnn nocne npobepkr cornacno pa3deny "BbIaBHeMe HeNCnpaBHOctTe" 3TOrO pykoBODCTBA yUyIeHNe Me npO3oUNo, He daJIte NoIbIcK TOpEOMHTpObaTb, Pa3o6PbI nnpepeDnat yCPOrCTBO. Ecnn IrfHpOnpyetc Ta npedynpeDntelbHaMepa, To BO3MOKeH Cepbe3Hb 3NeKTPnuCeckn loK.
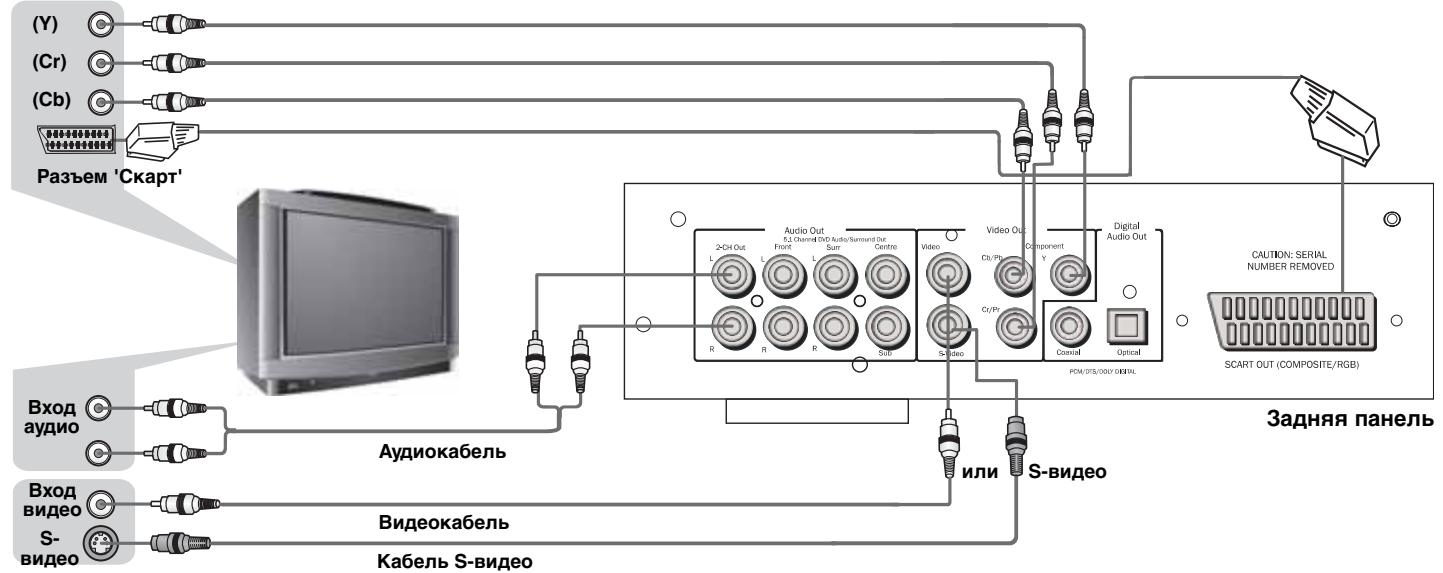
ПОДКЛЮЧЕНИЗHA 3АДHEМ ПАHEЛN

PoiCoeHHeHnBnDeo
Плелер DVD85 сабхен разьем amи Дли подсо enden HnKOMПОЗИТHorO BnIeO (CVBS), S-Video (SVHS), SCART (RGB u CVBS) n KOMПОЕНТHorO BnIeO (YC_bC_r) . Плелер DVD89 taKke coapedxnt nHTepcfeCbI ZmfppoBOro BnIeO DVI-D u HDMI.
PoiocoeHHeHHa 3Byka
UΦpOBoBbIe BbIXoDbI - IJIeep DVD89 TaKxpe Cha6xhen ONTuYeCKM IN KOAKcNAJbHbIM ΚΦpOBoBbIM BbIXODm. OHN DeJaIO T BO3MOXHbIM nepeDaay UΦpOBoBd Dopoxxk 3ByKO3aIcns NDCKa DVD Ha nOxDoxaun AV-npneMnK dN deKoInpoBaHn yCsIeHn. O6a BbIXoDa BblONHJIoT OdINHaKOByФyHKuIIO - npcTO Bbl6epnte Hanboone noDxOaIu Bam TnI.
Ahaorobble BbIXOdbI - O6a nneepa mMeOT TpaDnUHOHHbI
ctpeoBbIXoR RCA (3Byk), c KOTOPORc tpeo3ByK nOdaETcK kObuHOMy CTpeo ycNITeIIO. TaKHe NMeTcR 1eCTMkaHbN bDeKOdUropOBaHHb BbXOD C cnHAmON B oPomate Dolby Digital 5.1, dOnyckaHOUsn POKNIIOHEne K NOxOJaIeM6-KaHaJIbHOMy ycNITeIIO. DInr 3ByKOBbIX dIckOB SACD n DVD MOxHO nCnOJIb3ObaTb IINb aHaIOrOBbIE BbIXObl Tnla 5.1.CM.BBeHEne B DVD-aynio Ha cTp.204.
PnmeaHne:ДЯДИСКаCKOINPOBkoD TDSdOPOKky3ByKo3aIINCTIa DTSMOxHO6yTeNpepaBaTbIIMbYepe3UΦpOBBe BIXObIДЯBHeHreroDEKOINPOBAHn.(TpaH3nTHaNpeceblKa DTS).
CnloBoi pa3bem nepemehHoro ToKa
Iocne 3aBepseHnB CEx NpOKJIIOeHn K yCNIITeJIIO NDOCoEINHTe Hyp nITaHn OT cETn nepemehoro TOKA B NOxOJaUcYO CeTeByIO p03eTKy.
PoiKJIoueHn K TeJeBn3Opy/AncIpeIo
PpOurpbIbAeT Dnck N npIOCTaHaBJIbAeT BOCpOn3BeDeHne.
Stop (Cto)
OctaHaBnBaet Bocnpoun3BeDeHne DnscKa. Ecn 3aTeM KpaTkoBpeMeHHo HaxaTb Ha 'Play', DVD-nnneep Bo3o6HoBnT BOCnpoun3BeDeHne C TOrO MeCTa, Ige 6bIa npoun3BeDeHa ocTaHOBka. DboHoe HaxaTne Ha KNOpKy ocTaHOBKn BO3BpaTnT K Naany nCKa. Komnakt-Dnck OcTaHOBnTcN Ha 3KpaHe NpOBrtca Coo6eHne. Haxmnte KhoNkY 'PLAY' dnil npdoJnxKeHH.
Skip/Scan (П糊涂ский Кан�оваиме)
IozBoJnEeIeIaTb npOpyckm Meky pa3dEnamn Ha DVD-dicke nn TpeKaMn Ha CD-dicke.
PpmeaHne:ДЯ BbINONHeH NJIeepomФyHKcNcKaHnOBAHn Tpe6yeTc, YTObI KHOJa 6bIHa HaxaTa Ha HeCKoJIbKO CeKHyN I 3aTeM OTnySeHa. NOBTOPHe 3TOrO ppoecca yBelenuCt CKOpocTb BbINONHeH NfHKcNcKaHnOBAHn.
Bo n36exaHne noNaJaHnB MexaHn3M rpa3n I nbIi, DepxKe Te JOTOK dIaNCKa 3aKpbITbIM.
Ecnn nck cnblho noapaan h nn cnilkom rpa3e, npeep MOKET OKa3aTbca HeNtOcO6HbIM K YTeHNO ero nn Bocnpou3BeDeHIO.
HnkOrda He 3arpykaTe B loTOK dIa DnCKa 6oJIe OndHO rCKa.
HopmaIbHoe BOCnpoN3BeDeHne AnCKa
- BkIIOHTe BaIeTeBn3Op n, ecIy BAc IMeETcYcIIITeIb, yCTaHOBTe K HxHHe IIOJKeHne erO ceJIeKTOp BXoIDOB uYCTaHOBTe peryIaTOr IprMOKOCtHa MmHMym.
- Haxmte nepekIIOuateIb 'Power' (NITaHne). BoIbUnHCTBO TeIeBn3OpOB 6yUyt ABtOMaTHeCKN pepeKIOuAtbcHa TOT KaHAn/BXoD, K KOtOpOMy IOnCoEINHeh DVD-IIneIep.
- Haxmte KhoNky 'Open/Close' (OTKpbITb/3aKpbITb), yTo6bl OTKpbITb ILOTOK DnIa NcKa, n YcTaHOBtE DnCK.
- Choba haxmnte KhoNky 'Open/Close' (OTKpbIb/3aKpbIb) dIra 3aKpbITnI Notka. DVD-nnneep npOteT nck n haHnet 3arpy3ky. B KaueCTBe aIbTePHTaNTbI, HauKaTne KHOKn 'Play' (BocpOnu3BeDeHne) npBcTeT K aKpbITnIO Notka n K haCuany npOirpRbAHnI DaNCK. PnpMeUaHne: KomnakT-DnCK (CD) HaHnet BOCpONu3BODInTbCBA TOMaTNeeCKn.
5.ДИСКТиаDVDДОЛЖЕнЗARpy3nTbMeHIO OTKpbITI(rIe IMeETcAdoCTynK Bbl6Opy CsuEhB,3ByKa/cneuaJIbHbIMФyHKuIaM).HeKOTOpBie NDCNHaHHTNOKa3ФINbMa,TorgaKakpePexoD K MeHIO MoXHO cdeNaHakATNeH MaKHONky'Menu'(MeHo). - TTo6bl OCTaHOBnTb DnCK B LIO6OM MeCTe, HaxMnTe KhoNkY 'Stop' (CtoI). HaxKaTne Ha KhoNkY 'Play' (BocPon3BeHeHne) Ha nepeDHei nnHei DV-DnEepa, Korda nDet npOnrpbBaHne dncka, npNoctaHOBnT npOcecc noka3a. HaxKtne KhoNkn 'Play' (BocPon3BeHeHne) Ha Ndy He DaT hKaKoRTO 3ΦΦeKta, NockoJIbKy 3deCb ImeeTcR O'TeJbHaN KhoNka Na3bl. Korda noka3 dncka npNoctaHOBnHe, Ha 3KpAne POBBIAETcR NOKKa Na3bl, BOCPON3BeHeHne MoXHO BO306HOBnTb NOBTOHPbIM HaxKaTHEm Ha KhoNkY PLAY (BOcPon3BeHeHne).
Korda DVD-Плелер Зakoнчт Воррпзбевене, OH BepheTcK CTapTOBOM MEHNo, a KOMnakT-DnCK (CD) NepeiDertВ ржКIM OxkDaHnA. EcInb6bla NaKhOna KhONka REPEAT (IOBOTP), DVD-Плелер ChOba NaHHT NOKa3Фильma ИЛN pOuRpbBaHne KOMnakT-DnCKa (CD).
OhapyxKeHne yKa3aHHoN ToUKN Ha DVD
3anycntte nck, kak onncaco H npdeIyuee rnaBe. YacTo BO3MOXHO 6hApKHTb Kelaemyo dny npocmOTpa Tochky pnnpoOnu yHKnU m'Chapter/Scene Selection' (Bb6op IraBbl/cceHbl) B MeHIO nCKa, KOtopa Bb6nepaetc Knabuamn Kypcopa. Doctyn K 3TNM rnaBam BO3MOKeH npri NpOOnu KhoNok npOnycka (skip) Ha PdY nnHa nepeDnei panEni nneepa.
ПОИСТAKЖЕВОЗМОЖЕиВHHTPNIЯБы,ИСПОЛБ3УК"HONKNIПОССА (Search)Ha ПДУ.ПОВТОРhoeнхаТе Ha KHOKNY ПОИССA (Search) YCKOPRIT BOCPON03BVEHNE O T2do X32.3TO TAKЖЕ моЖно npoDEЯТьВOBpaTHOMNoprДKE.

COBmectHMOCTb DnCKa, CO3dAnHHOro Ha KOMNbIOTepe: NnCKn,
co3daHbIe Ha KOMNbIOTepe, MORYT OKa3aTbCHeNpNiEMMbIMn DJIa 3TOI npEnepa BCNEdCTBne HAcTPOeK npNKlaDbHX npOrpaMM, NcONlb3OBAHHbIX dJIa co3aHbIM DaCK. B TaKnx YacThbIX CnyaJx ObaPITecb K npOn3BOIDHTeIO npOrpaMMHO o6ecNeueHnE nI ONyueHn B0oee noDpo6Hn INHOFOpMaUIN.
ДиCKN,ЗапсаньеВ ржиме пakTeHо 3aПСИ (формТ UDF), HeCOBMeCTnMbI c 3Tm ПпeнepOM ПрOBePЯТе nporpamMHOe o6eCneHeneKopo6ok C дбКамDN DVD-R/RW Ил CD-R/RW Дя nOlyeHЯДОЛONHc TELBнOHnHfOpMaUN O COBMeCTnMOCTN.
ПиMuMeaHnHe:Верси DivX Bce eue NoCToRHHO OboHOBnIeTc n CaMaJ noCneHnry BePcN -3To DivX 5.1.HekOTOpBie NDCKn Ha pBInKe, nOmeYeHbIe MapKoM MPEG4,Ha cAmOM DeNe YBaJIHOtCn DnCKaMn *rM/.rM/.rmm n np., KOTOpBie HecOBMeCTmbl.БydTe BHNMaTeIbHbI npn nOKyIke DnCKOB.
Bocnpon3BeDeHne paJIOB MPEG4
Korda BbI BCTaBnIeTe DnCK MPEG4, Ha TeIe3kpaHe NOBJIReTcR MeHIO, nOKa3aHHoe Ha Pnc. A (NOKa3bIBaEMoe CoDEpXIMoe MeHReTcR O T DnCKa K DnCKy.)

A:
B:
HaximaiTe CTpeiKn UP/DOWN (BBEPX/BHN3)ДЯ BbI6opa Jeaemoi DnpeKToPm.ДЯ npOBepkn HaxmTe KhONky SELECT (BbI5OP).HanpImep, Bby BbIbnpaete DnpeKToPm DU000 B Pnc.A n HaximaeTe SELECT (Bbl5OP),KaK pokaasoHa Pnc.B.
OKnHO Bo3BpaaTaTcHa3aD InH HaxKaTna CTrpeNoK UP/DOWN (BBEPX/BH/3) dIy Bb6opa Xeanaemoi DnpeKToPm. IInI npOBepkn HaxMnTe KhoNky SELECT (Bb15OP). HanpImep, Bbl Bb6ipaeTe DnpeKToPn DU00 B Pnc. A n HaxmmaeTe SELECT (Bb15OP), kak Noka3aHo Ha Pnc. B. OkHO Bo3BpaaTaTcHa3aD K npEdbIyuei DnpeKToPn, KoJa Bbl Bb6ipaeTe [ ..] B nepBoI cTrpoke nn HaxmaaTe cTrpeNkY LEFT (BJI EBO).
HaximaiTe CTpeKn UP/DOWN (BBEPX/BHN3) Ha Pnc. B dIa BbIbopa Jeaemoro MPEG4-paJna. IJa npOBepKn Haxmnte KhoNky SELECT (BbIOP).Torga pneepcmoxet BocnpoJ3bOuInb MPEG4-paJnbl.
ПОДСОЕДИЕНЕ K TEЛEBN3OPY/ДИСПLEЮ C ПОГPECCNBHOJ PA3BEPTKOJ
HeKToOpbIe TeneBn3Opbl MoHITOpbl Cha6KeHb BXOaMIMOMHOENTHO BnDEo N CnOCo6Hb BOcPNO3BODHTb BnDEOCrHaN CnporpeccNBHO pa3BepTKo. POnkIoUeHne K 3Tm BXoAM No3BOJNet Bam HabNIOaTB KapTINKn NobIweHHoro KaueCTBa C MeHbIm MepuahmE.
YTo6bI BKIOUHTb IocTpoHyO pa3BepTKy IIN KOMNoHEHTHO BXoJa, CM. cTp. 196 B MeHIO O6eH HAcTPOIKn, Ie ObbAChHeTcR, KaK POnyHTb K HeJ DoCTyn I3 MeHIO.
EcIn Bbl obHapyKnBaTe, YTo y Bac HeT noka3a, Ho n3 dHnAMnKOB cIbIweH 3Byk, Bam cIeNyET hAcTpOnTb DVD-nIeNep Ha pexIMn NoCTpOuHON pa3BepTKn. IpocTo haxMnte KhONky l-Scan (noCTpOuH. pa3BepTKa) Ha BaWem PNDY.
I-Scan PSM
EcIn BaI TeJIeBn3Op C NOCTPOUHO pa3BepTKo IMeET BUNDeOBXOdbI Y, Pb Pr, To Bbl MoKeTe NcNoIb3OBA Tb BbIXOdbI pIeHepa Y, Cb/Pb, Cr/Pr. HaxMITE KhoNkY 'P-Scan', uTo6bl nepeKIOuHTb pIeHep B peXIM NOCTPOUHO pa3BepTKu BNDeOBbIXOda.
EcnBbIXOdb3ByKa 3TOrO pIeepa TaKxe NpOKJIIOUeHb K TeLEBn3Opy, KaHaNb 'L/R' (J/Π) 2-KaHaNbHoro BbIXOda '2-CH OUT' DOnXhbl 6bITb PoIDcoEiHHeNb K pa3bEmam 'AUDIO IN' (BXOD 3ByKA) TeLEBn3Opa.
BaxkhbIM ycIbONEM ABJIeTcN IcNoIb3OBAHne BnDEoKa6eNeBbICOKOrKaueCTBa, YTO6bl OecneuHTb HauJNyUHme XapakTepcntKn.
HACTPOIKN DnCJIeA
Pa3mepbI 3KpaHa n φoPMaTbI έncka
Диску DVD-Video noctуноctаOT c pa3nHbIMN COOTHoSeHnMn PA3MepOB 3KpaHa, NaHnHaT OT TeIeNpOrpAMM, KOTOpBIE 06bHuHO IMeOT COOTHoSeHnE 4:3, Do IINpOKo3KpaHHbIX ΦInbMOB CinemaScope c COOTHoSeHnEM BnIoT do 7:3. TeIeBn3OpbI, B CBOIO OHepeIb, MOryt IMeTb pa3nHbIE COOTHoSeHnPA3MepOB; 'CTaHdApTHbIe' 4:3 nIINpOKo3KpaHHbIe 16:9.
PnHcNoJIb3OBAHHN Ndy NOMHnte O cJeIyoUeM:
- Y6eIITcB B OTCyTCTBm IpeIaTCTBm Mekdy Iy n erochcopom Ha nnnepe.
-ПДУИМeETДальhoeTдeиCTBnO OKOJ07M.
-ПДУМожETHeДeIeCTBOBaTb ПИВОВ3dEeIcTBnHaeroCEHcOp CnIbHorO CONHeuHOro CBeta IINФлуОPECeHTHOrO OCBeIeHnIa.
ПДУ дя pa3ичьх yctpoiCTB cnOcO6bbl BnHTb dpyr Ha dpyra. He nCOnIb3yIe ПДУ дя dpyrOro yctpoiCTBa, pa3meuHoro B6n3n O T pIneHa. - 3aMeHnTe 6aTapeiKn, ecn dalbHoCTb DeiCtBnIy mEmhUnlaCb.
BbluBJIeHHe HEnCnPABHOCTeI
Het nntaHn
Y6eINTEcB HAdEJXHOCn PNOCoEINHeHn IhHpya NITaHn K cETN nepemehoro Toka.
Y6eIHTecb TOM, YTO BUNka NIOHOCtBuO BCTaBJeHa B HAcTeHHyOp03ETky N BKJIIOUeHa.
IpoBepbTe, He nepeBepHyT nn dnck.
N3dHnHaMnKOBcblIeHrJl
Y6eIntecb B HaeJxHocTn BCEX KaebIbHbIX IOCoEINHeHn.
ПДУ He DeiCtByET
Поверьт, He paэрахжыл nb6aTapeик.
Y6eIITecb TOM, YTO HNUTo He 3aKpbBaet cHcOp Iy.
PpmeaHHeBceN3 npaMeTpOB pnpMeHmbl KO BcEM MoJeIaM.
HeKOTOpbIe DnCKn Ha pbIHKe C MeTKoM MPEG4 Ha cAmOM DeJe RbIaHOTc DaNCKAM*.rm*/.ram*/.mmm (HeCOBMeCTMbIe foPMAtbl). ByIbTe BHNMaTeNbHbI pnp NOKyIke DnCKOB.
Функим HeKOTopbIXДИСКOB MOryT He pa6oTaB Ha 3To mIepe. 3To He ABIIeTcH HeICnPaBHOCTbO nIepea.
Политка Компаши Cambridge Audio coCTOIT B NOCTOHHOM COBepseHCTBOBAHIN. BHeuHn BnI N TeXHueCKne Tpe6OBaHn MOryt n3MeHrTaC 6e3 npedBaPntelbHoro n3BeSeHn.

Cambridge Audio
80 Series DVD Player

www.cambridge-audio.com
Part No.AP18597/4