DR DISTORTO - Distortion pedal LINE 6 - Free user manual and instructions
Find the device manual for free DR DISTORTO LINE 6 in PDF.

User questions about DR DISTORTO LINE 6
0 question about this device. Answer the ones you know or ask your own.
Ask a new question about this device
Download the instructions for your Distortion pedal in PDF format for free! Find your manual DR DISTORTO - LINE 6 and take your electronic device back in hand. On this page are published all the documents necessary for the use of your device. DR DISTORTO by LINE 6.
USER MANUAL DR DISTORTO LINE 6
Pilot's Handbook for Dr. Distorto
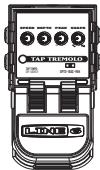
Line 6, ToneCore, Dr. Distorto, Constrictor, Crunchtone, Echo Park, Liqua-Flange, Otto Filter, Roto-Machine, Space Chorus, Tap Tremolo, Uber Metal and Verbzilla are trademarks of Line 6, Inc.
CAUTION
This equipment has been tested and found to comply with the limits for a Class B digital device pursuant to Part 15 of FCC Rules. Operation is subject to the following two conditions: (1) This device may not cause harmful interference, and (2) this device must accept any interference received, including interference that may cause undesired operation.
WARNING
To reduce the risk of fire or electric shock, do not expose this appliance to rain or moisture.

The exclamation point within a triangle means, "Caution!" Please read the information next to all caution signs.

The lightning symbol within a triangle means, "Electrical caution!" It indicates the presence of information about operating voltage and potential risks of electrical shock.

You should read these Important Safety Instructions. Keep these instructions in a safe place.

Before using your ToneCore, carefully read the applicable items of these operating instructions and the safety suggestions.
- Obey all warnings on the pedal and in the ToneCore Pilot's Handbook.
- Connect optional power supply only to AC power outlets rated 100-120V or 200-240V 47-63Hz (see indications on optional power supply).
-
Do not perform service operations beyond those described in the ToneCore Pilot's Handbook. Service is required when the apparatus has been damaged in any way, such as:
-
power-supply cord or plug is damaged
liquid has been spilled or objects have fallen into the apparatus
the unit has been exposed to rain or moisture
the unit does not operate normally or changes in performance in a significant way
the unit is dropped or the enclosure is damaged. -
Do not place near heat sources, such as radiators, heat registers, or appliances which produce heat..
- Guard against objects or liquids entering the enclosure. Do not use or place unit near water.
- Unplug the power supply when not in use for extended periods of time. Unplug the power supply during lightning storms.
- Clean only with a damp cloth.
- Only use attachments/accessories specified by the manufacturer.
- Prolonged listening at high volume levels may cause irreparable hearing loss and/or damage. Always be sure to practice "safe listening."
Dr. Distorto Pilot's Handbook
Output your ToneCore to your amplifier, or route it through another pedal.

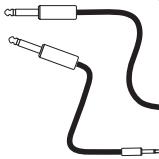
Connect your guitar using a standard cable.
You can, of course, feed your ToneCore with another effect pedal instead of a guitar.
Greetings and salutations! Thank you for inviting the Line 6 Dr. Distorto distortion pedal into your life.
Effect On-Off / Power Indicator Light
The Power Indicator Light on your ToneCore uses two colors to indicate the pedal's state:
Light not lit - Effect is bypassed (off)
GREEN - Effect is engaged (on)
- RED (flashing) - Batteries should be replaced. This low power indication will override all other states.
Connections and Power Indicator Light
In Jack
Here's where it all begins. Use a standard guitar cable to connect your guitar, or the output of another effect to use in combination with your ToneCore. Like most pedals, inserting a plug into this jack will turn on the power to your ToneCore. Disconnect the plug from this jack when the ToneCore is not being used.
Out Jack
Use a standard guitar cable to connect to the input of a guitar amp, or the input of another effect that will feed your amp.
Power Jack
Connect an optional ToneCore-compatible Line 6 power supply like the DC-1, and you'll never need a 9-volt battery again!
Foot Switch
Stomp on this to turn Dr. Distorto's effect sound processing on and off.
Dr. Distorto Pilot's Handbook
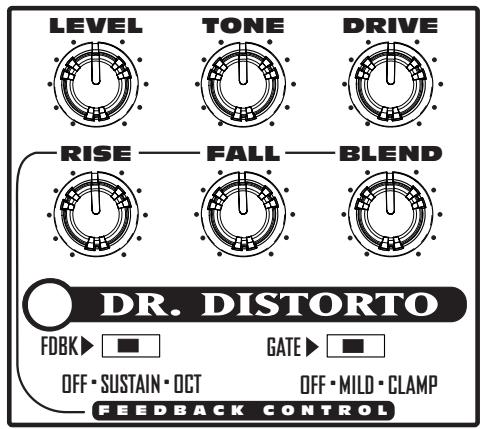
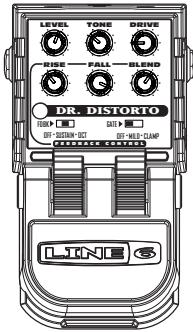
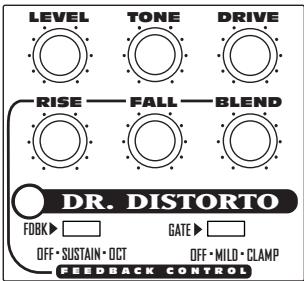
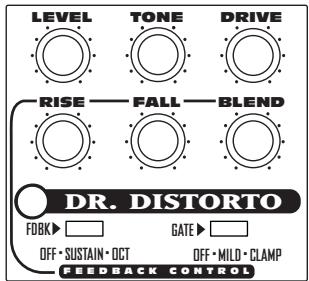
Level
This sets the output level. Higher levels will hit the amp or effect fed by the Dr. Distorto with more signal level, giving you more volume. If the level is high enough, it may also cause more distortion to be created within the receiving amp or pedal.
Tone
The TONE knob allows you to smoothly morph from a fuzz distortion tone (counter clockwise) to a classic drive tone (clockwise) using only one dial. Be sure to experiment with other voicings at in-between settings.
Drive
The drive knob controls the amount of distortion created within your Dr. Distorto. You may want to use the Gate to tame unwanted noise, especially when you've got the Drive set high.
FEEDBACK CONTROL
RISE
Adjusts the amount time it takes the feed-backer to begin sustaining a tone.
FALL
Adjusts the amount time it takes the feed-backer to stop sustaining a tone.
BLEND
Adjusts the volume of the feed-backer's sustained tone.
Fdbk Switch
SUSTAIN - provides a sustained tone that will be in unison with any single note played.
OCT - provides a sustained tone that is one octave above any single note played.
OFF - disables the feedback portion of the pedal, leaving, leaving RISE, FALL and BLEND non-functional.
Gate Switch
OFF - Disables the Gate.
MILD - A soft and mild noise gate, self-adjusting to your current Drive knob setting (cool, huh?).
CLAMP-A heavy, fast-clamping gate. Great for those aggressive metal chords and palm muting.
NOTE:
If you'd like to use Dr. Distorto's feedback / sustainer section with your favorite distortion pedal no problem. Just turn the DRIVE control all the way down (fully counterclockwise) and plug in your favorite Overdrive, Distortion, Fuzz or just plane drive pedal after Dr. Distorto. Experiment with the RISE, FALL, and BLEND settings to get the preferred amount of feedback in your signal.
Battery Access Instructions
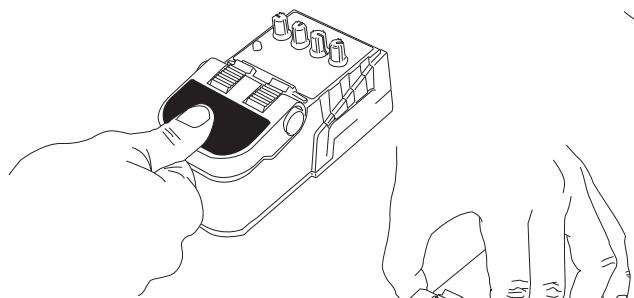
1)Depress pedal fully.

3) Squeezing hinge, raise pedal to reveal battery.
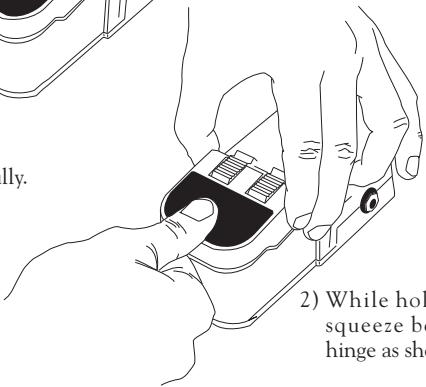
2) While holding pedal, squeeze both sides of hinge as shown.
Battery Access Instructions
Power Supply
Connect an optional Line 6 DC-1 power supply and you'll never need a 9-volt battery again! It is also compatible with most popular 9 Volt DC stomp boxes. Using the power supply will disconnect the battery.
POWER REQUIREMENTS
| Min | Nominal | Max | |
| Supply Voltage | 6 VDC | 9.6 VDC | 16 VDC |
| Supply Current @ 9.6VDC | 40mADC | 60mADC | 100mADC |
| Power @ 9.6VDC | 0.4 Watt | 0.6 Watt | 1 Watt |
Example Tones
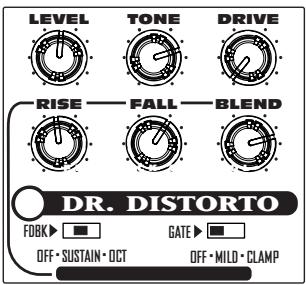
Clean Feedback Effect
Use this setting to get feedback when playing with a clean tone. It also works great if you put your favorite overdrive after Dr. Distorto for different tones with feedback.
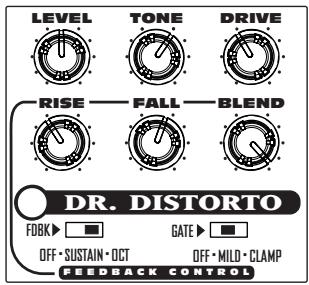
Overdrive with Feedback
This preset allows you to play normally, bringing in the octave overtone between performance passages when a single note is held.
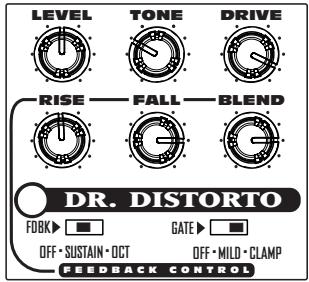
Supa-Sustain
This setting is for fullbore fuzzed out sustain!
Your Tone Settings

Mark the knob and switch settings for your favorite tones above.
LINE 6
TONE
Line 6, ToneCore, Dr. Distorto, Constrictor, Crunchtone, Echo Park, Liqua-Flange, Otto Filter, Roto-Machine, Space Chorus, Tap Tremolo, Uber Metal und Verbzilla sind Warenzeichen der Line 6, Inc.
VORSICHT
Spanning 6VDC 9,6VDC 16VDC
Stroom @ 9,6VDC 40mADC 60mADC 100mADC
Vermogen @ 9,6VDC 0,4W 0,6W 1W
Enkele voorbeelden