
DH 12 G - Dehumidifier ALPATEC - Free user manual and instructions
Find the device manual for free DH 12 G ALPATEC in PDF.
| Product type | Dehumidifier |
| Brand | ALPATEC |
| Model | DH 12 G |
| Power supply | 230-240 V, 50 Hz |
| Power consumption | 230 W (280 W max) |
| Dehumidification capacity (30°C, 80% RH) | 12 L/day |
| Dehumidification capacity (27°C, 60% RH) | 6 L/day |
| Operating temperature | 15 to 35 °C |
| Humidity setting | 20% to 80% and continuous mode (MAX) |
| Water tank capacity | 3.6 liters |
| Noise level | < 39 dB(A) |
| Refrigerant | R 134 A / 130 g |
| Dimensions (L x W x H) | 492 x 342 x 245 mm |
| Weight | 11 kg |
| Recommended area | Up to 16 m² |
| Air filter | Washable |
| Continuous drainage | Yes, with hose (12 mm diameter) |
| Automatic shut-off | When the water tank is full |
| Compressor protection | 3-minute delay before restart |
| Included accessories | Drainage hose, rubber plug |
| Usage | Indoor |
| Safety | Do not use outdoors, keep out of reach of children |
| Maintenance | Clean the filter regularly, exterior with a dry soft cloth |
Frequently Asked Questions - DH 12 G ALPATEC
User questions about DH 12 G ALPATEC
0 question about this device. Answer the ones you know or ask your own.
Ask a new question about this device
Download the instructions for your Dehumidifier in PDF format for free! Find your manual DH 12 G - ALPATEC and take your electronic device back in hand. On this page are published all the documents necessary for the use of your device. DH 12 G by ALPATEC.
USER MANUAL DH 12 G ALPATEC
SOLUTIONS CLIMATIQUES
FRANÇAIS
For your comfort and safety, ALPATEC has checked all the steps of manufacturing. The products have been made for you to enjoy their design and easiness to use.
ALPATEC, a complete range of air conditioners, coolers, fans and heaters for you to be completely satisfied.
CAUTION
PLEASE READ ALL THESE INSTRUCTIONS CAREFULLY BEFORE USING THIS APPLIANCE.
- Make sure that the voltage rating on the type plate corresponds to your main voltage. Any error in connecting the appliance invalidates the guarantee.
- Keep out of reach of children.
- Only use this appliance for domestic purposes and in the way indicated in these instructions. Never use for any other purposes.
- From time to time, check the cord. Never use the appliance if cord plug or appliance show any sign of damage.
- The cord length of this product has been selected to reduce the possibility of tangling in or tripping over a longer cord. If more cord length is needed, an extension cord may be used. Ensure not to let it dangle where someone could accidentally pull or trip over it.
- Do not place directly in front of heater or in direct sunlight as this could damage the appliance.
- Do not use the appliance outside.
- Never pull the cord to unplug or move the appliance.
- Unplug the appliance before cleaning or changing any pieces.
- Do never introduce metallic objects to avoid any risks of electrical shocks.
- Never use accessories that are not recommended or supplied by the manufacturer. It could constitute a danger for the user and could damage the appliance.
- Never repair the appliance yourself. All interventions made by a non-qualified person can be dangerous; in this case guarantee conditions would cancel. As all electrical products, a qualified electrician must repair it, as well as the power cord must be changed by an electrician.
- This product contains R 134A gas whose handling is regulated by the decree n° 2007-737 of May 7th 2007.
SPECIAL RECOMMENDATIONS
- Do not place any object onto the air outlet.
- The appliance must be used at a room temperature from 15^ to 35^ .
- Keep insecticide spray and paint spray or any inflammable products away from the unit to protect the plastic casing and avoid electrical shocks.
-
The rear of the unit can go quite close to the wall but leave at least 20cm gap.
-
Do note place the appliance on soft or uneven ground in order to prevent it from leaking of making noise.
- Do not place the appliance on its side or back / front in storage or transport. If unit has been transported allow to stand for 2 hours before switching the unit on.
- Switch off and unplug the appliance when is not used for a long time
THE MANUFACTURER WILL NOT ASSUME ANY RESPONSABILITY IN CASE OF NON ADHERENCE TO THESE INSTRUCTIONS.
SAVE THIS USER MANUAL CAREFULLY.
SPECIFICATIONS
| Power supply | : 230-240 V, 50 Hz |
| Power input | : 230 W (280 W maxi) |
| Moisture removal 30°C 80% | : 12 litters / day |
| Moisture removal 27°C 60% | : 6 litters / day |
| Temperature range for use | : 15 to 35 °C |
| Humidity rate adjustment | : 20% to 80% and continuous |
| Water tank capacity | : 3,6 litters |
| Noise level | : < 39 dB (A) |
| Cooling agent | : R 134 A / 130 g |
| Dimensions | : 492 x 342 x 245 mm |
| Weight | : 11 kg |
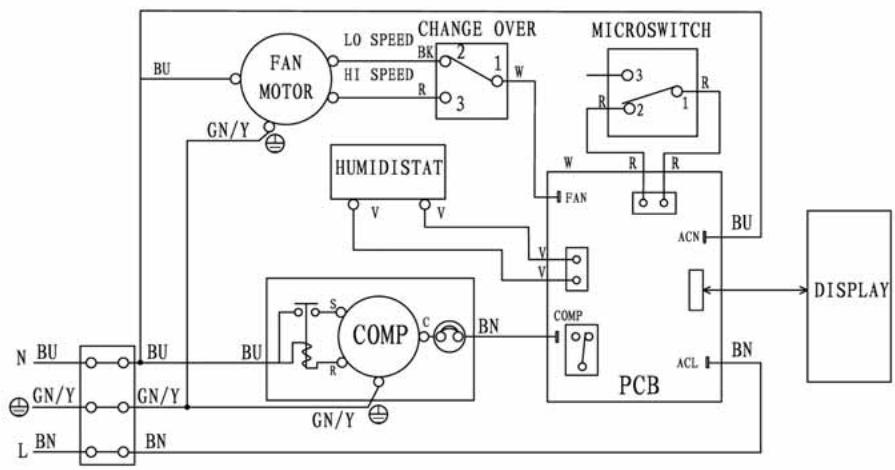
Electrical diagram
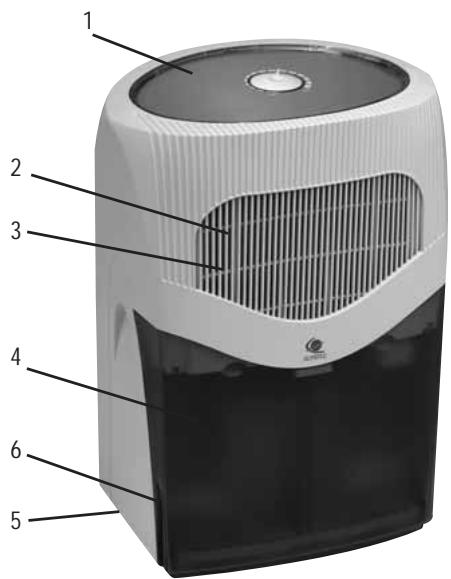
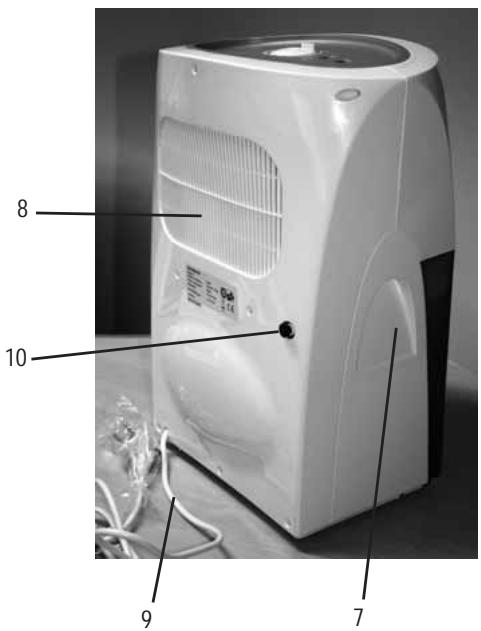
PARTS LIST
- Control panel
- Air inlet
- Filter (inside the unit)
- Water tank
- Casters
-
Handle for water tank
-
Handle
- Air outlet
- Power cord
- Drain hole (with rubber knob)
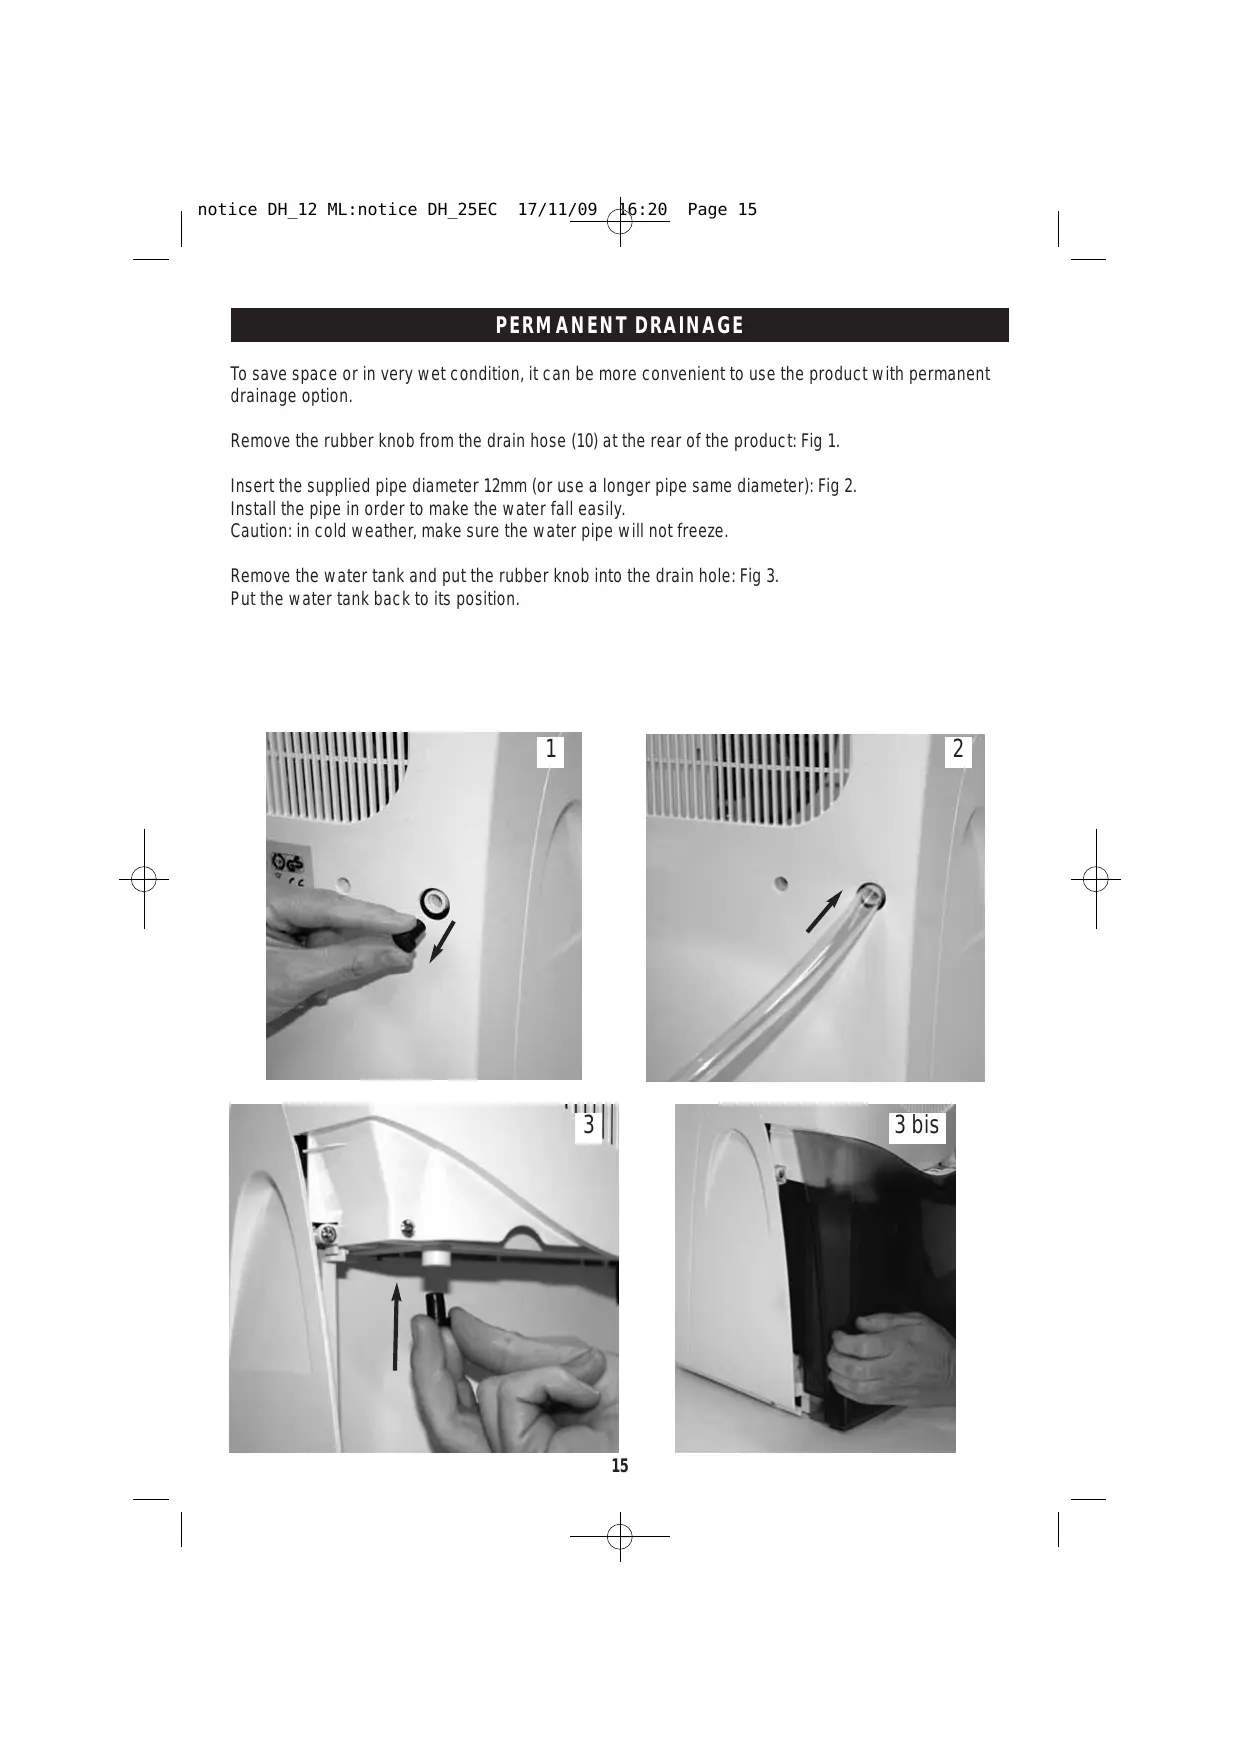
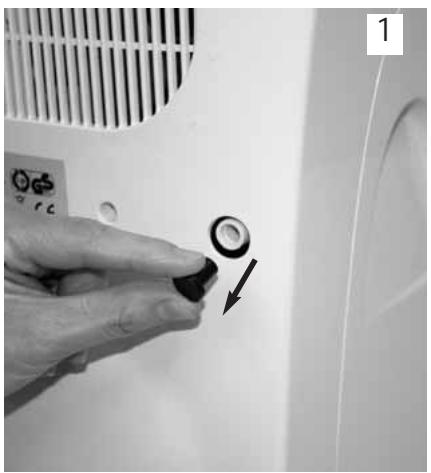
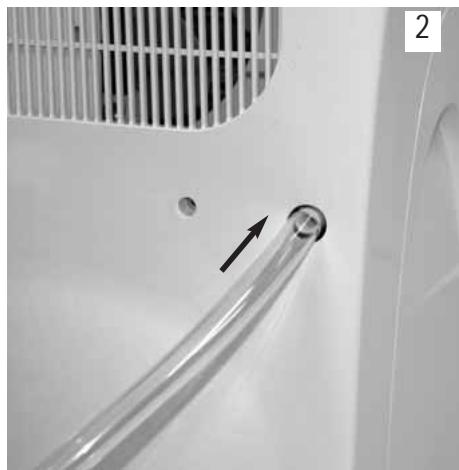
PERMANENT DRAINAGE
To save space or in very wet condition, it can be more convenient to use the product with permanent drainage option.
Remove the rubber knob from the drain hose (10) at the rear of the product: Fig 1.
Insert the supplied pipe diameter 12mm (or use a longer pipe same diameter): Fig 2.
Install the pipe in order to make the water fall easily.
Caution: in cold weather, make sure the water pipe will not freeze.
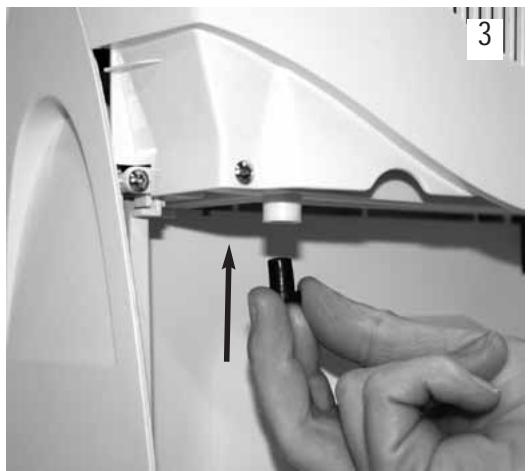
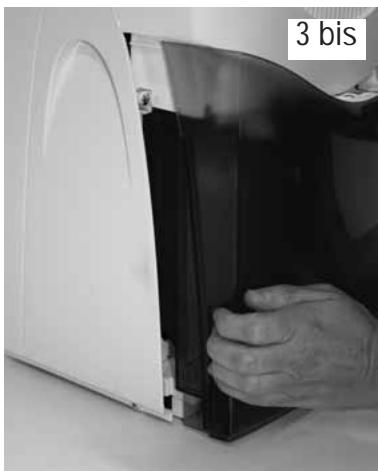
Remove the water tank and put the rubber knob into the drain hole: Fig 3.
Put the water tank back to its position.
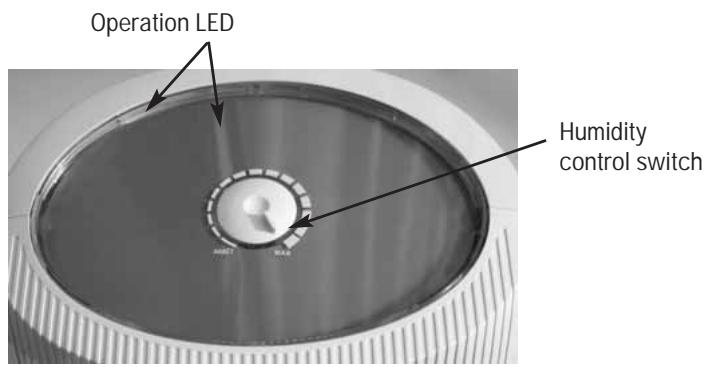
- Put the humidity control switch on ARRÉT position.
- Install permanent drainage (if needed).
- Plug the product.
- Turn the humidity control switch clockwise.
The humidity rate can be adjusted from 20 to 80% , the middle position is for 60% . Operation LED are blue.
MAX position means that the product will keep on dehumidifying.
5.When the water tank is full, the product stops working. Operation LED are red colour.
6. Remove the tank, empty and replace it.
The product starts again.
If the product does not restart, control the tank position.
- To stop the product, turn the humidity control switch in ARRÉT position.
When the product is stopped, wait for 3 minutes before restarting it (compressor protection).
NOTE: for a better dehumidifying effect, keep clear the areas in front and rear of the product.
MAINTENANCE
Stop and unplug the product before any operation.
Use a soft and dry cloth to clean the body
Never use detergent, chemical product or cleansing solution.
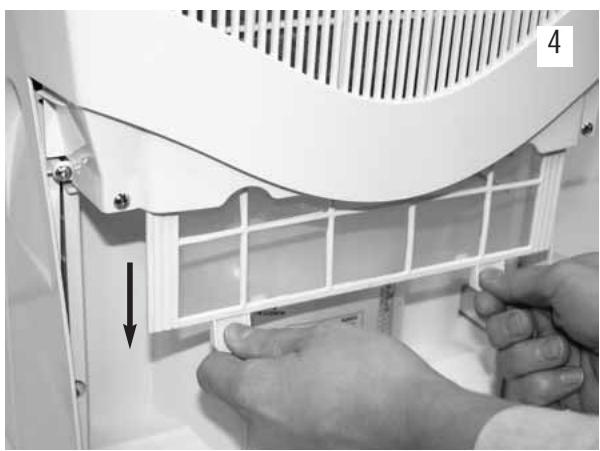
Filter is located behind air inlet 2. Remove the water tank and extract the filter: Fig 4.
Use a vacuum cleaner or tap it smoothly.
If it is very dirty use warm water with soap, rinse and dry.
Replace the filter.
Check the filter regularly.
When you do not use the appliance for a long time:
- Stop it
- Unplug it
- Empty and dry the water tank
- Cover and store the product away from the sunlight
TROUBLE SHOOTING
Before asking for repair service, please check the following points:
| PROBLEM | POSSIBLE CAUSE | SOLUTION |
| The unit is plugged but does not work | 1. Is the selected humidity rate high enough? | 1. increase the rate |
| 2. is the ambient temperature between 15°C and 35°C ? | 2. wait for the temperature to be between 15°C and 35°C | |
| 3. water tank full or not well assembled (water tank full LED on) | 3. empty (if needed) and assemble carefully the water tank | |
| Abnormal noise | 1. Unit is on a level surface? | 1. put the unit on a flat level surface |
| 2. is the filter clean ? | 2. clean the filter | |
| Dehumidifying is not enough | 1. the room is too big | 1. this product is suitable for rooms up to 20 m² |
| 2. there is something in the room producing humidity | 2. remove it | |
| 3. windows and doors are open | 3. close as most as doors and windows as possible | |
| Leakage | 1. continuous drainage | 1. make sure pipe is correctly inserted |
| 2. with water tank | 2. make sure rubber plug is inserted at the rear of the product |
If you have not solved the problem, stop and unplug the product. Contact your dealer or a qualified person.
Instructions on environment protection
Do not dispose of this product in the usual household garbage at the end of its life cycle; hand it over a collection point for the recycling of electrical and electronic appliances. The symbol on the product, the instructions for use or the packing will inform about the methods of disposal. The materials are recyclable as mentioned in its marking. By recycling or others forms of re-utilization of old appliances, you are making an important contribution to protect our environment. Please inquire at the community administration for the authorized disposal location.
ALPATEC
SOLUTIONS CLIMATIQUES
11/09


- FRANÇAIS
- CAUTION
- PLEASE READ ALL THESE INSTRUCTIONS CAREFULLY BEFORE USING THIS APPLIANCE.
- SPECIAL RECOMMENDATIONS
- THE MANUFACTURER WILL NOT ASSUME ANY RESPONSABILITY IN CASE OF NON ADHERENCE TO THESE INSTRUCTIONS.
- PARTS LIST
- PERMANENT DRAINAGE
- MAINTENANCE
- TROUBLE SHOOTING
- Instructions on environment protection
- ALPATEC
- SOLUTIONS CLIMATIQUES
Brand : ALPATEC
Model : DH 12 G
Category : Dehumidifier