
AC 105.1 ETP - Air-conditioner ALPATEC - Free user manual and instructions
Find the device manual for free AC 105.1 ETP ALPATEC in PDF.
User questions about AC 105.1 ETP ALPATEC
0 question about this device. Answer the ones you know or ask your own.
Ask a new question about this device
Download the instructions for your Air-conditioner in PDF format for free! Find your manual AC 105.1 ETP - ALPATEC and take your electronic device back in hand. On this page are published all the documents necessary for the use of your device. AC 105.1 ETP by ALPATEC.
USER MANUAL AC 105.1 ETP ALPATEC
SOLUTIONS CLIMATIQUES
CLIMATISEUR
MOBILE
MONOBLOC
MOBILE AIR
CONDITIONER
—AC 105.1 ETP—
MODED'EMPLOI
USERMANUAL
WEB
FRANÇAIS
B. EVACUATION CONTINUE
Fig. 22 et 23
Congratulations for having chosen this ALPATEC product, and thank you for trusting us. For your comfort and safety, your appliance has been checked at every step of manufacturing and has successfully gone through all our tests of quality. ALPATEC creates original products to please you, as far as design and easiness to use are concerned in order to give you complete satisfaction.
CAUTIONS
When using electrical appliances, some rules have to be respected. READ THESE INSTRUCTIONS CARREFULLY BEFORE USING THIS PRODUCT.
- Take care to install this product by complying with the national rules of electric installation. Make sure that the voltage on the rating plate is same as your main one before plugging. Always connect to earth ground.
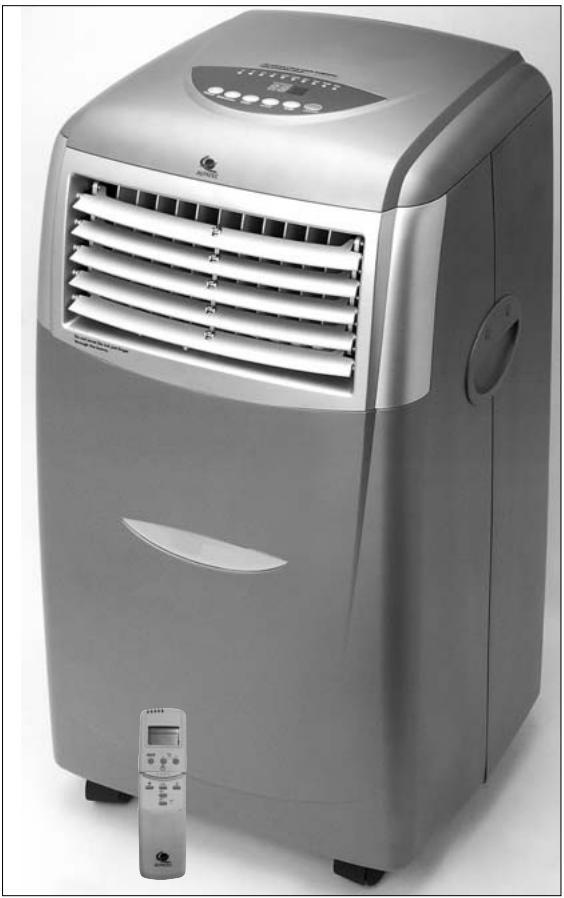
- Place the appliance on a dry and level surface, with enough room, without obstacle. Clearance of 50~cm between product and wall is needed.
- Always place the appliance in a vertical position, in order to maintain the compressor in good working conditions.
- Never let the appliance in a room with children and handicapped people without supervising.
- Do not use outdoor, in a wet environment, close to a bath-tub, a shower or a swimming pool.
- Do not immerse appliance or power cord
- This product is provided with its own power cord. Do not use any other electrical connection but the one supplied and recommended by the manufacturer. This could be dangerous and may damage the appliance.
- Do not use if power cord or appliance is damaged
- Only use this appliance for domestic purpose, following the instructions of that manual.
- Never move or unplug by pulling the power cord.
- Unplug before cleaning or replacement of one part.
- Do not use without filter.
- In order to avoid any electrical interference, keep away from electric sources.
- Never use near a hot place.
- Do not use if it is not totally assembled and particularly if the protection grid is not secured, or the exhaust pipe is not assembled.
- Do not introduce parts through the grid.
- Do not put anything on the appliance. Do not block air inlet and outlet.
- Do not attempt to repair the appliance yourself. Otherwise, guarantee would cancel. It has to be repaired by a qualified worker. Power cord has to be changed by a qualified person if needed.
THE MANUFACTURER WILL NOT ASSUME ANY RESPONSIBILITY IN CASE OF NON ADHERENCE TO THESE RECOMMANDATIONS. KEEP THIS MANUAL CAREFULLY.
TECHNICAL DATA
| AC 105.1 ETP | |
| Rotary compressor | R 407 C |
| Maximum cooling capacity | 2900 W |
| Nominal cooling input power | 1014 W |
| Heating capacity | 2900 |
| Dehumidifying capacity | 24 l/day |
| Air flow | 360 m³ / h |
| Noise level min.-max. dB (A) | 50-54 |
| Number of fan speeds | 2 |
| Duct length max. | 150 cm |
| Duct diameter | 130 mm |
INSTALLATION
- Let a 50 cm space all around the unit.
- After unpacking, place the unit upright to allow the cooling agent to stabilize and wait 3 hours before use.
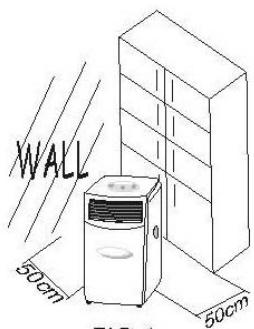
FIG.4
AIR EXHAUST DUCT MOUNTING METHOD
Fig. 5
1. Temporary method
Fix the end of the exhaust duct to the exhaust terminal of the unit.
- Half-open the window and let the air outlet duct get through.
2. Permanent method
Fix the end of the exhaust duct to the exhaust terminal of the unit.
- Dig a hole ( >136mm ) on the wall.
- Fit the supplied round window connector on the air outlet duct then let it get through the wall. BE CAREFUL : the length of the exhaust pipe is between 390 mm and 1500 mm. Use the shortest possible length. When mounting, we advise to keep the exhaust pipe in a horizontal position.
When the hole is not in use, use the cap to cover the hole.
GOOD MOUNTING
- If the exhaust pipe has to be bended it should be proceeded as shown on : Fig. 7
WRONG MOUNTING
- The bend of the exhaust pipe is too important and can occur a wrong working of the unit. : Fig. 8
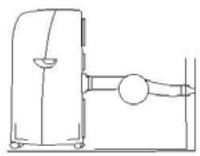
FIG.7
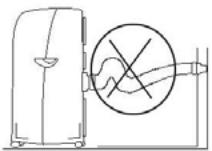
FIG.9
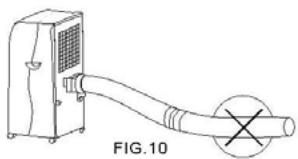
WARNING
- The length of the exhaust pipe is specially designed according to the specification of this product. Do not replace or prolong with your own private hose as this could cause the unit to mal-function.
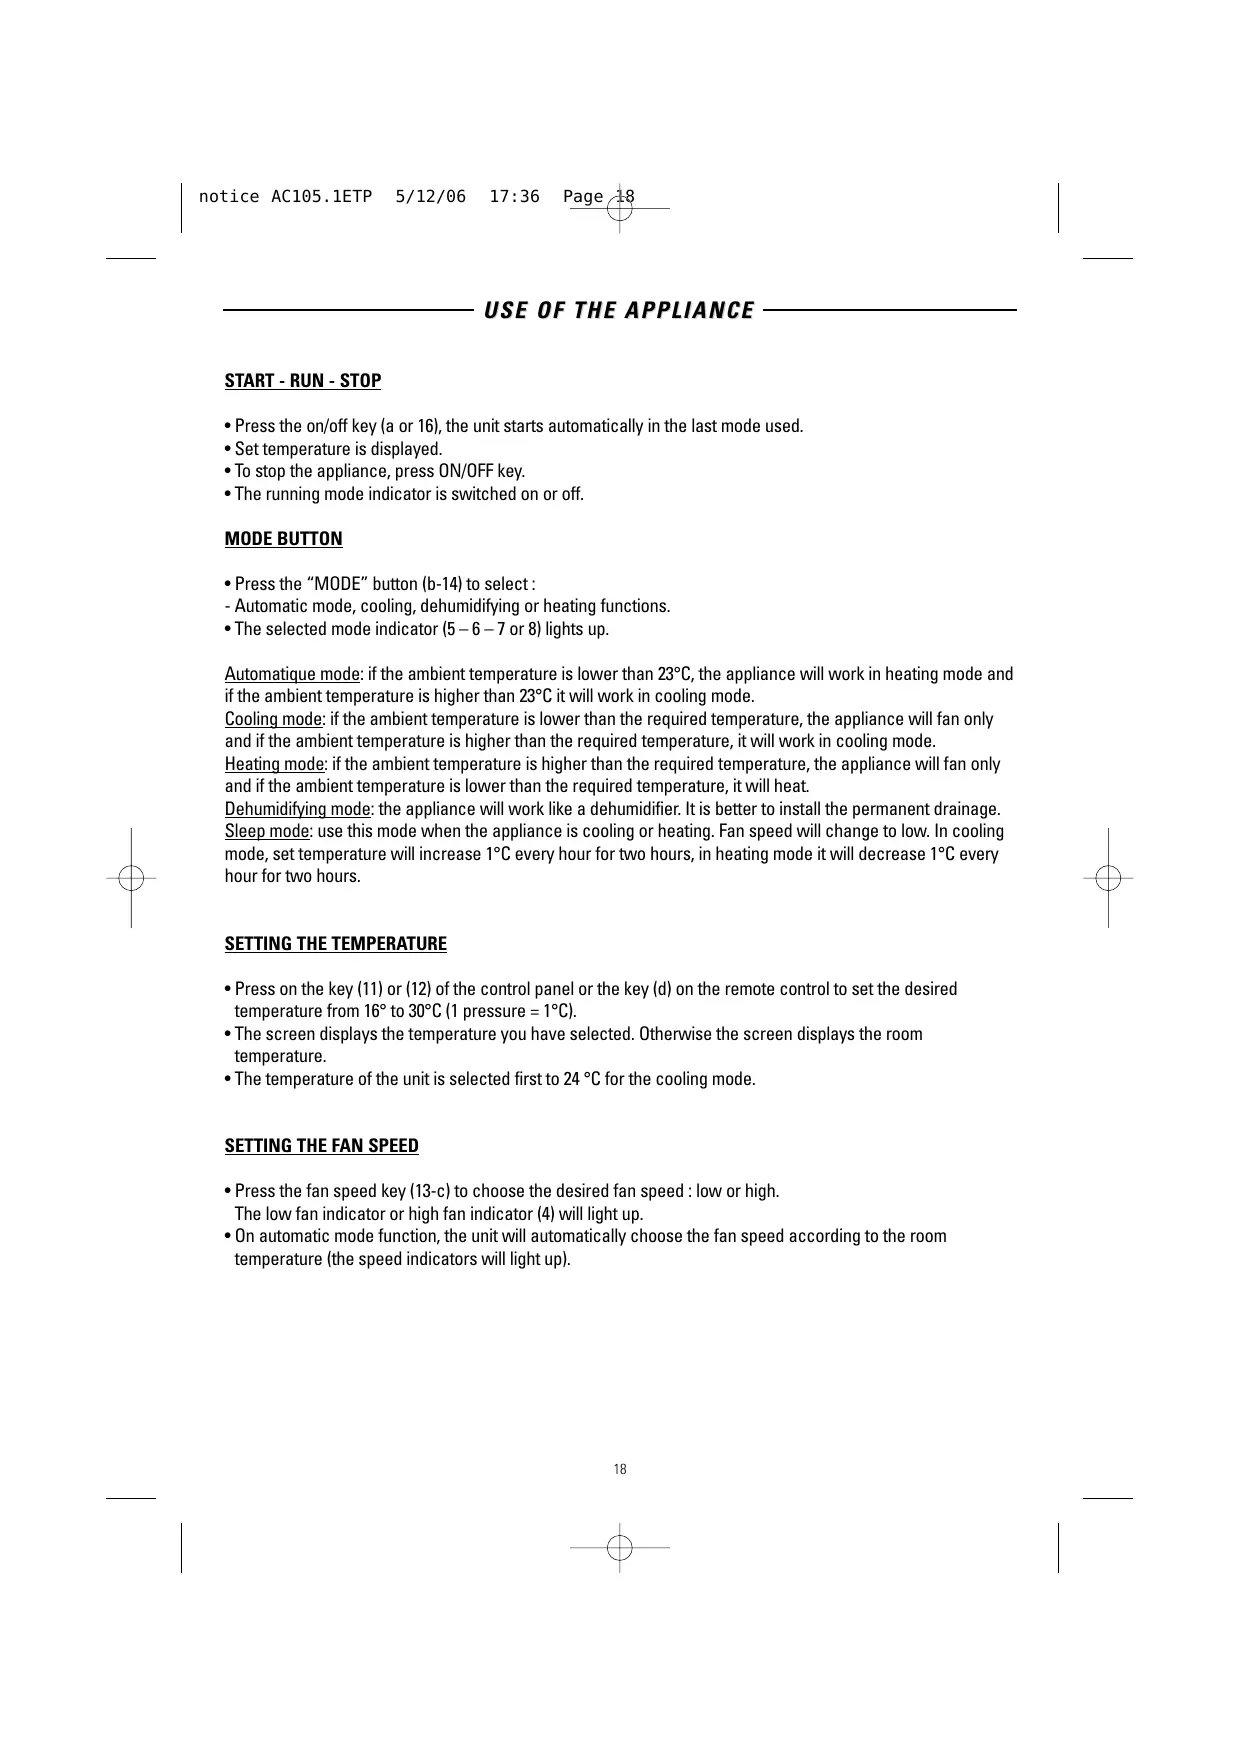
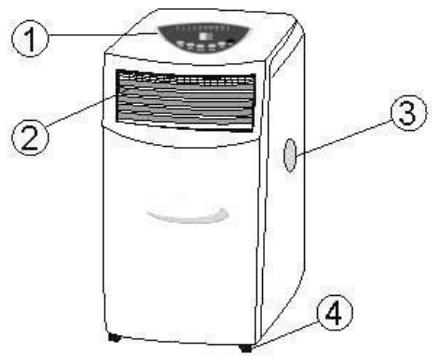
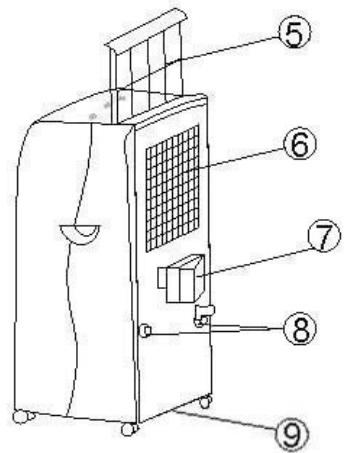
DESCRIPTION OF THE APPLIANCE
FRONT
- Control panel
- Air outlet
- Handle
- Casters
BACK
- Air filter
- Air inlet
- Exhaust air outlet
- Cord storage
- Water stopper (exhaust drain pipe)
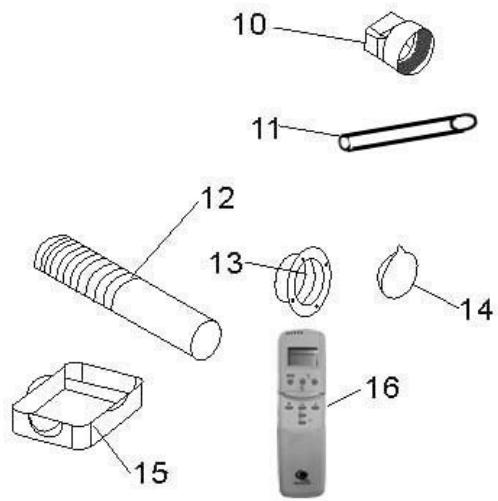
ACCESSORIES
- Adaptor between the back of the unit and the exhaust pipe
- Water pipe
- Exhaust pipe
- Round window connector for window or wall
- Cap for hole
- Water tray
- Remote control
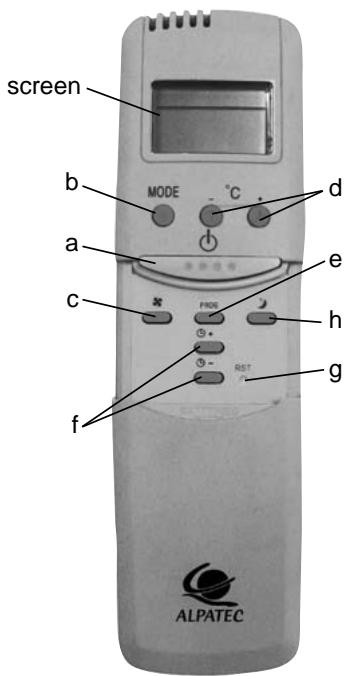
REMOTE CONTROL
a. on / off
b.MODE
c. fan speed
d. set temperature
e. timer
f. set timer hour
g. reset
h. sleep
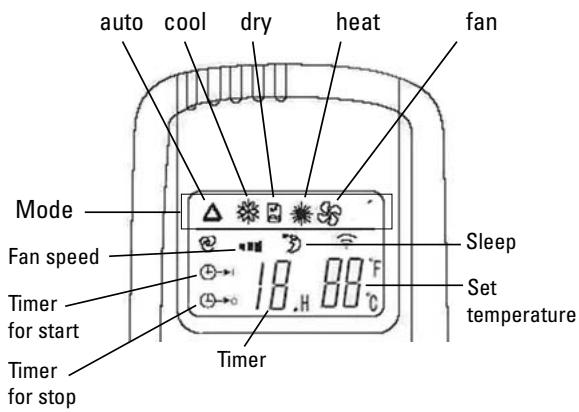
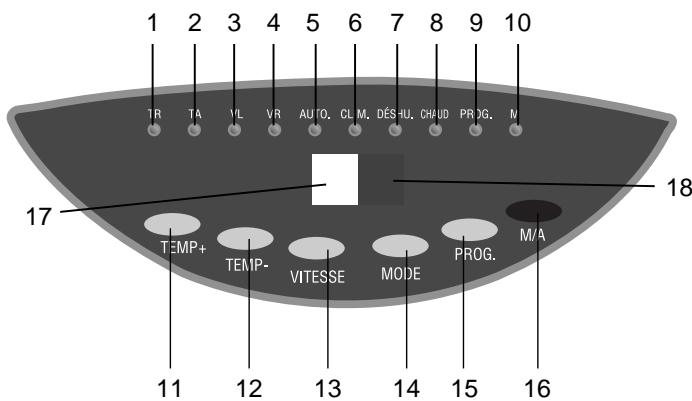
THE CONTROL PANEL
1- Set temperature indicator
2- Room temperature indicator
3-Low fan indicator
4-High fan indicator
5-Automatic mode indicator
6-Cooling mode indicator
7- Dehumidifying mode indicator
8- Heat mode indicator
9-Timer mode indicator
10- Running mode indicator
11- " ^+ temp key
12- " -" temp key
13-Fan speed key
14-Mode key
15- PROG key
16-ON/OFFkey
17- Set temperature/hour display
18- Remote control signal receiver
USE OF THE APPLIANCE
START - RUN - STOP
- Press the on/off key (a or 16), the unit starts automatically in the last mode used.
- Set temperature is displayed.
- To stop the appliance, press ON/OFF key.
- The running mode indicator is switched on or off.
MODE BUTTON
- Press the "MODE" button (b-14) to select:
- Automatic mode, cooling, dehumidifying or heating functions.
- The selected mode indicator (5 - 6 - 7 or 8) lights up.
Automatique mode: if the ambient temperature is lower than 23^ , the appliance will work in heating mode and if the ambient temperature is higher than 23^ it will work in cooling mode.
Cooling mode: if the ambient temperature is lower than the required temperature, the appliance will fan only and if the ambient temperature is higher than the required temperature, it will work in cooling mode.
Heating mode: if the ambient temperature is higher than the required temperature, the appliance will fan only and if the ambient temperature is lower than the required temperature, it will heat.
Dehumidifying mode: the appliance will work like a dehumidifier. It is better to install the permanent drainage. Sleep mode: use this mode when the appliance is cooling or heating. Fan speed will change to low. In cooling mode, set temperature will increase 1^ every hour for two hours, in heating mode it will decrease 1^ every hour for two hours.
SETTING THE TEMPERATURE
- Press on the key (11) or (12) of the control panel or the key (d) on the remote control to set the desired temperature from 16^ to 30^ (1 pressure = 1^ ).
- The screen displays the temperature you have selected. Otherwise the screen displays the room temperature.
- The temperature of the unit is selected first to 24^ for the cooling mode.
SETTING THE FAN SPEED
- Press the fan speed key (13-c) to choose the desired fan speed : low or high.
The low fan indicator or high fan indicator (4) will light up. - On automatic mode function, the unit will automatically choose the fan speed according to the room temperature (the speed indicators will light up).
TIMER
To program an automatic start of the appliance, start it, select the required mode, fan speed and temperature and stop it.
- Press PROG on the control panel until the required time appears on the control panel (from 1 to 24 hour).
- With the remote control, press PROG, the icon flashes on the screen. Use f touches to set the required time.
To program an automatic stop of the appliance:
- Press PROG on the control panel until the required time appears on the control panel (from 1 to 24 hour).
- With the remote control, press PROG, the icon (口) 口 flashes on the screen. Use f touches to set the required time.
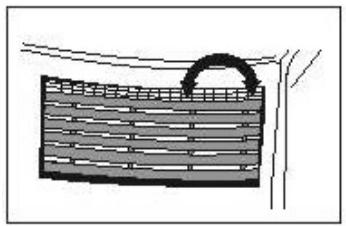
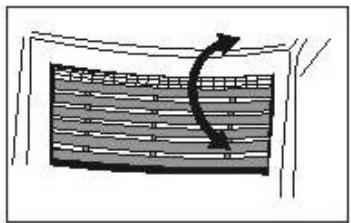
AIR FLOW DIRECTION
Vertical and horizontal louvers have to be manually adjusted.
WARNING!
- To prolong the life of the compressor, after switching off the unit, wait for 3 minutes minimum before plugging it again. The unit has a three minute compressor delay protection circuit.
- Your unit must always be used in an upright position because it contains a cooling agent.
WATER DRAINAGE METHODS
- During the cooling process, water is extracted from the air into the unit. When the water tray of the unit is full, the compressor stops, the fan only continues to run.
- Empty the water tray : the cooling process will run again.
A. WATER DRAINAGE WITH WATER TRAY
Fig 21
- Switch off the appliance
- Place the water tray on the floor under the drain hole.
- Take off the water stopper and the rubber plug of the drain hole, the condensed water will go automatically into the tray.
- When the water tray is almost full replace the rubber plug of the drain hole and the water stopper. Empty the water tray.
- Do the operations 2-3-4 again until there is no more water in unit.
- Place then the rubber plug firmly into the drain hole. The full tank indicator should be switched off.
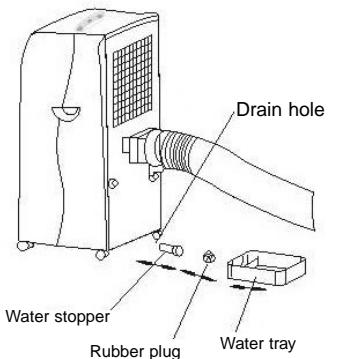
FIG.21
B PERMANENT DRAINAGE
Fig. 22 and 23
- Take off the water stopper and the rubber plug (fig. 22). Keep them aside.
- Connect the adapted pipe to the drain hole, the condensed water will go automatically (fig. 23).
- You can add an extension to the water tube (diameter 18mm ) (fig. 24).
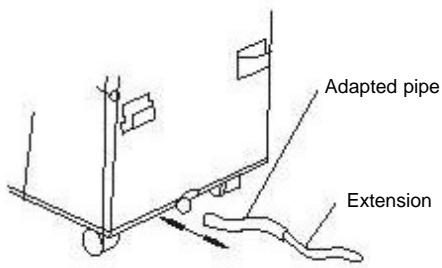
FIG.24
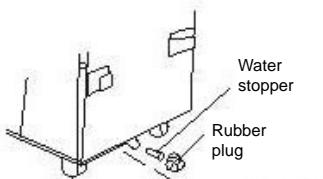
FIG.22
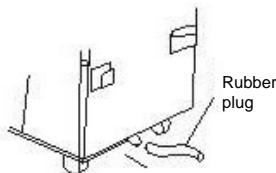
FIG.23
MAINTENANCE
- Unplug the appliance before any cleaning operation.
- Check there is no power more into the unit before any maintenance or repairing operation, in order to avoid any electric shock.
- Do not use chemical solvent (like benzene, alcohol glazer) to clean the surface of the unit. If you do so, the surface will be scratched, damaged even the whole casing could become deformed.
AIR FILTER
- Clean the air filter regularly (every two weeks) for an optimum air flow. Use a vacuum cleaner or tap the filter lightly to remove dust and then rinse thoroughly under running water (lukewarm water). Dry thoroughly in a shaded place.
CLEANING OF THE CASE
- Clean the outside part of the unit with a damp and dry cloth.
- Unplug the appliance.
- Drain the condensed water completely.
- Clean or change the filter.
- Make the unit working in fan mode about a couple of hours, so that the inside part of the unit can completely dry.
- Replace the unit in its original packing and do not stock heavy objects of the top of the appliance.
- When the appliance is not in use put the power cord away as shown in picture beneath. (fig. 26)
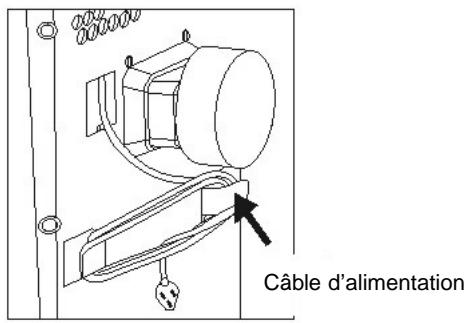
FIG.26
TROUBLESHOOTING
Check first the symptoms following before calling a qualified electrician.
| SYMPTOMS | CHECKING | ACTING |
| Air conditioner does not operate at all | Is power fail ? | Check the cord. |
| Is plug out ? | Push the plug into the wall socket. | |
| Is power fuse burned out ? | Change the fuse or switch on. | |
| The drain tank indicator is lit. | Pour the water out of the water tank. | |
| Is set time suitable ? | Change set time. | |
| Cooling efficiency is not good | Is air inlet or outlet locking ? | Clear the locking. |
| Is there any other heat sources in room ? | Move the heat sources. | |
| Is the unit in direct sunshine ? | Draw the curtains. | |
| Are air filters dirty ? | Clean the air filter. | |
| Is set temp suitable ? | Set suitable temperature. | |
| Is indoor fan speed set at low ? | Set suitable fan speed. | |
| Are there too many windows opened ? | Close the windows. | |
| Is the room temperature lower than the selected one ? | It is normal. |
TROUBLESHOOTING
| SYMPTOMS | CHECKING | ACTING |
| Too noisy and many vibrations | It is the inner liquid (refrigerant) flowing inside. Is it inclined? | It is normal. Place the unit in a horizontal floor. |
| The machine starts and stops frequently | Is the voltage of the power source normal? Is the air exhaust rightly fixed or bended? Have you added air exhaust yourself? | Keep the power source indicated in the rating plate. Try to keep the air exhaust in a horizontal position. Don’t add air exhaust yourself and remove it. |
| The compressor doesn’t run | The appliance is equipped with a overheating protection. | Check the air outlet exhaust is not bended. Wait until the temperature of the unit cools. |
BE CAREFUL!
Stop and unplug the unit and stop running immediately in case of something below happens. Then contact a qualified electrician if the problem lasts or as soon as something abnormal occurs.

Instructions on environment protection
Do not dispose of this product in the usual household garbage at the end of its life cycle; hand it over a collection point for the recycling of electrical and electronic appliances. The symbol on the product, the instructions for use or the packing will inform about the methods of disposal. The materials are recyclable as mentioned in its marking. By recycling or others forms of re-utilization of old appliances, you are making an important contribution to protect our environment. Please inquire at the community administration for the authorized disposal location.
ALPATEC
SOLUTIONS CLIMATIQUES
12/06