LIPO BALANCER CHARGER 2-3S - LiPo Battery Charger GRAUPNER - Free user manual and instructions
Find the device manual for free LIPO BALANCER CHARGER 2-3S GRAUPNER in PDF.
User questions about LIPO BALANCER CHARGER 2-3S GRAUPNER
0 question about this device. Answer the ones you know or ask your own.
Ask a new question about this device
Download the instructions for your LiPo Battery Charger in PDF format for free! Find your manual LIPO BALANCER CHARGER 2-3S - GRAUPNER and take your electronic device back in hand. On this page are published all the documents necessary for the use of your device. LIPO BALANCER CHARGER 2-3S by GRAUPNER.
USER MANUAL LIPO BALANCER CHARGER 2-3S GRAUPNER
Micro-processor controlled charger for two or three Lithium-Polymer cells, maximum charge current 1.1 A and with LiPo Balancer-Function
Please study these instructions, reading them completely and attentively, before you use the unit for the first time. This will guarantee that you will be able to exploit all the facilities of your new battery charger. The warnings and safety notes are particularly important. Please store these instructions in a safe place, and be sure to pass them on to the new owner if you ever dispose of the charger.
In purchasing the LiPo BALANCER CHARGER 2 -3S you have acquired a mature product with an excellent performance. It incorporates the latest semi-conductor technology, controlled by a high-performance RISC micro-processor, to provide superior charging characteristics combined with simple operation and optimum reliability. These features can normally be expected only from much more expensive units.
The LiPo BALANCER CHARGER 2 - 3S represents a reliable method of charging two or three Lithium-Polymer cells.
The battery balancer connector must be plugged in the right Output for 2S or 3S.
Note
It is important always to observe the charging instructions supplied by the battery manufacturer, and to keep to the recommended charge currents and times. Do not fast-charge batteries unless the manufacturer states expressly that they are suitable for the high currents which flow during these processes.
Rechargeable batteries generally - and Lithium-Polymer cells in particular - are sensitive and easily damaged.
It is therefore essential to supervise the whole of the charge process.
Warnings and safety notes
- This product isn't designed for use by children under the age of 14, it isn't a toy! This appliance is not intended for use by persons (including children) with reduced physical, sensory or mental capabilities, or lack of experience and knowledge, unless they have been given supervision or instruction concerning use of the appliance by a person responsible for their safety. Children should be supervised to ensure that they do not play with the appliance.
- Protect the charger from dust, damp, rain, heat (e.g. direct sunshine) and vibration. It should only be operated in dry indoor conditions.
-
Do not open the charger or the power supply by yourself!
-
The case slots serve to cool the charger, and must not be covered or enclosed; set up the charger with space round it, so that cooling air can circulate unhindered.
- The charger is designed to be powered by a 12 V car battery (11 - 16 V DC) or with the power supply to a main'socket (100 240V AC). Select the appropriate power input. If the 100 - 240V AC input is selected, for pluggable equipment like power supply, the socket-outlet shall be installed near the charger and shall be easily accessible.
If the input voltage of the charger is over 18V DC, this will damage the charger and can cause even fire. Danger! - Never connect the charger to both power sources simultaneously, and never connect an AC voltage to the DC voltage input. Do not modify the charger in any way.
- The charger and the battery to be charged should be set up on a heat-resistant, non-inflammable and non-conductive surface before use. Never place the charger directly on a car seat, carpet or similar. Keep all inflammable and volatile materials well away from the charging area. Provide good ventilation.
- Connect the charger directly to the car battery using the original cables and connectors supplied. The car's engine must be stopped all the time the LiPo BALANCER CHARGER 2 - 3S is connected to the car's battery. Do not recharge the car battery at any time when the LiPo BALANCER CHARGER 2 - 3S is connected to it.
- The charge output sockets and connecting leads must not be modified, and must not be inter-connected in any way. There is a danger of short-circuit between the charge outputs and the vehicle's bodywork when the charger is connected to the car battery. The charge leads and connecting leads must not be coiled up when the charger is in use. Avoid short-circuiting the charge output or the model battery with the car bodywork. For this reason the charger must never be placed directly on the vehicle's bodywork.
- Never leave the charger running or connected to the car battery unsupervised.
Only one battery may be connected to the charger for charging at any one time. - The only types of battery which may safely be connected to the charger are: Lithium-Polymer packs consisting of two to three cells.
- Never charge 2cells and 3 cells at the same time!
General Operating Information
- To avoid short-circuits between the crocodile plugs fitted to the charger lead, please always connect the charger lead to the charger first, and only then to the battery to be charged.
Reverse the sequence when disconnecting.
Check before using the charger
Before charging please check the following points: are all connections firm and secure, i.e. no intermittent contacts?
Please bear in mind that it can be dangerous to fast-charge batteries. For example, if there is a brief interruption due to an intermittent contact, the result is inevitably a malfunction such as a restart of the charge process, or an incorrect cell-count detection, which could result in the pack being massively overcharged.
Charging batteries
When a battery is charged, electrical current is fed into it at the rate of max. 1.1 A. The charger automatically adjusts the charge current, and reduces it when the final charge voltage is reached.
- Batteries must always be supervised when on charge.
- Batteries MUST be placed on a fire-proof surface for charging.
- Never attempt to recharge defective or inflated Lithium cells!
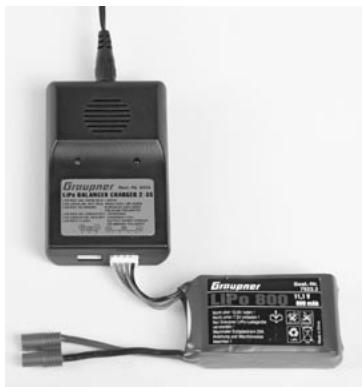
- Connect the battery to be charged using genuine GRAUPNER-EH balancer connectors for Lithium-Polymer cells.
- Ensure that all connectors and terminal clamps make good, sound contact. For example, if there is a brief interruption due to an intermittent contact, the result is inevitably a malfunction such as a restart of the charge process, which would result in the pack being massively overcharged.
Lithium-Polymer cells
This charge program is only suitable for charging Lithium-Polymer batteries with a nominal cell voltage of 3.7V .
The main outstanding feature of Lithium batteries is their much higher capacity compared to other battery types.
This is an important advantage, but it is balanced by the requirement to handle the batteries differently, especially with respect to charging and discharging, if the danger of using them is to be minimised. There are important basic rules governing the handling of these cells, and they must be observed at all times. For additional information and safety notes please study the battery manufacturer's published specifications. The fundamental rule is that Lithium-based batteries may ONLY be charged using special chargers which are designed and set for the actual battery type (final charge voltage, capacity). The method of charging these batteries is different to the one employed with Ni-Cd or Ni-MH batteries, and is based on what is known as a constant current / constant voltage process. The charge current required varies according to the battery capacity, and is set automatically by the charger.
Lithium batteries are generally charged at 1 - 2 C (1 C charge current = capacity charge current. Example: with a battery capacity of, say, 1500mA h the corresponding 1 C charge rate is 1500mA or 1.5 A). On this charger the charge current is set to max. 1.1 A. Once the battery reaches the final charge voltage appropriate to the specific battery type, the charger automatically reduces the charge current in order to prevent the final charge voltage being exceeded.
The charger does also balance the voltage of the single cells, if it's different, so this increases safety and the life time of the battery.
Liability Exclusion
As manufacturers, we at GRAUPNER are not in a position to ensure that you observe the correct methods of operation when installing, using and maintaining this product. For this reason we are obliged to deny all liability for loss, damage or costs which are incurred due to the incompetent or incorrect use and operation of our products, or which are connected with such operation in any way.
Components and accessories
As manufacturer of this product, the company of GRAUPNER GmbH & Co. KG recommends the use of associated components and accessory products which have been checked and approved by GRAUPNER for their suitability, proper function and safety. In such cases GRAUPNER accepts responsibility for these products on your behalf. We are unable to accept liability for parts or accessories made by other manufacturers, which are not expressly approved by GRAUPNER, as we are not in a position to assess every individual non-GRAUPNER item to decide whether it represents a safety risk or not.
Using the charger for the first time
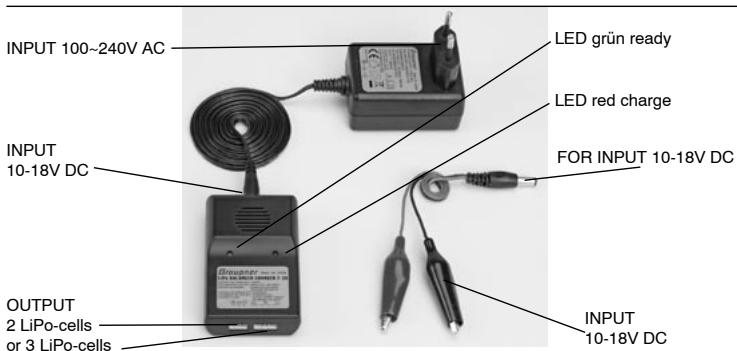
Connect the power supply a easily accessible mains socket near to the charger, when using the 100 - 240 V AC power input, if a main socket is available.
Connect the charger to 11 - 16 V DC with minimum 1.2A or to the power supply output 15V / 800mA
The green and red LED of the charger are lighting, 1 second later they will be off. Now you can connect the battery 2S or 3S (2 or 3 cells) balancer connector Graupner-EH to the charger.
You must not charge 2 cells and 3 cells at the same time!
Make sure for the right polarity of your battery balancer connector Graupner-EH.
From right handed to left side:
Pin 1 (GND): Ground = battery -,
Pin 2 (1): + cell 1
Pin 3 (2): + cell 2
Pin 4 (3): + cell 3
Contact 2 or 3 cells to the charger output correctly, make sure, positive is on the left side and negative on the right side.
Red LED on, green LED off means charging. If the battery is charged full, the green LED is on and the red LED is off.
Notes
- Contact AC power first, before contact to the charger.
- Move charger away after charging, do not contact charger with battery after charged full.
- Finished charging, take off the charger from AC power.
- Do not put something on it during charging.
- Working Temperature is from 0 to 40^ , the better charge performance is at 10 to 30^ .
- If the single cell voltage difference of 2S or 3S is bigger, the charge time may be longer.
- AC power supply should be only the original one or 15V 1.2A
- If the DC power is less than 10V , the charger can not work.
- Before using, customers must read this manual. Any accident lead by incorrect using method (other than specified), manufacturer, distributor, retailers will not be responsible.
Charge mode
The batteries will be charge with CC/CV charge method and the cells will be balanced, too.
Error mode
Red LED flash:
Connect battery with wrong polarity or short circuit. Check contact if there is a short circuit or wrong polarity.
Red LED no light, when connect battery: Battery voltage is lower as 2.75V per cell. Check battery voltage.
Both LEDs no light:
- Input connector is not good.
Check the input connector is good or not. - Input power supply is not suitable.
Check the input power supply or DC is between 10-18V.
Specification
Input voltage Power supply: 100 - 240V AC
Output voltage Power supply: 15V
Input voltage Charger: 10 - 18V DC
Battery type: Lithium-Polymer
(3.7 V type only),
Cell count: 2-3 LiPo
Charge current: 1.1 A (<15W)
Indicators: red, green LEDs
Safety functions: Reversed polarity
protection (input, out)
Output: Graupner-EH
Balancer connector
Balance voltage difference: about 30mV
Dimensions (L / W / H)
Power supply: app. 69 × 47 × 32 ~mm
Charger:app. 81× 52× 24mm
Weight power supply: approx. 105 g
Weight charger: approx. 50 g
Environmental Protection Notes
Whenever you see this symbol on a product, in the user instructions or the packaging, it means that you must not dispose of that item, or the electronic components in it, in the ordinary domestic waste when it comes to the end of its useful life. The correct method of disposal is to take it to your local collection point for recycling electrical and electronic equipment.
Individual markings indicate which materials can be recycled and re-used. You can make an important contribution to the protection of our shared environment by re-using the product, recycling the basic materials or recycling redundant equipment in other ways.
Dry cells and rechargeable batteries must be removed from the device and taken separately to a suitable battery disposal centre.
In the case of RC models, the electronic components - such as servos, receivers and speed controllers - must be removed from the model, and taken to an appropriate collection centre for electrical waste.
If you don't know the location of your nearest disposal centre, please enquire at your local council office.
EU Conformity Declaration
We hereby declare that the following product:
LiPo BALANCER CHARGER 2-3S 12V/230V; Order-No. 6454
conforms with the essential protective requirements as laid down in the directive for harmonising the statutory directives of the member states concerning electro-magnetic interference (89/336/EWG) and LVD (73/23/EG).
This product has been tested for electro-magnetic interference in accordance with the following norms:
Charger:
EMC: EN 61000-3/2/ EN61000-3-3 EN55022/EN55024
Power Supply:
LVD: EN 60950-1
This declaration was produced by:

and is valid for the manufacturer / importer of the product
73230 Kirchheim/Teck, Germany, on 16.10.08

Hans Graupner
Managing Director
Graupner GmbH & Co. KG, Henriettenstraße 94-96, 73230 Kirchheim/Teck, Germany guarantees this product for a period of 24 months from date of purchase.
The guarantee applies only to such material or operational defects witch are present at the time of purchase of the product.
Damage due to wear, overloading, incompetent handling or the use of incorrect accessories is not covered by the guarantee.
The user's legal rights and claims under guarantee are not affected by this guarantee.
Please check the product carefully for defects before you are make a claim or send the item to us, since we are obliged to make a charge for our cost if the product is found to be free of faults.
Newark, Nottinghamshire
NG24 2EG
(+44) 1636610539
Email: sales@gliders.uk.com
Belgie/Nederland
Jan van Mouwerik
Slot de Houvelaan 30
NL 3155 Maasland VT
(+31)105913594
Email: van_mouwerik@planet.nl
Servicehotline
(+49)(01805)472876
Montag-Freitag9:30-11:30
Graupner Service France
Gérard Altmayer
86, rue ST. Antoine
F 57601 Forbach-Oeting
(+)33)387856212
Email: GERALD.ALTMAYER@wanadoo.fr
Sverige
Baltechno Electronics
Box 5307
S 40227 Göteborg
(46)317073000
Email: balte@salgonet.se
Luxembourg
Kit Flammang
129, route d'Arlon
8009 Strassen
(+)352312232
Email: kitflam@pt.lu
Ceska Republika/Slovenská
Republika
RC Servis Z. Hnizdil
Leetecka 666/22