
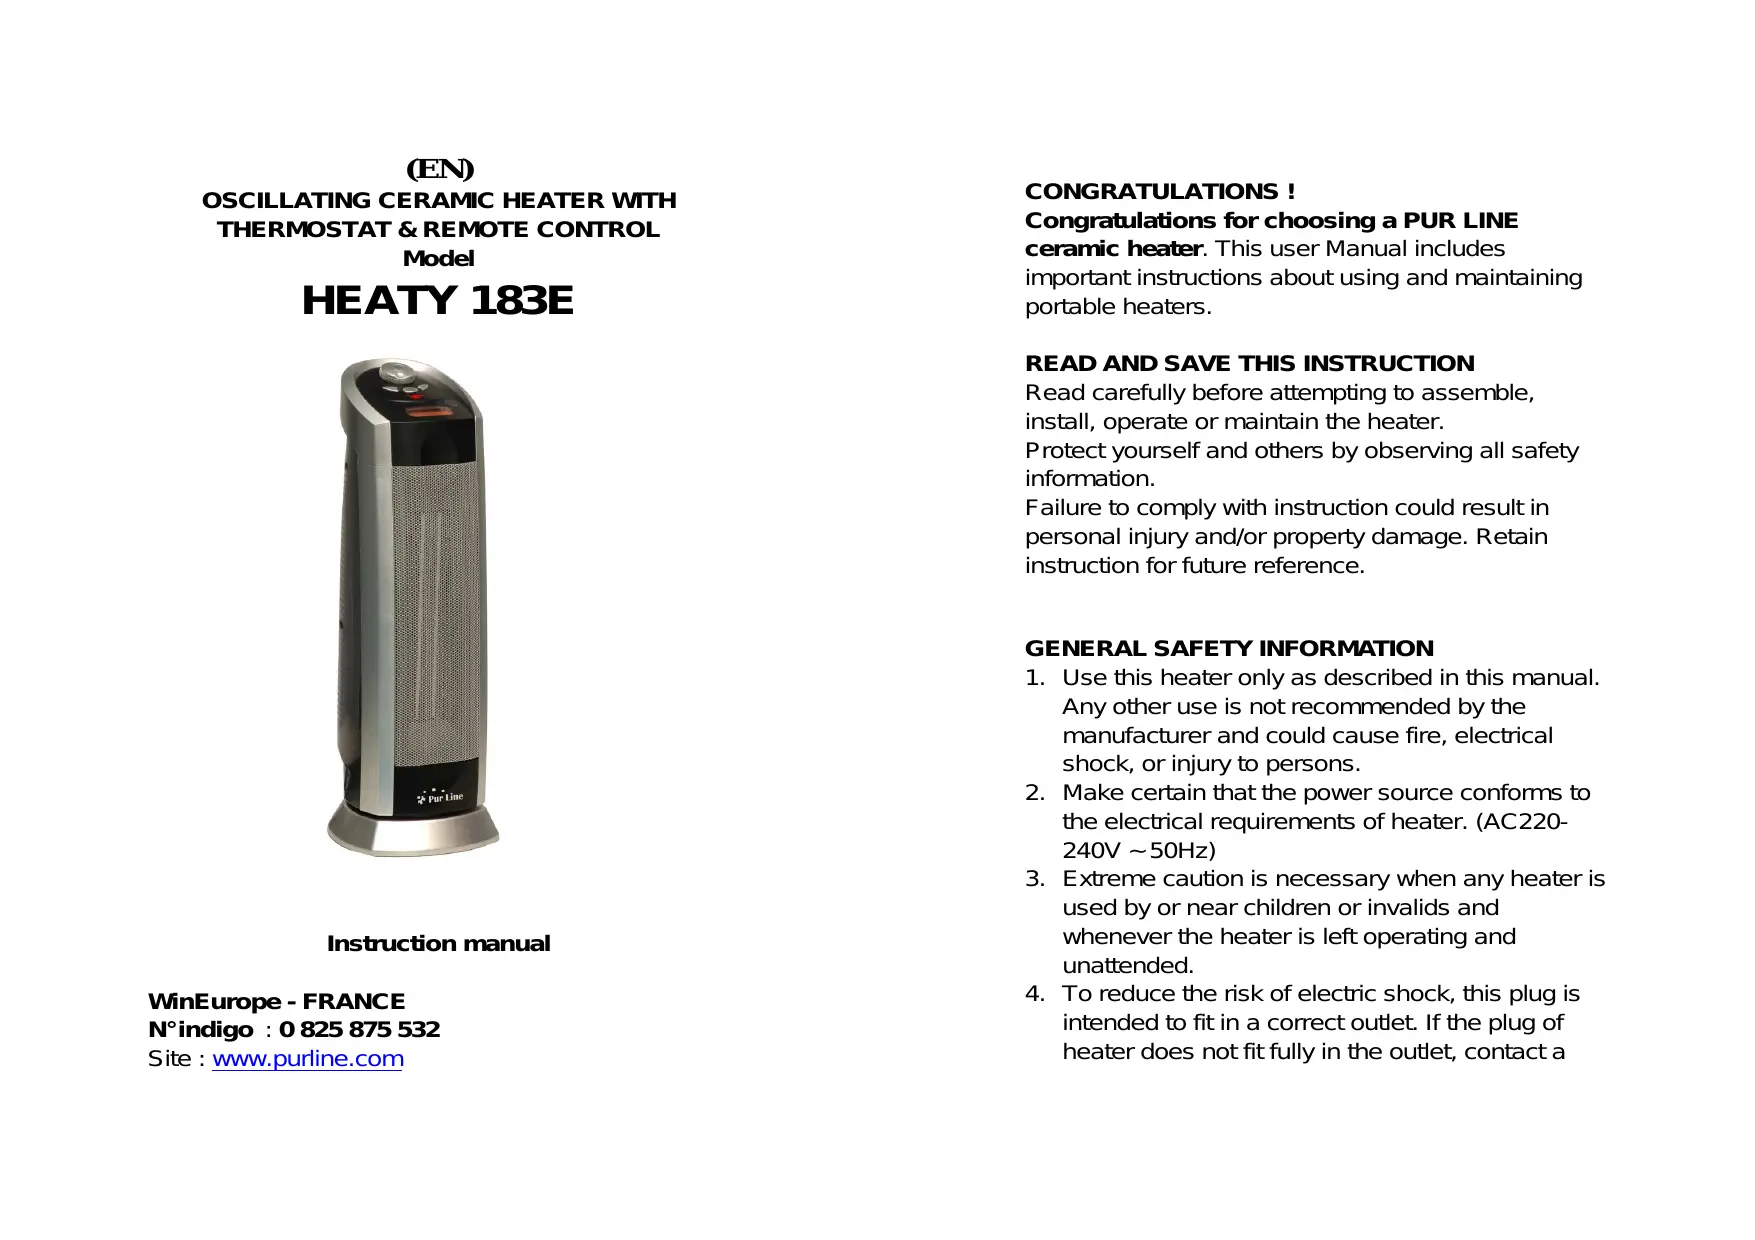
HEATY 183E - Electric heating PUR LINE - Free user manual and instructions
Find the device manual for free HEATY 183E PUR LINE in PDF.
| Product type | Ceramic electric fan heater |
| Brand | PUR LINE |
| Model | HEATY 183E |
| Power supply | 220-240 V ~ 50 Hz |
| Maximum power | 1800 W (fast and automatic mode) |
| Operating modes | Fast (1800 W), Slow (1100 W), Automatic (1800 W with thermostat), Fan (20 W) |
| Thermostat | Adjustable; stops at 2-3 °C above set point, restarts when temperature drops below 3 °C |
| Timer | Programmable from 1 to 8 hours, automatic shut-off |
| Oscillation | Yes, can be activated/deactivated via the "OSC" button |
| Remote control | Yes (AAA batteries not included) |
| Display | LED screen |
| Safety | Manual reset overheat sensor + thermal safety device |
| Maintenance | Clean the rear grille with a vacuum cleaner at least once a month |
| Warranty | 2 years (manufacturing defects) |
| Use | Indoor only |
Frequently Asked Questions - HEATY 183E PUR LINE
User questions about HEATY 183E PUR LINE
0 question about this device. Answer the ones you know or ask your own.
Ask a new question about this device
Download the instructions for your Electric heating in PDF format for free! Find your manual HEATY 183E - PUR LINE and take your electronic device back in hand. On this page are published all the documents necessary for the use of your device. HEATY 183E by PUR LINE.
USER MANUAL HEATY 183E PUR LINE
Site: www.purline.com
FELICITIONS!
Site: www.purline.com
CONGRATULATIONS!
Congratulations for choosing a PUR LINE
ceramic heater. This user Manual includes important instructions about using and maintaining portable heaters.
READ AND SAVE THIS INSTRUCTION
Read carefully before attempting to assemble, install, operate or maintain the heater. Protect yourself and others by observing all safety information.
Failure to comply with instruction could result in personal injury and/or property damage. Retain instruction for future reference.
GENERAL SAFETY INFORMATION
- Use this heater only as described in this manual. Any other use is not recommended by the manufacturer and could cause fire, electrical shock, or injury to persons.
- Make certain that the power source conforms to the electrical requirements of heater. (AC220-240V ~ 50Hz)
- Extreme caution is necessary when any heater is used by or near children or invalids and whenever the heater is left operating and unattended.
- To reduce the risk of electric shock, this plug is intended to fit in a correct outlet. If the plug of heater does not fit fully in the outlet, contact a
qualified electrician. Do not attempt to defeat this safety feature.
- Where possible, avoid the use of extension cords because the extension cord may overheat and cause a fire. However, if you have to use an extension cord, the cord shall be a 2-wire, with minimum 1.0mm^2 or larger and rated not less than 1890 watts. Never use a single extension cord to operate more than one heater.
- Do not operate heater with a damaged cord or plug or after the heater malfunctions, has been dropped or damaged in any manner. Return heater to authorized service facility for examination, electrical or mechanical adjustment or repair. If the power cord is damaged, it must be changed by a qualified electrician or the manufacturer to avoid any danger.
- Close the power switch and unplug power cord before servicing or moving the heater. Always unplug heater when not in use.
WARNING: DO NOT DEPEND ON THE ON/OFF BUTTON OR SWITCH AS THE SOLE MEANS OF DISCONNECTING POWER WHEN SERVICING OR MOVING THE HEATER. ALWAYS UNPLUG THE POWER CORD.
-
Do not insert or allow fingers or foreign objects to enter any ventilation or exhaust opening as it may cause an electric shock or fire or damage the heater. Do not block or tamper with the heater in any manner while it is in operation.
-
To prevent a possible fire, do not block air intakes or exhaust in any manner. Do not place heater on soft surfaces, like a bed, where openings may become blocked.
- Always place the heater on a stable, flat, level surface when operating, to avoid the chance of the heater overturning. Locate the power cord so the heater or other objects are not resting on it, Do not run power cord under carpeting. Do not cover power cord with throw rugs, runners, or the like. Arrange power cord away from room traffic and where it will not be tripped over.
- This heater is hot when in use. To avoid burns, do not let bare skin touch hot surfaces. Always use handle when moving this heater. Keep combustible materials, such as furniture, pillows, bedding, papers, clothes and curtains at least 0.9m from the front of the heater and keep them at least 0.3m from the sides and rear.
- A heater has hot and arcing or sparking parts inside. It must not be used in potentially dangerous locations such as flammable, explosive, chemical-laden or wet atmosphere.
- This heater is intended for general use only.
- This heater is not intended for use in wet or damp locations. Never locate a heater where it may fall into a bathtub or other water container.
- Do not use heater outdoors.
- Do not cover the heater.
WARNING: REDUCE THE RISK OF FIRE OR ELECTRIC SHOCK - DO NOT USE THIS HEATER WITH ANY SOLID STATE SPEED CONTROL DEVICES.
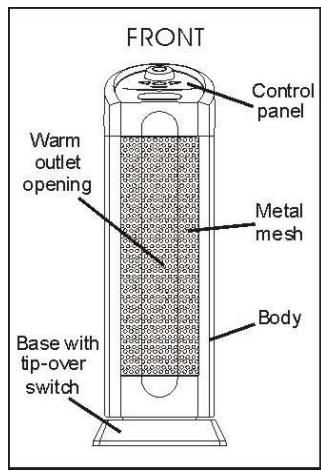
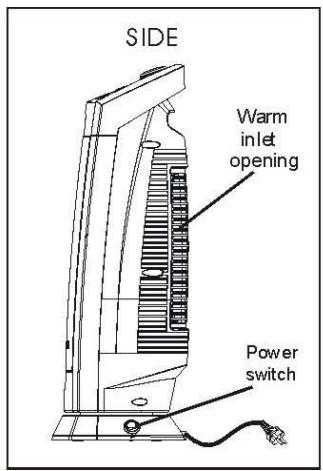
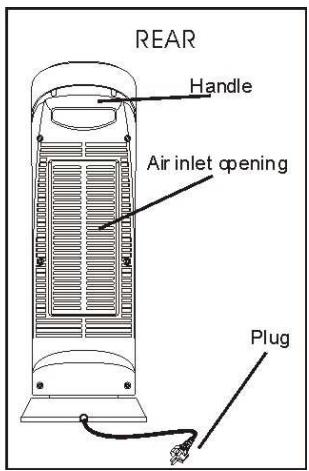
General description :
OPERATION.
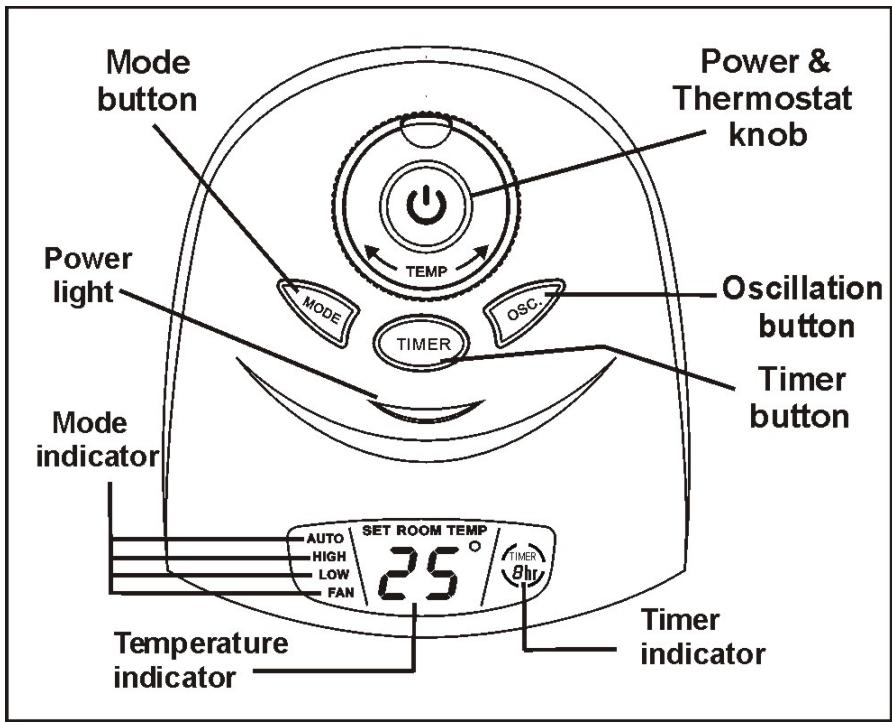
Control panel :
- Carefully remove the heater from the bag and the gift box.
- Make sure that the heater is in the "OFF" position before plugging the heater into an outlet.
- Place the heater on a flat, level surface.
- When the heater is plugged in and turns on the power switch on the side of the unit, there will be a "beep" and a red power light to indicate that there is power to the unit. The red light will remain lit until the power switch is closed or the
heater is unplugged from the outlet.
- Press the Power & thermostat knob will start the heater.
- Upon turning the heater on, the unit will be in the HIGH heat mode (1800 watts), the LCD will display the current air temperature, and the fan start to run. At the same time the "HIGH" in the LCD will be highlighted.
- When « Mode » button is pressed at this point, the heater will be set into LOW heat mode (1100 watts) and the “LOW” in the LCD will be highlighted.
- Pressing the « Mode » button once more will set the heater into AUTO mode (1800 watts). Notice that the display now displays a SET TEMP indicator (see THERMOSTAT INSTRUCTION).
- Press the "Mode" button again and the heater will be in the FAN mode (20 watts). The "FAN" in the LCD will be highlighted. Fan mode is for fan-only operation, without any heat output.
Pressing the « Mode » button again and the heater will go back to HIGH heat mode. Continuing to press the “Mode” button will cycle the unit through HIGH, LOW, AUTO, FAN mode.
- Press « OSC » button, the heater will oscillate back and forth. Press it again and the oscillation will stop.
To turn the heater off, press the « Power & Thermostat knob», and turn off the power switch,
then remove plug from outlet.
Timer Function:
The “TIMER” function allows users to set the time from 1 to 8 hours, and it is available under all HIGH/LOW/AUTO/FAN mode. When “TIMER” is off, pressing “TIMER” button will start this function and the right side of LCD screen displays 1, press again, it displays 2, then 3,4,5...8. “TIMER” turns to off after pressing the “TIMER” button while LCD displays 8, if press again, timer function will be restarted. “TIMER” will count down the hours in one hour increment until the machine turns to standby mode automatically. If the machine is on standby mode, press “POWER & THERMOSTAT” knob can restart it.
PS: Nothing displayed on the right side of the LCD screen means timer function is off.
WARNING: METAL MESH IS HOT WHEN HEATER IS IN OPERATION.
THERMOSTAT INSTRUCTION :
- Pressing the « Mode » button until the display shows AUTO mode.
- To adjust set temperature, Rotate the "Power & Thermostat knob" clockwise to increase the desired temperature and counter-
clockwise to decrease the desired temperature.
- When the air temperature raises 2 or 3 degrees above the set temperature, the heater will stop heating at once and stop blowing after 15 seconds.
- When the air temperature drops below the set temperature, the unit will come back on.
REMOTE CONTROL :
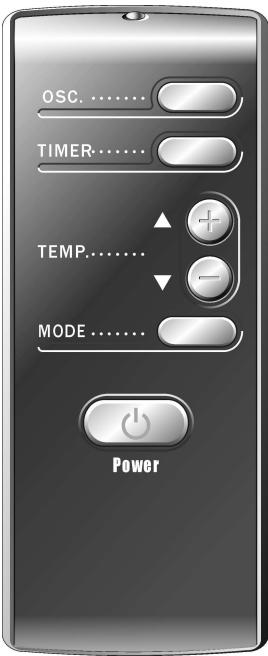
- Plug the heater into outlet and open the power switch on the side of the base.
- Press the POWER button will start the heater.
- The OSC, TIMER and MODE buttons function in the exact same manner as listed in the operation instructions above.
- The TEMP. Buttons (, or + ;-) are for the thermostat function in the exact same as rotating the Power & Thermostat knob.
- The remote control is powered by two AAA batteries. There is a cover on the back of the remote control that can be removed for replacement of the batteries as required.
- Do not mix old and new batteries, or batteries of different specifications.
- The batteries must be removed from the appliance before it is scrapped; it is to be disposed of safety.
SAFETY FEATURES.
- This heater is equipped a thermal overload protector to prevent overheating.
- When an overheat temperature is reached, the heater will be automatically shut off. It can only resume operation when the user resets the unit. (see RESET INSTRUCTIONS)
RESET INSTRUCTIONS
- Unplug the heater and wait 10-20 minutes for the unit to cool down.
- After the 10-20 minutes, plug the unit in again and operate normally.
MAINTENANCE
WARNING: ALWAYS UNPLUG THE CORD BEFORE MOVING OR SERVICING.
DO NOT IMMERSE HEATER IN WATER.
CLEANING: Clean the heater at least once a month, more often if dirty.
Clean the heater grill with the vacuum brush attachment on your vacuum cleaner. This will remove lint and dirt from the inside of the heater.
Do not attempt to take apart the heater.
Do not remove grill guard or allow heater to be operated without grill guard in place.
Clean the body of the heater with a soft cloth.
(NEVER USE ALCOHOL OR SOLVENTS.)
STORAGE: Store the heater with these instructions in the original carton in a cool, dry place.
Characteristics prone to change without notice
WARRANTY:
The warranty is valid for 2 years for a "manufacturing fault".
To benefit from the warranty, please return the device to your dealer with POSTAGE PAID along with the document of purchase proof specifying the date of purchase.
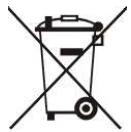
Discarding worn household devices
The European directive 2002/96/EC pertaining to electrical and electronic waste prohibits such household goods from being discarded with local refuse services. Worn devices must be collected separately to optimize the recovery and recycling rates of the components therein to reduce detrimental effects on the environment and on human health.
The "crossed out rubbish bin" symbol is affixed to all products as a reminder to respect the waste regulations.
Site: www.purline.com
ENHORABUENA!
Site: www.purline.com
GEFELICITEERD!
Site: www.purline.com