
FANY 87 - Air-conditioner PUR LINE - Free user manual and instructions
Find the device manual for free FANY 87 PUR LINE in PDF.

| Brand | PUR LINE |
| Model | FANY 87 |
| Product Type | Tower Fan |
| Power Supply Voltage | 220-240 V ~ 50 Hz |
| Power Consumption | 48 W |
| Net Weight | 4.8 kg |
| Number of Speeds | 3 (Low, Medium, High) |
| Oscillation | Yes, controlled by OSC button |
| Timer | 1 to 12 hours |
| Ionizer | Yes (generates negative ions) |
| Special Functions | Sleep (Zz), Breeze |
| Remote Control | Yes, with AAA batteries (not included) |
| Display | LCD |
| Control Type | Buttons on unit and remote control |
| Protection Grill | Yes |
| Assembly Required | Yes (base to fix with screws) |
| Cleaning | Soft damp cloth, no chemicals |
| Warranty | 2 years |
| Safety | Do not use outdoors, do not immerse, do not block air inlets |
Frequently Asked Questions - FANY 87 PUR LINE
User questions about FANY 87 PUR LINE
0 question about this device. Answer the ones you know or ask your own.
Ask a new question about this device
Download the instructions for your Air-conditioner in PDF format for free! Find your manual FANY 87 - PUR LINE and take your electronic device back in hand. On this page are published all the documents necessary for the use of your device. FANY 87 by PUR LINE.
USER MANUAL FANY 87 PUR LINE
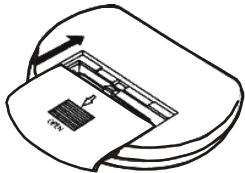
Figure 1
Figure 2
Figure 3
Website: www.purline.com
IMPORTANT SAFETY INSTRUCTIONS
When using any electrically powered product, basic safety precautions should always be followed.
PLEASE READ ALL INSTRUCTIONS CAREFULLY BEFORE USING THE PRODUCT.
Use the fan only as described in this manual. Misuse may cause a fire or an electrical shock.
- Do not operate the fan with a damaged power cord or plug, after it malfunctions, has been dropped or damaged. If the power cord is damaged it must be replaced by the manufacturer or a qualified service engineer to avoid a hazard.
- Close supervision is necessary when this fan is used near children, the elderly and pets.
- Always turn the fan off after use, before cleaning, or moving location.
- Do not insert fingers or other objects into the fan guard.
- Do not operate the fan in areas where petrol, paint or other flammable liquids are used or stored.
- Do not place the fan near an open flame, cooking or heating appliance, or hot surface.
- This fan is not intended for use in wet or damp locations. Never locate the fan in an area where it may fall into a bath or other water container.
- This fan should not be operated outside.
- Always use on a dry, level surface.
- Do not let the power cord hang over the edge of a table or counter.
- Arrange the cord away from an area where it may be tripped over.
-
Never place the power cord under a carpet or rug.
-
To disconnect from the power supply, grip the plug and pull from the power socket. Never pull by the cord.
- Do not hang or mount the fan on a wall or ceiling.
- Do not operate if the fan guard is removed or damaged.
- This product is designed for household and light commercial use ONLY.
PARTS DESCRIPTIONS
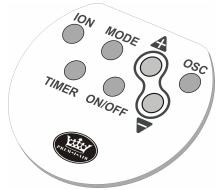
- Control panel
- LED indicator
- LCD
- Reflecting cover
- Front enclosure
- Rear enclosure
- Rotary support
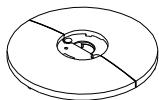
- Base
- Remote Control
9
ASSEMBLY
Pass the power cord through the channel on the stand, and firmly clasp the two halves of the stand together. Insert the base into the bottom of the housing

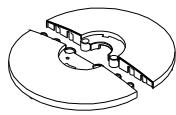

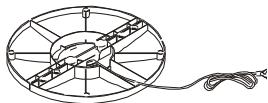
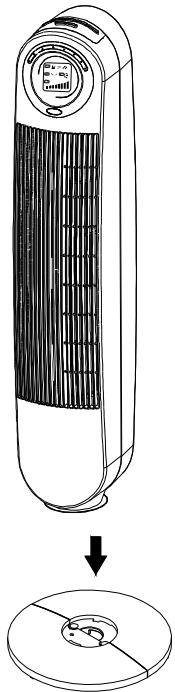
being careful to align with the corresponding holes.
Gently turn the fan upside down. Fix the
base and main body together using the
2 screws supplied.
To reduce movement of the power cord during use or transportation, place the power cord through the cut out on the bottom of the base.
REMOTE CONTROL
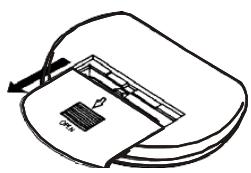
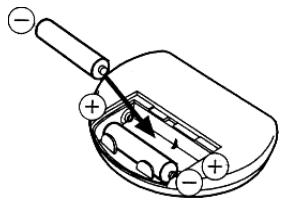
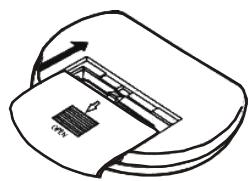
Figure 1
Figure 2
Figure 3
- Pull the cover in rearward direction and open it (figure 1)
- Insert the batteries (AAA). (figure 2)
- Close the battery cover. (figure 3)
NOTE: Follow the battery polarity markings moulded into the battery compartment to ensure that they are inserted correctly.
The batteries contain materials, which are hazardous to the environment; they must be removed from the appliance before it is scrapped, dispose of the batteries responsibly.
OPERATING INSTRUCTIONS
The fan can be controlled by pushing the buttons, which be setting on control panel or remote controller.
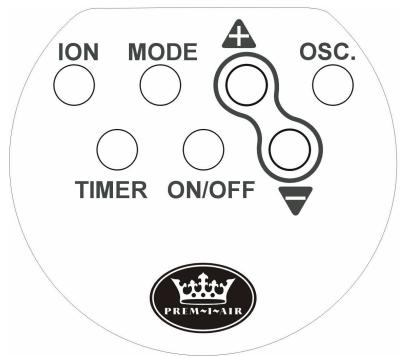
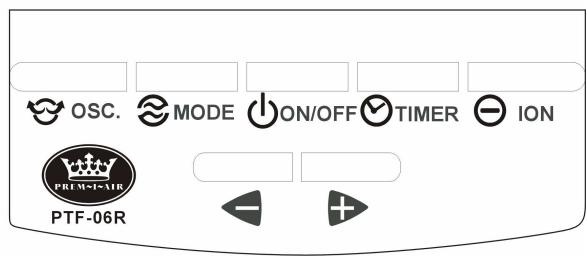
ON/OFF Press the button once to turn your Fan ON, press the button again to turn your Fan OFF.
Fan Speed Use the speed control buttons
the speed.

or decrea+

The Speed Setting is displayed in the LCD screen
Oscillation Press the OSC button to make the fan swing. Press the button again to switch this function off. The symbol is displayed in theen.
Mode Press the MODE button to select the SLEEP or BREEZE modes. In SLEEP mode the LCD displays ^ and in BREEZE mode it displays. Press the button a third time to turn the mode off.
NOTE: when mode of breeze wind or sleep wind is selected, the fan will continually cycle through Low, Medium, and High setting.
TIMER Press the TIMER button to set the time before your Fan switches OFF fan. The Timer can be set from 1 hour to 12 hours. Press the button once, the timer will be set 1 hour, press the button twice, the operating time is 2 hours, press it three times, the
operating time is 3 hours, and so on up to 12 hour. To cancel the Timer function press the TIMER button once more when it reaches 12 hours. In the Timer mode the LCD display shows the number of hours selected.
ION Press the ION button to turn on this function. The appliance will generate negative ions to clean the air and the LCD will display the symbol to indicate that the function ON. Press the button once more to turn off the ION function.
MAINTENANCE
CAUTION: SWITCH OFF AND DISCONNECT FROM POWER SUPPLY BEFORE SERVICING
- To clean the unit use a soft cloth to wipe off any dust. If the unit is very dirty use a damp cloth. Do not use any cleaning detergents, sprays or any other chemicals as these will damage the unit. Ensure no water enters into the machine.
SPECIFICATION
Power: 40W
Voltage: 230V 50Hz
N.W: 4.8Kg
G.W: 5.8Kg
WARRANTY:
Two years from the date of purchase.
To use the warranty, please bring or send (PREPAID) the device to your reseller along with the proof of sale indicating the purchase date.
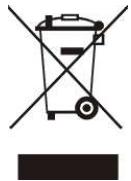
Removal of used domestic appliances
European directive 2002/96/EC on the Electric and Electronic Equipment Waste requires that domestic appliances not be thrown out together with the rest of municipal waste. Used devices must be collected separately in order to optimize recuperation and recycling rates of the materials that make them up and so reduce the impact on human health and the environment.
The symbol of the crossed out garbage can appears on all the products to remind the obligations regarding separated collection.
Consumers must contact local authorities or resellers regarding the procedure to follow for the device's removal.